Embed Size (px)
Citation preview
Maintenance
96
ROUTINE SERVICINGThe safety, reliability and performance of your vehicle will dependpartly on how it is maintained.
Maintenance is the owner’s responsibility; make sure that all routineservices and warranty inspections are carried out according to themanufacturers’ recommendations and at the intervals shown in theService Portfolio book. You will find this book in the literature pack.
The Service Portfolio book also includes a Service Record section,which enables a record to be kept of all the routine services carriedout on the vehicle - ensure your dealer signs and stamps the bookafter each service.
Emission controlYour vehicle is fitted with emission and evaporative controlequipment designed to meet specific territorial and legalrequirements. You should be aware that unauthorised replacement,modification or tampering with this equipment by an owner ormotor vehicle repairer could be unlawful and subject to legalpenalties.
In addition, engine settings must not be tampered with. These havebeen established to ensure that your vehicle complies with stringentexhaust emission regulations. Incorrect engine settings mayadversely affect exhaust emissions, engine performance and fuelconsumption, as well as causing high temperatures, which couldresult in damage to the catalytic converter and the vehicle.
OWNER MAINTENANCEIn addition to the routine services and warranty inspections referredto above, a number of simple checks must be carried out morefrequently. These are listed alongside. You can carry out thesechecks yourself and advice is given on the following pages.
Daily Checks ..........• Operation of lights, horn,
direction indicators, wipers,washers and warninglights.
• Operation of seat belts andbrakes.
• Look for fluid depositsbeneath the vehicle thatmight indicate a leak.
Weekly Checks ..........• Engine oil level.
• Coolant level.
• Operate air conditioning (iffitted).
• Brake and power steeringfluid levels.
• Screen washer fluid level.
• Tyre pressures andcondition.
Maintenance
97
SPECIAL OPERATING CONDITIONSWhen a vehicle is operated in extremely arduous conditions or adusty, wet or muddy terrain, more frequent attention must be paidto servicing requirements.
For example; if your vehicle experiences deep wading conditions,even DAILY servicing could be necessary to ensure the continuedsafe and reliable operation of the vehicle.
Contact a Land Rover dealer for advice.
SAFETY IN THE GARAGEIf you need to carry out maintenance, observe the followingsafety precautions at all times:
• Keep your hands, tools, and clothing away from drive belts andpulleys.
• If the vehicle has been driven recently, DO NOT TOUCH exhaustand cooling system components until the engine has cooled.
• DO NOT TOUCH electrical leads or components while the engineis running, or with the starter switch turned on.
• NEVER leave the engine running in an unventilated area -exhaust gases are poisonous and extremely dangerous.
• DO NOT work beneath the vehicle with the wheel changing jackas the only means of support.
• Ensure sparks and naked lights are kept away from the enginecompartment.
• Remove metal wrist bands and jewellery before working in theengine compartment.
• DO NOT allow battery leads or terminals to make contact withtools or metal parts of the vehicle.
Poisonous fluidsFluids used in motor vehicles are poisonous and should not beconsumed or brought into contact with open wounds. Theseinclude; battery acid, anti-freeze, brake and power steering fluid,petrol, diesel, engine oil and windscreen washer additives. Obey allinstructions printed on labels and containers.
WARNING!
Cooling fans maycommence operating up to4 minutes after the engineis switched off, andcontinue operating for up to8 minutes. Keep clear of allfans while working in theengine compartment.
For Your Safety .........Any significant or sudden dropin fluid levels, or uneven tyrewear, should be reported toyour dealer without delay.
Care Points .........Engine oil should be checkedmore frequently, if the vehicleis driven for prolonged periodsat high speeds.
For Your Safety .........Prolonged contact with engineoil may cause serious skindisorders, including dermatitisand cancer of the skin. Washthoroughly after contact.
Environment .........It is illegal to pollute drains,water courses or soil. Useauthorised waste disposal sitesto dispose of used oil and toxicchemicals.
Bonnet Opening
98
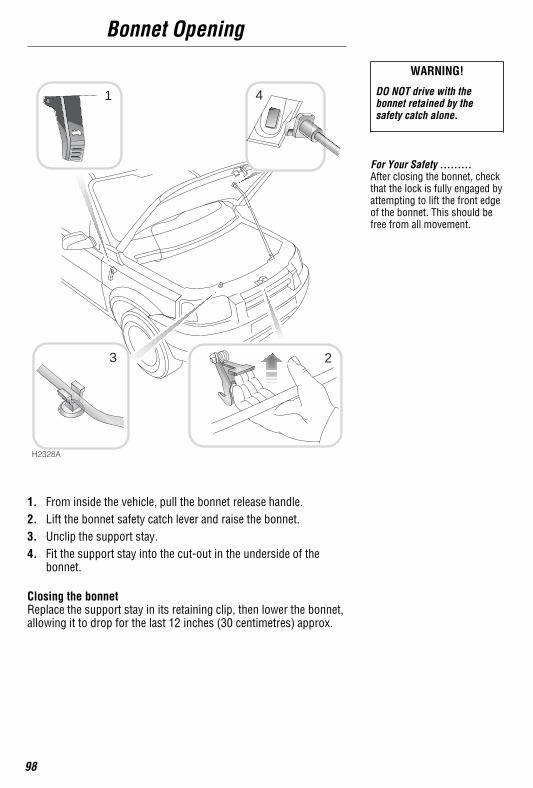
1. From inside the vehicle, pull the bonnet release handle.2. Lift the bonnet safety catch lever and raise the bonnet.3. Unclip the support stay.4. Fit the support stay into the cut-out in the underside of the
bonnet.
Closing the bonnetReplace the support stay in its retaining clip, then lower the bonnet,allowing it to drop for the last 12 inches (30 centimetres) approx.
WARNING!
DO NOT drive with thebonnet retained by thesafety catch alone.
For Your Safety .........After closing the bonnet, checkthat the lock is fully engaged byattempting to lift the front edgeof the bonnet. This should befree from all movement.
H2328A
1 4
23
Engine Compartment
99
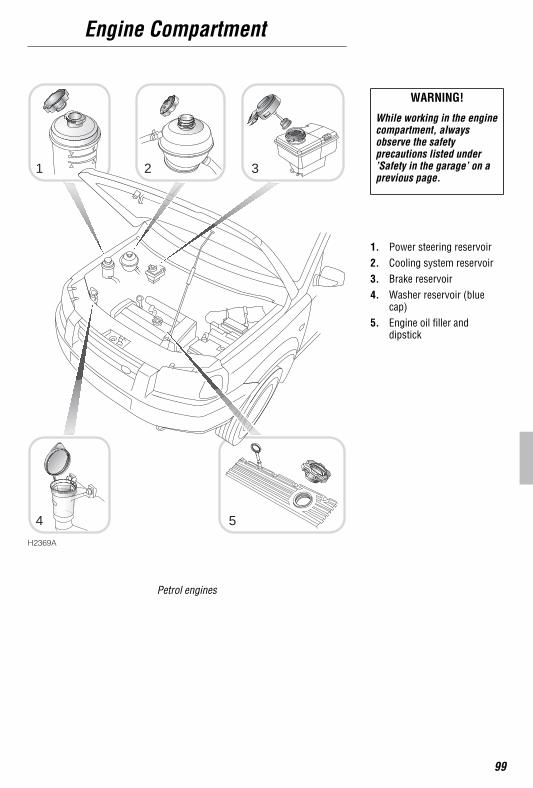
Petrol engines
WARNING!
While working in the enginecompartment, alwaysobserve the safetyprecautions listed under’Safety in the garage’ on aprevious page.
1. Power steering reservoir2. Cooling system reservoir3. Brake reservoir4. Washer reservoir (blue
cap)5. Engine oil filler and
dipstick
H2369A
4 5
1 2 3
Engine Compartment
100
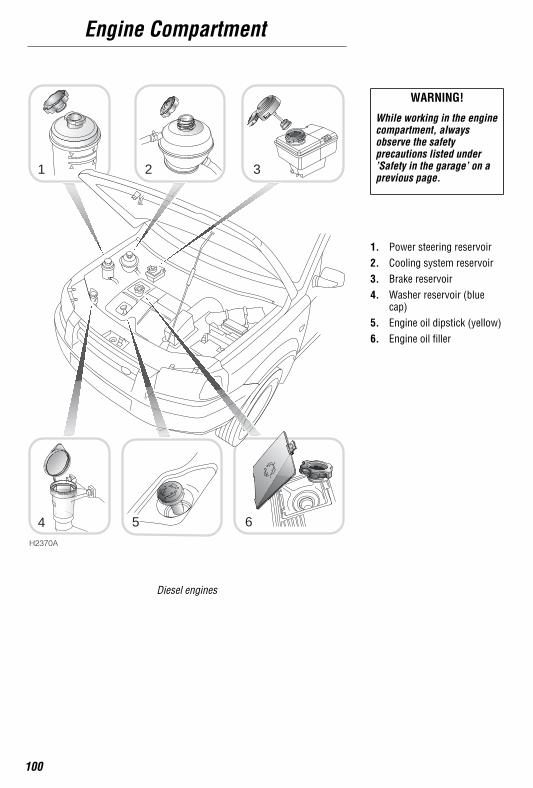
Diesel engines
WARNING!
While working in the enginecompartment, alwaysobserve the safetyprecautions listed under’Safety in the garage’ on aprevious page.
1. Power steering reservoir2. Cooling system reservoir3. Brake reservoir4. Washer reservoir (blue
cap)5. Engine oil dipstick (yellow)6. Engine oil filler
H2370A
1
4
2 3
5 6
Engine
101
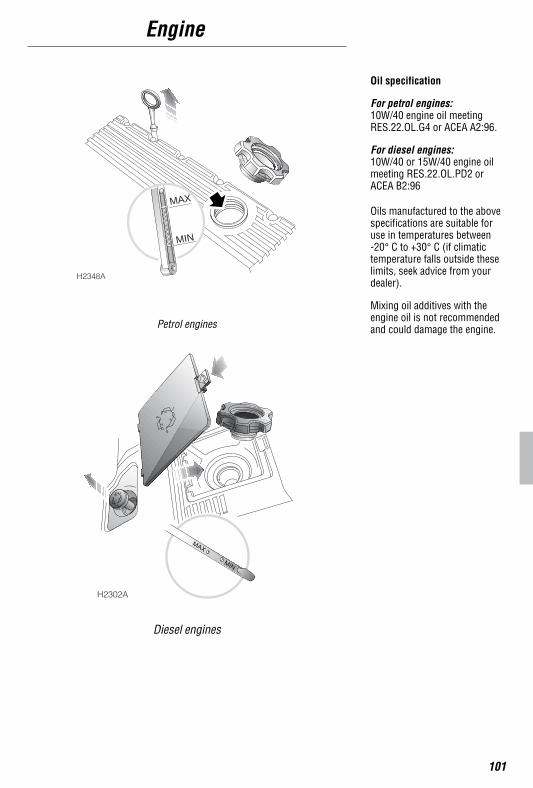
Petrol engines
Diesel engines
Oil specification
For petrol engines:10W/40 engine oil meetingRES.22.OL.G4 or ACEA A2:96.
For diesel engines:10W/40 or 15W/40 engine oilmeeting RES.22.OL.PD2 orACEA B2:96
Oils manufactured to the abovespecifications are suitable foruse in temperatures between-20° C to +30° C (if climatictemperature falls outside theselimits, seek advice from yourdealer).
Mixing oil additives with theengine oil is not recommendedand could damage the engine.
H2348A
MIN
MAX
MIN
MAX
H2302A
Engine
102
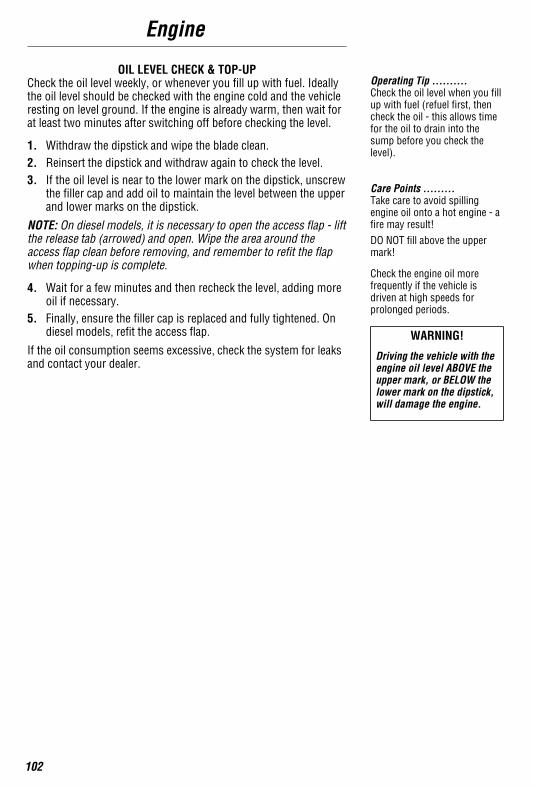
OIL LEVEL CHECK & TOP-UPCheck the oil level weekly, or whenever you fill up with fuel. Ideallythe oil level should be checked with the engine cold and the vehicleresting on level ground. If the engine is already warm, then wait forat least two minutes after switching off before checking the level.
1. Withdraw the dipstick and wipe the blade clean.2. Reinsert the dipstick and withdraw again to check the level.3. If the oil level is near to the lower mark on the dipstick, unscrew
the filler cap and add oil to maintain the level between the upperand lower marks on the dipstick.
NOTE: On diesel models, it is necessary to open the access flap - liftthe release tab (arrowed) and open. Wipe the area around theaccess flap clean before removing, and remember to refit the flapwhen topping-up is complete.
4. Wait for a few minutes and then recheck the level, adding moreoil if necessary.
5. Finally, ensure the filler cap is replaced and fully tightened. Ondiesel models, refit the access flap.
If the oil consumption seems excessive, check the system for leaksand contact your dealer.
Operating Tip ..........Check the oil level when you fillup with fuel (refuel first, thencheck the oil - this allows timefor the oil to drain into thesump before you check thelevel).
Care Points .........Take care to avoid spillingengine oil onto a hot engine - afire may result!DO NOT fill above the uppermark!
Check the engine oil morefrequently if the vehicle isdriven at high speeds forprolonged periods.
WARNING!
Driving the vehicle with theengine oil level ABOVE theupper mark, or BELOW thelower mark on the dipstick,will damage the engine.
Cooling System
103
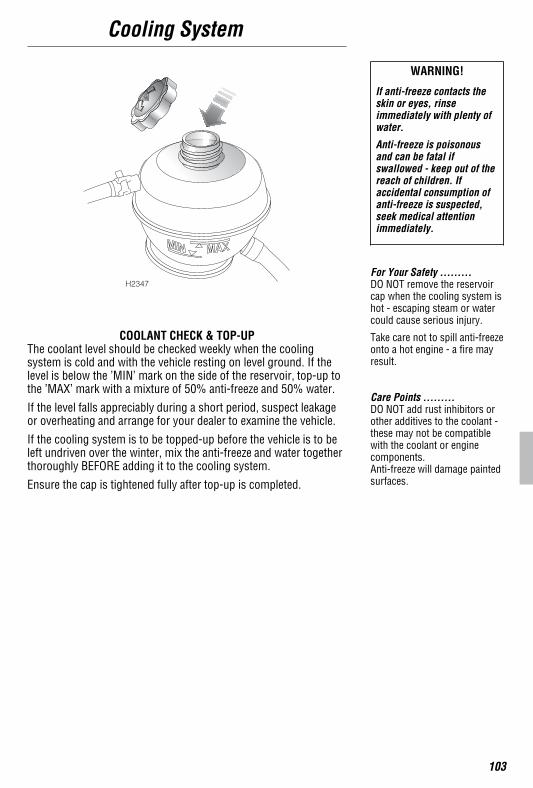
COOLANT CHECK & TOP-UPThe coolant level should be checked weekly when the coolingsystem is cold and with the vehicle resting on level ground. If thelevel is below the ’MIN’ mark on the side of the reservoir, top-up tothe ’MAX’ mark with a mixture of 50% anti-freeze and 50% water.
If the level falls appreciably during a short period, suspect leakageor overheating and arrange for your dealer to examine the vehicle.
If the cooling system is to be topped-up before the vehicle is to beleft undriven over the winter, mix the anti-freeze and water togetherthoroughly BEFORE adding it to the cooling system.
Ensure the cap is tightened fully after top-up is completed.
WARNING!
If anti-freeze contacts theskin or eyes, rinseimmediately with plenty ofwater.
Anti-freeze is poisonousand can be fatal ifswallowed - keep out of thereach of children. Ifaccidental consumption ofanti-freeze is suspected,seek medical attentionimmediately.
For Your Safety .........DO NOT remove the reservoircap when the cooling system ishot - escaping steam or watercould cause serious injury.
Take care not to spill anti-freezeonto a hot engine - a fire mayresult.
Care Points .........DO NOT add rust inhibitors orother additives to the coolant -these may not be compatiblewith the coolant or enginecomponents.Anti-freeze will damage paintedsurfaces.
H2347
Cooling System
104
Anti-freezeThe anti-freeze content of the coolant must be maintained at aminimum of 50% (but must never exceed 60%) all year round. Toensure that the anti-corrosion properties of the coolant are retained,the anti-freeze content should be checked by your dealer once ayear and the coolant completely renewed every two years,regardless of mileage.
For maximum corrosion prevention, use Land Rover PartsRTC5779A anti-freeze and summer coolant. If this is unavailable,use an ethylene glycol based anti-freeze which meets specificationBS 6580 and BS 5117.
Coolant specification50% mix of water and LandRover Parts RTC5779Aanti-freeze and summercoolant, or any ethylene glycolbased anti-freeze which meetsspecification BS 6580 and BS5117.
Brakes
105
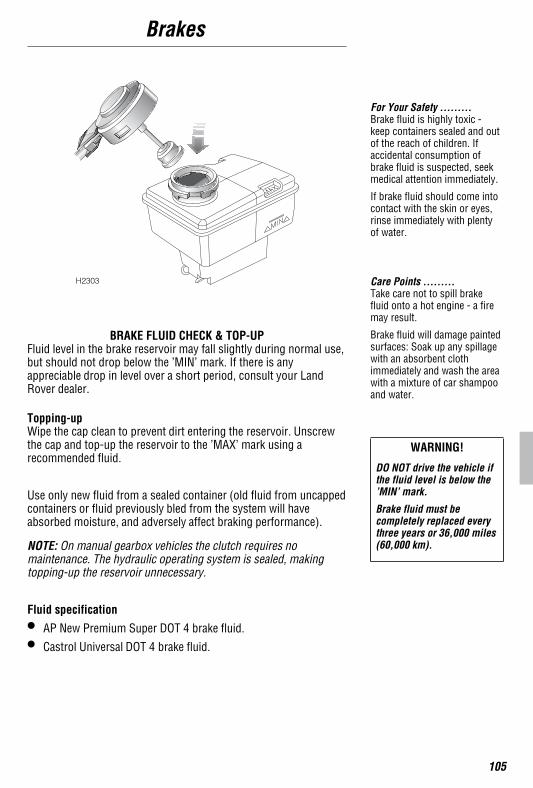
BRAKE FLUID CHECK & TOP-UPFluid level in the brake reservoir may fall slightly during normal use,but should not drop below the ’MIN’ mark. If there is anyappreciable drop in level over a short period, consult your LandRover dealer.
Topping-upWipe the cap clean to prevent dirt entering the reservoir. Unscrewthe cap and top-up the reservoir to the ’MAX’ mark using arecommended fluid.
Use only new fluid from a sealed container (old fluid from uncappedcontainers or fluid previously bled from the system will haveabsorbed moisture, and adversely affect braking performance).
NOTE: On manual gearbox vehicles the clutch requires nomaintenance. The hydraulic operating system is sealed, makingtopping-up the reservoir unnecessary.
Fluid specification
• AP New Premium Super DOT 4 brake fluid.
• Castrol Universal DOT 4 brake fluid.
For Your Safety .........Brake fluid is highly toxic -keep containers sealed and outof the reach of children. Ifaccidental consumption ofbrake fluid is suspected, seekmedical attention immediately.
If brake fluid should come intocontact with the skin or eyes,rinse immediately with plentyof water.
Care Points .........Take care not to spill brakefluid onto a hot engine - a firemay result.
Brake fluid will damage paintedsurfaces: Soak up any spillagewith an absorbent clothimmediately and wash the areawith a mixture of car shampooand water.
WARNING!
DO NOT drive the vehicle ifthe fluid level is below the’MIN’ mark.
Brake fluid must becompletely replaced everythree years or 36,000 miles(60,000 km).
H2303
Power Steering
106
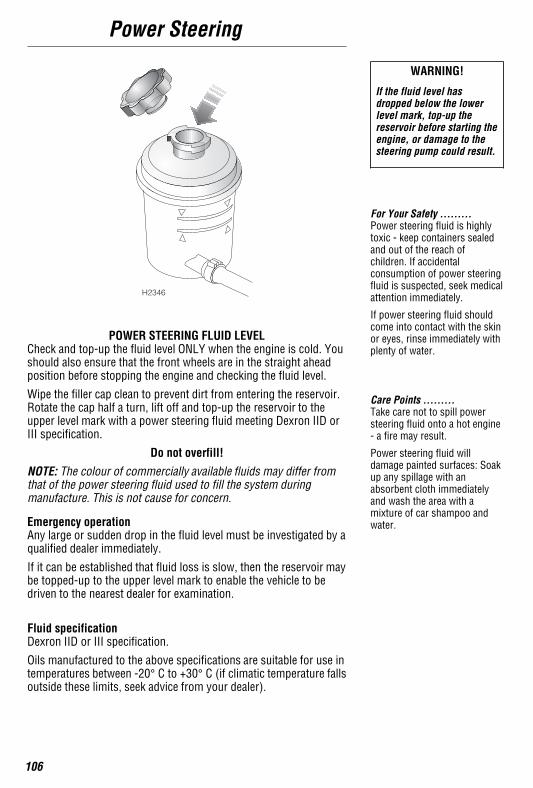
POWER STEERING FLUID LEVELCheck and top-up the fluid level ONLY when the engine is cold. Youshould also ensure that the front wheels are in the straight aheadposition before stopping the engine and checking the fluid level.
Wipe the filler cap clean to prevent dirt from entering the reservoir.Rotate the cap half a turn, lift off and top-up the reservoir to theupper level mark with a power steering fluid meeting Dexron IID orIII specification.
Do not overfill!
NOTE: The colour of commercially available fluids may differ fromthat of the power steering fluid used to fill the system duringmanufacture. This is not cause for concern.
Emergency operationAny large or sudden drop in the fluid level must be investigated by aqualified dealer immediately.
If it can be established that fluid loss is slow, then the reservoir maybe topped-up to the upper level mark to enable the vehicle to bedriven to the nearest dealer for examination.
Fluid specificationDexron IID or III specification.
Oils manufactured to the above specifications are suitable for use intemperatures between -20° C to +30° C (if climatic temperature fallsoutside these limits, seek advice from your dealer).
WARNING!
If the fluid level hasdropped below the lowerlevel mark, top-up thereservoir before starting theengine, or damage to thesteering pump could result.
For Your Safety .........Power steering fluid is highlytoxic - keep containers sealedand out of the reach ofchildren. If accidentalconsumption of power steeringfluid is suspected, seek medicalattention immediately.
If power steering fluid shouldcome into contact with the skinor eyes, rinse immediately withplenty of water.
Care Points .........Take care not to spill powersteering fluid onto a hot engine- a fire may result.
Power steering fluid willdamage painted surfaces: Soakup any spillage with anabsorbent cloth immediatelyand wash the area with amixture of car shampoo andwater.
H2346
Washers
107
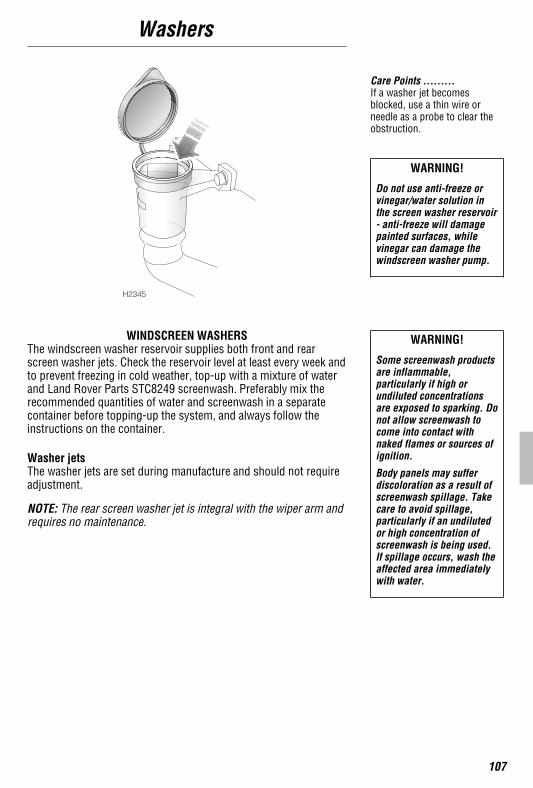
WINDSCREEN WASHERSThe windscreen washer reservoir supplies both front and rearscreen washer jets. Check the reservoir level at least every week andto prevent freezing in cold weather, top-up with a mixture of waterand Land Rover Parts STC8249 screenwash. Preferably mix therecommended quantities of water and screenwash in a separatecontainer before topping-up the system, and always follow theinstructions on the container.
Washer jetsThe washer jets are set during manufacture and should not requireadjustment.
NOTE: The rear screen washer jet is integral with the wiper arm andrequires no maintenance.
Care Points .........If a washer jet becomesblocked, use a thin wire orneedle as a probe to clear theobstruction.
WARNING!
Do not use anti-freeze orvinegar/water solution inthe screen washer reservoir- anti-freeze will damagepainted surfaces, whilevinegar can damage thewindscreen washer pump.
WARNING!
Some screenwash productsare inflammable,particularly if high orundiluted concentrationsare exposed to sparking. Donot allow screenwash tocome into contact withnaked flames or sources ofignition.
Body panels may sufferdiscoloration as a result ofscreenwash spillage. Takecare to avoid spillage,particularly if an undilutedor high concentration ofscreenwash is being used.If spillage occurs, wash theaffected area immediatelywith water.
H2345
Wipers
108
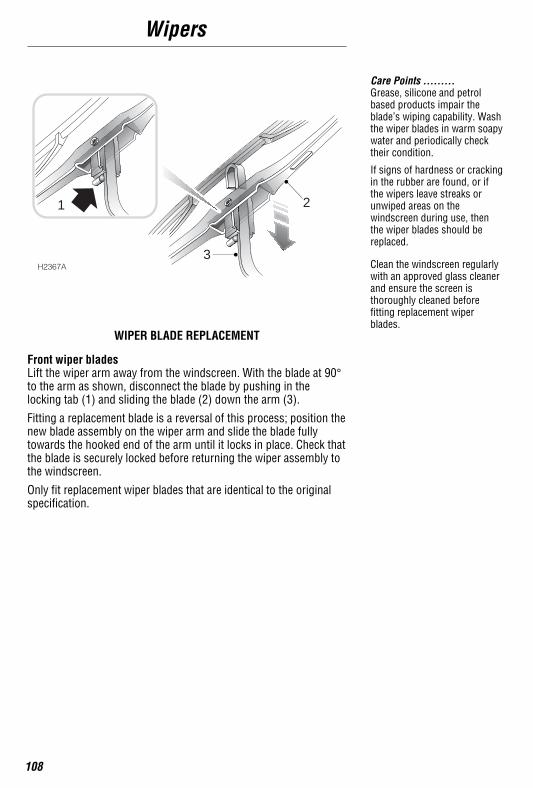
WIPER BLADE REPLACEMENT
Front wiper bladesLift the wiper arm away from the windscreen. With the blade at 90°to the arm as shown, disconnect the blade by pushing in thelocking tab (1) and sliding the blade (2) down the arm (3).
Fitting a replacement blade is a reversal of this process; position thenew blade assembly on the wiper arm and slide the blade fullytowards the hooked end of the arm until it locks in place. Check thatthe blade is securely locked before returning the wiper assembly tothe windscreen.
Only fit replacement wiper blades that are identical to the originalspecification.
Care Points .........Grease, silicone and petrolbased products impair theblade’s wiping capability. Washthe wiper blades in warm soapywater and periodically checktheir condition.
If signs of hardness or crackingin the rubber are found, or ifthe wipers leave streaks orunwiped areas on thewindscreen during use, thenthe wiper blades should bereplaced.
Clean the windscreen regularlywith an approved glass cleanerand ensure the screen isthoroughly cleaned beforefitting replacement wiperblades.
H2367A
1
3
2
Wipers
109
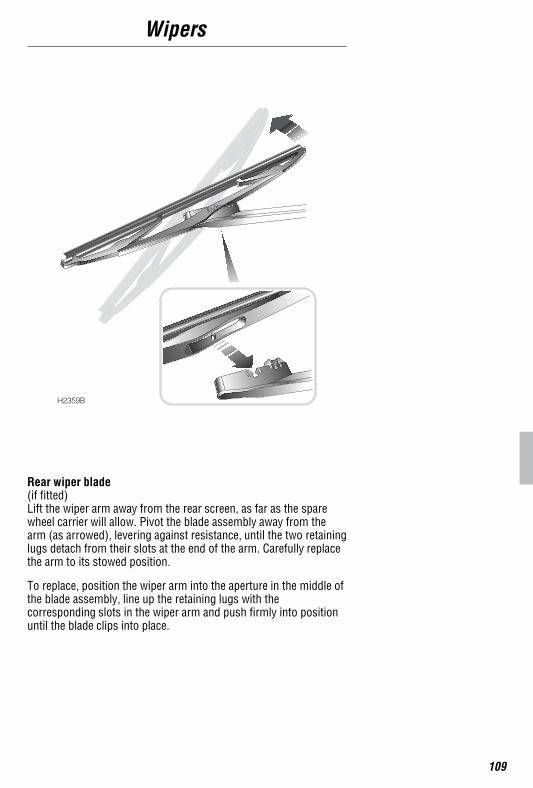
Rear wiper blade(if fitted)Lift the wiper arm away from the rear screen, as far as the sparewheel carrier will allow. Pivot the blade assembly away from thearm (as arrowed), levering against resistance, until the two retaininglugs detach from their slots at the end of the arm. Carefully replacethe arm to its stowed position.
To replace, position the wiper arm into the aperture in the middle ofthe blade assembly, line up the retaining lugs with thecorresponding slots in the wiper arm and push firmly into positionuntil the blade clips into place.
H2359B

Tyres
110
CARING FOR YOUR TYRESAlways drive with consideration for the condition of the tyres, andregularly inspect the tread and side walls for any sign of distortion(bulges), cuts or wear.
The most common causes of tyre failure when driving on-road are:
• Bumping against kerbs
• Driving with under or over-inflated tyres
Off-road driving places additional wear and tear on the tyres somore frequent and careful inspections of the tyres will benecessary.
If possible, protect tyres from contamination by oil, grease, fuel andother automotive fluids.
Tyre pressuresCorrectly inflated tyres will ensure that you enjoy the bestcombination of tyre life, ride comfort, fuel economy and roadhandling.
Under-inflated tyres wear more quickly and unevenly, cause a lossof handling on-road, a reduction in fuel economy and an increasedlikelihood of tyre failure. Over-inflated tyres give a harsher ride,wear unevenly and are more prone to damage.
Check the pressures (including the spare wheel) at least every week(more frequently if regularly driving off-road), preferably when thetyres are cold - be aware that it only takes a mile (1.6 km) of drivingto warm up the tyres sufficiently to affect the tyre pressures.
Air pressure naturally increases in warm tyres; if it is necessary tocheck the tyres when they are warm (after the vehicle has beendriven for a while, even in cold weather), you should expect thepressures to have increased between 4 and 6 lbf/in
2. In this
circumstance, DO NOT let air out of the tyres in order to match therecommended pressures.
The recommended pressures for cold tyres are shown in ’TechnicalData’ later in this handbook.
WARNING!
DEFECTIVE TYRES AREDANGEROUS! DO NOT driveyour vehicle if any tyre isexcessively worn ordamaged, or is inflated toan incorrect pressure.
For Your Safety .........Incorrect tyres can affect thestability of your vehicle - onlyfit replacement tyres that areidentical to the originalspecification.
Operating Tip ..........The spare tyre pressure onvehicles fitted with steel wheelscan be checked through theaperture in the wheel cover(provided the wheel is correctlypositioned on the carrier).
Tyres
111
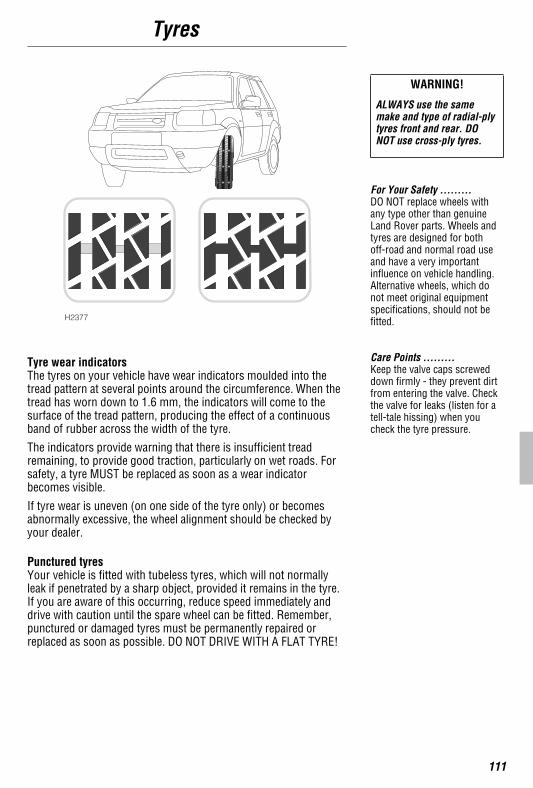
Tyre wear indicatorsThe tyres on your vehicle have wear indicators moulded into thetread pattern at several points around the circumference. When thetread has worn down to 1.6 mm, the indicators will come to thesurface of the tread pattern, producing the effect of a continuousband of rubber across the width of the tyre.
The indicators provide warning that there is insufficient treadremaining, to provide good traction, particularly on wet roads. Forsafety, a tyre MUST be replaced as soon as a wear indicatorbecomes visible.
If tyre wear is uneven (on one side of the tyre only) or becomesabnormally excessive, the wheel alignment should be checked byyour dealer.
Punctured tyresYour vehicle is fitted with tubeless tyres, which will not normallyleak if penetrated by a sharp object, provided it remains in the tyre.If you are aware of this occurring, reduce speed immediately anddrive with caution until the spare wheel can be fitted. Remember,punctured or damaged tyres must be permanently repaired orreplaced as soon as possible. DO NOT DRIVE WITH A FLAT TYRE!
WARNING!
ALWAYS use the samemake and type of radial-plytyres front and rear. DONOT use cross-ply tyres.
For Your Safety .........DO NOT replace wheels withany type other than genuineLand Rover parts. Wheels andtyres are designed for bothoff-road and normal road useand have a very importantinfluence on vehicle handling.Alternative wheels, which donot meet original equipmentspecifications, should not befitted.
Care Points .........Keep the valve caps screweddown firmly - they prevent dirtfrom entering the valve. Checkthe valve for leaks (listen for atell-tale hissing) when youcheck the tyre pressure.
H2377

Tyres
112
Replacement tyresFor your own safety, ONLY fit replacement tyres that are identical tothe original specification shown in ’Technical Data’ later in thishandbook. In addition, ensure that the load rating shown on theside wall of the tyre, is the same as that of the original equipment.Contact your Land Rover dealer for further information orassistance.
Ideally, tyres should be replaced as sets of four, but if this is notpossible, replace the tyres as axle sets. When replacing tyres in axlesets, always fit the new tyres to the rear axle.
Always have the wheels and tyres re-balanced after replacing.
Snow chainsSnow chains can only be fitted to vehicles equipped with 195/80 x15 tyres.
Unsuitable snow chains could damage the tyres, wheels,suspension, brakes or bodywork of your vehicle. Only fit snowchains that are recommended by a Land Rover dealer and havebeen approved for use on your vehicle.
Land Rover approved snow chains are designed for on-road use inextreme snow conditions only, and are not recommended foroff-road use. In use, always observe the following precautions:
• ONLY Land Rover approved chains may be fitted.
• Chains can be fitted to the front wheels only, or to all fourwheels.
• Always adhere to the snow chain fitting and retensioninginstructions and the speed limitations for varying roadconditions. NEVER exceed 30 mph (50 km/h).
• Avoid tyre damage and excessive chain wear by removing snowchains when driving on snow free roads.
For further information about approved snow chains, consult yourLand Rover dealer.
WARNING!
DO NOT fit unapprovedsnow chains - this coulddamage brake components.

Cleaning & Vehicle Care
113
WASHING YOUR VEHICLE
Cleaning the paintworkIf the vehicle is particularly dirty, use a hose to flush grime and gritfrom the painted surface, prior to washing. Then, wash the vehicleusing cold or lukewarm water containing a good quality wash andwax shampoo. Always use plenty of water to ensure that grit isflushed from the surface and not ground into the paintwork. Afterwashing, rinse the vehicle with clean water and dry off with achamois leather.
NOTE: On 3-door vehicle fitted with composite Targa roof panels,do not apply wax polish to the panels, the wax will becomeingrained in the textured finish.
Cleaning the undersideDuring winter months if salt has been used on the roads, use ahose to wash the underside, paying particular attention to wheelarches and panel seams, and to removing accumulations of mud.
Removing tar spotsUse white spirit to remove tar spots and stubborn grease stains.Then wash immediately with soapy water to remove all traces of thespirit.
WARNING!
Some high pressurecleaning systems willpenetrate door, window andsunroof seals, and damagelock mechanisms. DO NOTaim water jets directly atcomponents that might beeasily damaged.
Care Points .........• DO NOT use hot water to
wash the vehicle.
• DO NOT use detergents orwashing up liquid.
• In hot weather, DO NOTwash the vehicle in directsunlight.
• If using a hose, DO NOTdirect the water directly atwindow, door or sunroofseals, at the soft-backcanopy (if fitted), orthrough wheel aperturesonto brake components.
• If using an automatic carwash (5-door models only),remove the radio aerialbefore entering the carwash. DO NOT wash a3-door model in anautomatic car wash.
Engine compartment
WARNING!
DO NOT use a high pressurehose to clean the enginecompartment - damage tothe vehicle’s electronicsystems may occur.
H2326
Cleaning & Vehicle Care
114
Cleaning the softback canopy and hardback
• Use a soft brush to remove dust and flaking dirt from thecanopy or hardback (not the windows), then soak with a mildsoap and water solution to soften encrusted dirt and removestains, prior to washing.
• Wash using a mild soap and water solution, before rinsing thecanopy or hardback with clean lukewarm or cold water. Rinseuntil all traces of soap are removed.
• Never use spirit, petrol or chlorine based cleaning agents, orwash/wax compounds to clean the canopy, hardback andwindows - wax polishes will become ingrained in the texturedfinish.
• Never use an automatic car wash, or a high pressure hose.
• Do not aim jets of water at zips or seals.
• Ensure the canopy is dry before folding or removing.
• Improper cleaning and lack of care may cause damage to thecanopy and window panels, resulting in water penetration.
Cleaning the softback or hardback windows
• DO NOT use brushes, solvents, petrol, hot water, strongdetergents or abrasive cleaners on the window panels.
• Wipe off any dust or dirt using a damp soft cloth.
• DO NOT wipe the window panels when they are dry.
• Wash the windows with a clean, grit-free sponge or cloth and amixture of a mild dishwashing detergent and cold or lukewarmwater. Rinse the window panels thoroughly and wipe with a softmoist cloth.
• Remove frost, ice and snow using lukewarm water - do not usea scraper. Take care when clearing ice or snow from the windowpanels, as they are easily scratched and could crack at lowtemperatures.
• Do not put adhesive backed material (badges, stickers etc) ontothe window panels - this may result in damage anddiscolouration.
WARNING!
DO NOT use abrasive orsolvent cleaners on thecanopy or hardback andespecially NOT on thewindow panels.Use only mild detergents.
Care Points .........The removable window panelsfitted to the softback, aresusceptible to scratching fromthe effects of dirt and grit. Forthis reason, it is important towash them frequently.Always stow the window panelsin the bag provided when not inuse - ensure the panels are drybefore stowing.
Cleaning & Vehicle Care
115
Protecting paint damageAfter washing, examine the paintwork for damage. Treat paint chipsand scratches with a Land Rover paint touch-up pencil. If thedamage has revealed bare metal, use a coloured primer first, thenapply the base coat and finish off with a lacquer pencil, ifappropriate. Carry out this treatment after washing but beforepolishing or waxing.
More extensive damage to paint or bodywork must be repaired inaccordance with the manufacturer’s recommendations. Ask yourLand Rover dealer for advice.
PolishingOccasionally treat the paint surface with an approved polishcontaining the following properties:
• Very mild abrasives to remove surface contamination withoutremoving or damaging the paint.
• Filling compounds that will fill scratches and reduce theirvisibility.
• Wax to provide a protective coating between the paint and theelements.
Wiper bladesWash in warm soapy water. DO NOT use spirit or petrol basedcleaners.
Windows and mirrorsRegularly clean all windows, inside and out, using an approvedglass cleaner.
Windscreen:In particular, clean the outside of the screen with glass cleaner afterwashing the vehicle with wash and wax products, and before fittingnew wiper blades.
Rear screen:Clean the inside with a soft cloth, using a side to side motion toavoid damaging the heating elements. DO NOT scrape the glass oruse abrasive cleaners - this will damage the heating elements.
Mirrors:Wash with soapy water. Use a plastic scraper to remove ice. DONOT use abrasive cleaners or metal scrapers.
Care Points .........• If possible, avoid applying
polish or wax products towindow glass or rubberseals.
• DO NOT scrape or useabrasive cleaners on theinside of the rear screen -this will damage the heatingelements.
• DO NOT use car polishcontaining coarse abrasives- these will remove thepaint film and damage thegloss finish.
Cleaning & Vehicle Care
116
CLEANING THE INTERIOR
Plastic materialsClean with diluted upholstery cleaner and wipe with a damp cloth.
Leather materialsClean leather seats and trim with warm water and a non-detergentsoap. Dry and polish the leather with a dry, clean, lint-free cloth.
Carpet and fabricsClean with diluted upholstery cleaner - test a concealed area first.
Airbag module coversTo prevent damage to the airbag SRS, the steering wheel and areaof the fascia panel containing the passenger airbag should ONLY becleaned sparingly with a damp cloth and upholstery cleaner.
DO NOT allow these areas to be flooded with liquid and DO NOT usepetrol, detergent, furniture cream or polishes.
Instrument pack, clock and radioClean with a dry cloth - DO NOT use cleaning fluids or sprays.
Seat beltsExtend the belts, then use warm water and a non-detergent soap toclean. Allow the belts to dry naturally; DO NOT retract them or usethe vehicle until they are completely dry.
Fascia mounted rubber matsThe mats are removable for cleaning - replace with care.
RECOMMENDED VEHICLE CARE PRODUCTS
De-icer STC717..............................................................Wheel cleaner STC718....................................................Glass cleaner STC719....................................................Bumper cleaner STC721................................................Shampoo STC722..........................................................Exterior wax polish STC723............................................
Care Points .........• DO NOT polish plastic
fascia components - theseshould remainnon-reflective.
• DO NOT use bleaches, dyesor cleaning solvents on seatbelts.
Battery
117
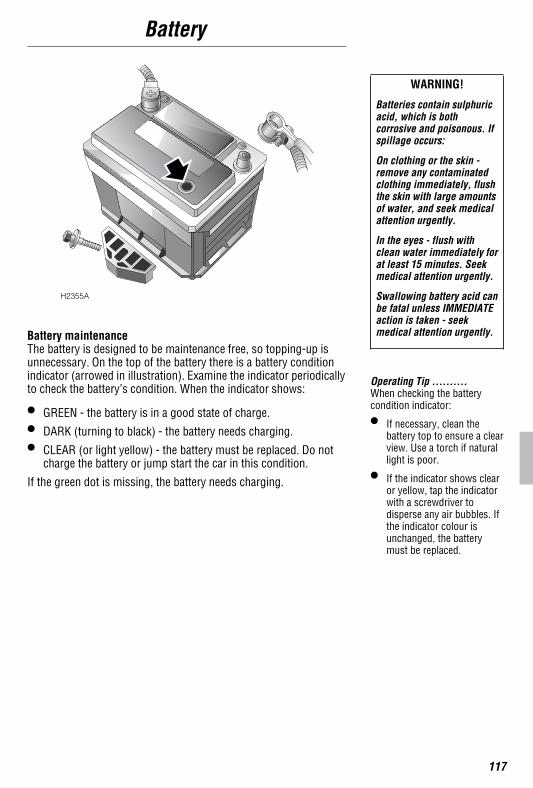
Battery maintenanceThe battery is designed to be maintenance free, so topping-up isunnecessary. On the top of the battery there is a battery conditionindicator (arrowed in illustration). Examine the indicator periodicallyto check the battery’s condition. When the indicator shows:
• GREEN - the battery is in a good state of charge.
• DARK (turning to black) - the battery needs charging.
• CLEAR (or light yellow) - the battery must be replaced. Do notcharge the battery or jump start the car in this condition.
If the green dot is missing, the battery needs charging.
WARNING!
Batteries contain sulphuricacid, which is bothcorrosive and poisonous. Ifspillage occurs:
On clothing or the skin -remove any contaminatedclothing immediately, flushthe skin with large amountsof water, and seek medicalattention urgently.
In the eyes - flush withclean water immediately forat least 15 minutes. Seekmedical attention urgently.
Swallowing battery acid canbe fatal unless IMMEDIATEaction is taken - seekmedical attention urgently.
Operating Tip ..........When checking the batterycondition indicator:
• If necessary, clean thebattery top to ensure a clearview. Use a torch if naturallight is poor.
• If the indicator shows clearor yellow, tap the indicatorwith a screwdriver todisperse any air bubbles. Ifthe indicator colour isunchanged, the batterymust be replaced.
H2355A
Battery
118
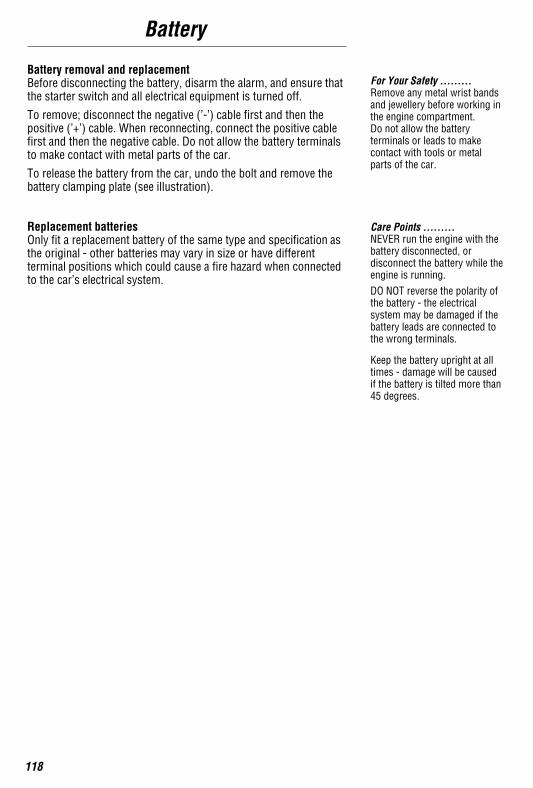
Battery removal and replacementBefore disconnecting the battery, disarm the alarm, and ensure thatthe starter switch and all electrical equipment is turned off.
To remove; disconnect the negative (’-’) cable first and then thepositive (’+’) cable. When reconnecting, connect the positive cablefirst and then the negative cable. Do not allow the battery terminalsto make contact with metal parts of the car.
To release the battery from the car, undo the bolt and remove thebattery clamping plate (see illustration).
Replacement batteriesOnly fit a replacement battery of the same type and specification asthe original - other batteries may vary in size or have differentterminal positions which could cause a fire hazard when connectedto the car’s electrical system.
For Your Safety .........Remove any metal wrist bandsand jewellery before working inthe engine compartment.Do not allow the batteryterminals or leads to makecontact with tools or metalparts of the car.
Care Points .........NEVER run the engine with thebattery disconnected, ordisconnect the battery while theengine is running.DO NOT reverse the polarity ofthe battery - the electricalsystem may be damaged if thebattery leads are connected tothe wrong terminals.
Keep the battery upright at alltimes - damage will be causedif the battery is tilted more than45 degrees.
Battery
119
Battery chargingAs the battery ages, it may not retain its charge as effectively aswhen it was new. Cars that are used infrequently, or are usedexcessively for short journey motoring, or operation in coldclimates, may need the battery to be charged regularly. Alwayscheck the battery condition indicator before charging.
Batteries generate explosive gases, contain corrosive acid andproduce levels of electric current sufficient to cause serious injury.While charging, always heed the following precautions.
• Before charging, disconnect and remove the battery from the car- charging the battery with the cables connected may damagethe car’s electrical system.
• Make sure the battery charger leads are securely clamped to thebattery terminals BEFORE switching on the battery charger. Donot move the leads once the charger is switched on.
• Shield your eyes, or avoid leaning over the battery.
• Keep the area around the top of the battery well ventilated.
• Do not allow naked lights near the battery (batteries generateinflammable hydrogen during and after charging).
• When charging is finished, switch off the battery chargerBEFORE disconnecting the leads from the battery terminals.
After charging, leave the battery for one hour before returning it tothe car - this will allow time for explosive gases to disperse, therebyminimising the risk of fire or explosion.
WARNING!
DO NOT charge the batteryif it is connected to the car -this may seriously damagethe car’s electrical system.DO NOT charge the batteryif it is suspected of beingfrozen.
DO NOT attempt to chargethe battery if the batterycondition indicator is clearor light yellow.
Operating Tip ..........Be aware that a battery will takelonger to charge in a coldenvironment.The battery will be sufficientlycharged once the batterycondition indicator showsGREEN.
Environment .........Used batteries can be recycled.They are also hazardous. Seekadvice about disposal fromyour Land Rover dealer or localauthority.
Battery
120
THE EFFECTS OF BATTERY DISCONNECTIONSome of the car’s electrical systems will be affected if the battery isdisconnected. These are listed below, together with the symptomsyou might experience once the battery is reconnected and theactions required to restore operation.
Radio/cassette playerThe word ’CODE’ will appear in the display and the set will fail tooperate. To restore operation, enter the security code using theprocedure described in the ’In-car Entertainment’ book.
Taildoor glassIf the battery has been disconnected, the taildoor glass will need tobe recalibrated. If the alarm was armed when the battery wasdisconnected (or discharged), disarm the alarm after reconnection -the taildoor glass will fully lower. This will happen automatically ifthe alarm was in a disarmed state when the battery wasdisconnected.
After battery reconnection, fully raise the taildoor glass (if the glassis not fully raised, an error ’beep’ will sound) - the taildoor glass isnow recalibrated.
Alarm systemThe alarm system will automatically reset to the status in operationprior to battery disconnection, but the handset will need to bere-synchronised (see ’Locks & Alarm’ ).