Embed Size (px)
Citation preview

F R E E S TA N D I N G W O O D S T O V E S
Limit 380
Firepoint 360
Spirit 550
This manual includes instructions for the Installation, Operation and Maintenance of your stove.
Models:Limit 380
Firepoint 360Spirit 550
Please read this entire manual carefully before installing and lighting your stove.
Save these instructions for future use.Always follow the instructions contained in the manual.
For more information go to: www.bosca.co.nz
INSTALLATION MANUAL

INSTALLATION MANUAL
TABLE OF CONTENTS
PRINCIPAL COMPONENTS 1
INTRODUCTION 2
INSTALLATION 2
What is the most adequate loaction to install my Bosca stove 2
What is the correct way to install my bosca stove 4
Floor protectors 4
Seismic restraints 4
REMOVING THE FIREBOX BAFFLE 6
How can I verify that the installation has been correctly executed? 6
OPERATION INSTRUCTION 6
How does the double combustion system work? 6
How do I choose appropriate firewood? 6
How can I recognize dry firewood before buying it? 7
How do I check that the firewood is dry before using it? 7
How do I light the stove? 7
How do I reload firewood in the stove? 8
How do I turn off the stove? 8
MAINTENANCE AND CLEANING 8
What maintenance does my Bosca stove require? 8
How do I clean the flue on my stove? 9
How do I remove the ash from my stove? 10
How do I clean the glass panel on my stove? 10
CHIMNEY FIRE 10
What is a chimney fire? 10
What should I do in case of a chimney fire? 10
How can I avoid a chimney fire? 10
TROUBLESHOOTING 11
IMPORTANT INFORMATION 11
SAFETY PRECAUTIONS 11
WARRANTY 12
DISTRIBUTED IN NEW ZEALAND BY:RETAIL LINKS LTDPH: 03-547 0770EMAIL: [email protected]
7 FORESTS ROADSTOKE
NELSON 7011
NEW ZEALAND

INSTALLATION MANUAL
— 1 —
MAIN COMPONENTS
1. Flue Spigot
2. Ceramic Glass (Resists temperatures up to 800°C)
3. Ashtray Door
4. Locking System
5. Ash-pan
6. Refractive Bricks
7. Removable Baffle
8. Combustion Control (Primary Air Control)
5
81
3
4
2
6
7
WARNING: THIS APPLIANCE AND FLUE SYSTEM SHALL BE INSTALLED IN ACCORDANCE WITH AS/NZS 2918:2001 AND THE APPRO-PRIATE REQUIREMENTS OF THE RELEVANT BUILDING CODE OR CODES.
WARNING: APPLIANCES INSTALLED IN ACCORDANCE WITH THIS STANDARD SHALL COMPLY WITH THE REQUIREMENTS OF AS/NZS 4013:1999 WHERE REQUIRED BY THE REGULATORY AUTHORITY, I.E. THE APPLIANCE SHALL BE IDENTIFIABLE BY A COMPLIANCE PLATE WITH THE MARKING ‘TESTED TO AS/NZS 4013:1999’.
ANY MODIFICATION OF THE APPLIANCE THAT HAS NOT BEEN APPROVED IN WRITING BY THE TESTING AUTHORITY IS CONSIDERED TO BE IN BREACH OF THE APPROVAL GRANTED FOR COMPLIANCE WITH AS/NZS 4013:1999.
CAUTION: MIXING OF APPLIANCE OR FLUE SYSTEM COMPONENTS FROM DIFFERENT SOURCES OR MODIFYING THE DIMENSIONAL SPECIFICATION OF COMPONENTS MAY RESULT IN HAZARDOUS CONDITIONS. WHERE SUCH ACTION IS CONSIDERED, THE MANUFACTURER SHOULD BE CONSULTED IN THE FIRST INSTANCE.
CAUTION: CRACKED AND BROKEN COMPONENTS, e.g. GLASS PANELS OR CERAMIC TILES, MAY RENDER THE INSTALLATION UNSAFE.
WARNING: ANY MODIFICATION OF THE APPLIANCE THAT HAS NOT BEEN APPROVED IN WRITING BY THE TESTING AUTHORITY IS CONSIDERED AS BREACHING AS/NZS 4013:1999.
WARNING: DO NOT USE FLAMMABLE LIQUIDS OR AEROSOLS TO START OR REKINDLE THE FIRE.
WARNING: DO NOT USE FLAMMABLE LIQUIDS OR AEROSOLS IN THE VICINITY OF THIS APPLIANCE WHEN IT IS OPERATING.
WARNING: DO NOT STORE FUEL WITHIN HEATER INSTALLATION CLEARANCES.
WARNING: WHEN OPERATING THIS APPLIANCE AS AN OPEN FIRE USE A FIRE SCREEN.
WARNING: OPEN AIR CONTROL BEFORE OPENING FIRE DOOR.
CAUTION: THIS APPLIANCE SHOULD NOT BE OPERATED WITH A CRACKED GLASS.
CAUTION: THIS APPLIANCE SHOULD BE MAINTAINED AND OPERATED AT ALL TIMES IN ACCORDANCE WITH THESE INSTRUCTIONS
CAUTION: THE USE OF SOME TYPES OF PRESERVATIVE-TREATED WOOD AS A FUEL CAN BE HAZARDOUS
KEEP THESE INSTRUCTIONS FOR FUTURE REFERENCE

INSTALLATION MANUAL
— 2 —
Congratulations on purchasing a Bosca stove. By choosing Bosca you automatically receive the support and guarantee of more than 20 years experience in manufacturing stoves.
Bosca products are manufactured using only high quality materials and the latest in design and technology that, in the hands of our experienced workers, ensures our products meet the highest international standards. equipped with double combustion systems that allow for an efficient use of firewood with a minimum impact on the environment. Bosca stoves are equipped with double combustion systems that allow for an efficient use of firewood with a minimum impact on the environment.
Not suitable for wetback or water booster application.
INTRODUCTION
INSTALLATION
To ensure the safe and proper functioning of your stove, it must be installed according to the instructions included in this manual.
In terms of safety, the flue is the most important component of your stove as it is the exhaust for the gases produced by the combustion of the firewood. These gases extremely corrosive can reach high temperatures and often contain fuel components. Studies have demonstrated that fires related to stove or wood cook-stoves usually originate near the flue.
Where should I install my Bosca stove?
In the case of a freestanding stove, it is essential to chose a suitable location for it’s installation.The following are the main considerations you should take into account:
1. It is important that the stove be located in an area that allows for an adequate circulation of air currents. This will enable the hot air to reach the different rooms of the house more easily. Additionally, the stove must be located so that it is not a danger to people moving around the room, especially children.
2. Be especially careful to maintain clearances to flammable material such as curtains and carpets. The mini-mum installation distances are detailed to the right.
MINIMUM CLEARANCES FROM COMBUSTIBLE WALLS (mm)
Refer to Technical Specification sheet for more dimensions.For clearances to non-combustible or insulated walls refer to AS/NZS 2918:2001.Note: For Spirit 550 & Limit 380, side clearance (B) is to be no less than 200mm and rearclearance (A) no less than 100mm irrespective of wall material, to ensure access to rear ofstove for baffle replacement.
BOSCA REAR HEAT SHIELD
Bosca Rear Heat Shield
A Bosca Rear Heat Shield (shown right) is supplied in all Bosca Flue Shield Kits and can be used in conjunction with the flue shield to reduce the rear clearance to the minimum allowable distance.
In the above table *I denotes the minimum allowable clearances for each model if the Rear Heat Shield is fitted. If the Rear Heat Shield is not fitted then the rear clearance should be no less than that stated in column A.
Note: The Rear Heat Shield cannot be used with the Spirit 550. The fitting instructions for the Rear Heat Shield can be found with the instruction for the Flue Shield Kit. The Rear Heat Shield does not replace the Bosca Flue Shield.
Installation instruction are provided with the Flue Shield and Heat Shield kit.
B
A (*I)
E
E
A B E *I see note below FIREPOINT 360 315 340 320 195
LIMIT 380 345 325 250 240SPIRIT 550 230 245 140 N/A

INSTALLATION MANUAL
— 3 —
FLUE SHIELDThe Bosca flue shield (P/N110017) must be used in all installations where the fire is installed against a combustible wall to the clearances listed in the chart on page 2 of this manual.
If the wall behind the fire is a non-combustible ventilated surface as per AS/NZS 2918:2001 then clearances can be reduced and the flue shield is not required.
Installation instruction are provided with the Flue Shield and Heat Shield kit
FLOOR PROTECTOR
– Bosca freestanding wood fires DO NOT require an insulating floor protector as they comply with the minimum floor protector requirements of AS/NZS 2918:2001. These minimum floor protector requirements are:
– They must be of adequate size to give appropriate wall, rear and front clearances/ projections as detailed below and in the chart illustrated on page “2”.
– The floor protector must extend 200mm horizontally to each side directly below the door opening, and 300mm forward of the door opening.
– The upper surface of the floor protector must be made of non-combustible material.
– A suitable floor protector for a Bosca freestanding wood fire is therefore any non-combustible material which could include;
– Ceramic tiles with grouted joints fixed directly to timber flooring.
– A sheet of toughened glass, panel steel etc directly onto a wooden or other combustible floor.
Note: if being installed directly onto concrete or non-combustible floor, a floor protector is not necessary.
FLUE INSTALLATIONAny flue system used on this fire must comply with and be installed as detailed in AS/NZS 2918:2001. We recommend the following kits which are compliant and come complete with instructions.
“Bosca Flue Kit” (available through your Bosca dealer)
“Sheet metal Fabricated Products Limited 4 metre Freestanding 2400 Flue Kit”
SEISMIC RESTRAINT
As per AS/NZS 2918:2001, Bosca fires installed in New Zealand are required to have seismic restraint.
This can be achieved in the Limit 380 and Firepoint 360 by using the two holes provided in the baseplate of the fireplace. If installing into a concrete floor masonry anchors are required, for wooden floors, any suitable fastener will suffice.
The Spirit 550 is supplied with two Seismic Restraint Brackets welded on each side as it does not have a base plate. Use these brackets with masonry anchors if installing into a concrete floor, or alternatively, any suitable fastener for a wooden floor.
The fittings must comply with all local council specifications.
Note: the fastener must pass through the Floor Protector if fitted into the floor.
Spirit 550 Seismic Restraint Brackets

INSTRUCTIONS FOR REPLACING THE BAFFLE
— 4 —
11mm spanner
LIMIT 380
1. The first stage consists of removing the anchoring bolts of the baffle. This will require an 11mm spanner.
2. Undo the 1/4” (stainless steel) nuts on the back of your stove counter-clockwise with the spanner.To facilitate the process, we recommend you first lubricate the nuts with WD40 or a similar product.
3. Once the nuts are loose, undo them until you have completely removed them from the bolts. Set them aside to avoid losing them.You can now dismount the baffle from inside the stove. Do so from the front of the stove. Place the screws and tighten them.
4. To remove the baffle, hold it with both hands and slide it forward so that the bolts separate from the back of the stove.
5. To stop the baffle from falling, tilt it slightly from the back so that you can hold it firmly with your hands. Straighten it and remove from the stove.
6. To mount the baffle in its original position, insert it into the firebox as indicated by the arrows and rest it on the supports designed for it.Ensure the oxygenating tube and the bolts are fully inserted in the perforations located in the back of the stove. Place the nuts and tighten them.
SPIRIT 5501. The Spirit model stove has a dismountable back panel that must be removed. You will need an 11mm spanner to do this.
2. Loosen the bolts located on both sides of the panel.
3. Undo the 1/4” (stainless steel) nuts on the back of your stove counter-clock-wise with the spanner.To facilitate the process, we recommend you first lubricate the nuts with WD40 or a similar product.Once the nuts are loose, undo them until you have completely removed them from the bolts. Set them aside so as to avoid losing them.You can now remove the baffle from inside the stove. Do so from the front of the stove.
11mm spanner

INSTRUCTIONS FOR REPLACING THE BAFFLE
— 5 —
SPIRIT 550 (continued)
4. To remove the baffle, hold it with both hands and slide it forward so that the bolts separate from the back of the stove.
5. To stop the baffle from falling, tilt it slightly from the back so that you can hold it firmly with your hands. Straighten it and remove it from the stove.
6. To mount the baffle back in it’s original position, insert it into the firebox as indicated by the arrows and rest it on the supports designed for it.Ensure the oxygenating tube and the bolts are fully inserted in the perforations located in the back of the stove. Place the nuts and tighten them.
FIREPOINT 360
1. The first stage consists of removing the anchoring bolts of the baffle. This will require an 11mm spanner.
2. Undo the 1/4” (stain-less steel) bolts from the inside of your stove counter-clockwise with the spanner. To facilitate the process, we recommend you first lubricate the bolts with WD40 or a similar product.
3.Once the bolts are loose, undo them until you have completely removed them from the bolts. Set them aside so as to avoid losing them.You can now remove the baffle from inside the stove. Do so from the front of the unit.
11mm spanner
4. To remove the baffle, hold it with both hands and slide it forward so that the bolts separate form the back of the stove.
5 To stop the baffle from falling, tilt it slightly from the back so that you can hold it firmly with your hands. Straighten it and remove it from the stove.
6. To mount the baffle, back in it’s original position, insert it into the firebox as indicated by the arrows and rest it on the supports designed for it.Ensure the oxygenating tube and the bolts are fully inserted in the perforations located in the back of the stove. Place the screws and tighten them.
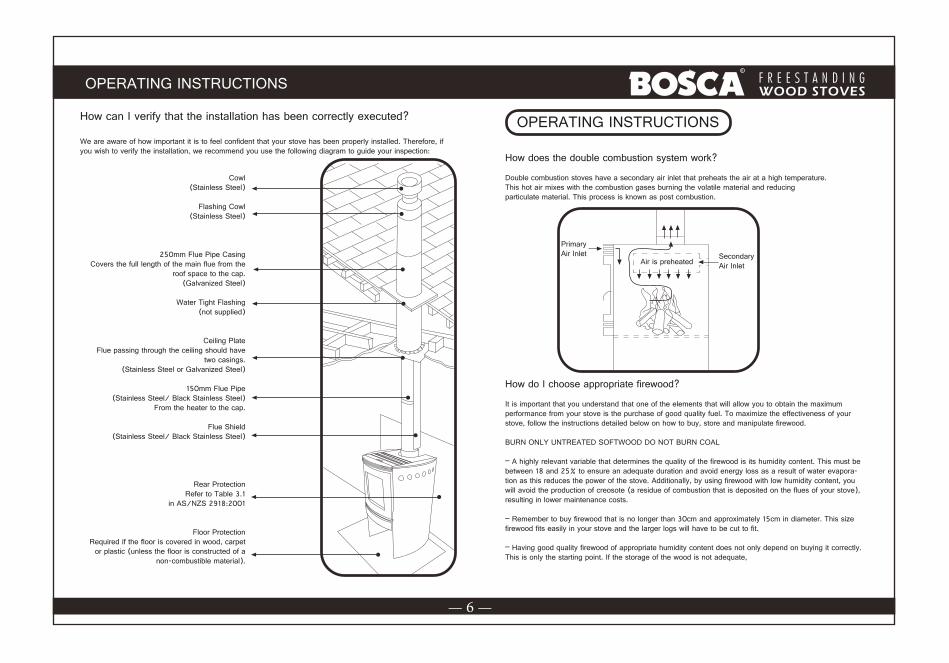
OPERATING INSTRUCTIONS
— 6 —
How can I verify that the installation has been correctly executed?
We are aware of how important it is to feel confident that your stove has been properly installed. Therefore, if you wish to verify the installation, we recommend you use the following diagram to guide your inspection:
Cowl(Stainless Steel)
Flashing Cowl(Stainless Steel)
250mm Flue Pipe CasingCovers the full length of the main flue from the
roof space to the cap. (Galvanized Steel)
Water Tight Flashing(not supplied)
Ceiling PlateFlue passing through the ceiling should have
two casings.(Stainless Steel or Galvanized Steel)
150mm Flue Pipe(Stainless Steel/ Black Stainless Steel)
From the heater to the cap.
Flue Shield(Stainless Steel/ Black Stainless Steel)
Rear ProtectionRefer to Table 3.1
in AS/NZS 2918:2001
Floor ProtectionRequired if the floor is covered in wood, carpet
or plastic (unless the floor is constructed of a non-combustible material).
Secondary Air InletAir is preheated
Primary Air Inlet
How does the double combustion system work?
Double combustion stoves have a secondary air inlet that preheats the air at a high temperature. This hot air mixes with the combustion gases burning the volatile material and reducing particulate material. This process is known as post combustion.
OPERATING INSTRUCTIONS
How do I choose appropriate firewood?
It is important that you understand that one of the elements that will allow you to obtain the maximum performance from your stove is the purchase of good quality fuel. To maximize the effectiveness of your stove, follow the instructions detailed below on how to buy, store and manipulate firewood.
BURN ONLY UNTREATED SOFTWOOD DO NOT BURN COAL
– A highly relevant variable that determines the quality of the firewood is its humidity content. This must be between 18 and 25% to ensure an adequate duration and avoid energy loss as a result of water evapora-tion as this reduces the power of the stove. Additionally, by using firewood with low humidity content, you will avoid the production of creosote (a residue of combustion that is deposited on the flues of your stove), resulting in lower maintenance costs.
– Remember to buy firewood that is no longer than 30cm and approximately 15cm in diameter. This size firewood fits easily in your stove and the larger logs will have to be cut to fit.
– Having good quality firewood of appropriate humidity content does not only depend on buying it correctly. This is only the starting point. If the storage of the wood is not adequate,

OPERATING INSTRUCTIONS
— 7 —
your efforts will have been wasted. This is why it is important that you safeguard the storage conditions. The wood must be stored in an isolated location so that it is not exposed to rain and receives adequate air circulation. Under no circumstance must it be in contact with the ground unless it is paved.
How can I recognise dry firewood before buying it?
– The logs are lighter.– The bark must be partially detached and have cracks on the ends.– It must not have white or grey spots. – When you bend a small splinter with your finger, it breaks.
How do I check the firewood before using it?
Place a log in your stove over a large quantity of cinders and check for the following:Dry Firewood: ignites on more than one side in minutes.Humid Firewood: turns grayish-black and takes time to ignite.Wet Firewood: emits a whistle sound, blackens, does not produce a flame and emits a large quantity of smoke.
IMPORTANTWet firewood is NOT apt for use
How do I light the stove? (Easy Lighting System)
1. Check that the baffle is in its place, if this is not so locate it in the correct position as indicated on page 8
2. Place crumpled paper in the middle of the firebox
3. Place various split logs over the paper and some splinter on top of this, preferably in a vertical position. Set the primary Air Control on “Maximum”.
IMPORTANTThe first time the stove is lit the high temperature paint on it will smoke and emit a resin smell for some hours. Open the windows to ventilate.
Initial mound splinters and paper
Ashtray door is closed
4. Light the fire and close the upper door of the stove.
5. Open the door of the ashtray and keep it this way for approximately three minutes or until the splinters are lit.
6. Open the upper door and add the load of firewood, placing the lightest logs over the lit splinters. It is very important that spaces are left between the logs as these allow for air circulation and consequently a faster and more vigorous ignition.
7. Finally, close the door and adjust the Pri-mary Air Control to “maximum” for five minutes or until the flames burn vigorously, and then adjust the control to “intermediate”.
8.Learning to manage the stove to your liking requires some practice, as you must first become familiar with its functioning. Do not expect an immediate reaction of the fire when you slide the Primary Air Control. The flame will not intensify nor extinguish quickly as is the case with liquid or gas fuels. Solid fuels like firewood react slowly.
Paper and splinters light in 1 to 5 minutes
Ashtray door is open
Firewood Load
Primary Air Control on “maximum” for 5 minutes, and then adjust to “intermediate”.

OPERATING INSTRUCTIONS
— 8 —
IMPORTANTThe best moment to reload the stove is when a good layer of cinders has set itself. If this layer is too thin, the way to reload it is repeating the initial lighting procedure (page 6).
IMPORTANTIf you follow these instructions you will generate an effective combustion that does not produce smoke when you start a fire in your stove.
How do I reload firewood into the stove?
1. Adjust the Primary Air Control to “maximum” and open the door of the firebox (upper door).
2. Place the dry firewood logs on the cinders inside the stove. Logs must be loaded front to back as shown in the figure at right. As is the case when lighting the fire, remember that it is better if the logs are arranged with spaces between them to allow air flow. Finally, close the upper door.
Firewood load
Primary Air Control on “maximum”
How do I turn off the stove?
As your stove is a safe unit it is not necessary to turn it off. However, if you wish to do so, all you have to do is adjust the Primary Air Control to “minimum”. Remember that solid fuels react slowly, so this process will take several minutes.
IMPORTANTThe “minimum” position on the Primary Air Control must be only used to turn off the stove. It must never be used as a way to save firewood, as the effect will be to make the functioning of the stove deficient.
MAINTENANCE AND CLEANING
What maintenance does my Bosca stove require?
Cleaning the flue is essential to ensure the proper functioning of your stove. This consists of removing the creosote (a flammable substance that results from the combustion of firewood with a high per-centage of humidity and/or when there is insufficient air entering) from the interior of the flue. This accumulation obstructs the flue and affects the proper functioning of your stove, making the lighting process slow and tedious and impeding appropriate combustion. Moreover, the combustion will not be vigorous and there will be insufficent draft and an abundance of smoke emerging from the door.
IMPORTANTUnder certain conditions creosote can ignite, resulting in extremely high and dangerous temperatures.
The frequency with which the flue must be cleaned varies according to the percentage of humidity in the firewood you use. The flues must be cleaned at least once a year if the firewood you use is dry. However, if it is green or contains over 25% humidity it must be done every 15 or 20 days.

OPERATING INSTRUCTIONS
— 9 —
We recommend the flues of your stove be cleaned by an authorised techinical service. If this is not possible for any reason, you can clean the flues yourself by following the instructions indicated below. The tools you will need are a ladder, a screwdriver and a steel brush. After cleaning the flue, check the state of the seal between the flues and the sheet. If necessary, we recommend you reseal with a suitable high temp sealant.
How do I clean the flues of my stove?
Your stove is installed in such a way that the flues can be cleaned without uninstalling the unit.
1. Make sure the stove and the flues are both cold before touching them. We recommend using safety gloves to protect your hands.
2. Unscrew the cap and remove it.
3. Remove the anchoring screws to dismount the baffle of your stove. We recommend you carefully read the instructions on removing the firebox baffle.
IMPORTANTBosca stoves contain a baffle that must be dismounted in order to clean the unit.
Oxygenating Tube
Anchoring Screws
Baffle
Baffle Support
4. It is not necessary to totally remove the baffle from the stove once it is dismounted in order to clean the flues.
5. Slide the weight inside the upper side of the flue all the way down until it appears inside the stove.
6. Pull the rope inside the stove so that the steel brush moves up the flue. Repeat this operation 6 times. Do not use regular steel wool instead of a steel brush.Keep the door as closed as possible to avoid soot being dispersed outside of the stove.

OPERATING INSTRUCTIONS
— 10 —
7. To refit the baffle in its regular position (follow the indications recom-mended in the instructions to dismount the baffle).
2
3
1
How do I remove the ash from my stove?
Check that your stove is cold and proceed to empty the firebox with a shovel into a non-combustible container, preferably with a layer of sand on the bottom of it.
Take the ashes outside the house to a safe location. Remember that live coals can remain lit for up to 36 hours. The ash of untreated wood makes an excellent fertilizer for your garden.
IMPORTANTAlways maintain a bed of ash on the inside of the firebox as this will make the accumulation of live coal and reloading easier.
How do I clean the glass on my stove?
One of the main attractions of your Bosca fire is the visible fire. However, often this is limited because of spots that appear on the glass of the stove. To avoid this follow the instructions below:
– The main cause of spots on the glass is directly associated with the use of firewood that has a high humidity content and maintaining the primary air control on “minimum”. Avoid the occurence of both by buying dry firewood and storing it correctly and maintaining the Primary Air Control in the “intermediate” position.
CHIMNEY FIRE
What is a chimney fire?
Soot and residue resulting from the combustion of firewood are deposited in the flue. The residue is called creosote, which is a fuel. Under certain circumstances, the interior of the flue catches fire producing extremely high temperatures that may reach such a level that the flue turns an incandescent red color.
Incandescent creosote emanations may appear on the upper extreme of the flue.
What should I do in the case of a chimney fire?
– Stay calm. A properly installed flue in which the correct materials have been used should resist the situation without problems.
– Close the door of the stove well and close the Primary Air Control. The fire on the inside of the flue will most probably go out in five minutes. Do NOT open the door of the firebox or the ashtray door until 30minutes after the chimney fire is extinguished. Otherwise, the fire could re-ignite.
– Keep an eye on the flue, especially in the area of the roof space.
– Remove any fuel that may be near the flue.
– If the situation prolongs excessively or if you suspect the installation was not properly executed, call the fire department immediately.
– Do not use your stove again until it has been checked by a certified technician.
How can I avoid a chimney fire?
– The key to avoiding a chimney fire is to keep you stove’s gas exhaust system clean.– To keep the flue clean, your stove must function with a vigorous fire. Avoid using your stove with flameless smoking fire.– When reloading your stove, avoid cooling the existing fire. Place the Primary Air Control on “maxi-mum” so that the new logs heat quickly. Only after this has occurred should you adjust the Primary Air Control to the “intermediate” position.

OPERATING INSTRUCTIONS
— 11 —
Smoke is coming out of my stove
The glass is dirty
Stained flues
Stove doesn’t heat
Visible smoke
Baffle is worn out
– Check the installation. The cap of the flue must have sufficient space to evacuate smoke and extend 60 cm over the roof of the house– Reload the stove properly.– Keep the flue of your stove clean.– Check the baffle is correctly installed.
– Use firewood with a low percentage of humidity.– Keep the Primary Air Control in the “intermediate” or “maximum” position.
– Use firewood with a low percentage of humidity.– Do not overload your stove to avoid overheating.
– Use firewood with a low percentage of humidity.– Reload your stove over a good bed of live coals.– Keep the Primary Air Control in the “intermediate” or “maximum” position.
– Use firewood with a low percentage of humidity.– It is normal to have smoke emissions for the first few minutes of ignition. The smoke will ease when the combustion chamber reaches a higher temperature (this should not take more than 30 minutes).
– If your stove has been in use for more than three years.
TROUBLESHOOTING
IMPORTANT INFORMATION
Your Bosca stove is identified by a serial number stamped on a plate on the inside of the ashtray door. No other Bosca stove of similar model has the same serial number. The serial number may be requested if you require a service.
(Fill in the information of your stove)Model:Purchase Date:
Serial Number:Dealer:
SAFETY PRECAUTIONS
Gas
gas
The stoves are designed to only use firewood as fuel. The use of any other kind of fuel could damage the stove and make the warranty void.
Periodically inspect the flue pipes and clean if necessary. The accumulation of creosote can provoke fires inside the flue.
Keep any flammable materials away from your stove (furniture, curtains, papers, plastic, etc.).
Do not leave clothes or other flammable materi-als on your stove.
Do not burn large amounts of paper or oth-er flammable materials that may produce a fast and extremely hot fire.
The door of your stove’s firebox must remain closed while the fire is burning.
The stove must be properly installed to avoid possible fires. The installation instructions contained in this manual must be strictly adhered to. Preferably by an Authorised Installation Service.
Never use gasoline, par-affin or other flammable fuels to light the fire. Do not store gasoline or other fuels near the stove.
Do not make modifica-tions to the installation of the stove without consulting specialised technicians.
If any elements close to or in contact with stove begin to smoke it is overheating. Do not add more wood, make sure the firebox is well closed and turn off the air control completely
Direct contact with a lit stove can produce serious burns in children and adults.

WARRANTY
— 12 —
Warranty Conditions for Bosca New Zealand
This warranty is provided by the New Zealand Distributor of Bosca Fires, who trade as Retail Links LTD (referred to in this document as Retail Links). The warranty applies from the date of purchase from or through an authorised Bosca fire dealer.
1.0 Nature of Warranty1.1 Subject to the exclusions in section 2 & 3, Retail Links undertake to put right any defects in the Bosca products supplied by Retail Links for the periods specified below:
Parts Parts and Labour Warranty
Firebox 5 years*
Baffle 1 Year*
Fire Bricks 1 Year*
Door Seal 1 Year* * From date of purchase 1.2 Retail Links must pre-authorise all warranty work.1.3 The benefits provided by under this warranty are in addition to the consumer guarantees and any other statutory rights you may have under the consumer law and/or other applicable laws.
2.0 Warranty Exclusions2.1 This warranty does not apply and will be void where:2.1.1 The Bosca fire is not installed in accordance with AS/NZS 2918:2001 or any building code or consent.2.1.2 The Bosca fire has not been installed or operated in accordance to the Bosca installation manual, in particular, defects, malfunctions or failures caused by incorrect installation, normal wear and tear, misuse, neglect, lack of proper and regular maintenance, accidental damage any other alteration, or failure to follow operating instructions in the installation manual. 2.1.3 The use of products, including flue systems that are not specified in accordance with installation manual.2.1.4 Repairs or modifications by persons not authorised or use of parts not supplied by Retail Links, or damage or other events which have occurred since the product left the control of Retail Links.2.1.5 Any scratches, dints, finger print marks and melted items that occurred after the arrival of the product to the Bosca Dealer.2.1.6 Improper handling of fragile components such as glass.2.1.7 Damage caused by incorrect use or the burning of treated or painted wood, driftwood or other fuels which are not recommended.2.1.8 Changes in the interior / exterior surfaces of the house, fire or flue (e.g. any staining or soot / smoke damage or discoloration of surfaces caused by themal stress or overlead).2.1.9 Damage caused by abnormally corrosive environments (e.g. sea salt corrosion).2.1.10 Damage caused by water affecting the Bosca fire. 2.1.11 Operation of the Bosca fire without its baffles, fire bricks, door seals, complete glass doors in place or partly open doors will create an overfired situation resulting in damage, which will not be covered by warranty.
2.1.12 Bosca wood fires are painted with high temperature porous paint that will show signs of surface rust if exposed to moisture for an extended period of time. Retail Links reserve the right to prep and paint a brand new fire that has just been delivered rather than supplying a new fire in the rare event any rust is present. Any subsequent rust damage is not covered by warranty.2.1.13 This warranty does not cover paint blemishes or imperfections because of the uneven nature of high temperature paint. A spray can of touch up Bosca paint is available and can be purchased from your Bosca dealer.2.1.14 Where any incidental or consequential damage and act of God occurs.
3.0 Other Bosca Warranty Conditions3.1 No dealer, distributor, or similar person has the authority to warrant Bosca products beyond the terms contained in this warranty.3.2 This warranty is automatically voided if the appliance’s serial number has been removed or altered in anyway.3.3 Any differences in fireplace appearance from Bosca promotional images that is due to printing limitations, environmental factors or wood variations are not a warranty issue.3.4 Where you make a claim under this warranty, an authorised repairer may need to attend your premises to inspect the Bosca product. Retail Links may charge you a service call fee if a repairer will be required to travel more than 30 km from the nearest service centre to your location. You can obtain details on the location of service centres and service call fees by visiting the. Bosca web site or calling the customer care line below
4.0 Warranty Claims4.1 If you make a valid claim under warranty and none of the exclusions set out in section 2 and 3 apply, Retail Links will, at Retail Links`s election either:4.1.1 Repair the relevant part of the Bosca product; or4.1.2 Replace the relevant part of the Bosca product with a product of identical specification (or where the product is superseded or no longer in stock, with a product of as close a specification as possible).
5.0 How to make a warranty claim 5.1 To make a valid claim under this warranty, you must:5.1.1 Lodge the claim through the dealer who supplied the fire, as soon as you first become aware of the breakdown. The Bosca Dealer will then follow Retail Links’s warranty claim process.5.1.2 Provide the Bosca product serial number.5.1.3 Provide reasonable proof of purchase for the Bosca product.5.1.4 If required, provide access to the premises at which the Bosca product is located (so it can be inspected).
New Zealand Bosca Distributor Filing a Claim
RETAIL LINKS LTD7 FORESTS ROADSTOKE, NELSON 7011, NEW ZEALANDPh: 03-547 0770WWW.BOSCA.CO.NZ
Contact the dealer you purchased the fire from.