Embed Size (px)
Citation preview
©2016-2017 Image Access GmbH, all rights reserved. Reproduction in any form is prohibited. Scan2Net®, Bookeye® and WideTEK® are registered trademarks of Image Access, all other trademarks are the property of their respective owners.
Frequently Asked Questions
Integrating Billing Systems
Abstract Image Access scanners always include a PC running under Linux. The system can communicate with
user identification servers; databases or simple external card readers to charge the scanning and
transferal of the images. The option “Journal / Billing” can be purchased through our portal
https://portal.imageaccess.de. The communication to many third party billing systems is integrated in
the Scan2Net® software including: Showmäcker, Intercard, Copytron, Emos Pharos and Cartadis. Also,
we have developed our own integration for systems like Internal; Journal and the Mifare 2 billing
modules.
Title Integrating Billing Systems
Revision 1.1
Date: 28.07.2017
Category FAQ
Owner Image Access GmbH, Germany
Authors AKU, JMO

FAQ: Billing Systems Page 2 of 45
1. Confidentiality
Status Interested Party Source PDF
Public Information Image Access Support Yes Yes
Authorized Service Providers No Yes
Image Access Customers No Yes
2. Revision History
Date Rev. Name Description of Change Reason for Change
07.07.2016 1.0 AKU Initial Version
27.02.2017 1.0 DI Initial version corrections Text correction
28.07.2017 1.1 TI Minor formatting changes Formatting
04.10.2017 1.2 AKU Additional Billing System Additional Billing System added
3. Table of Contents
1. Confidentiality ........................................................................................................................... 2
2. Revision History ......................................................................................................................... 2
3. Table of Contents ....................................................................................................................... 2
Table of Figures ............................................................................................................................. 6
4. Purpose ..................................................................................................................................... 8
5. Scope ......................................................................................................................................... 8
6. Terms and Definitions ................................................................................................................ 8
7. Introduction............................................................................................................................... 8
8. General Information about Billing .............................................................................................. 9
9. Purchasing the Journal / Billing Key .......................................................................................... 10
Purchasing the Option Key for Journal / Billing ......................................................................... 10
Log on to the Customer Service Portal ...................................................................................... 10
Initiate Purchase of Journal / Billing Key ................................................................................... 10
10. Integrated Billing Modules ....................................................................................................... 11
11. Setting Up the Scanner for Journal / Billing ............................................................................... 12
Log On to the Scanner ....................................................................................................... 12
Activate Software Key ....................................................................................................... 12
Billing Module Login Level................................................................................................. 13
Select the Billing Module .................................................................................................. 13
12. Set Up Billing Module Internal .................................................................................................. 14

FAQ: Billing Systems Page 3 of 45
About Internal Billing ........................................................................................................ 14
Requirements ................................................................................................................... 14
Compatible Applications ................................................................................................... 14
Internal Billing Interface Menu .......................................................................................... 14
Set Provider Data .............................................................................................................. 15
Edit Charges ..................................................................................................................... 16
Usage Analysis .................................................................................................................. 16
Locked / Unlocked Screens................................................................................................ 17
Create Invoice .................................................................................................................. 19
Invoice ............................................................................................................................. 20
13. Set Up Billing Module Journal ................................................................................................... 21
About Journal .............................................................................................................................. 21
Requirements .............................................................................................................................. 21
Compatible Applications ............................................................................................................. 21
Interface Menu ............................................................................................................................ 21
Show Journal ............................................................................................................................... 21
Journal Setup ............................................................................................................................... 22
Journal Path configuration .......................................................................................................... 22
Journal Template ......................................................................................................................... 22
14. IAC Voucher (Special Customer Solution) .................................................................................. 23
Software Download ..................................................................................................................... 23
Firmware-Installation .................................................................................................................. 23
Installation of RSL Touchscreen App ........................................................................................... 23
Firmware Setup ........................................................................................................................... 23
Deactivation of QR code on BE4 main monitor ........................................................................... 23
Deactivation of main touch screen disclaimer text ..................................................................... 23
Billing Key Check .......................................................................................................................... 24
Activation of Voucher Billing Module .......................................................................................... 24
Setup of Billing Module (IAC Voucher 1) ..................................................................................... 24
Check RSL App UseHTLM ............................................................................................................. 24
Unmark all other apps from Show .............................................................................................. 24
Edit of GUI and Translation on the Scanner ................................................................................ 25
8. Option: ..................................................................................................................................... 25
9. Option: ..................................................................................................................................... 25

FAQ: Billing Systems Page 4 of 45
10. Option: ................................................................................................................................... 25
15. Set Up Billing Module Emos Pharos .......................................................................................... 26
About Emos Pharos ..................................................................................................................... 26
Requirements .............................................................................................................................. 26
Compatible Applications ............................................................................................................. 26
Select the Billing Module ............................................................................................................. 26
List of Charges ............................................................................................................................. 27
Setup ............................................................................................................................................ 28
Edit Charges ................................................................................................................................. 29
16. Set Up Billing Module Intercard AS3400 .................................................................................... 30
About Intercard AS3400 .............................................................................................................. 30
Requirements .............................................................................................................................. 30
Intercard AS3400 Interface Menu ............................................................................................... 30
AS3400 Setup .............................................................................................................................. 30
Test Device .................................................................................................................................. 31
17. Set Up Billing Module CTM 5020/ CA3020 / CA3030 .................................................................. 32
About CTM5020 / CA3030 / CA3030 ........................................................................................... 32
Requirements .............................................................................................................................. 32
Compatible Applications ............................................................................................................. 32
Interface Menu ............................................................................................................................ 32
CTM Setup ................................................................................................................................... 33
Setting Prices with Copytron CTM5020 Modul ........................................................................... 34
Test Device .................................................................................................................................. 35
18. Set Up Billing Module Copytron CA3030/3020 IP Networking .................................................... 35
About Copytron CA3030/3020 .................................................................................................... 35
Requirements .............................................................................................................................. 35
Compatible Applications ............................................................................................................. 35
Interface Menu ............................................................................................................................ 35
Device Status ............................................................................................................................... 36
Card Data ..................................................................................................................................... 36
Setup ............................................................................................................................................ 37
List of Charges ............................................................................................................................. 38
Edit Charges ................................................................................................................................. 39
19. Set Up Billing Module Cartadis TC11N ....................................................................................... 40

FAQ: Billing Systems Page 5 of 45
About Cartadis TC11N ................................................................................................................. 40
Requirements .............................................................................................................................. 40
Compatible Applications ............................................................................................................. 40
Interface Menu ............................................................................................................................ 40
TC11N Setup ................................................................................................................................ 41
Test Device .................................................................................................................................. 41
20. Setup Billing Module PaperCut ................................................................................................. 42
About PaperCut ........................................................................................................................... 42
Requirements .............................................................................................................................. 42
Compatible Applications ............................................................................................................. 42
Interface Menu ............................................................................................................................ 42
List of charges .............................................................................................................................. 42
Setup ............................................................................................................................................ 43
Edit Charges ................................................................................................................................. 44
Device Status ............................................................................................................................... 44
Device Status (Mifare) ................................................................................................................. 45

FAQ: Billing Systems Page 6 of 45
Table of Figures
Fig. 1: Journal / Billing Key ........................................................................................................................... 10
Fig. 2: Activating installed options .............................................................................................................. 12
Fig. 3: Entering Option Key .......................................................................................................................... 12
Fig. 4: Billing Module Login Level ................................................................................................................ 13
Fig. 5: Billing Module Selection ................................................................................................................... 13
Fig. 6: Internal Billing Interface Menu ......................................................................................................... 14
Fig. 7: Set Provider Data .............................................................................................................................. 15
Fig. 8: Edit Charges ...................................................................................................................................... 16
Fig. 9: Usage Analysis................................................................................................................................... 16
Fig. 10: Touchscreen Locked ....................................................................................................................... 17
Fig. 11: TFT Locked ...................................................................................................................................... 17
Fig. 12: Touchscreen Unlocked .................................................................................................................... 18
Fig. 13: TFT Unlocked .................................................................................................................................. 18
Fig. 14: Usage Analysis after Scan Job ......................................................................................................... 19
Fig. 15: Invoice ............................................................................................................................................. 20
Fig. 16: Reset Counter / Unlock Scanner for the next Scan Job .................................................................. 20
Fig. 17: Interface Menu Journal ................................................................................................................... 21
Fig. 18: View Journal .................................................................................................................................... 21
Fig. 19: Journal Path .................................................................................................................................... 22
Fig. 20: Journal Setup .................................................................................................................................. 22
Fig. 21: Emos Pharos Interface .................................................................................................................... 26
Fig. 22: List of Charges ................................................................................................................................. 27
Fig. 23: Pharos Setup ................................................................................................................................... 28
Fig. 24: Edit Charges .................................................................................................................................... 29
Fig. 25: Intercard AS3400 Interface ............................................................................................................. 30
Fig. 26: AS3400 Setup .................................................................................................................................. 30
Fig. 27: Test Device ...................................................................................................................................... 31
Fig. 28: CTM 5020 CA3030/3020 Interface ................................................................................................. 32
Fig. 29: CTM Price Level Setup .................................................................................................................... 33
Fig. 30: Test Device ...................................................................................................................................... 35
Fig. 31: CA3030/3020 Network Interface Menu ......................................................................................... 35
Fig. 32: Device Status ................................................................................................................................... 36
Fig. 33: Card Data ........................................................................................................................................ 36
Fig. 34: IP Setup ........................................................................................................................................... 37
Fig. 35: List of Charges ................................................................................................................................. 38
Fig. 36: edit Charges .................................................................................................................................... 39
Fig. 37: Interface Menu ............................................................................................................................... 40
Fig. 38: TC11N Setup ................................................................................................................................... 41
Fig. 39: Test Device ...................................................................................................................................... 41
Fig. 40: Interface Menu ............................................................................................................................... 42
Fig. 41: List of Charges ................................................................................................................................. 43
Fig. 42: Setup ............................................................................................................................................... 43
Fig. 43: Edit Charges .................................................................................................................................... 44
Fig. 44: Communication Test ....................................................................................................................... 44

FAQ: Billing Systems Page 7 of 45
Fig. 45: Device Status Mifare ....................................................................................................................... 45

FAQ: Billing Systems Page 8 of 45
4. Purpose
The purpose of this document is to answer frequently asked questions about how to configure a “Billing
Module” in the Scan2Net software and how to work with the active billing functionalities.
5. Scope
The scope of the document includes all Scan2Net Bookeye scanner with an active “ Journal / Billing”
option key. The firmware versions covered by this document are 6.xx and higher.
6. Terms and Definitions
Term Description, Meaning
Scan2Net Technology from Image Access implemented in many scanners. More at: www.imageaccess.de/?page=SoftwareScan2Net
CSP CSP, which stands for Image Access Customer Service Portal.
Bookeye Book scanners. More at: http://www.imageaccess.de/?page=ScannersBookscanner&lang=en
Journal A record where all transactions are entered
Billing To cash out for a provided service
Debit Card A payment card that deducts money directly from a consumer’s checking account to
pay for a purchase.
Credit Card A payment card with a credit line for purchases.
Cost Center The cost center which tracks all payment transactions of a department.
Database A storage of data from any application.
Multiple User Management
An option to assign rights to each individual user
7. Introduction
The target audience for this FAQ document is the administrator of a Scan2Net scanner and the
administrator of the billing system. The administrator should have experience setting up and configuring
the Scan2Net interface.
The document will provide a guideline to:
• Purchase the Journal / Billing Key
• Understand general information about billing
• Integrated billing modules in the Scan2Net software
• Select the billing module in the Scan2Net interface
• Setup the billing module
• Requirements for the module
• Difference between Debit, Credit and Cost Center card
• List of charges

FAQ: Billing Systems Page 9 of 45
8. General Information about Billing
The billing system is important to charge a user for the scan job itself but also the image transferal to a
target in a public area or a department of a company. The most popular application for a billing system is
a copier with a coin box. When enough money is inserted in the coin box, the copier will be unlocked and
can be used to make a certain number of copies. After the copy job, or when the money has been used
up, the copier is locked again. The Image Access scanners use the same functionality for scanning and
transferring of the images. In the following document, the various possibilities integrated in the
respective billing modules are described in detail.

FAQ: Billing Systems Page 10 of 45
9. Purchasing the Journal / Billing Key
Purchasing the Option Key for Journal / Billing
Log on to the Customer Service Portal
In order to use Journal / Billing, you must first log on to the Image Access Customer Service Portal at
https:\\portal.imageaccess.de and purchase a key to activate the software on your scanner.
Select the menu item Actions.
Initiate Purchase of Journal / Billing Key
Select the item Software Options.
Enter the serial number of the scanner.
Select Journal / Billing from the list of available options by checking the checkbox.
Fig. 1: Journal / Billing Key
After confirming the purchase, the key and an invoice for the purchase will be sent to the email
registered on the Customer Service Portal.

FAQ: Billing Systems Page 11 of 45
10. Integrated Billing Modules
Scan2Net Modul Third Party Modul
Internal Schomäcker QPilot
Journal ЭЛАР ССС (Special Customer Solution)
Mifare 1 (Special Customer Solution) ЭЛАР НЕБ (Special Customer Solution)
Mifare 2 Emos Pharos
Voucher Intercard CM3883
Intercard AS3400
Copytron CA3020 / CA3030 / CTM5020
Copytron CA3020 / CA3030 - IP Networking
Cartadis TC11N
Infineer 6255
PaperCut
Argos Sepialine

FAQ: Billing Systems Page 12 of 45
11. Setting Up the Scanner for Journal / Billing
Log On to the Scanner
Log on to the scanner as the Poweruser.
Username / Password = Poweruser
Activate Software Key
In the menu area Updates & Uploads click the button Installed Options.
Fig. 2: Activating installed options
Enter the key for the Journal / Billing which was sent to you via email. You may copy and paste it out of
the PDF but be aware that no extra blanks should be copied. Confirm by clicking the Apply button. The
text in the line will change from red to green.
Fig. 3: Entering Option Key
Back to Setup Menu returns you to the Setup Menu.

FAQ: Billing Systems Page 13 of 45
Billing Module Login Level
If the key for the option Billing and Authentication is installed, the Setup Device login level page will
show two additional login level button.
Fig. 4: Billing Module Login Level
Select the Billing Module
After logging in, select your “Billing Module” from the drop down list.
If Auto Lock is enabled, the scanner will be locked automatically when no user is authenticated.
The Terminal ID field will be described detailed in the Module Setup.
Fig. 5: Billing Module Selection

FAQ: Billing Systems Page 14 of 45
12. Set Up Billing Module Internal
About Internal Billing
Internal billing is an integrated remote control function of the Scan2Net System. In order to bill for each
scan job prepared for every customer, an operator must unlock the scanner and activate the billing
module.
Requirements
Scan2Net Keys = Journal / Billing
Desktop PC with a browser
Cashier with cash register
Compatible Applications
ScanWizard and HTML Applications
Internal Billing Interface Menu
If Internal Billing is chosen, you will see five Option Buttons
Fig. 6: Internal Billing Interface Menu

FAQ: Billing Systems Page 15 of 45
Set Provider Data
This data is important for the invoice generated after your customer´s scan job. Please enter your
company data in the fields.
Fig. 7: Set Provider Data

FAQ: Billing Systems Page 16 of 45
Edit Charges
Choose the button “Edit Charges” to set up the costs for your provision options. Please edit the currency,
decimal mark and VAT for your country. With the +/- 0,01; 0, 10; 1 buttons you can in / decrease your
charges for the necessary options.
Fig. 8: Edit Charges
Usage Analysis
The menu “Usage Analysis” shows all counters of the provision options and the total price of the actual
scan job. To start a new scan job, click the “Unlock Scanner” button. If the scanner is unlocked, the
status dialog shows the current setting.
Fig. 9: Usage Analysis

FAQ: Billing Systems Page 17 of 45
Locked / Unlocked Screens
Unlock the scanner prior to use. If the scanner is locked, the touchscreen shows the message “Locked”.
See the picture below. When the administrator unlocks the scanner, the scan application is unlocked and
can be used. Please refer to the following pictures.
Fig. 10: Touchscreen Locked
Fig. 11: TFT Locked

FAQ: Billing Systems Page 18 of 45
Fig. 12: Touchscreen Unlocked
Fig. 13: TFT Unlocked

FAQ: Billing Systems Page 19 of 45
Create Invoice
After finishing the scan job, the menu “Usage Analysis” shows the scan counter and the costs of the
provided options that were used by the customer. To create an invoice, click on the “Invoice” button.
Fig. 14: Usage Analysis after Scan Job

FAQ: Billing Systems Page 20 of 45
Invoice
The Invoice shows the costs including VAT of the last scan job. The button “Print Invoice” allows printing
the current invoice.
Fig. 15: Invoice
Go to the “Usage Analysis” Menu to reset the Counter and to start a new Scan-Job.
Fig. 16: Reset Counter / Unlock Scanner for the next Scan Job

FAQ: Billing Systems Page 21 of 45
13. Set Up Billing Module Journal
About Journal
The Journal Billing is an integrated Scan2Net module that logs the scan jobs in a generated text file. The
scanner can´t be locked.
Requirements
Scan2Net Keys = Journal / Billing
Desktop PC with a browser
Compatible Applications
ScanWizard; HTML Applications
Interface Menu
If Journal Billing is chosen you will see 2 Buttons.
Fig. 17: Interface Menu Journal
Show Journal
Here is the Journal listed of the scan jobs. The text entry is configurable at the “Journal Setup”.
Fig. 18: View Journal

FAQ: Billing Systems Page 22 of 45
Journal Setup
Journal Path configuration
In the drop down menu are all transfer options listed for the journal.
Fig. 19: Journal Path
Journal Template
The text entry of the Journal is configurable with the Template entry, for more information open the
Wildcards character menu.
Fig. 20: Journal Setup

FAQ: Billing Systems Page 23 of 45
14. IAC Voucher (Special Customer Solution)
Software Download
Please download the file “RSL.zip” from the Image Access FTP directory at the customer service portal at
http://portal.imageaccess.de
The zip file contains the following files:
Scan2Net firmware 6.30Cxx: s2nfirm-6.30Crcxx.zip
RSL App: RSLTestApp.zip
DesignJavaGUI: V2.30-b16_DesignJavaGUI_2014_10_16.zip
A file with a short screen description of the RSL APP: 2014-10-16 short screen description RSL APP.docx
2014-10-16 RSL_Self_Scanning_Solution_Installation_and_Setup.docx
Firmware-Installation
Upload the Scan2Net Firmware 6.30C with s2nfirm-6.30C.zip
Installation of RSL Touchscreen App
Upload the java app "RSLTestApp.zip" via DesignJavaGUI.exe
Firmware Setup
In Scan2Net / Setup Device / Enter your login level: Poweruser
Deactivation of QR code on BE4 main monitor
Location: Scan2Net / Setup Device / Poweruser / Base Settings/ Touchscreen / Desktop Screen /
Set: Show QRCode: No
Deactivation of main touch screen disclaimer text
Location: Scan2Net / Setup Device / Poweruser / Administrative Settings / Edit Disclaimer Text /
Select: Target User: "default"
Set: Enable disclaimer text?: No

FAQ: Billing Systems Page 24 of 45
Billing Key Check
Now check the status of the required and activated Scan2Net software option key "Journal/Billing
Module"
Location: Scan2Net / Setup Device / Poweruser / Updates & Uploads / Installed Options / Journal/Billing
Module
If there is no key listed, get one from the Customer Service Portal, where you are able to purchase the
dedicated option key.
Upload the dedicated key to the installed options as described above.
Activation of Voucher Billing Module
Location: Scan2Net / Setup Device / Journal/Billing Module (Username and Password are “Billing”) /
The “Setup” interface opens.
Please set the following entries:
Set: Auto Lock: No
Select Billing Module: IAC Voucher 1
Select: Terminal ID: Range: 0 - 99 (After changing the module, a reboot is required)
Setup of Billing Module (IAC Voucher 1)
Location: Scan2Net / Setup Device / Journal/Billing Module / Setup / Billing Module (IAC Voucher 1) /
Edit Charges
Required: Currency: Ruble
Required: Scan: Set a price for a Scan
Check RSL App UseHTLM
Location: Scan2Net / Setup Device / Poweruser / Base settings / Touchscreen GUI /
Unmark all other apps from Show
Location: Scan2Net / Setup Device / Poweruser / Base settings / Touchscreen GUI/

FAQ: Billing Systems Page 25 of 45
Edit of GUI and Translation on the Scanner
For the “ScannAppConf” only the currently activated language can be changed.
8. Option:
To edit the dialogue texts of the RSL app on the scanner, please use the following link:
Scanner-IP/EditSSSLokalisation.php
The basic dialogs for the IAC Voucher solutions are:
Welcome
VoucherLanguageChoice
Voucher (Change text for button 1 from "Scan bar code" to "Print voucher")
EndWork
VoucherRules
WrongBarCode
9. Option:
To edit the text translation in the RSL app of the ScanAppConf please use the following link:
Scanner-IP/ScanAppConfLokalisation.php
10. Option:
To restart the touchscreen application please use the following link:
Scanner-IP/cgi/start-kiosk?restart

FAQ: Billing Systems Page 26 of 45
15. Set Up Billing Module Emos Pharos
About Emos Pharos
The Emos Pharos billing solution is a network based server system, with a user identification on the
scanner.
Requirements
Scan2Net Keys: Journal / Billing
Pharos Server Software
Pc or server for the Emos Pharos application
Compatible Applications
Java / HTML applications
Select the Billing Module
Select the Pharos billing module
The “Terminal ID” is the “Side Code” of the Pharos system, for example: edi123
Fig. 21: Emos Pharos Interface
With the buttons “List of Charges”; “Setup”; “Edit Charges” you can open other menus or a status
information screen.

FAQ: Billing Systems Page 27 of 45
List of Charges
Here the prices for the options are displayed.
Fig. 22: List of Charges
Click the button “Print List” to print the list.
Click the button “Edit Charges” to change the prices for all provided options.
Click “Back” to return to the Billing General Setup window.

FAQ: Billing Systems Page 28 of 45
Setup
Address : : Enter the IP Address of the Pharos Server
Port : Enter the communication Port of the connection
Side Code : Enter the Pharos Site Code
Terminal : Enter the Pharos Terminal
Printer 1-4 : Choose your System Printer
Click on one of the “Setup” buttons to edit your print templates.
For more information about printer installation refer to the Operation Manual of the scanner.
Fig. 23: Pharos Setup

FAQ: Billing Systems Page 29 of 45
Edit Charges
Click the button “Edit Charges” in order to define the costs for your provision options.
Please edit the currency, the kind of decimal mark and the VAT for your country.
The buttons +/- 0,01, 0,10 and 1,00 allow you to increase or decrease the charges for the offered
options.
With the button “List of Charges” return to the former menu.
The button “Print List” prints the list as displayed at the screen.
Fig. 24: Edit Charges

FAQ: Billing Systems Page 30 of 45
16. Set Up Billing Module Intercard AS3400
About Intercard AS3400
The Intercard is a klick interface based card reader. This system is using debit cards to bill the jobs on the
scanner.
Requirements
Scan2Net Keys: Journal Billing
Intercard AS3400 card reader
Intercard AS3400 Interface Menu
The menu shows you two additional buttons for setting up and testing the billing system.
Fig. 25: Intercard AS3400 Interface
AS3400 Setup
The setup menu is for configuring the price level for the provided options. Price level : A4; 2xA4; 3xA4;
A3; 2x A3; 3xA3 are supported. The list can be printed with the “Print List” button.
Fig. 26: AS3400 Setup
FAQ: Billing Systems Page 31 of 45
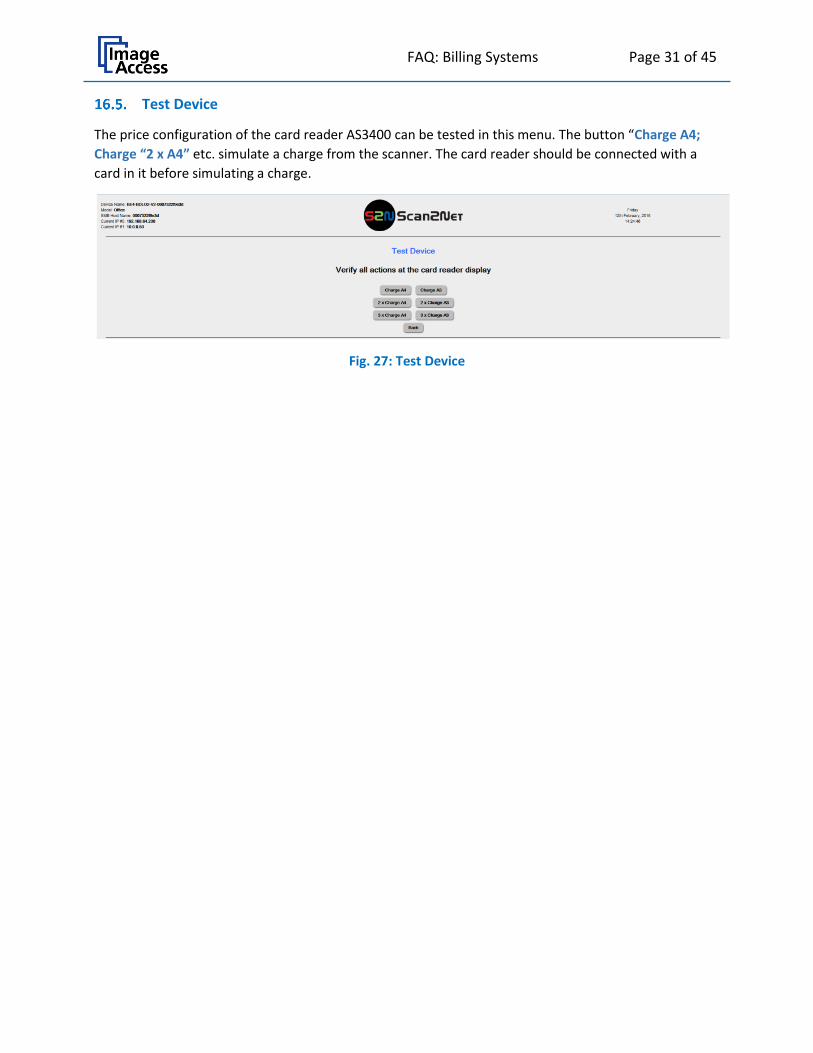
Test Device
The price configuration of the card reader AS3400 can be tested in this menu. The button “Charge A4;
Charge “2 x A4” etc. simulate a charge from the scanner. The card reader should be connected with a
card in it before simulating a charge.
Fig. 27: Test Device

FAQ: Billing Systems Page 32 of 45
17. Set Up Billing Module CTM 5020/ CA3020 / CA3030
About CTM5020 / CA3030 / CA3030
The CTM5020 is a simple coin box controlled via a simple click interface which requires a low level of
administration. If the money value is to less than required, the scanner will lock. After inserting more
money, the scan job will reactivate.
The module CA3030 / CA3020 is a card reader controlled via click interface, the workflow is the same as
the CTM5020.
Requirements
Scan2Net Keys: Journal Billing Key
Coin box CTM5020 or a CA3030 / 3020 card reader
Compatible Applications
JAVA / HTML applications
Interface Menu
This menu shows you two additional buttons for setting up and testing the billing system.
Fig. 28: CTM 5020 CA3030/3020 Interface

FAQ: Billing Systems Page 33 of 45
CTM Setup
Setup is used to configure the price level for the provided options. Price levels: A4; A4 Duplex; A3; A3; A3
Duplex; A4 Special Format; A4 Special Format Duplex; A3 Special Format; A3 Special Format Duplex are
supported. The list can be printed with the “Print List” button.
Fig. 29: CTM Price Level Setup

FAQ: Billing Systems Page 34 of 45
Setting Prices with Copytron CTM5020 Modul
To activate the setup for setting prices on the CTM5020, open the front of the CTM5020 with the
key.
Apprximately in the middle, there are four keys.
Press the red key first, then hold the three keys „+“; „-“ and the yellow key until the display no
longer changes.
With the „+“ and „-“ keys, change between the menu items. With the yellow key, you can select a
menu. With the „+“ and „-“ keys, you can change the values in a selected menu.
Pressing the yellow key again moves you to the next menu item.
Press the red key to leave the menu.
A configuration example:
• Preiseinstellungen = price configuration o Preis A4 = price A4……………………………………..0,1 o Preis A3 = price A3………………………………………0,2
FAQ: Billing Systems Page 35 of 45
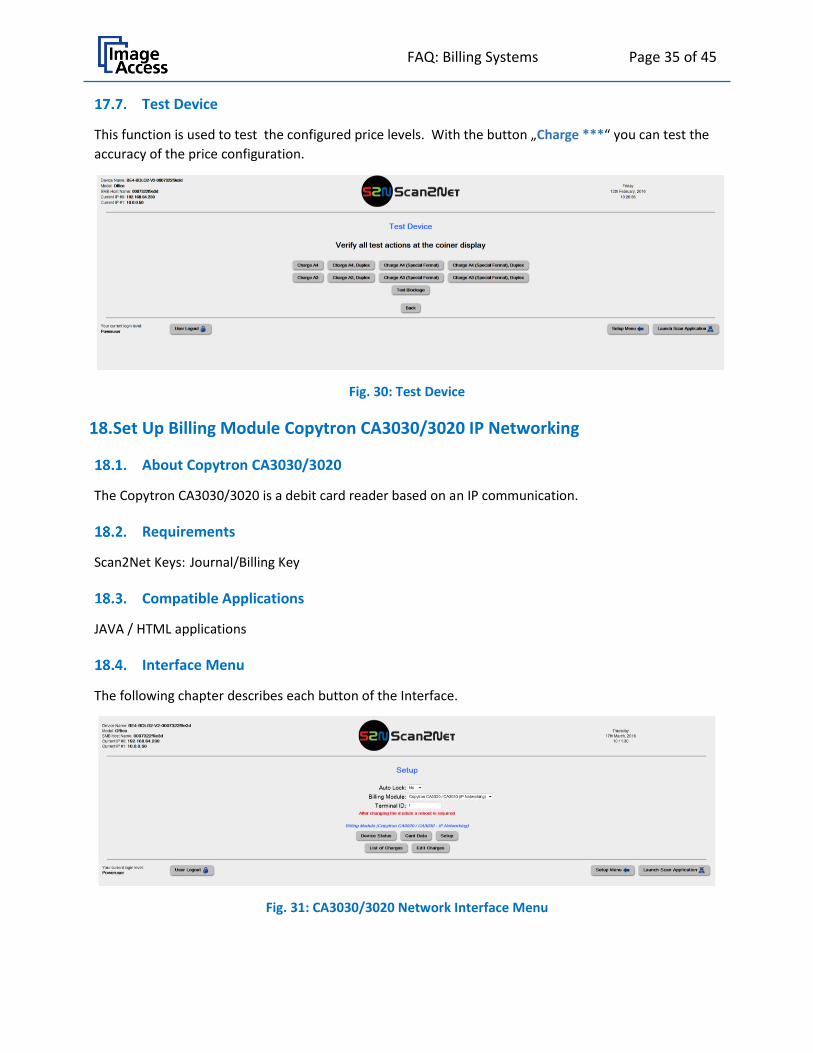
Test Device
This function is used to test the configured price levels. With the button „Charge ***“ you can test the
accuracy of the price configuration.
Fig. 30: Test Device
18. Set Up Billing Module Copytron CA3030/3020 IP Networking
About Copytron CA3030/3020
The Copytron CA3030/3020 is a debit card reader based on an IP communication.
Requirements
Scan2Net Keys: Journal/Billing Key
Compatible Applications
JAVA / HTML applications
Interface Menu
The following chapter describes each button of the Interface.
Fig. 31: CA3030/3020 Network Interface Menu

FAQ: Billing Systems Page 36 of 45
Device Status
The menu “Device Status” shows the device status information.
To print this information, click the “Print List” button.
If a card is inserted in the card reader, the line “Device Status” shows the current status.
Click the “Logout & Eject Card” button to close the menu “Device Status” windows and to return to the
“Setup Menu”.
Fig. 32: Device Status
Card Data
Card Data displays information about “Card Type”; “Card Serial” and “Card Value”.
The card has to be inserted into the card reader to get the information.
Fig. 33: Card Data

FAQ: Billing Systems Page 37 of 45
Setup
First, enter the IP address of the Copytron CA3030.
Click the link “Communication Test” to check the connection between the scanner and the billing
module.
Fig. 34: IP Setup

FAQ: Billing Systems Page 38 of 45
List of Charges
This list shows all provided options and the price per use.
To print this information, click the “Print List” button.
"Edit charges" opens a further menu where the costs for each listed action can be changed.
Click “Back” to return to the “Setup Menu”.
Fig. 35: List of Charges
FAQ: Billing Systems Page 39 of 45
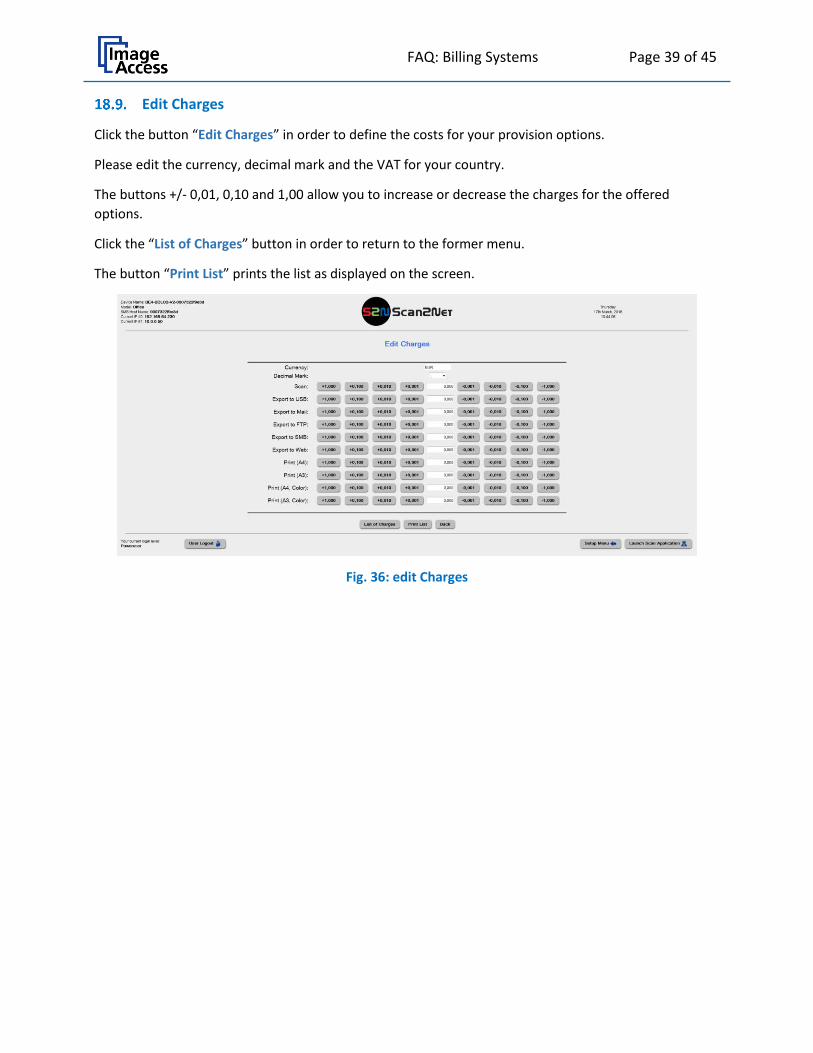
Edit Charges
Click the button “Edit Charges” in order to define the costs for your provision options.
Please edit the currency, decimal mark and the VAT for your country.
The buttons +/- 0,01, 0,10 and 1,00 allow you to increase or decrease the charges for the offered
options.
Click the “List of Charges” button in order to return to the former menu.
The button “Print List” prints the list as displayed on the screen.
Fig. 36: edit Charges

FAQ: Billing Systems Page 40 of 45
19. Set Up Billing Module Cartadis TC11N
About Cartadis TC11N
Cartadis TC11N is a modern prepaid card system, which can be used with all standard copiers and
printers. Devices which are outfitted with a Cartadis TC11N can only be used after a valid prepaid card is
inserted. Each copy made reduces the credit available on the card until it is used up. Cartadis prepaid
cards are formatted in a similar way as ATM and credit cards. The cards use a secure HICO technology
andare available in two variations: as a prepaid card that can be reloaded with funds and as a disposable
prepaid card, good for only the amount of money on the card. Both card types are delivered as blanks,
meaning that the value information is added later, using an administration card an any TC11N. The
administration card allows the system administrator access to all TC11N device settings as well as to load
money on the card.
Requirements
Scan2Net Keys: Journal/Billing Key
Cartadis TC11N card reader
Compatible Applications
JAVA/HTML applications
Interface Menu
This menu shows you two additional buttons for setting up and testing the billing system.
Fig. 37: Interface Menu

FAQ: Billing Systems Page 41 of 45
TC11N Setup
Setup is for configuring the price levels of the provided options. The supported price levels are visible in
the drop down menu of the options. Click on the arrow to show the drop down menu.
The button “Print List” prints the list as displayed at the screen.
The Button “Back” returns to the “Setup Menu”
Fig. 38: TC11N Setup
Test Device
This menu is for testing the “Price Level”. Press the buttons to check the configured price levels.
A card with enough credits should be inserted in the card reader. The card reader will show you the
value of the credits.
Fig. 39: Test Device

FAQ: Billing Systems Page 42 of 45
20. Setup Billing Module PaperCut
About PaperCut
The PaperCut billing solution is a network based server system, with a user identification via Mifare cards
on the scanner.
Requirements
Scan2Net Keys: Journal/Billing Key
Card reader: 13.56MHz RFID Reader SL500
PaperCut MF Server
Compatible Applications
ScanWizard
Interface Menu
The following chapter describes each button of the Interface.
Fig. 40: Interface Menu
List of charges
This list shows all provided options and the price per use.
To print this information, click the “Print List” button.
"Edit charges" opens a further menu where the costs for each listed action can be changed.
Click “Back” to return to the “Setup Menu”.

FAQ: Billing Systems Page 43 of 45
Fig. 41: List of Charges
Setup
Address : : Enter the IP Address of the PaperCut Server
Port : Enter the communication Port of the connection
Auth Token : Enter the Auth Token of the PaperCut Server
SMB Configuration : Edit the SMB template with the “Setup” burron
Communication Test : Test the Communication to the PaperCut server
Click on the “Setup” button to edit your SMB template.
For more information about SMB configuration refer to the SMB FAQ.
Fig. 42: Setup
Info: The Port 9191 should be open in the firewall on the PaperCut server.

FAQ: Billing Systems Page 44 of 45
Edit Charges
Click the button “Edit Charges” to define the costs for your provision options.
Please edit the currency, decimal mark and the VAT for your country.
The buttons +/- 0,01, 0,10 and 1,00 allow you to increase or decrease the charges for the offered
options.
Click the “List of Charges” button to return to the former menu.
The button “Print List” prints the list as displayed on the screen.
Fig. 43: Edit Charges
Device Status
Click the button “Device Status (PaperCut)” to check the connection between the scanner and the billing
module.
Fig. 44: Communication Test

FAQ: Billing Systems Page 45 of 45
Device Status (Mifare)
Click on the button ”Device Status (Mifare)” to check the connection of the card reader and show the
card serial witch is recently on the reader.
Fig. 45: Device Status Mifare
End of Document