Embed Size (px)
Citation preview

Renaissance & Renewal Descriptions
by Session
FRIDAY #1 HANDS ON 9:10-11:00

Purposeful Printmaking: Sharing Your Voice Through Art Tracy Perry All Levels Come transform a theme you are passionate about into a series of prints. Come explore how artists have used the printmaking method as their voice throughout time. Next, experiment a variety of printing techniques at various stations (monoprint, collagraphy, relief printing, intaglio, silk screen, and stamping) and create a “Print Sample”. Next, select and apply one or more of these techniques to create your print series. Finally, reflect upon your theme in writing to help the viewer understand the purpose of your print. 1. Brainstorm and sketch for planning 2. Explore artists for inspiration 3. Experiment with printmaking techniques 4. Select and apply techniques for final project 5. Reflect and Record your purpose

More than a Still Life Barbara Townsley Elementary This starts with primary color bubble prints. Then you throw in some symmetry. Next you practice paper weaving. The culminating collage still life has a tablecloth, a vase of flowers, and optional fruit. The final touch is to shade the edges of the vase for a more three-dimensional feel. 1. Make 4 bubble prints: b+y+r, b+y, b+r, y+r 2. Cut a symmetrical vase 3. Make a paper weaving with weft strips of bubble prints 4. Collage paper weaving tablecloth and bubble print vase onto wall color paper and add cut flowers and fruit 5. Shade edges of vase with matching crayon or cool shadow color using 3 values

Lover’s Eyes, Mysterious Miniature Portraits Pat Burdette All Levels Begun by a royal secret love, eye portraits were the fashion in the 18th century. Is a portrait of your eye enough to identify you? Students first create a value study of their eye, which is then attached to the top of a tin or pin, and embellished symmetrically with jewels and trinkets. It starts with a great story and ends with a great lesson.
1. Learn about the 18th century fashion and the history behind it 2. Students draw a pencil portrait of their own eye with correct proportion and value 3. The miniature portrait is then attached to the tin, box, or pin 4. A color scheme is chosen for the adornment and attached in a balanced way 5. Glitter glue is finally applied to hold everything in place

Storyteller Dolls Jane Peterson Middle level - Junior High This hands on workshop focuses on the history and importance of Storyteller dolls in the Native American (Pueblo) culture. We will look at the work of contemporary storyteller artist Helen Cordero and her contribution to the reappearance of storytellers in Native American art. Participants will build their own storyteller dolls using traditional hand building techniques and receive a complete lesson plan including: power point presentation, project criteria, rubric, homework assignment, and assessment. Step by step visual aides will be available to assist in teaching the storyteller making process to upper Elementary through Middle school age students. Hand building a storyteller: 1. Using low fire clay, shape an open cylinder and a sphere. 2. Attach sphere to top of open cylinder using the score and attach (slip) method of clay hand building. Insert pencil to form an open mouth. 3. Add arms (coils), legs or feet, three or more small children or animals, and any other desired details using the same method. 4. Dry before bisque firing (04). 5. Once fired, paint the storyteller doll using traditional Pueblo colors using tempera (seal with clear acrylic) or acrylic paints.
Mixing Mixed Media Toni Bigelow High School This workshop will provide the opportunity for experimentation with various media, using watercolor resist and oil and water techniques with various grounds and tools. Each participant will go home with at least 2-3 examples of media for their future use. 1. Introduction to various media and possible results. 2. Demonstration of oil and water technique. 3. Demonstration of collage technique. 4. Student experimentation at various stations, with various media. 5. Show and tell with critique.

Visual Journaling and Bookbinding Barbara Bergstrom High School Construct your own Visual Journal using the technique of traditional Coptic bookbinding. Ideas for content will be shared including 2-D visual entries and considerations for writing. Participants in this workshop walk away with a handmade journal and a handout regarding ways to engage students in the reflective process of visual journaling. 1. Observe bookbinding and visual journaling examples. 2. Cover book-boards to prepare them for front and back covers. 3. Fold paper into groups of signatures for the book's pages. 4. Stitch with the Coptic technique to complete the book’s binding. 5. Practice reflective activity.

Science and Still Life Kelly Martin Middle level - Junior High This still life project starts with learning about scientific field journals and the commonalities and differences between still life drawings and scientific field journals. We will start with a presentation with examples from the history, production, criticism, and aesthetics components of the project, and then actually do realistic still life drawings. Presentation Portion of Workshop: 1. Learn about and look at images from scientific field study journals, and compare and contrast them to still life drawings. 2. Learn and practice the elements and principles my students needed to know for the project (value, form, space, balance) 3. Show examples of final products. Activity Portion of Workshop: 4. Use a viewfinder to select a composition.5. Draw a realistic still life drawing.

A Hunting We Will Go Mary Ambrose Middle level - Junior High How to make a memory box that Joseph Cornell would be proud of and along the way explore the works of Cornell and Lucas Samaras, describe their use of symbols and objects that signify meaning and identity. One added plus to this is the option to define and compile materials that explore their cultural identity. 1. Engage: use of personal items and what they mean to me then ask the students to share among the table what objects they keep and why. 2. Build Knowledge: discussion about symbolism 3. Apply: build a memory box using the technique of assemblage or clean out your supplies. 4. Reflect: How can I make it better, what can I do to portray the meaning behind. 5. Clean up and rubric: self-evaluation.

Sock Buddies Elisabeth Monsma Middle level - Junior High Create your very own Sock Buddy! Using one colorful knee-high sock and one child-size sock learn to cut, sew and stuff a body, embroider a face and attach arms. Extra socks or sock parts are used to create a sweater and stocking cap for your buddy. Participants will master a variety of stitch techniques, including overcast, backstitch, purse stitch and button sewing. Please bring a pair of colorful crew-style socks - the zanier the better! 1. Cut and sew body 2. Cut and sew arms, 3. Stuff body and form neck 4. Stuff and attach arms 5. Make sweater and hat

FRIDAY #2 BEST PRACTICE LECTURE 11:10-12:10

Write Competitive Grants Alex Nelson All Levels This interactive workshop will examine the characteristics of winning proposals and provide information on grant opportunities from the Arizona Commission on the Arts. By taking on the role of "reviewer" in a mock panel, participants will learn how to effectively approach funding opportunities and prepare strong grant applications. Mock Panel Review 1. Engage in "panelist orientation" and overview of grants review process. 2. Read sample grants representing various types of projects. 3. Discuss the sample grants and how they met the review criteria. 4. Discuss the elements found in quality proposals. 5. Learn about strategies to incorporate those elements into your own grant writing.

Fostering Academically Productive Talk that supports the Common Core State Standards through Discussions of Fine Art Images Barbara Place All Levels This presentation presents clear checklists and strategies for helping to foster academically productive talk and discussions in the art classrooms. The strategies are research proven and practical. Each participant will receive a checklist and a list of strategies and examples. They will also view a video of a first grade inner city classroom where the students, 95% of whom come from homes where a language other than English is spoken, engage in the type of evidence-based discussions that are at the heart of the Common Core State Standards. Discussions are based on fine art images and related photos. Participants will leave with sample lessons and a CD with fine art images and real-world photos. 1. Project a fine art image 2. Use "talk moves" or strategies for encouraging students to discuss the image with each other, and use evidence in the image to support their arguments. 3. Guide the discussion, as needed, to ensure coherence, intelligibility, and equitable participation by all students. 4. Introduce Tier 2 academic vocabulary as appropriate. 5. Conclude the lesson by recapping major insights and key vocabulary.

Writing Through Art at the Art Museum Chelsea Farrar All Levels Presentation will discuss how works of visual art can be used to inspire writing with students in the classroom. Literacy skills, as defined by the new Common Core Standards, can be taught through interdisciplinary methods that motivate students to think critically and communicate their ideas effectively. Connections between visual literacy and literacy in writing will be explained. Presentation will also show the "art/write" education program at the University of Arizona Museum of Art. “art/write” is a museum based literacy program that provides teachers with images online as well as writing prompts that are aligned with the English and Language Arts Common Core Standards for high school students. 1.View image 2. Interpret image (discuss as a class) 3. Use graphic organizer to analyze image 4. Pre-write 5. Complete finished piece of writing

Taiwanese Undergraduate Students' Digital Stories From Second Life: Existential Concerns Dr. Mary Stokrocki High School In order to promote cultural understanding, I was curious to discover how Taiwanese students would present their digital story ideas from the virtual world of Second Life as I was teaching an undergraduate semester course in Chiayi Taiwan in real life. Such participant observation in context included information-gathering data, analyzing and interpreting it, and exploring issues. Results revealed frequent themes, such as lonely, funny, and beautiful, and expressive artworks in undergraduate students’ digital stories. Deeper investigation of meanings exposed transformation themes that revealed students' real life existential concerns - life purpose, love, death, and “angst.” Future implications call for more collaboration, social action, and critical thinking. Digital Storytelling Project: A Quest to Find Art Treasure. The major project was to make a digital story PowerPoint Presentation involving a Quest for Art Treasure on the Virtual World of Second Life. Using Sanchez’ (2009) suggestions, we introduced the following considerations: 1. Introduce your avatar character and its role (hero, seeker, detective) at some SL art place. 2. Pose a conflict or quest to find an artwork and its secret details. Focus on one artwork and its form or expressive details. Tell us why you chose it. 3. Include the resolution scene at the same place. Include the name of artist/artwork/SL location-URL, so we can visit it. Change your viewpoint (aerial/worm/close-up) and add special effects. 4. Use a screen capture program to capture story scenes and arrange them in a PowerPoint Presentation and include a creative title. Include contrasting colors—the background needs to be exciting too! Add some character gestures (e.g., running, surprise, crying). 5. Complete pre- and post questionnaires. Using art criticism, evaluate your digital story.
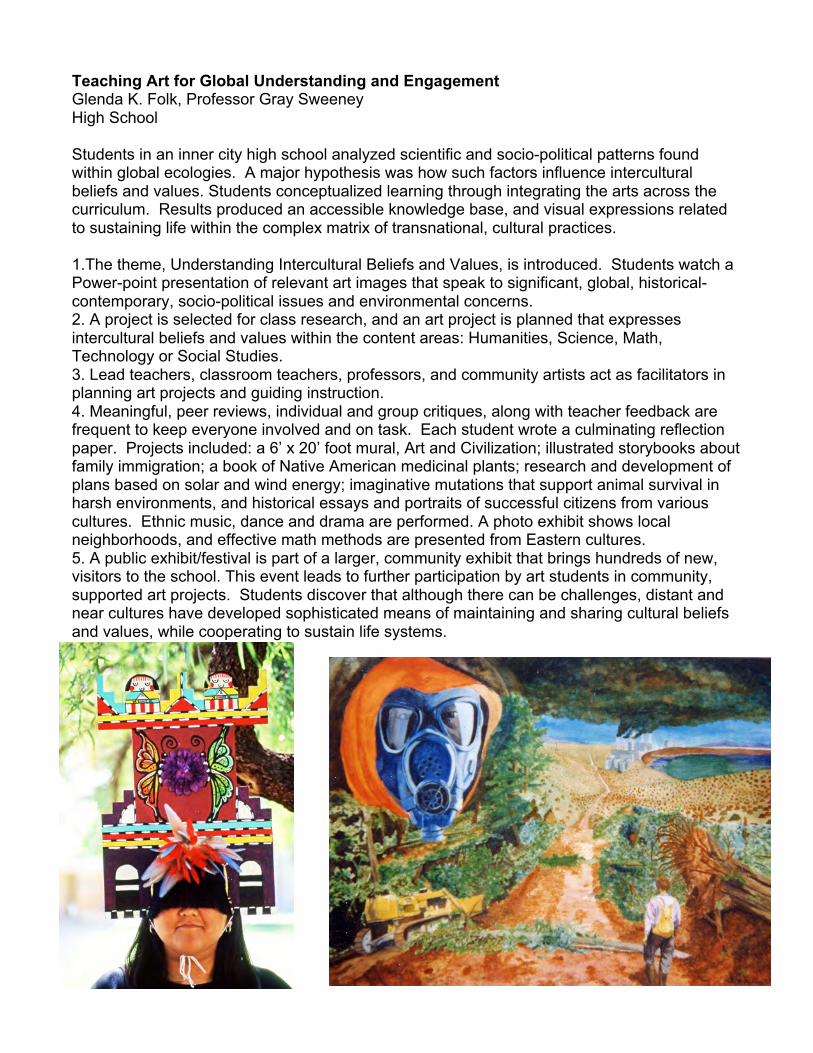
Teaching Art for Global Understanding and Engagement Glenda K. Folk, Professor Gray Sweeney High School Students in an inner city high school analyzed scientific and socio-political patterns found within global ecologies. A major hypothesis was how such factors influence intercultural beliefs and values. Students conceptualized learning through integrating the arts across the curriculum. Results produced an accessible knowledge base, and visual expressions related to sustaining life within the complex matrix of transnational, cultural practices. 1.The theme, Understanding Intercultural Beliefs and Values, is introduced. Students watch a Power-point presentation of relevant art images that speak to significant, global, historical-contemporary, socio-political issues and environmental concerns. 2. A project is selected for class research, and an art project is planned that expresses intercultural beliefs and values within the content areas: Humanities, Science, Math, Technology or Social Studies. 3. Lead teachers, classroom teachers, professors, and community artists act as facilitators in planning art projects and guiding instruction. 4. Meaningful, peer reviews, individual and group critiques, along with teacher feedback are frequent to keep everyone involved and on task. Each student wrote a culminating reflection paper. Projects included: a 6’ x 20’ foot mural, Art and Civilization; illustrated storybooks about family immigration; a book of Native American medicinal plants; research and development of plans based on solar and wind energy; imaginative mutations that support animal survival in harsh environments, and historical essays and portraits of successful citizens from various cultures. Ethnic music, dance and drama are performed. A photo exhibit shows local neighborhoods, and effective math methods are presented from Eastern cultures. 5. A public exhibit/festival is part of a larger, community exhibit that brings hundreds of new, visitors to the school. This event leads to further participation by art students in community, supported art projects. Students discover that although there can be challenges, distant and near cultures have developed sophisticated means of maintaining and sharing cultural beliefs and values, while cooperating to sustain life systems.

Super Session: Common Core, Surviving or Thriving Gretchen A. Boyer, Bettie Lake All Levels Here we go again! First it was state essential skills! Then it was state standards and writing cross the curriculum, to name a few! And now we have Common Core Standards! And the Arts are not included…yet! Or, will they even be? Are you going to a lot of meetings that apparently don’t apply to you? Do you have a lot of extra demands placed upon you that take you away from the art classroom? Some of these issues have been cyclical. Some have been a change in educational jargonize. What makes Common Core different? Why should you not ignore Common Core? What aspects of Common Core can you use to promote your art program that may only require a slight twist in your day? Some aspects may require a new perspective on creativity. What is this perspective? How can you gain clout with your principal, other teachers and maybe even your superintendent and the school/district governing board? These questions and more will be addressed during this super session. Helpful hints for surviving and capitalizing on Common Core, as well as program promotion, will be provided! Super Session: Common Core: Surviving or Thriving!!?? The following questions will be addressed: 1. Why should you not ignore Common Core? 2. What aspects of Common Core can you use to promote your art program that may only require a slight twist in your day? 3. Some aspects may require a new perspective on creativity. What is this perspective? 4. How can you gain clout with your principal, other teachers and maybe even your superintendent and the school/district governing board? 5. What can we do to assist you in answering these questions?

Incorporate the Common Core with Inquiry Mary Erickson, Michelle Nichols-Dock, Jasen Evoy, & Karla Primosch All Levels Looking for ready-to-use art activities that teach the Common Core? The Tempe Center for the Arts' online curriculum offers free, ready-to-print-out worksheets your students can use to develop Common Core skills as they reflect on artworks from wood to glass, from portraits to landscapes, from guitars to cartoons. This inquiry worksheet demonstrates links between the Common Core standards and the visual arts. Lesson plans and PowerPoint presentations are also available online to introduce big ideas and follow though with studio projects related to each Questor Question worksheet. 1. After selecting a Questor Questions worksheet from one of the Tempe Center for the Arts online curriculum units, show the online exhibition preview PowerPoint and ask students to think of questions they could ask to help them better understand the artworks. 2. Distribute copies of the Questor Questions worksheet to small groups of students and ask a volunteer to read aloud the LOOK text on the handout. The group should discuss the LOOK question/s and write responses on the back of the worksheet. 3. Ask a second student in each small group to read aloud the LEARN text and a third student to read aloud the COMPARE text. In their groups, students should share their responses to the LEARN question/s as well as point to and describe similarities and differences in response to the COMPARE questions/s. 4. Ask a student in each group to read aloud the INTERPRET text. Then, using all they've learned and thought about, the group should work together to write their own interpretation of one of the artworks reproduced on the Questor Questions worksheet. Ask them to write a one-sentence interpretation on the back of the Questor Questions worksheet by completing the sentence "This artwork is about…." They should be ready to argue for their conclusion and give evidence to support it when they report to the entire class. 5. Ask members of each group to present their interpretation to the entire class. Student #1 points to and identifies the artwork by artist, title, date, and materials, as available. Student #2 carefully reads the group's interpretation sentence. Remaining students explain how they reached their conclusion and point to evidence that supports it.

Teaching in 21st Century Museums Rory O'Neill Schmitt All Levels If museums are educational institutions, just who is doing the teaching? This dissertation research study uncovers how art museum institutions teach the public about art. This mixed methods study examines how museum educators and curators teach art interpretation to both novice and advanced adult visitors. Through qualitative interviews and surveys, the researcher identifies how art interpretation is currently taught in art museums, which exhibit twentieth and twenty-first century art from their permanent collections. This presentation is based on a research study; there is no lesson plan to provide.

The Other White Cube: The Curatorial Dimensions of Refrigerator Displays Stuart Robinson All Levels Everyone is a collector. Some people collect paintings and others collect bellybutton lint - it's true. Many books and projects have focused on what people collect but rarely have they addressed how collectors display their items. The Other White Cube Project explores one venue on which many people gather, arrange, and share their collections - on the refrigerator. Like a museum, refrigerators display objects of value, from wedding photographs to children's drawings. Even the seemingly unimportant items, such as take-out menus and appointment reminders, say a lot about our lives, personalities, and interests. With 99.5% of households owning at least one, the refrigerator may be the most popular and widely used exhibition space in the United States, and likely elsewhere. The Other White Cube Project has gathered photographs and stories of refrigerator displays from across the United States in an effort to inspire everyday critical thinking, artistic expression, and, ultimately, learning beyond the art classroom. 1. Think about the definition of a curator - a person who selects, organizes, and arranges a collection. Apart from museums, where else may you find a curator? Who do you know that is a curator? 2. Take a photograph of your refrigerator. 3. Answer these questions: why did I choose to hang these items? Why did I choose to put this here and that there? What do these objects say about me, my family, and my culture? 4. Go to theotherwhitecube.com and look at other refrigerator displays. 5. Answer these questions: what do you think this person or these people are like? Can you pinpoint characteristics from the items on their refrigerator? What does their refrigerator say about them?

FRIDAY #3 HANDS ON 1:40-3:30
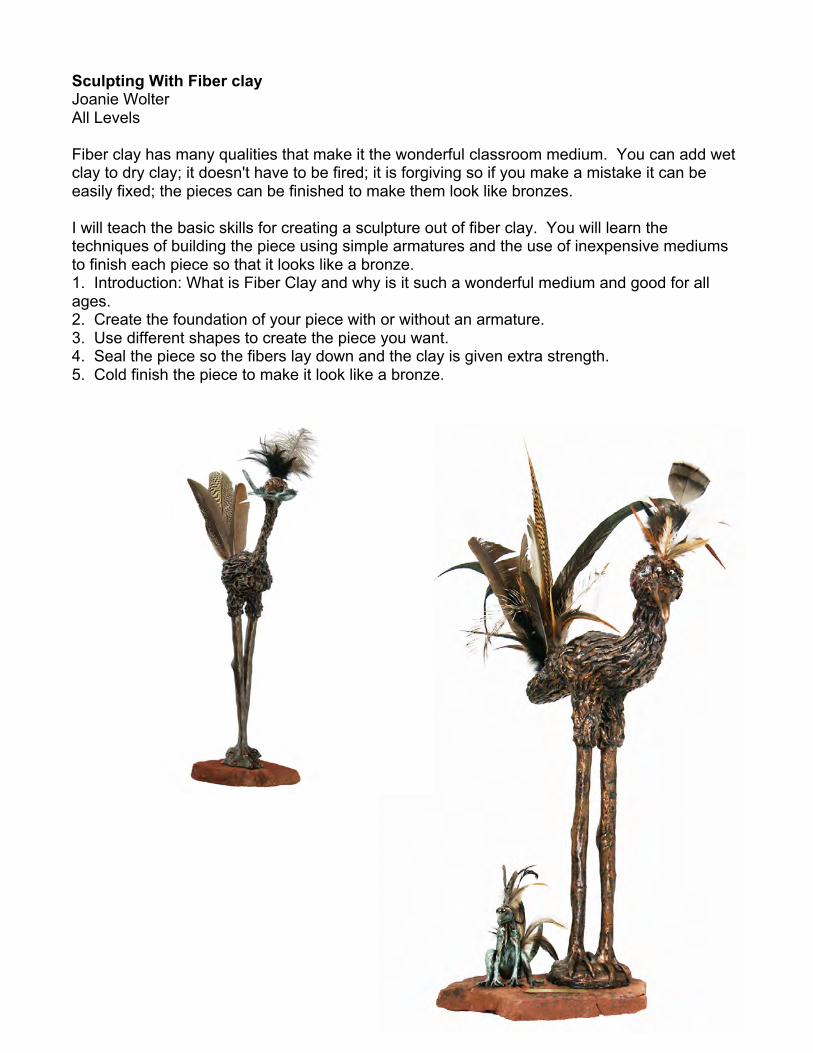
Sculpting With Fiber clay Joanie Wolter All Levels Fiber clay has many qualities that make it the wonderful classroom medium. You can add wet clay to dry clay; it doesn't have to be fired; it is forgiving so if you make a mistake it can be easily fixed; the pieces can be finished to make them look like bronzes. I will teach the basic skills for creating a sculpture out of fiber clay. You will learn the techniques of building the piece using simple armatures and the use of inexpensive mediums to finish each piece so that it looks like a bronze. 1. Introduction: What is Fiber Clay and why is it such a wonderful medium and good for all ages. 2. Create the foundation of your piece with or without an armature. 3. Use different shapes to create the piece you want. 4. Seal the piece so the fibers lay down and the clay is given extra strength. 5. Cold finish the piece to make it look like a bronze.

The Accordion Book and the Illuminated Manuscript Roxie May All Levels Participants will create an accordion book using inexpensive and/or repurposed materials. The accordion book is an ideal format for messages, sayings, lyrics, and quotes. A multimedia approach will be used to embellish or illustrate the text. Concepts can be adapted to any art level. 1. Explore various patterns and approaches to creating accordion books. 2. Select art quotes, song lyrics, sayings to be used in the text. 3. Explore lettering styles and several approaches to "illuminating". 4. Design a sequence for the "pages" of the book. 5. Apply multi-media and collage materials to complete the book.

Zentangle Basics Sherri Lee, CZT All Levels Zentangle is an easy-to-learn, relaxing, and fun way to create beautiful images by drawing structured patterns. Almost anyone can use it to create beautiful images. It increases focus and creativity, provides artistic satisfaction along with an increased sense of personal wellbeing. The Zentangle method is enjoyed all over this world across a wide range of skills, interests and ages. I, as well as other trained CZTs (Certified Zentangle Instructors) believe that life is an art form and that our Zentangle method is an elegant metaphor for deliberate artistry in life. Please join me in learning the basics of creating your own works of Zentangle art, while de-stressing and opening the creativity door. 1. History of Zentangle 2. Theory of Zentangle 3. Creation of Zentangle 4. Demonstration and description of designs Step-by-step- instructions 5. Sharing the Unknown "outcomes" of the final artwork

Whooo knew Clay could be such a HOOT? Linda McLendon, Stacia McCann Elementary This is a lesson for taking students from 2-D to 3-D art. Start with finding out student prior knowledge of owls. Show a PowerPoint about owls and how they are created with basic shapes. Demonstrate how to draw a 2-D owl (or family of owls) and color with oil pastels. Demonstrate creating an owl with clay. Information on firing and glazing will be provided. Participants create examples of both 2-D and 3-D owls. 1. Discuss prior knowledge of owls with students/show ppt. 2. Read “Owl Babies” or “”Owl Moon to students. 3. Draw a 2-D owl with students. 4. Demonstrate creating a 3-D owl/students create a 3-D owl. 5. Students glaze 3-D Owl.

Tie Dye Fun Debbi Engbring All Levels Tie-dye describes a pattern of color made by preventing the dye from reaching some areas of the fabric by using tight ties of rubber bands, sinew, string, etc., while dyeing others. In just 5 easy steps, you can create wondrous patterns and unique designs to show off at any event! Have a fundraiser where everyone tie-dyes a shirt. Have a family reunion where everyone from babies to grandparents ends up in tie-dye! Fun, easy, plus your own colorful expression, you can't beat it. This workshop will be an introduction to tie-dyeing and a number of different techniques. Participants will create their own tie-dye piece. Lesson plans, state standards, dyeing instructions, and supply list will be provided. Your cost includes an item to dye. 1. Overview of the process 2. List of supplies and suppliers 3. Demonstration of tie and dye techniques 4. Hands on in tie dye Fun! 5. Your tie-dye experience neat and tidy in a gallon zip lock baggie to take home.

Art Criticism: Learning to Describe Ellen Z. Salov All Levels Most middle and high school students are very vague when asked to describe what they see during the first step of art criticism (describe, analyze, interpret and judge). Participants will engage in a lesson that provides students with an active way of understanding how powerful their words are. They will listen to two different descriptions of an artwork and draw what is being described, then share, compare and contrast the results. Participants will then partner up, and take turns describing and drawing different artworks from various provided art postcards. The lesson can be adapted to any level, but is geared towards middle school or visual arts I high school students, and utilizes language arts common core standards. 1. Vague description of image & students/participants draw 2. Good description of image & students/participants draw 3. We share and compare/contrast drawings & discuss why (emulate how to get kids to engage in discussion) 4. Students/participants pair up and receive art postcards. Go over rules. Take turns drawing/describing. 5. Share out, & discuss possible adjustments to lesson for different levels, or various other ideas.

A Horse of a Different Pattern Terri Mickelson, Edith Kent Middle level - Junior High Looking for a lesson to enhance the Common Core Standards? Tying into literature, make Debra Butterfield style horse sculptures. Decorate with stamps, beads, leather, and raffia. Students will also learn the cultural significance of the horse as a symbol. 1. Presentation of objectives and Debra Butterfields horse sculptures. 2. Cut out pattern on tag board of horse and spray paint. 3. Decorate with pattern stamps before gluing horse together. 4. Add raffia for mane and tail. 5. Add details with leather and beads.

Paper Pulp Magic Margaret Gentry Elementary School Learn the secret of a fun recycle project using newspaper! It is a fun sculpture media called paper pulp. This is a fun hands-on workshop that will show you how to make paper pulp. There will be opportunities to make pulp and see how it is set up for classroom use. Create your very own lizard project to take with you along with other ideas how to teach this through grade levels.
1. Blend up the pulp 2. Make the armature 3. Sculpt the armature with paper pulp 4. Paint the wet paper pulp 5. After dry, add detail paint and texture
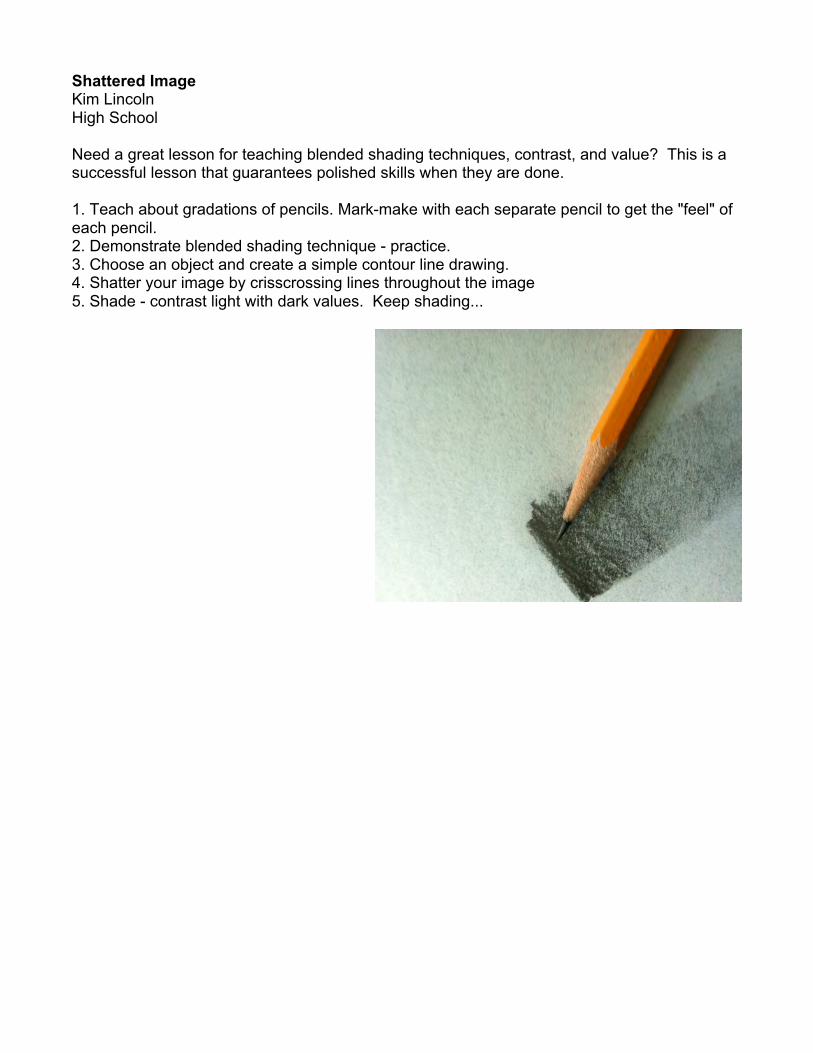
Shattered Image Kim Lincoln High School Need a great lesson for teaching blended shading techniques, contrast, and value? This is a successful lesson that guarantees polished skills when they are done. 1. Teach about gradations of pencils. Mark-make with each separate pencil to get the "feel" of each pencil. 2. Demonstrate blended shading technique - practice. 3. Choose an object and create a simple contour line drawing. 4. Shatter your image by crisscrossing lines throughout the image 5. Shade - contrast light with dark values. Keep shading...

SATURDAY #4 HANDS ON 8:30-10:20

Cantrell inspired Masks Micki Anderson All Levels Learn about the Contemporary African-American Artist Kimmy Cantrell and create a cubist style mask using cardboard, recycled and found materials. 1. View artwork by Kimmy Cantrell and cubist style masks 2. Sketch out idea for own mask. 3. Use cardboard for base for mask and cut out different shapes for the different parts of the face. 4. Color using different mediums, recommended paint, oil pastels and color pencils 5. Arrange then glue down all pieces and any additional embellishments.
!"#$%&"'()*+,-%./'!"#$%&'()*)+(,&-./('#.+"&.$,&0#+&1."/(+"'
'

Get Tangled With Erin and Elisa: Meditative drawing in the classroom Erin Gooch, Elisa Wiedeman High School This presentation will focus on the meditative art of Zentangle. An exciting process of pattern and rhythm designed to guide students' creativity and bring out the artist in all of them! Use this as an exercise to begin each of your classes and allow creativity to flow throughout the classroom. This works great for creating a mellow yet inspired work environment and will surely make your students want to continue these techniques outside of your classroom as well! 1. Start by having your students find patterns in nature, whether that is on the sole of their shoe or maybe a doodle on their math homework. 2. Discuss with the students what emotions are drawn from them with respect to each individual pattern. Does a zigzag pattern have more of a harsh emotion? Maybe polka dots are more playful? 3. Hand out a guide or worksheets with a variety of patterns based on the Zentangle method and have them think about ways in which they would describe themselves through the patterns. 4. Have students create a variety of tiles as warm-up exercises perhaps on a weekly basis throughout the semester or year, and at the end of your time with them, have them put their pieces in a small portfolio. 5. Look at works side by side and discuss how they have evolved as artists and individuals based upon their finished Zentangle creations.

Monoprinting with Gelli Arts Michelle Lindsay & Chelsea Shinker All Levels We love gelatin printing and we've developed a better way to do it! Our Gel Printing Plate looks and feels like gelatin, but is durable, reusable and stores at room temperature. It's easy to clean and always ready for printing. Monoprinting on a Gelli plate is simple and fun. 1. Introduction to Gelli Printing Plate and Monoprinting 2. Apply acrylic paint(s) to gel printing plate 3. Roll paint into thin layer with brayer 4. Create designs by pressing textured objects into wet paint 5. Lay paper/fabric, gently rub with hands and pull paper from printing plate! Voila - a monoprint :)

Get Ahead with Clay Debbie Hammer High School This presentation covers a 2 week unit that teaches students how to make a 6" bust. Includes lesson plan, student handouts, and time for practical application. Participants should bring a toilet paper tube and small box to take home project. 1. Background information about the human head, including proportions, skeletal structure, muscles, and surface textures. 2. Building the head. 3. Creating surface textures and facial details. 4. Hollow out the head. 5. Optional alterations; zombie, anamorphic, container with lid.

The Art of Illumination Angie Watts Middle level - Junior High Before the Renaissance and the invention of the printing press, books had to be handwritten and illustrated. This lesson incorporates social studies and the art history of Medieval Western Europe as students create a symbolic interpretation of themselves into an initial letter using a variety of media. 1. Presentation of social and historic atmosphere of medieval Western Europe. 2. Student will view examples of manuscript illumination and vocabulary background. 3. Teacher models techniques in developing initial design. 4. Students sketch plan for their work. 5. Students execute their design.

Champion Creatively Alive Children - How Art Helps Develop 21st Century Skills Linda Parzych with Crayola Elementary Forming a creative leadership team increases the entire school's creative capacity and increases the use of art across the curriculum. Explore what creativity means, how art builds 21st Century Skills and increases student engagement. A participatory hands-on activity demonstrating how the arts help develop 21st Century Skills will be included. 1. This lesson entails all of the 4 C's and will take 10 to 15 minutes 2. Form small teams of 3 to 4 people 3. Think about creating a new species - where it'll live, what it'll eat, its function in nature, etc. 4. Once the teams decide, use Model Magic to create the new species 5. Present your creature to the rest of the classroom

Blind Contour Self Portrait with Pastel Stacy Marko Middle & High School Using sharpies, we will do multiple views of ourselves, overlapping, filling a paper. After, using a color scheme, we will add value and blend colors on the contours. Blind contours - attention to details, not necessarily proportions. Filling the page - movement, repetition. Using a color scheme. Blending of colors and value. Repeating colors (repetition and movement) 1. Review - colors, elements, and principles 2. Blind contours (may start with hand/shoe, attention to detail as opposed to "symbols") 3. Using a sharpie, draw blind contour self-portraits (various angles) on a larger piece of paper - overlapping, turning the paper, and going off the page. 4. After filling the page, pick a color scheme and using fairly realistic values, color the images and background 5. Make sure the colors and values are repeated for a successful composition

Weaving Made Easy on a Chinet Plate Maripat Kudray-Flores All Levels Weaving Made Easy on Chinet Plates, no box looms to collect and store. This yarn project I use when I have a tougher- larger class since all students want to work with yarn. Find a knitter and you will have plenty of yarn. All you need is Chinet plates, Sharpie markers, yarn and string. This project last year received second place at the district art fair.
1. Brainstorming, showing examples and sketching ideas on paper to create a balanced curricular design with animals.
2. Adding animal drawing to the edge of Chinet plate using sharpie markers, leaving the center empty for weaving
3. Critiquing drawings, cleaning up, and outlining with thick black markers (students practice tying knots at this time).
4. Adding string loom to plate like a bicycle spoke with an odd number of spokes. 5. Weaving with yarn starting in the center of plate choosing colors to create a pattern.
Extension: add feathers and beads to weaving.

Marker Color Study Emily Gabaldon All Levels Using water-based markers and a simple objects student will create a simple color study. Can be easily used as a specific color scheme study, an introduction to water media or contour drawing. 1. Draw a simplified line drawing of the still life (glass bottles) 2. Decide on a color scheme 3. Trace bottles with water based marker (Crayola works great) 4. Use a clean watercolor brush and water to ""fill in"" bottles. Let dry. 5. Finish by re-tracing bottles with a thin line sharpie

SATURDAY #5 HANDS ON 12:30-2:20

Alternative Photo Processes - Sun Prints, Negative Creations Amber Wallace All Levels Instructor will demonstrate the most basic ways of creating sun prints to the most advanced. Pre-soaked paper will be used for the elementary level teachers and directions will be provided how to mix the chemicals and soak it for the high school/advanced students. Bring objects that are relatively small in size and have interesting form, textures to use for printing. Instructor will have items as well. Magazines and contact paper will be used to create negatives, which can also be used to create sun prints. 1. Wash watercolor paper with chemical mixture to make light sensitive. (Or purchase pre-soaked paper.) 2. Place objects on piece of plexiglass the size of your paper or create magazine negative. 3. Place plexiglass or negative onto exposed paper in sunlight (or artificial light) and expose for 30 seconds to 1 minute. 4. Rinse paper with water. 5. Hang to dry.

Abstract Collage & Emphasis LynnAlison McGavack Elementary, this could be expanded for all levels. This workshop will include a power point presentation showing 9 different ways that emphasis can be shown in a work of art, handouts for student assessment and note taking as well as a lesson plan. Participants will be briefly introduced to emphasis and given a number of different items to use while making a collage that demonstrates at least 3 or more ways to show emphasis. Magazines, found objects, different types of paper, scraps of fabric and any other items that could be used to make collage will be provided. If you would like to bring anything to add to your collage, please bring them with you to share with the participants of this workshop. 1. Pre-assessment 2. Power Point - note-taking sheet 3. Team collage production 4. Individual collage making activity 5. Post-assessment and/or Artist's Statement production

Teaching Culture Through Puppetry Nancy Wilkinson Elementary Puppetry is an age old art. They are found in almost every culture in the world. In this session, teachers will receive handouts on puppets, see puppets from around the world and create their own. "Pedro the Pirate Gets Shipwrecked in the Desert" will be our story to retell. Backdrops and desert critter shadow puppets will be created for this tale. They can be used in the classroom as examples for further use. l. Find a story to recreate with shadow puppets (there will be a story presented as an example) 2.File folders can be used for shadow puppets (they will be provided). Teachers will cut out animals and use sticks to hold the puppets for performing 3.A sheet and light will be needed for projecting the image 4.The story will be told and the puppets will act out the adventure 5.Handouts and scripts will be provided for future puppet shows to be used in the classroom

It's Called A 30-Minute Teapot Karen Hiller High School Teapots seem to be the benchmark of "serious" ceramic production. However, throwing one on the wheel is not required. In this workshop, participants will use the slab technique to create a teapot...in 30 minutes...sure. Bring an idea for a theme-based teapot that you will construct in one session. You're on your own for firing and glazing. 1. Sketch an idea for the teapot - theme-based 2. Roll out ¼” slabs of chosen clay type. 3. Form one slab over domed-shaped armature to create body of teapot. 4. Remove clay dome from armature and center on second slab and attach and trim excess from bottom slab. Smooth seam. 5. Add handle, spout and additional details to reflect theme.

Alternatives to Glazing Stacia McCann Elementary Three techniques used to color bisque ware that don't include glaze. Please bring one ceramic item that you wish to decorate (these techniques are not food safe, so please bring something you will not be using in that capacity.) two small pieces will be provided. That way you can try all three techniques. 1. Take a piece of ceramic bisque ware and paint with watercolor paints, tempera paints, or oil pastel. 2. Let paints dry and spray with clear acrylic spray paint to seal. 3. If using oil pastels, use a Q-tip dipped in baby oil to spread pastels evenly on the bisque ware. Then spray with acrylic spray paint to seal.

Cars, CArs, CARs, CARS Jessica Davis All Levels Get your engines ramblin'! Through the exploration of using recycled materials you will learn a lesson that can be taught at all levels (K-12). You will learn how to dissect a toilet paper roll and transform it into a fabulous showpiece. The lesson plan will include art history activities, procedures for the production of the car, videos, writing assignment, assessment tools and more. Come enjoy some fun! 1. Wrap tube with paper or paint tube with acrylic paint. Then mark location for the cockpit on top and the wheels at about the middle of the tube in the front and back. 2. Use a pushpin to puncture wholes for the wheels. Then use the pushpin to puncture the tube all the way around the cockpit. 3. Cut out wheels from black and white paper/tin foil. Glue the black and white paper/tin foil together. Then puncture wholes through the wheels. Attach to the wheels with brads. 4. Give your mean-machine a personalized assemblage! You can add a custom paint job, numbers, or develop a theme such as pop culture, self-portrait, historical events, animals, food, etc. The students can also build a show room, a racetrack or a large-scale car out of toilet paper rolls and paper towel rolls (as a group project). 5. When the car and/or accessories are finished you can have the students write a story about their work. As an assessment you can have the students write about what drove them to chose a particular theme, 1 thing they like and 1 thing they would change on their car and why, etc. Ready, start your engines!

Create My Story Connie Ferguson, Beth Rolfe, Katie Giroux All Levels Your principal wants your students to write in your art classes. What do you do? Three teachers share their lessons that combine writing, technology, and traditional art making. 1. Present overview of lessons that integrate traditional art making and writing 2. Explain at least three lessons in-depth. 3. Focus on Elementary and Middle Level as well as High School adaptations 4. Handouts for the lessons given out to attendees 5. Display Samples and Open for Questions.
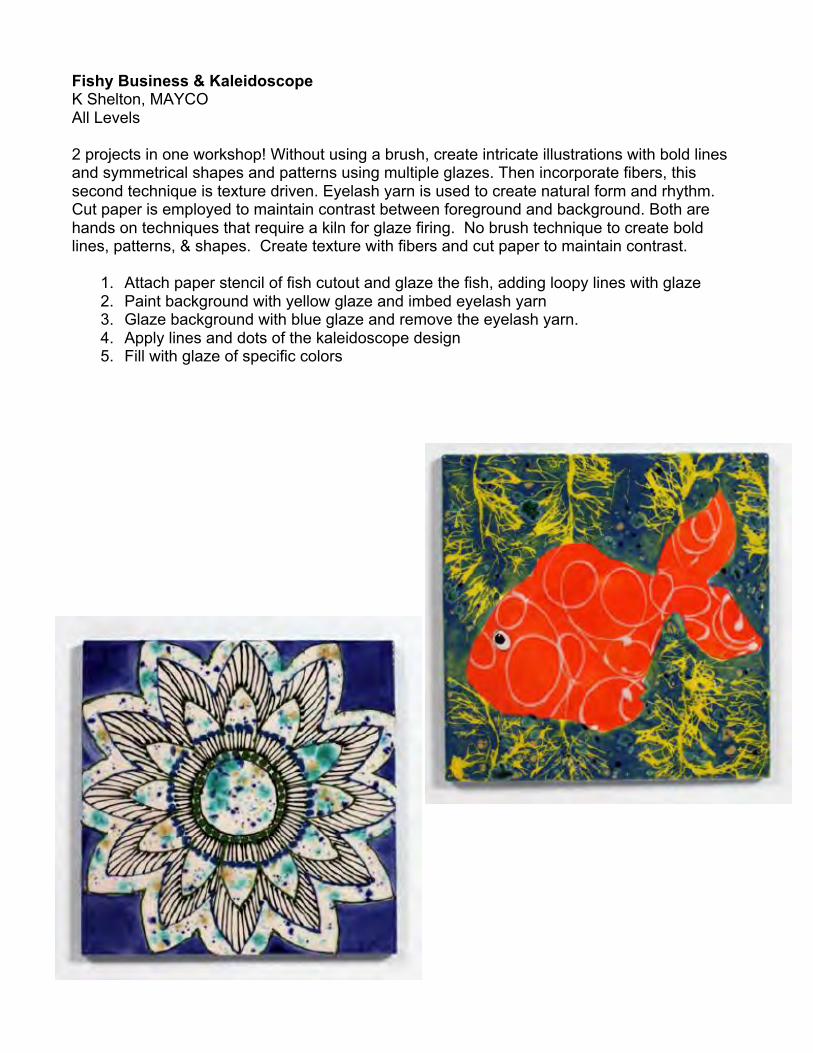
Fishy Business & Kaleidoscope K Shelton, MAYCO All Levels 2 projects in one workshop! Without using a brush, create intricate illustrations with bold lines and symmetrical shapes and patterns using multiple glazes. Then incorporate fibers, this second technique is texture driven. Eyelash yarn is used to create natural form and rhythm. Cut paper is employed to maintain contrast between foreground and background. Both are hands on techniques that require a kiln for glaze firing. No brush technique to create bold lines, patterns, & shapes. Create texture with fibers and cut paper to maintain contrast.
1. Attach paper stencil of fish cutout and glaze the fish, adding loopy lines with glaze 2. Paint background with yellow glaze and imbed eyelash yarn 3. Glaze background with blue glaze and remove the eyelash yarn. 4. Apply lines and dots of the kaleidoscope design 5. Fill with glaze of specific colors

Wonderful Weaving Hillary Andrelchik All Levels Weaving is an art form used across cultures and times. The types of weavings and designs produced are often a window into the heart and soul of a culture. Come and learn some basic weaving techniques that can be used with students from elementary to high school! We will also look at images of weaving from different cultures and throughout history, as well as discuss some lesson plans and ideas for incorporating weaving into your art class. 1. Introduction to Workshop -We will examine images of artworks in the fiber arts as they were used for different purposes. These purposes include shelter and protection, identity and adornment, storytelling and recording history, and social power and control. 2. Sampler Set up - We will then prepare our sampler, learning basics of embroidery set up and tools. This will include learning about needles, hoops, fabrics, and floss/threads. 3. Basic stitches/techniques - We will then learn and practice a few basic stitches. This section will include demonstrations, as well as the use of a few helpful websites. 4. Lesson Plans - While we are practicing our stitches, I will also present some ideas for bringing the fiber arts into your classroom, including some related to the different uses that textiles have traditionally had. Lessons will range from those for elementary to high school students. A handout of ideas will be provided. 5. Conclusion - You will also have time to talk with myself and other teachers about the process and share your own ideas!

SATURDAY #6 HANDS ON 2:30-4:20

Complimentary Personal Shrines Pat Burdette Elementary Create a COMPLIMENTARY personal shrine while exploring COMPLEMENTARY colors. Cut and cover a cracker box with blue prints and paint with one complementary pair of colors using liquid watercolors. Creatively write compliments about yourself on primary puzzle pieces, and gather other meaningful objects in the same color scheme. Including the written text as a focal point of the lesson incorporates vocabulary acquisition and use as well as developing supporting details, and that connects to Common Core Standards for Reading, Writing, and Language. 1.Cut the opening flaps on the box and glue on a decorative top piece 2. Cover entirely with blueprints, while you decide your complementary color scheme 3. Create Compliment pieces - creative text of describing words and phrases - written with permanent markers on large puzzle pieces 4. Paint every surface of the shrine in your complementary color scheme, using liquid watercolors. 5. Add the Compliments and other related meaningful objects in your color scheme to complete the personal shrine

Visual Journal Travis Waldron, Debbi Engbring High School In this hands-on workshop you will participate in transforming the everyday sketchbook into a Visual Journal. Visual Journaling is a creative way to record experiences, emotions, feelings, opinions and ideas. It’s a way to meet the common core standards by uniting the written word and artwork. In this hands-on workshop you will learn how to assist students in planning, developing their ideas and organizing their compositions. The visual journal will serve as a vehicle for students to experiment with new media, tools and techniques. Students will intertwine written reflections and artwork. The goal is for students to make the connection that visual journaling can be used as a life long tool. Sketchbooks, materials, state/common core standards, and lesson plans will be provided. Transform the sketchbook into a Visual Journal by introducing: 1. Reflections; combining the written word and artwork. 2. Still Life, Gesture Drawing, Progressive and Thumbnail sketches. 3. My Gallery; explore media, subject and style. 4. Virtual Instructor; an educational website that teaches about tools, media, techniques and vocabulary. 5. Assessment; performance assessing

VIk Muniz and Assemblage Art Candace Greene Middle level - Junior High After students study Vik Muniz and check out the documentary “Wasteland”, students discuss how art can be used to help improve communities and individuals lives. Students will assemble an art piece using any material they want in the style of Vik Muniz, i.e. trash, paper, puzzle pieces, chocolate etc. Then they photograph the piece. You will need to bring supplies you want to create your piece such as colored rice, chocolate syrup, recyclable materials, coins, yarn etc. I will have some things if you forget. 1. Brief introduction to the Artist Vik Muniz and then watch the documentary Wasteland. 2. Discuss how art can have an impact on people and communities and can transform lives. 3. Decide on an art piece that they would like to use for their assemblage piece. They can pick a famous piece of art or create their own image. 4. Color and shade in the image using materials that they want to fill the piece in with such as, candy, paper, puzzle pieces, garbage etc. 5. Photograph their piece

Tree of Life ala Klee Elisabeth Monsma, Barbara Faltico Middle level - Junior High Inspired by the abstract works of Paul Klee, create a tree of life that incorporates symbols and demonstrates balance. Images are painted using black, and neon watercolors for a dramatic effect. 1. Review and discuss artist's work and use of made-up symbols; look at tree of life images. 2. Introduce a variety of approaches to drawing trees. 3. Sketch and transfer to project paper. 4. Fill in tree and outline symbols using black permanent marker. 5. Paint symbols and background with neon watercolors.

Under the Sea: Illuminated Sea Life Sculpture Inspired by Chinese Fish Lanterns Joolz Fernandez-Yonge All Levels This workshop focuses on using an open-ended sculpture project to strengthen problem-solving skills while supporting the common core curriculum. You will leave with presentation materials and handouts that support language arts and math (common core goals) by creating connections with science, social studies, arts & engineering. 1. Intro & Background- water & fish symbolism of many cultures; artworks relating to this symbolism; Chinese lantern fish info & examples 2. Plan & Gather - Choose a theme from list of different cultural associations with fish and water in art; Plan & Sketch (math tie in) sculpture including type and amount of materials 3. Build Skeleton/Frame - Use assortment of materials to build frame 4. Cover Frame- Cover frame with clear plastic and colored tissue 5. Decorate - add finishing touches and illuminate

Huichol Yarn Painting Lonni Himmelstein Elementary We will learn how the Huichol Indians created their works of art by reading a special Huichol story. Then we will create our own picture. However, rather than using the traditional method of warm wax and yarn, we will use Wikki Stix, a wax covered colored yarn that is easier to use. 1. Create a picture that has some meaning to you personally. 2. Transfer the picture to the prepared cardboard 8"X8". 3. Using the colored Wikki Stix fill in the appropriate areas. 4. Have the Wikki Stix go in different directions to create a textured look. 5. Make sure the cardboard is fully covered by the Wikki Stix.
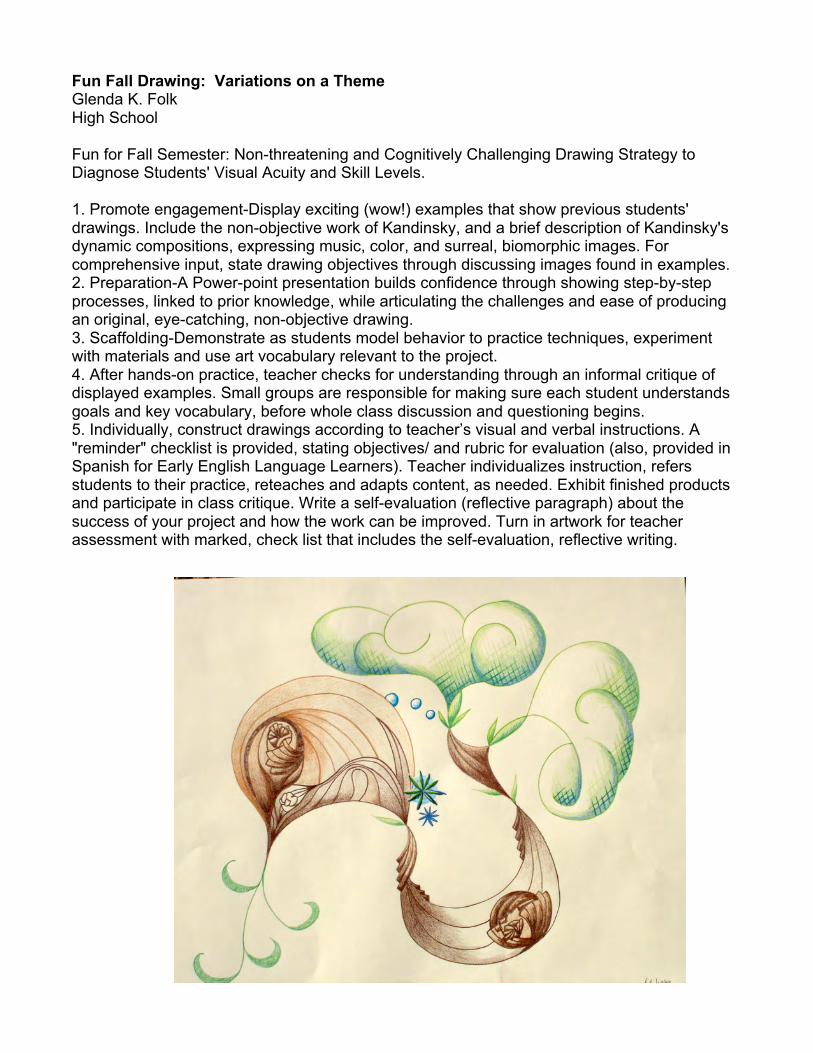
Fun Fall Drawing: Variations on a Theme Glenda K. Folk High School Fun for Fall Semester: Non-threatening and Cognitively Challenging Drawing Strategy to Diagnose Students' Visual Acuity and Skill Levels. 1. Promote engagement-Display exciting (wow!) examples that show previous students' drawings. Include the non-objective work of Kandinsky, and a brief description of Kandinsky's dynamic compositions, expressing music, color, and surreal, biomorphic images. For comprehensive input, state drawing objectives through discussing images found in examples. 2. Preparation-A Power-point presentation builds confidence through showing step-by-step processes, linked to prior knowledge, while articulating the challenges and ease of producing an original, eye-catching, non-objective drawing. 3. Scaffolding-Demonstrate as students model behavior to practice techniques, experiment with materials and use art vocabulary relevant to the project. 4. After hands-on practice, teacher checks for understanding through an informal critique of displayed examples. Small groups are responsible for making sure each student understands goals and key vocabulary, before whole class discussion and questioning begins. 5. Individually, construct drawings according to teacher’s visual and verbal instructions. A "reminder" checklist is provided, stating objectives/ and rubric for evaluation (also, provided in Spanish for Early English Language Learners). Teacher individualizes instruction, refers students to their practice, reteaches and adapts content, as needed. Exhibit finished products and participate in class critique. Write a self-evaluation (reflective paragraph) about the success of your project and how the work can be improved. Turn in artwork for teacher assessment with marked, check list that includes the self-evaluation, reflective writing.

2 Squared + Change = ART Camille Mardis All Levels Learn about and how to create beautiful Notan squares with your students. This is a fabulous way to teach; shape, space, contrast and balance. You will see a short presentation about Notan squares and then time to make and take. You will be creating a watercolor background and then cutting and gluing your Notan square to your dry watercolor background for a beautiful piece of artwork. 1. Use a watercolor wash technique with vibrant colors to use as a background. 2. While that is drying, listen and watch a PowerPoint presentation on Notan squares. 3. Draw your design on all 4 sides, going into the center of the square, but not touching the other shapes. Draw additional shapes to be cut out and flipped to create an intricate design. 4.Cut out all your shapes, being careful to place them exactly opposite from where they were cut. 5. Carefully glue each piece in place. You should not have any waste, use everything you cut out, and voila!

Feeling Stitchy Hillary Andrelchik All Levels Textiles have been used throughout history for a variety of purposes including shelter and protection, identity and adornment, storytelling and recording history, and as an agent of social power and control. In this hands-on workshop we will explore the basics of embroidery and other fiber based embellishment techniques while discussing fibers' diverse history. Using fiber's interesting past as a catalyst, we will also discuss potential lesson plans and ideas for incorporating the fiber arts into different arts based courses. 1. Introduction to Workshop -We will examine images of artworks in the fiber arts as they were used for different purposes. These purposes include shelter and protection, identity and adornment, storytelling and recording history, and social power and control. 2. Sampler set up - We will then prepare our sampler, learning basics of embroidery set up and tools. This will include learning about needles, hoops, fabrics, and floss/threads. 3. Basic stitches/techniques - We will then learn and practice a few basic stitches. This section will include demonstrations, as well as the use of a few helpful websites. 4. Lesson Plans - While we are practicing our stitches, I will also present some ideas for bringing the fiber arts into your classroom, including some related to the different uses that textiles have traditionally had. Lessons will range from those for elementary to high school students. A handout of ideas will be provided. 5. Conclusion - You will also have time to talk with myself and other teachers about the process and share your own ideas!