Embed Size (px)
Citation preview
Frogbone Offense, V:1.5The Bullfrog Spread Option
The Bullfrog Spread Option, what we call the Frogbone,is a series‐based offense that uses the Triple Option as the core scheme, and is executed from a Run and Shoot Formation. The Frogbone has the potential to have 4 WR's in the pass game and run an option game with 4 RB's.
Thus spake the master Coach:
“When you can know the error in the mesh, it will be time for you to leave.”
Frogbone Passing
Offensive pass concepts, routes, and plays that will be implemented in the Bret Harte Bullfrogs
football program.
The pass protection schemes are in the Blocking Schemes section.
The techniques and drills for the protection schemes are presented and discussed in the Skills:
Offensive Line section.
Passing Overview
• An effective passing game is essential for our offensive success because defenses cannot gang up on the running game if our passing game is a threat
• We will have a variety of timing routes, action passes, sprint‐out passes, and naked passes that we can execute
– This variety will allow us great flexibility in our play calling
• We have to practice the passing game with the same receivers and quarterbacks every day to ensure timing
– A well‐executed timing route is very difficult to defend
– The timing comes from repetition and work
• We must emphasize protecting the quarterback
– No matter how great a player the QB is, our offense will not be successful unless the quarterback is protected.
• We will use formations that utilize our players’ talents
– If we have great players we will spread the field and get as much speed and ability on the field as possible so that the defense must match our talent level or give up big plays
• We must run and pass the ball out of the same formations
Base Passing Concepts
• Objective is not to show how smart we are by calling every possible route combination there is
– We will use will use established concepts and work on executing those concepts at a very high level
– Curl‐flat, smash, mesh, vertical, slant, high‐low, stick
– Develop 2‐3 combinations for each concept and then work them to death
• Use 0‐, 1‐, and 3‐Step drops, play‐action, sprint out, and screens
– From under center, Pistol, and from Gun
• Rely on timing and execution, not better athletes
– Timing and execution will make better athletes even better
• Running two routes/combination
– 1 defender to read
– If both receivers are covered, check to swing, then throw it away
– Do not force the ball
• Use ½ of the field – not the whole thing
– We’re a run‐first team so time for perfecting passing is limited
– Let’s not try to be what we’re not
• The QB has the option to choose the most favorable matchup, regardless of the play side that is called
– The receivers will run mirror routes so the looks will be the same to both sides, he can choose either side to attack
– In unbalanced (Trips, Trey) the QB can still choose the backside if the matchup is favorable – we may be able to get our best receiver on their worst by using formations
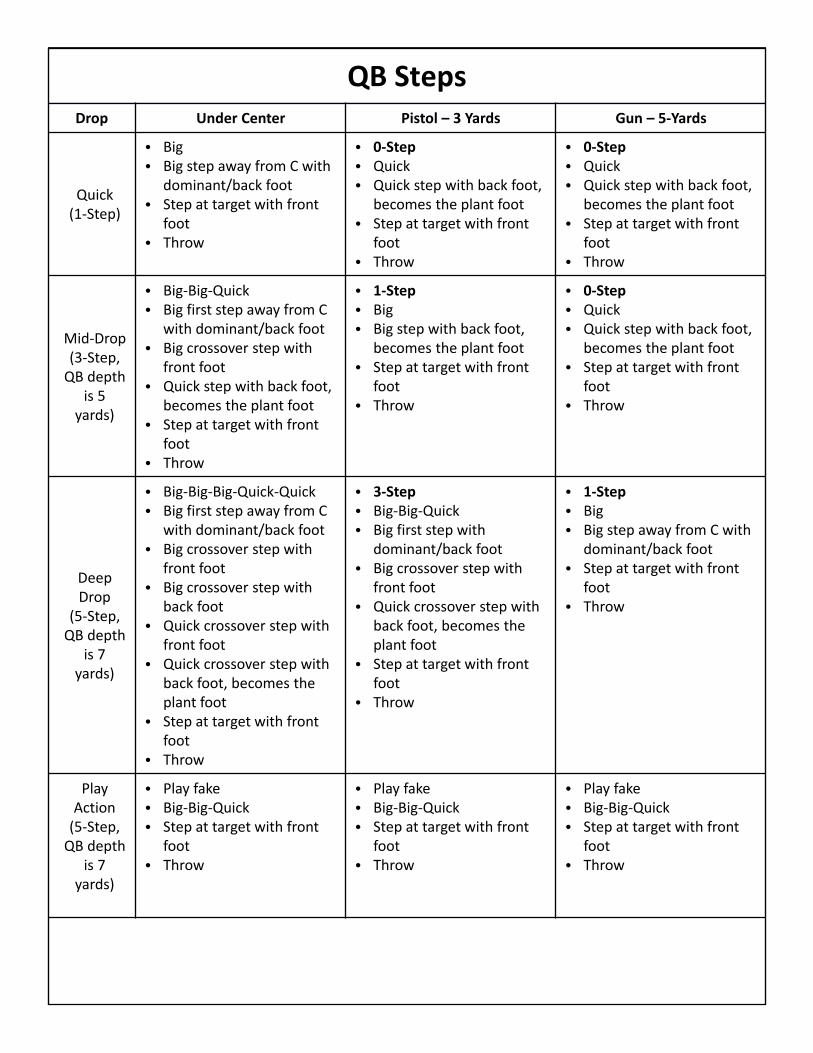
QB StepsDrop Under Center Pistol – 3 Yards Gun – 5‐Yards
Quick(1‐Step)
• Big• Big step away from C with
dominant/back foot• Step at target with front
foot • Throw
• 0‐Step• Quick• Quick step with back foot,
becomes the plant foot• Step at target with front
foot • Throw
• 0‐Step• Quick• Quick step with back foot,
becomes the plant foot• Step at target with front
foot • Throw
Mid‐Drop(3‐Step, QB depth
is 5 yards)
• Big‐Big‐Quick• Big first step away from C
with dominant/back foot• Big crossover step with
front foot• Quick step with back foot,
becomes the plant foot• Step at target with front
foot • Throw
• 1‐Step• Big• Big step with back foot,
becomes the plant foot• Step at target with front
foot • Throw
• 0‐Step• Quick• Quick step with back foot,
becomes the plant foot• Step at target with front
foot • Throw
Deep Drop
(5‐Step, QB depth
is 7 yards)
• Big‐Big‐Big‐Quick‐Quick• Big first step away from C
with dominant/back foot• Big crossover step with
front foot• Big crossover step with
back foot• Quick crossover step with
front foot• Quick crossover step with
back foot, becomes the plant foot
• Step at target with front foot
• Throw
• 3‐Step• Big‐Big‐Quick• Big first step with
dominant/back foot• Big crossover step with
front foot• Quick crossover step with
back foot, becomes the plant foot
• Step at target with front foot
• Throw
• 1‐Step• Big• Big step away from C with
dominant/back foot• Step at target with front
foot • Throw
Play Action (5‐Step, QB depth
is 7 yards)
• Play fake• Big‐Big‐Quick• Step at target with front
foot • Throw
• Play fake• Big‐Big‐Quick• Step at target with front
foot • Throw
• Play fake• Big‐Big‐Quick• Step at target with front
foot • Throw
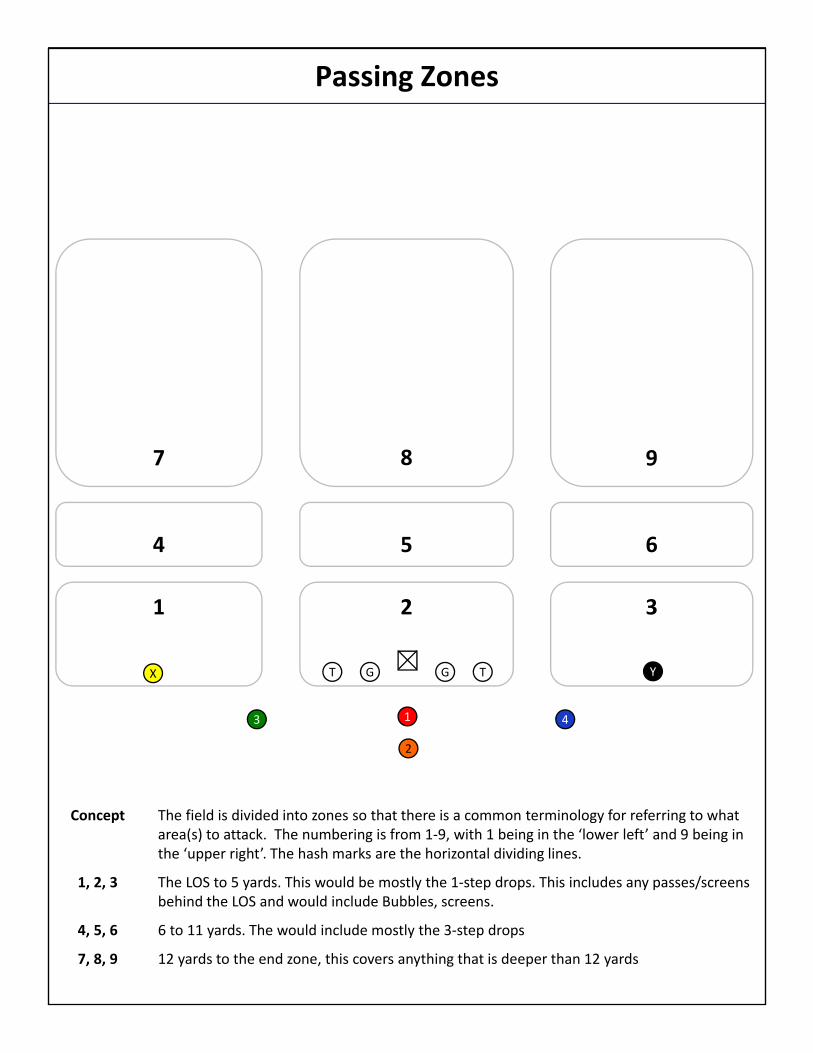
Passing Zones
Concept The field is divided into zones so that there is a common terminology for referring to what area(s) to attack. The numbering is from 1‐9, with 1 being in the ‘lower left’ and 9 being in the ‘upper right’. The hash marks are the horizontal dividing lines.
1, 2, 3 The LOS to 5 yards. This would be mostly the 1‐step drops. This includes any passes/screens behind the LOS and would include Bubbles, screens.
4, 5, 6 6 to 11 yards. The would include mostly the 3‐step drops
7, 8, 9 12 yards to the end zone, this covers anything that is deeper than 12 yards
1 2 3
4 5 6
7 8 9
13
TGGT
2
4
X Y
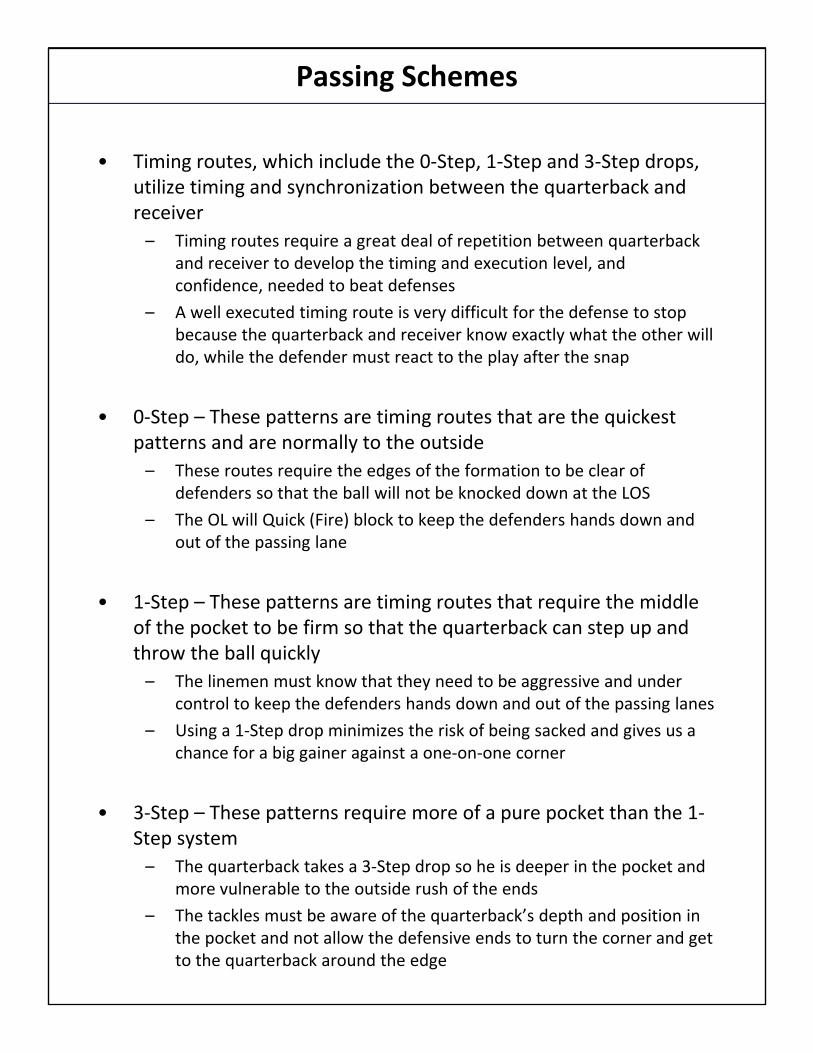
Passing Schemes
• Timing routes, which include the 0‐Step, 1‐Step and 3‐Step drops, utilize timing and synchronization between the quarterback and receiver
– Timing routes require a great deal of repetition between quarterback and receiver to develop the timing and execution level, and confidence, needed to beat defenses
– A well executed timing route is very difficult for the defense to stop because the quarterback and receiver know exactly what the other will do, while the defender must react to the play after the snap
• 0‐Step – These patterns are timing routes that are the quickest patterns and are normally to the outside
– These routes require the edges of the formation to be clear of defenders so that the ball will not be knocked down at the LOS
– The OL will Quick (Fire) block to keep the defenders hands down and out of the passing lane
• 1‐Step – These patterns are timing routes that require the middle of the pocket to be firm so that the quarterback can step up and throw the ball quickly
– The linemen must know that they need to be aggressive and under control to keep the defenders hands down and out of the passing lanes
– Using a 1‐Step drop minimizes the risk of being sacked and gives us a chance for a big gainer against a one‐on‐one corner
• 3‐Step – These patterns require more of a pure pocket than the 1‐Step system
– The quarterback takes a 3‐Step drop so he is deeper in the pocket and more vulnerable to the outside rush of the ends
– The tackles must be aware of the quarterback’s depth and position in the pocket and not allow the defensive ends to turn the corner and get to the quarterback around the edge
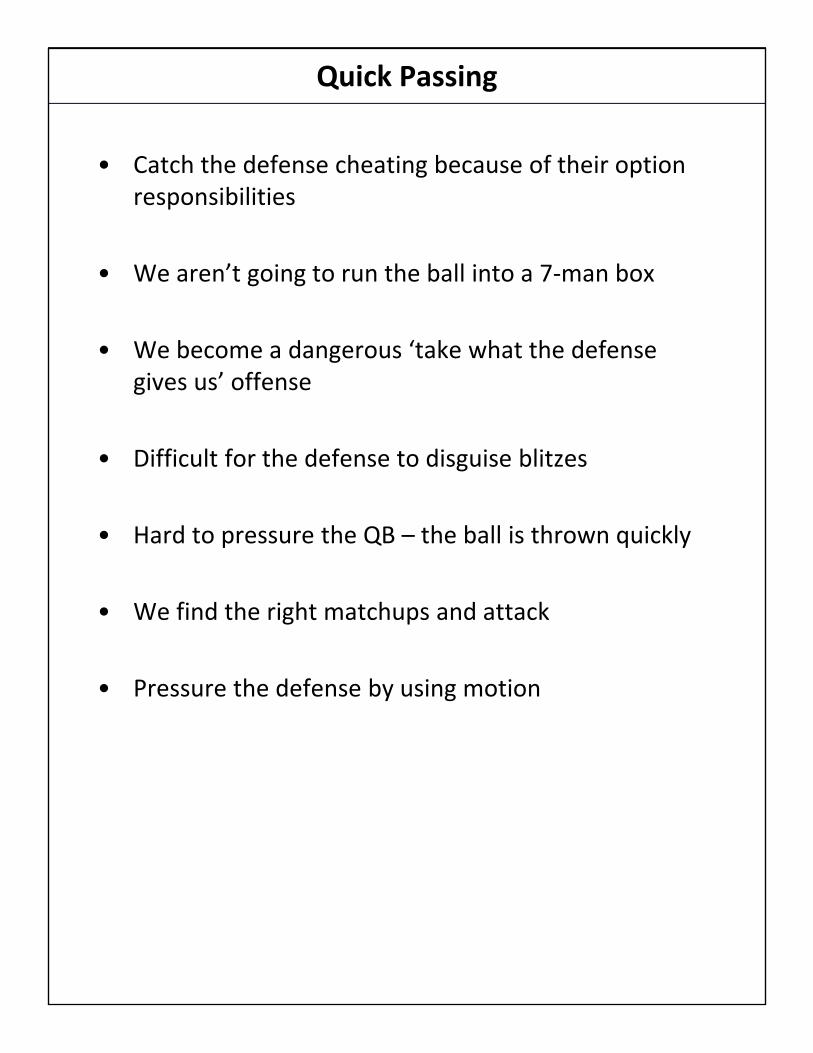
Quick Passing
• Catch the defense cheating because of their option responsibilities
• We aren’t going to run the ball into a 7‐man box
• We become a dangerous ‘take what the defense gives us’ offense
• Difficult for the defense to disguise blitzes
• Hard to pressure the QB – the ball is thrown quickly
• We find the right matchups and attack
• Pressure the defense by using motion
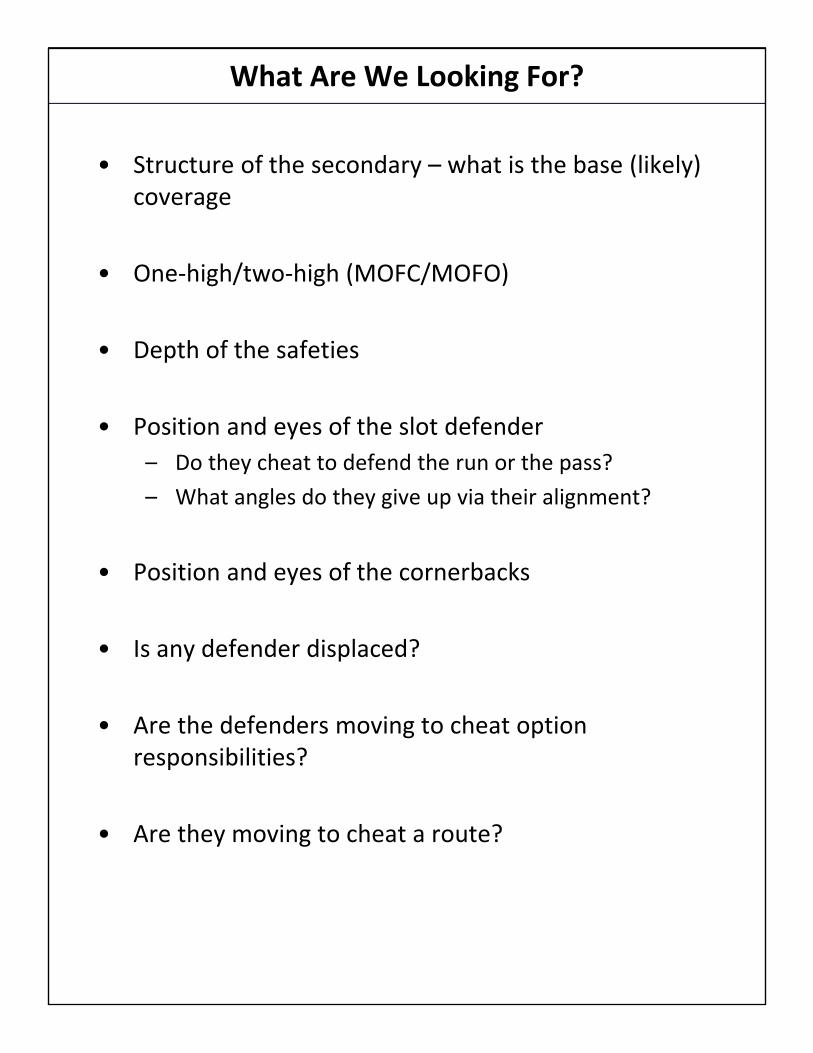
What Are We Looking For?
• Structure of the secondary – what is the base (likely) coverage
• One‐high/two‐high (MOFC/MOFO)
• Depth of the safeties
• Position and eyes of the slot defender
– Do they cheat to defend the run or the pass?
– What angles do they give up via their alignment?
• Position and eyes of the cornerbacks
• Is any defender displaced?
• Are the defenders moving to cheat option responsibilities?
• Are they moving to cheat a route?
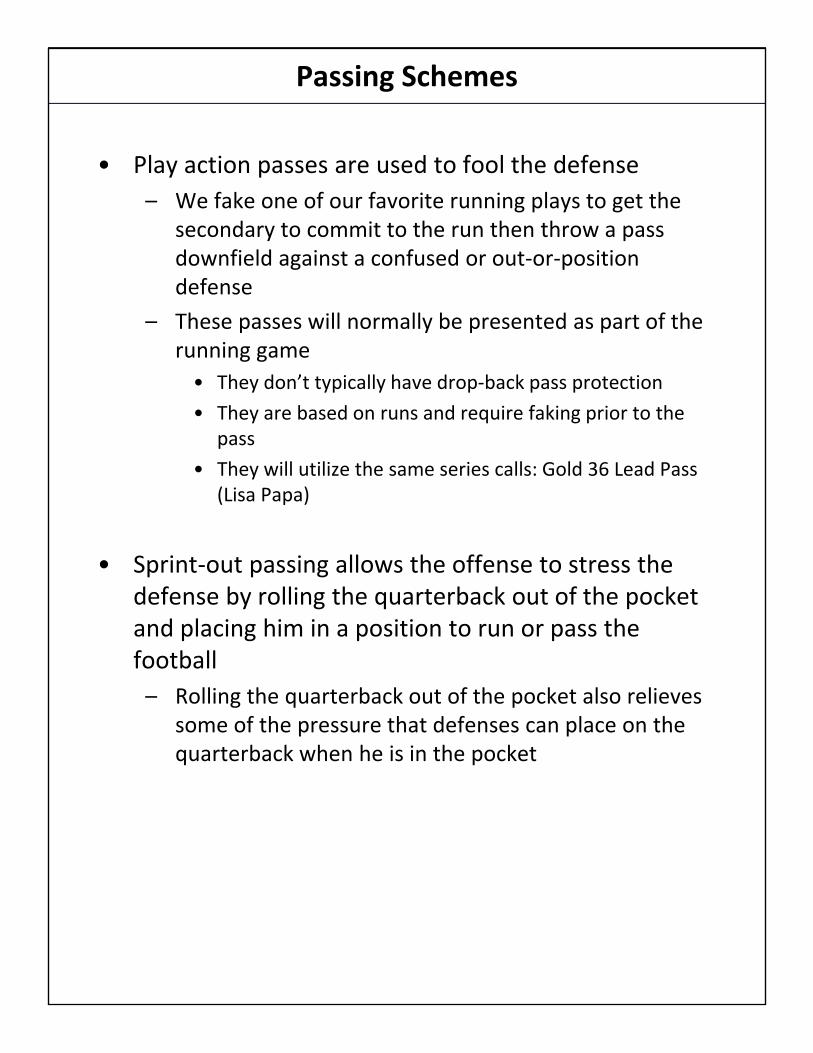
Passing Schemes
• Play action passes are used to fool the defense
– We fake one of our favorite running plays to get the secondary to commit to the run then throw a pass downfield against a confused or out‐or‐position defense
– These passes will normally be presented as part of the running game
• They don’t typically have drop‐back pass protection
• They are based on runs and require faking prior to the pass
• They will utilize the same series calls: Gold 36 Lead Pass (Lisa Papa)
• Sprint‐out passing allows the offense to stress the defense by rolling the quarterback out of the pocket and placing him in a position to run or pass the football
– Rolling the quarterback out of the pocket also relieves some of the pressure that defenses can place on the quarterback when he is in the pocket
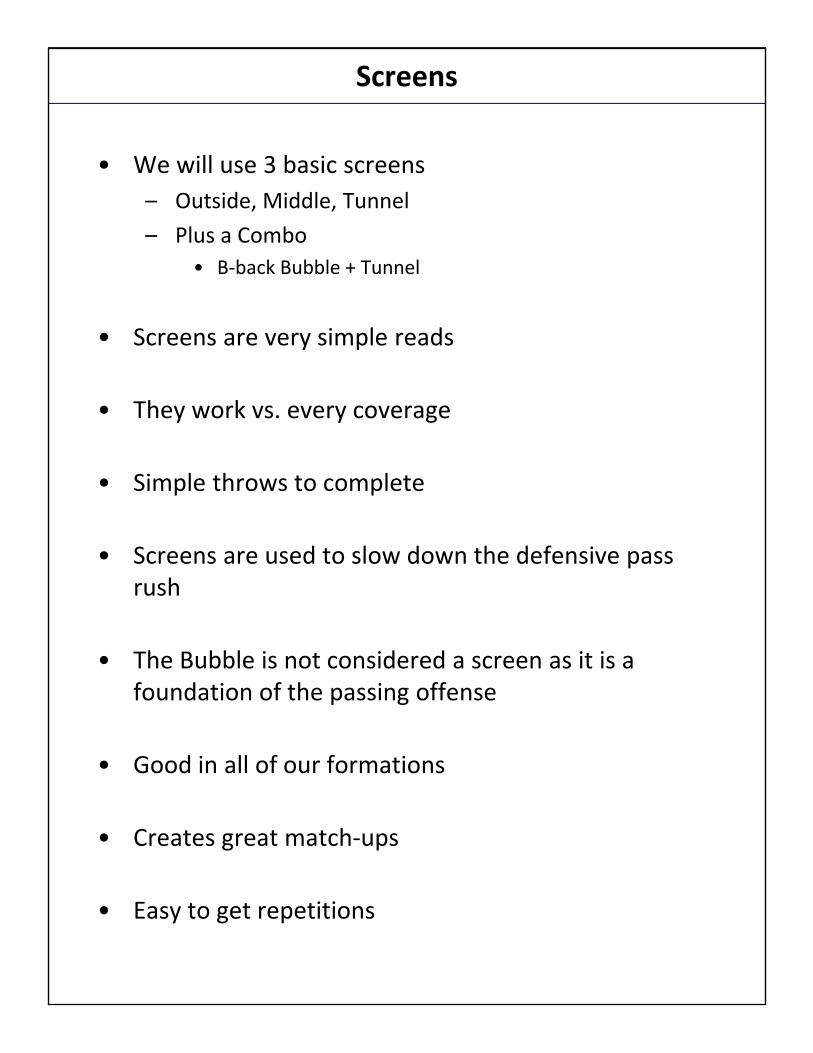
Screens
• We will use 3 basic screens
– Outside, Middle, Tunnel
– Plus a Combo
• B‐back Bubble + Tunnel
• Screens are very simple reads
• They work vs. every coverage
• Simple throws to complete
• Screens are used to slow down the defensive pass rush
• The Bubble is not considered a screen as it is a foundation of the passing offense
• Good in all of our formations
• Creates great match‐ups
• Easy to get repetitions
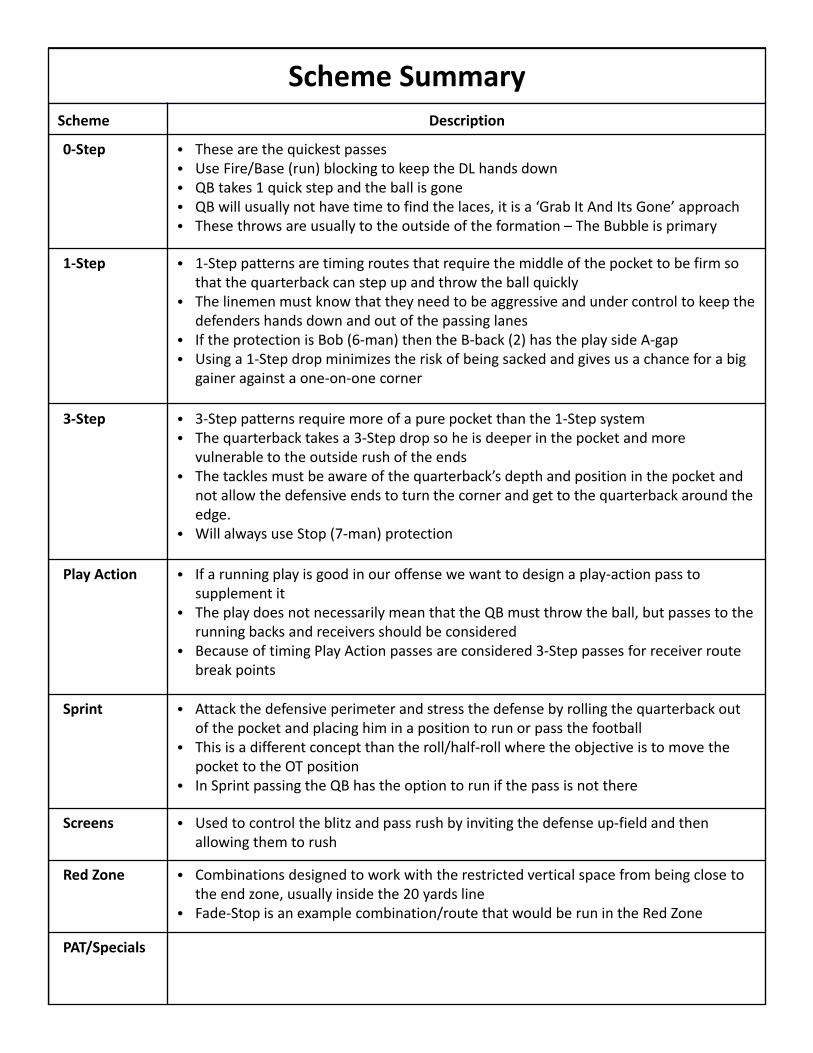
Scheme SummaryScheme Description
0‐Step • These are the quickest passes• Use Fire/Base (run) blocking to keep the DL hands down• QB takes 1 quick step and the ball is gone• QB will usually not have time to find the laces, it is a ‘Grab It And Its Gone’ approach• These throws are usually to the outside of the formation – The Bubble is primary
1‐Step • 1‐Step patterns are timing routes that require the middle of the pocket to be firm so that the quarterback can step up and throw the ball quickly
• The linemen must know that they need to be aggressive and under control to keep the defenders hands down and out of the passing lanes
• If the protection is Bob (6‐man) then the B‐back (2) has the play side A‐gap• Using a 1‐Step drop minimizes the risk of being sacked and gives us a chance for a big
gainer against a one‐on‐one corner
3‐Step • 3‐Step patterns require more of a pure pocket than the 1‐Step system• The quarterback takes a 3‐Step drop so he is deeper in the pocket and more
vulnerable to the outside rush of the ends• The tackles must be aware of the quarterback’s depth and position in the pocket and
not allow the defensive ends to turn the corner and get to the quarterback around the edge.
• Will always use Stop (7‐man) protection
Play Action • If a running play is good in our offense we want to design a play‐action pass to supplement it
• The play does not necessarily mean that the QB must throw the ball, but passes to the running backs and receivers should be considered
• Because of timing Play Action passes are considered 3‐Step passes for receiver route break points
Sprint • Attack the defensive perimeter and stress the defense by rolling the quarterback out of the pocket and placing him in a position to run or pass the football
• This is a different concept than the roll/half‐roll where the objective is to move the pocket to the OT position
• In Sprint passing the QB has the option to run if the pass is not there
Screens • Used to control the blitz and pass rush by inviting the defense up‐field and then allowing them to rush
Red Zone • Combinations designed to work with the restricted vertical space from being close to the end zone, usually inside the 20 yards line
• Fade‐Stop is an example combination/route that would be run in the Red Zone
PAT/Specials
Passing Rules
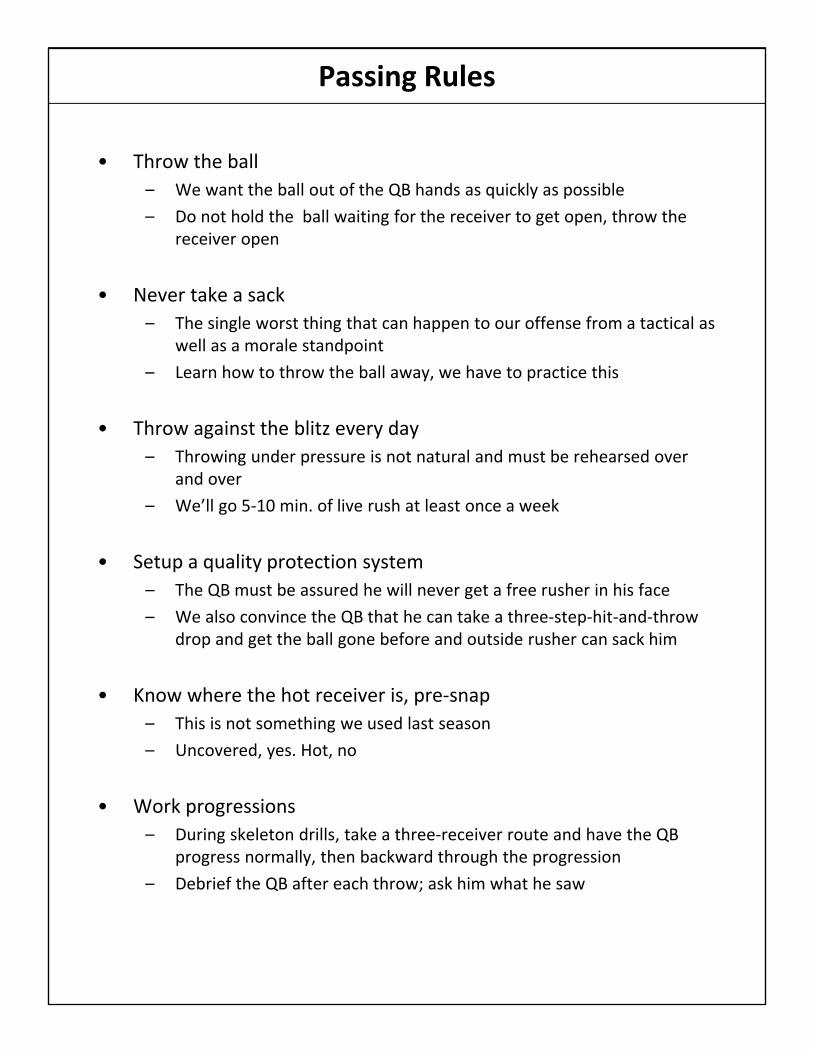
• Throw the ball
– We want the ball out of the QB hands as quickly as possible
– Do not hold the ball waiting for the receiver to get open, throw the receiver open
• Never take a sack
– The single worst thing that can happen to our offense from a tactical as well as a morale standpoint
– Learn how to throw the ball away, we have to practice this
• Throw against the blitz every day
– Throwing under pressure is not natural and must be rehearsed over and over
– We’ll go 5‐10 min. of live rush at least once a week
• Setup a quality protection system
– The QB must be assured he will never get a free rusher in his face
– We also convince the QB that he can take a three‐step‐hit‐and‐throw drop and get the ball gone before and outside rusher can sack him
• Know where the hot receiver is, pre‐snap
– This is not something we used last season
– Uncovered, yes. Hot, no
• Work progressions
– During skeleton drills, take a three‐receiver route and have the QB progress normally, then backward through the progression
– Debrief the QB after each throw; ask him what he saw
Passing Rules
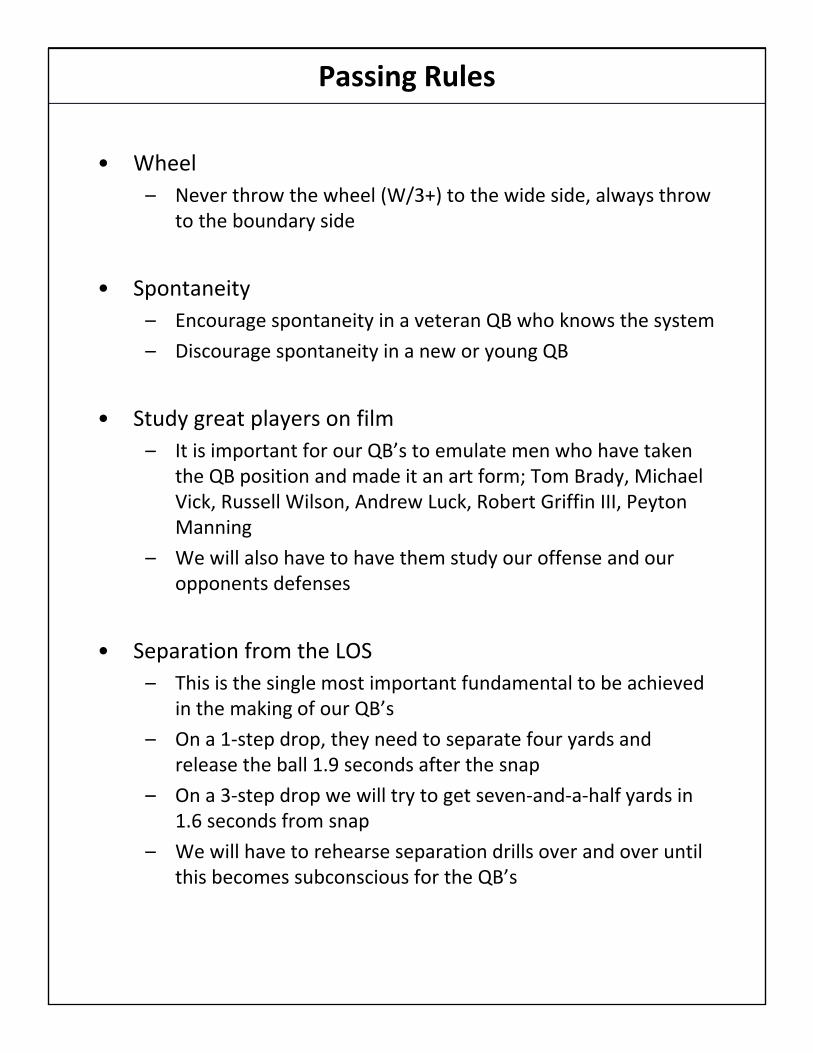
• Wheel
– Never throw the wheel (W/3+) to the wide side, always throw to the boundary side
• Spontaneity
– Encourage spontaneity in a veteran QB who knows the system
– Discourage spontaneity in a new or young QB
• Study great players on film
– It is important for our QB’s to emulate men who have taken the QB position and made it an art form; Tom Brady, Michael Vick, Russell Wilson, Andrew Luck, Robert Griffin III, Peyton Manning
– We will also have to have them study our offense and our opponents defenses
• Separation from the LOS
– This is the single most important fundamental to be achieved in the making of our QB’s
– On a 1‐step drop, they need to separate four yards and release the ball 1.9 seconds after the snap
– On a 3‐step drop we will try to get seven‐and‐a‐half yards in 1.6 seconds from snap
– We will have to rehearse separation drills over and over until this becomes subconscious for the QB’s
Passing Rules
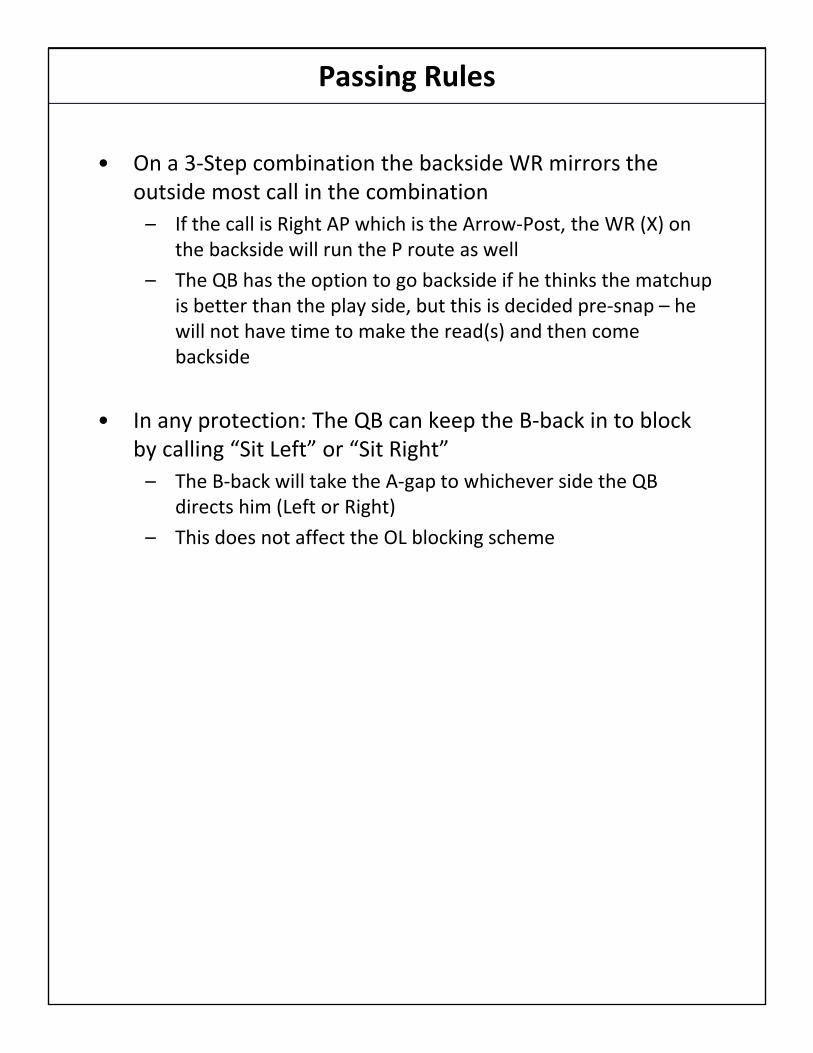
• On a 3‐Step combination the backside WR mirrors the outside most call in the combination
– If the call is Right AP which is the Arrow‐Post, the WR (X) on the backside will run the P route as well
– The QB has the option to go backside if he thinks the matchup is better than the play side, but this is decided pre‐snap – he will not have time to make the read(s) and then come backside
• In any protection: The QB can keep the B‐back in to block by calling “Sit Left” or “Sit Right”
– The B‐back will take the A‐gap to whichever side the QB directs him (Left or Right)
– This does not affect the OL blocking scheme
Secret Handshake
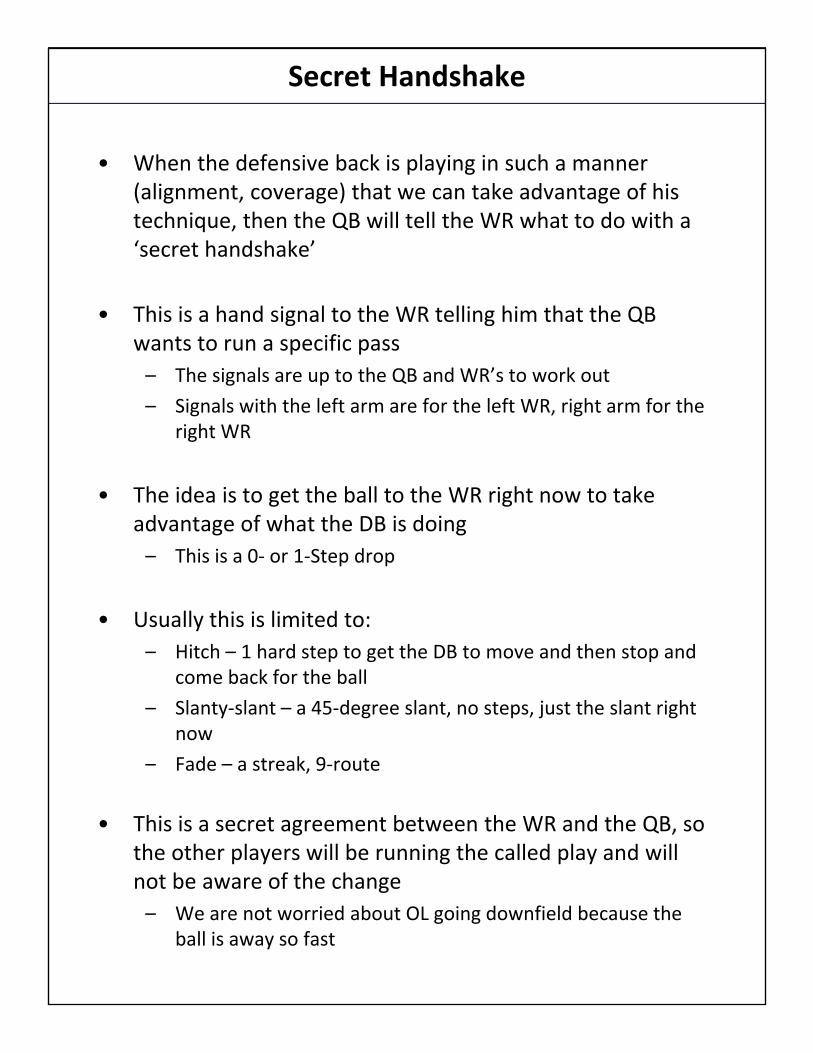
• When the defensive back is playing in such a manner (alignment, coverage) that we can take advantage of his technique, then the QB will tell the WR what to do with a ‘secret handshake’
• This is a hand signal to the WR telling him that the QB wants to run a specific pass
– The signals are up to the QB and WR’s to work out
– Signals with the left arm are for the left WR, right arm for the right WR
• The idea is to get the ball to the WR right now to take advantage of what the DB is doing
– This is a 0‐ or 1‐Step drop
• Usually this is limited to:
– Hitch – 1 hard step to get the DB to move and then stop and come back for the ball
– Slanty‐slant – a 45‐degree slant, no steps, just the slant right now
– Fade – a streak, 9‐route
• This is a secret agreement between the WR and the QB, so the other players will be running the called play and will not be aware of the change
– We are not worried about OL going downfield because the ball is away so fast
Sprint Out/Roll Passing Game
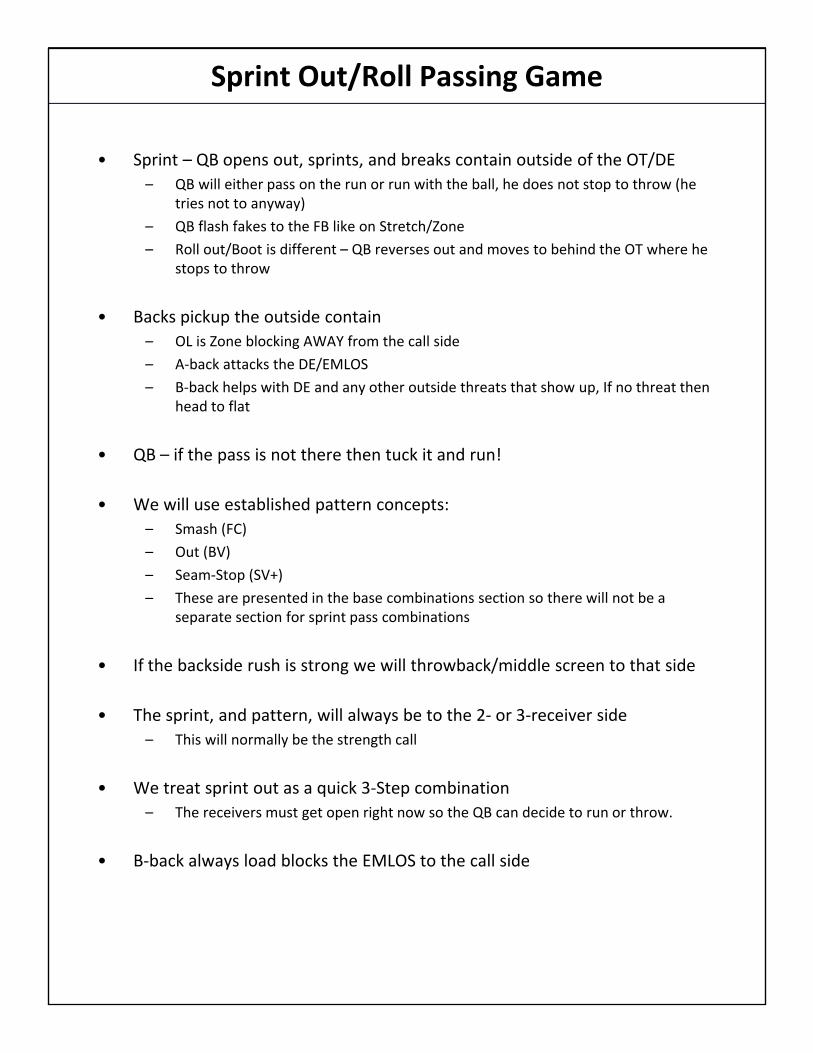
• Sprint – QB opens out, sprints, and breaks contain outside of the OT/DE
– QB will either pass on the run or run with the ball, he does not stop to throw (he tries not to anyway)
– QB flash fakes to the FB like on Stretch/Zone
– Roll out/Boot is different – QB reverses out and moves to behind the OT where he stops to throw
• Backs pickup the outside contain
– OL is Zone blocking AWAY from the call side
– A‐back attacks the DE/EMLOS
– B‐back helps with DE and any other outside threats that show up, If no threat then head to flat
• QB – if the pass is not there then tuck it and run!
• We will use established pattern concepts:
– Smash (FC)
– Out (BV)
– Seam‐Stop (SV+)
– These are presented in the base combinations section so there will not be a separate section for sprint pass combinations
• If the backside rush is strong we will throwback/middle screen to that side
• The sprint, and pattern, will always be to the 2‐ or 3‐receiver side
– This will normally be the strength call
• We treat sprint out as a quick 3‐Step combination
– The receivers must get open right now so the QB can decide to run or throw.
• B‐back always load blocks the EMLOS to the call side
READING THE DEFENSE
Identify the coverage and determine the areas of the defense against which we would have the highest probability of passing success.
Identifying the Defensive Coverage
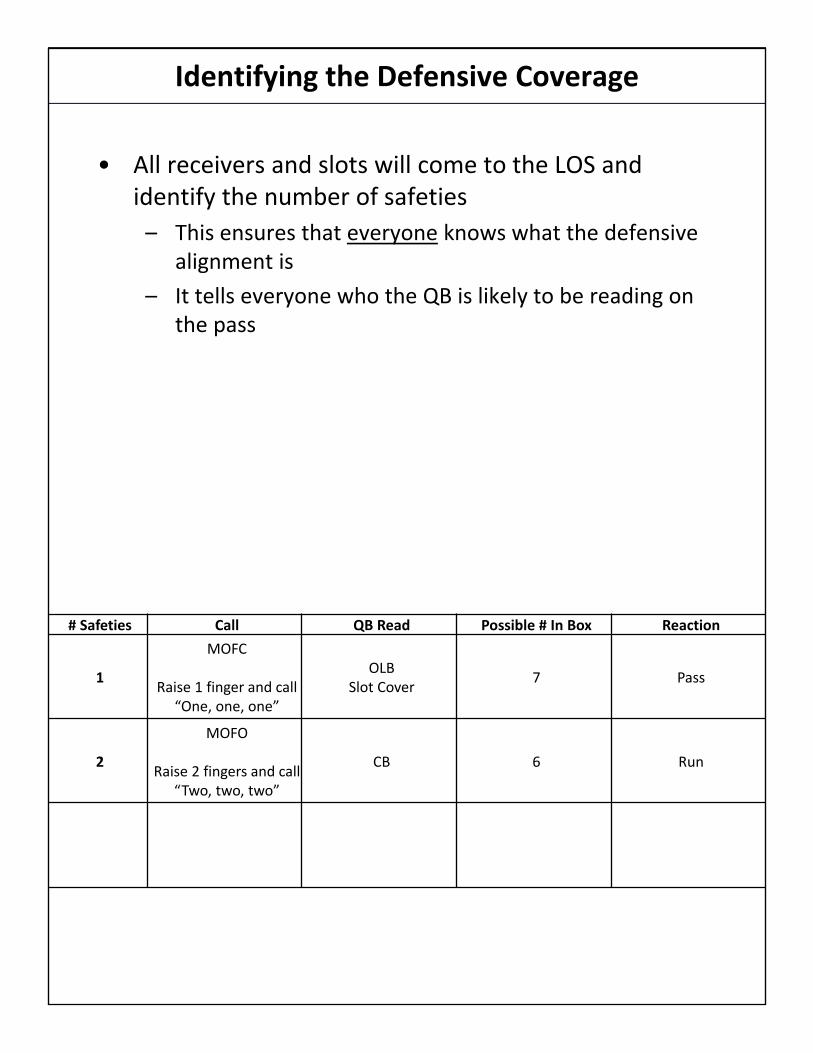
• All receivers and slots will come to the LOS and identify the number of safeties
– This ensures that everyone knows what the defensive alignment is
– It tells everyone who the QB is likely to be reading on the pass
# Safeties Call QB Read Possible # In Box Reaction
1
MOFC
Raise 1 finger and call “One, one, one”
OLBSlot Cover
7 Pass
2
MOFO
Raise 2 fingers and call “Two, two, two”
CB 6 Run
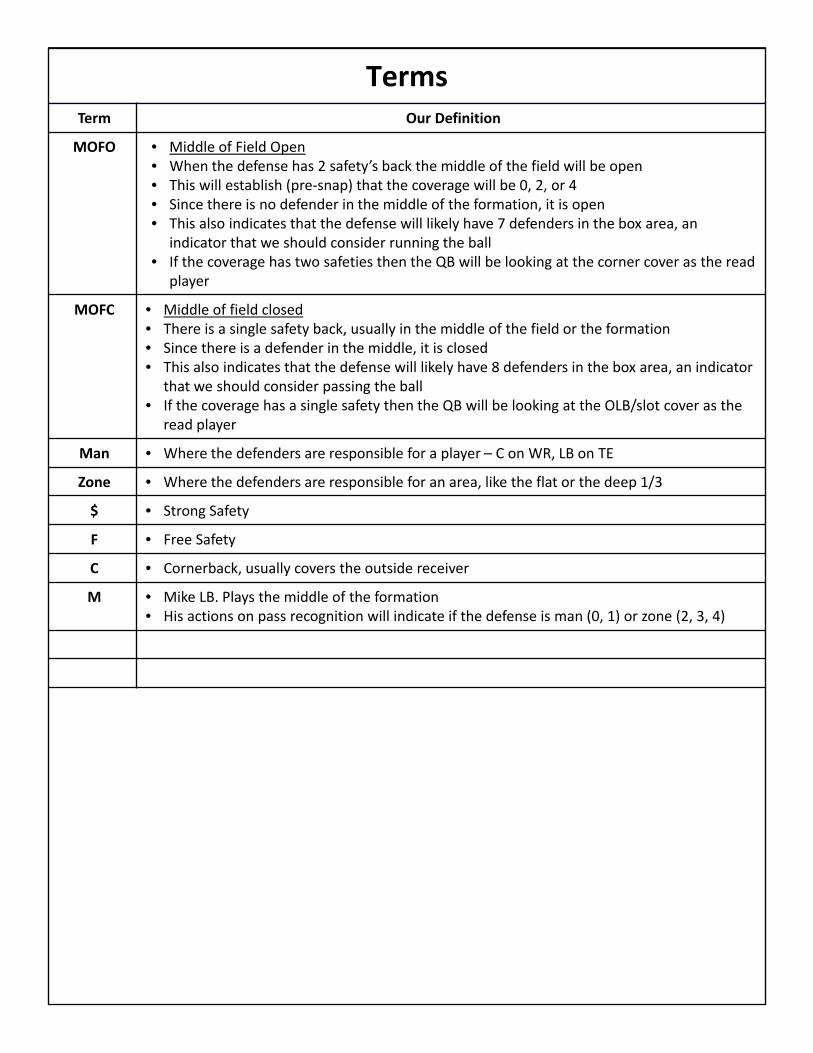
TermsTerm Our Definition
MOFO • Middle of Field Open• When the defense has 2 safety’s back the middle of the field will be open• This will establish (pre‐snap) that the coverage will be 0, 2, or 4• Since there is no defender in the middle of the formation, it is open• This also indicates that the defense will likely have 7 defenders in the box area, an
indicator that we should consider running the ball• If the coverage has two safeties then the QB will be looking at the corner cover as the read
player
MOFC • Middle of field closed• There is a single safety back, usually in the middle of the field or the formation• Since there is a defender in the middle, it is closed• This also indicates that the defense will likely have 8 defenders in the box area, an indicator
that we should consider passing the ball• If the coverage has a single safety then the QB will be looking at the OLB/slot cover as the
read player
Man • Where the defenders are responsible for a player – C on WR, LB on TE
Zone • Where the defenders are responsible for an area, like the flat or the deep 1/3
$ • Strong Safety
F • Free Safety
C • Cornerback, usually covers the outside receiver
M • Mike LB. Plays the middle of the formation• His actions on pass recognition will indicate if the defense is man (0, 1) or zone (2, 3, 4)
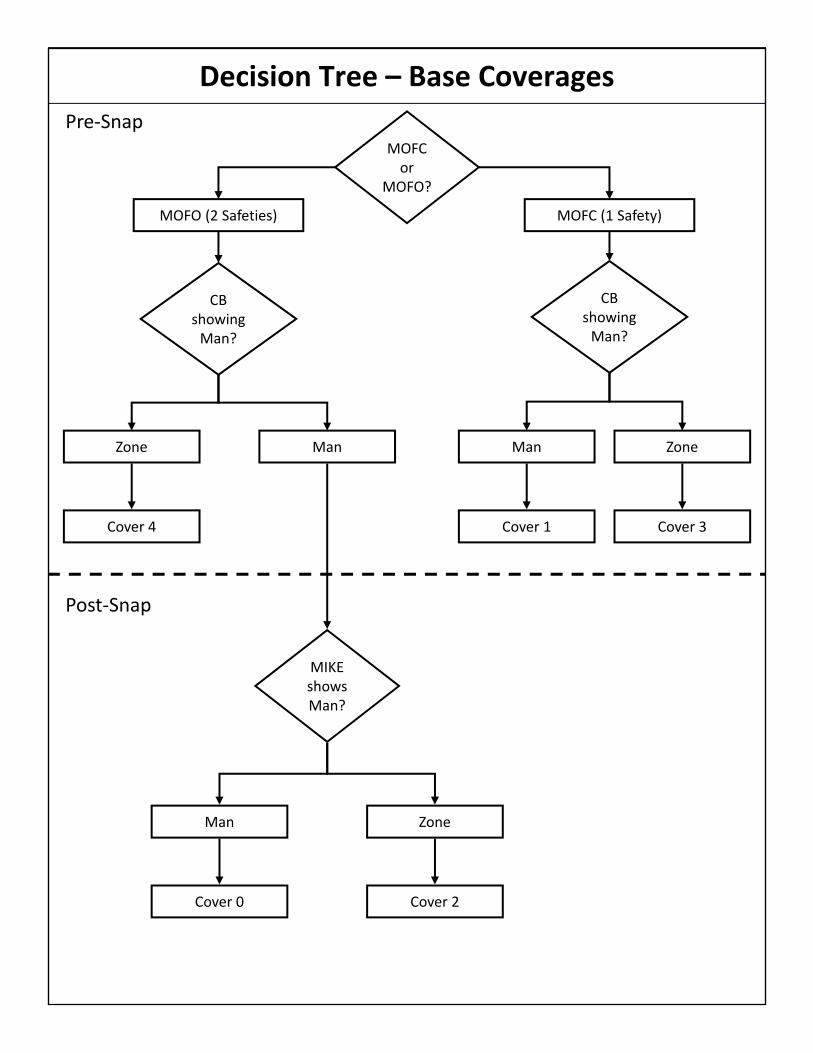
Decision Tree – Base Coverages
MOFC or
MOFO?
CB showing Man?
MIKE shows Man?
Cover 4 Cover 1 Cover 3
MOFO (2 Safeties)
CB showing Man?
MOFC (1 Safety)
Man ZoneManZone
Cover 0 Cover 2
Man Zone
Pre‐Snap
Post‐Snap
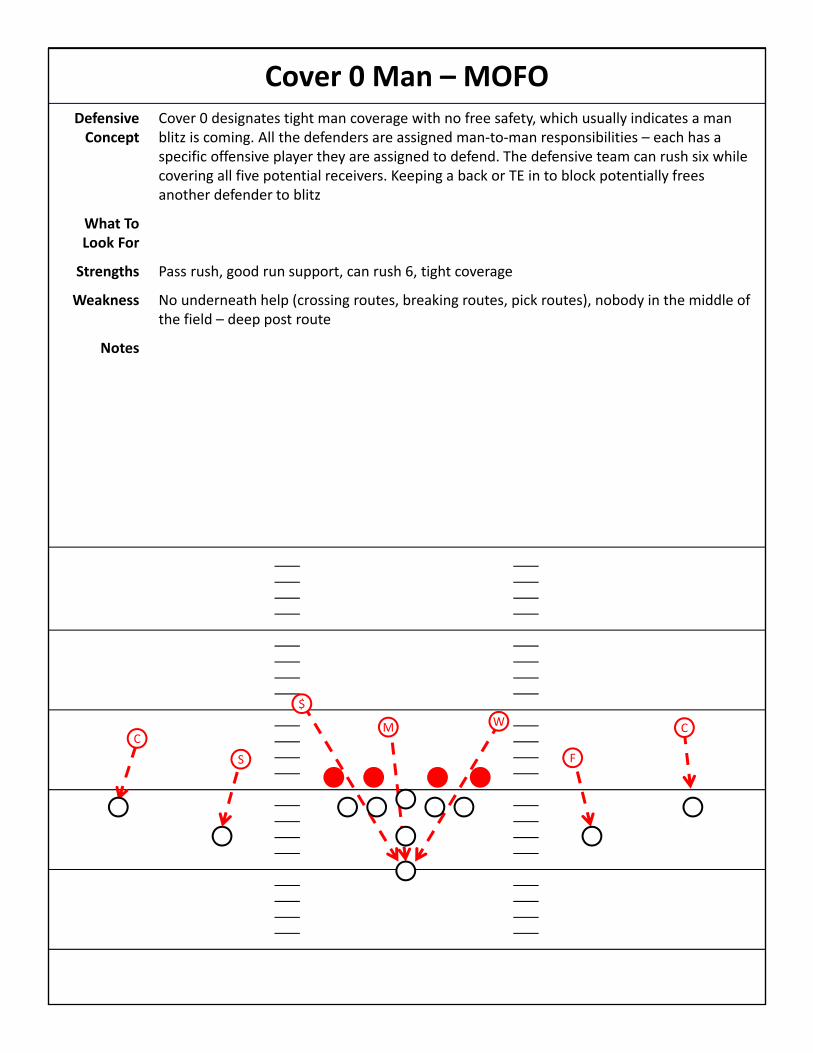
Cover 0 Man – MOFODefensive Concept
Cover 0 designates tight man coverage with no free safety, which usually indicates a man blitz is coming. All the defenders are assigned man‐to‐man responsibilities – each has a specific offensive player they are assigned to defend. The defensive team can rush six while covering all five potential receivers. Keeping a back or TE in to block potentially frees another defender to blitz
What To Look For
Strengths Pass rush, good run support, can rush 6, tight coverage
Weakness No underneath help (crossing routes, breaking routes, pick routes), nobody in the middle of the field – deep post route
Notes
C
W C
$
F
M
S
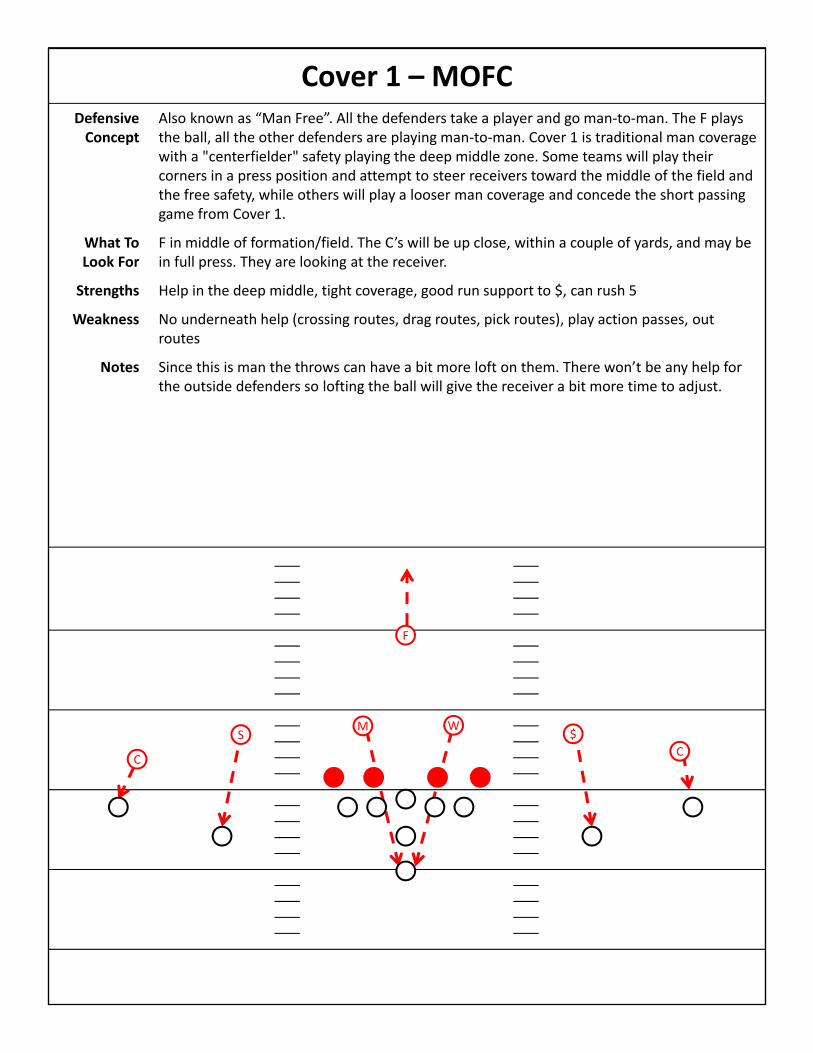
Cover 1 – MOFCDefensive Concept
Also known as “Man Free”. All the defenders take a player and go man‐to‐man. The F plays the ball, all the other defenders are playing man‐to‐man. Cover 1 is traditional man coverage with a "centerfielder" safety playing the deep middle zone. Some teams will play their corners in a press position and attempt to steer receivers toward the middle of the field and the free safety, while others will play a looser man coverage and concede the short passing game from Cover 1.
What To Look For
F in middle of formation/field. The C’s will be up close, within a couple of yards, and may be in full press. They are looking at the receiver.
Strengths Help in the deep middle, tight coverage, good run support to $, can rush 5
Weakness No underneath help (crossing routes, drag routes, pick routes), play action passes, out routes
Notes Since this is man the throws can have a bit more loft on them. There won’t be any help for the outside defenders so lofting the ball will give the receiver a bit more time to adjust.
C
SW
C
F
$M
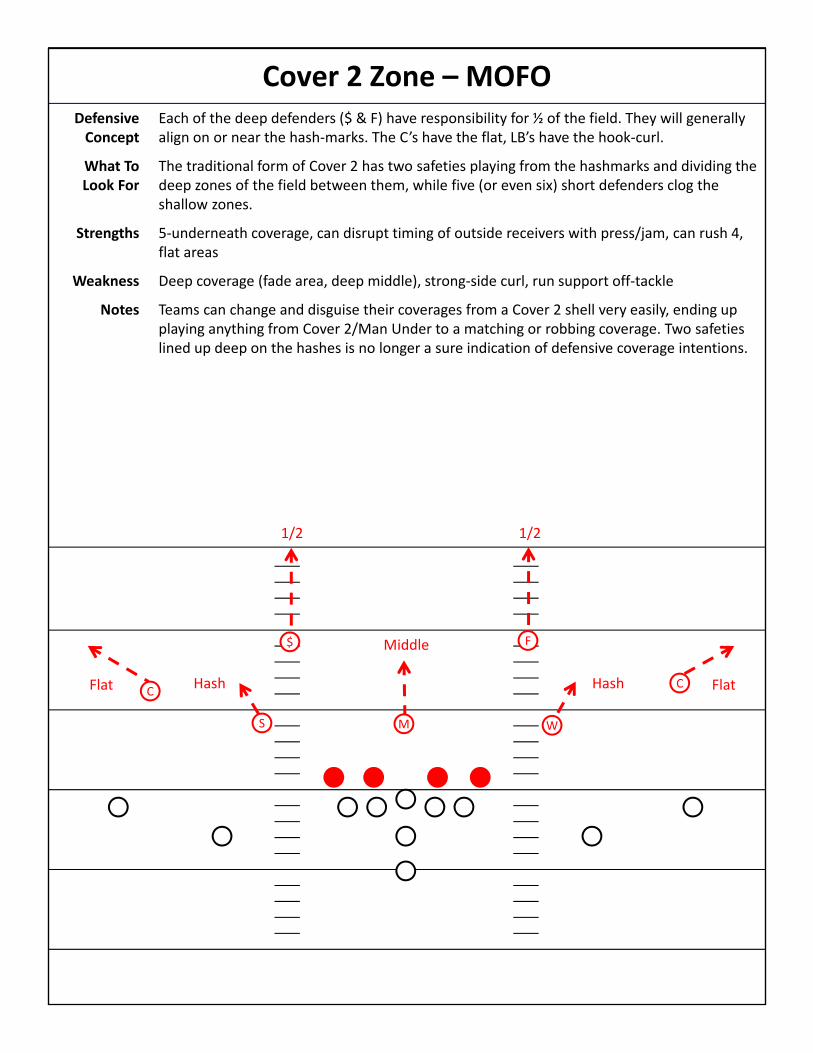
Cover 2 Zone – MOFODefensive Concept
Each of the deep defenders ($ & F) have responsibility for ½ of the field. They will generally align on or near the hash‐marks. The C’s have the flat, LB’s have the hook‐curl.
What To Look For
The traditional form of Cover 2 has two safeties playing from the hashmarks and dividing the deep zones of the field between them, while five (or even six) short defenders clog the shallow zones.
Strengths 5‐underneath coverage, can disrupt timing of outside receivers with press/jam, can rush 4, flat areas
Weakness Deep coverage (fade area, deep middle), strong‐side curl, run support off‐tackle
Notes Teams can change and disguise their coverages from a Cover 2 shell very easily, ending up playing anything from Cover 2/Man Under to a matching or robbing coverage. Two safeties lined up deep on the hashes is no longer a sure indication of defensive coverage intentions.
C
S W
C
$ F
M
1/2 1/2
FlatFlat Hash Hash
Middle
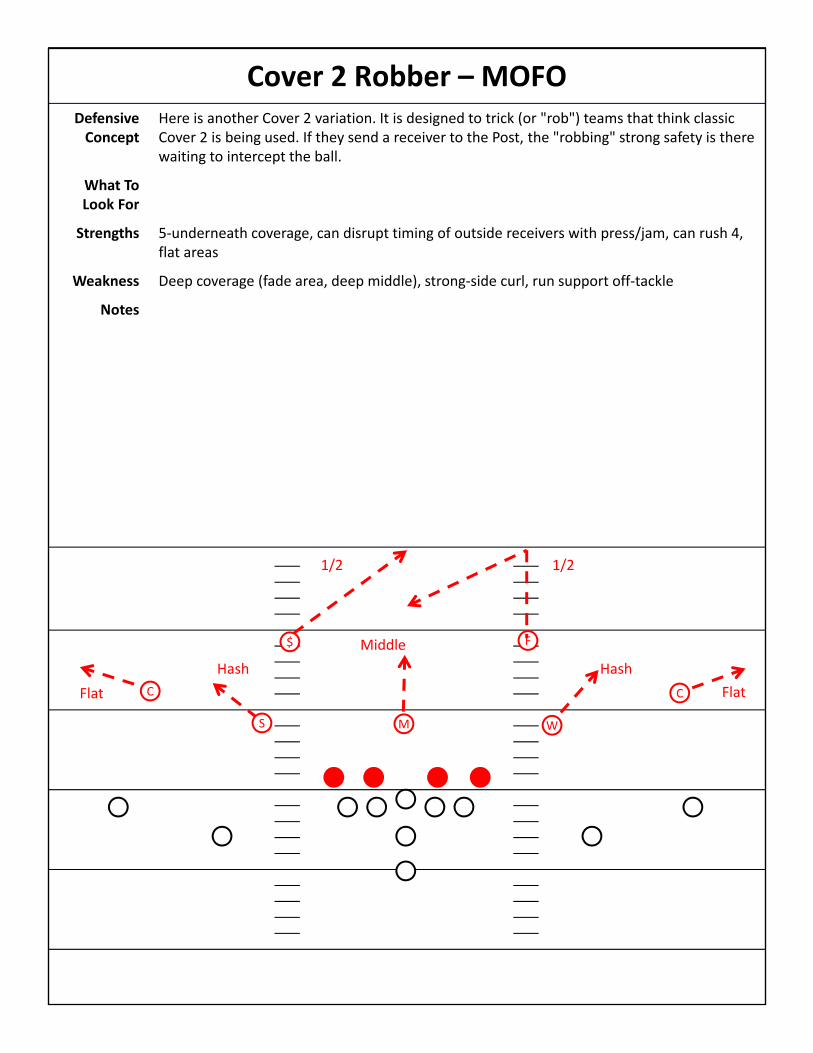
Cover 2 Robber – MOFODefensive Concept
Here is another Cover 2 variation. It is designed to trick (or "rob") teams that think classic Cover 2 is being used. If they send a receiver to the Post, the "robbing" strong safety is there waiting to intercept the ball.
What To Look For
Strengths 5‐underneath coverage, can disrupt timing of outside receivers with press/jam, can rush 4, flat areas
Weakness Deep coverage (fade area, deep middle), strong‐side curl, run support off‐tackle
Notes
W
C
$ F
1/2 1/2
FlatFlat
Hash Hash
Middle
C
S M
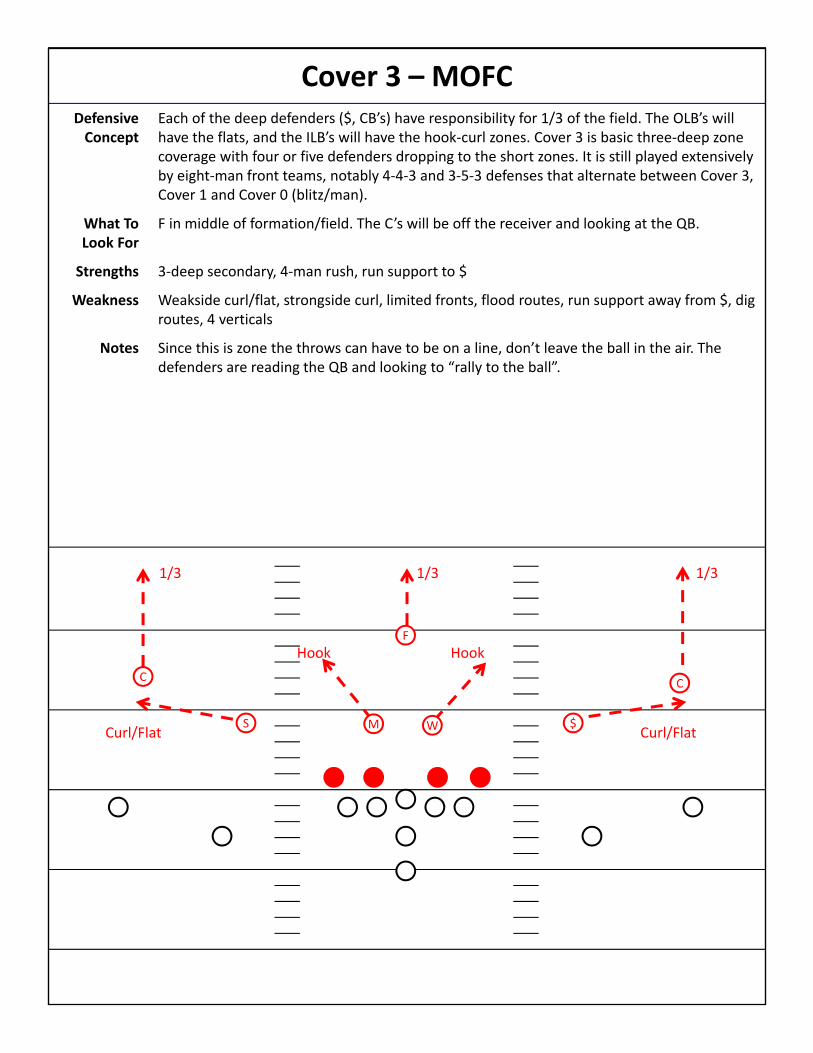
Cover 3 – MOFCDefensive Concept
Each of the deep defenders ($, CB’s) have responsibility for 1/3 of the field. The OLB’s will have the flats, and the ILB’s will have the hook‐curl zones. Cover 3 is basic three‐deep zone coverage with four or five defenders dropping to the short zones. It is still played extensively by eight‐man front teams, notably 4‐4‐3 and 3‐5‐3 defenses that alternate between Cover 3, Cover 1 and Cover 0 (blitz/man).
What To Look For
F in middle of formation/field. The C’s will be off the receiver and looking at the QB.
Strengths 3‐deep secondary, 4‐man rush, run support to $
Weakness Weakside curl/flat, strongside curl, limited fronts, flood routes, run support away from $, dig routes, 4 verticals
Notes Since this is zone the throws can have to be on a line, don’t leave the ball in the air. The defenders are reading the QB and looking to “rally to the ball”.
C
S W
C
F
$M
1/3 1/31/3
Curl/Flat Curl/Flat
Hook Hook
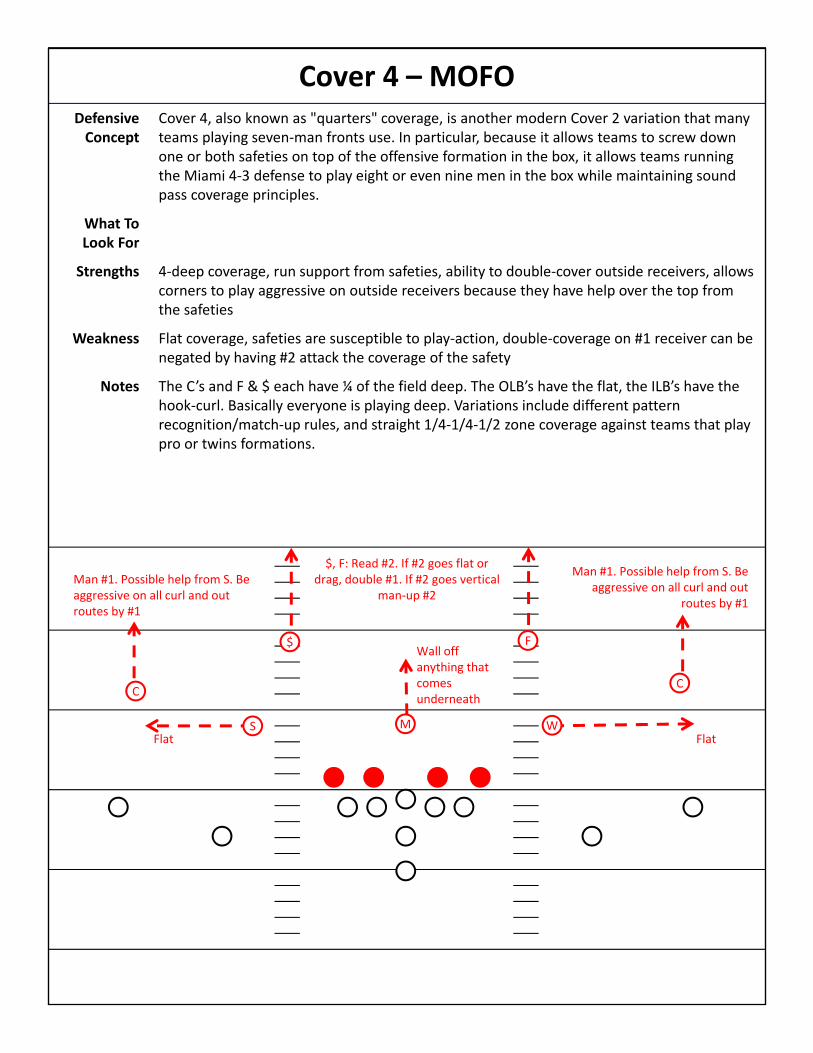
Cover 4 – MOFODefensive Concept
Cover 4, also known as "quarters" coverage, is another modern Cover 2 variation that many teams playing seven‐man fronts use. In particular, because it allows teams to screw down one or both safeties on top of the offensive formation in the box, it allows teams running the Miami 4‐3 defense to play eight or even nine men in the box while maintaining sound pass coverage principles.
What To Look For
Strengths 4‐deep coverage, run support from safeties, ability to double‐cover outside receivers, allows corners to play aggressive on outside receivers because they have help over the top from the safeties
Weakness Flat coverage, safeties are susceptible to play‐action, double‐coverage on #1 receiver can be negated by having #2 attack the coverage of the safety
Notes The C’s and F & $ each have ¼ of the field deep. The OLB’s have the flat, the ILB’s have the hook‐curl. Basically everyone is playing deep. Variations include different pattern recognition/match‐up rules, and straight 1/4‐1/4‐1/2 zone coverage against teams that play pro or twins formations.
CC
$ F
M
$, F: Read #2. If #2 goes flat or drag, double #1. If #2 goes vertical
man‐up #2
W
Man #1. Possible help from S. Be aggressive on all curl and out routes by #1
Man #1. Possible help from S. Be aggressive on all curl and out
routes by #1
FlatFlat
Wall off anything that comes underneath
S

ROUTESSetting the assignments for the receivers
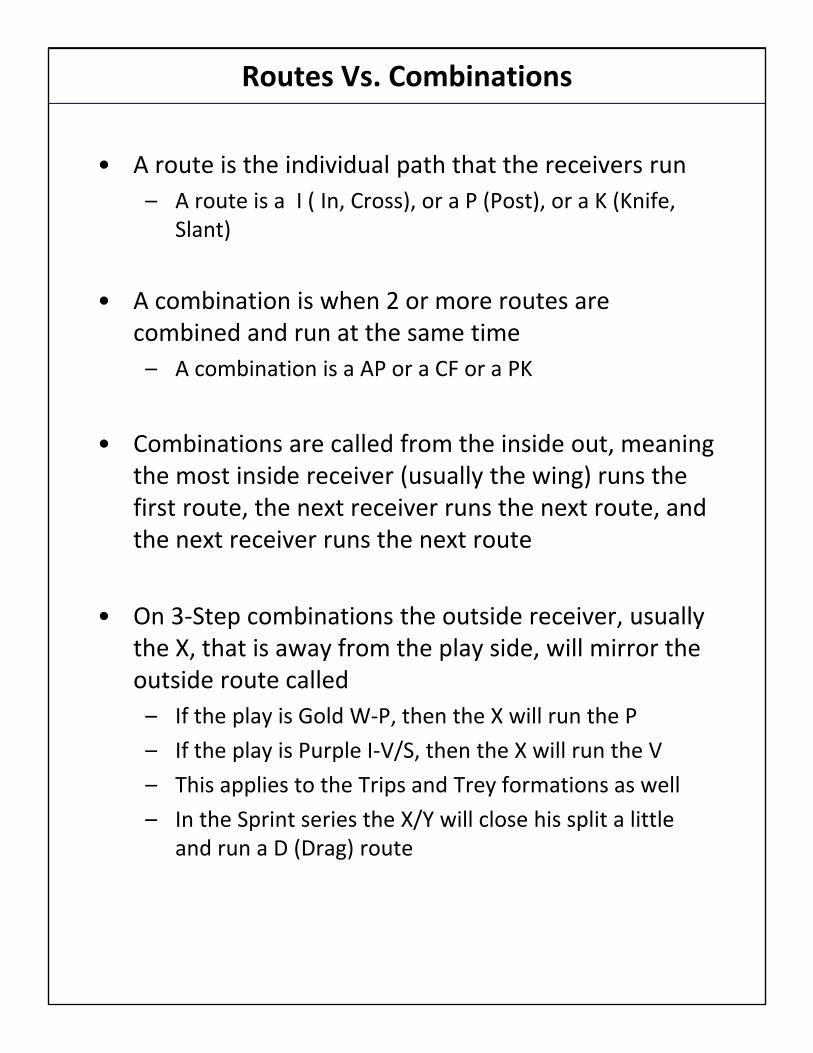
Routes Vs. Combinations
• A route is the individual path that the receivers run
– A route is a I ( In, Cross), or a P (Post), or a K (Knife, Slant)
• A combination is when 2 or more routes are combined and run at the same time
– A combination is a AP or a CF or a PK
• Combinations are called from the inside out, meaning the most inside receiver (usually the wing) runs the first route, the next receiver runs the next route, and the next receiver runs the next route
• On 3‐Step combinations the outside receiver, usually the X, that is away from the play side, will mirror the outside route called
– If the play is Gold W‐P, then the X will run the P
– If the play is Purple I‐V/S, then the X will run the V
– This applies to the Trips and Trey formations as well
– In the Sprint series the X/Y will close his split a little and run a D (Drag) route
Notes
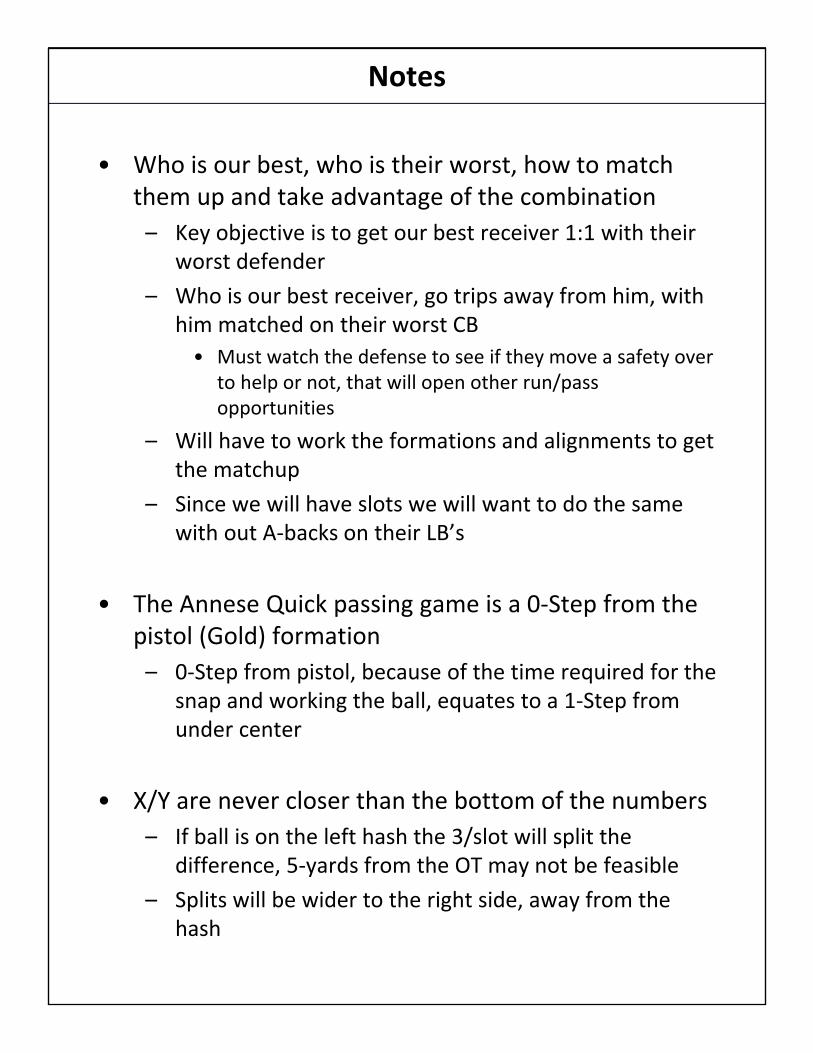
• Who is our best, who is their worst, how to match them up and take advantage of the combination
– Key objective is to get our best receiver 1:1 with their worst defender
– Who is our best receiver, go trips away from him, with him matched on their worst CB
• Must watch the defense to see if they move a safety over to help or not, that will open other run/pass opportunities
– Will have to work the formations and alignments to get the matchup
– Since we will have slots we will want to do the same with out A‐backs on their LB’s
• The Annese Quick passing game is a 0‐Step from the pistol (Gold) formation
– 0‐Step from pistol, because of the time required for the snap and working the ball, equates to a 1‐Step from under center
• X/Y are never closer than the bottom of the numbers
– If ball is on the left hash the 3/slot will split the difference, 5‐yards from the OT may not be feasible
– Splits will be wider to the right side, away from the hash
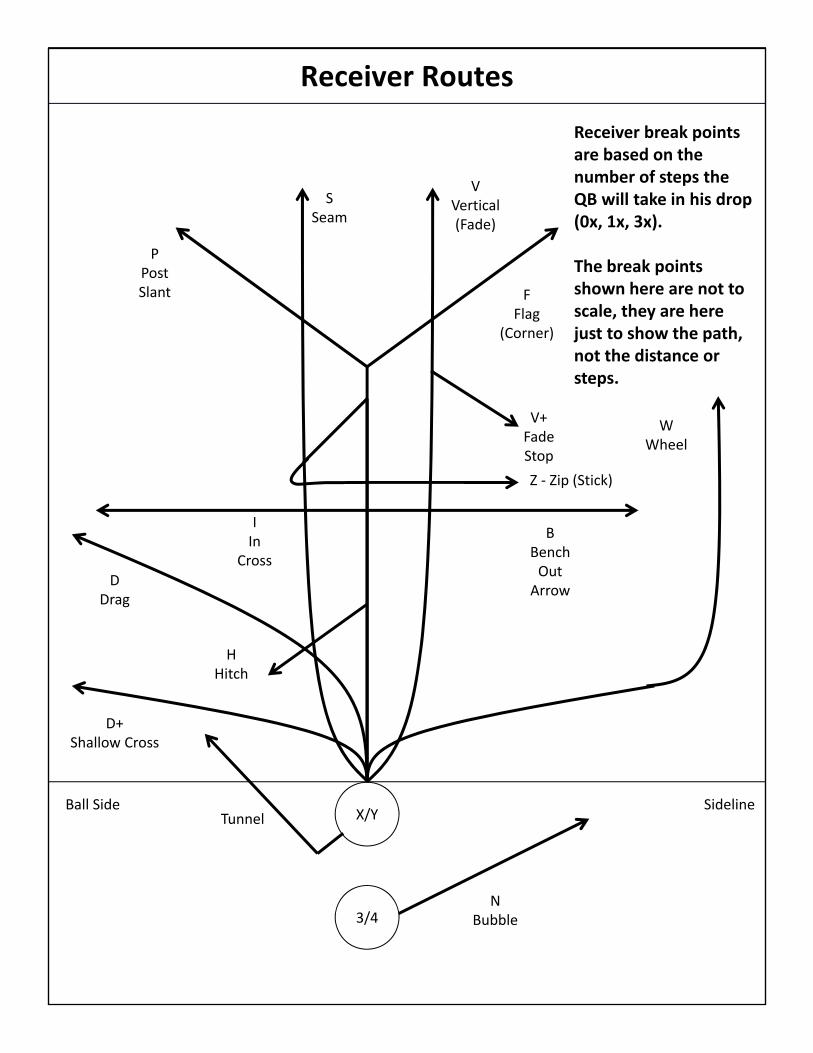
Receiver Routes
BBenchOutArrow
IIn
Cross
PPostSlant F
Flag(Corner)
VVertical(Fade)
X/Y
Receiver break points are based on the number of steps the QB will take in his drop (0x, 1x, 3x).
The break points shown here are not to scale, they are here just to show the path, not the distance or steps.
Ball Side
NBubble
SSeam
HHitch
WWheel
V+FadeStop
D+Shallow Cross
DDrag
TunnelSideline
3/4
Z ‐ Zip (Stick)
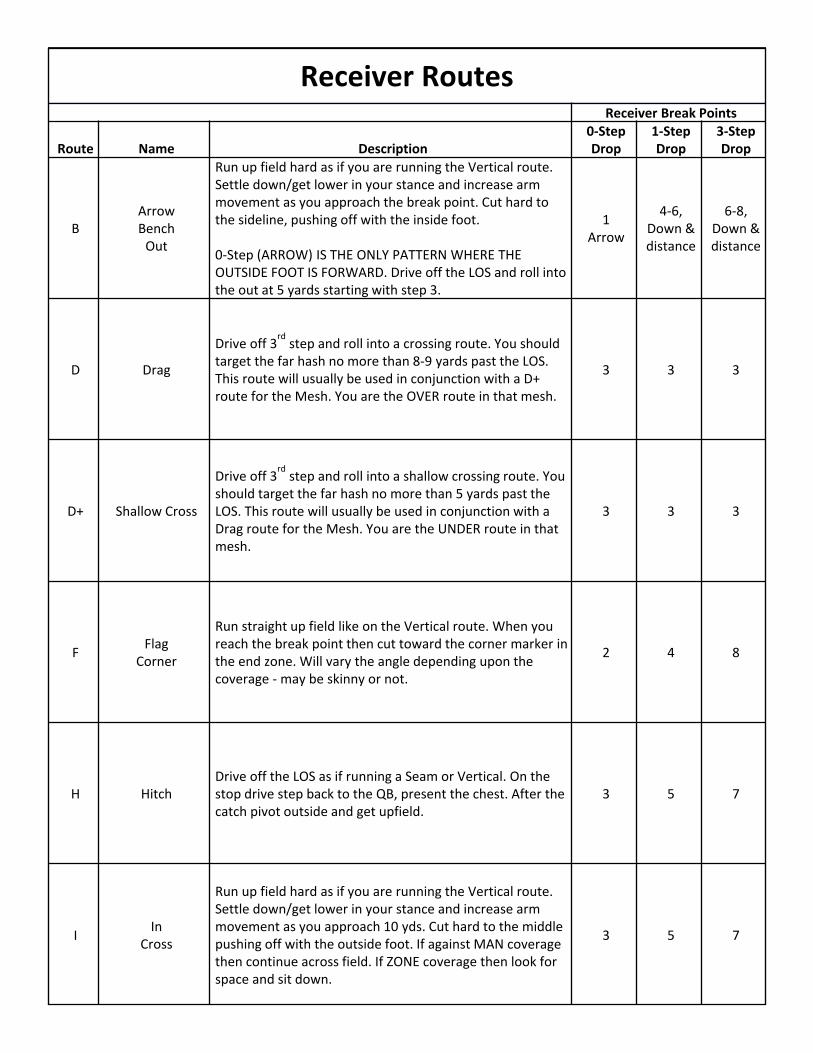
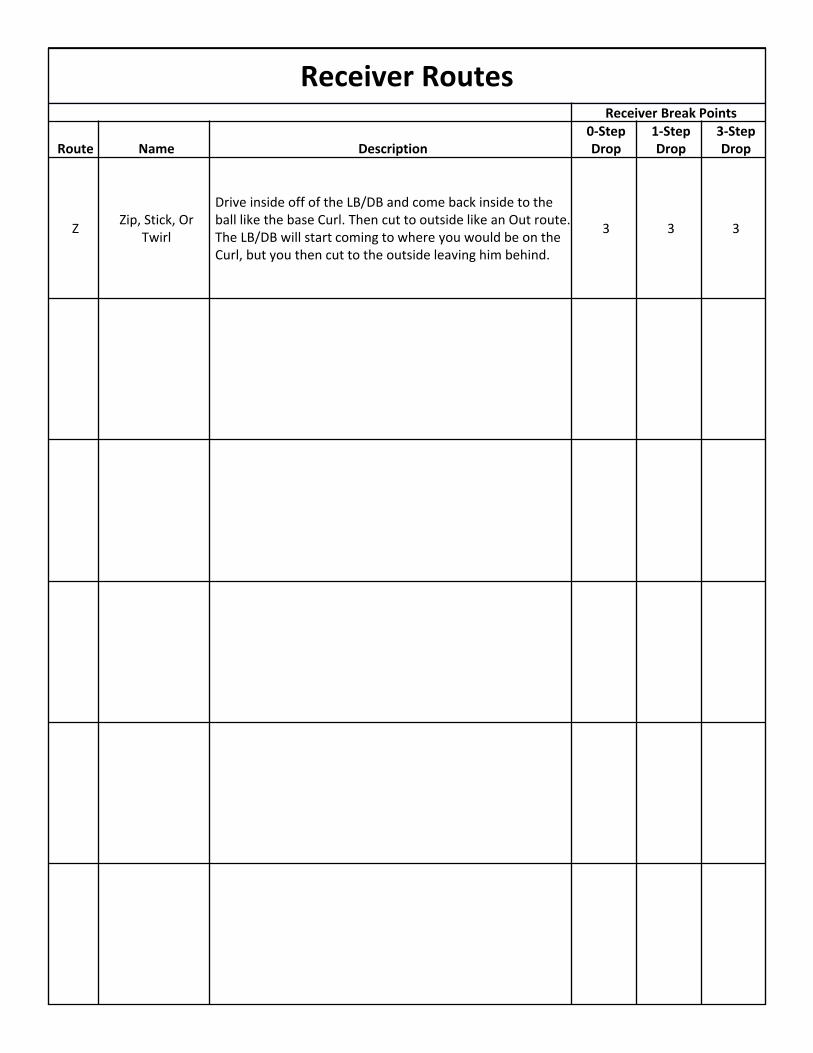
Receiver RoutesReceiver Break Points
Route Name Description0‐Step Drop
1‐Step Drop
3‐Step Drop
BArrowBenchOut
Run up field hard as if you are running the Vertical route. Settle down/get lower in your stance and increase arm movement as you approach the break point. Cut hard to the sideline, pushing off with the inside foot.
0‐Step (ARROW) IS THE ONLY PATTERN WHERE THE OUTSIDE FOOT IS FORWARD. Drive off the LOS and roll into the out at 5 yards starting with step 3.
1Arrow
4‐6, Down & distance
6‐8, Down & distance
D Drag
Drive off 3rdstep and roll into a crossing route. You should
target the far hash no more than 8‐9 yards past the LOS. This route will usually be used in conjunction with a D+ route for the Mesh. You are the OVER route in that mesh.
3 3 3
D+ Shallow Cross
Drive off 3rdstep and roll into a shallow crossing route. You
should target the far hash no more than 5 yards past the LOS. This route will usually be used in conjunction with a Drag route for the Mesh. You are the UNDER route in that mesh.
3 3 3
FFlag
Corner
Run straight up field like on the Vertical route. When you reach the break point then cut toward the corner marker in the end zone. Will vary the angle depending upon the coverage ‐may be skinny or not.
2 4 8
H HitchDrive off the LOS as if running a Seam or Vertical. On the stop drive step back to the QB, present the chest. After the catch pivot outside and get upfield.
3 5 7
IIn
Cross
Run up field hard as if you are running the Vertical route. Settle down/get lower in your stance and increase arm movement as you approach 10 yds. Cut hard to the middle pushing off with the outside foot. If against MAN coverage then continue across field. If ZONE coverage then look for space and sit down.
3 5 7
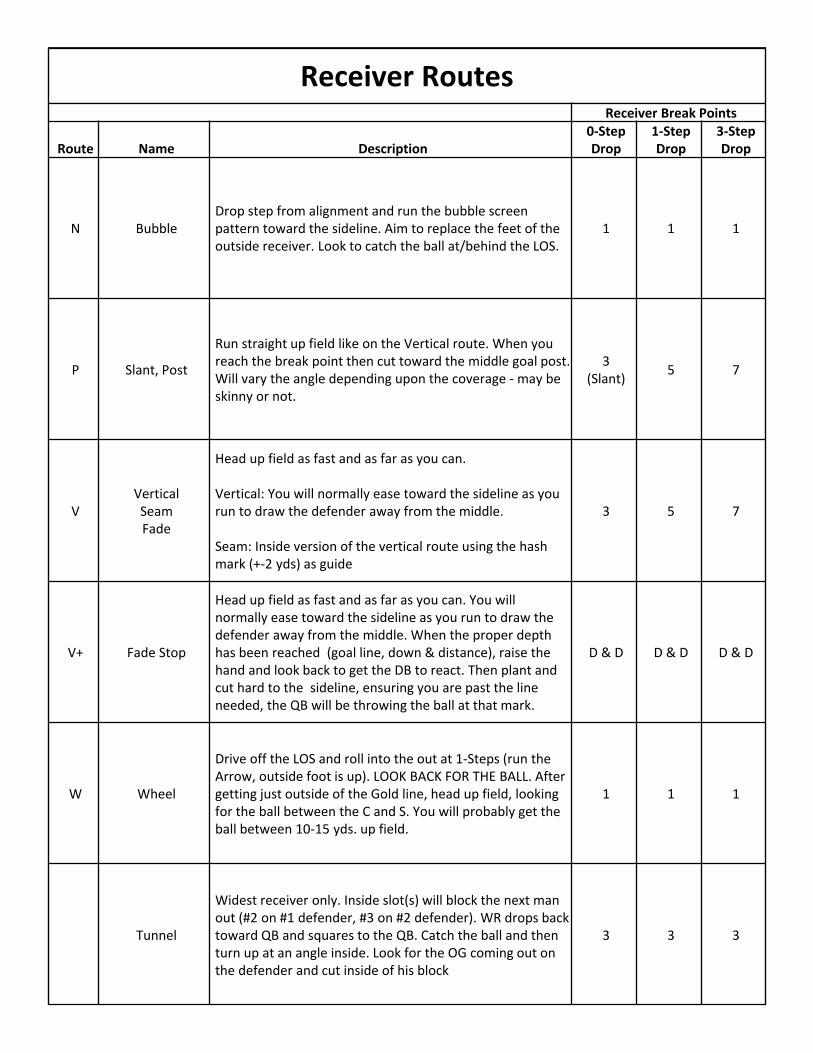
Receiver RoutesReceiver Break Points
Route Name Description0‐Step Drop
1‐Step Drop
3‐Step Drop
N BubbleDrop step from alignment and run the bubble screen pattern toward the sideline. Aim to replace the feet of the outside receiver. Look to catch the ball at/behind the LOS.
1 1 1
P Slant, Post
Run straight up field like on the Vertical route. When you reach the break point then cut toward the middle goal post. Will vary the angle depending upon the coverage ‐may be skinny or not.
3(Slant)
5 7
VVerticalSeamFade
Head up field as fast and as far as you can.
Vertical: You will normally ease toward the sideline as you run to draw the defender away from the middle.
Seam: Inside version of the vertical route using the hash mark (+‐2 yds) as guide
3 5 7
V+ Fade Stop
Head up field as fast and as far as you can. You will normally ease toward the sideline as you run to draw the defender away from the middle. When the proper depth has been reached (goal line, down & distance), raise the hand and look back to get the DB to react. Then plant and cut hard to the sideline, ensuring you are past the line needed, the QB will be throwing the ball at that mark.
D & D D & D D & D
W Wheel
Drive off the LOS and roll into the out at 1‐Steps (run the Arrow, outside foot is up). LOOK BACK FOR THE BALL. After getting just outside of the Gold line, head up field, looking for the ball between the C and S. You will probably get the ball between 10‐15 yds. up field.
1 1 1
Tunnel
Widest receiver only. Inside slot(s) will block the next man out (#2 on #1 defender, #3 on #2 defender). WR drops back toward QB and squares to the QB. Catch the ball and then turn up at an angle inside. Look for the OG coming out on the defender and cut inside of his block
3 3 3
Receiver RoutesReceiver Break Points
Route Name Description0‐Step Drop
1‐Step Drop
3‐Step Drop
ZZip, Stick, Or
Twirl
Drive inside off of the LB/DB and come back inside to the ball like the base Curl. Then cut to outside like an Out route. The LB/DB will start coming to where you would be on the Curl, but you then cut to the outside leaving him behind.
3 3 3
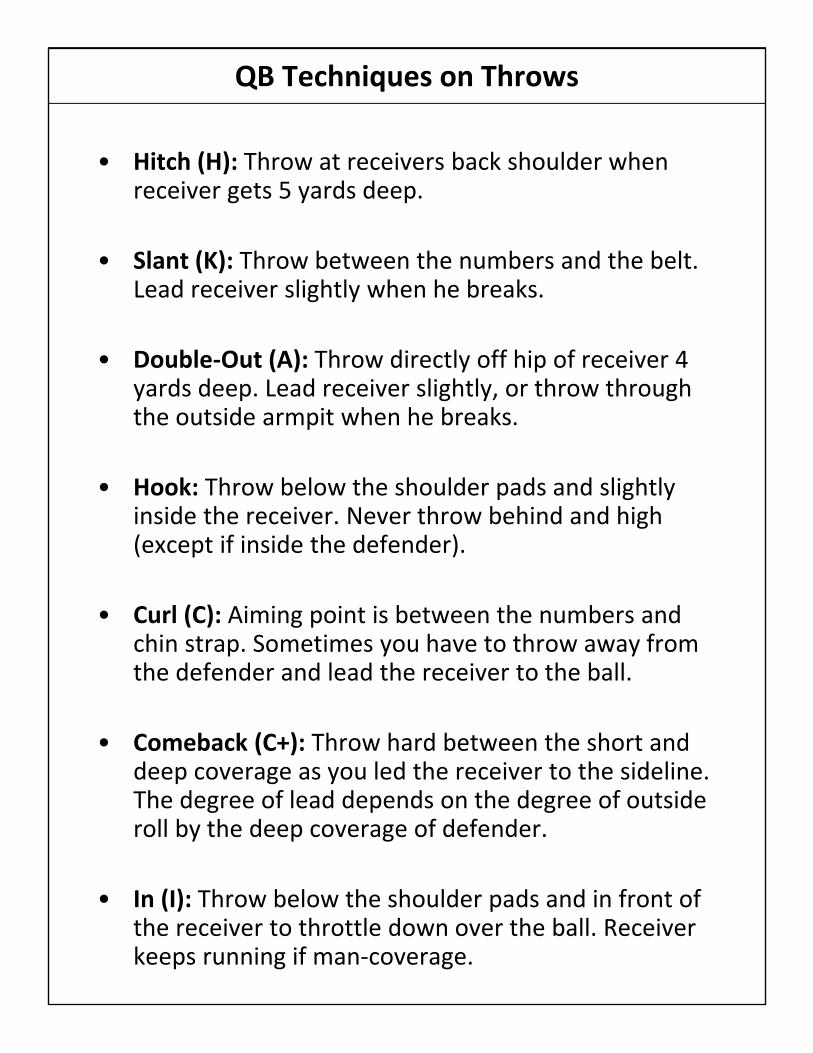
QB Techniques on Throws
• Hitch (H): Throw at receivers back shoulder when receiver gets 5 yards deep.
• Slant (K): Throw between the numbers and the belt. Lead receiver slightly when he breaks.
• Double‐Out (A): Throw directly off hip of receiver 4 yards deep. Lead receiver slightly, or throw through the outside armpit when he breaks.
• Hook: Throw below the shoulder pads and slightly inside the receiver. Never throw behind and high (except if inside the defender).
• Curl (C): Aiming point is between the numbers and chin strap. Sometimes you have to throw away from the defender and lead the receiver to the ball.
• Comeback (C+): Throw hard between the short and deep coverage as you led the receiver to the sideline. The degree of lead depends on the degree of outside roll by the deep coverage of defender.
• In (I): Throw below the shoulder pads and in front of the receiver to throttle down over the ball. Receiver keeps running if man‐coverage.
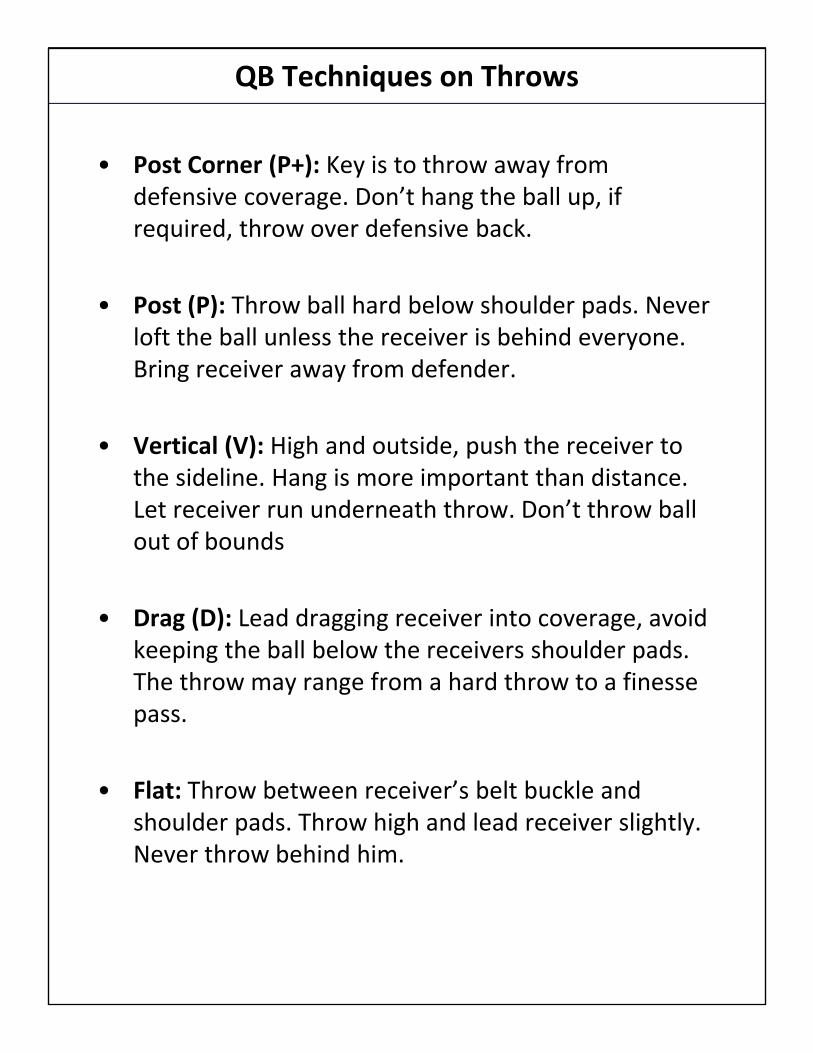
QB Techniques on Throws
• Post Corner (P+): Key is to throw away from defensive coverage. Don’t hang the ball up, if required, throw over defensive back.
• Post (P): Throw ball hard below shoulder pads. Never loft the ball unless the receiver is behind everyone. Bring receiver away from defender.
• Vertical (V): High and outside, push the receiver to the sideline. Hang is more important than distance. Let receiver run underneath throw. Don’t throw ball out of bounds
• Drag (D): Lead dragging receiver into coverage, avoid keeping the ball below the receivers shoulder pads. The throw may range from a hard throw to a finesse pass.
• Flat: Throw between receiver’s belt buckle and shoulder pads. Throw high and lead receiver slightly. Never throw behind him.

COMBINATIONS
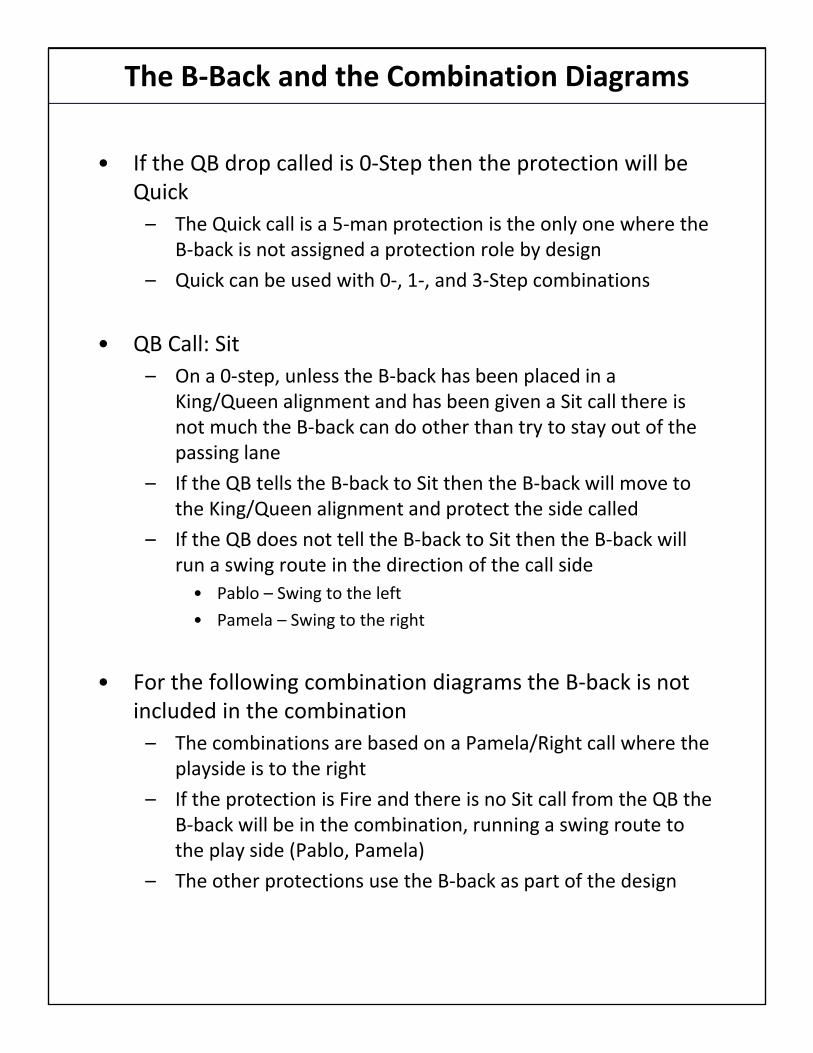
The B‐Back and the Combination Diagrams
• If the QB drop called is 0‐Step then the protection will be Quick
– The Quick call is a 5‐man protection is the only one where the B‐back is not assigned a protection role by design
– Quick can be used with 0‐, 1‐, and 3‐Step combinations
• QB Call: Sit
– On a 0‐step, unless the B‐back has been placed in a King/Queen alignment and has been given a Sit call there is not much the B‐back can do other than try to stay out of the passing lane
– If the QB tells the B‐back to Sit then the B‐back will move to the King/Queen alignment and protect the side called
– If the QB does not tell the B‐back to Sit then the B‐back will run a swing route in the direction of the call side
• Pablo – Swing to the left
• Pamela – Swing to the right
• For the following combination diagrams the B‐back is not included in the combination
– The combinations are based on a Pamela/Right call where the playside is to the right
– If the protection is Fire and there is no Sit call from the QB the B‐back will be in the combination, running a swing route to the play side (Pablo, Pamela)
– The other protections use the B‐back as part of the design
Notes
• When we go to Trips/Trey, either by alignment or by motion, the player to moves to the trips/trey side is the ‘Extra’ player
– This player will run either a Vertical or a Bubble, depending on the type and depth of the routes by the other two players
– If the players are short, such as hitches, in’s, or out’s, then the Extra player will run the Vertical
– If the players are longer, such as Posts, Verticals/Seams, in’s, or out’s, then the Extra player will run the Bubble
Schemes and CombinationsConcept Summary Combinations
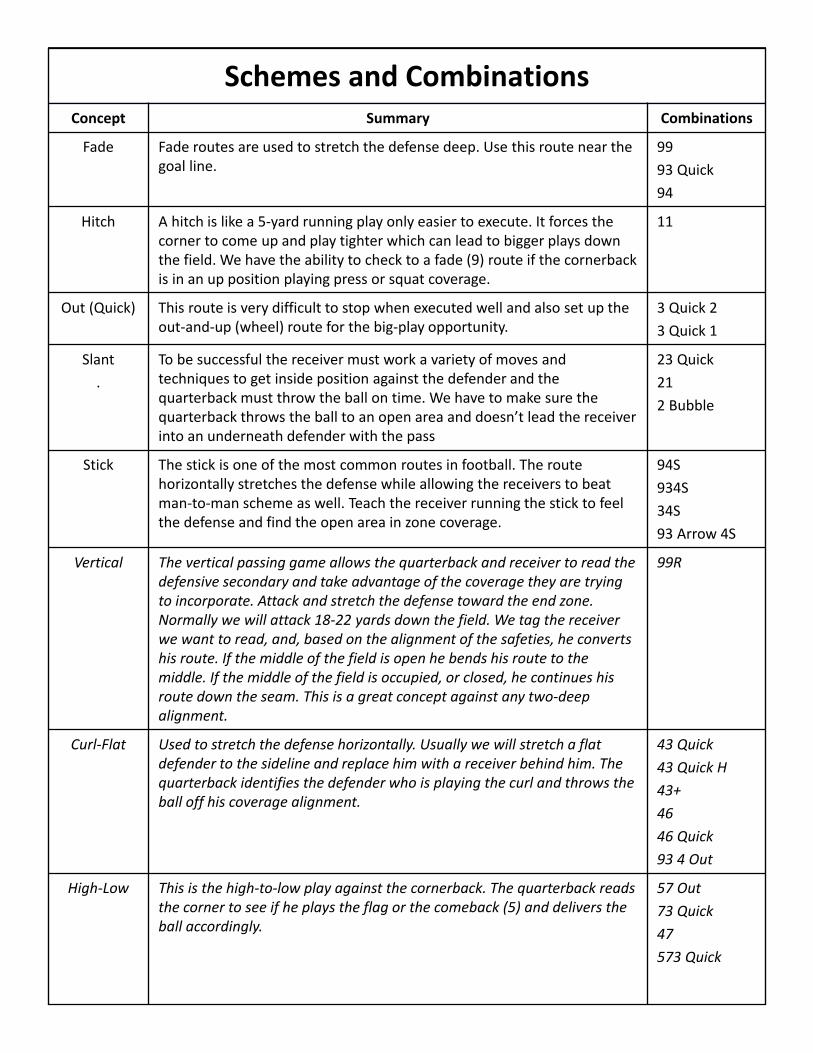
Fade Fade routes are used to stretch the defense deep. Use this route near the goal line.
99
93 Quick
94
Hitch A hitch is like a 5‐yard running play only easier to execute. It forces the corner to come up and play tighter which can lead to bigger plays down the field. We have the ability to check to a fade (9) route if the cornerback is in an up position playing press or squat coverage.
11
Out (Quick) This route is very difficult to stop when executed well and also set up the out‐and‐up (wheel) route for the big‐play opportunity.
3 Quick 2
3 Quick 1
Slant
.
To be successful the receiver must work a variety of moves and techniques to get inside position against the defender and the quarterback must throw the ball on time. We have to make sure the quarterback throws the ball to an open area and doesn’t lead the receiver into an underneath defender with the pass
23 Quick
21
2 Bubble
Stick The stick is one of the most common routes in football. The route horizontally stretches the defense while allowing the receivers to beat man‐to‐man scheme as well. Teach the receiver running the stick to feel the defense and find the open area in zone coverage.
94S
934S
34S
93 Arrow 4S
Vertical The vertical passing game allows the quarterback and receiver to read the defensive secondary and take advantage of the coverage they are trying to incorporate. Attack and stretch the defense toward the end zone. Normally we will attack 18‐22 yards down the field. We tag the receiver we want to read, and, based on the alignment of the safeties, he converts his route. If the middle of the field is open he bends his route to the middle. If the middle of the field is occupied, or closed, he continues his route down the seam. This is a great concept against any two‐deep alignment.
99R
Curl‐Flat Used to stretch the defense horizontally. Usually we will stretch a flat defender to the sideline and replace him with a receiver behind him. The quarterback identifies the defender who is playing the curl and throws the ball off his coverage alignment.
43 Quick
43 Quick H
43+
46
46 Quick
93 4 Out
High‐Low This is the high‐to‐low play against the cornerback. The quarterback reads the corner to see if he plays the flag or the comeback (5) and delivers the ball accordingly.
57 Out
73 Quick
47
573 Quick
5‐Step Route Combinations – Cont’dConcept Summary Combinations
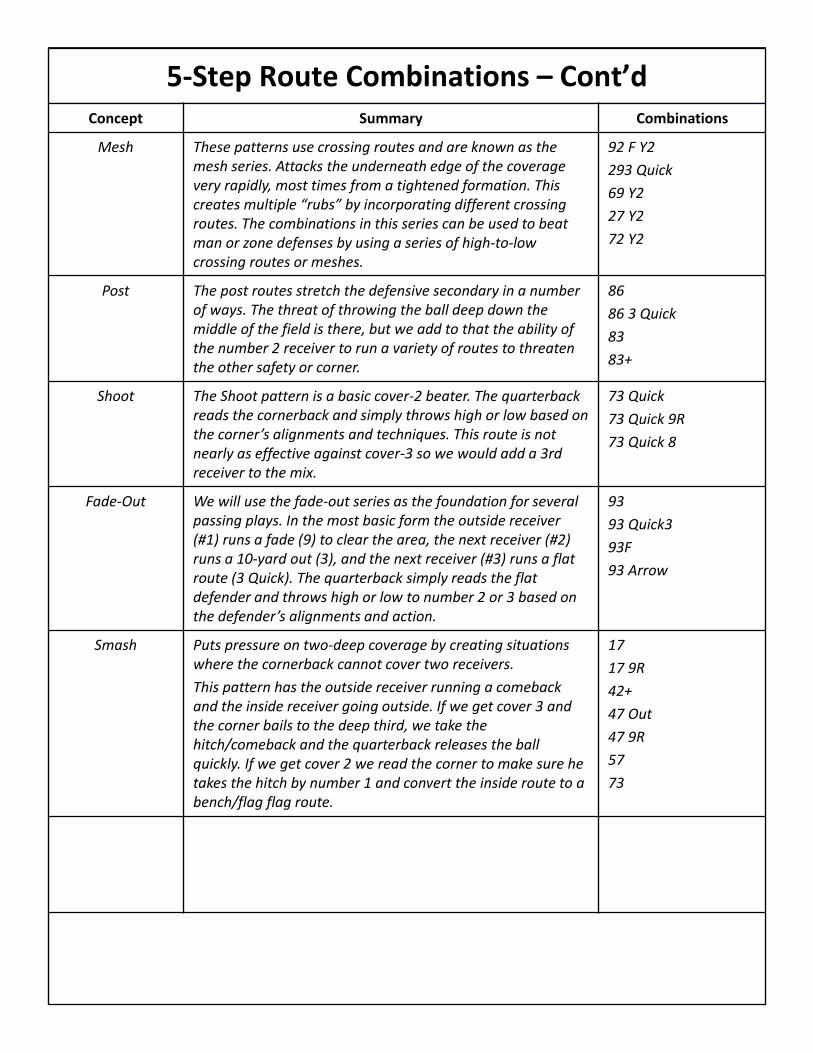
Mesh These patterns use crossing routes and are known as the mesh series. Attacks the underneath edge of the coverage very rapidly, most times from a tightened formation. This creates multiple “rubs” by incorporating different crossing routes. The combinations in this series can be used to beat man or zone defenses by using a series of high‐to‐low crossing routes or meshes.
92 F Y2
293 Quick
69 Y2
27 Y2
72 Y2
Post The post routes stretch the defensive secondary in a number of ways. The threat of throwing the ball deep down the middle of the field is there, but we add to that the ability of the number 2 receiver to run a variety of routes to threaten the other safety or corner.
86
86 3 Quick
83
83+
Shoot The Shoot pattern is a basic cover‐2 beater. The quarterback reads the cornerback and simply throws high or low based on the corner’s alignments and techniques. This route is not nearly as effective against cover‐3 so we would add a 3rd receiver to the mix.
73 Quick
73 Quick 9R
73 Quick 8
Fade‐Out We will use the fade‐out series as the foundation for several passing plays. In the most basic form the outside receiver (#1) runs a fade (9) to clear the area, the next receiver (#2) runs a 10‐yard out (3), and the next receiver (#3) runs a flat route (3 Quick). The quarterback simply reads the flat defender and throws high or low to number 2 or 3 based on the defender’s alignments and action.
93
93 Quick3
93F
93 Arrow
Smash Puts pressure on two‐deep coverage by creating situations where the cornerback cannot cover two receivers.
This pattern has the outside receiver running a comeback and the inside receiver going outside. If we get cover 3 and the corner bails to the deep third, we take the hitch/comeback and the quarterback releases the ball quickly. If we get cover 2 we read the corner to make sure he takes the hitch by number 1 and convert the inside route to a bench/flag flag route.
17
17 9R
42+
47 Out
47 9R
57
73
ScreensConcept Summary Combinations
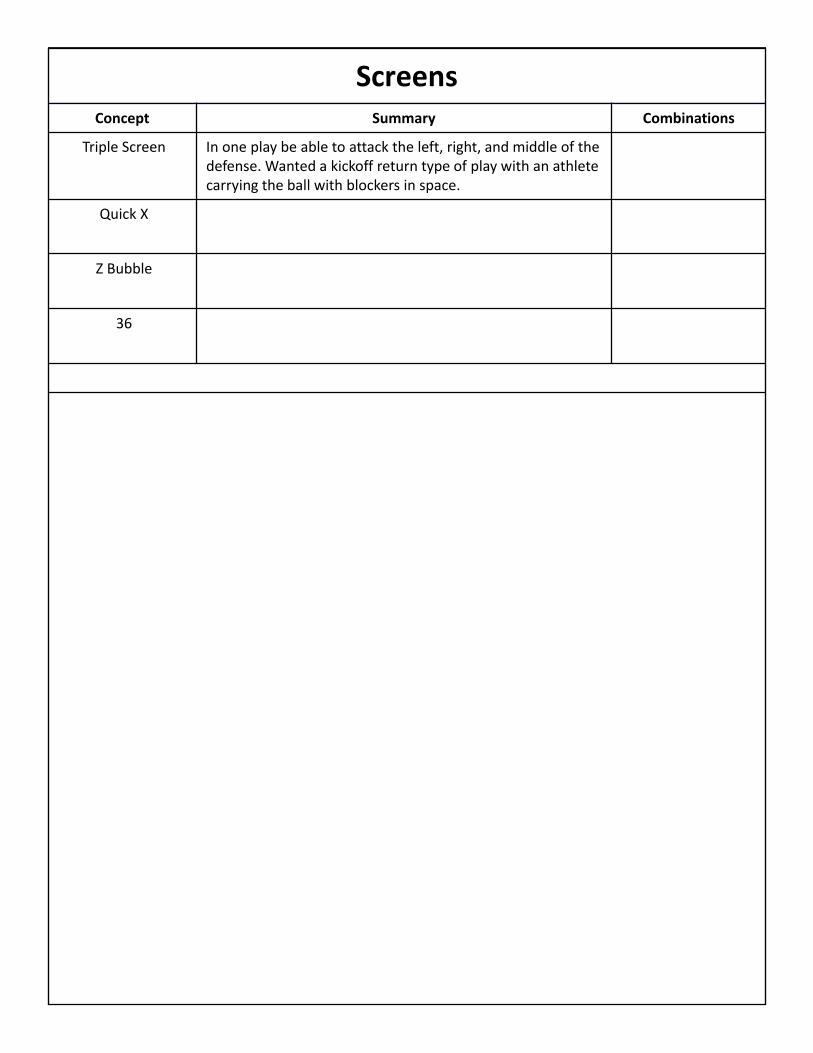
Triple Screen In one play be able to attack the left, right, and middle of the defense. Wanted a kickoff return type of play with an athlete carrying the ball with blockers in space.
Quick X
Z Bubble
36
Pass Combination ConceptsConcept QB Drop (Rcvrs) Combination Name (Wrist Band Insert)
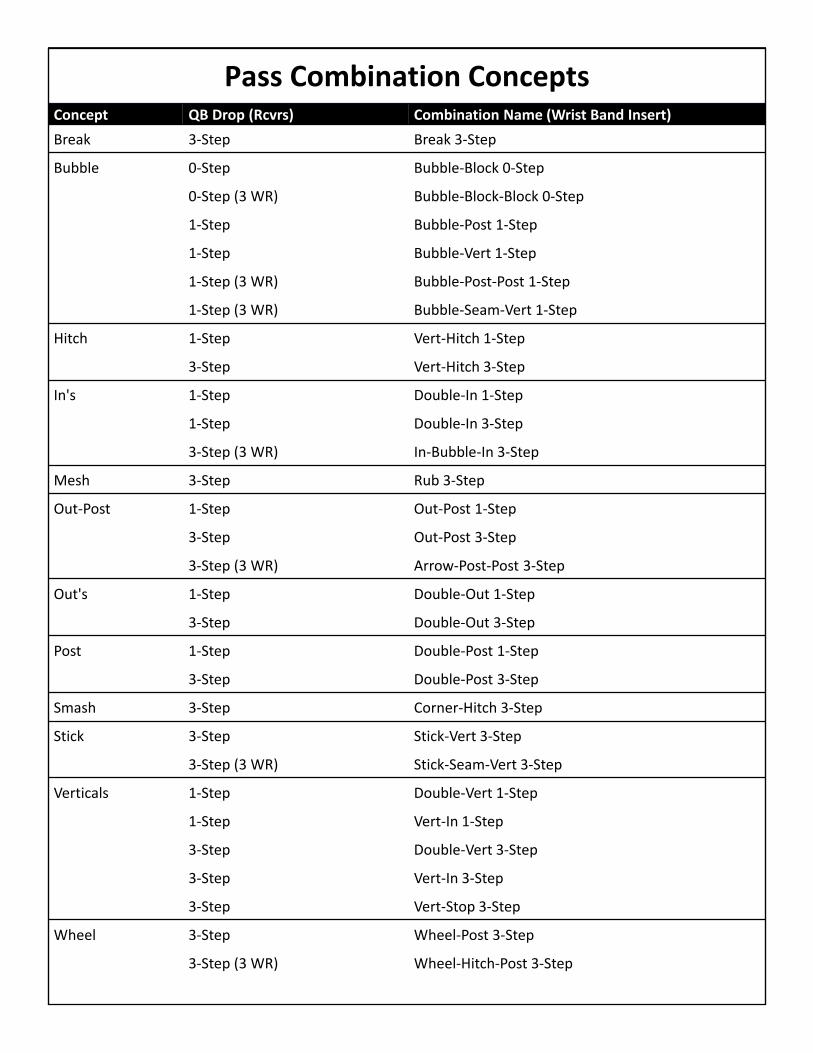
Break 3‐Step Break 3‐Step
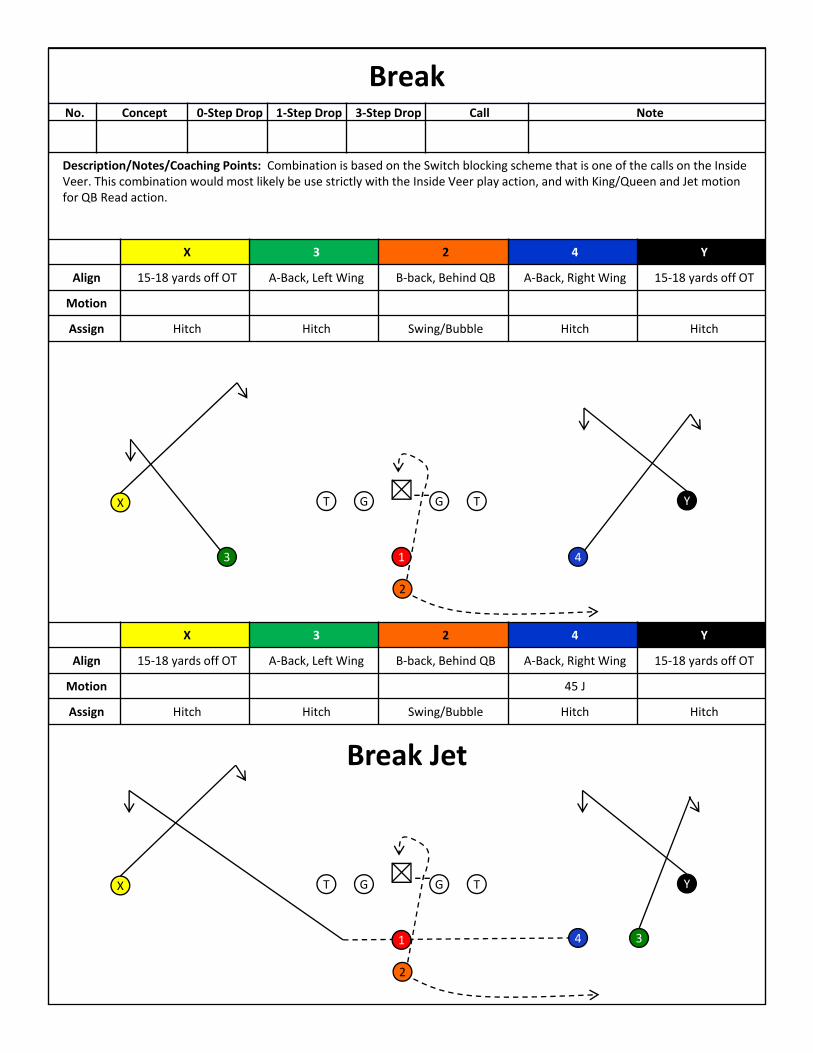
Bubble 0‐Step Bubble‐Block 0‐Step
0‐Step (3 WR) Bubble‐Block‐Block 0‐Step
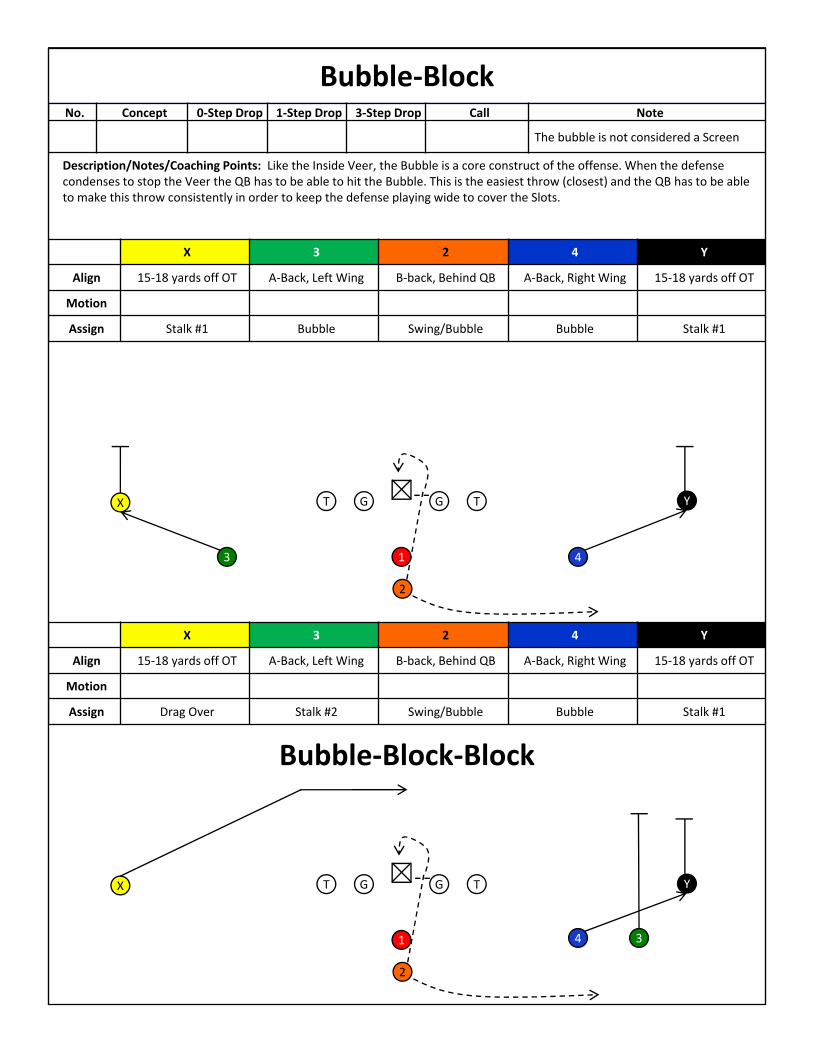
1‐Step Bubble‐Post 1‐Step
1‐Step Bubble‐Vert 1‐Step
1‐Step (3 WR) Bubble‐Post‐Post 1‐Step
1‐Step (3 WR) Bubble‐Seam‐Vert 1‐Step
Hitch 1‐Step Vert‐Hitch 1‐Step
3‐Step Vert‐Hitch 3‐Step
In's 1‐Step Double‐In 1‐Step
1‐Step Double‐In 3‐Step
3‐Step (3 WR) In‐Bubble‐In 3‐Step
Mesh 3‐Step Rub 3‐Step
Out‐Post 1‐Step Out‐Post 1‐Step
3‐Step Out‐Post 3‐Step
3‐Step (3 WR) Arrow‐Post‐Post 3‐Step
Out's 1‐Step Double‐Out 1‐Step
3‐Step Double‐Out 3‐Step
Post 1‐Step Double‐Post 1‐Step
3‐Step Double‐Post 3‐Step
Smash 3‐Step Corner‐Hitch 3‐Step
Stick 3‐Step Stick‐Vert 3‐Step
3‐Step (3 WR) Stick‐Seam‐Vert 3‐Step
Verticals 1‐Step Double‐Vert 1‐Step
1‐Step Vert‐In 1‐Step
3‐Step Double‐Vert 3‐Step
3‐Step Vert‐In 3‐Step
3‐Step Vert‐Stop 3‐Step
Wheel 3‐Step Wheel‐Post 3‐Step
3‐Step (3 WR) Wheel‐Hitch‐Post 3‐Step
BreakNo. Concept 0‐Step Drop 1‐Step Drop 3‐Step Drop Call Note
Description/Notes/Coaching Points: Combination is based on the Switch blocking scheme that is one of the calls on the Inside Veer. This combination would most likely be use strictly with the Inside Veer play action, and with King/Queen and Jet motionfor QB Read action.
X 3 2 4 Y
Align 15‐18 yards off OT A‐Back, Left Wing B‐back, Behind QB A‐Back, Right Wing 15‐18 yards off OT
Motion
Assign Hitch Hitch Swing/Bubble Hitch Hitch
X 3 2 4 Y
Align 15‐18 yards off OT A‐Back, Left Wing B‐back, Behind QB A‐Back, Right Wing 15‐18 yards off OT
Motion 45 J
Assign Hitch Hitch Swing/Bubble Hitch Hitch
1 3
TGGT
2
4
X Y
13
TGGT
2
4
X Y
Break Jet
1 3
TGGT
2
4
X Y
13
TGGT
2
4
X Y
Bubble‐BlockNo. Concept 0‐Step Drop 1‐Step Drop 3‐Step Drop Call Note
The bubble is not considered a Screen
Description/Notes/Coaching Points: Like the Inside Veer, the Bubble is a core construct of the offense. When the defense condenses to stop the Veer the QB has to be able to hit the Bubble. This is the easiest throw (closest) and the QB has to be able to make this throw consistently in order to keep the defense playing wide to cover the Slots.
X 3 2 4 Y
Align 15‐18 yards off OT A‐Back, Left Wing B‐back, Behind QB A‐Back, Right Wing 15‐18 yards off OT
Motion
Assign Stalk #1 Bubble Swing/Bubble Bubble Stalk #1
X 3 2 4 Y
Align 15‐18 yards off OT A‐Back, Left Wing B‐back, Behind QB A‐Back, Right Wing 15‐18 yards off OT
Motion
Assign Drag Over Stalk #2 Swing/Bubble Bubble Stalk #1
Bubble‐Block‐Block
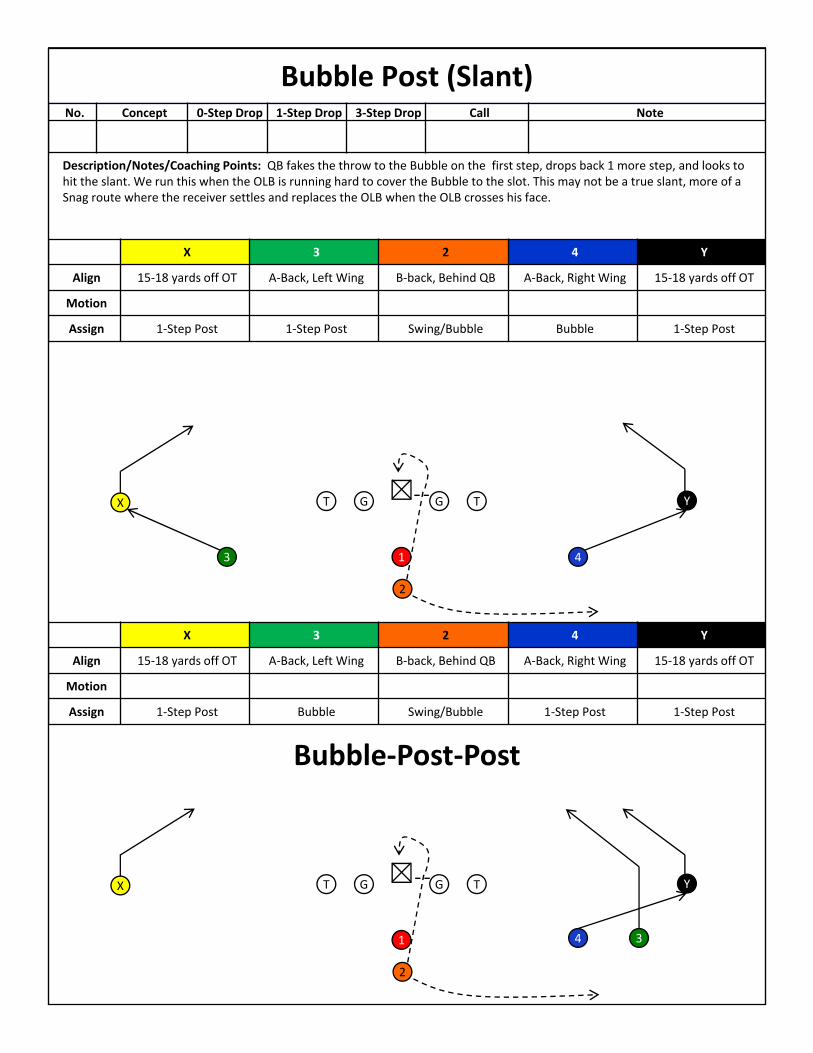
Bubble Post (Slant)No. Concept 0‐Step Drop 1‐Step Drop 3‐Step Drop Call Note
Description/Notes/Coaching Points: QB fakes the throw to the Bubble on the first step, drops back 1 more step, and looks to hit the slant. We run this when the OLB is running hard to cover the Bubble to the slot. This may not be a true slant, more of aSnag route where the receiver settles and replaces the OLB when the OLB crosses his face.
X 3 2 4 Y
Align 15‐18 yards off OT A‐Back, Left Wing B‐back, Behind QB A‐Back, Right Wing 15‐18 yards off OT
Motion
Assign 1‐Step Post 1‐Step Post Swing/Bubble Bubble 1‐Step Post
X 3 2 4 Y
Align 15‐18 yards off OT A‐Back, Left Wing B‐back, Behind QB A‐Back, Right Wing 15‐18 yards off OT
Motion
Assign 1‐Step Post Bubble Swing/Bubble 1‐Step Post 1‐Step Post
1 3
TGGT
2
4
X Y
13
TGGT
2
4
X Y
Bubble‐Post‐Post
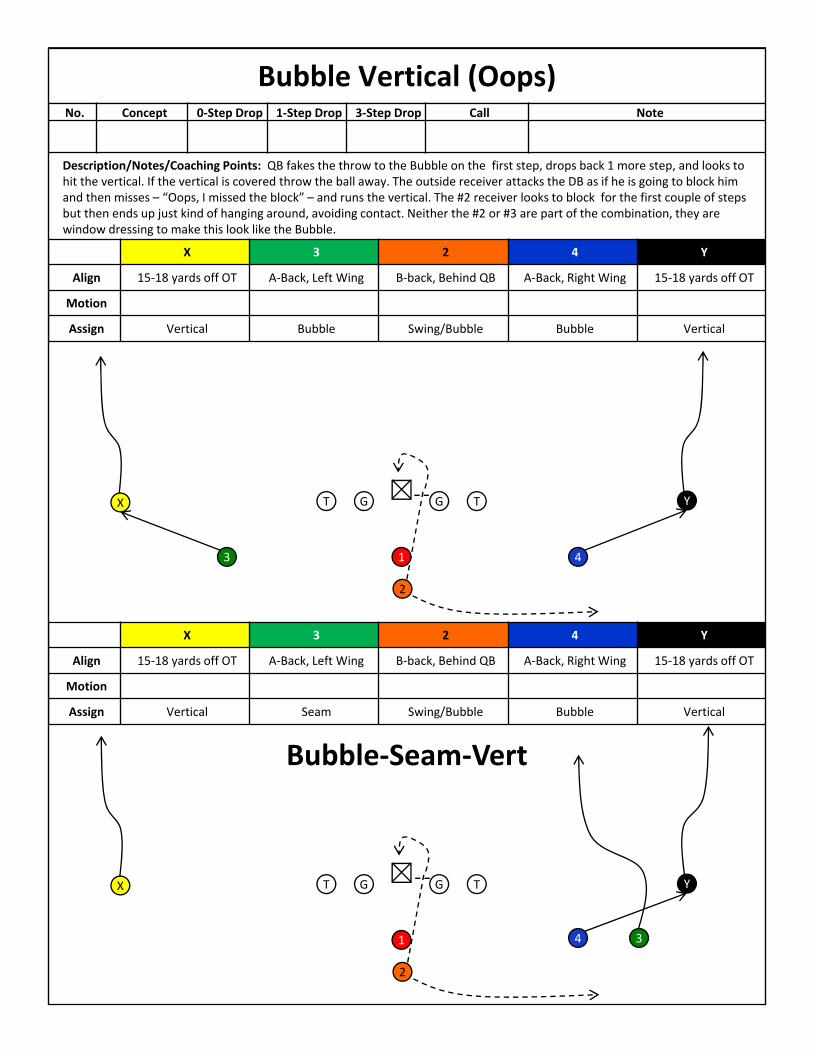
Bubble Vertical (Oops)No. Concept 0‐Step Drop 1‐Step Drop 3‐Step Drop Call Note
Description/Notes/Coaching Points: QB fakes the throw to the Bubble on the first step, drops back 1 more step, and looks to hit the vertical. If the vertical is covered throw the ball away. The outside receiver attacks the DB as if he is going to block him and then misses – “Oops, I missed the block” – and runs the vertical. The #2 receiver looks to block for the first couple of steps but then ends up just kind of hanging around, avoiding contact. Neither the #2 or #3 are part of the combination, they are window dressing to make this look like the Bubble.
X 3 2 4 Y
Align 15‐18 yards off OT A‐Back, Left Wing B‐back, Behind QB A‐Back, Right Wing 15‐18 yards off OT
Motion
Assign Vertical Bubble Swing/Bubble Bubble Vertical
X 3 2 4 Y
Align 15‐18 yards off OT A‐Back, Left Wing B‐back, Behind QB A‐Back, Right Wing 15‐18 yards off OT
Motion
Assign Vertical Seam Swing/Bubble Bubble Vertical
1 3
TGGT
2
4
X Y
13
TGGT
2
4
X Y
Bubble‐Seam‐Vert
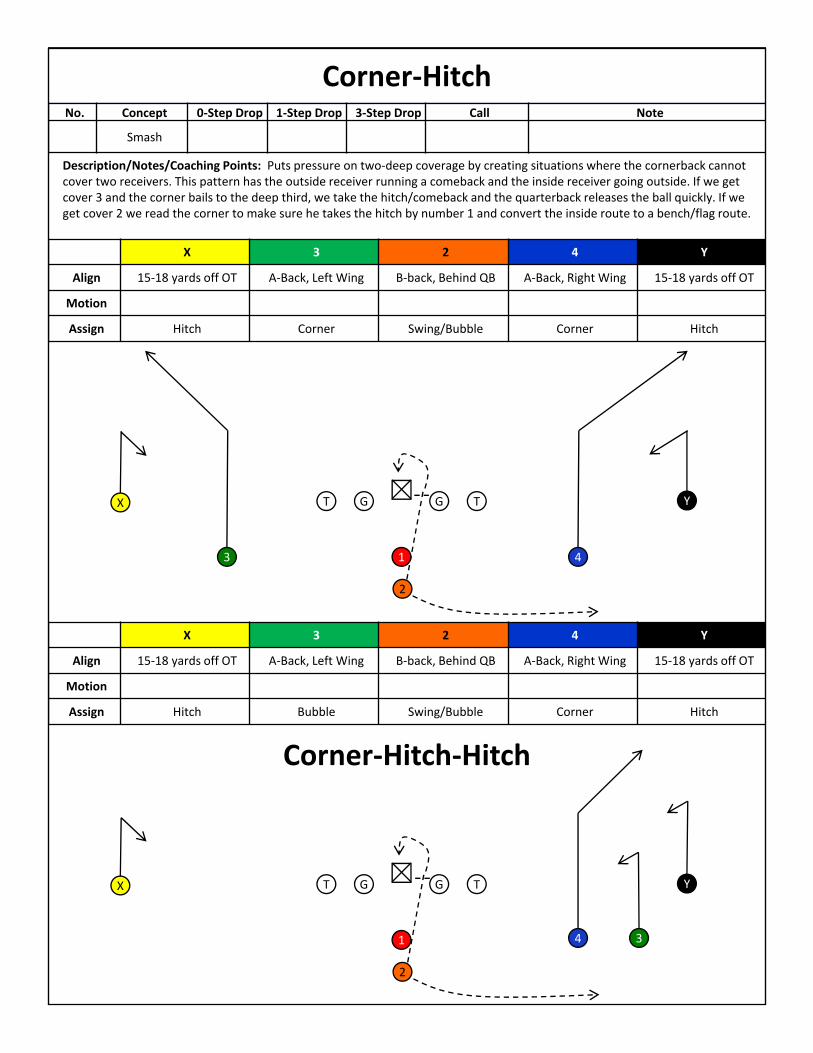
Corner‐HitchNo. Concept 0‐Step Drop 1‐Step Drop 3‐Step Drop Call Note
Smash
Description/Notes/Coaching Points: Puts pressure on two‐deep coverage by creating situations where the cornerback cannot cover two receivers. This pattern has the outside receiver running a comeback and the inside receiver going outside. If we get cover 3 and the corner bails to the deep third, we take the hitch/comeback and the quarterback releases the ball quickly. If we get cover 2 we read the corner to make sure he takes the hitch by number 1 and convert the inside route to a bench/flag route.
X 3 2 4 Y
Align 15‐18 yards off OT A‐Back, Left Wing B‐back, Behind QB A‐Back, Right Wing 15‐18 yards off OT
Motion
Assign Hitch Corner Swing/Bubble Corner Hitch
X 3 2 4 Y
Align 15‐18 yards off OT A‐Back, Left Wing B‐back, Behind QB A‐Back, Right Wing 15‐18 yards off OT
Motion
Assign Hitch Bubble Swing/Bubble Corner Hitch
1 3
TGGT
2
4
X Y
13
TGGT
2
4
X Y
Corner‐Hitch‐Hitch
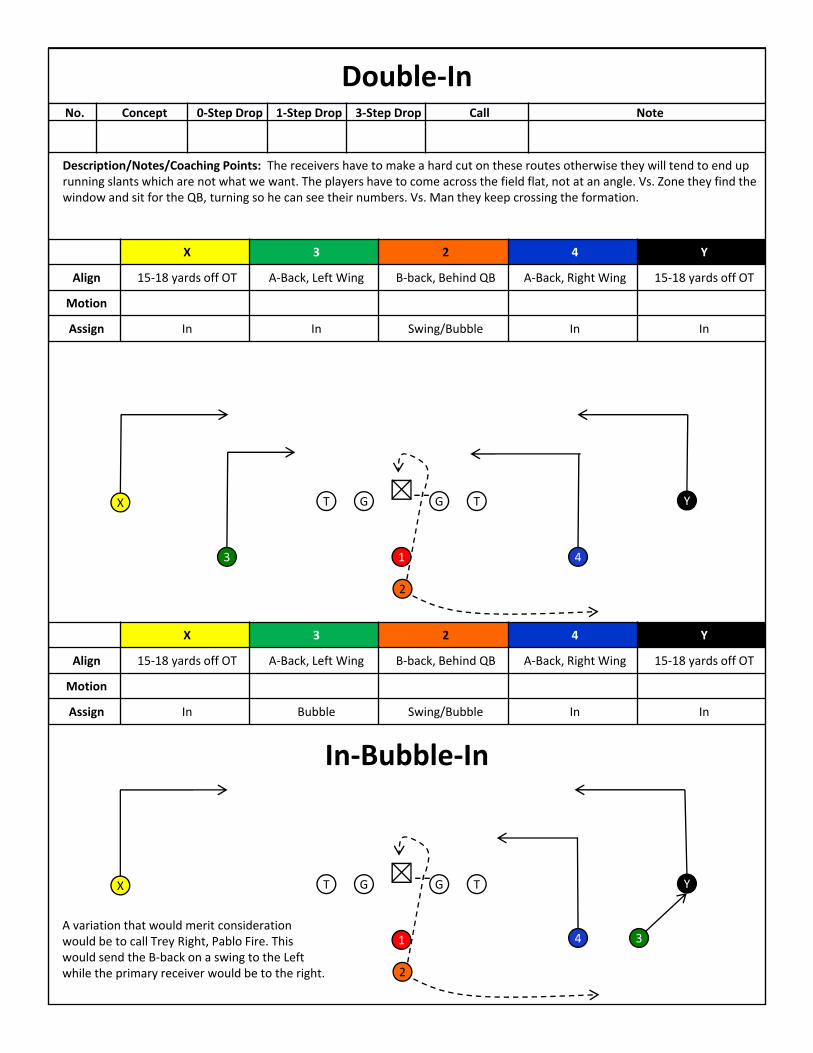
Double‐InNo. Concept 0‐Step Drop 1‐Step Drop 3‐Step Drop Call Note
Description/Notes/Coaching Points: The receivers have to make a hard cut on these routes otherwise they will tend to end up running slants which are not what we want. The players have to come across the field flat, not at an angle. Vs. Zone they find the window and sit for the QB, turning so he can see their numbers. Vs. Man they keep crossing the formation.
X 3 2 4 Y
Align 15‐18 yards off OT A‐Back, Left Wing B‐back, Behind QB A‐Back, Right Wing 15‐18 yards off OT
Motion
Assign In In Swing/Bubble In In
X 3 2 4 Y
Align 15‐18 yards off OT A‐Back, Left Wing B‐back, Behind QB A‐Back, Right Wing 15‐18 yards off OT
Motion
Assign In Bubble Swing/Bubble In In
1 3
TGGT
2
4
X Y
13
TGGT
2
4
X Y
A variation that would merit consideration would be to call Trey Right, Pablo Fire. This would send the B‐back on a swing to the Left while the primary receiver would be to the right.
In‐Bubble‐In
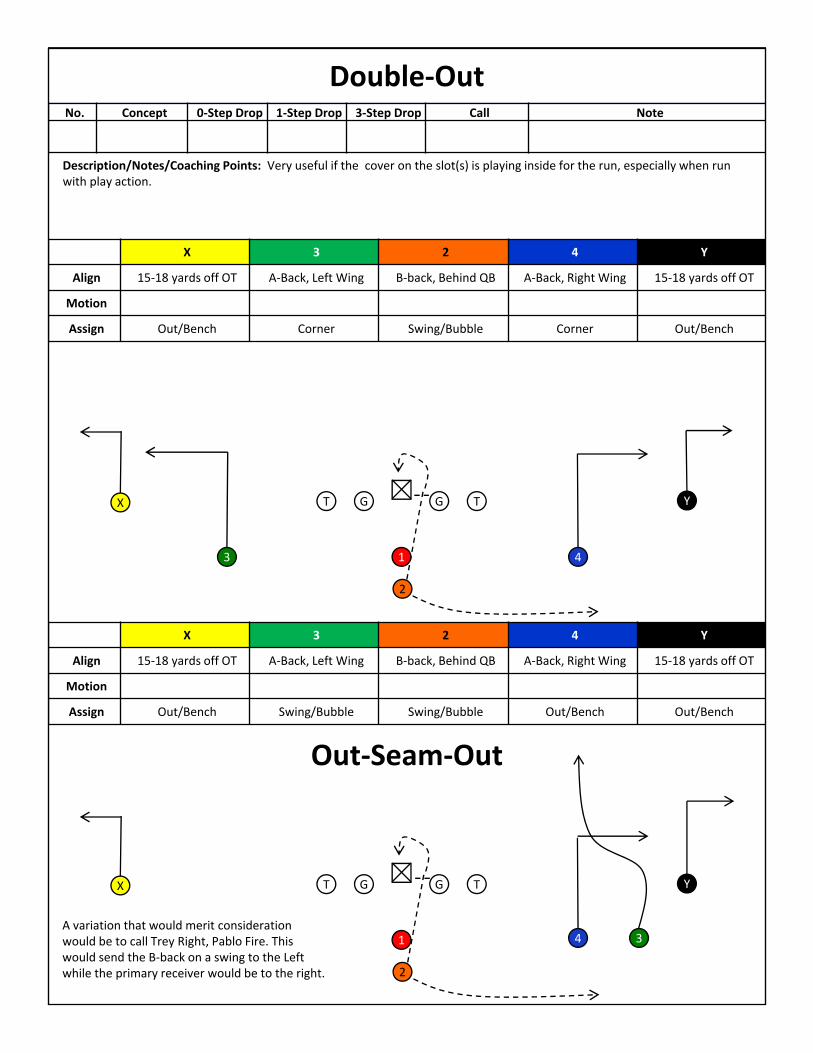
Double‐OutNo. Concept 0‐Step Drop 1‐Step Drop 3‐Step Drop Call Note
Description/Notes/Coaching Points: Very useful if the cover on the slot(s) is playing inside for the run, especially when run with play action.
X 3 2 4 Y
Align 15‐18 yards off OT A‐Back, Left Wing B‐back, Behind QB A‐Back, Right Wing 15‐18 yards off OT
Motion
Assign Out/Bench Corner Swing/Bubble Corner Out/Bench
X 3 2 4 Y
Align 15‐18 yards off OT A‐Back, Left Wing B‐back, Behind QB A‐Back, Right Wing 15‐18 yards off OT
Motion
Assign Out/Bench Swing/Bubble Swing/Bubble Out/Bench Out/Bench
1 3
TGGT
2
4
X Y
13
TGGT
2
4
X Y
A variation that would merit consideration would be to call Trey Right, Pablo Fire. This would send the B‐back on a swing to the Left while the primary receiver would be to the right.
Out‐Seam‐Out
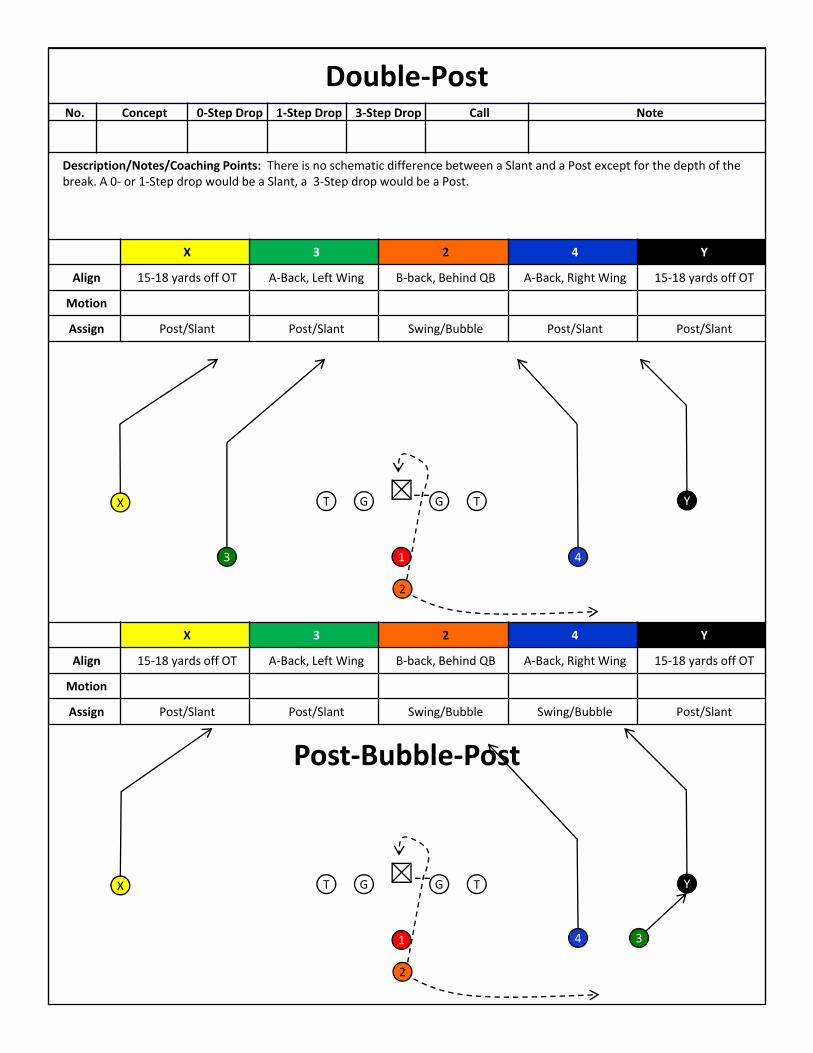
Double‐PostNo. Concept 0‐Step Drop 1‐Step Drop 3‐Step Drop Call Note
Description/Notes/Coaching Points: There is no schematic difference between a Slant and a Post except for the depth of the break. A 0‐ or 1‐Step drop would be a Slant, a 3‐Step drop would be a Post.
X 3 2 4 Y
Align 15‐18 yards off OT A‐Back, Left Wing B‐back, Behind QB A‐Back, Right Wing 15‐18 yards off OT
Motion
Assign Post/Slant Post/Slant Swing/Bubble Post/Slant Post/Slant
X 3 2 4 Y
Align 15‐18 yards off OT A‐Back, Left Wing B‐back, Behind QB A‐Back, Right Wing 15‐18 yards off OT
Motion
Assign Post/Slant Post/Slant Swing/Bubble Swing/Bubble Post/Slant
1 3
TGGT
2
4
X Y
13
TGGT
2
4
X Y
Post‐Bubble‐Post
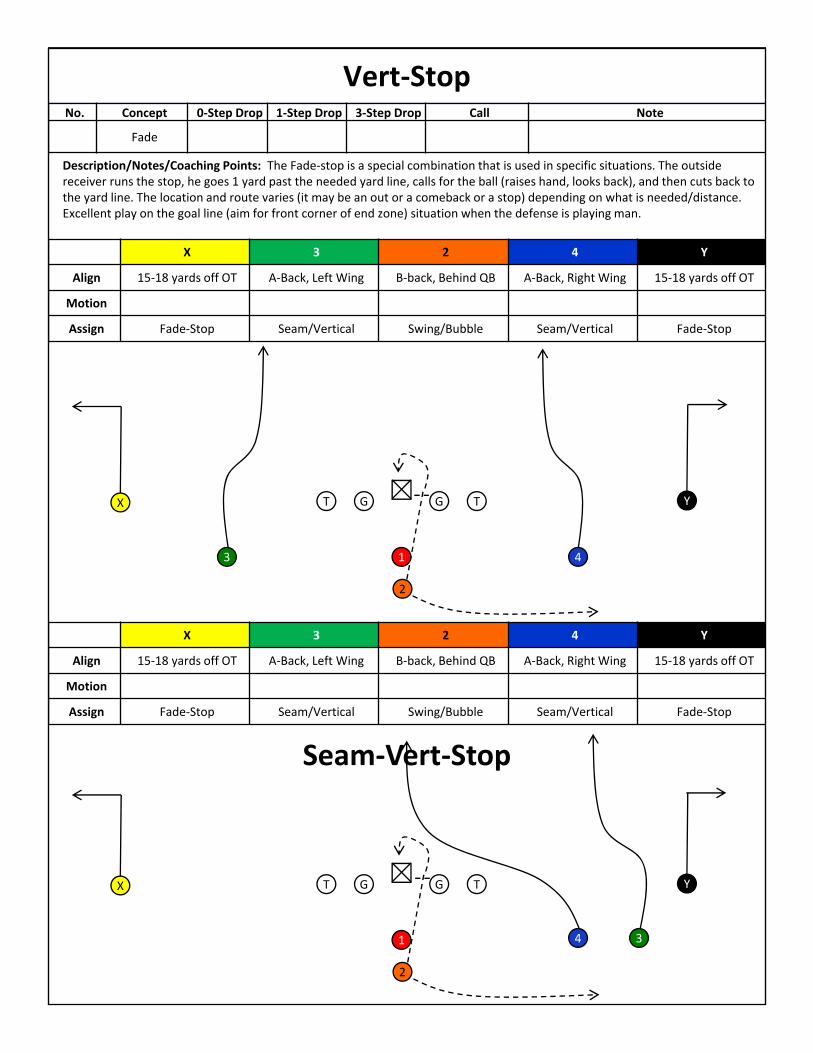
Vert‐StopNo. Concept 0‐Step Drop 1‐Step Drop 3‐Step Drop Call Note
Fade
Description/Notes/Coaching Points: The Fade‐stop is a special combination that is used in specific situations. The outside receiver runs the stop, he goes 1 yard past the needed yard line, calls for the ball (raises hand, looks back), and then cuts back to the yard line. The location and route varies (it may be an out or a comeback or a stop) depending on what is needed/distance.Excellent play on the goal line (aim for front corner of end zone) situation when the defense is playing man.
X 3 2 4 Y
Align 15‐18 yards off OT A‐Back, Left Wing B‐back, Behind QB A‐Back, Right Wing 15‐18 yards off OT
Motion
Assign Fade‐Stop Seam/Vertical Swing/Bubble Seam/Vertical Fade‐Stop
X 3 2 4 Y
Align 15‐18 yards off OT A‐Back, Left Wing B‐back, Behind QB A‐Back, Right Wing 15‐18 yards off OT
Motion
Assign Fade‐Stop Seam/Vertical Swing/Bubble Seam/Vertical Fade‐Stop
1 3
TGGT
2
4
X Y
13
TGGT
2
4
X Y
Seam‐Vert‐Stop

Out‐PostNo. Concept 0‐Step Drop 1‐Step Drop 3‐Step Drop Call Note
Description/Notes/Coaching Points: There is no schematic difference between an Arrow and a Bench except for the depth of the break. A 0‐ or 1‐step drop would be an Arrow‐Slant, a 3‐step drop would be a Bench‐Post.
X 3 2 4 Y
Align 15‐18 yards off OT A‐Back, Left Wing B‐back, Behind QB A‐Back, Right Wing 15‐18 yards off OT
Motion
Assign Post/Slant Out/Arrow Swing/Bubble Out/Arrow Post/Slant
X 3 2 4 Y
Align 15‐18 yards off OT A‐Back, Left Wing B‐back, Behind QB A‐Back, Right Wing 15‐18 yards off OT
Motion
Assign Post/Slant Post/Slant Swing/Bubble Out/Arrow Post/Slant
1 3
TGGT
2
4
X Y
13
TGGT
2
4
X Y
Arrow‐Post‐Post
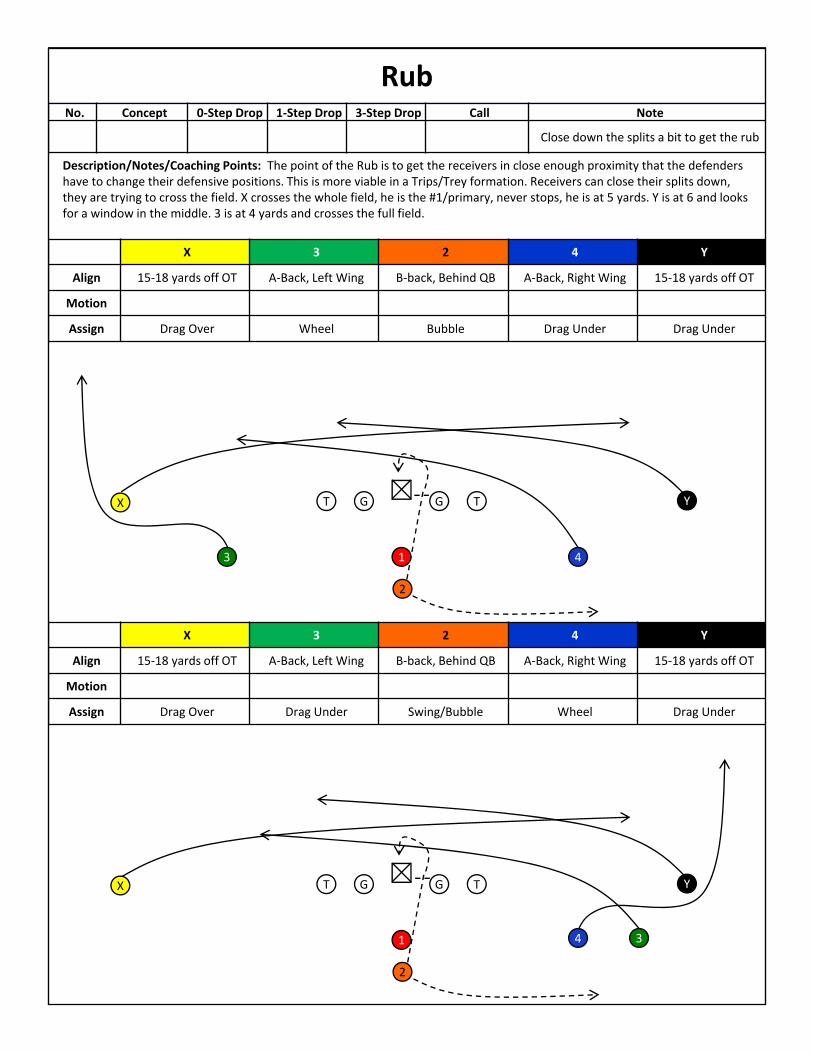
RubNo. Concept 0‐Step Drop 1‐Step Drop 3‐Step Drop Call Note
Close down the splits a bit to get the rub
Description/Notes/Coaching Points: The point of the Rub is to get the receivers in close enough proximity that the defenders have to change their defensive positions. This is more viable in a Trips/Trey formation. Receivers can close their splits down, they are trying to cross the field. X crosses the whole field, he is the #1/primary, never stops, he is at 5 yards. Y is at 6 and looks for a window in the middle. 3 is at 4 yards and crosses the full field.
X 3 2 4 Y
Align 15‐18 yards off OT A‐Back, Left Wing B‐back, Behind QB A‐Back, Right Wing 15‐18 yards off OT
Motion
Assign Drag Over Wheel Bubble Drag Under Drag Under
X 3 2 4 Y
Align 15‐18 yards off OT A‐Back, Left Wing B‐back, Behind QB A‐Back, Right Wing 15‐18 yards off OT
Motion
Assign Drag Over Drag Under Swing/Bubble Wheel Drag Under
1 3
TGGT
2
4
X Y
13
TGGT
2
4
X Y
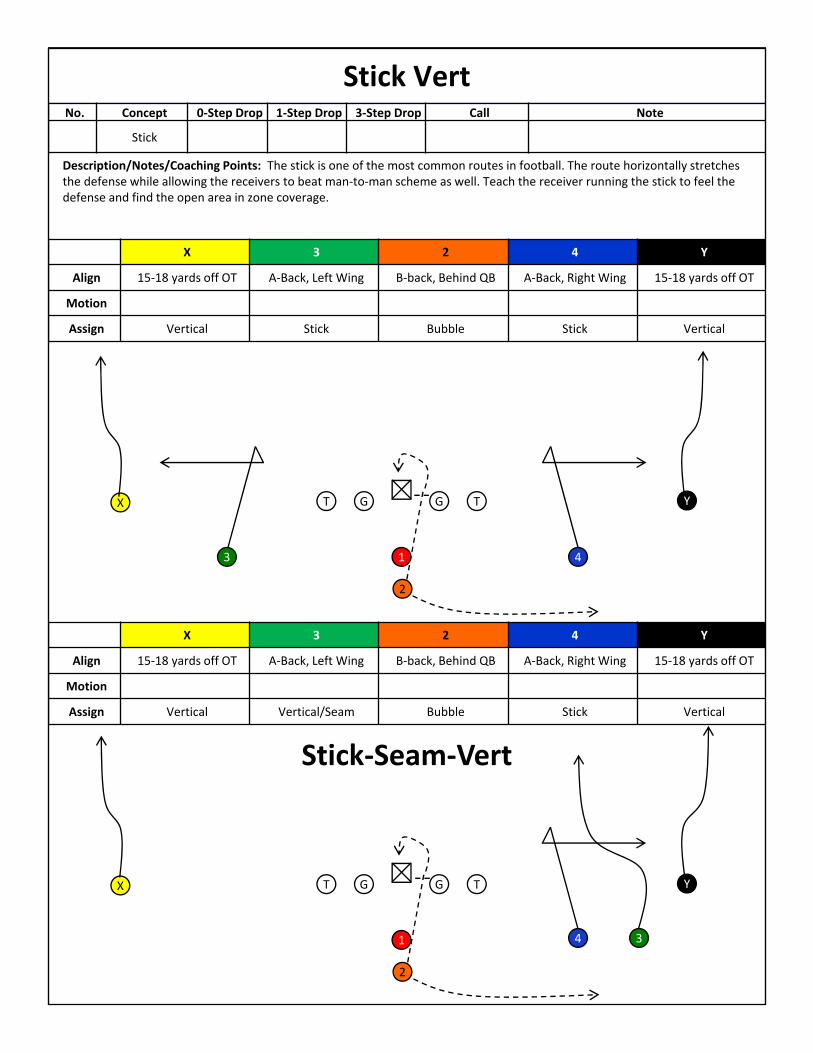
Stick VertNo. Concept 0‐Step Drop 1‐Step Drop 3‐Step Drop Call Note
Stick
Description/Notes/Coaching Points: The stick is one of the most common routes in football. The route horizontally stretches the defense while allowing the receivers to beat man‐to‐man scheme as well. Teach the receiver running the stick to feel the defense and find the open area in zone coverage.
X 3 2 4 Y
Align 15‐18 yards off OT A‐Back, Left Wing B‐back, Behind QB A‐Back, Right Wing 15‐18 yards off OT
Motion
Assign Vertical Stick Bubble Stick Vertical
X 3 2 4 Y
Align 15‐18 yards off OT A‐Back, Left Wing B‐back, Behind QB A‐Back, Right Wing 15‐18 yards off OT
Motion
Assign Vertical Vertical/Seam Bubble Stick Vertical
1 3
TGGT
2
4
X Y
13
TGGT
2
4
X Y
Stick‐Seam‐Vert
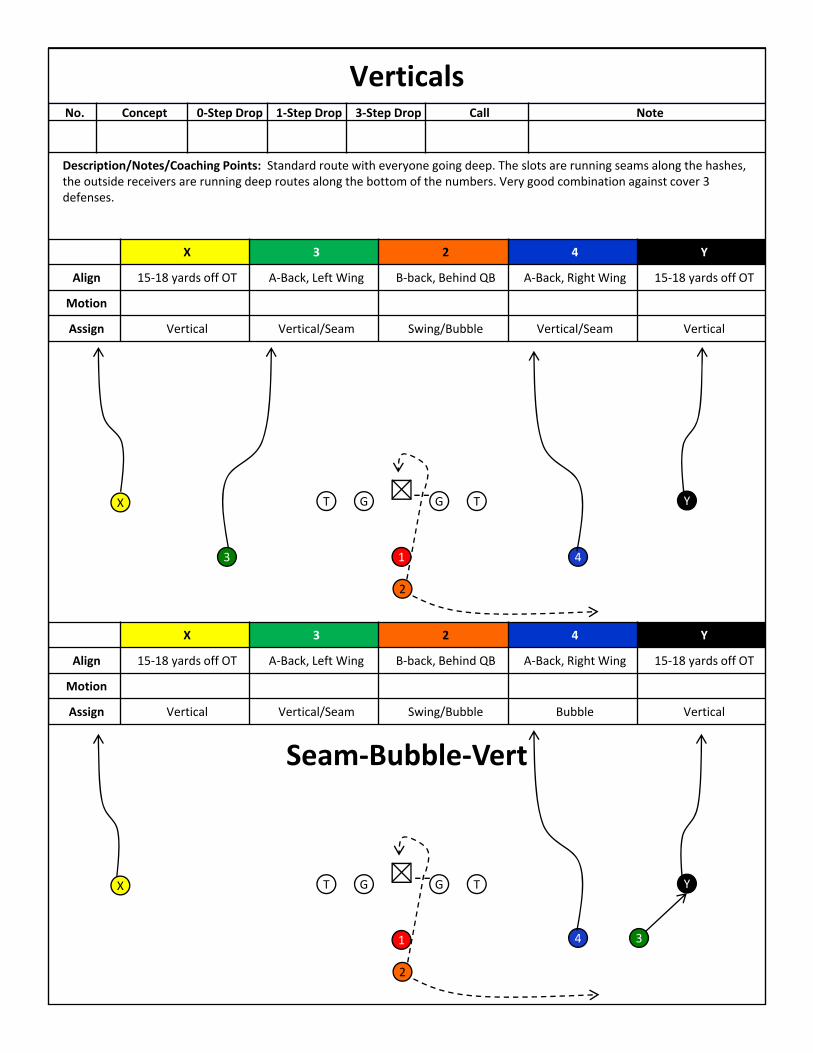
VerticalsNo. Concept 0‐Step Drop 1‐Step Drop 3‐Step Drop Call Note
Description/Notes/Coaching Points: Standard route with everyone going deep. The slots are running seams along the hashes, the outside receivers are running deep routes along the bottom of the numbers. Very good combination against cover 3 defenses.
X 3 2 4 Y
Align 15‐18 yards off OT A‐Back, Left Wing B‐back, Behind QB A‐Back, Right Wing 15‐18 yards off OT
Motion
Assign Vertical Vertical/Seam Swing/Bubble Vertical/Seam Vertical
X 3 2 4 Y
Align 15‐18 yards off OT A‐Back, Left Wing B‐back, Behind QB A‐Back, Right Wing 15‐18 yards off OT
Motion
Assign Vertical Vertical/Seam Swing/Bubble Bubble Vertical
1 3
TGGT
2
4
X Y
13
TGGT
2
4
X Y
Seam‐Bubble‐Vert

Vert‐HitchNo. Concept 0‐Step Drop 1‐Step Drop 3‐Step Drop Call Note
Hitch
Description/Notes/Coaching Points: A hitch is like a 5‐yard running play only easier to execute. It forces the corner to come up and play tighter which can lead to bigger plays down the field. We have the ability to check to a Vertical route if the cornerback is in an up position playing press or squat coverage. The slots run the seam/vertical to draw the deep defenders and the outsidereceivers run the hitch. They attack the outside defender, get him to turn his hips, and then stop and comeback for the ball.
X 3 2 4 Y
Align 15‐18 yards off OT A‐Back, Left Wing B‐back, Behind QB A‐Back, Right Wing 15‐18 yards off OT
Motion
Assign Hitch Seam Swing/Bubble Seam Hitch
X 3 2 4 Y
Align 15‐18 yards off OT A‐Back, Left Wing B‐back, Behind QB A‐Back, Right Wing 15‐18 yards off OT
Motion
Assign Hitch Vertical/Seam Swing/Bubble Hitch Hitch
1 3
TGGT
2
4
X Y
13
TGGT
2
4
X Y
Hitch‐Vert‐Hitch
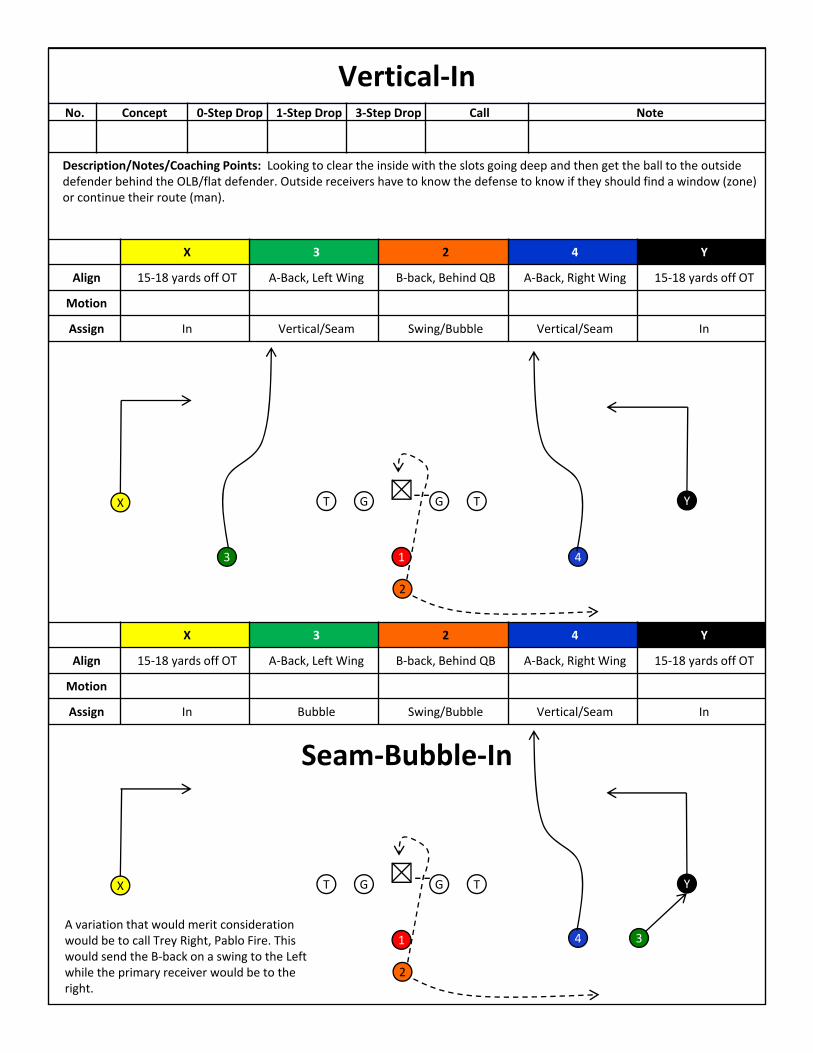
Vertical‐InNo. Concept 0‐Step Drop 1‐Step Drop 3‐Step Drop Call Note
Description/Notes/Coaching Points: Looking to clear the inside with the slots going deep and then get the ball to the outside defender behind the OLB/flat defender. Outside receivers have to know the defense to know if they should find a window (zone)or continue their route (man).
X 3 2 4 Y
Align 15‐18 yards off OT A‐Back, Left Wing B‐back, Behind QB A‐Back, Right Wing 15‐18 yards off OT
Motion
Assign In Vertical/Seam Swing/Bubble Vertical/Seam In
X 3 2 4 Y
Align 15‐18 yards off OT A‐Back, Left Wing B‐back, Behind QB A‐Back, Right Wing 15‐18 yards off OT
Motion
Assign In Bubble Swing/Bubble Vertical/Seam In
1 3
TGGT
2
4
X Y
13
TGGT
2
4
X Y
A variation that would merit consideration would be to call Trey Right, Pablo Fire. This would send the B‐back on a swing to the Left while the primary receiver would be to the right.
Seam‐Bubble‐In
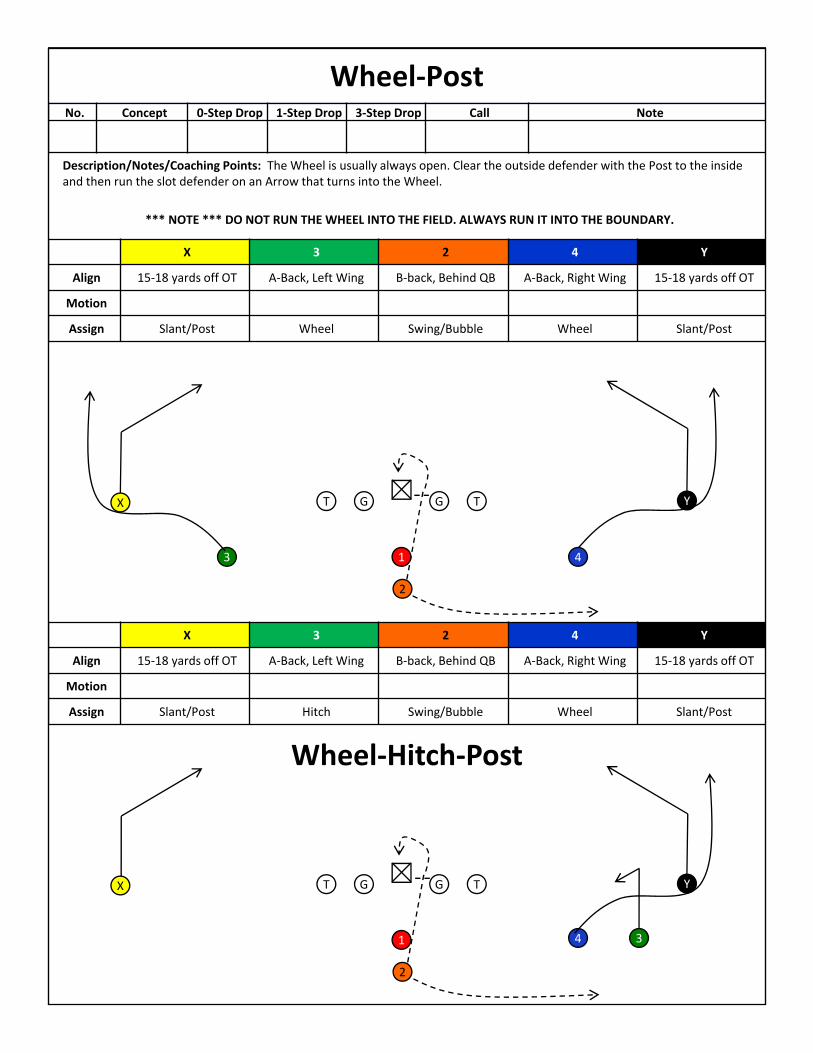
Wheel‐PostNo. Concept 0‐Step Drop 1‐Step Drop 3‐Step Drop Call Note
Description/Notes/Coaching Points: The Wheel is usually always open. Clear the outside defender with the Post to the inside and then run the slot defender on an Arrow that turns into the Wheel.
*** NOTE *** DO NOT RUN THE WHEEL INTO THE FIELD. ALWAYS RUN IT INTO THE BOUNDARY.
X 3 2 4 Y
Align 15‐18 yards off OT A‐Back, Left Wing B‐back, Behind QB A‐Back, Right Wing 15‐18 yards off OT
Motion
Assign Slant/Post Wheel Swing/Bubble Wheel Slant/Post
X 3 2 4 Y
Align 15‐18 yards off OT A‐Back, Left Wing B‐back, Behind QB A‐Back, Right Wing 15‐18 yards off OT
Motion
Assign Slant/Post Hitch Swing/Bubble Wheel Slant/Post
1 3
TGGT
2
4
X Y
13
TGGT
2
4
X Y
Wheel‐Hitch‐Post
SCREENS
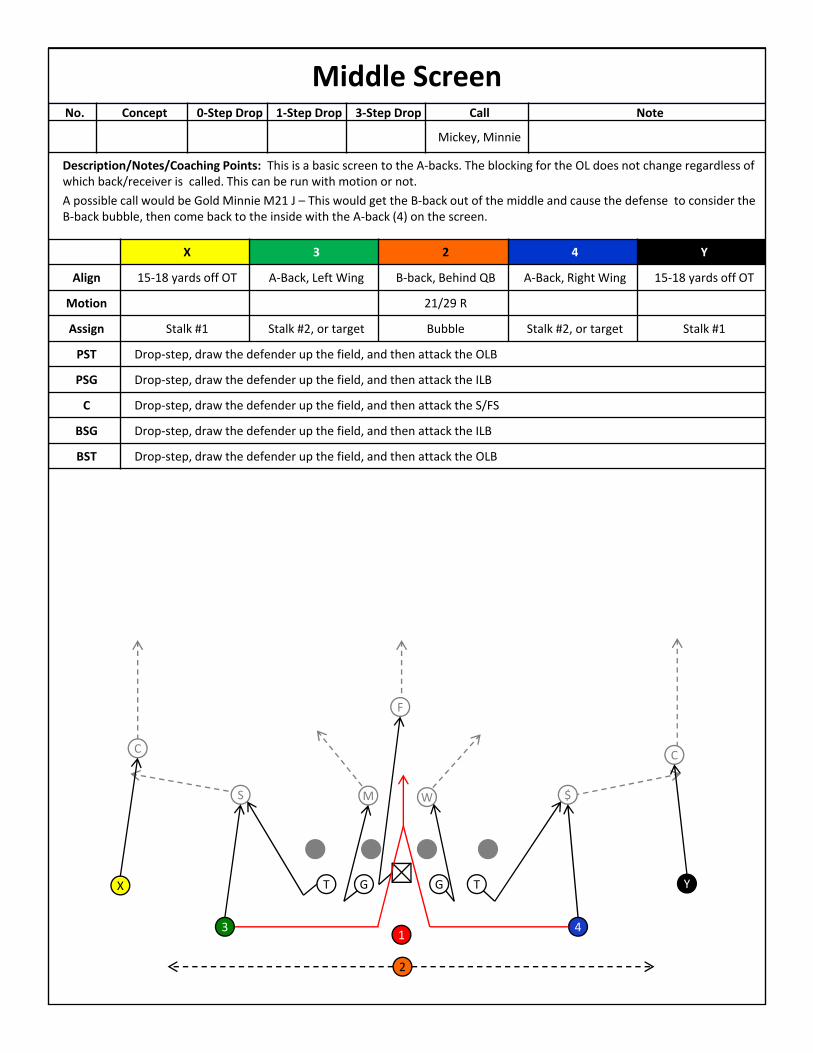
Middle ScreenNo. Concept 0‐Step Drop 1‐Step Drop 3‐Step Drop Call Note
Mickey, Minnie
Description/Notes/Coaching Points: This is a basic screen to the A‐backs. The blocking for the OL does not change regardless of which back/receiver is called. This can be run with motion or not.
A possible call would be Gold Minnie M21 J – This would get the B‐back out of the middle and cause the defense to consider the B‐back bubble, then come back to the inside with the A‐back (4) on the screen.
X 3 2 4 Y
Align 15‐18 yards off OT A‐Back, Left Wing B‐back, Behind QB A‐Back, Right Wing 15‐18 yards off OT
Motion 21/29 R
Assign Stalk #1 Stalk #2, or target Bubble Stalk #2, or target Stalk #1
PST Drop‐step, draw the defender up the field, and then attack the OLB
PSG Drop‐step, draw the defender up the field, and then attack the ILB
C Drop‐step, draw the defender up the field, and then attack the S/FS
BSG Drop‐step, draw the defender up the field, and then attack the ILB
BST Drop‐step, draw the defender up the field, and then attack the OLB
C
S W
C
F
$M
13
TGGT
2
4
X Y
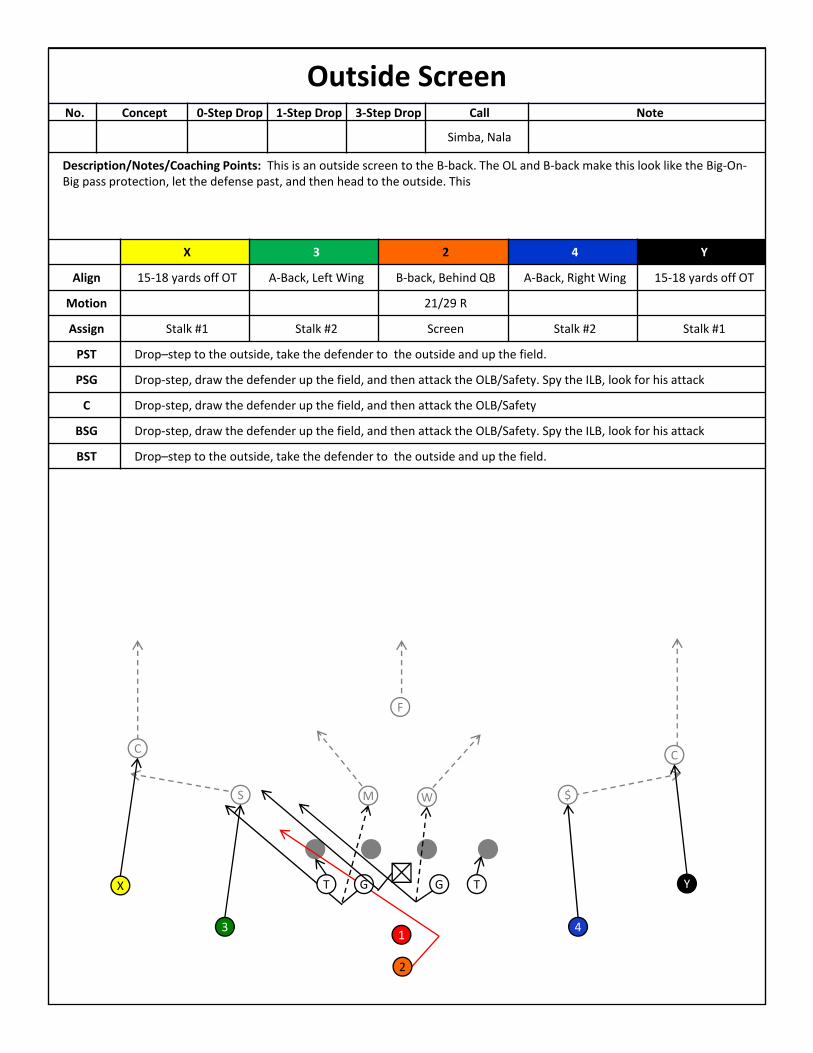
Outside ScreenNo. Concept 0‐Step Drop 1‐Step Drop 3‐Step Drop Call Note
Simba, Nala
Description/Notes/Coaching Points: This is an outside screen to the B‐back. The OL and B‐back make this look like the Big‐On‐Big pass protection, let the defense past, and then head to the outside. This
X 3 2 4 Y
Align 15‐18 yards off OT A‐Back, Left Wing B‐back, Behind QB A‐Back, Right Wing 15‐18 yards off OT
Motion 21/29 R
Assign Stalk #1 Stalk #2 Screen Stalk #2 Stalk #1
PST Drop–step to the outside, take the defender to the outside and up the field.
PSG Drop‐step, draw the defender up the field, and then attack the OLB/Safety. Spy the ILB, look for his attack
C Drop‐step, draw the defender up the field, and then attack the OLB/Safety
BSG Drop‐step, draw the defender up the field, and then attack the OLB/Safety. Spy the ILB, look for his attack
BST Drop–step to the outside, take the defender to the outside and up the field.
C
S W
C
F
$M
13
TGGT
2
4
X Y

29/21 B‐back Bubble ScreenNo. Concept 0‐Step Drop 1‐Step Drop 3‐Step Drop Call Note
Tarzan, Jane
Description/Notes/Coaching Points: This is a Bubble screen to the B‐back. The back goes in full‐speed/Rocket motion to the sideline, staying flat. When the WR’s move then head toward the feet of the WR and look for the ball. QB is throwing the bubble to the back. This can be run from the Empty set as well, motioning the back across the formation. If the ILB follows the B‐back then come back with QB Wrap. If the S/C crash then look for Bubble Snag.
X 3 2 4 Y
Align 15‐18 yards off OT A‐Back, Left Wing B‐back, Behind QB A‐Back, Right Wing 15‐18 yards off OT
Motion 21/29 R
Assign Stalk #1 Stalk #2 Bubble Stalk #1 Tunnel Screen
PST Fire pass protection
PSG Fire pass protection
C Fire pass protection
BSG Fire pass protection
BST Fire pass protection
C
S W
C
F
$M
13
TGGT
2
4
X Y
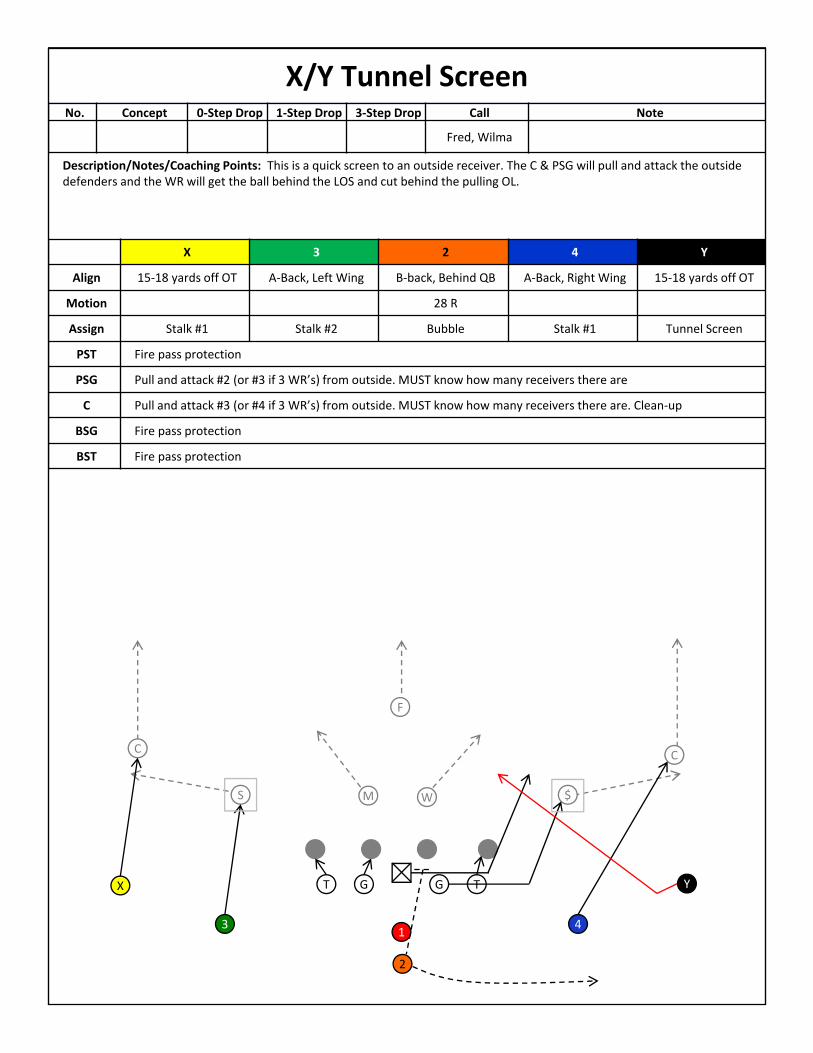
X/Y Tunnel ScreenNo. Concept 0‐Step Drop 1‐Step Drop 3‐Step Drop Call Note
Fred, Wilma
Description/Notes/Coaching Points: This is a quick screen to an outside receiver. The C & PSG will pull and attack the outside defenders and the WR will get the ball behind the LOS and cut behind the pulling OL.
X 3 2 4 Y
Align 15‐18 yards off OT A‐Back, Left Wing B‐back, Behind QB A‐Back, Right Wing 15‐18 yards off OT
Motion 28 R
Assign Stalk #1 Stalk #2 Bubble Stalk #1 Tunnel Screen
PST Fire pass protection
PSG Pull and attack #2 (or #3 if 3 WR’s) from outside. MUST know how many receivers there are
C Pull and attack #3 (or #4 if 3 WR’s) from outside. MUST know how many receivers there are. Clean‐up
BSG Fire pass protection
BST Fire pass protection
C
S W
C
F
$M
13
TGGT
2
4
X Y
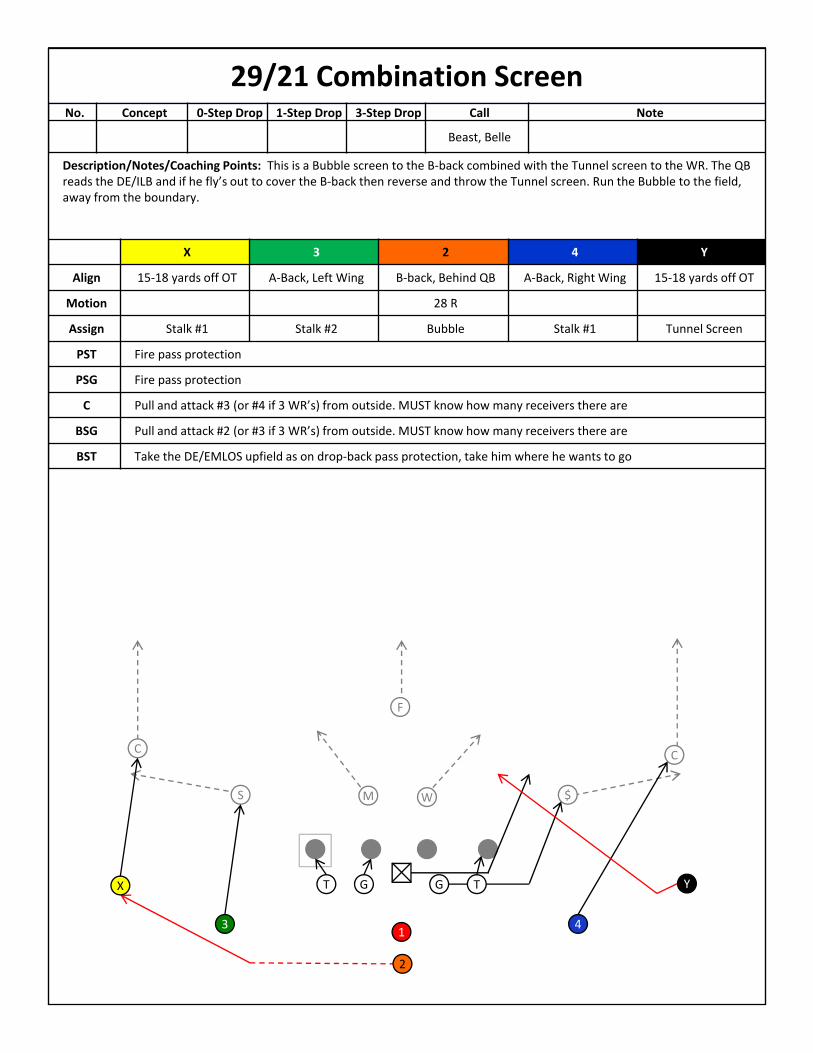
29/21 Combination ScreenNo. Concept 0‐Step Drop 1‐Step Drop 3‐Step Drop Call Note
Beast, Belle
Description/Notes/Coaching Points: This is a Bubble screen to the B‐back combined with the Tunnel screen to the WR. The QB reads the DE/ILB and if he fly’s out to cover the B‐back then reverse and throw the Tunnel screen. Run the Bubble to the field, away from the boundary.
X 3 2 4 Y
Align 15‐18 yards off OT A‐Back, Left Wing B‐back, Behind QB A‐Back, Right Wing 15‐18 yards off OT
Motion 28 R
Assign Stalk #1 Stalk #2 Bubble Stalk #1 Tunnel Screen
PST Fire pass protection
PSG Fire pass protection
C Pull and attack #3 (or #4 if 3 WR’s) from outside. MUST know how many receivers there are
BSG Pull and attack #2 (or #3 if 3 WR’s) from outside. MUST know how many receivers there are
BST Take the DE/EMLOS upfield as on drop‐back pass protection, take him where he wants to go
C
S W
C
F
$M
13
TGGT
2
4
X Y