Embed Size (px)
Citation preview
8/8/2019 From Camera to Computer - Week 1
http://slidepdf.com/reader/full/from-camera-to-computer-week-1 1/12
From Camera to Computer Week 1 - Session Plan
AFFECT Life Coaching & Training Services Victoria pg. 1
08
From Camerato Computer
Week 1 - Session Plan
Wayne Burrell
AFFECT Li fe Coachin g & Training
Serv ices V ictor ia
8/8/2019 From Camera to Computer - Week 1
http://slidepdf.com/reader/full/from-camera-to-computer-week-1 2/12

8/8/2019 From Camera to Computer - Week 1
http://slidepdf.com/reader/full/from-camera-to-computer-week-1 3/12
From Camera to Computer Week 1 - Session Plan
AFFECT Life Coaching & Training Services Victoria pg. 3
OUTLINE OF THE d ESSION e ONTENT
1. CONNECT A CA f ERA TO A COMPUTER USING AUSB
CABLE ² METHOD 1
After you take pictures with your digital camera, you'll want to copy the picturesfrom your camera to your computer
Some digital cameras come with software that helps you copy pictures from your camera to your computer.
You can use this software, but you don't have to. Windows XP can copy pictures to
your computer without requiring additional software.
Use a USB ca g le h Most i ip ital cameras come q it r a ca g le t r at connects t r ecamera to a USB port on your computer h Wit r your computer on an i your camera turne i o
s s t connect t r e ca g le as s r oq nh
y Nou turn your camera on
Tick herewhen
completed
8/8/2019 From Camera to Computer - Week 1
http://slidepdf.com/reader/full/from-camera-to-computer-week-1 4/12
From Camera to Computer Week 1 - Session Plan
AFFECT Life Coaching & Training Services Victoria pg. 4
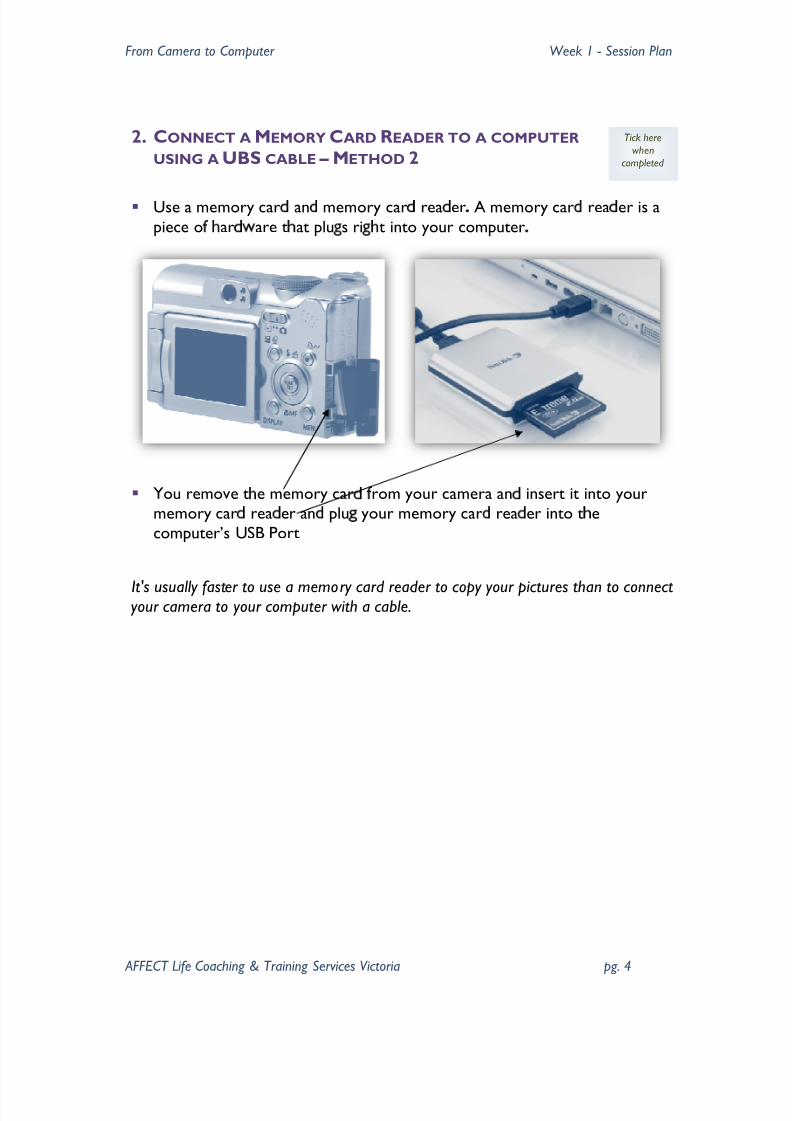
2. CONNECT AMEMORY CARD READER TO A COMPUTER
USING AUBS CABLE ² METHOD 2
Use a memory car v anv memory carv rea v erw A memory car v rea v er is apiece o x y ar v
are t y at plu s ri
y t into your computerw
You remove t e memory car rom your camera an insert it into yourmemory car rea er an plu your memory car rea er into t ecomputer·s USB Port
It's usually faster to use a memory card reader to copy your pictures than to connect your camera to your computer with a cable.
Tick herewhen
completed

8/8/2019 From Camera to Computer - Week 1
http://slidepdf.com/reader/full/from-camera-to-computer-week-1 5/12
From Camera to Computer Week 1 - Session Plan
AFFECT Life Coaching & Training Services Victoria pg. 5
3. CHOOSE THE MICROSOFT CAMERA SCANNER
IZARD OPTION IN THE CONNECTION DIALOGUE BOX
TO TRANSFER DIGITAL PHOTOS
Win o s XP ill etectt e connection an ask you
at you ant to o it your pictures
If you connected your camera with a USBcable click Microsof t
Scanner and Camera
izard an t en click OK .
y If you are using amemory card reader click Copy pictures toa f older on my
computer usingMicrosof t Scanner andCamera izard, an t en click OK
Tick herewhen
completed

8/8/2019 From Camera to Computer - Week 1
http://slidepdf.com/reader/full/from-camera-to-computer-week-1 6/12
From Camera to Computer Week 1 - Session Plan
AFFECT Life Coaching & Training Services Victoria pg. 6
4. SELECT OR DESELECT PHOTOS TO IMPORT TO THE
COMPUTER
y All o t e pictures on your camera's memory card are nowdisplaye
y Win o s XP selects all o t j e pictures or o nloa ink
l
y If t m ere are pictures you n o not o ant to n oo nloa n , just clear thecheck box next to those pictures
y To rotate a picture, click it, an t en click eit er t e otateclock ise or Rotate counter-clockwise utton on t e lo er-lef t
si
e of t
e pa
e
y W en f inis e , click Next z
Tick herewhen
completed

8/8/2019 From Camera to Computer - Week 1
http://slidepdf.com/reader/full/from-camera-to-computer-week-1 7/12
From Camera to Computer Week 1 - Session Plan
AFFECT Life Coaching & Training Services Victoria pg. 7
5. CHOOSE AND ASSIGN A NAME TO YOUR PHOTO GROUP
SELECT A FOLDER ON YOUR COMPUTER TO SAVE
YOUR PHOTOS TO
y On t { e Picture Name an | } estination pa~ e, type a name f or thegroup of pictures.
y Click Browse, an select a f older in
ic to save your pictures
y If you ant to erase t e ima es f rom your camera's memory car tomake space f or ne ones, select t e elete pictures f rom my eviceaf ter copyin t em check box, an t en click Next
y On t e f inal page of t e i ar , click Finish
Tick herewhen
completed

8/8/2019 From Camera to Computer - Week 1
http://slidepdf.com/reader/full/from-camera-to-computer-week-1 8/12
From Camera to Computer Week 1 - Session Plan
AFFECT Life Coaching & Training Services Victoria pg. 8
6. DESCRIBE SOME BASIC PHOTO TAKING TECHNIQUES
The Law of Thirds -If
you mentally
ivi
e your camera vie
f in
er intot ree ori ontal an t ree vertical sections,
ere t e lines intersect areconsi ere i eal f ocal points Focal points are
at t e eyes are naturally ra n to
en you look at a p oto rap Theref ore, any one of these f ocalpoints is a oo place to position your main su ject
Portraits - When takin portraits the closer you et to the su ject the etter Use the oom f unction to oom in an use optical oom only f or est results
Landscapes - Al ays apply the la of thir s
Vary your shooting angle - Instea of al ays shootin at eye level tryshootin overhea , aist-level or roun -level When photo raphin smallchil ren or animals et o n to their level f or est results
Framing the shot - Try to f rame it, so that your inten e content f ills mostof the picture area on·t f or et to use the la of thir s
Macro - A etter ay to et real close is to use the´macro mo eµ if one is availa le
Experiment - experiment ² experiment -People take oo pictures not cameras With a
i ital camera you can e periment y takin as many test shots as you likeusin various camera settin s, compositions "Practice Makes Perf ect"
Tick here
whencompleted
8/8/2019 From Camera to Computer - Week 1
http://slidepdf.com/reader/full/from-camera-to-computer-week-1 9/12
From Camera to Computer Week 1 - Session Plan
AFFECT Life Coaching & Training Services Victoria pg. 9
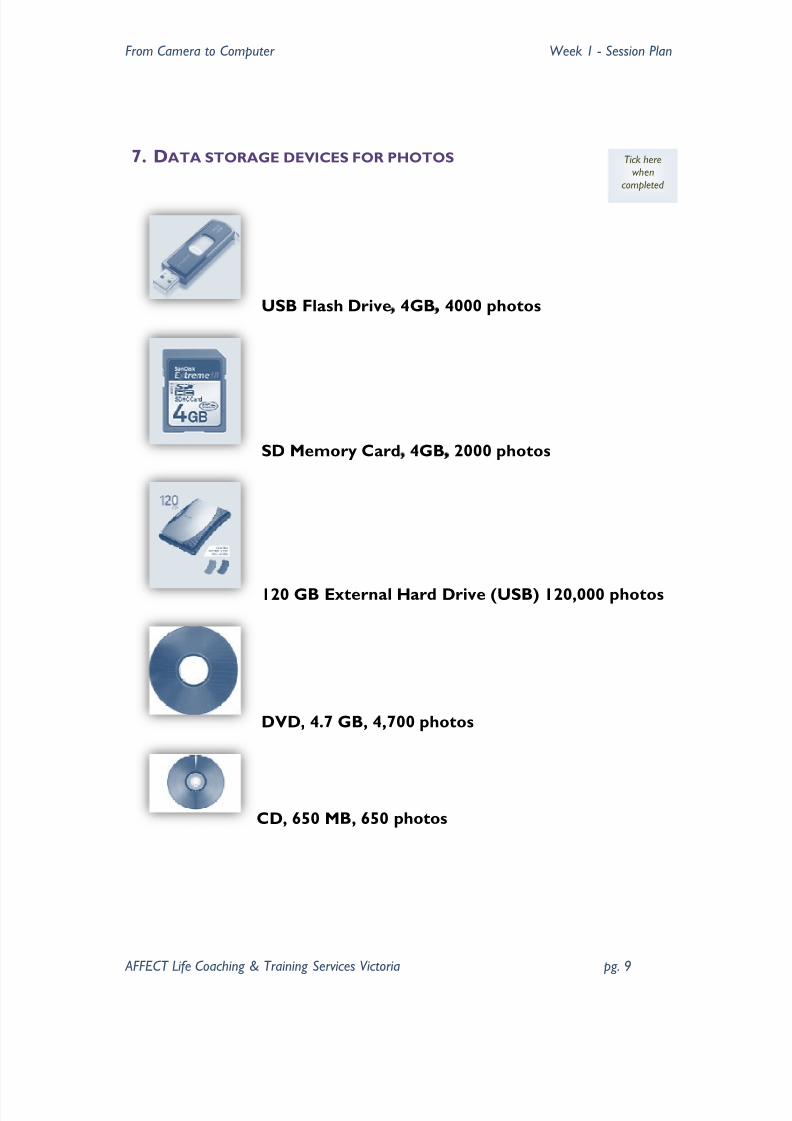
7. DATA STORAGE DEVICES FOR PHOTOS
USB Flash Drive 4GB 4000 photos
SD Memory Card 4GB 2000 photos
120 GB External Hard Drive (USB) 120,000 photos
DVD, 4.7 GB, 4,700 photos
CD, 650 MB, 650 photos
Tick herewhen
completed

8/8/2019 From Camera to Computer - Week 1
http://slidepdf.com/reader/full/from-camera-to-computer-week-1 10/12
From Camer a
o C ompu
er W eek 1
ession
an
AFFEC ife C oachin r ainin
er v ic es
ic
oria p
10
HOW WELL HAS THE SESSION BEEN UNDERSTOOD?
8. TO IMPORT YOUR PHOTOS TO YOUR COMPUTER USING
MICROSOFT PICTURE MANAGER:
Order these steps by placing a number next to the steps:
Connect a camera to a computer using a USB cable
Rotate the photos using the rotate clock wise or counter clock wise buttons
Select the photos you want by clicking the check box next tothose pictures
Click Microsof t Scanner and Camera
izard
Click Browse, and select a folder in which to save your pictures
Type a name for the group of pictures
Click Finish
Click Next
Written Sh
rt
nsw er C omp
etion of projec t Case study Role
l ay
roduc e a poster Jour nal entr y P
rtfolio Demonstr ation Make a v id eo C reate a podcast Observ ation Self
ac ed Assessment
T ic k here hen
c ompleted

8/8/2019 From Camera to Computer - Week 1
http://slidepdf.com/reader/full/from-camera-to-computer-week-1 11/12
From Camera to Computer Week 1 - Session Plan
AFFECT Life Coaching & Training Services Victoria pg. 11
9. LABEL THESE IMAGES
ITH THEIR CAPACITY:
4,700 photos
120,000 Photos
4000 Photos
4000 Photos
650 Photos
300 Photos
C
ª GB Flash rive
«
ª GB MemoryCar ¬
1 - 0 GB ®
̄ ternal
Har ¬ rive
W ritten Short Ans°
er Completion of project Case stu±
y ²
ole Play Produce a poster Journal entry Portfolio
³
emonstration ́
ake a video Create a podcast µ 
servation Self Paced Assessment
Tick here
whencompleted

8/8/2019 From Camera to Computer - Week 1
http://slidepdf.com/reader/full/from-camera-to-computer-week-1 12/12
From Camer a to C omputer W eek 1 · Session ̧ l an
AFFEC T ¹ ife C oachinº » T r aininº Ser v ic es¼
ic toria pº
½ 12
WHAT RESOURCES WERE USED TO CONSTRUCT THIS SESSION?
N¾
¿ e À f Á e À u Á
à e Det¾
Ä Å
 À f Á e À u Á
à e LÀ à ¾ t Ä
À n
Downloading picturesf rom your digital camera
Microsof t Æ
eb-site http://www.microsof t.com/windowsxp/using/digitalphotography/takeit/transf er.mspx