Embed Size (px)
Citation preview
From The Shop
The newsletter of the Lehigh Valley Woodworker’s Guild
Issue 06.2008 Next Meeting: June 17th, 2008 (3 rd Tuesday!) Location: Lehigh Co. Senior Center 1633 Elm Street Allentown, PA
Speakers and topics: Charles Bender – Custom woodworker and period furniture. Chuck will be bringing some period furniture, some slides that talk about secret compartments in furniture, and misc other topics. He will be a featured presenter at the York Woodworks show in the fall, and we get a preview!!
May Highlights:
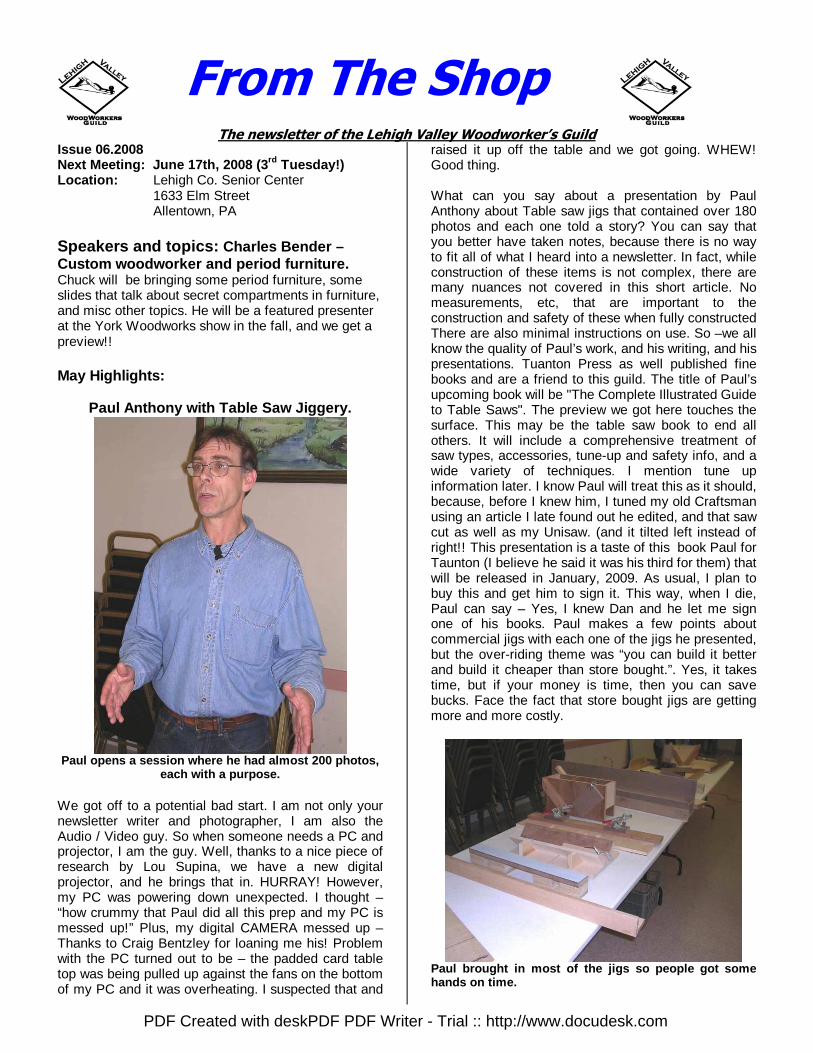
Paul Anthony with Table Saw Jiggery.
Paul opens a session where he had almost 200 photos ,
each with a purpose.
We got off to a potential bad start. I am not only your newsletter writer and photographer, I am also the Audio / Video guy. So when someone needs a PC and projector, I am the guy. Well, thanks to a nice piece of research by Lou Supina, we have a new digital projector, and he brings that in. HURRAY! However, my PC was powering down unexpected. I thought – “how crummy that Paul did all this prep and my PC is messed up!” Plus, my digital CAMERA messed up – Thanks to Craig Bentzley for loaning me his! Problem with the PC turned out to be – the padded card table top was being pulled up against the fans on the bottom of my PC and it was overheating. I suspected that and
raised it up off the table and we got going. WHEW! Good thing. What can you say about a presentation by Paul Anthony about Table saw jigs that contained over 180 photos and each one told a story? You can say that you better have taken notes, because there is no way to fit all of what I heard into a newsletter. In fact, while construction of these items is not complex, there are many nuances not covered in this short article. No measurements, etc, that are important to the construction and safety of these when fully constructed There are also minimal instructions on use. So –we all know the quality of Paul’s work, and his writing, and his presentations. Tuanton Press as well published fine books and are a friend to this guild. The title of Paul’s upcoming book will be "The Complete Illustrated Guide to Table Saws". The preview we got here touches the surface. This may be the table saw book to end all others. It will include a comprehensive treatment of saw types, accessories, tune-up and safety info, and a wide variety of techniques. I mention tune up information later. I know Paul will treat this as it should, because, before I knew him, I tuned my old Craftsman using an article I late found out he edited, and that saw cut as well as my Unisaw. (and it tilted left instead of right!! This presentation is a taste of this book Paul for Taunton (I believe he said it was his third for them) that will be released in January, 2009. As usual, I plan to buy this and get him to sign it. This way, when I die, Paul can say – Yes, I knew Dan and he let me sign one of his books. Paul makes a few points about commercial jigs with each one of the jigs he presented, but the over-riding theme was “you can build it better and build it cheaper than store bought.”. Yes, it takes time, but if your money is time, then you can save bucks. Face the fact that store bought jigs are getting more and more costly.
Paul brought in most of the jigs so people got some hands on time.
PDF Created with deskPDF PDF Writer - Trial :: http://www.docudesk.com
2
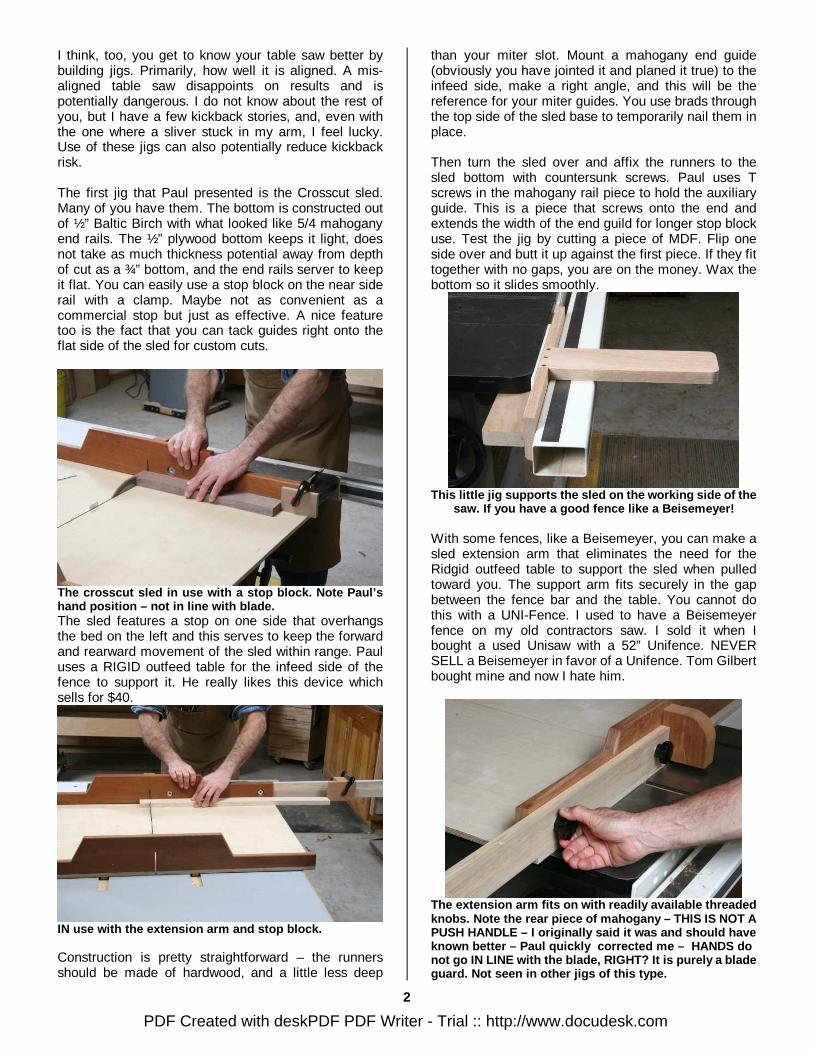
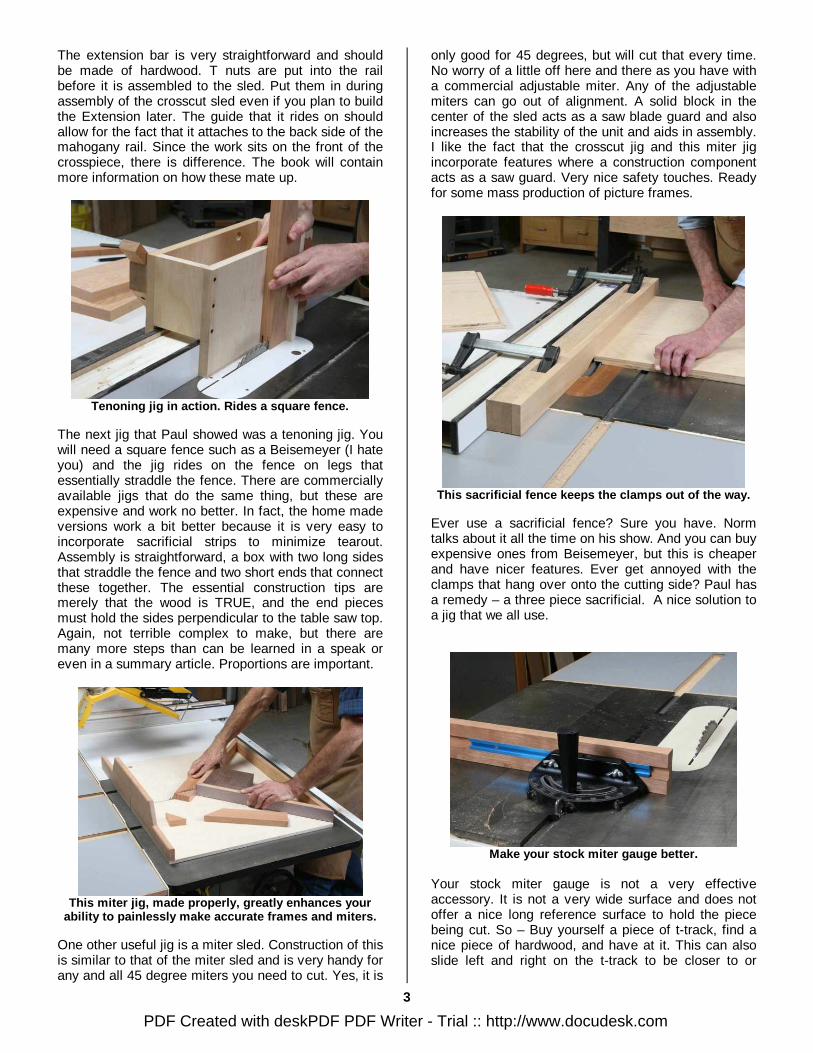
I think, too, you get to know your table saw better by building jigs. Primarily, how well it is aligned. A mis-aligned table saw disappoints on results and is potentially dangerous. I do not know about the rest of you, but I have a few kickback stories, and, even with the one where a sliver stuck in my arm, I feel lucky. Use of these jigs can also potentially reduce kickback risk. The first jig that Paul presented is the Crosscut sled. Many of you have them. The bottom is constructed out of ½” Baltic Birch with what looked like 5/4 mahogany end rails. The ½” plywood bottom keeps it light, does not take as much thickness potential away from depth of cut as a ¾” bottom, and the end rails server to keep it flat. You can easily use a stop block on the near side rail with a clamp. Maybe not as convenient as a commercial stop but just as effective. A nice feature too is the fact that you can tack guides right onto the flat side of the sled for custom cuts.
The crosscut sled in use with a stop block. Note Pa ul’s hand position – not in line with blade. The sled features a stop on one side that overhangs the bed on the left and this serves to keep the forward and rearward movement of the sled within range. Paul uses a RIGID outfeed table for the infeed side of the fence to support it. He really likes this device which sells for $40.
IN use with the extension arm and stop block. Construction is pretty straightforward – the runners should be made of hardwood, and a little less deep
than your miter slot. Mount a mahogany end guide (obviously you have jointed it and planed it true) to the infeed side, make a right angle, and this will be the reference for your miter guides. You use brads through the top side of the sled base to temporarily nail them in place.
Then turn the sled over and affix the runners to the sled bottom with countersunk screws. Paul uses T screws in the mahogany rail piece to hold the auxiliary guide. This is a piece that screws onto the end and extends the width of the end guild for longer stop block use. Test the jig by cutting a piece of MDF. Flip one side over and butt it up against the first piece. If they fit together with no gaps, you are on the money. Wax the bottom so it slides smoothly.
This little jig supports the sled on the working si de of the
saw. If you have a good fence like a Beisemeyer!
With some fences, like a Beisemeyer, you can make a sled extension arm that eliminates the need for the Ridgid outfeed table to support the sled when pulled toward you. The support arm fits securely in the gap between the fence bar and the table. You cannot do this with a UNI-Fence. I used to have a Beisemeyer fence on my old contractors saw. I sold it when I bought a used Unisaw with a 52” Unifence. NEVER SELL a Beisemeyer in favor of a Unifence. Tom Gilbert bought mine and now I hate him.
The extension arm fits on with readily available th readed knobs. Note the rear piece of mahogany – THIS IS NO T A PUSH HANDLE – I originally said it was and should h ave known better – Paul quickly corrected me – HANDS do not go IN LINE with the blade, RIGHT? It is purely a blade guard. Not seen in other jigs of this type.
PDF Created with deskPDF PDF Writer - Trial :: http://www.docudesk.com
3
The extension bar is very straightforward and should be made of hardwood. T nuts are put into the rail before it is assembled to the sled. Put them in during assembly of the crosscut sled even if you plan to build the Extension later. The guide that it rides on should allow for the fact that it attaches to the back side of the mahogany rail. Since the work sits on the front of the crosspiece, there is difference. The book will contain more information on how these mate up.
Tenoning jig in action. Rides a square fence.
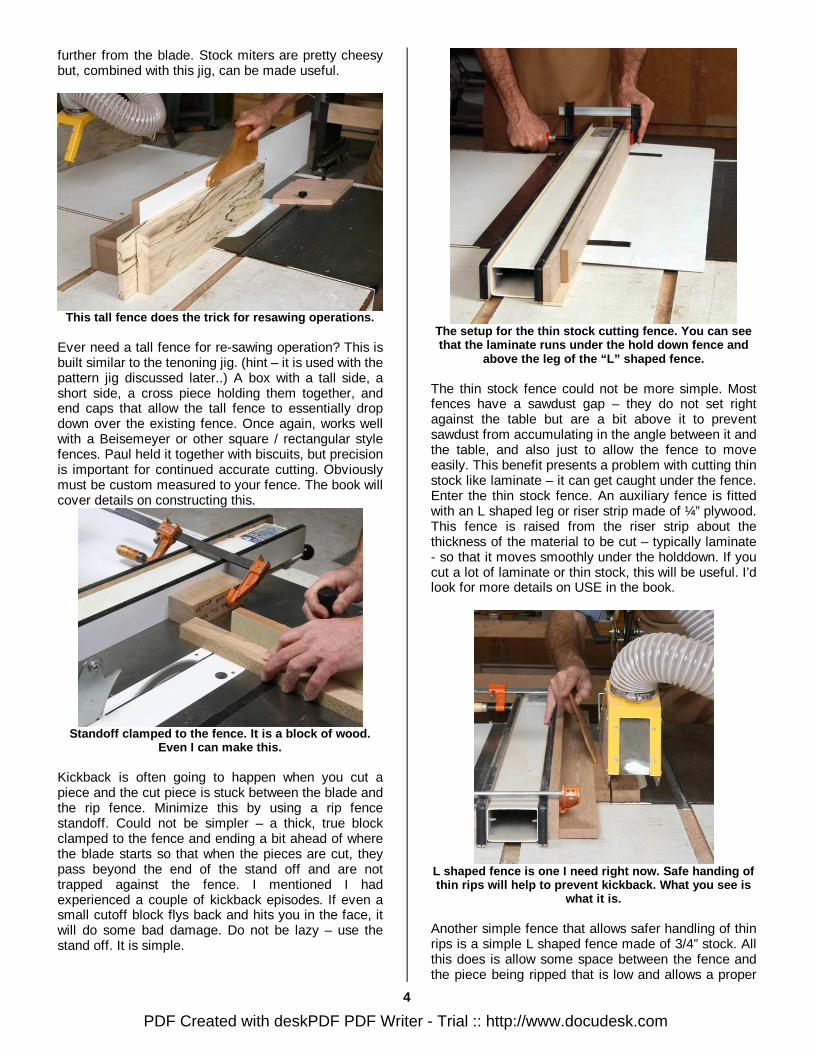
The next jig that Paul showed was a tenoning jig. You will need a square fence such as a Beisemeyer (I hate you) and the jig rides on the fence on legs that essentially straddle the fence. There are commercially available jigs that do the same thing, but these are expensive and work no better. In fact, the home made versions work a bit better because it is very easy to incorporate sacrificial strips to minimize tearout. Assembly is straightforward, a box with two long sides that straddle the fence and two short ends that connect these together. The essential construction tips are merely that the wood is TRUE, and the end pieces must hold the sides perpendicular to the table saw top. Again, not terrible complex to make, but there are many more steps than can be learned in a speak or even in a summary article. Proportions are important.
This miter jig, made properly, greatly enhances you r
ability to painlessly make accurate frames and mite rs.
One other useful jig is a miter sled. Construction of this is similar to that of the miter sled and is very handy for any and all 45 degree miters you need to cut. Yes, it is
only good for 45 degrees, but will cut that every time. No worry of a little off here and there as you have with a commercial adjustable miter. Any of the adjustable miters can go out of alignment. A solid block in the center of the sled acts as a saw blade guard and also increases the stability of the unit and aids in assembly. I like the fact that the crosscut jig and this miter jig incorporate features where a construction component acts as a saw guard. Very nice safety touches. Ready for some mass production of picture frames.
This sacrificial fence keeps the clamps out of the way.
Ever use a sacrificial fence? Sure you have. Norm talks about it all the time on his show. And you can buy expensive ones from Beisemeyer, but this is cheaper and have nicer features. Ever get annoyed with the clamps that hang over onto the cutting side? Paul has a remedy – a three piece sacrificial. A nice solution to a jig that we all use.
Make your stock miter gauge better.
Your stock miter gauge is not a very effective accessory. It is not a very wide surface and does not offer a nice long reference surface to hold the piece being cut. So – Buy yourself a piece of t-track, find a nice piece of hardwood, and have at it. This can also slide left and right on the t-track to be closer to or
PDF Created with deskPDF PDF Writer - Trial :: http://www.docudesk.com
4
further from the blade. Stock miters are pretty cheesy but, combined with this jig, can be made useful.
This tall fence does the trick for resawing operati ons.
Ever need a tall fence for re-sawing operation? This is built similar to the tenoning jig. (hint – it is used with the pattern jig discussed later..) A box with a tall side, a short side, a cross piece holding them together, and end caps that allow the tall fence to essentially drop down over the existing fence. Once again, works well with a Beisemeyer or other square / rectangular style fences. Paul held it together with biscuits, but precision is important for continued accurate cutting. Obviously must be custom measured to your fence. The book will cover details on constructing this.
Standoff clamped to the fence. It is a block of woo d.
Even I can make this.
Kickback is often going to happen when you cut a piece and the cut piece is stuck between the blade and the rip fence. Minimize this by using a rip fence standoff. Could not be simpler – a thick, true block clamped to the fence and ending a bit ahead of where the blade starts so that when the pieces are cut, they pass beyond the end of the stand off and are not trapped against the fence. I mentioned I had experienced a couple of kickback episodes. If even a small cutoff block flys back and hits you in the face, it will do some bad damage. Do not be lazy – use the stand off. It is simple.
The setup for the thin stock cutting fence. You can see that the laminate runs under the hold down fence an d
above the leg of the “L” shaped fence.
The thin stock fence could not be more simple. Most fences have a sawdust gap – they do not set right against the table but are a bit above it to prevent sawdust from accumulating in the angle between it and the table, and also just to allow the fence to move easily. This benefit presents a problem with cutting thin stock like laminate – it can get caught under the fence. Enter the thin stock fence. An auxiliary fence is fitted with an L shaped leg or riser strip made of ¼” plywood. This fence is raised from the riser strip about the thickness of the material to be cut – typically laminate - so that it moves smoothly under the holddown. If you cut a lot of laminate or thin stock, this will be useful. I’d look for more details on USE in the book.
L shaped fence is one I need right now. Safe handin g of thin rips will help to prevent kickback. What you s ee is
what it is.
Another simple fence that allows safer handling of thin rips is a simple L shaped fence made of 3/4” stock. All this does is allow some space between the fence and the piece being ripped that is low and allows a proper
PDF Created with deskPDF PDF Writer - Trial :: http://www.docudesk.com
5
push stick or push tool to be used without the fence getting in the way. Precision as always needed to make sure that the auxiliary fence is as true as regular one.
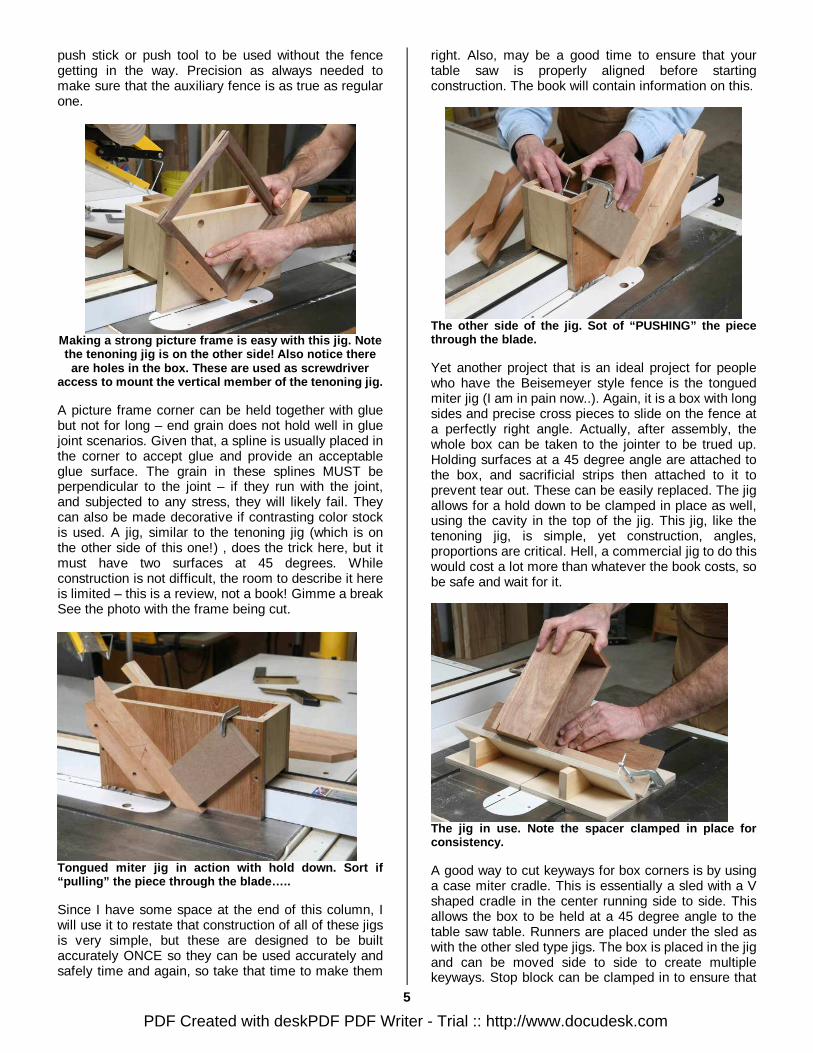
Making a strong picture frame is easy with this jig . Note the tenoning jig is on the other side! Also notice there are holes in the box. These are used as screwdriver
access to mount the vertical member of the tenoning jig.
A picture frame corner can be held together with glue but not for long – end grain does not hold well in glue joint scenarios. Given that, a spline is usually placed in the corner to accept glue and provide an acceptable glue surface. The grain in these splines MUST be perpendicular to the joint – if they run with the joint, and subjected to any stress, they will likely fail. They can also be made decorative if contrasting color stock is used. A jig, similar to the tenoning jig (which is on the other side of this one!) , does the trick here, but it must have two surfaces at 45 degrees. While construction is not difficult, the room to describe it here is limited – this is a review, not a book! Gimme a break See the photo with the frame being cut.
Tongued miter jig in action with hold down. Sort if “pulling” the piece through the blade….. Since I have some space at the end of this column, I will use it to restate that construction of all of these jigs is very simple, but these are designed to be built accurately ONCE so they can be used accurately and safely time and again, so take that time to make them
right. Also, may be a good time to ensure that your table saw is properly aligned before starting construction. The book will contain information on this.
The other side of the jig. Sot of “PUSHING” the piece through the blade. Yet another project that is an ideal project for people who have the Beisemeyer style fence is the tongued miter jig (I am in pain now..). Again, it is a box with long sides and precise cross pieces to slide on the fence at a perfectly right angle. Actually, after assembly, the whole box can be taken to the jointer to be trued up. Holding surfaces at a 45 degree angle are attached to the box, and sacrificial strips then attached to it to prevent tear out. These can be easily replaced. The jig allows for a hold down to be clamped in place as well, using the cavity in the top of the jig. This jig, like the tenoning jig, is simple, yet construction, angles, proportions are critical. Hell, a commercial jig to do this would cost a lot more than whatever the book costs, so be safe and wait for it.
The jig in use. Note the spacer clamped in place fo r consistency. A good way to cut keyways for box corners is by using a case miter cradle. This is essentially a sled with a V shaped cradle in the center running side to side. This allows the box to be held at a 45 degree angle to the table saw table. Runners are placed under the sled as with the other sled type jigs. The box is placed in the jig and can be moved side to side to create multiple keyways. Stop block can be clamped in to ensure that
PDF Created with deskPDF PDF Writer - Trial :: http://www.docudesk.com
6
when you cut 4 slots, they are equal distance from box top / bottom. Thin “Keys” can be cut using a miter gauge and fence offset block.
Tapering jig. Bottom is a piece of plywood. Toggles
mounted high on blocks that are affixed to a pivoti ng jig with a stop block on the end.
Ah – the tapering jig. Everyone has one. Almost. Like you got it with your Craftsman saw? Yes, there are commercially available models. Some very good, some very expensive. Paul’s design is simple, and you do not even need a Beisemeyer to make it work. One end of the smaller board acts as a pivot point, and there is a stop block on that end (hey, even I can make this). On top of the pivoting board are a couple of toggles hold downs, as most legs are made from 6/4 or thicker stock. You mark where you want your bevel to start, mark where it stops. Put the starting end away from you and put the end (top of the leg) against the stop block, align the start line with the edge of the base board, align the end mark with the edge of the base board, place the whole thing into the table saw so that the base is set with one end against the fence and the other end just touching the blade teeth, and have at it.. Save the cutoff – you use that as a wedge hold down for when you rotate the leg to cut the second taper.
Very useful and pretty accurate. Bevel cuts would n ot be practical on the corsscut sled work well here.
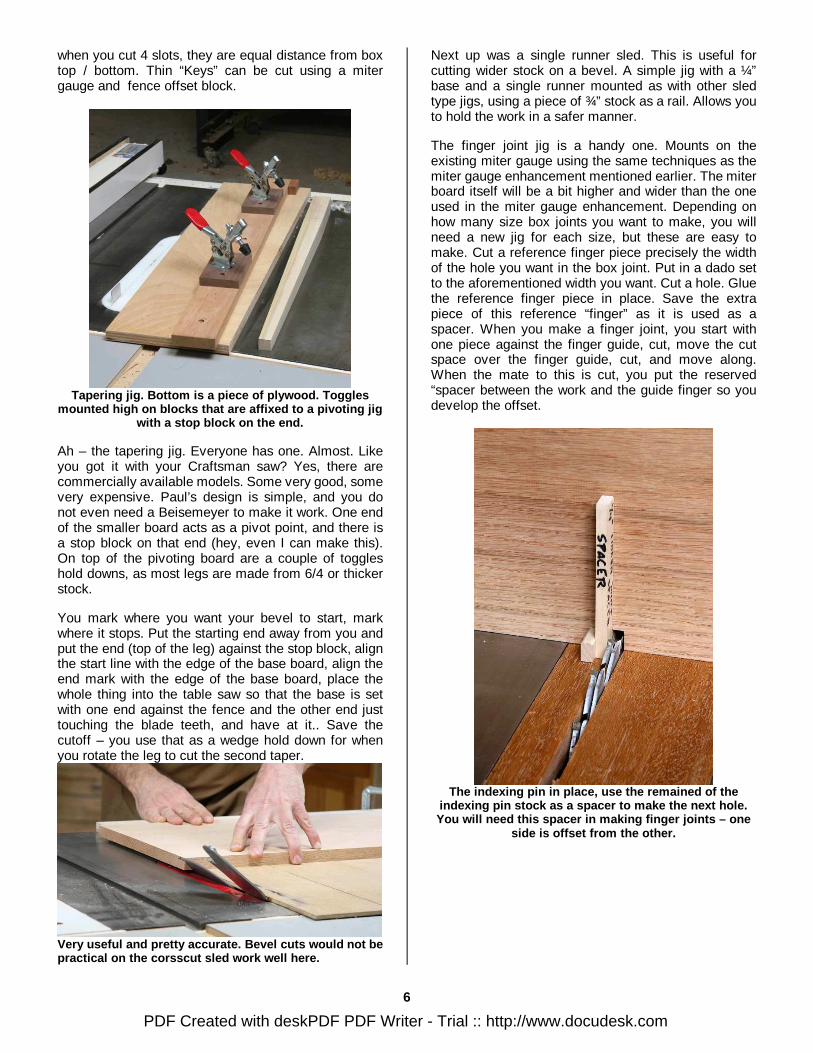
Next up was a single runner sled. This is useful for cutting wider stock on a bevel. A simple jig with a ¼” base and a single runner mounted as with other sled type jigs, using a piece of ¾” stock as a rail. Allows you to hold the work in a safer manner. The finger joint jig is a handy one. Mounts on the existing miter gauge using the same techniques as the miter gauge enhancement mentioned earlier. The miter board itself will be a bit higher and wider than the one used in the miter gauge enhancement. Depending on how many size box joints you want to make, you will need a new jig for each size, but these are easy to make. Cut a reference finger piece precisely the width of the hole you want in the box joint. Put in a dado set to the aforementioned width you want. Cut a hole. Glue the reference finger piece in place. Save the extra piece of this reference “finger” as it is used as a spacer. When you make a finger joint, you start with one piece against the finger guide, cut, move the cut space over the finger guide, cut, and move along. When the mate to this is cut, you put the reserved “spacer between the work and the guide finger so you develop the offset.
The indexing pin in place, use the remained of the
indexing pin stock as a spacer to make the next hol e. You will need this spacer in making finger joints – one
side is offset from the other.
PDF Created with deskPDF PDF Writer - Trial :: http://www.docudesk.com
7
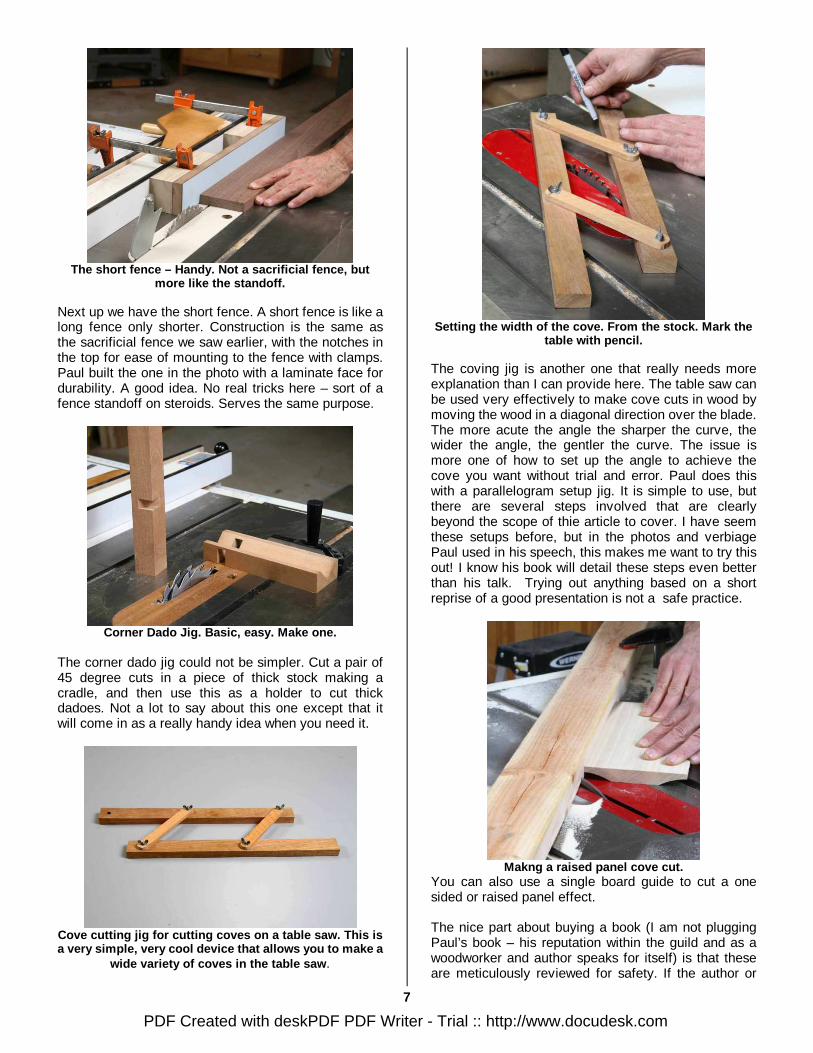
The short fence – Handy. Not a sacrificial fence, b ut
more like the standoff.
Next up we have the short fence. A short fence is like a long fence only shorter. Construction is the same as the sacrificial fence we saw earlier, with the notches in the top for ease of mounting to the fence with clamps. Paul built the one in the photo with a laminate face for durability. A good idea. No real tricks here – sort of a fence standoff on steroids. Serves the same purpose.
Corner Dado Jig. Basic, easy. Make one.
The corner dado jig could not be simpler. Cut a pair of 45 degree cuts in a piece of thick stock making a cradle, and then use this as a holder to cut thick dadoes. Not a lot to say about this one except that it will come in as a really handy idea when you need it.
Cove cutting jig for cutting coves on a table saw. This is a very simple, very cool device that allows you to make a
wide variety of coves in the table saw .
Setting the width of the cove. From the stock. Mark the
table with pencil.
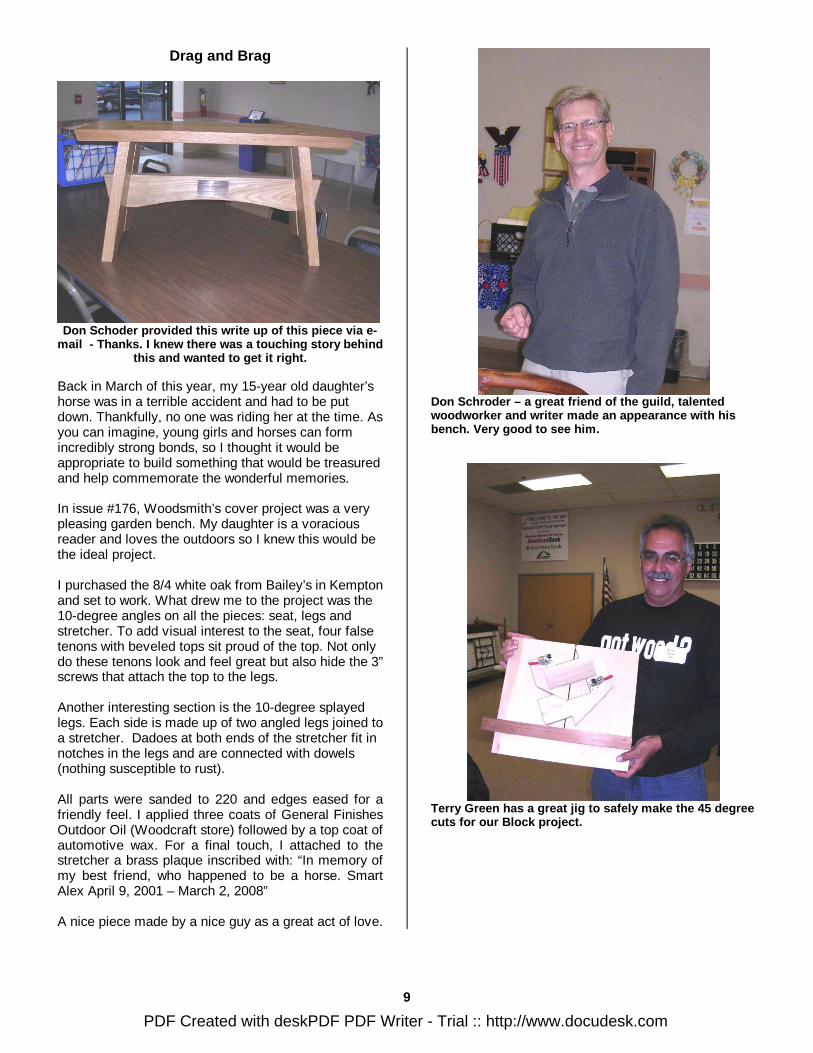
The coving jig is another one that really needs more explanation than I can provide here. The table saw can be used very effectively to make cove cuts in wood by moving the wood in a diagonal direction over the blade. The more acute the angle the sharper the curve, the wider the angle, the gentler the curve. The issue is more one of how to set up the angle to achieve the cove you want without trial and error. Paul does this with a parallelogram setup jig. It is simple to use, but there are several steps involved that are clearly beyond the scope of thie article to cover. I have seem these setups before, but in the photos and verbiage Paul used in his speech, this makes me want to try this out! I know his book will detail these steps even better than his talk. Trying out anything based on a short reprise of a good presentation is not a safe practice.
Makng a raised panel cove cut.
You can also use a single board guide to cut a one sided or raised panel effect. The nice part about buying a book (I am not plugging Paul’s book – his reputation within the guild and as a woodworker and author speaks for itself) is that these are meticulously reviewed for safety. If the author or
PDF Created with deskPDF PDF Writer - Trial :: http://www.docudesk.com

8
publisher feel something presents a risk, they will not publish that portion or will correct it to the point where risk is mitigated. Woodworkers know that every tool they buy, every project they make, involves risk. But going about a project half-assed is even worse. We say a preview sketch of a drawing Paul will be putting into the book for construction purposes – these look like they will enable any of us to make one of these properly.
Pattern Cutting Jig. See text.
The next jig (whew!) is a pattern cutting jig. This is another L shaped auxiliary fence that gets clamped to the “TALL” fence and acts like a guide or “bushing” where the pattern rides. The fence is set up to be above the table the thickness of the stock to be cut. The pattern is sticky taped to the work and the pattern edge is moved along the “L” edge, cutting the work along the pattern. If you do a lot of work like this, one of these would be very handy.
Pattern on top, work on bottom. Double face tape wo rks
well here. Pattern follows edge of jig.
Last but not least is a small accessory to fit in your crosscut sled that allows you to saw kerfs in wood for kerf bending. It is a small strip with a brad in it. Since most stock to be bent is ¾” thick, the brad is mailed into a strip of wood so that the top of the brad is maybe ½” from the bottom of the strip. The strip is then clamped to the rear rail of the crosscut sled at an acceptable distance, maybe ¾”, from the blade. The blade is set to a height that would allow about 1/8” of stock left above the kerf. As you cut kerfs, you move the stock over the brad, giving evenly spaced kerfs.
Set blade depth, put wood against brad. Make a cut . Slip wood over brad into first cut, Make a cut. Again. A gain.
While I have joked about my Unifence, there are many jigs in here that will work with it or which can be adapted to it. The sled type jigs in particular are ones that will aide us all. One key point – I feel that by building these as opposed to buying, you learn more about your table saw, alignment, characteristics of the jigs, and use. If we liked just buying stuff, we would not be woodworkers, would we? I have glossed over many of the important aspects of Paul’s excellent presentation. I am not trying to sell you his book, but many of the items he spoke about are excellent shop jigs and, more importantly, will help remove elements of danger associated with kickback and direct “hand/blade interference”. I usually buy new books written by our professional members like Paul and Bill Hylton and Ken Burton. Not because they are members, but because they do a thorough job in writing and presenting material relevant to what I do. I know that when Paul’s book does come out, it will describe how to make and use these jigs with no ambiguity. That said, we got a fine preview by a great friend of this guild. Thank you again, Paul.
Since I have already blown the budget on this editi on, why not show Paul with a commercial table saw push
stick he actually likes!
PDF Created with deskPDF PDF Writer - Trial :: http://www.docudesk.com
9
Drag and Brag
Don Schoder provided this write up of this piece vi a e-
mail - Thanks. I knew there was a touching story b ehind this and wanted to get it right.
Back in March of this year, my 15-year old daughter’s horse was in a terrible accident and had to be put down. Thankfully, no one was riding her at the time. As you can imagine, young girls and horses can form incredibly strong bonds, so I thought it would be appropriate to build something that would be treasured and help commemorate the wonderful memories. In issue #176, Woodsmith’s cover project was a very pleasing garden bench. My daughter is a voracious reader and loves the outdoors so I knew this would be the ideal project. I purchased the 8/4 white oak from Bailey’s in Kempton and set to work. What drew me to the project was the 10-degree angles on all the pieces: seat, legs and stretcher. To add visual interest to the seat, four false tenons with beveled tops sit proud of the top. Not only do these tenons look and feel great but also hide the 3” screws that attach the top to the legs. Another interesting section is the 10-degree splayed legs. Each side is made up of two angled legs joined to a stretcher. Dadoes at both ends of the stretcher fit in notches in the legs and are connected with dowels (nothing susceptible to rust). All parts were sanded to 220 and edges eased for a friendly feel. I applied three coats of General Finishes Outdoor Oil (Woodcraft store) followed by a top coat of automotive wax. For a final touch, I attached to the stretcher a brass plaque inscribed with: “In memory of my best friend, who happened to be a horse. Smart Alex April 9, 2001 – March 2, 2008” A nice piece made by a nice guy as a great act of love.
Don Schroder – a great friend of the guild, talente d woodworker and writer made an appearance with his bench. Very good to see him.
Terry Green has a great jig to safely make the 45 d egree cuts for our Block project.
PDF Created with deskPDF PDF Writer - Trial :: http://www.docudesk.com
10
Will Schmidt – root or not a root? Seagull?
For July – Preview!
Folks, this promises to be another special evening. Jeffry Lohr, not only a well known and respected woodworker, but a person who has a woodworking outreach program in Africa, is presenting along with one of his associates from Africa. An enlightening evening. Title: Mr. Jeffry's Thrid World Table Saw, Jointer and Planer Project. Speakers: Jeffry Lohr of Schwenksvile, PA; Abubakar Abdullai, Cape Coast, Ghana. Organization: Moringacommunity.org. Synopsis: Jeffry Lohr, Professional Studio Furniture maker and woodworking teacher and Abubukar Abdullai of Ghana, West Africa are developing an inexpensive woodworking machine shop complete with table saw, jointer and planer for native woodworkers in West Africa. Despite the availability of electricity in many villages, African carpenters and woodworkers have virtually no stationary woodworking equipment. Typically, they work from dawn to dusk for sub-poverty wages that are insufficient to feed themselves and their families. Their extensive use of hand tools makes the production of simple wood products for homes and businesses vastly time consuming. However, although stationary woodworking equipment is quite beyond the reach of all but a fraction of African woodworkers, many do have access to hand held power circular saws and routers. Jeffry Lohr and Abubakar Abdullai will demonstrate how relatively cheap electric powered hand tools such as these can be transformed into highly effective, precise, stationary production equipment at minimal expense, and how the development of trade schools in Africa to teach this practical real world technology to native woodworkers and carpenters can do much to lift the typical African professional woodworker out of poverty. For more information about these presenters see: www.jefflohr.com
For Sale – From Tinsman Collection
In a the 1999 American Woodworker show, Bob Tinsman was a recipient of a limited supply of hand made step stool type chairs made and signed by Frank Klausz. This piece is for sale for $125. Cash sale. Art Silva will bring it to the meeting.
Steering Committee Meeting Notes
JULY IS THE INDOOR PICNIC MEETING! Judy Muth gave me hell at the steering committee meeting for not having this in the last newsletter. I mean BAD! So be prepared to eat. Picnic food. Also, if you have a funny TEE SHIRT, wear it for some comedy relief. REALLY! The contest – We will have a category for turners and for Decorative items (catch all for carving and little stuff) in addition to the 1 – 5 years, 5 – 10 years, Professional categories. Lou Supina, Allen “Boog” Powell, and Ken Muth are judging. Do not forget that the Christmas holiday food donation can is out at meetings. Judy got $7.00 and 14 S&H green stamps so far.
And the Woodcraft winner is…
Wally Lukow!
Special Presentation!
PDF Created with deskPDF PDF Writer - Trial :: http://www.docudesk.com
11
In the course of going through Bob Tinsman’s many tools Art Silva and Tom Wayne found a vintage Dremel vibrating coping saw. Really
vintage. Who better would Bob want to have this tool go to but master veneer and woodworker,
Adolph Schneider! Nice gesture!
June’s speaker Chuck Bender on the left, Craig Bent zley in front, and Don Schoder on the right. A couple of really
nice people and Craig.
Wood Specials SHADY LANE TREE FARM
Louise & Mike Peters 5220 Shimerville Road Emmaus, PA 610 965-5612 Please call
FLEETWOOD LUMBER & FLOORING BILL BURKERT 27 Rapp Rd. Fleetwood, PA 610 944-8364 Please call Member discount 5%
Bailey Wood Products, Inc. 441 Mountain Rd. RD#2 Box 38 Kempton, PA 610 756-6827
Woodcraft Pkwy Shopping Ctr.
1534 Lehigh St. Allentown, Pa.,18103
L.V.W.G. Contacts Founded in 1995 by: Dave Dreher Newsletter: Dan Manturi 484-894-7116
[email protected] Steering Committee Support: Ray Winkler Distribution / Mail list: Quentin Patterson 610-253-1402 Special Projects Manager Allen Powell
(610) 419-4864
Web Site Administrator : Lou Supina
610-965-2520
Treasurer: Harold Andy Anderson 610-965-4828 Book / Purchase Coordinator Russ Reinhard [email protected] Guild Contact Person – E-mail Russ Reinhard [email protected]
PDF Created with deskPDF PDF Writer - Trial :: http://www.docudesk.com
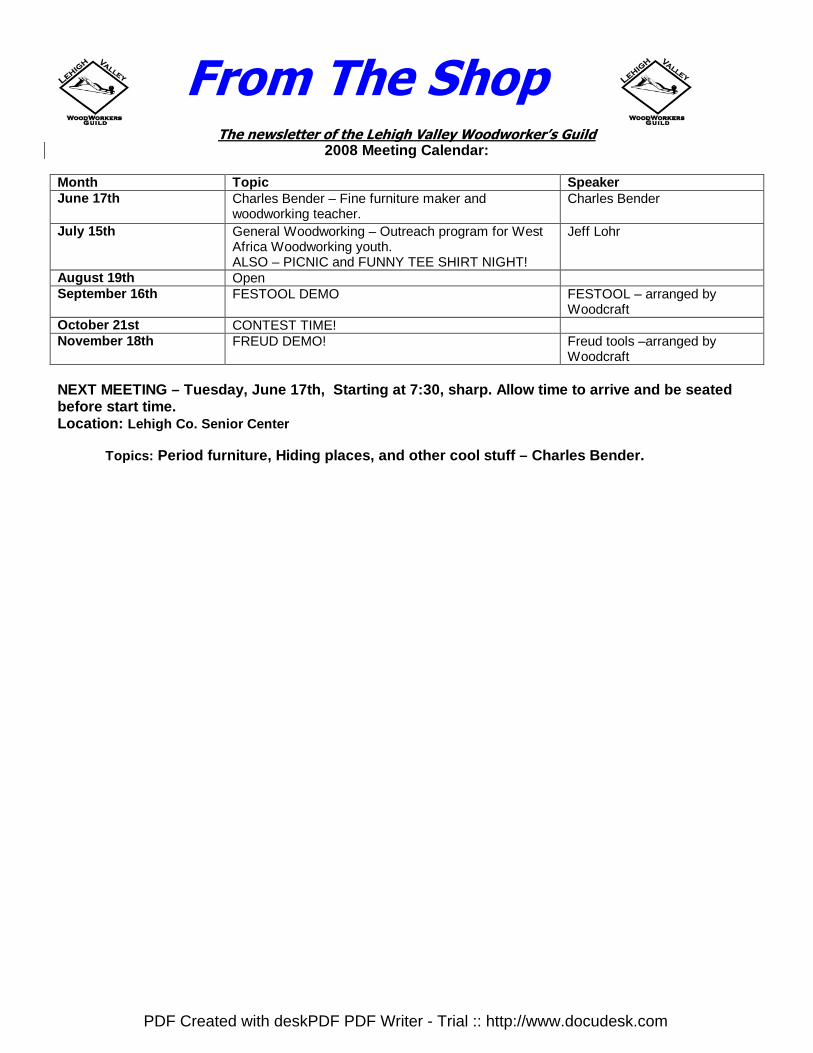
From The Shop
The newsletter of the Lehigh Valley Woodworker’s Guild
2008 Meeting Calendar: Month Topic Speaker June 17th Charles Bender – Fine furniture maker and
woodworking teacher. Charles Bender
July 15th General Woodworking – Outreach program for West Africa Woodworking youth. ALSO – PICNIC and FUNNY TEE SHIRT NIGHT!
Jeff Lohr
August 19th Open September 16th FESTOOL DEMO FESTOOL – arranged by
Woodcraft October 21st CONTEST TIME! November 18th FREUD DEMO! Freud tools –arranged by
Woodcraft NEXT MEETING – Tuesday, June 17th, Starting at 7:3 0, sharp. Allow time to arrive and be seated before start time. Location: Lehigh Co. Senior Center
Topics: Period furniture, Hiding places, and other cool st uff – Charles Bender.
PDF Created with deskPDF PDF Writer - Trial :: http://www.docudesk.com