Embed Size (px)
Citation preview

Front Sprocket Norton 961
1 | P a g e r i c h a r d @ c o o t e 1 . c o m c o p y r i g h t 2 0 1 6

Front Sprocket Norton 961
2 | P a g e r i c h a r d @ c o o t e 1 . c o m c o p y r i g h t 2 0 1 6
This section shows how to replace your front Sprocket
Per chance you’re going touring or looking for faster off the line performance. ONE07 Front Sprockets made by John Snead at Special Tool Solutions will give you what you need.
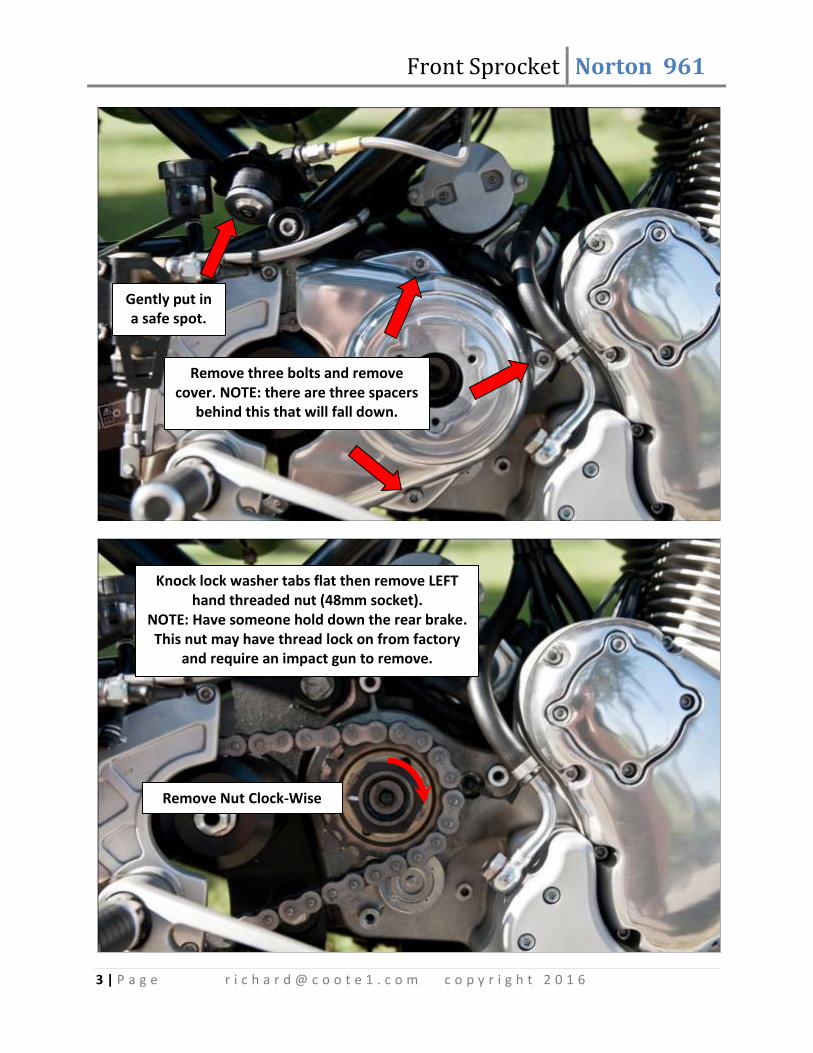
Remove Three Bolts. NOTE: This is not exactly needed but makes the job easier. Also, it is important not to operate the clutch lever while this is apart.
Front Sprocket Norton 961
3 | P a g e r i c h a r d @ c o o t e 1 . c o m c o p y r i g h t 2 0 1 6
Gently put in a safe spot.
Remove three bolts and remove cover. NOTE: there are three spacers
behind this that will fall down.
Knock lock washer tabs flat then remove LEFT hand threaded nut (48mm socket).
NOTE: Have someone hold down the rear brake. This nut may have thread lock on from factory
and require an impact gun to remove.
Remove Nut Clock-Wise

Front Sprocket Norton 961
4 | P a g e r i c h a r d @ c o o t e 1 . c o m c o p y r i g h t 2 0 1 6
Loosen rear wheel nut.
Really loosen off the rear wheel alignment bolts
(one per side) and push the rear tire forward towards engine. Be careful not to
tip the bike over doing this!

Front Sprocket Norton 961
5 | P a g e r i c h a r d @ c o o t e 1 . c o m c o p y r i g h t 2 0 1 6
Remove Front Sprocket.

Front Sprocket Norton 961
6 | P a g e r i c h a r d @ c o o t e 1 . c o m c o p y r i g h t 2 0 1 6
It is always a good idea to purchase a spare lock washer for reasons like in
this image shown. NOTE: DO NOT RE-USE A DAMAGED
NUT OR LOCK WASHER!
OEM Norton Nut OEM Norton Lock Washer
OEM Norton 18 tooth Sprocket
ONE07 17 tooth Sprocket
(Speedometer reads approx. 10mph faster)
ONE07 19 tooth Sprocket
(Speedometer reads approx. 5mph slower)

Front Sprocket Norton 961
7 | P a g e r i c h a r d @ c o o t e 1 . c o m c o p y r i g h t 2 0 1 6
ONE07 The 17 tooth Sprocket
is faster off the line. Easier slow speed control. Ideal for
city or short circuit racing.
ONE07 The 19 tooth Sprocket
provides better fuel mileage. Longer duration between switching gears. Great for touring or top end speed.
OPTIONAL: If using a new Lock Washer you
need to pre bend the tabs.

Front Sprocket Norton 961
8 | P a g e r i c h a r d @ c o o t e 1 . c o m c o p y r i g h t 2 0 1 6
OPTIONAL: If using a new Lock Washer you need to pre bend the tabs. Slightly bend two
tabs opposite each other one way and two tabs the other way.
Install Lock Washer with two of the slightly bent tabs in towards the holes on the sprocket.

Front Sprocket Norton 961
9 | P a g e r i c h a r d @ c o o t e 1 . c o m c o p y r i g h t 2 0 1 6
OPTIONAL: If using a NEW lock washer, install nut fairly tight and line up nut to access tabs so you can punch in
tabs towards the sprocket using a blunt punch.
Tighten the left handed nut to 90foot pounds.
Have a friend hold down the rear brake.
Front Sprocket Norton 961
10 | P a g e r i c h a r d @ c o o t e 1 . c o m c o p y r i g h t 2 0 1 6
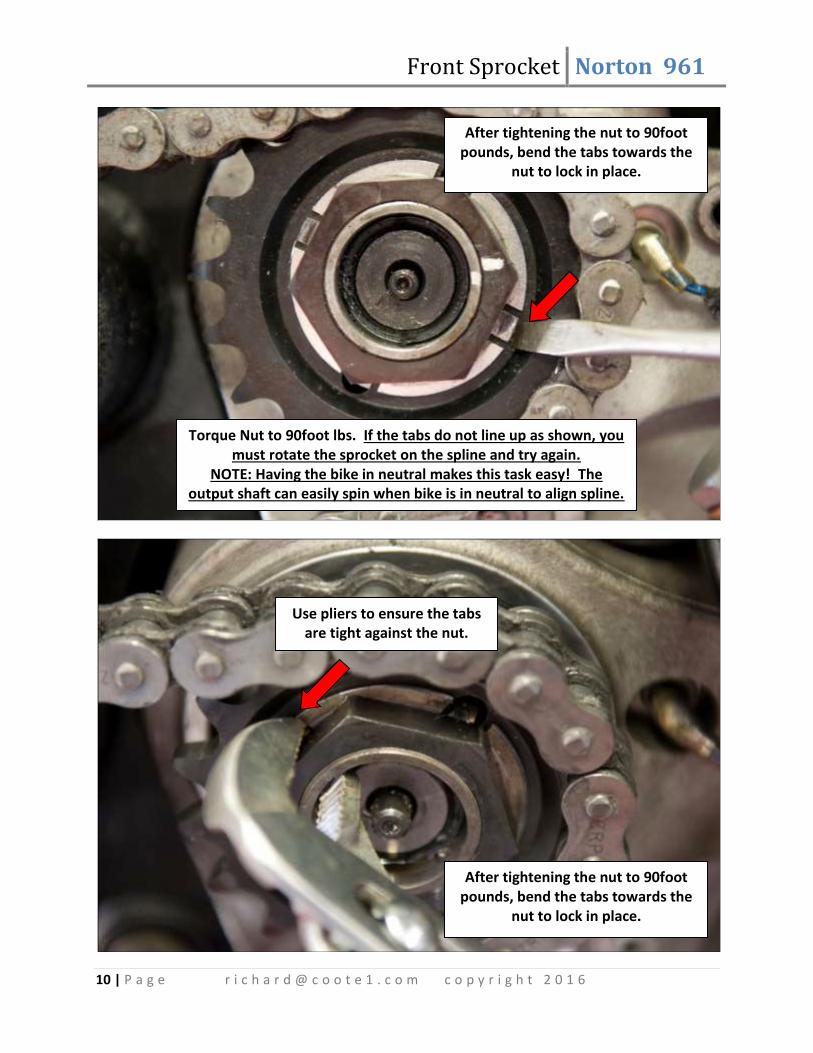
Torque Nut to 90foot lbs. If the tabs do not line up as shown, you must rotate the sprocket on the spline and try again.
NOTE: Having the bike in neutral makes this task easy! The output shaft can easily spin when bike is in neutral to align spline.
After tightening the nut to 90foot pounds, bend the tabs towards the
nut to lock in place.
Use pliers to ensure the tabs are tight against the nut.
After tightening the nut to 90foot pounds, bend the tabs towards the
nut to lock in place.

Front Sprocket Norton 961
11 | P a g e r i c h a r d @ c o o t e 1 . c o m c o p y r i g h t 2 0 1 6
Tighten both alignment bolts on swing arm evenly to produce the correct amount of chain slack. Use a measuring device to ensure they
are even. Then tighten the rear wheel.
After rear wheel is tight, snug up alignment bolts so they don’t vibrate out.

Front Sprocket Norton 961
12 | P a g e r i c h a r d @ c o o t e 1 . c o m c o p y r i g h t 2 0 1 6
Be aware that these tabs are a flaw. Do not measure rear wheel
alignment off these tabs.
Before re-installing cover and clutch mechanism, ensure the ball
bearing is still in place.

Front Sprocket Norton 961
13 | P a g e r i c h a r d @ c o o t e 1 . c o m c o p y r i g h t 2 0 1 6
Although this guide doesn’t have a price tag it is copyrighted and formally registered. If you like what
you see and this has helped you, please make a donation via PAYPAL to [email protected]. Your
support will help make more manuals like this available.
If you haven't helped yet, please donate so I can continue to offer these guides.
We are slowly developing useful tools to help make it easier for you to work on your pride and joy.
Specialty hand crafted tools for your modern Norton by One07 Tools, can be purchased from places like
Colorado Norton Works in the USA. If there are any tools in this manual or other manuals you would
like more information on, please email me at [email protected]
Peter Howes - Norton Canada CEO on a 2014 Norton Commando SE #112. Special Thanks to Peter for all the hard work he does getting bikes in Canada.