Embed Size (px)
Citation preview

8/2/2019 Frustration Free Guitar a Beginners Guide
http://slidepdf.com/reader/full/frustration-free-guitar-a-beginners-guide 1/19
P a g e | 1
Copyright © 2011 http://www.Learn2playguitars.com
Frustration Free
Guitar A Beginners Guide
© Copyright 2011, All rights reserved. No part of this report shall be reproduced, stored in aretrieval system, or transmitted by any means, electronic, mechanical, photocopying, recording,or otherwise, without written permission from the author. No patent liability is assumed withrespect to the use of the information contained herein. While every precaution has been taken in the preparation of this report, the author assumes noresponsibility for errors or omissions, or for damages resulting from the use of informationcontained in this publication. Note: This publication contains the opinions and ideas of its author.It is intended to provide helpful and informative material on the subject matter covered.If the reader requires personal assistance or advice, a competent professional should be consulted.In no event shall the author be liable for any loss or damages caused or alleged to have beencaused directly or indirectly by this publication.
Disclosure: We are a professional review site that receives compensation from the companies whose products we review.

8/2/2019 Frustration Free Guitar a Beginners Guide
http://slidepdf.com/reader/full/frustration-free-guitar-a-beginners-guide 2/19
P a g e | 2
Copyright © 2011 http://www.Learn2playguitars.com
Table of Contents
Introduction .......................................................................................................................................... 3
Types of Guitars..................................................................................................................................... 4
Parts of the guitar .................................................................................................................................. 5
The Guitar Fretboard ............................................................................................................................ 6
Tuning Your Guitar ............................................................................................................................... 7
Tuning Without a Guitar Tuner ........................................................................................................... 8
Warming Up To Play Guitar ................................................................................................................. 9
The notes on the guitar neck ............................................................................................................... 10
Guitar Tablature Explained .................................................................................................................. 12
Scales – Using the notes we’ve found on The Neck ............................................................................ 14
Chords & Construction ........................................................................................................................ 15
Handy chord chart references ............................................................................................................. 17
What Do I do with all of this?.............................................................................................................. 17
Parting Thoughts .................................................................................................................................. 19
Disclosure: We are a professional review site that receives compensation from the companies whose products we review.

8/2/2019 Frustration Free Guitar a Beginners Guide
http://slidepdf.com/reader/full/frustration-free-guitar-a-beginners-guide 3/19
P a g e | 3
Copyright © 2011 http://www.Learn2playguitars.com
Introduction
The purpose of this guide is get you primed to learn to play the guitar and to help educate you in
methods of learning to play guitar that will allow you to avoid the frustration, wasted time and
money that many guitar players simply had to suffer through.
Playing the guitar can and should be a very fun and rewarding creative outlet that can provide
years of enjoyment and can even lead to writing your own songs, performing with a band, getting
a huge recording contract and making millions of dollars! Sorry, I’m getting ahead of myself here!
Kidding aside, we’ll focus on the very basics so you have a solid foundation that will allow you to
grow into a confident guitar player. You will look back fondly on these basics years from now and
you’ll no doubt be very glad that you took the time to learn them as you may find yourself
teaching others and passing on the gift of music and the journey that you’re about to embark on.
Let’s get started!
Learn2PlayGuitars.com
Disclosure: We are a professional review site that receives compensation from the companies whose products we review.

8/2/2019 Frustration Free Guitar a Beginners Guide
http://slidepdf.com/reader/full/frustration-free-guitar-a-beginners-guide 4/19
P a g e | 4
Copyright © 2011 http://www.Learn2playguitars.com
Types of Guitars
For the purposes of this book, we’re going to be looking at two different types of guitar. Type 1 is
the acoustic or hollow body guitar and the second is the electric or solid body guitar. Both are
shown below.
Each type of guitar serves its own purpose and it’s not uncommon to own one of each type of
guitar. Many students (and often parents of students) will ask…
Which type of guitar should I choose to learn to play guitar on; acoustic or electric?
While this will partially come down to personal preferences, there are some important factors to
consider when selecting which type of guitar to buy for your budding new Rock Star or yourself.
Disclosure: We are a professional review site that receives compensation from the companies whose products we review.

8/2/2019 Frustration Free Guitar a Beginners Guide
http://slidepdf.com/reader/full/frustration-free-guitar-a-beginners-guide 5/19
P a g e | 5
Copyright © 2011 http://www.Learn2playguitars.com
Volume of the Instrument – Both electric and acoustic guitars can be heard while sitting and
strumming with no amplifier but the acoustic can generally be loud enough to fill a small room
with sound. If you’ll be practicing in a room with other people around, the electric will be able to
be heard but is pretty quiet and not too disturbing. That said; if you want to entertain or play
with others, you can do so with an acoustic without having to buy an amplifier at first.
Comfort while playing – The electric guitar is typically easier and more comfortable to play than
the acoustic guitar. This is due to the acoustic guitars body being larger, the neck being thicker
and wider and the action or height of the strings being higher or further from the neck. Many
choose to start on acoustic only to find it tough on the fingers. They become discouraged and
quit before ever really getting started because they started out at a disadvantage. Starting on
acoustic is fine, but the player should pay extra to get the guitar set-up properly for maximum
comfort.
Extra Cost of Amplifier – If you’re going to start out on an electric guitar, you’ll have to factor in
the cost of an amplifier. While you’ll still be able to hear the guitar if strummed unplugged, you won’t get the full effect.
Parts of the guitar
It’s very important to get to know all of the specific parts of your guitar. While you may opt to
take your guitar into a music store or repair shop for service, you’ll still need to know your way
around the instrument not only for basic playing but also for the general care and upkeep of your
guitar.
The most basic explanation of the guitar and its parts would be that there is a body, and a neck
with a headstock. This basic layout applies to both the acoustic and electric guitars. They start to
differ when we get into how the sound is generated.
Disclosure: We are a professional review site that receives compensation from the companies whose products we review.

8/2/2019 Frustration Free Guitar a Beginners Guide
http://slidepdf.com/reader/full/frustration-free-guitar-a-beginners-guide 6/19
P a g e | 6
Copyright © 2011 http://www.Learn2playguitars.com
The diagram below shows the basic parts of the electric guitar.
The main areas we’ll focus on are the fretboard, the strings, and the tuners.
The Guitar Fretboard
The guitar fretboard can be very daunting to a beginning player. It looks like a sea of notes with
no rhyme or reason to how they’re laid out. It’s actually not as scary as it seems and the layout
makes perfect sense once you take a closer look at it.
You’ll notice in the electric guitar diagram above that the frets (the wires that run from one side
of the neck to the other) go up so far and then there are two dots on the fretboard and then more
frets. These double dots represent the 12th fret. All notes are repeated after the 12th fret which we
call the “second octave”. For example, starting with the open low “E” string and playing each noteup the neck, we’d have the following notes:
E-F-F#-G-G#-A-Bb-B-C-C#-D-D#-E
The exact same pattern would repeat beyond the 12th fret.
Let’s just focus on the 1st octave or all the notes from the first fret to the 12th.
Disclosure: We are a professional review site that receives compensation from the companies whose products we review.

8/2/2019 Frustration Free Guitar a Beginners Guide
http://slidepdf.com/reader/full/frustration-free-guitar-a-beginners-guide 7/19
P a g e | 7
Copyright © 2011 http://www.Learn2playguitars.com
An important thing to note is the dots that appear on the neck. Their layout would be a very
good thing to memorize. The dots appear at the 3rd, 5th, 7th, 9th and 12th frets. You’ll use these
dots, otherwise known as “fret markers” to find your way around the fretboard so you’re always
hitting the correct notes and playing in key.
Playing an “open” note simply means playing a string without pushing your fingers on it anywhere(referred to as fretting).
The Strings of the Guitar
There are 6 strings on the guitar shown (which is a Fender Stratocaster) which is the most
common arrangement. Other guitars may have 7, 8, 9 or 12 strings. We’ll keep things simple in
this book and stick with the good old fashioned 6 string.
We name the strings of the guitar starting with the top string (which is the fattest string and is
the one furthest from the floor. We call this the 6th string or the low E. The chart below shows
the rest of the strings and their names.
String Number String Note
6 E (Low E)5 A 4 D3 G2 B1 E (High E)
It may seem confusing that I called the fat string that is closest to the player the “Low E” while the
one nearest to the floor is called the “High E” but the names actually refer to the pitch of the
strings. The 6th string (The low E) is lower in pitch than the 1st string (the high E) hence the
naming convention.
Tuning Your Guitar
Trying to learn to play guitar on an instrument that is out of tune will be frustrating and no fun at
all. Thankfully, that’s something that’s very easy to avoid. While there are many different
“alternate” tunings available, we’ll stick to standard tuning for this book.
While every guitarist should eventually get their own tuner, there are some pretty cool tuners
available online that will do the trick just fine while you’re learning.
Here’s a good example: http://www.jamplay.com/tools/online-guitar-tuner
Disclosure: We are a professional review site that receives compensation from the companies whose products we review.

8/2/2019 Frustration Free Guitar a Beginners Guide
http://slidepdf.com/reader/full/frustration-free-guitar-a-beginners-guide 8/19
P a g e | 8
Copyright © 2011 http://www.Learn2playguitars.com
To tune, you simply play the reference note in the program and then play the same string (open)
on your guitar and adjust the strings pitch to suit. If your guitar has 6 inline tuners on the top of
the headstock, you’ll turn them counter clockwise to raise the pitch and clockwise to lower it.
Start with the 6th string (Low E) and then tune the A, D, G, B, and high E strings.
You may notice that when you go back to check strings that you’ve tuned to make sure they’re
still in tune, they’ve all of a sudden gone sharp or flat and are out of tune. This is due to the
increased tension on the strings as each string is brought up to pitch. Other causes include
strings stretching if they’re new and the strings slipping around the tuning machine posts.
A great tip to minimize this is to take each string one by one and gently tug up on it pulling it
away from the fretboard. This will stretch the string and break it in. This trick is especially
important with brand new strings.
Another important tuning tip is to always tune up to a note and never down to it. If your note
happens to be a little sharp compared to your reference note, tune down a bit until your note isslightly lower in pitch than the reference and then tune up to the note.
Tuning Without a Guitar Tuner
I haven’t seen this method described in many of the courses I’ve read or taken so we’re going to
cover it here for you now.
There will come a time when your guitar is out of tune and you’re either not near a computer to
use an online tuner or you’re away and have no pocket electronic tuner with you. Sure you can
tune your guitar to a friend’s guitar but what if HIS guitar is out of tune?
The answer is to tune each string to the one before it.
Step 1 - To do this, we leave the low E string at whatever pitch it happens to be at or we tune it to
the friends so the two instruments match.
Step 2 – Fret the low E string at the 5th fret which would be “A”. Play the 5th string which should
also be “A”. Tune the A string sharp or flat until it matches the reference note which is the fretted
A note on the 6th string.
Step 3 – Repeat this process for the A and the D strings.
Step 4 – When you get to the G string, fret the G string on the 4th fret which will give you a B note
Step 5 – To tune the 1st or high E string, go back to the original pattern and fret the 2nd string (B)
on the 5th fret which will give you an E note.
Disclosure: We are a professional review site that receives compensation from the companies whose products we review.

8/2/2019 Frustration Free Guitar a Beginners Guide
http://slidepdf.com/reader/full/frustration-free-guitar-a-beginners-guide 9/19
P a g e | 9
Copyright © 2011 http://www.Learn2playguitars.com
After going thru this exercise a couple of times, all your strings will be in tunes with each other
and the whole guitar should be in tune and sound great.
Warming Up To Play Guitar
This is something that many guitarists simply skip and it makes no sense. Playing guitar requires
the use of many muscles and the more comfortable you are, the easier it will be to practice and
have a fun.
A weight lifter would never lift a heavy stack of weights without warming up with a few reps of lighter weights and a runner would never run a marathon without doing some stretches.
Similarly a guitarist would be foolish to play a concert or even have a long practice session
without stretching and warming up.
What do we need to stretch and warm-up?
The best parts to stretch and warm-up for comfortable guitar playing are:
• Hands/Fingers
• Forearms
• Shoulders• Neck
Naturally, you can warm up whatever parts you feel like warming up, but these are the ones I
recommend! If you practice for a long time and feel part of you starting to cramp up, stop and
take a break.
Hands & Fingers
Exercise 1 – starting where each finger joins the hand, grasp each finger one by one with the
opposite hand and slide down to the finger tip. This will increase blood flow to each finger and
warm it up. Wring your hands out a few times after this exercise to release the tension.
Exercise 2 – With your palm facing up, fan your fingers out as far as you can without hurting
yourself and then release. Repeat this 5 times per hand.
Forearm Stretch – Hold your left arm straight out in front of you with the palm facing down. Let
your hand flop down so your fingers are point to the floor. Grab your left fingers with your right
Disclosure: We are a professional review site that receives compensation from the companies whose products we review.

8/2/2019 Frustration Free Guitar a Beginners Guide
http://slidepdf.com/reader/full/frustration-free-guitar-a-beginners-guide 10/19
P a g e | 10
Copyright © 2011 http://www.Learn2playguitars.com
hand and gently pull your fingers as a group toward your chest and release. Repeat this 5 times
per hand.
Shoulder stretch – Standing up with your back straight and your head looking straight forward,
bring your left arm across your chest as far as it will go naturally. Take your right hand and reach
under your left arm. Grasp your left shoulder with your right hand and gently pull your left armfurther across your chest. Your waist and upper body should not rotate. Repeat this with the
right arm. Repeat the stretch 5 times per side.
Neck (Do This Exercise VERY carefully and avoid it if you have neck problems)
Standing straight and looking straight ahead, let your head fall slowly toward your left shoulder.
Take your left hand, grasp the right side of your head just above the ear and very slowly and
gently pull your head closer to your left shoulder stretching the muscles in the right side of your
neck. Hold for 5 seconds and release. Repeat with your head tipped to the right shoulder.
Alternate back and forth until each side has been stretched 4 times.
The notes on the guitar neck
Getting to know your way around the guitar neck is one exercise that will make all the difference
in the world when it comes to how quickly you progress on the instrument. What may look like a
sea of notes now, will eventually layout like a pattern (or more accurately, a collection of patterns)
that you can recognize quickly so you can play freely all over the guitar neck.
You’ve got to crawl before you walk and walk before you can run so let’s get the basics down first.
Have a look at the diagram below.
The diagram above shows all the natural notes on the guitar up to the 12 th fret with a couple extra
notes on the Low E and A strings just to complete the patterns on those strings.
Do I actually NEED to know the notes on the neck?
Well I certainly believe you should know the notes on the neck COLD (that means have them
memorized). Knowing where the notes on the neck are (especially on the 6th and 5th strings) will
Disclosure: We are a professional review site that receives compensation from the companies whose products we review.

8/2/2019 Frustration Free Guitar a Beginners Guide
http://slidepdf.com/reader/full/frustration-free-guitar-a-beginners-guide 11/19
P a g e | 11
Copyright © 2011 http://www.Learn2playguitars.com
keep you from fumbling all over the place looking for notes and trying to stay in key when soloing
or just playing along and changing chords.
So how are the notes laid out on the fretboard?
We know that the notes get higher in pitch as you go up the alphabet and up the fretboard. Some
interesting points to consider:
• Whole steps and half steps: A whole step is two frets: a half step is one fret.
• Sharps are one fret higher: 6th string/3rd fret = G, so 6th string/4th fret = G#
• 6th string/8th fret = C, so 6th string/9th fret = C#.
• Flats are one fret lower: 6th string/5th fret =A. so 6th string/4th fret =Ab; 6th string/ 10th
fret = D, so 6th string/9th fret = Db.
• There are no sharps or flats between the notes E and F or B and C
How do I know where I am on the fretboard?
Fretboard markings help. Most guitars have fretboard inlays or marks somewhere on the neck (on
the face of the fretboard and/or on the side of the neck where your thumb wraps around)
indicating the
3rd, 5th, 7th, 9th, 12th, 15th, 17th, 19th and 24th frets. Memorize where these dots are!
Ok, what do I do with the info I’ve learned so far?
Start by memorizing the notes on the 6th and 5th strings. This will be the ground work for
mastering the neck of the guitar and becoming a better soloist and a better guitar player overall. A
great way to memorize the notes is to play them along to a metronome or a drum loop. You
should SAY the note as you play it.
Have a metronome play at a comfortable tempo that allows you to pick one note per beat as you
say the note without making any mistakes. Let’s say the metronome is clicking away 1-2-3-4, click-
click-click-click. You’d start on the low “E” or 6th string and staying on the 6th string you’d play
open, then 1st fret, then 3rd fret, then 5th fret, then 7th , then 8th etc and you’d say aloud “E, F, G,
A, B, C” etc. until you reach “E” again.
Disclosure: We are a professional review site that receives compensation from the companies whose products we review.

8/2/2019 Frustration Free Guitar a Beginners Guide
http://slidepdf.com/reader/full/frustration-free-guitar-a-beginners-guide 12/19
P a g e | 12
Copyright © 2011 http://www.Learn2playguitars.com
At that point you can start with the open string again and keep doing that pattern or you can
continue on up the fret board (since the whole neck above the 12th fret is a repeat of the first half
of the neck). Once you’re comfortable with that, you could always get to the “E” at the 12th fret
and go back down. In this case you’d be saying “E, D, C, B, A, G, F, E”.
In time, it won’t matter what pattern you play or where you start it. You’ll just know the notes so well that you could start anywhere and go up or down and not feel the least bit afraid of not
knowing where you were on the neck!
Guitar Tablature Explained
The easiest way to visualize guitar songs and notes is through the use of something called
tablature. Reading tablature is considerably easier than reading standard notation or sheet music
and thanks to the power of the internet; guitarists can learn almost any song (or at least
someone’s interpretation of the song) by viewing a tablature or tab of the song.
Here’s an image of a standard guitar tablature grid:
The easiest way to relate the image above to your guitar is to lay your guitar across your lap with
the fretboard facing up.
Tablature doesn’t show the frets as lines, rather it lists each note as a fret number as shown below.
In the image above, we see the number 3 shown on the D string. This means that we would fret
the D string at the 3rd fret. In this case we’d be playing an F note.
Disclosure: We are a professional review site that receives compensation from the companies whose products we review.

8/2/2019 Frustration Free Guitar a Beginners Guide
http://slidepdf.com/reader/full/frustration-free-guitar-a-beginners-guide 13/19
P a g e | 13
Copyright © 2011 http://www.Learn2playguitars.com
The one drawback to using tablature is that it doesn’t tell you which finger to use. In the case
above, it doesn’t really matter as we’re only playing the one note but when we get into more
complex runs and scales, it can often be easier to use certain fingers for certain notes.
This is a skill that you’ll pick up as you start working on scales. It all comes down to economy of
motion. By that I mean you should always strive to move your fingers as little as possible.
If you watch a great guitar player like Steve Vai, you’ll notice that although he can play very fast
and complex pieces, he keeps his fingers close to the fretboard at all times and doesn’t move his
fingers anymore than he has to.
The image below shows a diagram of the G Major scale and it also happens to show the fingering
The next image shows the same scale in tablature format.
There is no right or wrong way to finger each pattern, but more often than not, there is an
“easiest” way. Play the scale a couple of different ways to see what feels most comfortable to you.
As a hint, always look to the next string to see where your fingers need to get to after they play the
notes on the string they’re currently on.
Disclosure: We are a professional review site that receives compensation from the companies whose products we review.
8/2/2019 Frustration Free Guitar a Beginners Guide
http://slidepdf.com/reader/full/frustration-free-guitar-a-beginners-guide 14/19
P a g e | 14
Copyright © 2011 http://www.Learn2playguitars.com
Scales – Using the notes we’ve found on The Neck
In a prior exercise, we played every note on the neck. Now we’re going to dig into scales and play
specific notes in a specific order. It will sound musical to you and you’ll finally feel like you’re
actually PLAYING the guitar. That will be because you ARE playing the guitar.
The Major Scale
The first scale any guitarist should know and work with is the major scale. The major scale is the
mother of all scales and every other scale out there is derived from this particular scale.
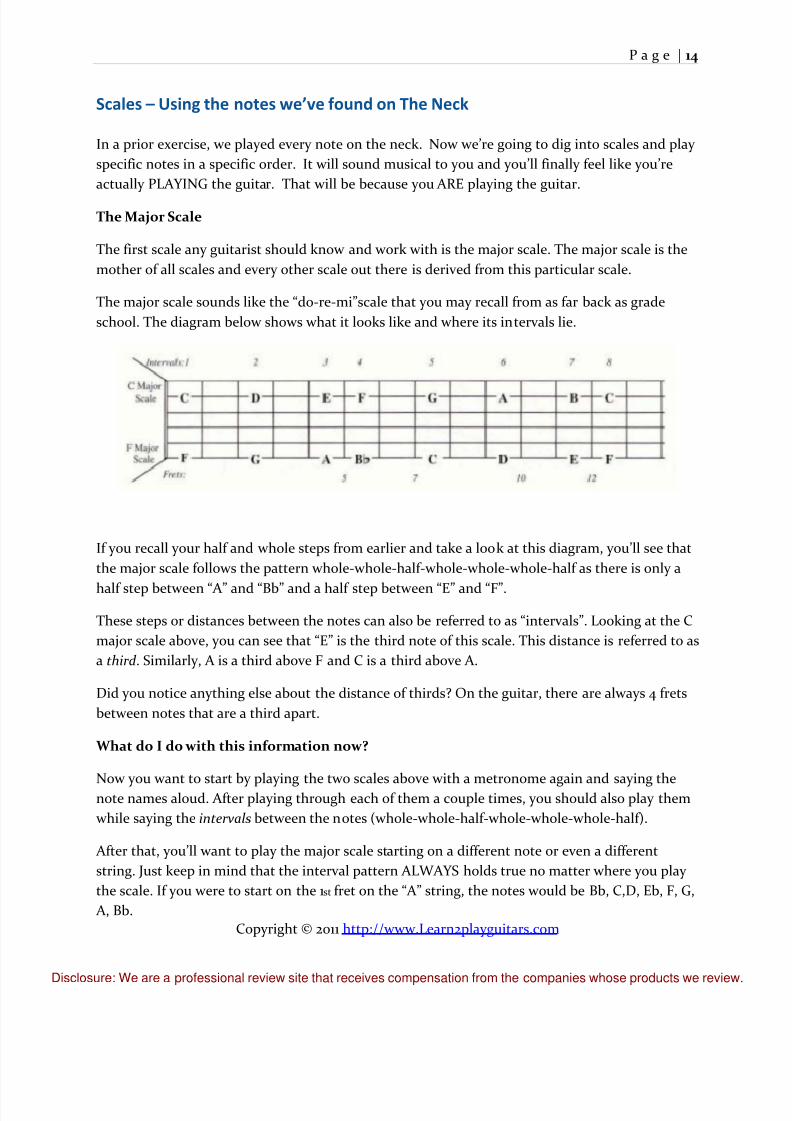
The major scale sounds like the “do-re-mi”scale that you may recall from as far back as grade
school. The diagram below shows what it looks like and where its intervals lie.
If you recall your half and whole steps from earlier and take a look at this diagram, you’ll see that
the major scale follows the pattern whole-whole-half-whole-whole-whole-half as there is only a
half step between “A” and “Bb” and a half step between “E” and “F”.
These steps or distances between the notes can also be referred to as “intervals”. Looking at the C
major scale above, you can see that “E” is the third note of this scale. This distance is referred to as
a third . Similarly, A is a third above F and C is a third above A.
Did you notice anything else about the distance of thirds? On the guitar, there are always 4 frets
between notes that are a third apart.
What do I do with this information now?
Now you want to start by playing the two scales above with a metronome again and saying thenote names aloud. After playing through each of them a couple times, you should also play them
while saying the intervals between the notes (whole-whole-half-whole-whole-whole-half).
After that, you’ll want to play the major scale starting on a different note or even a different
string. Just keep in mind that the interval pattern ALWAYS holds true no matter where you play
the scale. If you were to start on the 1st fret on the “A” string, the notes would be Bb, C,D, Eb, F, G,
A, Bb.
Disclosure: We are a professional review site that receives compensation from the companies whose products we review.

8/2/2019 Frustration Free Guitar a Beginners Guide
http://slidepdf.com/reader/full/frustration-free-guitar-a-beginners-guide 15/19
P a g e | 15
Copyright © 2011 http://www.Learn2playguitars.com
Chords & Construction
Chords are a collection of notes that are derived from scales. For example, a C Major chord
contains only notes found in the C Major scale. Major chords are built by using the root of the
matching scale as well as the 3rd and the 5th notes in the major scale.
Let’s look at the notes of the C Major scale: C-D-E-F-G-A-B-C
In the pattern of notes above, the root note would be C. Counting over to the third note, we find E
and over to the 5th note, we find G. The C Major chord consists of the notes C, E and G.
Here’s the chord diagram for that chord:
Other Chords in The same Key
The other chords that are found in the same key can be found by identifying each “degree” of the
scale in question and counting over in the same fashion as we did to construct the C Major chord.
Here’s the C Major Scale Pattern with the Degrees identified:
Degree 1 2 3 4 5 6 7 8Note C D E F G A B C
With the above chart in mind, the chord that is the second degree of C Major would be D Minor
and it’s notes would be: D – F – A
Let’s list some others:
Disclosure: We are a professional review site that receives compensation from the companies whose products we review.

8/2/2019 Frustration Free Guitar a Beginners Guide
http://slidepdf.com/reader/full/frustration-free-guitar-a-beginners-guide 16/19
P a g e | 16
Copyright © 2011 http://www.Learn2playguitars.com
E Minor would be: E – G – B
F Major would be: F – A – C
G Major would be: G – B – D
A Minor would be: A – C – E
Minor Chords Explained
The pattern that we covered before (root note, 3rd, 5th) holds true for every major scale. To make a
minor chord, all we do is flatten the 3rd. To flatten a note, you simply play it a half step or one fret
lower.
The E Major scale is: E – F# – G# – A – B – C# – D# – E
If we play the root, the 3rd and the 5th to play the E Major, we’d have the following notes:
E – G# - B but we’re looking for the E Minor so we flatten the third and we get: E – G – B
If you’re wondering how I knew there were 4 sharps in the E major scale, it’s thanks to the “circle
of fifths” which basically lays out the relationship between the 12 tones of the chromatic scale.
Disclosure: We are a professional review site that receives compensation from the companies whose products we review.

8/2/2019 Frustration Free Guitar a Beginners Guide
http://slidepdf.com/reader/full/frustration-free-guitar-a-beginners-guide 17/19
P a g e | 17
Copyright © 2011 http://www.Learn2playguitars.com
If you refer to the circle and find E you’ll notice on the grey circle, it says 4# which means 4
sharps. You can also find E in the chart to the right of the circle under the heading “Sharps” and
the sub-heading Major” and read across to the left where you’ll find the number 4.
For an in-depth explanation of the Circle of Fifths, please refer to this write up on Wikipedia.
http://en.wikipedia.org/wiki/Circle_of_fifths
Handy chord chart references
Here are a couple of quick and easy ways to find and learn chords:
http://www.jamplay.com/tools/guitar-chords - Shows many different voicings for each chord that
is covered with a description of where or how the chord is often used.
http://www.8notes.com/guitar_chord_chart/ - This one even plays audio examples of each chord
Or if you’d like to print chords for easy viewing away from the computer, print off a chord chart
here: http://www.chordie.com/chords.php
What Do I do with all of this?
We’ve covered a lot of material in this short book but it’s extremely valuable material that would
have taken weeks to learn through weekly guitar lessons. The trick now is to put it all into
practice. Luckily, that’s the fun part.
Disclosure: We are a professional review site that receives compensation from the companies whose products we review.

8/2/2019 Frustration Free Guitar a Beginners Guide
http://slidepdf.com/reader/full/frustration-free-guitar-a-beginners-guide 18/19
P a g e | 18
Copyright © 2011 http://www.Learn2playguitars.com
Things you should be working on after reading this book:
• Memorizing the names of the strings
• Memorizing the notes of the fretboard (just take it one string at a time)
• Tuning your guitar with a tuner
• Tuning your guitar to itself with no tuner present• Stretches for comfortable playing
• The first two scales we covered
• Chords – start with the major C, D, E, F, G, and A and then move onto minor and others
That’s a great base that will allow you to quickly pick up new techniques and dig into other
lessons and courses with confidence.
Let’s go over some ways to effectively take your guitar playing to the next level:
Online Courses
The internet has made it WAY easier to learn to play guitar. You can access lessons anytime day
or night and in many different formats such as audio, video or digital books just like this one.
Some websites even offer memberships where you can belong to a community and receive your
lessons via streaming audio and video so you don’t have to download anything.
Most courses are very reasonably priced and some even offer more than one instructor so you can
learn a variety of styles without ever leaving the house.
Here are some of the best courses we have found at Learn2PlayGuitars:
Guitar Tricks - With almost 40 guitar instructors and every style of music imaginable, this is our
first choice for online lessons.
JamPlay - Very similar to Guitar Tricks but is slightly more expensive and has a little different
format. An excellent source of quality lessons from many instructors.
Gibson's Learn and Master Guitar - This one is an actual physical course that is shipped to you
and that you can watch on your TV. It includes a book, 20 DVD's and 5 jam along CD's. They
have an online member’s forum and this is endorsed by Gibson so you really can't go wrong.
Local Guitar Teachers
Most cities have guitar teachers that either teach privately or out of a music store or studio.
There are pros and cons to the good old fashioned method of learning guitar this way. One of the
major pros is that the teacher can watch you play and correct when you’re playing something
wrong to help you better understand the technique.
Disclosure: We are a professional review site that receives compensation from the companies whose products we review.

8/2/2019 Frustration Free Guitar a Beginners Guide
http://slidepdf.com/reader/full/frustration-free-guitar-a-beginners-guide 19/19
P a g e | 19
Copyright © 2011 http://www.Learn2playguitars.com
The one-on-one method also allows the student to ask questions and hopefully get answers on the
spot. This also allows the teacher to assign “homework” and follow up with the student to hold
him or her accountable so they’re ready for the next lesson.
A great place to find reputable instructors in the United States is over at TakeLessons.com. They
put all of the teachers in their directory through a screening process.
The cons of in-person guitar lessons include the fact that the teacher will choose the curriculum
and will also set the pace. The student basically has to take the teachers word that what is being
worked on is the best for the student at that time in their learning process. Lessons can also be
expensive as the teacher controls how fast or slow the material is presented.
What’s the Recommended Method?
Everyone learns at a different pace. Some will be able to consume what was taught in this book,
work on it and apply it and then jump right into one of the digital courses and they’ll do just fine.
Others will find they need further explanation of some of the methods, techniques and concepts.
There is no shame in needing things explained in greater detail and it’s wise to make sure you
have things down cold. For these folks, I’d recommend either finding a digital course that also
has a member’s forum or hiring a local teacher to explain things a little further. That way you’ll
be able to work on the course whenever you want, ask the questions you need to ask, and then go
back over the course material over and over again until you’ve got it down.
Parting Thoughts
Learning to play the guitar is a life long journey. There will be times when things seem so easy
and new techniques are mastered quickly. There will also be times when it seems like nothing
will stick in your noggin and you simply cannot get your fingers to do what you want. Keep it fun
and make sure you put in the practice time and you’ll be a great guitar player before you know it.
Make sure to check us out on Facebook for more tips and tricks:
http://www.facebook.com/learn2playguitar