Embed Size (px)
Citation preview

Full Build GuideLearn how to design, fabricate and build a geodesic dome from start to finish!
Written By: Eric Schimelpfenig
Full Build Guide
© 2017 sketchup.dozuki.com Page 1 of 18

Step 1 — Cutting Guide
To make all of your cuts you need tocalculate each cut in your dome.
Every dome size and tessellation isdifferent.
In the following steps we'll learn howyou can easily calculate your pipecuts for your dome. We even have ahandy spreadsheet that will do allthe hard math for you.
Follow along with this guide bydownloading our SketchUp model ofthis dome here.
Step 2 — Understanding the measurements
From now on this instruction set is referring to a 3V geodome.
Most formulae for geodesic domes assume that you have a wire structure like this.
The distance they calculate is from point to point.
The dome you're going to build will use hubs. When you insert the pipe into the hub, there a spacebetween the end of the pipe and the theoretical intersection point dictated by the formula.
To put more simply, hubs effectively make your pipes longer. If you don't account for this you willend up doing the math for a dome, and it will be larger than you anticipated.
Full Build Guide
© 2017 sketchup.dozuki.com Page 2 of 18

Step 3 — Spreadsheet
To help you figure out how to make all of your cuts we have created a spreadsheet that we used tobuild our domes. Get that spreadsheet here.
This spreadsheet will allow you to calculate all of your cuts and material usage for any diameter 3Vdome you'd like to build.
This will let you easily figure out how many pipes, hubs and bolts you need.
In the following steps we'll show you how to download and use our spreadsheet.
Full Build Guide
© 2017 sketchup.dozuki.com Page 3 of 18
Step 4 — Downloading the sheet
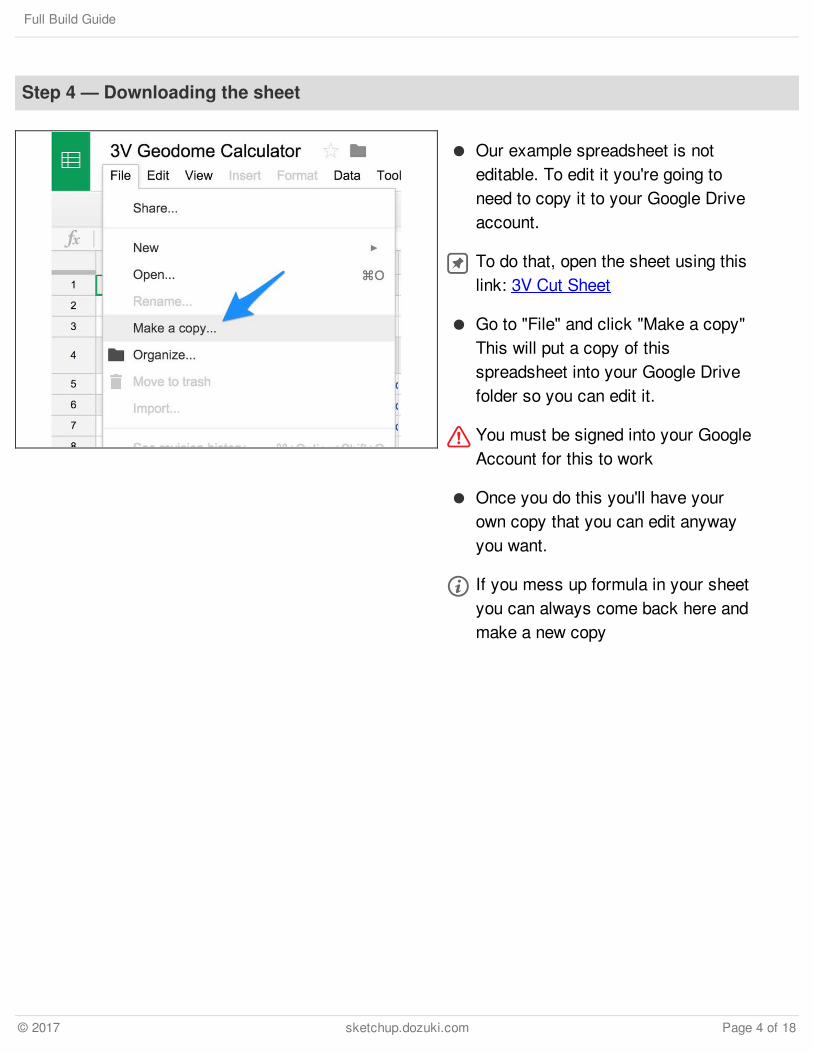
Our example spreadsheet is noteditable. To edit it you're going toneed to copy it to your Google Driveaccount.
To do that, open the sheet using thislink: 3V Cut Sheet
Go to "File" and click "Make a copy"This will put a copy of thisspreadsheet into your Google Drivefolder so you can edit it.
You must be signed into your GoogleAccount for this to work
Once you do this you'll have yourown copy that you can edit anywayyou want.
If you mess up formula in your sheetyou can always come back here andmake a new copy
Full Build Guide
© 2017 sketchup.dozuki.com Page 4 of 18

Step 5
The first number you're going towant to set is your diameter of yourdome. This is the diameter aroundthe base of the dome.
Just punch in the number in feet andhit enter.
All entries should be decimalnumbers. So if you wanted a ten anda half foot diameter dome you'denter it as "10.5"
Step 6 — Set dome count and waste
Next we're going to set the numberof domes you want to make, and theamount of waste you'll have.
The amount of waste is apercentage. This will take all hub,hardware, and pipe counts and add alittle extra to your calculation. Thisway if you lose a few bolts, break ahub or miss cut a pipe you'll becovered.
Enter your dome count as a wholenumber
Enter your percentage waste as awhole number. Numbers from 0-100are acceptable.
Full Build Guide
© 2017 sketchup.dozuki.com Page 5 of 18

Step 7 — Set stock pipe size
Next we need to set the length ofpipe we'll be cutting.
We used 10ft PVC pipe that wasavailable at the hardware store. Youcan see our entered length is justshy of 1' at 119".
We did this because some of thepipes have chipped ends, and thisallows for your saw kerf if you'recuts are really close.
Full Build Guide
© 2017 sketchup.dozuki.com Page 6 of 18

Step 8 — Final Calculations
Now that you have all of this information into your spreadsheet we can take a look at the cuts youneed to make.
Lengths A B and C correspond to the map that's below in the sheet.
"Individual Lengths" tells you the length of each dome type you need.
"Number of each length for one dome" tells you how many of each length you need.
"Amount of pipe to order" tells you how many pipes you need for each individual length.
"Yield per pipe" shows you how many pipes you'll get out of each length of pipe.
"Waste per pipe" shows you how much waste you'll have in each pipe length. This can be a goodone to pay attention to. Sometimes changing the size of your dome just a tiny bit can make it soyou waste a lot less pipe (and save some money)
Full Build Guide
© 2017 sketchup.dozuki.com Page 7 of 18

Step 9 — Get your pipe
First, you're going to need a lot ofPVC pipe. Read our guide oncalculating the amount of pipe you'llneed if you haven't already.
We built too domes which requiredan immense amount of pipe. Wecleaned out three Home Depot's.Plan ahead and make sure that theamount of pipe you need is actuallyavailable. Consider ordering from aplumbing supplier directly to.
Step 10 — Cut pipes
Get a good chop saw stand. This isa critical tool for this project. Evenon a small dome you'll be cuttinghundreds of pipes. A stand like thishas arms with stops you can set.This will keep all of your cuts thesame. It will also prevent you fromhaving to hand measure each pipe.
Despite having a cutting jig like this,every 10-15 pipes stop and checkthem with a tape measure.
Full Build Guide
© 2017 sketchup.dozuki.com Page 8 of 18

Step 11 — Cut and organize
Organization of cut pipe is essential. A lot of these pipes are really close in dimension. As you cutthem, stack and label them.
We used colored duct tape to label each size pipe. To keep track of the count, we bundled them ingroups of 5 with plastic shipping wrap. (after we drilled them)
Full Build Guide
© 2017 sketchup.dozuki.com Page 9 of 18

Step 12 — Drill the pipes
Each pipe in the dome needs a holeall the way through it on each end.The holes need to be lines up withone another
To do this, we made a simple jig forour drill press as seen here. Sincethere are so many holes to drill, adrill press is pretty essential here,as a hand drill wouldn't be asaccurate. It will also be incrediblyfatiguing to use.
Make sure your holes match up withthe bolts you will be using with yourhubs. We drilled ours a little bitlarger than the diameter of the bolts.Just enough to allow the bolts toslide in easily, but not too much thatthe heads of the bolts pulled through.
Full Build Guide
© 2017 sketchup.dozuki.com Page 10 of 18
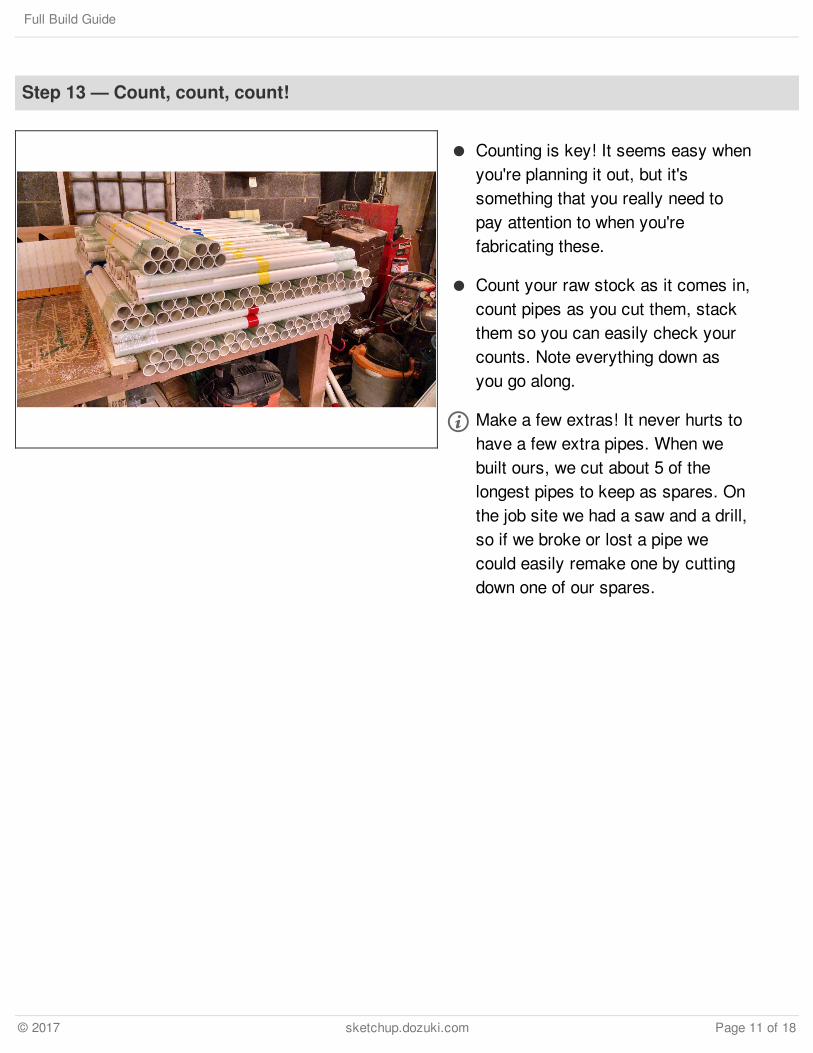
Step 13 — Count, count, count!
Counting is key! It seems easy whenyou're planning it out, but it'ssomething that you really need topay attention to when you'refabricating these.
Count your raw stock as it comes in,count pipes as you cut them, stackthem so you can easily check yourcounts. Note everything down asyou go along.
Make a few extras! It never hurts tohave a few extra pipes. When webuilt ours, we cut about 5 of thelongest pipes to keep as spares. Onthe job site we had a saw and a drill,so if we broke or lost a pipe wecould easily remake one by cuttingdown one of our spares.
Full Build Guide
© 2017 sketchup.dozuki.com Page 11 of 18

Step 14 — Lay it out
Gather your hubs, pipes and toolsup. Lay them out and counteverything to make sure you have allof the parts needed.
Gather help! This will take at least 2people to help setup.
Full Build Guide
© 2017 sketchup.dozuki.com Page 12 of 18

Step 15 — Visualize the dome
Before we begin, it's worth noting some patterns that occur in this dome. At first glance it looks likean impossibly complex structure, but when you break it down it's really rather simple.
There are 6 pentagons, that provide the strength for the structure, and 10 6 star patterns. Thesepatterns occasionally overlap with one anther. Once you identify them, this dome becomes a loteasier to visualize.
Have a laptop with the SketchUp model open, this will help you out a lot.
Full Build Guide
© 2017 sketchup.dozuki.com Page 13 of 18

Step 16 — Build the base
Using the blue and red pipes, lay out and assemble the first layer of pipes just like the picture.
Bolt every connection as you go.
If pipes are difficult to slide over the hubs, use a rubber mallet to whack them in place. A little oilcan help as well.
This is the hardest set of pipes to assemble because there's no strength in the structure at thisstage. As you go along, it will get easier.
Step 17
While some people are laying out the ring, get two or more people to star making pentagons. Therewill be 6 total. fully assemble and bolt them together. Set them aside until you need them. (Or holdthem up and pose because it makes an awesome photo op)
Full Build Guide
© 2017 sketchup.dozuki.com Page 14 of 18

Step 18 — Next layer
Next put the first round of base poles up
You'll want to put some of the 6 star hubs in as well. (Circled)
Remember to bolt everything as you go.
Step 19 — At two pentagons
Remember those pentagons youassembled a few steps ago? Time touse them!
Mount then up, and fill in the spacebetween them with the appropriatepipe.
BOLT AS YOU GO!
Full Build Guide
© 2017 sketchup.dozuki.com Page 15 of 18

Step 20 — Add the rest of the pentagons
Work your away around the domeand put in the rest of the pentagons.
BOLT AS YOU GO!
If the dome feels a little bendy now,don't worry, you'll be shocked at howstrong it gets when you're done.
Step 21 — Nearly there!
Now that you have all the pentagonsin, fill in the rest of the pipe abovethe pentagons
Full Build Guide
© 2017 sketchup.dozuki.com Page 16 of 18

Step 22 — Dome done!
Add in the last pentagon!
This will complete the dome. You'llnow see how incredibly strong thisis. It's safe now to move it around,and even climb on it if you want to.
Step 23 — Make doors
Now is the time to remove a fewpipes if you want to make doors.
We recommend keeping thepentagons in place and removing thespace between them for a good sizedoor that won't compromise thestructure of the dome.
Full Build Guide
© 2017 sketchup.dozuki.com Page 17 of 18

This document was last generated on 2017-06-26 05:51:44 AM.
Step 24 — Video
Here's a time lapse of one domegoing up. 2 people built this one inabout 2 hours!
Full Build Guide
© 2017 sketchup.dozuki.com Page 18 of 18