Embed Size (px)
Citation preview
Fundamentals of Galileo®:
Reports
Kerridan A. Smith, B.A.
Margaret A. Johnson, M.Ed.
Leanna Stetson, M.Ed.
Assessment Technology, Incorporated
6700 E. Speedway Boulevard Tucson, AZ 85710
1.800.367.4762
www.ati-online.com
©Assessment Technology, Incorporated 2018 “Galileo” and the Galileo logos are trademarks or registered trademarks of Assessment Technology Incorporated.
All rights reserved. No part of this document may be reproduced or transmitted in any form or by any means, electronic or mechanical, including photocopy, recording, or any information storage and retrieval system, without
permission from the publisher. Printed in the U.S.A
Galileo® Pre-K Online
©2018 Assessment Technology, Incorporated
Revised as of 06.18.18
Galileo® Pre-K Online
©2018 Assessment Technology, Incorporated Revised as of 06.18.18 i
Fundamentals of Galileo:
Reports
Table of Contents
A Little About Galileo Reports ..................................................................... 1 Parent Reports ............................................................................................ 1 Who generates and prints Galileo Reports? ..................................................... 2
Teachers and Teacher Aides ...................................................................... 2 Supervisors and Directors .......................................................................... 2
Reports Settings ......................................................................................... 2
Report Categories ....................................................................................... 4
Tips on Generating Reports ......................................................................... 5 School Readiness Reporting Scales ................................................................ 5
Purpose ................................................................................................... 5 Optional Filters and Settings ......................................................................... 6
Purpose ................................................................................................... 6 Apply Gender and/or Age Range Filter ......................................................... 6
Form Filters ................................................................................................ 7 Purpose ................................................................................................... 7 Apply Form Filters .................................................................................... 7
Assessment History .................................................................................... 8 Purpose ..................................................................................................... 8 How Can I Use This? .................................................................................... 9 Generate Report.......................................................................................... 9
Delete an Observation ............................................................................. 11
Class Observation Records ........................................................................ 11
Data Checker Tool ..................................................................................... 11 Purpose ................................................................................................... 11 How Can I Use This? .................................................................................. 11 Form Information Report ............................................................................ 11 Inactive/Active Children Report ................................................................... 14
Development Profiles and Milestones........................................................ 16 Purpose ................................................................................................... 16 How Can I Use this? .................................................................................. 16
Generate Report ..................................................................................... 17 Defining a Milestone Set ............................................................................. 20
Development Summaries .......................................................................... 21 Purpose ................................................................................................... 21 How Can I Use This? .................................................................................. 22
A. Developmental Level Score .................................................................. 23 B. Percentile Rank .................................................................................. 23
Galileo® Pre-K Online
©2018 Assessment Technology, Incorporated ii Revised as of 06.18.18
C. Standard Score .................................................................................. 24 D. Normal Curve Equivalent Score ............................................................ 24
Development Summaries ........................................................................... 25 Individual Development Summary ............................................................... 26
Form Information ..................................................................................... 27
Inactive/Active Children ........................................................................... 27
Individual Child Development Plan ........................................................... 28 Purpose ................................................................................................... 28 How Can I Use This? .................................................................................. 28 Generate Report........................................................................................ 29
Individual Child Information Summary ..................................................... 30 Purpose ................................................................................................... 30 How Can I Use This? .................................................................................. 31 Access ..................................................................................................... 31
Individual Development Milestones .......................................................... 34 Purpose ................................................................................................. 34
How Can I Use This? .................................................................................. 34 Generate Report ..................................................................................... 35
Individual Development Profile ................................................................. 37 Purpose ................................................................................................. 37
How Can I Use This? .................................................................................. 37 Generate Report ..................................................................................... 38
Individual Development Summary ............................................................ 40
Individual Knowledge Area Proficiency Profile .......................................... 40
Individual Observation Records ................................................................ 41
Individual Progress Report ....................................................................... 41
Knowledge Area Proficient Profiles ........................................................... 41 Purpose ................................................................................................... 41 How Can I Use This? .................................................................................. 41 Knowledge Area Proficiency Profile .............................................................. 43 Individual Knowledge Area Proficiency Profile ................................................ 44
Milestone Observation Records ................................................................. 45
Observation Records ................................................................................. 45 Purpose ................................................................................................... 45 How Can I Use this? .................................................................................. 45 Individual Observation Records ................................................................... 48 Milestone Observation Records .................................................................... 48 Class Observation Records ......................................................................... 49
Outcomes Analysis Report ........................................................................ 51 Purpose ................................................................................................... 51
Galileo® Pre-K Online
©2018 Assessment Technology, Incorporated Revised as of 06.18.18 iii
How Can I Use This? .................................................................................. 51 Generate Report........................................................................................ 54
Aggregation Level Selection ..................................................................... 54 Report Selection ..................................................................................... 63
Parent Activity Report ............................................................................... 65 Purpose ................................................................................................... 65 How Can I Use This? .................................................................................. 65 Generate Report........................................................................................ 65
Progress Reports ...................................................................................... 67 Purpose ................................................................................................... 67 How Can I Use This? .................................................................................. 67 Generate Report........................................................................................ 69 Individual Progress Report .......................................................................... 70
User Activity Report .................................................................................. 71 Purpose ................................................................................................... 71 How Can I Use This? .................................................................................. 72 Generate Report........................................................................................ 72
Other Reports ........................................................................................... 73 Child Demographics Page Options ............................................................... 74 Enrollment Page Options ............................................................................ 76 Family Demographics Page Options ............................................................. 77 Additional Reports ..................................................................................... 78
Galileo Pre-K Parent Center ...................................................................... 79
Library Builder .......................................................................................... 80 What is a Galileo Library? ........................................................................ 80 Create a Library ..................................................................................... 81 View a Library ........................................................................................ 84 Edit a Library ......................................................................................... 85 Delete a Library ..................................................................................... 85
Galileo® Pre-K Online
©2018 Assessment Technology, Incorporated iv Revised as of 06.18.18
Galileo® Pre-K Online
©2018 Assessment Technology, Incorporated
Revised as of 06.18.18 1
A LITTLE ABOUT GALILEO REPORTS
Galileo (or Galileo Plus with Merlin) allows you to generate a variety of reports that
are intended to give you valuable information about children, learning, teaching and progress. These reports are designed to provide varying levels of aggregation. It is
possible to aggregate data for an entire agency. One can also generate reports for individual sites and classes within a center or school. In addition, it is possible to
generate individual reports for one or more children.
These reports help to connect all the stakeholders in early childhood education
because:
• Teachers are more closely connected to their children by printing reports that
clearly articulate what progress students have made.
• Galileo reports also help open dialogues between teachers. It is
recommended that teachers print reports regularly and discuss these reports with fellow staff members and supervisors to get advice and feedback on the
trends that they see.
• There are reports in Galileo that are ideal for use in parent-teacher
conferences, which will help open the lines of communication between the
school and the home.
• Galileo provides reports that help connect educators working in the
“trenches” with policymakers.
PARENT REPORTS Communicating with the child’s parents about how the child is progressing through your program can benefit you, the parent, and the child. Galileo provides reports,
as well as the Pre-K Parent Center, that can help you with the lines of communication. The following reports include a parental signature line and/or
parent comments box:
• Individual Development Profile (page 37)
• Individual Knowledge Area Proficiency Profile (page 44)
• Individual Development Milestones (page 34)
• Individual Child Development Plan (page 28)
• Individual Observation Record1 (page 48)
1 This report does not contain a parental signature line/box. This report is accessed via the
Pre-K Parent Center.
Galileo® Pre-K Online
©2018 Assessment Technology, Incorporated
2 Revised as of 06.18.18
Of course, you may generate any of the individual reports from Galileo (or Galileo
Plus with Merlin) for a parent following the guidelines of your agency.
WHO GENERATES AND PRINTS GALILEO REPORTS? Any user with Galileo password may print reports in Galileo. However, individual job responsibilities determine, in large part, the types of reports you will be generating
and printing.
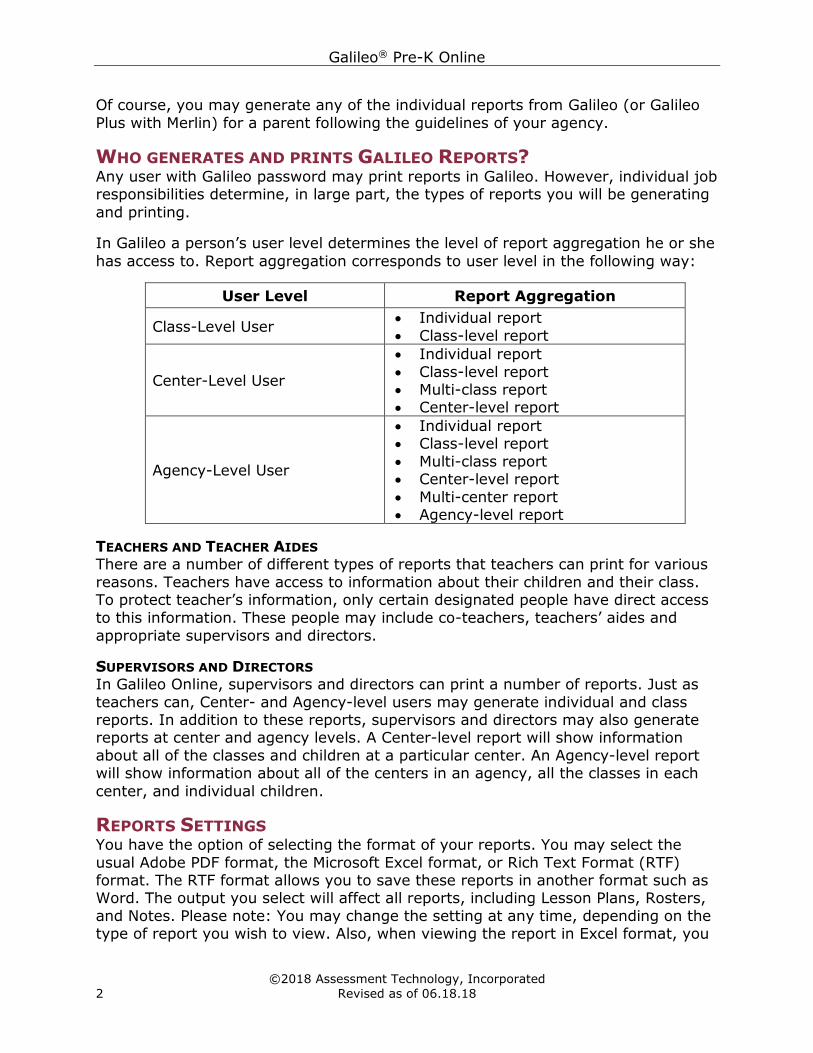
In Galileo a person’s user level determines the level of report aggregation he or she
has access to. Report aggregation corresponds to user level in the following way:
User Level Report Aggregation
Class-Level User • Individual report
• Class-level report
Center-Level User
• Individual report
• Class-level report • Multi-class report • Center-level report
Agency-Level User
• Individual report • Class-level report
• Multi-class report • Center-level report
• Multi-center report • Agency-level report
TEACHERS AND TEACHER AIDES There are a number of different types of reports that teachers can print for various
reasons. Teachers have access to information about their children and their class. To protect teacher’s information, only certain designated people have direct access
to this information. These people may include co-teachers, teachers’ aides and
appropriate supervisors and directors.
SUPERVISORS AND DIRECTORS In Galileo Online, supervisors and directors can print a number of reports. Just as
teachers can, Center- and Agency-level users may generate individual and class reports. In addition to these reports, supervisors and directors may also generate reports at center and agency levels. A Center-level report will show information
about all of the classes and children at a particular center. An Agency-level report will show information about all of the centers in an agency, all the classes in each
center, and individual children.
REPORTS SETTINGS You have the option of selecting the format of your reports. You may select the
usual Adobe PDF format, the Microsoft Excel format, or Rich Text Format (RTF) format. The RTF format allows you to save these reports in another format such as Word. The output you select will affect all reports, including Lesson Plans, Rosters,
and Notes. Please note: You may change the setting at any time, depending on the type of report you wish to view. Also, when viewing the report in Excel format, you
Galileo® Pre-K Online
©2018 Assessment Technology, Incorporated
Revised as of 06.18.18 3
may need to manually change the width of the cells to see all the data the report
contains.
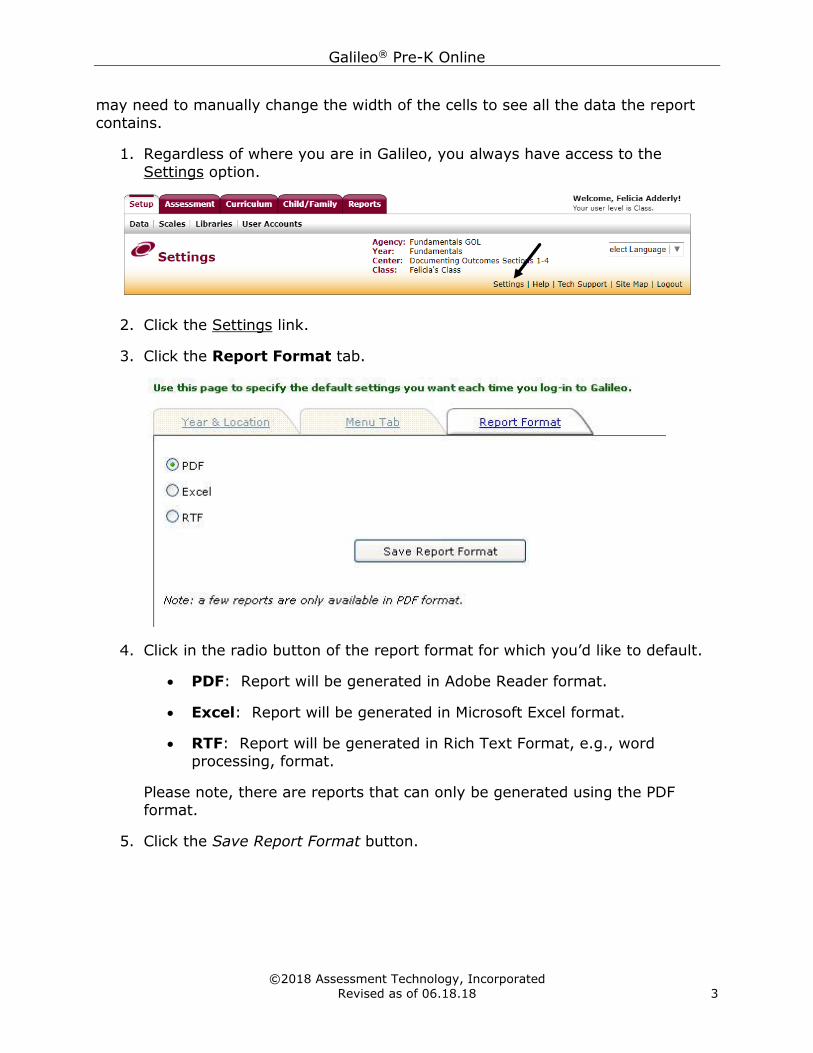
1. Regardless of where you are in Galileo, you always have access to the
Settings option.
2. Click the Settings link.
3. Click the Report Format tab.
4. Click in the radio button of the report format for which you’d like to default.
• PDF: Report will be generated in Adobe Reader format.
• Excel: Report will be generated in Microsoft Excel format.
• RTF: Report will be generated in Rich Text Format, e.g., word
processing, format.
Please note, there are reports that can only be generated using the PDF
format.
5. Click the Save Report Format button.
Galileo® Pre-K Online
©2018 Assessment Technology, Incorporated
4 Revised as of 06.18.18
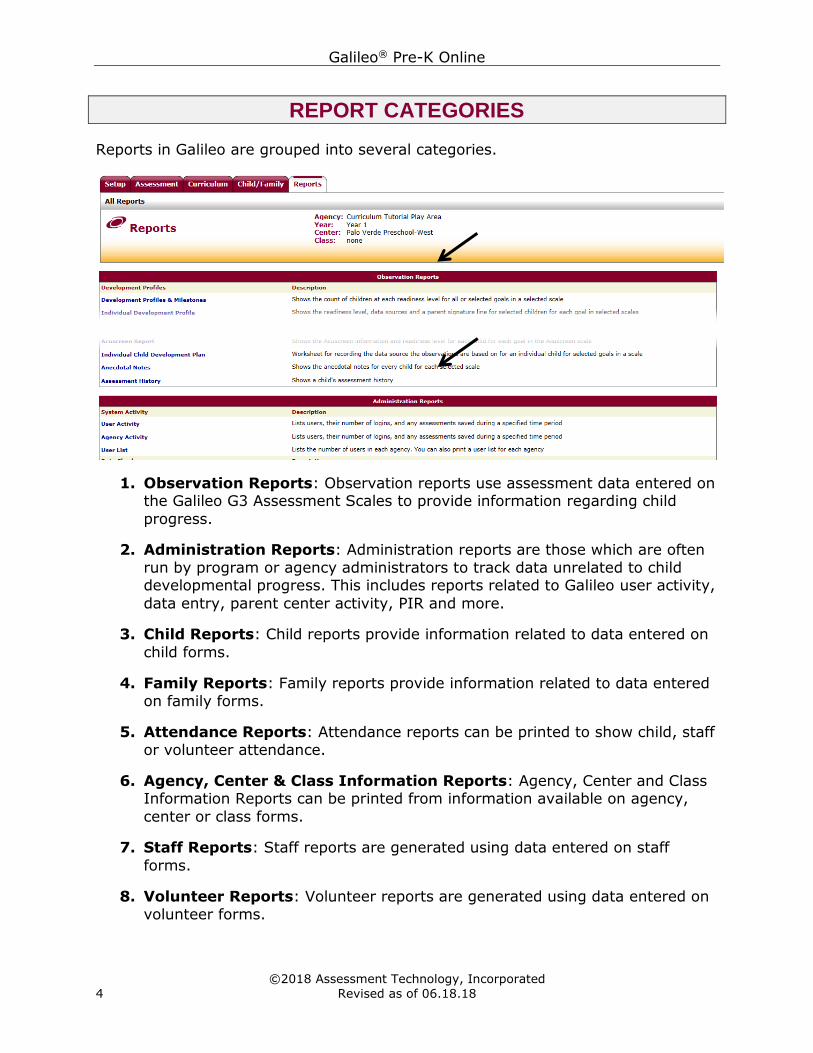
REPORT CATEGORIES
Reports in Galileo are grouped into several categories.
1. Observation Reports: Observation reports use assessment data entered on the Galileo G3 Assessment Scales to provide information regarding child
progress.
2. Administration Reports: Administration reports are those which are often
run by program or agency administrators to track data unrelated to child developmental progress. This includes reports related to Galileo user activity,
data entry, parent center activity, PIR and more.
3. Child Reports: Child reports provide information related to data entered on
child forms.
4. Family Reports: Family reports provide information related to data entered
on family forms.
5. Attendance Reports: Attendance reports can be printed to show child, staff
or volunteer attendance.
6. Agency, Center & Class Information Reports: Agency, Center and Class Information Reports can be printed from information available on agency,
center or class forms.
7. Staff Reports: Staff reports are generated using data entered on staff
forms.
8. Volunteer Reports: Volunteer reports are generated using data entered on
volunteer forms.
Galileo® Pre-K Online
©2018 Assessment Technology, Incorporated
Revised as of 06.18.18 5
TIPS ON GENERATING REPORTS
SCHOOL READINESS REPORTING SCALES
PURPOSE Research shows that the social, physical, and cognitive environments that a child is exposed to in the first years of life have a lasting impact on how a child develops.
The capabilities that children acquire during their formative preschool years have a profound effect on their successful transition to school as well as maintaining success while attending school. One of the fundamental goals of Assessment
Technology, Incorporated (ATI) is to assist programs in meeting the school readiness needs of children. To help programs target these valued educational
goals, ATI has created the Galileo School Readiness Scales.
The Galileo School Readiness Scale is a developmental scale that consists of
capabilities from the essential areas of learning and development reflected in the G3 Assessment Scales. There is one School Readiness Scale for each age range
reflected in the G3 Assessment Scales. There is a Galileo School Readiness Scale
for:
• 00-08 months,
• 08-18 months,
• 18-24 months,
• 2-3 years, and
• 3-5 years.
The capabilities on these scales reflect valued school readiness goals, which
programs may use to benchmark the progress their children are making in getting
ready for successful entry into kindergarten.
The Galileo School Readiness Scales should be used for reporting purposes. As a teacher documents a child’s
learning on the Galileo G3 Assessment Scales, the like-capabilities on the Galileo School Readiness Scale will also
be updated as learned, meaning no additional work for
the teacher.
Users may select the age range appropriate School Readiness Scale when running
reports. This may be very useful for planning and reporting purposes.
(Image on next page.)
Galileo® Pre-K Online
©2018 Assessment Technology, Incorporated
6 Revised as of 06.18.18
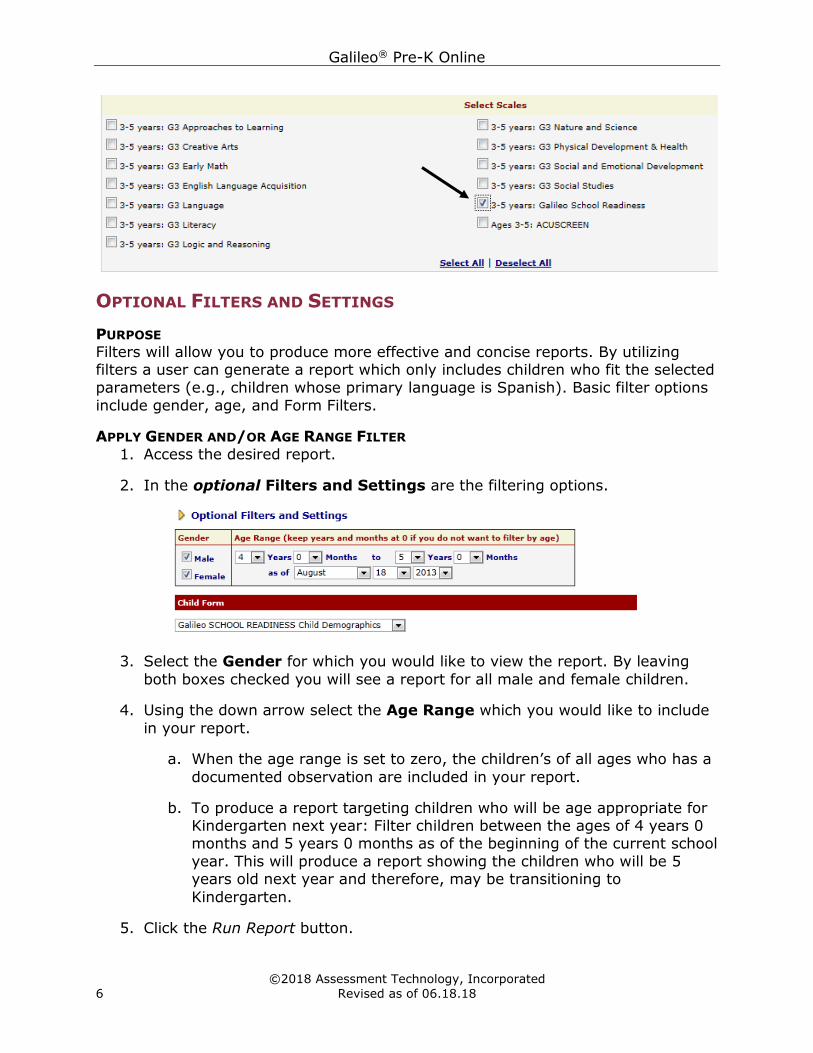
OPTIONAL FILTERS AND SETTINGS
PURPOSE Filters will allow you to produce more effective and concise reports. By utilizing filters a user can generate a report which only includes children who fit the selected
parameters (e.g., children whose primary language is Spanish). Basic filter options
include gender, age, and Form Filters.
APPLY GENDER AND/OR AGE RANGE FILTER
1. Access the desired report.
2. In the optional Filters and Settings are the filtering options.
3. Select the Gender for which you would like to view the report. By leaving
both boxes checked you will see a report for all male and female children.
4. Using the down arrow select the Age Range which you would like to include
in your report.
a. When the age range is set to zero, the children’s of all ages who has a
documented observation are included in your report.
b. To produce a report targeting children who will be age appropriate for Kindergarten next year: Filter children between the ages of 4 years 0 months and 5 years 0 months as of the beginning of the current school
year. This will produce a report showing the children who will be 5 years old next year and therefore, may be transitioning to
Kindergarten.
5. Click the Run Report button.
Galileo® Pre-K Online
©2018 Assessment Technology, Incorporated
Revised as of 06.18.18 7
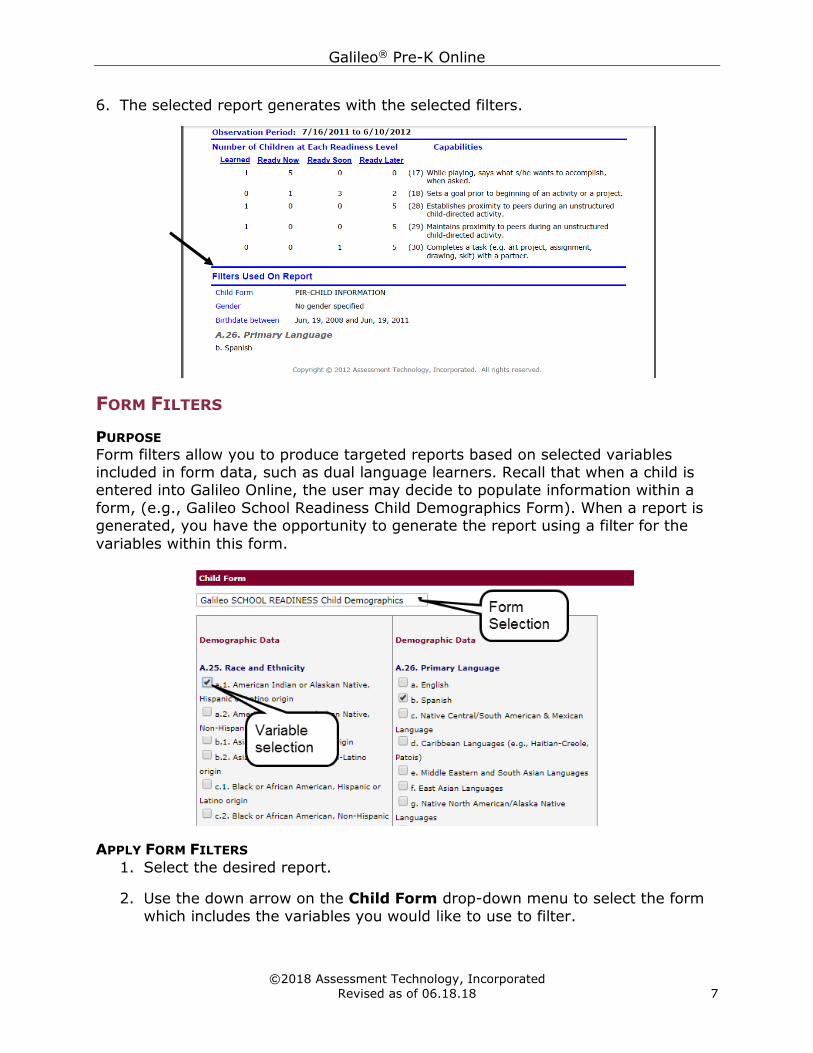
6. The selected report generates with the selected filters.
FORM FILTERS
PURPOSE Form filters allow you to produce targeted reports based on selected variables included in form data, such as dual language learners. Recall that when a child is entered into Galileo Online, the user may decide to populate information within a
form, (e.g., Galileo School Readiness Child Demographics Form). When a report is generated, you have the opportunity to generate the report using a filter for the
variables within this form.
APPLY FORM FILTERS
1. Select the desired report.
2. Use the down arrow on the Child Form drop-down menu to select the form
which includes the variables you would like to use to filter.
Galileo® Pre-K Online
©2018 Assessment Technology, Incorporated
8 Revised as of 06.18.18
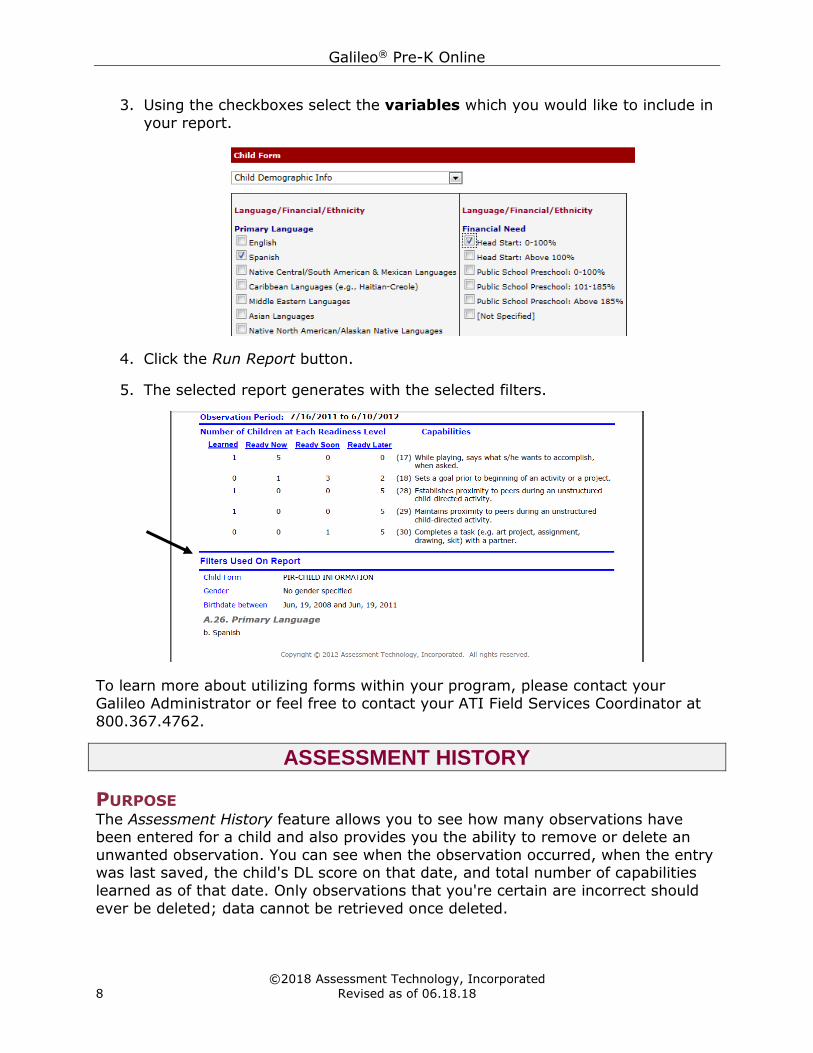
3. Using the checkboxes select the variables which you would like to include in
your report.
4. Click the Run Report button.
5. The selected report generates with the selected filters.
To learn more about utilizing forms within your program, please contact your
Galileo Administrator or feel free to contact your ATI Field Services Coordinator at
800.367.4762.
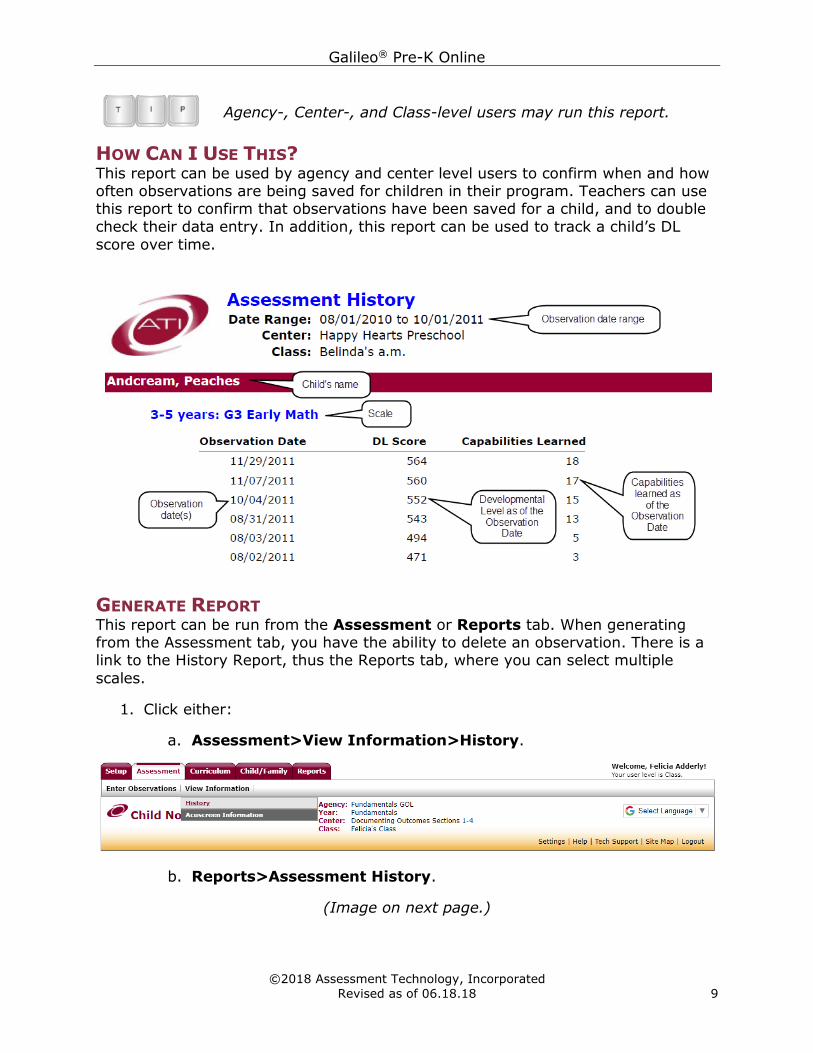
ASSESSMENT HISTORY
PURPOSE The Assessment History feature allows you to see how many observations have been entered for a child and also provides you the ability to remove or delete an
unwanted observation. You can see when the observation occurred, when the entry was last saved, the child's DL score on that date, and total number of capabilities
learned as of that date. Only observations that you're certain are incorrect should
ever be deleted; data cannot be retrieved once deleted.
Galileo® Pre-K Online
©2018 Assessment Technology, Incorporated
Revised as of 06.18.18 9
Agency-, Center-, and Class-level users may run this report.
HOW CAN I USE THIS? This report can be used by agency and center level users to confirm when and how often observations are being saved for children in their program. Teachers can use this report to confirm that observations have been saved for a child, and to double
check their data entry. In addition, this report can be used to track a child’s DL
score over time.
GENERATE REPORT This report can be run from the Assessment or Reports tab. When generating from the Assessment tab, you have the ability to delete an observation. There is a link to the History Report, thus the Reports tab, where you can select multiple
scales.
1. Click either:
a. Assessment>View Information>History.
b. Reports>Assessment History.
(Image on next page.)
Galileo® Pre-K Online
©2018 Assessment Technology, Incorporated
10 Revised as of 06.18.18
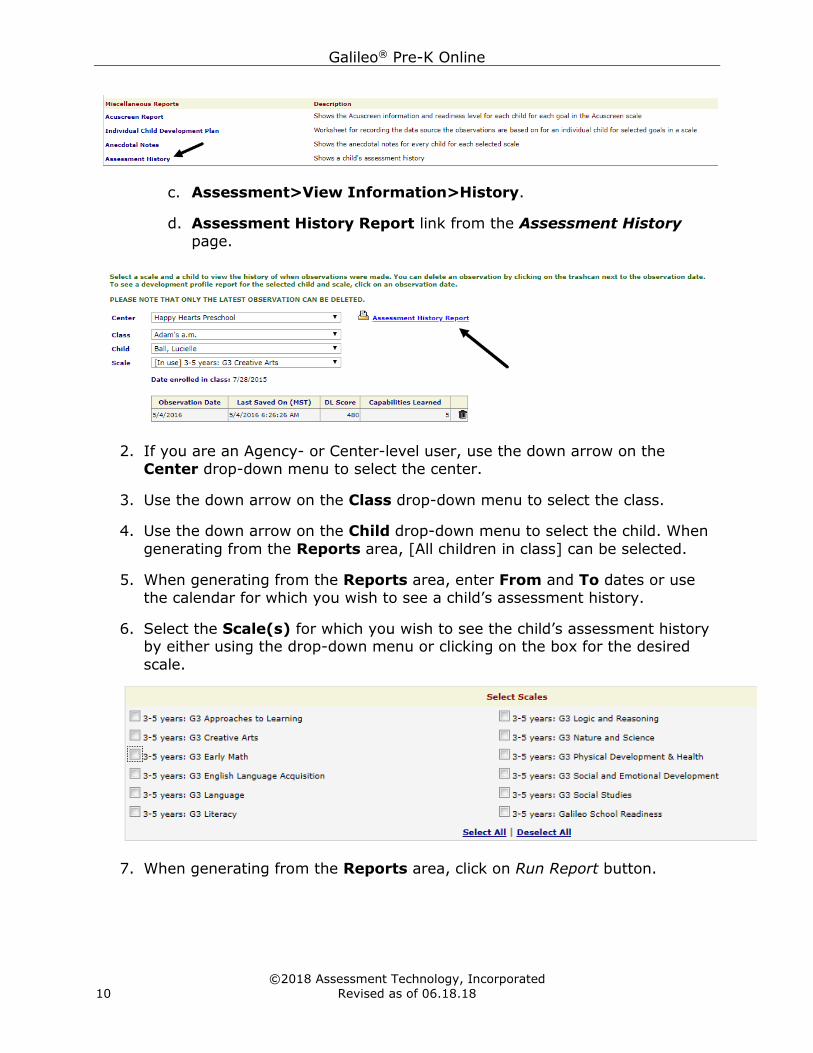
c. Assessment>View Information>History.
d. Assessment History Report link from the Assessment History
page.
2. If you are an Agency- or Center-level user, use the down arrow on the
Center drop-down menu to select the center.
3. Use the down arrow on the Class drop-down menu to select the class.
4. Use the down arrow on the Child drop-down menu to select the child. When
generating from the Reports area, [All children in class] can be selected.
5. When generating from the Reports area, enter From and To dates or use
the calendar for which you wish to see a child’s assessment history.
6. Select the Scale(s) for which you wish to see the child’s assessment history by either using the drop-down menu or clicking on the box for the desired
scale.
7. When generating from the Reports area, click on Run Report button.

Galileo® Pre-K Online
©2018 Assessment Technology, Incorporated
Revised as of 06.18.18 11
DELETE AN OBSERVATION 8. When generating from the Assessment tab and you wish to delete an
erroneous observation, Click the trashcan next to the observation you wish
to delete. Answer the warning message.
CLASS OBSERVATION RECORDS
Refer to the Observation Records section’s Class Observation Records section, page
49, for instructions on generating the Class Observation Records report.
DATA CHECKER TOOL
PURPOSE There are two Data Checker tools:
1. Form Information – Allows you to query child forms and see who does or
does not have completed information.
2. Inactive/Active Children – Allows you to find children without (or with)
observations documents.
Agency-, Center-, and Class-level users may run this report.
HOW CAN I USE THIS? The Data Checker-Form Information report can be used as a quality check measure to ensure that data has been correctly entered in Galileo forms. The Data-Checker Active/Inactive Child tool can provide a quality check to ensure that observations
are being entered for all children.
FORM INFORMATION REPORT You should be aware of how the different fields operate:
• A Checkbox. A checkbox will provide you with a count.
• An Option. An option field consisting of a drop-down menu with several
choices, will provide you with a count.
• A Number box. A number box will provide you with a count for that field.
Please note: Because of the vast number of different responses that can be filled
into the date, text, and memo fields, this data cannot be aggregated.
Galileo® Pre-K Online
©2018 Assessment Technology, Incorporated
12 Revised as of 06.18.18
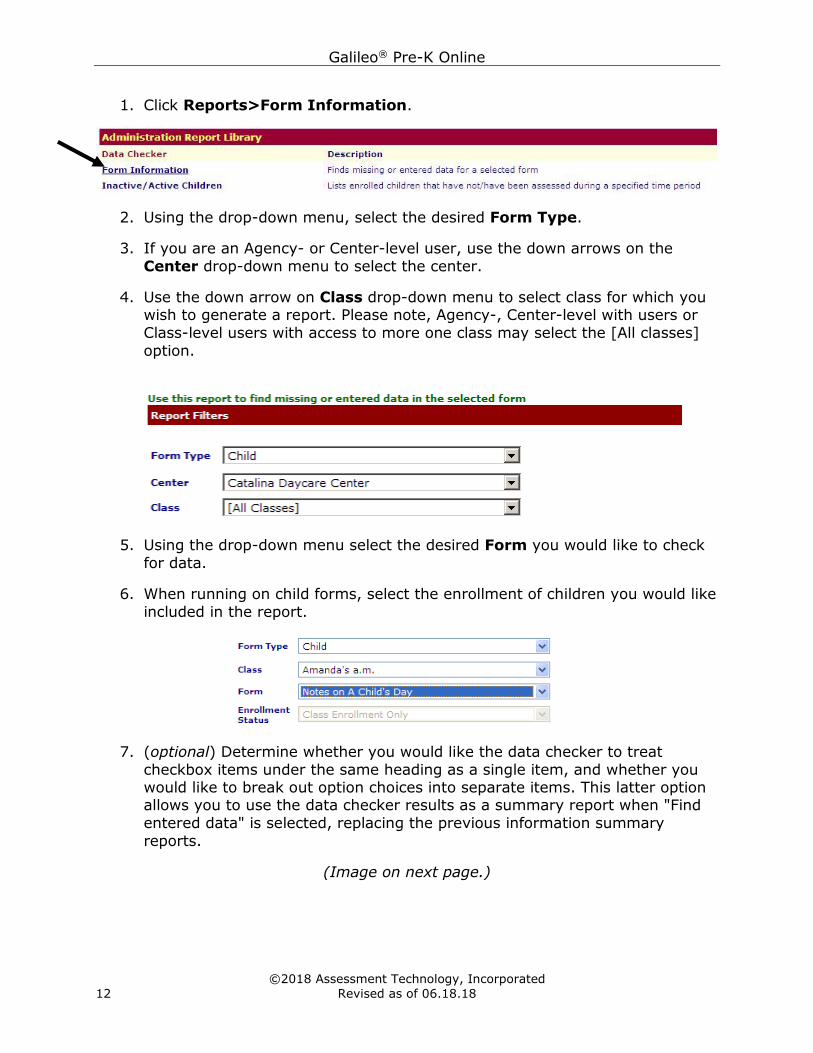
1. Click Reports>Form Information.
2. Using the drop-down menu, select the desired Form Type.
3. If you are an Agency- or Center-level user, use the down arrows on the
Center drop-down menu to select the center.
4. Use the down arrow on Class drop-down menu to select class for which you wish to generate a report. Please note, Agency-, Center-level with users or
Class-level users with access to more one class may select the [All classes]
option.
5. Using the drop-down menu select the desired Form you would like to check
for data.
6. When running on child forms, select the enrollment of children you would like
included in the report.
7. (optional) Determine whether you would like the data checker to treat
checkbox items under the same heading as a single item, and whether you would like to break out option choices into separate items. This latter option allows you to use the data checker results as a summary report when "Find
entered data" is selected, replacing the previous information summary
reports.
(Image on next page.)
Galileo® Pre-K Online
©2018 Assessment Technology, Incorporated
Revised as of 06.18.18 13
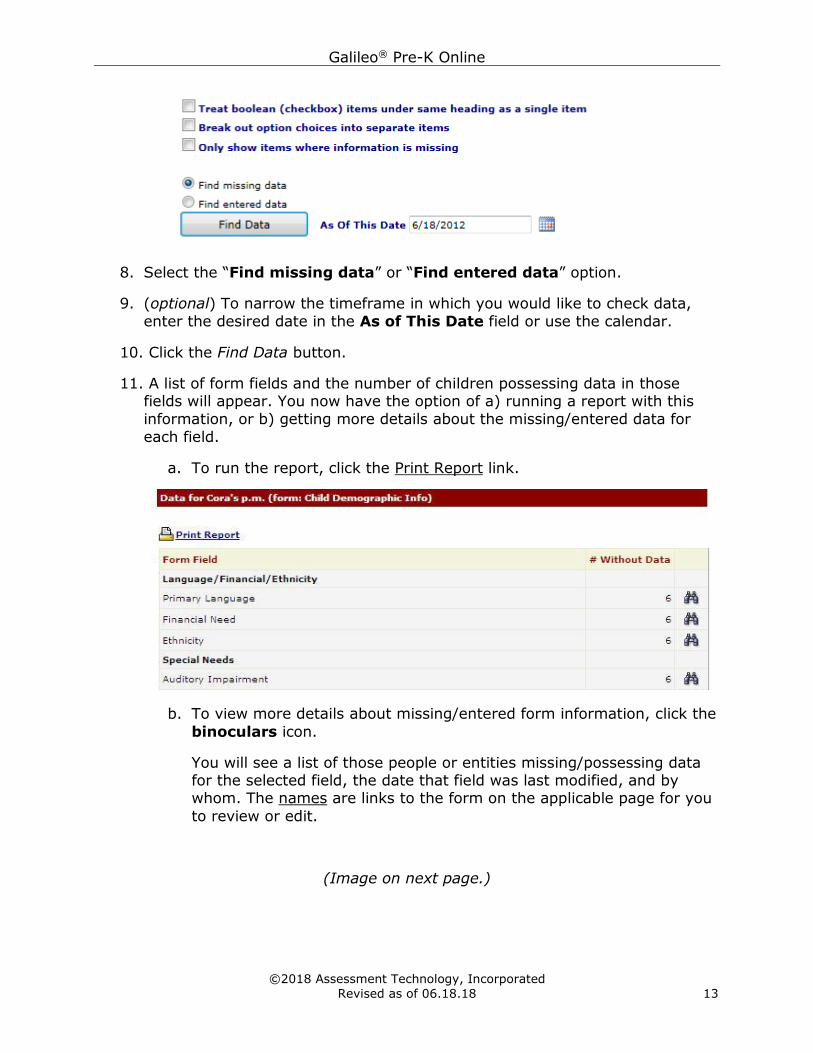
8. Select the “Find missing data” or “Find entered data” option.
9. (optional) To narrow the timeframe in which you would like to check data,
enter the desired date in the As of This Date field or use the calendar.
10. Click the Find Data button.
11. A list of form fields and the number of children possessing data in those fields will appear. You now have the option of a) running a report with this
information, or b) getting more details about the missing/entered data for
each field.
a. To run the report, click the Print Report link.
b. To view more details about missing/entered form information, click the
binoculars icon.
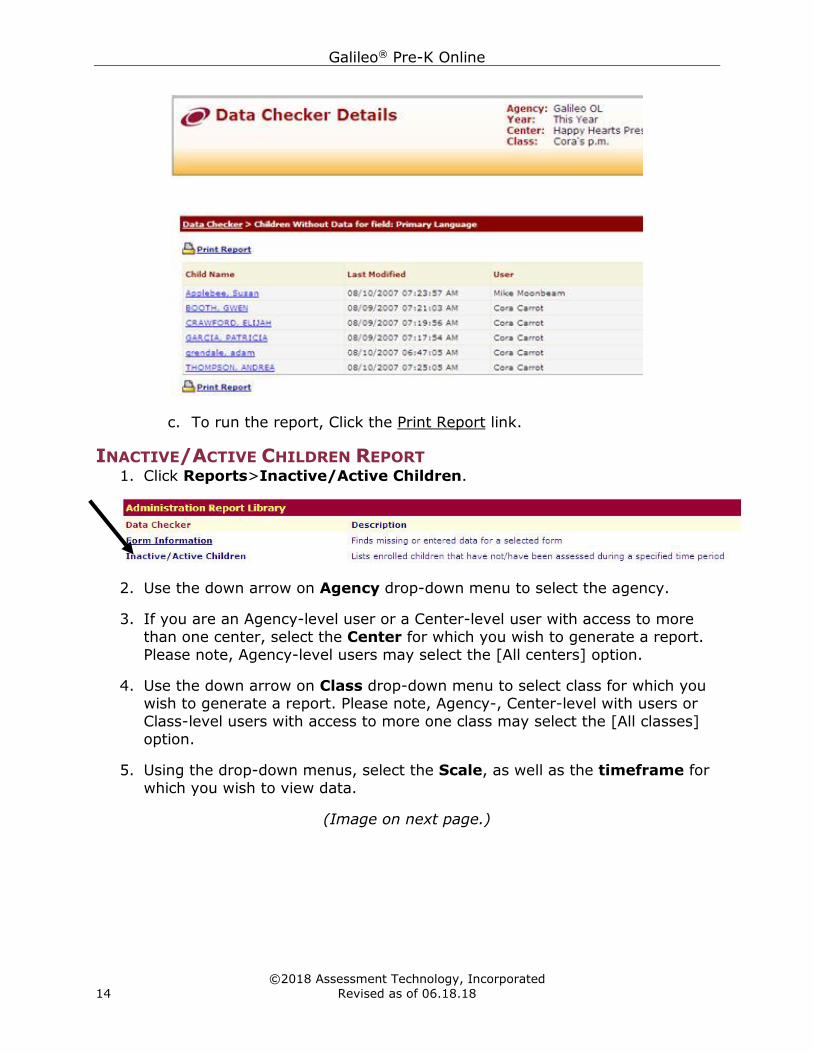
You will see a list of those people or entities missing/possessing data for the selected field, the date that field was last modified, and by whom. The names are links to the form on the applicable page for you
to review or edit.
(Image on next page.)
Galileo® Pre-K Online
©2018 Assessment Technology, Incorporated
14 Revised as of 06.18.18
c. To run the report, Click the Print Report link.
INACTIVE/ACTIVE CHILDREN REPORT 1. Click Reports>Inactive/Active Children.
2. Use the down arrow on Agency drop-down menu to select the agency.
3. If you are an Agency-level user or a Center-level user with access to more
than one center, select the Center for which you wish to generate a report.
Please note, Agency-level users may select the [All centers] option.
4. Use the down arrow on Class drop-down menu to select class for which you wish to generate a report. Please note, Agency-, Center-level with users or
Class-level users with access to more one class may select the [All classes]
option.
5. Using the drop-down menus, select the Scale, as well as the timeframe for
which you wish to view data.
(Image on next page.)
Galileo® Pre-K Online
©2018 Assessment Technology, Incorporated
Revised as of 06.18.18 15
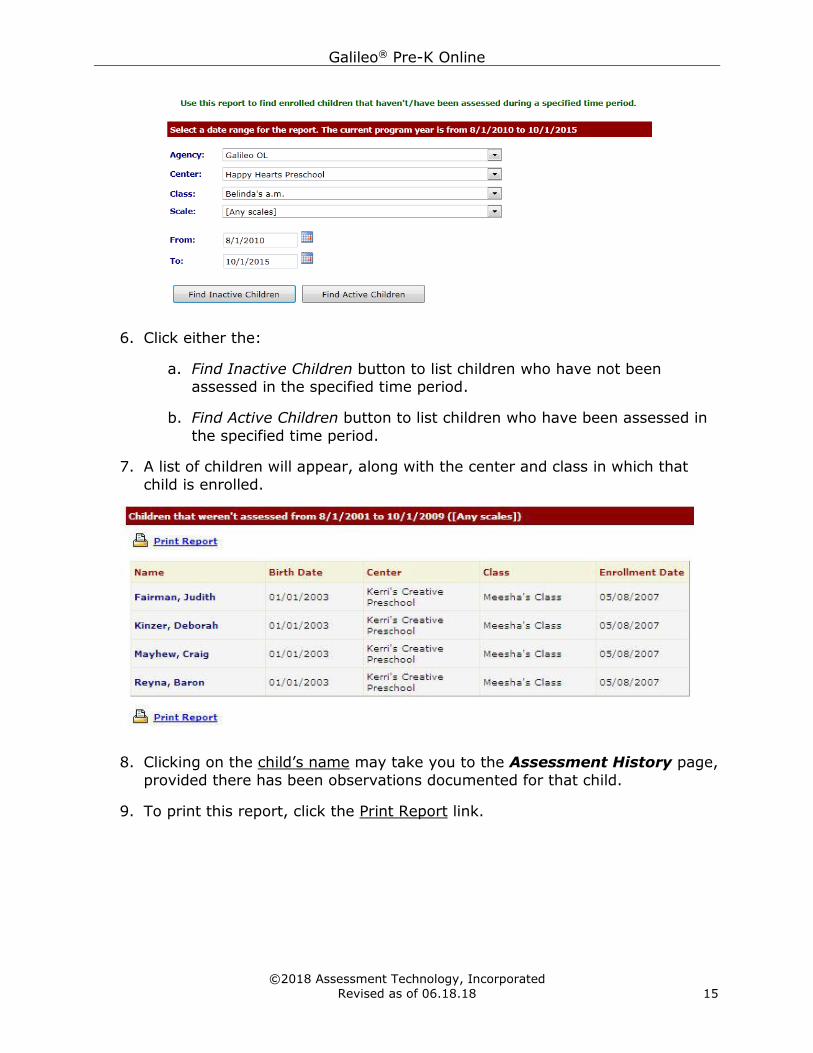
6. Click either the:
a. Find Inactive Children button to list children who have not been
assessed in the specified time period.
b. Find Active Children button to list children who have been assessed in
the specified time period.
7. A list of children will appear, along with the center and class in which that
child is enrolled.
8. Clicking on the child’s name may take you to the Assessment History page,
provided there has been observations documented for that child.
9. To print this report, click the Print Report link.
Galileo® Pre-K Online
©2018 Assessment Technology, Incorporated
16 Revised as of 06.18.18
DEVELOPMENT PROFILES AND MILESTONES
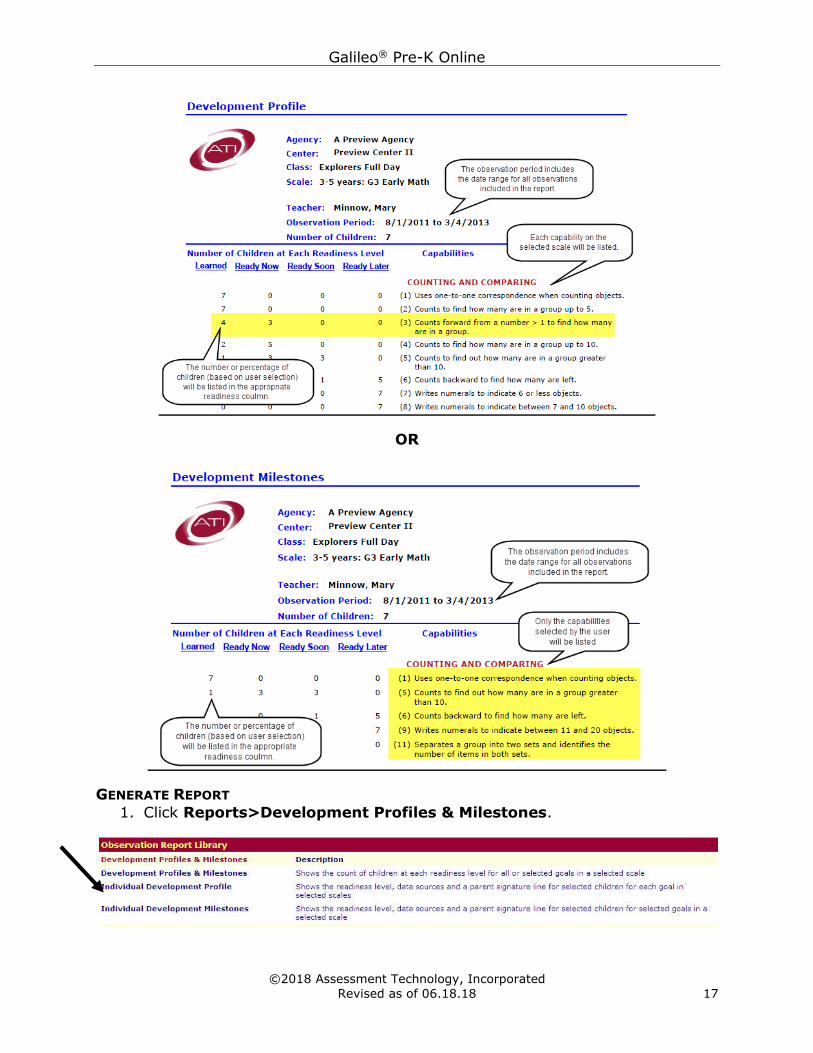
PURPOSE The Development Profiles & Milestones report shows how many children have
acquired capabilities in a scale for a given developmental area. When running the
report as a:
• Profile, all of the capabilities are listed.
• Milestone, you select specific capabilities on which to report. Milestones may
be saved by defining a Milestone Set to provide easy reporting on the same
milestones throughout the program year.
Whether running a Profile or a Milestone report, you will see the number or percentage of children who have learned capabilities and who are ready now, will
be ready soon, or will be ready later to learn capabilities that make-up a scale.
Saved milestone sets created by Agency-level users will be available to Center and
Class-level users. Milestone sets created by Center-level users will be available to
Class-level users.
Either the Profile or the Milestone report may be generated as an aggregate report.
Agency-, Center-, and Class-level users may run these reports.
HOW CAN I USE THIS? The Development Profiles and Milestones reports are often used by teachers to inform lesson planning as it shows the children’s readiness levels for each
capability. Milestones allow the user to print a targeted report for including only selected goals on a scale. Some programs select to use the save milestones, the Milestone Set, feature in Galileo to track specific capabilities selected as program
goals for school readiness.
(Image on next page.)
Galileo® Pre-K Online
©2018 Assessment Technology, Incorporated
Revised as of 06.18.18 17
OR
GENERATE REPORT
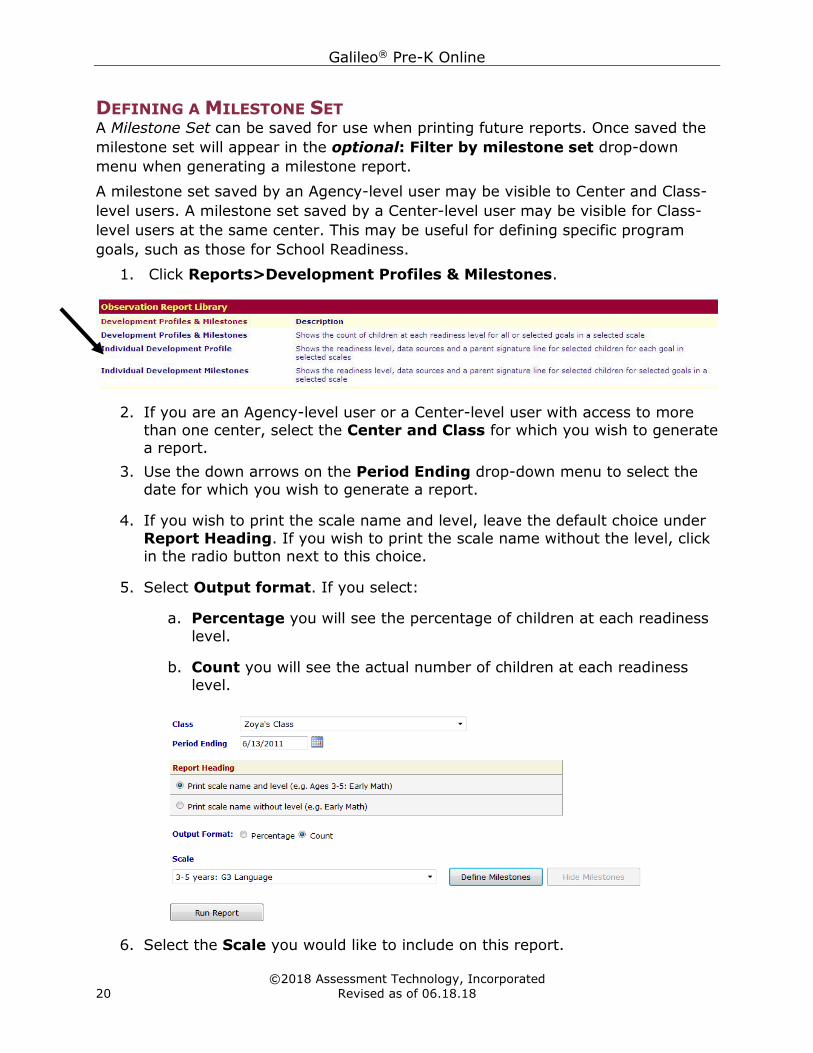
1. Click Reports>Development Profiles & Milestones.
Galileo® Pre-K Online
©2018 Assessment Technology, Incorporated
18 Revised as of 06.18.18
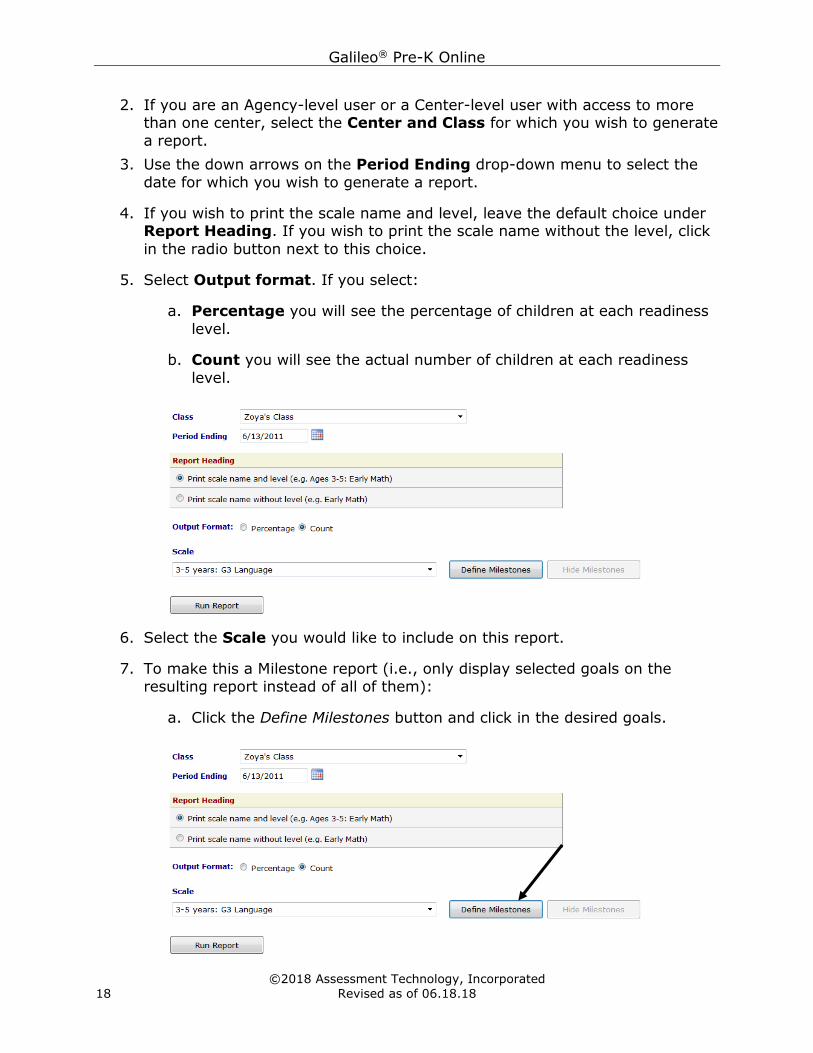
2. If you are an Agency-level user or a Center-level user with access to more than one center, select the Center and Class for which you wish to generate
a report.
3. Use the down arrows on the Period Ending drop-down menu to select the
date for which you wish to generate a report.
4. If you wish to print the scale name and level, leave the default choice under Report Heading. If you wish to print the scale name without the level, click
in the radio button next to this choice.
5. Select Output format. If you select:
a. Percentage you will see the percentage of children at each readiness
level.
b. Count you will see the actual number of children at each readiness
level.
6. Select the Scale you would like to include on this report.
7. To make this a Milestone report (i.e., only display selected goals on the
resulting report instead of all of them):
a. Click the Define Milestones button and click in the desired goals.
Galileo® Pre-K Online
©2018 Assessment Technology, Incorporated
Revised as of 06.18.18 19
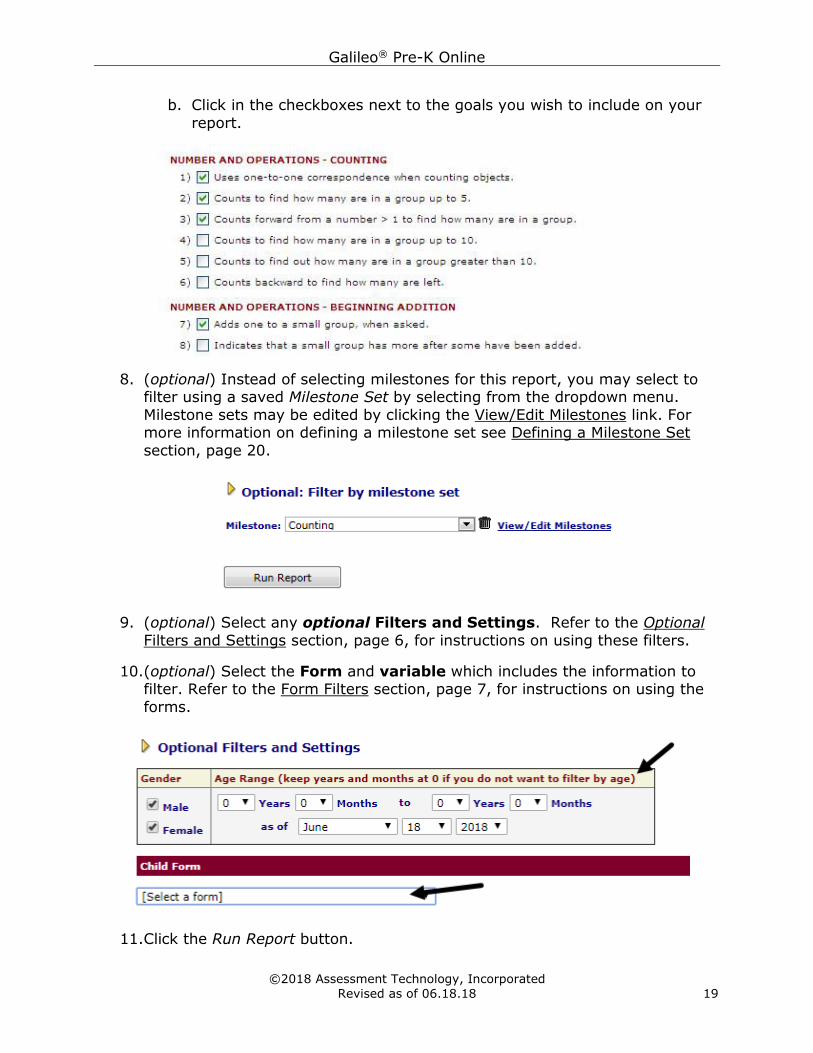
b. Click in the checkboxes next to the goals you wish to include on your
report.
8. (optional) Instead of selecting milestones for this report, you may select to filter using a saved Milestone Set by selecting from the dropdown menu.
Milestone sets may be edited by clicking the View/Edit Milestones link. For more information on defining a milestone set see Defining a Milestone Set
section, page 20.
9. (optional) Select any optional Filters and Settings. Refer to the Optional
Filters and Settings section, page 6, for instructions on using these filters.
10.(optional) Select the Form and variable which includes the information to filter. Refer to the Form Filters section, page 7, for instructions on using the
forms.
11.Click the Run Report button.
Galileo® Pre-K Online
©2018 Assessment Technology, Incorporated
20 Revised as of 06.18.18
DEFINING A MILESTONE SET A Milestone Set can be saved for use when printing future reports. Once saved the
milestone set will appear in the optional: Filter by milestone set drop-down
menu when generating a milestone report.
A milestone set saved by an Agency-level user may be visible to Center and Class-
level users. A milestone set saved by a Center-level user may be visible for Class-
level users at the same center. This may be useful for defining specific program
goals, such as those for School Readiness.
1. Click Reports>Development Profiles & Milestones.
2. If you are an Agency-level user or a Center-level user with access to more
than one center, select the Center and Class for which you wish to generate a report.
3. Use the down arrows on the Period Ending drop-down menu to select the
date for which you wish to generate a report.
4. If you wish to print the scale name and level, leave the default choice under
Report Heading. If you wish to print the scale name without the level, click
in the radio button next to this choice.
5. Select Output format. If you select:
a. Percentage you will see the percentage of children at each readiness
level.
b. Count you will see the actual number of children at each readiness
level.
6. Select the Scale you would like to include on this report.
Galileo® Pre-K Online
©2018 Assessment Technology, Incorporated
Revised as of 06.18.18 21
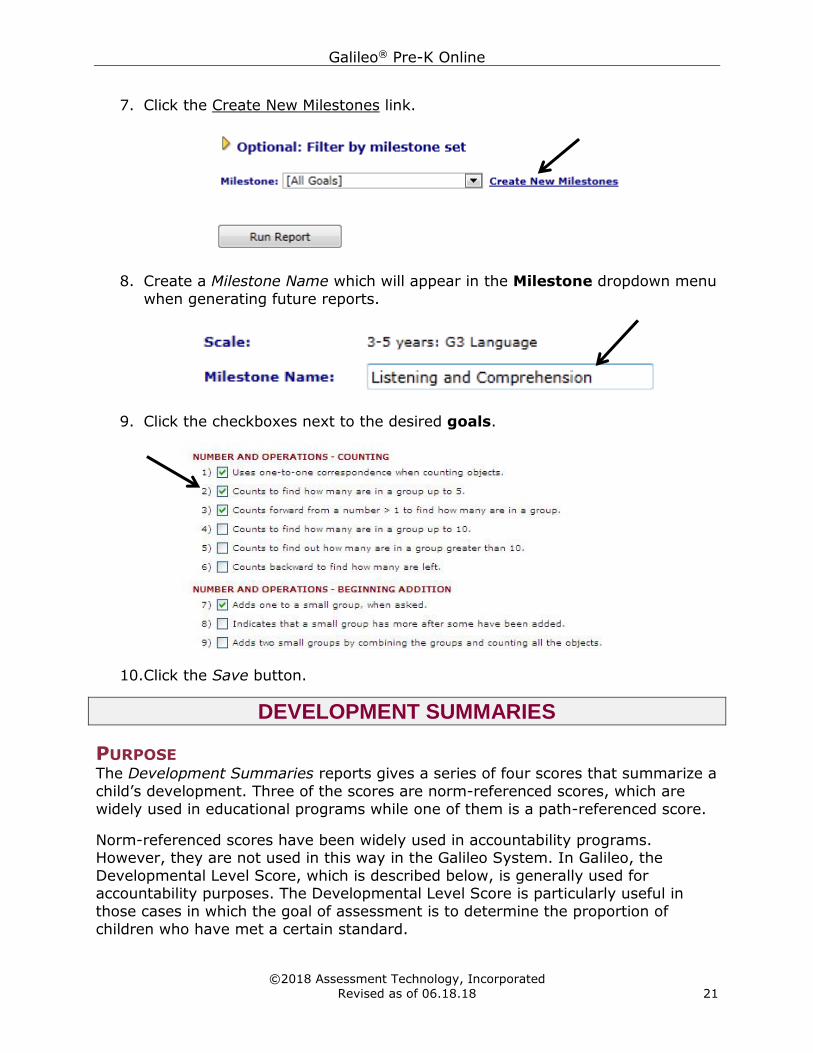
7. Click the Create New Milestones link.
8. Create a Milestone Name which will appear in the Milestone dropdown menu
when generating future reports.
9. Click the checkboxes next to the desired goals.
10.Click the Save button.
DEVELOPMENT SUMMARIES
PURPOSE The Development Summaries reports gives a series of four scores that summarize a
child’s development. Three of the scores are norm-referenced scores, which are
widely used in educational programs while one of them is a path-referenced score.
Norm-referenced scores have been widely used in accountability programs. However, they are not used in this way in the Galileo System. In Galileo, the
Developmental Level Score, which is described below, is generally used for accountability purposes. The Developmental Level Score is particularly useful in
those cases in which the goal of assessment is to determine the proportion of
children who have met a certain standard.
Galileo® Pre-K Online
©2018 Assessment Technology, Incorporated
22 Revised as of 06.18.18
HOW CAN I USE THIS? Although the Development Summaries reports are most widely used by directors
and supervisors, they do have some practical uses for teachers. The norm-referenced scores may be useful in those instances in which decisions must be made based on where a child stands in a norm group. For example, knowing the
position of the child in relation to the norm group may be helpful in arriving at a decision to refer the child for diagnostic testing. In some cases, norm-referenced
scores may be used to assist in planning learning opportunities. For example, a teacher may wish to know the extent to which a child has made progress relative to his or her peers. A norm-referenced score can provide this information. Not only
are the norm-referenced scores helpful to teachers, but so are the Developmental Level Scores. The Developmental Level Score can be used to assist in the planning
of learning opportunities and in documenting learning outcomes. For example, the Developmental Level Score is used along with other information to compute the probability that a child will be able to perform each of the capabilities in a
developmental scale. These show up as the readiness/planning levels that you see in the observation screen and in Developmental Profiles and Milestone reports. This
score corresponds to the readiness levels and can thus be used to guide the
planning of learning opportunities for children.
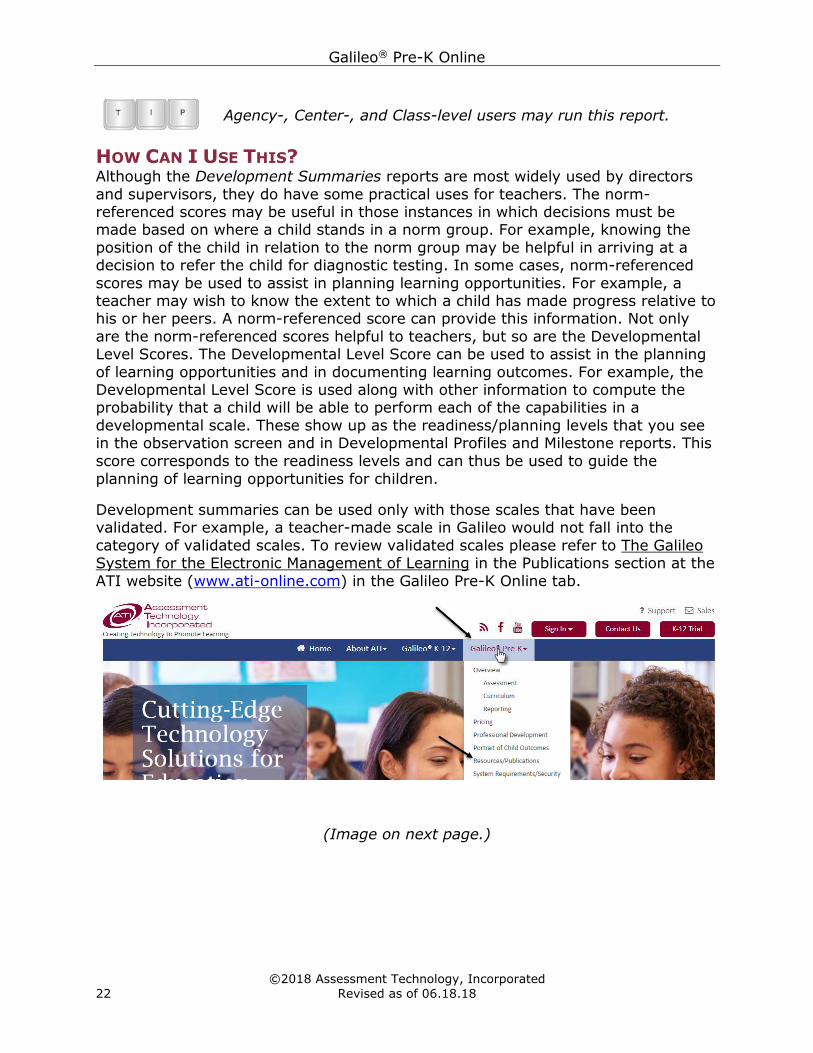
Development summaries can be used only with those scales that have been validated. For example, a teacher-made scale in Galileo would not fall into the
category of validated scales. To review validated scales please refer to The Galileo System for the Electronic Management of Learning in the Publications section at the
ATI website (www.ati-online.com) in the Galileo Pre-K Online tab.
(Image on next page.)
Agency-, Center-, and Class-level users may run this report.
Galileo® Pre-K Online
©2018 Assessment Technology, Incorporated
Revised as of 06.18.18 23
OR
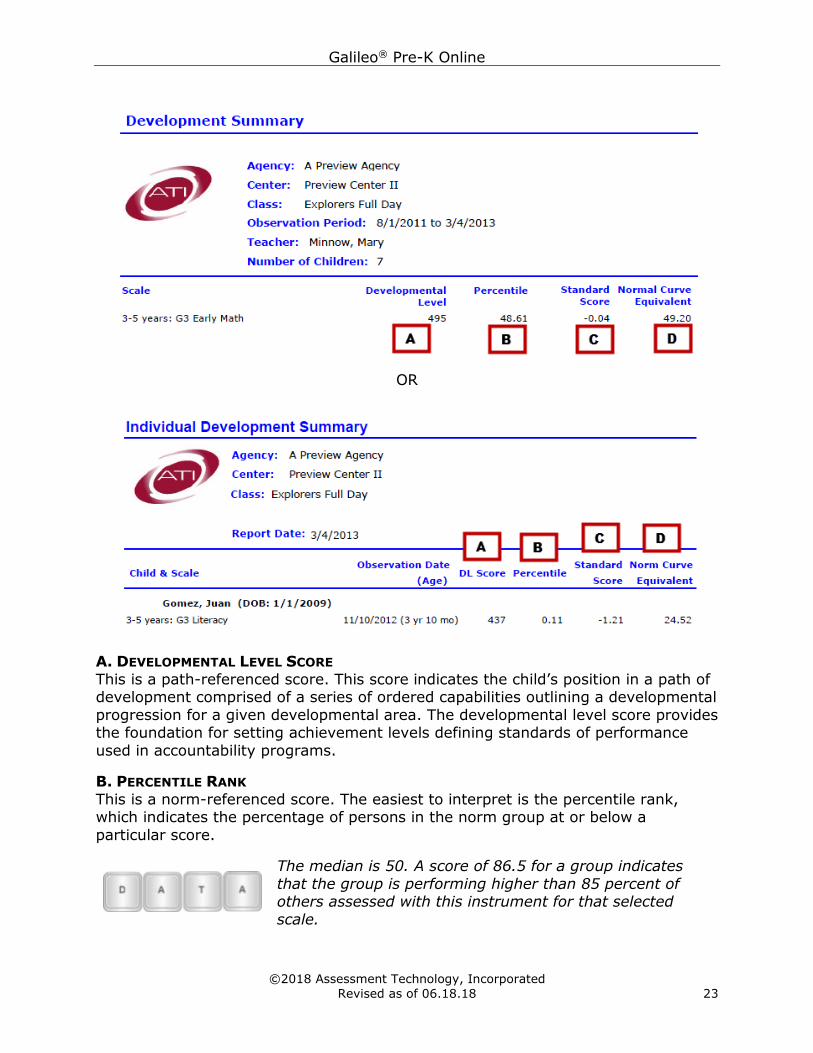
A. DEVELOPMENTAL LEVEL SCORE
This is a path-referenced score. This score indicates the child’s position in a path of development comprised of a series of ordered capabilities outlining a developmental
progression for a given developmental area. The developmental level score provides the foundation for setting achievement levels defining standards of performance
used in accountability programs.
B. PERCENTILE RANK
This is a norm-referenced score. The easiest to interpret is the percentile rank, which indicates the percentage of persons in the norm group at or below a
particular score.
The median is 50. A score of 86.5 for a group indicates
that the group is performing higher than 85 percent of others assessed with this instrument for that selected
scale.
Galileo® Pre-K Online
©2018 Assessment Technology, Incorporated
24 Revised as of 06.18.18
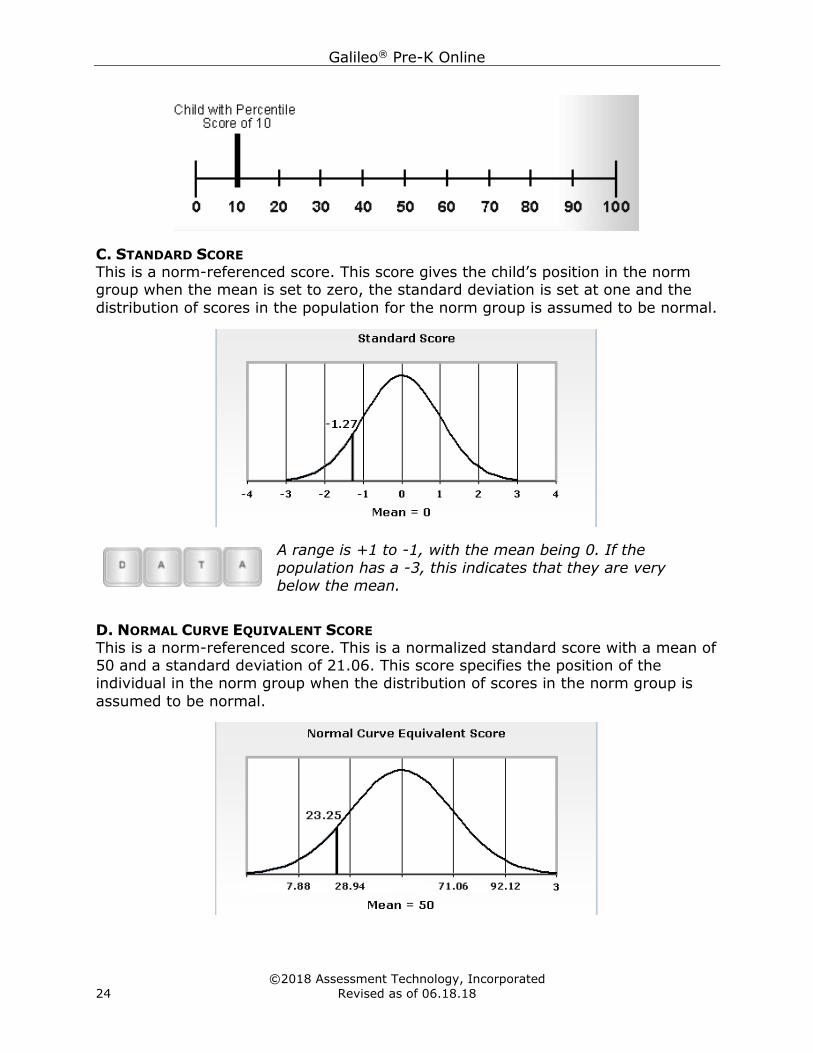
C. STANDARD SCORE This is a norm-referenced score. This score gives the child’s position in the norm group when the mean is set to zero, the standard deviation is set at one and the
distribution of scores in the population for the norm group is assumed to be normal.
A range is +1 to -1, with the mean being 0. If the
population has a -3, this indicates that they are very
below the mean.
D. NORMAL CURVE EQUIVALENT SCORE This is a norm-referenced score. This is a normalized standard score with a mean of 50 and a standard deviation of 21.06. This score specifies the position of the individual in the norm group when the distribution of scores in the norm group is
assumed to be normal.
Galileo® Pre-K Online
©2018 Assessment Technology, Incorporated
Revised as of 06.18.18 25
The median is 50. An average range is 30 to 70 for the
selected scale.
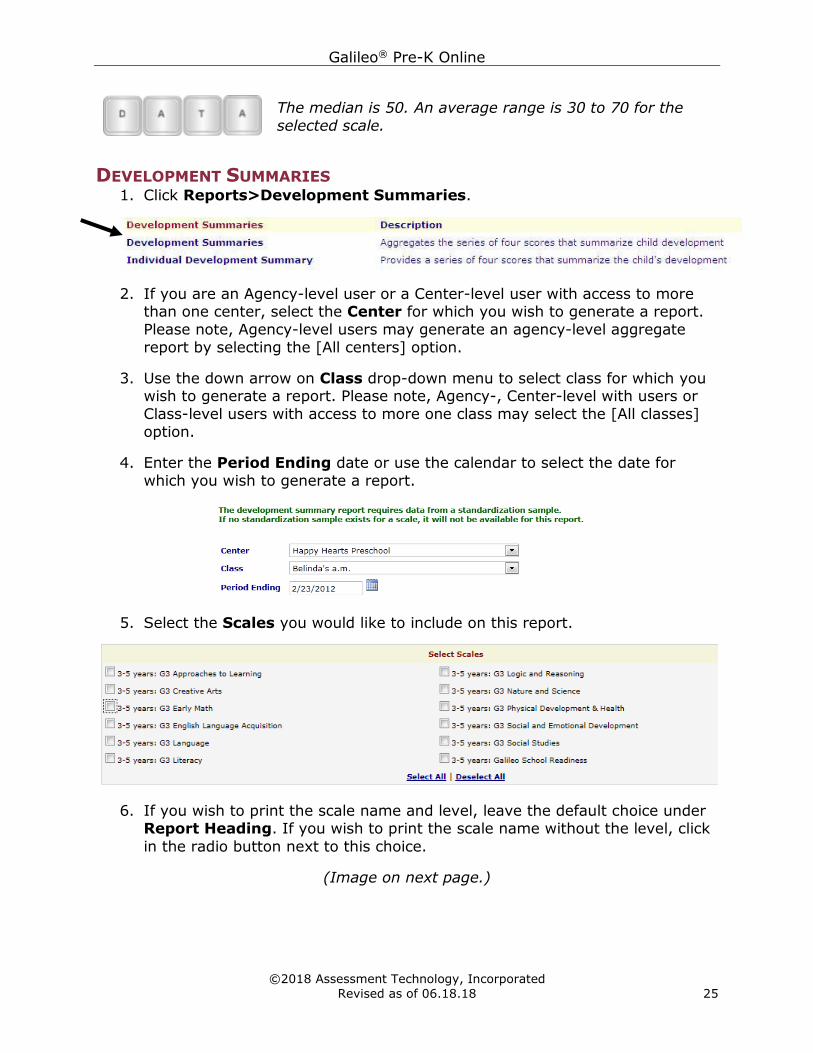
DEVELOPMENT SUMMARIES 1. Click Reports>Development Summaries.
2. If you are an Agency-level user or a Center-level user with access to more than one center, select the Center for which you wish to generate a report.
Please note, Agency-level users may generate an agency-level aggregate
report by selecting the [All centers] option.
3. Use the down arrow on Class drop-down menu to select class for which you wish to generate a report. Please note, Agency-, Center-level with users or
Class-level users with access to more one class may select the [All classes]
option.
4. Enter the Period Ending date or use the calendar to select the date for
which you wish to generate a report.
5. Select the Scales you would like to include on this report.
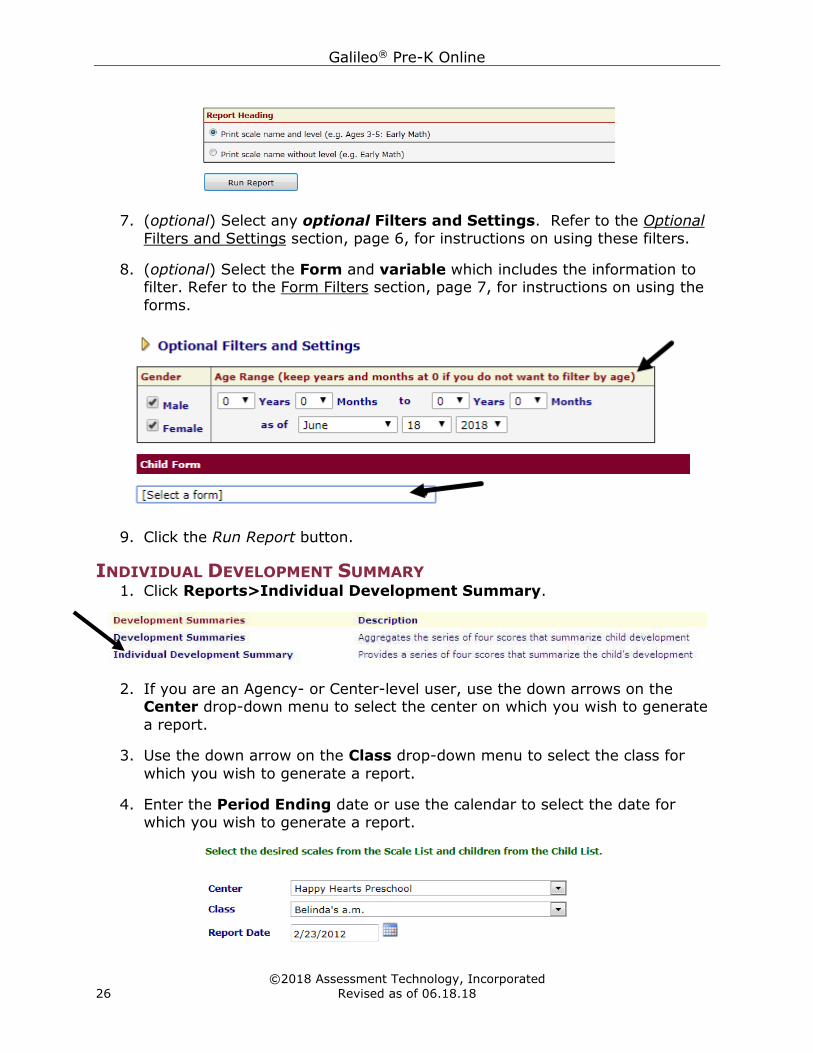
6. If you wish to print the scale name and level, leave the default choice under Report Heading. If you wish to print the scale name without the level, click
in the radio button next to this choice.
(Image on next page.)
Galileo® Pre-K Online
©2018 Assessment Technology, Incorporated
26 Revised as of 06.18.18
7. (optional) Select any optional Filters and Settings. Refer to the Optional
Filters and Settings section, page 6, for instructions on using these filters.
8. (optional) Select the Form and variable which includes the information to filter. Refer to the Form Filters section, page 7, for instructions on using the
forms.
9. Click the Run Report button.
INDIVIDUAL DEVELOPMENT SUMMARY 1. Click Reports>Individual Development Summary.
2. If you are an Agency- or Center-level user, use the down arrows on the Center drop-down menu to select the center on which you wish to generate
a report.
3. Use the down arrow on the Class drop-down menu to select the class for
which you wish to generate a report.
4. Enter the Period Ending date or use the calendar to select the date for
which you wish to generate a report.
Galileo® Pre-K Online
©2018 Assessment Technology, Incorporated
Revised as of 06.18.18 27
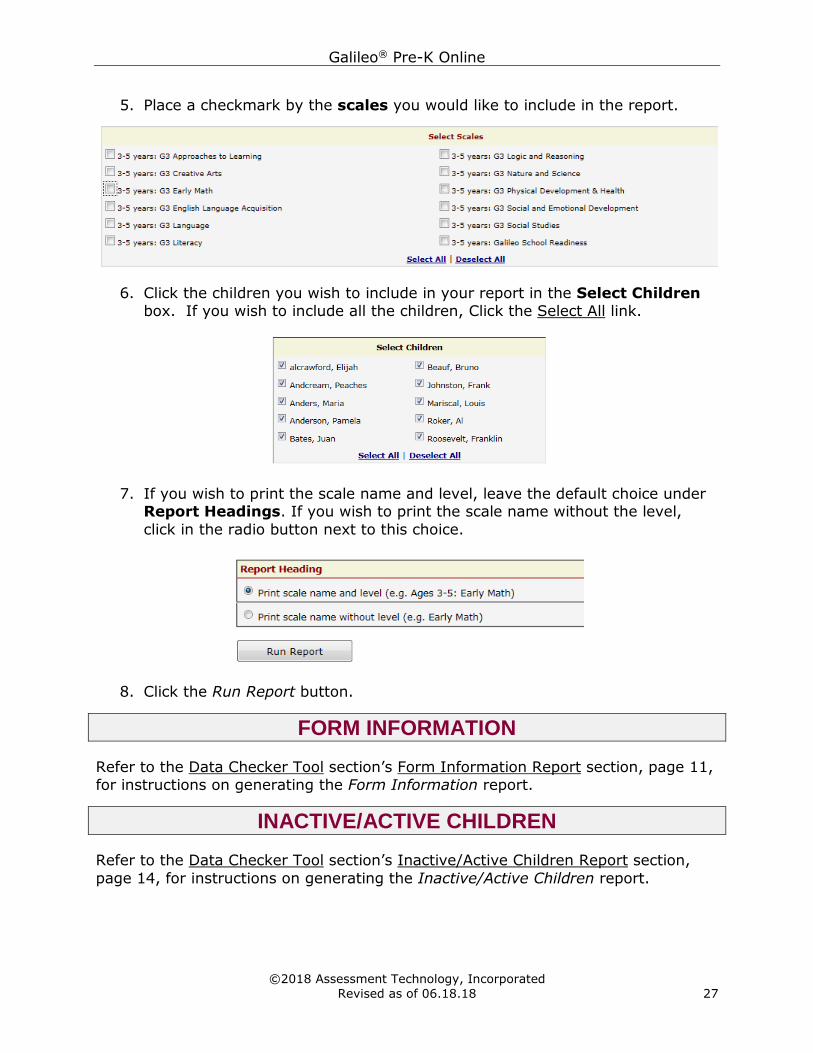
5. Place a checkmark by the scales you would like to include in the report.
6. Click the children you wish to include in your report in the Select Children
box. If you wish to include all the children, Click the Select All link.
7. If you wish to print the scale name and level, leave the default choice under Report Headings. If you wish to print the scale name without the level,
click in the radio button next to this choice.
8. Click the Run Report button.
FORM INFORMATION
Refer to the Data Checker Tool section’s Form Information Report section, page 11,
for instructions on generating the Form Information report.
INACTIVE/ACTIVE CHILDREN
Refer to the Data Checker Tool section’s Inactive/Active Children Report section,
page 14, for instructions on generating the Inactive/Active Children report.
Galileo® Pre-K Online
©2018 Assessment Technology, Incorporated
28 Revised as of 06.18.18
INDIVIDUAL CHILD DEVELOPMENT PLAN
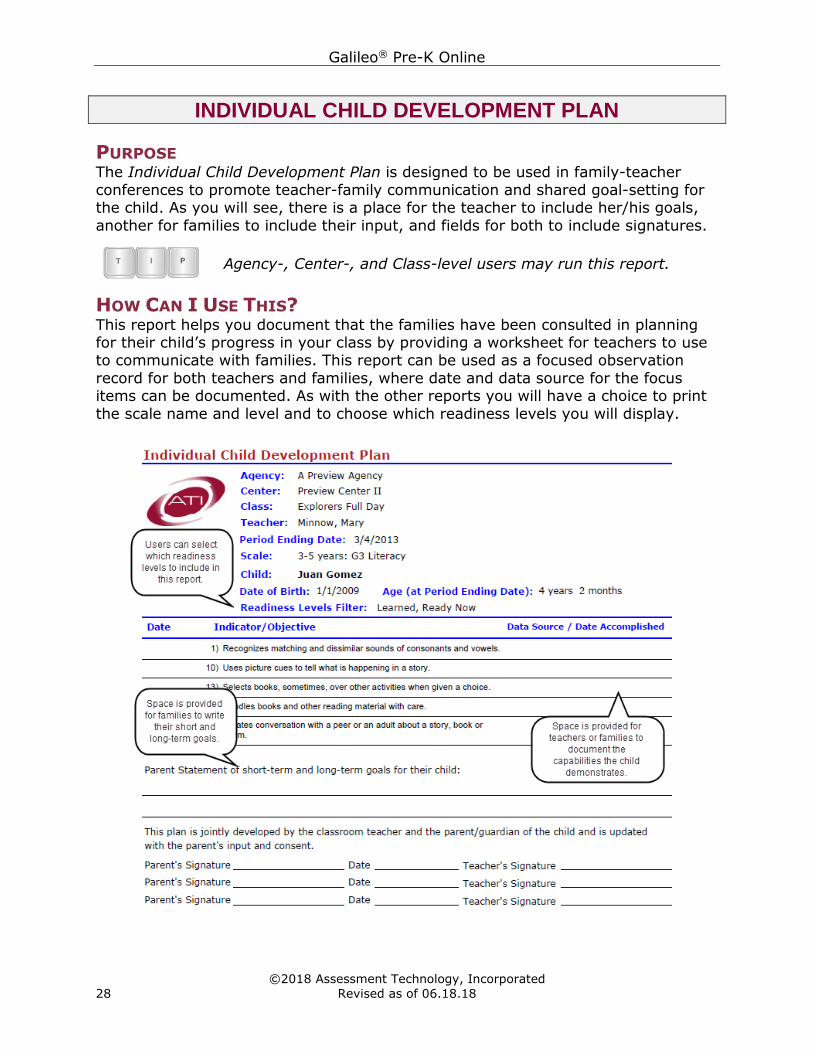
PURPOSE The Individual Child Development Plan is designed to be used in family-teacher
conferences to promote teacher-family communication and shared goal-setting for the child. As you will see, there is a place for the teacher to include her/his goals,
another for families to include their input, and fields for both to include signatures.
Agency-, Center-, and Class-level users may run this report.
HOW CAN I USE THIS? This report helps you document that the families have been consulted in planning for their child’s progress in your class by providing a worksheet for teachers to use to communicate with families. This report can be used as a focused observation
record for both teachers and families, where date and data source for the focus items can be documented. As with the other reports you will have a choice to print
the scale name and level and to choose which readiness levels you will display.
Galileo® Pre-K Online
©2018 Assessment Technology, Incorporated
Revised as of 06.18.18 29
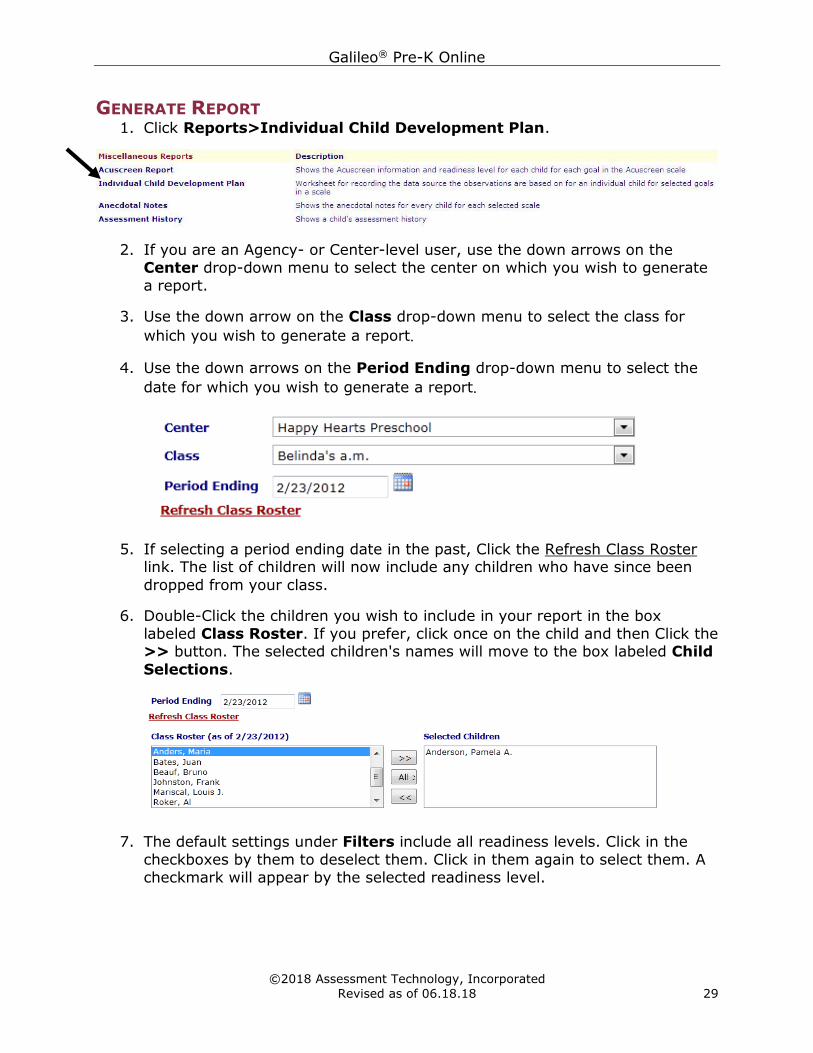
GENERATE REPORT 1. Click Reports>Individual Child Development Plan.
2. If you are an Agency- or Center-level user, use the down arrows on the
Center drop-down menu to select the center on which you wish to generate
a report.
3. Use the down arrow on the Class drop-down menu to select the class for
which you wish to generate a report.
4. Use the down arrows on the Period Ending drop-down menu to select the
date for which you wish to generate a report.
5. If selecting a period ending date in the past, Click the Refresh Class Roster link. The list of children will now include any children who have since been
dropped from your class.
6. Double-Click the children you wish to include in your report in the box
labeled Class Roster. If you prefer, click once on the child and then Click the >> button. The selected children's names will move to the box labeled Child
Selections.
7. The default settings under Filters include all readiness levels. Click in the
checkboxes by them to deselect them. Click in them again to select them. A
checkmark will appear by the selected readiness level.
Galileo® Pre-K Online
©2018 Assessment Technology, Incorporated
30 Revised as of 06.18.18
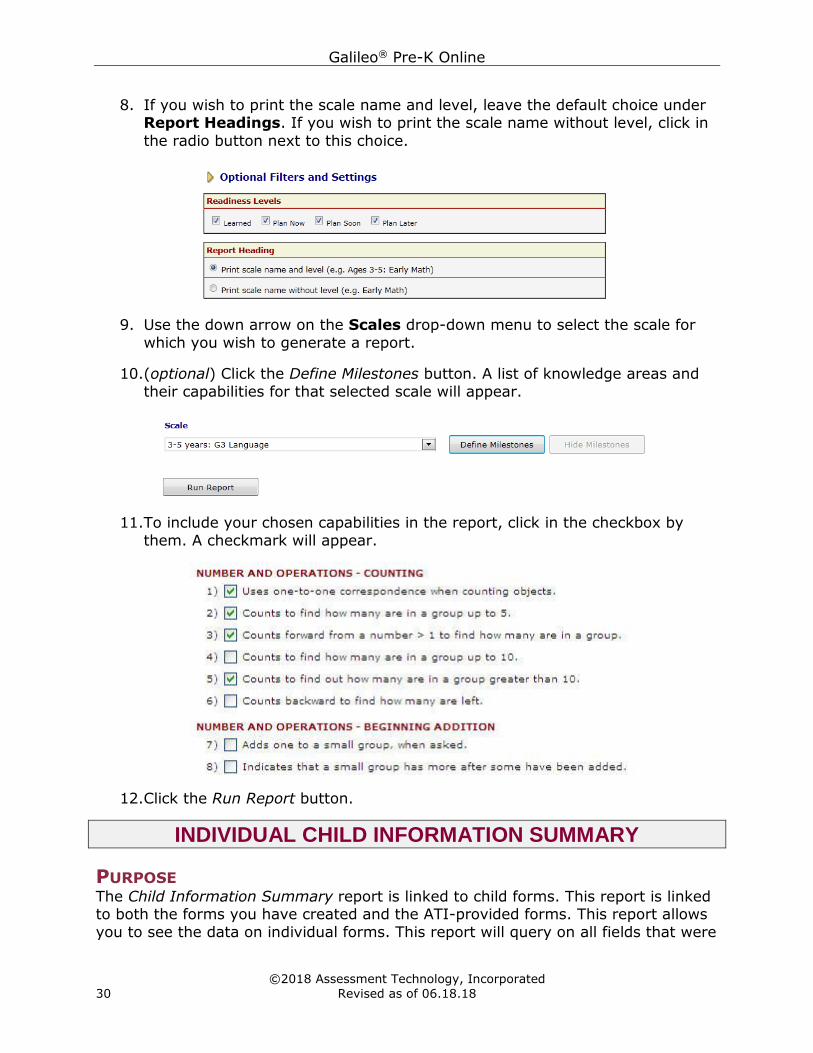
8. If you wish to print the scale name and level, leave the default choice under Report Headings. If you wish to print the scale name without level, click in
the radio button next to this choice.
9. Use the down arrow on the Scales drop-down menu to select the scale for
which you wish to generate a report.
10.(optional) Click the Define Milestones button. A list of knowledge areas and
their capabilities for that selected scale will appear.
11.To include your chosen capabilities in the report, click in the checkbox by
them. A checkmark will appear.
12.Click the Run Report button.
INDIVIDUAL CHILD INFORMATION SUMMARY
PURPOSE The Child Information Summary report is linked to child forms. This report is linked to both the forms you have created and the ATI-provided forms. This report allows
you to see the data on individual forms. This report will query on all fields that were

Galileo® Pre-K Online
©2018 Assessment Technology, Incorporated
Revised as of 06.18.18 31
filled in, which may include checkboxes, dates, text boxes, memo boxes, number
fields, and option fields.
Agency-, Center-, and Class-level users may run this report.
HOW CAN I USE THIS? This report is often printed to create a “hard copy” of all child data saved in Galileo which can be placed in a child’s file or used as a quality check to ensure all data has
been entered correctly into Galileo forms.
ACCESS 1. Click one of the following:
a. Reports>Individual Child Information Summary.
b. Child/Family>Records>Child.
c. Merlin>Child>Demographics.
(Image on next page.)
Galileo® Pre-K Online
©2018 Assessment Technology, Incorporated
32 Revised as of 06.18.18
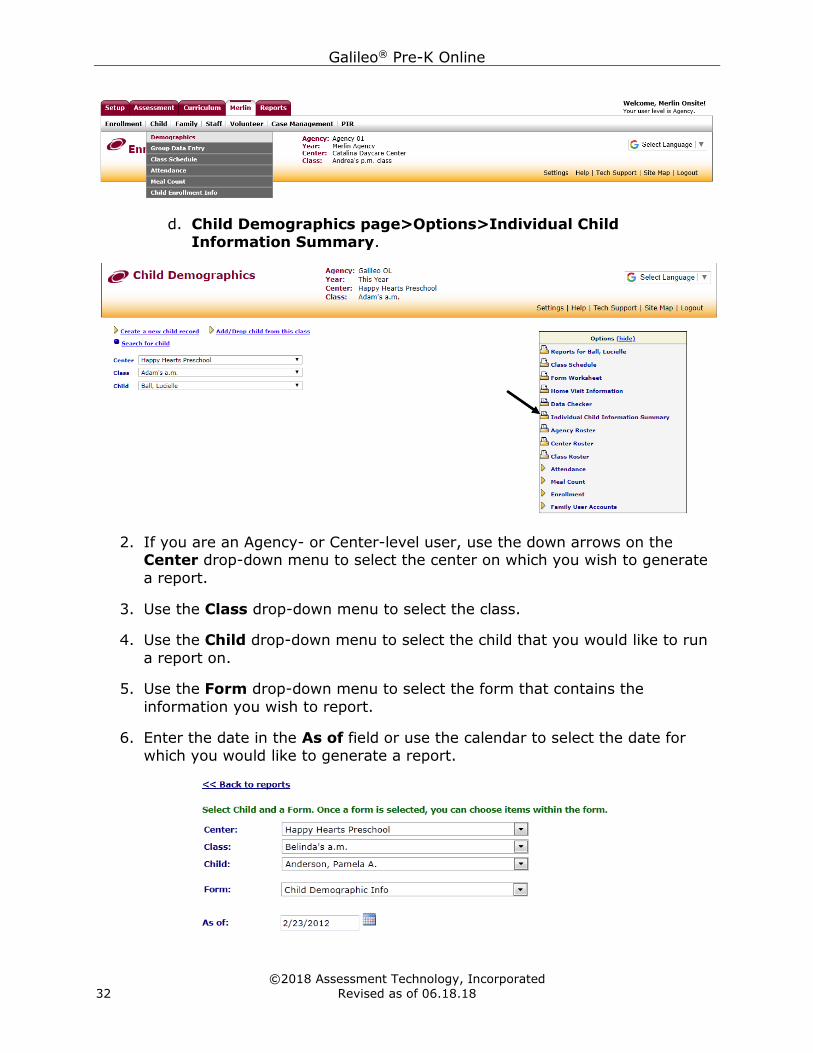
d. Child Demographics page>Options>Individual Child
Information Summary.
2. If you are an Agency- or Center-level user, use the down arrows on the Center drop-down menu to select the center on which you wish to generate
a report.
3. Use the Class drop-down menu to select the class.
4. Use the Child drop-down menu to select the child that you would like to run
a report on.
5. Use the Form drop-down menu to select the form that contains the
information you wish to report.
6. Enter the date in the As of field or use the calendar to select the date for
which you would like to generate a report.
Galileo® Pre-K Online
©2018 Assessment Technology, Incorporated
Revised as of 06.18.18 33
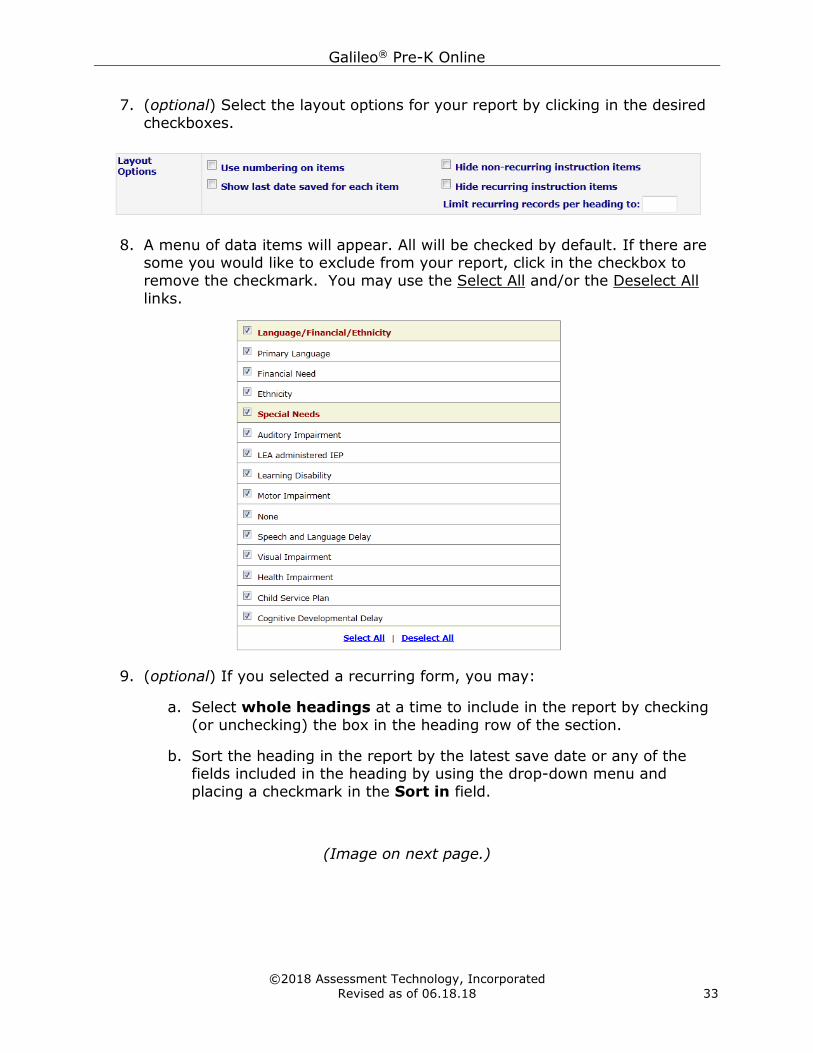
7. (optional) Select the layout options for your report by clicking in the desired
checkboxes.
8. A menu of data items will appear. All will be checked by default. If there are some you would like to exclude from your report, click in the checkbox to
remove the checkmark. You may use the Select All and/or the Deselect All
links.
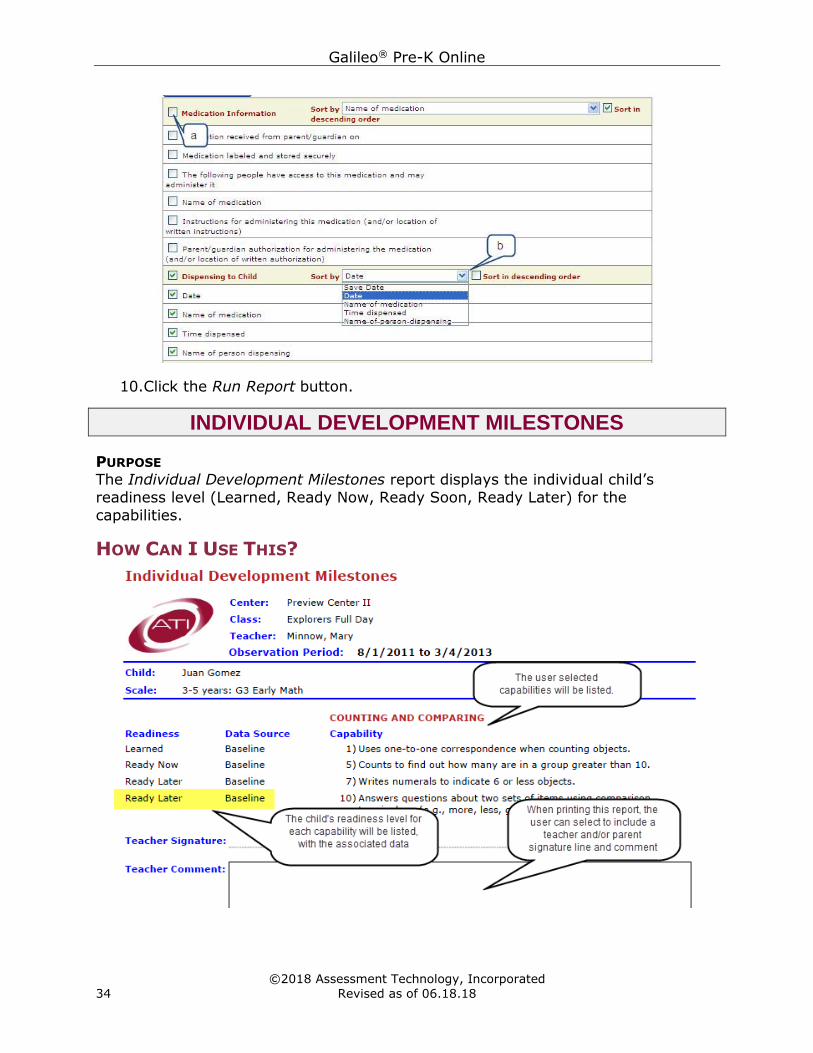
9. (optional) If you selected a recurring form, you may:
a. Select whole headings at a time to include in the report by checking
(or unchecking) the box in the heading row of the section.
b. Sort the heading in the report by the latest save date or any of the fields included in the heading by using the drop-down menu and
placing a checkmark in the Sort in field.
(Image on next page.)
Galileo® Pre-K Online
©2018 Assessment Technology, Incorporated
34 Revised as of 06.18.18
10.Click the Run Report button.
INDIVIDUAL DEVELOPMENT MILESTONES
PURPOSE The Individual Development Milestones report displays the individual child’s
readiness level (Learned, Ready Now, Ready Soon, Ready Later) for the
capabilities.
HOW CAN I USE THIS?
Galileo® Pre-K Online
©2018 Assessment Technology, Incorporated
Revised as of 06.18.18 35
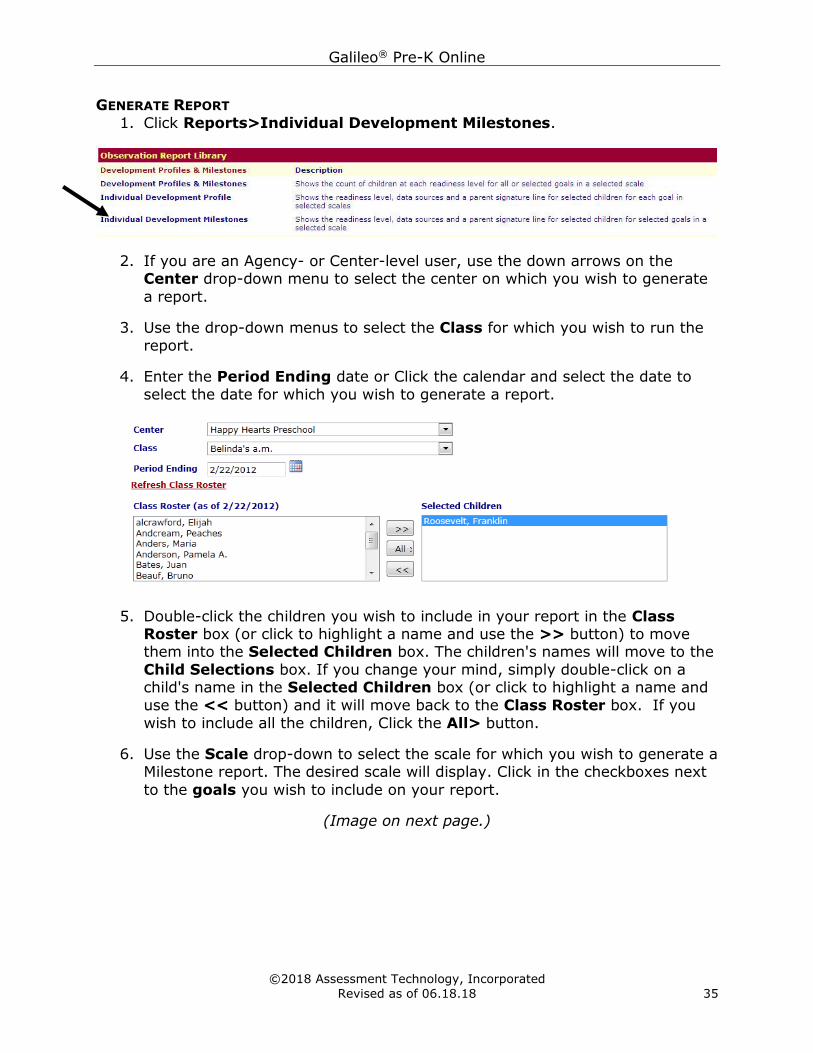
GENERATE REPORT
1. Click Reports>Individual Development Milestones.
2. If you are an Agency- or Center-level user, use the down arrows on the Center drop-down menu to select the center on which you wish to generate
a report.
3. Use the drop-down menus to select the Class for which you wish to run the
report.
4. Enter the Period Ending date or Click the calendar and select the date to
select the date for which you wish to generate a report.
5. Double-click the children you wish to include in your report in the Class Roster box (or click to highlight a name and use the >> button) to move them into the Selected Children box. The children's names will move to the
Child Selections box. If you change your mind, simply double-click on a child's name in the Selected Children box (or click to highlight a name and
use the << button) and it will move back to the Class Roster box. If you
wish to include all the children, Click the All> button.
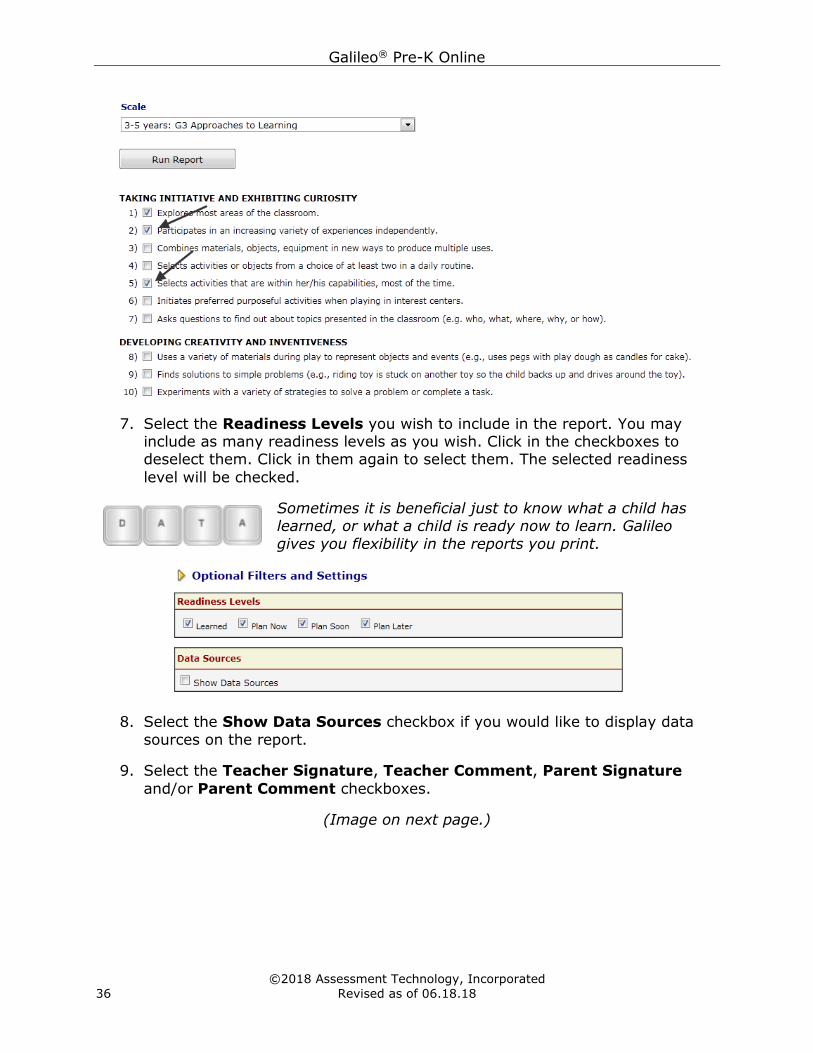
6. Use the Scale drop-down to select the scale for which you wish to generate a Milestone report. The desired scale will display. Click in the checkboxes next
to the goals you wish to include on your report.
(Image on next page.)
Galileo® Pre-K Online
©2018 Assessment Technology, Incorporated
36 Revised as of 06.18.18
7. Select the Readiness Levels you wish to include in the report. You may include as many readiness levels as you wish. Click in the checkboxes to deselect them. Click in them again to select them. The selected readiness
level will be checked.
Sometimes it is beneficial just to know what a child has learned, or what a child is ready now to learn. Galileo
gives you flexibility in the reports you print.
8. Select the Show Data Sources checkbox if you would like to display data
sources on the report.
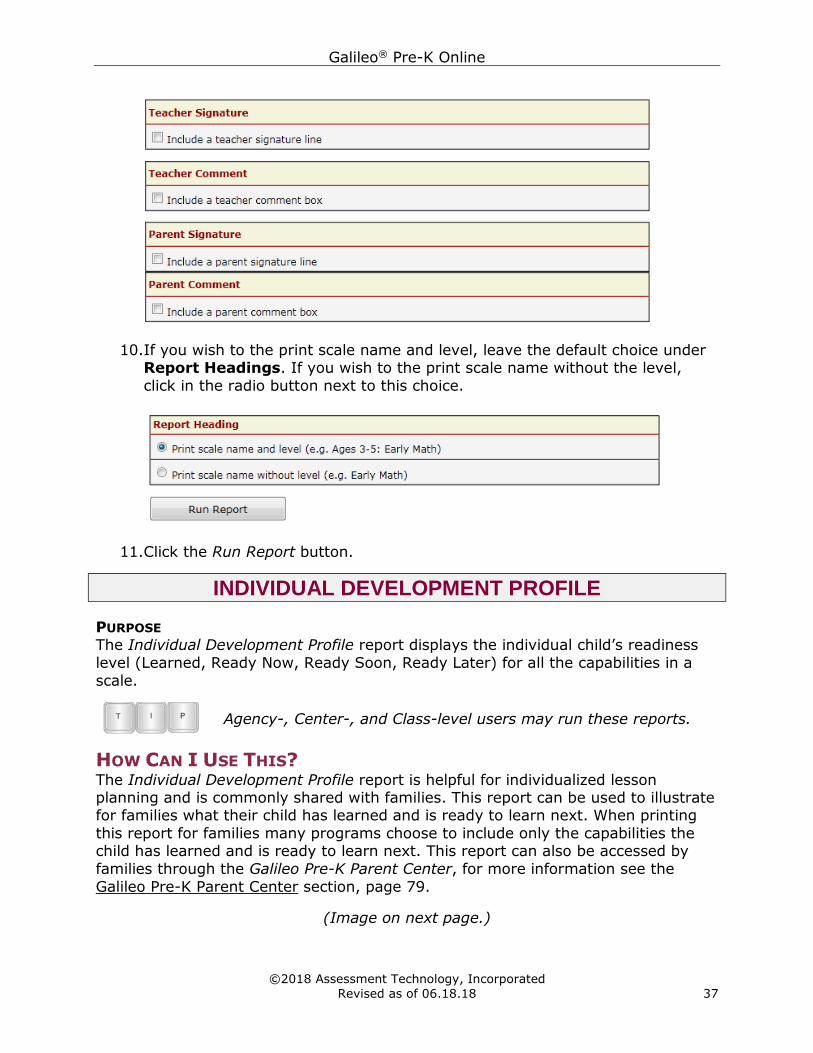
9. Select the Teacher Signature, Teacher Comment, Parent Signature
and/or Parent Comment checkboxes.
(Image on next page.)
Galileo® Pre-K Online
©2018 Assessment Technology, Incorporated
Revised as of 06.18.18 37
10.If you wish to the print scale name and level, leave the default choice under Report Headings. If you wish to the print scale name without the level,
click in the radio button next to this choice.
11.Click the Run Report button.
INDIVIDUAL DEVELOPMENT PROFILE
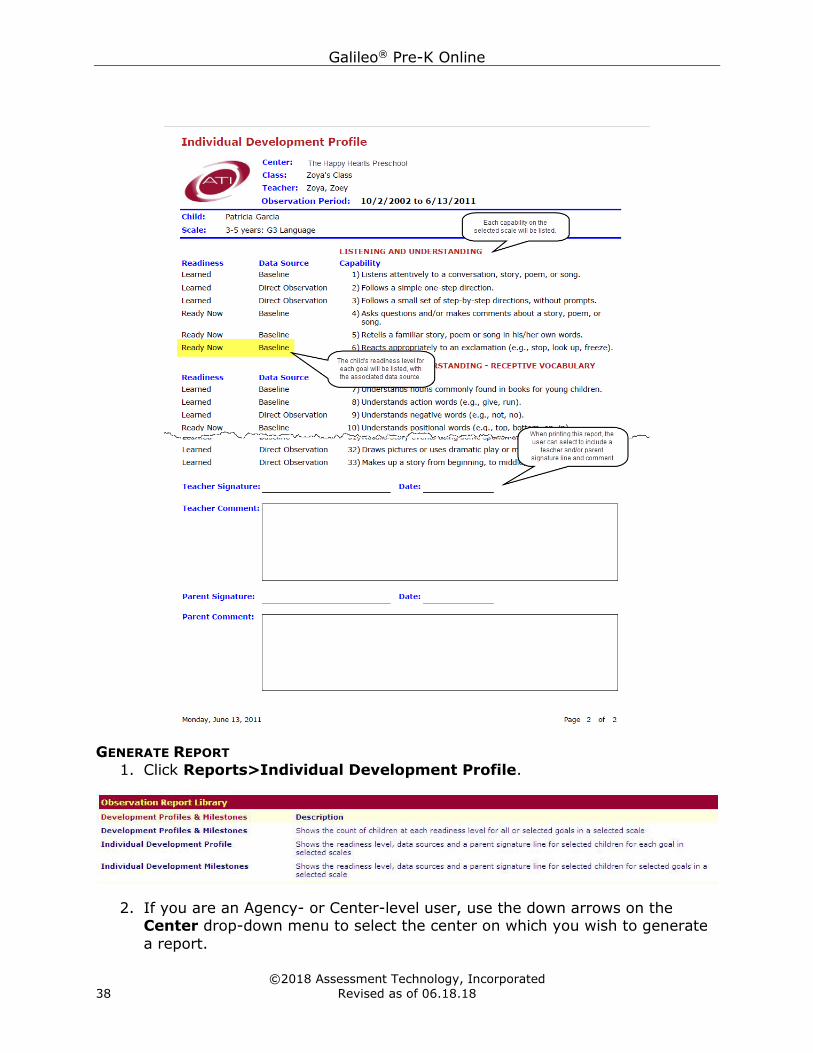
PURPOSE The Individual Development Profile report displays the individual child’s readiness
level (Learned, Ready Now, Ready Soon, Ready Later) for all the capabilities in a
scale.
Agency-, Center-, and Class-level users may run these reports.
HOW CAN I USE THIS? The Individual Development Profile report is helpful for individualized lesson planning and is commonly shared with families. This report can be used to illustrate for families what their child has learned and is ready to learn next. When printing
this report for families many programs choose to include only the capabilities the child has learned and is ready to learn next. This report can also be accessed by
families through the Galileo Pre-K Parent Center, for more information see the
Galileo Pre-K Parent Center section, page 79.
(Image on next page.)
Galileo® Pre-K Online
©2018 Assessment Technology, Incorporated
38 Revised as of 06.18.18
GENERATE REPORT
1. Click Reports>Individual Development Profile.
2. If you are an Agency- or Center-level user, use the down arrows on the Center drop-down menu to select the center on which you wish to generate
a report.
Galileo® Pre-K Online
©2018 Assessment Technology, Incorporated
Revised as of 06.18.18 39
3. Use the down arrows on the Class drop-down menu to select the class on
which you wish to generate a report.
4. Enter the Period Ending date or Click the calendar and select the date to
select the date for which you wish to generate a report.
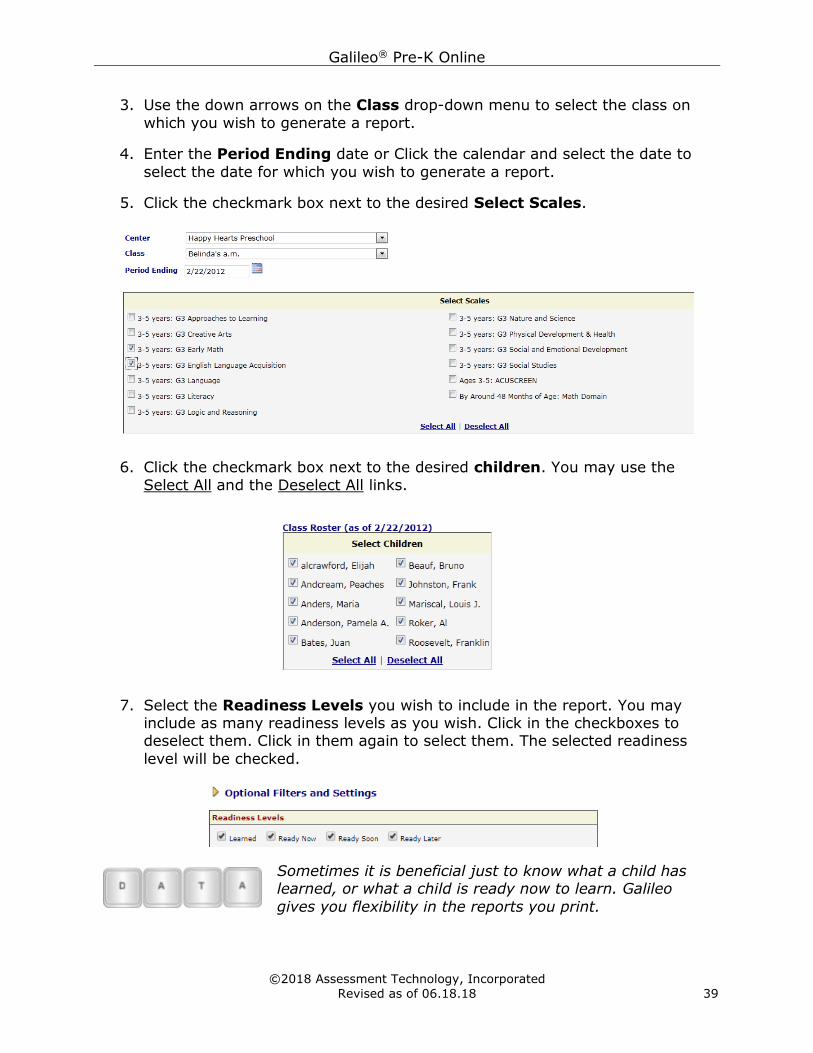
5. Click the checkmark box next to the desired Select Scales.
6. Click the checkmark box next to the desired children. You may use the
Select All and the Deselect All links.
7. Select the Readiness Levels you wish to include in the report. You may include as many readiness levels as you wish. Click in the checkboxes to deselect them. Click in them again to select them. The selected readiness
level will be checked.
Sometimes it is beneficial just to know what a child has learned, or what a child is ready now to learn. Galileo
gives you flexibility in the reports you print.
Galileo® Pre-K Online
©2018 Assessment Technology, Incorporated
40 Revised as of 06.18.18
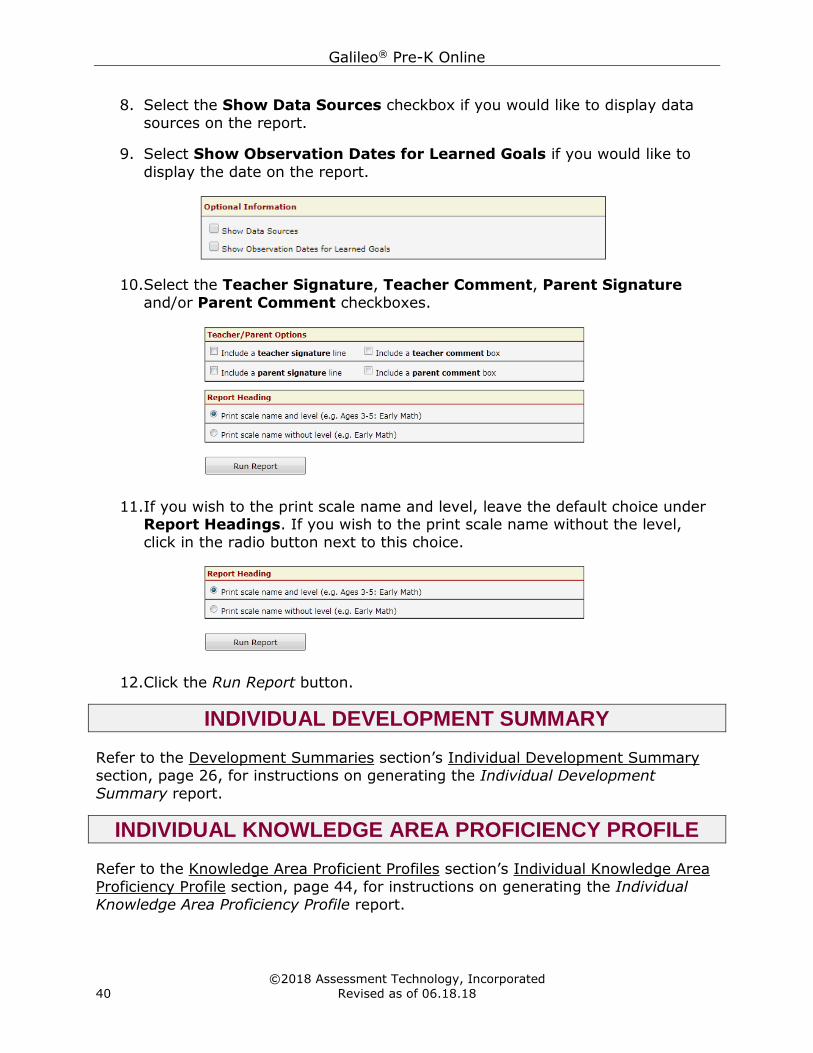
8. Select the Show Data Sources checkbox if you would like to display data
sources on the report.
9. Select Show Observation Dates for Learned Goals if you would like to
display the date on the report.
10.Select the Teacher Signature, Teacher Comment, Parent Signature
and/or Parent Comment checkboxes.
11.If you wish to the print scale name and level, leave the default choice under Report Headings. If you wish to the print scale name without the level,
click in the radio button next to this choice.
12.Click the Run Report button.
INDIVIDUAL DEVELOPMENT SUMMARY
Refer to the Development Summaries section’s Individual Development Summary
section, page 26, for instructions on generating the Individual Development
Summary report.
INDIVIDUAL KNOWLEDGE AREA PROFICIENCY PROFILE
Refer to the Knowledge Area Proficient Profiles section’s Individual Knowledge Area
Proficiency Profile section, page 44, for instructions on generating the Individual
Knowledge Area Proficiency Profile report.
Galileo® Pre-K Online
©2018 Assessment Technology, Incorporated
Revised as of 06.18.18 41
INDIVIDUAL OBSERVATION RECORDS
Refer to the Observation Records section’s Individual Observation Records section,
page 48, for instructions on generating the Individual Observation Records report.
INDIVIDUAL PROGRESS REPORT
Refer to the Progress Reports section’s Individual Progress Report section, page 70,
for instructions on generating the Individual Progress Report.
KNOWLEDGE AREA PROFICIENT PROFILES
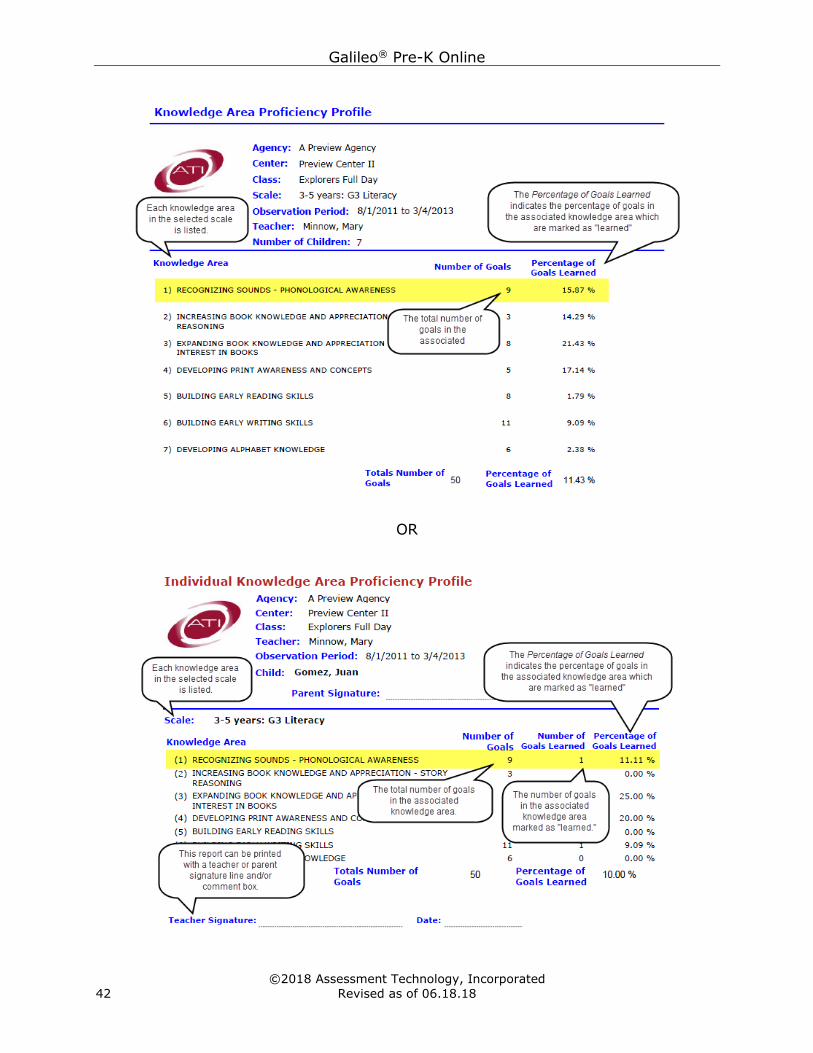
PURPOSE The Knowledge Area Proficiency Profile or KAPP is a report that lists each knowledge area of a scale, the number of goals per knowledge area, and the percent of goals
attained by the child or children.
The percentage is determined by the following formula:
(children) x (goals in knowledge area)= A
(Children in the “learned” column)/A=%
This report is beneficial as it can:
• Show children’s development overtime.
• Allows the user to view up to 12 scales at one time for a child, thus showing
the development of the whole child.
• Shows a summary at the child’s development.
Agency-, Center-, and Class-level users may run these reports.
The KAPP report can be generated as an aggregate report or for an individual child.
HOW CAN I USE THIS? This report can be printed at multiple times throughout the program year to show an overview of the developmental progression of an individual child or a class by
illustrating development in each knowledge area.
(Image on next page.)
Galileo® Pre-K Online
©2018 Assessment Technology, Incorporated
42 Revised as of 06.18.18
OR
Galileo® Pre-K Online
©2018 Assessment Technology, Incorporated
Revised as of 06.18.18 43
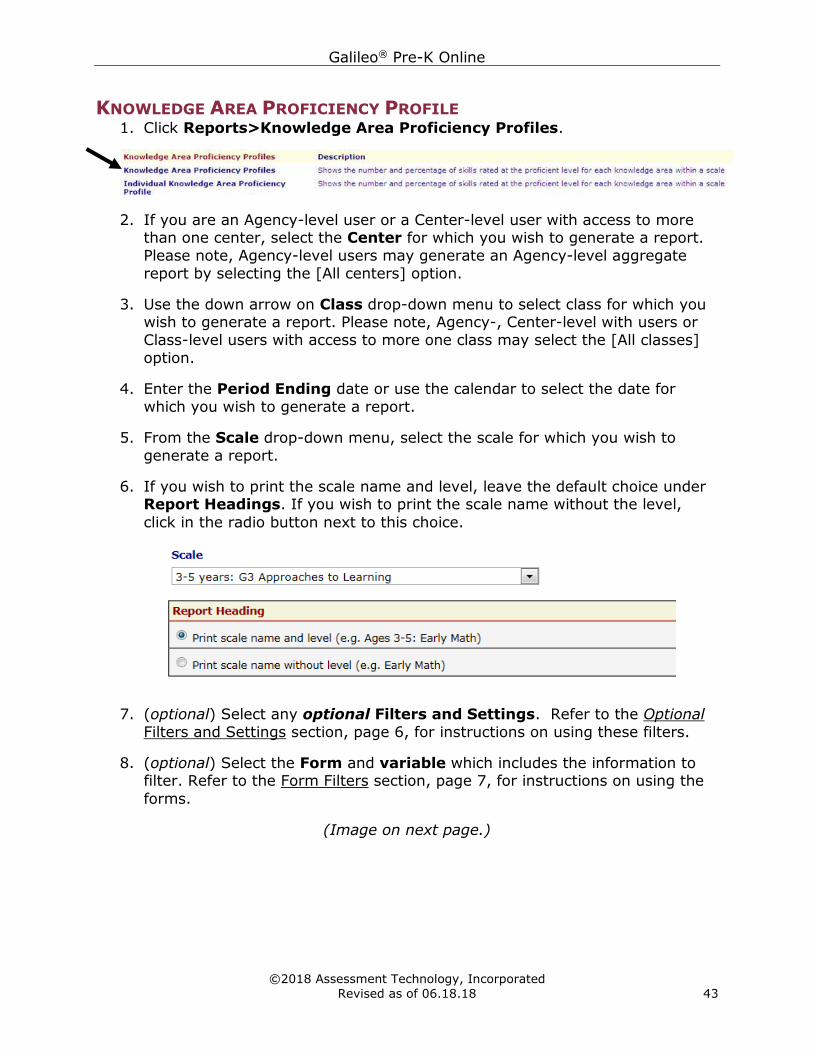
KNOWLEDGE AREA PROFICIENCY PROFILE 1. Click Reports>Knowledge Area Proficiency Profiles.
2. If you are an Agency-level user or a Center-level user with access to more than one center, select the Center for which you wish to generate a report.
Please note, Agency-level users may generate an Agency-level aggregate
report by selecting the [All centers] option.
3. Use the down arrow on Class drop-down menu to select class for which you wish to generate a report. Please note, Agency-, Center-level with users or
Class-level users with access to more one class may select the [All classes]
option.
4. Enter the Period Ending date or use the calendar to select the date for
which you wish to generate a report.
5. From the Scale drop-down menu, select the scale for which you wish to
generate a report.
6. If you wish to print the scale name and level, leave the default choice under Report Headings. If you wish to print the scale name without the level,
click in the radio button next to this choice.
7. (optional) Select any optional Filters and Settings. Refer to the Optional
Filters and Settings section, page 6, for instructions on using these filters.
8. (optional) Select the Form and variable which includes the information to filter. Refer to the Form Filters section, page 7, for instructions on using the
forms.
(Image on next page.)
Galileo® Pre-K Online
©2018 Assessment Technology, Incorporated
44 Revised as of 06.18.18
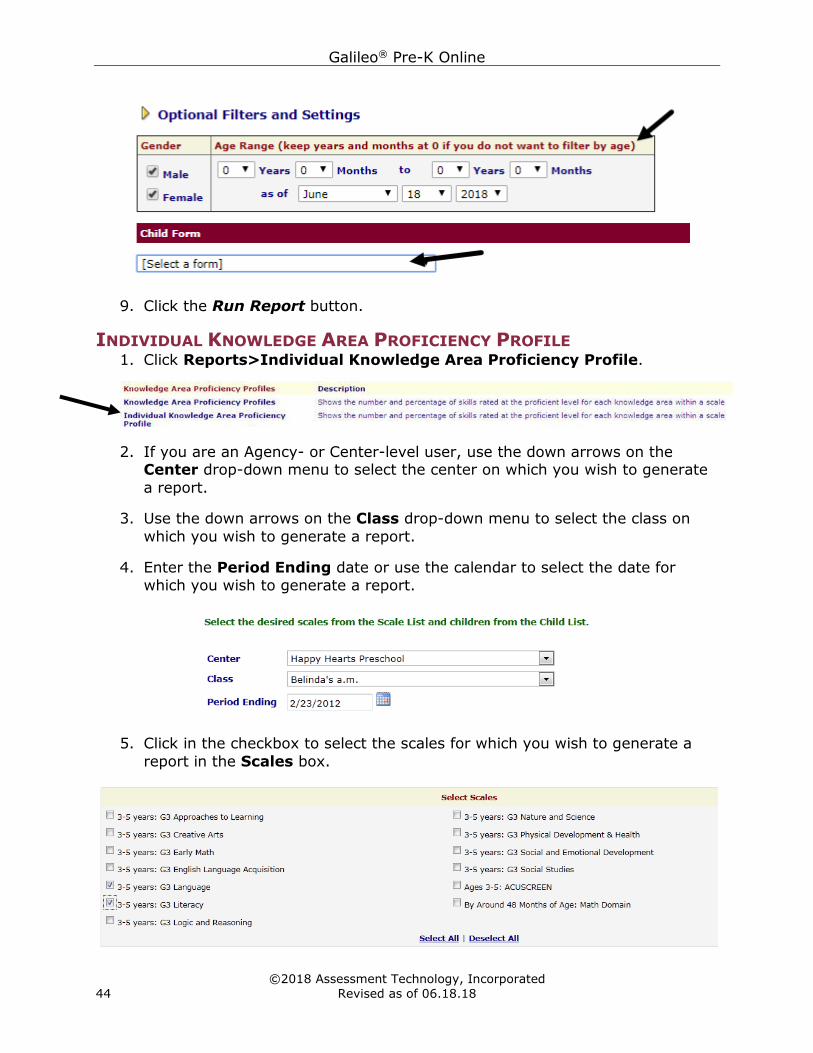
9. Click the Run Report button.
INDIVIDUAL KNOWLEDGE AREA PROFICIENCY PROFILE 1. Click Reports>Individual Knowledge Area Proficiency Profile.
2. If you are an Agency- or Center-level user, use the down arrows on the Center drop-down menu to select the center on which you wish to generate
a report.
3. Use the down arrows on the Class drop-down menu to select the class on
which you wish to generate a report.
4. Enter the Period Ending date or use the calendar to select the date for
which you wish to generate a report.
5. Click in the checkbox to select the scales for which you wish to generate a
report in the Scales box.
Galileo® Pre-K Online
©2018 Assessment Technology, Incorporated
Revised as of 06.18.18 45
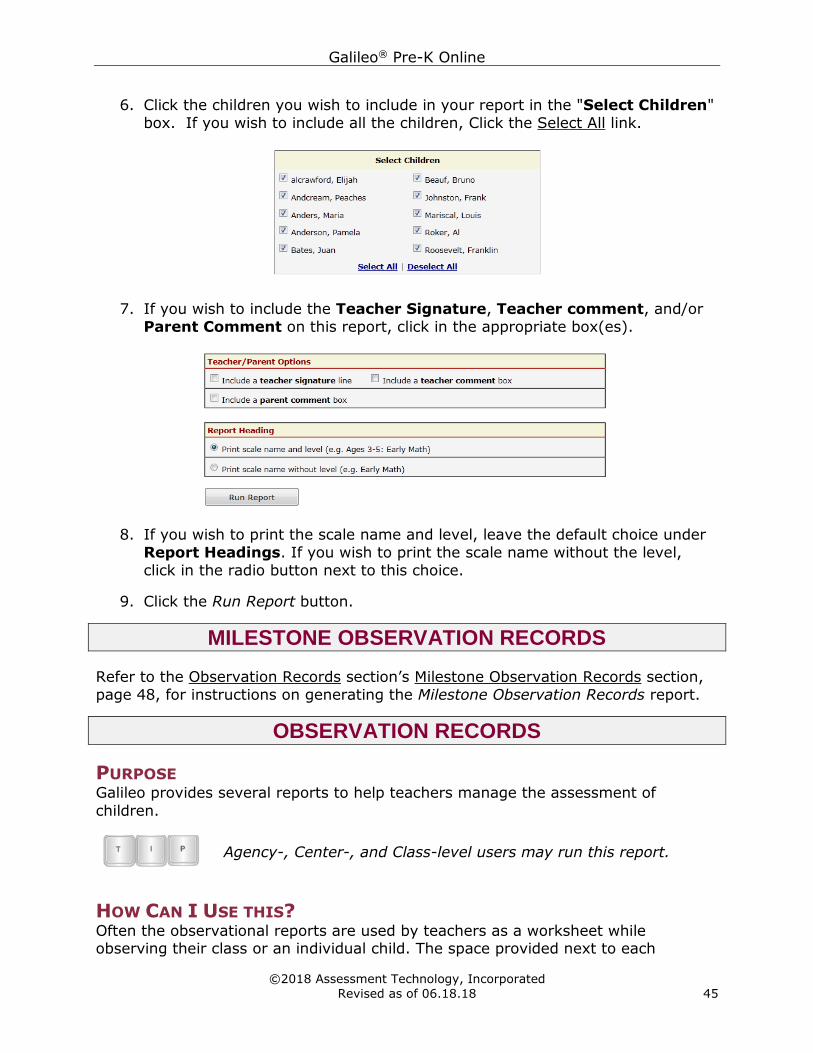
6. Click the children you wish to include in your report in the "Select Children"
box. If you wish to include all the children, Click the Select All link.
7. If you wish to include the Teacher Signature, Teacher comment, and/or
Parent Comment on this report, click in the appropriate box(es).
8. If you wish to print the scale name and level, leave the default choice under
Report Headings. If you wish to print the scale name without the level,
click in the radio button next to this choice.
9. Click the Run Report button.
MILESTONE OBSERVATION RECORDS
Refer to the Observation Records section’s Milestone Observation Records section,
page 48, for instructions on generating the Milestone Observation Records report.
OBSERVATION RECORDS
PURPOSE Galileo provides several reports to help teachers manage the assessment of
children.
HOW CAN I USE THIS? Often the observational reports are used by teachers as a worksheet while observing their class or an individual child. The space provided next to each
Agency-, Center-, and Class-level users may run this report.
Galileo® Pre-K Online
©2018 Assessment Technology, Incorporated
46 Revised as of 06.18.18
capability can be used to make notes, while the checkboxes are provided to indicate capabilities which you observe the child demonstrating. This report can also be
given to families, or printed through the Galileo Pre-K Parent Center (see page 79)
for families to observe their child at home.
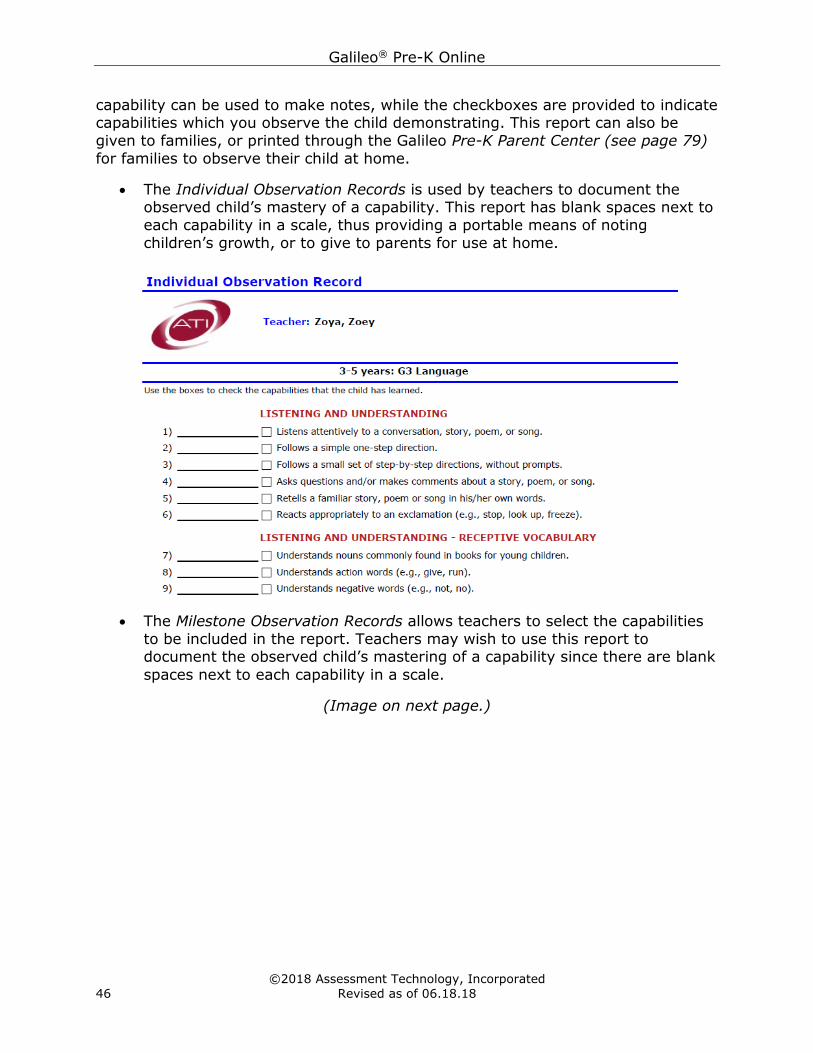
• The Individual Observation Records is used by teachers to document the observed child’s mastery of a capability. This report has blank spaces next to
each capability in a scale, thus providing a portable means of noting
children’s growth, or to give to parents for use at home.
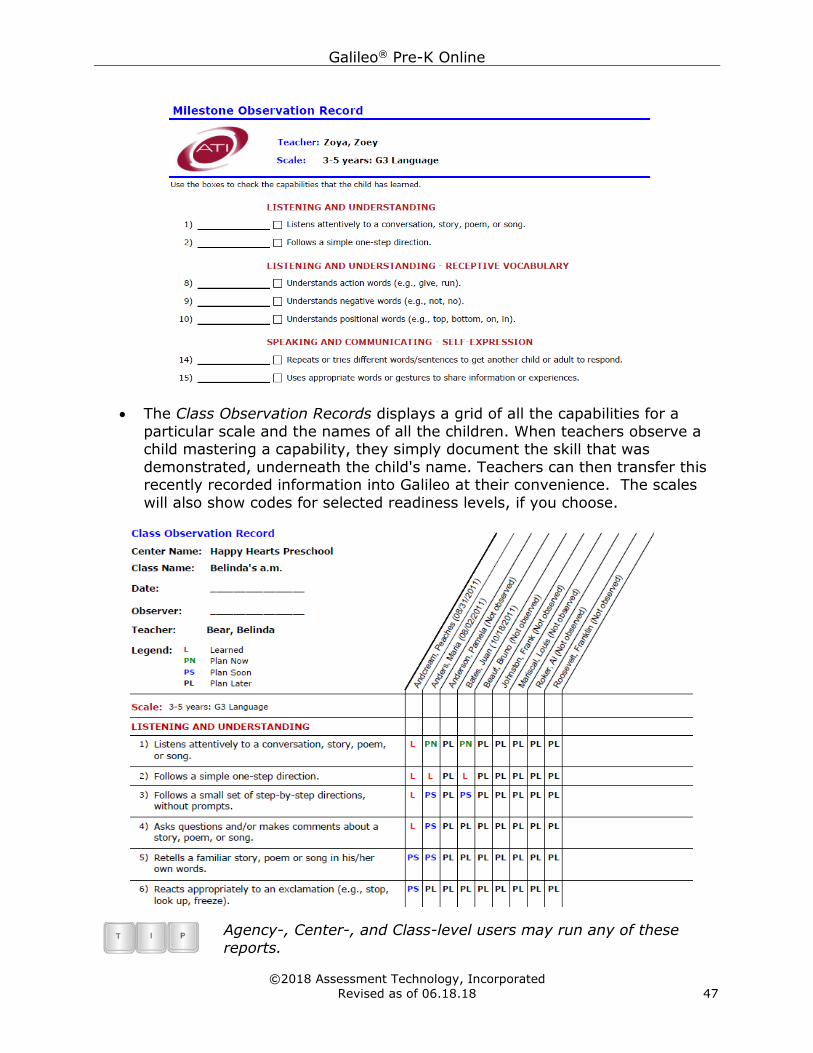
• The Milestone Observation Records allows teachers to select the capabilities
to be included in the report. Teachers may wish to use this report to document the observed child’s mastering of a capability since there are blank
spaces next to each capability in a scale.
(Image on next page.)
Galileo® Pre-K Online
©2018 Assessment Technology, Incorporated
Revised as of 06.18.18 47
• The Class Observation Records displays a grid of all the capabilities for a
particular scale and the names of all the children. When teachers observe a child mastering a capability, they simply document the skill that was
demonstrated, underneath the child's name. Teachers can then transfer this recently recorded information into Galileo at their convenience. The scales
will also show codes for selected readiness levels, if you choose.
Agency-, Center-, and Class-level users may run any of these
reports.
Galileo® Pre-K Online
©2018 Assessment Technology, Incorporated
48 Revised as of 06.18.18
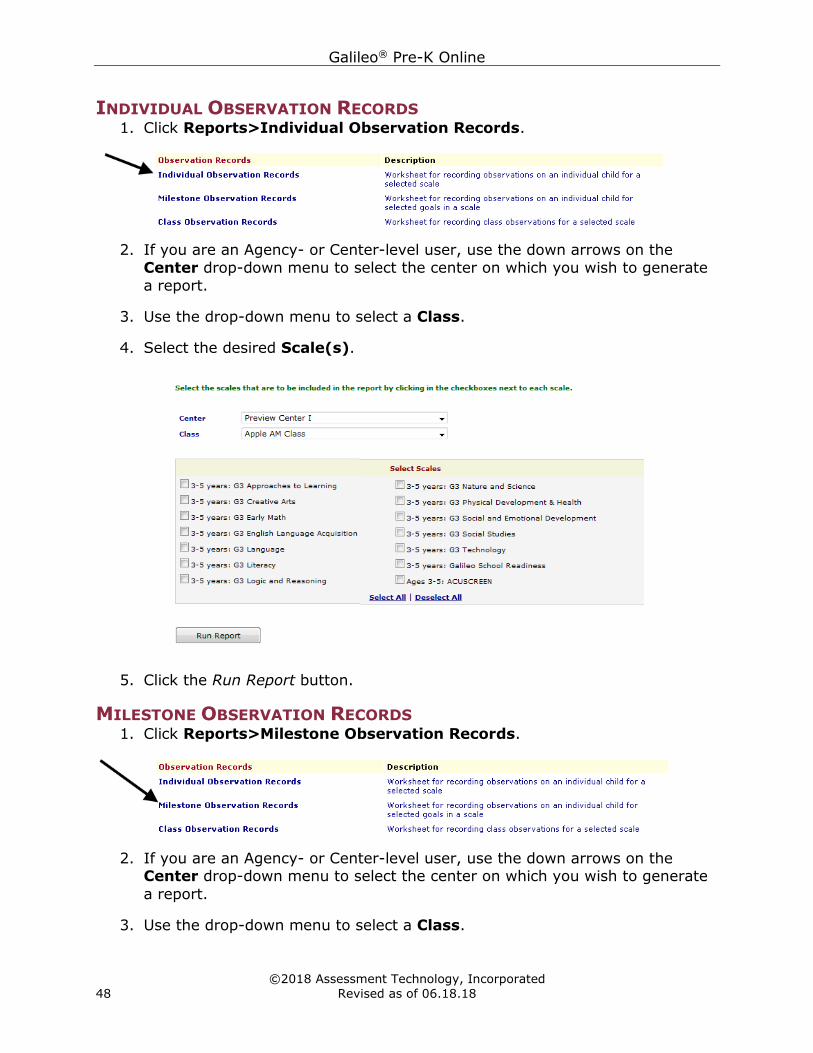
INDIVIDUAL OBSERVATION RECORDS 1. Click Reports>Individual Observation Records.
2. If you are an Agency- or Center-level user, use the down arrows on the
Center drop-down menu to select the center on which you wish to generate
a report.
3. Use the drop-down menu to select a Class.
4. Select the desired Scale(s).
5. Click the Run Report button.
MILESTONE OBSERVATION RECORDS 1. Click Reports>Milestone Observation Records.
2. If you are an Agency- or Center-level user, use the down arrows on the Center drop-down menu to select the center on which you wish to generate
a report.
3. Use the drop-down menu to select a Class.
Galileo® Pre-K Online
©2018 Assessment Technology, Incorporated
Revised as of 06.18.18 49
4. Use the Scales drop-down box to select the scale for which you would like to
select milestones.
5. Click in the checkbox by the goals you wish to select.
6. Click the Run Report button.
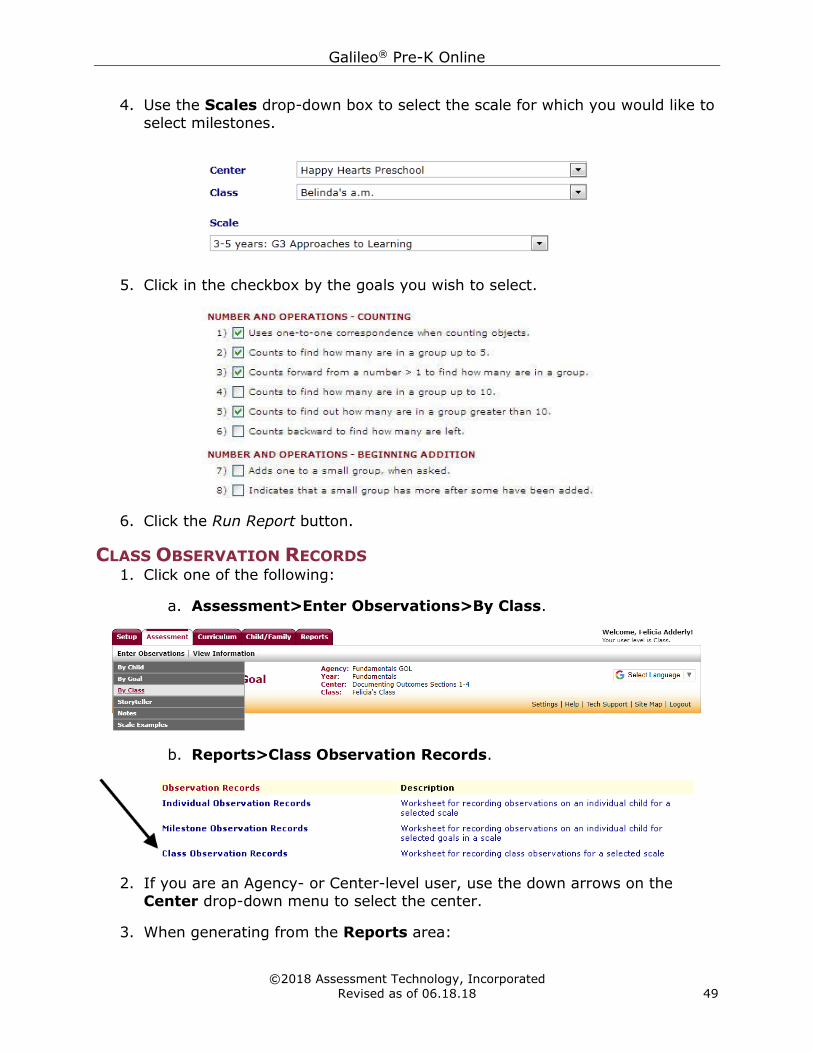
CLASS OBSERVATION RECORDS 1. Click one of the following:
a. Assessment>Enter Observations>By Class.
b. Reports>Class Observation Records.
2. If you are an Agency- or Center-level user, use the down arrows on the
Center drop-down menu to select the center.
3. When generating from the Reports area:
Galileo® Pre-K Online
©2018 Assessment Technology, Incorporated
50 Revised as of 06.18.18
a. Use the down arrow on the Scale drop-down menu to select the scale
for which you wish to generate a report.
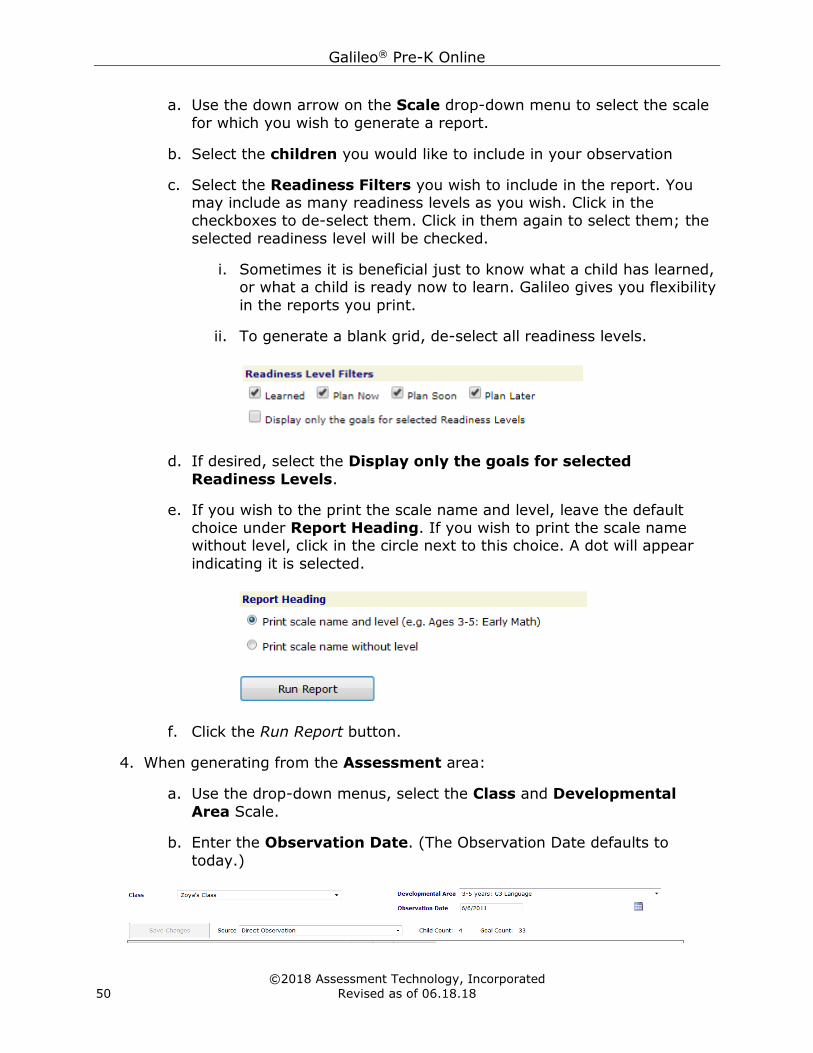
b. Select the children you would like to include in your observation
c. Select the Readiness Filters you wish to include in the report. You may include as many readiness levels as you wish. Click in the
checkboxes to de-select them. Click in them again to select them; the
selected readiness level will be checked.
i. Sometimes it is beneficial just to know what a child has learned, or what a child is ready now to learn. Galileo gives you flexibility
in the reports you print.
ii. To generate a blank grid, de-select all readiness levels.
d. If desired, select the Display only the goals for selected
Readiness Levels.
e. If you wish to the print the scale name and level, leave the default
choice under Report Heading. If you wish to print the scale name without level, click in the circle next to this choice. A dot will appear
indicating it is selected.
f. Click the Run Report button.
4. When generating from the Assessment area:
a. Use the drop-down menus, select the Class and Developmental
Area Scale.
b. Enter the Observation Date. (The Observation Date defaults to
today.)
Galileo® Pre-K Online
©2018 Assessment Technology, Incorporated
Revised as of 06.18.18 51
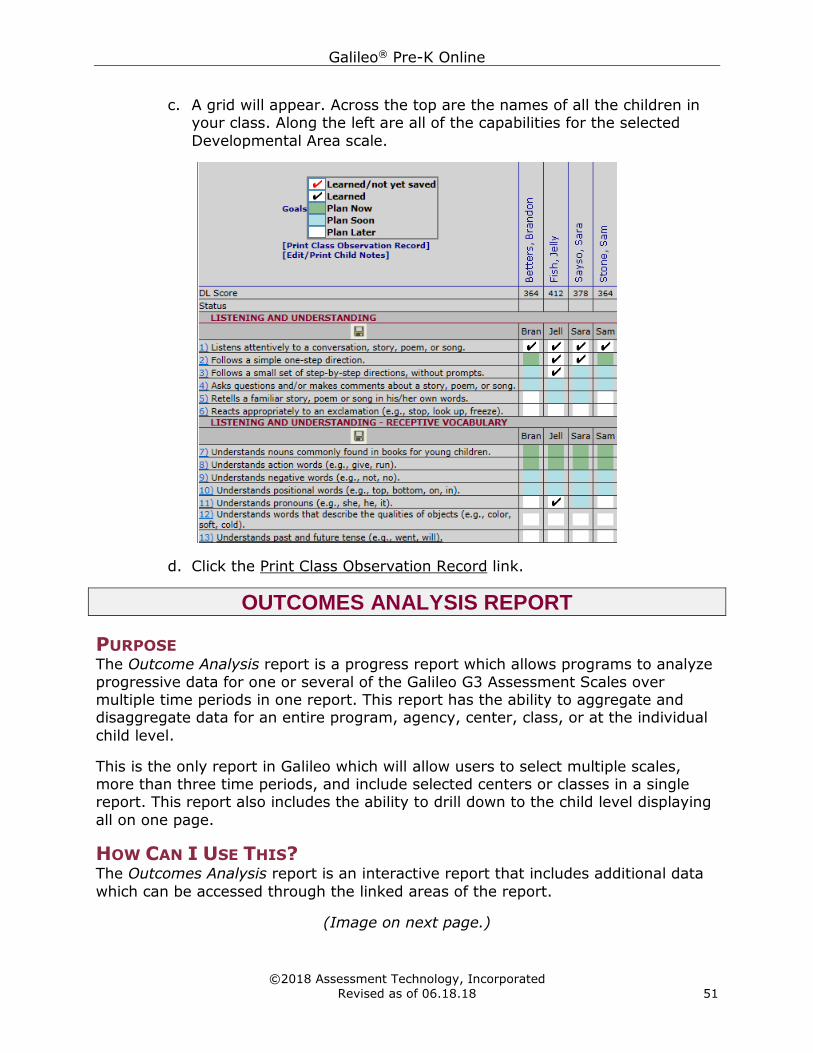
c. A grid will appear. Across the top are the names of all the children in your class. Along the left are all of the capabilities for the selected
Developmental Area scale.
d. Click the Print Class Observation Record link.
OUTCOMES ANALYSIS REPORT
PURPOSE The Outcome Analysis report is a progress report which allows programs to analyze
progressive data for one or several of the Galileo G3 Assessment Scales over multiple time periods in one report. This report has the ability to aggregate and disaggregate data for an entire program, agency, center, class, or at the individual
child level.
This is the only report in Galileo which will allow users to select multiple scales, more than three time periods, and include selected centers or classes in a single report. This report also includes the ability to drill down to the child level displaying
all on one page.
HOW CAN I USE THIS? The Outcomes Analysis report is an interactive report that includes additional data
which can be accessed through the linked areas of the report.
(Image on next page.)
Galileo® Pre-K Online
©2018 Assessment Technology, Incorporated
52 Revised as of 06.18.18
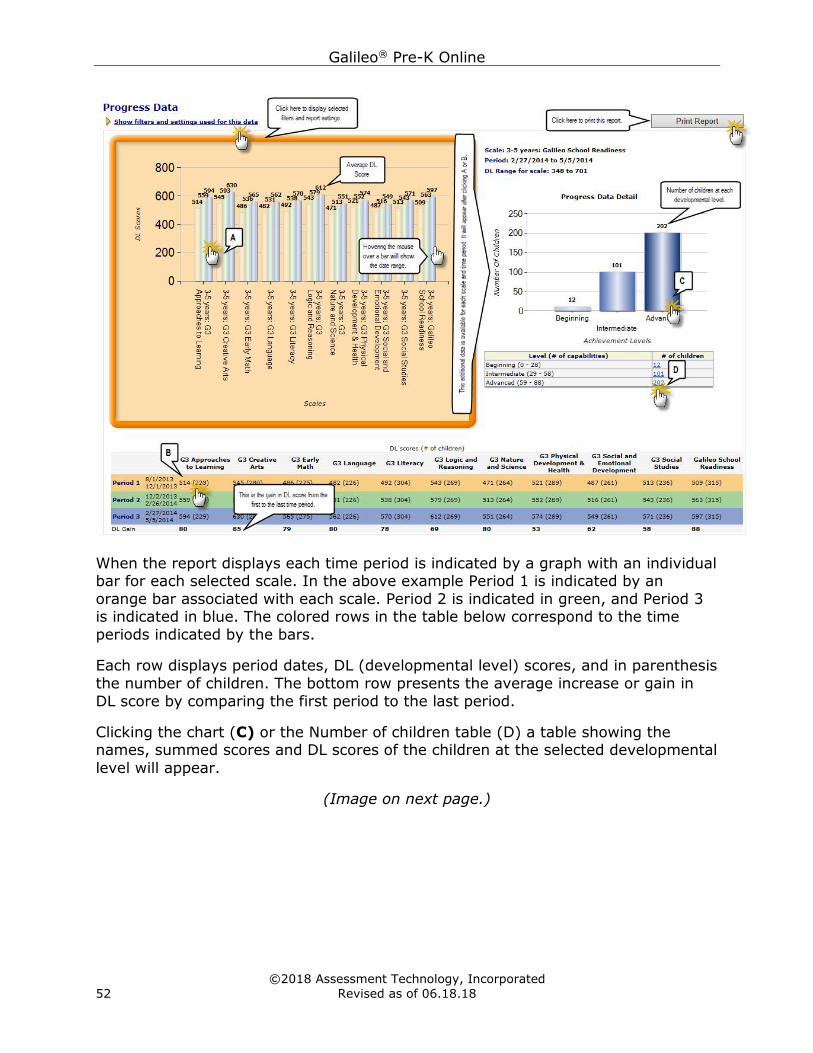
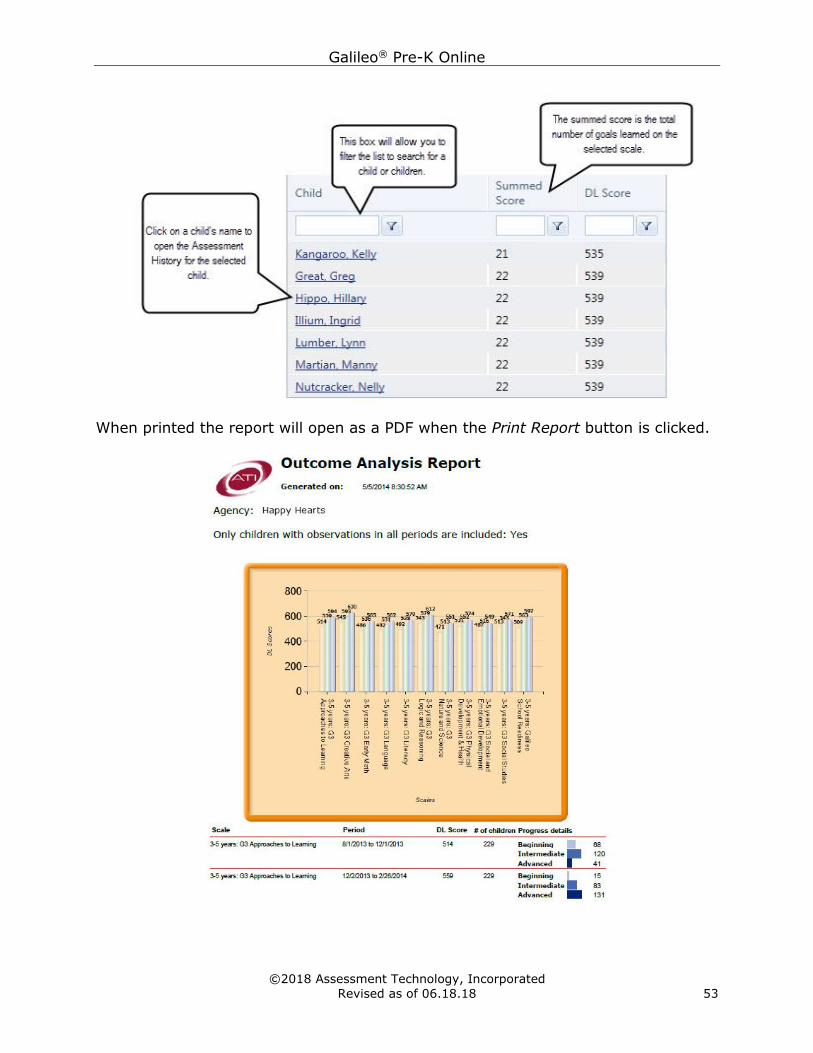
When the report displays each time period is indicated by a graph with an individual bar for each selected scale. In the above example Period 1 is indicated by an
orange bar associated with each scale. Period 2 is indicated in green, and Period 3 is indicated in blue. The colored rows in the table below correspond to the time
periods indicated by the bars.
Each row displays period dates, DL (developmental level) scores, and in parenthesis
the number of children. The bottom row presents the average increase or gain in
DL score by comparing the first period to the last period.
Clicking the chart (C) or the Number of children table (D) a table showing the names, summed scores and DL scores of the children at the selected developmental
level will appear.
(Image on next page.)
Galileo® Pre-K Online
©2018 Assessment Technology, Incorporated
Revised as of 06.18.18 53
When printed the report will open as a PDF when the Print Report button is clicked.
Galileo® Pre-K Online
©2018 Assessment Technology, Incorporated
54 Revised as of 06.18.18
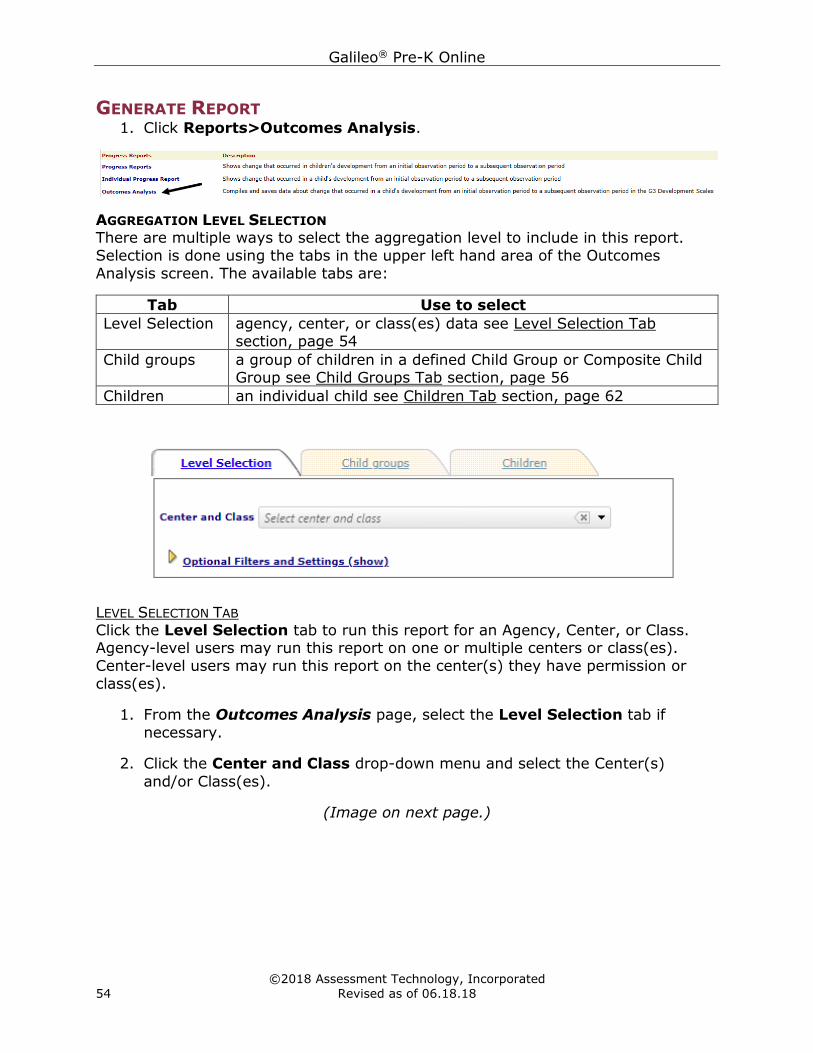
GENERATE REPORT 1. Click Reports>Outcomes Analysis.
AGGREGATION LEVEL SELECTION There are multiple ways to select the aggregation level to include in this report.
Selection is done using the tabs in the upper left hand area of the Outcomes
Analysis screen. The available tabs are:
Tab Use to select
Level Selection agency, center, or class(es) data see Level Selection Tab section, page 54
Child groups a group of children in a defined Child Group or Composite Child Group see Child Groups Tab section, page 56
Children an individual child see Children Tab section, page 62
LEVEL SELECTION TAB Click the Level Selection tab to run this report for an Agency, Center, or Class. Agency-level users may run this report on one or multiple centers or class(es).
Center-level users may run this report on the center(s) they have permission or
class(es).
1. From the Outcomes Analysis page, select the Level Selection tab if
necessary.
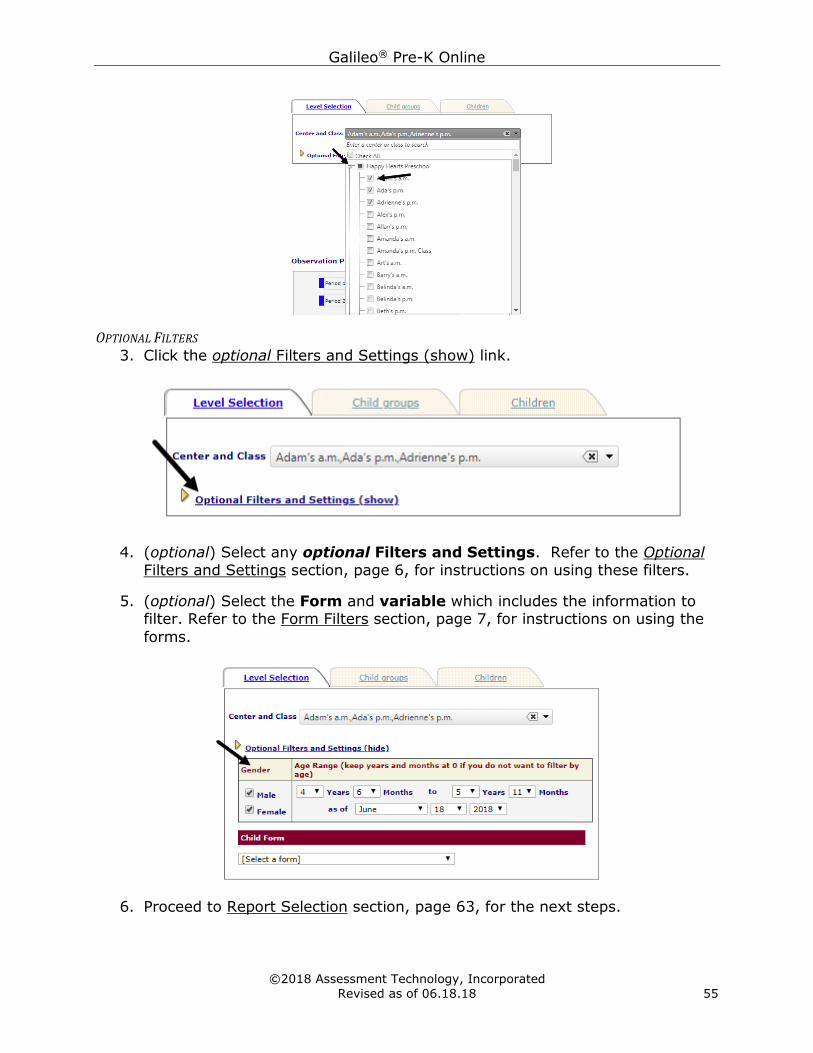
2. Click the Center and Class drop-down menu and select the Center(s)
and/or Class(es).
(Image on next page.)
Galileo® Pre-K Online
©2018 Assessment Technology, Incorporated
Revised as of 06.18.18 55
OPTIONAL FILTERS 3. Click the optional Filters and Settings (show) link.
4. (optional) Select any optional Filters and Settings. Refer to the Optional
Filters and Settings section, page 6, for instructions on using these filters.
5. (optional) Select the Form and variable which includes the information to filter. Refer to the Form Filters section, page 7, for instructions on using the
forms.
6. Proceed to Report Selection section, page 63, for the next steps.
Galileo® Pre-K Online
©2018 Assessment Technology, Incorporated
56 Revised as of 06.18.18
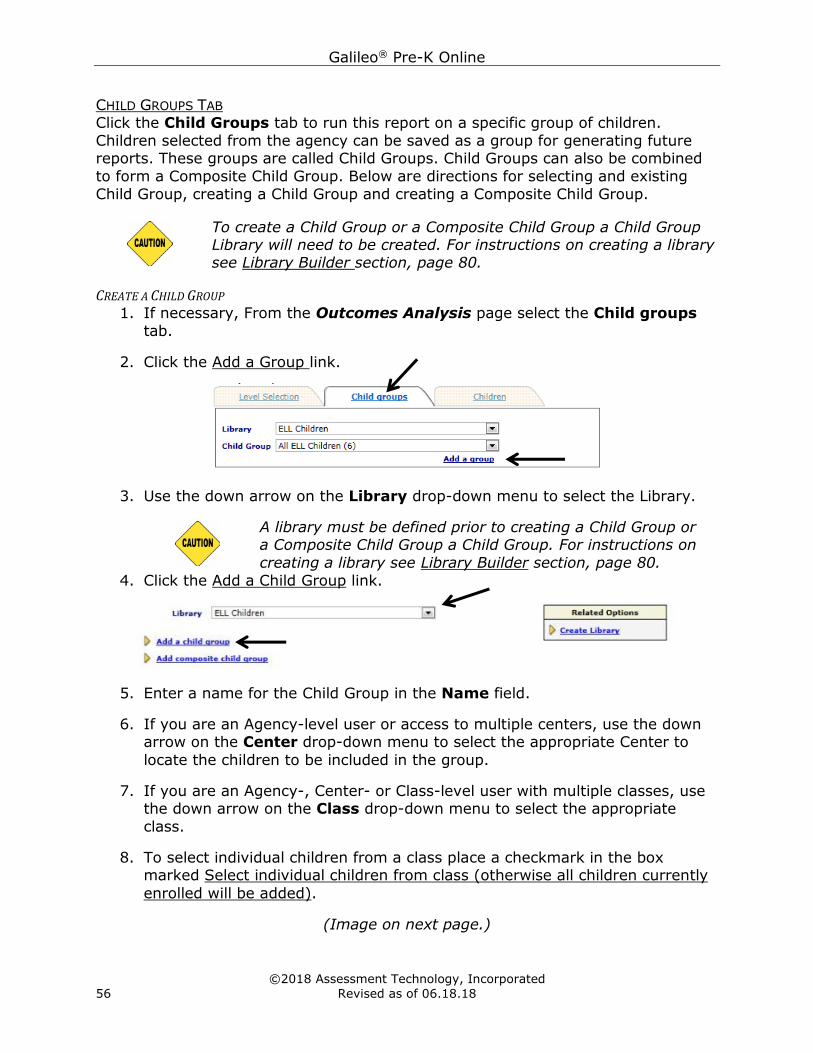
CHILD GROUPS TAB Click the Child Groups tab to run this report on a specific group of children.
Children selected from the agency can be saved as a group for generating future reports. These groups are called Child Groups. Child Groups can also be combined
to form a Composite Child Group. Below are directions for selecting and existing
Child Group, creating a Child Group and creating a Composite Child Group.
To create a Child Group or a Composite Child Group a Child Group Library will need to be created. For instructions on creating a library see Library Builder section, page 80.
CREATE A CHILD GROUP 1. If necessary, From the Outcomes Analysis page select the Child groups
tab.
2. Click the Add a Group link.
3. Use the down arrow on the Library drop-down menu to select the Library.
A library must be defined prior to creating a Child Group or a Composite Child Group a Child Group. For instructions on
creating a library see Library Builder section, page 80.
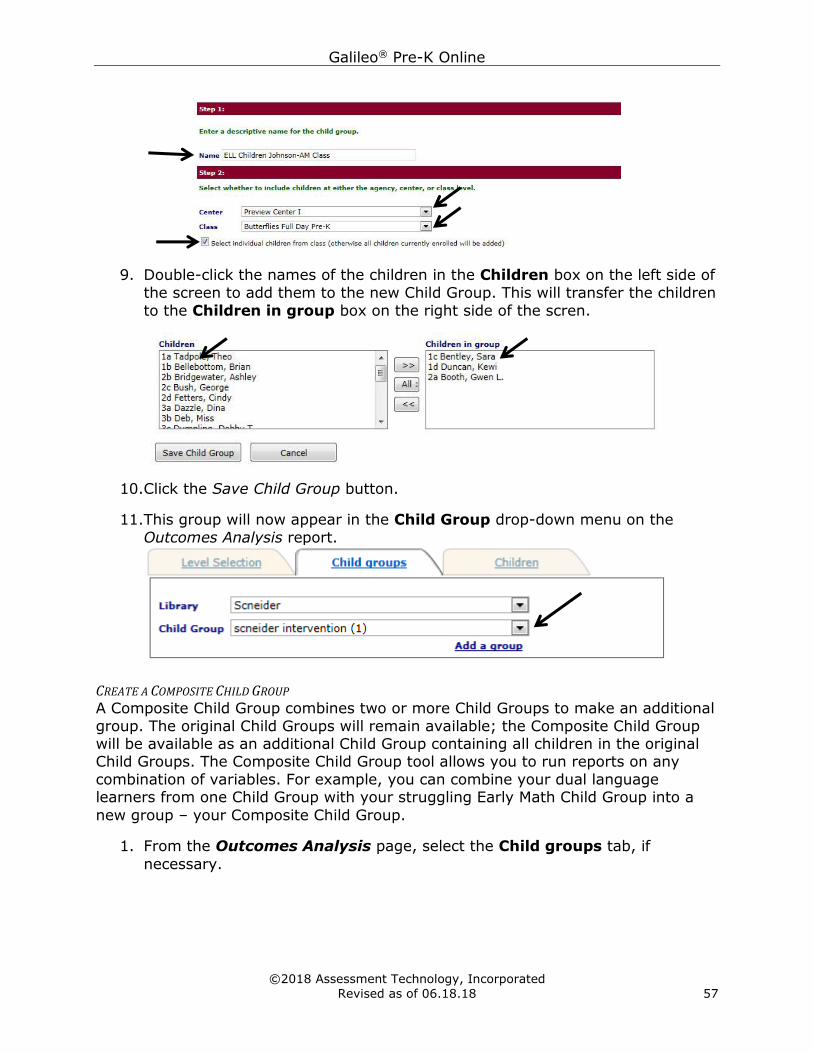
4. Click the Add a Child Group link.
5. Enter a name for the Child Group in the Name field.
6. If you are an Agency-level user or access to multiple centers, use the down arrow on the Center drop-down menu to select the appropriate Center to
locate the children to be included in the group.
7. If you are an Agency-, Center- or Class-level user with multiple classes, use the down arrow on the Class drop-down menu to select the appropriate
class.
8. To select individual children from a class place a checkmark in the box marked Select individual children from class (otherwise all children currently
enrolled will be added).
(Image on next page.)
Galileo® Pre-K Online
©2018 Assessment Technology, Incorporated
Revised as of 06.18.18 57
9. Double-click the names of the children in the Children box on the left side of
the screen to add them to the new Child Group. This will transfer the children
to the Children in group box on the right side of the scren.
10.Click the Save Child Group button.
11.This group will now appear in the Child Group drop-down menu on the
Outcomes Analysis report.
CREATE A COMPOSITE CHILD GROUP A Composite Child Group combines two or more Child Groups to make an additional
group. The original Child Groups will remain available; the Composite Child Group will be available as an additional Child Group containing all children in the original Child Groups. The Composite Child Group tool allows you to run reports on any
combination of variables. For example, you can combine your dual language learners from one Child Group with your struggling Early Math Child Group into a
new group – your Composite Child Group.
1. From the Outcomes Analysis page, select the Child groups tab, if
necessary.
Galileo® Pre-K Online
©2018 Assessment Technology, Incorporated
58 Revised as of 06.18.18
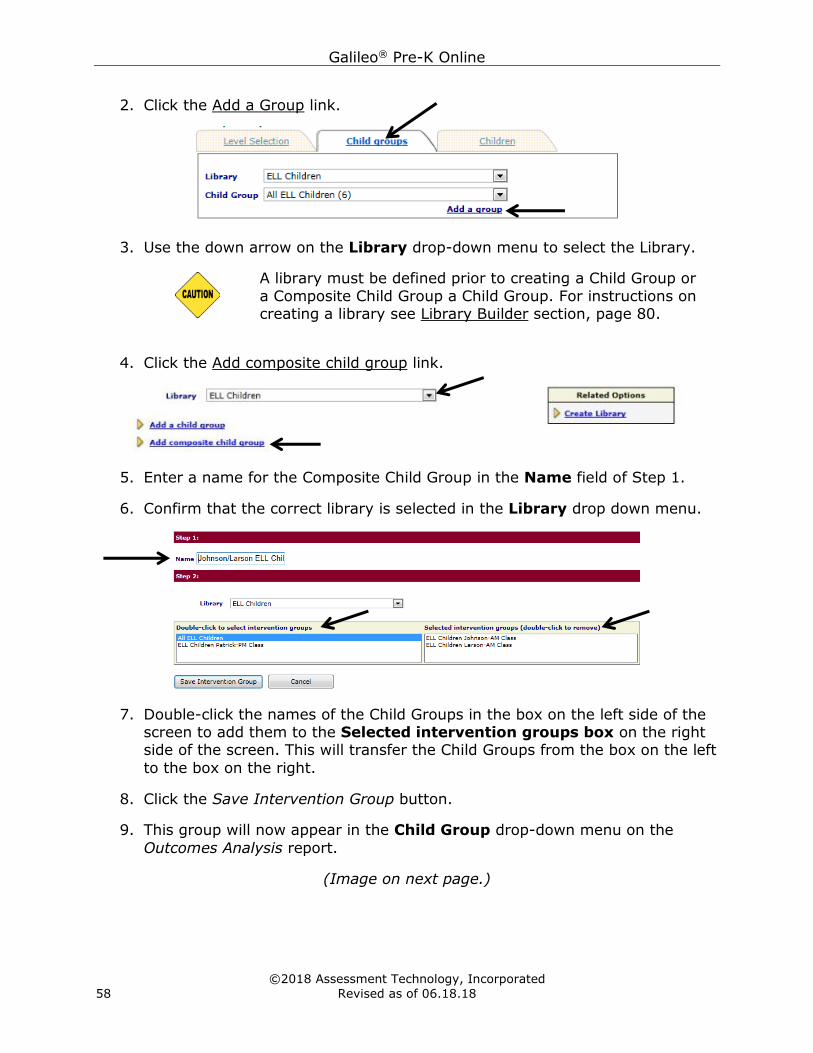
2. Click the Add a Group link.
3. Use the down arrow on the Library drop-down menu to select the Library.
A library must be defined prior to creating a Child Group or
a Composite Child Group a Child Group. For instructions on creating a library see Library Builder section, page 80.
4. Click the Add composite child group link.
5. Enter a name for the Composite Child Group in the Name field of Step 1.
6. Confirm that the correct library is selected in the Library drop down menu.
7. Double-click the names of the Child Groups in the box on the left side of the screen to add them to the Selected intervention groups box on the right side of the screen. This will transfer the Child Groups from the box on the left
to the box on the right.
8. Click the Save Intervention Group button.
9. This group will now appear in the Child Group drop-down menu on the
Outcomes Analysis report.
(Image on next page.)

Galileo® Pre-K Online
©2018 Assessment Technology, Incorporated
Revised as of 06.18.18 59
SELECT A PREEXISTING CHILD GROUP 1. From the Outcomes Analysis page, select the Child groups tab, if
necessary.
2. Click the down arrow on the Library drop down menu to select the library
containing the Child Group to include in the report.
3. Click the down arrow on the Child Group drop down menu to select the
Child Group to include in the report.
4. Proceed to Report Selection section, page 63, for the next steps.
EDIT A CHILD GROUP 1. Either:
a. From the Outcomes Analysis page
i. select the Child groups tab, if necessary.
ii. Select the Child group tab.
iii. Click the Add a group link.
b. Setup>Program Info>Filter Child Groups.
(Image on next page.)
Galileo® Pre-K Online
©2018 Assessment Technology, Incorporated
60 Revised as of 06.18.18
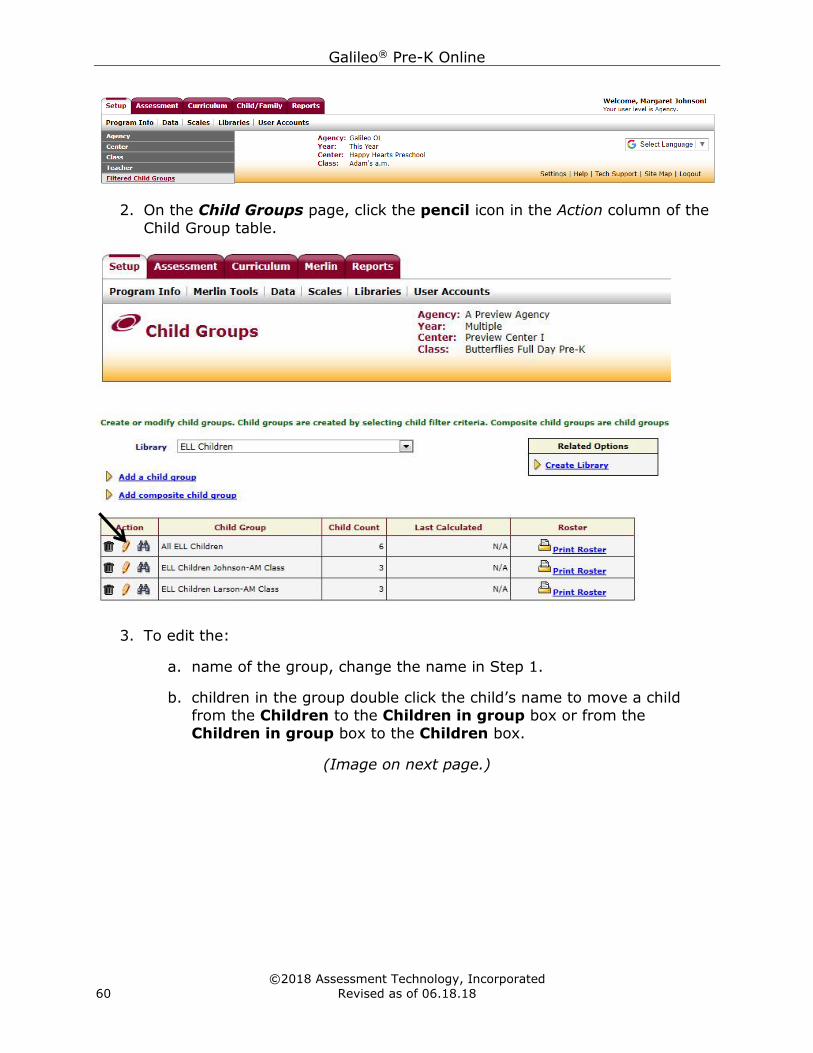
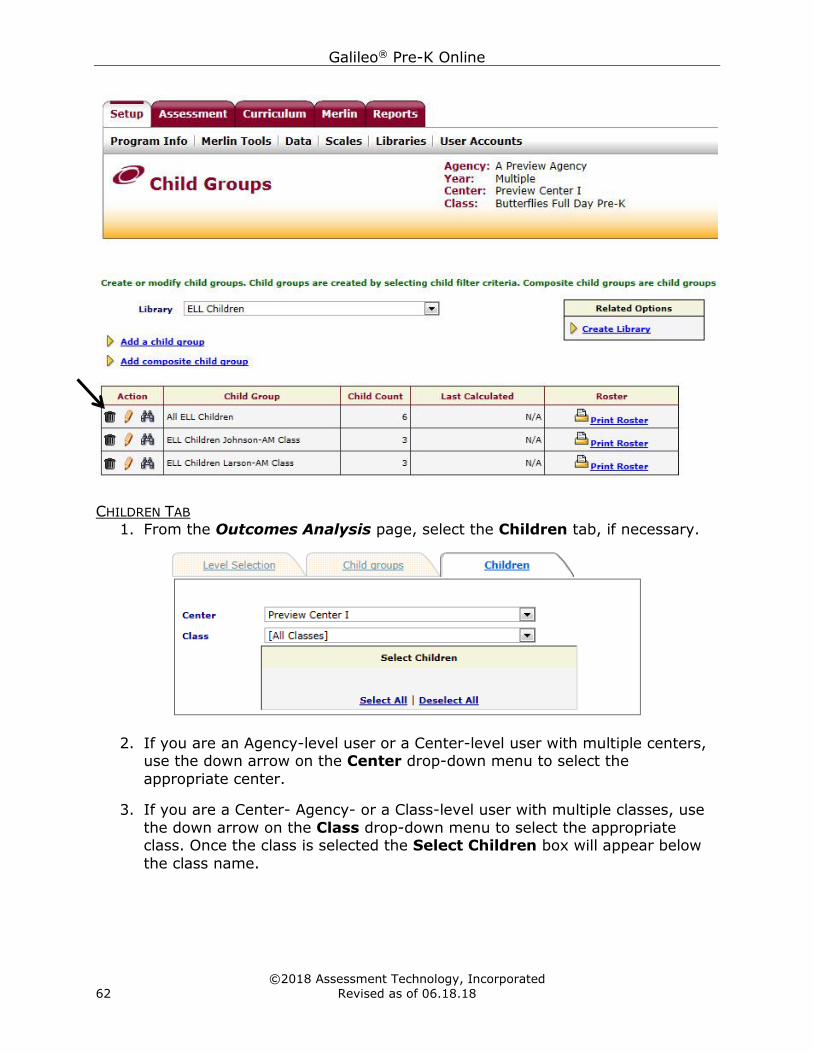
2. On the Child Groups page, click the pencil icon in the Action column of the
Child Group table.
3. To edit the:
a. name of the group, change the name in Step 1.
b. children in the group double click the child’s name to move a child
from the Children to the Children in group box or from the
Children in group box to the Children box.
(Image on next page.)
Galileo® Pre-K Online
©2018 Assessment Technology, Incorporated
Revised as of 06.18.18 61
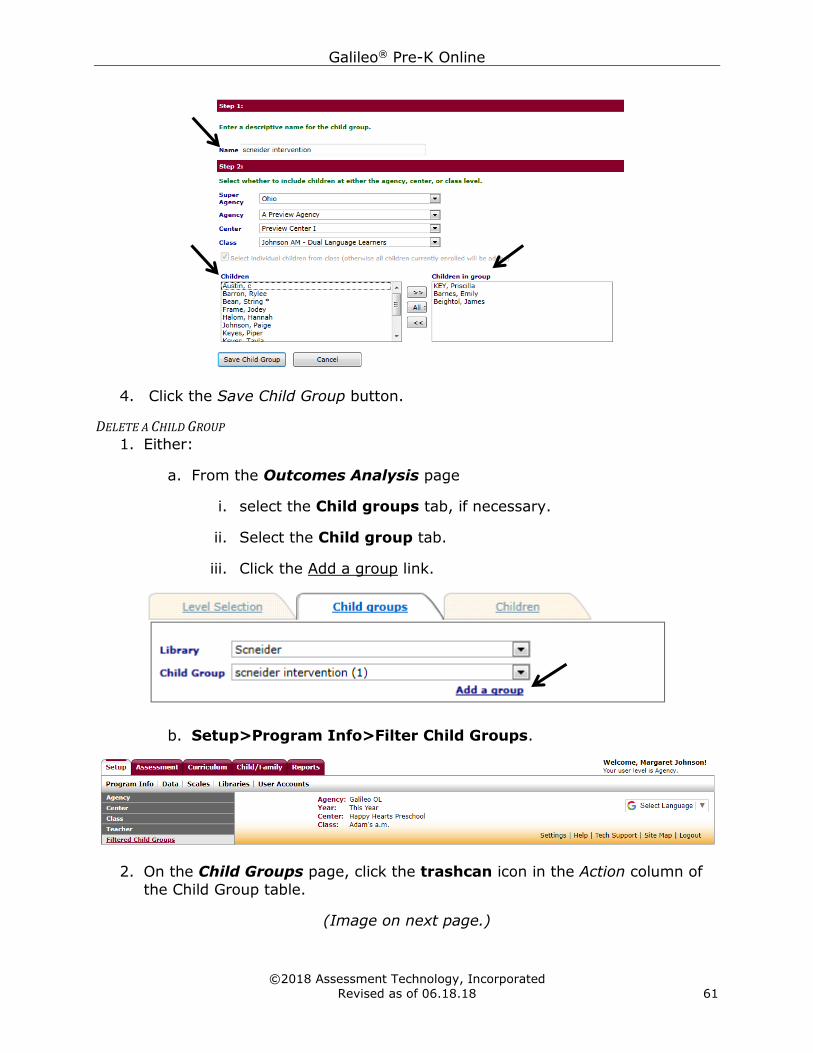
4. Click the Save Child Group button.
DELETE A CHILD GROUP 1. Either:
a. From the Outcomes Analysis page
i. select the Child groups tab, if necessary.
ii. Select the Child group tab.
iii. Click the Add a group link.
b. Setup>Program Info>Filter Child Groups.
2. On the Child Groups page, click the trashcan icon in the Action column of
the Child Group table.
(Image on next page.)
Galileo® Pre-K Online
©2018 Assessment Technology, Incorporated
62 Revised as of 06.18.18
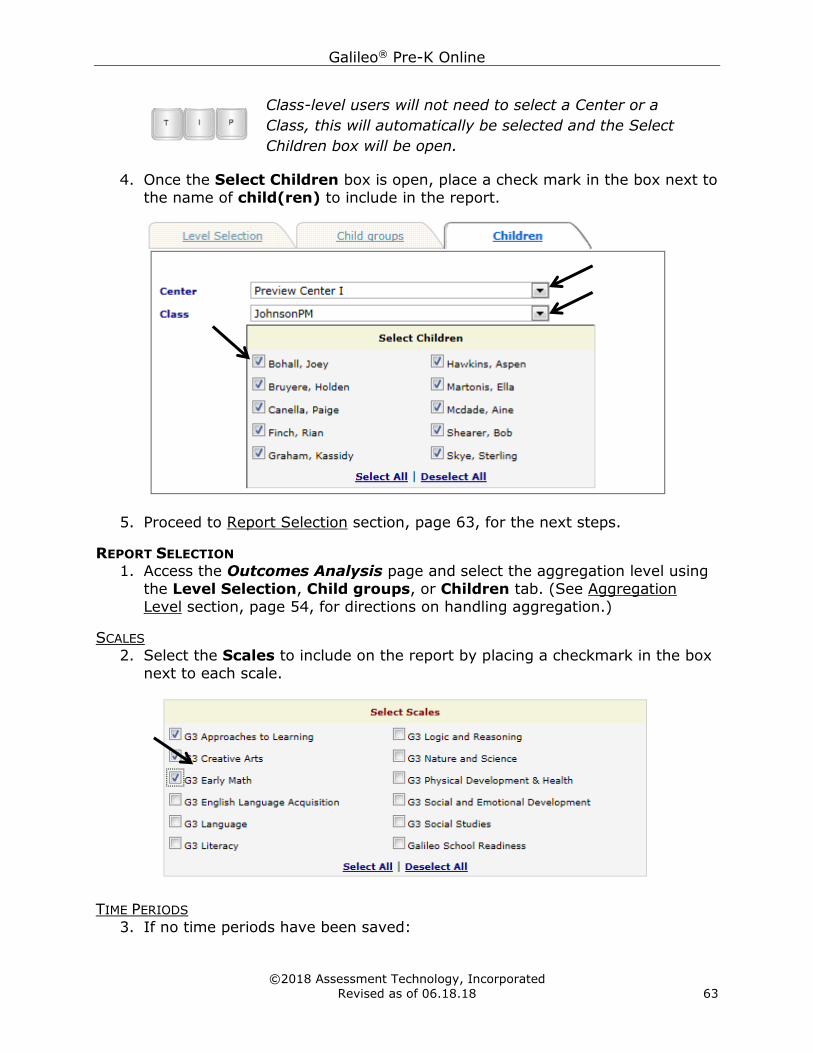
CHILDREN TAB
1. From the Outcomes Analysis page, select the Children tab, if necessary.
2. If you are an Agency-level user or a Center-level user with multiple centers, use the down arrow on the Center drop-down menu to select the
appropriate center.
3. If you are a Center- Agency- or a Class-level user with multiple classes, use
the down arrow on the Class drop-down menu to select the appropriate class. Once the class is selected the Select Children box will appear below
the class name.
Galileo® Pre-K Online
©2018 Assessment Technology, Incorporated
Revised as of 06.18.18 63
Class-level users will not need to select a Center or a
Class, this will automatically be selected and the Select
Children box will be open.
4. Once the Select Children box is open, place a check mark in the box next to
the name of child(ren) to include in the report.
5. Proceed to Report Selection section, page 63, for the next steps.
REPORT SELECTION 1. Access the Outcomes Analysis page and select the aggregation level using
the Level Selection, Child groups, or Children tab. (See Aggregation
Level section, page 54, for directions on handling aggregation.)
SCALES 2. Select the Scales to include on the report by placing a checkmark in the box
next to each scale.
TIME PERIODS
3. If no time periods have been saved:
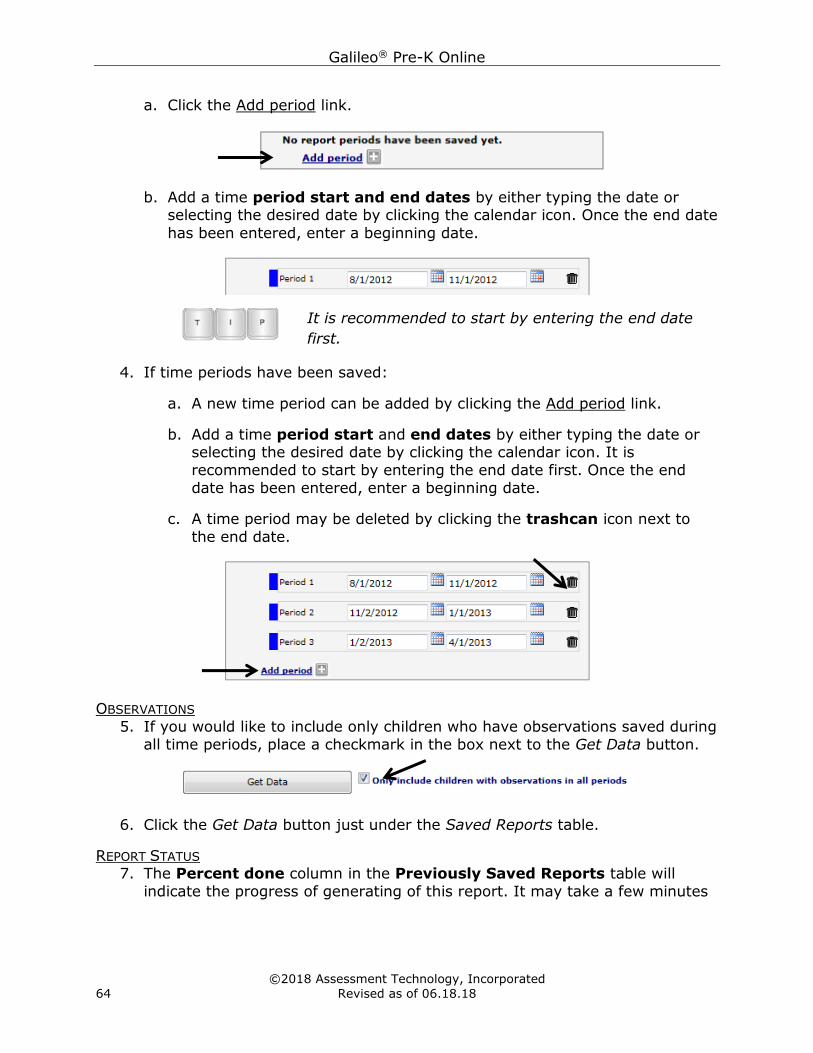
Galileo® Pre-K Online
©2018 Assessment Technology, Incorporated
64 Revised as of 06.18.18
a. Click the Add period link.
b. Add a time period start and end dates by either typing the date or selecting the desired date by clicking the calendar icon. Once the end date
has been entered, enter a beginning date.
It is recommended to start by entering the end date
first.
4. If time periods have been saved:
a. A new time period can be added by clicking the Add period link.
b. Add a time period start and end dates by either typing the date or selecting the desired date by clicking the calendar icon. It is
recommended to start by entering the end date first. Once the end
date has been entered, enter a beginning date.
c. A time period may be deleted by clicking the trashcan icon next to
the end date.
OBSERVATIONS
5. If you would like to include only children who have observations saved during
all time periods, place a checkmark in the box next to the Get Data button.
6. Click the Get Data button just under the Saved Reports table.
REPORT STATUS 7. The Percent done column in the Previously Saved Reports table will
indicate the progress of generating of this report. It may take a few minutes
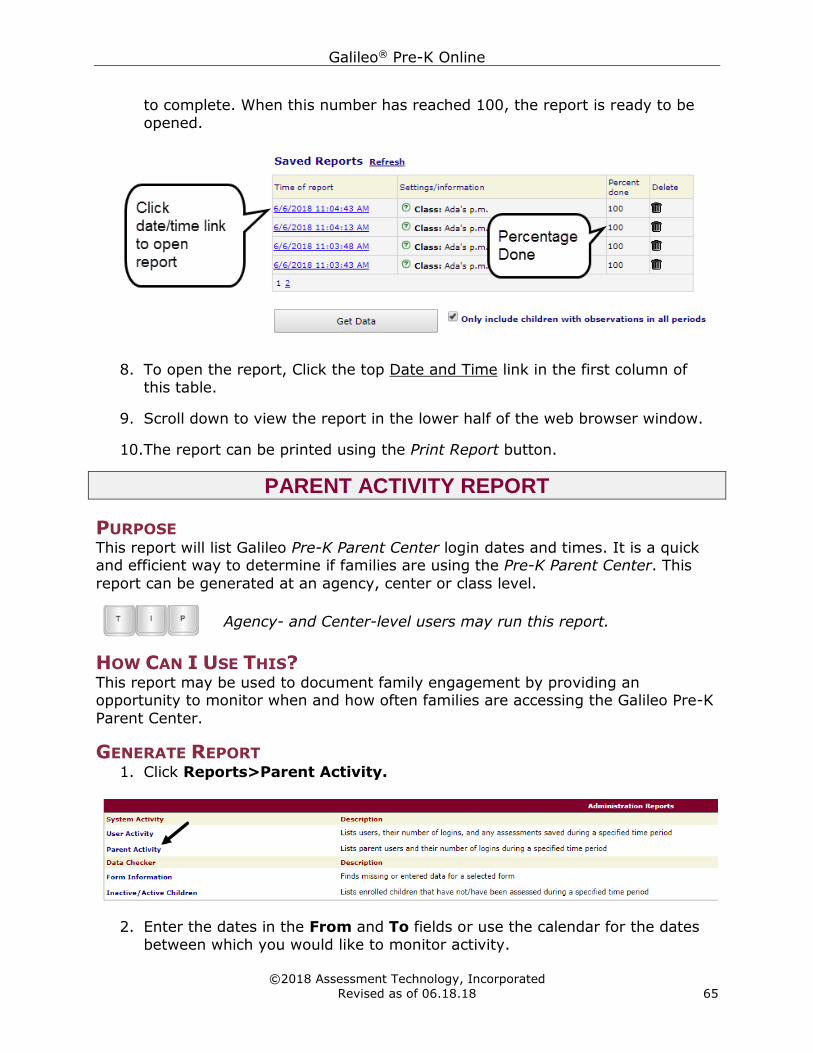
Galileo® Pre-K Online
©2018 Assessment Technology, Incorporated
Revised as of 06.18.18 65
to complete. When this number has reached 100, the report is ready to be
opened.
8. To open the report, Click the top Date and Time link in the first column of
this table.
9. Scroll down to view the report in the lower half of the web browser window.
10.The report can be printed using the Print Report button.
PARENT ACTIVITY REPORT
PURPOSE This report will list Galileo Pre-K Parent Center login dates and times. It is a quick and efficient way to determine if families are using the Pre-K Parent Center. This
report can be generated at an agency, center or class level.
Agency- and Center-level users may run this report.
HOW CAN I USE THIS? This report may be used to document family engagement by providing an opportunity to monitor when and how often families are accessing the Galileo Pre-K
Parent Center.
GENERATE REPORT 1. Click Reports>Parent Activity.
2. Enter the dates in the From and To fields or use the calendar for the dates
between which you would like to monitor activity.
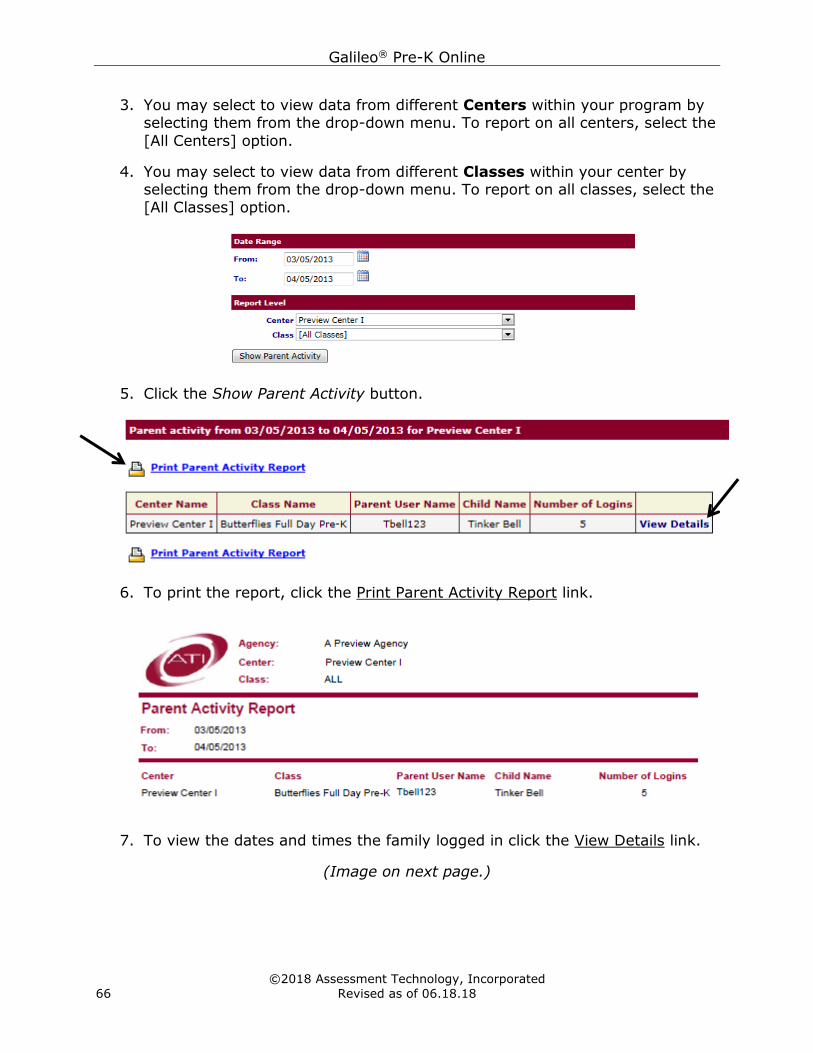
Galileo® Pre-K Online
©2018 Assessment Technology, Incorporated
66 Revised as of 06.18.18
3. You may select to view data from different Centers within your program by selecting them from the drop-down menu. To report on all centers, select the
[All Centers] option.
4. You may select to view data from different Classes within your center by selecting them from the drop-down menu. To report on all classes, select the
[All Classes] option.
5. Click the Show Parent Activity button.
6. To print the report, click the Print Parent Activity Report link.
7. To view the dates and times the family logged in click the View Details link.
(Image on next page.)
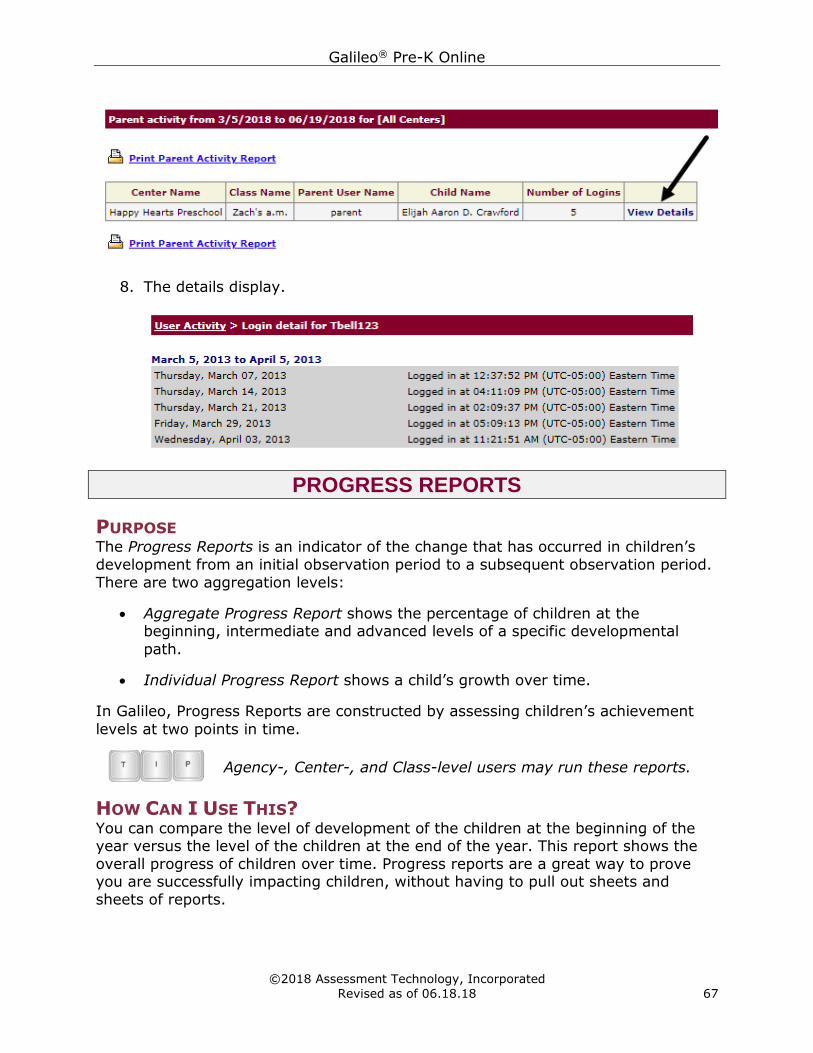
Galileo® Pre-K Online
©2018 Assessment Technology, Incorporated
Revised as of 06.18.18 67
8. The details display.
PROGRESS REPORTS
PURPOSE The Progress Reports is an indicator of the change that has occurred in children’s
development from an initial observation period to a subsequent observation period.
There are two aggregation levels:
• Aggregate Progress Report shows the percentage of children at the beginning, intermediate and advanced levels of a specific developmental
path.
• Individual Progress Report shows a child’s growth over time.
In Galileo, Progress Reports are constructed by assessing children’s achievement
levels at two points in time.
Agency-, Center-, and Class-level users may run these reports.
HOW CAN I USE THIS? You can compare the level of development of the children at the beginning of the year versus the level of the children at the end of the year. This report shows the
overall progress of children over time. Progress reports are a great way to prove you are successfully impacting children, without having to pull out sheets and
sheets of reports.
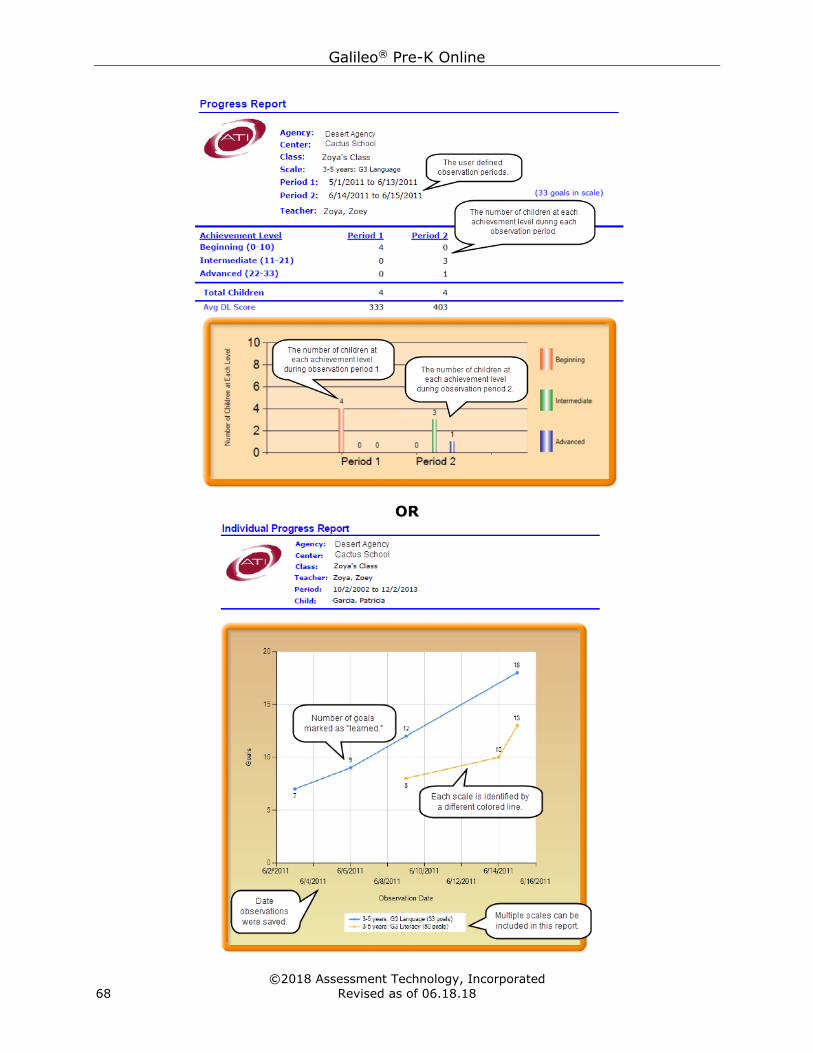
Galileo® Pre-K Online
©2018 Assessment Technology, Incorporated
68 Revised as of 06.18.18
OR
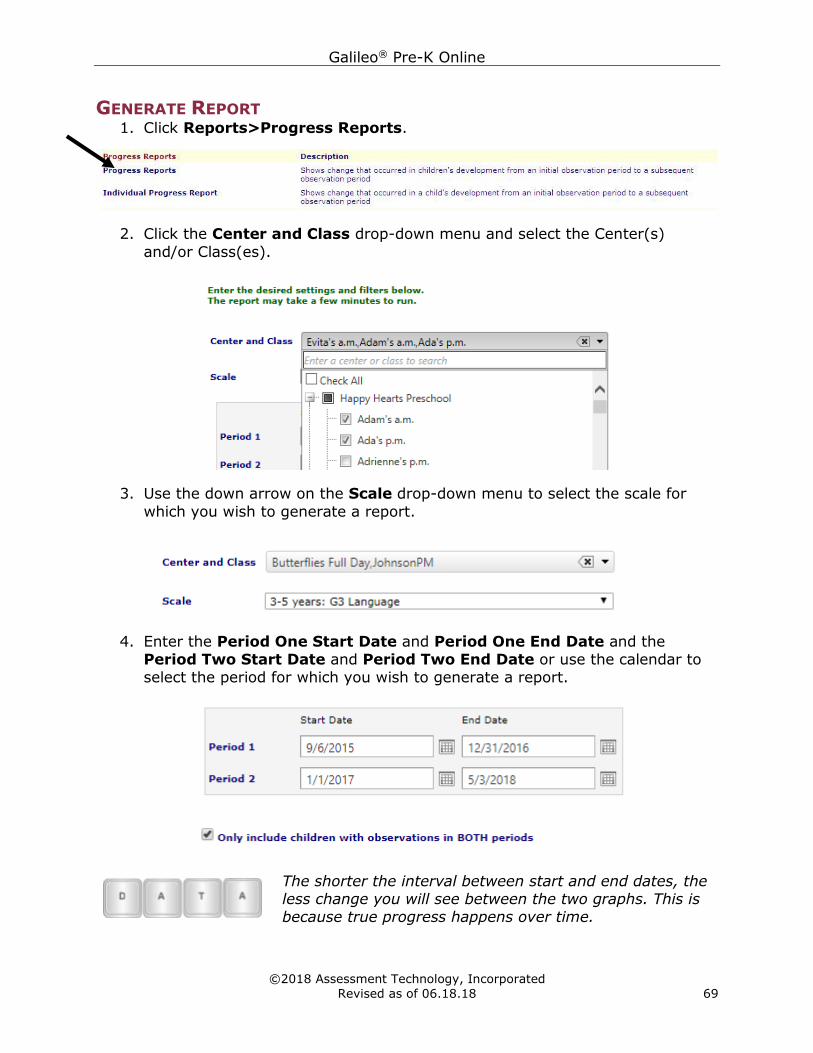
Galileo® Pre-K Online
©2018 Assessment Technology, Incorporated
Revised as of 06.18.18 69
GENERATE REPORT 1. Click Reports>Progress Reports.
2. Click the Center and Class drop-down menu and select the Center(s)
and/or Class(es).
3. Use the down arrow on the Scale drop-down menu to select the scale for
which you wish to generate a report.
4. Enter the Period One Start Date and Period One End Date and the
Period Two Start Date and Period Two End Date or use the calendar to
select the period for which you wish to generate a report.
The shorter the interval between start and end dates, the
less change you will see between the two graphs. This is
because true progress happens over time.
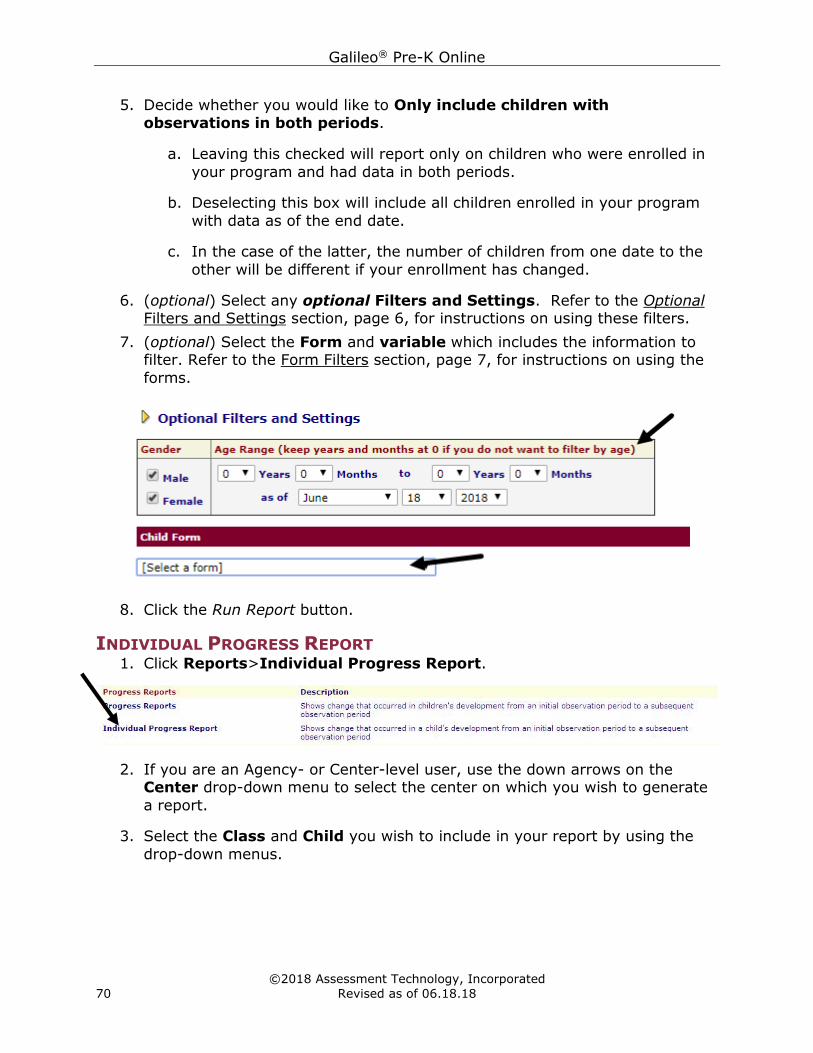
Galileo® Pre-K Online
©2018 Assessment Technology, Incorporated
70 Revised as of 06.18.18
5. Decide whether you would like to Only include children with
observations in both periods.
a. Leaving this checked will report only on children who were enrolled in
your program and had data in both periods.
b. Deselecting this box will include all children enrolled in your program
with data as of the end date.
c. In the case of the latter, the number of children from one date to the
other will be different if your enrollment has changed.
6. (optional) Select any optional Filters and Settings. Refer to the Optional Filters and Settings section, page 6, for instructions on using these filters.
7. (optional) Select the Form and variable which includes the information to filter. Refer to the Form Filters section, page 7, for instructions on using the
forms.
8. Click the Run Report button.
INDIVIDUAL PROGRESS REPORT 1. Click Reports>Individual Progress Report.
2. If you are an Agency- or Center-level user, use the down arrows on the Center drop-down menu to select the center on which you wish to generate
a report.
3. Select the Class and Child you wish to include in your report by using the
drop-down menus.
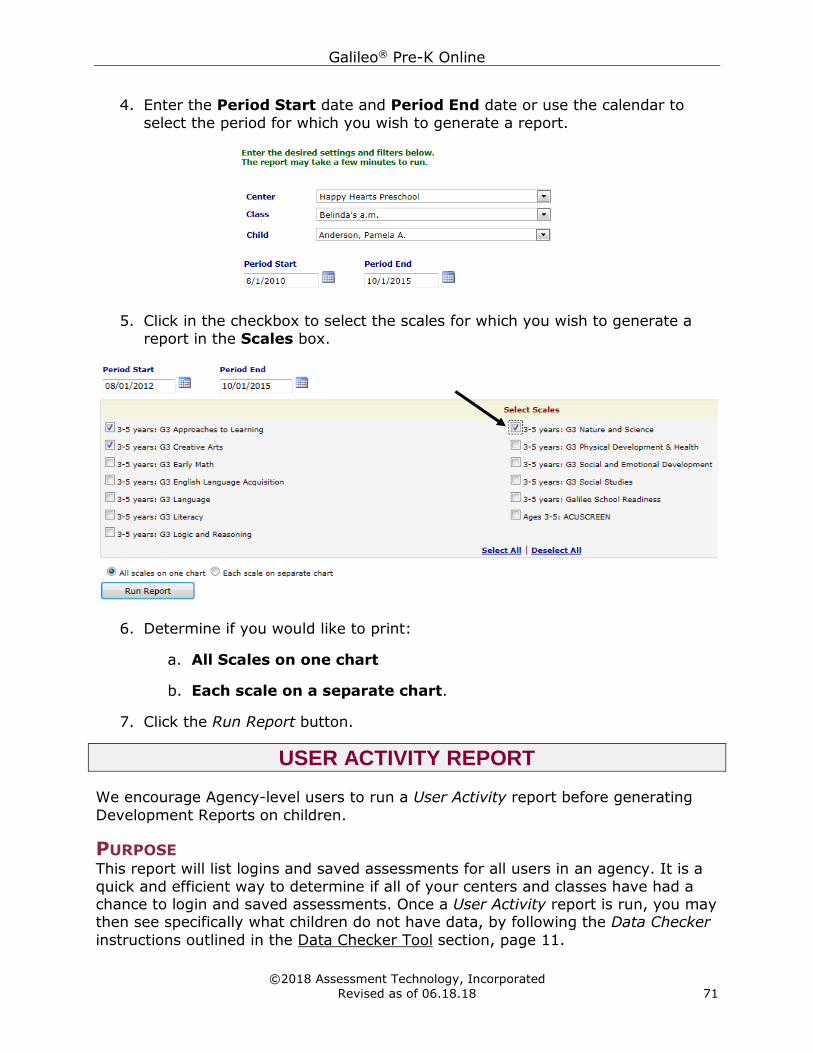
Galileo® Pre-K Online
©2018 Assessment Technology, Incorporated
Revised as of 06.18.18 71
4. Enter the Period Start date and Period End date or use the calendar to
select the period for which you wish to generate a report.
5. Click in the checkbox to select the scales for which you wish to generate a
report in the Scales box.
6. Determine if you would like to print:
a. All Scales on one chart
b. Each scale on a separate chart.
7. Click the Run Report button.
USER ACTIVITY REPORT
We encourage Agency-level users to run a User Activity report before generating
Development Reports on children.
PURPOSE This report will list logins and saved assessments for all users in an agency. It is a
quick and efficient way to determine if all of your centers and classes have had a chance to login and saved assessments. Once a User Activity report is run, you may then see specifically what children do not have data, by following the Data Checker
instructions outlined in the Data Checker Tool section, page 11.
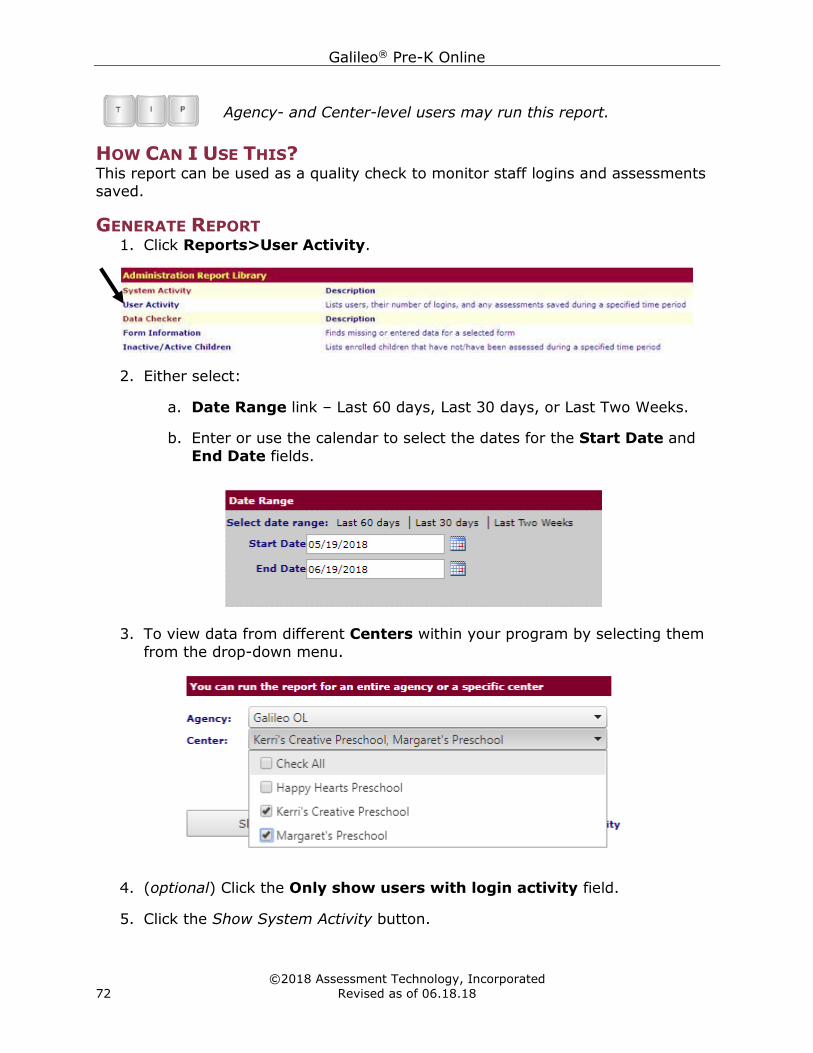
Galileo® Pre-K Online
©2018 Assessment Technology, Incorporated
72 Revised as of 06.18.18
Agency- and Center-level users may run this report.
HOW CAN I USE THIS? This report can be used as a quality check to monitor staff logins and assessments
saved.
GENERATE REPORT 1. Click Reports>User Activity.
2. Either select:
a. Date Range link – Last 60 days, Last 30 days, or Last Two Weeks.
b. Enter or use the calendar to select the dates for the Start Date and
End Date fields.
3. To view data from different Centers within your program by selecting them
from the drop-down menu.
4. (optional) Click the Only show users with login activity field.
5. Click the Show System Activity button.
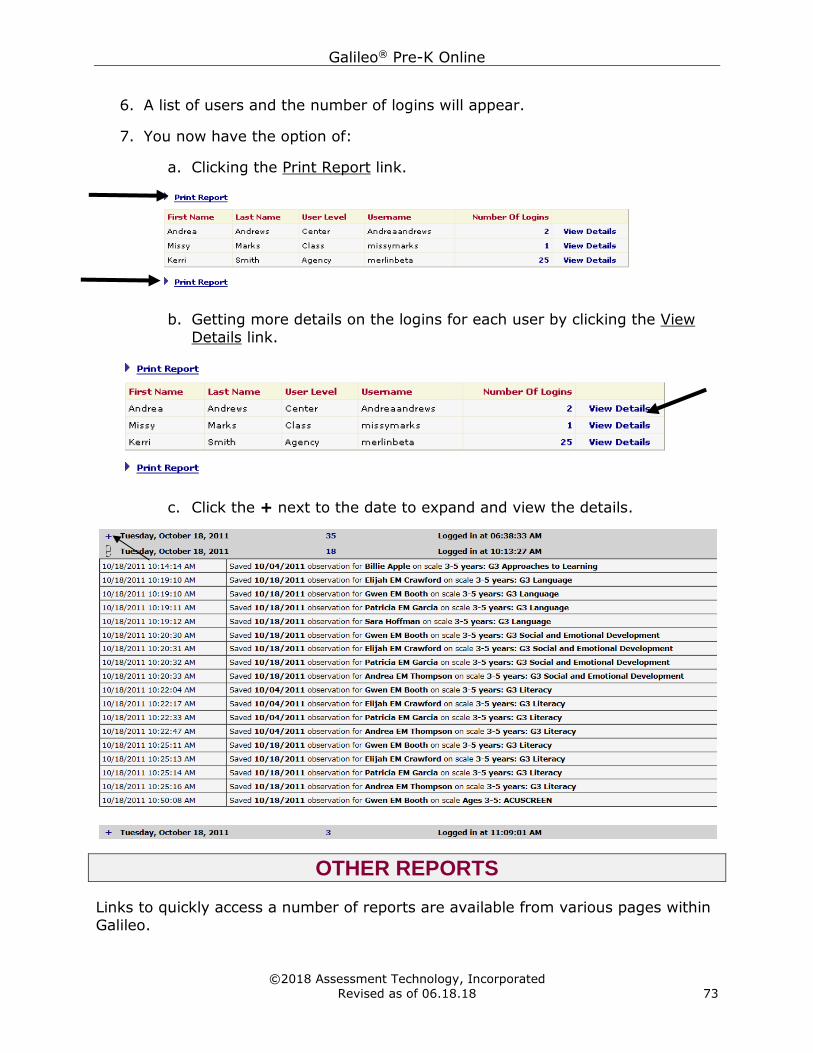
Galileo® Pre-K Online
©2018 Assessment Technology, Incorporated
Revised as of 06.18.18 73
6. A list of users and the number of logins will appear.
7. You now have the option of:
a. Clicking the Print Report link.
b. Getting more details on the logins for each user by clicking the View
Details link.
c. Click the + next to the date to expand and view the details.
OTHER REPORTS
Links to quickly access a number of reports are available from various pages within
Galileo.
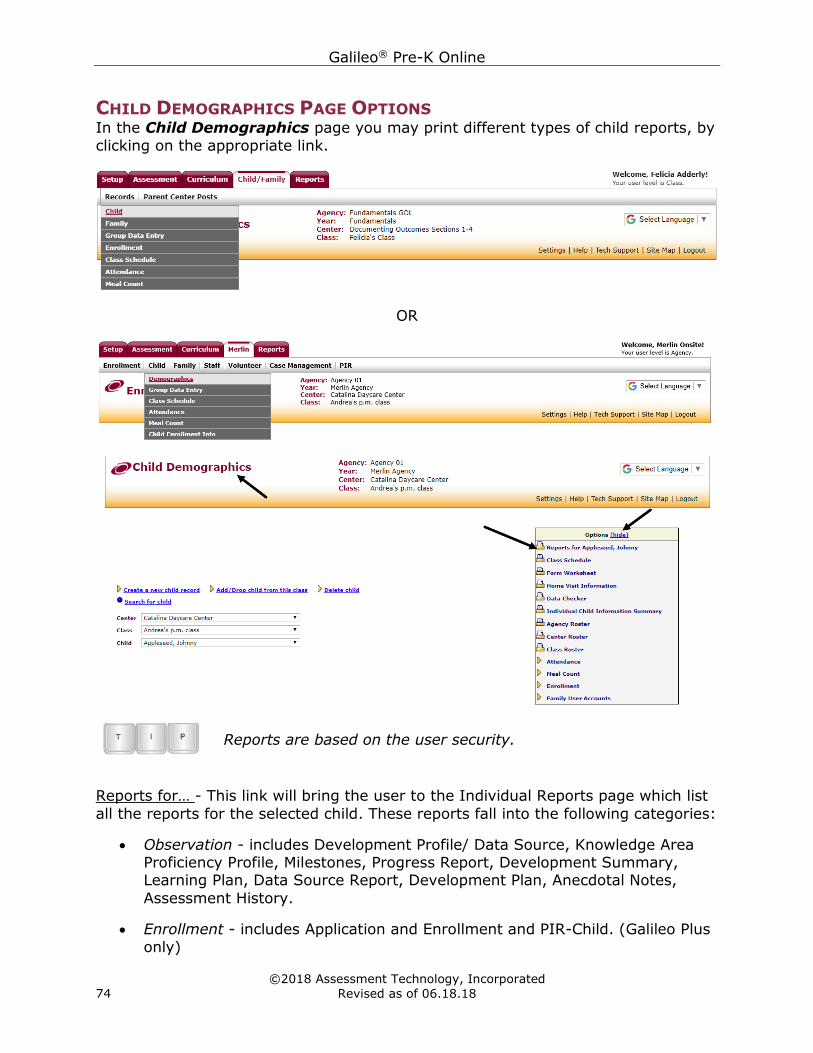
Galileo® Pre-K Online
©2018 Assessment Technology, Incorporated
74 Revised as of 06.18.18
CHILD DEMOGRAPHICS PAGE OPTIONS In the Child Demographics page you may print different types of child reports, by
clicking on the appropriate link.
OR
Reports are based on the user security.
Reports for… - This link will bring the user to the Individual Reports page which list
all the reports for the selected child. These reports fall into the following categories:
• Observation - includes Development Profile/ Data Source, Knowledge Area Proficiency Profile, Milestones, Progress Report, Development Summary, Learning Plan, Data Source Report, Development Plan, Anecdotal Notes,
Assessment History.
• Enrollment - includes Application and Enrollment and PIR-Child. (Galileo Plus
only)
Galileo® Pre-K Online
©2018 Assessment Technology, Incorporated
Revised as of 06.18.18 75
• Health and Nutrition - includes Health/Developmental Services, EHS Health Services, Immunization Services, Emergency Care and Safety Services,
Medication Administration Services, Head Start Nutrition Services, EHS (Infant) Nutrition Services, Record of Illness, Height/Weight Chart. (Galileo
Plus only)
• Attendance - includes Attendance.
• Special Needs - includes Disability Services and IEP/IFSP. (Galileo Plus)
• Information Summaries - includes individual Information summaries run on
and agency-created forms.
Class Schedule - Brings the user to the child’s class schedule.
Form Worksheet - Allows the user to print a worksheet for any child form.
Home Visit Information - You may print home visit information by clicking on this
link. The information on this report is generated from the information stored in the
General Family Member Info form.
Data Checker –Tools to check for entered and missing data on forms and
developmental scales.
Individual Child Information Summary - Reports on available child forms at Class-
level.
Roster – This report will list the name, Social Security Number, birth date, and the
enrollment date/status of the children enrolled in the agency, center or class.
• Agency Roster - This is available only to Agency-level users. All children
currently enrolled in a class in the agency.
• Center Roster - This is available only to Center-level users. All children
currently enrolled in a particular center.
• Class Roster - All children currently enrolled in a particular class.
Attendance - Brings the user to the Attendance page.
Meal Count - Brings the user to the Meal Count page.
Enrollment - Brings the user to the Enrollment page.
Family Demographics - Takes the user to the Family Demographics page.
Student User Accounts – Takes the user to the Student User Accounts page.

Galileo® Pre-K Online
©2018 Assessment Technology, Incorporated
76 Revised as of 06.18.18
ENROLLMENT PAGE OPTIONS In the Enrollment page you may print different types of Enrollment Reports, by
clicking on the appropriate link.
OR
Reports are based on the user security.
Roster - This report will list the name, Social Security Number, birth date, and the
enrollment date/status of the children enrolled in the agency, center or class.
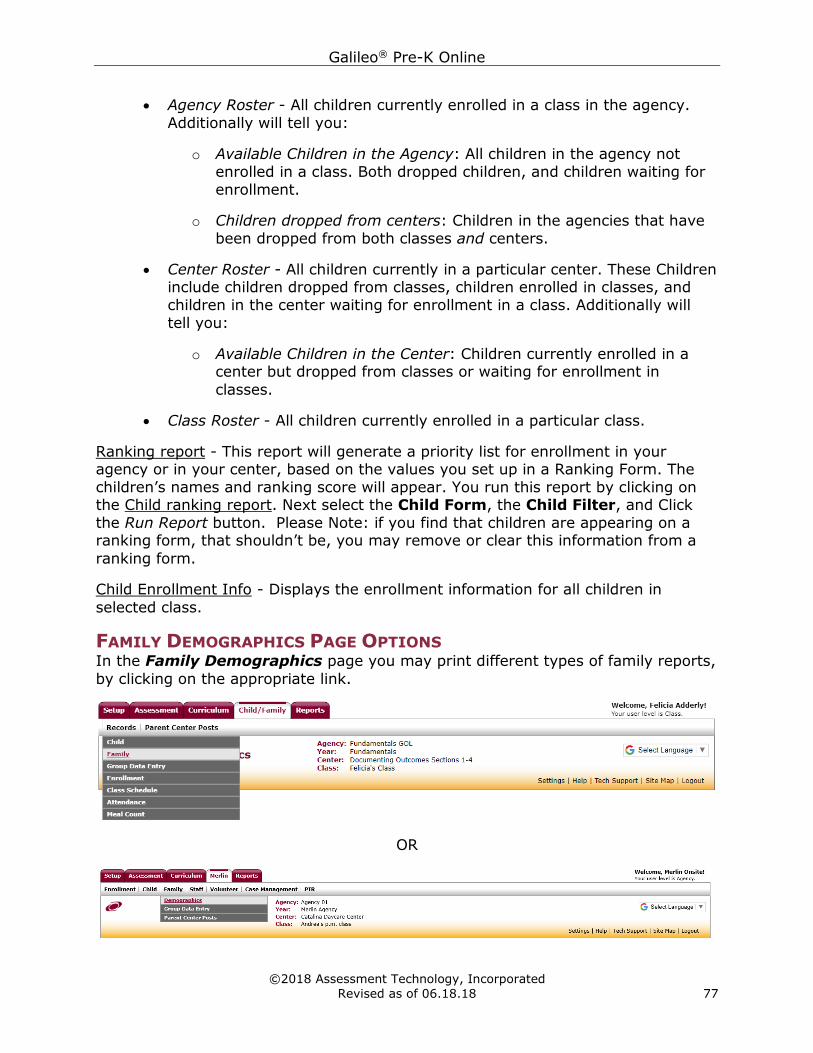
Galileo® Pre-K Online
©2018 Assessment Technology, Incorporated
Revised as of 06.18.18 77
• Agency Roster - All children currently enrolled in a class in the agency.
Additionally will tell you:
o Available Children in the Agency: All children in the agency not
enrolled in a class. Both dropped children, and children waiting for
enrollment.
o Children dropped from centers: Children in the agencies that have
been dropped from both classes and centers.
• Center Roster - All children currently in a particular center. These Children include children dropped from classes, children enrolled in classes, and
children in the center waiting for enrollment in a class. Additionally will
tell you:
o Available Children in the Center: Children currently enrolled in a center but dropped from classes or waiting for enrollment in
classes.
• Class Roster - All children currently enrolled in a particular class.
Ranking report - This report will generate a priority list for enrollment in your agency or in your center, based on the values you set up in a Ranking Form. The
children’s names and ranking score will appear. You run this report by clicking on the Child ranking report. Next select the Child Form, the Child Filter, and Click
the Run Report button. Please Note: if you find that children are appearing on a ranking form, that shouldn’t be, you may remove or clear this information from a
ranking form.
Child Enrollment Info - Displays the enrollment information for all children in
selected class.
FAMILY DEMOGRAPHICS PAGE OPTIONS In the Family Demographics page you may print different types of family reports,
by clicking on the appropriate link.
OR
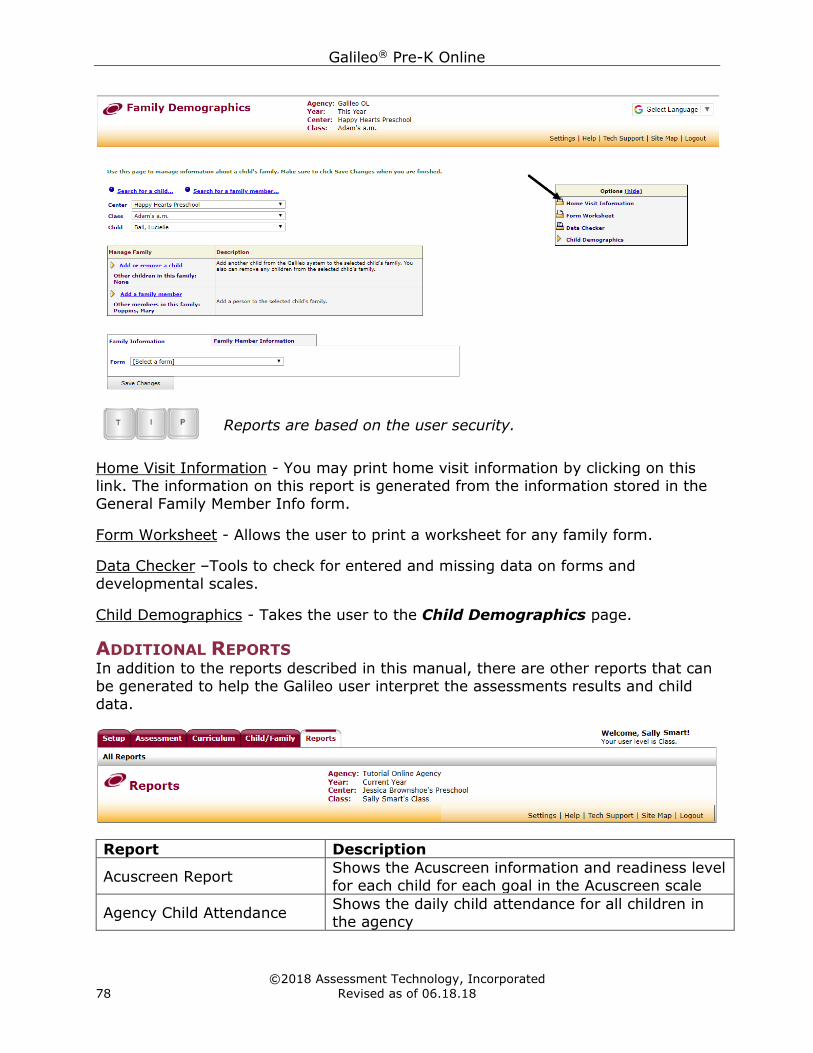
Galileo® Pre-K Online
©2018 Assessment Technology, Incorporated
78 Revised as of 06.18.18
Reports are based on the user security.
Home Visit Information - You may print home visit information by clicking on this
link. The information on this report is generated from the information stored in the
General Family Member Info form.
Form Worksheet - Allows the user to print a worksheet for any family form.
Data Checker –Tools to check for entered and missing data on forms and
developmental scales.
Child Demographics - Takes the user to the Child Demographics page.
ADDITIONAL REPORTS In addition to the reports described in this manual, there are other reports that can
be generated to help the Galileo user interpret the assessments results and child
data.
Report Description
Acuscreen Report Shows the Acuscreen information and readiness level
for each child for each goal in the Acuscreen scale
Agency Child Attendance Shows the daily child attendance for all children in
the agency
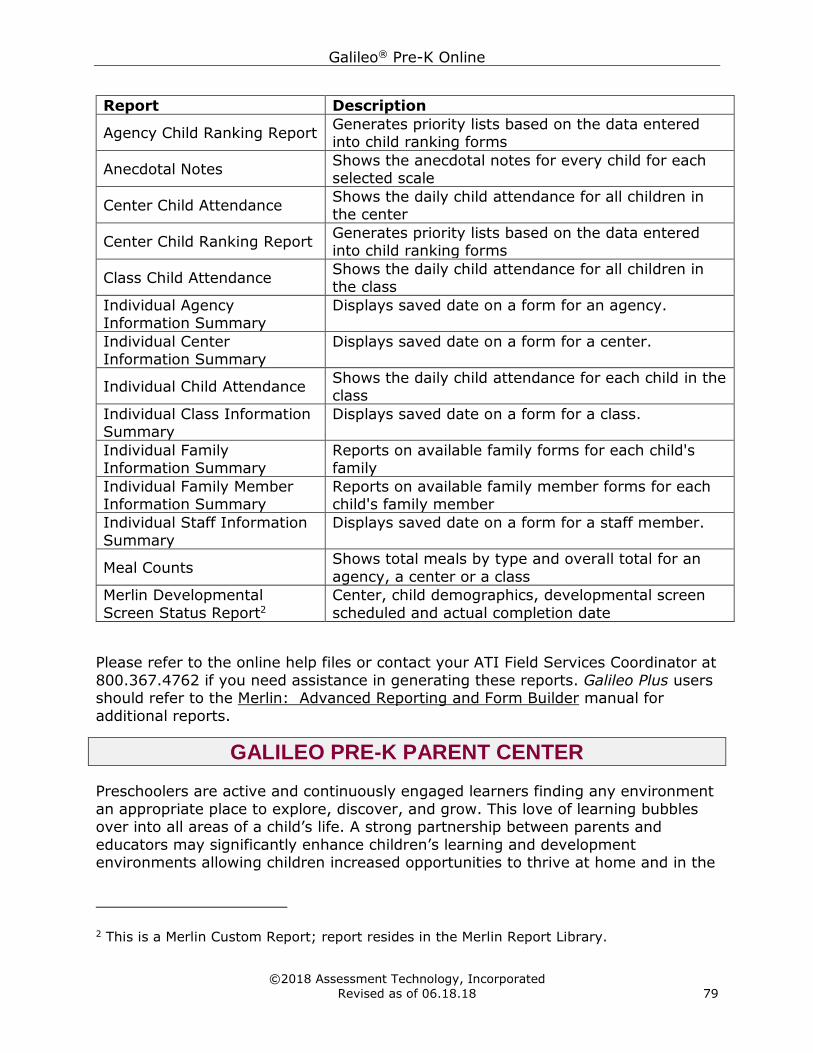
Galileo® Pre-K Online
©2018 Assessment Technology, Incorporated
Revised as of 06.18.18 79
Report Description
Agency Child Ranking Report Generates priority lists based on the data entered into child ranking forms
Anecdotal Notes Shows the anecdotal notes for every child for each selected scale
Center Child Attendance Shows the daily child attendance for all children in the center
Center Child Ranking Report Generates priority lists based on the data entered into child ranking forms
Class Child Attendance Shows the daily child attendance for all children in the class
Individual Agency Information Summary
Displays saved date on a form for an agency.
Individual Center Information Summary
Displays saved date on a form for a center.
Individual Child Attendance Shows the daily child attendance for each child in the class
Individual Class Information Summary
Displays saved date on a form for a class.
Individual Family Information Summary
Reports on available family forms for each child's family
Individual Family Member Information Summary
Reports on available family member forms for each child's family member
Individual Staff Information
Summary
Displays saved date on a form for a staff member.
Meal Counts Shows total meals by type and overall total for an
agency, a center or a class
Merlin Developmental
Screen Status Report2
Center, child demographics, developmental screen
scheduled and actual completion date
Please refer to the online help files or contact your ATI Field Services Coordinator at
800.367.4762 if you need assistance in generating these reports. Galileo Plus users should refer to the Merlin: Advanced Reporting and Form Builder manual for
additional reports.
GALILEO PRE-K PARENT CENTER
Preschoolers are active and continuously engaged learners finding any environment
an appropriate place to explore, discover, and grow. This love of learning bubbles over into all areas of a child’s life. A strong partnership between parents and
educators may significantly enhance children’s learning and development environments allowing children increased opportunities to thrive at home and in the
2 This is a Merlin Custom Report; report resides in the Merlin Report Library.
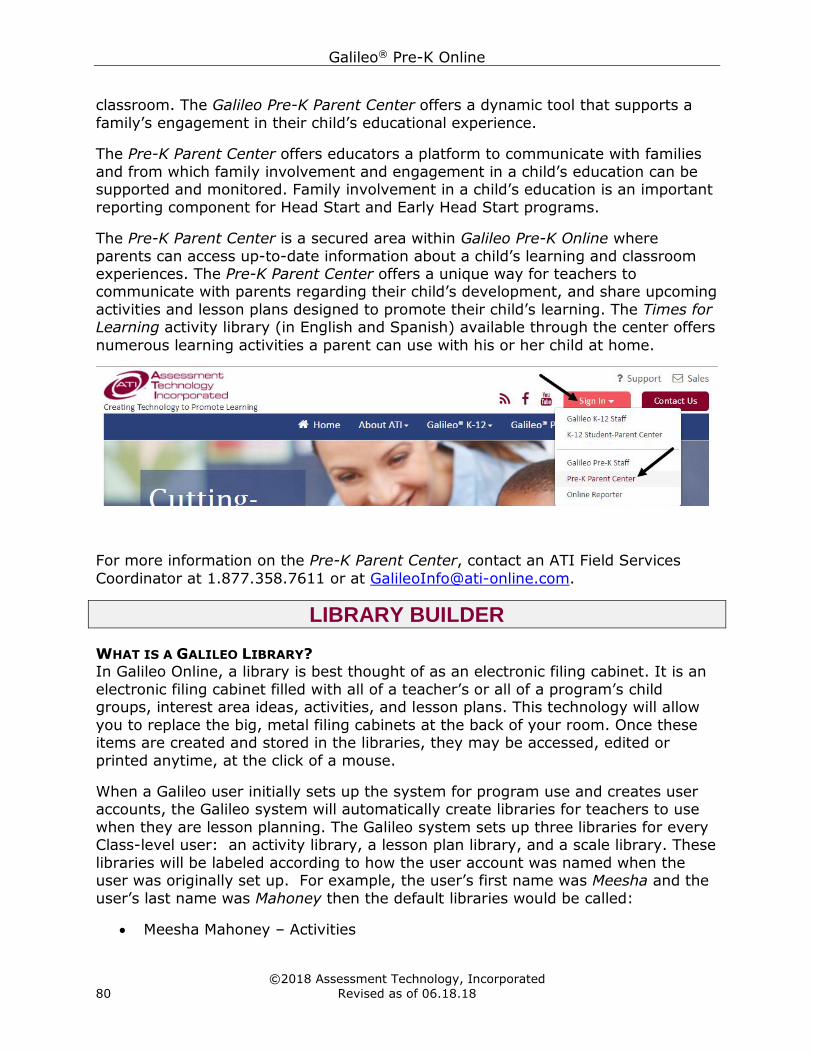
Galileo® Pre-K Online
©2018 Assessment Technology, Incorporated
80 Revised as of 06.18.18
classroom. The Galileo Pre-K Parent Center offers a dynamic tool that supports a
family’s engagement in their child’s educational experience.
The Pre-K Parent Center offers educators a platform to communicate with families
and from which family involvement and engagement in a child’s education can be supported and monitored. Family involvement in a child’s education is an important
reporting component for Head Start and Early Head Start programs.
The Pre-K Parent Center is a secured area within Galileo Pre-K Online where
parents can access up-to-date information about a child’s learning and classroom experiences. The Pre-K Parent Center offers a unique way for teachers to communicate with parents regarding their child’s development, and share upcoming
activities and lesson plans designed to promote their child’s learning. The Times for Learning activity library (in English and Spanish) available through the center offers
numerous learning activities a parent can use with his or her child at home.
For more information on the Pre-K Parent Center, contact an ATI Field Services
Coordinator at 1.877.358.7611 or at [email protected].
LIBRARY BUILDER
WHAT IS A GALILEO LIBRARY? In Galileo Online, a library is best thought of as an electronic filing cabinet. It is an
electronic filing cabinet filled with all of a teacher’s or all of a program’s child groups, interest area ideas, activities, and lesson plans. This technology will allow
you to replace the big, metal filing cabinets at the back of your room. Once these items are created and stored in the libraries, they may be accessed, edited or
printed anytime, at the click of a mouse.
When a Galileo user initially sets up the system for program use and creates user accounts, the Galileo system will automatically create libraries for teachers to use
when they are lesson planning. The Galileo system sets up three libraries for every Class-level user: an activity library, a lesson plan library, and a scale library. These
libraries will be labeled according to how the user account was named when the user was originally set up. For example, the user’s first name was Meesha and the
user’s last name was Mahoney then the default libraries would be called:
• Meesha Mahoney – Activities

Galileo® Pre-K Online
©2018 Assessment Technology, Incorporated
Revised as of 06.18.18 81
• Meesha Mahoney – Lesson Plans
• Meesha Mahoney – Scale
In addition, the system comes with a Galileo Library of Interest Areas that everyone
may use. Most agencies find that using the default libraries fits most of their curriculum and reporting needs. However, it is possible for users to create
additional libraries.
Class-level users have these default libraries, but also have the ability to create for
themselves additional Class-level libraries. If a Class-level user has access to more than one class, they may choose to give his or her other classes access to the
library he or she is creating. As with the default libraries, no other Class-level users can copy, view, or edit the content housed in the library unless special viewing status has been granted, at the teacher's request, by an Agency- or Center-level
user. However, it should be noted that these libraries, like the default libraries, can
be seen or accessed by Agency- or Center-level users.
If you decide you would like to create libraries, ATI’s Field Services Coordinators
will be more than happy to assist you. Feel free to contact ATI at 800.367.4762.
CREATE A LIBRARY
1. Click Setup>Libraries>Library Builder.
2. Use the drop-down menu to select the Library Type.
Generating the Outcomes Analysis report for Child Groups,
select the Child Group for Reports type of library.
3. Click the New Library link.
4. You will be brought to a 3-tabbed set-up process. The books icon in the
upper right-hand corner will bring you back to the Library Builder home page.
NAME AND YEAR TAB
5. Type the library name in the textbox.
(Image on next page.)
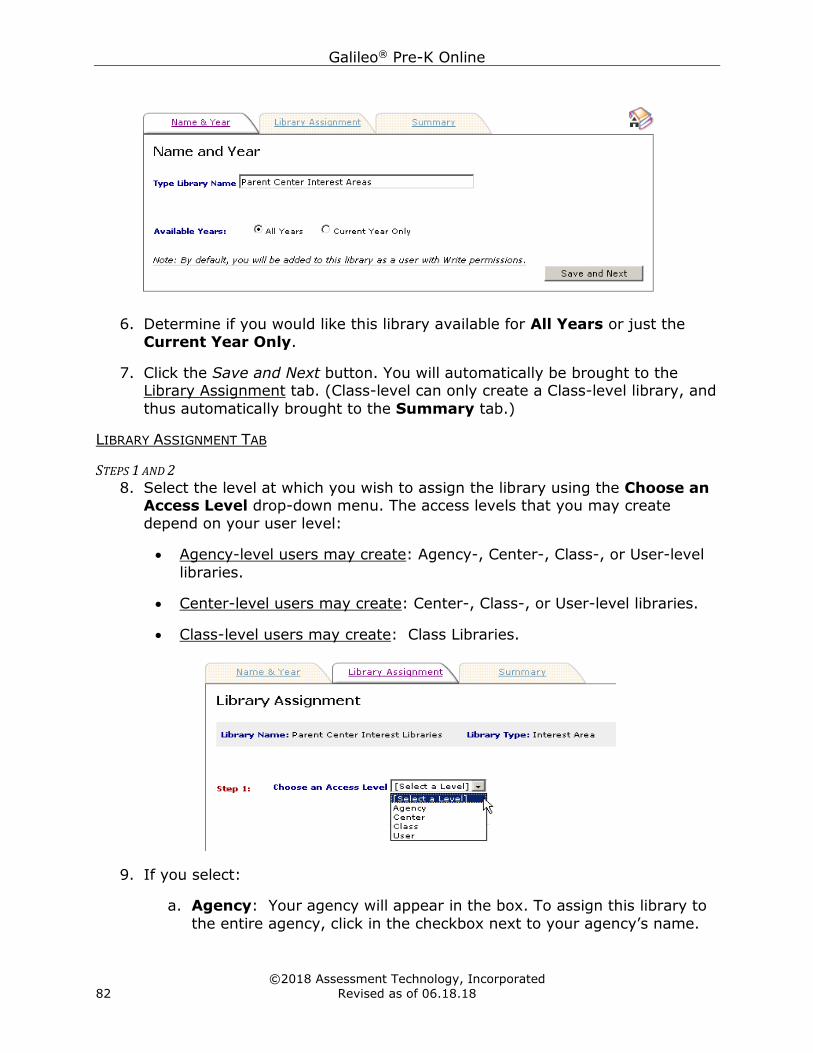
Galileo® Pre-K Online
©2018 Assessment Technology, Incorporated
82 Revised as of 06.18.18
6. Determine if you would like this library available for All Years or just the
Current Year Only.
7. Click the Save and Next button. You will automatically be brought to the Library Assignment tab. (Class-level can only create a Class-level library, and
thus automatically brought to the Summary tab.)
LIBRARY ASSIGNMENT TAB
STEPS 1 AND 2 8. Select the level at which you wish to assign the library using the Choose an
Access Level drop-down menu. The access levels that you may create
depend on your user level:
• Agency-level users may create: Agency-, Center-, Class-, or User-level
libraries.
• Center-level users may create: Center-, Class-, or User-level libraries.
• Class-level users may create: Class Libraries.
9. If you select:
a. Agency: Your agency will appear in the box. To assign this library to
the entire agency, click in the checkbox next to your agency’s name.
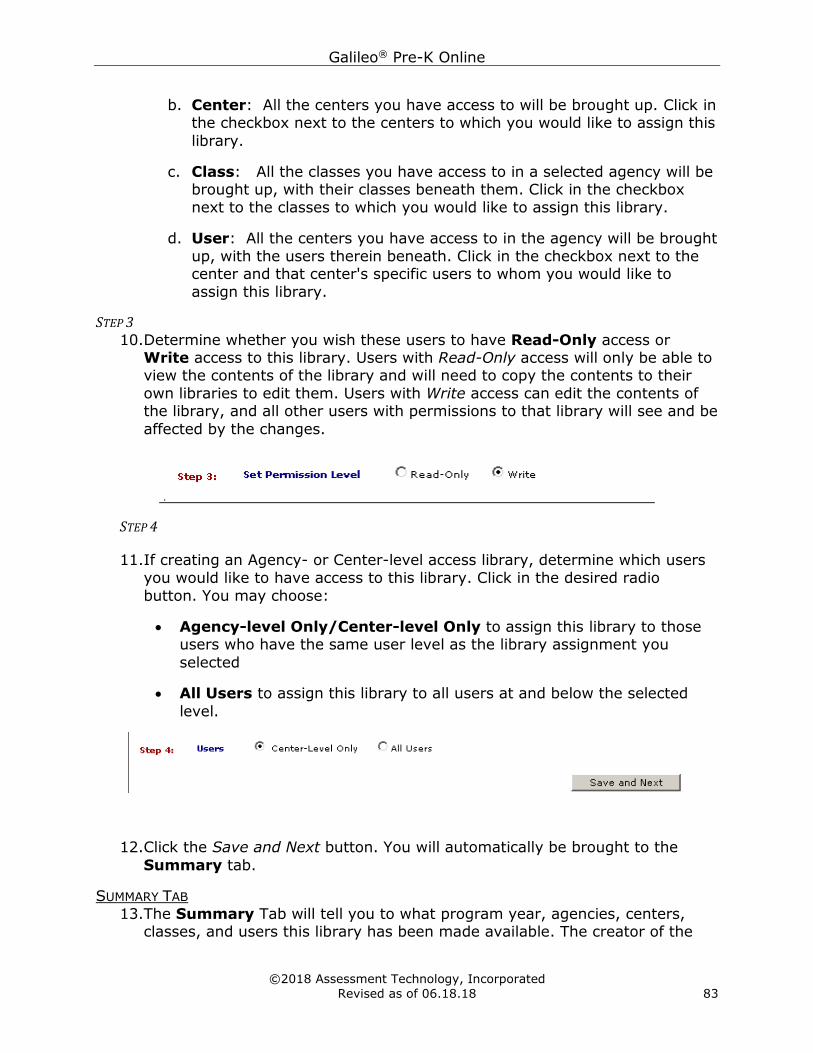
Galileo® Pre-K Online
©2018 Assessment Technology, Incorporated
Revised as of 06.18.18 83
b. Center: All the centers you have access to will be brought up. Click in the checkbox next to the centers to which you would like to assign this
library.
c. Class: All the classes you have access to in a selected agency will be brought up, with their classes beneath them. Click in the checkbox
next to the classes to which you would like to assign this library.
d. User: All the centers you have access to in the agency will be brought
up, with the users therein beneath. Click in the checkbox next to the center and that center's specific users to whom you would like to
assign this library.
STEP 3 10.Determine whether you wish these users to have Read-Only access or
Write access to this library. Users with Read-Only access will only be able to view the contents of the library and will need to copy the contents to their
own libraries to edit them. Users with Write access can edit the contents of the library, and all other users with permissions to that library will see and be
affected by the changes.
STEP 4
11.If creating an Agency- or Center-level access library, determine which users
you would like to have access to this library. Click in the desired radio
button. You may choose:
• Agency-level Only/Center-level Only to assign this library to those users who have the same user level as the library assignment you
selected
• All Users to assign this library to all users at and below the selected
level.
12.Click the Save and Next button. You will automatically be brought to the
Summary tab.
SUMMARY TAB
13.The Summary Tab will tell you to what program year, agencies, centers, classes, and users this library has been made available. The creator of the
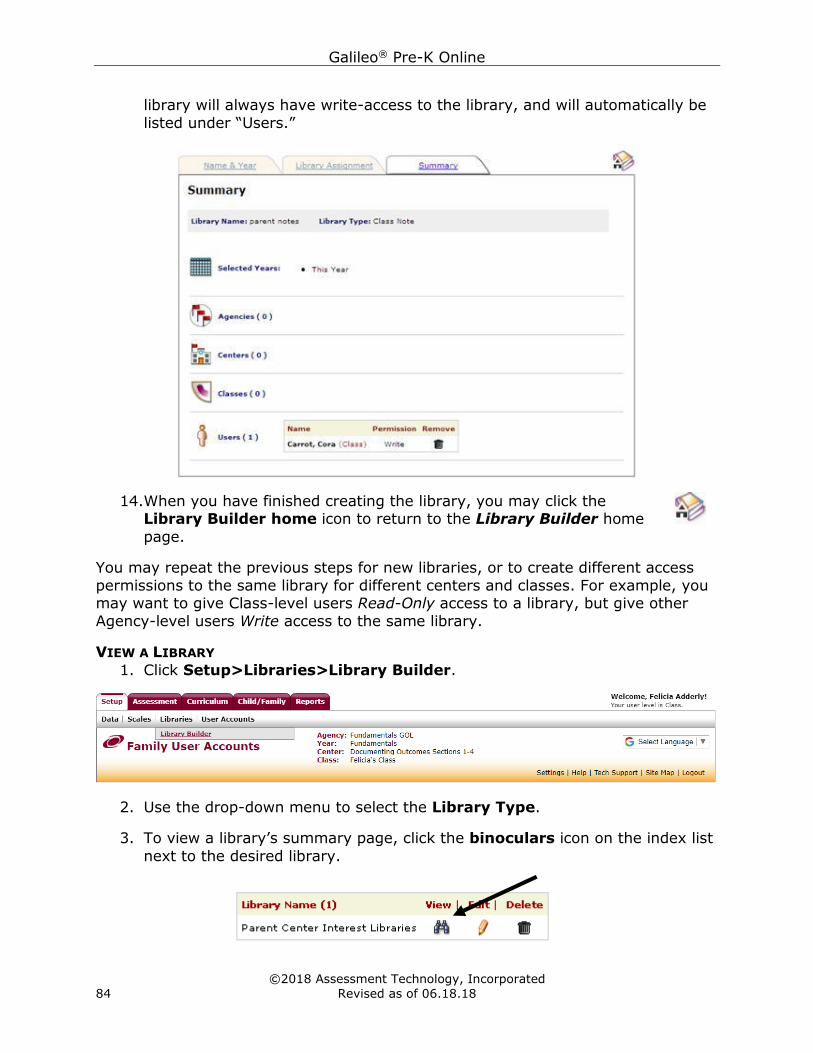
Galileo® Pre-K Online
©2018 Assessment Technology, Incorporated
84 Revised as of 06.18.18
library will always have write-access to the library, and will automatically be
listed under “Users.”
14.When you have finished creating the library, you may click the Library Builder home icon to return to the Library Builder home
page.
You may repeat the previous steps for new libraries, or to create different access
permissions to the same library for different centers and classes. For example, you may want to give Class-level users Read-Only access to a library, but give other
Agency-level users Write access to the same library.
VIEW A LIBRARY
1. Click Setup>Libraries>Library Builder.
2. Use the drop-down menu to select the Library Type.
3. To view a library’s summary page, click the binoculars icon on the index list
next to the desired library.
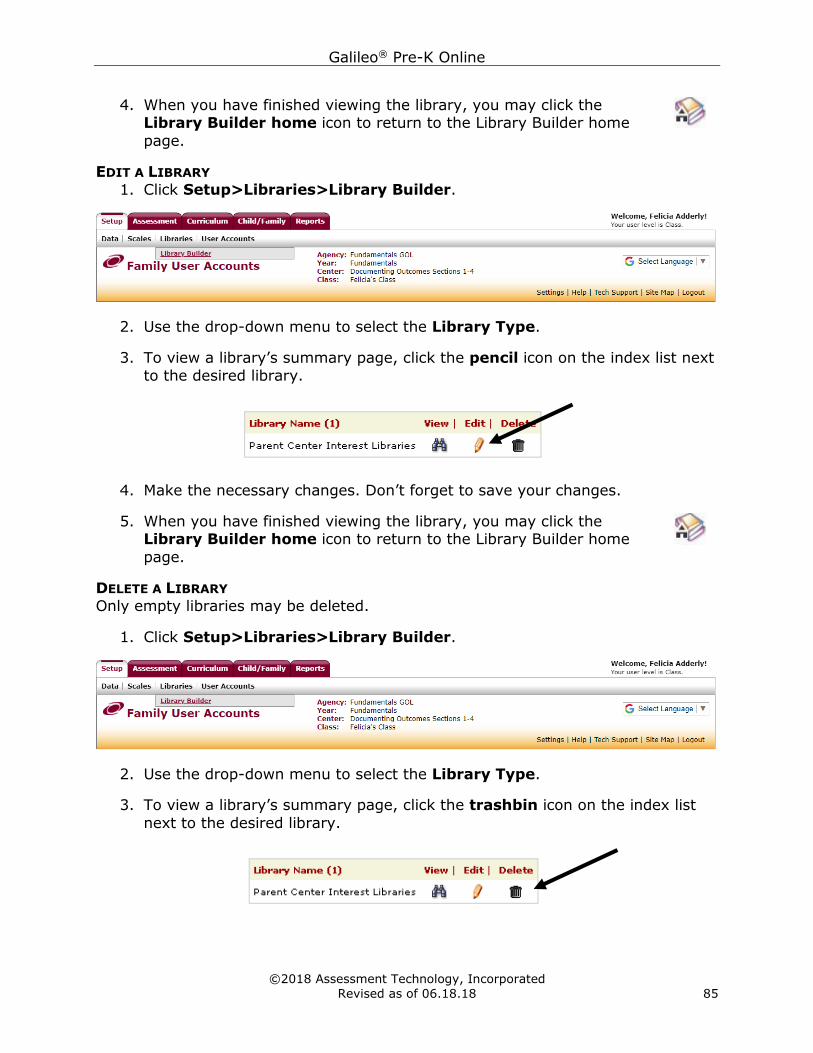
Galileo® Pre-K Online
©2018 Assessment Technology, Incorporated
Revised as of 06.18.18 85
4. When you have finished viewing the library, you may click the Library Builder home icon to return to the Library Builder home
page.
EDIT A LIBRARY
1. Click Setup>Libraries>Library Builder.
2. Use the drop-down menu to select the Library Type.
3. To view a library’s summary page, click the pencil icon on the index list next
to the desired library.
4. Make the necessary changes. Don’t forget to save your changes.
5. When you have finished viewing the library, you may click the Library Builder home icon to return to the Library Builder home
page.
DELETE A LIBRARY
Only empty libraries may be deleted.
1. Click Setup>Libraries>Library Builder.
2. Use the drop-down menu to select the Library Type.
3. To view a library’s summary page, click the trashbin icon on the index list
next to the desired library.


![Galileo - Manuale d'usogalileo-ofrm.ised.it/galileo/Galileo - Manuale utente.pdf · Manuale d’uso [OFR] - Progetto GALILEO - Manuale d’uso Documento di proprietà di ISED S.p.A](https://img.pdfslide.net/doc/110x75/5b7292867f8b9a95348d2403/galileo-manuale-dusogalileo-ofrmiseditgalileogalileo-manuale-manuale.jpg)