Embed Size (px)
Citation preview
FUNKY 15 / 17
English manual - revision 1.1August 2011
Seedwings Flugsport GmbHA 6262 Schlitters 63
Austria
Telephone 0043 650 7273 650Email: [email protected]
www.seedwings.at
Thank you for purchasing a Seedwings Europe Funky. We hope that your new Funky will bring you joy for many years to come.
• Please read this manual thoroughly!• Please take this manual with you when setting up your Funky for the first time.• Never fly when it’s raining as water on the sail can severely change the flying
characteristics of the glider.
Table of contents
1. Important notes on safety 32. DHV certification 43. Towing 44. Powered hang gliding 45. Re-assembly after shipping 46. Set-up procedure 57. Pre-flight check 78. Last checks before launching 79. Foot launching 810. In flight 811. Landing 912. Crashes or hard landings 913. Spare parts 1014. Breakdown procedure 1015. Short packing the glider 1116. Laying the glider flat 1117. Transport and storage 1118. Adjusting the glider’s settings 1219. Adjusting the glider’s trim speed 1219. Trimming out a build-in turn 1320. Service and maintenance 1321. Assembly diagram (Available in high resolution on www.seedwings.at) 1422. Funky 15 - DHV test flight report 1523. Funky 17 - DHV test flight report 1724. Specifications 1925. Insurance data 1926. List of owners 1927. Full strip down and inspection by authorized dealer or Seedwings Europe 1928. Funky 15 technical data sheet (In German) 2029. Funky 17 technical data sheet (In German) 2230. Guidelines for periodic (2 years/5 years) maintenance checks (In German) 24
2
1. Important notes on safety
All Seedwings Europe gliders are designed and build according to the highest level of modern design and manufacturing techniques.
Hang gliding has evolved into a safe sport. This is the result of certified instructors and a very strict testing and certification process of new gliders. The Funky is certified for both foot launch, winch towing and aero towing.
• Always get proper training from a certified instructor.• Only fly a glider that suits your level of pilot proficiency.• Carefully examine the weather conditions and only fly when the weather is safely suited for
flying. Very strong conditions can be extremely dangerous - also for experienced pilots. Extreme weather conditions can even result in structural failure which can have disastrous consequences.
• Fly regularly to maintain your level of pilot proficiency.• Never fly under the influence of alcohol or if you don’t feel well.• If you don’t feel like flying - even after you have set up your glider - breaking down your
glider and not go flying is a sign of maturity and not a sign of cowardliness.• There’s an added level of risk associated with flying a new glider. Your first flights should be
in calm conditions with an extra large landing area only performing simple and safe maneuvers. You can then gradually fly in more demanding conditions and gradually perform more advanced maneuvers.
• When getting aquatinted with your glider do not perform abrupt maneuvers below 150 m.• Helmet and emergency chute is mandatory!• Do not perform maneuvers with more than 60% bank in roll and +/- 30% in pitch.• Never exceed 70 km/h.• The Funky is not certified for aerobatics.• After big repairs, if you have had the sail removed from the frame or if you haven’t flown in a
while always launch from a place with easy landing options nearby.
As a pilot you must understand that due to the inherent risk involved in flying no warranty is made or implied of any kind against accidents, bodily injury or death other than those which cannot by law be excluded. In order to reduce any risks of accidents please follow the guidelines listed below.
3
2. DHV certification
The Funky is fully certified under the very strict requirements of the DHV. The Funky has been rated DHV1.
3. Towing
The Funky is certified for towing and is a lovely glider to tow with a great directional stability.
• Always receive proper tow training.• Make sure that any ground crew or tow pilots are fully certified and properly trained to assist
you. • Only tow using proper towing equipment (winch, car, aeroplane) that is purpose build for
towing hang gliders.• Only use a tested and certified tow release mechanism.• Always mount wheels on the basebar.
4. Powered hang gliding
When using one of the many powered harnesses available there are many very important safety measures to be made. Always consult Seedwings Europe prior to flying with a powered harness to be absolutely sure that the glider is safe to use for powered flight.
5. Re-assembly after shipping
This is easiest to do with the help of a friend. Open the zipper at the wing tip and the zipper where the side wires connect to the leading edge. The outer leading edges are marked with “left” and “right”. “Left and right” and “up and down” is in respect to when the glider is set up and you stand behind the glider looking forward.
The Funky is not certified as a tandem glider. Never hook in more than one person.
4
The bolt for connecting the leading edge tubes should be inserted from the bottom with the safety ring installed on the upper side of the leading edge tube. Yes, you read it correctly. The head of the bolt is pointed down when your glider is set up.
Near the tip of the wing you find the webbing anchor strap of the sail. This is to be mounted to the leading edge tube. It is absolutely vital that the strap is mounted to the underside of the leading edge tube. Don’t get confused know. You are currently having your glider upside down. When the glider is fully assembled and set up the strap MUST BE MOUNTED TO THE UNDERSIDE OF THE LEADING EDGE TUBE. Again, insert the bolt from the bottom with the safety ring on the upper side of the leading edge tube. Failing to connect the sail strap correctly can result in a twisted sail at the tips which has VERY SEVERE INFLUENCE on the glider’s flying characteristics.
6. Set-up procedure
Unless your glider came with a custom ordered slider for the A-frame it can only be set up standing on the A-frame.
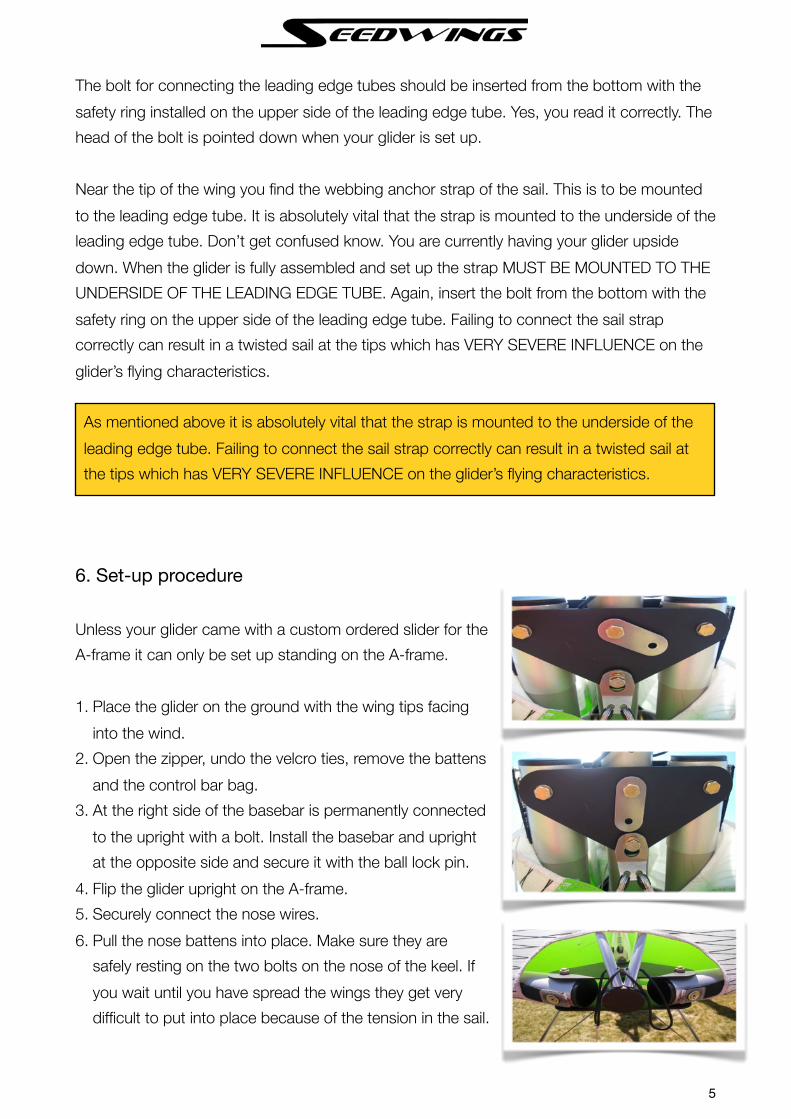
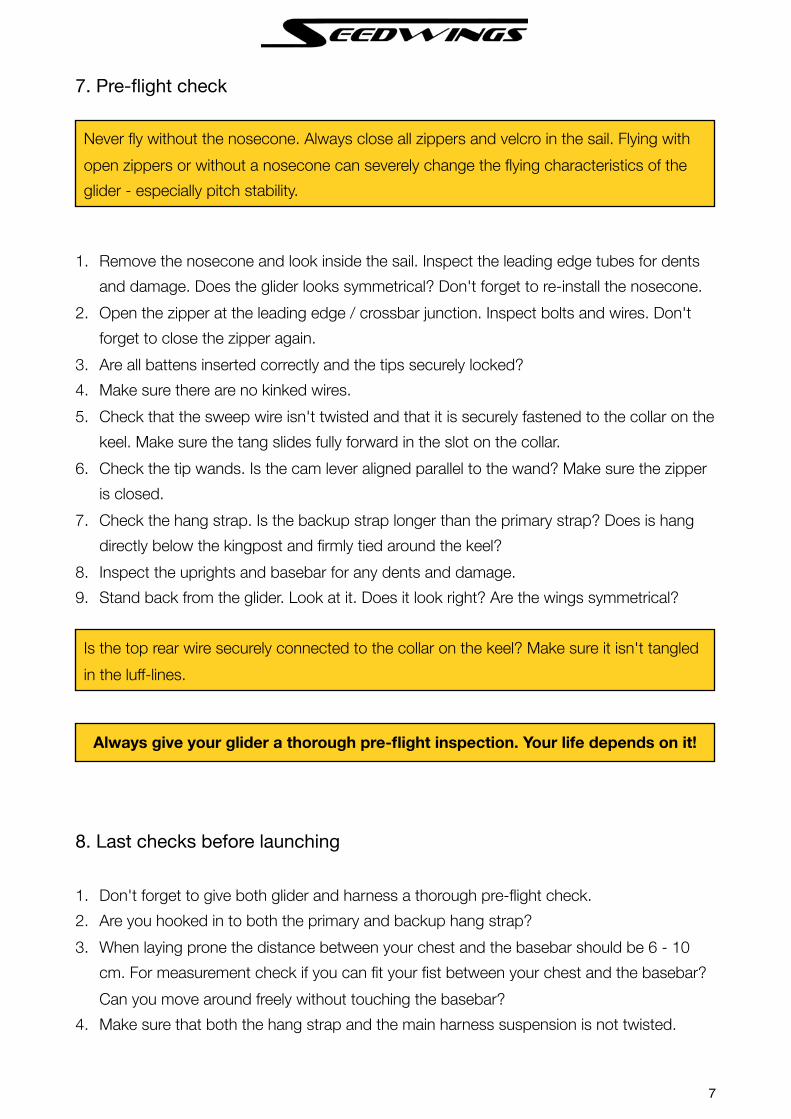
1. Place the glider on the ground with the wing tips facing into the wind.
2. Open the zipper, undo the velcro ties, remove the battens and the control bar bag.
3. At the right side of the basebar is permanently connected to the upright with a bolt. Install the basebar and upright at the opposite side and secure it with the ball lock pin.
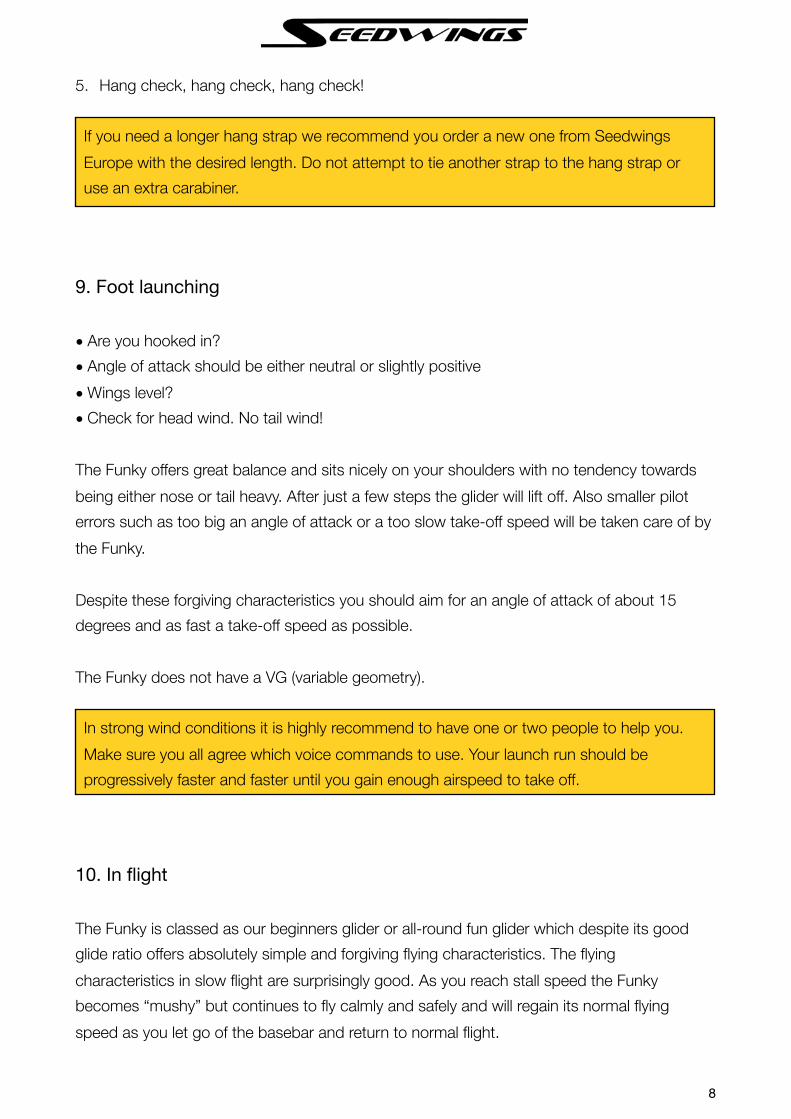
4. Flip the glider upright on the A-frame.5. Securely connect the nose wires.6. Pull the nose battens into place. Make sure they are
safely resting on the two bolts on the nose of the keel. If you wait until you have spread the wings they get very difficult to put into place because of the tension in the sail.
As mentioned above it is absolutely vital that the strap is mounted to the underside of the leading edge tube. Failing to connect the sail strap correctly can result in a twisted sail at the tips which has VERY SEVERE INFLUENCE on the glider’s flying characteristics.
5

7. Spread the wings almost all the way and erect the kingpost.
8. Remove the wing tip bags and unfold the wing tip. Open the outmost zipper and pull out the wand lever.
9. The tip wands are tapered; the larger end is installed in the receptacle in the end of the leading edge tube.
10. Install the tip wand into the receptacle and give it a good push all the way in until it bottoms out and you hear a firm “clonk”.
11. Standing in front of the glider pull the leading edge towards you. Pull back on the cam lever until the cup is beyond the end of the wand and install the cup onto the wand.
12. Cam over the tip wand cam lever thereby tensioning the sail at the tip. Make sure you are pulling down on the bottom surface zipper so that it doesn’t get caught and damaged between the cam lever and the tip wand.
13. Spread the wings all the way.14. Take out the battens. They are marked at the tip with
(L)eft and (R)ight. Sort them according to size and lay them on the ground.
15. Put in the battens one wing at a time. Start by inserting the longest batten.
16. Install the batten tips into the hem of the trailing edge and lock the tips to tension them. You should hear a click and the tip should be securely held in the locked position. If the hinge part accidentally pops off it can easily be put back on.
17. Pull the sweep wire out of the keel pocket and tension the glider by pulling firmly back on the wire. Secure it on the rear wire collar on the keel.
18. Secure the wire from the kingpost onto the same rear wire collar. Make sure the wire doesn’t get tangled with the luff lines.
19. Make sure that the cam lever on the tips are aligned parallel to the wand.20. Close all zippers and velcro in the sail.21. Put on the nose cone.22. Proceed with a thorough pre-flight check!
6
7. Pre-flight check
1. Remove the nosecone and look inside the sail. Inspect the leading edge tubes for dents and damage. Does the glider looks symmetrical? Don't forget to re-install the nosecone.
2. Open the zipper at the leading edge / crossbar junction. Inspect bolts and wires. Don't forget to close the zipper again.
3. Are all battens inserted correctly and the tips securely locked?4. Make sure there are no kinked wires.5. Check that the sweep wire isn't twisted and that it is securely fastened to the collar on the
keel. Make sure the tang slides fully forward in the slot on the collar.6. Check the tip wands. Is the cam lever aligned parallel to the wand? Make sure the zipper
is closed.7. Check the hang strap. Is the backup strap longer than the primary strap? Does is hang
directly below the kingpost and firmly tied around the keel?8. Inspect the uprights and basebar for any dents and damage.9. Stand back from the glider. Look at it. Does it look right? Are the wings symmetrical?
8. Last checks before launching
1. Don't forget to give both glider and harness a thorough pre-flight check.2. Are you hooked in to both the primary and backup hang strap?3. When laying prone the distance between your chest and the basebar should be 6 - 10
cm. For measurement check if you can fit your fist between your chest and the basebar? Can you move around freely without touching the basebar?
4. Make sure that both the hang strap and the main harness suspension is not twisted.
Never fly without the nosecone. Always close all zippers and velcro in the sail. Flying with open zippers or without a nosecone can severely change the flying characteristics of the glider - especially pitch stability.
Is the top rear wire securely connected to the collar on the keel? Make sure it isn't tangled in the luff-lines.
Always give your glider a thorough pre-flight inspection. Your life depends on it!
7
5. Hang check, hang check, hang check!
9. Foot launching
• Are you hooked in?• Angle of attack should be either neutral or slightly positive• Wings level?• Check for head wind. No tail wind!
The Funky offers great balance and sits nicely on your shoulders with no tendency towards being either nose or tail heavy. After just a few steps the glider will lift off. Also smaller pilot errors such as too big an angle of attack or a too slow take-off speed will be taken care of by the Funky.
Despite these forgiving characteristics you should aim for an angle of attack of about 15 degrees and as fast a take-off speed as possible.
The Funky does not have a VG (variable geometry).
10. In flight
The Funky is classed as our beginners glider or all-round fun glider which despite its good glide ratio offers absolutely simple and forgiving flying characteristics. The flying characteristics in slow flight are surprisingly good. As you reach stall speed the Funky becomes “mushy” but continues to fly calmly and safely and will regain its normal flying speed as you let go of the basebar and return to normal flight.
If you need a longer hang strap we recommend you order a new one from Seedwings Europe with the desired length. Do not attempt to tie another strap to the hang strap or use an extra carabiner.
In strong wind conditions it is highly recommend to have one or two people to help you. Make sure you all agree which voice commands to use. Your launch run should be progressively faster and faster until you gain enough airspeed to take off.
8
In flight the Funky offers great directional stability with no tendency to PIO.
11. Landing
• Set up your approach so that the final is always direct into the wind.• Fly slightly faster than trim speed.• Slowly ease the basebar forward. Notice how the glider slows down while maintaining
altitude.• When you feel negative bar pressure (the basebar wants to come towards you) push out
quickly and firmly.• The Funky stalls very gently.
12. Crashes or hard landings
In the unfortunate event of a crash or a hard landing - or if a parked glider gets flipped over by a wind gust - you must always give the glider a thorough inspection. Use the guidelines found in this manual.
Only fly in optimal weather conditions during the first flights. All maneuvers should be performed at a safe altitude with full clearance of all obstacles until you feel completely safe flying the Funky.
The Funky's glide ratio improves in ground effect. Keep this in mind when setting up your landing approach. Make sure the landing area is large during your first flights.
Keep your hands high on the uprights for better flare authority. If you find it difficult to grab the uprights high enough the leg loops of your harness may be too long.
Unless you are 100% certain that you have found and repaired all damage always have an authorized Seedwings Europe dealer inspect your glider.
9
13. Spare parts
Always use genuine Seedwings Europe spare parts. Never attempt to make your own spare parts. See the assembly diagram on page 14.
14. Breakdown procedure
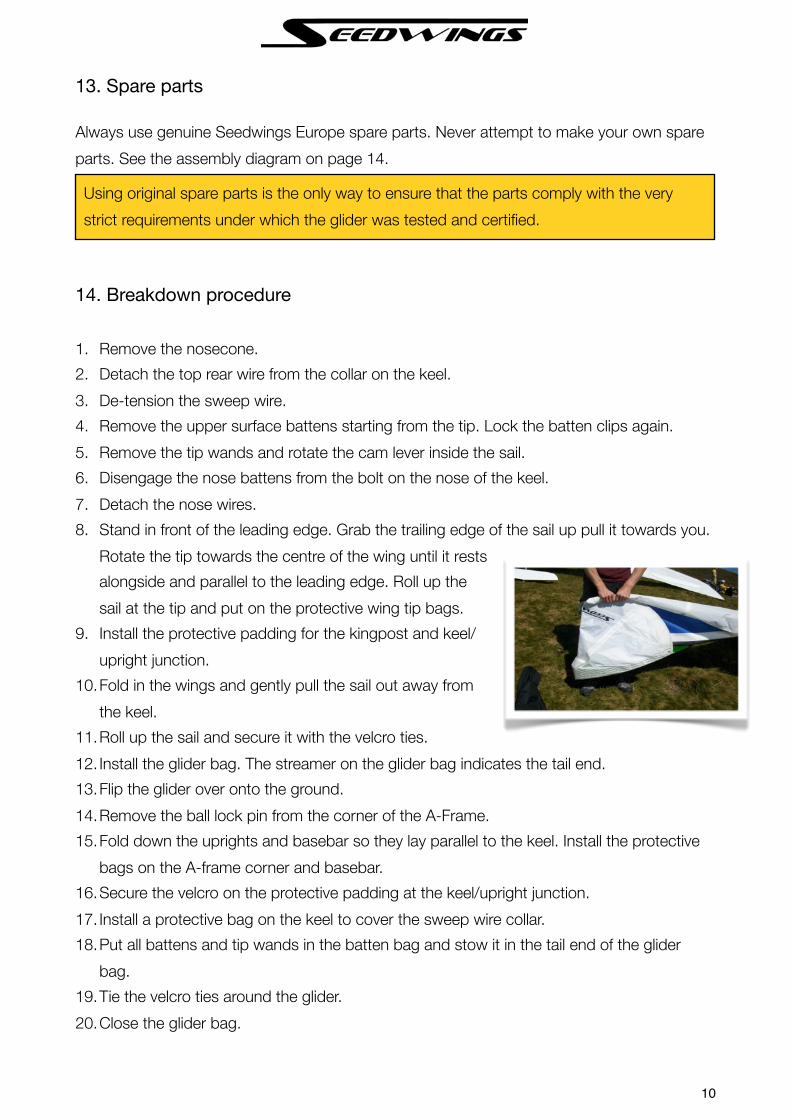
1. Remove the nosecone.2. Detach the top rear wire from the collar on the keel.3. De-tension the sweep wire.4. Remove the upper surface battens starting from the tip. Lock the batten clips again.5. Remove the tip wands and rotate the cam lever inside the sail.6. Disengage the nose battens from the bolt on the nose of the keel.7. Detach the nose wires.8. Stand in front of the leading edge. Grab the trailing edge of the sail up pull it towards you.
Rotate the tip towards the centre of the wing until it rests alongside and parallel to the leading edge. Roll up the sail at the tip and put on the protective wing tip bags.
9. Install the protective padding for the kingpost and keel/upright junction.
10.Fold in the wings and gently pull the sail out away from the keel.
11.Roll up the sail and secure it with the velcro ties.12. Install the glider bag. The streamer on the glider bag indicates the tail end.13.Flip the glider over onto the ground.14.Remove the ball lock pin from the corner of the A-Frame.15.Fold down the uprights and basebar so they lay parallel to the keel. Install the protective
bags on the A-frame corner and basebar.16.Secure the velcro on the protective padding at the keel/upright junction.17. Install a protective bag on the keel to cover the sweep wire collar.18.Put all battens and tip wands in the batten bag and stow it in the tail end of the glider
bag.19.Tie the velcro ties around the glider.20.Close the glider bag.
Using original spare parts is the only way to ensure that the parts comply with the very strict requirements under which the glider was tested and certified.
10
15. Short packing the glider
1. Open the glider bag.2. Remove the protective wing tip bags.3. Open the zipper at the leading edge / crossbar junction.4. Remove the bolt that connects the outer leading edge tube to the inner leading edge.
Mark them "left" and "right" if it's not already done.5. Remove the bolt that connects the sail's webbing anchor strap to the outer leading edge.6. Gently pull the leading edge apart.7. Stow the leading edges near the nose of the glider. Use good padding.8. Fold the tips of the sail.9. Remove the bolt from the right side of the basebar to remove the basebar. Stow the
basebar parallel to the uprights.10.Close glider bag zipper. Fold the end of the glider bag and secure it with a velcro tie.
16. Laying the glider flat
1. Face the glider's nose into the wind.2. Disconnect the upright and basebar at the right side. Ball lock pin recommended.3. Detach the nose wires.4. Gently pull the glider's nose towards you so that the A-frame folds beneath the glider.5. The glider can now be laid on the ground.
17. Transport and storage
The most common reason for damage on a glider is transportation.
1. If you packed the glider according to the instructions in this manual you should always store the glider in the bag with the zipper down.
2. The glider must rest on at least three supports or on a single support at least 2/3 the length of the glider.
3. Make sure that the roof rack or ladder has sufficient padding.
When putting the glider back on the A-frame you must give it a new pre-flight inspection!
11
4. When transporting by car we recommend also supporting the glider at the nose.5. Tie the glider down firmly but make sure you don't overdo it. You don't want to crush the
mylar of the leading edge.6. When transporting the glider by mountain cable car we recommend you travel with your
glider. Don't leave loading / unloading to someone else.7. Always store the glider in its bag.8. Always store the glider in a dry room.9. Never pack your glider and store when it's wet.
18. Adjusting the glider’s settings
Trimming the Funky requires a high level of experience with altering the various settings on a glider and an in-depth understanding on how it influences on the glider’s flying characteristics.
19. Adjusting the glider’s trim speed
The trim speed has been been trimmed and set at the Seedwings Europe workshop. The weight of the pilot and harness can have a significant influence on the trim speed which may require that you alter the trim speed settings.
A trim speed that is either too low or too high can cause the glider to become unstable in yaw and/or cause the glider to wind in in turns.
The trim speed can be adjusted by moving the kingpost back or forwards on the keel.
• On the keel you’ll find two holes. By moving the kingpost back and forth between these two you can make a rough adjustment.
• The fine adjustment is made using the four different holes in the kingpost sledge.• Fine adjusting the kingpost one hole back/forth changes the trim speed about 5 km/h.• Moving the kingpost forward results in a higher trim speed.
12
Only move the kingpost one hole a time. Moving the kingpost too much in one operation can have a significant influence on the glider’s flight characteristics.
19. Trimming out a build-in turn
Lay the batten diagram on a flat surface. Compare all battens with the batten diagram. A difference of 0,5 cm or more must always be corrected.
You can also adjust the second batten from the tip. Turn the batten clip to the left (in order to increase tension in the sail) on the wing to which the glider has a tendency to turn.
If the glider still has a tendency to turn to either side the angle of the tip wands can be adjusted. The ex-center of the bushing for the tip wand can be rotated 3 to 5 mm (maximum). For this you need a power drill, riveting pliers and a in-depth knowledge of aerodynamics.
20. Service and maintenance
The glider must undergo regular maintenance to ensure safety, performance and durability.
General maintenance:• Self-locking nuts must be replaced every single time they have been removed.• From time to time apply telfon spray to zippers, pulleys, fittings and battens.• Regularly check fittings, uprights and tubing for dents, corrosion etc.• Inspect wires and wire connectors for damage, dents, kink damage etc.• Never pack your glider when it’s wet as it can damage the sail.• Always replace damaged parts with original Seedwings Europe spare parts.
Every 20 hours:• Compare all battens to the batten diagram.• Check the tip wands for cracks and deformation. If the wand bends more than 3 mm
lengthwise it must be replaced. A deformed wand can cause the glider to turn.
Every 2 years:• Replace the tip wands.• Replace the side wires.
Unless you are 100% sure that you can perform these modifications safely always contact your authorized Seedwings dealer or Seedwings Europe directly.
13
• Regularly inspect the front and rear wires. They must be replaced at least every 5 years. Preferably sooner!
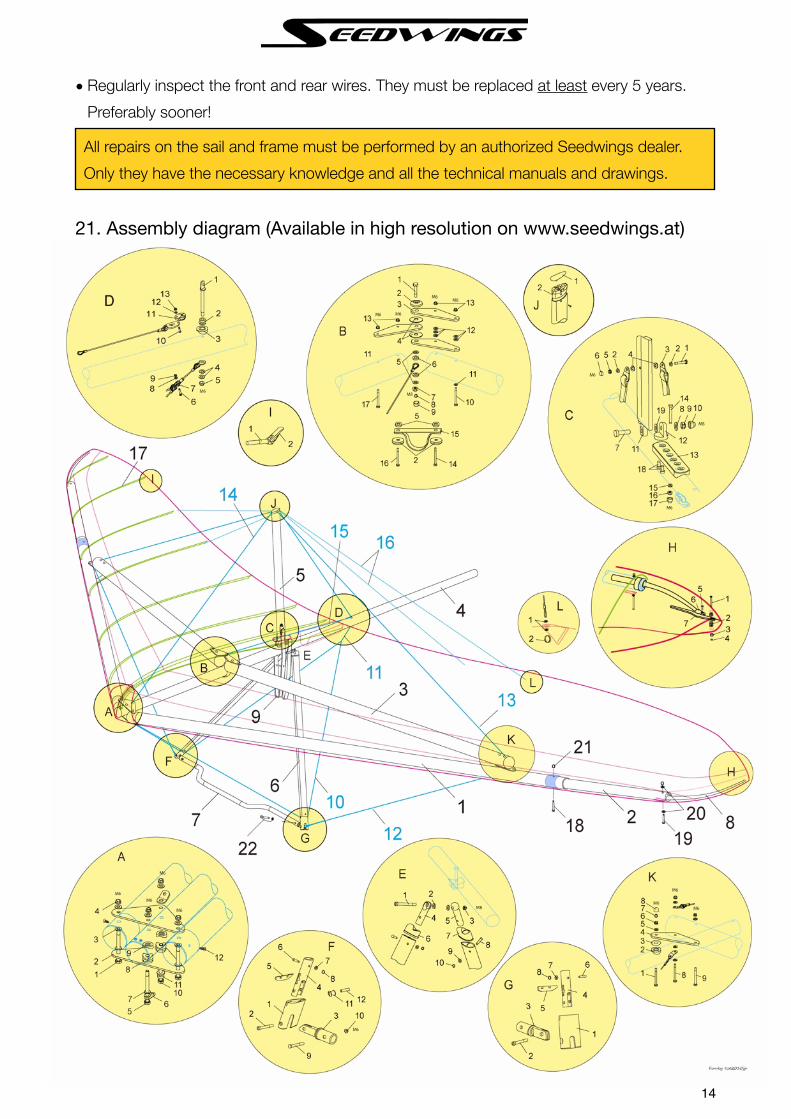
21. Assembly diagram (Available in high resolution on www.seedwings.at)
14
All repairs on the sail and frame must be performed by an authorized Seedwings dealer. Only they have the necessary knowledge and all the technical manuals and drawings.

22. Funky 15 - DHV test flight report
15
16
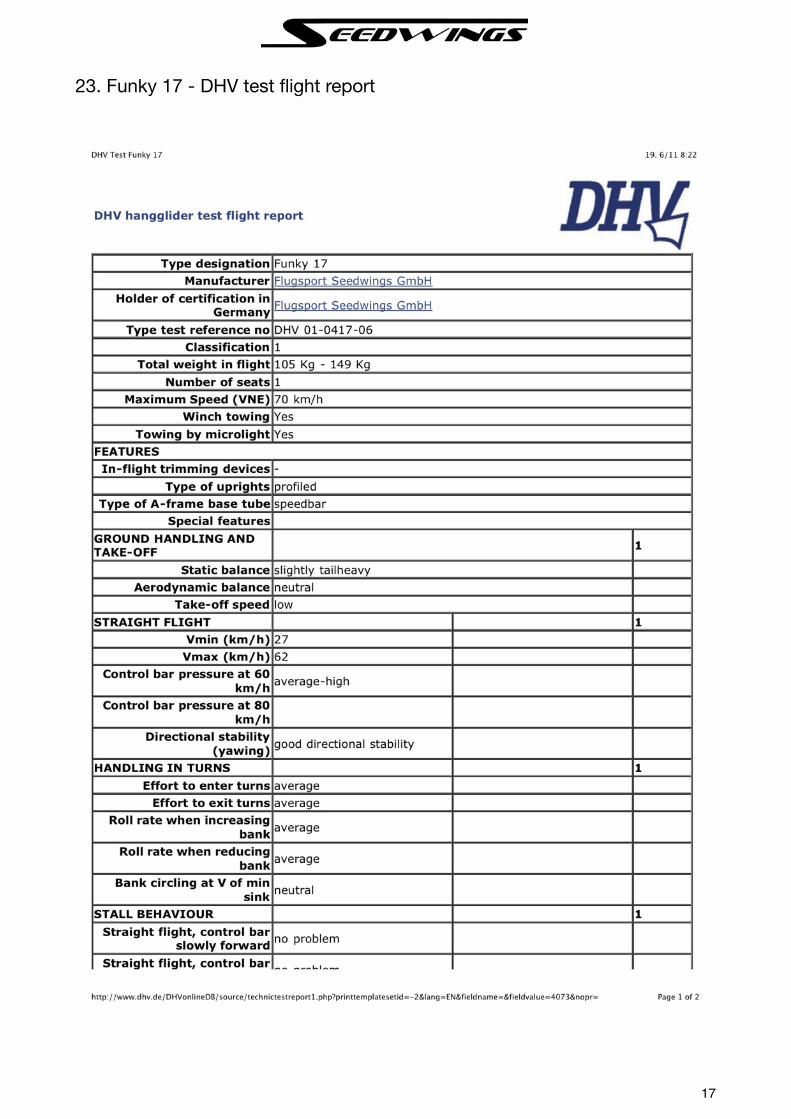
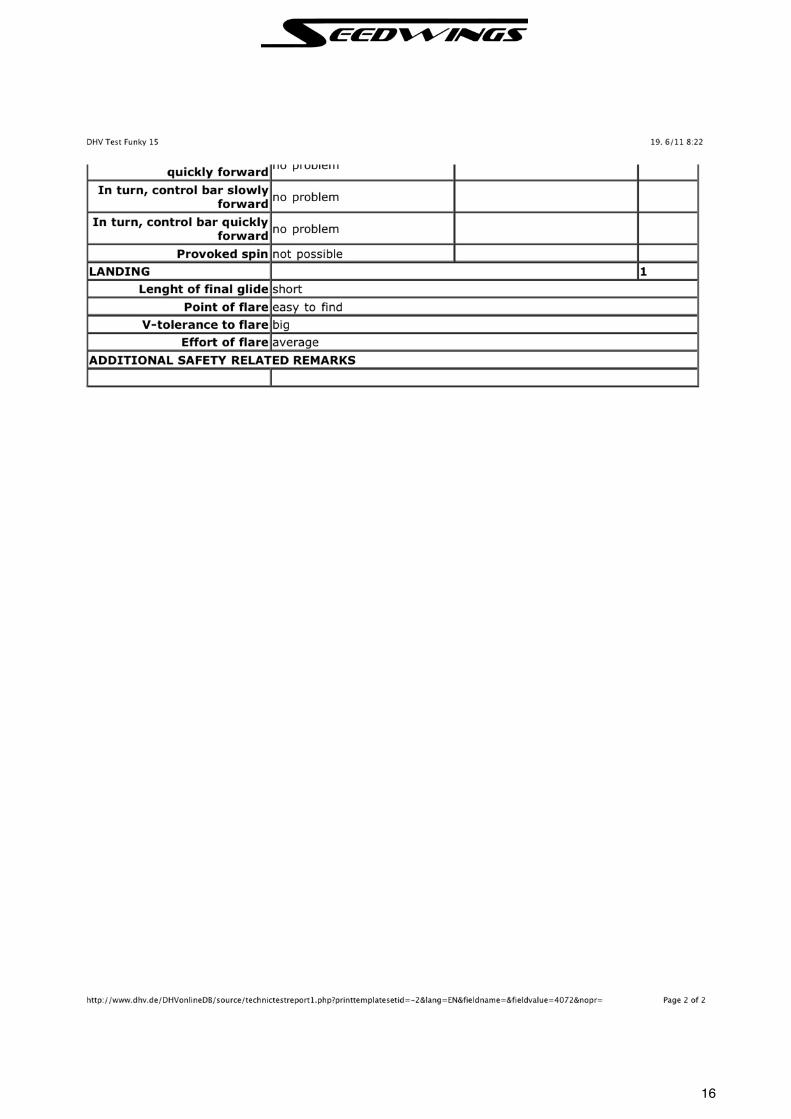
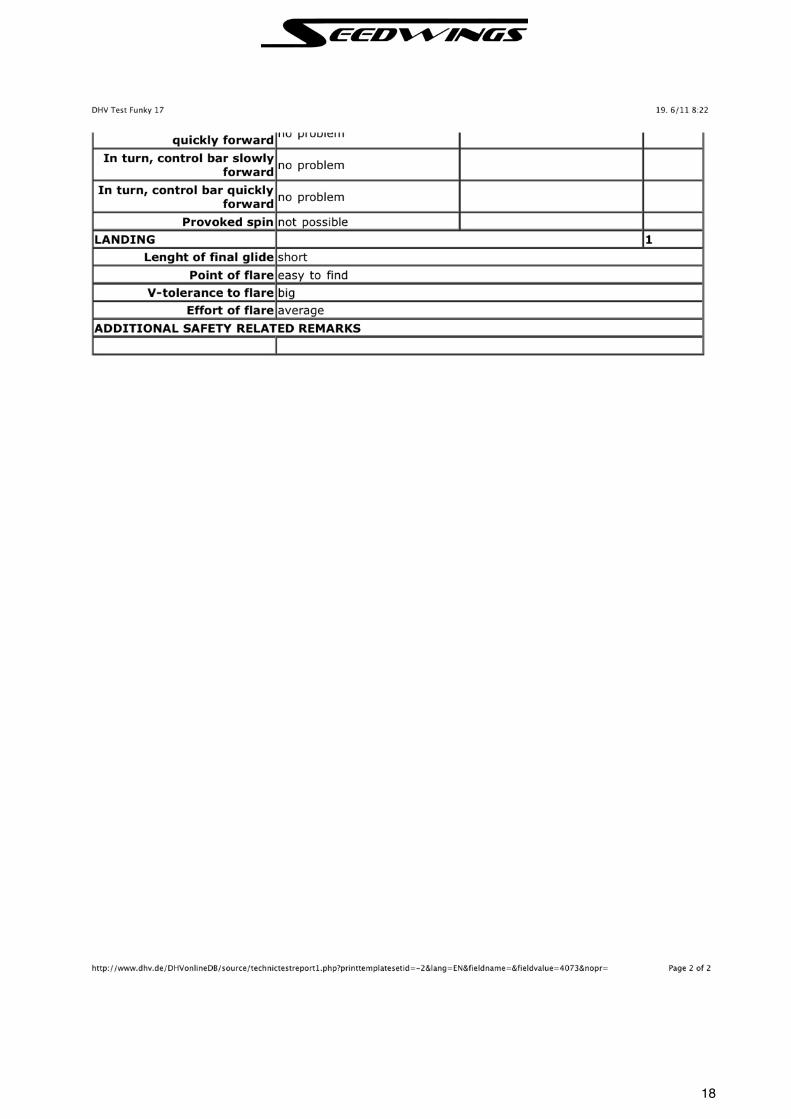
23. Funky 17 - DHV test flight report
17
18

24. Specifications
Funky 15 Funky 17
Area 15,3 m2 17,3 m2
Weight 21 kg 23 kg
Span 9,2 m 9,8 m
Packed length (short) 3,50 m 3,75 m
Packed length (long) 4,90 m 5,15 m
Aspect ratio 5,5 5,5
Number of nose battens 2 2
Upper surface battens 6 6
% double sail 30% 30%
Max. takeoff weight 130 kg 149 kg
Recommended pilot weight (without harness etc.)
55 - 85 kg 80 - 120 kg
DHV classification DHV1 DHV1
25. Insurance data
Hang glider model: _________________! Upper surface colour(s): _______________________
Serial number: ____________________ DHV certification number: ____________________ Year of manufacture: _________________
26. List of owners
1. owner: Name: ____________________ Address: ____________________________________2. owner: Name: ____________________ Address: ____________________________________
27. Full strip down and inspection by authorized dealer or Seedwings Europe
1. check: _____ / _____ - 20_____ Signature: ________________________________________2. check: _____ / _____ - 20_____ Signature: ________________________________________3. check: _____ / _____ - 20_____ Signature: ________________________________________
19
Funky
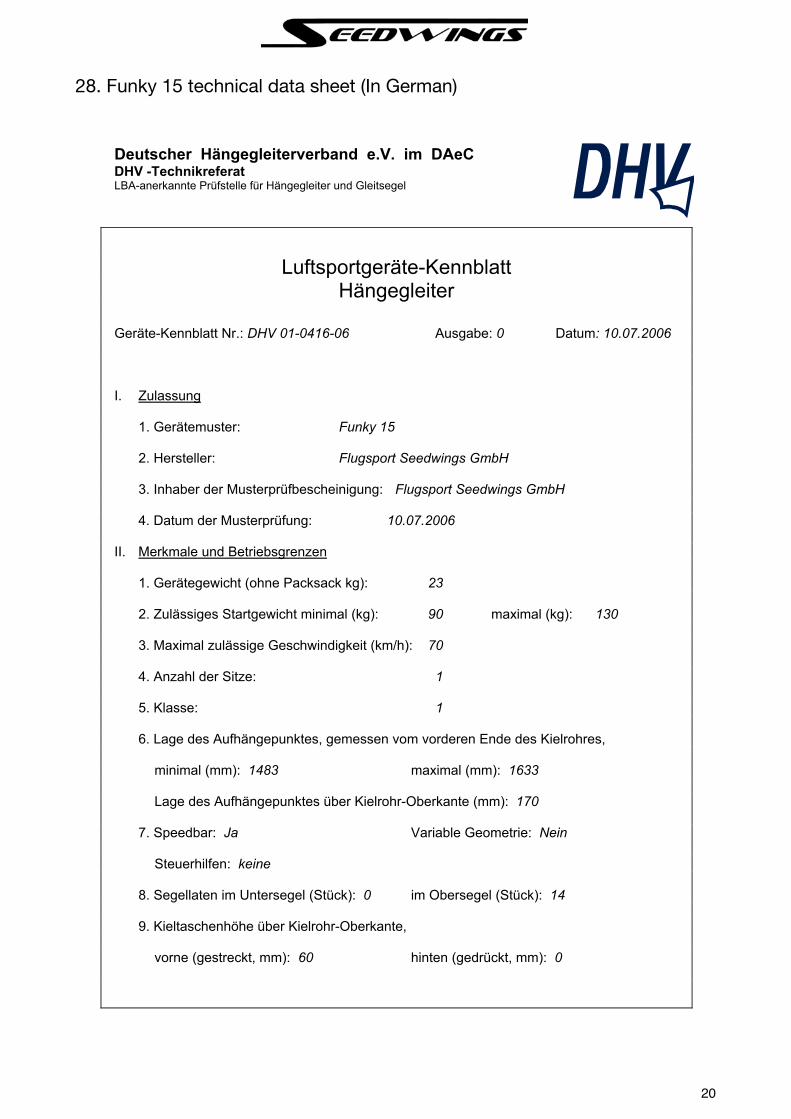
28. Funky 15 technical data sheet (In German)
20
Deutscher Hängegleiterverband e.V. im DAeC DHV -Technikreferat LBA-anerkannte Prüfstelle für Hängegleiter und Gleitsegel
Luftsportgeräte-Kennblatt
Hängegleiter Geräte-Kennblatt Nr.: DHV 01-0416-06 Ausgabe: 0 Datum: 10.07.2006 I. Zulassung 1. Gerätemuster: Funky 15 2. Hersteller: Flugsport Seedwings GmbH 3. Inhaber der Musterprüfbescheinigung: Flugsport Seedwings GmbH 4. Datum der Musterprüfung: 10.07.2006 II. Merkmale und Betriebsgrenzen 1. Gerätegewicht (ohne Packsack kg): 23 2. Zulässiges Startgewicht minimal (kg): 90 maximal (kg): 130 3. Maximal zulässige Geschwindigkeit (km/h): 70 4. Anzahl der Sitze: 1 5. Klasse: 1 6. Lage des Aufhängepunktes, gemessen vom vorderen Ende des Kielrohres, minimal (mm): 1483 maximal (mm): 1633 Lage des Aufhängepunktes über Kielrohr-Oberkante (mm): 170 7. Speedbar: Ja Variable Geometrie: Nein Steuerhilfen: keine 8. Segellaten im Untersegel (Stück): 0 im Obersegel (Stück): 14 9. Kieltaschenhöhe über Kielrohr-Oberkante, vorne (gestreckt, mm): 60 hinten (gedrückt, mm): 0

21
Seite 2 Geräte-Kennblatt Nr.: DHV 01-0417-06 Ausgabe: 0 Datum: 10.07.2006
10. Gestützte Segellatten über Kielrohr-Oberkante, von innen nach außen, (mm) VG gespannt, 1. Latte: 280 2. Latte: 430 3. Latte: 520 4. Latte: VG gespannt, 5. Latte: 6. Latte: 7. Latte: 8. Latte: VG gespannt 9. Latte: 10. Latte: VG entspannt, 1. Latte: 2. Latte: 3. Latte: 4. Latte: VG entspannt, 5. Latte: 6. Latte: 7. Latte: 8. Latte: VG entspannt 9. Latte: 10. Latte: 11. Swivelgestützte Segellatte über Kielrohr-Oberkante (mm) VG gespannt: VG entspannt: 12. Randbogen-Ende über Kielrohr-Oberkante (mm) VG gespannt: 245 VG entspannt: 13. Seitenrohr-Ende über Kielrohr-Oberkante (mm) Gerät auf Basis stehend, VG gespannt: 8 VG entspannt: Gerät auf Turm stehend, VG gespannt: VG entspannt: 14. Zugelassen für Windenschlepp: Ja für UL-Schlepp: Ja 15. Nachprüffrist: 60 Mo 16. Sonstige Besonderheiten: III. Betriebsanweisungen Betriebsanleitung in der genehmigten Fassung vom 02.05.2006.
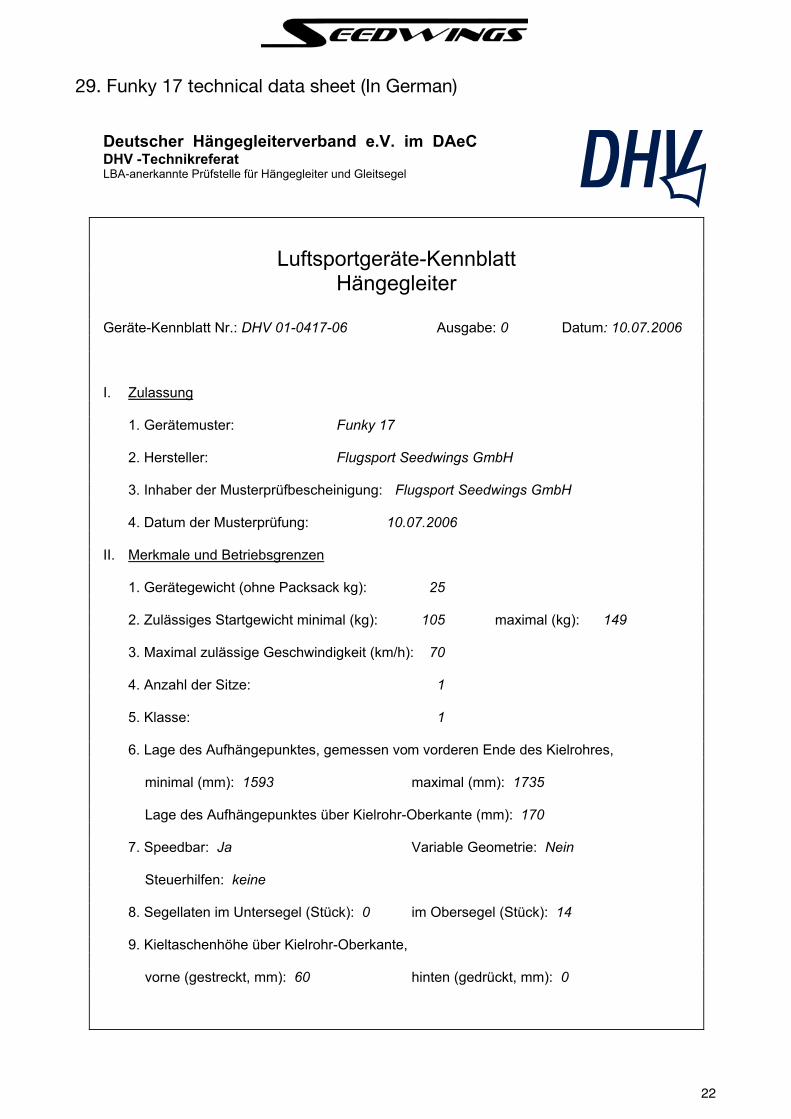
29. Funky 17 technical data sheet (In German)
22
Deutscher Hängegleiterverband e.V. im DAeC DHV -Technikreferat LBA-anerkannte Prüfstelle für Hängegleiter und Gleitsegel
Luftsportgeräte-Kennblatt Hängegleiter
Geräte-Kennblatt Nr.: DHV 01-0417-06 Ausgabe: 0 Datum: 10.07.2006 I. Zulassung 1. Gerätemuster: Funky 17 2. Hersteller: Flugsport Seedwings GmbH 3. Inhaber der Musterprüfbescheinigung: Flugsport Seedwings GmbH 4. Datum der Musterprüfung: 10.07.2006 II. Merkmale und Betriebsgrenzen 1. Gerätegewicht (ohne Packsack kg): 25 2. Zulässiges Startgewicht minimal (kg): 105 maximal (kg): 149 3. Maximal zulässige Geschwindigkeit (km/h): 70 4. Anzahl der Sitze: 1 5. Klasse: 1 6. Lage des Aufhängepunktes, gemessen vom vorderen Ende des Kielrohres, minimal (mm): 1593 maximal (mm): 1735 Lage des Aufhängepunktes über Kielrohr-Oberkante (mm): 170 7. Speedbar: Ja Variable Geometrie: Nein Steuerhilfen: keine 8. Segellaten im Untersegel (Stück): 0 im Obersegel (Stück): 14 9. Kieltaschenhöhe über Kielrohr-Oberkante, vorne (gestreckt, mm): 60 hinten (gedrückt, mm): 0

23
Seite 2 Geräte-Kennblatt Nr.: DHV 01-0417-06 Ausgabe: 0 Datum: 10.07.2006
10. Gestützte Segellatten über Kielrohr-Oberkante, von innen nach außen, (mm) VG gespannt, 1. Latte: 280 2. Latte: 430 3. Latte: 520 4. Latte: VG gespannt, 5. Latte: 6. Latte: 7. Latte: 8. Latte: VG gespannt 9. Latte: 10. Latte: VG entspannt, 1. Latte: 2. Latte: 3. Latte: 4. Latte: VG entspannt, 5. Latte: 6. Latte: 7. Latte: 8. Latte: VG entspannt 9. Latte: 10. Latte: 11. Swivelgestützte Segellatte über Kielrohr-Oberkante (mm) VG gespannt: VG entspannt: 12. Randbogen-Ende über Kielrohr-Oberkante (mm) VG gespannt: 245 VG entspannt: 13. Seitenrohr-Ende über Kielrohr-Oberkante (mm) Gerät auf Basis stehend, VG gespannt: 8 VG entspannt: Gerät auf Turm stehend, VG gespannt: VG entspannt: 14. Zugelassen für Windenschlepp: Ja für UL-Schlepp: Ja 15. Nachprüffrist: 60 Mo 16. Sonstige Besonderheiten: III. Betriebsanweisungen Betriebsanleitung in der genehmigten Fassung vom 02.05.2006.
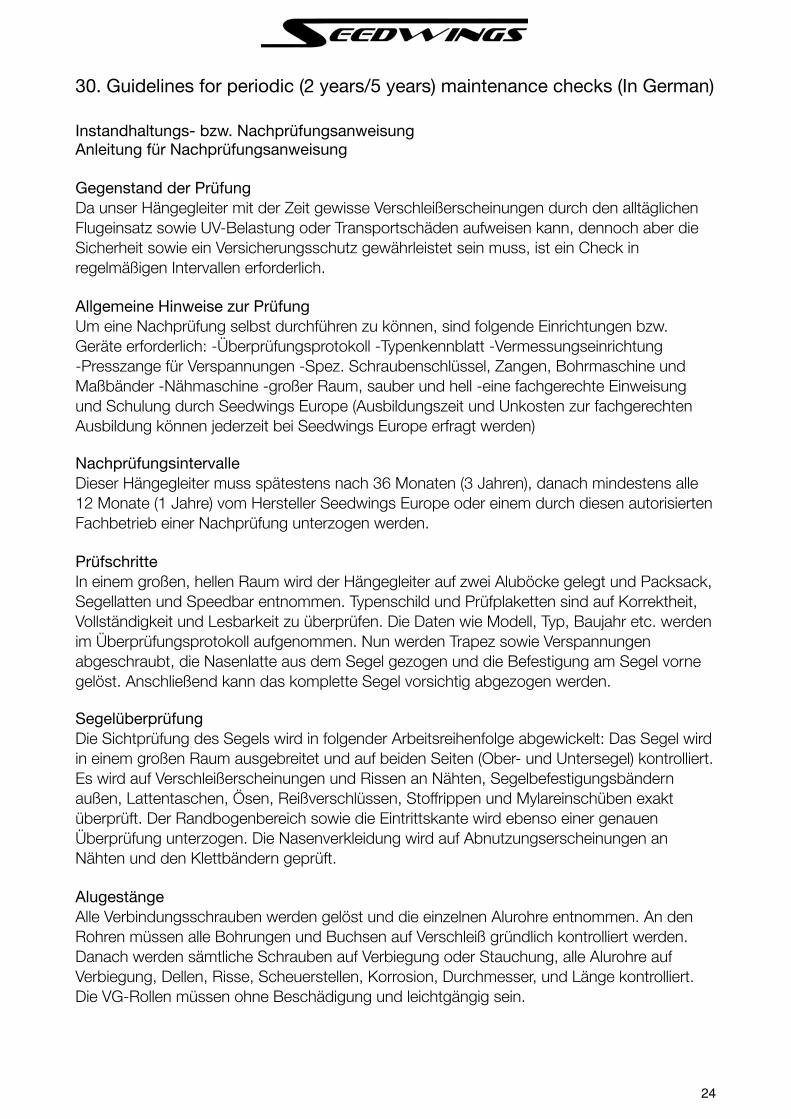
30. Guidelines for periodic (2 years/5 years) maintenance checks (In German)
Instandhaltungs- bzw. NachprüfungsanweisungAnleitung für Nachprüfungsanweisung
Gegenstand der PrüfungDa unser Hängegleiter mit der Zeit gewisse Verschleißerscheinungen durch den alltäglichen Flugeinsatz sowie UV-Belastung oder Transportschäden aufweisen kann, dennoch aber die Sicherheit sowie ein Versicherungsschutz gewährleistet sein muss, ist ein Check in regelmäßigen Intervallen erforderlich.
Allgemeine Hinweise zur PrüfungUm eine Nachprüfung selbst durchführen zu können, sind folgende Einrichtungen bzw. Geräte erforderlich: -Überprüfungsprotokoll -Typenkennblatt -Vermessungseinrichtung-Presszange für Verspannungen -Spez. Schraubenschlüssel, Zangen, Bohrmaschine und Maßbänder -Nähmaschine -großer Raum, sauber und hell -eine fachgerechte Einweisung und Schulung durch Seedwings Europe (Ausbildungszeit und Unkosten zur fachgerechten Ausbildung können jederzeit bei Seedwings Europe erfragt werden)
NachprüfungsintervalleDieser Hängegleiter muss spätestens nach 36 Monaten (3 Jahren), danach mindestens alle 12 Monate (1 Jahre) vom Hersteller Seedwings Europe oder einem durch diesen autorisierten Fachbetrieb einer Nachprüfung unterzogen werden.
PrüfschritteIn einem großen, hellen Raum wird der Hängegleiter auf zwei Aluböcke gelegt und Packsack, Segellatten und Speedbar entnommen. Typenschild und Prüfplaketten sind auf Korrektheit, Vollständigkeit und Lesbarkeit zu überprüfen. Die Daten wie Modell, Typ, Baujahr etc. werden im Überprüfungsprotokoll aufgenommen. Nun werden Trapez sowie Verspannungen abgeschraubt, die Nasenlatte aus dem Segel gezogen und die Befestigung am Segel vorne gelöst. Anschließend kann das komplette Segel vorsichtig abgezogen werden.
SegelüberprüfungDie Sichtprüfung des Segels wird in folgender Arbeitsreihenfolge abgewickelt: Das Segel wird in einem großen Raum ausgebreitet und auf beiden Seiten (Ober- und Untersegel) kontrolliert. Es wird auf Verschleißerscheinungen und Rissen an Nähten, Segelbefestigungsbändern außen, Lattentaschen, Ösen, Reißverschlüssen, Stoffrippen und Mylareinschüben exakt überprüft. Der Randbogenbereich sowie die Eintrittskante wird ebenso einer genauen Überprüfung unterzogen. Die Nasenverkleidung wird auf Abnutzungserscheinungen an Nähten und den Klettbändern geprüft.
AlugestängeAlle Verbindungsschrauben werden gelöst und die einzelnen Alurohre entnommen. An den Rohren müssen alle Bohrungen und Buchsen auf Verschleiß gründlich kontrolliert werden. Danach werden sämtliche Schrauben auf Verbiegung oder Stauchung, alle Alurohre auf Verbiegung, Dellen, Risse, Scheuerstellen, Korrosion, Durchmesser, und Länge kontrolliert. Die VG-Rollen müssen ohne Beschädigung und leichtgängig sein.
24
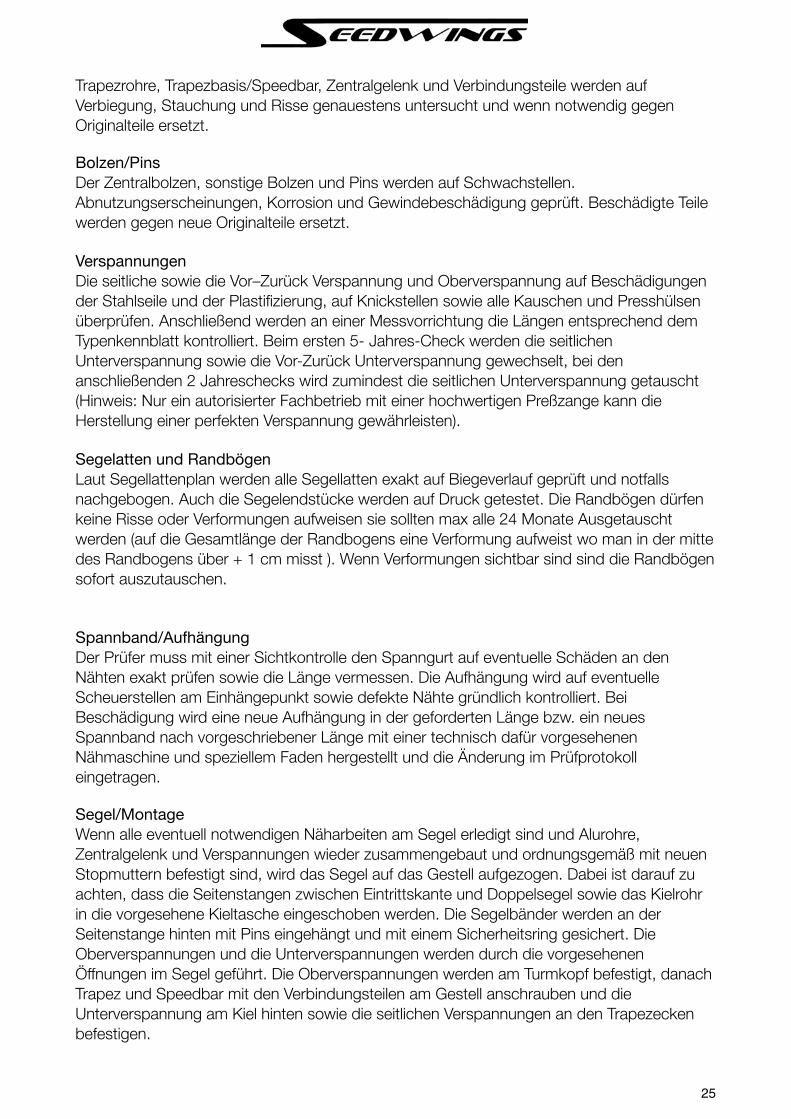
Trapezrohre, Trapezbasis/Speedbar, Zentralgelenk und Verbindungsteile werden auf Verbiegung, Stauchung und Risse genauestens untersucht und wenn notwendig gegen Originalteile ersetzt.
Bolzen/PinsDer Zentralbolzen, sonstige Bolzen und Pins werden auf Schwachstellen. Abnutzungserscheinungen, Korrosion und Gewindebeschädigung geprüft. Beschädigte Teile werden gegen neue Originalteile ersetzt.
VerspannungenDie seitliche sowie die Vor–Zurück Verspannung und Oberverspannung auf Beschädigungen der Stahlseile und der Plastifizierung, auf Knickstellen sowie alle Kauschen und Presshülsen überprüfen. Anschließend werden an einer Messvorrichtung die Längen entsprechend dem Typenkennblatt kontrolliert. Beim ersten 5- Jahres-Check werden die seitlichen Unterverspannung sowie die Vor-Zurück Unterverspannung gewechselt, bei den anschließenden 2 Jahreschecks wird zumindest die seitlichen Unterverspannung getauscht(Hinweis: Nur ein autorisierter Fachbetrieb mit einer hochwertigen Preßzange kann die Herstellung einer perfekten Verspannung gewährleisten).
Segelatten und RandbögenLaut Segellattenplan werden alle Segellatten exakt auf Biegeverlauf geprüft und notfalls nachgebogen. Auch die Segelendstücke werden auf Druck getestet. Die Randbögen dürfen keine Risse oder Verformungen aufweisen sie sollten max alle 24 Monate Ausgetauscht werden (auf die Gesamtlänge der Randbogens eine Verformung aufweist wo man in der mitte des Randbogens über + 1 cm misst ). Wenn Verformungen sichtbar sind sind die Randbögen sofort auszutauschen.
Spannband/AufhängungDer Prüfer muss mit einer Sichtkontrolle den Spanngurt auf eventuelle Schäden an den Nähten exakt prüfen sowie die Länge vermessen. Die Aufhängung wird auf eventuelle Scheuerstellen am Einhängepunkt sowie defekte Nähte gründlich kontrolliert. Bei Beschädigung wird eine neue Aufhängung in der geforderten Länge bzw. ein neues Spannband nach vorgeschriebener Länge mit einer technisch dafür vorgesehenen Nähmaschine und speziellem Faden hergestellt und die Änderung im Prüfprotokoll eingetragen.
Segel/MontageWenn alle eventuell notwendigen Näharbeiten am Segel erledigt sind und Alurohre, Zentralgelenk und Verspannungen wieder zusammengebaut und ordnungsgemäß mit neuen Stopmuttern befestigt sind, wird das Segel auf das Gestell aufgezogen. Dabei ist darauf zu achten, dass die Seitenstangen zwischen Eintrittskante und Doppelsegel sowie das Kielrohr in die vorgesehene Kieltasche eingeschoben werden. Die Segelbänder werden an der Seitenstange hinten mit Pins eingehängt und mit einem Sicherheitsring gesichert. Die Oberverspannungen und die Unterverspannungen werden durch die vorgesehenen Öffnungen im Segel geführt. Die Oberverspannungen werden am Turmkopf befestigt, danach Trapez und Speedbar mit den Verbindungsteilen am Gestell anschrauben und die Unterverspannung am Kiel hinten sowie die seitlichen Verspannungen an den Trapezecken befestigen.
25

Aufbau des GleitersJetzt muss der Hängegleiter auf das Trapez gestellt und die Flügel ausgebreitet werden. Die Nasenlatte wird von vorne nach hinten in die Segellattentasche eingeschoben und die Kieltasche hinten mit Der entsprechenden Schraube am Kielrohr befestigt. Anschließend wird nach Bedienungsanleitung der Gleiter komplett aufgebaut.
VermessungNun wird der Gleiter auf eine Vermessungseinrichtung gestellt, so dass die Speedbar keinen Bodenkontakt hat. Alle Vermessungen der einzelnen Segellatten werden mit einer Schnur gemessen und sofort protokolliert und anschließend wird die nächste Segellatte vermessen. Wenn alle einzelnen Messergebnisse der Segellatten mit dem Typenkennblatt verglichen und im Überprüfungsprotokoll eingetragen sind (zulässiger Toleranzwert ±1cm), muss der Prüfer eine Gesamtbewertung erstellen. Sollten die Werte nicht übereinstimmen, müssen entsprechende Korrekturmaßnahmen in Rücksprache mit Seedwings-Europe durchgeführt werden.
BewertungshinweisUnter Bewertungshinweise müssen sonstige Reparaturen und Korrekturarbeiten eingetragen und der Gesamtzustand des Geräts beurteilt werden. Von jedem Prüfergebnis einer Nachpüfung am Hängegleiter ist umgehend eine Kopie des Nachprüfprotokolls an Seedwings Europe zu übersenden. Sollte der Hängegleiter in einem schlechtem Zustand sein, kann der Prüfer nur noch für 12 Monate statt für 24 Monate die Zulassung erteilen. Zusätzlich ist der Prüfer innerhalb von 3 Tagen zur Meldung von außergewöhnlichen Mängeln an den Hersteller verpflichtet.
Kennzeichnung der NachprüfungDie Bestätigung der Nachprüfung am Hängegleiter und im Betriebshandbuch kann nur von einer autorisierten Prüfpersonen mit ausführlicher Einweisung durch Seedwings Europe erfolgen. Hierfür wird die Prüfung durch Unterschrift (wenn vorhanden Stempel der Prüfstelle) am Fluggerät und im Handbuch bestätigt.
Personelle Voraussetzungen für die NachprüfungEine ausreichende typenbezogene 3-wöchige Einschulung und spezielle Ausbildung im Betrieb bei Seedwings Europe sowie eine anerkannte, gültige Fluglizenz ist die Grundvoraussetzung für die Erlaubnis zur Durchführung der Nachprüfung einen Hängegleiters.
Umweltgerechte Entsorgung des HängegleiterEs ist bei der Entsorgung des Hängegleiter zu achten , das der Hängegleiter gesondert zu entsorgen ist Das heisst er muss in seine Einzelteile zerlegt und Dementsprechend entsorgt werden Alu zu Aluminium / das Segel ohne Pitschkabel zu PVC Sondermüll und die Schrauben zu Eisen.
26