Embed Size (px)
Citation preview
COOPERATIVE EXTENSION SERVICE • OREGON STATE UNIVERSITY • CORVALLIS
FURNITURE RESTORATION
Extension Circular 734 Revised January 1970
4 WHEN IS RESTORATION WORTHWHILE?
4 AVOID OVER-RESTORATION
5 CLEANING MAY RESTORE FURNITURE 5 Natural Wood Finishes 6 Brass Hardware 7 Leather
7 DAMAGED FINISHES MAY BE REPAIRED 7 Paper Adhered to Surface 7 White Spots or Rings 8 Scratches 8 Small Cracks Near An Edge 9 Gouges, Holes, Burns
CONTENTS
10 SOME FINISHES CAN BE REVIVED 10 Hairline Checking of Varnish 11 Cloudy Varnish Finishes 11 Dull Dry Oil, Varnish, or Lacquer II Furniture With Matte (Dull) Finish 11 Foggy, Faded, Scratched, Worn Shellac
11 REFINISHING WOOD FURNITURE I I Arrange Space to Work I I Usual Steps in Refinishing Wood 12 To Determine Type of Old Finish on Your Piece 12 Remove Hardware, Upholstery, Caning 12 Remove the Old Finish 16 Examine Wood After Removing Finish 16 Prepare Bare Wood for Finish 17 Smooth Bare Wood With Abrasives 20 Wipe Wood Surface 20 Stain Wood If Necessary 24 Apply Finish
Take Precautions When Using Finishing Materials or Cleaning Solvents
The words "Flammable" or "Keep away from flame" on containers mean that the products give off flammable vapors at room temperatures. When you open the container, flammable vapors come out of the opening.
As soon as you spread one of these substances on a surface, the vapors come off much faster. And as these vapors mix with the air, they will burn or explode if a spark or flame ignites them. Striking a match, operating a light switch, or even the flame in a gas range pilot light can ignite such fumes.
• Read the manufacturer's labels and heed their warnings.
• Provide good cross ventilation to carry vapors away quickly, to prevent toxic effects from breathing fumes, and to reduce danger of fire.
• Don't smoke in the area where you use flammables.
• Replace caps immediately after pouring finishing liquids.
• Do not let containers of flammable liquids stand uncovered. Place cover on container while you work.
• Place rags or papers used in finishing in metal covered cans after use. Or destroy them at once. Don't leave them crumpled in open containers. They are subject to spon- taneous heating under certain conditions and can start fires in your home.
FURNITURE RESTORATION
This publication was written by Gena Thames, Associate Specialist in Home Furnishings, Extension service. College of Agriculture, Rutgers—the State University of New Jersey, New Brunswick.
You can furnish your home inexpensively and with real distinction and beauty by refinishing furniture.
New materials and methods of finishing make it possible to restore an old piece to beauty and even to enhance its usefulness. You may apply finishes that resist moisture, alka- lies, acids, alcohol, heat, or abrasion. These finishes are ap- propriate for today's way of living, withstanding maximum wear with a minimum of care.
First, look at the pieces you have. Could you enhance their beauty and usefulness by refinishing them?
Secondhand pieces of simple design and durable construc- tion, if suitable for your purpose, may be bought reasonably. Explore secondhand stores, auctions, swap shops, sales from model homes, and movers' storage warehouses. Read want ads in local papers. Or you may enjoy shopping in antique shops.
Unfinished furniture with beauty in grain and wood color is another possibility.
Restoring Furniture Not Difficult Furniture restoration is not difficult, even for a beginner.
Time, patience, and care are essential. Your first restoration
project can be completely successful. Just follow each step carefully to avoid difficulties that would take much time and effort to correct later.
There are many ways to restore furniture. Some techniques are best suited for professional use. The methods included in this bulletin are appropriate for beginners as well as those who have had some experience.
It is rewarding to see the beauty of natural wood grain and color emerge from beneath layers of old finish. As the mellow satin-smooth finish develops, you will feel real satis- faction in your accomplishment.
You don't need to be an expert on identifying antiques or woods to select furniture for restoration. You need only to recognize beauty in wood and style. You may glean much information by studying restored pieces in museums and shops, and by observing woods and finishes used in new furniture displayed in stores.
Natural Finish Reveals True Beauty Old furniture with beautiful color and grain usually is given
a natural finish — a clear finish that shows the natural wood color and grain, with no apparent surface covering.
WHEN IS RESTORATION WORTHWHILE? A piece of furniture does not have to be a collector's item
to give you pleasure and have value. If the wood has natural beauty and the design is pleasing to you, if the piece fits your purpose and your home, restoration may be well worth your while.
Examine Piece Carefully, Ask Yourself: • Will it be functional? How will I use it, and where will
I place it in my home? Will it fit the space?
• Is it well designed with pleasing lines and proportions?
• Is it constructed from one or several woods? Scrape sev- eral small areas on an underside with your fingernail. Moisten with finger to see if refinished wood will have rich color. Color may be freshened or added with stain.
• Are any parts missing? Would they be expensive to replace? Can I replace them at home with available tools, materials?
• Is construction sturdy? Check for loose joints.
• If piece has poorly constructed or designed features, can it be remodeled to advantage?
• Will restored piece cost less than a new piece of furniture? If not, it may be wiser to buy a new piece, unless it is valu- able as an antique.
• Will restored piece blend with my furnishings? Woods and styles do not have to match.
• Or does piece just need cleaning?
AVOID OVER-RESTORATION
When restoring old furniture, don't attempt to make the piece look new. Part of the charm of old furniture lies in the signs of age and use that remind you of the people and social customs of earlier days. Over-restoration can ruin a fine old piece.
If the piece is not disfigured, leave some indications of age — the marks of the cabinetmaker, some signs of wear. The proof that a piece is an antique, and its commercial value, often rests on these marks.
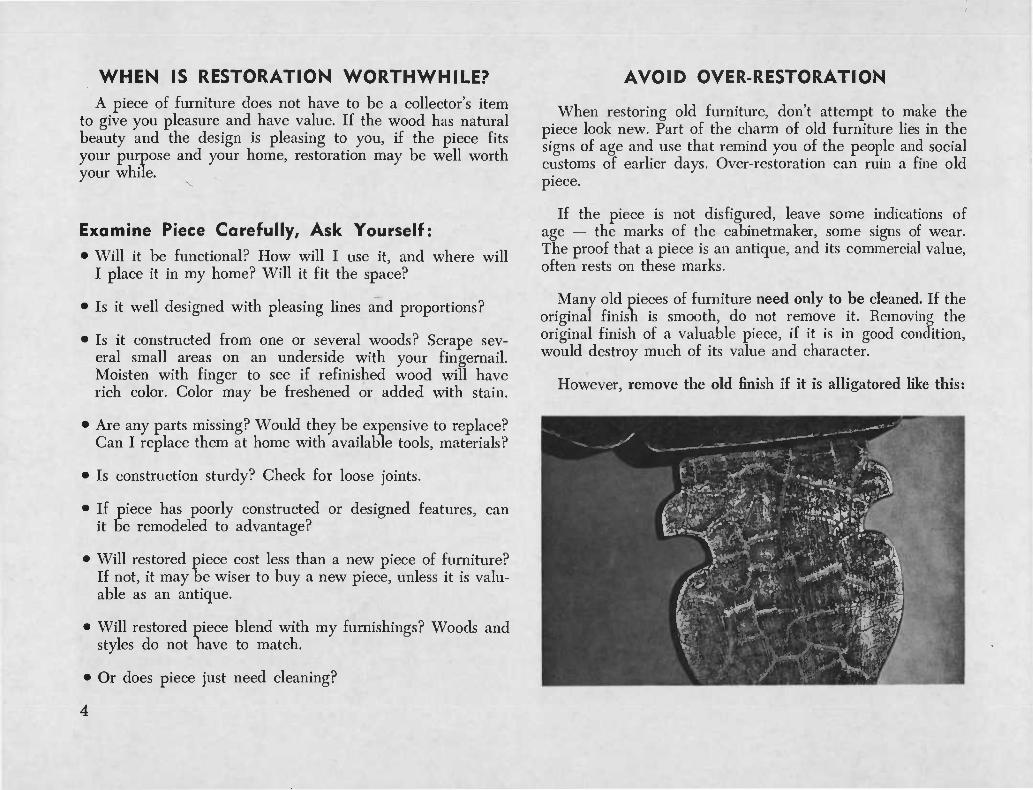
Many old pieces of furniture need only to be cleaned. If the original finish is smooth, do not remove it. Removing the original finish of a valuable piece, if it is in good condition, would destroy much of its value and character.
However, remove the old finish if it is alligatored like this:
• V
■■
:-.' r .-■ . ... ^.-i
• //v.
1
Hhfk ^ I-
I , i%* ,■,.• ',..;• ■' v A y\
p |
X ■^v^J
CLEANING MAY RESTORE FURNITURE NATURAL WOOD FINISHES
If Finish is Smooth, Use Furniture Cleanser-Con- ditioner To: • Clean wood and restore natural grain and color. • Disguise scratches and retard checking. • Remove cloudiness and dullness caused by smoke, grease,
dust. • "Winterize" furniture to withstand dryness and heat of
rooms in fall and winter.
For Furniture Cleanser-Conditioner You Will Need:
• Glass container with tight-fitting lid. • Gum turpentine. (Pure spirits of gum turpentine is best
grade, recommended for all restoration processes.) • Boiled linseed oil. (Buy commercially prepared — do not
attempt to boil linseed oil at home.)
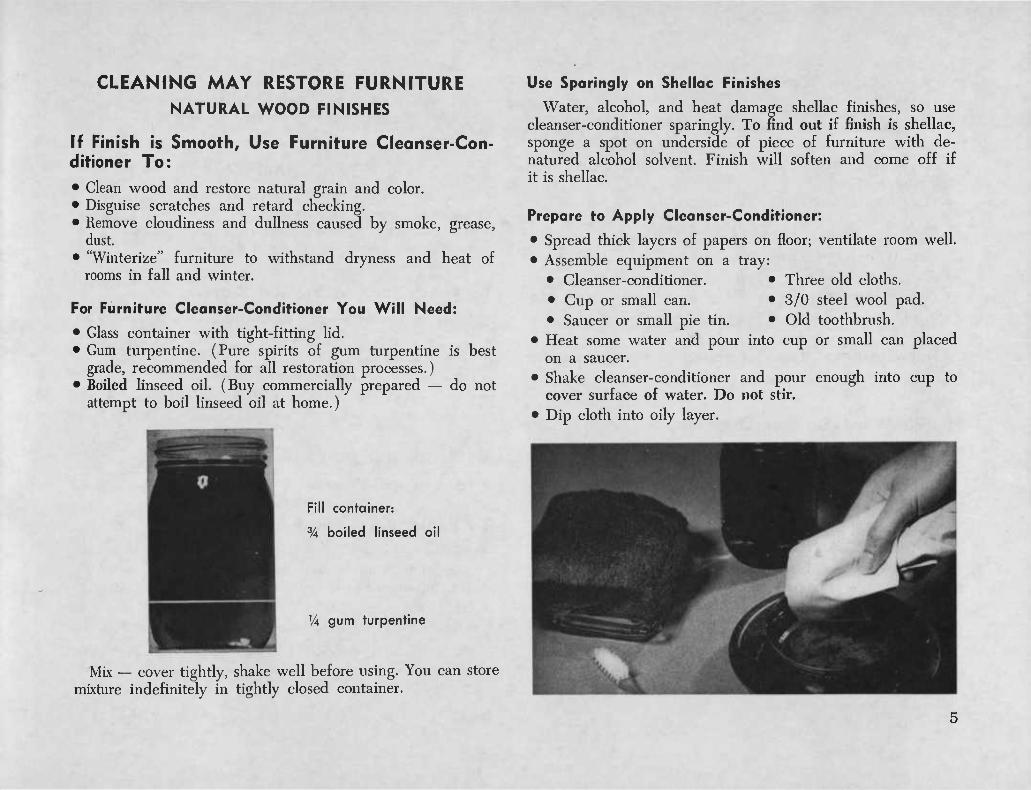
Fill container:
% boiled linseed oil
VA gum turpentine
Mix — cover tightly, shake well before using. You can store mixture indefinitely in tightly closed container.
Use Sparingly on Shellac Finishes
Water, alcohol, and heat damage shellac finishes, so use cleanser-conditioner sparingly. To find out if finish is shellac, sponge a spot on underside of piece of furniture with de- natured alcohol solvent. Finish will soften and come off if it is shellac.
Prepare to Apply Cleanser-Conditioner:
• Spread thick layers of papers on floor; ventilate room well. • Assemble equipment on a tray:
• Cleanser-conditioner. • Three old cloths. • Cup or small can. • 3/0 steel wool pad. • Saucer or small pie tin. • Old toothbrush.
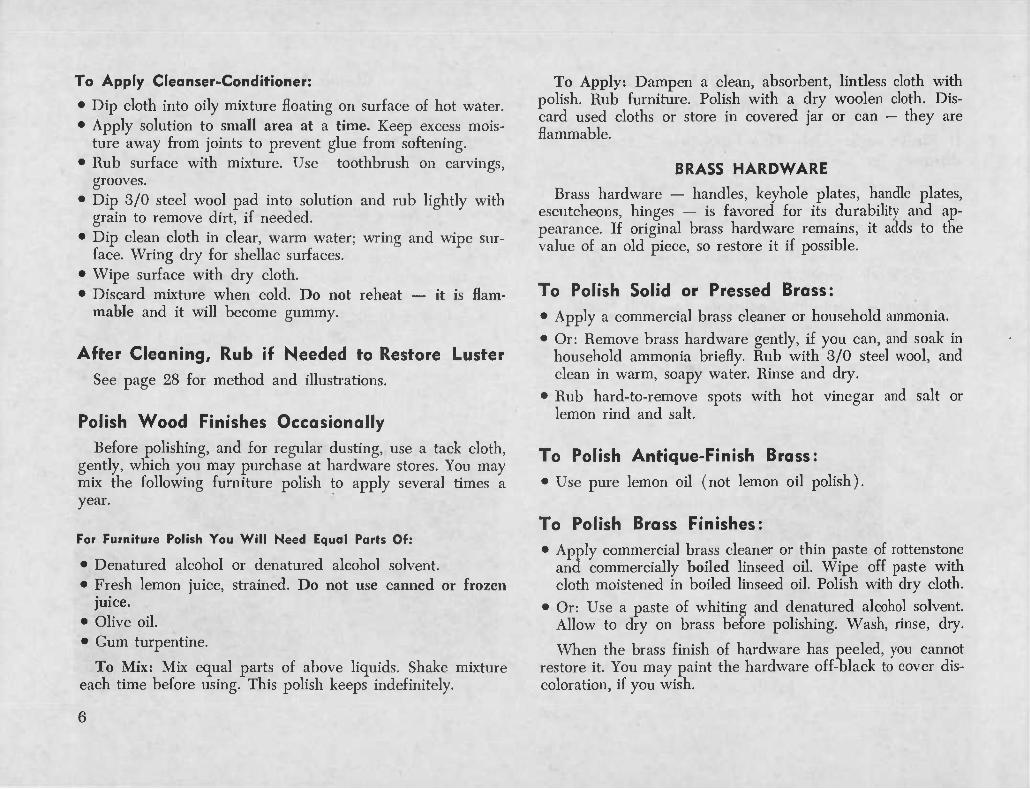
• Heat some water and pour into cup or small can placed on a saucer.
• Shake cleanser-conditioner and pour enough into cup to cover surface of water. Do not stir.
• Dip cloth into oily layer.
To Apply Cleanser-Conditioner:
• Dip cloth into oily mixture floating on surface of hot water. • Apply solution to small area at a time. Keep excess mois-
ture away from joints to prevent glue from softening. • Rub surface with mixture. Use toothbrush on carvings,
grooves. • Dip 3/0 steel wool pad into solution and rub lightly with
grain to remove dirt, if needed. • Dip clean cloth in clear, warm water; wring and wipe sur-
face. Wring dry for shellac surfaces. • Wipe surface with dry cloth. • Discard mixture when cold. Do not reheat — it is flam-
mable and it will become gummy.
After Cleaning, Rub if Needed to Restore Luster See page 28 for method and illustrations.
Polish Wood Finishes Occasionally Before polishing, and for regular dusting, use a tack cloth,
gently, which you may purchase at hardware stores. You may mix the following furniture polish to apply several times a year.
For Furniture Polish You Will Need Equal Parts Of:
• Denatured alcohol or denatured alcohol solvent. • Fresh lemon juice, strained. Do not use canned or frozen
juice. • Olive oil. • Gum turpentine.
To Mix: Mix equal parts of above liquids. Shake mixture each time before using. This polish keeps indefinitely.
To Apply: Dampen a clean, absorbent, lintless cloth with polish. Rub furniture. Polish with a dry woolen cloth. Dis- card used cloths or store in covered jar or can — they are flammable.
BRASS HARDWARE
Brass hardware — handles, keyhole plates, handle plates, escutcheons, hinges — is favored for its durability and ap- pearance. If original brass hardware remains, it adds to the value of an old piece, so restore it if possible.
To Polish Solid or Pressed Brass: • Apply a commercial brass cleaner or household ammonia.
• Or: Remove brass hardware gently, if you can, and soak in household ammonia briefly. Rub with 3/0 steel wool, and clean in warm, soapy water. Rinse and dry.
• Rub hard-to-remove spots with hot vinegar and salt or lemon rind and salt.
To Polish Antique-Finish Brass: • Use pure lemon oil (not lemon oil polish).
To Polish Brass Finishes: • Apply commercial brass cleaner or thin paste of rottenstone
and commercially boiled linseed oil. Wipe off paste with cloth moistened in boiled linseed oil. Polish with dry cloth.
• Or: Use a paste of whiting and denatured alcohol solvent. Allow to dry on brass before polishing. Wash, rinse, dry.
When the brass finish of hardware has peeled, you cannot restore it. You may paint the hardware off-black to cover dis- coloration, if you wish.
6
LEATHER Leather on tables, chairs, and other furnishings may be
renewed and maintained by washing with saddle or castile soap and water. Avoid using furniture polishes, oils, and var- nishes on leather. These often contain solvents that will make leather sticky.
Wash Leather • Dip cloth or sponge in warm water; wring.
• Rub cloth over saddle soap or bar of castile soap.
• Rub leather briskly.
• Rub leather with another warm, moist cloth.
• Rub surface with dry cloth.
If Leather Appears Dried: Rub small amount of leather dressing into leather to re-
place oil. You can buy a leather dressing or make one, using ingredients available at your drug store.
For Leather Dressing You Will Need:
% pure neat's-foot oil (in small container). • 40% anhydrous lanolin (in larger container).
To Mix: Warm container of lanolin in hot water until melted. Slowly add neat's-foot oil, stirring until blended.
To Apply: Apply small amount of dressing to leather with fingertips. Rub with your hands until dressing is completely absorbed. Rub tooled areas gently. You may store dressing indefinitely.
DAMAGED FINISHES MAY BE REPAIRED Often damaged finishes can be repaired without refinishing
piece. White rings or spots may be caused by moisture, heat, or alcohol. Paper sometimes adheres to a surface. Scratches or cigarette bums scar finishes. Holes, gouges, and cracks may occur through use or aging.
PAPER ADHERED TO SURFACE You May Use: • Lightweight oil (such as mineral, paraffin, olive, or lemon)
warmed; and 3/0 steel wool pad.
To Apply: Pour enough warm oil on surface to saturate paper. Let stand. Rub lightly with steel wool. Apply more warm oil; rub. Wipe surface with oil, then with a dry cloth.
WHITE SPOTS OR RINGS You May Use: • FFFF pumice powder, or cigarette ashes. • Lightweight oil. • 3/0 steel wool pad.
To Apply: Dust pumice or ashes over spot or ring; dip steel wool pad into oil; rub lightly with grain of wood. Apply light- ly to entire surface to prevent spotting; wipe surface with soft cloth.
OR USE: Salt and lightweight oil. To Apply: Dip finger into oil, then salt; rub spot with mixture. If white spot is old or very deep, much rubbing may be needed.
OR USE: Household ammonia and a damp cloth. To Apply: For deeper white spots, dip a cloth in clear water; wring; hold up to mouth of ammonia bottle to moisten. Whisk damp cloth over spot lightly, quickly. Rub with dry cloth.
OR USE: A commercial product for removing white spots from furniture, following manufacturer's directions.
SCRATCHES
On Woods with Natural Finish • Use furniture cleanser-conditioner (see pages 5 and 6) to
clean and blend color of scratched area with natural finish. • To disguise minor scratches, use broken pieces of nutmeats,
such a pecan, English or black walnut, Brazil, or butternut. Rub diagonally along scratch until it darkens.
On Oil Finish • Use 3/0 steel wool pad dipped in lightweight mineral oil,
boiled linseed oil, or paraffin oil. Rub carefully with wood grain. Wipe entire surface with a cloth slightly moistened with oil, then with a dry cloth. In badly scarred instances use boiled linseed oil.
On Lacquer Finish (see page 12 to determine your finish) • Use lacquer thinner to soften lacquer finish around scratch.
Apply with a small brush or toothpick.
On Shellac Finish • Use shellac thinner or denatured alcohol solvent to soften
shellac around scratch.
On Varnish Finish • Use gum turpentine to soften the varnish to cover a small
scratch. • Or commercial scratch remover (use as label directs).
On Stained Woods, Natural Finish Use a stain to blend with the old stain, of color and type
originally used on piece if possible. For instance: On wood
stained yellowish brown, use base of walnut stain and small amount of yellowish maple on stain first. See page 22 for colors. Dry, and apply type of finish used originally.
To Color Scratch, Apply:
• Colors-in-oil (such as burnt umber) thinned with turpentine.
• Or varnish stain, ready-mixed in wood colors. If too con- centrated, add stain to clear varnish of same brand.
• Or colored varnish. May be added to clear varnish of same brand. Set container in pan of hot water before applying.
• Or clear varnish tinted with colors-in-oil.
• Or commercial scratch remover.
To Apply Stain or Solvent1 to Scratch:
With your finger or a small pointed brush, apply stain or solvent diagonally along scratch, feathering it out toward edges. When dry, rub surface with a lintless cloth. It may be necessary to repeat process after 24 hours. When dry, rub varnish or shellac finishes with pumice and oil, lacquered surfaces with rottenstone and oil.
SMALL CRACKS NEAR AN EDGE
Repairs can be made over existing finish or during refinish- ing, after several coats of finish have been applied and are thoroughly dry.
Fill Cracks with Wood-Forming Plastic: • Soften plastic with denatured alcohol solvent, if needed. • Add colors-in-oil to blend color of plastic to finished wood.
(Mix color several shades darker than you desire — it dries to much lighter color.)
8
To Apply Wood-Forming Plastic: • Press wood-forming plastic into crack with your finger,
working diagonally across crack. • Level plastic with wood surface by sliding a knife blade
along crack diagonally. • Unless finish is shellac, remove excess plastic with a cloth
and denatured alcohol solvent. • When dry, smooth with 3/0 steel wool pad. • Repeat steps if plastic shrinks below surface. • Apply finish over repaired area.
GOUGES, HOLES, BURNS When wood finishes are gouged or burned, repairs may be
made on existing finish. Or, during refinishing, burns, holes, and gouges may be filled after several coats of new finish have been applied and are dry.
Remove Discoloration or Char • Scrape charred spot or darkened edges of holes with a knife
blade or 3/0 steel wool wrapped around an orange stick or pencil.
• Brush out scrapings with an old toothbrush. • Sponge charred area with denatured alcohol to bleach. • Repeat process, if necessary.
Fill and Finish Damaged Area
If damaged area is shallow, fill it with several coats of colored sealer or varnish if stained. Or use a clear sealer or varnish.
If hole is deep and no larger than thumbnail, fill it with lacquer stick.
If hole goes clear through, use spackling compound or wood- forming plastic underneath. Fill top with lacquer stick.
You May Use Lacquer Stick Use lacquer stick on surfaces that have a natural finish.
Apply without removing old finish or during refinishing (at any stage after second finish coat dries thoroughly).
Opaque and transparent lacquer sticks are available in light, medium, and dark shades of many wood colors. Select one stick of clear, one of opaque lacquer similar to wood color; fasten sticks together with masking or adhesive tape.
You Will Need: • Lintless cloths. • Two old table knives
with flexible blades. • Single-edge razor blade. • Old toothbrush or
eyelash brush.
• Two old screwdrivers. • 2/0 and 3/0 steel wool. • Denatured alcohol or dena-
tured alcohol solvent. • Orange stick. • Canned heat, matches.
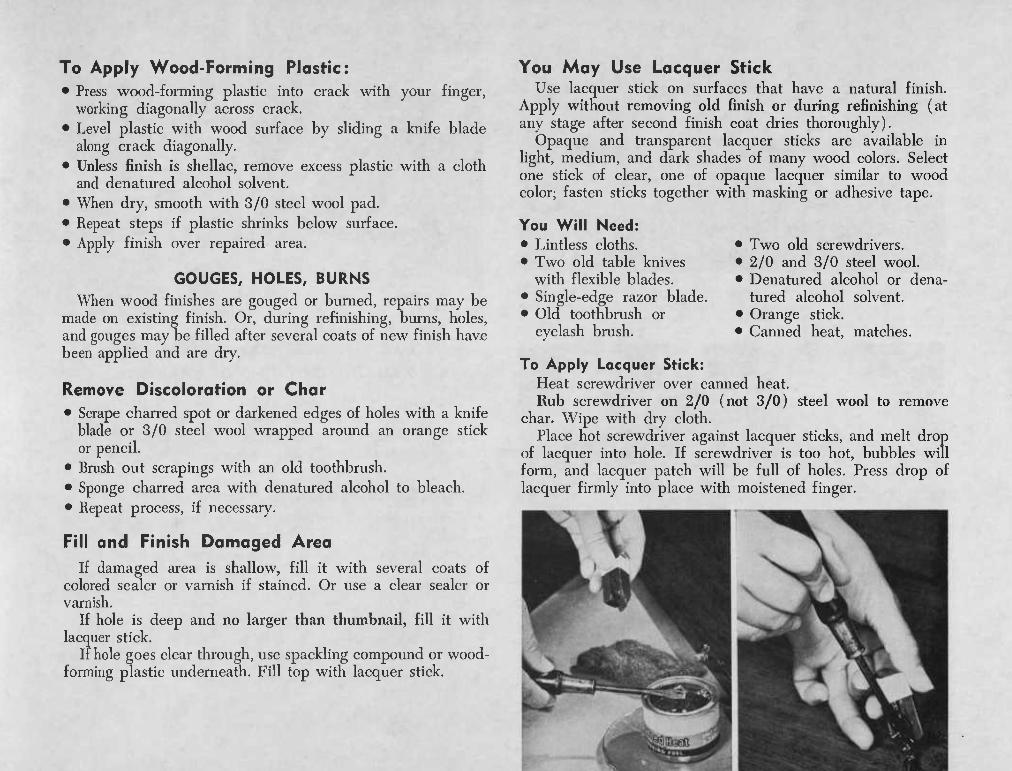
To Apply Lacquer Stick: Heat screwdriver over canned heat. Rub screwdriver on 2/0 (not 3/0) steel wool to remove
char. Wipe with dry cloth. Place hot screwdriver against lacquer sticks, and melt drop
of lacquer into hole. If screwdriver is too hot, bubbles will form, and lacquer patch will be full of holes. Press drop of lacquer firmly into place with moistened finger.
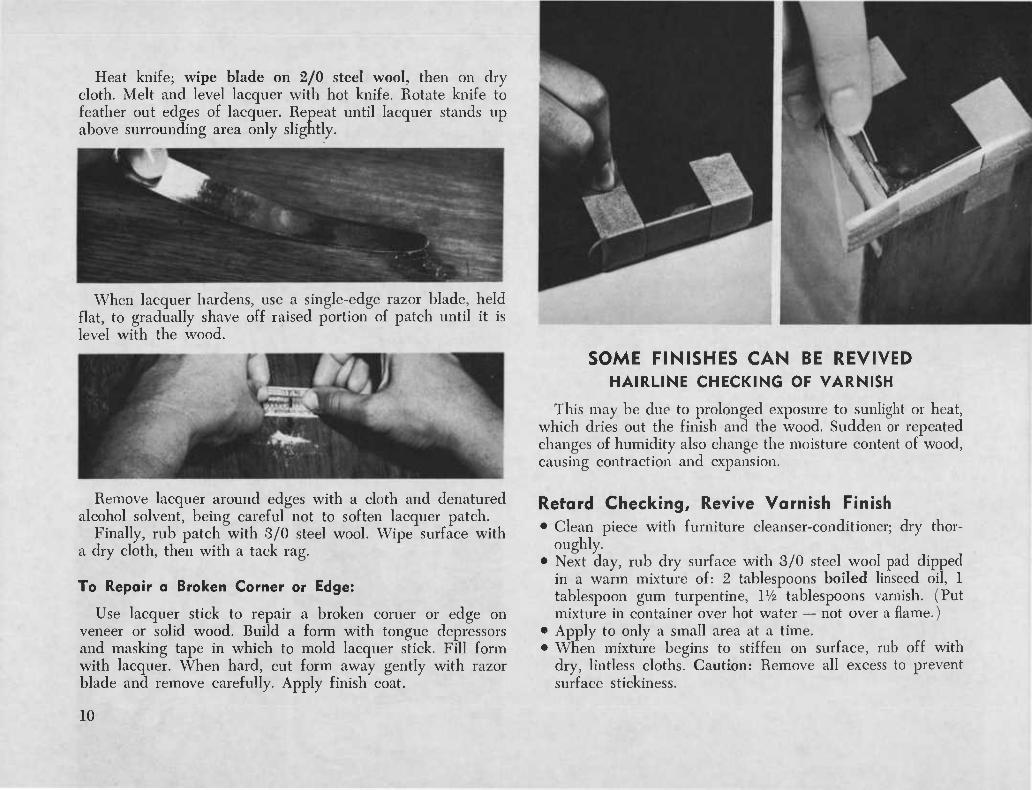
Heat knife; wipe blade on 2/0 steel wool, then on dry cloth. Melt and level lacquer with hot knife. Rotate knife to feather out edges of lacquer. Repeat until lacquer stands up above surrounding area only slightly.
When lacquer hardens, use a single-edge razor blade, held flat, to gradually shave off raised portion of patch until it is level with the wood.
Remove lacquer around edges with a cloth and denatured alcohol solvent, being careful not to soften lacquer patch.
Finally, rub patch with 3/0 steel wool. Wipe surface with a dry cloth, then with a tack rag.
To Repair a Broken Corner or Edge:
on Use lacquer stick to repair a broken corner or edge veneer or solid wood. Build a form with tongue depressors and masking tape in which to mold lacquer stick. Fill form with lacquer. When hard, cut form away gently with razor blade and remove carefully. Apply finish coat.
SOME FINISHES CAN BE REVIVED HAIRLINE CHECKING OF VARNISH
This may be due to prolonged exposure to sunlight or heat, which dries out the finish and the wood. Sudden or repeated changes of humidity also change the moisture content of wood, causing contraction and expansion.
Retard Checking, Revive Varnish Finish • Clean piece with furniture cleanser-conditioner; dry thor-
oughly. • Next day, rub dry surface with 3/0 steel wool pad dipped
in a warm mixture of: 2 tablespoons boiled linseed oil, 1 tablespoon gum turpentine, IV2 tablespoons varnish. (Put mixture in container over hot water — not over a flame.)
• Apply to only a small area at a time. • When mixture begins to stiffen on surface, rub off with
dry, lintless cloths. Caution: Remove all excess to prevent surface stickiness.
10

CLOUDY VARNISH FINISHES
Smoke, dust, and grease may collect on varnished surfaces and cause a milky, cloudy appearance. Poor quality varnish may cause cloudiness, too, but this necessitates refinishing.
• Clean piece with furniture cleanser-conditioner. Let dry.
• Apply equal parts of raw linseed oil and gum turpentine with a 3/0 steel wool pad, rubbing with the grain. Wipe off with a dry cloth.
FOGGY, FADED, SCRATCHED, WORN SHELLAC • Remove old wax with a cloth dampened in gum turpentine. • Mix 2 parts paraffin oil or lightweight mineral oil with 1
part white shellac. Mix only enough to use. Shake well. Do not store.
• Caution: Shellac must be fresh. Old shellac remains sticky and will not dry.
• Apply with 3/0 steel wool pad. • Wipe surface with a lintless cloth.
DULL DRY OIL, VARNISH, OR LACQUER
• Clean piece with furniture cleanser-conditioner. Allow to dry.
• Mix equal parts of boiled linseed oil and gum turpentine. Apply to top and bottom surfaces with coarse, lintless cloth.
• Rub surface briskly with clean, dry coarse cloth until wood is completely dry and a sheen appears. Let soak into wood.
FURNITURE WITH MATTE (DULL) FINISH
(Oil Rubbed Finish)
New Furniture: Rub once a month for the first 3 or 4 months with a mixture of xk boiled linseed oil and Vi gum turpentine. Use a dry, coarse cloth to rub mixture into the pores of the wood. Wipe off surplus until wood appears dry.
Older Furniture: Rub, especially the top of the table, every 6 to 8 months with a mixture of % boiled linseed oil and % gum turpentine (not steam distilled). Apply to underside of table leaves to prevent warping.
REFINISHING WOOD FURNITURE ARRANGE SPACE TO WORK
You will need a place to work that has ample light. Pro- vide cross ventilation of air to prevent toxic effects from breathing and to reduce danger of fire. See precautions, page 2.
Try to arrange a work area where furniture and equipment can remain undisturbed during refinishing. Spread a thick layer of papers to protect floor and work surfaces.
USUAL STEPS IN REFINISHING WOOD
• Remove hardware, table leaves, doors, caning, upholstery. • Remove old finish. • Examine wood after removing finish. • Prepare bare wood for finish. • Smooth surface with abrasives. • Wipe surface. • Stain wood if necessary. • Apply finish:
• Penetrating Wood Sealer Finish • Oil Finish • Polyurethane Finish
11
TO DETERMINE TYPE OF OLD FINISH ON YOUR PIECE:
The finish is lacquer if it is crystal hard and chips. Lacquer thinner will soften and remove it.
The finish is shellac if denatured alcohol solvent or shellac thinner soften and remove it.
The finish is varnish if gum turpentine softens it.
Never Use Lye
You should not use lye to remove wood finishes. Lye burns and pulps the wood. It is difficult to remove and counteract the action of lye, so the new finish often remains sticky and does not dry. It may even come off in a short time.
REMOVE HARDWARE, UPHOLSTERY, CANING
Before you begin to remove the old finish, gently remove hinges, handles, old caning, padding, and upholstery. Wood surfaces are now more accessible, and removed parts are pro- tected from damage during refinishing processes.
REMOVE THE OLD FINISH
Dislodging layers of old paint or varnish isn't difficult, but patience, time, and perseverance are required.
Select Your Remover
A good grade of commercial paint-and-varnish remover is the safest material to use in preparing wood for a natural finish.
Commercial removers are available with a thin, water-like consistency and in semi-paste and paste forms. You will find the thick removers easiest to use, as they tend to cling to the surface without running off or dripping.
Some removers work faster than others. Their action is af- fected by the number of layers, kind, and age of finish. Some removers contain wax. Wax-free types are required for finishes that contain residues of silicone polishes.
"Rinse-away" type removers bum furniture woods, and the water used with them damages bare wood. In addition, they are expensive to use.
Do Not Scrape or Sand Off Old Finish
The original wood surface may be destroyed by scraping with sharp tools or glass, by planing, or even by cutting too deeply with abrasives. Also, a beginner may risk gouging the surface when using a scraper or sanding machine the first time. The mellowness and texture (patina) in the old wood are built up by age, years of use, and repeated rubbings. Once re- moved, patina cannot be restored.
Was Silicone Polish Used on Piece?
If the piece has been treated with silicone polishes, such as Simoniz, HiLite, Dri-Glo, Woodbrite, or Pride, all traces of silicone must be removed before refinishing. Otherwise, craters and pits will form as finish is applied.
Use a wax-free paint-and-varnish remover to remove finish from silicone-polished pieces. This will not remove silicone residues completely. After removing finish, follow instructions on page 15 to complete removal of silicone residues.
Shellac Finishes Do Not Require Remover If the old finish is shellac, you can remove it with denatured
alcohol solvent and 2/0 medium steel wool. To test for a shellac finish, see page 5.
12
Equipment You Will Need: Paint-and-varnish remover (paste type). Denatured alcohol solvent. Gum turpentine (if remover contains wax). Putty knife. Wide wall spatula. 21/2-inch-wide paint brush. (Trim bristles Va-inch.) Orange or lollipop sticks, or wooden meat skewers.
Burlap ravelings or twine. Old toothbrush. 1/0 steel wool; 2/0 steel wool for old veneer. Clean old cloths. Newspapers. Covered containers for remover and alcohol. Covered metal container for used rags and papers. Waterless hand cleaner.
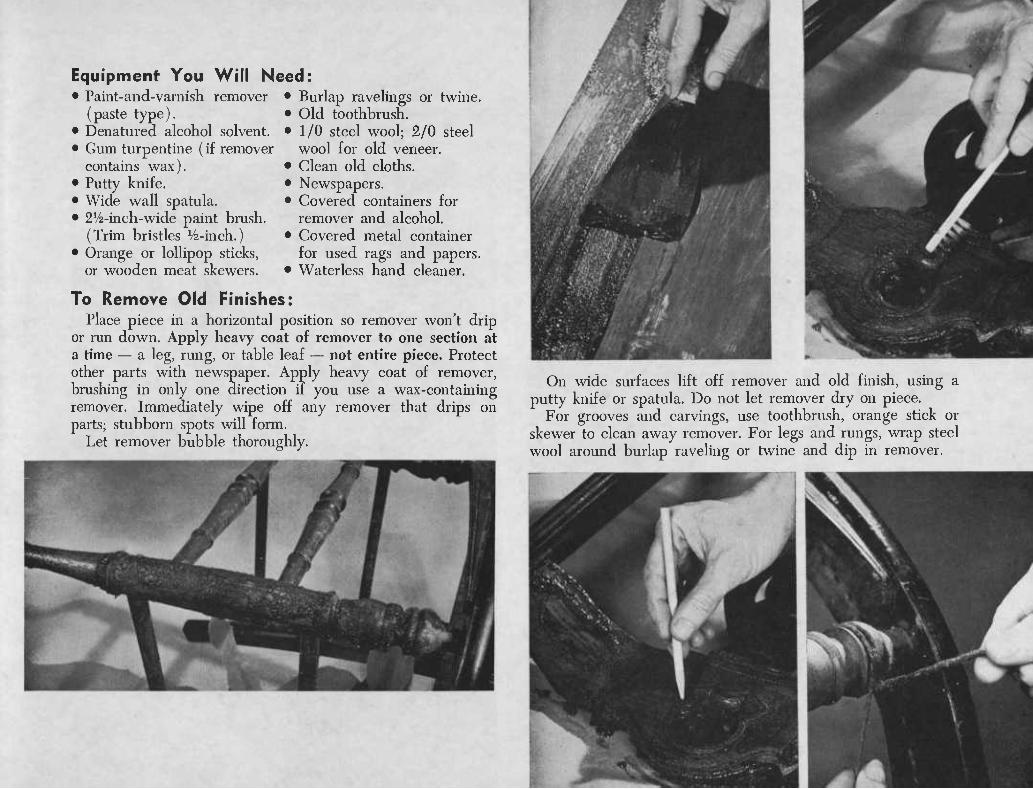
To Remove Old Finishes: Place piece in a horizontal position so remover won't drip
or run down. Apply heavy coat of remover to one section at a time — a leg, rung, or table leaf — not entire piece. Protect other parts with newspaper. Apply heavy coat of remover, brushing in only one direction if you use a wax-containing remover. Immediately wipe off any remover that drips on parts; stubborn spots will form.
Let remover bubble thoroughly.
On wide surfaces lift off remover and old finish, using a putty knife or spatula. Do not let remover dry on piece.
For grooves and carvings, use toothbrush, orange stick or skewer to clean away remover. For legs and rungs, wrap steel wool around burlap raveling or twine and dip in remover.
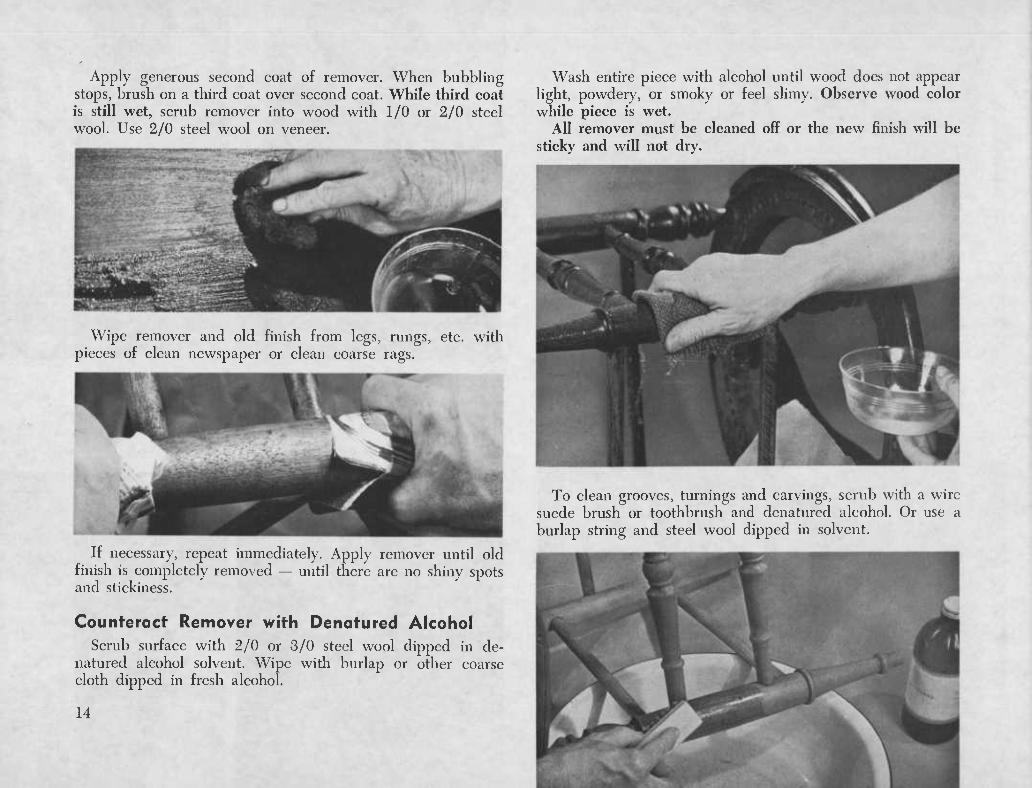
Apply generous second coat of remover. When bubbling stops, brush on a third coat over second coat. While third coat is still wet, scrub remover into wood with 1/0 or 2/0 steel wool. Use 2/0 steel wool on veneer.
Wipe remover and old finish from legs, rungs, etc. with pieces of clean newspaper or clean coarse rags.
If necessary, repeat immediately. Apply remover until old finish is completely removed — until there are no shiny spots and stickiness.
Counteract Remover with Denatured Alcohol Scrub surface with 2/0 or 3/0 steel wool dipped in de-
natured alcohol solvent. Wipe with burlap or other coarse cloth dipped in fresh alcohol.
14
Wash entire piece with alcohol until wood does not appear light, powdery, or smoky or feel slimy. Observe wood color while piece is wet.
All remover must be cleaned off or the new finish will be sticky and will not dry.
To clean grooves, turnings and carvings, scrub with a wire suede brush or toothbrush and denatured alcohol. Or use a burlap string and steel wool dipped in solvent.
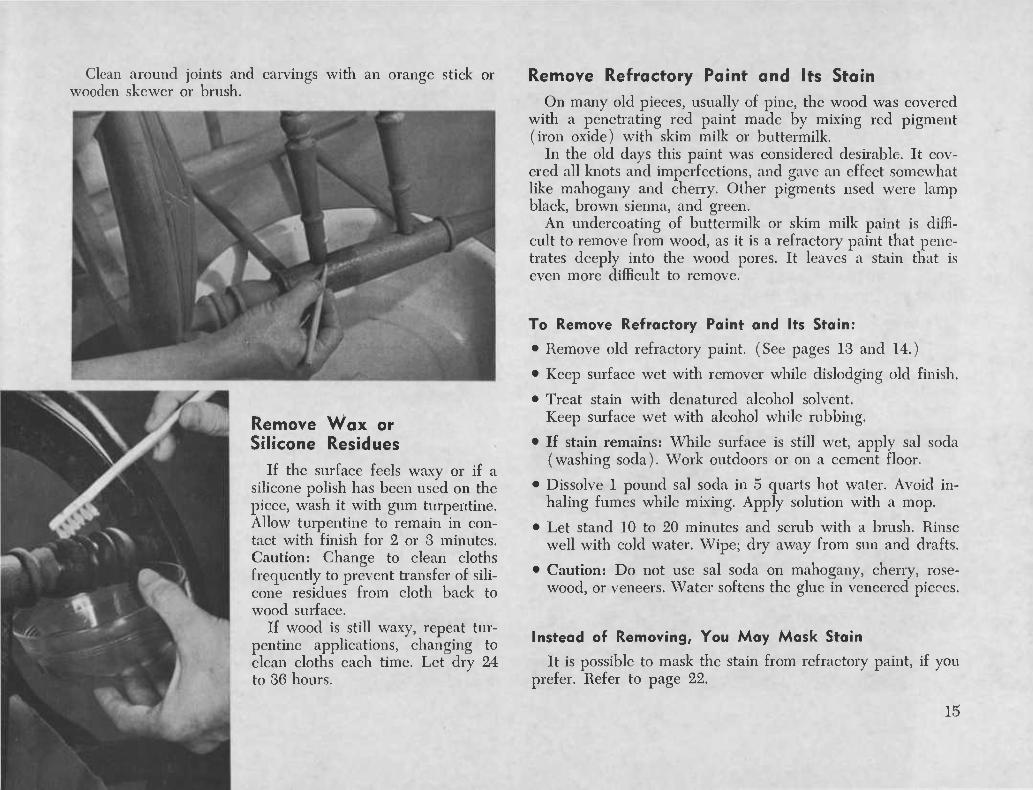
Clean around joints and carvings with an orange stick or wooden skewer or brush.
Remove Wax or Silicone Residues
If the surface feels waxy or if a silicone polish has been used on the piece, wash it with gum turpentine. Allow turpentine to remain in con- tact with finish for 2 or 3 minutes. Caution: Change to clean cloths frequently to prevent transfer of sili- cone residues from cloth back to wood surface.
If wood is still waxy, repeat tur- pentine applications, changing to clean cloths each time. Let dry 24 to 36 hours.
Remove Refractory Paint and Its Stain
On many old pieces, usually of pine, the wood was covered with a penetrating red paint made by mixing red pigment (iron oxide) with skim milk or buttermilk.
In the old days this paint was considered desirable. It cov- ered all knots and imperfections, and gave an effect somewhat like mahogany and cherry. Other pigments used were lamp black, brown sienna, and green.
An undercoating of buttermilk or skim milk paint is diffi- cult to remove from wood, as it is a refractory paint that pene- trates deeply into the wood pores. It leaves a stain that is even more difficult to remove.
To Remove Refractory Point- and Its Stoin:
• Remove old refractory paint. (See pages 13 and 14.)
• Keep surface wet with remover while dislodging old finish.
• Treat stain with denatured alcohol solvent. Keep surface wet with alcohol while rubbing.
• If stain remains: While surface is still wet, apply sal soda (washing soda). Work outdoors or on a cement floor.
• Dissolve 1 pound sal soda in 5 quarts hot water. Avoid in- haling fumes while mixing. Apply solution with a mop.
• Let stand 10 to 20 minutes and scrub with a brush. Rinse well with cold water. Wipe; dry away from sun and drafts.
• Caution: Do not use sal soda on mahogany, cherry, rose- wood, or veneers. Water softens the glue in veneered pieces.
Insteod of Removing, You May Mask Stain
It is possible to mask the stain from refractory paint, if you prefer. Refer to page 22.
15
EXAMINE WOOD AFTER REMOVING FINISH
Is surface sticky? Old finish remains — apply remover again to entire section. Is surface smoky? Wash section again with alcohol. Is piece dented, bruised, or stained? If old glue remains in crevices and joints, apply hot vine- gar to glue. Do joints need regluing? For sealer finish, apply two coats before gluing.
Sometimes the surface is stained by this treatment, so it should be done before you remove dark stains from the wood.
Remove Grease
Frequently, oil and grease penetrate the wood of tabletops, cheese or meat boards, or salad bowls. It is necessary to remove as much grease as possible from the surface so that the new finish will adhere.
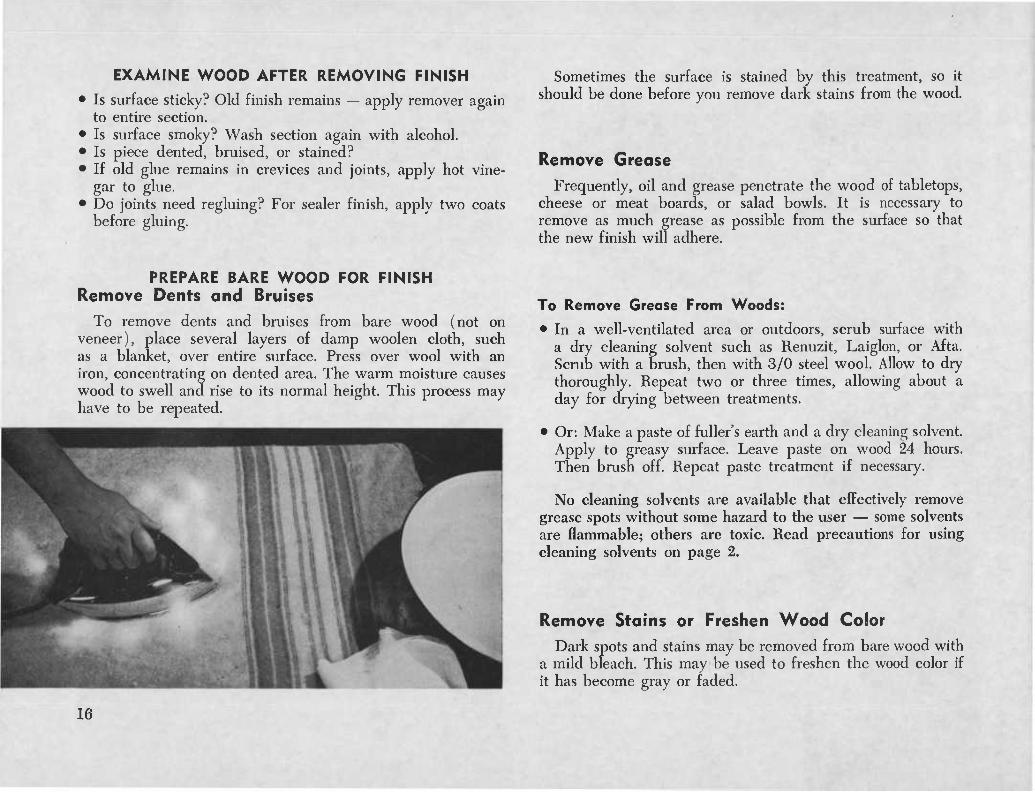
PREPARE BARE WOOD FOR FINISH Remove Dents and Bruises
To remove dents and bruises from bare wood (not on veneer), place several layers of damp woolen cloth, such as a blanket, over entire surface. Press over wool with an iron, concentrating on dented area. The warm moisture causes wood to swell and rise to its normal height. This process may have to be repeated.
To Remove Grease From Woods:
• In a well-ventilated area or outdoors, scrub surface with a dry cleaning solvent such as Renuzit, Laiglon, or Afta. Scrub with a brush, then with 3/0 steel wool. Allow to dry thoroughly. Repeat two or three times, allowing about a day for drying between treatments.
• Or: Make a paste of fuller's earth and a dry cleaning solvent. Apply to greasy surface. Leave paste on wood 24 hours. Then brush off. Repeat paste treatment if necessary.
No cleaning solvents are available that effectively remove grease spots without some hazard to the user — some solvents are flammable; others are toxic. Read precautions for using cleaning solvents on page 2.
Remove Stains or Freshen Wood Color
Dark spots and stains may be removed from bare wood with a mild bleach. This may be used to freshen the wood color if it has become gray or faded.
16
To Mix Mild Bleach:
• Place 2 ounces (about 2 rounded tablespoons) oxalic acid crystals and 2 ounces tartaric acid powder in a glass jar, or in a heat-resistant glass or enamel container. (You may buy tartaric acid at drug stores, oxalic acid at hardware or paint stores.)
• Pour 1 quart hot water over crystals to dissolve them. Use while hot, or reheat when you use it.
• Label solution, "Poison." It may be stored in a glass jar.
SMOOTH BARE WOOD WITH ABRASIVES
Before applying a new finish to bare wood, you will need to smooth the surface with abrasives. A satin-smooth surface underlies every beautiful natural finish. Smoothing brings out the beauty of grain and color. It removes hair grain from soft, fibrous woods and permits stain and finish to penetrate the surface uniformly.
When humidity in the atmosphere is high, it is important to smooth the wood just before you apply the stain or finish. On humid days, if wood stands as long as 10 to 12 hours after smoothing, the moisture in the air will raise wood fibers again.
To Apply Hot Bleach:
• Apply hot solution to entire surface with a small cloth. Con- centrate on stained area, keeping entire surface wet.
• Turn and change cloths frequently as you apply solution.
• Allow bleach to remain on wood about 20 minutes.
Counteract' Bleach Action:
• Add 1 tablespoon clear ammonia (not sudsy type) to 1 quart cold water.
• Immediately wash off bleach with ammonia solution.
• Wipe off with clean cloths wrung from clear water, then wipe with dry cloths.
• Let dry 24 hours.
• If dark spots do not disappear within 24 hours, repeat bleach applications, then allow to dry 24 hours.
• After use of this bleaching solution it is advisable to wear a mask during smoothing process.
You Will Need: • Abrasive finishing paper. Silicon carbide abrasive finishing
paper is recommended for both hard and soft woods. It cuts quickly and efficiently. Select grit size of a coarseness that will not scratch. You may need to try smoothing a spot underneath to find size that doesn't scratch. Some trade names: Durite, Trimite, Wetordry. There are others.
For first smoothing: Use 240A or 280A silicon carbide finishing paper.
For next smoothing: Use 360A or 400A silicon carbide finishing paper.
• A smoothing block. Select a piece of soft wood about 1- IVz inches by 4-41/2 inches. Glue a piece of felt or thin rubber to base to serve as a pad. Abrasive paper is wrapped over padded block for smoothing woods. To remove hair grain from pine or fir, you may use the bare, unpadded side of block, instead. Smoothing blocks are available com- mercially, also.
17
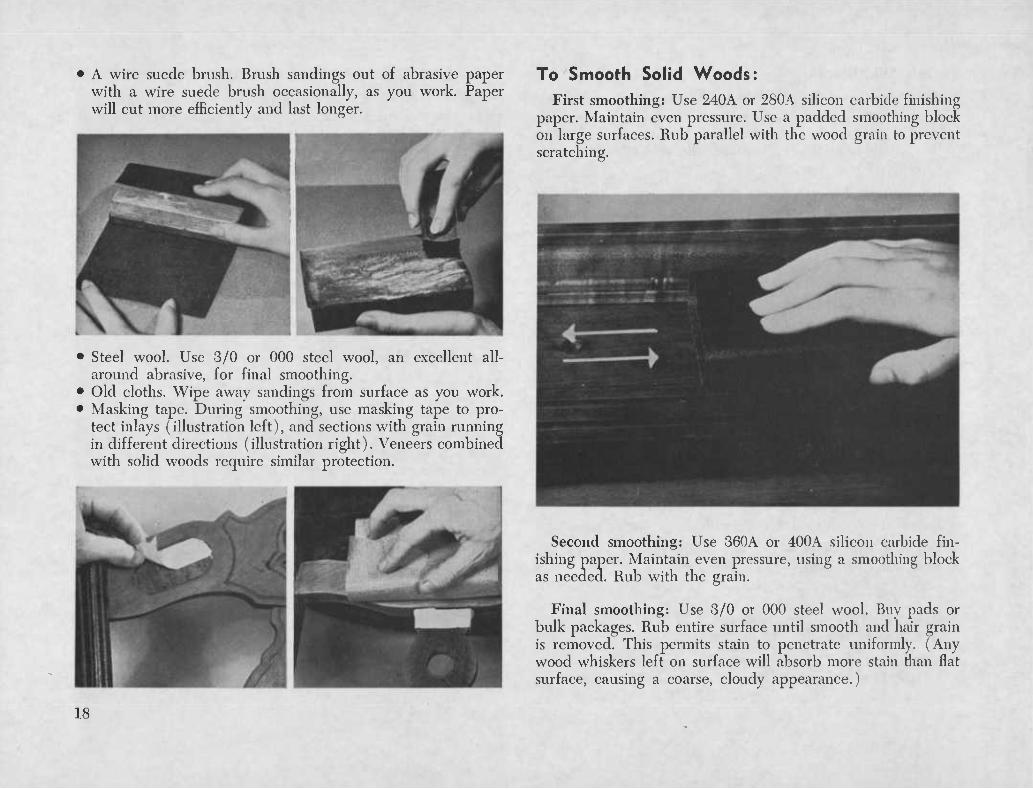
• A wire suede brush. Brush sandings out of abrasive paper with a wire suede brush occasionally, as you work. Paper will cut more efficiently and last longer.
Steel wool. Use 3/0 or 000 steel wool, an excellent all- around abrasive, for final smoothing. Old cloths. Wipe away sandings from surface as you work. Masking tape. During smoothing, use masking tape to pro- tect inlays (illustration left), and sections with grain running in different directions (illustration right). Veneers combined with solid woods require similar protection.
To Smooth Solid Woods: First smoothing: Use 240A or 280A silicon carbide finishing
paper. Maintain even pressure. Use a padded smoothing block on large surfaces. Rub parallel with the wood grain to prevent scratching.
Second smoothing: Use 360A or 400A silicon carbide fin- ishing paper. Maintain even pressure, using a smoothing block as needed. Rub with the grain.
Final smoothing: Use 3/0 or 000 steel wool. Buv pads or bulk packages. Rub entire surface until smooth and hair grain is removed. This permits stain to penetrate uniformly. (Any wood whiskers left on surface will absorb more stain than flat surface, causing a coarse, cloudy appearance.)
18
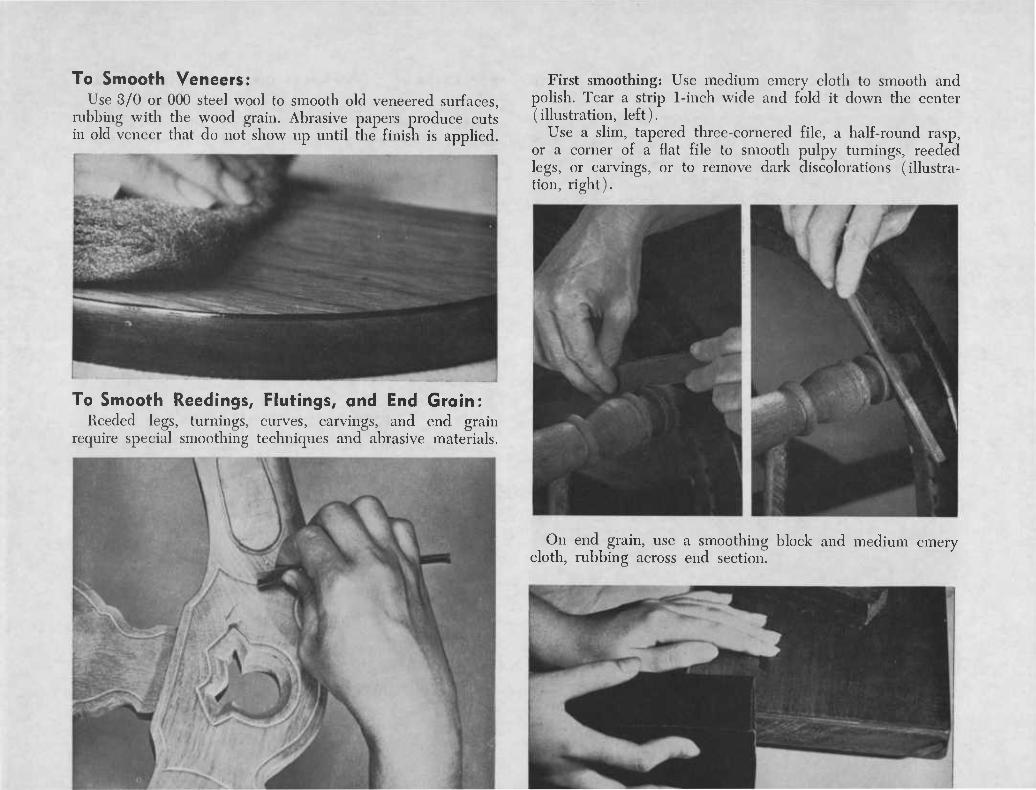
To Smooth Veneers: Use 3/0 or 000 steel wool to smooth old veneered surfaces,
rubbing with the wood grain. Abrasive papers produce cuts in old veneer that do not show up until the finish is applied.
To Smooth Reedings, Flutings, and End Grain; Reeded legs, turnings, curves, carvings, and end grain
require special smoothing techniques and abrasive materials.
First smoothing: Use medium emery cloth to smooth and polish. Tear a strip 1-inch wide and fold it down the center (illustration, left).
Use a slim, tapered three-cornered file, a half-round rasp, or a corner of a flat file to smooth pulpy turnings, reeded legs, or carvings, or to remove dark discolorations (illustra- tion, right).
On end grain, use a smoothing block and medium emery cloth, rubbing across end section.
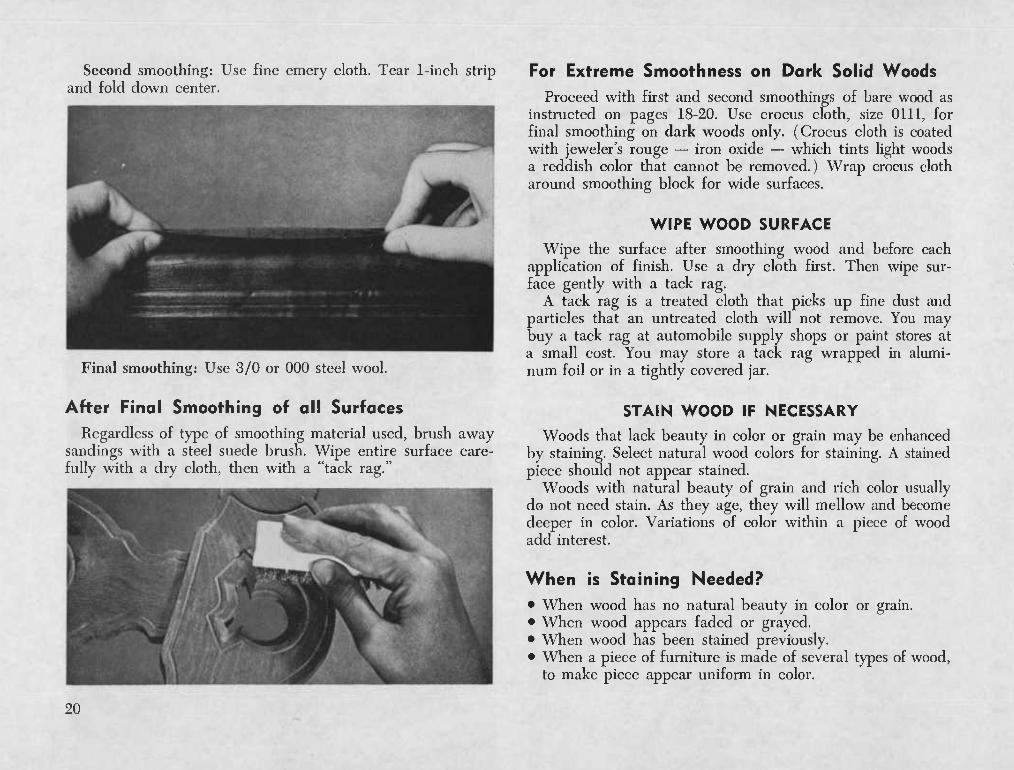
Second smoothing: Use fine emery cloth. Tear 1-inch strip and fold down center.
Final smoothing: Use 3/0 or 000 steel wool.
After Final Smoothing of all Surfaces
Regardless of type of smoothing material used, brush away sandings with a steel suede brush. Wipe entire surface care- fully with a dry cloth, then with a "tack rag."
For Extreme Smoothness on Dork Solid Woods
Proceed with first and second smoothings of bare wood as instructed on pages 18-20. Use crocus cloth, size 0111, for final smoothing on dark woods only. (Crocus cloth is coated with jeweler's rouge — iron oxide — which tints light woods a reddish color that cannot be removed.) Wrap crocus cloth around smoothing block for wide surfaces.
WIPE WOOD SURFACE
Wipe the surface after smoothing wood and before each application of finish. Use a dry cloth first. Then wipe sur- face gently with a tack rag.
A tack rag is a treated cloth that picks up fine dust and particles that an untreated cloth will not remove. You may buy a tack rag at automobile supply shops or paint stores at a small cost. You may store a tack rag wrapped in alumi- num foil or in a tightly covered jar.
STAIN WOOD IF NECESSARY
Woods that lack beauty in color or grain may be enhanced by staining. Select natural wood colors for staining. A stained piece should not appear stained.
Woods with natural beauty of grain and rich color usually do not need stain. As they age, they will mellow and become deeper in color. Variations of color within a piece of wood add interest.
When is Staining Needed?
• When wood has no natural beauty in color or grain. • When wood appears faded or grayed. • When wood has been stained previously. • When a piece of furniture is made of several types of wood,
to make piece appear uniform in color.
20
Does Wood Hove Beauty? How can you tell whether a wood has beauty? While wet,
the wood color resembles that color it will have when finished. • You may have observed the wood color as you washed the
piece with denatured alcohol, after removing old finish. • If not, moisten a spot with water and observe the color.
Is Wood Hard or Soft? Test wood for hardness with your fingernail — if you can
dent it, wood is soft. This is important in staining because:
• Soft woods, like pine and poplar, absorb much stain.
• Hard woods, such as maple or birch, absorb very little.
Which Woods Require Stain? Woods with no color that must be stained or painted are:
• Basswood • Gumwood • Poplar • White Pine
Light-colored woods that may be finished in their natural color or stained include:
• Ash • Beech • Birch • Elm • Oak
Maple Primavera Chestnut Philippine Mahogany Korina
Stain is not usually used on veneers or woods with natural beauty and rich color, such as:
• Butternut • Rosewood • Cherry • Teak • Mahogany • Maple • Myrtle
At What Stage is Wood Stained? Stain wood after the surface is smoothed to satin-smoothness.
When you can rub a piece of nylon hose over the surface with- out catching, it is smooth enough for staining.
Colors do not appear true in artificial light, especially fluor- escent light. Therefore, apply stain during the daytime in strong natural light.
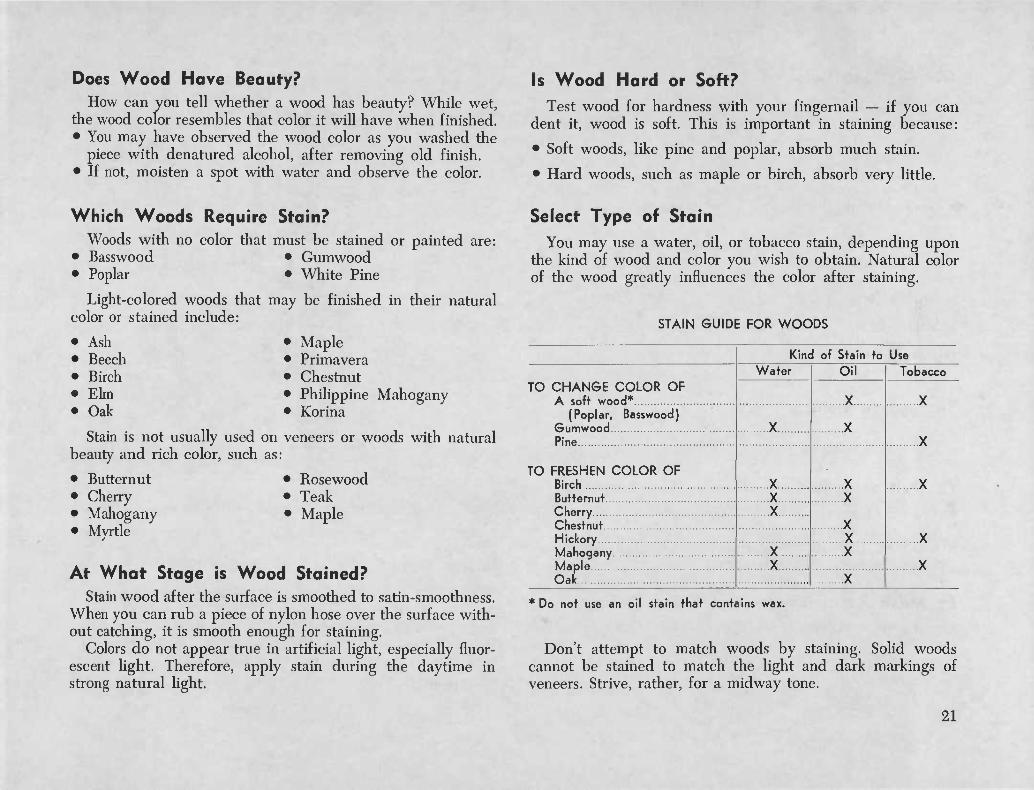
Select Type of Stain You may use a water, oil, or tobacco stain, depending upon
the kind of wood and color you wish to obtain. Natural color of the wood greatly influences the color after staining.
STAIN GUIDE FOR WOODS
Kind of Stain to Use Water Oil Tobacco
TO CHANGE COLOR OF A soft wood* X X
(Poplar, Basswood) Gumwood X X Pine X
TO FRESHEN COLOR OF Birch X X X Butternut X X Cherry X
X Chestnut Hickory X X Mahogany X X Maple X X Oak X
* Do not use an oil stain that contains wax.
Don't attempt to match woods by staining. Solid woods cannot be stained to match the light and dark markings of veneers. Strive, rather, for a midway tone.
21
Decide Upon Color of Stain
You can create most of the wood colors you will need for refinishing by varying the proportions of the three basic colors:
• Walnut — true brown. • Maple — brownish yellow. • Mahogany — reddish brown.
You can intermix stains of the same type — oil stain with another color of oil stain, one water stain with another.
COLOR GUIDE FOR MIXING STAINS
To stain woods
BROWN (reddish) (yellowish)
YELLOW (brownish)
Add to base
Reddish-brown mahogany stain Brownish-yellow maple stain Walnut stain
To Lighten Color:
• Add water to water stains. • Add gum turpentine to oil stains.
To Dull or Gray Color that is Too Bright:
• Add a small amount of deep Thalo green (blue-green) color- in-oil to an oil stain.
• Add a small amount of Malachite blue-green solution (comes in powder form) to a water stain.
To Mask Refractory or Other Red Stains:
• Add a small amount of blue-green color, as when you dull or gray color. Caution: Use a very little green to dull the red stain and to produce a reddish-brown wood tone. Don't stain the wood green!
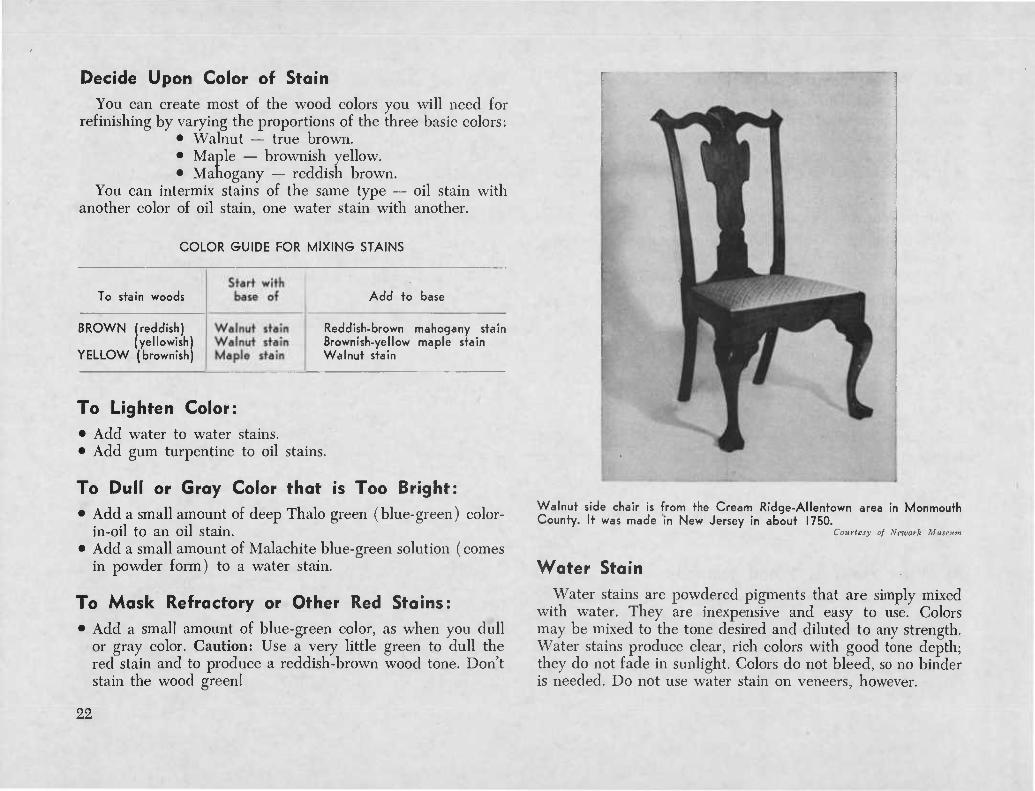
Walnut side chair is from the Cream Ridge-Allentown area in Monmouth County. It was made in New Jersey in about 1750.
Courtesy of Newark Museum
Water Stain
Water stains are powdered pigments that are simply mixed with water. They are inexpensive and easy to use. Colors may be mixed to the tone desired and diluted to any strength. Water stains produce clear, rich colors with good tone depth; they do not fade in sunlight. Colors do not bleed, so no binder is needed. Do not use water stain on veneers, however.
22
If you desire a deep color change, see page 31, mask with satin-like ready-mixed "acid" type water stain.
To Mix Water Stains:
• Place stain powder in a clean glass jar. Cover mouth of jar with a clean thin cloth or nylon hose.
• Add warm water. (If water is hard: boil, cool, strain, and reheat it. Or use distilled.) Stir. Label container with color.
• To obtain desired color: Dilute with cold water to obtain a lighter color. Mix two or three stain colors for blends.
• Smooth and stain a test area on underside of furniture to be sure color is appropriate for the wood.
To Apply Water Stain:
• Wipe smoothed wood surface, especially turnings and end grain, with a damp cloth just before applying stain. This insures even penetration and helps to obtain desired color.
• Apply water stain with a lintless cloth; wipe off excess with another cloth.
• If piece contains light and dark areas, dilute stain with water and apply to darker parts. Tones will vary, however, with different growths, cuts, and the hardness of the wood.
• Dry slowly and thoroughly in a well-ventilated area away from heat, so wood will not warp or crack.
• After drying at least 24 hours, smooth surface lightly with 3/0 steel wool. Use care in smoothing edges — it is easy to remove color at this stage.
Tobacco Stain
Tobacco stain may be used to produce an "old pine" look. It may be used on new pine paneling and furniture or to freshen old pine during refinishing. It may be used on other woods, too. See Stain Guide on page 21.
To Mix Tobacco Stain:
• Break up 1 plug of chewing tobacco. Place in quart jar. • Add 1 pint of clear household ammonia. • Place lid on jar and store at least 1 week. • Uncover jar and place outdoors overnight before using to
permit ammonia fumes to escape, so you will not inhale the fumes while applying the stain.
To Apply Tobacco Stain:
• Wipe surface with a damp cloth just before applying the stain to insure even penetration.
• Place a piece of nylon hose over a top of jar to strain out bits of tobacco when dipping cloth into stain.
• Mop or "rag on" several coats of stain with absorbent cloth. • Wipe off surplus. This stain dries to a lighter shade, but
appears darker when finish is applied. Two applications of tobacco stain are usually enough.
• After 24 hours, rub lightly with 3/0 steel wool.
Oil Stain Intermix Ready-Mixed Oil Stains
You will find ready-mixed oil stains in these wood colors — maple, walnut, or mahogany, in 4 pint, pint, or quart cans. Intermix one stain color with another to get the color you want. See page 22 for Color Guide for mixing.
23
To Apply Oil Stain: First Step to (insure uniform penetration of stain and to pre- vent muddiness.) • Wipe smoothed surface with a dry cloth, then gently with
a tack rag. • Mix: 3 parts gum turpentine and 1 part boiled linseed oil
(buy commercially boiled linseed oil). • Apply mixture to smoothed surface with a cloth. • Wipe away excess with a cloth.
Second Step
• Test stain color on underside to be sure it's appropriate. • Apply stain with brush or cloth. Allow to remain on wood
long enough to penetrate and give desired effect. • Wipe off surplus before it sets. • Allow stain to dry 24 hours. • Smooth lightly with 3/0 steel wool to remove roughness.
If You Mix Your Own Oil Stain Colors Using Tubes of Colors-in-Oil: • First: Follow "First Step" directions under "TO APPLY
OIL STAIN."
• Second: Select colors-in-oil to use in mixing your stain. The basic colors are:
• RED — burnt sienna. • YELLOWS — raw sienna, yellow ochre. • RROWNS — burnt umber, Vandyke brown, raw umber. • GREENS (to dull reds) — deep Thalo green, medium
green chrome. • RLACKS — lampblack, ivory black.
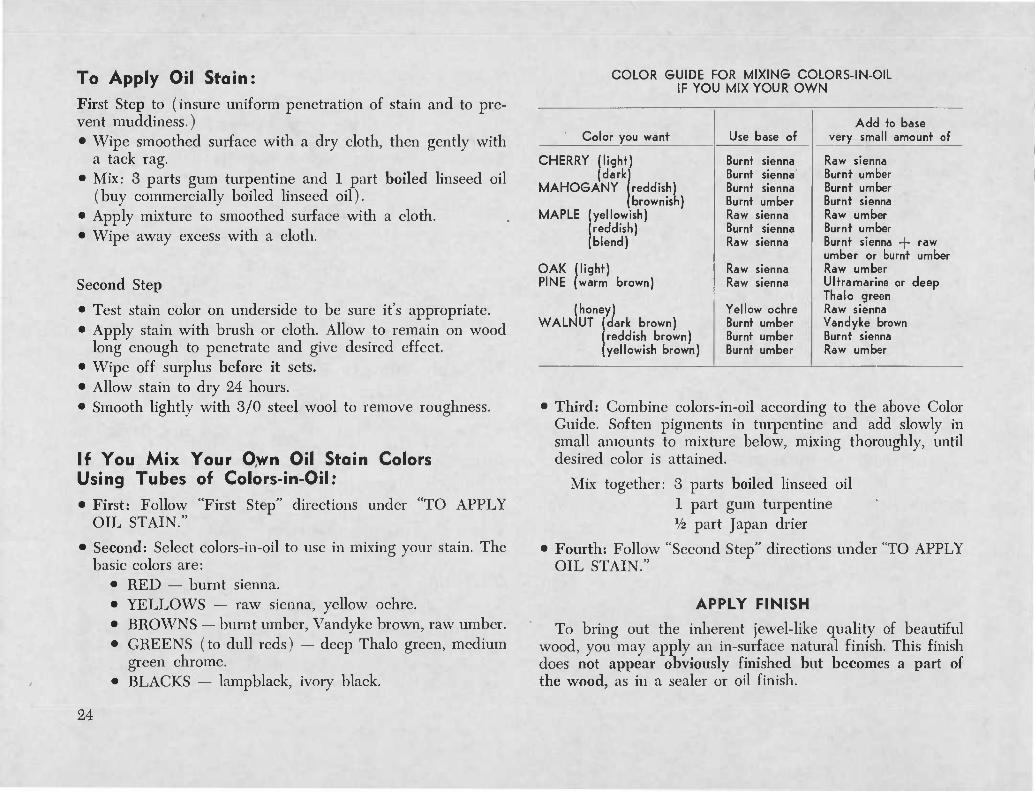
COLOR GUIDE FOR MIXING COLORS-IN-OIL IF YOU MIX YOUR OWN
Add to base Color you want Use base of very small amount of
CHERRY (light) Burnt sienna Raw sienna (dark) Burnt sienna Burnt umber
MAHOGANY (reddish) Burnt sienna Burnt umber (brownish) Burnt umber Burnt sienna
MAPLE (yellowish) Raw sienna Raw umber (reddish) Burnt sienna Burnt umber (blend) Raw sienna Burnt sienna -\- raw
umber or burnt umber OAK (light) Raw sienna Raw umber PINE (warm brown) Raw sienna Ultramarine or deep
Thalo green (honey) Yellow ochre Raw sienna
WALNUT (dark brown) Burnt umber Vandyke brown [reddish brown) Burnt umber Burnt sienna (yellowish brown) Burnt umber Raw umber
• Third: Combine colors-in-oil according to the above Color Guide. Soften pigments in turpentine and add slowly in small amounts to mixture below, mixing thoroughly, until desired color is attained.
Mix together: 3 parts boiled linseed oil 1 part gum turpentine Vz part Japan drier
• Fourth: Follow "Second Step" directions under "TO APPLY OIL STAIN."
APPLY FINISH
To bring out the inherent jewel-like quality of beautiful wood, you may apply an in-surface natural finish. This finish does not appear obviously finished but becomes a part of the wood, as in a sealer or oil finish.
24
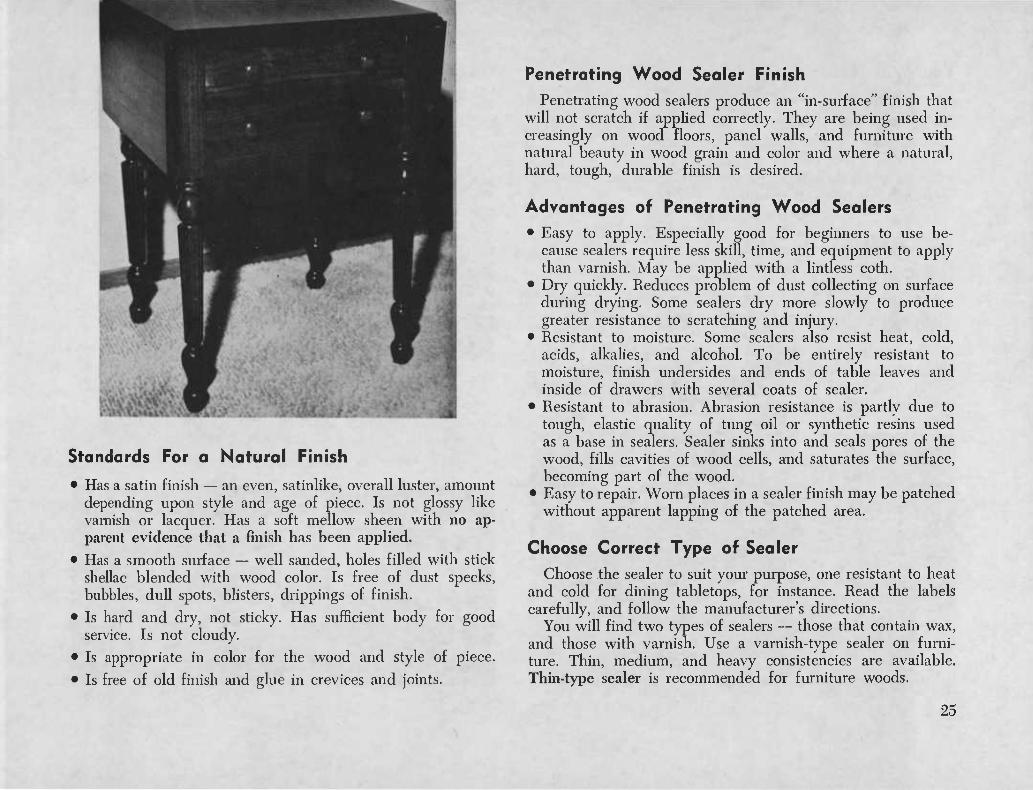
Standards For a Natural Finish
• Has a satin finish — an even, satinlike, overall luster, amount depending upon style and age of piece. Is not glossy like varnish or lacquer. Has a soft mellow sheen with no ap- parent evidence that a finish has been applied.
• Has a smooth surface — well sanded, holes filled with stick shellac blended with wood color. Is free of dust specks, bubbles, dull spots, blisters, drippings of finish.
• Is hard and dry, not sticky. Has sufficient body for good service. Is not cloudy.
• Is appropriate in color for the wood and style of piece.
• Is free of old finish and glue in crevices and joints.
Penetrating Wood Sealer Finish
Penetrating wood sealers produce an "in-surface" finish that will not scratch if applied correctly. They are being used in- creasingly on wood floors, panel walls, and furniture with natural beauty in wood grain and color and where a natural, hard, tough, durable finish is desired.
Advantages of Penetrating Wood Sealers
• Easy to apply. Especially good for beginners to use be- cause sealers require less skill, time, and equipment to apply than varnish. May be applied with a lintless coth.
• Dry quickly. Reduces problem of dust collecting on surface during drying. Some sealers dry more slowly to produce greater resistance to scratching and injury.
• Resistant to moisture. Some sealers also resist heat, cold, acids, alkalies, and alcohol. To be entirely resistant to moisture, finish undersides and ends of table leaves and inside of drawers with several coats of sealer.
• Resistant to abrasion. Abrasion resistance is partly due to tough, elastic quality of tung oil or synthetic resins used as a base in sealers. Sealer sinks into and seals pores of the wood, fills cavities of wood cells, and saturates the surface, becoming part of the wood.
• Easy to repair. Worn places in a sealer finish may be patched without apparent lapping of the patched area.
Choose Correct Type of Sealer
Choose the sealer to suit your purpose, one resistant to heat and cold for dining tabletops, for instance. Read the labels carefully, and follow the manufacturer's directions.
You will find two types of sealers — those that contain wax, and those with varnish. Use a varnish-type sealer on furni- ture. Thin, medium, and heavy consistencies are available. Thin-type sealer is recommended for furniture woods.
25
You Will Need: • Penetrating wood sealer (thin type). • Old nylon stockings, or rayon or nylon fabric. • Tack rag. • 3/0 steel wool. • Lard, vegetable shortening, or waterless hand cleaner to
clean hands after using sealer.
To Apply A Sealer Finish: First Coat
Apply within 12 hours after smoothing wood, or 24 hours after applying stain. Before applying finish, wipe the surface with a dry cloth, then with a tack rag.
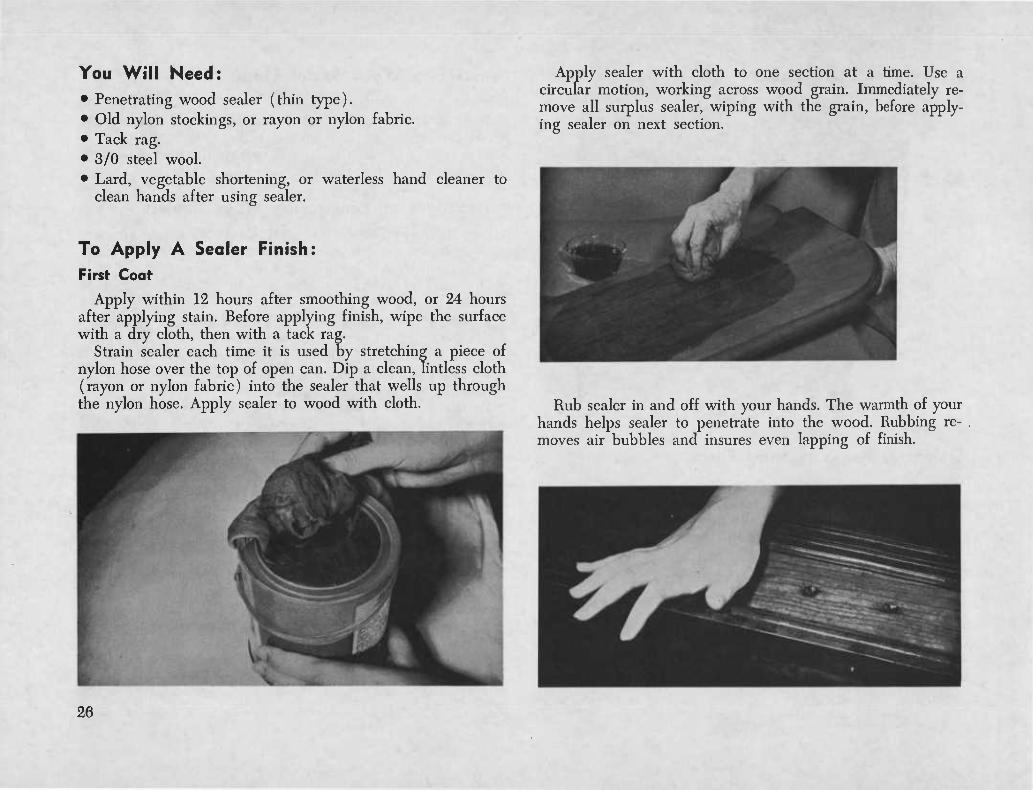
Strain sealer each time it is used by stretching a piece of nylon hose over the top of open can. Dip a clean, lintless cloth (rayon or nylon fabric) into the sealer that wells up through the nylon hose. Apply sealer to wood with cloth.
Apply sealer with cloth to one section at a time. Use a circular motion, working across wood grain. Immediately re- move all surplus sealer, wiping with the grain, before apply- ing sealer on next section.
Rub sealer in and off with your hands. The warmth of your hands helps sealer to penetrate into the wood. Rubbing re- moves air bubbles and insures even lapping of finish.
26
Apply sealer to rungs, one at a time, with another piece of nylon hose or fabric. Wipe surplus away immediately with your hands. Remove surplus sealer from edges and carvings with your fingers.
Do not let a heavy, glass-like coating of sealer build up on the surface. Wipe off any excess that is not absorbed. Allow sealer to dry 24 hours.
Smooth Surface Between Finish Coats
Before applying next coat, and before every succeeding coat, smooth the surface gently with 3/0 steel wool. This removes bubbles and "makes tooth" for the next coat. Wipe surface with a dry cloth and then with a tack rag.
Second Coot
Apply sealer as for first coat. Rub sealer on, in, and off. After second coat dries, repair any small cracks (see procedure on page 8). Fill holes or gouges as shown on pages 9 and 10. Reglue joints if necessary.
For extreme smoothness on dark woods, see special smooth- ing instructions for use of crocus cloth, page 20.
Succeeding Coats
Apply sealer as for previous coats. Apply several coats to undersides of table leaves and inside of drawers. Allow each coat to dry 24 hours in good drying weather — 36 hours or more if humidity is high. Then rub the surface lightly with 3/0 steel wool. Wipe with a dry cloth, then a tack rag.
Continue to apply finish coats until no dull spots appear. For an even, satin-like smoothness and a hard finish, apply three to five coats on chairs or legs of a piece. Apply 9 to 21 coats of finish on dining and coffee tabletops, depending on degree of smoothness you desire and the intended use. Let final coat dry 1 week.
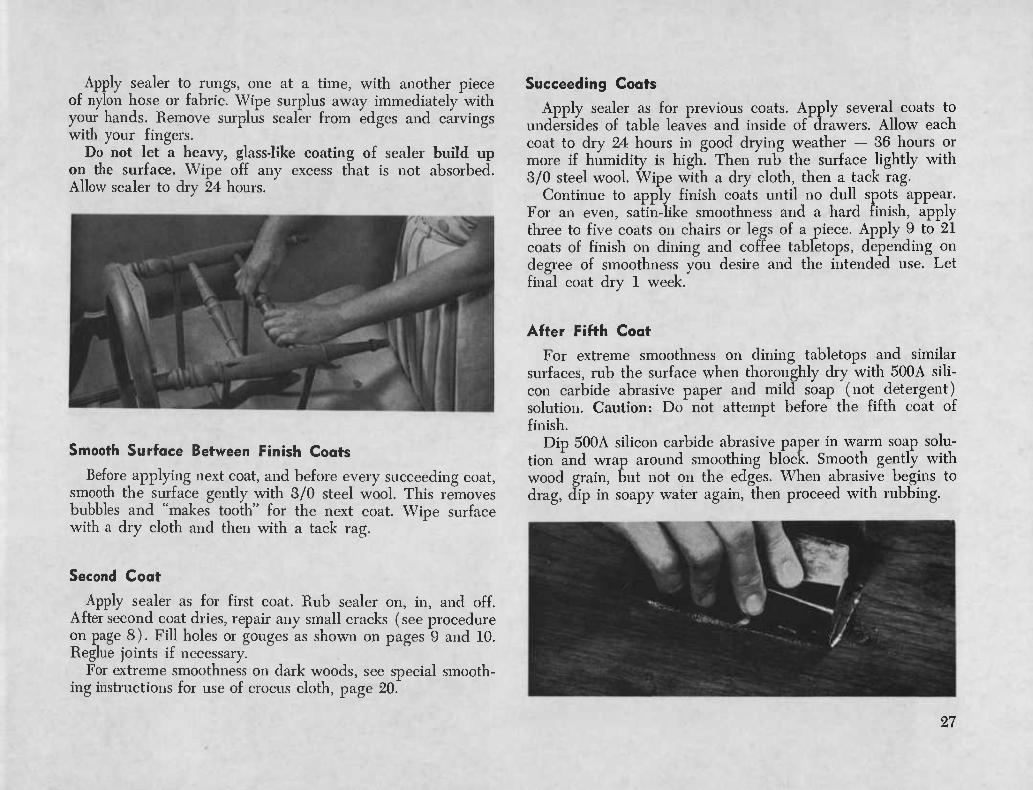
After Fifth Coat
For extreme smoothness on dining tabletops and similar surfaces, rub the surface when thoroughly dry with 500A sili- con carbide abrasive paper and mild soap (not detergent) solution. Caution: Do not attempt before the fifth coat of finish.
Dip 500A silicon carbide abrasive paper in warm soap solu- tion and wrap around smoothing block. Smooth gently with wood grain, but not on the edges. When abrasive begins to drag, dip in soapy water again, then proceed with rubbing.
27
Wipe surface with a cloth moistened in clear water and then wipe with a dry cloth. Allow to dry at least 1 hour. Don't be concerned about the white appearance of surface.
On veneer and shellac finishes, use rubbing oil with abra- sive instead of soapy water. Use equal parts of mineral spirits and paraffin oil, or use very thin mineral oil. (Various lubri- cants are sold to use with abrasive finishing paper — use one as thin as water. Do not use naphtha or fast-drying solvents.) Wipe off with dry cloths.
This treatment is applied only once or twice — not after each finish coat. At least two final coats must be applied after this process.
Complet-e Finish With Final Rub
Before giving the finish the final rub, allow the final coat to cure 1 full week. Rubbing with pumice and oil before the finish is thoroughly dry produces a streaked, smoky surface.
You Will Need: • Powdered pumice stone, FFFF or 4/0.
• 1 pint lightweight mineral oil, paraffin oil, or lemon oil (not lemon oil polish).
• Spoon.
• Clean, lintless cloths.
• Felt pad, such as blackboard eraser.
• Jar to hold pumice and oil.
• Saucer for oil.
• Brush to remove pumice from crevices.
28
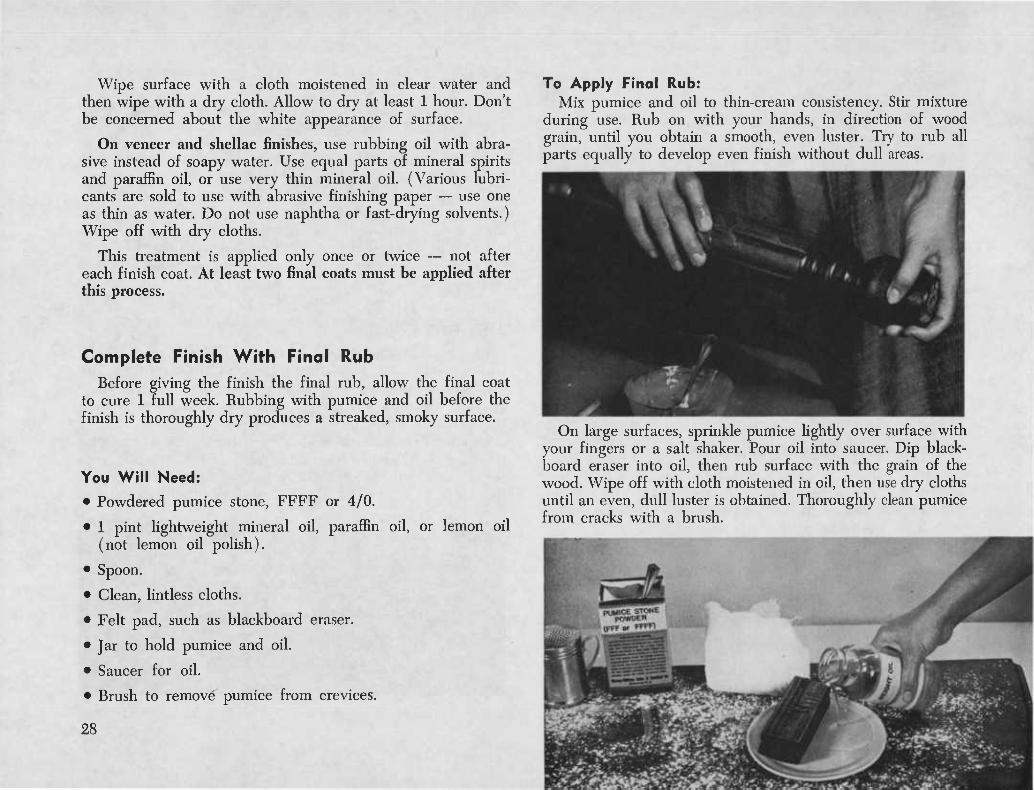
To Apply Final Rub: Mix pumice and oil to thin-cream consistency. Stir mixture
during use. Rub on with your hands, in direction of wood grain, until you obtain a smooth, even luster. Try to rub all parts equally to develop even finish without dull areas.
On large surfaces, sprinkle pumice lightly over surface with your fingers or a salt shaker. Pour oil into saucer. Dip black- board eraser into oil, then rub surface with the grain of the wood. Wipe off with cloth moistened in oil, then use dry cloths until an even, dull luster is obtained. Thoroughly clean pumice from cracks with a brush.
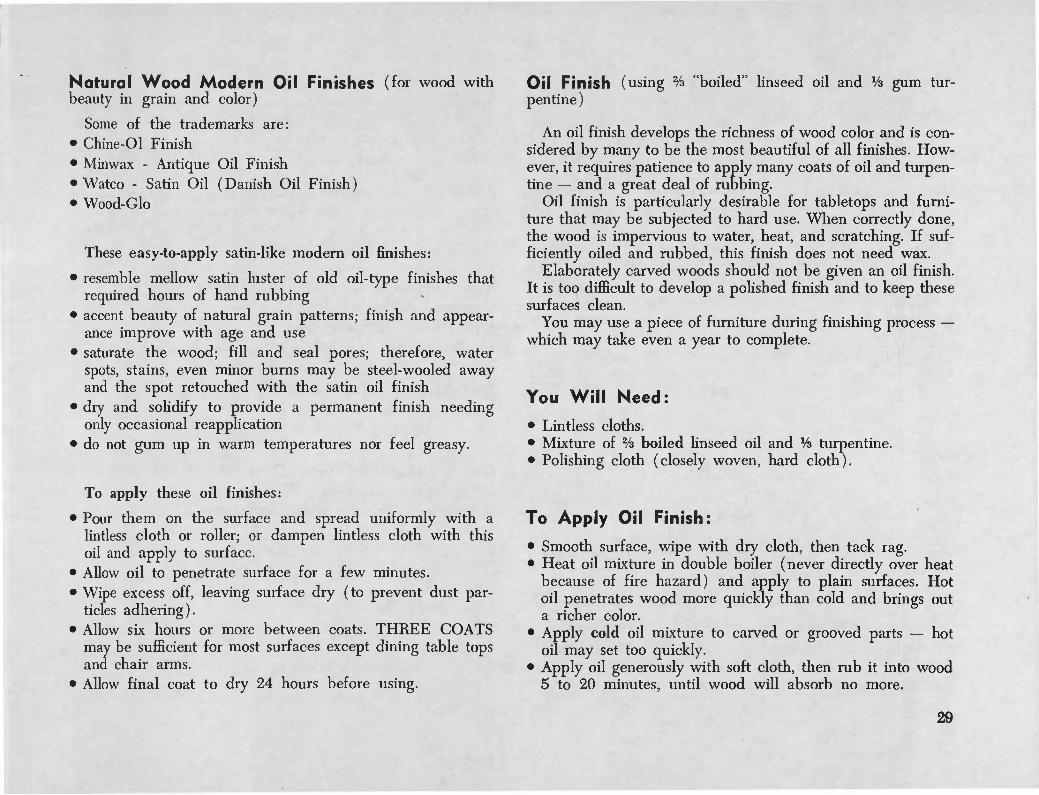
Natural Wood Modern Oil Finishes (for wood with beauty in grain and color)
Some of the trademarks are: • Chine-Ol Finish • M in wax - Antique Oil Finish • Watco - Satin Oil (Danish Oil Finish) • Wood-Glo
These easy-to-apply satin-like modem oil finishes:
• resemble mellow satin luster of old oil-type finishes that required hours of hand rubbing
• accent beauty of natural grain patterns; finish and appear- ance improve with age and use
• saturate the wood; fill and seal pores; therefore, water spots, stains, even minor burns may be steel-wooled away and the spot retouched with the satin oil finish
• dry and solidify to provide a permanent finish needing only occasional reapplication
• do not gum up in warm temperatures nor feel greasy.
To apply these oil finishes:
• Pour them on the surface and spread uniformly with a lintless cloth or roller; or dampen lintless cloth with this oil and apply to surface.
• Allow oil to penetrate surface for a few minutes. • Wipe excess off, leaving surface dry (to prevent dust par-
ticles adhering). • Allow six hours or more between coats. THREE COATS
may be sufficient for most surfaces except dining table tops and chair arms.
• Allow final coat to dry 24 hours before using.
Oil Finish (using % "boiled" linseed oil and % gum tur- pentine )
An oil finish develops the richness of wood color and is con- sidered by many to be the most beautiful of all finishes. How- ever, it requires patience to apply many coats of oil and turpen- tine — and a great deal of rubbing.
Oil finish is particularly desirable for tabletops and furni- ture that may be subjected to hard use. When correctly done, the wood is impervious to water, heat, and scratching. If suf- ficiently oiled and rubbed, this finish does not need wax.
Elaborately carved woods should not be given an oil finish. It is too difficult to develop a polished finish and to keep these surfaces clean.
You may use a piece of furniture during finishing process — which may take even a year to complete.
You Will Need: • Lintless cloths. • Mixture of % boiled linseed oil and % turpentine. • Polishing cloth (closely woven, hard cloth).
To Apply Oil Finish:
• Smooth surface, wipe with dry cloth, then tack rag. • Heat oil mixture in double boiler (never directly over heat
because of fire hazard) and apply to plain surfaces. Hot oil penetrates wood more quickly than cold and brings out a richer color.
• Apply cold oil mixture to carved or grooved parts — hot oil may set too quickly.
• Apply oil generously with soft cloth, then rub it into wood 5 to 20 minutes, until wood will absorb no more.
29
• Wipe away excess oil, changing cloths as needed. Remove all traces of oil from crevices; otherwise, oil will harden like a varnish, or become sticky.
• Next, rub each part of the piece with polishing cloth for 10 to 20 minutes. A firmly woven, hard cloth is excellent for developing a polish. Woolen cloth also may be used.
• For a soft, satiny luster, 4 to 12 coats of oil and rubbing after each coat are needed. Each coat must soak thoroughly into wood before another coat is applied.
• If surface is oily when hand is held on wood a few minutes, it is not dry enough to apply next coat. If sticky, more rubbing is needed to remove excess oil.
• Repeat process until no dull spots remain. • Repeat oiling once or twice a year to keep furniture in
good condition. Oil table leaves on underside as often as top to prevent warping.
• If the grain of the wood is raised with oiling, rub wood until smooth with 3/0 steel wool.
• If oil hardens in crevices, remove with varnish remover. • Caution: Oiled rags are combustible, so destroy them im-
mediately or wash at once.
Allow Sufficient Drying Time • In warm, dry weather, allow at least 2 days between first
and second coats of oil, 1 week between remaining coats. • In moist weather, allow 1 week, at least, between first and
second coats; 2 weeks and progressively longer between re- maining coats.
Polyurefhane Finishes (Oil-Modified Urethanes) Polyurcthane Finishes Are Clear, On-Surface Coatings, That:
• Are highly resistant to abrasion, scratching, water, chemi- cals, grease, solvents, food stains, alcohol, and oils.
• Do not penetrate (they form a coating on the surface).
• Are more difficult than sealers to apply evenly. • Produce a slippery surface. • Dry by evaporation and oxidation so good air circulation
is required during drying. • Will give satisfactory service if you choose the type of
polyurcthane formulated by the manufacturer and intended for your purpose, and follow manufacturer's directions in preparing surface and applying it. Polyurethanes, like other finishes, are not miracles. Each type is designed for specific purposes but not for all purposes.
Recommended in Areas Subjected To Unusual Abrasion • Some wood furniture (especially tops) • Some wood wall paneling, trim, doors, cabinets
Available in Gloss and Satin Types The gloss type is very shiny. The satin type produces a
sheen if wiped on, in, and off.
Use Oil-Modified Type Only; Read the Label If petroleum thinner is included in list of contents on can,
you can be assured you are buying an oil-modified type. Also if directions include cleaning brushes with mineral spirits, it is an oil-modified type.
Read the can label and follow manufacturer's directions.
They May Be Applied: • To bare wood (new or old) that is smooth and free of dust
and grease. • Over a sealer or varnish finish that has been cleaned and
deglossed.
30
A Successive Coat Must Be Applied Within a 48-Hour Period.
Do not Apply a Polyurethane Finish Over a Shellac or Lacquer Finish or a Pastewood Filler or Liquid Filler Unless Es- pecially Formulated for Polyurethane Finishes.
To find out if finish is shellac, sponge a spot on underside with denatured alcohol solvent. Finish will soften and come off if it is shellac.
To find out if finish is lacquer, which is crystal hard and chips, use lacquer thinner in same manner.
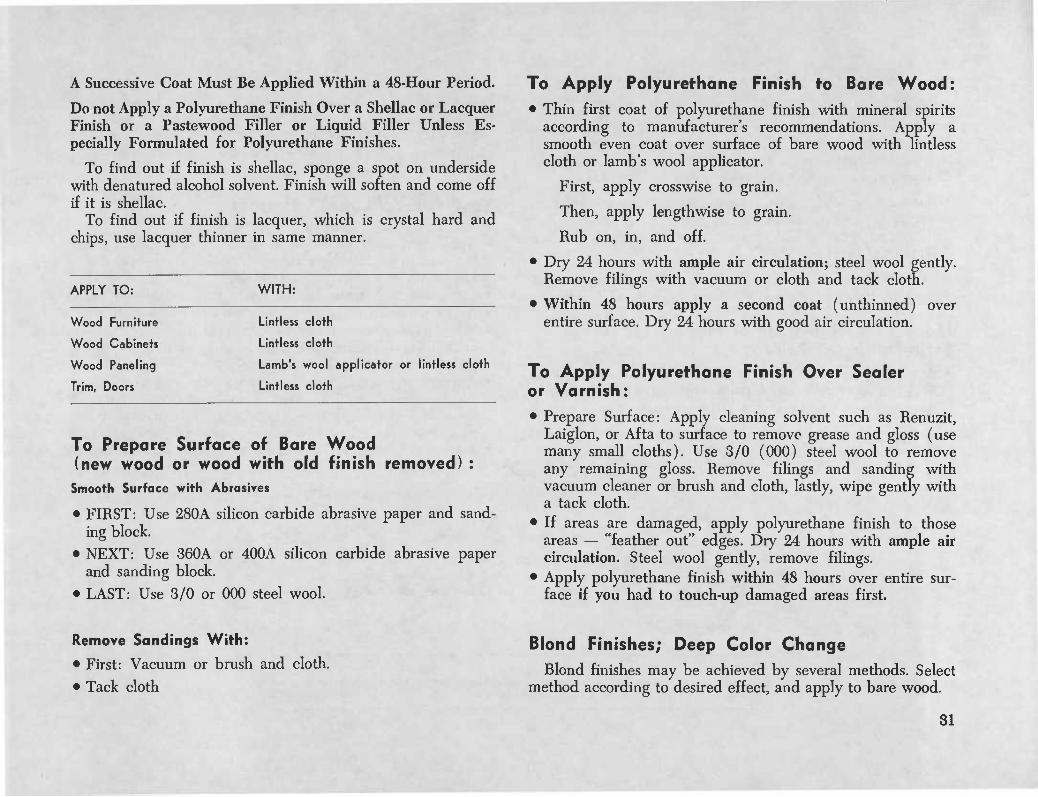
APPLY TO: WITH:
Wood Furniture
Wood Cabinets
Wood Paneling
Trim, Doors
Lintless cloth
Lintless cloth
Lamb's wool applicator or lintless cloth
Lintless cloth
To Prepare Surface of Bare Wood (new wood or wood with old finish removed) :
Smooth Surface with Abrasives
• FIRST: Use 280A silicon carbide abrasive paper and sand- ing block.
• NEXT: Use 360A or 400A silicon carbide abrasive paper and sanding block.
• LAST: Use 3/0 or 000 steel wool.
To Apply Polyurethane Finish to Bare Wood: • Thin first coat of polyurethane finish with mineral spirits
according to manufacturer's recommendations. Apply a smooth even coat over surface of bare wood with lintless cloth or lamb's wool applicator.
First, apply crosswise to grain.
Then, apply lengthwise to grain.
Rub on, in, and off.
• Dry 24 hours with ample air circulation; steel wool gently. Remove filings with vacuum or cloth and tack cloth.
• Within 48 hours apply a second coat (unthinried) over entire surface. Dry 24 hours with good air circulation.
To Apply Polyurethane Finish Over Sealer or Varnish: • Prepare Surface: Apply cleaning solvent such as Renuzit,
Laiglon, or Afta to surface to remove grease and gloss (use many small cloths). Use 3/0 (000) steel wool to remove any remaining gloss. Remove filings and sanding with vacuum cleaner or brush and cloth, lastly, wipe gently with a tack cloth.
• If areas are damaged, apply polyurethane finish to those areas — "feather out" edges. Dry 24 hours with ample air circulation. Steel wool gently, remove filings.
• Apply polyurethane finish within 48 hours over entire sur- face if you had to touch-up damaged areas first.
Remove Sandings With:
• First: Vacuum or brush and cloth.
• Tack cloth
Blond Finishes; Deep Color Change Rlond finishes may be achieved by several methods. Select
method according to desired effect, and apply to bare wood.
31
Mask With Oil or Satin "Add" Type Stains Where a deep color change is desired, for example, a
weathered gray on red oak or ebony on mahogany, use a satin- like ready-mixed "acid" type water stain. Some colors avail- able are: various grays, brown, ebony, reddish and brown mahoganys, maple and oak. They may be intermixed.
• Purchase a ready-mixed stain, such as graywood, drift- wood, or smokewood in oil or "acid" type. Stain is very thin in consistency and opaque. Apply according to manu- facturer's directions.
• Dry 24 hours and apply finish coats of sealer, water-white lacquer, polyurethane or one of the modern oil finishes.
Mask with Thin Coat of Flat or Satin-Finish Oil Paint • Apply a resin primer, such as white or gray or tinted firzite,
or white or light-colored paint, thinned with appropriate thinner (read label). Use a brush or spray gun.
• If you wish to mask entire surface, let paint dry 24'hours, then apply finish coats of sealer or water-white lacquer.
• If you wish grain to stand out, allow paint to remain on wood 10 to 20 minutes until tacky. Rub off with coarse cloth over block of wood, swirling across grain, then with grain until surplus is removed. Grain will stand out, with only thin, uniform paint film remaining. Finish with sealer or water-white lacquer.
To Produce "Limed" Finishes: • Use on oak, ash, chestnut, or mahogany. • Apply two coats of thin-type sealer 24 hours apart. After
last coat dries 24 hours, smooth with 3/0 steel wool. • Dust with dry cloth, then tack rag. • Fill pores with white firzite, white lead, or colored paint. • Apply paint across grain with brush or lintless cloth. • When paint reaches tacky stage, rub off surplus with coarse
cloth and smoothing block. Rub with circular motion to prevent streaking, then rub crosswise.
• After paint dries 24 hours, smooth gently with grain, using 3/0 steel wool, until all paint is removed from surface. Or sprinkle a cloth with turpentine, fold, and wipe away sur- plus. Paint should remain only in pores and grain.
• Repeat if necessary. Then apply additional sealer coats.
Reprinted with the permission of Rutgers University by the Cooperative Extension Service
Oregon State University—Corvallis
Cooperative Extension work in Agriculture and Home Economics, Gene M. Lear, director. Oregon State
University and the United States Department of Agriculture cooperating. Printed and distributed in fur- therance of the Acts of Congress of May 8 and June 30, 1914. BAA—1-70