Embed Size (px)
Citation preview

SOFTWARE SOFTWARE OPERATING GUIDE
FUTURA AUTO

vers. 1
Edition: January 2019
(c) 2019 SILCA S.p.A. - Vittorio Veneto The Manufacturer declines any responsibility for possible inaccuracies in this document due to printing or transcription errors. The Manufacturer reserves the rights to alter the information without prior notice, except when they affect safety. This document or any of its parts cannot be copied, altered or reproduced without written authorization from the Manufacturer. Keep the manual and look after it for the entire life cycle of the machine.The information has been drawn up by the manufacturer in his own language (Italian) to provide users with the necessary indications to use the key-cutting machine independently, economically and safely.
IMPORTANT NOTE: in compliance with current regulations relating to industrial property, we hereby state that the trade-marks or trade names mentioned in our documentation are the exclusive property of authorized manufacturers of locks and users. Said trade-marks or trade names are nominated only for the purposes of information so that any lock for which our keys are made can be rapidly identifi ed.
INDEX PROGRAM START ................................................................................................................................................................. 5 CHOICE OF KEYBOARD ...................................................................................................................................................... 6 CHANGE PROGRAM LANGUAGE ........................................................................................................................................ 6 MEASURING UNITS ............................................................................................................................................................... 6 DROP-DOWN MENU ............................................................................................................................................................. 7
1 SEARCHES ......................................................................................................................................................8
1.1 VEHICLE keys..................................................................................................................................................... 8
1.2 TRASPONDER GUIDE ....................................................................................................................................... 8
1.3 DATA CARD/SERIE info .....................................................................................................................................11
1.4 Using a CUTTING DATA CARD ........................................................................................................................ 13
1.5 CUTTING VEHICLE keys with STANDARD cuts .............................................................................................. 20
1.6 Cutting TRACK/TUBULAR keys and CUTTING SPEED .................................................................................. 21
2 COPY VEHICLE KEYS ...................................................................................................................................22
3 FAVORITE’S ...................................................................................................................................................30
4 QUEUE OF JOBS ...........................................................................................................................................31
4.1 “STANDARD” QUEUE OF JOBS ...................................................................................................................... 31
5 OPTIONS ........................................................................................................................................................32
5.1 INFO ........................................................................................................................................................ 32
5.2 CALIBRATION ................................................................................................................................................... 33
5.2.1 STANDARD key clamp calibration ..................................................................................................................... 33
5.2.2 DIMPLE/TRACK keys clamp calibration ............................................................................................................ 35
5.2.3 MOBILE TRACER calibration (07T) ................................................................................................................... 36
5.2.4 STANDARD key Adapter calibration .................................................................................................................. 37
5.2.5 DIMPLE/TRACK keys Adapters calibration ........................................................................................................ 37
5.3 SETTINGS ........................................................................................................................................................ 38
5.3.1 ZERO-POINT Calibration ................................................................................................................................... 38
5.3.2 Options ............................................................................................................................................................... 405.3.2.a General ...........................................................................................................................................................................405.3.2.b Preferences STANDARD key .........................................................................................................................................425.3.2.c Preferences DIMPLE/TRACK key ..................................................................................................................................43
5.3.3 USE .................................................................................................................................................................. 445.3.3.a ACCESS POINT mode (Wi-Fi connection between machine and Tablet) ......................................................................445.3.3.b ETHERNET with connection to LAN and router .............................................................................................................465.3.3.c TETHERING USB mode .................................................................................................................................................475.3.3.d LOCAL NETWORK mode ...............................................................................................................................................49
5.3.4 IMPORT HOOKS POSITION FILE .................................................................................................................... 53
5.4 MACHINE MAINTENANCE ............................................................................................................................... 55
6 MACHINE UPDATE and REGISTRATION .....................................................................................................58
6.1 MACHINE REGISTRATION ............................................................................................................................. 58
6.2 MACHINE SOFTWARE UPDATE ..................................................................................................................... 64
6.2.1 Update by TABLET ............................................................................................................................................. 64
6.2.2 Update by USB PEN .......................................................................................................................................... 66
6.2.3 Update with LOCAL NETWORK connected to the internet ................................................................................ 67
6.2.4 Update with SRS Program (Silca Remote Service) .......................................................................................... 69
6.3 APP UPDATE (Silca.apk and SilcaKeyboard.apk) ............................................................................................ 71
7 BACKUP / RECOVERY ..................................................................................................................................73
8 USER SERIES ................................................................................................................................................74
9 TRANSPONDER GUIDE ................................................................................................................................78
10 CHANGING TABLETS ....................................................................................................................................80
11 FUTURA PROCEDURE TO CLEAR CACHE .................................................................................................82

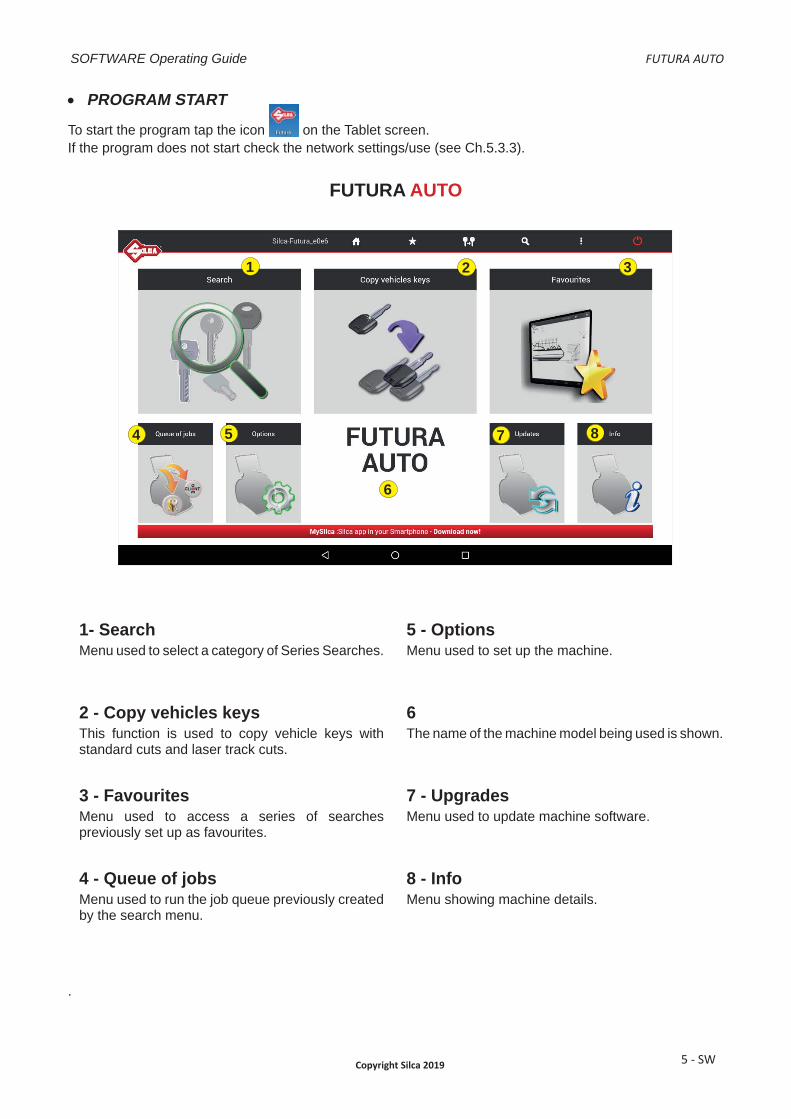
PROGRAM START
To start the program tap the icon on the Tablet screen.If the program does not start check the network settings/use (see Ch.5.3.3).
FUTURA AUTO
1- SearchMenu used to select a category of Series Searches.
5 - OptionsMenu used to set up the machine.
2 - Copy vehicles keysThis function is used to copy vehicle keys with standard cuts and laser track cuts.
6The name of the machine model being used is shown.
3 - FavouritesMenu used to access a series of searches previously set up as favourites.
7 - UpgradesMenu used to update machine software.
4 - Queue of jobsMenu used to run the job queue previously created by the search menu.
8 - InfoMenu showing machine details.
.
1 3
4 5
6
7 8
2
SOFTWARE Operating Guide FUTURA AUTO
Copyright Silca 2019 5 - SW

Machine ID: shows the name of the machine.
Initial menu: tap the symbol to go back to the initial menu.
Favourites: tap the symbol to view the data cards/series saved in the favorites menu.
Tap the symbol for direct access to the “Copy vehicles keys” menu.
Search menu: tap the symbol for direct access to the “Search” menu.
Information: tap the symbol to view information about the Futura AUTO machineTurn off machine: tap the symbol to turn off the Futura AUTO machine without affecting the software; wait until the green light goes out and then turn off the machine with the ON/Emergency push button.
CHOICE OF KEYBOARD When the FUTURA program is started you are required to choose the type of keyboard you will use for entering data.SILCA Keyboard: smaller keyboard specially designed for the FUTURA program.Google Keyboard: standard Android Tablet keyboard.
If you have chosen the Silca keyboard you can go back to Android by hitting the key on the Silca keyboard.
CHANGE PROGRAM LANGUAGEThe default program language is English. To change language go to the Options menu (Ch.5), select Settings -> Options -> General -> Language and choose the language you require.
MEASURING UNITSAll the values given in the program for the technical measurements of keys and clamps are expressed in hundredths of a millimetre (default) or thousandths of an inch, according to the measuring unit chosen from the “Options” menu.
SOFTWARE Operating Guide FUTURA AUTO
Copyright Silca 20196 - SW

DROP-DOWN MENU
To view this menu on the Tablet scroll from left to right to open the list:
Connect to: used to fi nd the Futura AUTO machine, if there is a LAN connection or Wi-Fi ACCESS POINT.
Reload page: used to reload the page if it is not properly viewed/activated.
Restart Machine: used to restart the machine.
Machine IP address: used to enter the Futura AUTO IP address manually (default is192.168.0.1).
Reset Axes: used to clear the axes on the machine.
Machine Status: used to see connection status between the machine and Tablet.
Change Keyboard: used to select and set the type of keyboard to be used (Silca or Google keyboard)
Machine Registration: used to register the machine when the Tablet is connected to a Wi-Fi network with internet access.
Update FUTURA: used to download new updates for the machine:
• by tablet connected to a Wi-Fi network with access to the internet (Ch.6.2.1).• by USB PEN DRIVE and PC with access to the internet (Ch.6.2.2).
Recovery tools: this function is protected by a password and is for the exclusive use of Silca personnel.
In addition, the Silca App version installed on the Tablet is shown below.
SOFTWARE Operating Guide FUTURA AUTO
Copyright Silca 2019 7 - SW

1 SEARCHES
When the Searches menu is opened, the following window appears:
1.1 VEHICLE keysThis menu is used to restrict a search to the category of standard edge cut and track vehicle keys only (e.g.: GT15R - HON66GP - HU66P - SIP22LP - TOY40P - TOY43... )
1.2 TRASPONDER GUIDEThe Transponder Guide contains all the transponder key copying solutions provided by Silca (Ch.9).
SOFTWARE Operating Guide FUTURA AUTO
Copyright Silca 20198 - SW

See example of VEHICLE KEYS search fl ow:
When you enter the VEHICLE keys category the following window appears for you to enter the search parameters.
Tap “VEHICLE MAKE”; a guided procedure appears to simplify your search.
Enter the fi rst letters of the MAKE and select the one you require.
SOFTWARE Operating Guide FUTURA AUTO
Copyright Silca 2019 9 - SW

Enter the fi rst letters of the VEHICLE MODEL and select the one you require.
Select the YEAR.
Select the CARD key to access the cutting data card.
SOFTWARE Operating Guide FUTURA AUTO
Copyright Silca 201910 - SW

1.3 DATA CARD/SERIE info
To access the cutting card select the relevant line and tap the “OPEN CUTTING CARD” button.In the section of the window showingthe search results
• Order searches by tapping the arrow next to the relative fi elds.
• Select a series from those shown, or search for it on the next pages:
• Tap this icon to access the “Transponder Guide” (for vehicle keys).
• Select the “Silca” or “User” series:
- “Silca” is the default icon for viewing Silca series.
- tap “User” to view the existing user series (Ch.8) associated to the selected card.
• Tap the special fi eld to enter the Hook position: it is automatically saved when the keyboard is turned off.
There are “3 folders” on the right of the screen:
INFORMATION: shows information about the lock make, applications and Silca/Ilco key blank. Info about a key can be viewed by tapping the fi eld relating to the key blank.
APPLICATIONS: shows the applications for which this key blank is used: locks, cylinders, vehicle model,etc.
CARD: shows information relating to accessories needed for cutting keys with the Futura AUTO key-cutting machine.
SOFTWARE Operating Guide FUTURA AUTO
Copyright Silca 2019 11 - SW

KEY BLANK
To gain access to additional information regarding the Silca key blank simply tap on the following icon
• List of other Silca key blanks that can be used • List of comparative key blanks• List of Brand names linked to the Silca key blank.
SOFTWARE Operating Guide FUTURA AUTO
Copyright Silca 201912 - SW

1.4 Using a CUTTING DATA CARD
Example:
The screen shows all the technical details relating to the selected cutting card (e.g. Card, SN, Profi le, Series, Spaces, Depth, Cutting angle).
Tap the key to go back to the previous screen.
Tap to edit the way to view depths on the card:
Fig. 1
Depths referring to the “key axis”
Fig. 2
Depths referring to “key back”(i.e. the plate/bottom of the clamp)
Note: this function is only available for two sided symmetrical keys.
SOFTWARE Operating Guide FUTURA AUTO
Copyright Silca 2019 13 - SW

The list on the right contains the functions listed below:• CODE: enter the indirect code for cutting the key.• CUTS: this function is used to enter direct cuts.
• QUEUE OF JOB: If the cut is fi lled and correct you can save your job in “Queue of Job” by tapping the following icon (the job can then be done afterwards).
Tap on “Queue of Job” to display the list of jobs available.
• DECODING: used to decode the cuts on the original key.
ATTENTION: make sure the key to be decoded is clean.
ATTENTION: anodised aluminium keys, plastic keys or any other key without electrical conductivity CANNOT BE decoded!
Tap “Decoding”: information appears regarding the position of the key in the clamp.
SOFTWARE Operating Guide FUTURA AUTO
Copyright Silca 201914 - SW

SELECT ARTICLE: to solve installation diffi culties encountered with symmetrical vehicle keys on side A or B of the standard clamp, the user may select the key blank before decoding the key. In this way the machine will indicate the best side of the clamp (C or D) on which to fi t the key and can run the decoding operation successfully.
To continue tap START and perform the operations described on the screen. At the end of the operation tap OK.
To view the decoded measurements and the measurements read on the key, tap “Decoded Values” on the bottom of the screen.
Then tap “CUT” to cut the key using the combination provided by the previous operation.
Copy key with measurements read: after decoding a key the cuts can be verifi ed and compared to the keys original cuts. If the cuts “Offset” values are signifi cant, it’s possible to cut the key by using the measurements just read (not the keys original cuts nominal values that are in the card) by inserting a check “fl ag” in the appropriate box.
NOTE: when decoding standard keys, you must use the clamp side designated by the software as well as the stop position designated in order to decode the key properly. Use of other clamp positions or stop positions will result in a misread key. Once decoded, should you receive the message “key blank not allowed” or “bad permutation”, the key may not have been positioned properly. As a result the software will not recognize the key blank or the depths read will not correspond with any of the codes in the code series database. If you are sure that the proper card and key blank were used, reposition your key and try again.
SOFTWARE Operating Guide FUTURA AUTO
Copyright Silca 2019 15 - SW

• MANUAL CORRECTIONS: to enter manual adjustments in the relative fi elds for X axis and Y axis, activate the “Use corrections” fl ag, tap “Save” and then “Close”.
Adjustments: from -30 to +30 hundredths of mm (+/- 118 thousandths of an inch)
Close the window after it has shown an OK message. An icon indicates when the manual adjustment is active.
Confi rm with “Save”.
SOFTWARE Operating Guide FUTURA AUTO
Copyright Silca 201916 - SW

• PARTIAL CUTS: used to make a search for correspondence with the code table (if applicable): enter the known cuts and tap “Search”.
Cutting tree: function accessible only from “Partial cuts” and enabled only for Data cards/Series with code tables available. Tap the “Cutting Tree” key to continue.
- The list of keys shown in the cutting tree coincides with the list of keys shown in the “Partial cuts” window; however, here the keys are listed according to Groups, Code and Cuts in order to reduce to a minimum the number of key blanks to be used.
- The box at the top of the screen shows the maximum number of key blanks to be used for all the possible cut combinations listed.
- Each Group needs a new key blank to cover all the cut combinations it lists (work down from top). Select the group and/or single code and tap the QUEUE key to place them in the job queue.
- Tap Close, OK, and then Queue of Job.- The jobs must be carried out in progressive order, starting from the key with the shallowest cuts to those with
deeper cuts.
SOFTWARE Operating Guide FUTURA AUTO
Copyright Silca 2019 17 - SW

• CARD OPTIONS
Cut type: the indicated cut type is:
LASER (M_LA2_LFD)Conjunction of the cutting angles is determined automati-cally by the machine, allowing cuts to be made with varia-ble angles; this facilitates the smooth entry of the key into the lock, prolonging the working life of the key.
• INFO CARD: views information about the clamp, side and stop to be used, cutter and key blank.
Tap the relevant icons to see images and part code.
• [Note]: tap “Note” (when shown) to view data card notes, i.e. further specifi c information relating to the position of the key or an accessory, etc.
SOFTWARE Operating Guide FUTURA AUTO
Copyright Silca 201918 - SW

• MEASUREMENTS: view information regarding the measurements of SPACES and DEPTH on the card.
SOFTWARE Operating Guide FUTURA AUTO
Copyright Silca 2019 19 - SW

1.5 CUTTING VEHICLE keys with STANDARD cuts
To make a cut on the key, tap CUT : information is shown about the position of the key in the clamp.
The following can be set:
Use any clamp: if this function is enabled the key to be cut can be positioned on a clamp side different from default. The function is used to acquire the measurement of the key blank (stem width) in order to adapt cuts to the key blank being used. It is applied automatically only to keys with double symmetrical sides.ATTENTION: option valid for CUTTING only (NOT DECODING).
NOTE: activating the “Use any clamp” allows the user to clamp the key in any jaw position (i.e. clamping the keys profi le on side C or D) when cutting a key by code. Regardless of the jaw position used, the stop position designated by the software must be used. This function is only available when cutting two symmetrical sided standard keys. When this function is enabled cuts cannot be repeated on a key already cut.
Pieces: indicates how many keys you wish to cut.
ATTENTION: anodised aluminium keys, plastic keys or any other key without electrical conductivity CANNOT BE CUT!
SOFTWARE Operating Guide FUTURA AUTO
Copyright Silca 201920 - SW

1.6 Cutting TRACK/TUBULAR keys and CUTTING SPEED
To make a cut on the key, tap CUT : information is shown about the position of the key in the clamp.
For TRACK keysSteps: used to edit the default number of passes during key cutting. The value is memorised once it has been edited.
The following can be set:
Pieces: indicates how many keys you wish to cut.
Press START to begin the procedure.
ATTENTION: anodised aluminium keys, plastic keys or any other key without electrical conductivity CANNOT BE CUT!
SOFTWARE Operating Guide FUTURA AUTO
Copyright Silca 2019 21 - SW

2 COPY VEHICLE KEYSThis function is used to copy vehicle keys with standard or laser track cuts, by means of facilitated searching.
Searches are made by MAKE -> MODEL -> YEARIn that order: - After confi rming the “Make”, the “Model” fi eld activates;- After confi rming the “Model”, the “Year” fi eld activates.
The search has a fi lter to speed up results (digit the initial letter of the make or model). When a fi eld is highlighted in green it means at least one of the keys included has an associated hook position (see Ch.5.3.4).
Example 1: FIAT -> 500 -> 2007 key ref. SIP22... TRACK type cutting
SOFTWARE Operating Guide FUTURA AUTO
Copyright Silca 201922 - SW

SOFTWARE Operating Guide FUTURA AUTO
Copyright Silca 2019 23 - SW

When the READ key has been hit, the sequence of operations is shown, with a drawing of the clamp and jaws to use and the Stop in use for the key in question.Tap START to continue.
SOFTWARE Operating Guide FUTURA AUTO
Copyright Silca 201924 - SW
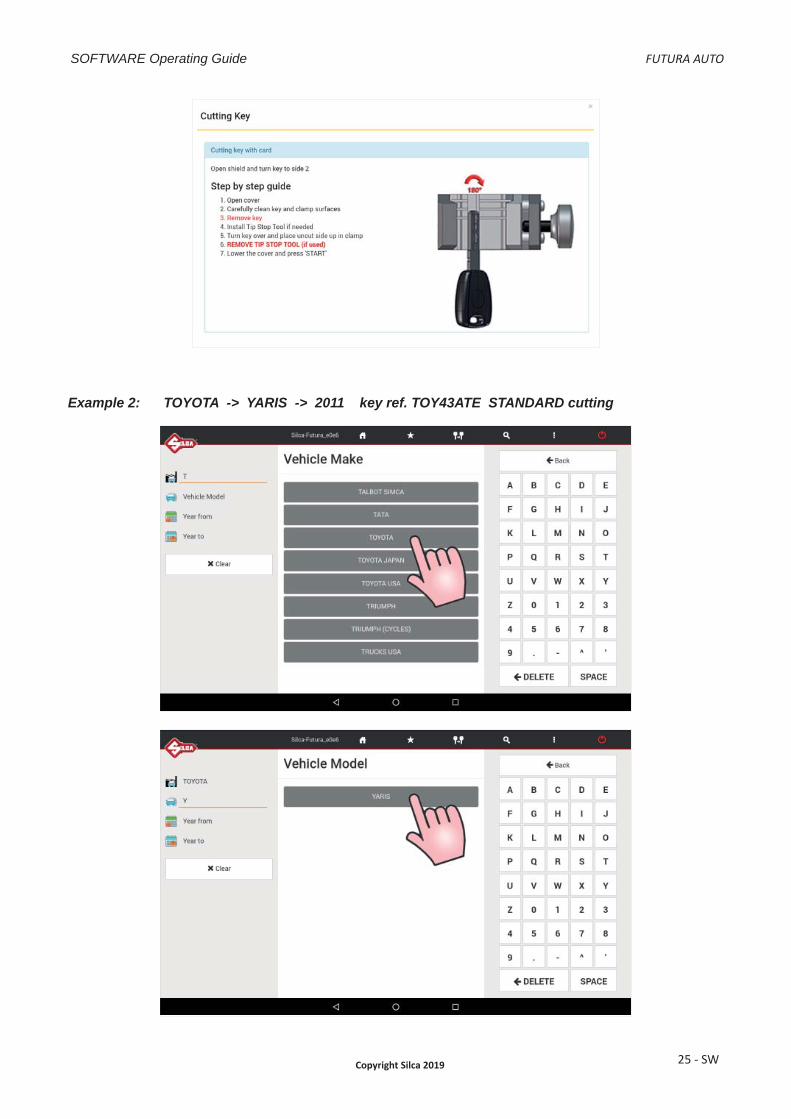
Example 2: TOYOTA -> YARIS -> 2011 key ref. TOY43ATE STANDARD cutting
SOFTWARE Operating Guide FUTURA AUTO
Copyright Silca 2019 25 - SW
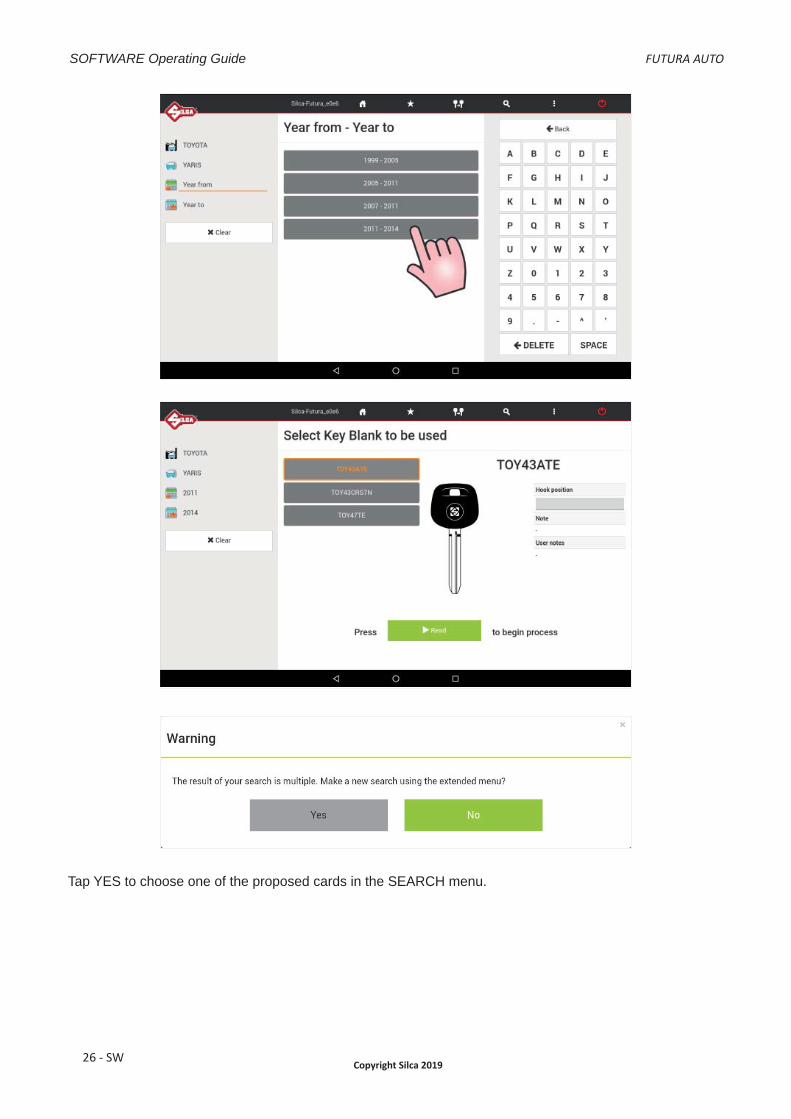
Tap YES to choose one of the proposed cards in the SEARCH menu.
SOFTWARE Operating Guide FUTURA AUTO
Copyright Silca 201926 - SW
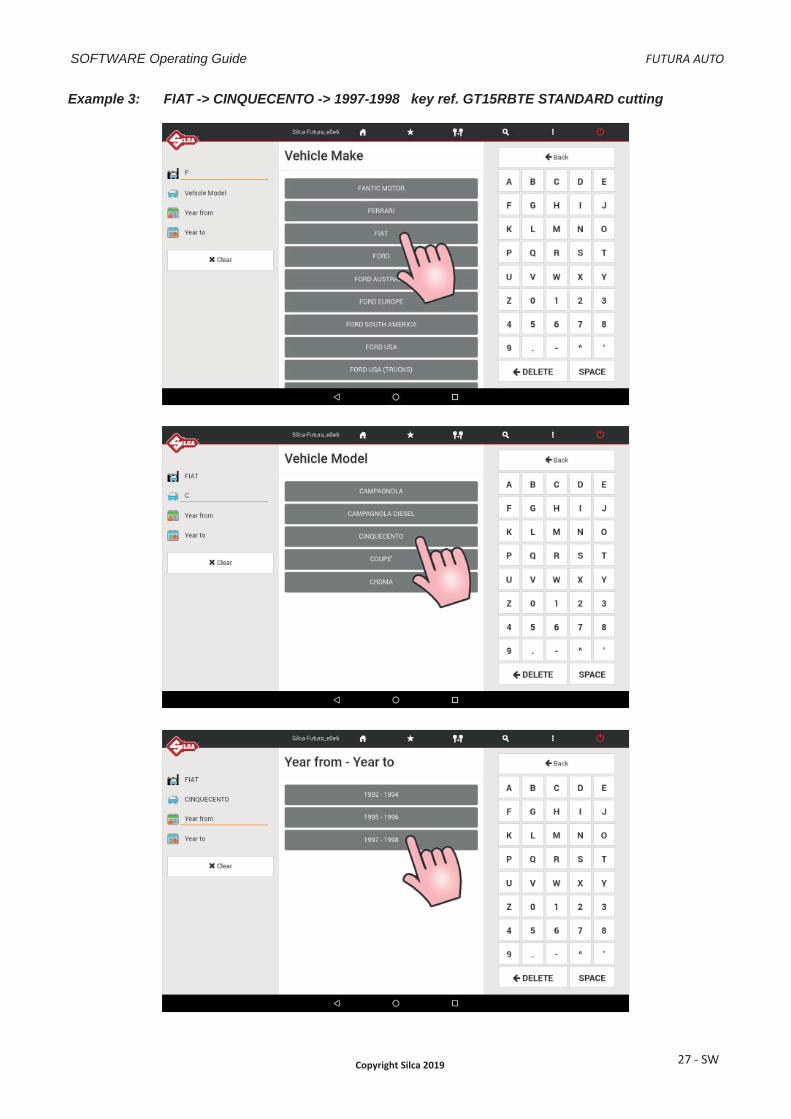
Example 3: FIAT -> CINQUECENTO -> 1997-1998 key ref. GT15RBTE STANDARD cutting
SOFTWARE Operating Guide FUTURA AUTO
Copyright Silca 2019 27 - SW

When the READ key has been hit, the sequence of operations is shown, with a drawing of the clamp and side to use, and the Stop in use for the key in question. Tap START to continue.
SOFTWARE Operating Guide FUTURA AUTO
Copyright Silca 201928 - SW

SOFTWARE Operating Guide FUTURA AUTO
Copyright Silca 2019 29 - SW

3 FAVORITE’S
The FAVORITES menu contains the data cards that have been selected in the Vehicle keys Search menu. Saving data cards to the favorites menu will eliminate the time spent searching for frequently used cards.For each data card a description can be written in the special fi eld in the “User Note” column.
To select data cards to be included in the Favorite’s menu tap the star symbol in the fi rst left-hand column of the Search menu; the symbol will be highlighted in black.
To remove a data card in the Favorite’s menu, tap the relevant star symbol, which will go back to white.
SOFTWARE Operating Guide FUTURA AUTO
Copyright Silca 201930 - SW
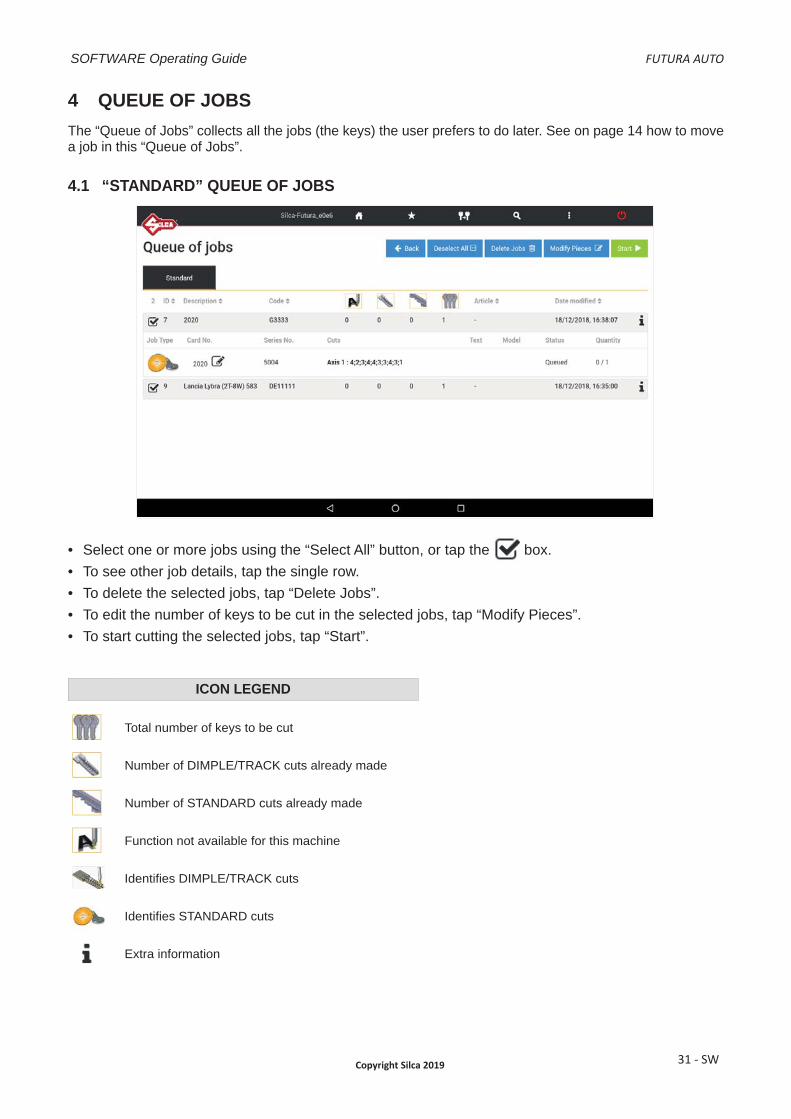
4 QUEUE OF JOBSThe “Queue of Jobs” collects all the jobs (the keys) the user prefers to do later. See on page 14 how to move a job in this “Queue of Jobs”.
4.1 “STANDARD” QUEUE OF JOBS
• Select one or more jobs using the “Select All” button, or tap the box.• To see other job details, tap the single row.• To delete the selected jobs, tap “Delete Jobs”.• To edit the number of keys to be cut in the selected jobs, tap “Modify Pieces”.• To start cutting the selected jobs, tap “Start”.
ICON LEGEND
Total number of keys to be cut
Number of DIMPLE/TRACK cuts already made
Number of STANDARD cuts already made
Function not available for this machine
Identifi es DIMPLE/TRACK cuts
Identifi es STANDARD cuts
Extra information
SOFTWARE Operating Guide FUTURA AUTO
Copyright Silca 2019 31 - SW

5 OPTIONS
Options contains the following menus:• Info• Calibration• Settings• Machine maintenance • Upgrades• Backup/Restore• User series
5.1 INFOThis window shows the main data for the Futura AUTO machine (e.g. SW update version, serial number, number of keys cut, etc.).
Tap the appropriate icon to view the Futura AUTO “SOFTWARE OPERATING GUIDE”.
SOFTWARE Operating Guide FUTURA AUTO
Copyright Silca 201932 - SW

5.2 CALIBRATION
Calibration includes: • Clamp Standard keys• Clamps Dimple/Track keys• Mobile Tracer• Standard key Adapter• Dimple/Track key Adapter
5.2.1 STANDARD key clamp calibration
Tap START to begin calibration.Fit template Z3 into the 01V clamp, as illustrated.
SOFTWARE Operating Guide FUTURA AUTO
Copyright Silca 2019 33 - SW

Close the safety shield and press START to continue.
At the end of the operation you are required to save the data entered.Tap “Yes” to confi rm.
The 01V clamp is calibrated only for Side A.Only Manual corrections of Y (spaces) e X (depth) can be entered on sides B, C and D.Positive value of Y: takes cut closer to stop.Negative value of Y: takes cut away from stop.Positive value of X: lowers the cut from the axis.Negative value of X: raises the cut from the axis.Adjustments: from -30 to +30 hundredths of mm (+/- 118 thousandths of an inch).
Tap “Save” to confi rm.
SOFTWARE Operating Guide FUTURA AUTO
Copyright Silca 201934 - SW
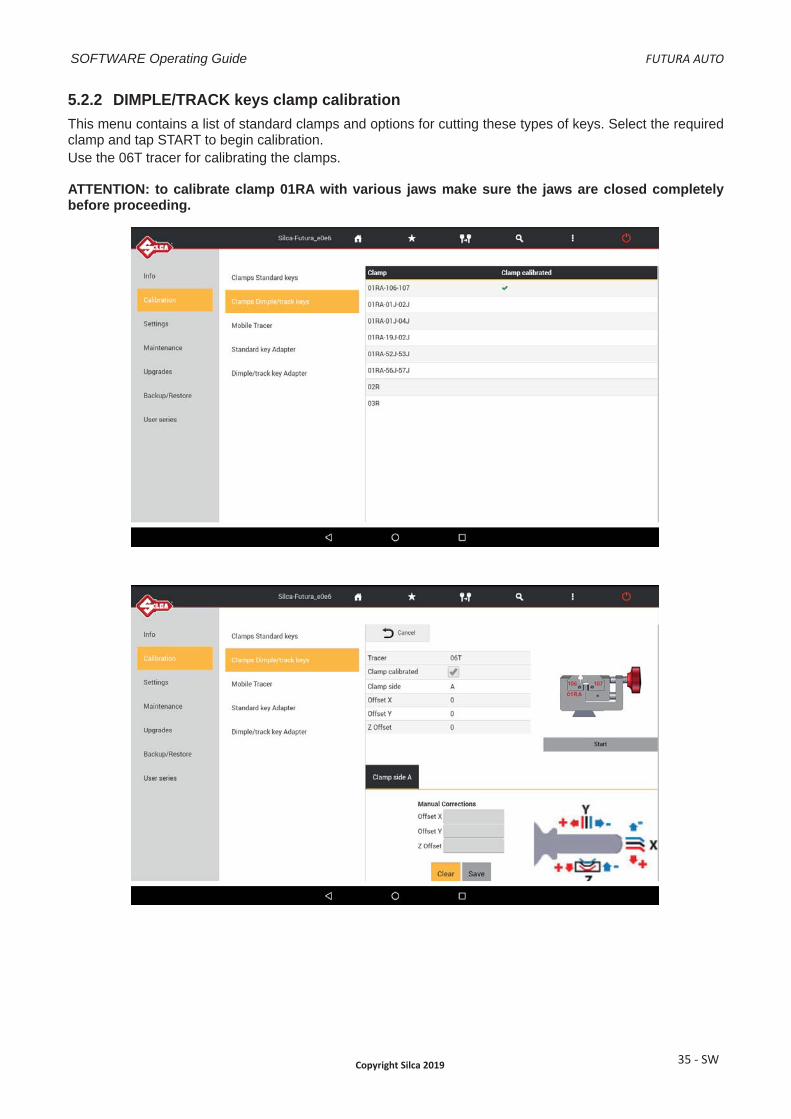
5.2.2 DIMPLE/TRACK keys clamp calibrationThis menu contains a list of standard clamps and options for cutting these types of keys. Select the required clamp and tap START to begin calibration.Use the 06T tracer for calibrating the clamps.
ATTENTION: to calibrate clamp 01RA with various jaws make sure the jaws are closed completely before proceeding.
SOFTWARE Operating Guide FUTURA AUTO
Copyright Silca 2019 35 - SW

At the end of the operation you are required to save the data entered. Tap “Yes” to confi rm.
MANUAL CORRECTIONSY, X and Z axis manual corrections can be applied if necessary.Positive value of Y: takes cut closer to stop.Negative value of Y: takes cut away from stop.Positive value of X: moves cut to the right of the axis.Negative value of X: moves cut to the left of the axis.Positive value of Z: lowers the cut from the axis.Negative value of Z: raises the cut from the axis.
Adjustments: from -30 to +30 hundredths of mm (+/- 118 thousandths of an inch)Tap “Save” to confi rm.
5.2.3 MOBILE TRACER calibration (07T)ATTENTION: when calibrating the 07T mobile tracer make sure the 106-107 jaws are completely closed before proceeding.
- Lower the 07T mobile tracer and lock in place by turning the knurled knob clockwise.- Tap START to begin calibration and follow the instructions on the screen.- At the end of the operation you are required to save the data entered.- Tap YES to confi rm.
SOFTWARE Operating Guide FUTURA AUTO
Copyright Silca 201936 - SW

5.2.4 STANDARD key Adapter calibration
If any adapter will be add, manually corrections of the Y (spaces) and X (depths) axis will be possible to manage.Positive value of Y: takes cut closer to stop.Negative value of Y: takes cut away from stop.Positive value of X: lowers the cut from the axis.Negative value of X: raises the cut from the axis.Adjustments: from -30 to +30 hundredths of mm (+/- 118 thousandths of an inch). Tap “Save” to confi rm.
5.2.5 DIMPLE/TRACK keys Adapters calibration
Positive value of Y: takes cut closer to stop.Negative value of Y: takes cut away from stop.Positive value of X: moves cut to the right of the axis.Negative value of X: moves cut to the left of the axis.Positive value of Z: lowers the cut from the axis.Negative value of Z: raises the cut from the axis.Adjustments: from -30 to +30 hundredths of mm) (+/- 118 thousandths of an inch). Tap “Save” to confi rm.
SOFTWARE Operating Guide FUTURA AUTO
Copyright Silca 2019 37 - SW

5.3 SETTINGS
The Settings menu contains:• ZERO-POINT Calibration• Options• Network setting• Registration• Import hooks position fi le
5.3.1 ZERO-POINT Calibration
This operation requires the use of the 01RA clamp with 106-107 jaws and the 06T tracer point.
ATTENTION: make sure the jaws are completely closed before starting.Tap START and follow the instructions on the screen.
SOFTWARE Operating Guide FUTURA AUTO
Copyright Silca 201938 - SW

At the end of the operation you are required to save the data entered.Tap “Yes” to confi rm.
NOTE: Remember to replace the 06T tracer with the proper cutter prior to attempting to cut a key to prevent damaging the 06T tracer.
SOFTWARE Operating Guide FUTURA AUTO
Copyright Silca 2019 39 - SW

5.3.2 OptionsThe Options menu contains:- General- Preferences STANDARD key- Preferences DIMPLE/TRACK key
5.3.2.a GeneralThe following parameters can be modifi ed:
• Measurement Unit (millimeters or inches)
• Language
SOFTWARE Operating Guide FUTURA AUTO
Copyright Silca 201940 - SW

• Comparatives (comparative brands to visualize for key research)It’s possible to pick and/or unpick brands that can be seen after a research of comparatives articles.In the comparative list Silca is activated by default.
• Reference Key ManufacturerAfter a key search… the key to be duplicated will always (with exception*) be the Silca reference by default. ILCO can also be set as a reference by default.* keys that are not produced by Silca (copyright - obsolete - new keys)
SOFTWARE Operating Guide FUTURA AUTO
Copyright Silca 2019 41 - SW

5.3.2.b Preferences STANDARD key
Cutting check: in simple terms …MACS protection (Maximum Adjacent Cut Specifi cation). When enabled this function prevents the machine from accepting user input of direct cuts that would result in a combination of cuts not included in the data cards.
Check installed key: when enabled this function checks whether the second side of the key is properly aligned in the clamp. Any alignment errors (taper) will be offset. This function is used only for keys with cuts on both sides.
Use any clamp: if this function is enabled the key to be cut can be positioned on a clamp side different from default. The function is used to acquire the measurement of the key blank (stem width) in order to adapt cuts to the key blank being used. It is applied automatically only to keys with double symmetrical sides.ATTENTION: option valid for CUTTING only (NOT DECODING).
Rectify key STOP: when enabled adjusts the key stop as per instructions on the screen.
Minimum distance from stop: the range [50-90] (hundredths of a millimeter); 197-354 thousandths of an Inch)
Interval for parameters involved (in hundredths of a millimeter):X 0 - 99Y 0 - 400H 0 - 400L 0 - 500
SOFTWARE Operating Guide FUTURA AUTO
Copyright Silca 201942 - SW

5.3.2.c Preferences DIMPLE/TRACK key
Set preferences: used to enable or disable the use of the 07T mobile tracer. If the fi eld is not selected the 06T tracer is required, to be fi tted into the shaft for the decoding operations.
Carriage speed at rapid: used to set the carriage speed for rapid movements; the pre-set value of 3000 is recommended by Silca.
SOFTWARE Operating Guide FUTURA AUTO
Copyright Silca 2019 43 - SW
5.3.3 USE
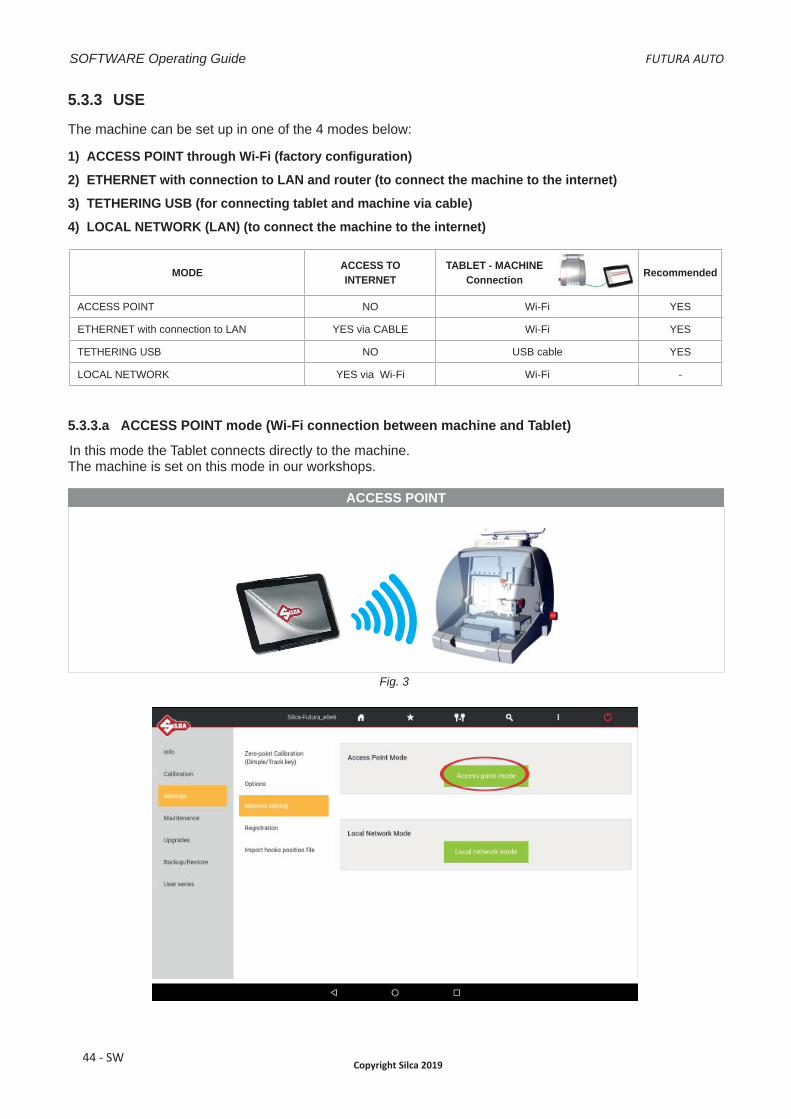
The machine can be set up in one of the 4 modes below:
1) ACCESS POINT through Wi-Fi (factory confi guration)
2) ETHERNET with connection to LAN and router (to connect the machine to the internet)
3) TETHERING USB (for connecting tablet and machine via cable)
4) LOCAL NETWORK (LAN) (to connect the machine to the internet)
MODE ACCESS TOINTERNET
TABLET - MACHINE Connection Recommended
ACCESS POINT NO Wi-Fi YES
ETHERNET with connection to LAN YES via CABLE Wi-Fi YES
TETHERING USB NO USB cable YES
LOCAL NETWORK YES via Wi-Fi Wi-Fi -
5.3.3.a ACCESS POINT mode (Wi-Fi connection between machine and Tablet)
In this mode the Tablet connects directly to the machine. The machine is set on this mode in our workshops.
ACCESS POINT
Fig. 3
SOFTWARE Operating Guide FUTURA AUTO
Copyright Silca 201944 - SW

When the machine and Tablet are switched on the connection automatically activates in around two minutes; if not, check the Wi-Fi connection from your Tablet to see if the machine is included in the Wi-Fi (WLAN) networks that are found; the machine will appear as Silca-Futura_....
If it is not connected pick “Silca-Futura_...” and input the password which correspond to the machine serial number (made up of 13 numbers).
SOFTWARE Operating Guide FUTURA AUTO
Copyright Silca 2019 45 - SW

The option to change the Wi-Fi channel is used in cases when the (point to point) communication cannot be properly connected since there are too many devices tuned to the same channel. It also permits the user to adapt to the rules and restrictions of Wi-Fi channel use in their country.To change the channel one must fi rst be connected, select the new channel and then reboot the machine.
5.3.3.b ETHERNET with connection to LAN and router
To connect the Futura AUTO machine to the internet through your LAN:- Set the machine on ACCESS POINT and connect the tablet in Wi-Fi to the machine (factory confi guration).- Connect your LAN ethernet cable to the machine (Fig. 4).
ETHERNET with connection to LAN and router
Ethernetcable
Fig. 4
SOFTWARE Operating Guide FUTURA AUTO
Copyright Silca 201946 - SW

5.3.3.c TETHERING USB mode
This method is used to connect the machine to a Tablet by means of a USB cable.Use the power cable provided with the Tablet.
Attention! This control is active and can be selected only if: - the Tablet Wi-Fi network is disabled (OFF).- the USB cable is connected to the Tablet and machine (Fig. 5).- an Ethernet cable is not connected to the machine port.
TETHERING USB
USB cable
Fig. 5
1) Connect the USB cable to the machine and Tablet (Fig. 5).2) Access “Settings” on the Tablet.3) Disable the Wi-Fi (WLAN). 4) In the Tablet “Settings” tap the “More...” icon and select the item “Tethering & Portable hotspot”.
5) Tick “USB Tethering” or select “ON” to enable.
SOFTWARE Operating Guide FUTURA AUTO
Copyright Silca 2019 47 - SW

When this item is enabled a green light on the machine will fl ash for a few seconds. It may take 10-20 seconds for this to happen.Start the Silca Futura APP and open the drop-down menu.Select “Connect to” to fi nd the machine.
When the machine has been found, hit to select and establish connection.
NOTE: if the Tablet and machine have been turned off, when turning on the USB connection must be made again, in the way described above, if you wish to work with the Tethering USB mode.
NOTE: when the machine-tablet connection has been made, if necessary you can re-boot the tablet Wi-Fi connection to connect to the internet.
SOFTWARE Operating Guide FUTURA AUTO
Copyright Silca 201948 - SW
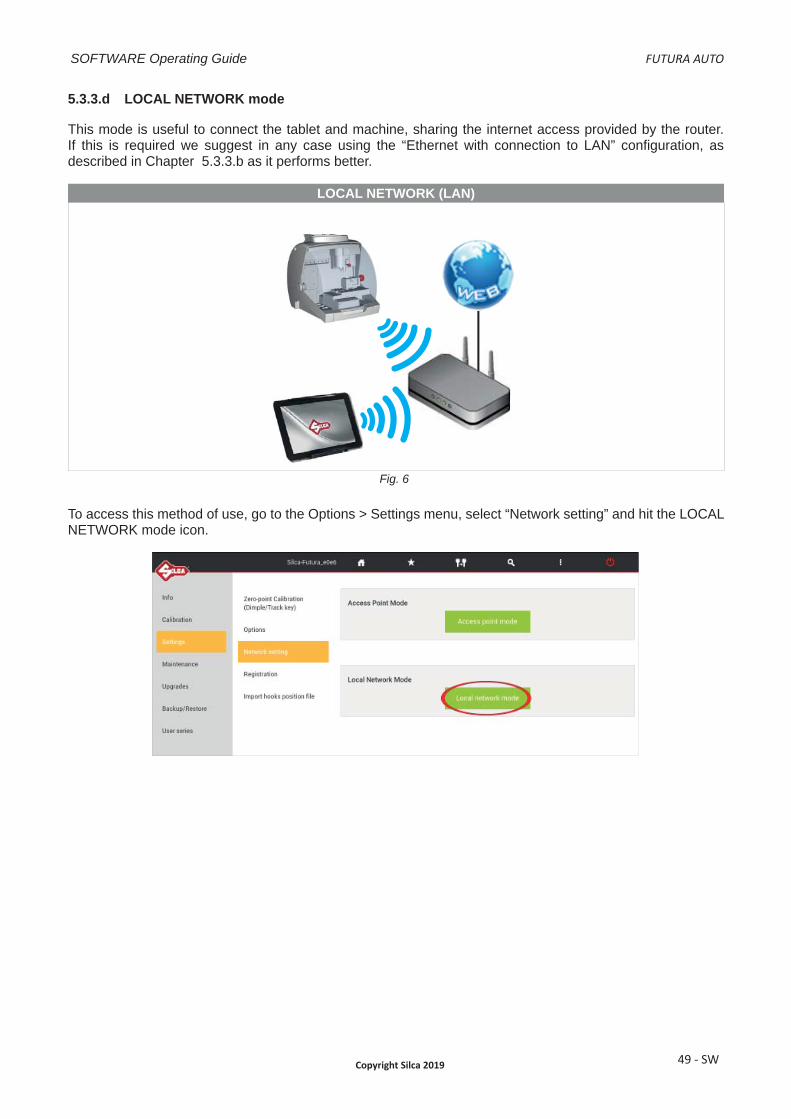
5.3.3.d LOCAL NETWORK mode
This mode is useful to connect the tablet and machine, sharing the internet access provided by the router. If this is required we suggest in any case using the “Ethernet with connection to LAN” confi guration, as described in Chapter 5.3.3.b as it performs better.
LOCAL NETWORK (LAN)
Fig. 6
To access this method of use, go to the Options > Settings menu, select “Network setting” and hit the LOCAL NETWORK mode icon.
SOFTWARE Operating Guide FUTURA AUTO
Copyright Silca 2019 49 - SW
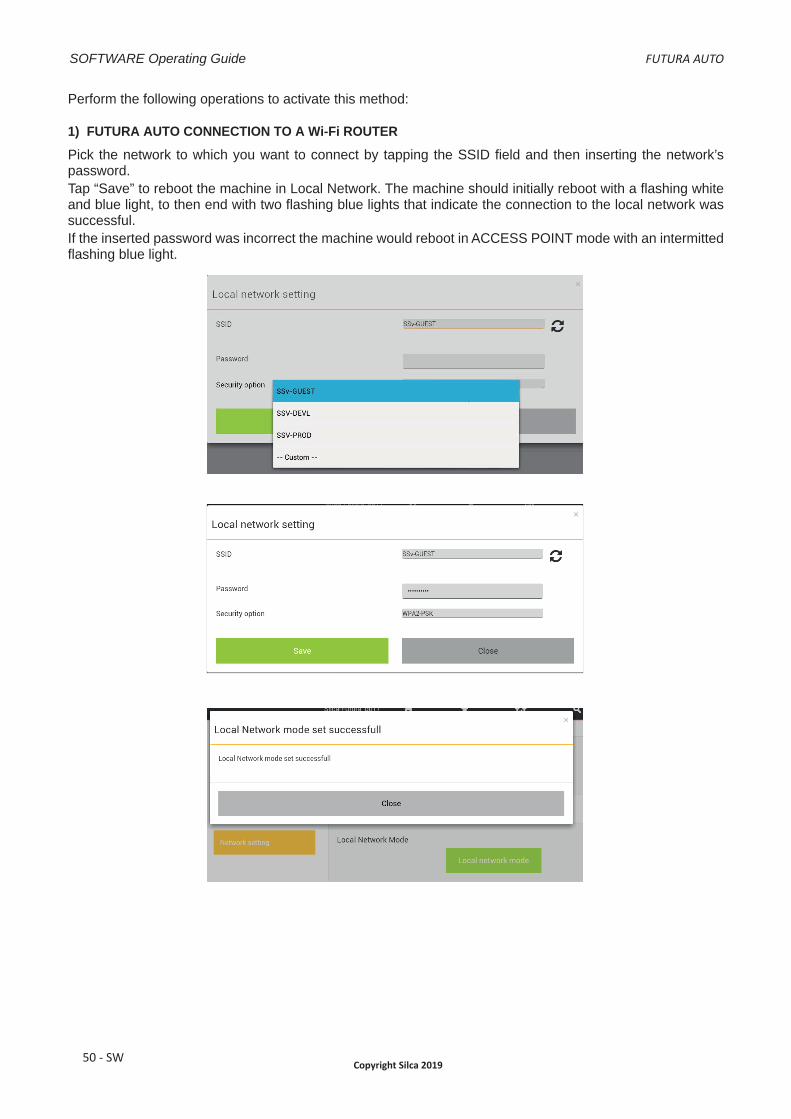
Perform the following operations to activate this method:
1) FUTURA AUTO CONNECTION TO A Wi-Fi ROUTER
Pick the network to which you want to connect by tapping the SSID fi eld and then inserting the network’s password.Tap “Save” to reboot the machine in Local Network. The machine should initially reboot with a fl ashing white and blue light, to then end with two fl ashing blue lights that indicate the connection to the local network was successful.If the inserted password was incorrect the machine would reboot in ACCESS POINT mode with an intermitted fl ashing blue light.
SOFTWARE Operating Guide FUTURA AUTO
Copyright Silca 201950 - SW

2) CONNECTING TABLET TO A Wi-Fi ROUTER
From the Tablet’s “Settings” menu tap on the desired network to connect.
3) REBOOTING THE FUTURA’S APPS
Open the drop-down menu and select “Connect to”.
SOFTWARE Operating Guide FUTURA AUTO
Copyright Silca 2019 51 - SW
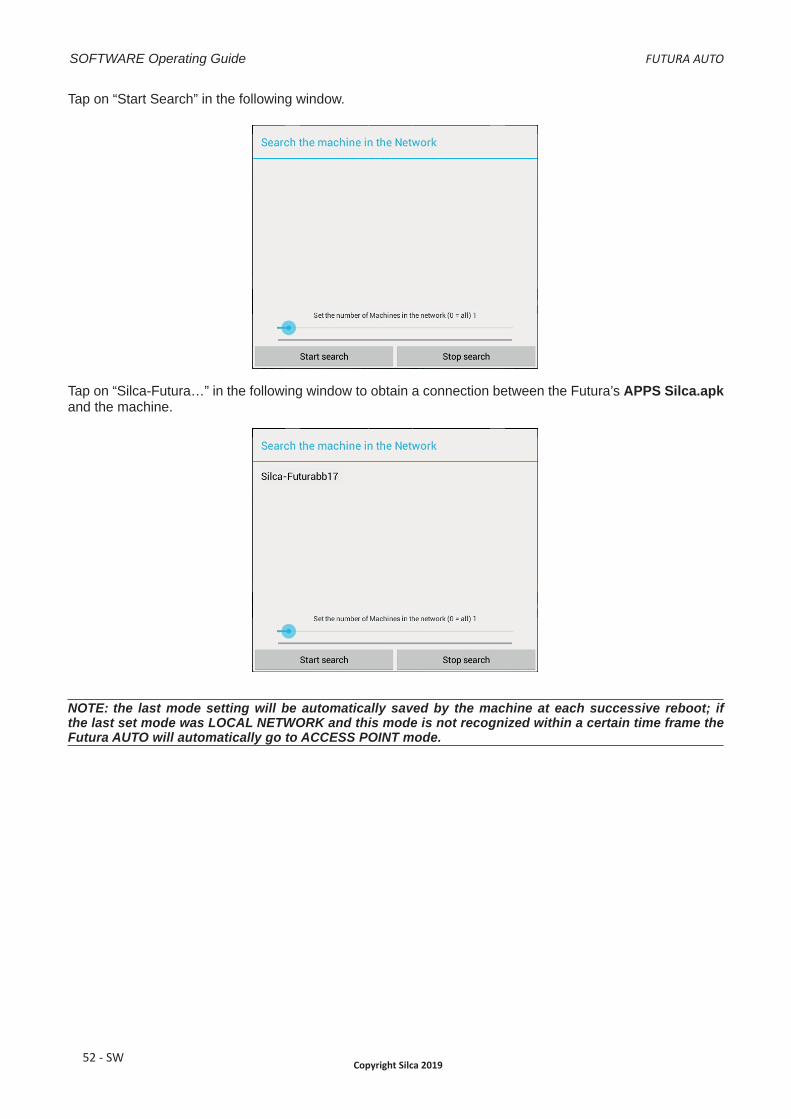
Tap on “Start Search” in the following window.
Tap on “Silca-Futura…” in the following window to obtain a connection between the Futura’s APPS Silca.apk and the machine.
NOTE: the last mode setting will be automatically saved by the machine at each successive reboot; if the last set mode was LOCAL NETWORK and this mode is not recognized within a certain time frame the Futura AUTO will automatically go to ACCESS POINT mode.
SOFTWARE Operating Guide FUTURA AUTO
Copyright Silca 201952 - SW
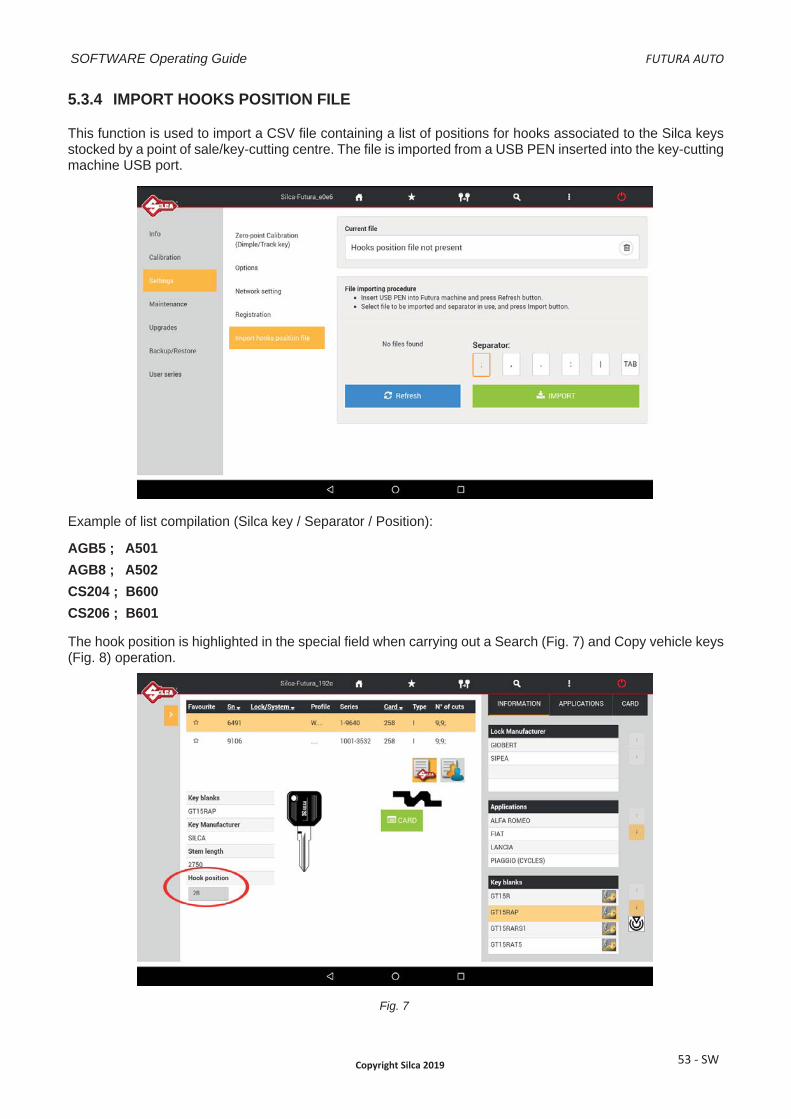
5.3.4 IMPORT HOOKS POSITION FILE
This function is used to import a CSV fi le containing a list of positions for hooks associated to the Silca keys stocked by a point of sale/key-cutting centre. The fi le is imported from a USB PEN inserted into the key-cutting machine USB port.
Example of list compilation (Silca key / Separator / Position):
AGB5 ; A501AGB8 ; A502CS204 ; B600CS206 ; B601
The hook position is highlighted in the special fi eld when carrying out a Search (Fig. 7) and Copy vehicle keys (Fig. 8) operation.
Fig. 7
SOFTWARE Operating Guide FUTURA AUTO
Copyright Silca 2019 53 - SW

Fig. 8
SOFTWARE Operating Guide FUTURA AUTO
Copyright Silca 201954 - SW
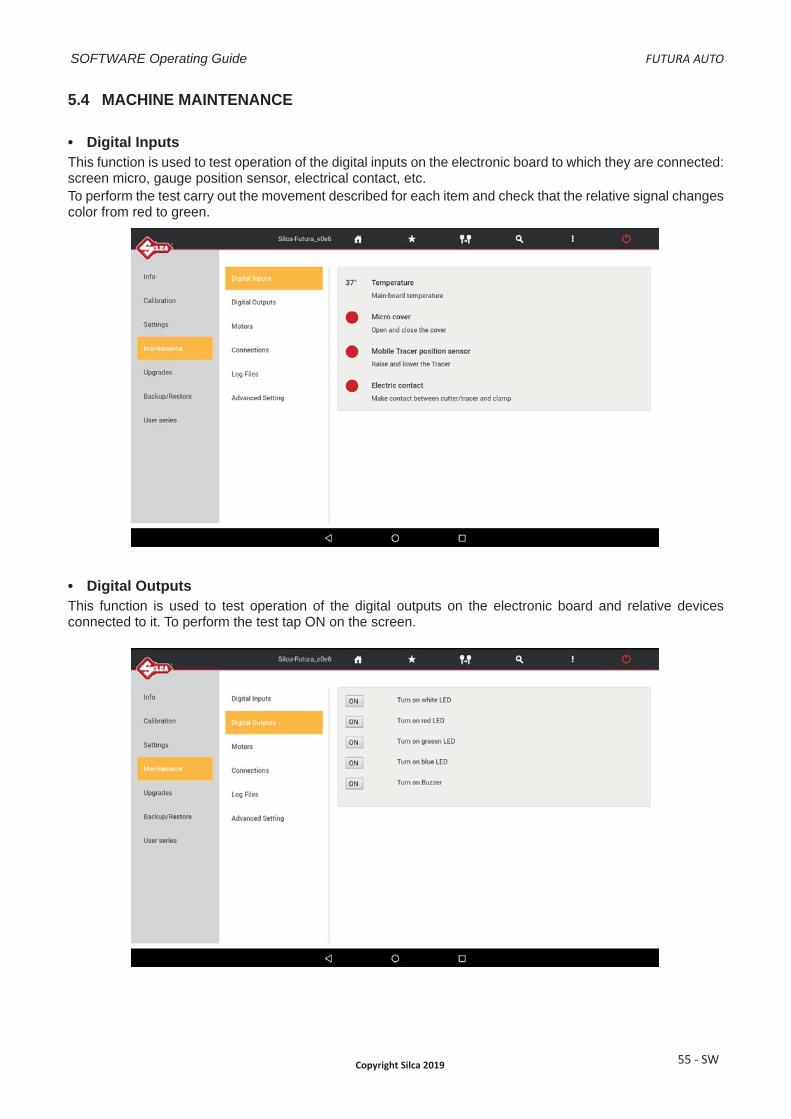
5.4 MACHINE MAINTENANCE
• Digital InputsThis function is used to test operation of the digital inputs on the electronic board to which they are connected: screen micro, gauge position sensor, electrical contact, etc.To perform the test carry out the movement described for each item and check that the relative signal changes color from red to green.
• Digital OutputsThis function is used to test operation of the digital outputs on the electronic board and relative devices connected to it. To perform the test tap ON on the screen.
SOFTWARE Operating Guide FUTURA AUTO
Copyright Silca 2019 55 - SW

• MotorsThis function is used to test operation of the 3 step motors for the X, Y and Z axes (at the moment the B axis is not used). To perform the test tap “+” for the axis involved. Note: The carriage must not reach and hit the end of its run.The Reset key homes the axes.NOTE: tap “-” only when the value shown in the “Working position” fi eld is positive.Axis clearance sensor: the ring becomes green when activated.
• Cutter motorsTo perform the test tap the button for the motor to be tested: check that the cutter turns for 5 seconds.
• ConnectionsThis function shows all the machine connections that are available.
SOFTWARE Operating Guide FUTURA AUTO
Copyright Silca 201956 - SW

• Log FilesThe Log fi le is requested by Silca when on board machine software anomalies are encountered.This function permits to create and save a log fi le:- on a USB key connected to the machine’s USB port (Fig. 9).- or directly to Silca’s Server (with the Futura AUTO machine connected to a local network) Wi-fi or LAN cable
connection).
Fig. 9
• Advanced SettingFunction for Silca internal use.
SOFTWARE Operating Guide FUTURA AUTO
Copyright Silca 2019 57 - SW

6 MACHINE UPDATE AND REGISTRATION
6.1 MACHINE REGISTRATION To download the machine software updates you must be registered on the SILCA WEB FUTURA server. This operation is required only on fi rst access.
After cutting at least 50 keys you are required to register the machine (only if not yet done) on the Silca FUTURA web server.
• If the machine is not registered now, the same message will appear every time Futura AUTO is started.• If the machine is not registered it will not be possible to download software updates.
There are 4 ways to register:
Method 1: Futura AUTO machine with access to the internet
Method 2: Futura AUTO tablet with access to the internet
Method 3: Using the Silca Remote Service (SRS) program
Method 4: Using a browser on a PC/tablet connected to the internet
SOFTWARE Operating Guide FUTURA AUTO
Copyright Silca 201958 - SW

Method 1Futura AUTO machine with access to the Internet
- Start the FUTURA program; tap the icon OPTIONS -> Settings -> Registration- Enter the data into the fi elds shown (those with * are required) and then tap Register and wait for a message
communicating that the machine has been registered. Tap Close.
NOTE: Tap to view the registration method for Futura AUTO machines.
A message confi rming registration will arrive at the address given.Use your mail program to open the e-mail from Silca and click on “Validating email”.
At the end, tap “Close” and then “Check” to conclude the registration procedure on the Tablet.
SOFTWARE Operating Guide FUTURA AUTO
Copyright Silca 2019 59 - SW

Method 2Futura AUTO tablet with access to the internet
NOTE: the Tablet must be taken where there is a Wi-Fi connection with internet access.
Connect a tablet to your local Wi-Fi network and connect to the internet to start the Silca FUTURA APP. Scroll from left to right to open the drop-down menu, as shown below.
Tap “Machine Registration”.
- If the serial number is not read, digit its thirteen numerical characters and press “Check”.- Enter the data into the fi elds shown (those with * are required) then tap Register.
SOFTWARE Operating Guide FUTURA AUTO
Copyright Silca 201960 - SW

- A message confi rming registration will arrive at the address given. Use your mail program to open the e-mail from Silca and click on “Validating email”.
- Go back to the Futura AUTO machine and re-connect in ACCESS POINT mode.
NOTE: when the machine is updated for the fi rst time registration data will be transmitted by the Futura WEB server to the machine.
SOFTWARE Operating Guide FUTURA AUTO
Copyright Silca 2019 61 - SW

Method 3Using the Silca Remote Service (SRS) program
Futura AUTO machine and Tablet connected in ACCESS POINT modeInstall the “Silca Remote Service” program on your PC. The program can be downloaded from the Silca website www.silca.biz, by selecting the Products menu -> Silca Key Programs -> SKP Modules -> Silca Remote Service.
- Start the program and select the Futura machine model, select the “Next” button and then “Register”: a dedicated web page will appear.
- If the machine has not already been registered, enter the data in the relevant fi elds (fi elds marked * are required) and then tap “Register”.
- A message will be sent to the given email address to confi rm registration. Use your mail program to open the email from Silca and click on “Validating email”.
The machine is now registered.
SOFTWARE Operating Guide FUTURA AUTO
Copyright Silca 201962 - SW
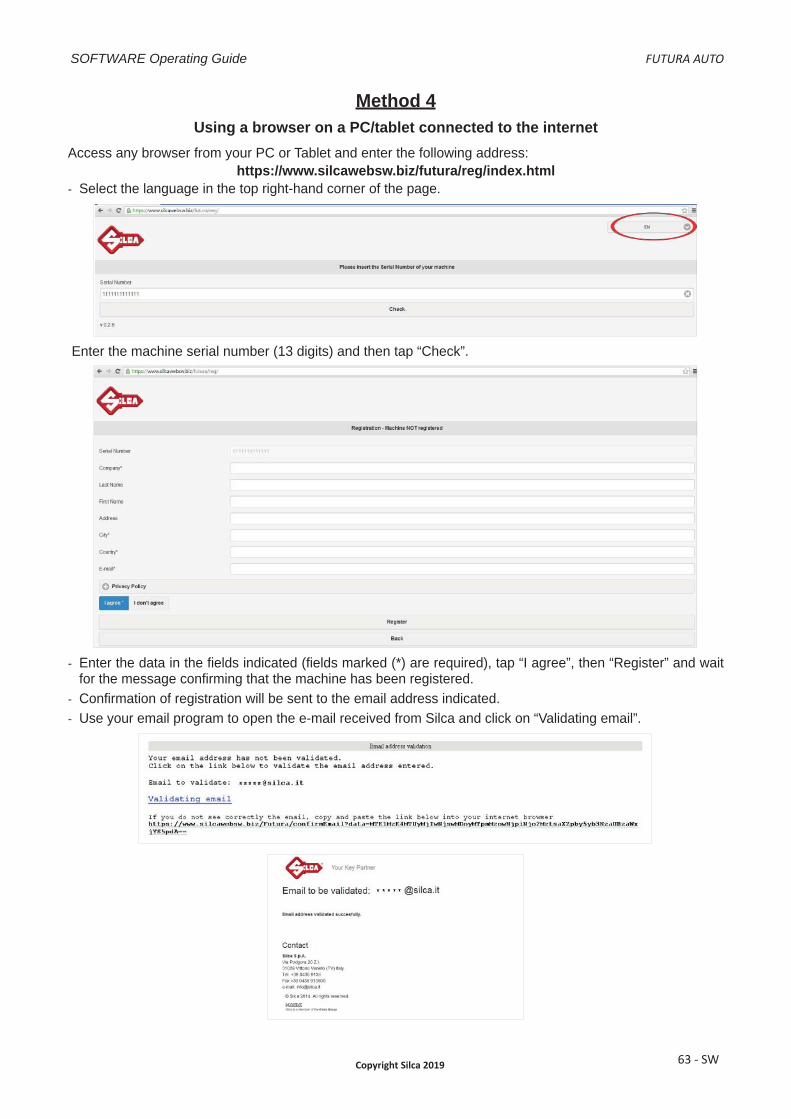
Method 4Using a browser on a PC/tablet connected to the internet
Access any browser from your PC or Tablet and enter the following address:https://www.silcawebsw.biz/futura/reg/index.html
- Select the language in the top right-hand corner of the page.
Enter the machine serial number (13 digits) and then tap “Check”.
- Enter the data in the fi elds indicated (fi elds marked (*) are required), tap “I agree”, then “Register” and wait for the message confi rming that the machine has been registered.
- Confi rmation of registration will be sent to the email address indicated. - Use your email program to open the e-mail received from Silca and click on “Validating email”.
SOFTWARE Operating Guide FUTURA AUTO
Copyright Silca 2019 63 - SW

6.2 MACHINE SOFTWARE UPDATESilca periodically releases Software and Data Updates for the machine. To check for new updates use one of the connection methods available. ATTENTION: Do not insert a USB modem sticks for the transfer of data in the machine USB port.NOTE: before starting, check that the machine is registered (shown on the Machine Registration screen - on the Tablet scroll from left to right to open the drop-down menu).
Futura AUTO can be updated in one of the following ways:1) Update by TABLET
2) Update by USB PEN DRIVE
3) Update through LOCAL NETWORK
4) Update by SRS (Silca Remote Service) program
6.2.1 Update by TABLET
Fig. 10
ATTENTION: Make sure there is no USB PEN in the Futura AUTO machine USB port during updating. 1) Take the tablet to a place with a Wi-Fi network and internet connection and connect.2) Start the Silca Futura APP and follow the instructions on the screen:
- On the Tablet scroll from left to right to open the drop-down menu.- Tap “Machine registration” (Fig. 11.- Enter the machine serial number (13 digits) and then tap “Check”.
Fig. 11
1 2
SOFTWARE Operating Guide FUTURA AUTO
Copyright Silca 201964 - SW

- On the Tablet scroll from left to right to open the drop-down menu- Tap “Machine update”; the following screen will appear:
Fig. 12
- Click on the tablet image (Fig.10) and follow the guided procedure (if the tablet is not connected to a Wi-Fi network you will see a screen from which a Wi-Fi network can be selected).
- When the new update has been downloaded you will be asked to re-start the machine so that the update will be applied automatically.
- Press the “Re-start machine” button and wait a few minutes. The tablet will automatically connect to Futura AUTO.
SOFTWARE Operating Guide FUTURA AUTO
Copyright Silca 2019 65 - SW
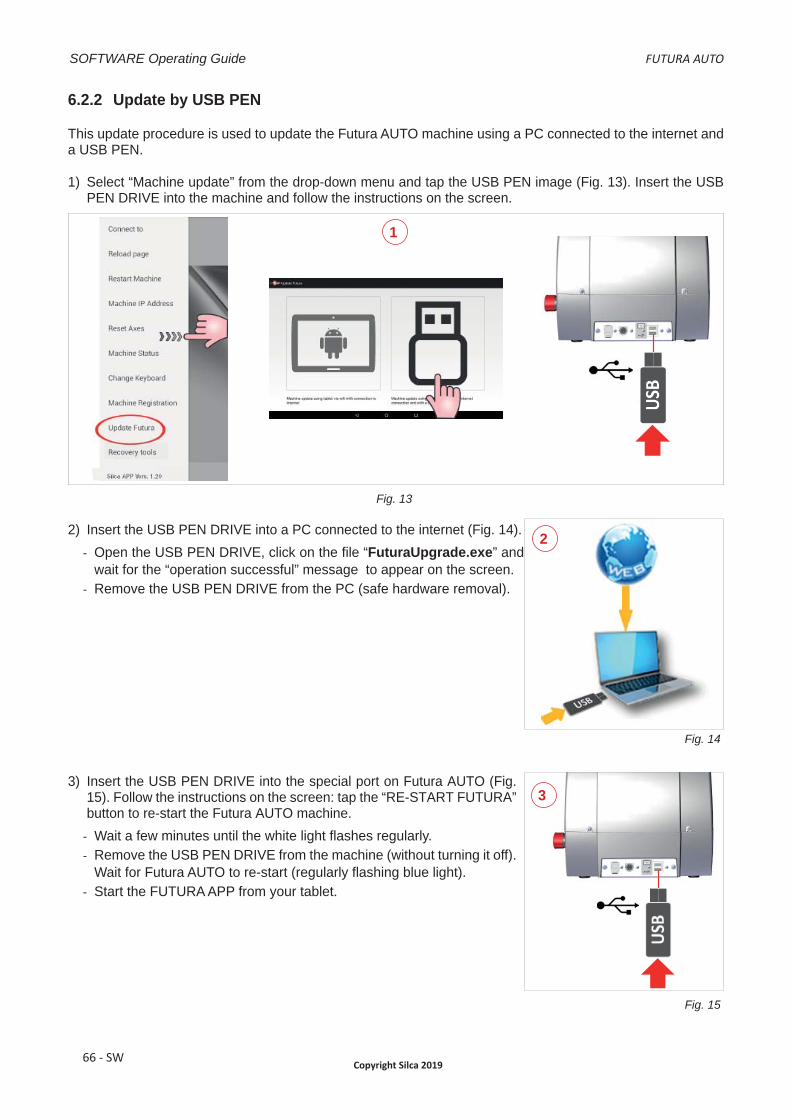
6.2.2 Update by USB PEN
This update procedure is used to update the Futura AUTO machine using a PC connected to the internet and a USB PEN.
1) Select “Machine update” from the drop-down menu and tap the USB PEN image (Fig. 13). Insert the USB PEN DRIVE into the machine and follow the instructions on the screen.
Fig. 13
2) Insert the USB PEN DRIVE into a PC connected to the internet (Fig. 14). - Open the USB PEN DRIVE, click on the fi le “FuturaUpgrade.exe” and
wait for the “operation successful” message to appear on the screen.- Remove the USB PEN DRIVE from the PC (safe hardware removal).
Fig. 14
3) Insert the USB PEN DRIVE into the special port on Futura AUTO (Fig. 15). Follow the instructions on the screen: tap the “RE-START FUTURA” button to re-start the Futura AUTO machine.
- Wait a few minutes until the white light fl ashes regularly.- Remove the USB PEN DRIVE from the machine (without turning it off).
Wait for Futura AUTO to re-start (regularly fl ashing blue light).- Start the FUTURA APP from your tablet.
Fig. 15
1
2
3
SOFTWARE Operating Guide FUTURA AUTO
Copyright Silca 201966 - SW

6.2.3 Update with LOCAL NETWORK connected to the internet
LOCAL Wi-Fi NETWORK Cabled LOCAL NETWORK
Connect the Futura AUTO machine to the local Wi-Fi network (Attention: fi rst set up the machine and then the Tablet in LOCAL NETWORK mode)
Connect the Futura AUTO machine to the LOCAL network inserting the network cable to the machine Ethernet port (the machine must remain in ACCESS POINT mode).
Fig. 16 Fig. 17
ATTENTION: Make sure there is no USB PEN in the Futura AUTO machine USB port during updating.
To upgrade the Futura AUTO machines software in manual mode, follow the steps indicated below.
Fig. 18
NOTE: tap to view machine update methods.
- Tap on “Check for Updates” to get a list of what will be downloaded with the update.
SOFTWARE Operating Guide FUTURA AUTO
Copyright Silca 2019 67 - SW

Fig. 19
- Tap “News” to see information about the update to be installed on the machine.- Tap on “Yes” to start downloading.- When download is over, you will be asked to restart the Futura AUTO machine (procedure run by the
software). Follow the on-screen instructions.
SOFTWARE Operating Guide FUTURA AUTO
Copyright Silca 201968 - SW
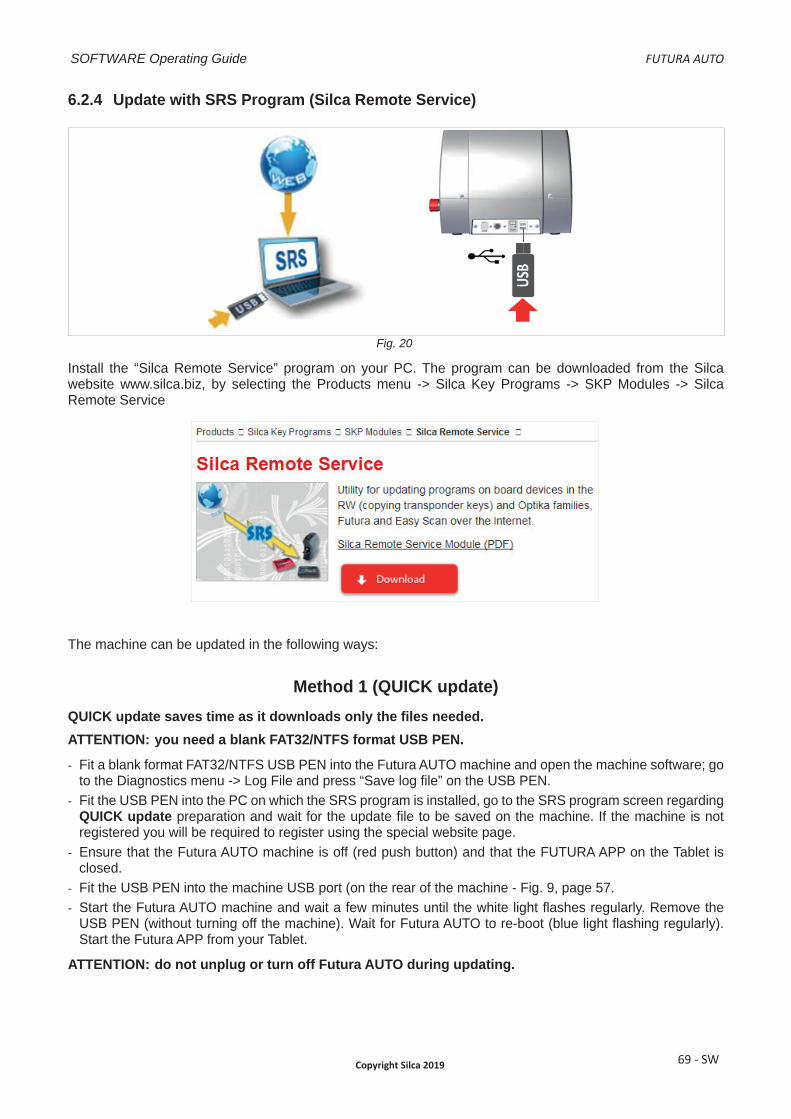
6.2.4 Update with SRS Program (Silca Remote Service)
Fig. 20
Install the “Silca Remote Service” program on your PC. The program can be downloaded from the Silca website www.silca.biz, by selecting the Products menu -> Silca Key Programs -> SKP Modules -> Silca Remote Service
The machine can be updated in the following ways:
Method 1 (QUICK update)QUICK update saves time as it downloads only the fi les needed.ATTENTION: you need a blank FAT32/NTFS format USB PEN.
- Fit a blank format FAT32/NTFS USB PEN into the Futura AUTO machine and open the machine software; go to the Diagnostics menu -> Log File and press “Save log fi le” on the USB PEN.
- Fit the USB PEN into the PC on which the SRS program is installed, go to the SRS program screen regarding QUICK update preparation and wait for the update fi le to be saved on the machine. If the machine is not registered you will be required to register using the special website page.
- Ensure that the Futura AUTO machine is off (red push button) and that the FUTURA APP on the Tablet is closed.
- Fit the USB PEN into the machine USB port (on the rear of the machine - Fig. 9, page 57.- Start the Futura AUTO machine and wait a few minutes until the white light fl ashes regularly. Remove the
USB PEN (without turning off the machine). Wait for Futura AUTO to re-boot (blue light fl ashing regularly). Start the Futura APP from your Tablet.
ATTENTION: do not unplug or turn off Futura AUTO during updating.
SOFTWARE Operating Guide FUTURA AUTO
Copyright Silca 2019 69 - SW
Method 2 (TOTAL update)
TOTAL update will download all the fi les on the machine
Start the program and select the Futura AUTO machine.
ATTENTION: you need a blank FAT32/NTFS format USB PEN.
- Enter the Futura AUTO machine serial number into the SRS program screen regarding update preparation and then fi t a USB PEN into the PC. Wait for the TOTAL update fi le to be saved on the USB PEN. If the machine is not registered you will be required to register using the special website page.
- Ensure that the machine is off (red push button) and that the FUTURA APP on your Tablet is closed.
- Fit the USB PEN into the machine USB port (on the rear - Fig. 9, page 57).
- Start the Futura AUTO machine and wait a few minutes until the white light fl ashes regularly. Remove the USB PEN (without turning off the machine). Wait for Futura AUTO to re-boot (blue light fl ashing regularly). Start the Futura APP from your Tablet.
ATTENTION: do not unplug or turn off Futura AUTO during updating.
SOFTWARE Operating Guide FUTURA AUTO
Copyright Silca 201970 - SW

6.3 APP UPDATE (Silca.apk and SilcaKeyboard.apk)
After you updated the Futura AUTO machine’s software, when the program starts up, you may see the following screen indicating that a new version of the Silca.apk or SilcaKeyboard.apk is avaialble.
Fig. 21
Tap on “Install” and proceed with updating the APP.
Fig. 22
Close the application that is opened by tapping on and dragging the Futura APP (see Fig. 23).
SOFTWARE Operating Guide FUTURA AUTO
Copyright Silca 2019 71 - SW
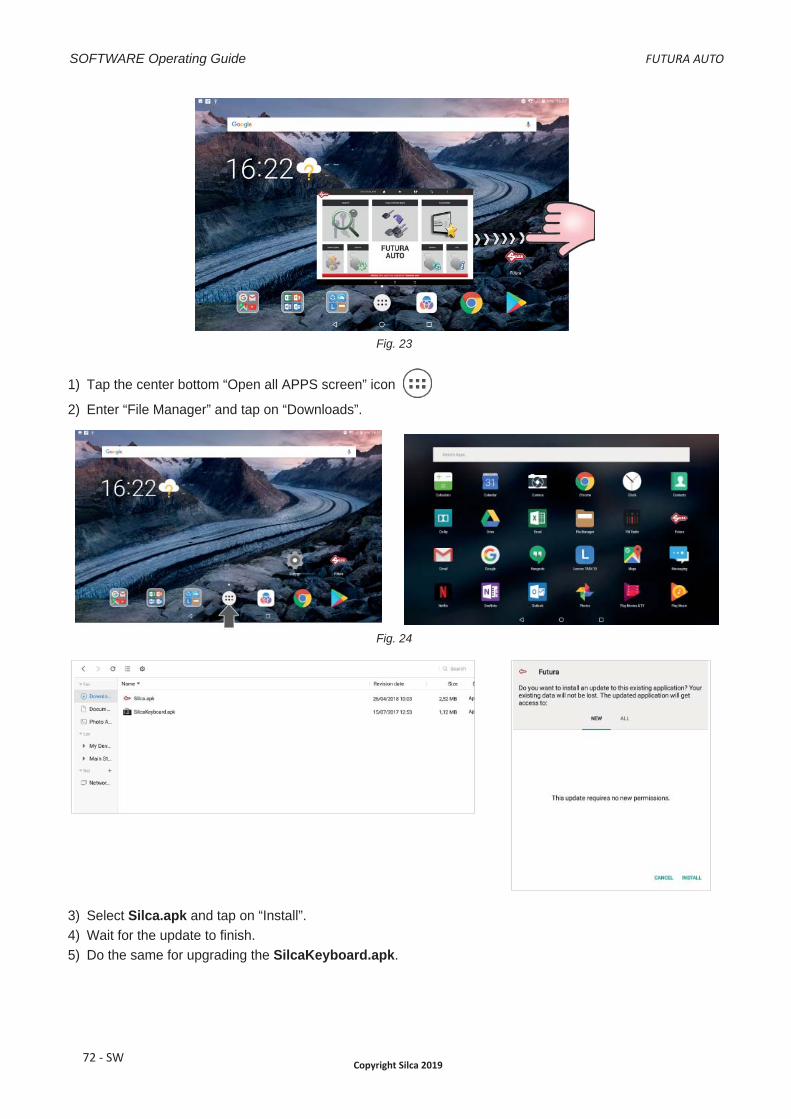
Fig. 23
1) Tap the center bottom “Open all APPS screen” icon
2) Enter “File Manager” and tap on “Downloads”.
Fig. 24
3) Select Silca.apk and tap on “Install”.4) Wait for the update to fi nish. 5) Do the same for upgrading the SilcaKeyboard.apk.
SOFTWARE Operating Guide FUTURA AUTO
Copyright Silca 201972 - SW

7 BACKUP / RECOVERY
This function permits to create and save a backup (backup User database) fi le in a USB pen that can be connected the machine’s USB port (Fig. 9, page 57).Also provided is the recovery (Restore User database) function always using the USB pen with the last fi le that was saved on it.
SOFTWARE Operating Guide FUTURA AUTO
Copyright Silca 2019 73 - SW

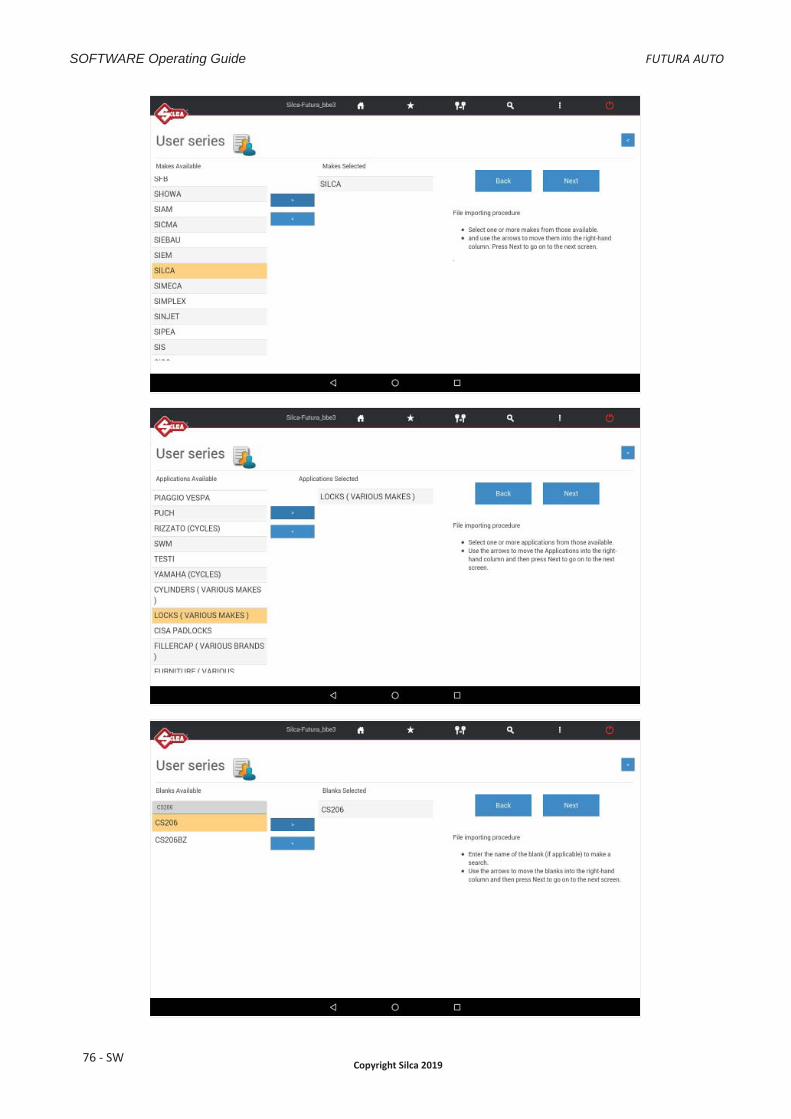
8 USER SERIESFunction accessible from “Options => User Series”. This function is available to the user to import a code table in XML-Keso, CSV, TXT format, associating it to a data card and thereby creating a new user series.- Use a USB-PEN, FAT32/NTFS format, and copy onto it the fi le (or fi les) with the table to be imported. Note:
the fi le must not be in a folder.- Insert the USB-PEN into the Futura AUTO USB port (Fig. 9, page 57).
To create the user series, tap “User Series Management”.
Tap “Add Series” to import the new fi le.When the User Series exists and is selected/highlighted you can:- Tap the “Edit” key to vary certain parameters associated to the series.- Tap the “Eliminate” key to erase the selected series.
SOFTWARE Operating Guide FUTURA AUTO
Copyright Silca 201974 - SW

- Follow the instructions on the Tablet page. During guided import you will be required to enter or select certain parameters to associate to the new series (e.g. Data card number, Profi le, Series, Makes, Applications and Key blank.
- Tap “Next” to continue.
SOFTWARE Operating Guide FUTURA AUTO
Copyright Silca 2019 75 - SW
SOFTWARE Operating Guide FUTURA AUTO
Copyright Silca 201976 - SW

- Tap “Import” to import the fi le directly without editing.
NOTE: only if necessary, before terminating table import you can edit certain parameters using the menu on the right (Operation on data in the table and/or Operations on columns).
NOTE: tap to view information about the fi eld.
- After editing the parameters “Operation on data in the table” tap the “Refresh” key”.- After carrying out operations in the columns, tap the “Import” button to start importing the fi les.
At the end of the operations the following screen will appear:
- Tap “Save” to save the new User series.- Tap “Modify” to make changes.
SOFTWARE Operating Guide FUTURA AUTO
Copyright Silca 2019 77 - SW

9 TRANSPONDER GUIDE
The Transponder Guide (in the SEARCH menu) contains all the transponder key copying solutions provided by Silca.Open the Transponder Guide MENU - the search window will appear.Enter into the fi elds the known information about the vehicle or transponder key to view data relating to identifi cation, copying, storage and the procedures provided by Silca:
IMPORTANT:• tap the column icon to learn the meaning of each column • press the orange arrow to make a new search or go back
Fig. 25
SOFTWARE Operating Guide FUTURA AUTO
Copyright Silca 201978 - SW

Selet the required car model at the top of the window.The bottom part of the window will show detailed information about the different possibilities:Blue section- use one of the Silca keys indicated in the fi rst 3 columns to create a clone of the original transponder key, i.e.
a key ready for use.
Green section- use one of the Silca keys indicated in the fi rst 3 columns to get a key that can be programmed on the vehicle
by diagnostics or manual procedure. If there is no solution with Silca keys, when programming by diagnostics or manual procedure, if available, the copy must be made from an original key.
column indicating a Silca key blank complete with transponder or ORIGINAL
column indicating a Silca key blank without transponder
column indicating a Silca FLIP key blank without transponder
Example Fig. 25In this case the user may:Blue section => to clone the original key with RW devices- use HU101MH - use HU101TE or HU101FH with GTI transponder
Green section => to programme a key on the vehicle with original diagnostics (sd = see dealer)- use HU101T17 - use HU101TE or HU101FH with GTI transponder programmed as ID63 or with T17 transponder
Get further details or access “manual programming” procedures by hitting (see Fig. 25).
Tap icon to make a search in the key-cutting section to fi nd the data cards for the Silca key blank selected.
SOFTWARE Operating Guide FUTURA AUTO
Copyright Silca 2019 79 - SW

10 CHANGING TABLETS
If a new Tablet is to replace the previous one, download/install the Futura APP. and the customized “Silca Keyboard”. Proceed as follows:1) Connect the tablet <=> FUTURA in ACCESS POINT mode (Ch.5.3.3.a).
2) Open the browser CHROME (the CHROME icon is in the APPS page ) and enter the following addresses:
192.168.0.1/Silca.apk to download the APP192.168.0.1/SilcaKeyboard.apk to download the keyboard
3) Tap the center bottom “Open all Apps screen” icon
4) Enter “File Manager” and tap on “Downloads”.
Fig. 26
5) Tap on the 2 apps just downloaded for installation.
SOFTWARE Operating Guide FUTURA AUTO
Copyright Silca 201980 - SW

After you install the new FUTURA APP you should move the Silca FUTURA application icon to the main screen:
1) Tap the center bottom “Open all APPS screen” icon
2) Search for “Futura” icon
3) Tap and hold (keep pressing) the Silca Futura application icon and drag it to the main screen.
SOFTWARE Operating Guide FUTURA AUTO
Copyright Silca 2019 81 - SW

11 FUTURA PROCEDURE TO CLEAR CACHE
Clearing the FUTURA APP Cache is recommended to improve the performance of the FUTURA APP.1) Entering the Android Tablet Settings .
2) Tap on “APPS” and then “FUTURA”.
3) Enter “Storage” and tap on “CLEAR CACHE”.
SOFTWARE Operating Guide FUTURA AUTO
Copyright Silca 201982 - SW

GNU GENERAL PUBLIC LICENSE
This product includes partly software owned by Silca and partly open source software. Below is the original text of the offi cial license for open source software.
On request Silca will provide a DVD with the GPL code included in the FUTURA product.To make the request contact SILCA at the following address:
SILCA S.p.A. Via Podgora 2031020 Vittorio veneto Italy
Email: [email protected]
The GPL code used on this product is distributed WITHOUT A WARRANTY and is subject to copyright for one or more writers.
This product also includes software developed by OpenSSL Project for use by the OpenSSL Toolkit.
GNU GENERAL PUBLIC LICENSEVersion 2, June 1991
Copyright (C) 1989, 1991 Free Software Foundation, Inc., 51 Franklin Street, Fifth Floor, Boston, MA 02110-1301 USAEveryone is permitted to copy and distribute verbatim copies of this license document, but changing it is not allowed.
Preamble
The licenses for most software are designed to take away your freedom to share and change it. By contrast, the GNU General Public License is intended to guarantee your freedom to share and change free software--to make sure the software is free for all its users. This General Public License applies to most of the Free Software Foundation’s software and to any other program whose authors commit to using it. (Some other Free Software Foundation software is covered by the GNU Lesser General Public License instead.) You can apply it to your programs, too.
When we speak of free software, we are referring to freedom, not price. Our General Public Licenses are designed to make sure that you have the freedom to distribute copies of free software (and charge for this service if you wish), that you receive source code or can get it if you want it, that you can change the software or use pieces of it in new free programs; and that you know you can do these things.
To protect your rights, we need to make restrictions that forbid anyone to deny you these rights or to ask you to surrender the rights. These restrictions translate to certain responsibilities for you if you distribute copies of the software, or if you modify it.
For example, if you distribute copies of such a program, whether gratis or for a fee, you must give the recipients all the rights that you have. You must make sure that they, too, receive or can get the source code. And you must show them these terms so they know their rights.
We protect your rights with two steps: (1) copyright the software, and (2) offer you this license which gives you legal permission to copy, distribute and/or modify the software.
Also, for each author’s protection and ours, we want to make certain that everyone understands that there is no warranty for this free software. If the software is modifi ed by someone else and passed on, we want its recipients to know that what they have is not the original, so that any problems introduced by others will not refl ect on the original authors’ reputations.
Finally, any free program is threatened constantly by software patents. We wish to avoid the danger that redistributors of a free program will individually obtain patent licenses, in effect making the program proprietary. To prevent this, we have made it clear that any patent must be licensed for everyone’s free use or not licensed at all.
The precise terms and conditions for copying, distribution and modifi cation follow.
GNU GENERAL PUBLIC LICENSE TERMS AND CONDITIONS FOR COPYING, DISTRIBUTION AND MODIFICATION
0. This License applies to any program or other work which contains a notice placed by the copyright holder saying it may be distributed under the terms of this General Public License. The “Program”, below, refers to any such program or work, and a “work based on the Program” means either the Program or any derivative work under copyright law: that is to say, a work containing the Program or a portion of it, either verbatim or with modifi cations and/or translated into another language. (Hereinafter, translation is included without limitation in the term “modifi cation”.) Each licensee is addressed as “you”.
Activities other than copying, distribution and modifi cation are not covered by this License; they are outside its scope. The act of running the Program is not restricted, and the output from the Program is covered only if its contents constitute a work based on the Program (independent of having been made by running the Program).Whether that is true depends on what the Program does.
1. You may copy and distribute verbatim copies of the Program’s source code as you receive it, in any medium, provided that you conspicuously and appropriately publish on each copy an appropriate copyright notice and disclaimer of warranty; keep intact all the notices that refer to this License and to the absence of any warranty; and give any other recipients of the Program a copy of this License along with the Program.
SOFTWARE Operating Guide FUTURA AUTO
Copyright Silca 2019 83 - SW

You may charge a fee for the physical act of transferring a copy, and you may at your option offer warranty protection in exchange for a fee.
2. You may modify your copy or copies of the Program or any portion of it, thus forming a work based on the Program, and copy and distribute such modifi cations or work under the terms of Section 1 above, provided that you also meet all of these conditions:
a) You must cause the modifi ed fi les to carry prominent notices stating that you changed the fi les and the date of any change.
b) You must cause any work that you distribute or publish, that in whole or in part contains or is derived from the Program or any part thereof, to be licensed as a whole at no charge to all third parties under the terms of this License.
c) If the modifi ed program normally reads commands interactively when run, you must cause it, when started running for such interactive use in the most ordinary way, to print or display an announcement including an appropriate copyright notice and a notice that there is no warranty (or else, saying that you provide a warranty) and that users may redistribute the program under these conditions, and telling the user how to view a copy of this License. (Exception: if the Program itself is interactive but does not normally print such an announcement, your work based on the Program is not required to print an announcement.)
These requirements apply to the modifi ed work as a whole. If identifi able sections of that work are not derived from the Program, and can be reasonably considered independent and separate works in themselves, then this License, and its terms, do not apply to those sections when you distribute them as separate works. But when you distribute the same sections as part of a whole which is a work based on the Program, the distribution of the whole must be on the terms of this License, whose permissions for other licensees extend to the entire whole, and thus to each and every part regardless of who wrote it.
Thus, it is not the intent of this section to claim rights or contest your rights to work written entirely by you; rather, the intent is to exercise the right to control the distribution of derivative or collective works based on the Program.
In addition, mere aggregation of another work not based on the Program with the Program (or with a work based on the Program) on a volume of a storage or distribution medium does not bring the other work under the scope of this License.
3. You may copy and distribute the Program (or a work based on it, under Section 2) in object code or executable form under the terms of Sections 1 and 2 above provided that you also do one of the following:
a) Accompany it with the complete corresponding machine-readable source code, which must be distributed under the terms of Sections 1 and 2 above on a medium customarily used for software interchange; or,
b) Accompany it with a written offer, valid for at least three years, to give any third party, for a charge no more than your cost of physically performing source distribution, a complete machine-readable copy of the corresponding source code, to be distributed under the terms of Sections 1 and 2 above on a medium customarily used for software interchange; or,
c) Accompany it with the information you received as to the offer to distribute corresponding source code. (This alternative is allowed only for noncommercial distribution and only if you received the program in object code or executable form with such an offer, in accord with Subsection b above.)
The source code for a work means the preferred form of the work for making modifi cations to it. For an executable work, complete source code means all the source code for all modules it contains, plus any associated interface defi nition fi les, plus the scripts used to control compilation and installation of the executable. However, as a special exception, the source code distributed need not include anything that is normally distributed (in either source or binary form) with the major components (compiler, kernel, and so on) of the operating system on which the executable runs, unless that component itself accompanies the executable.
If distribution of executable or object code is made by offering access to copy from a designated place, then offering equivalent access to copy the source code from the same place counts as distribution of the source code, even though third parties are not compelled to copy the source along with the object code.
4. You may not copy, modify, sublicense, or distribute the Program except as expressly provided under this License. Any attempt otherwise to copy, modify, sublicense or distribute the Program is void, and will automatically terminate your rights under this License.However, parties who have received copies, or rights, from you under this License will not have their licenses terminated so long as such parties remain in full compliance.
5. You are not required to accept this License, since you have not signed it. However, nothing else grants you permission to modify or distribute the Program or its derivative works. These actions are prohibited by law if you do not accept this License. Therefore, by modifying or distributing the Program (or any work based on the Program), you indicate your acceptance of this License to do so, and all its terms and conditions for copying, distributing or modifying the Program or works based on it.
6. Each time you redistribute the Program (or any work based on the Program), the recipient automatically receives a license from the original licensor to copy, distribute or modify the Program subject to these terms and conditions. You may not impose any further restrictions on the recipients’ exercise of the rights granted herein. You are not responsible for enforcing compliance by third parties to this License.
7. If, as a consequence of a court judgment or allegation of patent infringement or for any other reason (not limited to patent issues), conditions are imposed on you (whether by court order, agreement or otherwise) that contradict the conditions of this License, they do not excuse you from the conditions of this License. If you cannot distribute so as to satisfy simultaneously your obligations under this License and any other pertinent obligations, then as a consequence you may not distribute the Program at all. For example, if a patent license would not permit royalty-free redistribution of the Program by all those who receive copies directly or indirectly through you, then the only way you could satisfy both it and this License would be to refrain entirely from distribution of the Program.
If any portion of this section is held invalid or unenforceable under any particular circumstance, the balance of the section is intended to apply and the section as a whole is intended to apply in other circumstances.
It is not the purpose of this section to induce you to infringe any patents or other property right claims or to contest validity of any such claims; this section has the sole purpose of protecting the integrity of the free software distribution system, which is implemented by public license practices. Many people have made generous contributions to the wide range of software distributed through that system in reliance on consistent application of that system; it is up to the author/donor to decide if he or she is willing to distribute software through any other system and a licensee cannot impose that choice.
This section is intended to make thoroughly clear what is believed to be a consequence of the rest of this License.
8. If the distribution and/or use of the Program is restricted in certain countries either by patents or by copyrighted interfaces, the original copyright
SOFTWARE Operating Guide FUTURA AUTO
Copyright Silca 201984 - SW

holder who places the Program under this License may add an explicit geographical distribution limitation excluding those countries, so that distribution is permitted only in or among countries not thus excluded. In such case, this License incorporates the limitation as if written in the body of this License.
9. The Free Software Foundation may publish revised and/or new versions of the General Public License from time to time. Such new versions will be similar in spirit to the present version, but may differ in detail to address new problems or concerns.
Each version is given a distinguishing version number. If the Program specifi es a version number of this License which applies to it and “any later version”, you have the option of following the terms and conditions either of that version or of any later version published by the Free Software Foundation. If the Program does not specify a version number of this License, you may choose any version ever published by the Free Software Foundation.
10. If you wish to incorporate parts of the Program into other free programs whose distribution conditions are different, write to the author to ask for permission. For software which is copyrighted by the Free Software Foundation, write to the Free Software Foundation; we sometimes make exceptions for this. Our decision will be guided by the two goals of preserving the free status of all derivatives of our free software and of promoting the sharing and reuse of software generally.
NO WARRANTY
11. BECAUSE THE PROGRAM IS LICENSED FREE OF CHARGE, THERE IS NO WARRANTY FOR THE PROGRAM, TO THE EXTENT PERMITTED BY APPLICABLE LAW. EXCEPT WHEN OTHERWISE STATED IN WRITING THE COPYRIGHT HOLDERS AND/OR OTHER PARTIES PROVIDE THE PROGRAM “AS IS” WITHOUT WARRANTY OF ANY KIND, EITHER EXPRESSED OR IMPLIED, INCLUDING, BUT NOT LIMITED TO, THE IMPLIED WARRANTIES OF MERCHANTABILITY AND FITNESS FOR A PARTICULAR PURPOSE. THE ENTIRE RISK AS TO THE QUALITY AND PERFORMANCE OF THE PROGRAM IS WITH YOU. SHOULD THE PROGRAM PROVE DEFECTIVE, YOU ASSUME THE COST OF ALL NECESSARY SERVICING, REPAIR OR CORRECTION.
12. IN NO EVENT UNLESS REQUIRED BY APPLICABLE LAW OR AGREED TO IN WRITING WILL ANY COPYRIGHT HOLDER, OR ANY OTHER PARTY WHO MAY MODIFY AND/OR REDISTRIBUTE THE PROGRAM AS PERMITTED ABOVE, BE LIABLE TO YOU FOR DAMAGES, INCLUDING ANY GENERAL, SPECIAL, INCIDENTAL OR CONSEQUENTIAL DAMAGES ARISING OUT OF THE USE OR INABILITY TO USE THE PROGRAM (INCLUDING BUT NOT LIMITED TO LOSS OF DATA OR DATA BEING RENDERED INACCURATE OR LOSSES SUSTAINED BY YOU OR THIRD PARTIES OR A FAILURE OF THE PROGRAM TO OPERATE WITH ANY OTHER PROGRAMS), EVEN IF SUCH HOLDER OR OTHER PARTY HAS BEEN ADVISED OF THE POSSIBILITY OF SUCH DAMAGES.
END OF TERMS AND CONDITIONS
How to Apply These Terms to Your New Programs
If you develop a new program, and you want it to be of the greatest possible use to the public, the best way to achieve this is to make it free software which everyone can redistribute and change under these terms.
To do so, attach the following notices to the program. It is safest to attach them to the start of each source fi le to most effectively convey the exclusion of warranty; and each fi le should have at least the “copyright” line and a pointer to where the full notice is found.
<one line to give the program’s name and a brief idea of what it does.>Copyright (C) <year> <name of author>
This program is free software; you can redistribute it and/or modify it under the terms of the GNU General Public License as published by the Free Software Foundation; either version 2 of the License, or (at your option) any later version.
This program is distributed in the hope that it will be useful, but WITHOUT ANY WARRANTY; without even the implied warranty of MERCHANTABILITY or FITNESS FOR A PARTICULAR PURPOSE. See the GNU General Public License for more details.
You should have received a copy of the GNU General Public License along with this program; if not, write to the Free Software Foundation, Inc., 51 Franklin Street, Fifth Floor, Boston, MA 02110-1301 USA.
Also add information on how to contact you by electronic and paper mail.
If the program is interactive, make it output a short notice like this when it starts in an interactive mode:
Gnomovision version 69, Copyright (C) year name of authorGnomovision comes with ABSOLUTELY NO WARRANTY; for details type `show w’. This is free software, and you are welcome to redistribute it under certain conditions; type `show c’ for details.
The hypothetical commands `show w’ and `show c’ should show the appropriate parts of the General Public License. Of course, the commands you use may be called something other than `show w’ and `show c’; they could even be mouse-clicks or menu items--whatever suits your program.
You should also get your employer (if you work as a programmer) or your school, if any, to sign a “copyright disclaimer” for the program, if necessary. Here is a sample; alter the names:
Yoyodyne, Inc., hereby disclaims all copyright interest in the program `Gnomovision’ (which makes passes at compilers) written by James Hacker.
<signature of Ty Coon>, 1 April 1989 Ty Coon, President of Vice
This General Public License does not permit incorporating your program into proprietary programs. If your program is a subroutine library, you may consider it more useful to permit linking proprietary applications with the library. If this is what you want to do, use the GNU Lesser General Public License instead of this License.
SOFTWARE Operating Guide FUTURA AUTO
Copyright Silca 2019 85 - SW


![Poly(propylene) Nanocomposites Containing Various Carbon ...composites.utk.edu/papers in pdf/Li_et_al-2011... · [2 , 6 , 27–32 ] In particular, signifi - cant property enhancements](https://img.pdfslide.net/doc/110x75/600d48ee6e7d8e397d689796/polypropylene-nanocomposites-containing-various-carbon-in-pdflietal-2011.jpg)