Embed Size (px)
Citation preview

fx-9860G SlimHardwareUser’s Guide
E
CASIO Worldwide Education Website
http://edu.casio.comCASIO EDUCATIONAL FORUM
http://edu.casio.com/forum/
GUIDELINES LAID DOWN BY FCC RULES FOR USE OF THE UNIT IN THE U.S.A. (not appli-cable to other areas).
NOTICEThis equipment has been tested and found to comply with the limits for a Class B digital device, pursuant to Part 15 of the FCC Rules. These limits are designed to provide reasonable protection against harmful interference in a residential installation. This equipment generates, uses and can radiate radio frequency energy and, if not installed and used in accordance with the instructions, may cause harmful interference to radio communications. However, there is no guarantee that interference will not occur in a particular installation. If this equipment does cause harmful interference to radio or television reception, which can be determined by turning the equipment off and on, the user is encouraged to try to correct the interference by one or more of the following measures:
• Reorient or relocate the receiving antenna.• Increase the separation between the equipment and receiver.• Connect the equipment into an outlet on a circuit different from that to which the receiver is
connected.• Consult the dealer or an experienced radio/TV technician for help.
FCC WARNINGChanges or modifi cations not expressly approved by the party responsible for compliance could void the user’s authority to operate the equipment.Proper connectors must be used for connection to host computer and/or peripherals in order to meet FCC emission limits.
Connector SB-62 Power Graphic Unit to Power Graphic Unit
USB connector that comes with the fx-9860G Slim Power Graphic Unit to Windows® compatible PC
Windows is a registered trademark of Microsoft Corporation.Company and product names used in this manual may be registered trademarks or trademarks of their respective owners.
Declaration of ConformityModel Number: fx-9860G SlimTrade Name: CASIO COMPUTER CO., LTD.Responsible party: CASIO, INC.Address: 570 MT. PLEASANT AVENUE, DOVER, NEW JERSEY 07801Telephone number: 973-361-5400
This device complies with Part 15 of the FCC Rules. Operation is subject to the following two conditions: (1) This device may not cause harmful interference, and (2) this device must accept any interference received, including interference that may cause undesired operation.
BEFORE USING THE CALCULATOR FOR THE FIRST TIME...
Batteries are not loaded in your calculator at the factory.Be sure to follow the procedure below to load batteries and adjust the display contrast before trying to use the calculator for the fi rst time.
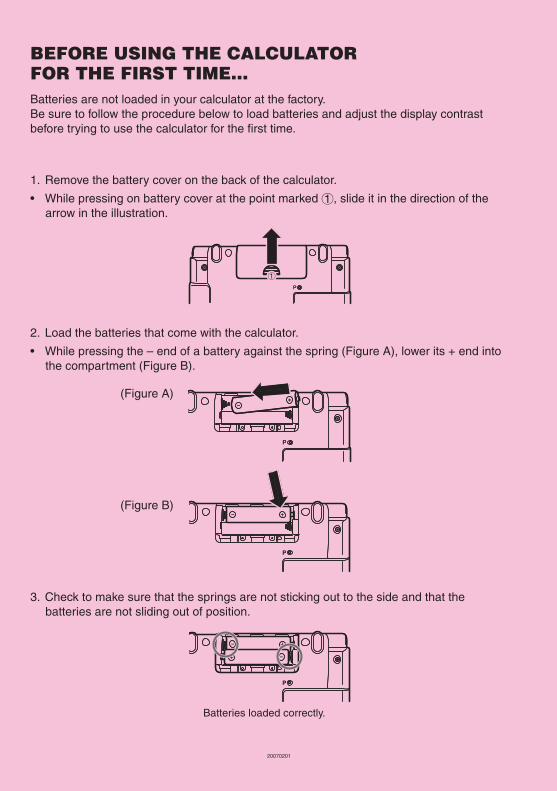
1. Remove the battery cover on the back of the calculator.
• While pressing on battery cover at the point marked 1, slide it in the direction of the arrow in the illustration.
2. Load the batteries that come with the calculator.
• While pressing the – end of a battery against the spring (Figure A), lower its + end into the compartment (Figure B).
(Figure A)
(Figure B)
3. Check to make sure that the springs are not sticking out to the side and that the batteries are not sliding out of position.
Batteries loaded correctly.
20070201
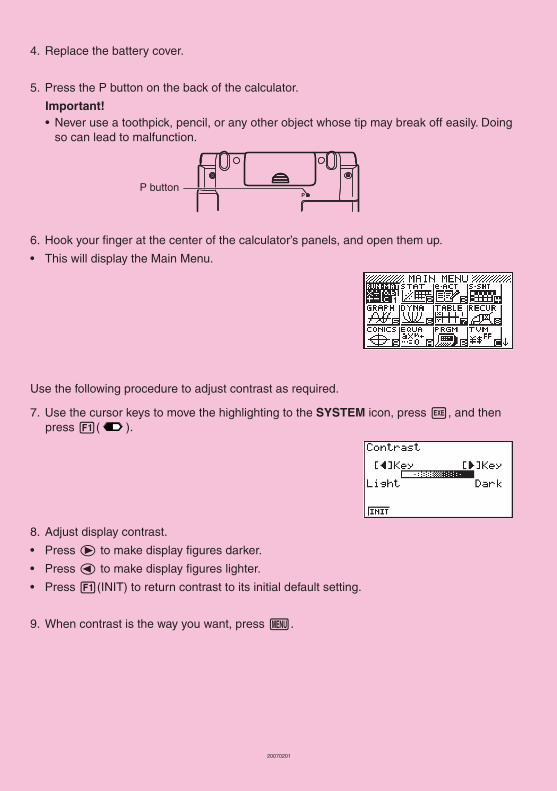
4. Replace the battery cover.
5. Press the P button on the back of the calculator.
Important!• Never use a toothpick, pencil, or any other object whose tip may break off easily. Doing
so can lead to malfunction.
P button
6. Hook your fi nger at the center of the calculator’s panels, and open them up.
• This will display the Main Menu.
Use the following procedure to adjust contrast as required.
7 . Use the cursor keys to move the highlighting to the SYSTEM icon, press w, and then press 1 ( ).
8. Adjust display contrast.
• Press e to make display fi gures darker.
• Press d to make display fi gures lighter.
• Press 1 (INIT) to return contrast to its initial default setting.
9. When contrast is the way you want, press m .
20070201
20070201
Precautions when Connecting to a Computer
A special USB driver must be installed on your computer in order to connect to the calculator. The driver is installed along with the Program-Link software (FA-124) that comes bundled with the calculator. Be sure to install the Program-Link software (FA-124) on your computer before trying to connect the calculator. Attempting to connect the calculator to a computer that does not have the Program-Link software installed can cause malfunction. For information about how to install the Program-Link software, see the User’s Guide on the bundled CD-ROM.
20070201
Handling Precautions • Your calculator is made up of precision components. Never try to take it apart.
• Avoid dropping your calculator and subjecting it to strong impact.
• Do not store the calculator or leave it in areas exposed to high temperatures or humidity, or large amounts of dust. When exposed to low temperatures, the calculator may require more time to display results and may even fail to operate. Correct operation will resume once the calculator is brought back to normal temperature.
• The display will go blank and keys will not operate during calculations. When you are operating the keyboard, be sure to watch the display to make sure that all your key operations are being performed correctly.
• Replace the batteries once every one year regardless of how much the calculator is used during that period. Never leave dead batteries in the battery compartment. They can leak and damage the unit.
• Do not use an oxyride battery or any other type of nickel-based primary battery with this product. Incompatibility between such batteries and product specifi cations can result in shorter battery life and product malfunction.
• Keep batteries out of the reach of small children. If swallowed, consult a physician immediately.
• Avoid using volatile liquids such as thinner or benzine to clean the unit. Wipe it with a soft, dry cloth, or with a cloth that has been moistened with a solution of water and a neutral detergent and wrung out.
• Always be gentle when wiping dust off the display to avoid scratching it.
• In no event will the manufacturer and its suppliers be liable to you or any other person for any damages, expenses, lost profi ts, lost savings or any other damages arising out of loss of data and/or formulas arising out of malfunction, repairs, or battery replacement. It is up to you to prepare physical records of data to protect against such data loss.
• Never dispose of batteries, the liquid crystal panel, or other components by burning them.
• Be sure that the power switch is set to OFF when replacing batteries.
• If the calculator is exposed to a strong electrostatic charge, its memory contents may be damaged or the keys may stop working. In such a case, perform the Reset operation to clear the memory and restore normal key operation.
• If the calculator stops operating correctly for some reason, use a thin, pointed object to press the P button on the back of the calculator. Note, however, that this clears all the data in calculator memory.
• Note that strong vibration or impact during program execution can cause execution to stop or can damage the calculator’s memory contents.
• Using the calculator near a television or radio can cause interference with TV or radio reception.
• Before assuming malfunction of the unit, be sure to carefully reread this user’s guide and ensure that the problem is not due to insuffi cient battery power, programming or operational errors.
20070201
Be sure to keep physical records of all important data! Low battery power or incorrect replacement of the batteries that power the unit can cause the data stored in memory to be corrupted or even lost entirely. Stored data can also be affected by strong electrostatic charge or strong impact. It is up to you to keep back up copies of data to protect against its loss.
In no event shall CASIO Computer Co., Ltd. be liable to anyone for special, collateral, incidental, or consequential damages in connection with or arising out of the purchase or use of these materials. Moreover, CASIO Computer Co., Ltd. shall not be liable for any claim of any kind whatsoever against the use of these materials by any other party.
• The contents of this user’s guide are subject to change without notice.
• No part of this user’s guide may be reproduced in any form without the express written consent of the manufacturer.
• Be sure to keep all user documentation handy for future reference.
20070201
Contents
1 Key Layout
2 Using the Backlight
3 Specifi cations
4 P Button (In case of hang up)
5 Power Supply
20070201
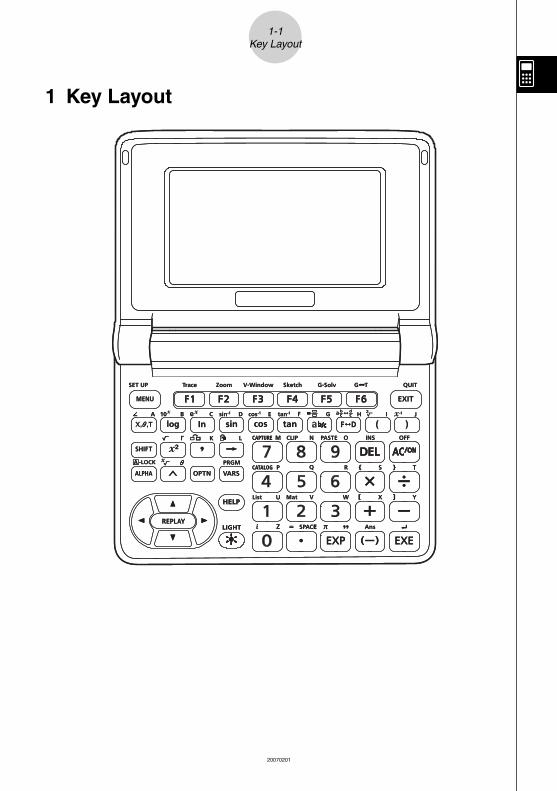
1 Key Layout
1-1Key Layout
20070201
2-1Using the Backlight
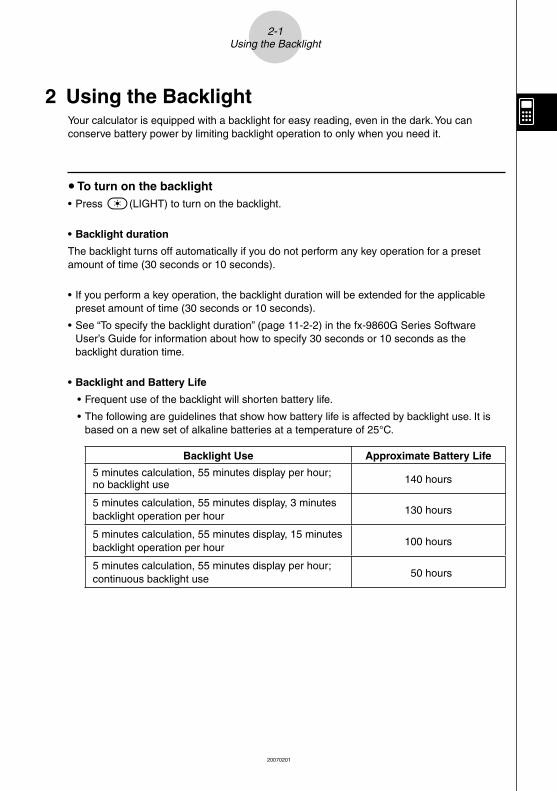
2 Using the BacklightYour calculator is equipped with a backlight for easy reading, even in the dark. You can conserve battery power by limiting backlight operation to only when you need it.
u To turn on the backlight• Press ](LIGHT) to turn on the backlight.
• Backlight duration
The backlight turns off automatically if you do not perform any key operation for a preset amount of time (30 seconds or 10 seconds).
• If you perform a key operation, the backlight duration will be extended for the applicable preset amount of time (30 seconds or 10 seconds).
• See “To specify the backlight duration” (page 11-2-2) in the fx-9860G Series Software User’s Guide for information about how to specify 30 seconds or 10 seconds as the backlight duration time.
• Backlight and Battery Life
• Frequent use of the backlight will shorten battery life.
• The following are guidelines that show how battery life is affected by backlight use. It is based on a new set of alkaline batteries at a temperature of 25°C.
Backlight Use Approximate Battery Life
5 minutes calculation, 55 minutes display per hour; no backlight use 140 hours
5 minutes calculation, 55 minutes display, 3 minutes backlight operation per hour 130 hours
5 minutes calculation, 55 minutes display, 15 minutes backlight operation per hour 100 hours
5 minutes calculation, 55 minutes display per hour; continuous backlight use 50 hours
20070201
3-1Specifi cations
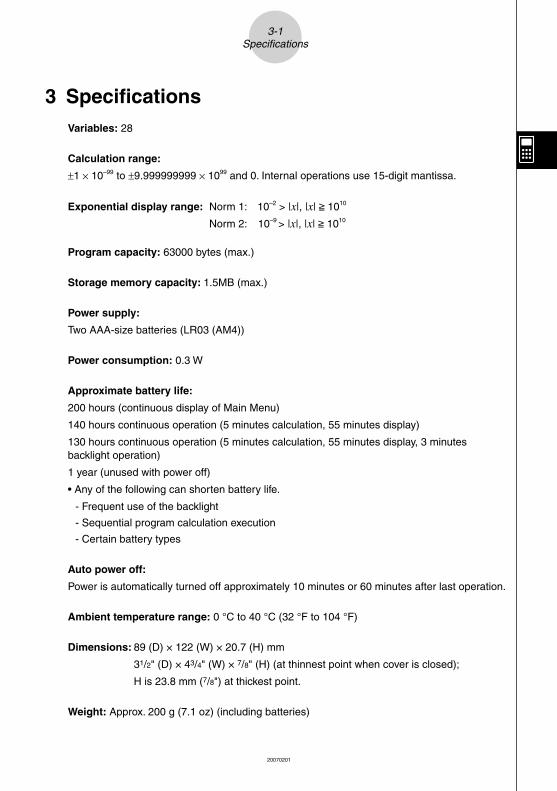
3 Specifi cations
Variables: 28
Calculation range:
± 1 × 10 –99 to ± 9.999999999 × 10 99 and 0. Internal operations use 15-digit mantissa.
Exponential display range: Norm 1: 10 –2 > | x |, | x | > 10 10
Norm 2: 10 –9 > | x |, | x | > 10 10
Program capacity: 63000 bytes (max.)
Storage memory capacity: 1.5MB (max.)
Power supply:
Two AAA-size batteries (LR03 (AM4))
Power consumption: 0.3 W
Approximate battery life:
200 hours (continuous display of Main Menu)
140 hours continuous operation (5 minutes calculation, 55 minutes display)
130 hours continuous operation (5 minutes calculation, 55 minutes display, 3 minutes backlight operation)
1 year (unused with power off)
• Any of the following can shorten battery life.
- Frequent use of the backlight
- Sequential program calculation execution
- Certain battery types
Auto power off:
Power is automatically turned off approximately 10 minutes or 60 minutes after last operation.
Ambient temperature range: 0 °C to 40 °C (32 °F to 104 °F)
Dimensions: 89 (D) × 122 (W) × 20.7 (H) mm
3 1 / 2 " (D) × 4 3 / 4 " (W) × 7 / 8 " (H) (at thinnest point when cover is closed);
H is 23.8 mm (7/8") at thickest point.
Weight: Approx. 200 g (7.1 oz) (including batteries)
20070201
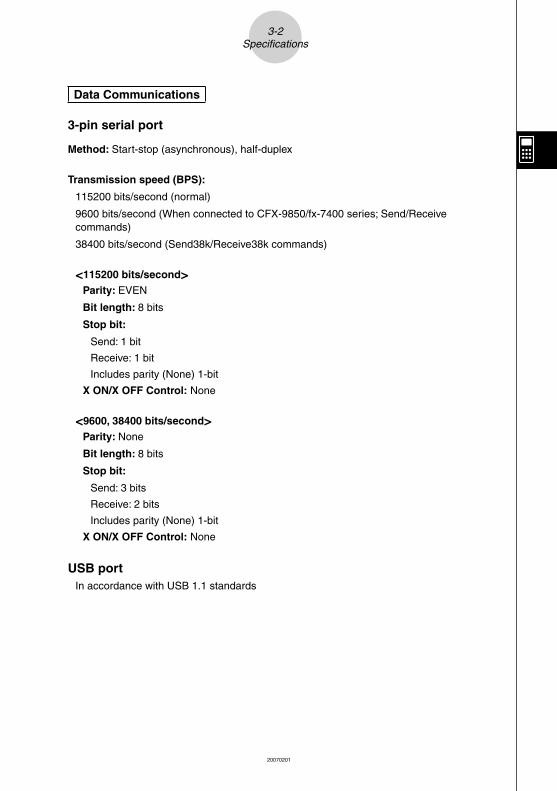
Data Communications
3-pin serial port
Method: Start-stop (asynchronous), half-duplex
Transmission speed (BPS):
115200 bits/second (normal)
9600 bits/second (When connected to CFX-9850/fx-7400 series; Send/Receive commands)
38400 bits/second (Send38k/Receive38k commands)
<115200 bits/second>
Parity: EVEN
Bit length: 8 bits
Stop bit:
Send: 1 bit
Receive: 1 bit
Includes parity (None) 1-bit
X ON/X OFF Control: None
<9600, 38400 bits/second>
Parity: None
Bit length: 8 bits
Stop bit:
Send: 3 bits
Receive: 2 bits
Includes parity (None) 1-bit
X ON/X OFF Control: None
USB port
In accordance with USB 1.1 standards
3-2Specifi cations
20070201
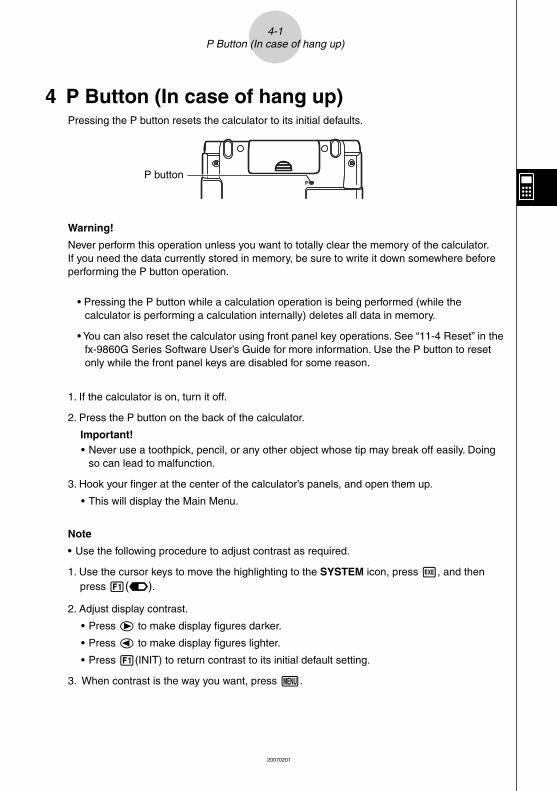
4 P Button (In case of hang up) Pressing the P button resets the calculator to its initial defaults.
P button
Warning!
Never perform this operation unless you want to totally clear the memory of the calculator. If you need the data currently stored in memory, be sure to write it down somewhere before performing the P button operation.
• Pressing the P button while a calculation operation is being performed (while the
calculator is performing a calculation internally) deletes all data in memory.
• You can also reset the calculator using front panel key operations. See “11-4 Reset” in the fx-9860G Series Software User’s Guide for more information. Use the P button to reset only while the front panel keys are disabled for some reason.
1. If the calculator is on, turn it off.
2. Press the P button on the back of the calculator.
Important!• Never use a toothpick, pencil, or any other object whose tip may break off easily. Doing
so can lead to malfunction.
3. Hook your fi nger at the center of the calculator’s panels, and open them up.
• This will display the Main Menu.
Note
• Use the following procedure to adjust contrast as required.
1. Use the cursor keys to move the highlighting to the SYSTEM icon, press w, and then press 1( ).
2. Adjust display contrast.
• Press e to make display fi gures darker.
• Press d to make display fi gures lighter.
• Press 1(INIT) to return contrast to its initial default setting.
3. When contrast is the way you want, press m.
4-1P Button (In case of hang up)
20070201
5 Power Supply This calculator is powered by two AAA-size (LR03 (AM4)) batteries.
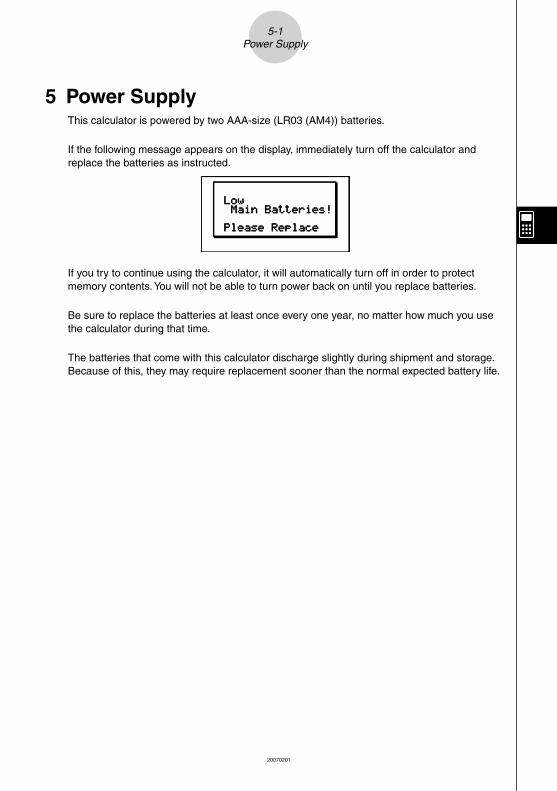
If the following message appears on the display, immediately turn off the calculator and replace the batteries as instructed.
If you try to continue using the calculator, it will automatically turn off in order to protect memory contents. You will not be able to turn power back on until you replace batteries.
Be sure to replace the batteries at least once every one year, no matter how much you use the calculator during that time.
The batteries that come with this calculator discharge slightly during shipment and storage. Because of this, they may require replacement sooner than the normal expected battery life.
5-1Power Supply
20070201
k Replacing Batteries
Precautions:
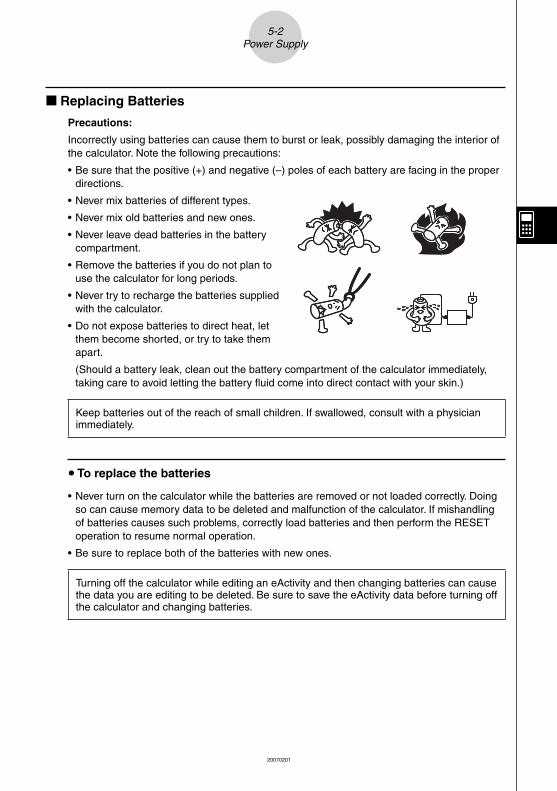
Incorrectly using batteries can cause them to burst or leak, possibly damaging the interior of the calculator. Note the following precautions:
• Be sure that the positive (+) and negative (–) poles of each battery are facing in the proper directions.
• Never mix batteries of different types.
• Never mix old batteries and new ones.
• Never leave dead batteries in the battery compartment.
• Remove the batteries if you do not plan to use the calculator for long periods.
• Never try to recharge the batteries supplied with the calculator.
• Do not expose batteries to direct heat, let them become shorted, or try to take them apart.
(Should a battery leak, clean out the battery compartment of the calculator immediately, taking care to avoid letting the battery fl uid come into direct contact with your skin.)
Keep batteries out of the reach of small children. If swallowed, consult with a physician immediately.
u To replace the batteries
• Never turn on the calculator while the batteries are removed or not loaded correctly. Doing so can cause memory data to be deleted and malfunction of the calculator. If mishandling of batteries causes such problems, correctly load batteries and then perform the RESET operation to resume normal operation.
• Be sure to replace both of the batteries with new ones.
Turning off the calculator while editing an eActivity and then changing batteries can cause the data you are editing to be deleted. Be sure to save the eActivity data before turning off the calculator and changing batteries.
5-2Power Supply
20070201
5-3Power Supply
1. Press !o(OFF) to turn off the calculator.
2. To ensure that you do not press the o key accidentally while replacing batteries, fold
the calculator shut.
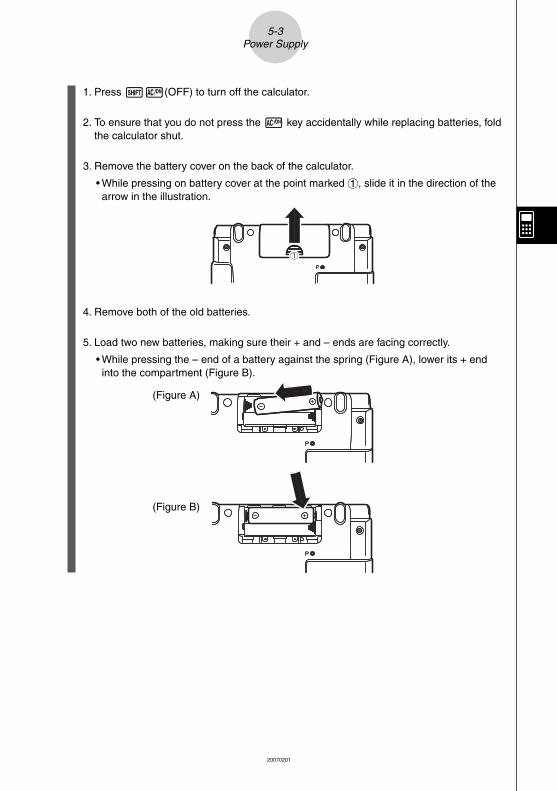
3. Remove the battery cover on the back of the calculator.
• While pressing on battery cover at the point marked 1, slide it in the direction of the arrow in the illustration .
4. Remove both of the old batteries.
5. Load two new batteries, making sure their + and – ends are facing correctly.
• While pressing the – end of a battery against the spring (Figure A), lower its + end into the compartment (Figure B).
(Figure A)
(Figure B)
20070201
5-4Power Supply
# If the fi gures on the display appear too light and hard to see after you turn on power, adjust the contrast.
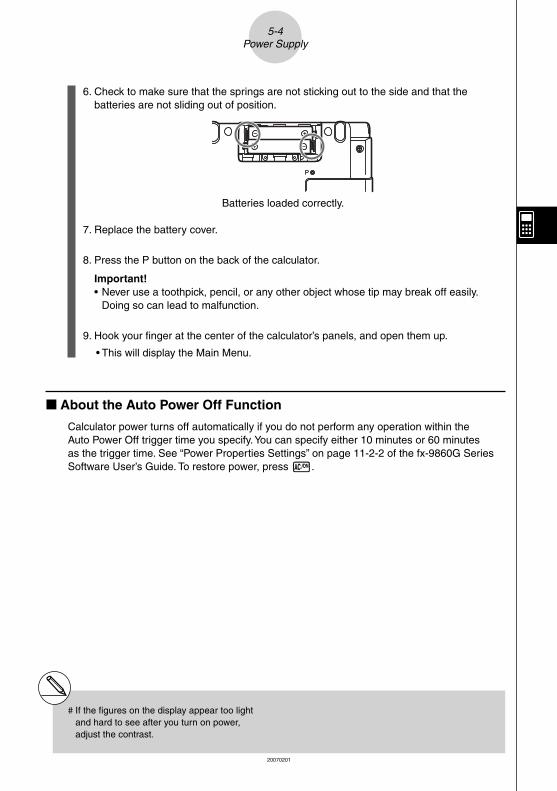
6. Check to make sure that the springs are not sticking out to the side and that the batteries are not sliding out of position.
Batteries loaded correctly.
7. Replace the battery cover.
8. Press the P button on the back of the calculator.
Important!• Never use a toothpick, pencil, or any other object whose tip may break off easily.
Doing so can lead to malfunction.
9. Hook your fi nger at the center of the calculator’s panels, and open them up.
• This will display the Main Menu.
k About the Auto Power Off Function
Calculator power turns off automatically if you do not perform any operation within the Auto Power Off trigger time you specify. You can specify either 10 minutes or 60 minutes as the trigger time. See “Power Properties Settings” on page 11-2-2 of the fx-9860G Series Software User’s Guide. To restore power, press o.

CASIO Europe GmbHBornbarch 10, 22848 Norderstedt, Germany
This mark applies in EU countries only.

CASIO COMPUTER CO., LTD.
6-2, Hon-machi 1-chomeShibuya-ku, Tokyo 151-8543, Japan
One or more of the following patents may be used in the product.
U.S.Pats. 5,166,897 5,210,708 5,535,317 5,539,867
SA0702-A