Embed Size (px)
Citation preview
Recommended use of G-Series™
US. Edition 9, 2017
G-SERIES Manual

Vitrolife G-Series™ Manual 9.02
© 2002–2017 Vitrolife Sweden AB. All rights reserved.
You may copy this for internal use only, not for publishing.
The Vitrolife logotype is a trademark of Vitrolife Sweden AB, registered in Europe, the U.S. and other countries.
Vitrolife Sweden AB Box 9080SE-400 92 GöteborgSwedenTel: +46-31-721 80 00
Vitrolife Inc.3601 South Inca StreetEnglewoodColorado 80110USATel: +1-866-VITRO US (866-848-7687)
Vitrolife Pty LtdLevel 10, 68 Pitt StreetSydney NSW 2000Australia
G5, G-Series™, the G5 logo, G-MM™, HSA-solution™, G-IVF™, G-IVF PLUS™, G-1™, G-1™ PLUS, G-2™, G-2™ PLUS, G-GAMETE™, G-MOPS™, G-MOPS™ PLUS, G-RINSE™, G-PGD™, G-TL™, SpermGrad™, HYASE™ and ICSI™ are trademarks of Vitrolife Sweden AB.
EmbryoGlue® is a registered trademark of Vitrolife Sweden AB.
Vitrolife G-Series™ Manual 9.0 Contents 3
ContentsIntroduction 4
General 5Opening your Vitrolife products 5CO2 equilibration 6Supplementing media 6Recommended use of G-MOPS™ 8How to measure pH 10IVF and Embryo Culture 12
Sperm preparation 13Swim-up method (migration) 14Density gradient centrifugation method 16Surgically retrieved spermatozoa 18
IVF-ET 21Follicle aspiration 21Oocyte identification 22Oocyte culture and fertilisation 23Insemination 24Fertilisation assessment 24Choosing the culture system 25Preparation of culture system 26Embryo culture 27Embryo culture in time-lapse systems 29Embryo assessment 30Scoring criteria for human blastocysts 30Scoring system 31Table for assessment of blastocysts 32Embryo transfer 33Replacement of embryos 33Loading the catheter 34
Micromanipulation 37Denudation of oocytes for ICSI 38ICSI procedure 41Difficult ICSI cases 42Embryo biopsy 43
Quality Control Program 46
G-Series™ and related products from Vitrolife 49
Instruments by Vitrolife 51
Time-lapse by Vitrolife 52
Labware by Vitrolife 53
Correspondence 54
Vitrolife G-Series™ Manual 9.0Introduction4
IntroductionImproving success rates
Vitrolife is dedicated to improving the success rates of Human Assisted Reproduction. Long term research in reproductive physiology and studies on embryo development have resulted in the most advanced IVF media products available. This manual describes the use of Vitrolife’s G-Series™ developed by Professor David K. Gardner.
We are well aware that there are many ways of practicing assisted reproductive technology. The methods we describe below have resulted in high success rates with our products.
Our media products
Vitrolife offers a wide range of products, all the way from oocyte retrieval to embryo transfer with the recent addition of products enabling time-lapse culture. Every LOT undergoes rigorous Quality Control testing including mouse embryo assay (MEA) before release to customers. With every released LOT, a Certificate of Analysis is issued.
Quality Control together with quality assured operations (ISO 13485:2012 and 21 CFR Part 820) guarantees LOT-to-LOT consistency. All raw materials used for the manufacturing of our products are selected as the best available on the world market. All raw materials are tested and evaluated individually by stringent quality control and MEA procedures before use in the manufacturing of our media. The final products also undergo quality control and MEA prior to their release.
We are certain you will agree that the “creation” of new human life deserves the best pos-sible environment. We are committed to bringing you the highest quality products.
Vitrolife G-Series™ Manual 9.0 General 5
GeneralOpening your Vitrolife media products
When you receive your delivery of Vitrolife products you may notice that they are packaged in a special way. There are specific reasons for this:
• All Vitrolife products are tamper-proof sealed. The packaging ensures that it is impossible to enter the bottle without visible evidence.
• All materials used in the packaging are non-toxic so that nothing may interfere with the final product. PETG bottles, screw caps, specially designed labels and pharmaceutical sealing are all part of this tamper-proof protocol.
G-Series™ PLUS media, except G-IVF™ PLUS, G-GAMETE™ and G-TL™ are supplemented with 5 mg HSA/mL. G-IVF™ PLUS, is supplemented with 10 mg HSA/mL. EmbryoGlue® is supplemented with 2.5 mg recombinant human albumin/mL. Other G-Series media are protein-free (unless otherwise labeled) and need to be supplemented with either G-MM™ (recombinant human albumin) or HSA-solution™ (human serum albumin) according to bot-tle labels. See Table on page 7.
Essentials
• Wash and disinfect your hands before handling any product.
• Take necessary precautions when handling any biological fluid such as blood, follicular fluid and semen.
Hands on
1 Open all products in a clean laminar air flow (LAF) cabinet.
2 Before bringing bottles into the LAF cabinet, assure the bottles are clean on the outside. It is recommended that the bottles are wiped with a lint free cloth and an appropriate disinfectant.
3 Identify the product and check the expiry date. Break the tamper-proof seal and discard.

Vitrolife G-Series™ Manual 9.0General
4 Remove the cap and make sure to maintain sterility, for example place the cap face down in a sterile petri dish.
5 Remove the desired volume with a sterile non-toxic pipette. Replace bottle cap and screw on firmly. Do not touch the inner sides of the cap.
6 Keep the media cold as much as possible. Prepare dishes immediately after the bottles have been removed from the refrigerator. Media bottles should not be left at ambient temperature for a longer period of time than it takes to prepare dishes or tubes.
Aseptic working techniques means to work in the absence of microorganisms capable of causing infection or contamination.
CAUTIONNever pour the contents out of the bottle, as the lip of the bottle may not be sterile once opened.
CO2 equilibration
Optimal pH for culture of human embryos is 7.2- 7.4.
To obtain correct pH, all G-Series™ media (with the exception of G-MOPS™/G-MOPS™ PLUS and G-PGD™, should be equilibrated at 6% CO2. This is a general recommendation that is valid for laboratories located at or near sea level. For laboratories located at higher altitudes, the CO2 percentage should be increased by approximately 0.6% CO2 per 1000 meters.
Correct pH must always be verified with pH measurements. See page 10.
Supplementing media with G-MM™ or HSA-solution™
In this manual the word “supplemented” is frequently used. Supplemented means the addition of G-MM™ or HSA-solution™ as described in this section, or G-Series™ PLUS products.
G-Series™ PLUS media, G-RINSE™, G-TL™, G-GAMETE™ and EmbryoGlue® do not require albumin supplementation.
6
Vitrolife G-Series™ Manual 9.0 General
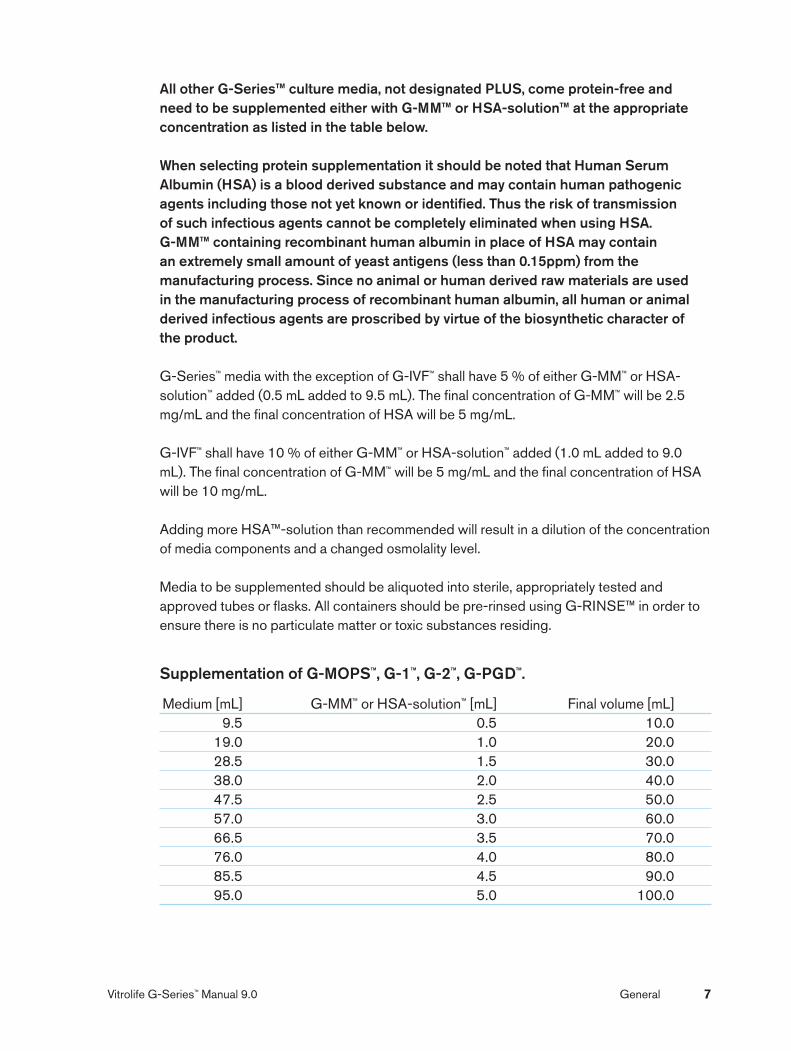
All other G-Series™ culture media, not designated PLUS, come protein-free and need to be supplemented either with G-MM™ or HSA-solution™ at the appropriate concentration as listed in the table below.
When selecting protein supplementation it should be noted that Human Serum Albumin (HSA) is a blood derived substance and may contain human pathogenic agents including those not yet known or identified. Thus the risk of transmission of such infectious agents cannot be completely eliminated when using HSA. G-MM™ containing recombinant human albumin in place of HSA may contain an extremely small amount of yeast antigens (less than 0.15ppm) from the manufacturing process. Since no animal or human derived raw materials are used in the manufacturing process of recombinant human albumin, all human or animal derived infectious agents are proscribed by virtue of the biosynthetic character of the product.
G-Series™ media with the exception of G-IVF™ shall have 5 % of either G-MM™ or HSA-solution™ added (0.5 mL added to 9.5 mL). The final concentration of G-MM™ will be 2.5 mg/mL and the final concentration of HSA will be 5 mg/mL.
G-IVF™ shall have 10 % of either G-MM™ or HSA-solution™ added (1.0 mL added to 9.0 mL). The final concentration of G-MM™ will be 5 mg/mL and the final concentration of HSA will be 10 mg/mL.
Adding more HSA™-solution than recommended will result in a dilution of the concentration of media components and a changed osmolality level. Media to be supplemented should be aliquoted into sterile, appropriately tested and approved tubes or flasks. All containers should be pre-rinsed using G-RINSE™ in order to ensure there is no particulate matter or toxic substances residing.
Supplementation of G-MOPS™, G-1™, G-2™, G-PGD™.
Medium [mL] G-MM™ or HSA-solution™ [mL] Final volume [mL] 9.5 0.5 10.0 19.0 1.0 20.0 28.5 1.5 30.0 38.0 2.0 40.0 47.5 2.5 50.0 57.0 3.0 60.0 66.5 3.5 70.0 76.0 4.0 80.0 85.5 4.5 90.0 95.0 5.0 100.0
7

Vitrolife G-Series™ Manual 9.0General
Supplementation of G-IVF™
Medium [mL] G-MM™ or HSA-solution™ [mL] Final volume [mL] 9.0 1.0 10.0 18.0 2.0 20.0 27.0 3.0 30.0 36.0 4.0 40.0 45.0 5.0 50.0 54.0 6.0 60.0 63.0 7.5 70.0 72.0 8.0 80.0 81.0 9.0 90.0 90.0 10.0 100.0
Recommended use of G-MOPS™ /G-MOPS™ PLUS
G-MOPS™/G-MOPS™ PLUS are intended for handling of gametes and embryos outside of the CO2 incubator.
Essentials
In order not to subject oocytes and embryos to unnecessary stress when working outside of the CO2 incubator, it is very important to work as quickly as possible to maintain optimal temperature and osmolality. As the lid of the dishes must be removed when moving oocytes and embryos between dishes and when performing ICSI, pH as well as temperature and osmolality may change after some time. This is valid for all media including G-MOPS™/ G-MOPS™ PLUS.
Importance of pHG-MOPS™/G-MOPS™ PLUS are MOPS buffered media and must be used at +37°C in an air atmosphere. Do not put this medium in a CO2 environment as the pH will go down below the specification range. Furthermore, do not use paraffin oil equilibrated in a CO2 environment when covering G-MOPS™/G-MOPS™ PLUS.
Importance of TemperatureOocytes and embryos must be kept at +37°C at all times.
To ensure that the temperature of G-MOPS™/G-MOPS™ PLUS inside of a tube/dish is +37°C, it is recommended to validate the procedure using a certified thermometer that is placed inside of a tube/dish containing a sample amount of G-MOPS™/G-MOPS™ PLUS, in the warming block (tube) or on a heated stage (dish). The goal is to ensure the G-MOPS™/G-MOPS™ PLUS is +37°C before use. Individual pieces of warming equipment should be adjusted to attain this goal.
8
Vitrolife G-Series™ Manual 9.0 General
Importance of OsmolalityChanges in osmolality can occur rapidly during preparation of dishes. Several factors can cause a change in osmolality. For example, the time it takes to prepare dishes, the ambient temperature as well as surface temperature where the dishes are prepared, whether the laminar air flow hood is turned on or off and the size of the droplets are all factors that will influence osmolality. Small droplets are more sensitive to osmolality increase than larger medium volumes.
To avoid changes in osmolality, tubes must be filled as much as possible and tightly capped. It is recommended to cover dishes with OVOIL™ and keep them with the lid on.
G-MOPS™ for oocyte aspiration
G-MOPS™ for oocyte aspiration should not to be supplemented. In order to ensure the G-MOPS™ is appropriately warmed to +37°C before use, pre-warm the medium by plac-ing a tightly sealed bottle of G-MOPS™ into a warming incubator without CO2. The bottle must be tightly capped to avoid changes in osmolality. Place an appropriate number of G-MOPS™ bottles in a warming oven the night prior to the oocyte aspiration to ensure the G-MOPS™ has reached a validated temperature of +37°C . Each time the bottle is removed from the warming incubator and used, ensure the cap is tightly replaced.
G-MOPS™ for gamete and embryo handling
G-MOPS™ for gamete and embryo handling must be supplemented. In a laminar flow hood pipette G-MOPS™/G-MOPS™ PLUS into appropriately tested and approved sterile test tubes. If G-MOPS™ is used supplement with the appropriate amount of G-MM™ or HSA-solution™. The tubes must be filled and tightly capped to avoid changes in osmolality. Place the tubes in a warming incubator without CO2 or in an adequately calibrated warming block. Pipette pre-warmed G-MOPS™/G-MOPS™ PLUS into a pre-warmed culture dish. To avoid changes in osmolality the dish should be covered with OVOIL™.
To ensure that the temperature inside of the culture dish is +37°C it is recommended to validate the procedure using a certified thermometer that is placed inside of a culture dish with G-MOPS™/G-MOPS™ PLUS on a heated stage. The temperature setting of the heated stage needs to be adjusted to achieve the correct +37°C of the medium in the culture dish.
IMPORTANT Ensure that no G-MOPS™/G-MOPS™ PLUS is transferred to the culture dishes by introducing washing steps between the G-MOPS™ dish and the culture dish. The washing procedure should include at least two steps of 1 mL culture medium per step. The wash dishes should be changed after 5 oocytes or embryos.
9

Vitrolife G-Series™ Manual 9.0General
How to measure pH
Introduction
pH can be measured with a classic pH-meter or alternative methodologies such as a blood-gas analyzer. Measurement of pH with a classic glass membrane electrode and a modern instrument is a straightforward process. There are however several pitfalls to be avoided when the highest possible accuracy needs to be achieved. This is especially the case if pH must be measured in solutions with dissolved gas or with high protein content.
Essentials
• Use a semi-micro or a micro electrode with a built in reference electrode and temperature measurement.
• Set the instrument for automatic temperature compensation.
• Use fresh buffers with at least one having a pH close to that of the tested solution. Change the buffer between every test.
• Confirm the proper function of the electrode daily by testing slope and offset.
• Change the electrode as soon as it starts to deteriorate. A pH-electrode rarely lasts for longer than 12 months and may often have to be replaced every second or third month.
• Store the electrode in a neutral buffer or in a special storage solution.
• Calibrate the instrument before each sequence of testing.
Hands on – suggested procedure of pH measurement
(The exact procedure may vary depending on instrumentation and the nature of the sample)
1 Take the electrode from the storage solution, rinse it and place it in pH 7.00 buffer. Remove the plug or tube that blocks the air inlet to the electrode.
2 Let the electrode stand in the pH 7.00 buffer for between one and two hours. This time may be reduced if the electrode is stored in pH 7.00 buffer over night.
3 Calibrate the electrode using at least two fresh buffers, one close to pH 7.00 and one at e.g. pH 10.00.
4 Verify that the slope and the offset of the electrode are within the specified limits of the electrode manufacturer. We recommend that the slope should be between 95 and 102 % of the theoretical value, and that the offset at pH 7.00 should not differ more than ± 4 mV from the value acquired during the previous calibration.
10
Vitrolife G-Series™ Manual 9.0 General
5 Verify that the calibration was performed properly by testing a buffer with a pH of approximately 8.00. Compare the measured and the specified pH at the actual test temperature. The measured pH may not differ from the specified pH by more than ± 0.05 pH units.
6 Place the electrode in distilled water at approximately the same temperature that the sample will have when it is tested.
7 Equilibrate the sample at the temperature and gas composition that is required. Equilibration with CO2 may take up to 16 hours depending on the conditions of equilibration e.g volume and medium vessel.
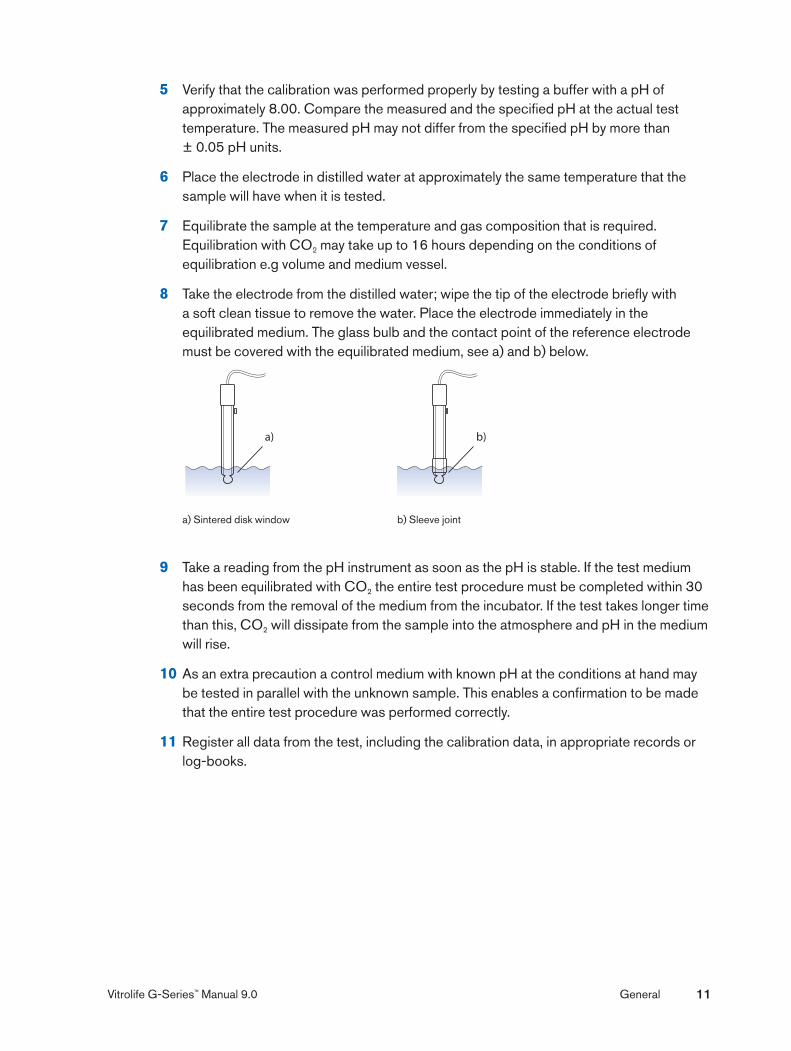
8 Take the electrode from the distilled water; wipe the tip of the electrode briefly with a soft clean tissue to remove the water. Place the electrode immediately in the equilibrated medium. The glass bulb and the contact point of the reference electrode must be covered with the equilibrated medium, see a) and b) below.
a) Sintered disk window b) Sleeve joint
9 Take a reading from the pH instrument as soon as the pH is stable. If the test medium has been equilibrated with CO2 the entire test procedure must be completed within 30 seconds from the removal of the medium from the incubator. If the test takes longer time than this, CO2 will dissipate from the sample into the atmosphere and pH in the medium will rise.
10 As an extra precaution a control medium with known pH at the conditions at hand may be tested in parallel with the unknown sample. This enables a confirmation to be made that the entire test procedure was performed correctly.
11 Register all data from the test, including the calibration data, in appropriate records or log-books.
11
a)
a)
a)
a) b)
c) d)
a)
b)
a)
b)
b)
a)
c)
d)
b)
a)
b)
b)c)
A
DENS A GIII
DENS B,C,D GIII
PREPCULT A,B
MICRO A,B
MICRO SETUP A,B
LOADSTRAW CRYO 1
LOADSTRAW CRYO 2
SWIMUP C
SWIMUP D/E
PH measure
a) b)
b)
a)
B C D
A B
A
B
1
2
3
4
5
6 4
5
6
1
2
3
A B
a) b) c) e) g) i)d) f) h)
a) Syringe b) Plastic tube c) Cotton plug sealing cement d) FS 2, 2cm e) Air bubble 1/4 cmf) FS 2 + embryos, 2–3 cm g) Air bubble 1/4 cm h) FS 2, 1 cm i) Seal: plastic plug
a) b) c) e) g) i)d) f) h)
a) Syringe b) Plastic tube c) Cotton plug sealing cement d) BFS 2, 2cm e) Air bubble 1/4 cmf) BFS 2 + embryos, 2–3 cm g) Air bubble 1/4 cm h) BFS 2, 1 cm i) Seal: plastic plug
a)b)
c)
d)
e)
f)
Vitrolife G-Series™ Manual 9.0General
IVF and Embryo Culture
We are aware that there are many options to choose from when considering the culture system for IVF. This manual provides a suggested methodology that has been proven suc-cessful for our products.
Essentials
• Choose your culture systems for their efficacy, simplicity and reproducibility.
• Organise yourself and prepare in advance.
• Use only sterile appropriately tested and approved disposables (for example Vitrolife Labware) that are subject to quality control for embryo culture and keep a log of all items used and procedures performed.
• If you use Vitrolife Labware, rinsing of plastic utensils is not necessary. If other brands of labware is used, it is recommended to rinse them prior to use to remove any particulate matter residing using G-RINSE™.
• Adhere to your protocols to ensure consistency.
• Ensure that all of your equipment is correctly maintained, and regularly checked and calibrated.
• All procedures should be performed in a clean, dedicated work environment (LAF cabinet).
• Use aseptic working techniques.
• Qualify all operators for handling media and keep training protocols consistent.
• Always wear non-toxic gloves when handling biological fluids.
• Check the identity of the patient and label all materials before proceeding.
12
Vitrolife G-Series™ Manual 9.0 Sperm Preparation
Sperm PreparationPrior to being used for IUI, IVF and ICSI, motile sperm cells are separated from the seminal plasma, dead sperm cells and other cells. This can be done by different procedures.
The decision of which semen preparation method to use is based on the patient history, previous semen analyses, as well as an examination of the present sample. Another consideration is whether fertilisation will be achieved by IVF, ICSI or IUI. In IVF you will need more sperm for insemination. The preparation methods select sperm based on their motility, ideally selecting only live sperm, or on their density, ideally selecting only mature sperm. If the sperm count and motility are adequate, migration (swim-up) is suitable. If semen quality is poor or includes large numbers of other cells, density gradient centrifugation is preferred. Recovery of sperm is more effective using the gradient centrifugation method rather than using the swim-up procedure, with respect to total yield. However, in some instances percent motility can be higher in sperm prepared by swim-up. It is also possible to let the gradient centrifugation method be followed by swim up.
Essentials
• Before proceeding with patient material, mark all vessels with patient ID according to local policies and regulations
• The sperm preparation should be performed in a clean aseptic work area. Use non-toxic, non-powdered gloves and follow local regulations regarding protection and safety of staff.
• All samples should be collected in appropriate sterile vessels tested and approved for human IVF. It is recommended that the semen sample be collected not more than one hour before preparation. The semen sample should be protected from cold and heat.
• All laboratory procedures should be followed.
• Sterile, non-toxic tubes, needles and pipettes should be washed with G-RINSE™ before use for the preparation of sperm.
13

Vitrolife G-Series™ Manual 9.0Sperm Preparation
Swim-up method (migration)
Hands on
This method is to be used for semen samples with a good sperm count and motility.
1 Allow approximately 20 minutes for the semen to liquefy. If the sample does not liquefy, you may need to pass it through a 23 gauge needle or a non-toxic sterile narrow Pasteur pipette.
Liquefy for 20 minutes
2 Make a microscopic assessment of the sperm sample to confirm the optimal method for processing the sperm.
3 Mark a test tube with patient ID. More than one tube can be set up if there are concerns about semen quality.
4 Pipette 1.0 mL of semen into a rinsed tube. Make up an appropriate number of tubes depending on semen quality. Carefully overlay 2.0 mL of pre-equilibrated supplemented G-IVF™/G-IVF™ PLUS. Place the swim-up tube in an angled position in the incubator at +37°C and 6 % CO2 for 30–60 minutes.
Incubate in 37°C, 6 % CO2 for 30–60 minutes. a) G-IVF™ / G-IVF™ PLUS b) Semen
14
a)
a)
a)
a) b)
c) d)
a)
b)
a)
b)
b)
a)
c)
d)
b)
a)
b)
b) c)
A
DENS A GIII
DENS B,C,D GIII
PREPCULT A,B
MICRO A,B
MICRO SETUP A,B
LOADSTRAW CRYO 1
LOADSTRAW CRYO 2
SWIMUP C
SWIMUP D/E
PH measure
a) b)
b)
a)
b)
a)
B C D
A B
A
B
1
2
3
4
5
6 4
5
6
1
2
3
A B
a) b) c) e) g) i) d) f ) h)
a) Syringe b) Plastic tube c) Cotton plug sealing cement d) FS 2, 2cm e) Air bubble 1/4 cm f ) FS 2 + embryos, 2–3 cm g) Air bubble 1/4 cm h) FS 2, 1 cm i) Seal: plastic plug
a) b) c) e) g) i) d) f) h)
a) Syringe b) Plastic tube c) Cotton plug sealing cement d) BFS 2, 2cm e) Air bubble 1/4 cm f) BFS 2 + embryos, 2–3 cm g) Air bubble 1/4 cm h) BFS 2, 1 cm i) Seal: plastic plug
a) b)
c)
d)
e)
f)
Liquify for 20 minutes

Vitrolife G-Series™ Manual 9.0 Sperm Preparation
5 Aspirate the top medium without touching the underlaying semen and transfer to a clean tube. Add 5.0 mL of equilibrated supplemented G-IVF™/G-IVF™ PLUS, mix and centrifuge for 10 minutes at 300–600 g.
Remove top medium. Dilute with G-IVF™ / G-IVF™ PLUS. Centrifuge.
6 Discard the supernatant and re-suspend the pellet in 5.0 mL of equilibrated supplemented G-IVF™/G-IVF™ PLUS and repeat the centrifugation at 300–600 g for 10 min.
Discard supernatant. Repeat wash.
7 Discard the supernatants and combine all pellets. Re-suspend the pellets in 0.5–1.0 mL of equilibrated supplemented G-IVF™/G-IVF™ PLUS, depending on sample quality.
Resuspend in small volume G-IVF™ / G-IVF™ PLUS.
8 Determine motility and concentration of spermatozoa in the washed sample.
9 Dilute the washed sample with equilibrated supplemented G-IVF™/G-IVF™PLUS to a final concentration of 75 000–200 000 motile sperm/mL.
10 Prepare rinsed insemination dishes with 0.5-1.0 mL of sperm suspension and equilibrate at +37°C and 6 % CO2 for at least 2 hours.
Alternatively: Add equilibrated sperm suspension to equilibrated dishes with the oocytes already present. If this insemination method is used, the semen sample does not require the dilution described under points 9-10 above.
It is recommended to inseminate in a volume of 0.5-1.0 mL with an oil overlay.
If oocytes are to be inseminated in droplets under oil, it is recommended to use a volume of at least 100 µL of medium.
15
Resuspend in small volume G-FERT™.
Remove supernatant.Repeat wash.a)
a)
a)
a) b)
c) d)
a)
b)
a)
b)
b)
a)
c)
d)
b)
a)
b)
b)c)
A
DENS A GIII
DENS B,C,D GIII
PREPCULT A,B
MICRO A,B
MICRO SETUP A,B
LOADSTRAW CRYO 1
LOADSTRAW CRYO 2
SWIMUP C
SWIMUP D/E
PH measure
a) b)
b)
a)
B C D
A B
A
B
1
2
3
4
5
6 4
5
6
1
2
3
A B
a) b) c) e) g) i)d) f) h)
a) Syringe b) Plastic tube c) Cotton plug sealing cement d) FS 2, 2cm e) Air bubble 1/4 cmf) FS 2 + embryos, 2–3 cm g) Air bubble 1/4 cm h) FS 2, 1 cm i) Seal: plastic plug
a) b) c) e) g) i)d) f) h)
a) Syringe b) Plastic tube c) Cotton plug sealing cement d) BFS 2, 2cm e) Air bubble 1/4 cmf) BFS 2 + embryos, 2–3 cm g) Air bubble 1/4 cm h) BFS 2, 1 cm i) Seal: plastic plug
a)b)
c)
d)
e)
f)
Vitrolife G-Series™ Manual 9.0Sperm Preparation
Density gradient centrifugation method
This method can be used to wash all samples of sperm regardless of quality.
SpermGrad™ is a solution of silane coated, colloidal silica particles in an isotonic balanced salt solution. By using different dilutions of SpermGrad™, solutions of different densities are obtained. Layering these solutions of different densities carefully in a centrifuge tube creates a density gradi-ent. Cells and other particles with different buoyant densities will sediment until they reach a solution with higher density. Centrifugation accelerates this sedimentation. Commonly, a two-step gradient of 90 % and 45 % SpermGrad™ is used. Since mature sperm with tightly packed DNA have a higher density than 90 % SpermGrad™, they sediment through this layer and are found at the bottom of the tube, whereas other cells, including immature and dead sperm, stop sedimenting at the 90 % or 45 % interface. You can use either SpermGrad™ RTU solutions already diluted to 90% (Upper Layer) and 45% (Lower Layer) or SpermGrad™ 100% stock solution, should you prefer to make your own dilutions. The stock solution must be diluted in G-IVF™/G-IVF™ PLUS into appropriate concentra-tions. G-IVF™ should be supplemented with either G-MM™ or HSA-solution™. G-IVF™/G-IVF™ PLUS must be equilibrated at +37 °C and 6% CO2 before use.
Hands on
1 If you use SpermGrad™ RTU, continue to paragraph 2. If you use SpermGrad™ stock solution: Mix SpermGrad™ with supplemented G-IVF™/G-IVF™ PLUS in separate tubes to obtain 90 % and 45 % stock solutions. For 90 % stock solution, mix 9.0 mL SpermGrad™ with 1.0 mL supplemented G-IVF™. For 45 % stock solution, mix 4.5 mL SpermGrad™ with 5.5 mL supplemented G-IVF™. Mix the solutions thoroughly and store in sterile appropriately tested and approved tubes or tissue culture flasks. Label and refrigerate until use. Always use a sterile pipette approved for IVF to aliquot amounts needed for individual sperm preparations. Before use, allow suitable volumes of gradient solutions to reach ambient temperature.
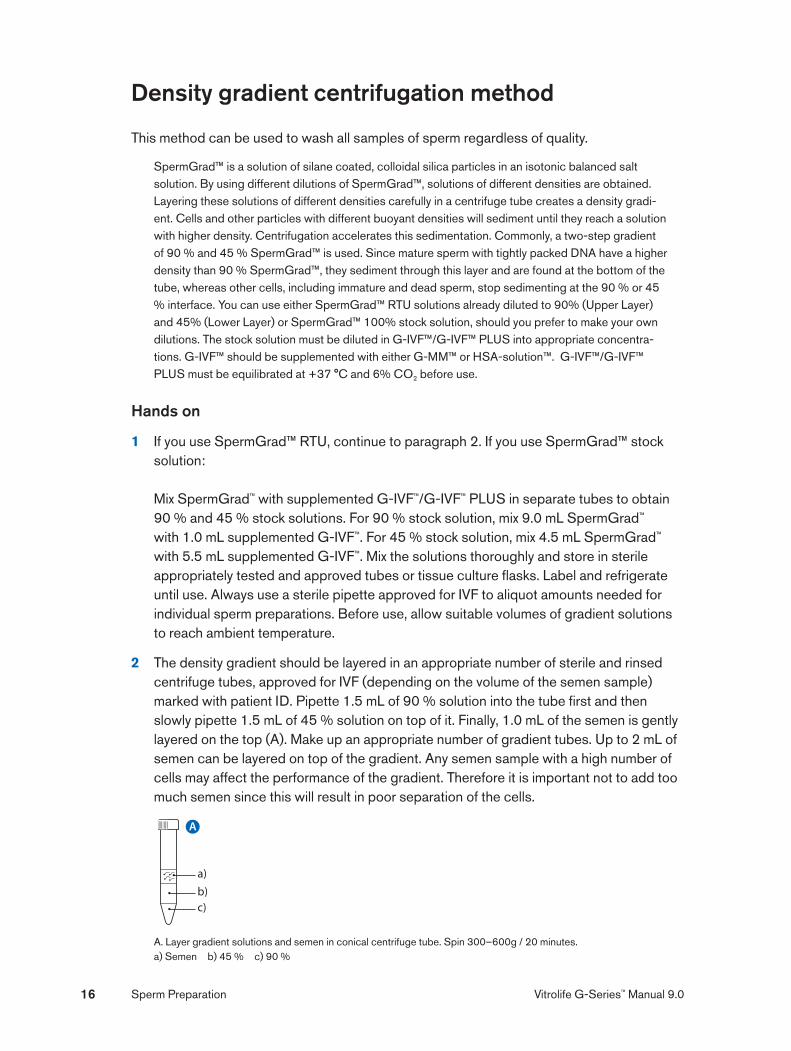
2 The density gradient should be layered in an appropriate number of sterile and rinsed centrifuge tubes, approved for IVF (depending on the volume of the semen sample) marked with patient ID. Pipette 1.5 mL of 90 % solution into the tube first and then slowly pipette 1.5 mL of 45 % solution on top of it. Finally, 1.0 mL of the semen is gently layered on the top (A). Make up an appropriate number of gradient tubes. Up to 2 mL of semen can be layered on top of the gradient. Any semen sample with a high number of cells may affect the performance of the gradient. Therefore it is important not to add too much semen since this will result in poor separation of the cells.
A. Layer gradient solutions and semen in conical centrifuge tube. Spin 300–600g / 20 minutes.a) Semen b) 45 % c) 90 %
16
a)
a)
a)
a) b)
c) d)
a)
b)
a)
b)
b)
a)
c)
d)
b)
a)
b)
b)c)
A
DENS A GIII
DENS B,C,D GIII
PREPCULT A,B
MICRO A,B
MICRO SETUP A,B
LOADSTRAW CRYO 1
LOADSTRAW CRYO 2
SWIMUP C
SWIMUP D/E
PH measure
a) b)
b)
a)
B C D
A B
A
B
1
2
3
4
5
6 4
5
6
1
2
3
A B
a) b) c) e) g) i)d) f) h)
a) Syringe b) Plastic tube c) Cotton plug sealing cement d) FS 2, 2cm e) Air bubble 1/4 cmf) FS 2 + embryos, 2–3 cm g) Air bubble 1/4 cm h) FS 2, 1 cm i) Seal: plastic plug
a) b) c) e) g) i)d) f) h)
a) Syringe b) Plastic tube c) Cotton plug sealing cement d) BFS 2, 2cm e) Air bubble 1/4 cmf) BFS 2 + embryos, 2–3 cm g) Air bubble 1/4 cm h) BFS 2, 1 cm i) Seal: plastic plug
a)b)
c)
d)
e)
f)

Vitrolife G-Series™ Manual 9.0 Sperm Preparation 17
3 The tubes are then centrifuged for 10–20 minutes at 300–600g.
4 Remove the two top layers and take care not to leave any residues on the tube wall (B). Transfer the sperm pellets with as little of the 90 % solution as possible to a sterile conical rinsed tube with 5 mL of equilibrated supplemented G-IVF™/G-IVF™ PLUS.
5 Centrifuge for 10 minutes at 300–600g.
6 Aspirate and discard the supernatants and repeat the wash (C). After the second wash, combine pellets and re-suspended in 1 mL of equilibrated supplemented G-IVF™/G-IVF™ PLUS (D). The washed sample is then assessed for motility and concentration.
B. Remove top layers C. Wash pellet with D. Resuspend pellet and transfer pellet G-IVF™/G-IVF™ PLUS. in small volume to clean tube. REPEAT. of G-IVF™/G-IVF™ PLUS. a) Pellet
7 Dilute the washed sample with equilibrated supplemented G-IVF™/ G-IVF™ PLUS to a final concentration of 75 000–200 000 motile sperm/mL.
8 Prepare rinsed insemination dishes with 0.5–1.0 mL of sperm suspension and equilibrate at +37 ° C and 6 % CO2 for at least 2 hours.
Alternatively: Add equilibrated sperm suspension to equilibrated dishes with the oocytes already present.
It is recommended to inseminate in a volume of 0.5-1.0 mL.
If oocytes are to be inseminated in droplets under oil, it is recommended to use a volume of at least 100 µL of medium.
a)
DENS B,C,D GIII
B C D

Vitrolife G-Series™ Manual 9.0Sperm Preparation
Surgically retrieved spermatozoa
In cases with azoospermia spermatozoa can be retrieved form the epididymis or the testicle. Different techniques are available to collect sperm cells from both origins. Needle puncture or open surgery methods are used depending on the choice of the surgeon or the indication of the azoospermia.
Local regulations regarding performance of surgical procedures prevail. The following are examples of laboratory procedures that may be considered.
The choice of medium depends on the laboratory procedures. For incubation in a CO2-environment, supplemented G-IVF™/G-IVF™ PLUS is recommended. When procedures are performed in ambient atmosphere only, supplemented G-IVF™/G-IVF™ PLUS may also be considered. Surgically retrieved sperm cells are however more sensitive and for a more stable pH SpermRinse™ may be used.
Needle puncture
Both epididymal and testicular sperm can be collected using a needle puncture. A syringe is attached to the needle and used to make an aspirating movement for collection of cells or tissue. Since the syringe may come in contact with the spermatozoa, a properly tested needle and syringe should be used. Like for any plastic disposable used, rinsing of the syringe as well as the needle with G-RINSE™ before starting the puncture is recommended.
Hands on
Epididymal samples1 Collect the sample in supplemented G-IVF™/G-IVF™ PLUS.
2 If large numbers of spermatozoa are collected demonstrating a reasonable level of motility, a density gradient procedure can be performed, see page 16.
3 If only small numbers of sperm cells are collected, sperm cells may be aspirated directly from a droplet with the collected material or may even be concentrated in a washing step using supplemented G-IVF™/G-IVF™ PLUS before searching for motile sperm cells.
Testicular samples1 Collect the sample in supplemented G-IVF™/G-IVF™ PLUS. Use a sufficiently large
volume allowing easy manipulation in the laboratory.
2 Transfer the tissue with the medium into a Petri dish, tested for IVF, and disperse into small pieces.
3 Move the medium and dispersed tissue pieces to a test tube and allow the pieces of tissue to sediment.
18
Vitrolife G-Series™ Manual 9.0 Sperm Preparation 19
4 Remove the supernatant, transfer it to a conical test tube and centrifuge for 5 minutes at 300-600 g.
5 Discard the supernatant and re-suspend the pellet in a small volume of G-IVF™/G-IVF™ PLUS. A second wash may be necessary.
6 Place testicular material in supplemented G-IVF™/G-IVF™ PLUS droplets in a Petri dish and cover with OVOIL™.
7 Retrieve spermatozoa and place them in a fresh droplet of supplemented G-IVF™/ G-IVF™ PLUS for ICSI or cryopreservation.
Open surgical procedure
For collection of epididymal sperm cells, the epididymis may be visualized by surgical procedure and liquid can then be aspirated. Collection and handling of the liquid is similar as described before. Depending on the laboratory procedures supplemented G-IVF™/ G-IVF™ PLUS or SpermRinse™ are the media of choice for collection and handling of the material. The isolated material is transferred into sperm handling media and transferred to the lab for further handling as described above.
In cases where the collected material is cryopreserved, SpermFreeze™ solution should be used.
In cases where it is used for ICSI immediately or the next day, the material is incubated according to laboratory procedures. For incubation in a CO2-environment supplemented G-IVF™/G-IVF™ PLUS is recommended. For incubation in ambient environment SpermRinse™ is recommended. For selection and fertilisation see the section on Intracytoplasmic sperm injection, page 41.

20 Vitrolife G-Series™ Manual 9.0
This page is intentionally left blank.

21Vitrolife G-Series™ Manual 9.0 IVF-ET
IVF-ETVitrolife has developed handling and culture media for gametes as well as for all stages of embryo development. G-IVF™/G-IVF™ PLUS should be used for in vitro fertilisation. For cleavage and culture of early embryos G-1™/G-1™ PLUS should be used. For culture from day 3 up to the blastocyst stage, G-2™/G-2™ PLUS should be used. Alternatively, G-TL™ can be used for for culture from fertilisation to the blastocyst stage. After ICSI, embryos should be placed directly into G-1™/G-1™ PLUS or G-TL™. Irrespective of stage, embryos should be transferred to the uterus using EmbryoGlue® or supplemented G-2™ or G-2™ PLUS.
Follicle aspiration
The purpose of the oocyte collection procedure is to collect as many oocytes as quickly as possible and to minimise the exposure of those oocytes to non-physiological conditions. Important parameters are temperature, osmolality and pH. Any deviations from physiologic conditions may have deleterious effects on the ability of the oocyte to fertilise normally and achieve normal preimplantation development.
Essentials
• Day 0 is defined as the day of oocyte collection.
• Check that all vessels are marked according to local policies and regulations and in accordance with patient ID.
• Ensure that all surfaces are warmed and that all materials that may come in contact with the oocytes are appropriately tested and approved for human IVF.
• Oocyte aspiration is performed under ultra-sound guidance using a needle with a double or single lumen. For recommended aspiration needles, see Instruments by Vitrolife page 51, Oocyte retrieval needles. Negative pressure is typically applied to the needle lumen by an adjustable aspiration pump.
• High or uncontrolled negative pressures may damage oocytes.
Vitrolife G-Series™ Manual 9.0IVF-ET
• Pre-warmed G-MOPS™ is used as the rinsing fluid for the procedure.
• G-MOPS™ is a modified G-1™, MOPS buffered medium used to maintain pH at ambient atmosphere.
• For collecting aspirates and follicle flushing pre-warmed G-MOPS™ can be used protein-free due to the high protein content of follicular fluid.
• For washing of oocytes prior to incubation in supplemented G-IVF™/G-IVF™ PLUS, pre-warmed supplemented G-MOPS™/G-MOPS™ PLUS should be used.
• G-GAMETE™ equilibrated at +37°C and 6 % CO2 can be used as an alternative to supplemented G-MOPS™ for washing of retrieved oocytes.
• It is advised to prepare one wash dish for a maximum of five follicles.
Hands on
1 Pre-equilibrate G-RINSE™ at +37°C in an atmosphere of 6 % CO2.
2 Warming of G-MOPS™ PLUS for oocyte wash: pipette the medium in rinsed tubes. Tightly cap the tubes and place them in a warming incubator without CO2 at +37°C.
3 Warming of un-supplemented G-MOPS™ for follicle flushing: pipette the medium in rinsed tubes. Tightly cap the tubes and place them in a warming incubator without CO2 at +37°C.
Before use, ensure that the temperature of the media is +37°C.
4 Rinse the needle lumen and tubing using G-RINSE™ and discard the rinsed fluid.
5 The follicles may be aspirated individually or collectively. The aspirated follicular fluid must be collected in a rinsed culture tube which is tested and approved for human IVF.
6 If the follicle aspirates cannot be examined directly, the tubes should be tightly sealed and kept at +37°C.
Oocyte identification
Essentials
• wear non-toxic gloves
• identify the patient before proceeding
• work rapidly to avoid cooling
22
Vitrolife G-Series™ Manual 9.0 IVF-ET
Hands on
1 Follicle aspirates should be kept at +37°C. The use of a test tube heating block next to the microscope can facilitate this. Follicle aspirates are microscopically examined in sterile IVF approved Petri dishes.
2 Should it be necessary to flush a follicle, G-MOPS™ pre-warmed to +37°C should be used.
3 Transfer the follicular aspirates to an empty dish. Identify the oocytes, pre-rinse a sterile pipette with supplemented G-MOPS™/G-MOPS™ PLUS, and immediately remove the oocytes from the follicular fluid and possible blood contamination. When working in a laminar flow hood under atmospheric conditions, place the collected oocytes in a G-MOPS™ PLUS dish covered with oil until the end of the procedure.
4 Rinse the oocytes in pre-warmed supplemented G-MOPS™/G-MOPS™ PLUS, and then in equilibrated supplemented G-IVF™/G-IVF™ PLUS. Transfer the oocytes to dishes with equilibrated supplemented G-IVF™/G-IVF™ PLUS and return the dishes to the incubator immediately.
Oocyte culture and fertilisation
Essentials
• Crucial considerations for gamete handling and fertilisation are temperature, pH and osmolality.
• Temperature loss occurs rapidly and is related to the amount of time a culture vessel stays out of the incubator and whether the surface is heated, e.g. a heated microscope stage.
• Changes in osmolality depend on volume, temperature and presence or absence of oil overlay. Changes in osmolality can occur fast and is often an undetected parameter. The culture system should be correctly humidified and under oil. It is recommended to cover all dishes with OVOIL™ to avoid fluctuations in temperature and osmolality inside as well as outside of the incubator.
• Changes in pH occur rapidly and, like temperature, is related to the time the culture vessel stays out of the incubator and the time of exposure to air.
• Ensure that all surfaces are warmed and that all materials that may come in contact with the oocytes are sterile, non-toxic and approved for human IVF.
23

Vitrolife G-Series™ Manual 9.0IVF-ET
Insemination
Hands on
1 Transfer the oocytes to insemination dishes containing 75 000–200 000 sperm/mL and leave at +37°C and 6 % CO2 for an appropriate time period.
Alternatively: Add equilibrated sperm suspension to equilibrated dishes with the oocytes already present.
Several oocytes may be inseminated in the same vessel. If an oil overlay is used, drop-lets of at least 100 µL volume are recommended.
Fertilisation assessment
Essentials
• IVF inseminated oocytes are checked for fertilisation approximately 15–20 hours after addition of sperm (day 1). ICSI oocytes may be observed 12–18 hours after injection, as pronuclei (PN) may appear earlier.
• Fertilised oocytes are sensitive to temperature and pH variations and it is important to minimise these changes by using pre-warmed supplemented G-MOPS™/G-MOPS™ PLUS as a handling medium outside of the incubator. If the procedure outside of the incubator takes less than 3 minutes, the use of supplemented G-MOPS™ /G-MOPS™ PLUS can be omitted.
• G-MOPS™/G-MOPS™ PLUS contains the buffer MOPS that stabilises pH during handling under atmospheric conditions and must never be exposed to a CO2 rich atmosphere. Rather, this medium is designed to maintain a pH of 7.2 – 7.4 outside of a CO2 atmosphere at +37°C.
• G-GAMETE™ can be used as an alternative to supplemented G-MOPS™/G-MOPS™ PLUS. G-GAMETE™ should be equilibrated at +37°C and 6 % CO2 before use.
• It is essential to ensure that the heated stages are calibrated at +37°C. To verify that the temperature inside of the dish is correct, use a certified thermometer or a calibrated digital thermometer with a thermocouple that can be secured to the stage and to the inside of the dish.
24
Vitrolife G-Series™ Manual 9.0 IVF-ET 25
Hands on – fertilisation assessment
1 Transfer the oocytes to a dish with pre-warmed supplemented G-MOPS™/G-MOPS™ PLUS if the assessment is estimated to take longer than 3 minutes or if oil overlay is not used.
2 Remove cumulus and corona cells from oocytes at +37°C using a denudation pipette, see Instruments by Vitrolife page 51. The cumulus and corona cells are often well dis-persed by the hyaluronidase from the sperm. Cells need only be removed to the extent that polar bodies and pronuclei can be clearly observed.
3 Observe microscopically and record the number of pronuclei, polar bodies and the pos-sible presence of a germinal vesicle. It is recommended to make these observations at high magnification (minimum 200X) on an inverted microscope with appropriate optics. It is difficult to be accurate in the assessment of fertilisation if lower magnifications are used. Only embryos derived from normally fertilised oocytes (2 PN) should be consid-ered for embryo culture and transfer. Oocytes that are not normally fertilised should be removed from culture.
4 After assessment, the fertilised oocytes should be rinsed thoroughly in several droplets of equilibrated supplemented G-1™/G-1™ PLUS /G-TL™ and then cultured in equili-brated supplemented G-1™/G-1™ PLUS or in G-TL™ under OVOIL™.
Choosing the culture system
There are essentially two culture systems to choose from for culture of gametes and embryos:
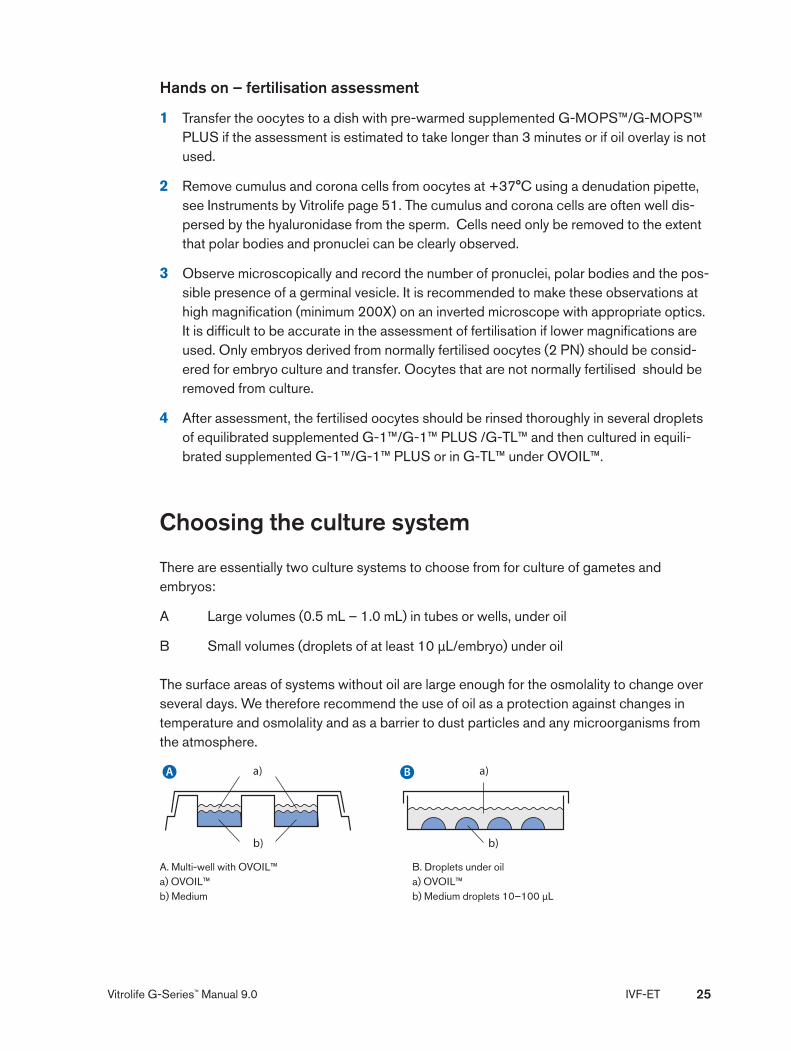
A Large volumes (0.5 mL – 1.0 mL) in tubes or wells, under oil
B Small volumes (droplets of at least 10 µL/embryo) under oil
The surface areas of systems without oil are large enough for the osmolality to change over several days. We therefore recommend the use of oil as a protection against changes in temperature and osmolality and as a barrier to dust particles and any microorganisms from the atmosphere.
A. Multi-well with OVOIL™ B. Droplets under oila) OVOIL™ a) OVOIL™b) Medium b) Medium droplets 10–100 µL
a)
a)
a)
a) b)
c) d)
a)
b)
a)
b)
b)
a)
c)
d)
b)
a)
b)
b)c)
A
DENS A GIII
DENS B,C,D GIII
PREPCULT A,B
MICRO A,B
MICRO SETUP A,B
LOADSTRAW CRYO 1
LOADSTRAW CRYO 2
SWIMUP C
SWIMUP D/E
PH measure
a) b)
b)
a)
B C D
A B
A
B
1
2
3
4
5
6 4
5
6
1
2
3
A B
a) b) c) e) g) i)d) f) h)
a) Syringe b) Plastic tube c) Cotton plug sealing cement d) FS 2, 2cm e) Air bubble 1/4 cmf) FS 2 + embryos, 2–3 cm g) Air bubble 1/4 cm h) FS 2, 1 cm i) Seal: plastic plug
a) b) c) e) g) i)d) f) h)
a) Syringe b) Plastic tube c) Cotton plug sealing cement d) BFS 2, 2cm e) Air bubble 1/4 cmf) BFS 2 + embryos, 2–3 cm g) Air bubble 1/4 cm h) BFS 2, 1 cm i) Seal: plastic plug
a)b)
c)
d)
e)
f)

Vitrolife G-Series™ Manual 9.0IVF-ET26
Preparation of culture system
Embryo cultures should ideally be performed in 6 % CO2 and 5 % O2. This gas environment can be created using any incubator suitable for IVF. There are significant benefits to using a low oxygen environment. Should it not be possible to use a reduced oxygen environment, use 6 % CO2 in air atmosphere.
Hands on
1 All contact material should be rinsed with G-RINSE™ and prepared in advance of the procedure. If Vitrolife Labware is used, rinsing will not be necessary.
2 In the afternoon of the day of oocyte retrieval, prepare the dishes to be used for embryo culture the following day. There are many ways to create droplets for embryo culture. Choose the dish and technique most appropriate for your clinic. Label a dish with ID of the patient. Using a pre-rinsed sterile tip, make the droplets with supplemented G-1™/G-1™ PLUS or G-TL™. Immediately cover the drops with OVOIL™ to avoid an increase in osmolality due to evaporation. Do not prepare more than 1 dish at the time.
3 Place the dish in the incubator at 6 % CO2 and +37°C.
Dishes must equilibrate in the incubator for a minimum of 6 hrs (this is the minimal measured time for the media to reach correct pH under oil) before use. Dishes can be used up to 96 hours. This includes equilibration time for the medium as well as embryo culture. If the medium is not covered with oil, an increase in osmolality may occur due to evaporation. In such cases the time frame must be validated in the laboratory by osmolality measurements.
Vitrolife G-Series™ Manual 9.0 IVF-ET 27
Embryo culture
Essentials
• Crucial considerations for embryo culture are temperature, pH, and osmolality.
• Temperature loss occurs rapidly and is related to the amount of time a culture vessel stays out of the incubator. It is recommended to work on heated surfaces, e.g. the microscope stage.
• Changes in osmolality can occur quickly and is often an undetected parameter. The culture system should be correctly humidified and under oil to avoid such fluctuations
• Changes in pH occur rapidly when medium is exposed to air. Ensure the culture dishes are out of the incubator for the minimal time period.
• A sufficient number of incubators is a prerequisite to avoid disturbing the embryo culture system unnecessarily. To avoid too many door openings, separate incubators should be used for handling, such as equilibration of media, and for culture. Alternatively, time-lapse equipment (EmbryoScope® or Primo Vision™) can be used to minimise incubator openings).
• There are many ways to create droplets for embryo culture. Choose the dish and technique most appropriate for your clinic. Label a dish with ID of the patient. Using a pre-rinsed sterile tip, make the droplets with supplemented G-1™/G-1™ PLUS/G-2™/G-2™ PLUS or G-TL™. The droplet volume should be at least 10 µL/embryo. Add wash droplets as well. Immediately cover the drops with OVOIL™ to avoid an increase in osmolality due to evaporation. Do not prepare more than 1 dish at the time.
• In order to culture embryos in an undisturbed environment, i.e. without fluctuations in temperature, osmolality and pH, we recommend the use of time-lapse technology.
Hands on: Culture of Cleavage Stage EmbryosDay 1 – Culture in G-1™/G-1™ PLUS or G-TL™
1 Once the cumulus is removed, all manipulations should be performed using an appro-priate pipette, see Instruments by Vitrolife page 51, Transfer pipette. It is important to use a pipette containing a tip with a diameter that is slightly larger than that of the embryo. To avoid damage, it is very important that the tip is not smaller than the embryo. For example, for embryos on day 1 to 3, a pipette tip of 150 to 200 µm would suffice. Using the appropriate size tip minimises the volumes of culture medium moved with each embryo, which typically should be less than one microlitre.

Vitrolife G-Series™ Manual 9.0IVF-ET28
2 Place the embryos in the equilibrated supplemented drops of G-1™/G-1™ PLUS or G-TL™. As a precautionary measure, prepare two culture dishes if the patient has more than 10 embryos. Embryos should then be washed successively in at least two drops in the culture dish. More extensive washing will reduce the risk of transferring medium from the old dish to the fresh one. Residues of MOPS-buffer in the culture droplets may decrease pH below specification. Return the dish to the incubator immediately.
3 On day 3, embryos can be transferred to the uterus in equilibrated EmbryoGlue® or in equilibrated supplemented G-2™/G-2™ PLUS. Alternatively, on day 3, embryos can be transferred to equilibrated supplemented G-2™/G-2™ PLUS/G-TL™ for further culture to the blastocyst stage.
Hands on: Culture of Blastocyst Stage EmbryosDay 3 – Culture in G-2™ /G-2™ PLUS
1 In the morning of day 3 prepare the dishes to be used for continued embryo culture. (Note that if G-TL™ is used there is no need to change medium on Day 3.)
Alternatively, prepare the dishes for blastocyst culture in the afternoon of day 2 and equilibrate at 6 % CO2 and +37°C over night.
2 For each patient, set up one wash dish of pre-warmed supplemented G-MOPS™/ G-MOPS™ PLUS or equlibrated G-GAMETE™ per 10 embryos. Place 1 mL of G-MOPS™/G-MOPS™ PLUS/G-GAMETE™ into the well of a centre well dish. Place 2 mL of G-MOPS™/G-MOPS™ PLUS/G-GAMETE™ into the moat of the dish. Place on a heated stage.
3 In the afternoon of day 3, the embryos that were assessed for cleavage in the morning are transferred to equilibrated supplemented G-2™/G-2™ PLUS. Rinse the embryos in the wash drops of the equilibrated supplemented G-2™/G-2™ PLUS in the culture dish and place the embryos in the culture drops. Return the dish to the CO2 incubator imme-diately. The embryos will remain in the supplemented G-2™/G-2™ PLUS in 6 % CO2 and +37°C until the assessment for transfer on the morning of day 5.
4 On day 4, prepare a dish for transfer with EmbryoGlue® or supplemented G-2™/G-2™ PLUS. The dishes should be equilibrated overnight at +37°C and 6 % CO2. Dishes should be pre-equilibrated for no less than 6 hours prior to use.
5 Transfers should be performed either in equilibrated EmbryoGlue® or in supplemented G-2™/G-2™ PLUS . Equilibrate transfer dishes at +37°C and 6 % CO2 at least 6 hours prior to use.
6 Good quality blastocysts not transferred can be cryopreserved. Should an embryo not have formed a blastocyst by day 5, the culture may continue for an additional 24 hours, until Day 6 in a fresh drop of G-2™/G-2™ PLUS.
7 Move the selected embryo(s) to the transfer dish and leave at +37°C and 6 % CO2 at an appropriate time before transfer.
Vitrolife G-Series™ Manual 9.0 IVF-ET 29
Embryo culture in time-lapse embryo monitoring systems
Embryo culture in time-lapse systems (EmbryoScope™, Primo Vision™) provides the possibility of embryo assessment in an undisturbed environment during the entire culture period. In combination with improved embryo monitoring, which allows for a better selection and de-selection of embryos for transfer, the stress-free culture contributes to an increase in success rates.
When culturing embryos from fertilisation to the blastocyst stage without medium change it is important to use a medium that is specifically developed for that purpose. Of particular importance is the ammonium level after several days of culture and that the level of nutrients is sufficient and balanced. G-TL™ is a medium that is developed especially for time-lapse culture. G-TL™ is part of the G-Series™ and can therefore preferably be used together with the other G-Series™ media designed for handling and embryo transfer.
Essentials
• Dishes for time-lapse culture contain very small wells for the placement of embryos and bubbles may be formed inside the wells when preparing the dishes. Bubbles will block the microscopic view and must be avoided. If present they must be removed before the oocytes are placed in the wells.
• Before loading of time-lapse culture dishes, the Primo Vision™ group culture dish or the EmbryoSlide™, carefully read the manual provided with the time-lapse equipment.
• Prolonged handling may result in evaporation affecting medium osmolality. Osmolality above specification will results in impaired embryo development. It is therefore recommended to prepare dishes one at a time. Oil cover must be used.
• It is possible to use sequential supplemented G-1™/G-2™ media for culture in time-lapse systems. If sequential media are used, a medium change should be performed on Day 3 of embryo development.
Hands on
1 The day before use, prepare the dishes with G-TL™ and cover with OVOIL™ according to the instructions provided with the time-lapse system you are using.
2 Place the dishes in the incubator.
3 On the day of use, check the dishes for bubbles and, if necessary, remove the bubbles with a fine pipette.
4 Place the embryos in the wells of the time-lapse culture dish. The embryos can be dropped immediately above the well and allowed to sink to the bottom of the well. This will happen in a few seconds.
Vitrolife G-Series™ Manual 9.0IVF-ET30
5 Place the dishes in the EmbryoScope™ or in the Primo Vision™ microscopes in the CO2 incubator.
6 Continue embryo culture until the day of transfer. Embryo transfer, see page 33.
Embryo assessment
Essentials
• It is recommended to follow the Alpha scoring system for assessment of embryos and blastocysts.
• If a time-lapse embryo monitoring system is used, refer to recommended EmbryoScope™ or Primo Vision™ manuals.
• The embryo(s) chosen for transfer are placed into a dish of equilibrated EmbryoGlue® or equilibrated supplemented G-2™/G-2™ PLUS, irrespective of stage.
Scoring criteria for human blastocysts
This is the system for blastocyst scoring by Gardner and Schoolcraft. Ref Gardner DK and Schoolcraft WB (1999) In-vitro culture of human blastocysts. In Towards Reproductive Certainty: Fertility and Genetics Beyond 1999. Eds. R Jansen and D Mortimer. Parthenon Press, Carnforth, pp 378-388.
Essentials
• The scoring system is used to assess the developmental capacity of blastocysts based on their morphological appearance, and thereby enable selection for transfer or cryopreservation.
• Scoring of blastocysts should be performed on an appropriate microscope while maintaining physiological pH and temperature, or using a time-lapse embryo monitoring system
• Preference should be given to blastocysts graded as 3 and higher. Select the best scoring blastocysts preferentially, i.e. AA.
Hands on
1 Blastocysts are given an alphanumeric score from 1 to 6, based on their degree of expansion and hatching status and two letter scores for inner cell mass (ICM) and tro-phectoderm.
2 The second step in scoring the blastocysts should be performed on an appropriate microscope. For blastocysts graded as 3 to 6 (i.e. full blastocysts onwards) the devel-opment of the inner cell mass (ICM) and trophectoderm can then be assessed.
Vitrolife G-Series™ Manual 9.0 IVF-ET 31
1 2 3 4
Scoring system
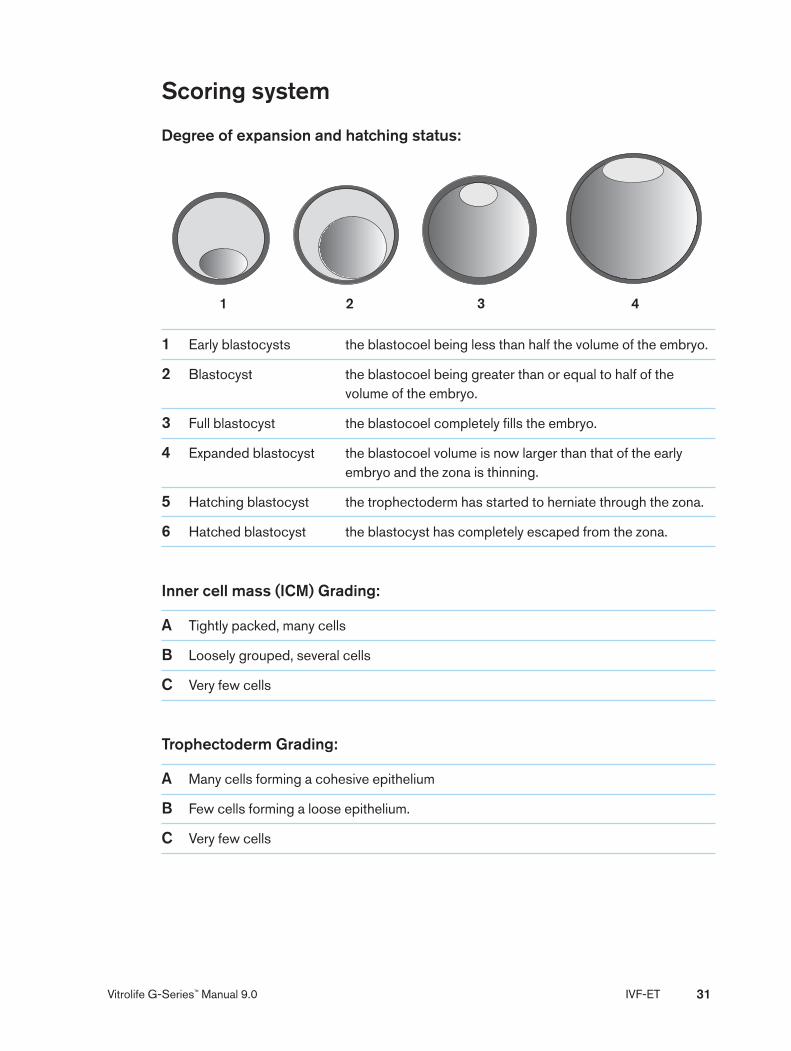
Degree of expansion and hatching status:
1 Early blastocysts the blastocoel being less than half the volume of the embryo.
2 Blastocyst the blastocoel being greater than or equal to half of the volume of the embryo.
3 Full blastocyst the blastocoel completely fills the embryo.
4 Expanded blastocyst the blastocoel volume is now larger than that of the early embryo and the zona is thinning.
5 Hatching blastocyst the trophectoderm has started to herniate through the zona.
6 Hatched blastocyst the blastocyst has completely escaped from the zona.
Inner cell mass (ICM) Grading:
A Tightly packed, many cells
B Loosely grouped, several cells
C Very few cells
Trophectoderm Grading:
A Many cells forming a cohesive epithelium
B Few cells forming a loose epithelium.
C Very few cells

Vitrolife G-Series™ Manual 9.0IVF-ET32
Example of a 4AA blastocyst.
Focus on: Inner cell mass Focus on: Trophectoderm
Table for assessment of blastocysts
Degree of Inner cell mass Trophectoderm gradingexpansion/hatching Tightly Loosely Very few Many cells Few cells Very few status packed, grouped, cells forming a forming a cells many cells several cells cohesive loose epithelium epithelium
A B C A B C 3 Full blastocyst; the blastocoel completely fills the embryo 4 Expanded blastocyst; the blastocoel volume is now larger than that of the early embryo and the zona is thinning 5 Hatching blastocyst; the trophectoderm has started to herniated through the zona 6 Hatched blastocyst; the blastocyst has completely escaped from the zona
Vitrolife G-Series™ Manual 9.0 IVF-ET 33
Embryo transfer
Embryo transfer (ET) is the process of placing the embryos into the uterus.
Essentials
• Sterile non-toxic non-powdered gloves should be worn when handling the catheter.
• Great care should be taken to avoid contamination of the catheter tip at all times.
• A too large volume of transfer medium and a large air interface may result in expulsion of embryos into the cervix or to the outside of the catheter. Removing the air column can minimise such complications. Therefore it is recommended that a continuous fluid column of approximately 30 microliters of equilibrated EmbryoGlue® or equilibrated supplemented G-2™/G-2™ PLUS is used in a catheter attached to a 1cc airtight syringe. Load the embryos preferentially toward the tip of the column of transfer medium, closest to the catheter opening.
Replacement of embryos
Hands on for the gynaecologist
1 Arrange in advance for the patient to arrive for the ET with a partially full bladder. In most cases this helps to position the uterus for easy entry with a soft, atraumatic catheter. In the situation of a retroverted uterus, the patient may empty her bladder.
2 An atraumatic catheter, appropriately tested for IVF, must be used.
3 It is recommended to perform embryo transfer under ultrasound guidance.
4 Place the patient into lithotomy position. Expose the cervix with the use of a speculum washed with equilibrated G-RINSE™. It may be necessary to remove the cervical mucus.
5 An ultrasound scan during the ET (abdominally) is highly recommended for guidance of the catheter in its passage through the cervical canal. A trial catheter may be introduced to test the ease of passage. If the passage is easy, the embryos may be loaded into a clean catheter and the ET performed. If the trial catheter meets some obstruction sev-eral options may be considered. An obturator with some flexibility may be used to direct the catheter into the cavity. Whichever is used, attention should be paid to minimise trauma to the cervical canal and cavity.
Vitrolife G-Series™ Manual 9.0IVF-ET34
6 The operator performing the ET should be careful not to expel the embryos from the catheter by bending, squeezing or causing damage to it.
7 The catheter should pass through the cervical canal and beyond the inner os. Tactile feedback may be sufficient for the operator to accomplish this. The catheter should be clearly marked so that it can be determined how far it has been introduced. Ultrasound should be used to confirm the position.
8 Expel the embryo(s) into the uterus in approximately 30 µL of transfer medium and slowly withdraw the catheter while maintaining steady pressure on the plunger of the syringe.
9 Make a final microscopic examination of the catheter.
For a more complete review of this topic see: Schoolcraft, Surrey and Gardner (2001) Embryo transfer: techniques and variables affecting success. Fertil. Steril.76; 863-870.
Loading the catheter
Hands on for the laboratory
1 Embryo transfer can be performed either in equilibrated EmbryoGlue® or in equilibrated supplemented G-2™/G-2™ PLUS.
2 Add approximately 1 mL of EmbryoGlue® to the well of a rinsed centre well dish. It is recommended to cover the dish with oil to avoid osmolality changes.
3 Add approximately 2 mL of EmbryoGlue® to the moat of the centre well dish.
4 Equilibrate the dish at +37°C and 6 % CO2 for at least 6 hours if the dish is covered with oil. Without oil cover, equilibrate the dish for 4 hours.
5 Pre-equilibrate the embryos to be transferred in the well containing EmbryoGlue® for a minimum of 10 minutes and a maximum of 4 hours in a 6% CO2 environment prior to transfer.
6 Rinse the 1 mL non-toxic syringe by drawing up and then out medium from the moat several times until no air bubbles are observed in the syringe. Draw up approximately 0.5 mL of the medium from the moat.
Vitrolife G-Series™ Manual 9.0 Micro Manipulation 35
7 Firmly attach the transfer catheter to the pre-rinsed 1 mL non-toxic syringe. Flush approximately 0.5–1.0 mL of equilibrated transfer medium from the moat through and out of the catheter.
8 After rinsing, draw approximately 0.1 mL of EmbryoGlue® from the center well and expel into the moat until approximately 20 µL is left in the syringe.
9 Under microscopic control, gently load the embryos into the catheter in approximately 5–10 µL of additional EmbryoGlue® followed by a small amount of air. (The small pocket of air at the tip allows better imaging of the tip for ultrasound guided transfers). For the embryo transfer, pass the tip of the catheter into the uterus approximately 1 cm from the top of the cavity and expel the embryos in a total volume of approximately 25–30 µL of medium. Slowly withdraw the catheter while maintaining steady pressure on the plunger of the syringe. Make a final microscopic examination of the catheter.

36 Vitrolife G-Series™ Manual 9.0
This page is intentionally left blank.
37Vitrolife G-Series™ Manual 9.0
MicroManipulationMicromanipulation includes the procedures of ICSI (Intra Cytoplasmic Sperm Injection), assisted hatching and embryo biopsy.
Essentials
• All micromanipulation equipment should be correctly aligned and positioned for maximum stability. It is recommended to keep it separate from vibrations caused by doors, elevators, air currents and through traffic that may cause stressful interruption and noise.
• Temperature maintenance during the procedures is extremely important. The inverted microscope should have a heated stage correctly adjusted to maintain fluid in the dish at +37°C.
• Oil cover is important to maintain the physiological level of osmolality as well as temperature.
• Highest quality micro-tools, appropriately tested for human IVF, should be used for all procedures for consistency and quality control, see Instruments by Vitrolife page 51, ICSI- and Holding Pipettes.
Vitrolife G-Series™ Manual 9.0Micro Manipulation
Denudation of oocytes for ICSI
If ICSI is to be performed, the oocytes will need to have their cumulus mass and corona removed. This process is called denudation.
This process may be performed either using the large volume method, using multi-wells and dishes or the droplet method under oil.
HYASE™-10X (hyaluronidase) is used to facilitate the dispersal of the cumulus mass and corona. Using either plastic or fine glass pipettes, see Instruments by Vitrolife page 43 , Denudation pipettes, cells are removed by gently pipetting the oocyte up and down. The diameter of the pipette should be slightly larger than that of the oocyte (approximately 130–175 µm) and, several different sized pipettes may be needed. Using a pipette that is too narrow or has a jagged edge may damage the oocyte. Exposure to HYASE™-10X for too long or rough handling as well as exposure to sub-physiological pH and temperatures, may also damage the oocyte. For the above reasons it is important to use the correct con-centration of HYASE™-10X and to keep to the recommended exposure time. HYASE™-10X is concentrated 10 times and should be diluted 1:10 with supplemented G-MOPS™/G-MOPS™ PLUS or with G-GAMETE™.
CAUTIONExposure to HYASE™-10X for longer than 30 seconds may damage the oocyte.
Hands on
1 If you are working in atmospheric conditions, dilute HYASE™-10X with supple-mented G-MOPS™/G-MOPS™ PLUS. If you are working at 6% CO2 equilibrated G-GAMETE™ can be used.
2 Prepare denudation dishes with diluted HYASE™-10X and supplemented G-MOPS™/G-GAMETE™ for oocyte wash.
3 For every well of diluted HYASE™-10X, prepare a suitable number of washing wells or droplets of supplemented G-MOPS™/G-MOPS™ PLUS/G-GAMETE™ under oil (A, B). Equilibrate at +37°C at ambient atmosphere for a validated time period that allow the dishes to reach +37°C, if G-MOPS™/G-MOPS™ PLUS is used. If G-GAMETE™ is used, dishes should be equilibrated in 6% CO2 until correct pH has been attained, preferably over night. At the same time prepare ICSI dishes (see below “HANDS ON
38

Vitrolife G-Series™ Manual 9.0 Micro Manipulation
- SET UP”). It is recommended to cover all dishes with OVOIL™. If a multi-well dish is used, all wells should be covered to avoid a difference in temperature between wells.
A. Droplets under oil.a) HYASE™-10X solution b – f ) Supplemented G-MOPS™/G-MOPS™ PLUS/G-GAMETE™ wash droplets
B. 5-well dish. With or without oil.a) HYASE™-10X solution b–e) Supplemented G-MOPS™/G-MOPS™ PLUS/G-GAMETE™, wash droplets
4 Using a large bore pipette, see Instruments by Vitrolife page 51, Transfer pipette, place 3–5 oocytes into the diluted HYASE™-10X. Gently pipette the hyaluronidase and the oocytes. The cumulus cells will start to disperse. It is important not to expose the oocytes to the hyaluronidase solution for longer than 30 seconds.
5 Move the partly denuded oocytes into the first wash volume and take care to carry over a minimum amount of hyaluronidase solution. Aspirate each oocyte singly up and down, using a fine bore denudation pipette, see Instruments by Vitrolife page 51, Denudation pipette, to remove the corona. Rinse the oocytes in warmed supplemented G-MOPS™/G-MOPS™ PLUS or in equilibrated G-GAMETE™. Repeat with new dishes until all oocytes are denuded.
6 Observe the oocytes for maturity by examining the presence (MII) or absence (MI) of a polar body or presence of a germinal vesicle (GV). Place all mature oocytes (MII) into the prepared ICSI droplets, if the oocytes are to be injected immediately. If the denuded oocytes are to be incubated for some time before injection, the oocytes should be placed in supplemented G-1™/G-1™ PLUS or in G-TL™ until the time of injection. Immature oocytes (MI and GV) may be placed in a culture medium for further incubation and maturation.
39
a)
a)
a)
a) b)
c) d)
a)
b)
a)
b)
b)
a)
c)
d)
b)
a)
b)
b)c)
A
DENS A GIII
DENS B,C,D GIII
PREPCULT A,B
MICRO A,B
MICRO SETUP A,B
LOADSTRAW CRYO 1
LOADSTRAW CRYO 2
SWIMUP C
SWIMUP D/E
PH measure
a) b)
b)
a)
B C D
A B
A
B
1
2
3
4
5
6 4
5
6
1
2
3
A B
a) b) c) e) g) i)d) f) h)
a) Syringe b) Plastic tube c) Cotton plug sealing cement d) FS 2, 2cm e) Air bubble 1/4 cmf) FS 2 + embryos, 2–3 cm g) Air bubble 1/4 cm h) FS 2, 1 cm i) Seal: plastic plug
a) b) c) e) g) i)d) f) h)
a) Syringe b) Plastic tube c) Cotton plug sealing cement d) BFS 2, 2cm e) Air bubble 1/4 cmf) BFS 2 + embryos, 2–3 cm g) Air bubble 1/4 cm h) BFS 2, 1 cm i) Seal: plastic plug
a)b)
c)
d)
e)
f)
a)
b)
e)
c)
d)
B

Vitrolife G-Series™ Manual 9.0Micro Manipulation
Hands on - set up
1 Pre-warm supplemented G-MOPS™/G-MOPS™ PLUS and OVOIL™ at +37°C for, a validated time period that allow the dishes to reach +37°C or equilibrate G-GAMETE™ at +37°C and 6 % CO2 for at least 6 hours if the dish is covered with oil or for at least 4 hours if oil cover is not used.
2 Remove ICSI™ (viscous sperm injection solution) from cold storage and equilibrate to a temperature of +20 ± 5°C.
3 Dishes for ICSI should be made quickly. Place a 1–10 µL drop of ICSI™ in the center of an ICSI-dish and 6–10 µL droplets of supplemented G-MOPS™/G-MOPS™ PLUS/ G-GAMETE™, cover with OVOIL™. Do not prepare more than one dish at a time to avoid evaporation in the droplets. Work rapidly and have all items needed close at hand (A, B). Make up two dishes per patient.
A. Option 1 B. Option 2a) Oocyte droplets, 1 to 6 a) Oocyte droplets, 1 to 6 (G-MOPS™ PLUS/G-GAMETE™) (G-MOPS™ PLUS/G-GAMETE™) b) ICSI™ b) ICSI™
4 Warm the dishes at +37°C for a validated time period that allow the dishes to reach +37°C, if G-MOPS™ PLUS is used. If G-GAMETE™ is used, equilibrate the dishes at +37°C and 6 % CO2 for at least 6 hours.
40
a)
a)
a)
a) b)
c) d)
a)
b)
a)
b)
b)
a)
c)
d)
b)
a)
b)
b)c)
A
DENS A GIII
DENS B,C,D GIII
PREPCULT A,B
MICRO A,B
MICRO SETUP A,B
LOADSTRAW CRYO 1
LOADSTRAW CRYO 2
SWIMUP C
SWIMUP D/E
PH measure
a) b)
b)
a)
B C D
A B
A
B
1
2
3
4
5
6 4
5
6
1
2
3
A B
a) b) c) e) g) i)d) f) h)
a) Syringe b) Plastic tube c) Cotton plug sealing cement d) FS 2, 2cm e) Air bubble 1/4 cmf) FS 2 + embryos, 2–3 cm g) Air bubble 1/4 cm h) FS 2, 1 cm i) Seal: plastic plug
a) b) c) e) g) i)d) f) h)
a) Syringe b) Plastic tube c) Cotton plug sealing cement d) BFS 2, 2cm e) Air bubble 1/4 cmf) BFS 2 + embryos, 2–3 cm g) Air bubble 1/4 cm h) BFS 2, 1 cm i) Seal: plastic plug
a)b)
c)
d)
e)
f)
Vitrolife G-Series™ Manual 9.0 Micro Manipulation
ICSI procedure
ICSI is the procedure of injecting the sperm into the oocyte. ICSI enables pregnancies to be achieved in couples with severe male factor infertility.
Polyvinylpyrrolidone (PVP) is commonly used in ICSI because of its viscous properties. It slows the motility of the sperm and makes it easier to “catch” the sperm, allowing correct immobilisation of the sperm and “crushing” of the tail membrane before injection. It also allows for controlled injection of the sperm by slowing down the speed of the injection fluid. This helps to stabilise the microinjection procedure and minimise the volume of fluid that is injected into the oocyte. All these factors contribute to success of the procedure.
Essentials
• Immobilise the sperm correctly by swiping just below the neck of the sperm with the injection pipette.
• To avoid the expulsion of the sperm into the perivitelline space, be sure the oolemma is broken by gentle suction of a small amount of cytoplasm.
• Inject sperm deep (50–75 % of the oocyte diameter) into the cytoplasm and ensure the sperm is not dragged out with the injection pipette.
• Minimise the volume of ICSI™ (PVP) injected into the oocyte.
For ICSI and Holding pipettes, see Instruments by Vitrolife page 51.
Hands on
1 Place a small volume (1–2 µL) of prepared sperm suspension into the centre of the ICSI™ droplet. Leave the dishes for a few minutes on a heated stage to allow migration of sperm to the outer perimeter of the droplet.
2 Place denuded oocytes into droplets of supplemented G-MOPS™/G-MOPS™ PLUS/G-GAMETE™, one oocyte per droplet, maximum 4 oocytes at a time.
3 Prime the injection pipette with ICSI™ to reduce the risk of the sperm sticking to the inside of the pipette.
4 Immobilise individual sperm by using the injection pipette to hit the membrane of the sperm tail. It is important not to damage the neck region of the sperm since it contains the centriole, which is crucial for the migration of chromosomes during cell division.
41

Vitrolife G-Series™ Manual 9.0Micro Manipulation
Inefficiently damaged tails will lead to reduced fertilisation rates. Aspirate the individual immobilised sperm.
5 Move the oocyte droplet into the field of view. Use a holding pipette to secure the oocyte for injection. Inject the sperm with the least amount of ICSI™ possible and after injection, make sure to stop the flow in the injection pipette. Pay attention to the time the dishes are outside of the incubator. Fewer oocytes per dish may be set up when the operator is inexperienced or the case is difficult.
6 After all oocytes are injected, rinse through several drops of supplemented G-1™/G-1™ PLUS/G-TL™ and then place into prepared G-1™ / G-1™ PLUS / G-TL™ culture sys-tems for overnight culture or in a time-lapse embryo monitoring system
7 The oocytes are assessed for fertilisation by the presence of two PN and two polar bod-ies on the following day.
Difficult ICSI cases
The level of difficulty of a case is mainly determined by three factors:
• Operator
• Equipment
• Sperm sample
The training, experience, endurance, and ability of the operator determine the first factor. It is very important when setting up ICSI that sufficient time and resources are available, particularly for diffi-cult cases. The equipment should be easy to use and provide a stable setting to enable the operator to concentrate on the difficulties encountered in trying to find and pick the sperm. An ergonomically designed ICSI workstation allows the work to progress smoother and increases the endurance of the operator.The sperm sample can also present difficulties. For example, sperm suspensions prepared from tes-ticular biopsies as well as severe cases of oligoasthenoteratospermia usually exhibit very low count, low and sluggish motility, and presence of debris and other cells. Frozen thawed epididymal sperm may also be problematic. Only a small fraction of the sperm may survive and the surviving sperm may exhibit a very low progressive movement or no movement at all. A third example of a difficult ICSI case is sperm obtained by Electro-ejaculation. In this case, the sperm count can be very high and the motility very low. In addition there are other cells and debris present.
42
43Vitrolife G-Series™ Manual 9.0
Low sperm count, motility and progression
Use SpermGrad™ to retrieve sperm (see Sperm Preparation). Add the sperm suspension to a droplet of equilibrated supplemented G-IVF™/G-IVF™ PLUS. Transfer the sperm to ICSI™ before proceeding.
Note that in cases of extremely low sperm count, the semen sample can be washed in equilibrated supplemented G-IVF™/G-IVF™ PLUS and centrifuged at 300–600 g for 10 minutes without previous gradient centrifugation. Re-suspend the spermatozoa in 200–500 µL of equilibrated supplemented G-IVF™/G-IVF™ PLUS and use as soon as possible.
Embryo biopsy
Embryo biopsy can be performed at several developmental stages. Polar bodies, blastomeres at the cleavage stage as well as trophectoderm cells at the blastocyst stage can be removed for Pre-implantation Genetic Diagnosis (PGD) and Pre-Implantation Genetic Screening (PGS). Below follows the procedure for blastomere biopsy of cleavage stage embryos.
Essentials
• When embryo biopsy is performed on day 3, it is usually done in the morning, before compaction of the blastomeres begins.
• An opening in the zona can be created either with Tyrode’s acid, a laser or by partial zona dissection.
• A separate pipette is needed to remove the biopsied blastomere. See Instruments by Vitrolife page 51, Blastomere Biopsy Pipette.
CAUTIONG-PGD™ is MOPS buffered and must be supplemented with albumin and handled exactly like G-MOPS™ (see page 8). G-PGD™ must never be placed in a CO2 incubator, but rather warmed in a tube warming block or in an incubator without CO2.
Micro Manipulation

44 Vitrolife G-Series™ Manual 9.0Micro Manipulation
Hands on
1 Prepare dishes with droplets of pre-warmed supplemented G-PGD™ covered with OVOIL™.
2 Wash the embryo in several droplets of supplemented G-PGD™ to remove the culture medium.
3 Place the embryo in G-PGD™ (MOPS buffered, Ca2+- and Mg2+-free medium) at +37°C.
4 Secure the embryo with the holding pipette.
5 Create an opening in the zona. Introduce a clean biopsy pipette into the hole and gently aspirate one or two blastomeres for analysis.
6 After extensive washing in G-2™/G-2™ PLUS/G-TL™, to remove G-PGD™, place the embryos into equilibrated supplemented G-2™/G-2™ PLUS/G-TL™ for further culture or cryopreserve the embryos until the results of the embryo biopsy analysis are con-firmed and decision regarding embryo transfer can be made according to clinical policy.
CAUTION• Spend time adjusting the embryo position on the holding pipette so that a
nucleated blastomere can be clearly identified and biopsied.
• Jagged edges on the biopsy pipette will cause the biopsied cell to lyse. Therefore, only use the highest quality pipettes.

Vitrolife G-Series™ Manual 9.0 45
This page is intentionally left blank.
Vitrolife G-Series™ Manual 9.0Quality Control Program46
QualityControl ProgramAll raw materials used for manufacturing Vitrolife products are of US Pharmacopeia (USP) and/or European Pharmacopoeia (Ph Eur) grade. Each lot of raw materials and final prod-ucts are tested and evaluated by stringent quality control procedures. All production takes place in a manufacturing environment classified for aseptic production that is under strict control and monitoring. Quality Control, together with quality assured operations (ISO 13485:2012 and 21 CFR Part 820) result in excellent LOT-to-LOT consistency.
Physicochemical, biological and functional tests are performed according to the charac-teristics of each product. In addition to recognised standards for test performance, internal Standard Operating Procedures according to the Quality Handbook of Vitrolife are fol-lowed. The Quality Control Program of Vitrolife includes all necessary tests to guarantee both the safety and efficacy of the media.
All instruments and standard solutions used in the Quality Control system are acquired from qualified manufacturers.
Validation and calibration
All quality control procedures performed by Vitrolife are performed in accordance with quality assured operations by highly qualified personnel. All methods and equipment used are subject to a continuous and extensive validation and calibration programs.
Vitrolife G-Series™ Manual 9.0 Quality Control Program 47
Physicochemical tests
pH
The pH measurement is performed using a validated method according to USP and Ph Eur. The range of acceptance for each product is kept as small as possible, considering the nature of the product and its intended use. Samples are pre-incubated at the appropriate temperature and atmosphere before measurement. Medium equilibration at 6 % CO2 is achieved by the use of a gas mixture with a certified CO2 level. Osmolality
The osmolality measurement is performed according to USP and Ph Eur using a validated method based on freezing-point depression. The range of acceptance for each product is kept as small as possible, considering the nature of the product and its intended use.
Biological tests
Bacterial endotoxin
The absence of toxic levels of endotoxins is verified for all raw materials and each LOT manufactured. The validated bacterial endotoxin test (LAL assay) that is used by Vitrolife is the most sensitive of the currently used methods for endotoxin testing with a minimum sensitivity of 0.005 EU or IU/mL. The validated procedure is performed in accordance with USP, Ph Eur, and FDA guideline “Guideline on validation of the limulus amebocyte lysate test as an end-product endotoxin test for human and animal parenteral drugs, biological products, and medical devices”.
Sterility test - membrane filtration
The sterility of all media is confirmed by a membrane filtration in accordance with USP and Ph Eur. The test period for media is 2 weeks and for oil it is 3 weeks. No detectable bacterial or fungal growth is accepted, neither in fluid thioglycollate medium nor in soya-bean casein digest medium. A strict requirement of the sterility assurance level (SAL) provides a safe application for users.
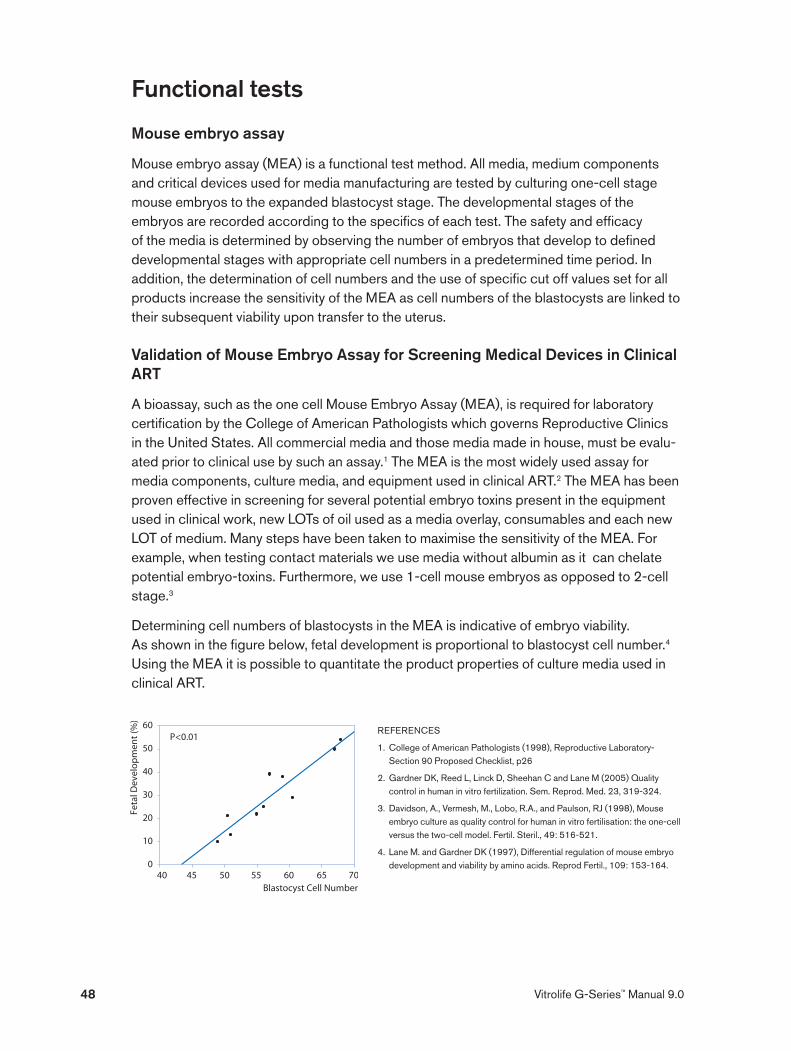
Vitrolife G-Series™ Manual 9.048
Functional tests
Mouse embryo assay
Mouse embryo assay (MEA) is a functional test method. All media, medium components and critical devices used for media manufacturing are tested by culturing one-cell stage mouse embryos to the expanded blastocyst stage. The developmental stages of the embryos are recorded according to the specifics of each test. The safety and efficacy of the media is determined by observing the number of embryos that develop to defined developmental stages with appropriate cell numbers in a predetermined time period. In addition, the determination of cell numbers and the use of specific cut off values set for all products increase the sensitivity of the MEA as cell numbers of the blastocysts are linked to their subsequent viability upon transfer to the uterus.
Validation of Mouse Embryo Assay for Screening Medical Devices in Clinical ART
A bioassay, such as the one cell Mouse Embryo Assay (MEA), is required for laboratory certification by the College of American Pathologists which governs Reproductive Clinics in the United States. All commercial media and those media made in house, must be evalu-ated prior to clinical use by such an assay.1 The MEA is the most widely used assay for media components, culture media, and equipment used in clinical ART.2 The MEA has been proven effective in screening for several potential embryo toxins present in the equipment used in clinical work, new LOTs of oil used as a media overlay, consumables and each new LOT of medium. Many steps have been taken to maximise the sensitivity of the MEA. For example, when testing contact materials we use media without albumin as it can chelate potential embryo-toxins. Furthermore, we use 1-cell mouse embryos as opposed to 2-cell stage.3
Determining cell numbers of blastocysts in the MEA is indicative of embryo viability. As shown in the figure below, fetal development is proportional to blastocyst cell number.4 Using the MEA it is possible to quantitate the product properties of culture media used in clinical ART.
REFERENCES
1. College of American Pathologists (1998), Reproductive Laboratory- Section 90 Proposed Checklist, p26
2. Gardner DK, Reed L, Linck D, Sheehan C and Lane M (2005) Quality control in human in vitro fertilization. Sem. Reprod. Med. 23, 319-324.
3. Davidson, A., Vermesh, M., Lobo, R.A., and Paulson, RJ (1998), Mouse embryo culture as quality control for human in vitro fertilisation: the one-cell versus the two-cell model. Fertil. Steril., 49: 516-521.
4. Lane M. and Gardner DK (1997), Differential regulation of mouse embryo development and viability by amino acids. Reprod Fertil., 109: 153-164.
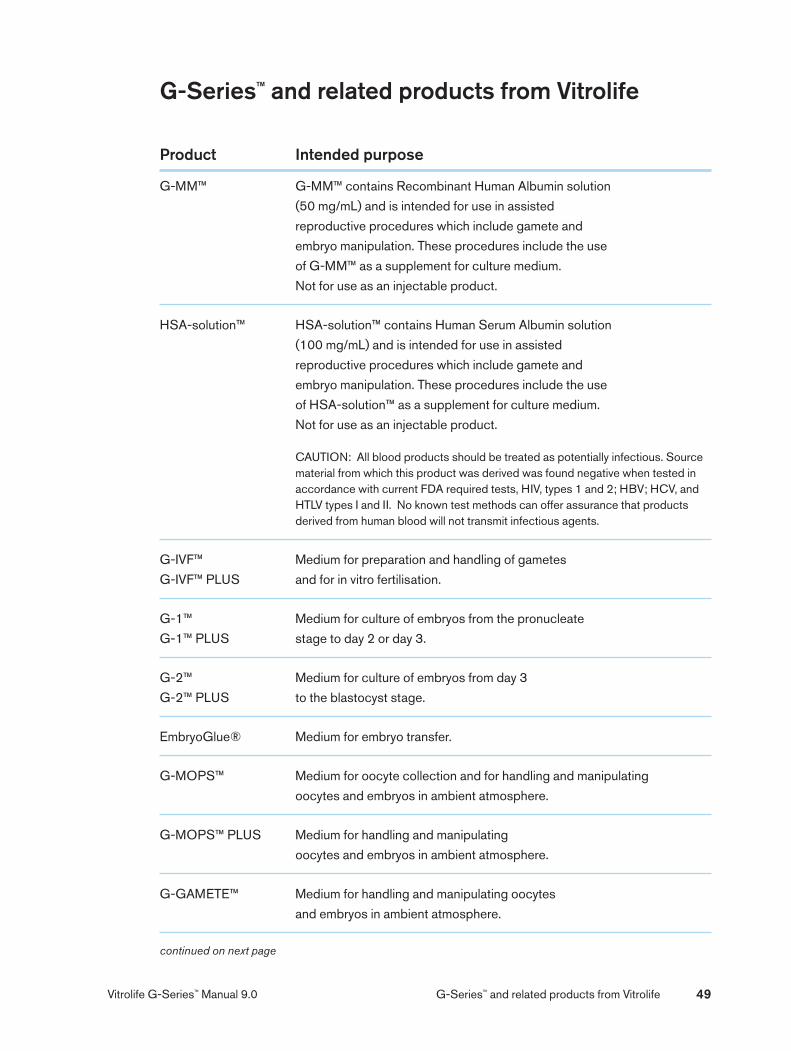
Vitrolife G-Series™ Manual 9.0 G-Series™ and related products from Vitrolife 49
G-Series™ and related products from Vitrolife
Product Intended purpose
G-MM™ G-MM™ contains Recombinant Human Albumin solution
(50 mg/mL) and is intended for use in assisted
reproductive procedures which include gamete and
embryo manipulation. These procedures include the use
of G-MM™ as a supplement for culture medium.
Not for use as an injectable product. HSA-solution™ HSA-solution™ contains Human Serum Albumin solution
(100 mg/mL) and is intended for use in assisted
reproductive procedures which include gamete and
embryo manipulation. These procedures include the use
of HSA-solution™ as a supplement for culture medium.
Not for use as an injectable product.
CAUTION: All blood products should be treated as potentially infectious. Source material from which this product was derived was found negative when tested in accordance with current FDA required tests, HIV, types 1 and 2; HBV; HCV, and HTLV types I and II. No known test methods can offer assurance that products derived from human blood will not transmit infectious agents.
G-IVF™ Medium for preparation and handling of gametes
G-IVF™ PLUS and for in vitro fertilisation. G-1™ Medium for culture of embryos from the pronucleate
G-1™ PLUS stage to day 2 or day 3. G-2™ Medium for culture of embryos from day 3
G-2™ PLUS to the blastocyst stage. EmbryoGlue® Medium for embryo transfer. G-MOPS™ Medium for oocyte collection and for handling and manipulating
oocytes and embryos in ambient atmosphere. G-MOPS™ PLUS Medium for handling and manipulating
oocytes and embryos in ambient atmosphere. G-GAMETE™ Medium for handling and manipulating oocytes
and embryos in ambient atmosphere. continued on next page

Vitrolife G-Series™ Manual 9.0G-Series™ and related products from Vitrolife50
G-RINSE™ Solution for rinsing of contact materials and for washing of the cervix. Not for culture. G-TL™ Medium for culture of embryos from fertilisation to the blastocyst stage. G-PGD™ Medium for embryo biopsy. SpermGrad™ For gradient sperm separation. HYASE™-10X * For removal of cumulus cells. ICSI™ * For the immobilisation and isolation of sperm prior to
intracytoplasmic sperminjection, ICSI. OVOIL™ For covering of medium during in vitro fertilisation and
micro-manipulation procedures.
Additional products supplied by Vitrolife
IVF™ * For in vitro fertilisation, culture and transfer
of embryos. ASP™ * For oocyte retrieval and rinsing (follicle flushing). SpermRinse™ * For sperm preparation. * Not available in Australia
Product Intended purpose
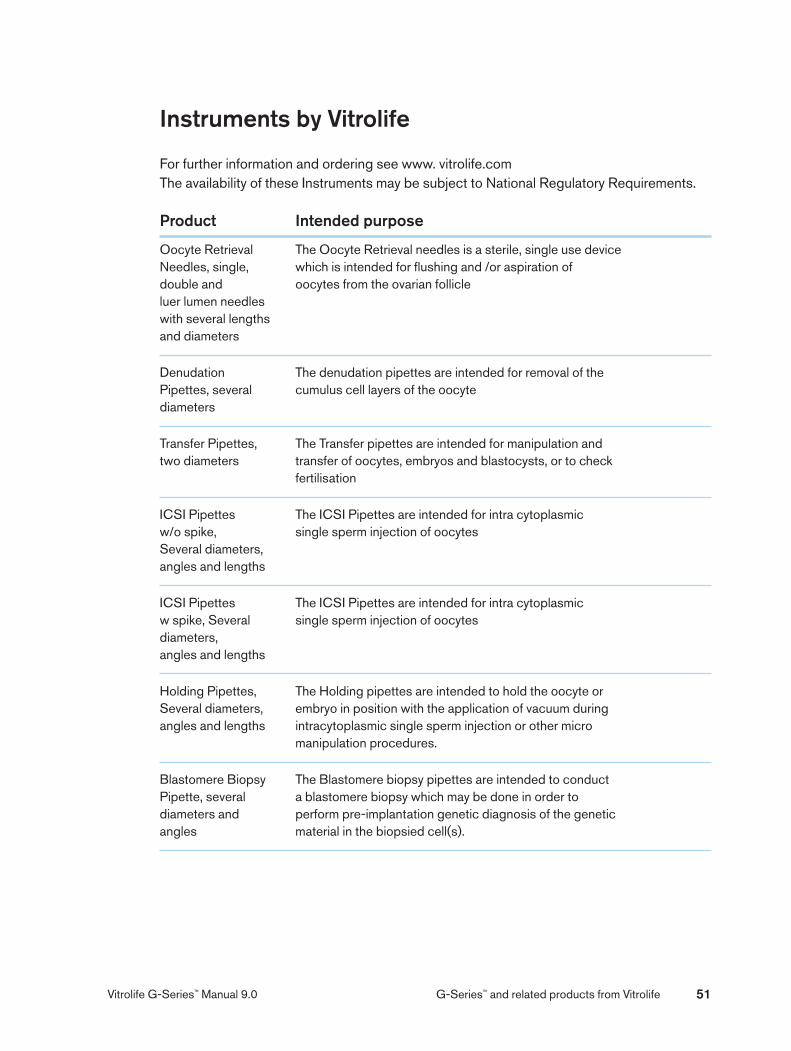
51Vitrolife G-Series™ Manual 9.0 G-Series™ and related products from Vitrolife
Instruments by Vitrolife
For further information and ordering see www. vitrolife.comThe availability of these Instruments may be subject to National Regulatory Requirements.
Product Intended purpose
Oocyte Retrieval The Oocyte Retrieval needles is a sterile, single use device Needles, single, which is intended for flushing and /or aspiration of double and oocytes from the ovarian follicleluer lumen needles with several lengthsand diameters Denudation The denudation pipettes are intended for removal of thePipettes, several cumulus cell layers of the oocytediameters Transfer Pipettes, The Transfer pipettes are intended for manipulation andtwo diameters transfer of oocytes, embryos and blastocysts, or to check fertilisation ICSI Pipettes The ICSI Pipettes are intended for intra cytoplasmic w/o spike, single sperm injection of oocytes Several diameters, angles and lengths ICSI Pipettes The ICSI Pipettes are intended for intra cytoplasmic w spike, Several single sperm injection of oocytesdiameters, angles and lengths Holding Pipettes, The Holding pipettes are intended to hold the oocyte orSeveral diameters, embryo in position with the application of vacuum during angles and lengths intracytoplasmic single sperm injection or other micro manipulation procedures. Blastomere Biopsy The Blastomere biopsy pipettes are intended to conduct Pipette, several a blastomere biopsy which may be done in order todiameters and perform pre-implantation genetic diagnosis of the geneticangles material in the biopsied cell(s).
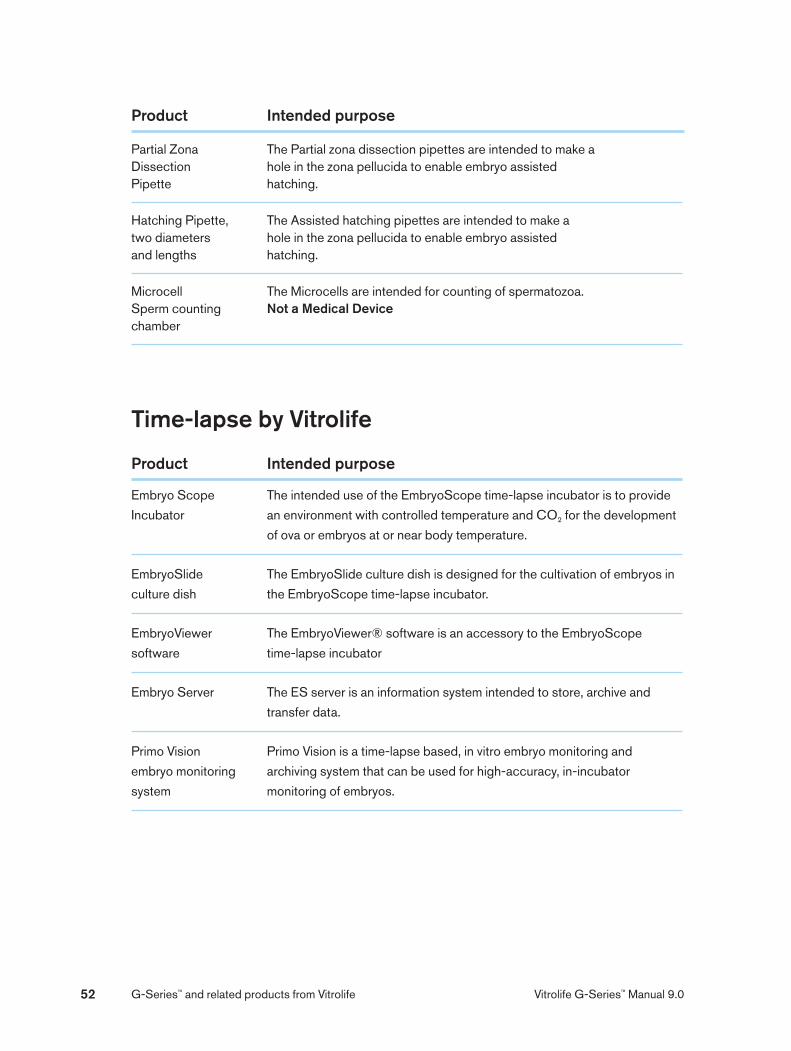
52 Vitrolife G-Series™ Manual 9.0G-Series™ and related products from Vitrolife
Partial Zona The Partial zona dissection pipettes are intended to make a Dissection hole in the zona pellucida to enable embryo assisted Pipette hatching. Hatching Pipette, The Assisted hatching pipettes are intended to make a two diameters hole in the zona pellucida to enable embryo assisted and lengths hatching. Microcell The Microcells are intended for counting of spermatozoa.Sperm counting Not a Medical Devicechamber
Time-lapse by Vitrolife
Product Intended purpose
Embryo Scope The intended use of the EmbryoScope time-lapse incubator is to provide
Incubator an environment with controlled temperature and CO2 for the development
of ova or embryos at or near body temperature. EmbryoSlide The EmbryoSlide culture dish is designed for the cultivation of embryos in
culture dish the EmbryoScope time-lapse incubator. EmbryoViewer The EmbryoViewer® software is an accessory to the EmbryoScope
software time-lapse incubator Embryo Server The ES server is an information system intended to store, archive and
transfer data. Primo Vision Primo Vision is a time-lapse based, in vitro embryo monitoring and
embryo monitoring archiving system that can be used for high-accuracy, in-incubator
system monitoring of embryos.
Product Intended purpose
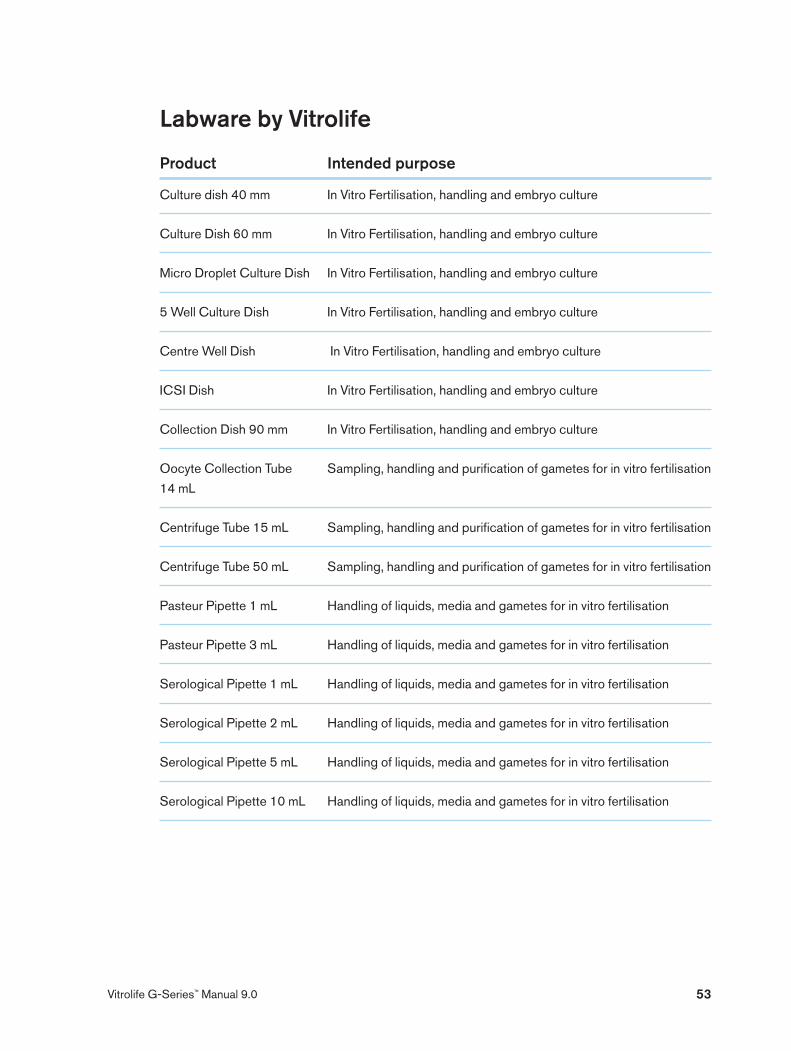
53Vitrolife G-Series™ Manual 9.0
Labware by Vitrolife
Product Intended purpose
Culture dish 40 mm In Vitro Fertilisation, handling and embryo culture Culture Dish 60 mm In Vitro Fertilisation, handling and embryo culture Micro Droplet Culture Dish In Vitro Fertilisation, handling and embryo culture 5 Well Culture Dish In Vitro Fertilisation, handling and embryo culture Centre Well Dish In Vitro Fertilisation, handling and embryo culture ICSI Dish In Vitro Fertilisation, handling and embryo culture Collection Dish 90 mm In Vitro Fertilisation, handling and embryo culture Oocyte Collection Tube Sampling, handling and purification of gametes for in vitro fertilisation
14 mL Centrifuge Tube 15 mL Sampling, handling and purification of gametes for in vitro fertilisation Centrifuge Tube 50 mL Sampling, handling and purification of gametes for in vitro fertilisation Pasteur Pipette 1 mL Handling of liquids, media and gametes for in vitro fertilisation Pasteur Pipette 3 mL Handling of liquids, media and gametes for in vitro fertilisation Serological Pipette 1 mL Handling of liquids, media and gametes for in vitro fertilisation Serological Pipette 2 mL Handling of liquids, media and gametes for in vitro fertilisation Serological Pipette 5 mL Handling of liquids, media and gametes for in vitro fertilisation Serological Pipette 10 mL Handling of liquids, media and gametes for in vitro fertilisation
54 Vitrolife G-Series™ Manual 9.0
Correspondence
Vitrolife welcomes any comments on the text in the Manual. If you have questions or need further explanations, please contact us:
Europe, Middle East, AsiaTel: +46-31-721 80 20 support lineFax: +46-31-721 80 99E-mail: [email protected]
Address: Vitrolife Sweden AB Gustaf Werners Gata 2 SE-421 32 Göteborg Sweden
PacificAddress: Vitrolife Pty Ltd Level 10, 68 Pitt Street Sydney NSW 2000 Australia
Internethttp://www.vitrolife.com
AmericasTel: 866-VITRO US (866-848-7687)Fax: 866-VITROFAX (866-848-7632)E-mail: [email protected]
Address: Vitrolife Inc. 3601 South Inca Street Englewood Colorado 80110 USA

55Vitrolife G-Series™ Manual 9.0

AmericasVitrolife Inc., 3601 South Inca Street Englewood, Colorado 80110, USATel 866-848-7687 (866-VITRO US)Fax 866-848-7632 (866-VITROFAX)
Europe, Middle East, AsiaVitrolife Sweden AB, Box 9080SE-400 92 Göteborg, SwedenTel +46-31-721 80 20, Fax +46-31-721 80 99 PacificVitrolife Pty Ltd, Level 10, 68 Pitt StreetSydney NSW 2000, Australia
E-support [email protected] E-support Europe, Middle East, Asia/[email protected]
E-mail [email protected]
Internethttp://www.vitrolife.com