Embed Size (px)
Citation preview
Page 1 of 9
Galaxy Configuration Guide for Morpho® SIGMA Readers
Compatible with Galaxy Hardware
JAN 2021 | SG 11.7.0 to Current Galaxy supports Legacy Mode in SG 10.3.1 or higher
Page 2 of 9
System Galaxy
How to Install and Configure
MorphoAccess®
SIGMA Readers for Legacy Mode
1st Edition
Galaxy Control Systems
3 North Main Street Walkersville MD 21793
800.445.5560
www.galaxysys.com
Version 11.x
THIS MANUAL IS INITIALLY DISTRIBUTED STARTING WITH THE 10.4 RELEASE OF SYSTEM GALAXY SOFTWARE. HOWEVER MA-SIGMA READERS ARE COMPATIBLE WITH NEW AND EXISTING INSTALLATIONS.
Information in this document is subject to change without notice. Therefore, no claims are made as to the accuracy or completeness of this document.
Copyright © 2014 Galaxy Control Systems All rights reserved
No part of this document may be reproduced, copied, adapted, or transmitted, in any form or by any means, electronic or mechanical, for any purpose, without the express written consent of Galaxy Control Systems. Copyright protection claims include all forms and matters of copyrighted material and information, including but not limited to, material generated from the software programs, which are displayed on the screen such as icons, look and feel, etc.
Trademarks Microsoft®, Windows®, Windows NT®, MSDE® and SQL Server® are registered trademarks of Microsoft Corporation in the U.S. and other countries.
Adobe®, Acrobat® are registered trademarks of Adobe Systems Inc.
Page 3 of 9
Table of Contents
Introduction to Sagem MorphoAccess® SIGMA Readers ........................................ 4
REQUIREMENTS & CAUTIONS .................................................................................................. 5
Images of MA SIGMA Reader (front & rear with back open) ................................................................................................ 5
Installing and Configuring MA-SIGMA Readers ..................................................... 6
Wiring the MA SIGMA Reader at Galaxy Controllers.................................................................. 6
Diagram of MA SIGMA Reader with back open ..................................................................................................................... 6
About Sagem’s Installation Quick Guide .................................................................... 7
Programming the SIGMA Reader ............................................................................................. 8
Creating/Loading Bases & Setting Reader Recognition Modes ................................................... 9
Page 4 of 9
Introduction to Sagem MorphoAccess® SIGMA Readers
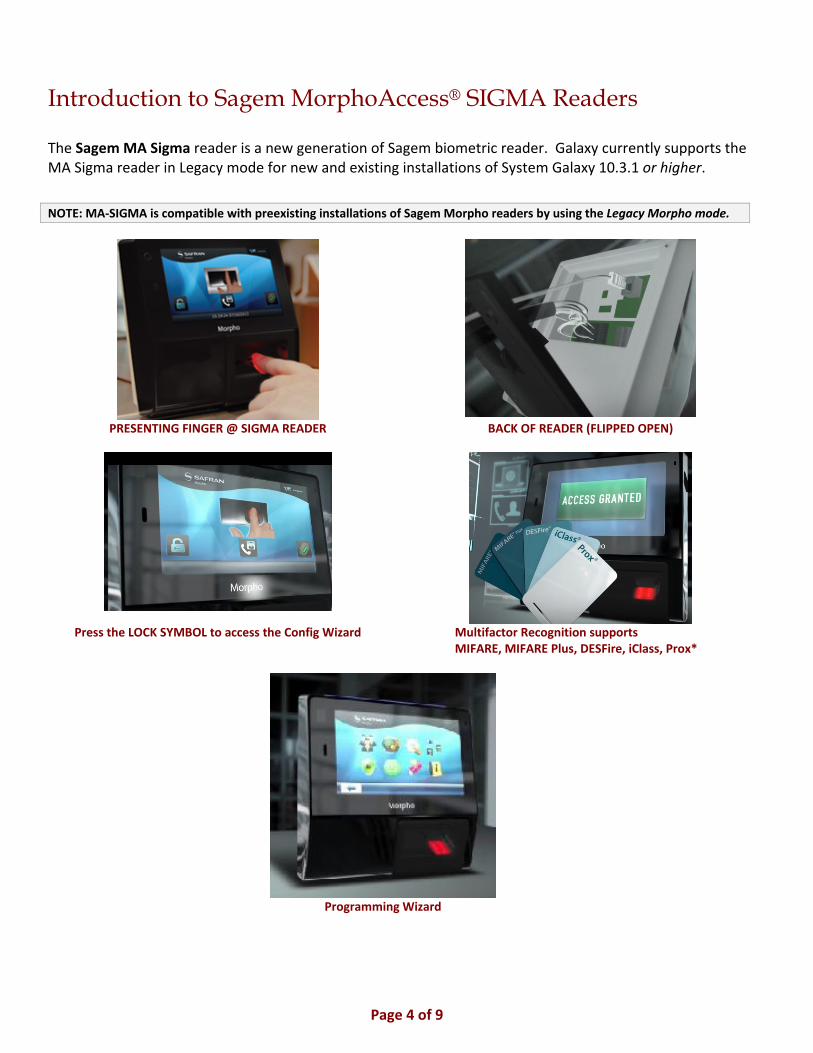
The Sagem MA Sigma reader is a new generation of Sagem biometric reader. Galaxy currently supports the MA Sigma reader in Legacy mode for new and existing installations of System Galaxy 10.3.1 or higher.
NOTE: MA-SIGMA is compatible with preexisting installations of Sagem Morpho readers by using the Legacy Morpho mode.
PRESENTING FINGER @ SIGMA READER BACK OF READER (FLIPPED OPEN)
Press the LOCK SYMBOL to access the Config Wizard Multifactor Recognition supports MIFARE, MIFARE Plus, DESFire, iClass, Prox*
Programming Wizard
Page 5 of 9
REQUIREMENTS & CAUTIONS
1. Supports iClass®, MIFARE®, MIFARE® Plus, DESFire®, multifactor, and fingerprint minutia data
2. Input power is rated at +12V / 1A (according to the markings on the reader – i.e. orange warning sticker).
3. The Sagem install guide recommends using 20-24 AWG non-stranded wiring for the data and power input. Galaxy recommends using shielded cable for data connections.
4. Galaxy recommends installing a separate, dedicated power supply for each SIGMA reader.
5. Power / Data Connectors use a “plug-in/push-pin release” type connector to land the wires. This is explained on the instructions inside the reader packaging. Basically there is a pin hole next to each wiring pin that you insert a tool to release the wire if you need to move it.
6. Wiring Pin-out Stickers are affixed to the rear-side of the reader. [ ! ] The pin-out stickers are affixed upside-down!
IMPORTANT! Avoid damaging the reader - pay close attention to how you insert the power wires. Inverting the power input wires will cause damage according to Sagem manufacturer’s documentation.
NOTICE: the wiring stickers are affixed upside-down, thus you should turn the reader upside-down to read the pin-out correctly.
BE AWARE, it is perfectly possible to insert wiring without turning the reader, and that doing so could confuse/disorient the installer and lead to inserting power into the wrong pin or inverting the power input and ground wires.
7. Reader programming is done using the “First Boot Config Assistant”, which is a Configuration Wizard that launches when the unit is first powered-up. Once the configuration is completed, the Boot Assistant can be configured to prevent it from automatically launching to prevent the configuration from being exposed upon power-up.
8. Manufacturer’s install instructions use pictograms (drawings) to showing how to mount the reader to the wall, installing the battery, and insert/remove wiring to the reader (no written instructions, no specifications).
9. The SIGMA Reader supports access control as well as independent time & attendance systems.
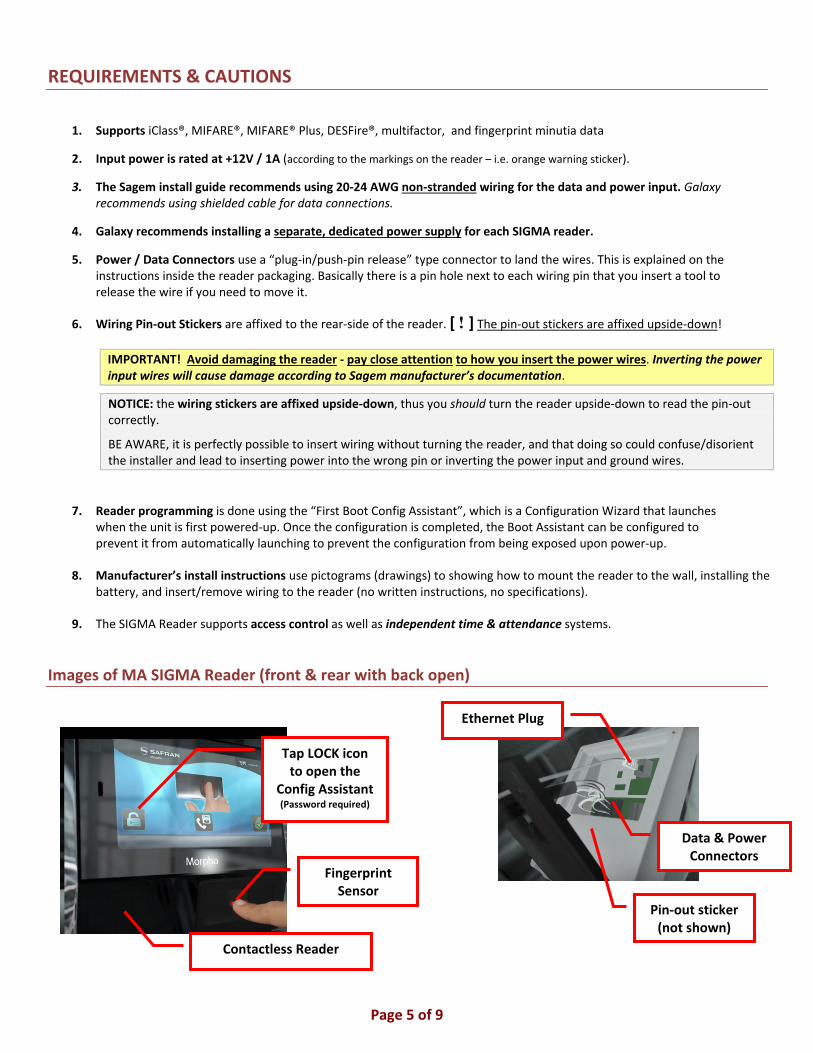
Images of MA SIGMA Reader (front & rear with back open)
Contactless Reader
Tap LOCK icon to open the
Config Assistant (Password required)
Data & Power Connectors
Ethernet Plug
Pin-out sticker (not shown)
Fingerprint Sensor
Page 6 of 9
Installing and Configuring MA-SIGMA Readers
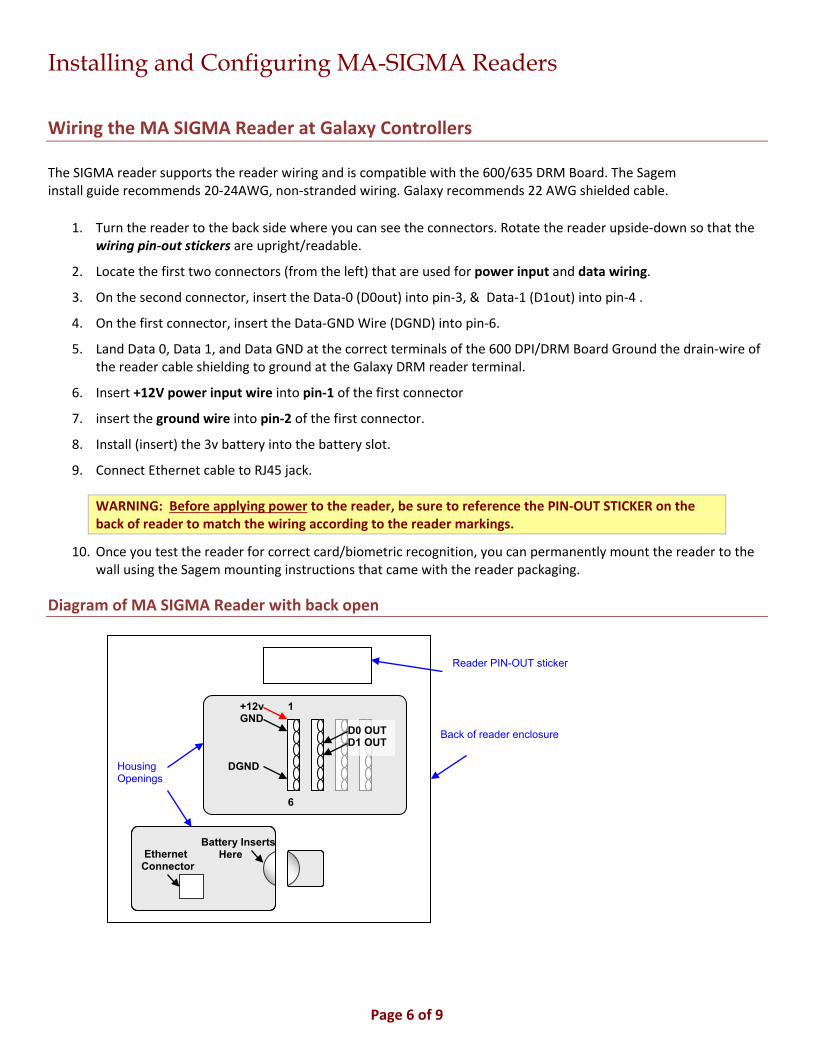
Wiring the MA SIGMA Reader at Galaxy Controllers The SIGMA reader supports the reader wiring and is compatible with the 600/635 DRM Board. The Sagem install guide recommends 20-24AWG, non-stranded wiring. Galaxy recommends 22 AWG shielded cable.
1. Turn the reader to the back side where you can see the connectors. Rotate the reader upside-down so that the wiring pin-out stickers are upright/readable.
2. Locate the first two connectors (from the left) that are used for power input and data wiring.
3. On the second connector, insert the Data-0 (D0out) into pin-3, & Data-1 (D1out) into pin-4 .
4. On the first connector, insert the Data-GND Wire (DGND) into pin-6.
5. Land Data 0, Data 1, and Data GND at the correct terminals of the 600 DPI/DRM Board Ground the drain-wire of the reader cable shielding to ground at the Galaxy DRM reader terminal.
6. Insert +12V power input wire into pin-1 of the first connector
7. insert the ground wire into pin-2 of the first connector.
8. Install (insert) the 3v battery into the battery slot.
9. Connect Ethernet cable to RJ45 jack.
WARNING: Before applying power to the reader, be sure to reference the PIN-OUT STICKER on the back of reader to match the wiring according to the reader markings.
10. Once you test the reader for correct card/biometric recognition, you can permanently mount the reader to the wall using the Sagem mounting instructions that came with the reader packaging.
Diagram of MA SIGMA Reader with back open
1
6
+12v GND
DGND
Ethernet Connector
Battery Inserts Here
Back of reader enclosure
Housing Openings
D0 OUT D1 OUT
Reader PIN-OUT sticker
Page 7 of 9
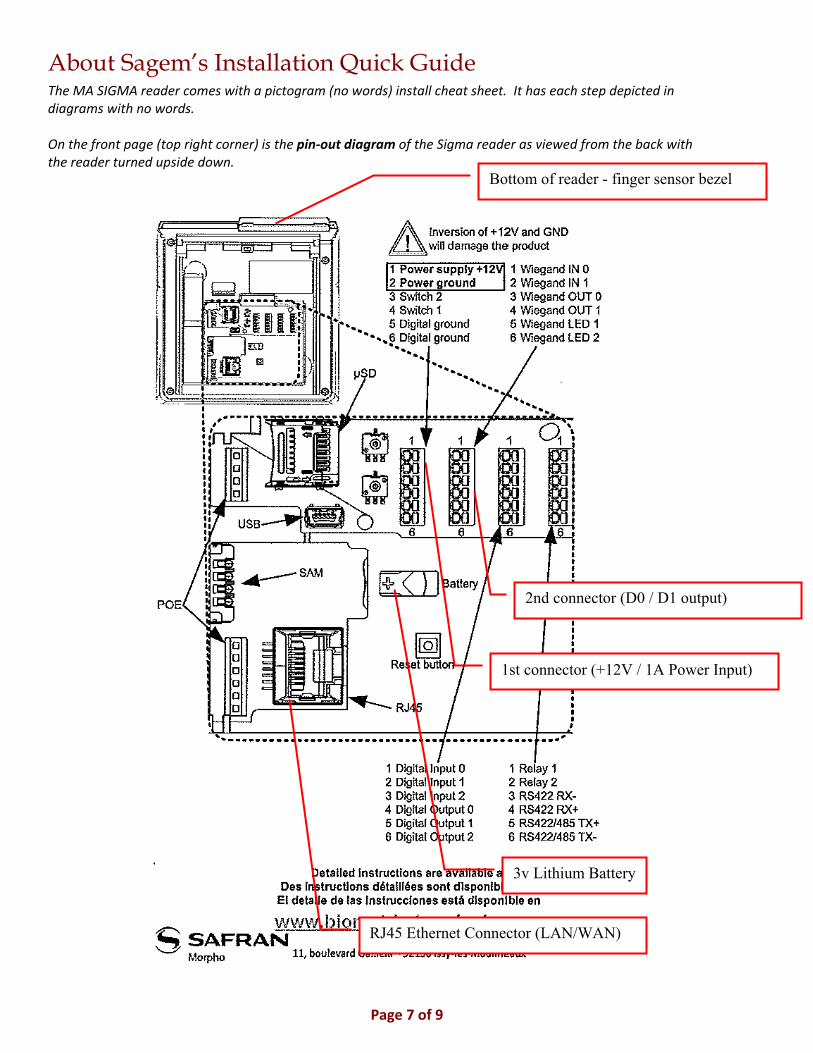
About Sagem’s Installation Quick Guide The MA SIGMA reader comes with a pictogram (no words) install cheat sheet. It has each step depicted in diagrams with no words. On the front page (top right corner) is the pin-out diagram of the Sigma reader as viewed from the back with the reader turned upside down.
Bottom of reader - finger sensor bezel
1st connector (+12V / 1A Power Input)
2nd connector (D0 / D1 output)
3v Lithium Battery
RJ45 Ethernet Connector (LAN/WAN)
Page 8 of 9
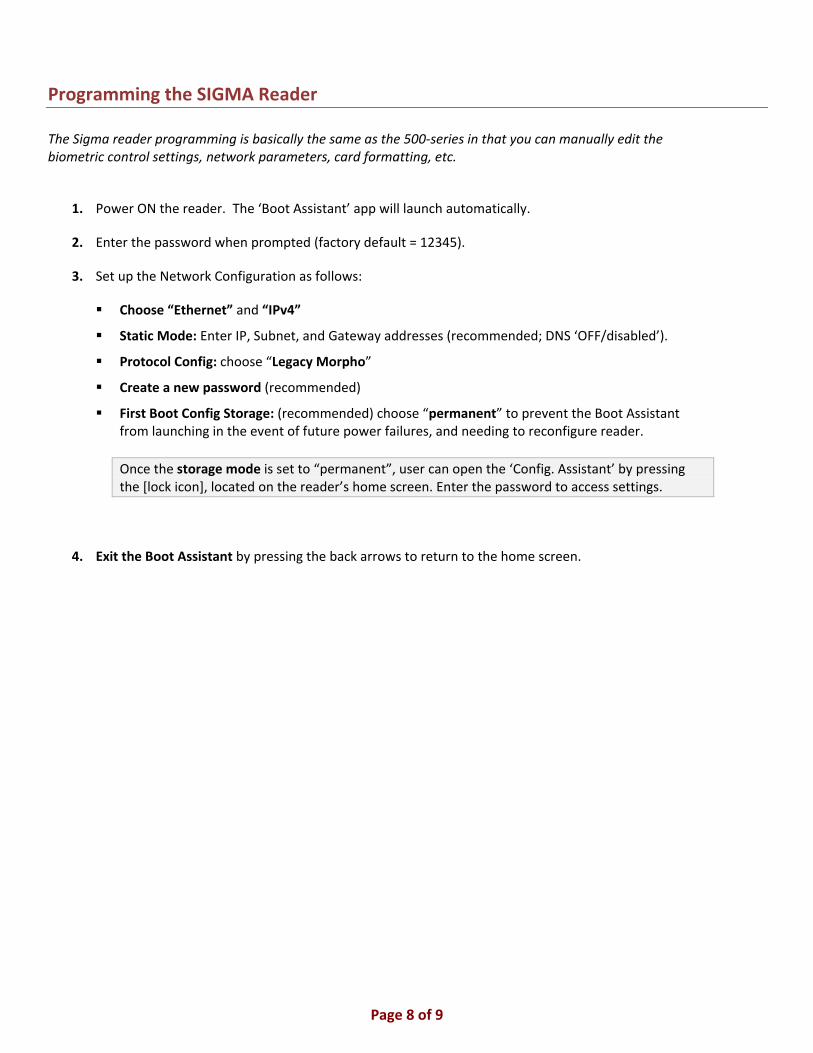
Programming the SIGMA Reader The Sigma reader programming is basically the same as the 500-series in that you can manually edit the biometric control settings, network parameters, card formatting, etc.
1. Power ON the reader. The ‘Boot Assistant’ app will launch automatically.
2. Enter the password when prompted (factory default = 12345).
3. Set up the Network Configuration as follows:
Choose “Ethernet” and “IPv4”
Static Mode: Enter IP, Subnet, and Gateway addresses (recommended; DNS ‘OFF/disabled’).
Protocol Config: choose “Legacy Morpho”
Create a new password (recommended)
First Boot Config Storage: (recommended) choose “permanent” to prevent the Boot Assistant from launching in the event of future power failures, and needing to reconfigure reader.
Once the storage mode is set to “permanent”, user can open the ‘Config. Assistant’ by pressing the [lock icon], located on the reader’s home screen. Enter the password to access settings.
4. Exit the Boot Assistant by pressing the back arrows to return to the home screen.
Page 9 of 9
Creating/Loading Bases & Setting Reader Recognition Modes The Sigma reader programming is basically the same as the 500-series in that you can manually edit the biometric control settings, network parameters, card formatting, etc.
5. Creating bases at the reader: The GCS MA Loader Utility supports creating bases. Keep in mind that the GCS MA Loader creates the number of bases that the MA110 and MA520 readers support.
NOTICE: If the Sigma reader using Legacy Mode can support more bases than was supported by the MA110 or MA520 models, the installer may need to configure bases manually from the reader.
a) The System Galaxy(SG) communication server and Sigma reader must both be online on the Ethernet network and network connectivity must be unblocked.
b) System Galaxy software must be correctly registered. The ‘Biometric Support’ option must be enabled and the Number of Biometric Readers must be set to a value that allows for the reader being configured/added.
c) In the System Galaxy Reader Programming screen, Reader Technology type must be set to a compatible MA READER selection. And the IP Address of the Sigma reader must be entered into the appropriate field in the General tab.
6. Setting the Reader recognition mode: Use GCS MA Loader Utility program from the System Galaxy communication server to quickly set the reader recognition mode. The recognition modes available depend on the Reader Technology type chosen in the SG Reader Programming screen. MA100 type supports iClass parameters and MA500 type supports MIFARE parameters.
Using the GCS MA Loader to set the reader recognition mode includes the Bio-Control settings. For more information on these Legacy modes, refer to chapter on setting recognition modes in the Galaxy SG Sagem Guides for the appropriate reader (MA 110 or 520).
7. Load Finger/card data: The GCS Sagem Loader Utility supports loading fingers. Use the main screen of the Loader to clear bases, load finger, and get configuration from the reader.
8. Once finger/card data has been loaded to the reader, you can walk-test the reader to confirm it is working correctly.
9. You can enroll cards and fingers from the System Galaxy software using the standard fingerprint capture screen and card enrollment/encoding screens for biometric enrollment which is found in the Cardholders screen.
• SG 10 supports enrolling the finger from an MA110/520 reader or using an MSO finger enrollment device . Use whichever method is compatible with the Sigma reader.