Embed Size (px)
Citation preview
Game Sound Design and Asset Production with Nuendo 7
Introduction Nuendo 7 was designed to support game sound designer workflows using an audio workstation for creating and designing sound assets and a game audio engine such as Audiokinetic Wwise to integrate audio assets (.wav audio files) into the game.
This document gives an overview of the system concept and provides basic knowledge to get started. It is meant as a supplementary to the operation manuals of Nuendo 7 and Audiokinetic Wwise.
System Setup
On one computer • Install Nuendo 7. • Install Wwise 2015.1 and activate the install option “Nuendo Connection” during setup. • In Nuendo, open the Game Audio Connect window and activate it. • Open Game Audio Connect settings and select “Enable Game Engine Network Connection”. • Start the Wwise authoring tool and open an existing Wwise project or create a new project.
The connection to Nuendo should happen automatically. • Nuendo shows the active Wwise connection in the Game Audio Connect window.
On separate computers (example configuration) • Install Nuendo 7 on a Mac Pro DAW. • Install Wwise 2015.1 on Windows PC and activate the install option “Nuendo Connection”
during setup.
Both computers should be connected via network (e.g. Ethernet) and have IP address configurations that allow TCP/IP communication between the computers.
If there is a firewall activated on the Nuendo computer, please make sure it is configured to allow incoming TCP connections on the TCP port configured in the Game Audio Connect settings (default 4444). Please ask your IT administrator for help if you have questions about the network or firewall setup.
• In Wwise, open the “Nuendo Connection Settings” and enter the IP address of the Nuendo computer as “Server Address”.
In order to use Render in Place/Export or Export Audio Mixdown with Wwise on two computers, a shared network folder should be used. This can be a folder that you are sharing on the Windows computer or a network share on a network file server.
• In the Wwise “Nuendo Connection Settings”, set the path to the shared folder or network drive.
Exported files to this shared folder or any of its sub-‐folders will then automatically be found by Wwise and imported into your Wwise project.
Note: It is possible to change the TCP port used, if you have problems using the default port 4444 for the network communication (e.g. because it is already in use by other software on your computer). Please make sure to enter the new TCP port both in the Nuendo Game Audio Connect settings as well as the Wwise “Nuendo Connection Settings”.
Setup of Nuendo Projects for Sound Design and Asset Production Many sound designers appreciate the linear timeline of a DAW as a workbench to create sound design assets that will sound distinctive once integrated into the game. A Nuendo project can be setup to support both creative sound design and organizing and maintaining thousands of sounds in a logical manner.
Tools for sound design Apart from the very obvious tools like cutting, crossfading, timestretching and layering sounds on different tracks, using VST plug-‐in effects is probably the most popular way to modify sounds. Nuendo generally offers two ways of using VST plug-‐in effects, which can also be used in combination:
• Offline processing plug-‐in effects into audio clips. • Using plug-‐in effects as inserts in the MixConsole signal flow. • Using the MixConsole Channel Strips for equalizing, compressing and shaping sounds.
Choosing Your Principal Organization Scheme The way you organize your sound design assets in the game audio engine (such as Audiokinetic Wwise) should correlate to the way your Nuendo project is structured. It is important that you assign a general meaning or concept for the vertical and horizontal aspects of a project. When the project is setup in an appropriate and comprehensive way, you can later create the final assets in one go.
Depending on your workflow, the Nuendo project can be setup in various ways, and there are two main functions that will create the final assets.
• Export Audio Mixdown with Batch Export o Use this when your project is organized with Marker Tracks and has structured audio
routing. • Render In Place/Export
o Use this when your event selection represents the assets you want to create.
Particularly when using mixer insert effects, you must ensure that the desired effect is included by using the appropriate signal routing.
The following described examples should give an idea of the possibilities and encourage you to try out different scenarios.
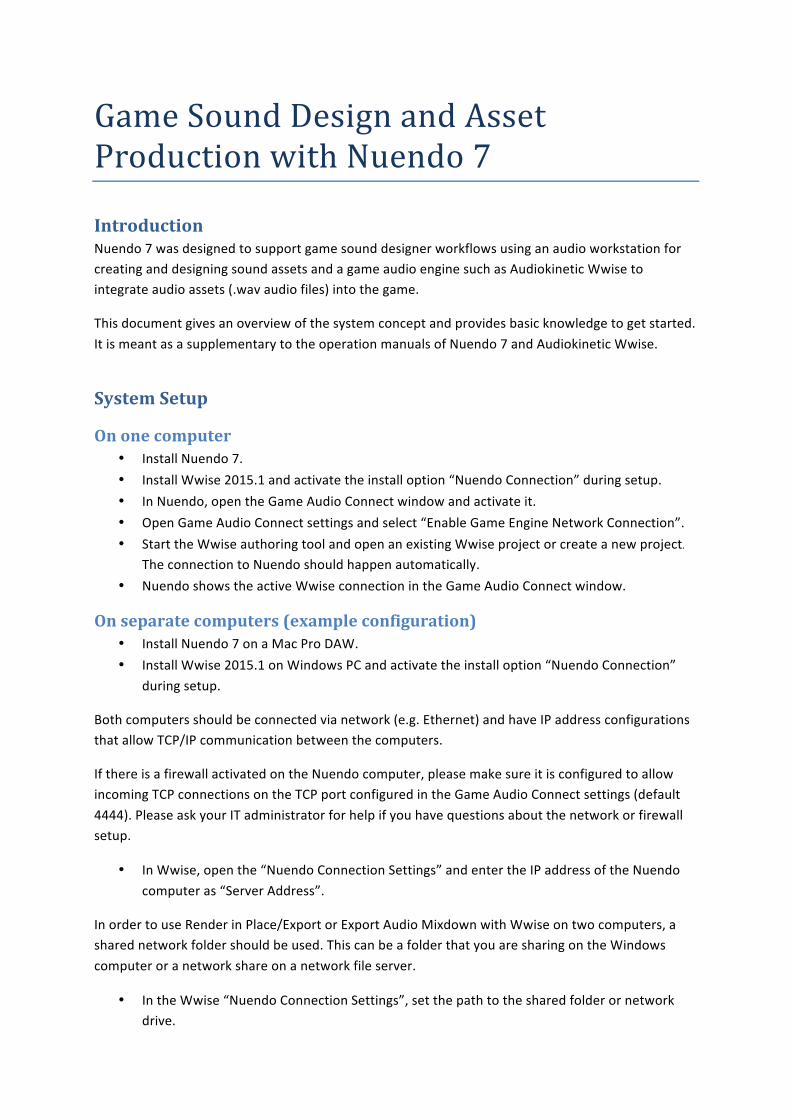
Example “Weather” Outcome: In this project the final assets will be sets of sound files that will be layered and balanced by the game Audio engine during game play.
• The horizontal axis represents different flavors of the sounds (different weathers depending on the game level condition). Cycle Markers are used to describe the meaning of each block of sounds.
• The vertical axis (Audio Tracks) represents multiple components of a sound event (different sounds in combination make the weather). Tracks can be organized in Folder Tracks, this helps managing complex projects.
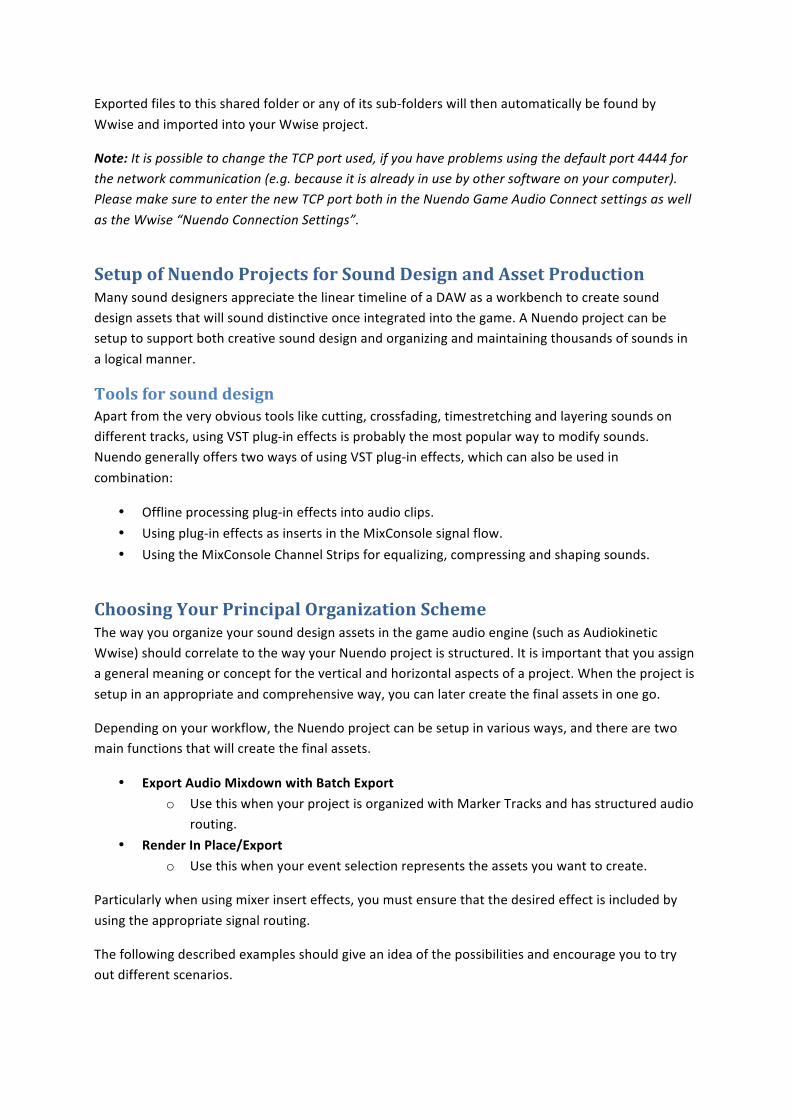
Let’s say the game asset naming conventions used by the studio require the following naming: Title_Level#_Group_Situation The Naming Scheme function of Nuendo can output files named like this:
Functions used: Export Audio Mixdown with Batch Export. Asset naming created from Track Names and Cycle Marker names.
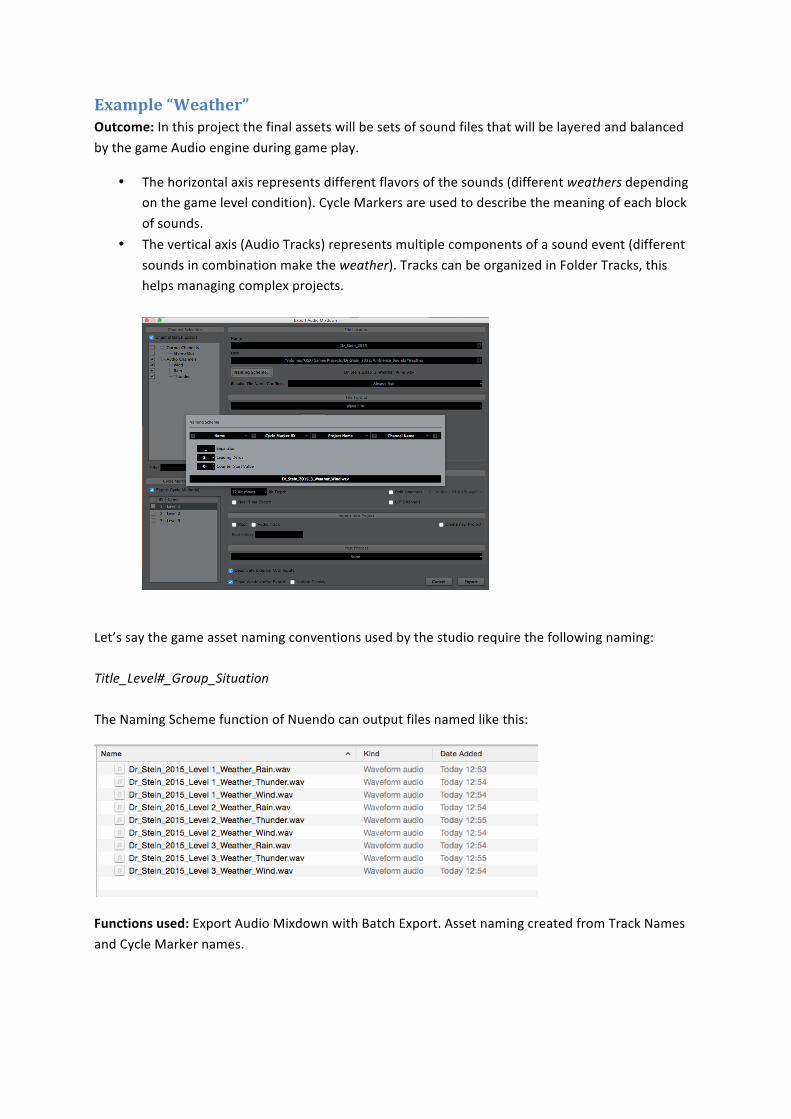
Example “Footsteps” Outcome: In this project the final assets will be a series of sound files that will be layered and balanced by the game audio engine during game play.
• The horizontal axis (clips in a row) represents multiple variations of a sound event (different versions of a foot step recording). The variations allow for the game audio engine to randomly play different sounds to make it sound more natural.
• The vertical axis represents additional sounds (clothes, gravel) which will be mixed to the footsteps assets.
• Alternatively the assets can be rendered without being mixed, but as separate files, so the game audio engine can do the balancing during game play.
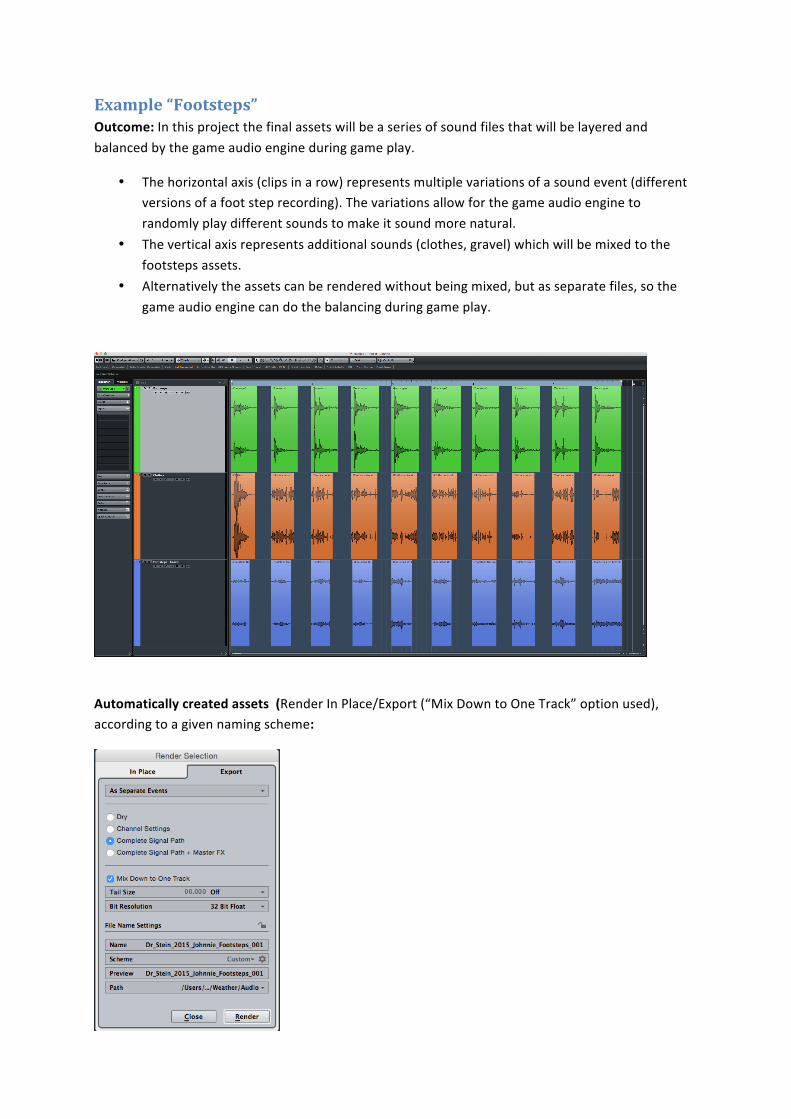
Automatically created assets (Render In Place/Export (“Mix Down to One Track” option used), according to a given naming scheme:
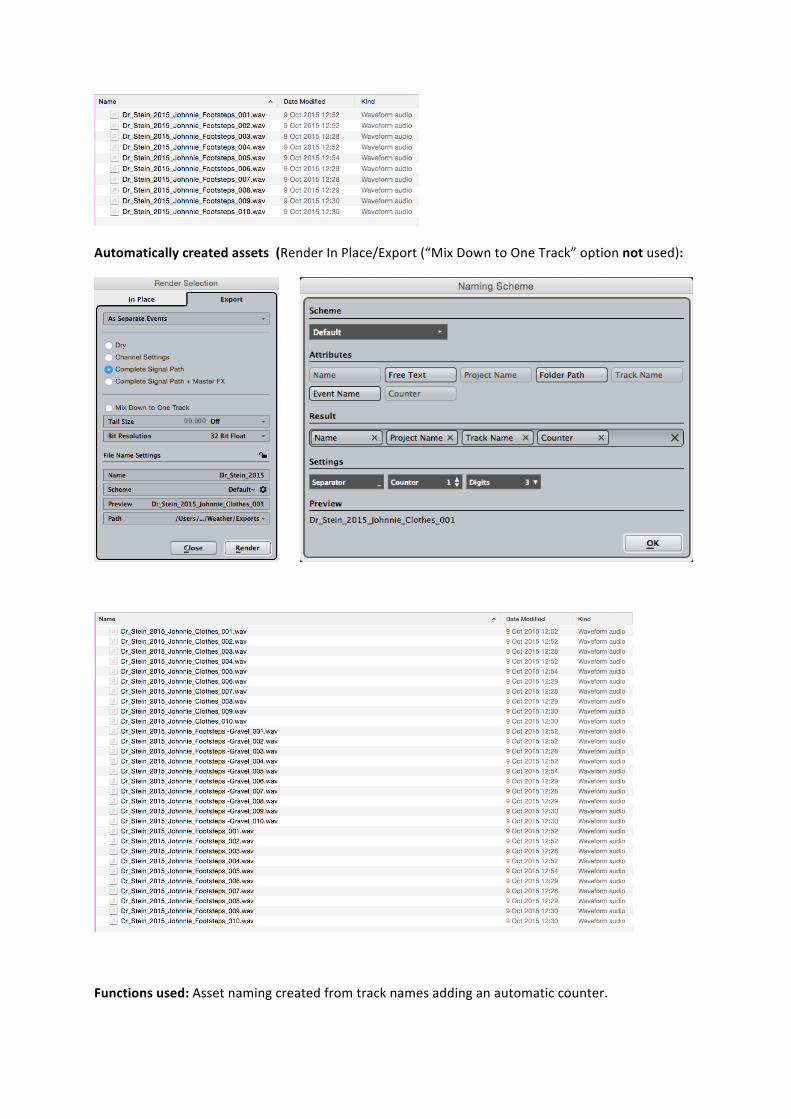
Automatically created assets (Render In Place/Export (“Mix Down to One Track” option not used):
Functions used: Asset naming created from track names adding an automatic counter.
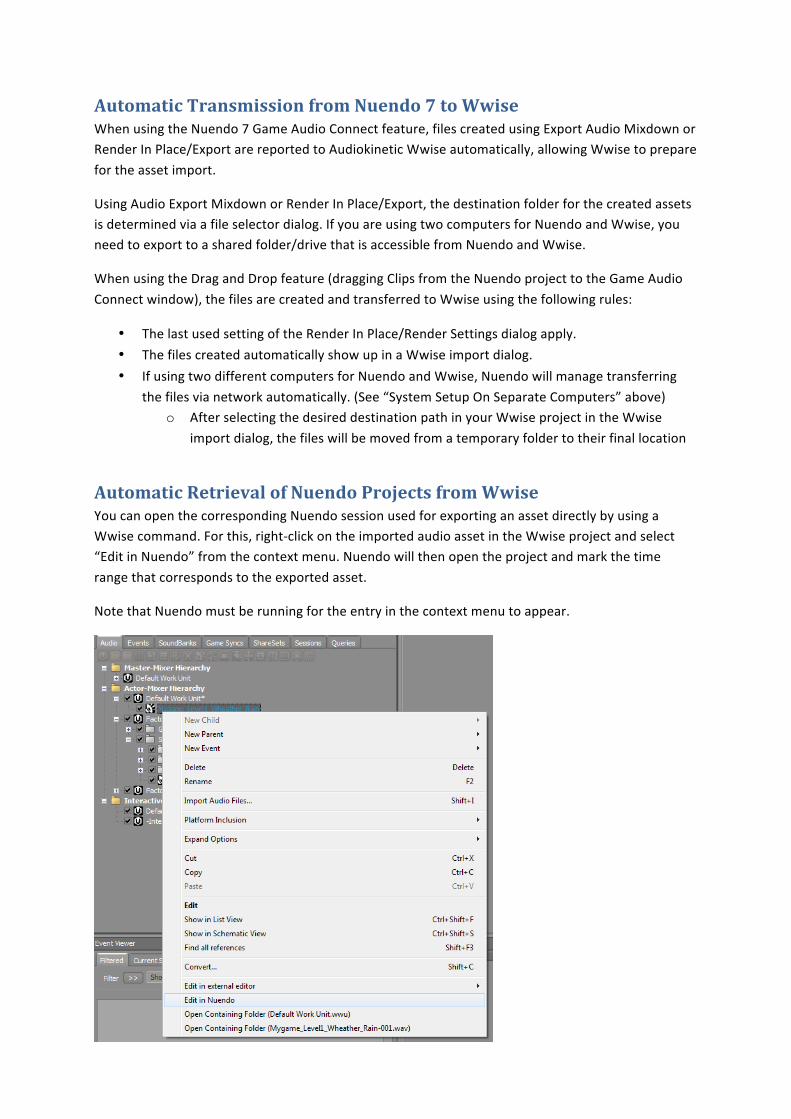
Automatic Transmission from Nuendo 7 to Wwise When using the Nuendo 7 Game Audio Connect feature, files created using Export Audio Mixdown or Render In Place/Export are reported to Audiokinetic Wwise automatically, allowing Wwise to prepare for the asset import.
Using Audio Export Mixdown or Render In Place/Export, the destination folder for the created assets is determined via a file selector dialog. If you are using two computers for Nuendo and Wwise, you need to export to a shared folder/drive that is accessible from Nuendo and Wwise.
When using the Drag and Drop feature (dragging Clips from the Nuendo project to the Game Audio Connect window), the files are created and transferred to Wwise using the following rules:
• The last used setting of the Render In Place/Render Settings dialog apply. • The files created automatically show up in a Wwise import dialog. • If using two different computers for Nuendo and Wwise, Nuendo will manage transferring
the files via network automatically. (See “System Setup On Separate Computers” above) o After selecting the desired destination path in your Wwise project in the Wwise
import dialog, the files will be moved from a temporary folder to their final location
Automatic Retrieval of Nuendo Projects from Wwise You can open the corresponding Nuendo session used for exporting an asset directly by using a Wwise command. For this, right-‐click on the imported audio asset in the Wwise project and select “Edit in Nuendo” from the context menu. Nuendo will then open the project and mark the time range that corresponds to the exported asset.
Note that Nuendo must be running for the entry in the context menu to appear.
If the project is not available any more at the exact path where it had been saved when exporting the asset, Nuendo will help you find the Nuendo project file at a different location. In this case, Nuendo will show up a search window where you can define a folder to start searching for the Nuendo project file (.npr). Nuendo will perform a search through all subfolders of the path you selected. For example, if the project had been on your local hard drive when exporting the assets, but was moved to a backup network drive later on, you should specify the path on the network drive where all the sessions are located for the particular gaming project you are working on.
Notes • Information about the path to the Nuendo project is placed as metadata in the exported
Wave file. Therefore, make sure that you save the Nuendo project before exporting the asset in order to allow you to find the project again later on.
• Nuendo must be running and Wwise must successfully be connected to Nuendo via network (see System Setup above).
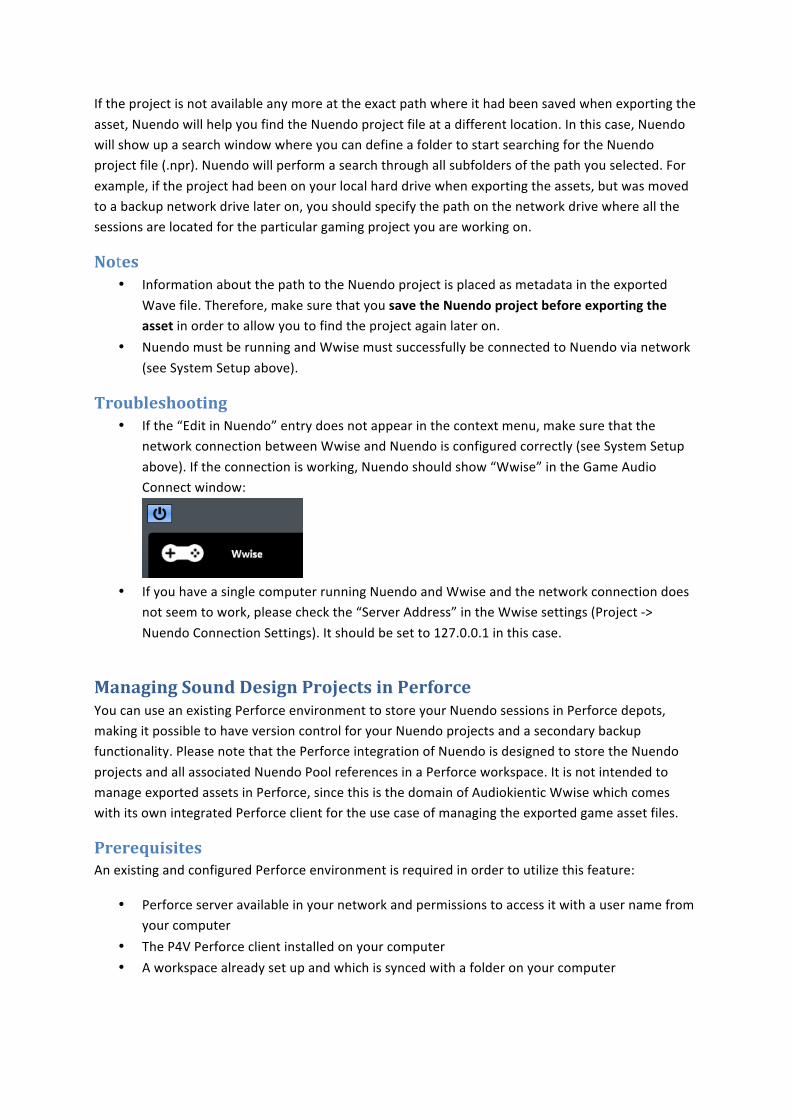
Troubleshooting • If the “Edit in Nuendo” entry does not appear in the context menu, make sure that the
network connection between Wwise and Nuendo is configured correctly (see System Setup above). If the connection is working, Nuendo should show “Wwise” in the Game Audio Connect window:
• If you have a single computer running Nuendo and Wwise and the network connection does
not seem to work, please check the “Server Address” in the Wwise settings (Project -‐> Nuendo Connection Settings). It should be set to 127.0.0.1 in this case.
Managing Sound Design Projects in Perforce You can use an existing Perforce environment to store your Nuendo sessions in Perforce depots, making it possible to have version control for your Nuendo projects and a secondary backup functionality. Please note that the Perforce integration of Nuendo is designed to store the Nuendo projects and all associated Nuendo Pool references in a Perforce workspace. It is not intended to manage exported assets in Perforce, since this is the domain of Audiokientic Wwise which comes with its own integrated Perforce client for the use case of managing the exported game asset files.
Prerequisites An existing and configured Perforce environment is required in order to utilize this feature:
• Perforce server available in your network and permissions to access it with a user name from your computer
• The P4V Perforce client installed on your computer • A workspace already set up and which is synced with a folder on your computer
Configuration • Open the Game Audio Connect window in Nuendo (Project -‐> Game Audio Connect). • Click the “Open Game Audio Connect settings” button. • Activate the “Use Perforce” checkbox and set Perforce Server Address, User Name and
Password. • After you close the Game Audio Connect settings, a green Perforce logo will show you that
the login process for the Perforce server was successful. If the logo is shown in red, an error with the connection occurred.
Working with Perforce If you have a session that you want to check in to a Perforce server, take following steps:
• Save the Nuendo project somewhere under your local Perforce workspace sync folder. Nuendo will then detect the workspace associated with this path automatically and the menu option File -‐> Save To Perforce will become active.
• Select File -‐> Save To Perforce, a dialog will show up listing all files that will be added to the Perforce workspace. You can also add a comment about your file.
When opening a Perforce controlled project, Nuendo will ask whether it should create a Perforce change list for you. Nuendo will then add a new change list in the underlying workspace and keep track of all changes and additions you do to the project. If you close the project, Nuendo will ask what to do with the open change list and the contained changes:
1. Submit: Nuendo will commit all changes in the project and referenced files to the Perforce depot. The change list is closed afterwards.
2. Revert: All changes since the last commit will be reverted. Warning: you will lose all changes made since the last Perforce commit. The Nuendo project will thus be reverted to the latest version available on the Perforce server.
3. Ignore: This will do nothing to the Perforce change list. The project is closed, but all changes to the files are still available in the workspace change list. Please use an external Perforce client (e.g. P4V) to resolve the change list manually. You should select this option if you want to manually decide for each file whether to commit or revert.