Embed Size (px)
Citation preview
ge.com
©Safety Instructions ......... 2-4
Operating h_tru_¢iot_Clock and Timer ............. 8
Control Lo(kout ............. 8
Conuols .................... 5
{:onw:(tion .............. 12-14
Oven .................... 6, 7
Probe .................. 10, 14
Proofing ................... 11Sabbath Featme ............. 21
Sell:Cleaning Ow_n ....... 17, 18
Special Features .......... 19, 20The rmostat ................ 16
Timed Baking
and Roasting ............. 9, 15Warming .................. 11
Care and Cleaning
Cleaning ()yen Door . ........ 23Control Pan(1 .............. 24
LifI-OffOven Door . ......... 23
Light Bulb ................. 22Probe ..................... 23
Racks ..................... 24
Removing Packaging "I'_p( .... 22Stainless St(el Smti_ces ....... 24
•..2 -2tTroubleshooting _ps. . =___
Consumer Support(:onsmner Suppor_ .......... 34
Produ_ t Registration ...... 31, 32
Warranty .................. 33
PK916-27" Sh_gle Wall Oven
PK956-27" l)oubl(¢ _}_dl Oven
P7"916-30" Sb@ Wall Oven
PT956-30" Double _dl Oven
Write the model andserialnumbershere:
Model #
SeKal#
'_i)u can find them oil a label
on the trent of the oven behind
lhe oxen (Ioor oil single ovell models,
or the front ot the lower oven behind
lhe oven door oil dollble o_en models.
49-80430-2 10-07JR

IMPORTANTSAFETYINFORMATION.READALLINSTRUCTIONSBEFOREUSING.
a, WARNING!For your safety, the information in this manual must be followed to minimize the risk of fire orexplosion, electric shock, or to prevent property damage, personal injury, or loss of life.
IMPORTANTSAFETYNOtiCEThe California Safe Drinking Water and Toxic Enforcement Act requires the Governor of Californiato publish a list of substances known to the state to cause cancer, birth defects or other reproductiveharm, and requires businesses to warn customers of potential exposure to such substance&
The fiberglass insulation in self-clean ovens gives off a very small amount of carbon monoxide duringthe cleaning cycle. Exposure can be minimized by venting with an open window or using a ventilationfan or hoocL
2
SAFETYPRECAUtiONSWhen using electrical appliances, basic safety precautions should be followed, including thefollowing:
_;_Use this appliance only fi)r its hm'nded
purpose as des(rib(d in this ()wneFsManual
_;_B_ sure your applianc_ is prop_ rly
installed and grounded by a qualifiedtechnician in ac(ordance with the
provided installation instructions.
_ Do not attempt to rt pair or replace any
part of your oven unless it is spedfi(allyrt commended in this mamml. All other
sctMcing shouM be red. rr,.'d K) a qualifiedtechnician.
_ I lave the installer show }ou file locationof t|_ cir(uit breaker or fhse. Mark il for
(asy r( _.,rt_llCe.
_2 Belore perfonning all? setMce, disconnect
the oven power supply at the household
distribution panel by removing th( ti*se or
switching off the cilvuit bt* akcn
N Do not l(av( chiMrcn alone--chikhcn
should riot 1)( l(*t 31011( or lltl3ttctlded ill
an m-ea where an appliance is ill us(. Theyshould never be allowed to sit or stand on
ally part ot the appliance.
{#_;Do not alk)w anyone Io climb, stand or
hang on the _:l,.),.)l;They could dan;ag,: fll_.
OV(!II, or Catlse S(w(!r(! l)(rsonal il!jltl3_
_2Be smc the (wen is securdy installed in
a cabinet d_at is firnfly attached to tile
hotlse Sll'tl( tltr('. Never allow atlyolle to
(liml), sit, strum or hang on the ov(n door:
{_;N(_er leave the oven door ol)en !.vh(:ll VOll
ar( not watching the oven.
_;_Always ke(p combustible _111 covering,
( urmins or &apes a satb distan(e flx)m
Vottr ov(!ll,
{_;_Mways k(ep dish lowds, dishcloflls, potholdc>, and oilier linens a safe distmlce
['1"O111 VOllr OVell,
_;_Always ke(p wooden and plastic tm nsils
and canncd Iood a sail' distancc away
_l'Olll your ()veil.
{_;])ach childr(n not to play with th(
controls or any other part ot file ov(n,
_;_Lltge scmtt hes or impacts to glass doors
call lead m broken or shattered glass.
{_;;Do not slore flammal)le malerials in
all OV(
ge.com
WARNING!PRECAUTIONS
_JZN<wer wear loose-fitting or hanginggarments whil( using th( appliance. Becat>ful wile** l>a( hing R)r items stored in( al)inets ov(r the oxen. Flammable matelial
couM be ignited if brought in contact wit|*hot surf_lces or heating elenmms and maycause sevete BIIFIIS,
_ Use only dlT pot holders--moist or damppot holde)> on hot surl_m(s may rcsuh in])utns fi-otn steam. Do not let pot homers
touch hot heating elements. Do not use atow(1 or olher bulky cloth.
{f;For your sat_ ty, n(_er use your appliancefor wmming or heating tl*e morn.
_gDo not let cooking grease or otherflammabl( mamrials ac( umulate in ortleat lhe (iv(q*.
)_¢_I)O t*OI ITS(! "wHteY or* grease fires.Never pick up a flmning pan. Turn the( onttwls ott_
Flame in the oven can lie smothered
complelely by closing th( oven doorand umfing the oven offor })y using a
multi-propose (tiT ( henfical (it- toain-typefire extinguishe>
{#_Do Hot touch the heating elen*ents or theinterior sm'fitc( of the oven. These sm'fitc(s
m W b( hot enough to burn even thoughthq are dark in coloL I)uring and afteruse, do not t()uch, or let clothing or otherflalmnable materials (onta(t any ira( riotar('a ot the oven; allow sufticiem time R)*
( ooling first.
Potentially hot surti_ces include oven
vent openings, surf_lces near the openings,(revic(s around the oven dool; fl*e edg(sof the window and meted tthll pallS Hbov(the door:
REMEMBER: The inside sut lime of tl*e oven
may be hot wh(n the door is opened.
{f;Never place cooking ut(nsils or an) ofll(rimms on the oven floon There is a heating
element beneath the oven flool: Placingimms on t|;( oxen floor ma} (ause th(oven to oveHmat, t* sulting in damage
to the oven and risk of dan*age or fireto cabin( ts.
_ Never lea(( jars or (:alas of ti_t drippings inOf H(ar yollt- over*.
{#_Do not store ,.)r use confl)ustible mat(lials,
gasoline or other flanmlable vapors andliqukls it* the vicinity of this or any otherappliance.
{#_Stand away from file oven when opetfingthe oven dool: ttot air or steam whi(h
es(apes call (ause bl/rllS 1o llanOs, fa(e
and/or ey(s.
{#_Do not heat unop(n(d tood containers.Pressm-c (ould build up and the ( onminer
could burst, (ausing all ill.jut>
_:_Keep the oven vent unobstructed.
_2K_ep th( ow:n fiee fl'om grease Imildup.
_ Place the oxen rock in the desired positionwhile the ov(n is cool. If rocks nmst be
handl(d when hot, do not let pot holder
comae( the heating elements.
_2When using cooking or roasting bags in theoven, follow the mamlfi,ctur(r's directions.
{f;Pulling out file rock to the stop-lock is aconvenience it* liliing [maw R)ods. It is also
a pre(aution against brans fl-om tou(hinghot surfaces of the door or oven walls.
{f;Do not use the ov(n Io/hy l*(_vspapeYs.If overheated, th( 3 can <at<h on fire.
?_2Do not use the ovetl [()i"a stot_lg_" atca.
hems stored it* an oven can ignite.
?>_Do not lea:-(' paper products, cookingumnsils or food in the ov(n when nolill list.
_2After broiling, always take any broiler
pan oltt of the oven and clean it. I.cflovergrease in a broiler pan can cak:h fire t*(!xttime you use the flat*.
_2(]lean only parts listed in this Owner'sManual.
_2Do not use alumimnn fbil t<:)line
ovell bottollls, except as suggested in thismatmal. Improper installation ofalmninmn
R)il m W resuft in a risk of electrk; shockor fit-(!.
3

IMPORTANTSAFETYINFORMATION.READALLINSTRUCTIONSBEFOREUSING.
COOKMEATANDPOULTRYTHOROUGHLY...Cookmeat andpoultry flToroughly--meat to at leastan INTERNALtemperatureof 160°Fandpoultryto at leastan INTERNALtemperatureof 180°FCookingto thesetemperaturesusuallyprotectsagainstfoodborneillness.
SELF-CLEANINGOVEN?_2Do not clean the door gasket. The door
gasket is essential fi)r a good seal. Care
should be taken not to rub, damage or
move the gask(t.
_; [)o not us_ oven cl_an_ rs. No commercial
OVell cleaner or OV,2_IIliner prot(ctive
coating ()[any kind should be used in or
arotmd any part of the oven. Residue flom
oven cleanet_ will damage the inside of theow::n when the salt-dean cycle is used.
£ZBefore sell:cleaning the ow:m remove theprobe and any broiler pan, grid and other( ook_w_t l'e,
_; Be sure to wipe up _xcess spillage b_fi)restarting dm sell-cleaning op_ ration.
@ If the selfcl_ aning mode malflmctions,
turn the oven offand disc(:mnect the powersuppl> ttave it se*wiced by a qualifi< dtechnician.
READANDFOLLOWTHISSAFETYINFORMATIONCAREFULLY.SAVETHESEINSTRUCTIONS
4

Usingthe oven controls.(Throughout this manual, features and appearance may vary from your model.) ge.com
Oollblo OVOnCOtT[rOIshowR
OvenControl Clockand timer FeaturesandSettings
Bake Pad 0Press to sel(cl tb( I)ake fun( ti(;n.
BroilHi/Lo PadF'ress to "<q((I th( I)roil function.
Convection Bake PadPress t,.) s(l( ('t baking v,ith the COllX3.x:tiOllfuncti,.)n.
Convection RoastPadPress to self (1 l-OaStillg with Ill(! t-:OllVet-tiOll
flmction.
StartPad._]ust be l)resse(I to slart any cookir, g or
el( aning ftl llctiOll.
Display
Sbo_s the tinle of da b oven tcnq)(mturc,whether the oven is in tile bake, broil or
sell:_ leaning lm_le and the times set tbrtile tilller or alltomatic oven oi}erations.
ff "F- and a number or letter" flash & the display andthe oven control signals, this &dicntes a functionerror code. Press the Clear/Off pad Allow the even tocool for one hour Put tt_eoven back into operation If thefunction error code repeats,disconnectthepower to theoven and call for service
ff your oven was set for a timed oven operationand a power outage occurred, thedeck and allprog_mmed functionsmust be rese_
Thetime ofday will flash& thedisplaywhen therehasbeenapower outage.
Self Clean Std/Low Pad
Press to selecl seltk:leaning/'tlllCtiOll. Seethe Using the self-cleaning over section.
Oven Light On/Off Pad
Pr(ss I,) mm tile ox(n light on ,,n off.
Delay Start Pad
kse along with Cooking Time or
Self Clean Std/Low p_ds to set dwoven to start and stop autonlati(ally at atinle you set.
Cooking Ttme Pad
Pr('s_ _lll(1th(n prtss the number pads to s(tthe amount of tinle you want your f_od tocook. The oven will shut off antomaticallv
when the cooking time has run otlI, unlessthe Cook and Hold f_._amr( was s(t.
Clear/Off Pafl
I)I'(S,S to (alltel ALL ov(ll oi)t latiolls (x(t!i)t
th( clock alld lillleE
ClockPadPress betbr_ s(tting lh( clock.
Number Pads
Use to sel ally function requiring nunlbep_such as the tinle of (/a) Oil tile clock, tile
tinier; the oven tenlpemmre, th( internalt;ood tempeFature, the starl tim( and
length of opel',ltion for timed bakingand self:cleaning.
Kitchen timer On/Off PadPress to sd(ct tile tinier fi,ature.
Probe Pad
Press when using tile [)rol)e to cook food.
Warm Pad
Press to k(ep hot, cooked foods warm.
Proof PailPress to select a warnl environnlcnt us(rid
f;.w rising )east-leaven_ d products.
5

Usingthe oven.
To avoid possible bums, place the racks in the desired position before you turn the oven on.
Before yon begin...
The racks have stop-lock_,, so that when[)laced correcfl? on the supports, tile? willstop be[ore coming (omplet_ lyout, andwill not tilt.
When placing and removing cookware,pull the ]'d(k ollt tO the bump on tile
rock support.
Toremove a rack, ptfll it toward you, liltthe front ell([ tip and pul[ it kilt.
Toreplace,place file end ot the rack(_,top-locks) on the sul)po]% tilt up tilek-oat and push lhe rock ill.
/VOTE:Theovenhas7 rackpoeitions
CAUTION:NeverplacecookingutensilsoranyotheritemsontheovenfloorThereisaheatingdementbeneaththeovenfloorPlacingitemsontheovenfloormaycausetheoventooverheat,resultingindamagetotheovenandriskofdamageorfiretocabinets.
i!i ii iiiii iiiiiiiill¸
NOTE:A cooling fan mayautomaticafly turn on and off tocool k_temal parts This is normal,and the fan may continue to nmeven after the oven is turned off
How to Set the Oven for Baking or Roasting
[] Press th< Bake pad.
] l)l'(SS tile lltllll[)el- p_l(IS to s([ the
d(_sil( d 11 llll)( l_ltule.
[] Presst[le Start pad.
[] C[l{(k ['o(_[for doneness atminimum time on recipe. Cooklonger if'ncce_sal3.
[] Pressth_ Clear/Offpad _qmncooking is (erupt(l(.
Rack Position
Type of Food 27" Oven 30" Oven
Frozenpies BorC CorD(oncookiesheet)
Angelfoodcake A A orB
Bundtorpoundcakes A A orB
Biscuits,muffins, BorC CorDbrownies,cookies,cupcakes,layercakes,pies
Casseroles BorC CorD
For27" Ovens: If baking fbur cake layer_
at the same time, [)lace two [ay_ 1_,on rockA and two layers on rock C.
For30" Ovens: If baking fbur cake layer_
at the same time, place two [ay_l_, on rockB an(I two la?el_ on rack D.
Stagger pans on the rock so one is notdirect[y above the ethel:
Topreheat, set the oven at thecorrect temperature Thecontrolwifl beep when tile oven ispreheated and the display willshow your set temperature, Thismay take approximately 10 mktutes
Preheating and Pan Placement
Preh{ at the oven iFtile recipe cal[s [br it.Preheating is necessa U for good resu[tswhen baking cakes, cookies, pastlT andbreads.
Baking re_,u[lswill be better iFl)akingpans are centert, d in th( (wen as muchas possible. Pans shou[d not louch each
other or tile walls of the oxen. If _ou
need to use two racks, smggt.r the pans
so one is not directly above tile ethel;and [eave approximamly [ ½" belwe{ n
pans, from tile fl-ont, back and sidesof rile wall.
6
Aluminum Foil
Donot usealuminumfoil onthebotiomoftheoven
Never entir_ ly (over a rock withahlminum [i)il. This will disturb the heat
circu[ation and lvsuh ill poor baking.
A _ma[[er sheet of foil mav be used to
catch a spil[over by placing it on a towerl-ackseveral inches belo_ the ['end.
ge.corn
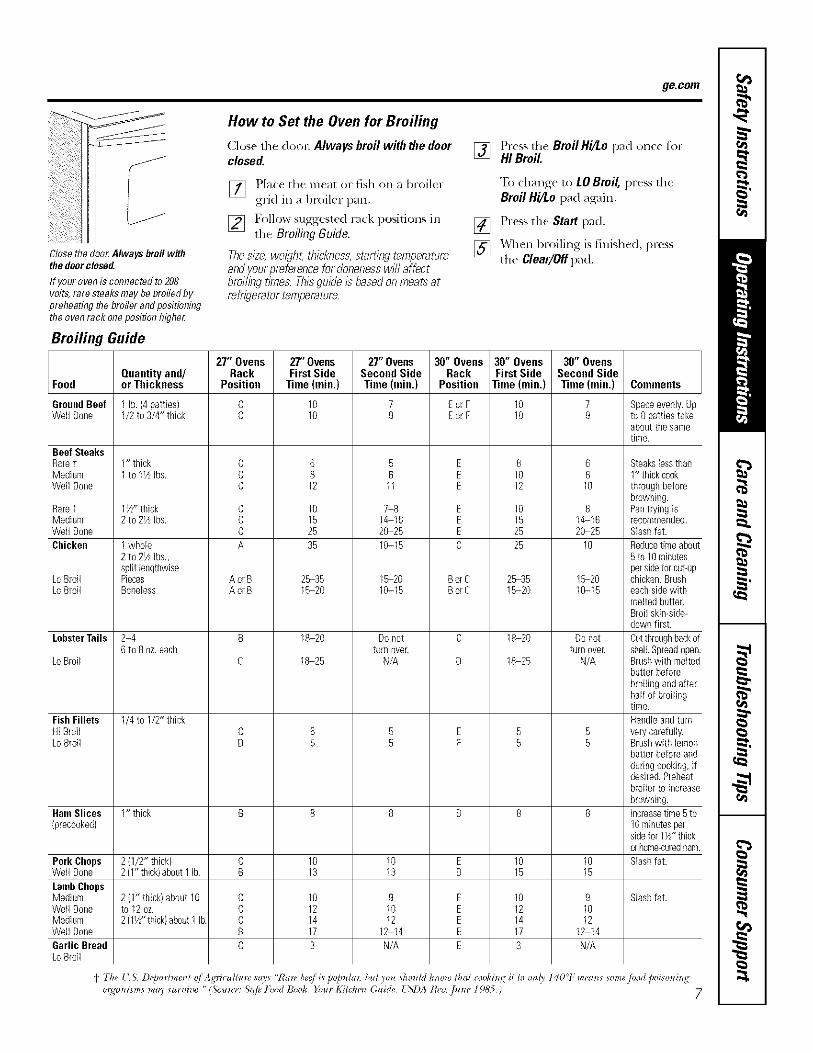
Close the dooKAlways broil w#hthedoorclosed
If your oven is connected to 208volts, rare steaks maybe broiled bypreheating the broiler and positionfl_gthe oven rack onepost#on highe_
How to Set the Oven for Broiling
(;los( xh_ do(n: Alwaysbroil withthedoorclosed.
[] Plac( the nr(at or iish on a/)roi11 rgrid in a broil(r pan.
[] Follow sugg(!stt(l ratk l:)OSilionsilrthe BroilingGuide.
[t}esize,weight,thickness,startingtemperatureatd yourpreferencefordonenesswill affectbroilingtimes Thisguideis basedonmeatsatrefrigeratortemperature
[] Pr(ss the BroiIHi/to pad on(( forHI Broil.
"1_)diane{ to LGBroil, presstiltBroilHi/to pad again.
[] Press 111(Start pad.
[] Wh(n 1)roiling is finished, l)ressthe Clear/Offl)ad.
Broifing Guide
27" Ovens 27" Ovens 27" Ovens 30" Ovens 30" Ovens 30" Ovens
Quantity and/ Rack First Side Second Side Rack First Side Second SideFood or Thickness Position Time(rain.) Time(rain.) Position Time(rain.) Time(grin.) Comments
GroundBeef 1 lb. (4 patties) C 10 7 Eor F 10 7 Spaceevenly.UpWell Done 1/2 to 3/4" thick C 10 9 EorF 10 9 to 8 patties take
aboutthe sametime
Beef SteaksRaret I" thick C B 5 E 8 B SteakslessthanMedium I to 1> Ibs. C 8 B E 10 8 I" thickcookWell Done C 12 11 E 12 10 throughbefore
browning.Rare t 1½" thick C 10 7-8 E 10 8 Panflying isMedium 2to2V_lbs. C 15 14 16 E 15 14 16 recommended.Weft Done C 25 20 25 E 25 20 25 Slashfat.Chicken 1 whole A 35 10-15 C 25 10 Reducetimeabout
2 to 2Y_Ibs., 5 to 10minutessplit lengthwise persideforcut-up
koBroil Pieces AorB 25-35 15-20 BorC 25-35 1,520 chicken.Brushko Broil Boneless AorB 15-20 10-15 BorC 15-20 10-15 eachside with
melted butter.Broil skin-side-down first
Lobster Tails 2-4 B 18-20 Do not C 18-20 Do not Cutthroughbackof6 to 8 oz each turn over. turn over shellSpreadopen.
koBroil C 18-25 N/A D 18-25 N/A Brushwith meltedbutter beforebroilingand afterhalf of broilingtime
Fish Fillets I/4 to 1/2" thick Handleand turnHi Broil C 5 5 E 5 5 verycarefullykoBroil D 5 5 F 5 5 Brushwith lemon
butter before andduringcooking,ifdesired.Preheatbroilerto increasebrowning.
Ham Slices 1" thick B 8 8 D B 8 Increasetime5 to(precooked) 10 minutesper
sidefor1½"thickorborne-curedham.
Pork Chops 2 {1/2" thick) C 1g 1g E 10 10 Slashfat.Well Done 2{1"thick}about 1 Ib B 13 13 D 15 15
Lamb ChopsMedium 2 (1" thick)about 10 C 10 9 E 10 9 Slashfat.Well Done to 12 oz. C 12 1B E 12 10Medium 2(lVB'thick)about1 lb. C 14 12 E 14 12Well Done B 17 12 14 E 17 12 14
Garlic Bread C 3 N/A E 3 N/AkoBroil

Usingthe clock, timer and control lockout.
Make sure the clock is set re the
correct time of dag
To Setthe Clock
The clock must be set to the (orruct time
el day l_r the automati( oven timing
fhn(tions to work properl>: The time ofday cannot be changed during a timed
baking or self Meaning (ycle.
[] ])tess th_ Clock l)ad.
[] ])ress th_ mlm/xr l)ads.
[] Press th_ Start pad.
The timer is a minute timer onlg
The timer does not control ovenoperations Themaximum setting onthe timer is 9 hours and 59 minutes,
To Set the Timer
[] Press th_ Kitchen TimerOn/Off pad.
[] Press tim num/)er pads unlil th(aHlOIIllt Of till]( }'011 1V_/ll[ sBo'ws
in th( display. For example, to s{t
2 hotll.S alld 45 lllillllle% pl'(SS 2, 4
and 5 in thai olde_: If you makc a
mistake, F,re+,sth_ Kitchen TimerO_Off pad and b(gin again.
[] Press th_ Startpad.
AfterpressingtheStartpad,SETdisappears,thistellsyoud}etimeismuntZngdown,althonghthedisplaydoesnotchangeuntiloneminutehaspassed,Secondswill notbesMwn in thedispbyuntildTelastminuteis countingclown
[] X+Vhen the timer reach:!s :_.the conlrol will I)eep. lnnes
f'ollowed/)v one/)_ep evelw6 seconds unlil the Kitchen
Timer On/Off pad is pressed.
The C_-_econdlone can be canceled bv
[ollowing th( st(ps in the Special featuresof your oven centre/section under Tones
at the End ef a timed Cycle•
To Reset the timer
If the display is still showing tile time
r(.maining, )ou may change it by pressingtile Kitchen Timer On/Off pad, then press
the nmnb(r pads until the time }ouwant at)peals, in the displa).
If tile rumaining time is not ill the display
(clock, delay start or (ooking time are inthe display), recall the rumaining time by
pres*ing the Kitchen Timer On/Off pad andthen pressing the lmmber pads to enmr
the new time }ou want.
To Cancel the Timer
Pr(ss KitchentimerOn/Offpad lwi((,.
8
Control Lockout
Yourcontrol will allow yoe to lock out d_e touchpads so dTeycannot beactivated when pressed
NOTE:On double,ovenmedals, this activates thisfeature for beth ovens
'IS lock/unlock the controls:
[] Press the 9 and Ol)ads at the sameti n(fi) _,seco (Is, t lt'l I1 ( disl)layshows LOCON.
[] "[k) unlock the (omrol, press th_ 9and 0 pads at the same tlllle IOF .
seconds, tmtil the diN)lay showsLOCOFF.
When this t}:amr( is on and the touch
pads m-e pr(ss(d, the corm-el will beepand tim display will show LOC ON.
NOTES:
_f Thecontrollockoutmodeaffectsall touchpads No touchpadswill workwhenthisfeatureis activatec_
@ Theadjustmentwill beretainedin memoryaftera powerfailure

Usingthe timed baking and roastingfeatures.(onsomemo e/s; geoom
On double oven models, you can use timed baking in one oven while using self-clean in the other; you can also usetimed baking in both ovens at the same time.
NOTE: Foods that spoil easily--such as milk, eggs, fish, stuffings, poultry and pork--should not be allowed to sit formore than I hour before or after cooking. Room temperature promotes the growth of harmful bacteria. Be sure thatthe oven light is off because heat from the bulb will speed harmful bacteria growth.
How to Set an Immediate Start and Automatic Stop
Theovenwigturnonirnmediatdyandcookforaselectedlengthof time At theendof dTecookingtime,theovenwill turnoffautornatical/y
,Xlak_,Slll-(f lhc <lock shows lh( COFF( C[
rime oi day.
[] Press th_ Bake pad.
[] lJsitag lhe numl)er pads, _nler thedesil-ed [ellll)el_][lll-{.
[] Pre_,s th( Cooking Time pad.
NOTE"If yalr reciperequirespreheating,youmayneedtoaddadditionaltllneto tbe/engd}ofthecookiogtime
[] Using 1he mnnl)er i)ads, enler Ihedesired baking lime. Tim oven[Ollll)el-_l[tll-¢ _]l](t IN( cookillg lil_l('
that you enlc red will I)e disl:)laye(I.
NOTE:If youwantyourfoodto bekeptwarmforup to3 hours"afterdTecookll}gfunctionisfinished,pressdTeWarmpadonce
[] Press the Start pad.
The displa? will show the changingtemt)emtnre (starting at 100°F) and the
cooking time. The display starts changingonce the temperatm-e reaches l(_)_E
NOTE:Ondoubleovenmodels,whenusingbothovensat thesane time,thetimesshowingin thedisplaywill beforthe lastovensol Todisplayd?etimeset for d?efirstovenset,pressthe CookingTimepadforthatoven
The oven will continue to cook for lhe
programmed amount at time, th{n shutof_' atl[Ol_la[i(-a[1v tlnl(?s£ lhe Wal-l_l(,l-
Press lhe Clear/Offl)ad 1o clearthe display.
How to Set a Delayed Start and Automatic Stop
Youcanset theovencontroltoddaKstarttheoven,cookforaspecific"lengthof tllneandthenturnoffautomatically
NOTE:Anattentiontonewill soundif youareusingtimedbakioganddonotpressd?eStartpadafterenteringthebakingtemperature
Make Sill-13lhe dock shows lh{ COlT(C[
tim_ of day
] Press th_ Bakepad.
[] [ S,illg Ill(t mlml)(r pads, elll(!l- thedesir( d [(fllll)( l-_l[lll-e.
[] Press thc CookingTime pad.
NOTE"If yalr reciperequirespreheatingyou/nayneedtoaddadditionalthneto dle lengthofthecookiogt#ne
[] [sing Iht! lnunl)(r pads, elll(!l- [he
desir( d baking time.
[] Press tile BelayStart pal1.
[] [sing th_ munber pads, cnt_r the[Jill( Of linty yOtlW_lll[ Ihe ovell [o
[IlFII 011 and sl_/l[ (ooking.
NOTE:If youwantyourfoodto bekeptwarmforupto 3 hoursafter tbecookiogfunctionisfinishedpresstbe Warmpadonce
[] Press th( Startpad.
If:you would like to check the timesyou have set, pwss th( Delay Start pad tocheck the start time you haw set or l)rcssthe CookingTimepad to ch{ck tim lengthat cooking time you have set.
1_'11( 11 lh_ OVell [tll'llS Oil }1[ Ill( tiln¢
of day you have set, the displny will
sh(m the (hanging t{ ml)(mturt
(slatting al 100<F) and the cooking
time. The display starts changing o11((
the t( ml)erature rt achcs 100°F.
NOTE:Ondoubleovenmodels,whenusingbothovens at dlesametime,file t#nesshowiogin thedisplaywill beforthelastovense_ Todisplaythetimeset for thefirstovenset,presstbeDelayStartor theCookingrime padforthatoven
The ow:n will t ontinue to cook for th_
l)YO_l'_tllllll(d _/IllO!/ll[ of tillle, [11( II shill
Of]"_/!/toln_[i(_/nv tmlcss the _,_/l-lllel
[_!_ltllle _V_IS sel,
Press Ih( Clear/Off [}all to cl(ar
the display.9

Usingthe probe.
For many foods, especially roasts and poultry, internal food temperature is the best test for doneness. Thetemperature probe takes the guesswork out of roasting by cooking foods to the exact aloneness you want
NOTE:Doubleovenroodelshaveaprobe#7theupperovenonly
Use ot prolyes Rill{ r lhan file oneprovid< d xdth this l)roduct may resuh indamage to tile l)robe.
The temperature probe has askewer-like probe at one end and aplug at the other end that goes intothe outlet k?the oven
[ 7s( the llandles ot the l)rob( and i)lugwhen inserting and removing them fl-omtile llleil_l il_ll(I Otltl(i.
_i; Toavoiddaroag#Tgyourprobe,donot usetongstopullonthecamewbenreroovingit
i_i;Toavoidbroakingtheprobe,makesurefoodiscoropletelydefrostedbeforeinserting
_ Topreventpossiblebums,donotunplugtheprobefromd?eoutletuntil d_eovenhascoo/e_
i_i;Neverleaveyourprobe#7sidedTeovendudnga self-cleaningcycle
M_er prepaling th( meat and placingit on a trivet or on a broiler pan grid,follow these directions for proper probeplacement.
[] Lay lh( l}rob( oil the oulsid( of th<meat along tll< lop or side and markwifll your finger whert +tile edg_ otthe meat comes to on the probe."['he [)oint shotlld rest in the cent_ rol tile thickest meaty part of thel'O_tSl,
[] Insert lhe probe complel(ly into lhemeat, up to Ihe handle. It shotlldnot totlch bolle, fht or gristl+.:.
For roasls with no bone, insert tile probeinto the meati(st part of the roast. Forbone-in ham or lamb, ins(rt tile probeinto th( center of tile lowest lalg( muscleor joint.
Insert file probe into the eenmr of dishessuch as meat loat or casseroles. When
cooking t]sll, insert the probe l_'rom jtlst
above the gill into the meatiest area,l)amll(l 1o the backbone.
Ins{ rt lhe probe illlo th< nl(:ali(st l)ml ofth< illller thigll ['roln /)eltlw }lllt-/l)_n-_allel
to the leg ot"a whole tllrkey.
How to Set the Oven For Roasting When Using the Probe
[][]
[]
Ins(ll Ih< l)robe into th( lll(_ll,
Plug tile probe illlo tile ot/tl(l ill th(ox'en. Make sure it's l.+ush(d all theWglV ill. Clo_,< lli( o\ell dOOl:
Press the Probepa(1.
[] Pr(ss ill< lllllll/)< r l)il_(Is 1{1 s<[ Ill(
desired internal food or lll(_/l
t(ml}< mlure. The maximuminternal t(mI)elvmlre f})l"Ill< foodthat you can s<t is 200°F.
[] F'r<ssth{ Bakel)a(1.
] Plxss tll( num/)(,r pads Io s(t filedeSil_(?d OV<ll lelnl)< l-_llllre.
[] Press th< Start pad.
Thedi57abywill flashif dTeprobeis insertedintotheoutletandyoohavenotsetaprobetemperatureandpresseddTeStartpacL
_M'ter the internal lemI)eramre of th(meat rea(bes 100°17, the changinginternal luml)eraulrt will b< shownin th( displa}.
] _,Vh(n lh( internal l(llll)er_/ltll-(: OlcIll( lll(_ll re_l<ll< s tile lltllllb(tr }'Otl
have set, the probe and the ov(ntmn oft and the ox'en control
signals. 'Ik)stop the signal, pressthe Clear/Offl)ad.Use h<)t [}ads toremove the probe fl-om the ti)od.Do not tls(' lollg_ to ptdl on it--they might damage it.
To change Ihe oven leml)el-_31ur< (hllJngtile Roasl cxcle press the Bakel)ad andthen 113(?ntmll)er pads to sel tll_ new
tellll)el_llllre.
soundandthedisplaywill flasbuntil theprobeis reroovedfrerotbeoven
_*_111( II Ill(! ()Vell sl_rts to he,It, th( t_ord _}{ YouCaRuse fl}e timer even though youcannotl 0 LO will be in th< display, use Kroedovenoperations

Usingtheproofingand warming features. e.com
The proofing feature maintains a warm environment useful for rising yeast-leavened products.(Available in the upper oven onlg)
How to Set the Oven for Proofing
[] Place tim covered dough in I11covenon _',lckB or C
NOTE:Forbestresults,coverthedoughwid7aclothorwithgreasedplastic"wrapfdTeplasticmayneedto beanchoredunderneathd}econtainerso theovenfanwill notblowit off_
[] Press th( Proof pad Iwi((.
The di,,play ",,.'ill read PrF (proot).
The oven interior light turns on an(Iremains on during proofing.
The proofhlg fZ,amre automaticallyprovides tim optinmm tempemtm-e liarth{ proofing proc_ ss, and therelore doesnot have a lemperamrt a({jllstment.
] Sol th_ Kitchen Timer for theminimum proot time.
[] Wh{n proofing is finished, pressth_ Clear/Off pad.
_'_Toavolll /ewedng d}e even temperatureand/ewthen_ng proofing time, do notopen the ovendeer unnecossadl_z
over-preofing
NOTE:
i!i:,Donotusetheproofingmodeforwarmll}gfoodorkeepingfoodho£Theproofingoventemperetnreisnot hotenewh toholdfoodsat safetemperaturesUsefl}eWarm featuretokeephot foodwarm
i!i:,Preofll}gwill notoperate>A}eeovenis above125°£"HOT"will showll} thedisplay
How to Set the Oven for Warming
The warm R.ature keeps cooked t'oo(I_,wmm lot up to 3 hours af_r a limedfunction is finished, or warm can 1)e
a_tivated to k_ep hot, cooked leedswmm. This fbatm-_ is nol designed toreheat toM [k_od.
'Ib use this tbature, press the Wann padonce and then lhe Start pad.
"Ib actiwlte this tbatm-e for us( after
Timed Baking or Roasting, press theWarmpad whik progranmfing th_ ov(nand bd'ore plvssing Start.
ToCrispStale Items
!5_Place food in low-sided dishes or pmls.
i{_:,For best resuhs, [;lace the fb,_:l items ina single lay(q; I)o not stack.
_;i;Leave [helll tlllCOVel'cd.
ib;Check crispness after 20-.10 minutes.Add time as ne_ ded.
IMPORTANTNOTES:
contall}eror transferredto aheabsafeservingdish
N Formoistfoods,coverfl}emwith anoven-safelidoralumll}umfoil
_i;Friedorcrispfoodsdonotneedtobecovered,butcanbecometeedryif warmedfor toolong
_i;Repeatedopeningof thedoorallowsthehotair to escapeandthefoodto cool
!_ Allowextratllne forthetemperetureinsidetheovento stabilizeafteraddingitems
!_ Withlargebadsit maybenecessarytocovercomeof thecookedfooditems
_ Removeservingspoons,etc, beforeplacingcontainersin dTeoven
_ Denotuseplasticconta#Ters,lidsorplastic"wrap
CAUTION:Plastic"containere,lidsorplastic"wrapwill me,It if placedfi}dTeoven Meltedplasticmaynotbe removahleandisnot coveredunderyoorwarren_
!!

Usingthe convectionoven.
Mutfl-rack position
Convection Bake
NOTE: file mnvectien fan will cycle on andoffwhile cooking to best distribute hot air in theoven
Theconvectionovenfanshutsoff whentheovendooris openedDONOTleaved}edooropenforlongperiodsof timewhileusingconvectioncookingoryoumayshortenttle life of theconvectionheatingdement
In a convection oven, a fan circulates hot airover, under and around the foot(
Thisdrculatinghot air is evenlydistributedthroughoutthe ovencavity As a result,foodsareevenlycookedandbrowned--often in lesstime with convectionheal
_'_IdealforevenlybrownedbakedfoodscookMonmultipleracks
_'_Goodforlargequantitiesof bakedfoods
i!i_,Goodresultswithrookies,biscuits,muffins,brownies,cnpcakes,creampurls,sweetmils,angelfoodcakeandbrea_
The comeclion tim circulates the heatedair evenly over m_d m-ound th( [_od.
Multi-Rack Convection Baking
When mnvectien bakfl}gwith only I rack,follow dTerackpositinm recommendedinthe Using rile ovensection
Because healed air is circu[at(d evenly
throughout the oven, foods can bebaked with excellent results usingmultil)le r_J(ks.
Muhi-l',lck lxlking may increase cooktimes s[ightl} fi.)r some toods but theoverall resuh is time saved. Cooki(s,
nlufl]ns, biscuits and other quickbrcadsgive vel T good results with multi-rackbaking.
For30" Ovens:When l)aking on 3 racks,place one rack in the second (B)po_ition, one in the fomth (D) positionand one in the sixth (F) position.
For tw(>rack baking, place one l'ackill the second (B) rack position. P[ac_the other rock in the _burth (I)) rockposition.
For27" Ovens:When l)aking on 3 racks,[)lace one rack in the first (A) position,one in the second (B) po_ition and on_in the fourth (D) position.
For Iw(>rack baking, [)lace one rockin the tie, t (A) rack position. Placethe other rock in the third (C) l'ack
poaition.
Adapting Recipes...
You can use your thvoritc recipes in theCOllVe( tiOll ()veil.
When convection baking, reduce bakingteml)emture b} 25°F or actiwlte the AutoRecipe _"C,onvelsion ti.,amre. Se_ AutoRecipe_ Conversinnin the Special featoms ofyonr ovencentre/s( orion.
casserolesormaindisheshavebeendevelopedusingcommercialconvectionovensForbestresultsin thisoven,preheattheovenandused}etemperatoreonthepackage
12

ge.com
Convection Roast
i_iGoodforlargetendercutsof meat,uncovered
The convection filn cir_ ulat_s the heated
air _wnly owr and around the fbod.
Meal and pouhl 3 m_ browned on allsides as it the} were cooked on arotisserie. Ileatcd air will be circulated
ovel; m'lder and aro'dnd the ikKld bringroasmd. The heated air seals in juicesquickl} tbr a moist and t(nder product
while, ut the same time, _rearing a rkbgolden brown exteriol:
_A]mn you are convection roasting it isiml)ortant tlmt you use a broiler pan andgrid tot best convection roasting resulNThe pan is used to (arch grease spillsand the grid is used to prew:nt grease
spattms.
When baking cookies, you willget the best results ff you use aflat cookie sheet instead of apan with low side&
Cookware for Convection Cooking
Bel}ole t/sillg }OIlI" ColP, e( tioll ovell,
check to see if your cookware leavesroom tor air circulation in tbe o_en.
If you are baking with several pans, leave
space between tbeln..klso, b_ sure the
pails do llOt toucl] _ach oth_r or thewalls of' the oven.
Paper and Plastic
IIeabrcsistant paper and plasticCOllDlillers tll_t arc leCOllllllellded
t_lr use ill regular exerts can b_ used inconvection ovens. Plastic cookware flint
is heat-l>sismnt u) temperatures of 4(XI°Fcan also be: us+.d.
Metal and Glass
.\n} type of cookware will work in )ourCOllVt, Ction OV( 11. nowevel; nletal pans
heal tile ti_stest and are recommended
for convtction baking.
_i;Darkenedorma_e-finisbedpanswill bakefastertbanshinypans
i!!#Glassor ceramicpans cookmore slowly
For recipes lik_ oven-baked chicken,use a pan with low sides. Ilot air cmmotcirculam well around tb_xl in a pan withhigb sides.
How to Set the Oven for Convection Baking or Roasting
] Press tile Convection Bake pador the Convection Roast pad.
] Ih-_ss th+ num[x r pads to sct lh{desired OV(II 1( llll}( l%llIIFe.
[] lhxss th_ Startpad.
To change lhe oven mmpemmre, pressthe Convection Bake or Convection Roast
pad and then th_ nmnb_ r pads to s_tthe llew tellll)el_ttl/l-e.
Wllen the oven starts to h(at, tile
changing tempemtur(, starting at 100°F,will be displa) ed. When the oven reachesthe temp_ ratnl*! you set, 3 beeps willSOHlld.
[] Press tll+ C/ear/Offpad whenfinisbed.
_ Youwill hoara fanwhilecookingwid7convection171efanwill stopwhend_edoorisopened,but thebeatwill not tamof_
_ YoumayheartheovenclickingduringbakingThisisnormal
!3

Usingthe convectionoven.
HowtoSot Ovenfo,ConveotionRoas,nowhen ino theP obe_>*J T at d s _ av _ ] _s _ PROBE a a( I a( eve r_q When fiat internal toni xmtm-e of
.. ., .... OLOJ(Ollll'OI _,Vll] Slgllal II th(, ])rob(, is IllS( Fred [h( let _lt F( H( h(!s [h{t lllllnb( l_ veil
.... into tilt ,.:ullt t, _tlld veil h;l\( llOt set a h_tx'( set, Ill( Is,robe _.lld. the ov(211
For best resuds when roasting large probt I(!llllJ(!l'allll'( alld [)l't_ss(_d the Itll-ll o_] all(I the o'_ell (OIIIF01
turkeys and roasts, we recommend Start pad. signals. 'lb stop the sigmd, pressusing the probe included in the lhe Clear/Off pad. [ se hot pads IoCORVOOtion OVeR
retllc)_+( Ih( ])rol)e frOlll Ihe food.
Do not ust tongs to pull on it_
they might damage it.
] Pla(e file m(k in th{ lowest position(A). Ins(rt the prolx into the In(at.
] Phlg tilt probe into the otltlt:l ill tiltoven. Make sure it is pushed all tileWay ill. Clos( the (*veil dOOl:
] Pr( ss tht Coevectioe Roast pad.
[] Ple'_s lh( nunll)er pads to sol th(desired t}V(?ll t( llll)( l_ltlll-e.
[] Pres, s lilt Probe pad.
[] Ple'__,the llt/llll)(?Fpads to sel tiledeSiF(d il]telllal llleal tel]]|)el%lttlre.
[] Pr(ss tilt Start pad.
CAUTION:Topreventpossib/ebures,donotunplugtheprobefrom#Teoven outletuntiltheovenhascoded Donotstorefl_eprobeintheoven
NOTE:
i!i_,If d}eprobeisremovedfromthefoodbeforethefinal temperatureisroadbed,a tonewillsoundandfl}edisplaywill flashuntil theprobeis romovedfromtbeoven
Youwill hear a fan wbile cook#_gwid_ thisfeature Thefan will stop when the door isopened,but the heat will not turo of{
_iVllell the OVell Stalls to heat, lhe word
LO will l)e ill lilt display.
2*k_'[(l" lilt int(rnal temp(l_ltur( ofth( III(Ht
reaches IO0°F, the changing internal
lemperamre will be shown ill the disl:)lav
_i_,Youcanuse the t#nereven thougbyoucannotuse timed oven operations
;'_On doubleoven mode& you will not beable touse d_eprobe in d_eupperoven during timMoven operations 7[hisis because,with dzeprobe, youare cookingby temperatureratherthan time
Tochange the oven temperatureduring the Convection Roast cycle,press _e ConvectienRoastpadand _en press _e number pads tosot _o now desired temperature
Convection Roasting Guide
Meats Minntes/Lb. Oven Temp. Internal Temp.Beef Rib.BonelessRibr Rare 20 24 325°F 140°Ft
TopSirloin Medium 24-28 325°F 160°F{3to 5 Ibs.} Well 2832 325°F 170°FReefTendedoin Rare 10-14 325°F 140°Ft
Medium 1_18 325°F 1BO°F
Pork Bone-in,Boneless(3 to 5 Ibs)
Chops(1/2 to 1" tNck} 2 chops4 chops6 chops
Ham CannedrButt,Shank(3 to 5 Ibs. fully cooked)
Lamb BonednrBoneless{3 to 5 Ibs.) MediumWell
Seafood Fish.whole {3to 5 Ibs.}
LobsterTails (8 to 8 oz.each)
Poultry Whole Chicken(2V,to 3V2Ibs.}
CornishHensUnstuffed(1to 1V_Ibs.)Stuffed(1 to 17, Ibs.)
Duckling(4to 5 Ibs.)
Turkey.wholeUnstuffed (10to 16Ibs.)Unstuffed (18to 24 Ibs.)
TurkeyBreast(4 to 6 Ibs.}
23 27 325°F 170°F
30-35 total 325°F 170°F35q0 total 325°F 170°F40-45 total 325°F 170°F
1_18 325°F 140°F
17 20 325°F 160°F20-24 325°F 170°F
30_0 total 400°F
20 25 total 350°F
2_26 350°F 180° 185°F
50-55 total 350°F 180°-185°F55 60 total 350°F 180° 185°F
24 26 325°F 180° 185°F
8-11 325°F 180°-185°F7 10 325°F 180° 185°F
16 19 325°F 170°F
t tm, St.<.h! k,g_ a*zdIn(.a_tu ilk l.d to/m'v<_t

Usingthe timed featuresfor convectioncooking. e.com
On double oven models, you can use timed baking or roasting in one oven while using self-clean in the other; you canalso use timed baking or roasting in both ovens at the same time.
Youwill hear a fan while cooking with these features, The fan will stop when the door is opened, butthe heatwill notturn oil
NOTE: Foods that spoil easily--such as milk, eggs, fish, stuffings, poultry and pork--should not be allowed to sit formore than I hour before or after cooking. Room temperature promotes the growth of harmful bacteria. Be surethat the oven light is off because heat from the bulb will speed harmful bacteria growth.
How to Set an Immediate Start and Automatic StopTireovenwillturnonimmediatdyarrdcookforaselectedlengthoftime.At theerdof thecookirTgtime,theovenwillturnoffautomatically_h&e surethe clockshowsthe correcttimeof day
] Pros,,the Convection Bake orConvection Reastp_Jd.
[] Prexs tll_ numbel pads to s(t the desiredoven temperature.
] Pressthe CookingTimepad.
NOTE"If yourreciperequirespreheatingyoumayneedto addadditionaltimeto tire lengthof thecookingtime.
[] Pres;_the mlmher pads to set tile desiredlength of cookh/g time. The minimumcooking time )ou can set is I mimlte.The o'_en teml)erature that you set andthe cooking time that you _ntered will b_in the displa}.
NOTE:If youwantyourfoodto bekeptwarmfor upto3 hoursafterthecookingfunctionisffoished,pressttle Warmpadonce
[] Pros the Startpad.
The displa will sllo_ the dlangh Ntemperattlre (stalting at I00°F) and tilecookhlg time. Th( displa? stalkschangingonce tlle tempe_;iture reaches I00ENOTE"Ondoubleover7models,whenusingbethevensatthesanvetime,betimesshowingb thedisplaywillbeforbelastovenset.Todisplaybe timesetforbefirstevenset,presstheCookingTimepadforthateven.The oven will (:ol/tlntle to (ook t{)rtileprogl'ammed amount of time, then shuteli automaticNl} tml_xsthe _armer _ature_s_sset.
[] Pr(xs dm Cloar/offpad to clear thedispla) if necessa/). Remoxe the foodti'om the oven, Remember; even thoughthe o_en shuc_ off automaficall 5 food leftin the oven will continue cooking afierthe ()veil ttltns OJJ'[
How to Set a Delayed Start and Automatic Stop
Youcansettireovencontroltodelay-starttheover?,cookforaspecificlengthoftimeandthenturnoffautomaticallyMake Stlre the clock shows th( colrect time
cffday
] Pressthe ConvectionBakeolConvectionRnastp_Jd.)
] I res:stlle RUlllherpads to set the desiredox,en tempel',lttlre.
] thexs th_ CookingTime pad.
NOTE"Ifyourreciperequiresprdleafingyoumayneedtoaddadditionaltimetothelengthofthecookingtime.
[] Pres,, the ram]her pads to set the desiredcooking time.
[] Prexsth_ OolayStartpad.
[] Press the tmn_her pads to s(t the tinl(of do} yell _,Xkll?t the ()veil t£) tl.]f'/'l ()n
and stalt cookhlg.
NOTE"If youwantyourfoodto bekeptwamlfor upto 3 hoursafter tirecookfogfunctionisfinished,pressdle WarmpadonceIfyouwouldliketocheckthetimesyouhaveset,presstheBelayStartpadtocheckthestarttimeyouhaveset,orpresstheCookingTimepadtocheckthelengthofcookfogtimeyouhaveset.
[] Pr(xsdm Startpad.
NOTE"Anattentiontonewillsoundif youareusingtimedbakingorroastinganddonotpresstheStartpadafterenteringthebakingorroastingtemperature.When the o_(ri turns on _Jt the time of day
)ou hm_ set, the displa) _dll sho_ thechmlging temperature (stmling at l()t) F) andthe cookh/g time. The displa} stalts changingonce the temperature reaches I00E
NOTE"Ondoubleovenmodels,_zhenusingbothovensatthesametime,thetimesshowinginthedisplaywillbeforthelastovense_Todisplaythetimesetforthefirstovenset,presstireBelayStartorCooklagBraepadforthatoven.The ox,en will (:ont[ntle to cook J_/" die
/)rogl al/lll/ed ktlnount of It[lie, then sl//It
ottautomaticall_ unless the x_armer t_ature
w_ts set.
[] Ples_ th( Clear/Off pad to (:l_ar thedispla} if necessar). Remoxe the tb(xIflom the oven. Remembel, even thoughthe oven shins off automaticall}, fbodleft in the oven will contimle cookingafter the oven ttltns oI_'.
!5

Adjust the oventhermostat--Do it yourself!
Youmay find that your new oven cooks differently titan the one it replaced, Use your new oven for a few weeksto become more familiar with it, If you still think your new oven is too hot or too cold, you can adjust tbetlrermostat yourself
Do not use tlTermometers, such as tlwse found in grocery stores, to check tire temperature setting of your oven•Tbese thermometers may vary 20-40 degrees.
NOTE: This adjustment will only affect baking and roasting temperatures; it does not affect broiling, convection orself-cleaning temperatures. The adjustment will be retained in memory after a power failure.
To Adjust the Thermostat
[] Press lhe Bake and BroilHi/Lo padsat Ih_' sam( lhll_' _(}1"._*S( ( OIVIs t]lllil
Ihe display shows SF.
[] Pr(ss the Bake pad for the o,,enwlli(h you want to us(. A two_ligitnumber shov:s in Ihe display.
Pr(ss Bake a_ain to allernat(bem((n in( rea.qng and de(r(asingthe OV(ll tellll)( l-Ht/ll-e.
] Th( ()veil [(llll)(17/ttll'( (all b(
(! st(dt)t (+)o: FI ,tt( ) (-)3 F(( )l(:t esstlm n rib( ) dsthe s_lll( "_V_l}' }'o1.1 1-( _t(l ill( In. For
ex;ll)]l)l( , 10 (llallg( tile 0_,'( 11
t( _ )e al ( 1 ) E ) ( s 1 and 5.
[] _'Vhell you h_l'_( mad( thea(!justm(nt, press th( Start pad to go
I)ack to 1he time of day display. Lse}'OIlF OV(II _IS }'Oil _',Ollld IlOFlllaUv.
Thetype ofmargarine will affect baking performance/.aMost recipes for baking have been developed using high-fat products such as butter or margarine (80% fat). ff you
decrease tlTefat, the recipe may not give the same results as with a higher-fat product,
Recipe failure can result if cakes, pies, pastries, cookies or candies are made with low-fat spreads. The lower tlTe fatcontent of a spread product, the more noticeable these differences become.
Fedel'al standards require products labeled "mmgafine" to contain at least 80% tht by weight. Louqht spreads, on theother band, (ontain less tit and more warm; The higlHnoismre content ot these spreads af{;vct tile lexttlre and flavor
of baked goods. For best results with you r old fhvorite recipes, use marg'arine, butter or slick spreads (ontaining at least7()(/_ veg(table oil.
16

Usingthe self-cleaning oven. o.oom
The oven door must be closed and all controls must be set correctly for tlTe cycle to work properly,
Wipe up heavy soil on file evenbottom (appearance may vary)
Before a Clean Cycle
We recommend venting your kitchen
with an open window or using aventilation thn or hood duringtile fh-st self-cleml (_,'cle.
R(mo_e any broiler pan, broiler glkl,prob(, all cook_are and any ahllllilltllllibil h-ore tilt ov(n.
The o'_ell racks ma} Felllail] ill Ihe overt
during lh( selfkcleaning c}cle withoulI)eing damaged.
I)o llol llSe al)msives or ov(n cleaners.
Clean the lop, sides and outside of"IheOV(_ll dooF wilh soap alld wail'l;
Mak( sur( th( oven light bulb co,,eris ill place and tile oxen light is off.
IMPORTANT."The heahh o_ some birds
is (xtrem( Iv sensitive 1o the filmes givenofl during the self-vleaning Q'cle ofam" ov(n. Move birds to anotherwell-ventilated room.
)'2On double oven models, you canset a clean ode in both ovens at thesame time. The last ow'n s(t will
automaticall} delay its start until theend ot the first oven's dean cxcle.
}),1 ()ll dotlbl( ov(ll rood( Is VOtl (all
us( limed baking in Olle i)_.(]l allds(ll:clean lhe olhel-at lh( sam( tim(.
CAUTION:Neverplacerookingutensilsoranyedgeritemsond?eovenfloor Thereis aheatingelementbeneaththeovenfloorPlacingitemson£l}eovenfloormaycaasetheoventoovefl}eat,resultingin damageto dTeovenandriskofdamageor fire to cabinets
How to Set the Oven for Cleanhlg
[] Press lhe SelfCleanStd/Lowpad011(( for a Amhotll (l(all tillle Of
p,',i(e Jbr a 3-hc,ur ,-lean lime,
A M t s( lt-_k a 1lira( isr(commen(/_d tor us_ when
('l(aning small, (ontained spills. As(lf-(l(an lilm of 4 hours or long(ris l-e('Olllln( ll(l((I lCt)l - a dilti( F OV( II.
] Ifa lime other than 4 houl's or3 1 n s "s (ed_d, t s lh( llUlllbelpads aim enter the desired ckantim(.
_.im can chang( the (l(an tim< to anytim(/)et_een 3 hours and 5 lit)Ill'S,
depending on how dirty your OV(:IIiS.
[] Press Iht Staff pad.
The door locks automatically The dispLJ?
will show the dean time remaining. It willnot be possible to open the oven door
until the temp(t-,iture drops below thelock temperam re and the LOCKED lightgoes ell
When th_ LOCKEDIight goes oil; you _ill
I)e a])l( to opell Ill{: (1oo12
i!i:"The words LOCKEDwillflash and the
o,,en control will signal if you set theclean cyck and t;._get to ch_e the(Ix, ell dool_
}!i:""I)_stop a clean cycle, press theClear/Off pad. When the LOCKEDlight goes off indicating the oven hascooled below the locking mmperamre,you will be _ll)le to open the dool:
!7

Usingthe self-cleaning oven.
The oven door must be closed and all controls must be set correctly for the cycle to work properly,
How to Delay the Start of Cleaning
[] ]:'ressthe SeffCleanStd/Lowl)adon((' _)l" a 4-hotly ( le_lll lilll(' OF
r, dcelora -hot (h _11 he.
A ?.hour self<lean tim_ isl_(:COllllllende(I f_)F rise whell
cleaning small, colllaill( d spills, ksell:-clean lime ot 4 hours or longeris recomnleri(hd fbr a dirtier oven.
[_] Ifa time (:)filer than 4 hours orhot]l'% is llei'(l(_d, llS0 [he ll/lllll)el-
pads and enler Ihe & sir( d (leanlime.
You can chang( the than lime 1(:)kRII}• , )
1 n(? I)el_( e I o hoIIl-S fill(1 5 holll'S,
del)( riding on how dilly your oven is.
[] Pr(ss th( DelayStart pad.
] lsing th( numl)er pads, ent(r thetinle of(lay you "¢_alll lhe (l(:_ln (}'(l(lo S[al-[.
"File door locks automaticall?: Th( disi)laywill show tile start time. It will not be
pos*ible to open the oven door until
tile temp_ ramre drops below the h)ckmmperalure and the LOCKEOlight
goes ott.
When the LOCKEDIiRht goes off; y( t _ill
I)e al)le Io Ol)(n Ill{: dOOl_
NOTE:Ondoubleovenmodels,youcansetadelayclean&bothovensat thesametimeThesemndovensetwill automatlsallydelaythestartof cleanleguntil theendof thefirstoven'scleancycle
Torecallthestarttimeof thesecondovenset,presstheDelayStart padonthecontrolsforthesecondoven
[] Press the Start l)ad.
After a Clean Cycle
_'_)u lnay nolice soln( white ash ill the
( _,( . _&'l)( "t ) _a'lh a damp (:lolh it]_'1(!1
lh( ov{!ll (eels.
/f whitespotsremale,removethemwithasoap-riflMsteel-woolpadandrinsed?oroughlywitha vinegarandwatermixture
These d(posils are usually a sah r_sidue[hal C_lllnO[ l)e 1-01]lov(d bv [he cl0all
(-_'( le.
It th_ ov{n is not clean al'hw (.le chart
cycle, rel:)<tt lhe cych.
2_i{_i)tlcannel s(t ill( oven h)l-cooking1mill the o_,en is (,.)ol ( hough tim th(door lo//lllo('k.
!2_While tile oven is seltZch aning, you
can press the Clack pad to displayfile lime ot daT< To return to lhe
clean countdown, press tile SelfClean Std/Low pad.
!2_If'th_ racks b( come hard 1o slide, _dl)elhe rack supl)orts wifll cooking (ill.
18

Special features ofyour ovencontrol, ge.com
Yournew touch pad contro! has additional features that you may choose to use. The following are the featuresand how you may activate them•
The special feature modes can only be activated while the display is showing the time of day They remain inflTecontrol's memory until the steps are repeated.
When the display shows your choice, press the Startpad. The special features wil! remain in memory afterapower failure, except for the Sabbath feature which will have to be reset.
12-Hour Shutoff
Withthis featare,shouldyoaforgetandleavetheovenon,thecontrolwill automaticallytamoff theovenafter12hoursdadngbakingfunctionsorafter3 hedgedadnga bmflfunction
Ityou wish to mrn OFFthis _amr<, fbllo_the st(ps belong.
[] Press fll( Bake an(l Bmil Hi/Lopads (on doublc ov(n modds, usethe oppero_en CoIIlFOIS) at tile sam{
time for 3 seconds, tmtil thc displayshows SE
[] Press th_ OelayStart pad untilno shdn (no shutotl) aplx m_,,illth(displa).
] Press th_ &"tart pa(I to actixat{ the noshutof'f'and l(av( Ih( control s(t in
this special f(umrus m_xle.
NOTE:On doubleoven models, this activates thisspecial featare for both ovens
12-Hour,24-Hour or Clock Blackout
Yourcontrolis"set to usea 12-hourclock
If:you wouM pretiq _ It) have a 24qlourmilitalw time do(k or/)la( k out Ihe clock
displa): follow Ihe stel)s I)elo_._,c
[] Press tll_ Bake and Broil Hi/Lo
pads (on doubl( oven modds, use
the opperoven controls) al th( same• ? _ ) ,
t ef_ as(( _ ds, untilth(displayshows SE
[] Press tht Clock [)ad on((. Th(display will sho,a t2 hr. If this is
the choic( VOll Wall[, pl'{ SS [h(_
Start pad.
Press the Clock pad again to chang(,
to tile 24-hour milita_ y tim( dock.The display will show 24 hr. If this
is th( choice you want, pr(,ss th_Start pad.
l)ress tile Clock pad again 1o Markout the clo(k display. The displaywill show OFF.If this is the choice
you want, press the Start pad.
NOTE:If theclockis in theblack-outmode,youwill notbeable.to usetheDelayStartfaocfion
Fahrenheit or Celsius Temperature Selection
Yourovencontrolis set tousetheFahrenheittemperatoreselections,hotyoumaychangethisto usetheCelsiussdecfions
[] Press dw Bake and Broil Hi/Lo
pads (Oil (lotlble ov(,l] HI(Klels, tlSe
the opperov_n controls) at file sam(
t'n(f) 3s((o_ds, _t'lflwd's)l_?,shows SE
[] Press lhe Bmil Hi/Lo and CookingTime pa(Is again al Ih( same tim(.
The display xdll show C (C(lsius).
[] Press th_ Start pad.
NOTE:On doubleoven models,dTenew settingwill bedisplayed for both ovens
[] Pr{ss th( Bmil Hi/Lo and CookingTime pads at the stone tim(. Th(
disl)lay will shox_ F (Kahrenhdl).
!9

Specialfeaturesofyourovencontrol
Tones at the End of a Timed Cycle
At tbeendof atimedcycle,3shortbeepswillsoundfollowedbyonebuepevery6secondsuntilti_eClear/Offpadis"pressedThiscontinuoas&secondbeepmaybecancelec_
"Ib cancel the 6-second beep:
I_ Pressthe Bake and BroilHi/LorL_
pads (,.m doubl( oven m(×Ms us{th_ upperoven<,,mtrols) al the same[ I ( i( 3 Se(7Otl(]S, until the displayshows SE
[] Pressthe Kitchen rlmer On/Offpad. Th_ disl)lay shows CONBEEP((ontinuous b('('p). Pres,,theKitchenTimerOn/Offpad again.The (]ispl_lyshows BEEP.(Thiscancels the one beep reel T6 seconds.)
[] Pr(ss th,.: Start pad.
NOTE."Ondoubleovenmodels,titis cancelstileend-of-cycletoneforbetbovens
Auto Recipe TM COIIVeI'sioII (onsome models)
Wbenusingconvectionbake,theAutoRecl}_eTM
Conversionfeaturewill automaticallyconvertenteredregubrbakingtemperaturestoconvectionbakingtemperatures
OncetiTefeatareis activated,ti?edisplaywill showti}eactualconverted(reduced)temperatureForexample,if youentera regularrecipetemperatareof 350°FandpresstbeStartpad,ttledisplaywill showCONandtheconvertedtemperatureof 325°£
NOTE."Thisfeaturedoesnotconvertconvectionbal<ecookingtimes,onlyregobrbaKngtemperatures
Toactivate the feature:
[]
[]
Pressd_eBakeand BroilHi/Lopads (on double oven models,IlS{: Ill(? opperov_n COIItFols) at
Ihe same lime i(}l- ._*s( COlldS,
llll[il lh{_ display ,,hews SF.
Press th< ConvectionBake pad. Thedisplay will show CONOFF.Pr(ss 1heConvection Bake pad again. Thedisplay will show CONON.
[] Press thc Start pad.
To dea(lixate file f_amre, rep(al sleps1-3 al)ov{ 1)1t )-{ss tile Start l)ad wh(nCONOFFis in the (lisl)la).
20

Using the SabbathFeature.(Designedforuseon theJewish Sabbathand Holidays.)(onsomemodels) ge.com
The Sabbathfeaturecan be used for bakflTg/roastingonlI4 It cannotbe used for convection,broit&g,self-cleaning orDelayStartcook&g.
NOTE:The ovenlight comes onautomatically(onsomemodels)when the door is openedandgoes off when the door is closed•Thebulb maybe removed•Seethe OvenLiglTtRepbcement section.Onmodelswith a light switch ol7the controlpanel, the ovenfight may be turned ol! and left on.
How to Set for Regular Baking/RoastingMake sure the dock shows the correct time of day andthe oven is of_
] Press ala(I hokl both Ibe Bake and BroilHi/Lo pads, at the same time,/mtil th_display sl_ox_ SE
[]
NOTE: It bake o1"br(;d appea_, in file
diNfla}: the Bake and Broil Hi/Lo padsWel'e I/Ol tOL]cht'd k_l [hu S_II/_I( * til_3('.
Touch t]lc Clear/Off pad and begin again.
Tap dl( Oela g Start pad until SAb bAtH
appeal:, in th_ display.
7_When tlw display shows D theoven is set la Sabbath. When thedisplay shows r_ c the oven is [_baklag/roasting
Toucll Ill_ Start pad and • will appear in
th( displa?
_])m(:l/Ihe Bake pad. No signal will
be given.
] I,s'ng th{ tmmlx:rpads, emer the desiredtemperature lx_tween 170°F and 550°E
No signal or ternF_:mlure will 1t(: given.
] _Ii)uch Ihe Start pad•
[] Afl(r a i',mdom (lel_y p( tied of
approximatel} 30 s_c(mds 1o 1 mimlt_,
• (- will appear ill file (lisplay indic;ling
that the oven is bakingiroasiing, g • c
doesn't tpp_ar ill the (lispl;9; stall
again at Step 4.
"1"(_t(!just the o_en temlcx:raulre, touch tb(
Bake pad, (l/t('l [lie i/(w I( illp( Fdtllr(_ t/Sil/g
Ill( ii/imlN:r p_lds, and touch the Startpad.
NOTE:Tb_ Clear/Off;rod Cooking Time pads are
a(tive dm'ing tb_ Sabba{l/_;lltu'_.
When the display shows D tlwoven is set la Sabbath. When thedisplay shows_) c- the oven isbaking/roasting,
How to Set for Timed Baking/Roastiag - hnmediate Start and Automatic Stop• o •Make sure the clock shows the correct time of day and T(m(h th_ Bake pad. N_ s gl _1_ 11b
the oven is off. [] given.
] IhessuldholdbothtlleBakeal_(1Bmil Using tll_ mlmber pads, enter II1_Hi/Lo pads, at the saw_ time, until the [] desired t r/p_ _t _e. N_ s',g / 1 o
displa} sho_ SE tempex>ltme _ill be given.
[]
[]
[][]
NOTE: If' bake or broiliqapeal in the
diNfla}: the Bake and Broil Hi/Lo padsWele i/el lo(iched at the S_lllle time.
Touch the Clear/Off p;_d and begin
again.
Fap the Delay Start pad until SAb bAtHappcm_ ill the displ ty•
Fl)tl(:ll Ill(t Start pad and • will appeal- ill
th( displa}
Foucl/ II1¢ Cookieil Time pad.
[]
T{ R/oh l]le DtlI/lb( I" pads tO set th(
desired length e! cooking lime between1 mimlte and 9 hout_, and _Ef mim_tcs.
FII( (ooking dine that yoo enraged will
be displayed.
F_mch Ill( Start pad.
[][]
Touch th< Start pad.
After a landom (k 1;_yp(ri_l ot
;tpp_oximatd} 30 s((onds to I nfinut(,
• • will appear in the display indicating
that th_ oven is bakingir0asting. It D c_
doesn't ;q:)p(ar ill the displa}, start
aguin _t Step 7.
To a(/jusl th( oven temp(x_llure, tou(:h the
Bake p_t(I, ol_t(:r _/e new le]_/per_fltlre LISillg
Ihe munber pads and to/_ch tbe Start pad.
When cooking is finisll(d, fl_ displ_ 9 will
change horn • c to • and 0:_0will appem;
indi(aiing thai th_ oven b;_ mrn_d OFFbut isstill set in Sabbath. Remoxe tile cook< d food.
How to Exit the Sabbath Feature
[][]
[]
TI)ucll Ill_ Clear/Offpa(l•
I{ tlIe oxen is cooking, '_ait tx)l a tun(h)]ndelta period el: approximalel) 3(1 _:conds
to 1 miracle until (rely • is in the displa)•
Press and bold both tile Bake and Broil
Hi/Lo pads, at the same time, umil ill<display shows SE
[] Tap the OelayStart pad until I2shd#or no shde aplxta_,_ in Ih( dispkiy. 12shd#
in(li(at_ s thai tb( oven will automatk ally
ttlrn Oil at/el- 12 hours, no shde in(lical(_
tl/at tlle o',(n _aill not automaticallyIurD ofl_
] "I'_m(h Ill( Staff pad.
NOTE: Ifa power outage (×:curred whilefile o_e_/was in S;d4_afl_, the oven will
_utttn/ati(:idly flirt/ Ot_" 31/(I st;l_ off ev(:ll
when the powei Iet//l_/S• The O_el/ COI/D'ol
l/l/let be rt'set•
21

Care and cleaning of the oven.
Be sure electrical power is off and al! surfaces are cool before cleaning any part of the oven.
How to RemoveProtective ShippingFilm andPackaging Tape
Carcfhlly grasp a corner ot tile protectiveshipping film witll your tlng(,l _, and slowly
peel it tiom tile appliance surfhc(. DoIIOt t/se ally sllalp items to l-t*lllove the
t_hn. l{('nlow all ot the t_hn ])ell)re usingthe appliance for ]be ]]l_,t time.
To assure no damag_ is done to tilet_nisb of the product, tile safi_st way to
relllove tile adbesive l'rom packagingta])_ on new ai)pliances is an appli(ation
of a llousehold liquid dishwasbingdetelgent. Appl} with a sofi clotb an(]allow to soak.
NOTE:Theadhesivemustbe removedfromallparts fl cannotberemovedflit is bakedon
Oven Light Bulb
NOTE:Tbeglassrover(onsomemode]eldlouldberemovedonlywhencold Wea_leglatexglovesmayoffera bettergrip
Betin-e replacing the ])till), disconnectelectli(al power to tile oven at the main
fuse or circuit breaker panel. Let thebulb cool completely bef_)re renloving it.
For your sal_kq},do not toucll allot bulbwith a damp (loth. If you do, ]be bulbwill break.
Toremove:
Turn the glass cowr counterclockwis(1/4 turn until the tabs of' tbe glass coxer
clear tile grooves ot the socket. Removclhe bull).
Toreplace:
])tit ill a nt'w 40-watt al)pliml(t" bulb.])lace lhe tabs el tile glass cover into tile
grooves of tile sockel. "Iku'n tile glasscov(r clockwis( l/4 mrn.
NOTE:
_'_A 40-wattappliancebulbis smallerdTanastandard40-watthouseholdbulb
i!i:,Reconnectelectricalpowerto tbeoven
i!i:,Forimpmvedlighdhgbside theoven,cleantbeglasscoverfrequentlyusinga wetclothThisd;ouldbedonewhentheoveniscompletelycool
22

ge.com
Do not rubor clean the doorgasket--it has anextremelylow resistancetoabrasion,
If younotice thegasket becomthgworn,frayedor damagedin any wayor it it hasbecomedisplacedon the door,youshoddhave it replaced
Cleaning the Oven Door
Toclean theinsideof the door:
i#i' Because the area inside the gasket iscleaned during th( seltklean cycle, youdo not need to cleml this I)x hmld.
_'_"File aria outside tile gasket andtile door liner call be cleaned with a
soap-filled or plastic scouring pad,hot water and detergent. Rinse x_cllwith a vineg'm- and water solution.
Toclean the outside of the door.
}al "s{ so_ ) d water to Ihoroughlycleall Ill( top, sides and fi-ont of Ill(OX(I] dooE l_JllS( _ell. _i_O!l lllav _lJs, o
like a glass el( allel 1o (le_lll Ill(! glass
oil the omside of tile door. Do not letwater drip into the writ openings.
i!!!_It any stain on llle door vent him ispersistent, use a soft abl'dsiw (leaner
and a Sl)onge-scmbb_ r for best resuhs.
!_ Spillage ot marinades, fiuitjuices,tOlll3to Satlces alld basthlg materials
containing acids may cansediscolo_-,ition and should be wipedup immedialel3< When surti_ce is cool,clean and rinse.
[)0 llOt /IS( oven cleaner:,, cl(aningl)owd( 1_or hm_-,habmsixes on th(outsi(l( ,.)f the dooL
Slot
Hingelock
Pull Bingo locks down to unlock
Romoval posifion
Lift-Off Oven Door
The door is very heav3z Be careful when []removhag mad rifting the door.
Donotlift #}edoorbythehandle.
Toremovethedoor:
[][]
Fully open Ill(! dt)o12
Pull th( hinge locks down towardthe door h-ame, to, th( unlo(k(d
position. A tool, such as a small tlal-blade s('r( w(hi'_(l, may be r( (luired.
[] FirnflY grasl) I)°th sid_ s °t the d°°rat th(1o1:).
] (_lose door to Ill(: door r( moralposilion (see illuslmtion).
[] Lift door up and out until thc hingeHI-Ill iS (leaf Of Ill(: slot.
Toreplace the door.
[] Firmly gras[) I)oth sides of the door;atth(tOl).
[]
[]
With the Bottomdoor at th( edgesame angle as 0tslot,the remo_d
position, s(at theindentation of
the hinge arminlo the bottom
edge of the hingv ';lot. The nolth in
the hinge arm must be full) seat(dinto the bottom ot the slot.
Fully open the (loot: If the door willn,at fillly olxn, the indentatic, n is
llot sealed corre(lly ill the 1)otlolll
((Ig( ol Ihe slot.
Push Ill(: hinge lo(ks up a_ainst th__}'Oll[ ['l'Hlll{_ ot th( i)vell C_lvitv to Ill{!
lock(d l)osition.
arm
Hinge10ck
Push Bingo locks up to lock
] (]los( the ovell dool_
Probe
rI'he tempec, mne probe may be cleanedwith soap and wamr or a soap-filled
scouting pad. Cool tile temlx l-atureprobe before cleaning. So(mr stubborn
q;,ots with a soap-filled scouring pad,rinse and (h};
23

Care and cleaning of the oven.
Oven Racks
_MI oxen racks may b( clean( d by handwith all abrasive { 1{ allel of sl{_{ ] wool.
_'M'ter chaning, rinse the rad<s with cleanwalel alld (11_,' with a clean clolh.
The ovell I_Icks lllaJv Felnaill ill th( OV(ll
during self:cl(aning c?cle without beingdamaged.
If the l-acks become hard to slide, wipe
their side (dges with a light coating otvegetable oil after cleaning them by hand
or in the oven. This will help maintainthe ease ot sliding the l-_lcks ill and outof the ovelL
Centre/Panel
It's a good idea to wipe tile controlpanel al_er each use. Clean with mild
SO_.p alld water or xillegaF and watel;rinse with clean water and polish d_T
with a soft cloth. When cleaning, thecontrol panel should be at r_om
tempemtln-_ and not ill direct sunlight.
[)O llOt llSe abrasive {Ieallsers, SlFOllg
liquid cleansee,, plastic scouring pads or
oven (leaners on the control panel--lh(ywill dama_t, the tfinish. A 50/50 solution
ot _inegar and hot water works w(ll.
Stainless Steel Surfaces (onsome models)
Donotusea steel woolpad,"it will scratchthesurface.
"['o clean the stainless steel surthce,use warm _u(lav water or a stainless steel
cleaner or polish. Nway_ wip( the surtsceill the direction of the grain. Follow the
cleaner instructions lot cleaning thestainless st(el surthce.
'Ib inquire about purchasing slainlesssled at)plian( e <'leaner <>1-polish, or u>
find tile location of a dealer nearest )on,[)lease call our toll-tree number:
NationalPartsCenter1,800.626.2002
ge.com
24

Before YouCall ForService... ge.oom
Troubleshooting tipsSave time and money! Review the charts on the followingpages first and you may not need to call for service.
__!, Possible Causes What To Do
You forgot to enter a hake * Press Ill(' Bake pad and (h,sircd t( ml)eramr( or lhetemperature or cleaning Self Clean Std/Low pad and desired d_an time.time.
Oven controls improperly ,set. * See th( Using the oven se(tion.
Rack position is incorrect * See th( Usil?g the overt s(!(tion.or the rock is not level.
Oven floor not in place. * Repla(e th_ oven flool;
Oven thermostat nee&s • So( dae Adjust the ovelt thermostat--Do it yourself!
adjustInent, section.
Oven door is open. • Close dm (loon This lm)d(l is designed fi'>r dosed doorbroiling only. Ah_ays broil _Gth th( door (los(d.
Oven controls improperly ,set. • Make sure you press the Broil Hi/Le l)ad.
Improper rack position *' S(c th( Broiling Guide.being _sed.
Food being cooked • For I)(st results, use a pan designed for broiling.in a hot pan. Make sure it is (ool.
Cook_,m'e not suited • For besl r(sults, us( a pan d(sign(d for broiling.for broiling.
The probe is plugged into the **I hi)lug mid r(lnox( Ihc [)l-ob(: _i'oln Ihc OV(II.outlet in the oven.
In some areas the power **Pl-(theal th( broil (l(m( nt fbr 10 minut( s.
(voltage) may be low. * Broil f;_n-the long(sl period ()f"lime r{ (olnmended ill
th( Broiling Guide.
h fttse hi your home nl_v t)€ * ]_xplace ill( lily,( or rcs(t I11( cir(zuit break(l:blouTi or the circuit breaker
tripped.
Oven controls improperly set. • Se( th( Using the clock, timer and control lockoutsecli()ll.
Light btdh is loose or defective. • Tighten or r( l)la(e th, bulb.
Pad operating light is broken. • Call lbr s(rG((.
25

BeforeYouCallForService...
Troubleshooting tips
Possible Causes What ToDo
Oven thermostat • See the Adjust the oven thermostat--Do it yourselfl
needs adjustment, section.
A t'use hlyour home may " R(pla({ th( fuse or res<t th( cir( uit break( t:he blown or the circuit
breaker tripped.
()veil coniTols improperly set. # See th( Using the oven sectioll.
The oven temperature • ,kllow th( ov(n to cool and reset tile controls.is too high to set aself-dean operation.
Oven controls improperly set. • See tile Using the self-cleaning ovell section.
The probe is plugged into • R(move the probe fl'om the oven.the outlet in the oven.
This is the sound of the • This is normal.metal heating and cooling
during both the cooking madcleaning functions.
Excessive soil. • t)r(ss the Clear/Off p_ld. Open tlw windows to ridtile room of smoke. Wait until tile LOCKED lighl goesofl_ Wip( up th( ex(ess soil _lnd reset the dean (vcl(.
()Veil too hot. " Allow the oven to cool below locking temperatllr(.
Oven controls not properly set. • S(e th( Using the self-cleaning oven s(ction.
Oven was heavily soiled. • Clean tip heax T spilloxers befol( starting the cleancycle, tieavilv soiled ovens may 11(((I to s(lf:cleanagain or for a long(r p( riod of time.
The self-clema cycle has • Clos( the oven do(,r.been selected but thedoor is not closed.
The oven door is locked *Pr(sstheClear/OIIpad. Allowtheox(nlo(ool.because the temperature
inside the oven has notdropped below thelocking temperature.
26

ge.com
Possible Causes What To Do
You have a function * ])ross the Clear/Offpad. Allow tll(, oven to (eel fbrelwor code. one hom_ Put the ov('n t)_lck into opcralion.
If the function code repeats. * [)is(onne(t all power to th( oxen for at least 30seconds and th(n rccomm(t pew( r. If the fun(tionerror (:ode repeats, call for s( rvic(.
A fuse in yovr home may 'b l_.el)lace th(, fuse or res( t 1he circuit/)reake,,be blown or the circuit
breaker hipped.
The clock is in the * Se( the Special features of your oven control section.black-out mode.
Power f_filu,'e. • ]_.(stl th( ch,ck.!
Oven control pads were "*The Bake and Broil Hi/to pads (on doubl, ov(n" not pressed properly, models, us( the Ul)l)er oven controls ) nltlsl I)e
This is reminding you to • Enter a prob( temper_lm re.enter a probe temperatm-eafter plugging in the probe.
Power outage or surge. • Reset the clock. It tilt* ovcn was in use, you must r(s(tit by pressing the Clear/Offl)ad, setting the clockand resetting any cooking function.
When using the convection • This is normal.feature, it is normal to see
steam coming out of theoven vent. As the numberof racks or anmunt of
food being cooked increases,the amount of visible steamwill increase.
This is normal in a new oven • "Ib speed tile proc(ss, set a self-clean cxcle fin" aand will disappear in time. " l" t el 3 I t s. Se( the Using the self-cleaning
ovel7 s( ction.
An odor from the insulation • This is temporary.around the inside of theoven is normal for the firstfew times the oven is used.
A coofing fan or a convectionfan (depending on thefunction you are using)may automatically turn on.
• This is normal. The cooling thn will turn Ollto cool internal parts. It may run tot up to 1-1/2houl-s after tile oven is turn(,d oft The convection
thn will (ycle on and olt' until the filnction is overor the door is opened.
27

m
_ Notes.
€_m
_hw
_h
m
h
28
/Votes. ge.com
_t
l_
m
m
29

m
._ Notes.
m
R
m
m
r_
3O

GE Service Protection Plus"
(:;F,. a name reco_,-niz('d_, worldwide for qualiI 5 and d(p(ndabfltI , otT_ rs voS(?I'VtC(?Pro (!( [t()tl I his --( OII/t)F( lit- tl. IX( ])ro|c('liOl/ Olt all VOIIF, alt ) tlianccs--.No Matter What Brand!
Benefits Include:
• Backed by GE• All brands covered
• Unlimited service calls
• All parts and labor costs included
• No out-of-pocket expenses• No hidden deductibles
• One 800 number to call
We'll CoverAny Appliance.Anywhere. Anytime.*
You will /)_ <ompl_tcly satistied wilb our scr',ice pr()t_ clion or you may r_ <luest your monQ,' ba<k
on tll( r(maining vahl( of yore- co1111-_3c1.No qu(stions asked. It's that simph.
Prot_ ct your reh-igeratol; dishwashel; washer and dl?:el; range, TV, VCR and much more--any brand!
Phls there's no extra charge for emergency service and low monthly finandng is available. 1,'Nell k emaker
coxerage and food spoilage prolection is oHbred. You can rest easy, knowing that all your vahlable
household products are protected against expensive r(pairs.
Plac( your (,,nl_dcn(e in GE and call us in lhc U.S. toll-f'r(e at _UU._Z_.ZZZ_
[or nlor( ill_()rlllatioll.
: \]] bl llldS (ov(!l( d, Ill) Jo _0 _{!111 s old, ill In(! (Olili11(!IIIii] [
........................................................................................... _=r. ._2."_'_"._2_2...........
Please place in envelope and mail to:
General Electric Company
Warranty Registration DepartmentP.O. Box 32150
Louisville, KY 40232-2150
31

Consumer Product Ownership RegistrationD(tH l- CAIs| olII_!Y:
Thank you• for lmrchasing, our l)r°duct and thank you {k_rplacing your confid(nce in us.
_,7( _11-(2 pr,.)lld Io ]la,._ }_O11 _tS _t (US[OIII(!Y!
Follow these three steps to protect your new appliance investment:
1 Complete and mail
your (_OllSIIlnor
Product Ownership
Registration today.Ha_e the peace of
mind ot knowing we
C_HI C(I//LICt }'Oil ill
die unlikely evenl of a
satct modificalion,
Ati_I mailing Ihe
I e_ist ralJol/ below,
'itoi-e l]/iS do(T/ll_l(_lll
in a sati_ place. ]1
you will need should}) re(l/lil-e seivJlTe,
()/11 ¸ service n/in/]31_f is
8(10A;EA_ARES
(800A32.2 3 ).
Read )?(¸)Ill ¸ OWI_(_/'5
Manual carefllll)
It will help you
opcq'att* o/w i/e_,_
appliarlcc ploperly.
Model Number Serial Number
IIIIIIIIIII IIIIIII
Important: If you did not get a registration card with yourproduct, detach and return the form below to
ensure that your product is registered, or registeronline at ge.com.
_._ ( fill here
Consumer Product Ownership Registration
Model Number Serial NumberI I I I I I I I I I I I I I I I I
M_ Ms M_ Miss
Filsl I I,,s, INmm I I I I I I I I I Name I I I I I I I I I I I I
Sl F_!OI [Add_ ss I I I I I I I I I I I I I I I I I I I I I I I I
ApI # I I I I I I I I l_-mail \d&ess:
I ZipI I(:iq>I I I I I I I I I I I I I I s_,_I I (,,d_, I
l) tle Phled
InlLsl _ Ph°HI' lMonl]l Nlunb_l ] [ [ [
GE Consumer & Industriol
ApplioncesGeneral Electric ComponyLouisviNe.KY40225ge COIT)
22
Please pmxide xou* t_mail address t_>leceix_, via c-mail, discounls, spedal ottiq _and olhe/important
comm/micafions flora GE Appliances ((;EA),
i_ Check he_ if you do not _nt to receiw" communications fl-om (;EA!s carcthl_ selected parme_,
FAII )_TRETO COMPI,I,'q_ \NI) RETURN THIS CARD I)OES NOT DIM_ISH YOUR
WARI_-_N_[YRIGHTS,
_r more inti_n_/ation aboul GFoA!sprivacy and data usa_ polio; go to ge.com and click on
"Pri_ PoliO' or call 800.626,2224,

GEBuilt-InElectricOvenWarranty.
Al! warranty service provided by our Factory Service Centers, oran authorized Customer Care® technician. To schedule service,on-line, 24 hours a day, visit us at ge.com, or call 800.GE.CARES(800.432.2737). Please ha ve serial number and model numberavailable when calling for service.
Staple your receipt here•Proof of the original purchase
date is needed to ebtaht serviceunder the warrant_
___!:_ GE Will Replace:i i
Anypartof the (_ _H whi( h thi]s due t(__ (li t_( t h_ m;_l_ria]s or _ orkma,_ship.Duri_g this limited one-year warranty, GE will ;dso providc , free of charge, ;dl l_fl)(,r
i!i_"Service lri_s to your home to teach you how to
use the product.
_'_Improper h_stallation, delivery or maintenance.
_'_Failure of the product if it is abused, misused,or used for other th;m the intended put'pose
or used conunercially.
i!i_"Replacement of house fuses or resetting of circuitbreakers.
!_ Damage to the product caused hy accident, f'tre, floodsor acts of God.
_ Incidental or consequentiM damag'e caused by" possible
defects with this appfiance.
_ Damage caused after delivery.
!i;_Product not accessible to provide required service.
EXCLUSION OFIMPLIED WARRANTIES--Your sole and exclusive remedy is product repa# asprovided in this LimitedWarranty.Any implied warranties, including the implied warranties of merchantability or fitness for a particular purpose,are limited to one year or the shortestperiod allowed by law,
This warranty is extended to the original purchaser and any succeeding owner for products purchased forhome use within the USA. ff the product is located in an area where service by a GEAuthorized Servicer is notavailable, you may be responsible for a trip charge or you may be required to bring the product to an Authorized GEService location for service. In Alaska, the warranty excludes the cost of shipping or service calls to your home.
Some states do not allow the exclusion or limitation of incidental or consequential damages. This warrantygives you specific legal rights, and you may also have other rights which vary from state to state. Toknowwhat your legal rights are, consult your local or state consumer affairs office or your state's Attorney General
Warrantor:General Electric Company.Louisville, KY 40225
33

ConsumerSupport.
gEAppliancesWebsite ge.com
Ilaxe a question or ne¢d assislmlce with y n - pp _ _?'I'E_' 1¢ GE \pp a ((s W( )s e 24 horns a (Iraany day of the }'(arl For great( r (ol_velfience and f_lst(r s(lwice, you can no_ download (hVll( r's Mmmals,
ordel l)_trls or ('_,( 11 s('he(h/l( s( rxi(:( oll-lin(.
ScheduleServiceFxpert GF repair selvice is only one step away R-ore your (too1_ Get onqin( and schedule your s(lvi(e atVOllr (7OllV(!lli(!ll(?(? _4 holllN _/IIV d_lv ()_'th{ year! - ' ' • _ _ _ _'- -" "
/)llSilleSS hoil l'S.
ge.com
RealLifeDesignStudio ge.com
GE supports th( [ niversal Deqgn concept--pr,)ducts, services, and environment _, that can be us(d b)
people ot all ages, sizes and capaNlifies. _ rcc(Nnize the ne(d to design tot a wide r,lnge ot physical andmental abilities and impairment', For details ot GE's [ niver_al Design apl)lications, including kitchen
design ill(as fi)r people with disabiliti(s, ch(ck i)ut our \gebsite loda}. For th( h(aring impair(d, l)leas{ (:all800.TDD.GIL\C (800.833.4322).
ExtendedWarranties ge.com
_udlasc a GE (xtended wm_mnty and learn al)olll spe¢ial discounts that are availabl( whil¢ your warranty
is still in eff(!ct. You can lmrchase it ol>lin( _tllylilll(, or call 81X).626.2224 du ring llOFlll_ll I)llSilleSS hours.(;E Consum¢r I Iome S( lvices will slill I)e Ihere ally. r your _A-_III-_tlIIT_'expires.
k.________
PartsandAccessories ge.com
Individuals qualili(d Io s( l-Vi(( th(ir own apl)liances <an have parts or a(< ( ssol-i¢ s s(nt dir{ lily to th(irhom(s (VISA, Master(_ard, and Discov( r (_ar,:ls m-(ac(xl)ted). O-( ( - I- 1( __ y, 94 1( "s('_'( T ( _?'_ "by
[)hone at 8()1).626.2(X)2 during normal busin(ss hours.
Instructions contained in this manual cover procedures to be performed by any user. Otherservicing generally
should be referred to qualified service personnel Caution must be exercised, since improper servicing may causeunsafe operation.
ContactUs ge.com
llyou are not satisi]ed with the selwice you receive h-ore GE, contact us on our _,Vel)site with all the details
including y(mr phone numben or write _o: (;eneml Managen Customer RelationsGE .\l)plian( es, Appliance ParkLouisville, KY 40225
RegisterYourApplianceRegister your new appliance on-line--at ymtr convenience! Timely product registration will allow Ibr('l_hall((?('[ (OlIllllIllli(alioll _llld [)rollll)t sel-vi(e Illld(l- tll_ I(!llllS o_ yOllY "_,_l-l-alll), shouM the n_(d alis_.
Y()u may also mail in th{ l:)rcl)rint{ d regislralion lard in(hlded in dae l)a(ldng malelial.
ge.com
Printed in the United States
ge.com
©
©
©
©
©
,©
©
h_strucciones de seguridad ........ 2-4
Instrucciones de operaci6nAs_do v horneado (ronom(m_do . . .9, 17}
Bloqueo de cont_oles ................ 8C_dcmmniento .................... 11
Contvoles ......................... 5
Conve((idn .................... 12-14
Fm](iones espe( iales ............ 19, 20tIorno ......................... 6, 7
tl[orno mm)limpieza ............. 17, 18L( udado ......................... I 1
Modo Sabbath ................. 21, 22
Rclqj y tempofizador . ............... 8Sonda ........................ 10, 14Tcunosmto ....................... 16
Cuidado y limpiezaC6mo retirar la cima (k (mi}aqu,: ..... 23
Lhnpara de luz ................... 23
Limpieza (k la puerta del homo ...... 24Panel de (ontrol ................... 25
Parrillas ......................... 25
Puerto (xtrafble del horno .......... 24
Sonda ........................... 24
Superfi(ies de a(ero inoxidable ....... 25
Consejos para resoluci6nde problemas .................. 26-28
Soporte al cvnsumidor(_mlntfa ........................ 33
Rcgistro del produ( to ........... 31, 32
Soporte al (onsumidor . ............ 34
Escriba los numeros de modelo yserie aqui:
N -°de modelo
N -°de serie
Puede encontrar esta iniormacidn
eli una etiqueta en In part{ delanteradel horno, detD_s de la puerla delhorno (n los modelos de horno
simple, o en la parle delantera del
horno int;vrior, deu-fis de la puerta delhorno (n los modelos de horno doble.
PKgl 6-Homo sirnp& & flared & 27"
PK956-Hcn'_w dobIc de flared de 2U
PT916-Harno simflh_ (le fla_vd tie 30"
PT956-Harno (lob# de pared de 30"
49-80430-2 10-07JR

INFORMACIONIMPORTANTEDESEGURIDAD.LEATODASLASINSTRUCCIONESANTESDEUSAR.
Si_n_iseAsigDueVexaEctRamTentEe_aNninfC_r_aAc1_de este manua_ pue_e _currir un incendi_ una
explosiSn o un cortocircuito que podria causar dafios a la propiedad, lesiones personales o lamuerte.
AVISOIMPORTANTEDESEGURIDADLa Ley de tSxicos y agua potable segura de California (California Safe Drinking Water and ToxicEnforcement Act) exige al gobemador de California publicar una lista de las sustancias conocidasen el estado que causan cancer, defectos de nacimiento u otros dafios, Yexige a las empresas quealerten a los clientes sobre la exposiciSn potencial a dichas sustancias.
El aislamiento de fibra de vidrio en los hornos de autolimpieza emite una pequefia cantidad demon&ido de carbono durante el ciclo de limpieza. Puede minimizarse la exposici6n permifiendola ventilaciSn con una ventana abierta o utilizando un ventilado_
2
PRECAUCIONESDESEGURIDADCuando se utilizan aparatos el6ctricos, se deben seguir las precauciones de seguridad b#sicas,incluyendo las siguientes:
#_l_s_ este apav4to dnicament¢ pant los finesdescritos en estc Manual &l propietario.
?i5A',egfirese de que .',uapavalo sea insmladoy (ollecla(!o a tleFl'4 (OllC(lvtlnel]lC [_1
un tdcnico califica&_, de acu( I*lo conlas instlucciones de instalacidn suminislradas.
?i5No int(nte rcpm',_r o reemplazar ninguna[)_/1_(! d( _ Sll hOlllO a menos que estv lllanllal
1orccomiende de man( lwesp(cffica. 'Ibdoslos d(mfis se_icios de mantenimiento deber, hlderivarse a un tGcnico calificado.
?i5Pida al instalador que le muesm la ubicacidndel coltacil*:uitos o fhsible. M_hquelo pay4 unarel_'mncia ti_cil.
?i5,\rites de rcalizar cualquier sela'icio demanwnimiento, des_ one_ tc el suministro de
en_ _gia del homo en el panel & dislribud6ndomdstk o quitando el filsible o apagandoel cortadrcuitos.
?i5No dcije a los nifios sin sulx'lvisidn; los nifiosno &l×.n _star solos o sin supervisi&_ _nlln _{rea en la que llll apa£ah_ est_i ell llSO.
No se les delta permitir sentarsc o pamrscsobm ninguna de las partes del apanm_.
No d@ qu_ nadie _' suba, se pare o u cuelguede la pue_ta. Podr/an dafiar el homo o sufiirleskmes pei_onales graves.
?i5A',egfirese de que el homo est_: instalado( o11_'( l,_lll]_!n[( (n till allllalio (]tle este bien
',ujeto a la ,.structul_t d_ la casa. Nunca permitaque alguien se lrcpe, se siente, se par_ osc cuelgue de la puerto del homo.
:_ Nunca &je la puerto del horno abierta cuandono est_ observ_indolo.
?ifSiempa mantenga topic<s, cortinas o patiosque pue(!an prcnderse fuego a una distanciascgura (]el homo.
:Z Siemprc manlcnga los patios de cocina,lvpasadores, guant* s pan_ (a_ erolas y todo til×)de tcla a una distancia segura de su homo.
'_ Siemprc mantcnga los utcnsilios de mademy ph{stico, as_como alimenu)s enlamdos, auna distancia ugu_z_ de su homo.
i{i.Ensefi_ a los nifios qu_ no del×.n.jugarcon los controles ni con ninguna otr4 [:)mte(]el mlef_tcm.
i_? Los; l_yOlleS o impa( tos severos sobre
las pu_ rtas de vidrio Fxhian rompero astillar _1xi&io.
'_ No guarde matcfiales inflamables en un homo.
_,PRECAUCION:Los artf(ulos & inler_s
para los nifios no dcbcn guardarsc en armadosarriba de un homo; ya que los nifios [×)ddmasutiir 1<sion<s graves al intentar tlcparse sobrc_1para alcanzar los objetos.

ge,com
i'_Nunca use vestimenm floja o que cuelguemienm,s hace uso del aparato. "Dnga cuidadoal inmmar alcanzar arffculos gnardados ellarmarios sobrc el homo. Los mater[ales
inflamabk s l_)drfan encen& rse si ennan ellcoma(to con suI× rficies calientes o dementoscak [hctnl* s y podrfan provocar quentadulas
gra;es.
{:il[se finicamenlc guantes para cacerolas queesldn secos; los guant('s hfimedos o mojadossobrv supeflicies calienms podffan causarquemadm'as debklo al vap(m No pennitaque los _llall{('S elt[l°t'lt ell ( Olllilc[o (Oil
los elememos calefiLcton's calienms. No use
una toalla u ore) tiIx) de mla "a)hnninosa.
?_Po s st gl dtd, mmca use su aparato paracalentar la habitaci6n.
#:_;No IX n" I que la grasa de la cocci6n u otrosmaleriales inflamables se a( lllttlll( It (lenll-o o
((:lca &l honlo,
/ T_{No use agua pain apagar inc< ndios con_'l'asa, N/tll( a ttlltlC Illla ( acerola qlle st: (:sle
qu(mando. Apagu< los cnntroles.
I.as llamas ell el homo pueden apagarse[/ol- complelw al cerrar la puerta del homoy apagarlo o al ulilizar un producto qufmicomultiuso seco o un extinlor de tipo espuma.
_ T_ N< toqu< los demt ntos cal( fhctor<s ni lasuperlk:ie intema del homo. Eslas supedk:ies[)odl'l*all cstal" lo sllficien[(nt( ltte calient(s COIItO
pma qu( mar afn si est_in oscums. I)uranteel uso y luego de dste, no toque ni i×Tnfitaque las pr(ndas u otros mater[ales inIlamabl( sentl'(ll (HI COlt[ac[o COIl lllllgtllt al'ea lllIenla
del horno; &je que se enfi-f( lnqmero.
Las superficies que pueden esmr caliemesinclu}vn: oritkios de wmfilacidn del homo,superficies cercanas a los oYificios, griemsah'cdedor de la puelta del homo, los bordes dela ventana v los rib,..ms mel_{licos sobrc la puerto.
RECUERDE.'Lasup(rfi( ie interna del homopue& estar calk nt( al abrir la l)U(rt;,.
Nunca coloque utensilios de cocina ni olrosd( m(ntos (n (1 piso del horno. Deb@/del pisodcl horno hay un (k m(nU) calethcto); Si colocad( m( mos sobre el piso del horno, dste podrfasobrecak ntal_,e y dafials( al igual quelos armarios.
_ N c t d@ fl'ascos o latas con gmsa &carneasada deltll-O (21Cel-t a de Stl honlo.
_ No guar& ni us( mat( liales combustibles,gasolina u otros lfquidos y xapores inflalnablescert:a (le este apal-ato ni ningfin otro.
?15,M(_j(st (k1horno (uandoabm la pu< rta.El aim o wq/or caliem< que sale pu(de causar( II(qtladllFas ('It las lllallOS la ('aYa x, los oios
_ TN / caliente recipientes de alimemos silt abrit:La presidn podrfa at ulnulal_e y el recipientelxxlrfa explotar } provorar tma lesidn.
_ M t tte ga librc la _cmilacidn del horno.
_2 No [XTltlila qtl(! Se at tlmtlle gl;tsa till el honlo.
i{i"Coloque la panilla &l horno cn la posMdn qutdes(e mienlras el horno estd fifo. Si es net esario
manipular las panillas t uando estfin call( rites,no permita que los guantes pan1 ta(erolas( ll[l'('lt ('It (()ll|,_LC[l) (!Oil los elcmentos
calelitctov(s.
;if"Cuando utilice bolsas pare cocinar o asar en(1 horno, sigat las in(l[(/(ion(s del fidlricant(.
?i;?Sacar la pan'ilia hasla el tope wsuha 6illpara levanmr (omklas pesadas. Tambidn('S llll_l l)l-U(al/t il)ll [)_lFd ('Vi[_ll (ltR'lltal'S("
al tocar las superfides calienws dc la puertao las parcdes del homo.
%zNo utilice tl horno para secar peri6dicos.Si s( sobrecali( ntan, pueden incendiarsc.
/;if"No utilice el homo como _h'ea deallllac(:nami(_nto. Los (:l(:lll(:ntos alltlacenatlos
(_lt till horno l)ll(!(](!ll iltcendialse.
;if"No deje ol)jetos h(chos de l/alx 1, m(nsiliosde totina o alim(ntos (n (1 hnnlo ltli(Hlll'aS
l]O CSI_ (It tlSO.
;_ Luego de a_tr a la parrilla, siempw retireuna asadera del homo y lflnpiela. La grasa qucquede ell una asadera puede incendiarsela prdxima vcz que utilice la ban&ja.
N Dnicanmnw limpie las partes ( nlismdas eneste Manual del propietario.
i_i.No utilic( pawl de ahnninio para rcvcstirla parte inlk'rior del holno, a exc( pcidn d(1o sugerido (n (st( manual. La instalat idnincomtta del papel d( aluminio pu_deprovocar un fie, go de descalga el&:tricao incendio. 3

INFORMACIONIMPORTANTEDESEGURIDAD.LEATODASLASINSTRUCCIONESANTESDEUSAR.
CUEZAI_ASCARNESYELPOLLOCOMPLETAMENTE...Cuezala cameroja y de avepor completo: la cameroja a unatemperaturaINTERNAde al menos 160°Fy la deavea unatemperaturaINTERNAde al menos 180°E Lacoccionaestas temperaturasofreceproteccioncontraenfermedadesde transmisionpot alimentos,
AUTOLIMPIEZADELHORNO_ No limpie el empaque de la puerta.
El empaque de la pu( l_ es esen(ial paratm buen (ierrc. D_l)e tene_se (uidado de
1"_odesgaslal; (lariat- o mover el elnl)a(lue.
{_;No utilice limpiadores. Ningdn limpiador
comercial para hornos ni ninguna cubierm
[)_v)t(!ctora pa_w hornos (let)_ utilizarse
(lentm o ahededor de las part_ s del homo.
I£_s rcsiduos de los limpiadorcs de hornosdafiar_in el inmrior &l homo cuando
se utilice el ciclo de auu)limpieza.
_%_Mltes de la autoliml)ieza (tel homo,l'(:Illll(Wa 12t Sollda, cllalqlliet- cac(:rola pai'a
asm; parrilla y otros ut< nsilios de cocina.
_,, _lt(_s d(! ( Olll_ llZaF ltll (it 1<) d(!
autolimpieza, as_ gtlr(se dc limpiar
con 1111 [f_l[)O 10S d( FI_tlII(!s,
_2 Si el modo de autolimpieza no flmcionabien, apague el horno y des(onectc
el suministro de corriente, ttaga que
un t('( nico (alifi(ado realice la t* paraci(,n.
LEAYSIGA£STA INFORMACIONDESEGURIDADCUIDADOSAMENTE.GUARDEESTASINSTRUCCIONES
4

Usode loscontrolesdel homoinferior.(,4 Io largo de este manual, las caractedsticas y apariencia pueden variar con los de su model&) ge.com
Se muestra el control del homo doble
Controldel homo,caracterfsticasy configuracionesdelreloj(Clock)y del temporizador(Timer)
BotdnBake(Horneado)Pl (tS]oIR" I)aHt S(t]L'((i()l]ar ]a t]ll]( ]()]l ho] i_(tado. 0
BotonBroilHi/Lo(AsaralaParrillaAIto/Bajo)Presion( pt£a sel(((iol_al ]a t/n/ci(tn t_tl a ]a par]-i]la.
BotdnDelayStart(Iniciopostergado)I filice.junto conh,sbotonl's CookingTimeo SelfCleanpare (:o_digura_ cl horn() plwaquc inicic y5C (k't('l]g;t _ltltot//_ltJ(311/Cllt(" cn el HI(Ill/el]tO qUC
uswd proglam_+
BntdnConvectionBake(Horneadoper convecci6n)PresiiSt)( 1o pal_l st I,t((ioH tr (_1 hoi3}eado (ol/
la ]_ln(i()]l (_( (oH'vtf((i()]_+
BotSnConvectionRoast(Asadoper eonvecci@)P]'( St(*)l)(]o pa1"d S( lecci(}]lal (I _a(]o LOll
la _mci('m de conxcccidn.
BntSnStart (tnicio)
Dd)c prcsionars,, pma inMtr cualquicr fimcidnd( coc(i6n o limpieza.
Pantalla
\|ucstra la horn dc] d_a,la tcmpcmtum dcl ho] no,si el homo estficn el ulodo de homcado, de asara la paHilla o de au(olimpieza y las hc.ras establecklaspara el tempofizador o las operacioncs aulomAlicasdel horno.
Siena "F-yen nhmereoletra"parpadeaaenlapantallay lasso#alesdecontrolde/homo,estoindieaueeodigodeerrordela funeiim.PreeioneelbotoeClear/OffPermitaqueelhomoseenBfefluranteueaheraPongaelhomonuevameeteeoof)eracioeSielcOdJgode,errordelafunciOnserepite,desconec_eelcable,de,corrientedel _[_homoycomuniqueseconelseMciodemanteeimiento
SisehomofeeeenfigeradoparaunaoperaeiimeronemeYadade/homoysepresent6erieinterrupeionene/f/uidoe/eetrico,elreloj_toflas/as£acbneeprograma@s@benrestablecerse
vLaheradeldiaparpadearaenlapaata/laeeandosehayapresentadounainterrepeiimenel f/eidoeleeYieo,
Bet@Self CleanStd/Low tLimpiezaautom#ticaest&ndar/baja)Prcsionc par4 sd_ccional la fimci6n (h' autolimpk za.(]onsulle la s((d6n Usedel homoautolimpieza.
BotSnOvenLight(Luzdelhomo)Pl (!SiOl'l( ])aHt ,2!nc(tl/d(tl- o ;Ipa_aF la hlz (1cl holTiO.
Bet@CookingTime(Tiempode cocci@)Prcsionc y hlcgo presionc los boloncs num('rico_para {stablel:er la caraidad (k iieml)o qu{ deseacocinar sus alimenios. El horno se apagal_iaulomailicamenle cuando se hma agoladoel tiempo de cocci6n, a memosque se ha?acoxdigurado la fimci6n "(ook and _fold"(( ocinary mantener).
Bo_dnClear/OffPl'.sion( para cancdar TODASlas operacion(sde] horuo eXCel)tO (I leloj } el I( ml)Ofizado]
BotbnClock(Reloj)
Pl_sion( ant_s d( (onfigur, u cl id(?j.
BoDaos falmolJCOa
[ dlice pala c(mfigular cualquiel fimci61_ quene(:esite nfin)eros come la hem del d_a en el Moj,el temp()lizador, la teml)elattlra del homo,la (emperamra in(ema de la comida, la herade inicio y la dtnaci6n de la operaci6n para
el hovnea(]o cronolneh ad_l y la anlolin/pieza.
Bet@KitchenTimerOrgOff(Temporizadorde cocinaencendet/apagaflPrcsionc para sdcccionar la carmtcr(sdca dclICl/IpOllZador.
BotdnProbe(Sonda)
Presion( CII tndo tltili(l" I;/soi/da })a]a (ociilar
aIiH/(!I/[OS a Illl;t [(l_/p( f;l[llla ill[(fl/a d(!sL';t(]a.
Bo_dnWarm(Calentamiento)
Pl(siOI/cl(I pala manten( i los alil]/Cnlos ((l(:id(ls
calic]/[_ s.
Bet@Proof(Leudado)
Presi6ndopma sdc(tionar tm ambk rae dbio dillpara lL'_ t1" los pl O(IIICIOS (01/ Io, a(]tlla.
5

Usodel homo.
Para prevenir posibles quemaduras, coloque las parrillas en la posiciSn deseada antes de encender el homo.
Antes de comenzar...
Ia'_ par rill_ts tienen cierres de tope,de _()/'ma ta] qtle trial]dO se enctlentl'en
colocados correctamente en ](is soportes,se detendr_n antes de salir complemmentey no se inclinar_n.
Cuando se enctmlm'e colocando o quimndouwnsilios de c(_ina, rite de lap milla haciaafilera hasm la protuber, mcia en el apo)_ dela pani/la.
Para quitar unaparrilla,rfielo hacia usWd,incline el fl'ente hacia arriba v tire de 61hacia
Para reemplazar,col(_-iue el extremede la parrilla (topes de cien'e) en el apo?,o,incline el ficnte y ernpt_ie de lapm villa haciaadentro.
NOTA:Elhomotiene7parrillasenposicibn.
PRECAUCION:Nuncacoloquelosutensiliosdecocinaniohosartfculossobteelpisode/homo.Svisteone/ementodeca/entamieotodebajode/piso de/homo.Colocarartfculossobreelpisodelhomopuedecausarqueelhomosesobrecaliente,resultandoendafiosparael homoyel riesgodedahosoioceodioenlosgabioetes
NOTA:Esposible que se enciendaautom,lticamente un ventilador deenfriamiento para refrigerar laspartes intemas, Esto es normal, y elventilador puede continuar andandoincluso despu#sde apagar el homo
Como confignrar el homo para hornear o asar
[_ Preskme el botdn Bake.
[] Presione los 1)otones num&'ic(_ paraestabl_c{t la temp_ r4tur',J deseada.
[_ Presione _1botdn StaR.
[] R_ise los alimentos pard el punto d_coccidn al mfnimo tiempo en la receta.Cocirle dumnte m._'_dempo si esnecesario.
[] Presione el bot6n Clear/Offcuandoest6complem la coccidn.
Posici0ndela parrilla
"ffpodecomida Homode27" Ovende30"
Pastelescongelados Bo C Co D(sobreueabandejaparahomear)
Terraligera(angelcake) A A o B
Tartade librao Bundt A A o B
Bizcochos,muffins, Bo C Co Dbrownies,galletas,pasteles[edividualesencapa,bizcochos,pasteles
Guise Bo C Co D
Homes de2l':Si homea cuatro capas depastel al mkmo fiempo, coloque dos cq)asen la paJTilla A y dos cq)as en la parrilla C.
Hereo$ de 30": Si homea cu ttro captsde pastel al mismo tiempo, coloque d(_ capasen la parfilla B y dos capa_ en la pmrilla D.
Ubique I_tscacetxdas en l;i parlilla de tal[imna que una no est_ colocada directamentesobre la otra.
Para precalen_ar,configureel homo a 13temperatura correct&Elcontrol pitar# cuando el homo esteprecalentado y lapantalla mostrarasu temperatura configurada Estopuede tomar aproximadamentelO minutes,
Precalentamiento y ubicacion de la cacerola
Precalienle el homo si la receta asi lo indica.
E1 precalenmmiento es necesatio par, tobtener buenos _esultados cnando homee
tortas, dulces, pastelitos y panes.
I*_s resulmdos del homeado son mttjoressi lv_,__vartene_de honmar eslfin centrada_ en
el borne tanto come sea posible, bs sal_enes
no se deben mcar entre sf ni deben t(mar
la._pmedes del homo. Si necesita tl_tr dosparrillas, c4oque 1_ sm'tenes de [brmaque tma no quede inmediatamentc encimade la om_, y d(_je aproximadamenm 1½" en{leca/a m_l_, desde el fi'ente, desde atr{_-sydesde los cosmdos.
6
Papel alnminio
Nuncacubraelrondodelhomoconpapeldealumioio.
Nunca cubm per complete una pmfilla conpapel aluminio. Esto obsm_irfila ci_*:ulacidndel calory obmndr,_un _tsadodeficiente.
Puede utilizmseuna pequefla h£ja de pq)elaluminio D}I|'_Iatrapar derrames colocfindolaen uno de la_pm rilla_infk'vioresvari_'_pulgadas per deb:!jodel alimenm.

Be.corn
!idiiii
Cierre la puelta, Siemprease ala parrilla con la puertacetrada.
Sisuhomoest_conectadoa 208voltios,los filetespocococidospueflenasarsea lapardllaprecaientandolaparrillayposicionandola parriliadeihomoen unaposiciCnm_salta
Come configurar el homo para asar a la parrilla
Ckrre In puelta. Siemprease a la parril/a conla puettacerrada,
[] Presione el bot6n BroilHi/Leuna __zpare asar a la parfillaHI(Aho).
[] Coloque la canto o el pescado sobleuna ifiji]lapara asal:ell una bandeja
E/tamafio,peso,groser,temperaturainicia/y supreferenciasobred puntodecoccbndelosal#nentosafectarbnbs tiemposdececcibn.EstagufaesdbasadaenBarnesatemperaturaderefrigerado_
Pro'4cambial a ,_ar a la parril/aLO(]:_@),presioneel bot(m BroilHi/Lont]e_ _l]//enk%
[] Presione _1bot6n Start.
[] Cuando {1asado a la panillaest_ t_m/inado, presione el bot6nClear/Off
Guia para asar a la parrilla
Hornosde2T' Hornosde27" Hornosde27" Hornosde30" Hernosdea0'r Homesde30"Cantidady/ PosickJn Primerlade Segundelade Pesicidn Primerlade Segundolade
Alimento ogrosor dela Parrilla Tiel_po{nlin} _ie_po{nlin} delaParrilla Tiempo{rain) ]iempo{mini Comentarios
Camemolida {d oqe I C 10 7 EoP 10 7 Oistdbuyaunitorr_ementeBenmcido 1/2a3/#'deespesor C 10 9 EoP 10 9 HastaBcroquetas
tar/an aproXJF;adaF ente
el"dsmodemp_
Filetesdecame
Pocococidot 1"deespesor C 6 5 E 8 6 bsBletesdor,enBsMedio 1al!d Ib C B 6 E 10 B deI pulgadadeespesorBienc_cido C 12 I1 E 12 10 sec_cmanpar
c_repleteantesPoe3cocidot 11/.,"deespesor C I 0 7aB E 10 B dedorarseMedio 2a2_lb C 15 14al6 E 15 14al6 BecomendamosBiencacido C 25 20a25 E 25 20a25 fredenelsarten
Cortelagrasa
Polio 1complete A 35 10a15 C 25 10 Beduzcaeltiempoen2a21/.,Ib apr_irada_ente5dBddidoIongi_Jdinal,'ente a10r,dnutosperlade
LoBroil Bresas A oB 25a35 15a20 BoC 25a35 15a20 parapoliodespresadoLoBroil 9eshuesado A oB 1Ba20 10a15 BoC 15aB0 10a15 Unteeadalademn
_'antequillader[etidaAseprl[/ereconlapielhadaabajo
Bolasde 2a4 B 1Ba20 Novoltee C IBa20 Novoltee Corteatra_dsdo
langesla 6aBozcadauna elcaparazdn elcaparaz& laparteposteriorLoBroil C 1Ba25 N!A D 18a25 N/A delcaparazOnOeje
las_olasbienseparadasUntec_an_'antequilladerreBdaantesdeasary despudsdela,'daddelde'_podecoo:idn
Filetesde 1/4aIFd"deespes-ar Manipuleyvoltee)escado c_ncuidadoUntecon
HiBroil C B B E 5 B _antequilladelir_BnLoBroil O 5 5 P 5 B antesydurante
lacecal&,sihdeseaPrecalienteelasador
paraaumentareldorado
Redajasde 1"de8spesor B B B D 8 B Aur,'enteeltierJ,polamCn deBa10rdnutos(precocido) porladoparaW'
doespesoro jar,_ncuradoencasa
Chuletasde¢erdo 2(I/2"deespes'ar} C 10 10 E 10 10 CurielagrasaBienc_cido 2(l"deespesor)aprox1Ib B 13 13 D 15 15Chuletasdecordero
Medio 2(1"deespesor) C I O B E 10 9 BoriclagrasaBienc_cido apro/Jr_adarrente10a12oz C 12 10 E 12 10Media 2(W'de espesor) C 14 12 E 14 12Bien_acido aproyJr,'adamenteIIb B 17 12a14 _ 17 12a14
Palldeaje C 3 N/A E 3 N/ALoBroil
tEI Departamentode Agricultura de EEUU ktdica que "la came a poco cocida es popular,pero usted debe saber que coc#tarla a solamente 140°Fsignifica que algunos organismosvenenosos podrfan sobrevivir", (Fuente:SafeFood Book YourKitchen Guide USDARe_ Junio 1985,)
7

Usedel reloj,el temporizadory el bloqueode controles.
AsegOrese de que el reloj seaajustado en la hera correcta del di&
Para ajustar el reloj
E1 role i debe ser @lsmdo en la ho_'4 cot rectadel dfa pare que los fimciones aulomSticasctonometrad_s del homo fimcionen
aptopiadarnenm, la her4 del d(:J no puedecambiarse chlrante tm ciclo de holneado
cmnometmdo o mm dimpieza.
[] Presione el botdn {?lock.
[] Presione los botones num&'icos.
[] Presione _1botdn Start.
Para ajustar el temporizador
[] Presion_ _l botdn Kitchen TlmerOe/Off
] Presione los botones n/lme_i(os
El temporizador es Onicamento un h_ta que _n ]a pantalla apalezc_Jtemporizadordeminutes,
Elzemporizadornoconrrolalosoperacionesdel homoL8 coRfiglo'SC]OI7 [17#Xin78
onel temporizadores de9 herosy59minutes
la cantidad de tiempo deseada. Per
ejemplo, para esmblecer 2 hor_ y45 mimltos, presione Z 4y 5on dicho
otden. Si corl/eR' tin ellel; presioneel bot6n Kitchee Timer Oe/Offy comiencei//leVal]/ente.
[] Plesione el botdn Staff.
Dospuesdoprosionarel bot5nStart,SETdesaparoce,estoleindicaqueel fiempoest_en
cuentaregrosiva,aunquelapantdla nocambiehastaquehayapasadounminute.EnJapantWJano
somostrar_nlossegundoshastaquoeJ(_Jtirnominuteost#oncuentarogresiva.
[] (;umldo eltempoHzadoralcance :ORel control pitat',i 3 v(ces s(guid;_s pertm pitido cada 6 sz-gundos hasta que
se presione _1bot6n KitchenTimer On/Off
El t(mo de 6 segundos pued_ cancelarsesigtfiendo los p;kq)s {illLOScaracteristicasespecialesde so secci6n de control del homob@) la secd6n Tonesal final de unciclocronometrado.
Para reiniciar el temporizador
Si la parltalla todav_a etfi mosmmdoel tiempo resmnte, puede cmnbim'la
presionando el boise Kitchen Timer On/Off,hlego presione los botones mlm&ic(xs hasm
que en la pantalla aparezca el tiempo que&'sea.
Si el tiempo resmnte no estfi en la pantallu(on la panmlla estfi tel@ inicio postergado
o tiempo de c(_cidn), recuerde el tiemporesmnm presionando el botdn Kitchen Timer
Oe/Ofty ]uego pxesionando los lx)tonesnum6ricos h_sta ingresm"el nue_o tiem[x)
que desea.
Para cancelar el temporizador]h'esione el bot&l Kitchen Timer On/OffdOS _,'( ( ( S.
8
Bloqueo de controles
Sucontrollepe_mitir_quebloqueelosbotonest_ctilesparaquenopuedanactivarsealpresionarlos.
NOTA:Enlosmodelosdehomodoble,estoactivadichafoncidnenamboshornos.
Pare bloquear/desbloquear los controles:
[] Plesion_ los botones 9y 0s]mulmneament_ (Itmmte 3 segundos,
h>_ta qu_ en la pantalla a])at (z(>t LOgON (bloqueo acti_ado).
[] Pare desbloquear el control, presi(melos botones 9 x Osimultfineamente
dtlF, mle 3 segundos, hasta qtl_ enla panmlla aparezca Log OFF
(bloqueo desacti_>_do).
Cum_do esta fimci6n estfi acfiv_da y
se wesi(man 1(_ botones tfictiles, el controlemitit:1 un bip y aparecm-,i LOCON (bloqueo
acti_ado) en la panmlla.
NOTAS:
_ Elmododebloqueodeconttolesafectaa todoslosbotonesdctiles.NingGnbotdnt#cti/foncionarbcuandoestafunci#nest#acfivada.
_ Elajostopemlaneceraenlamemorialuegodeunaintenupci&de/aenergb.

Usade las caracteristicascronometradasdehorneadoy asadodelhomo.to.a/ . osmo /osj go.cam
En modetosdehomo dab|a,puede utilizsr Is funci6n dehornesdo cronometrsdoen unhomo mientrss utilizs latimpiezsautomatics en el otro;tsmbi&npuede ussr el homesdo cronometrsdoensmbos homessimult&nesmente.
NORA:No debe permitirse que los stimentosque se echan s perder f&cilmente--como leche, huevos,pescsdo, rellenos,ayes y cerdo--reposenper m&sde I hers antes o despu#sde ta cocci6n. Ls tempersturs ambientepromueve et crecimientode bscteriss peligrosss.Aseg_resede que Is tuzdel homo est#apagsda ya queet cater de ts bombiltascetersria el crecimientode bscteriss peligrosss.
Coma configurar un Inicio inmediatoElhomose_cen_r_ bmed/atamen_y cocinaradsranteel tiemposeleccionado.AI finaldel tiempodecocci& el homoseapagar#autombticamente.
,&segdtese de que e| re]oj muest_e ]a he|'4correcm del d_,.
[] Presione el bot(,n Bake.
] [ ,tilizando los 1x_tones mmwl kos,ingles_ la tempemtur, Jdesea([a.
[] Px'esione el botd//Cooking Time.
NORA:Sisorecetsrequieredeprecalentamients,esposiblequenecesiteafiadirrobstiempoal tiempodecoccibn.
] Utilizando los l×)tones de los ndmeros,ingrese el tiempo de homeado deseado.Enpmmdla se mostr'al;i la lempel'4tumdel homo y el tiempo de coccidn queusted ingres6.
NORA:Sideseaquelosabnentossemantengsncalientesdurantehasta3horssdespubsdefina/izadalafuncibndecoccibn,presioneelbetSnWarmunavez
y una Parada automatica
[] Plesione el botdn Start.
En ]a pantalla aparecerfi el cambio de Ittemperature (a partir de IO0 °F) ? el tiempode cocci6n. I.a pantalla comienzk_ a cambialuna xez que la tempe£atuFa alcanza 100 °E
NORA:£n losmodelosdehomodoble,al utilizarlosdoshomessimu/tbneamente,lostiemposqoeaparecenen lapantal/acorrespenderanal 61timehomoconfigurado.Paraverel tiempoestablecidopars elprimerhomoconfigorado,presioneel bot6nCooking Timeparaesehomo.
El horno contimlm',i codnando duv, mte
la cantidad de tiemlx_ 1)rogramada, hlegose al)agaFa atltom{ttJcamente a menos qtle
se ]]aya configurado ]a camcterfsticaIn_s caliente.
Presione el botdn Clear/Offpala bolmlla pantalla.
Coma configurar on Inicio postergado y una Parada automMicaUstedpuedeconfigutard controldelhornsparaquepostergueel_nicio,cocineduranteunperiodoespecificodetiempoyluegosespagueautomfiticamente.
Asegdrese de que el reloj muestre la heracorrecta &l dfa.
[] Presione el botdn Bake.
] Utilizando los Ix)tones hum&ices,ingrese la temperature deseada.
[] Presione el botdn CookingTime.
NOTA:Sisurecetarequiemdeprecalentamiento,esposiblequenecesiteafiad__mils tiempoal tiempodecocci&
[] Utilizando los l×)tones de los n dmeros,ingles_ el tiempo de honleado deseado.
[] Presione el botdn Oelay Statt
[] UtilJzand° l°s l×_t°nes nu metric°s,inclose la hem del dfa en la cual des(aque e/homo se encienda e iniciela coccidn.
NOTA:Si fleseaquelosalimentossemantengancalientesdurantehasta3 horasdespubsdef_nalizada/a hlnci6ndecocci&l,presioneel bot6nWarmonavez
[] Presiorm el I)otdn Start.
NORA:UntongdeatenciOnsonatasi est,_ufilizando
elhorneadocrenometradoynopresionael botSnStartflespu#sdeingresarla temperaturadehomeado.
Si desea verificm' el fiempo que haconfigumdo, prcsione el bot6n DelayStartpara verifiear la hera de inicio que haconfigurado o preskme el bot6n Cooking Timepant verificax la duracidn del tiemlx_ decoccidn que ha configurado.
Cuando el borne se encienda a la hera del
dfa que usted hap1 establecido, la p;mta]lamosmu'J el cambio de mmpetwtum(comenzando a I(X) °F) y ]a cuenm regresiv:Jdel fiempo de: coccidn, la pantalla comienzaa cambiar t/l/a \_:Zque la te/)lpeF, IttlF, I
alcanza I00 °E
NOTA:Enlosmoddosdehomodsble,alutilizarlosdoshornsss_rnu/tfineamente,lostiemposquespsrecenenIspsntallacorresponderfinaldtimohomoconfigurado.Paraverd tiempoestablecidoparad primerhomoconfigurado,presioneelbotbnDelayStartoCookingTimepataesehomo.E1horno _ondn urn-,|(ocinando dur, mte
la cantidad de tieml_) programa/a, ]uegose apaga_v,aummfiticamente a menos quese ha}a configumdo la caracmr/sticam.tscalieme.
Presione el botdn Clear/Offpma bon',wlap mtalla.
9

Usode la sonda.
Paramuchosalimentos,especialmenteia came asaday/as ayes,ia temperaturaintemadetalimentoes la mejorpruebaparaelpuntode cocci6n.Lasondade temperaturaelimina/asconjeturasacercade losasadosal cocinarlosalimentosenelpuntodecocciSnexactoqueusteddesea.
NOTA"Losmodelosdehomodobiatiananunasoma
enel t_omosuperiorOnicamente.
El use de senders distinras a ]a suminisrrada
con este ptoducto ptlede re.ultra en el darioa la sonda.
La sonda de _,empemruratieneun detector en forma de pincho onllt7 ex_,remoy uf?enchufe on el ottoextremo; dicho enchufe va dentrodel enchufe eft el homo
Utilice ]as ag'arvadems de la sonda yel enchtlf_: ctlando la inset te y la relr_tlewJde la came _ del encllutb.
iI Paraevltardanosa susonda,noufilicetenazasparat#ardelcablecuandoia remueva.
_{_Paraevitarrupturasde/a sonda,aseg(_resedequalosalimentosest#ncompiatamentedesconge/adosantesde insertaria.
Paraprevenirposiblesquemaduras,nodesenchufeiasondade/enchufahastaqueelhomosehayaenfriado.
Nuncadejesusondadentrodelhomo&mateunciclodeautolimpiaza.
_ Noa/macene/a sondaonelhomo.
Despu& de p_epamr la came, colocarlasob_e un posafhenms o sobre tlzlapmfillapara __sados,siga est_,_instrucdones parala ubicacidn apmpiada de ]a szmda.
[] Coloqu_ la sonda fhera de la carne aIo largo de ]a parte superior o lateraly marqtle con su dedo la pm_e deridela Ckll ne S(' eDc/lel/tl'd COD IH St)Ill'[H,
E1 ptmro debe caer en el centre dela pare _camosa rafts gl ucsa del bistec.
] Ins{Ite la sonda completamente delltlode la ¢al'ne. [,a so/_da 1)o debe toc_lr
el hueso, la gl atsa o el cartilage.
Pare biqecs sin htleso, inseKte la sonda dentrode/a patte camosa del bistec. Para jamdn ocordero con hueso, inserre lu sonda dentrodel centre del m(isculo gmnde m(_ inmmoo la atficulaci6n.
Insmle la sonda dentin del centre de platoscome rollos de came o cacerolas. (]uando
cocine pescado, insm_.ela sondajusm perencima de la ag'allaen el _ireama_scarnosa,pm',delo a la co[umna w_rmbr,d.
Insmxe la souda _n la parte m;g camosa dela parte interna del tousle desde al)_!jo} enpar, tlelo a la pielna (l_ un paso complete.
BDDDm
Como configurar el homo para asar cuando se utiliza la sonda
[][]
[][]
Insetle la sonda dentFo de la caFne,
(]onecte ]a son(l_l_ell la toma (l(ntro
del homo. Asegfirese de que qu_de bi_nconectada en la ionia. Cierre la puertadel horno.
Presione el bot6n Probe.
Presione los botones ]ltlln{_licos
p;_tlYt(_c41)]ecel [a te/I)pel attlF,'t ]nterna
deseada para los alimentos o la crone.
La tempemtura interna mfixima pare
los alimentos que puede esmbleceres 200 E
Presi(me el bot&J Bake.[][][]
Presiolle los botones ntll/l_Y[cos par4estabk cerla tempetattmt deseada.Presione el bot6n Start
Lapantal/aparpadear#si /a sondaest#insertadadentrodelenchufeynohaconfigurado/a temperaturadeia sondaypresionbel botbnStart
Cuando el homo (omien(e a calental; enla pantalla aparecev,_ la palabva tO.
10
Despu& que la temperature intemade/a carne alcance 100 °E en la p:mmllase moswar, ln los cambios de la temperatureintt.rna.
[] Cuando la t_rap{ i'atula internade ]a carne alcance ]a tempevamn_que configur6, la scmda y el heinese apag_mJn y el control del homo danla serial. Pare dewner la seri_d, ptesioneel bot6n Clear/Ofl. I Jtilice almohadillas
con aislamiento t&mico pare quitarla sonda de la comkla. No urilke
tella//as i)al'a extl_,terla: las tenazas
pueden dariarla.
Para cambiat la mrnpetatum del homoduranm el ciclo de Asado, presione el botdnBakey luego los bou)nes ml:m_l ices pmaesbd)lecer la/-illegalfe///peF_tt/ll'a,
i!_Sisequitaia sondade ia comidaantesdequesealcanceia temperaturafinal,sonarbun tonoy iapantaliaparpaflear#hastaqua iasoma searemovidade/homo.
Z Ustadpuedeuti/izarel temporizadoraunquenoutilice/asoperacianascronometradasde/homo.

Usedelas funcionesdeleudadoy calentamiento. o.oo
La funciSn de leudado mantiene un ambiente tibio (ltil para levar los productos con levadura.(Disponible en el homo superior (micamente).
Come configurar el leudado en el homo
Cuando hm'a finalizado el 1_udado[_] Coloque ]a m_tvt cubietta en (I homo [_]en la pa_rilla B o C preskme el boron Clear/Off
NOTA:Paraobtenermejoresresdtados,cubra/amasaconunpatiooconpe/icu/aadherenteengrasada(elpbsticedeberaasegurarsedebajedelrecipientepataquaelvenfiladordelaestufanoIoquite).
[] Presioneelbot6nProof(I*mdar) dos
En la pantalla aparecer,_ PrF(proof [leudar]).
La luz del interior del hoH/o se encendm'5 v
permanece_,_encendida dnrante el leudado.
I,a fimcidn de leudado ptopotcionamltomfiticamente la temperamra 6ptimapare el p_x,'cesode leudado > per lo tanto,no posee un @lsm de mmpemtuta.
[] Configure el temporizador de cocina(Kitchen Timer) (n el tiempo de leudadomflfimo.
_ Paraevitarreducirb temperaturadelhomoyextenderel tiampodeleudado,noabra/apuertadd homosinnecesidad.
_xControlelosprodoctosdepanconanticipaci4nparaevitarqua/eudendemasiade.
NOTA:
i!_No utiliceel modede/eudadoparacalentara/imentoso mantenerlosca/ientes.La temperatorade/eudadode/homonoes/o suficientementealta
comeparamantenerlosalimentosa temperaturas
seguras.Utilice/a funci6nWarm(CalentatJparamantenerlosgimentosca/ientes.
i!_:Lafuncibnde leudadono funciomr4,cuando
el homoestea robsde 125°£ En/apanta//a,aparecerb"HOT"(Caliente).
Come configurar el calentamiento en
I_ flmcidn de calenmmiento mantienelos alimentos cc_idos c_dientes hastu
un mfiximo de 3 hems hlego de que l/a_finalizado una fimcidn c/onomemu/a.
O bien, el calentamiento puede acfivarsepaFa mamener tibios los alimentos cocklescalientes. Esta tuncidn no _tfi disefla&l
para recalentar alimemos flqos.
Para utifizar esm fimcidn, presione el botdnWarmuna vez y hlego el botbn Start.
Para activur esm fimcidn a fin de usarla
hlego del asado u homeado ct_m(m/etmdo,p_esione el bot6n Warmmientra_ p_ogramael homo y antes de preskmar Staff.
Pare cocinarelemeetosquenosonfrescoshastaqueesteecrocantes
!+{}Coloque los alimentos en fuentes obraid@Is de lades b@)s.
i?{Pal-a obtener/l/(jOleS resultados,coloque los alimentos en una dnJca capa.No los apile.
i_(_No los cubm.
¢} _&'ritique si estfin cnx:antes luegs_
de 20 a 30 mimltos. Agregue el tiemlx_
que sea necesafio.
el homo
NOT/ISIMPORTANTES:
i_ Losalimentosdebenmantenersecalientes
ensurecipientedecocci6no debentransferirsea unafuenteresistentealcalor
_ Contespectoalosal#nentoshGmedos,cGbralosconunatapaseguraparahomoo conpapaldealuminio.
_{_Losalimentosfritoso crocantesnodebencubdrse,
parepuedensecarseenexcesosi selosca/ientademasiado.
t'i_AI abrirlapuertarepetidamente,elairecalienteseescapavies aliment&_seenfdan.
soestabiliceduranteun tienlpoMicionaldespu#sdeagregara/_mentos.
i_{Concargasgrandes,puedesernecesariocubfirpartede losa/inlentoscocinados.
t'_¢Retire/ascucharasparasetvir,etc.,antesdecolocarlosrecipientesend homa
_ Noutilicerecipientes,tapaso pelfco/asadherentesp/4,sficas.
PRECAUCION:Losrecipientes,/as tapaso
/aspeffculasa_herentespl#sticassederretir#nsi secdocananel homo.EsposibJequaelpJ#sticoderrefidonopuedaquitarsey#stenoest#cubierto
por sugarantia. ! !

Usedelhomodeconveccl n.
Posicion de mOItiplesparriflas
Homeado per convecci6n
NOTA:Elventiladordeconveccibnse encenderay seapagarbencMosdurantela coccibnparadistribuirmejorelairecalienteenel homo
Elventiladordeconveccibndelhomoseapagacuandoseabrelapuertadelhomo NOdejelapuertaabiertadurantepedodoslargosmientrasetilizala mccibnpermnveccibnopodraredacirla vidaOtildelelementocalefactorpercooveccion
Enunhomoaconveccibn,unventilactorhacecircolaraimcalieotesobm,debajoy alrededordelosalimentos
Esteaimcalienteencirculacibnsedistribuyedemaneraonifbnneper lacavidaddelhomo Comeresoltado,losalimentossecocbanysedoran
demanerauniforme,amenudo,enmenortiempoconcalordemnveccibn
_'_Idealpara alimentos homeadosydoradosOlemaReraun/f}2rmegee se cocinaaeR var/as
dfinentos horneados
_'_Baenosresu/tadoscongalletas, panecillos,bellesdulces,brownies, magdalenas,bellesdecrema,pancitos dulces,pastel de bngd ypan
El vcndlador de conveccidn hate cirtularel aire c_llieme de lnane_-,_ unifonne
sobre y ah-udedor de los alim( ntos.
Homeado per conveccion en m#ltiples parrillas
AI homearperconveccibnconsblo I parnl/a,sigalasposicionestielaparrillamcomendadasenlaseccibnUsedelhomo
Ya que se circula aire caliente
mfitbrmemente a 1o larg_ del homo,
los _llilllelltOs pile(l( 11 hollle_ll_e coil
ex(dentes rusultados utilizando mtiltiples
parrillas.
La cantidad (le tiempo re(luefida l)am_1horneado de mfiltiples parrillas puede
aum_ ntar ligermnent_ para al,v,unosalimentos, pero s_ ahorra el tiempo
general )_l que nmchos alimentos secocinan a] mismo tiempo. (;alletas,
muffins, bizcochos y otros panecillosrJpidos dan buenos resultado,, con
el horneado de mfiltipl_ s parrillas.
Homes de 30": Cuando hornee en
3 [)arrillas, coloque una parrilla ell
la s<gunda posicidn (B), una _nla cumta posicidn (D) y uno en
la s<xta p_icidn (F).
Para el horneado (le dos parrillas,
coloque una panilla en el sopol_<de la s_gunda posicidn (B). Coloque
la Otl;i parrilla en <1sopolle d_la cumta posicidn (D).
Hornosde 27":Cuando hornee en
3 parrillas, cok×lue una panilla enla l)rim_ m posicidn (A), una enla segunda posicidn (B) 7'mlo enla cumta posicidn (I)).
Pare el homeado de dos lxn-fillas,
coloque una parrilla _n el soportede la primera posicidn (A). (_oloque
la oral panilla en el sopolte dela t_ rcera posicidn (C).
Come adaptar recetas...
[sled puede ufilizar sus recetas [_woritas_n el horno pot conveccidn.
Ctlalldo hOl'llee per convecci{511, re(hlzca
In tempemtura de horneado ell 25 °F oactiw la caracteri'stica de collv( rsi(3n .\rite
Recipe _''.Consuh_ la seccidn ConversiOnAutoRecipe_'en las Caracterfsticasespecialesdel controlde se homo.
_f Utilicelostamahosdecacerolarecomendados
i_ Algunasinstruccionesde/paqueteparacacerolascongdadaso piatospr#}cipaleshaosidodesarrolladasotilizandohomosCOlTlercia/es per COl?VecsioR Para lT)ejores
resultadosenestehoroo,precaiienteelhomoy utilicela temperatoraindicadaenelpaquete
12

ge.com
Asado per conveccioni_iBuenoparagrandescortesd_cameti_rna,
destapada
El ventilador de convecci(m circulael airc calentado unit_rnl{ nlenle sobrev alre(ledor de los alimentos. La carrieFQia ) aves se dOl-_lll l)Ol- [o(l(_ los la(Ios
COII]O Si t!/t'l'all (to(ill,trios qol)lx"
un rotisserie. E1aire calenta(lo cir(ulal-Jsol)re, (leb_Jjoy ahededor de losalimentos (lue estfin siendo asados.
El aire calentado atPapa los jugos
15pidamente i)aDi un producto m_shumedo y fierno mienlr_Js, al mismotiempo, crea/Ill liCO exterior dorado.
.kl asar por COIIV(:((iOlI,es ilnpol-tallteusm- una asadem y una r@lla paraobten_ r mqjores resuhados. La asade_-dse usa pare recoger los den-dines degcdsa y la rejilla se usa pacd evimrlas sall)ica(lu ms de gmsa.
AI homear galletas,obtendr#mejores resulfados si utiliza unabandeja tie homo plana en vezde una fuente con lados bajos
Utensilios de cocina para la coccion per conveccion
.M_les de utilizm su homo l)Orconveccidn, vefit]que si sus utensiliosde codna permiten que el aire circuledentro (lel horno. Si estfi hornean(Io con
varias ban(hjas, deje espacio (ntrc elias."Ihmbidn, aseglh'ese de (lue las 1)andqjas110 { Ilt]'(*II eIl CoIltacto !/IIHS COil Otl'EIS
ni con las parcdes del homo.
Papel y plastico
En los homos pot convecci6npueden utilizalse los recipientesde papel 7'pl_istico rcsislentes al calor1-(,co111{lldados pm-d el tlSO ell horllOS
regulares. "Imnl)idn pueden utilizamelos utensilios (le cocina pl_isticosresistentes al calor hasta tempemmrasde 4(_) "E
Metal y vidrio
Cualquier tipo de ut_ nsilio (le cocinathncionac, i en su hondo por corn eccidn.Sin (mbarg_), las I)andejas merrill{ass( calientan mils nlpido y est_inFeCOlllell(la(las l)am el hol-llea{Io
[)of COllVe{7( i61l.
_ Lasbandejasoscurecidasomn acabadomatehomear4nma'srbpidoquelasbandejasbrillantes
_ Lasbandejasdevidrioocer&7TicacocinaranrobsI_,ntamente
t)am recetas como el polio al horno,utilice una bandcja con lados b@)s.El airc caliente no pued( circularbien ah-ededor de los alinmmosell una t)and(ja con lados altos.
Come configurar el homo para hornear o asar
)] I resione el/)otdn Convection Bake
o el I)ot6n ConvectionRoast.
] Presione los bololleg IIHIII(_Fi(OS
l)_ll_l estal)le(_el _ la l(_llll)(_Fallll_t
del horno des(aria.
[] Presione el 1)ot6n Start.
Para cambiar la temDel-dtura del horno,pre:ione el pamel ConvectionBake(Hornem" l)or convt,(ddn) o ConvectionRoast (X_ar por (onvccci6n)) hlcgolos p_mt'h's nunl(_l-i{os [)al'd ('onfigumr
IH II!](%PH [tqllp{'l_]tlll'H.
Cumldo el horno comience a calentm;aparececJn en la panmlla 1o_cambios ellla tempel-dtm'd, comenzando en 100 °ECuan(Io el horno alcance la temperaturaque usted eslableci6, sonarfin 3 pitidos.
[_ l)resioll( el I}ol(}ll Clear/Offcuan(IoIkLJ
haya lermina(lo.
_i;Escuchar_unventiladormientrasestecocinandoporconveccionElventiladorsedetendracuandolapuertaseabra,peroelcalornoseacabar_
i!!#EsposibleClUeescuchealdunoschasquidosdentrodelhomoduranteel asadoEstoesnormal
!3

Usedel homode convecct n.
PSF3 mejoyes resu]t3dos CUafl_o
ase paves o filetes grandes,recomendamos utilizar la sonda
incluida en el homo percoRvoccion
Para cambiar la temperatura delhomo durante el ciclo de asado
per convecci6n, presione el boronConvectionRoasty hlego presionolos botonos del nOmeroparaconfigurar la nuova tomporaturadesead&
14
Come configurar el horno para asar per conveccion cuando se utilizala sonda
La p:mtalla palpadeatfi mosmmdo Probeyel control del horno indicmCt si la sonda estfiinsertada denm) del enchu[;e, y usmd no haesmblecido ulla temperature de sonda y hapresionado el l_)t6n Start.
[] (]oloque la partilla en la _)sicidnm_ksbaia CA). Insette la sonda dentlode la C_lllle,
[] Conecte la sondt en ]a toma dentrodel homo. AsegOrese de que est_ benconectada. ( ieiTe la puerta del horno.
] Presione d botdn Convection Roast.
[] Presk)ne los/_)tones num&kos paraestablecer la ten/p(mtu£a del homodese_ld?l.
] thesione _1 botdn Probe.
[] Presione los lx>tones num&kos paraconfigurar la temperature intema de]a Gttn_ qLle desea.
[] Presione el botdn Start
( Halide el homo comierlza a calenta_;
aparecerfi en pantalla la 1)alabraLO.
Despu& que la tempemtur4 inmmade la came alcanza I00 E se mosu'ar, ien la pantalla el cmnbio de la temperatureinterna.
] (uandola tenq)eratum internade la came alcance la temperat/]ra
que configurd, la sonda y el borne seapagal'Jn y el control del homo danl laserial. Para detener la serial, preskme elbol(m Clear/Off L tilice ahnohadillas con
aislamienm t&mico para quitar la sonda
de la comida. No utilice wnazas pata
exu',_erla: ]as tenazas pueden dafiarla.
PRECAUCION:Paraprevenirposiblesquemadoras,nodesenchufelasondaddenchufedelhomohastaqued homosehayaenfriado.Noa/macenelasondaen el centre de mcina.
NOTA:
Z Sisequitab sondadela comidaantesdequesealcancela temperaturafinal,sonar#on toneyb pantallaparpaflear#hastaclueb sondasearemovidadel homo.
Z Escocharaun venfiladormientrasesd cocinandoconestacaracteristica.Elventi/adorsedetendr#cuandolapuertaseabra,poreelcalorpermanecer#.
)ixUstedpuedeuti/izarel temporizadorporenopuedeuti/izar/asoperacionescronometraflasdel homo.
/asondaenelhomosuperiorfiuranteoperacionescronometradasdelhomo.Estoseflebeaque,con/asonda,sececinapertemperatura,envezdepertiempo.
Guia para asar per conveccion
Temperatura TemperaturaCarnes Minutos/Lb del homo interna
Carne Costillas,Costillasdeshuesadas, Pocococido 20 a 24 325% 140°FtTopSNoin Medio 24 a 28 325% 160°F(3a 5 Ib) Bienasado 28 a 32 325% 170%komode res Pocococido 10a14 325°F 140%t
Medio 14a 18 325% 160%
Cerdo Conhueso,Deshuesado{3a 5 Ib} 23 a 27 325% 170%
Chuletas(1/2a 1 pulg.deespesorl 2 chuletas 30 a 35total 325% 170%4 chuletas 35 a 40total 325% 170%6 chuletas 40 a 45total 325% 170%
Jamon EnlatadorButt,Shank(3a 5 Ib totalmentecocinado) 14a 1B 325% 140%
Cordero Conhueso,Deshuesado(3a 5 Ib) Medio 17a 20 325% 16O°FBienasado 20 a 24 325% 170%
Madsces Pescado,entero(3a 5 Ib) 30 a 40total 400%
Bolasde langosta(6a Bonzascadauna) 20a 25total 350%
Ayes Poliocomplete{2½a 3½ Ib} 24 a 26 350% 180° a 185%
GallinaCornish,no rellena(1a 1½Ib} 50a 55total 350°F 180° a 185%Rellena{1a 1_/,Ib) 55 a 60total 350% 180° a 185%
Pate{4a 5 Ib) 24 a 26 325% 180° a 185%
Pave,complete-No relleno(10a 16 Ib) 8 a 11 325°F 180° a 185%No relleno(18a 24 Ib} 7 a 10 325% 180° a 185%
Pechugade pave{4a 6 Ib) 16a 19 325% 170%

Usode las caracteristicascronometradas• • #_
paracocinar por conveccion. ge.com
Enmodelosdehomodeble,puedeutilizerInfuneiSndensMo uhomeadeeronometrMoenunhomomientrnsutilizeInlimpieznautomationenelotro;tambi#npuedeuearelasadeu homeadeeronometrMoenamboshomessimult_neamente.
Escuchar#unventilMormientrnsest#coeinnMoconestaeearneterietieae.Elventilndersedetenflr#eunndeInpuertnseahrn,pareelealorpermnneeer#.
Nora: Nodehepermitirsequalosalimentosquaseethanaperderf@ilmente_eomoleehe,huevoe,peecnde,rellenos,ayesyeerde_reposenper m,@de I hornanteso despudede Incoccide.Latempernturnambientepromueveel crecimientodebncterinspeligrosn&Asegziresedequalaluzdelhomoest#apngadnyaquaelcnlordeIn hombillancelernrfaelcrecimientodebacterinspeligrosn&
oI
Como configurar un Inicio inmediato y una Parada automMica
DDD I !i
Elhomo5_enceader,i inmediatamenreycocinarbduranteeltiemposeleccioaadoAIfiaal de,]tiernpodecocci@,elhomoeeapagarbautomMcamente
&_vgtil_sc dc quc (I reloj mucsh c la her. _on-ecladcl dfa.
] Pmsioneel lx_ffmConveetionBakeoConvectionRoast.
] ])lcsiolac los bo[ol](S I)tll/]_l'i(os pala
esial)lccer la tel//per;tltlla del Ilon_o deseada,
] ]h_sionc el botdn CookingTime,
NOTA:Sisurecetarequieredeprecalentamieeto,esposiblequenecesiteaifadirm@tiempoa] tiempodececal@
] pl(!SiOi)( lOS boton(5 I)[ll]](_l'iCOS p_tla
(:(ll_i_tllar cl tkmpo ck coccidn d(seado+
El mfifimo ficmpo dc (occi6n qua pucd(
(x)l/figt]ral es dr" ] minlno+ En la ])anta/laaparecer;_ ]a lelnp+:laltlra d(:] ho])lo qtll +
usled (onfigure y el (iempo de coc(:i6n queha}a ingresado.
Nora: Si@seaqualosalimentossemantengancalientesdurantehasta3 horasdespuesdefinalizadala funci6ndecocci6n,preeioneel bot6nWarmunavez
] Presione d I)otdn Start
1a pamalla mostrarfi los cambios ck temperamta(comenzando en 1O0 OF)y (I tiempo de col:ci6n.1a pantalla c(mfienza a (al//bial tlna vezque laIculperatma aJ(:anza100 OF.
Nora:Ealosme@losde@hiedob]&aluti/izarlosdoshomessimult_eeameete,lostiemposquaapareceeee]apaetallacorreepoaderanalJltimohomoconfigura@Paraverel tiempoeetablecidoparae/primerhomocoefigura@,presioneelpanelCookingTimeparaesehomoEl homo tenth mar,g+co(inando dllra//te la
canlidad de ikmpo progmmada, luex_)se apagar;ialll()n/alical_lelll{- a II/eltOS qua Se ]laSt (OIl_igtll'4(qo
la caraclerfstica mils calienl*.
] Presion¢ (I bot<m Clear/Offl)ara borrar lapantalla si (s necesafio. Retir{ la c<_mkkt @1
borne+ Rectlerde, au/lqtle el horl/O Se apagtle
atll ()ll/_ilicall-lente, los alimelltos qlle se d<janeu el homo COlllhltlaliil/(:ochlfindose
dcspuds que el homo se apague+
Como configurar un Inicio postergado y una Parada automMica
Uetedpuedecoafigurard controlde]homoparaquapoetergued bicio,cocbeduranteueperiodoespedficodetiempoy ]uegose@agueautombticarneete
A_egfilcsede qua (I r(+h:,jnm+.'she la hola corrcctadel dia.
] Pmsione(llx)tdnConveotionBakeoConvectionRoast.
] Pl(si(ll)e los bOlOll(S latll//el'iCOS palaeslablecer la lell/perattlla del Ilol_K) deseada,
] P_(sion_ el bot6n Cooking Time.
Nora:Sisurecetarequieredeprecalentamieato,esposiblequanecesitea@dirrnaetiempoa] tiempodecoccib'_
] Pr('SiOI/_ los botones I/UH/t;l'kOS pala
(X)l/tlgtllal +el IJel_/po de coc£i()l/des(:ad(),
] Plcsk)n_el l)<+tdnDelayStart
] ])ltsioI/_ los botoll(S I/tll_/_;l'i(t_s })ala(+stal)le(:(:l _ la hola (l{I d/a _t la (tlal (1_ s(t;i (itl(
cl heine SC erl(i_+//d21 } (X)l/licrlc(? _1(ocin_tl%
NOTA:Si@seaqualosal_mentoesemantengancalientesdurantehasta3 horasdespuesdefinalizadala tunci@decocci6n,presioneel bot6nWarmunavez
Sideseaverificarel tiempoquehacongdurado,preeioneelbet@DelayStartparaverificarlaheradebicioquahacoefiguradoopreeioneelbotoeCookingTimeparaverificarla@tad@de/tiempodeco2ci6nquahaconfigurado
] Presione d l)otdn Start,
NOTA:eoaarauntonedeatenci#ndes# utilizandoe]homeadoo d asadocronometradoynopresionad boronStartdespuesdeiagresarla temperaturadehemeadooasado
Cuando el homo s( endcnda a la hera del di;_
qua usRd hma esmblecido, la pantalla mostrar5 elcambio dc tempemtuta (comenzando a 100 "F) yel tiempo de coccidn. 1a pantalla comienza acambial una xez qua la tcmpelatura al(ance 100 F.NOTA:Eelosmoflelosdehonlodoble,a]utilizarlosdoehomess@ult&_eameate,lostiemposquaapareceneelapaetallacerreepoaderanal(_ltimohomocoefigura@Paraverel tiempoestablecidoparaelprimerhomoconfigura@,presieaeelpanelDelayStartoCookingTimeparaesel_omo
El homo contilltlar,4+co(i/lalldo dllra//te la
canlidad de tkmpo progmmada, luex_)se apagar;ialllOn/aligal)lelll{ + a I//eltOS qua Se ]laSt (Oll_]gtll'4do
la caracter+sticamils calienl*.
] Presion¢ (I bot<m Clear/Offpara borrar lapantalla si (s necesafio+ Refit( la c<mlkla @1
horno, R_ cuerde, au/lqtle cl borne se apagtle
atlt Oll/_iticalflente, los alimellios qlle se d_janeu el homo COlllhltlaliil/(:ochlfindose
dcspuds que el homo se apague+
!5
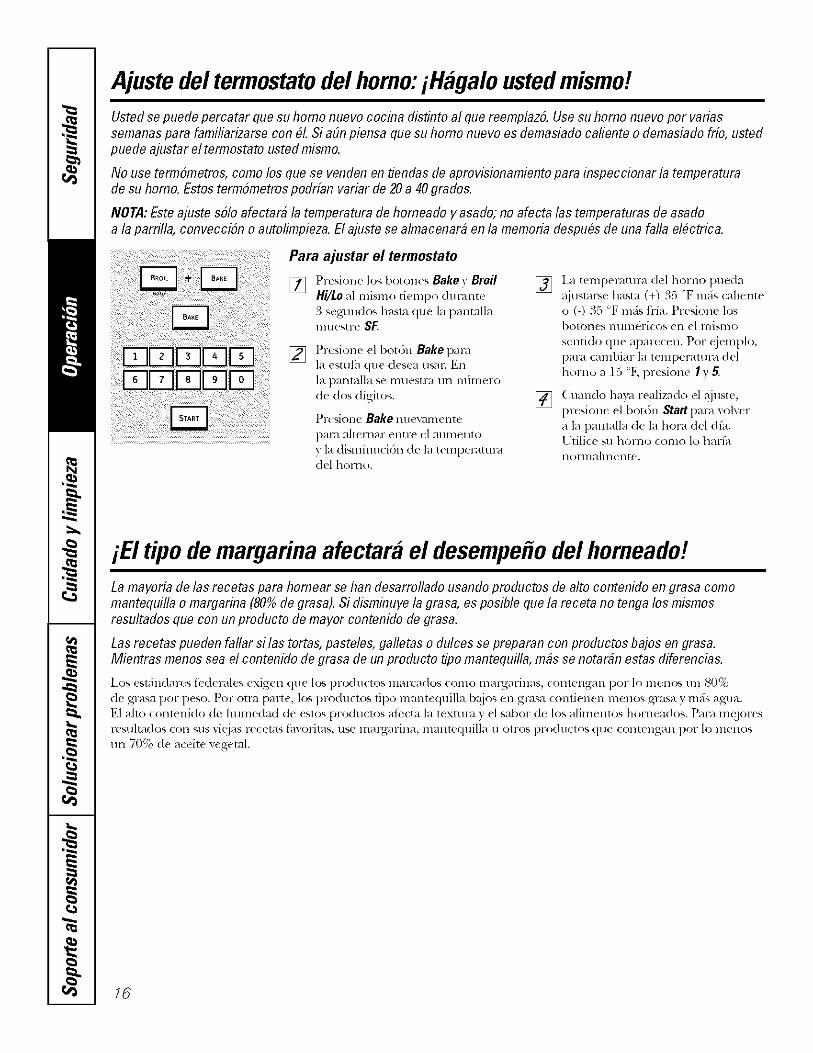
Ajustedeltermostatodelhomo:iHglgalolisted mismo!Usted se puede percatar que su homo nuevo cocina distinto al que reemplaz6. Use su homo nuevo por variassemanas para familiarizarse con #L Si a#n piensa que su homo nuevo es demasiado cafiente o demasiado frio, ustedpuede ajustar el termostato usted mismo.
No use term6metros, como los que se venden en tiendas de aprovisionamiento para inspeccionar la temperaturade su homo. Estos term6metros podrfan variar de 20a 40 grados.
NOTA: Este ajuste s61oafectar# la temperatura de homeado y asado; no afecta las temperaturas de asadoa la parri!la, convecciSn o autolimpieza. El ajuste se almacenar# en la memoria despu#s de una falla el#ctrica.
Para ajustar el termostato
[] Presion( los botones Bakey Broil []Hi/Lo al mismo tiempo (hn_,tnle3 segun(los hasla (lU( la panmllallltles[ F(_ SF,
[] Pr(sione el bot6n Bake parela estufa qu( desea usm; En
la pat'mdla se l]]ll(?S[l-_?llll I]I]HI(_I'Od( dos (lfgit(;s.
PI'( sioIle Bake lllleX_',llnellle
p_ll',l _t|{erll_w/Jll[Ye ul Et/llllell[O
y la dismimlcidn de la temperaml',ldel hol no.
[]
I_ temperamra d(l ['lornc, lmedaalusml_e basra (+) 35 "F m_is caliemeo (-) 35 "F mils fifa. Presione losbotolles lllllll(_riCOS ell el HliSIIIO
Selltidl:, que aparecen. Pot cj(mplo,
par_ cambiar la t(mperaml-,i del
homo a 15 <>F,presione 1y 5.
Cuando llan_ realizado el @lste,
presione el botdn _art pare volvera la pantalla (le la hora del df_l.l Jtilice su holilO (OlllO 1o hal-f_lllOFlll_/hllell[e,
iE! tipodemargarinaafectarael desempe#odelhomeado!La mayoria do las recotas para homoar so han desarrollado usando productos de alto contonido on grasa comomantequilla o margarina (80%de grasa). Si disminuye la grasa, es posible que la receta no tenga los mismosresultados que con on producto de mayor contenido de grasa.
Las rocetas pueden fallar si las tortas, pastelos, gal!otas o dulcos se preparan con productos bajos en grasa.Mientras menos sea el contenido de grasa de un producto tipo mantequi!la, rods se notardn estas diferencias.
Los eslxh_dares f_ demles exigen qu( 1o_ pr(×luctos mar(ados como mavgalinas, conmngan por 1o meno_ un 80%
de gr;lsa pot peso. Pot olin pmle, los l)roductos tipo nmntequilla b_!jos en gin.41 contien( n menos gl-,isa y re;is agua.El aho (:(_ntenido de humedad de (s(os producu)s atk.cta la textur;J y el sabot de los alimemos horneados. Pare m@)rt_s
r(,stdtados con sus vicjas r( ce(as f_mwims, us( malgarina, nmntequilla u olros productos (ltle contengan pot 1o menosun 70% de aceite vege(al.
16

Usodel homoautolimpieza. o.oomLa puerta del homo debe estar cerrada y todos los controles deben estar configurados correctamente paraque el cic!o funcione apropiadamente.
___. Antes de nn ciclo de limpieza
Re(omendamos ventilm- su codna
&jando una ventana abie rmo utilizandoun v( ntilador o campana exlraclora
dt/rallle €1 plimer dclo de autolimpieza.
Remu(va del homo { ualquier band@_
l)am parrilla, r@lla pare pm-lilla, sonda,lodo_, los utensilios du cocina y cualqui( rr( si(]uo (le papel alumhaio.
Limpie el suelo pesado sobrela parre inferior del horno(la apariencia puode variar)
Lus parrillas del homo pueden
autolimpial_,e sin daflo.
No ufilice abrasivos o limpiadorcs de
hornos. Limpie la parm _uperiol; lados yparle exterior de la puerta del homo ton
jabdn ) agua.
Asegfirese de que estd puesm la cubi( rm
d( la bombilla (ldcnica y que la luz eslt _
apagada.
IMPORTANTE: La salud d( algunasaV(S ('S CXII'('IIIH£1HIIICII[(* SCllsiblt' a
las emanaciones no(iv_ls de spetlidas(hll'dIlll2 el (i(lo de aulolimpieza de
( ualquier horno. Mue_ las ayes a olro( uarto bien ventilado.
)'_ En modelos (le horrid doble,
puede configurm- un ciclo de limpiezaell anlbos holllOS sillltllHillealllelltC.
El filtimo homo configur, tdo rew, tsarfiautom_iticmnenlt, su inicio h_Jsta
que finalice el ciclo de limpiezadel pvimero.
;'2 En modelos (le horno doble, puedeIISal el hornea(]o Cl'OllOllletl_ldO ell
un homo )la limpieza automfiticaoil (1 otro Sil_ltllti]llealllelllt*,
PRECAUCION:Nunca colocluo los uteosilios
decociqani otros articulos sobroel piso delhomo Existe undemonto deca/entamiento
debajodol piso dol homo Colocarart/culossobreel piso de/homo puode catsar quoel homoso sobrecaliento,rosultandoen dahos
para el homo y el riosgo dedafios o incendio
on los gabinotos
Come ajustar el homo para limpieza
[] Prcsione el bot6n Self Clean Std/Low
una vez par, iun tiempo de limpieza
de 4 horas o dos w!ces para
un tiempo de limpieza de 3 horns.
Se recomienda un liempo deautolimpieza de 3 horas pm-a
limpiar p(quefios denamesCOlltUlli(]os. PaF4 1111 hOl'llO qt/( io
St' l'¢*COllliCll(]a 1111 tJelllpO {'1('
autolimpieza de 4 horas o mils.
[] Si se necesita un tiempo dislinloa las 4 horas o alas _,1 _vs, utilicelos botones num&icos e inglvseel tiempo de limpieza d(seado.
Ust(d puede cambim- el fieml)o de
limpieza en cualquier momento enlre3 y 5 horns, dependiendo (le (lU_ mnStlCio estt; Sll hOFllO.
[] t)resione el boldn Start.
La puelta se bloquea mltom_licamenle.La pantalla mostmFJ el liempo restantede limpieza. No sm-J po_,ible abrirla puerta del homo basra quela lempeF41u lvl sea ini;vrior ala lenlpel'dlUla de bloqueo yse apague la luz LOCKED.
Cuando se apague la luz LOCKED,po(Irfi ablir la puerta del horno.
_'_Lu palabra LOCKEDpacl)adeal-,_
y el control del horno in(licaF, isi configur6 el ciclo de limpieza y
olvid6 cerrar la puerta del horno.
i¢i'Pare detener un cMo (le limpieza,
l)resione el bot6n Clear/O_ Cuandost' apaguc la hlz LOCKEDindi_ mado
(lue (1 homo s( ha (nfliado aunat(mI)eramm inti..lior a la de bloqueo,
po(Irfi abrir la puerta del horno.
!7
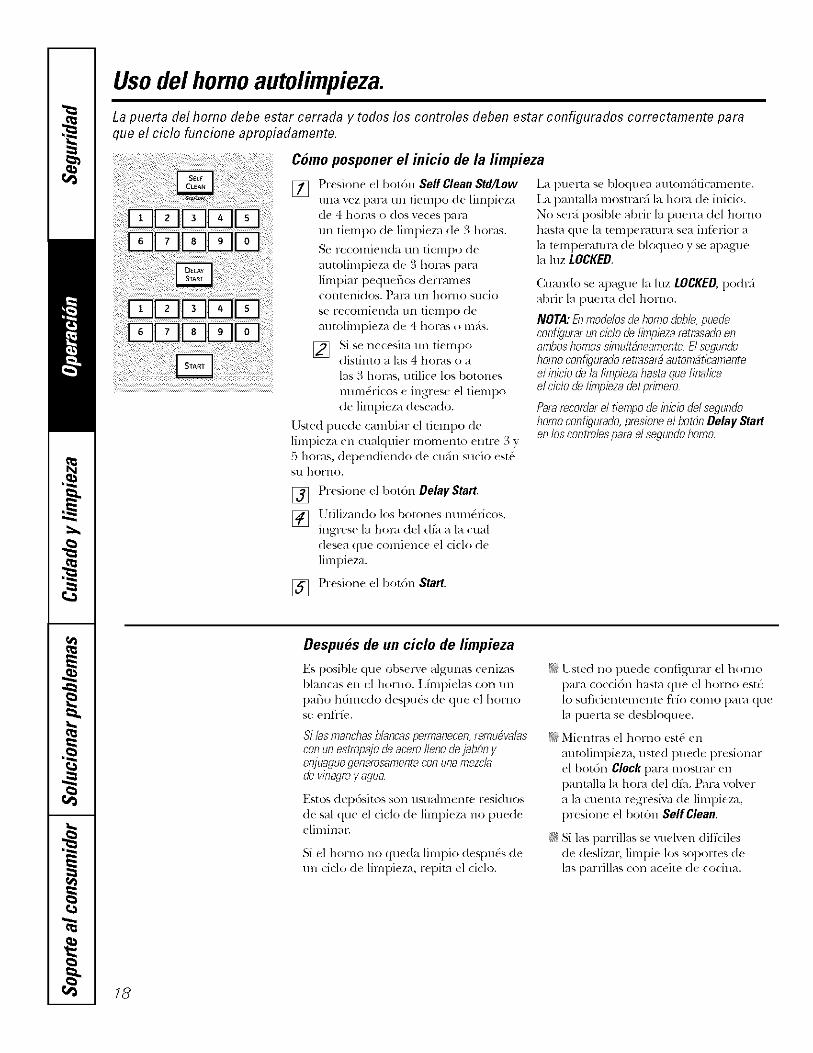
Usodelhomoautolimpieza.La puerta del homo debe estar cerrada y todos los controles deben estar configurados correctamente parsque el cic!o funcione apropiadamente.
Como posponer el hlicio de la limpieza
[_ Presion( el botdn SeKCleanstd/Lowuna vez pma un tk'mpo d(' limpicza
de 4 horns o (los wces pro'4un tiempo de limpieza de 3 horas.
Se recomienda un tiempo demltolimpieza (le 3 horas pal-4
limpiar pequeflos (lerlamesCOlltelli(los. Pal-_ llIl hoFIIO Sll(io
se recomienda un tiempo demltolimpieza de 4 holHS 0 lllfiS.
] Si _,( ll(((git21 llll [i(:lllpodislinto alas 4 horns o a
las 3 hocas, ufilice los botones
num&icos e ingrese el tiempo
de limpieza deseado.
[ 7sted puede cambiar el tiempo de
limpieza en cualquier HlOlllelllo entre 3 v5 horas, dependiendo de cufin sucio est6Sll horlIO,
[] Presion( (l bot6n Delay Start.
[] 1tilizandolosbolonesnum_ri(os,.nlgrese la horn del dfu a la cual
desea que comienc( el ciclo delimpieza.
La I)uelta se bloquea autom_hicamenle.La l)antalla mostmcJ la horn (le inicio.No seF,i posible abrir la pumas del homobasts que la tempemmra sea infkTior ala lenlpel-,mn'a de bloqueo y se apaguela hlz LOCKED.
Cuando se apague la luz LOCKED, podl5
abrir la l)UmXa del homo.
NOT4:b} moddosdehomodoble,puedeconfigurarun ciclo& I#_piezaf_trasadoenamboshornoss#nu/t&_eamenteElsegundohomoconfiguradof_trasar#astombticamenteel iniciodela limpiezabastsqueb}aliceel ciclodelimpiezadd primero
Pars fecordard tiempo de#}iciodel segundohomo mnfigurado, presione el botbnDelay Starten los contro/espars el segunctohomo
[] Presione el botdn Start.
Despues de un ciclo de limpieza
Es posible que obs(lwe algunas cenizasblancas en el homo. I_hnl)ielas con unpatio hl_medo desDu_s de (lue (1 hornose enfYfc.
Si /asmanchasblsncaspermanecen,remubva/asconunestropajocOaceroIlenodejabbnyenjuague generosamenteconuna mszo/adevinagreyagua
Estos dep6sitos son usuahnenw resi(hlosde sal que (1 ciclo de limpieza no pue(leeliminal;
Si el homo no queda limpio (lespuds deu n ci(lo (le liml)ieza, tel)its el ( iclo.
)'21sted no pue(le configm',u el homoI)m-a(occidn basts qtle el horno est_1osuficient(menw fifo como pars quela puel_a se desbloquee.
)'2 Mientras el homo est_ en
atm)limpieza, usmd puede prcsionar
el botdn Clock l)ara mostFm-elll)antalla la horn del dfa. Pm-a w)lver
a la cuema regresiva (1_ limpieza,presione el bot6n Se/fC/eao.
i!i:.Si Ins parrillas se vuelven diffdles
de deslizal, lilnpie los sopolles delas parrillas con a(eite de cocina.
18

Caracteristicasespecialesde controldesuhomo. ecomSu nuevo control con botones sensibles tiene caractedsticas adicionales que puede elegir utiliza_ A continuaciSnse describen las caracterfsticas y c6mo puede activarlas,
Los mofios de caracteristica especial s61opueden activarse mientras la pantalla estb mostrando la hora del dia,Dichos moflos permanecen on la memoria flel control hasta que los pasos sean repetiflos,
Cuanflo la pantalla muestre su elecciSn, presione el botdn Start Las caracteristicas especiales permanecer#nen la memoria despu#s de una falla en el suministro de electricidad, excepto para el modo Sabbath, que fleber#reestablecerse,
Apagado despues de 12horas
Conestacaractedstisa,si seolviday dejaelhomoencendide,el cootro/apagar#el homodespu6sde I2 horasautombticamentedurantelasfuncionesdehomeadeodespubsde3horasdoranteunafuncibndeasadeab parrilla
Si &sea apagar _sm camc_erfsfica, siga los[)aS{)S _t (OllIillll_( i(_)ll.
] Presione los bololms Bakey BroilHi/to (en mo<lulos de homo dobleuse los conlrol( s d(l homo superior)al mismo ti_mpo durmm,3 segundos hasta quela l)anmlla muestre SF.
[] Presione el bol(3n Delay Start hasmque no apagado (n_ shdn) apar_ zca_n la l)an/nlla.
[] Presi°ne el b°ldn StartP al_a_<t'x _o >_g_d '3 (1("_ 1configul_aci(m del control en _sle
m(_:lo (l_ Cal_lCt_ rl'slica esl)ecial.
NOTA:Enbs modelosdehomodeble,estoactiva_ichafnocibnespecialparaamboshomos
Reloj de 12 horas, 24 horas o supresi6n de/reloj
Sucontrolestbconfiguradeparautilizarunrdojde 12horas
Si usle(l l)refedria tener un r(l£j d(( " . ,24 h ms ( suprnnn- el rel(_]d( la 1)anlalla,
siga los pasos a (olltJlltla(:idll.
[]
[]
Presione los bolones Bake y BroilHi/to (en mod('los (1_ homo (Ioble,
us_ los conlroles del homo superior)al mismo fiempo (hn;,nlt"3 segundos hasta <lue
la pantalla muestr( SF.
Presion_ una vez el bot6n Clock.
La panlalla moslrar_i 12 hr. Si &m
es la ele(cidn que desea, presioneel I)otdn Start.
Presione mlevamente el botdn
Clock[)m',tcambiar al reloj (le24 horns. I,a pantalla mostl-,mi 24 hr.Si dsta es la eleccidn que desea,presione el botdn Start.
Presione lmevamente el botdn
Clockpac4 supfimir el rel(>jde lapmmllla. I,a pantalla mostml-J OFF.Si dsta es la eleccidn que desea,presione el botdn Start.
NOTA:Siel relojestaenelmodesuprimide,nopodr#ofi/izarla fuociboDelayStarL
Selecci6n de temperatura en grados Fahrenheit o Centigrados
Sumntroldelhomoest#configuradeparautilizar/asseleccionesde tempemturaengradosFahrenheit,perosepuedecambiarutilizandolasseleccionesengradesCentigrades
[] Presione los I)olones Bake y BroilHi/to (en modclos de homo done,
us_ los _omroks dd horno superior)al mismo tiempo (hmmte
3 segun(/os hasta (luela pantalla mu(stre SF.
[] Presione los bololl{s BroilHi/LoyCookingTimeal mislno tiempo.La panmlla mosmm_ F (Fahr_nheiO.
[] Presionc los bolones BroilHi/toyCookingtime lltl(!Val_l(!llle al lllifqllO
ti{mpo. I,a panlalla mosu-ar_C ((?enl fgl-a(lo).
[] Presione el boldn Start.
NOTA:Enmodelosdehomodoble,semostrarg{/anuevaconfigoracibnparaamboshornos ! 9

Caracteristicasespeciales de controlde su homo.
Tones al fiual de un ciclo cronometrado
AIfinaldeuncidocronometrado,sonarbn3pitidoscortosseguidosperunpitidocada6segundoshastaquesepresioneelbot6nClear/o_Estepitidoconfinuocada6segundospuedecancelarse.
Para cancelar e] pitido cada 6 _-gundos:
[] Preskme los l_ton_ s Bake_ BroilHi/Le(en moddos de homo doble, use los
controles del homo superior) al mismo
tiempo durante 3 sz%undos hast;, quela pantalla mt_estre SE
Presioneel bot6nKitchenBmer On/Off,
La panta]]a muestra CONBEEP(1)iddo('ominuo). Presi(me mle_mlente el
bot&l Kitchen Bmer On/Oft[a panmllamlestra BEEP. (Esto cancela el pitido
cada 6 segundos).
[] Plesion_ el botdn Start.
NOTA"_1modelosdehomodoble,estocancdaelsonidodelfinaldelcidoparaamboshornos.
Conversion Auto Recipe TM (Couversiou automMica de la recetas)(en atgunosmodetos)
Cuandoutiliced homeadoporconveccibn,la caracterfsticaConversibnAuto Recipe"convertirfi
autombticamente/astemperaturasdehorneadoregularingresadasen /astemperaturasdehorneado
porconvecci6n.
Unavezestbacfivada/acaracteristica,/apantalla
mostrar#/atemperaturarealconvertida(reducida).Porejemp/o,si ustedingresaunatemperaturade
unarecetanormalde350 °Fypresionaelbot6nStart,lapantal/amostrarbCONy la temperaturaconvertidade325°£
NOTA:Estacaractedsticanoconviertelos tiempos
decocci6ndelhorneadoporconvecciSn,sblo/astemperaturasnorma/esdehorneado.
Paraactivarla caracteristica:
[] Presione los botorJes Bake y Broil Hi/[o(eri modelos de horno doble, use los
conm)les del homo superior)al mismo
fieml)o &lvante 3 segundos hasm quela panm/la muestre SF.
] Presione el bot(m ConvectionBake.La pantalk_ mostrmv_CONOFF I reskmenuemmeme el botdn ConvectionBake.
La pro-indiamostrmv_CONON.
Presione el bot6n Start.[]Para desacfix_r la cm'acter/sfica, repim
los pasos l al 3 anwriores pero presioneel botdn Staffcuando CONOFFest_en
la pm_mlla.
20
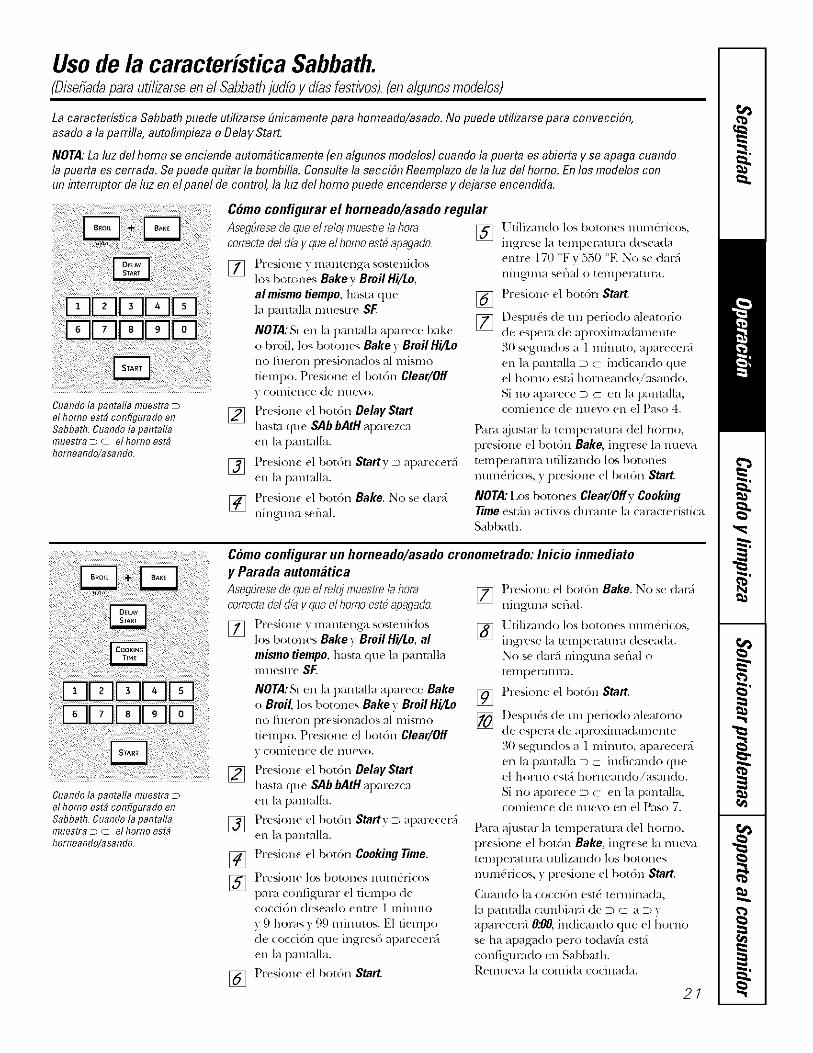
Usedela caracteristicaSabbath.(Disefiadaparautilizarseen el Sabbathjudfo y dfasfestivos).(en algunosmodelos)
Lacaracteristica Sabbathpuedeutitizarse6nicamentepara homeado/asado.No puede utilizarsepara conveccidn,asadoa la parrilla, autofimpiezaoDelayStart.
NOTA:La luz dethomo se enciendeautomMicamente(enalgunos me@los)cuando la puerta es abierta y se apaga cuandolapuerta es cerrada.Sepuede quitar la bombilla.Consultela secciOnReemplazode la luz delhomo. Enlos modelosconun #Tterruptorde luz enet panet de control,la tuzdel homo puede encendersey dejarseencendida.
Cuando la panrafla muesrra Del homo esta con@urado enSabbath Cuando la pantallamtlostr8 D C OI homo OSt8
homoando/asando
Coma configurar el homeado/asado regular
Aseg6rese& queel relejmuestr_lahera []correctadeldfay queelhomeestbapagade
[] PF{_S, iOll( 7' lll_ll][(llg_l SOSt( llidOs
los botoncs Bake v Broil Hi/to,
al misme tiempe, hasm qH{!
Ia pmltalla 111t1{SII'{!SF,
NOTA."Si en la pmamlla aparece bak{
o hioil, los bet<rues Bake y Broil Hi/to
no fiwron prcsionados _11mismofi_ rope. Presionu cl bot6n Clear/OffV ( Ol_]i_ql(_: (l{' IIII('VO.
[][]
[] F'resione el boldn Delay Startlaasta que SAb bAtHaparezca_11la panmlla.
[] Presion{ cl box6n Start y D apar{ c{ r;5(11 la pantalla.
[] Pl-esionc el bol&a Bake. No se dm_,_HI llglll]a S{ l_lal.
[ tilizando los bolon{ s lmm&icos,
illgres{ Ia telnl)el-_?lttlla (l{s{!_](l_]
entr{ 1;0 F ':):_O°ENosedam
llillgllna serial o [elllp{!l-_l[lll-_l.
Presione el bol6n Start.
Despu& de un periodo aleatorio
de espel-a de apl-OXil/ladaln(!ll[e
30 segundos a 1 minute, aparecePJ
en la pantalla D c indicando queel horno esti horn_ andoiasando.
Si no aparece D c en la panmlla,COllliellCe d( IIII{VO ell el ])as() 4.
Pa£4 HjLIS[aF la telllDel'dtIIFi/ (1{1 BOFIIO,
presione el bot6n Bake, ingrese la nuevatempeP4tura utiliTmldo h_ bolones
mira&ices, ? prcsione el bot6n Start.
NOTJL"Los be*ones Clear/Off y CookingTime est_n a(liv{}s (lu mnte la (am( tt,r_sli( a
Sabbath.
ii!iii!iii!ii iiii!ii!il iiiiiiiiiiii !! ii!iii!!iii!!!iii!!iii!ili!i!ii!iiiiii!!ii !i !ii!iiii!ii!!!!iii iii!iiiii!i ii
¸¸
Cuando la pantalla muestra Del homo estb conflgurado onSabbath Cuando la pantalla171llostr8D C OI horl}o ost8
horneando/asando
Como configurar un homeadn/asado cronometrado: Inicio inmediatoy Parada automMica
Aseg6resedequee/relojmuestre/ahora [] th-esi{nm {l bot6n Bake. No se dmv_correctadel 6@ y que el homo este apagado ninguna s{fial.
t)resi{m{ v mantenga sos_enidos 1 lilizan(lo los b(}lOl](% num&qcos,[] l{}sboton'{ s Bake v Broil Hi/to, al [] ingresela,empcm,u,_,des_ada.
misnm tiempe, haste (lUe la panlnlla No s{ dal-_{ l]ingtlna s{ [lal 0
l_]l/eS[l'{_ SF. I(!11113(! 1"/II tl 1"_.
NOTA:Si en la l)anlall_l aparece Bake Pr{siol]{ {1 bot6n Start.{, Broil, los botones Bake}' Broil Hi/to []
no [heron pr_sionados al mismo [] Desl}u(_s de un p( fiodo aleatoriotieml)o. Pr{ sione {1 1)Otdl_Clear/Off de eslxm (le al)roxinmdana{ nteV COllqiellC(! d{ llll{VO. 2_() s,{_gllndos _1 ] HlilllllO, _I[){?F(_C(:f_
en la panlalla D c indicando que[] Presi{m{elbo16nDelayStart el horno( sl_i horneando/asal]do.
hasta que SAb MtH aparezca Si no aparece D c- en la pantalla,
[]
[][]
[]
en la pantalla.
t)resione el bol6n StartyD apareceDi
en lapantalla.
Presi(me el bol6n CookiegTime.
Pr{ SiOlle los b{IIolles IltlIII{%Fi(OS
pare configtm_r {1 li{:mpo {1{co{{idn dcscado entre 1 mimlto
y 9 hems y 99 minutes. El fiempode cocci6n que ingres6 al)arec{ P,i
en la pantalla.
Prusiolle el botdn Start.
(olniellC(! (1(! llU{VO {:11 {:l t a_,o t.
PaPa @lstar la mmperamm del homo,presion_ el botdn Bake, ingrese la nueva
[elllp( 1"41111_1 t/tilizall(l{} los botollesnum_lico% y presione el botdn Start.
(uando la cocci6n e_,t_ tenninada,
la pantalla cambial-J de D c a D yal)arecer_ 0:00, indicando que el homo
se ha apagado p{ro to(lm _;i estficonfigumdo ('n SabbaflLR_ mueva la comida cocinada.
27

Usodela caracteristicaSabbath.(Disefiada para ut/lizarse en el Sabbath judfo y dfas festivos). (en algunos modelos)
Coma safir de la caracteristica Sabbath
[][]
Presion_ _1 boldn Clear/Off
Si el hol'llo est,/( O(ill_lll(]O, esper(
(]!llallte till [)el'i()do ale_tt()l-iO (le
aproximadmnente 30 segundos a1 minulo, hasm que solo D _std en
la pantalla.
PFesion( y SOS[{}llga lOS botolles Bake[] y Broil Hi/to, al mismo tiempo, hasm
(l'de la pantnlla mucstr_ SF.
[] Presione el botdn Delay Start hasla
que aparezca en la l)anmlla 12shdn o
noshdn. 125hdnindica que el homose apagm-,_ autom_ilicamenle
despu(_s (le 12 hoFds, noshdnindica que el homo no
se apagm-,i autom_ilicamenle.
[] Pr_sion_ el I)otdn Start.
NOTA:Si se presen16 ma cortc (11el suministro el(_ctrico mienu-as el homo
estaba _n Sabbath, el hondo se apaganiautomfiticamente y pm manecec, i apagadoaunque el suministro el&:n-ico regrese.El c(mtrol &l homo debe ser reiniciado.
22

Cuidadoy limpiezadel homo. gocornAntes de limpiar cualquier parte de! homo, asegEirese de que el suministro el#ctrico est# desconectado ytodas las superficies est#n fdas.
Como retirar la pelicula protectora y la cinta adhesiva de empaque
'Ibme cukladosamente una es(luinad_ la pelfcula proteclo_-a y despt:guelalentamente de la superficie del aparato.No use ningfin objeu_ puntiagudo pararetirar la pelfcula. Retire toda la pelfculaantes de usar el aparalo per primera vez.
Pal'd _lseglll'dl-be de no dal_lflr el a_abadodel producto, la manem mils segumde retirar el adhesive de la cinta de
empaque sobrv apar_m_s nuew_s _sla aplicacidn de un detelgente domdsticol_quido para la',:lr plates. Aplique con1111pal_lOsuave y m@.
NOTA:Oeborotirarel adhesivedetoctas/aspartesNopeoderotirarsosi sequoma
Lampara de luz del homo
NOTA:Lacubiortadevidriofenalgunosmodebs)sb/odeber9quitarsocuandoestbfria Elusedeguantesdelatexpuedeofreceronmejoragarro
Antes de reemplazar la Mmpara,desconecte la energfa eldctfica que vaal horno en el panel del cormci_vuitoso filsible principal. Dfije que la l_hnpal-,ise _nh-fe per complete antes de qtfitm-la.Pal-a su ';eguridad. no tO(lUe una ldnlpal_,,caliente con un patio hfimedo. Si 1ohate, se ron_perfi la lfimpara.
Para retirar.
Girt la cubierta de vidfio 1/4 de s_.mlta
en sentido c,puesto alas agl.!jas del rclojhasta que las leng{ietas d( la cubiertad_ _idrio se liberen de las reran-as
del pol_d_mpams. Retire la l;impara.
Para volver a colocar:
Coloque tma nuewl lfilnpal-,i de 40 wltiospac,t elecu-odomdsticos. Coloque laslengiietas de la cubierta de vidrio enlas canucas del portal;hnparas. Gir¢la cubiC rta de vidrio 1/4 de vu¢ ltaen el sentido de las agl!ias del rd@
NOTA:
_'_L_rTa/gmparaparaolectrodomgsticosdo40vatiososrobspequofiaquounabmparaost;}ndarparausedom_stiwcte40vatios
_'_(rTstaley ajustob cubbrtaOFelsentidodelas agujasdelreloj
}'_ Vudva a conoctar /a onergb o/bctricaal homa
i!i:,Paratenorunameierilomi_}acibn&ntrodelhomo,1fl_Tpiela cebiertadevidrioconunpahohfimododemanorafrecuontoEstodoboriarealizarse#,uandoelhomoost9complotamontofifo
23

Cuidadoy limpiezadel homo.
No Roteni limpieta juntade la puerta;_sta tienemuypoca resistenciaa la abrasi6n,
Siobservaque lajunta seest#desgastandoo dafiandode algunamanerao si se ha movidode iugaren lapuerta, h#galareparar
Limpieza de la puerta del homo
Paralimpiarel interiorde la puerta:
!_JDebido a que el fireadentro de la juntase limpia dumnte el cklo de limpiezam_mmfitica,no es necesario qtle la limpiede///allera 111allt]aL
!;_i#E1fireafileYade la junto y el rew!sthniemoimerior de ]a puerto pueden limpiarse contma esponja/impiakn_a plfixticao llena de.jab6n, agua caliente y detergvnm. Eqjuaguebien con una soluciSn de vinagre y agxla.
Paralimpiarel exteriordelapuerta:
!i;_[se agua Ljab6n pm',_limpiar bien la pmlesuperkm los costados y la purte delanmmde ]a pumla del horno. Er!juague bien.Tmnbi_Snpuede usar un ]impimidrios pro'4limpia_ el vidrio en el exteriox de ]a puerto.
No permita que se derYame agua (lllos oriikios de vemilaci&l.
_{_Si pe_sistealguna mancha en el ribek,de la ventilacidn de ]a puerta, use tmlimpiador abn,sivo suave y una espo_{jahotadora pmvtobmnet mejores resultados.
(%SEl derrmne de adobos,.jugos de tmtm,sals_sde tamale y matefia]es pul-arociarque conteng',m 5cidos puede provocmdecoloraci6n y debetfi limpiarse deinmediato, Cuando la superficie estd fl'fa,limpiela y eqjufiguela.
_,'No use limpiadores prowhomos, poM)s delimpieza ni ab_vtsivostumles en el exteriorde la puerm.
Ranura
Segurode labisagra
fire los seguros de la bisagra haciaabajo para desbloquearlos
Puerta extraible del homo
La puerta es muypesada. Tenga cuidadoal qlfitar y levantar la puerta.
Nolevantelapuertadelanlani]k
Paraquitar/apuerta:
[] Abra la pue/la por (ompleto.
[] Tire bacia ab@) los segurosde la bisagYahacia el marco dela puerta, y coldquelos en la posicidnde desbloqueo. Po&',i ser nec_sariotlt]liza/tlna heFFalrliellta_ co/l/o 111/
destornillador lXquefio de hoia plana.
[] Sqjet( con firmezaambos ladosde ]a puerta en la parte superiol:
[] (ierre la puerta b-sta la posici6nde extlacci6n de la puerta (consultela ihlstmci(m).
] l.-xante la puerta h;_'¢aque el bmzode la bisagYdse liber_ de la mmlra.
(_() IIBorde Bazode a bsaga
[] lapue,ln inferidde I 1/,, VJeznel mismo laranura!t
la 1)os/clonde II _'_ ]ext,-.,(ci6n, co](_lUe _"_ II.lamuescade] brazo Ide la bisagra.:. en el II....... M_borde ruler]or de la nmum de
la bi_,agra.I,a muesca en el brazo dela bi_tgra debe csmr bien _senvadaenla pa_te inferiox de la r,tmlm.
] AI)ra la puetta pol completo.Si la puetta no se abte completamente,la muesca no estfiasentadaCOrleCt_ll-nellte en el horde
inferior de la ranura.
[] Empuje los seg-ur,:_de la bisagrahacia aFl"iba conira e[ realco delantero
de la c:avidaddel homo y col6que]osen la posicidn de bloqueo.
Posicidn de extraccidn Paravolvera colocarla puerta
[] Sujete (on fim3eza ambos ladosde la puelta en ]a part( supeliot:
Brazode
Segurode la
bisagraEmpuje los seguros de la bisagra hacia arribapara bloquearlos
[] Ckrre la pue_ta del horno.
24
Sonda
I,a sonda de temperamra puedelimpiaBe con agua y.jal_m o con una esponjalimpiadota Ilena con.jab6n. Entire la sondade temperatura antes de limpiafla. ()uim]as manchas _ebeldes con una esponjalhnpiadora Ilena con jab6n, enju{_Kuelasy s_que]_ts.
Nointroduzca/asondade temperaturaenel agua.
Noalmacene/ason@de temperaturaenel homo.

ge.com
Parrillas de horno
"H)(las las l)arrillas de homo l)u(den
lillll;,iarse lll_llll_lllll( 11[(_ (O11 llll
liml)iador _IBI_ISix 0 0 lana de a(ero.
Luego de limpiarlas, elljuagtle lasl)arrillas con _lgua liml)ia y sdqtlelas
con un patio limpio.
Las parrillas de homo [)u(d(n
I)(rlllall( (el- (1] (1 horllo d/ll_tll[e (1 (i(lod( limI)i( za mltomfiti(a sin (laflm_se.
Si se torna (lificil deslizar las l)arrillas,
l)ase a los bort/es laleFdles una capa f'inade aceite vegetal hlego de liml)iarlaslnallllalnlellte o ell el hol'llO. F_slo
avtl(lal',i a manmner la fhcilidad d(
deslizamienlo de las parrillas haciaadentr(_ y hacia at'uel_l (lel horno.
Panel de control
Es buena idea limpiar el panel de (:ontrol
d(spu(% de ca(la uso. LimlMe con jal)6nsu_l_'e ) _l_u_l o (on una sohl(:idn de
xinagre y agu_l, elljuague con _Jgua liml)iay hlstl-e ell seco COl] 1111 Dal_lO _,llave.
Cuando haga la limpieza, el paneld( COII[I'O1 debe estar a lt,llll)ei-,tllll_]
aml)ienm y no b_jo la hlz solar directa.
No utilice liml)iadores abl_lsivos,
limpiadorcs liqui(Ios fuerms, almohadillasplfisticas l)al_l restregar o liml)iadores
pal_l hornos sobre el pmlel de control:(stos l)ro(ltl(:los daflm-,hl (1 acaf)ado.
kna solucidn 50/50 de vinagre y aguacaliente ftlnciona bien.
Superficies de acero inoxidable _enalounosmodolos)
No use una almohadil/a de lana de acero;
rayara la superficie.
t)al_t limpiar la s_lpert_cie de aceroinoxidable, us( aguajabonosa conpoca esDuma o bien un limpiador oabrillanmdor [)am acero inoxidable.Sieml)re limpie la SUl)erf_cie enla dircccidn de las vetas. Sign lasinstmcciolms del liml_iador i)ar_ limpiarla _,_lperficie (le acero inoxidable.
Pal_l DV('I'i_I.I;tF _lcel-ctl d( la colllDl'tl
de un limDiador (:, Hn Iustlaador de ac(rt)inoxidable, o pal'd enconlrar la ubicacidnde su distlibuidor mils cercano, pot i3u)rllame a llllesll-o nl/mel-o gl_milo:
Centro National de Refacciones
(National Parts Center)1.800.626.2002
ge.com
25

Antesde Ilamarparasolicitarunserviciodemantenimiento...
iLos consejos para resoluciSn de problemas ahorran tiempo ydinero! Revise primero las grMicas en las siguientes p@inasy es posible que no tenga que Ilamarpara solicitarservicio demantenimiento.
Causas posibles Qu# hacer
Olvid6 ingl'esar una * Presionc (,1botdla Bake y la temp(mmra d('scada otemperatttra de horneado o el botdn Self Clean Std/towy el tiempo de limpiezael tiempo de limpieza, deseado.
Controles del horno no .Co,,suhelase(ddnUsodelhorno.
configurados apropiadamente.
asanapropiadamonte La posici6n de la parrilla es * Col,st,lie la se( ddn Uso de/homo.
incorrecta o la parrilla noestit nivelado.
El piso del horno no estfi • Vllelva a (olo(ar cl piso del horl]o.en su lugar.
El termostato del horno * ())llstllle la se(:(:iOll Ajusto del termostato del homo:
necesita ajuste, iH_gato usted mismo!.
La puerto del horno est_
ahierta, asado dnkamunte con la lmerta ,, rmda. Si( mpre asea la parrilla (on la puerto terraria.
Los conh*oles del horno estfin * ,'¥_egtir(s( (l( ];q-(sionar (l I)ot(_,n Broil Hi/to.conf'_'ados inadecuadmnente.
eslit utilizando una posicibn • Col lstlll_ la Ouia para asar a la parritla.iimdecuada de la parrilla.
Los alimentos se est.4n • PaFd obl(ll( r ln(jores resuhados utilic( tma 5rant(cocinando en una fuente caliente, disefiada pma asar a la l)arrilla. A_egdr_ se de (lU(
Los uteimilios de cocina **t)al_a m@)res resultados, tltilic( tma I)and( ja disefladano son adecuados para asar pare asar a la l)arlilla.a la par rilla.
La sonda eslA conectada • [)escon((te y relire la sonda del horno.a la. 'salida en el horno.
En ',dgun&s ',ireas * ?r((ali(nte el (lemenlo d( asado a la parrilla duranleel voltaje puede ser bajo. lO lnilltltOS.
• A_e a la l)arrilla (hll'_tlll(! till 1)(l'i(Mo mils pr<)longado(it1( el rec,-mv_ndado (n la Gu[a para asar a la parrilla.
Un fusible en su c&sa • Rceml)la( e el filsible o reinici( (l (/is}_lnlol:puede estar fundido od di_ltor activado.
Los conlroles del homo es 'tim • Consuhe la seccidn Uso del roloj, el temporizador y
configm-ados incorrectamente, et bloquoo de controles.
La bomb'dla estfi tloja o • Apriete o rcemplac( la bombilla.defecmosa.
El bo|6n de operacidn • Llame pma s(tli(itar Sel-vido de mant( nimiento.de la bombilla estit roto.

ge.eom
Causas posibles Qu# hacer
El terlnostato dd horno * (]onstlllt, la scccidn Ajuste de] termostato c/el horlTo:
necesita un ajuste, iH@ato usted mismo!
Un fusiMe en su casa puede * Reemplace el fhsible o rt inicic cl disvuntonestm" fmzdido o d disytm/oracdvado.
Los controles del homo est_n " Consuhe la se4dGn Uso del homo.
conf'_nn'ados hladecuadamente.
La temperatttra del horno es " Permita que el homo s_ _nil-re ) veinicie losdemasiado alta para establecer controles.tma operad6n de autolimpieza.
Los controles del homo estfin " Consuhc la secci6n Uso del homo autolimpieza.
configurados inadecuadamente.
La sonda est'a endmfada en • R_ tire la sonda d_l horno.la toma dentro del homo.
Este es el sonido del metM • Esto es normal._stallidb!i calentfindose y enfrifindose
duraalte las funciones de
cocci6n y limpieza.
Exceso de mugre. • Presione el bot6n Clear/Off. Abr_l las ventanas parad_ jal salil el htllllO de In habitaci6n. Espere hasta quela luz LOCKED se apague. Limpi( el exceso d( mugre yreinicie el cklo de limpieza.
El horno estfi demasiado * Permim ClU< cl homo se enfHe pot deb_jo d_ lacaliente, t{ rap, ratm-a d< bloqueo.
Los controles del horno est_ * Constlltt, In s(cci6n Uso del homo autofimpieza.configm'ados inadecuadmnente.
El horno fiene mugre dificil * Limpie las sobras pesadas antes de comenzar el ciclode eliminar, de limpi(za. Es posible que los hornos que tienen
una mugre muy pesada necesiten de autolimpiezalllleValllente o d[/l-_lll[( till periodo lll_S pl-olollgado.
Se ha seleccionado el ciclo * Cierre la puerla del homo.autolimpieza pero la puerta
La puerta del horno * Pr_ sion_ el bot6n Clear/Off. Dqj_cnfriavdhorno.estfi bloqueada porquela temperatura dentrodel horno no ha caldo
por debajo de la temperaturade bloqueo.
27

Antesde Ilamarparasolicitarunserviciodemantenimiento...
Causas posibles Que hacer
Tiene tm c6digo de * Prcsiom, cl botdn Clear/Off. I'crmita quc cl horno seerror de la funci6n, enfrfc durante una hora. Ponga el horno nuevamente
en operacidn.
Si el cddigo de la funcidn • Desconecte la corri( nte del horno durantese repite. 3() segundos 7' conecte nu( vamente la corriente.
Si ¢1 fimcidn se repite, llame para solicitar s¢ rviciod( nl_l ilte nillli_!ll[ o.
Se ha fundido un fusible • R_ _mplac_ el filsible o r_@lste el cortacircuitos.en su hogar o bienel cortacircuitos no estitfuncionando correctamente.
El reloj estit en el modo • Consulte la sec d,"m Caracterfstlcas especiales dede apagado, control de su homo.
Falla en el suministro * R(inidc cl rcloj.de electricidad.
Los botones de control del • Los botones Bake y Broil Hi/Lo (en modelos de hornohorno no fueron presionados dol)le, use los botones del horno superior) d(benapropiadamente, ser pr(sionados que al mismo tiempo 7':sostenidos
durante 3 segundos.
Esto le recuerda ingresar * ]ngrese una temperatura de sonda.una temperatura de sondadespu6s de enchufm" la sonda.
Pico o corte del suministro • R_inkie ('1 reh:)j. Si el hOrllO estaba en uso,el6ctrico, debe reini(iarlo presionando el botdn Clear/Off,
configurando _1 reloj y reestableciendo cual(luierfuncidn d{ coccidn.
_b_hdo_ehtiliz_
Cuando se utiliza la caracterlstica • Esto es normal.
por convecddn es normal ver vaporsaliendo del respiradero del homo.Colfforme aumenta el nfimero
de parrillas o la canfidad dealimentos que esthn siendocodnados, _si mismo aumentarfila candrktd de vapor visible.
Esto es normal en un horno • Para acelerar el proceso, configure un ciclo d_nuevo y desaparecerfi con antolimi)i_ za durante un mfnimo (le 3 horas.el tiempo. Consuhe la seccidn Uso dot horno autotimpioza.
Un olor del aislamiento • Esto es t(mporal.
alrededor del interior delhorno es normal las primerasveces que se udliza el horno.
Un ventilador de enfriauniento * Esto {s normal. El ventilador (le _nfrimniento
o un ventilador de conveccidn seen( ender_ para r(fl'ig(rar las partes internas.(dependiendo de la funcidn Puede fim(ionar durante 1-1/2 horas despu_s qu_que est6 utilizando) puede el horno <st_ apagado. El ventilador de COllV( cci()iiencenderse automfiticamente, fllncionar5 y se apagarfi basra (lue la fimcidn termine
o la puerto sea abierta.
28

Notas. ge.com
,qm.
r*Jn
29 ""
NOta$,
€_
q_
m
q_
_mh
lU
_L
€_4_q
€_
l

Service Protection Plus'_'de GE
(;E, una marca recono(ida en lo(to _1 mundo d(bido a su (alidad _ (onfiabilidad
le ofi'e(_ Servi( ( Prot_ clion Plus _, una prow<cidn global (k to(los sus arl_tk_(los:iSin importar la marcM
Los beneficios incluyen:
• Respaldo de GE• Todas las marcas estfin cubiertas
• Servicio t6cnico ilimitado
• Todas las piezas y costos de mano de obra induidos• Sin desembolsos
• Sin deducibles ocultos
• Un n(tmero 800 para namar
Cubrimostodoslosartefactos.En todolugar.Entodomomento*
Si 11o (lU(Oa COlll])lel_llll(_lltc s_ltisfec[lo COil I]H(S[I'_] l)l-Ot(<ci6n de servicio [C(l]i(70, tl_,t((] DI/((](
solicitar la devolucidn d(l dinero del li_ mpo restante d_ su contrato. Sin pregtmtas. Asf d( siml:)l_.
Prot_ ja su refrigeradol; lavavaiillas, lavadoras, secadoras, cocina, televisidn, videocass_ ttera v lm_s,ide cuMquier marca! Adem_s, no se cobran gastos extra pot servicios t&nicos de _mmgencia y puedefinanciarse mensualm_ hie a un b_jo costo. Incluso, oh-ecemos protecci(m de mfiquinas de hielo _ dealimentos que se echan a p_ l-de1; Lsted puede quedarse tranquilo sabiendo que ';us valiosos productosdom_slicos se encuentran protegidos de reparacion_ s coslosas.
Conffe _,, GE y llfimenos <n ibrma _ratuita (,, los EE.[ [. al 800.626.2224 l:,_,,_ ,.:_s i,,*,:,,-,_,:,,ic,,,.
: lodas hs nl;u(as (!sliJll ( tlbiel{ Is, ]lastil 20 li'los do ;_ll@{I](d Id, (I1 I[E[[ ( ()111]11( 11]_1]
........................................................................................... _%_..(2:'2':23'.'_.............
Coloqueen un sobre y envie a:
General Electric Company
Warranty Registration DepartmentEO. Box 32150
Louisville, KY 40232-2150
3!

Inscripci6n del consumidor de propiedad de productoEstimado cliem( :
(_r3cias pof colll[)l_lJ- ll¿l(!s[l-o plOdll( Io y pot dcposiuu S[I COllfi2_tllZ_t (n IlOSOIYOS,
iEstamos orgullosos d_ _enerlo como clknte!
Siga estos tres pasos para proteger la inversion de su nuevo artefacto:
Complete y envie
su Inscripcion
del consumidor
de propiedad
de producto hoy mismo,
Tonga la Ii anqlfilidad
d_ 3b_!l (lilt _ ]0
])oden]os (onta(tal
de segulidad
2 l)espuds de i nviai
]a ins( ripcJdl?, c(tnst-iw{!
{:SI{_ (](t_2[in/_'lltO i,i) (ill
hlg_tl Se_two. (_olltlen_'
]a iDlttrl_lacJ6n ne _'sarJa
pala sollcilar serxiclo
l_¢Dico. MUeS[Itl i)(l/nelt)
de Sel_icio I('Cl3iCi) es
800.GEA :ARES
(800,432.2737),
l,l?3 S/I M_ln/l_l
del Propiel_rio
Ctlidado an/elite.
l,e as,udm'5 a opera_SU IIUeVI) artet tclo
de II)_tllel'_t COl'I( C[_!.
Nfimero de modelo Nfimero de serie
I I I I I I I I I I I I I I I I I I
Importante: Si no recibi6 una tarjeta de inscripci6n con suproducto, corte y envie el formulario siguiente paraasegurar que se producto est6 registrado, o registreloonline en ge.com.
.................................................................................................... _J_ ( (n'te aqui
Inscripci6n del consmnidor de propiedad de producto
Nfimero de modelo Nfimero de serieI I I I I I I I I I I I I I I I I I
S+ SH i SHa i
N_.nl_l I I I I I I I I I I Ap<,llid_,I IIIIIIIIIIII
I)iw_ ci6n ] I I I I I I I I I I I I I I I I I I I I I I I I
N_ I I)ir_!c(:ii_ll {]e {:ol:reoDepaitamento # I I I I I I I d_ i:lldnico:
ICiudad I I I I I I
F_Tha de
illki°d_Hsq_|es
I I IC6digo
NlllIICI o d_ IIclchmo I I I I I I I I
GE Consumer & Industrial
AppliancesGeneral Electric CompangLouisville, KY 40225
gecom
32
* IIIChl} t eSlkl dh eccidn para i'ecibJl; _/a COil 1_o i Ii or/alnico, desc/lenltls, olt,i ias especMes y OII'_tS
comunicaciones ilnpo_tanl_ s dl (;E Appliances ((;EA)
Mal(llll aqtlf si i_o (If'sea i-t?(Jbi/CO/l/tlnJcaci(l/ll s pot palte (ll los socios Clddadosamenteselecdonados de GEA,
NO COMPI,ECMI '_ I)E_( ]I,'_T.R ESTA %\1_]I "12\ N() P,I,2D/CI,2 S/S DERECHOS DE (;ML\NTIA.
Para re:is infi}m_aci(}n sol)re las i}olfti(as de pri_cidad _ de uso de infiwmaddn de (;EA, dir_jase a
ge.com y hag'a cli_ ¸ en "Pol fli_t de privaddad" o Ilame al 800,626,2224.

Garantiade GEparasuhomoel#ctricoempotrado.Todos los servicios de garantfa los proporcionan nuestros Centrosde ReparaciSn de F#brica o nuestros t#cnicos Customer Care®autorizados. Para concertar una cita de reparaciSn, en Ifnea,24 horas al dfa, visftenos en ge.com, o flame a1800.GECARES(800.432.2737). Cuando flame para solicitar servicio, pot favortenga a mano el nEtmero de serie y el nfimero de mode!o.
Pegue aqui su recibo.Se requiere facititar prueba
de la fecha de compra originalpara obtener un servicio
bajo la garantfa.
GE reemplazara:
Cualquierpartede] homo que f.dle del)ido _1de[_cl()s _n los m_teri_tk s o en h_[_1)1k:a( i6n.
Dunmk, este garantia limitada de un aft& (;E t_mfl)i(_n propordom_, sin costo alguno,tod_ l_ m_lno de ol)F4 y los sel'dcios infernos l)_m{ rcempL_zm p_ntcs defb(luos}_s.
_ Viajes de servicio a su casa para ensefnarle como usar )'_Dafio _dproducto ca_tsado por accidente, fuego,el producto, inundaciones o actos de Dios.
_ Instalaci6n, entl_a o mantenimiento inapropiada.
!_:_Fallas del produc/o si hay abttso, mM uso, o uso para
otros propbsitos que los propuestos, o uso para l_mescomerciales.
!_;_Reemplazo de fu_lbles de su casa o reajuste deinterruptores de circuito.
_'_Dafio incidental o consecuencial causado por posiblesdefectos con el apm-ato.
_i_,Dafio causado despu6s de la entrega.
i!i_,Producto no accesible para facilitar el servicio
requerido.
IEXCLUSION DE GARANTIAS IMPLJCITAS--Su #nico y exclusivo derecho es la reparaci6n del producto,tal y como se indica en esta Garantia limitada. Cualquier garantia implicita, ineluyendo las garantiasimplicitas de comerciabilidad o adecuaci6n para un fin determinado, esMn limitadas a un afio o elperiodo de tiempo mas breve permitido por la ley.
Estagarantfa se extiende al compraflor origina! y cualquier comprador posterior de profluctos compraflos parauso residencial dentro des Estados Unidos. Si el producto est# situado en un #rea que no dispone de servicio porpatte de un proveedor de servicio autorizado de GE,podria tener que hacerse cargo de los costes de envio o bienpodria solicit#rsele que Ileve el producto a un centro de servicio de GEautorizado para realizar la reparaciSn. EnAlaska, la garantfa excluye el costo de envio o las visitas de servicio a su casa.
Algunos estados no permiten !a exclusiSn o las limitaciones de dafios incidentales o consecuenciales. Esta garantfafia flerechos legales especfficos, y ustefl podria tener otros flerechos que variar#n de estado a estafl& Para sabercu#les son sus flerechos legales, consulte a la oficina de asuntos flel consumiflor local o la oficina del Prucurador(Attorney General) en su !ocalidafl.
Garante:General Electric Company.Louisville,AT 40225
33

Soporteal consumidor.
PgginaWebdeGEAppliances ge.com
{Tiene alguna pregunta sobrc su electrodoln_stico? iPmebe la p_gina Web de (;E Applianc(s 24 hoc, ls aldl'a, cualquier dfa del aft<!!Pm-,t mayor conveniencia y se, xicio mils l-Apido,7,'_1puede descmgar los Manualesde los Propi(tario% pedir piezas o inchlso hater una cim en linea pm-,i que xengan a realizar unareparaci6n.
Soliciteunareparaci6nFI s( l'd(io de (xpertos (;E (sl_i a tan s61o un paso de su puerta• iEntre en lfnea y solicile su reparaci(m
c_./ando l( venga bi(n 24 h(;ras al dia cualquier dia del aft(!! O llame al 800.GE•( '&RES (8) }.4:,2.2,'. t)(]tllallle hoFas llOl-lll_tles de ofi(ina•
ge.com
_2_ lRealLibDesignStudio(Estudiodedisefioparalavidareal) ge.com
GE apoya el concepto de I)iseflo Univelxal--pl-_Muctos, smxicios y ambientes que pueden usar genre detodas las edade% tamafios y capacidades. Reconocemos la nece,,idad de disefiar pm-,tuna gmn gama dehabilk/ades v dificultades fisicas v mentales. Pare mils detall(s cobre las aplicaciones d( GE I)isefio [ niversal,inchlyendo ideas de disefio pare la cocina l)m-apersonas con discapacktades, mire nuestl-,i pfigina Web hoymismo. Pare pemonas con dificuhades auditiwls, ti_v_wde llamar al 800.TDD.(;EAC (8t,_).833.4322).
garantfasampliadas ge.com
Compre una gatantfa ampliada y obtenga d(lall(s sol)re d¢s(uentos esp(ciales disponibl(s mientms su• I "9"19g'drmatfa ,est_iadn activa. Pu(de comF, rarla en lin(a (n cud( Ult r m m,. ill ), ) llam at-al 800._)_( •_224
durante hot-as normal(s de ofi(ina. (;E Consumer Horn( Setxic(s estarfi afin ahf (uando su gamntfa t( ratine.
Piezasy accesorios ge.com
Aquellos individuos con la calificaci6n necesaria pare repac, tr sos pvopios electrodom&licos puedenpedir (lue se l{s manden las piezas o accesorios dirccmmente a sos hogm-es (aceptamos las mrjetasVISA, MasterCard y Discover). tiara su pedido en lfnea ho}, 24 horas cada df:t o llamar por tel6fBnoal 800.626.2002 dumnte hol-,_snormales de oficina.
Las instrucciones desoritas en este manual cubren los procedimientos a seguir por cualqoier usuario, Coalqoier
otra reparation deberia, por regla general, referirse a personal calificado aotorizado. Debe ejercerse precaocionya qoe las reparaciones incorrectas poeden causar condiciones de foncionamiento inseguras.
P6ngaseencontactoconnosotros ge.com
Si no ('sl_ satMb(ho (on el servi(io (lue r((il)e (Ic (;E, pdngasc en (onla(lo (on nosolros en ml(slm [)_ginaWeb indi(ando t(Mos los demlles asi (omo su ndmero de teldfono o escrfl>anos a:
(;( neml Mining( 1;C!ls[oln( 1 R(lations(;F Applian((s, Al)pliml¢ ¢ l arkLoub,sille, KY40223
Registresuelectrodom#stico ge.com
iRegisffe su nuevo eleetrodom6stico en linea---mumado usted prefiera! El regismlr su pro(hlcto a tiempo leproporcionarfi, si "_tngiel-d la necesidad, una m£jor comunicacidn y un s( lwicio mils l-Jpido b_jo los t_rminos
de su gal',mt/;I. "Ihmbi_n puede enviar su taljeta de registro prcqmpl*_sa que se inchl}e (n (1 mamrialde embal_!je.
tmproso on los Estados Unidos