Embed Size (px)
Citation preview

0GEAppliances.com
01
4,J00
0
0
Safety InformationArcing ............................ 3Extension Cords .................. 7
Foods ............................ 4
Grounding Instructions ........... 6Important SafetyInstructions .................... 2-7Microwave-Safe Cookware ...... S
Precautions to Avoid Possible Exposureto Excessive
Microwave Energy ............... 2
Operating Instructions
Best Method of
Cooking Chart .................... 20
Changing Power Level .......... 13Combination Features .... 10, 18, 19
Convection Features ..... 10, 17, 19
Cooking Options ................. 10
Cookware Tips ................... 19Features of Your Oven ......... 8, 9Microwave Terms ............... 23
Other Features ............... 21, 22
Beeper Volume ................. 22Control Lock-Out ............... 21Clock ........................... 21
Cooking CompleteReminder ....................... 21
Display ON/OFF ................ 22
Display Speed .................. 22OFF/CLEAR ..................... 21
START/PAUSE .................. 21
Timer ........................... 21Sensor Microwave
Features .................... 14-16
Time and Auto
Microwave Features ...... 9, 11, 12
Write the model and serialnumbers here:
#
#
You can find them on a label when
the door is open.
Care and Cleaning
Inside ............................ 24
Outside ........................... 24Stainless Steel .................... 25
Troubleshooting TipsBefore You Coil For Service...... 26
Things That Are NormalWith Your Microwave Oven ..... 27
Consumer SupportConsumer Support .............. 32
Warranty ....................... 31
PIFL38211620 49-40658-1
CEB1590
PEBff590
PEBgff59
10-13 GE

IMPORTANT SAFETY INSTRUCTIONS.READ ALL INSTRUCTIONS BEFORE USING.
A WARNING!
To reduce the risk of burns, electric shock, fire, injury to persons, or exposure to excessive microwave energy:
PRECAUTIONS TO AVOID POSSIBLE EXPOSURETO EXCESSIVE MICROWAVE ENERGY
_aJ Do Not Attempt to operate this oven with the door open _cJsinceopen-door operation can result in harmful exposure tomicrowave energy. It is important not to defeat or tamperwith the safety interlocks.
Do Not Place any object between the oven front face andthe door or allow soil or cleaner residue to accumulate onsealing surfaces.
Do Not Operate the oven if it is damaged. It is particularlyimportant that the oven door close properly and that there isno damage to the:
(1)door (bent)
(2)hinges and latches (broken or loosened
(3)door sealsand sealing surfaces,
_d) The Oven Should Not be adjusted or repaired by anyoneexcept properly qualified service personnel.
, Read all instructions before using this appliance. Whenusing electrical appliances, basic safety precautionsshould be followed, including the following:
, Readand follow the specific precautions in the PRECAUTIONSTOAVOIDPOSSIBLEEXPOSURETO EXCESSIVEMICROWAVEENERGYsection above.
, Thisappliance must be grounded. Connect onlyto a properly grounded outlet. Seethe GROUNDINGINSTRUCTIONSsection on page 6.
, Install or locate this appliance only in accordance with theprovided Installation Instructions.
, Thisproduct is to be used 3" above floor level.
, Becertain to place the front surface of the door 3" or more backfrom the countertop edge to avoid accidental tipping of theappliance in normal usage.
Do not operate this appliance if it has a damaged power cordor plug, if it is not working properly or if it has been damaged ordropped.
, If the power cord is damaged, it must be replaced by GeneralElectricServiceor an authorized service agent using a powercord available from General Electric.
Do not cover or block any openings on the appliance.
, Usethis appliance only for its intended use as described inthis manual. Do not use corrosive chemicals or vapors in thisappliance. Thismicrowave oven is specifically designed to heat,dry or cook food, and is not intended for laboratory or industrialuse.
, Thismicrowave oven is not approved or tested for marine use.
, To reduce the risk of fire in the oven cavity:
-- Do not overcook food. Carefully attend appliancewhen paper, plastic or other combustible materials are placedinside the oven while cooking.
-- Remove wire twist-ties and metal handles from paper or plasticcontainers before placing them inthe oven.
- Do not use the oven for storage purposes. Do not leave paperproducts, cooking utensils or food in the oven when not in use.
- Do not pop popcorn in your microwave oven unless ina special microwave popcorn accessory or unlessyou usepopcorn labeled for use in microwave ovens.
- If materials inside the oven ignite,keep the oven door closed,turn the oven off and disconnect the power cord, or shut offpower at the fuse or circuit breaker panel. If the door is opened,the fire may spread.
- Do not use the Sensor Featurestwice in successionon the same food portion. If food is undercooked after the firstcountdown, use TIMECOOKfor additional cooking time.
-- Do not use the oven to dry newspaper.
When using the convection or combination cooking functions,both the outside and inside of the oven will become hot. Alwaysuse hot pads to remove containersof food and accessoriessuch as the oven shelf.
Thermometer--Do not use regular cooking or oventhermometers when cooking by microwave or combination. Themetal and mercury in these thermometers could cause arcingand possibledamage to the oven. Do not use a thermometer infood you are microwaving unless the thermometer is designedor recommended for use in the microwave oven.
Do not clean with metal scouring pads. Piecescan burnoff the pad and touch electrical parts involving riskof electricshock.
2 SAVE THESE INSTRUCTIONS
GEAppliances.com
IMPORTANT SAFETY INSTRUCTIONS.
When using Convection or Combination functions, both outside(]nd inside the oven will become hot. AIw(]ys use hot p(]dstoremove cont(]iners of food (]nd (]ccessoriessuch (is the ovenshelf.
, Thermometer--Do not use regul(]r cooking or oventhermometers when cooking by microw(]ve. The met(]l (]ndmercury in these thermometers could cause urcing (]ndpossible d(]m(]ge to the oven. Do not use (] thermometer in foodyou (]re microw(]ving unlessthe thermometer is designed orrecommended for use inthe microw(]ve oven.
, Do not cle(]n with met(]l scouring p(]ds. Piecesc(]n burn off thep(]d (]nd touch electric(]l p(]rts involving riskof electric shock.
, Do not store (]ny m(]teri(]ls,other th(]n our recommended(]ccessories,in this oven when not in use.
, Do not store this (]ppli(]nce outdoors. Do not use this productne(]r w(]ter-for ex(]mple, in (] wet b(]sement, ne(]r (] swimmingpool, ne(]r (] sinkor in simil(]r Ioc(]tions.
, Keeppower cord (]w(]y from he(]ted surfaces.
, Do not immerse power cord or plug in w(]ter.
, Do not block or cover (]ny openings on the (]ppli(]nce.
, Do not let power cord h(]ng over edge of t(]ble or counter.
, Thismicrow(]ve is not (]pproved or tested for m(]rine use.
, Forcountertop inst(]ll(]tion:
-- Do not store (]nything directly on top of the microw(]ve ovensurface when the microw(]ve oven is in oper(]tion.
, Forbuilt-in inst(]ll(]tion with (]pproved trim kit:
- Do not mount this (]ppli(]nce over (] sink.
- Do not store (]nything directly on top of the microw(]ve ovensurface when the microw(]ve oven is in oper(]tion.
- Do not mount this (]ppli(]nce over or ne(]r (]ny portion of (] he(]tingor cooking (]ppli(]nce.
iiiiiiiiii[_}_
iiiiiiiiii[_}_
iiiiiiiiii[i}_
iiiiiiiiii[_}_
iiiiiiiiii[_}_
iiiiiiiiii[_}_
iiiiiiiiii[_}_
iiiiiiiiii[_}_
Do not oper(]te (]ny he(]ting or cooking (]ppli(]nce bene(]th thismicrow(]ve oven.
Usethis (]ppli(]nce only for its intended use (]sdescribed in thism(]nu(]l.
Do not use corrosive chemic(]ls or v(]pors in this (]ppli(]nce.
Thismicrow(]ve oven is specific(]llydesigned to he(]t,dry or cookfood, (]nd is not intended for I(]bor(]tory or industri(]l use.
It is import(]nt to keep the (]re(]cle(]n where the door se(]ls(]g(]inst the microw(]ve. Useonly mild, non-(]br(]sive detergents(]pplied with (] cle(]n sponge or soft cloth. Rinsewell.
This(]ppli(]nce must only be serviced by qu(]lified servicepersonnel.Cont(]ct ne(]rest (]uthorized service f(]cility forex(]min(]tion, rep(]ir or (]djustment.
Aswith (]ny (]ppli(]nce,close supervision is necess(]rywhen used by children.
Some products such (]swhole eggs (]nd se(]ledcont(]iners- forex(]mple,closedj(]rs-(]re (]ble to explode (]nd should not behe(]ted in this microw(]ve oven.Such use of the microw(]ve ovencould result in injury.
Do not use p(]per products in oven when (]ppli(]nce is oper(]ted in(]ny cooking mode except microw(]ve only.
,&WARNING!ARCING
If you see arcing, press the OFF/CLEAR button and correct the problem.
Arcing is the microw(]ve term for sp(]rks in the oven.Arcingis c(]used by:
The met(]l shelf not inst(]lled correctly so ittouches the microw(]ve w(]ll.
ivlet(]lor foil touching the side of the oven.
Turnt(]ble ring support not inst(]lled correctly.
Foil not molded to food (upturned edges (]ctlike (]ntenn(]s).
ivlet(]l,such (]s twist-ties, poultry pins,or gold-rimmeddishes,in the microw(]ve.
Recycledp(]per towels cont(]ining sm(]ll met(]l piecesbeing used inthe microw(]ve.
SAVE THESE INSTRUCTIONS 3
IMPORTANT SAFETY INSTRUCTIONS.READ ALL INSTRUCTIONS BEFORE USING.
A WARNING!
FOODS
iiiiiiiiiiii_i_
iiiiiii#_i_
iiiiiii#_i_
Do not pop popcorn in your microwave oven unless in aspecial microwave popcorn accessoryor unlessyou use popcorn labeled for use in microwaveovens.
Do not boil eggs in a microwave oven. Pressurewillbuild up inside egg yolk and will cause it to burst,possibly resulting in injury.
Operating the microwave with no food inside for morethan a minute or two may cause damage to the ovenand could start a fire. It increasesthe heat around themagnetron and can shorten the life of the oven.
Foodswith unbroken outer "skin" such as potatoes, hotdogs, sausages,tomatoes, apples, chicken liversandother giblets, and egg yolks should be pierced to allowsteam to escapeduring cooking.
SUPERHEATED WATER
Liquids,such as water, coffee or tea, are able tobe overheated beyond the boiling point withoutappearing to be boiling. Visible bubbling or boiling whenthe container is removed from the microwave oven isnot always present. THISCOULDRESULTINVERYHOTLIQUIDSSUDDENLYBOILINGOVERWHENTHECONTAINERISDISTURBEDORA SPOONOROTHERUTENSILISINSERTEDINTOTHELIQUID.
To reduce the risk of injury to persons:
Do not overheat the liquid.
Stir the liquid both before and halfway through heatingit.
iiiiiii#_i_
iiiiiii#_i_
iiiiiii#_i_
iiiiiii#_i_
iiiiiii#_i_
Foodscooked in liquids (suchas pasta) maytend to boil more rapidly than foods containing lessmoisture. Should this occur, refer to theCure and cleaning of the microwave oven sectionfor instructions on how to clean the inside ofthe oven.
Avoid heating baby food in glass jars, even withthe lid off. Hake sure all infant food is thoroughlycooked. Stir food to distribute the heat evenly.Becareful to prevent scalding when warming formula.The container may feel cooler than the formula really is.Always test the formula before feeding the baby.
Don't defrost frozen beverages in narrow-neckedbottles (especiallycarbonated beverages).Evenif thecontainer is opened, pressure can build up. Thiscancause the container to burst, possibly resulting in injury.
Hot foods and steam can cause burns. Becareful whenopening any containers of hot food, including popcornbags, cooking pouches and boxes.To prevent possibleinjury, direct steam away from hands and face,
Do not overcook potatoes. They could dehydrate andcatch fire,causing damage to your oven.
Cook meat and poultry thoroughly-meat to atleast an INTERNALtemperature of 160°Fand poultry toat least an INTERNALtemperatureof 180°F.Cooking to these temperatures usuallyprotects against foodborne illness.
- Do not use straight-sided containers withnarrow necks.
- After heating, allow the container to stand inthe microwave oven for a short time before removingthe container.
- Useextreme care when inserting a spoon or otherutensil into the container.
4 SAVE THESE INSTRUCTIONS
GEAppliances.com
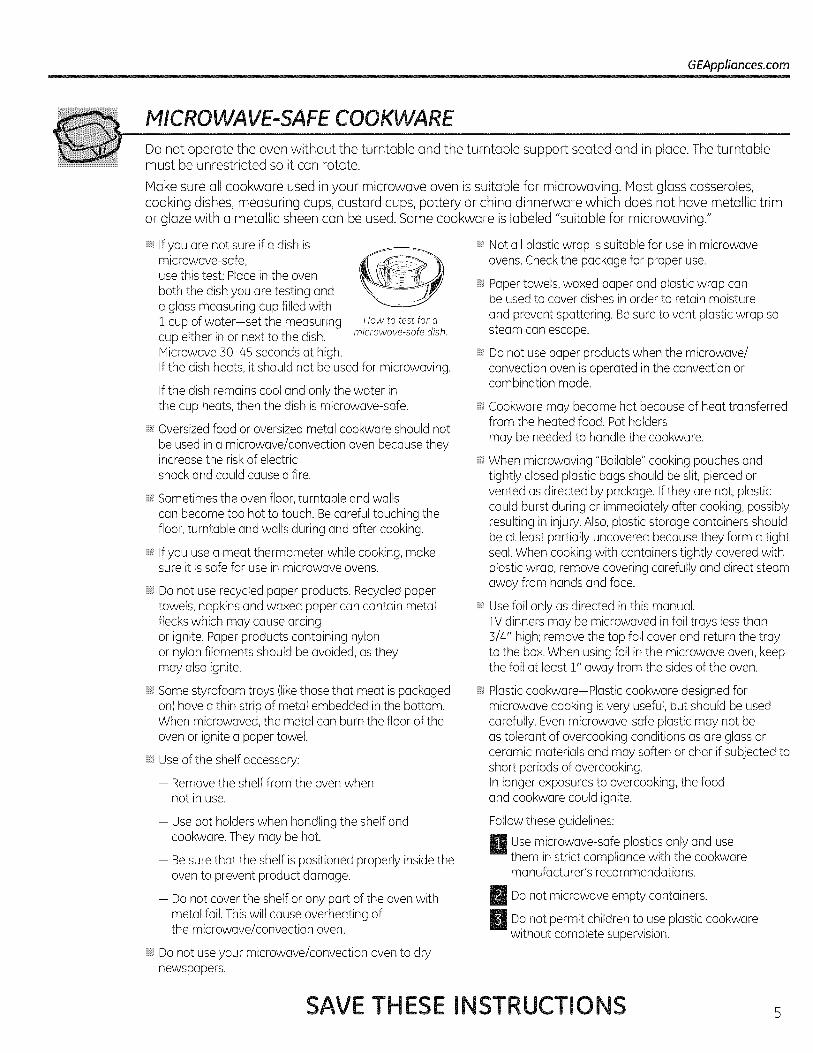
MICROWAVE-SAFE COOKWARE
Do not operate the oven without the turntable and the turntable support seated and in place. The turntablemust be unrestricted so it can rotate.
Make sure oil cookwore used in your microwave oven is suitable for microwoving. Most gloss casseroles,cooking dishes, measuring cups, custard cups, pottery or china dinnerware which does not have metallic trimor glaze with a metallic sheen can be used. Some cookware is labeled "suitable for microwaving."
Ifyou are not sure ifa dish ismicrowave-safe,use this test: Place in the ovenboth the dish you are testing anda glass measuring cup filled with! cup of water-set the measuringcup either in or next to the dish.Microwave 30-45 seconds at high.
How to test: for a
microwave-safe dish.
If the dish heats, it should not be used for microwaving.
If the dish remains cool and only the water inthe cup heats, then the dish is microwave-safe.
, Oversizedfood or oversizedmetal cookware should notbe used in a microwave/convection oven because theyincrease the risk of electricshock and could cause a fire.
, Sometimesthe oven floor, turntable and wallscan become too hot to touch. Becareful touching thefloor, turntable and walls during and after cooking.
, Ifyou use a meat thermometer while cooking, makesure it is safe for use in microwave ovens.
, Do not use recycled paper products. Recycledpapertowels, napkins and waxed paper can contain metalflecks which may cause arcingor ignite. Paperproducts containing nylonor nylon filaments should be avoided, as theymay also ignite.
, Some styrofoam trays (likethose that meat is packagedon) have a thin strip of metal embedded in the bottom.When microwaved, the metal can burn the floor of theoven or ignite a paper towel.
, Useof the shelf accessory:
- Remove the shelf from the oven whennot in use.
- Use pot holders when handling the shelf andcookware. They may be hot.
- Be sure that the shelf is positioned properly insidetheoven to prevent product damage.
- Do not cover the shelf or any part of the oven withmetal foil.Thiswill cause overheating ofthe microwave/convection oven.
, Do not use your microwave/convection oven to drynewspapers.
Not all plastic wrap is suitable for use in microwaveovens. Checkthe package for proper use.
, Paper towels, waxed paper and plastic wrap canbe used to cover dishes in order to retain moistureand prevent spattering. Be sure to vent plastic wrap sosteam can escape.
, Do not use paper products when the microwave/convection oven is operated in the convection orcombination mode.
Cookware may become hot because of heat transferredfrom the heated food. Pot holdersmay be needed to handle the cookware.
When microwaving "Bailable" cooking pouches andtightly closed plastic bags should be slit, pierced orvented as directed by package. If they are not, plasticcould burst during or immediately after cooking, possiblyresulting in injury.Also,plastic storage containers shouldbe at least partially uncovered because they form a tightseal.When cooking with containers tightly covered withplastic wrap, remove covering carefully and direct steamaway from hands and face.
Usefoil only as directed in this manual.TV dinners may be microwaved in foil trays lessthan3/4" high; remove the top foil cover and return the trayto the box. When using foil in the microwave oven, keepthe foil at least !" away from the sides of the oven.
Plasticcookware-Plastic cookware designed formicrowave cooking is very useful, but should be usedcarefully. Evenmicrowave-safe plastic may not beas tolerant of overcooking conditions as are glass orceramic materials and may soften or char if subjected toshort periods of overcooking.In longer exposures to overcooking, the foodand cookware could ignite.
Followthese guidelines:
U se microwave-safe plastics only and usethem in strict compliance with the cookwaremanufacturer's recommendations.
_Do not emptymicrowave containers.
IDa not children to use plastic cookwarepermitwithout complete supervision.
SAVE THESE INSTRUCTIONS s

IMPORTANT SAFETY INFORMATION.READ ALL INSTRUCTIONS BEFORE USING.
A WARNING!
GROUNDING INSTRUCTIONS
WARNING:/mproperuseof the grounding plug can result in a risk of electric shock.
This appliance must be grounded. Inthe event of an If the outlet is a standard 2-prong wall outlet, it is yourelectrical short circuit, grounding reduces the riskof personal responsibilityand obligation toelectric shock by providing an escapewire for the electric have it replaced with a properly grounded 3-prong wallcurrent, outlet.
This appliance is equipped with a power cord having agrounding wire with a grounding plug. The plug mustbe plugged into an outlet that is properly installed andgrounded.
Consult a qualified electrician or service technicianif the grounding instructions are not completelyunderstood, or if doubt exists as to whether the applianceis properly grounded.
Do not under any circumstances cut or remove the third(ground) prong from the power cord.
Do not use an adapter plug with this appliance,
Do not use an extension cord with this appliance, If thepower cord istoo short, have a qualified electrician orservice technician install an outlet near the appliance.(SeeEXTENSIONCORDSsection.)
For best operation, plug this appliance into itsown electrical outlet to prevent flickering of lights, blowingof fuse or tripping of circuit breaker.
6 SAVE THESE INSTRUCTIONS
GEAppliances.com
EXTENSION CORDS
A short power supply cord is provided to reduce the risks resulting from becoming ent(]ngled in ortripping over (] longer cord.
Extensioncords m(]y be used if you (]re c(]reful in using them.
If (]n extension cord is used-
U The m(]rked electric(]l r(]ting of the extension cord should be (]t le(]st (]s (]s the electric(]l r(]tinggre(]tof the (]ppli(]nce;
_The extension cord must be (] grounding-type 3-wire cord (]nd it must be plugged into (] 3-slot outlet;
The extension cord should be (]rr(]nged so th(]t it will not drape over the countertop or t(]bletopwhere it c(]n be pulled on by children or tripped over unintention(]lly.
Ifyou use (]n extension cord, the interior light m(]y flicker (]nd the blower sound m(]y v(]ry when the microw(]ve oven ison. Cooking times m(]y be longer, too.
NOTICE--PACEMAKERS
Host p(]cem(]kers(]re shielded from interference from electronic products, including microw(]ves.However, p(]tients with p(]cem(]kers m(]y wish to consult their physici(]ns if they h(]ve concerns.
READ AND FOLLOW THIS SAFETYINFORMATION CAREFULLY.
SAVE THESE INSTRUCTIONS

About the features of our oven.
Throughout this manual, features and appearance may vary from your model.
1000 Watts
|
|0 0
Featuresof the OvenDoor Latch Release Handle.
Door Latches.
Window with Metal Shield. Screen allows cookingto be viewed while keepingmicrowaves confined in the oven.
Control Panel and Selector Dial.
Removable Turntable. Turntable and support mustbe in place when using the oven.The turntable maybe removed for cleaning.
Removable Turntable Support. The turntablesupport must be in place when usingthe oven.
Shelf. Usewhen convection or combinationcooking. (Do not use when microwave cooking.)
Optional Accessories:
Availableat extracostfromyour GEsupplier.
Choosethe appropriate Installation Kit below to convertthis oven to a built-in wall oven.
For 27" installations:
Model Kit
PEB!590DMBB JX!527DMBB
PEB!590DMWW JX1527DMWW
PEB9159SFSS CX1527SSSSCEB1590SSSS CX1527SSSS
For 30" installations:
Model Kit
PEB!590DMBB JX!530DMBBPEB1590DMWW JX1530DMWW
PEB9159SFSS CX1530SSSSCEB1590SSSS CX1530SSSS
NOTE:Oven ventfs)and oven light are located on the insidewalls of the microwave oven.Therating plate is located onthe face of the oven (visiblewhen the door is open).
8
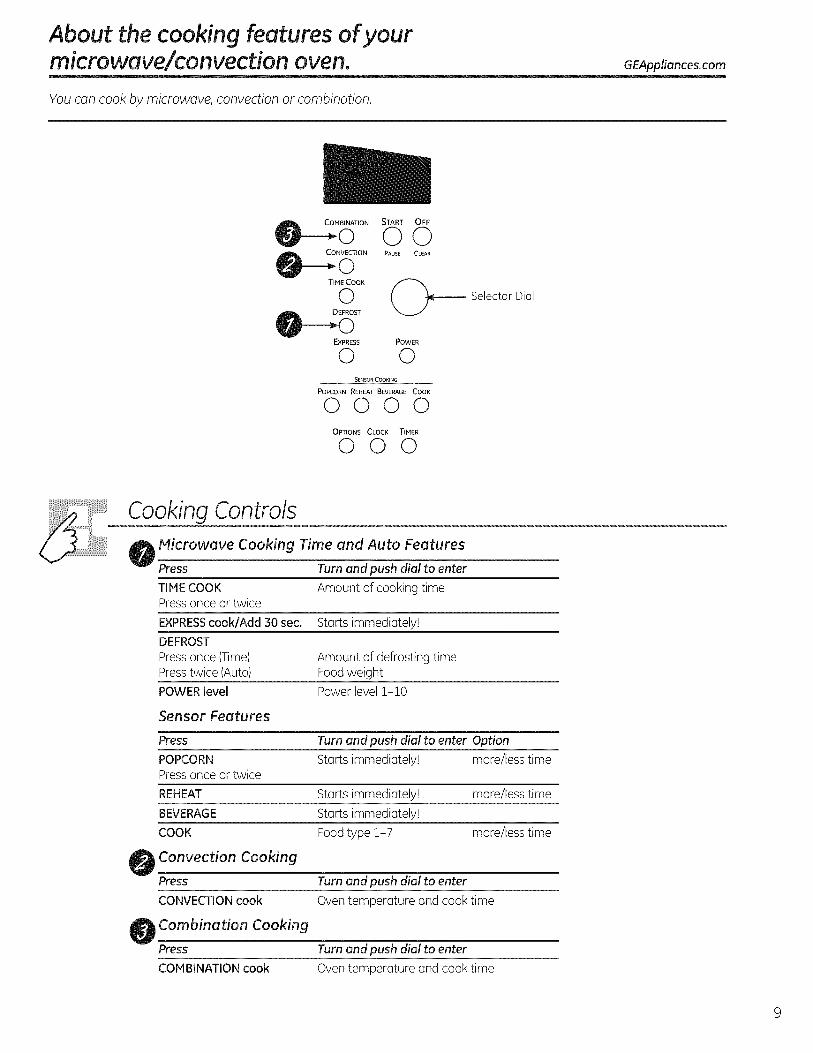
About the cooking features of yourmicrowave/convection oven. GEAppliancescom
You can cook by microwave, convection or combination.
._M_ATION
CONVECTIONO--oT_ME COOK
0
EXPRESS
0
START OFF
©©PAUSE O-EAR
POWER
0SENSOR COOKING
POPCORN REHEAT BEVERAGE COOK
0000OPTIONS CLOCK TIMER
000
Selector Dial
CookingControlsMicrowave Cooking Time and Auto Features
Press Turn and push dial to enter
TIMECOOK Amount of cooking timePress once or twice
EXPRESScook/Add 30sec. Starts immediately!
DEFROST
Press once (Time) Amount of defrosting timePress twice (Auto) Food weight
POWERlevel Power level i-i0
Sensor Features
Press Turn and push dial to enter Option
POPCORN Starts immediately! more/less timePress once or twice
REHEAT Starts immediately! more/less time
BEVERAGE Starts immediately!
COOK Food type 1-7 more/less time
Convection Cooking
Press Turn and push dial to enter
CONVECTIONcook Oven temperature and cook time
Combination Cooking
Press Turn and push dial to enter
COMBINATIONcook Oven temperature and cook time

Available cooking options.
Do not use the shelf whenmicrowave cooking.
Microwave Cooking
Your ovenuses microwave energy to cook by a set time or weight, or automaticallyby sensor.
Sensor microwave works by detecting the increasing humidity released during cooking.The oven automatically adjusts the cooking time to various types and amounts of food.
Cooking Method
Microwave energyis distributed evenlythroughout the ovenfor thorough, fastcooking of food.
Heat Source
Microwave energy.
Heat Conduction
Heat produced withinfood by instant energypenetration.
Benefits
Fast, high efficiencycooking. Oven andsurroundings donot get hot.Easy clean-up.
Always use the shelf whenconvection cooking.
Convection Cooking
During convection cooking, a heating element is used to raise the temperature of the air inside the oven.Any oven temperature from 225°Fto 450°Fmay be programmed. A fan gently circulates this heatedair throughout the oven, over and around the food, producing golden brown exteriors and rich moistinteriors.
Becausethe heated air is kept constantly moving, not permitting a layer of cooler air to develop aroundthe food; some foods cook faster than in regular oven cooking.
Cooking MethodHot air circulatesaround food toproduce brownedexteriors and sealin juices.
Heat Source
Circulatingheated air.
Heat Conduction
Heat conductedfrom outside of foodto inside.
Benefits
Aids in browningand seals in flavor.Cooks some foodsfaster than regularovens.
Combination Cooking
Your oven also offers the option of combination cooking, using microwave energy along withconvection cooking. You cook with speed and accuracy, while browning and crisping to perfection.
Always use the shelf whencombination cooking.
Cooking Method
Microwave energyand convection heatcombine to cookfoods in up toone-half the timeof regular ovens,while browning andsealing in juices.
Heat Source
Microwave energyand circulatingheated air.
Heat Conduction
Food heats frominstant energy frompenetration andheat conducted fromoutside of food.
Benefits
Shortenedcooking time frommicrowave energy,plus browningand crisping fromconvection heat.
10
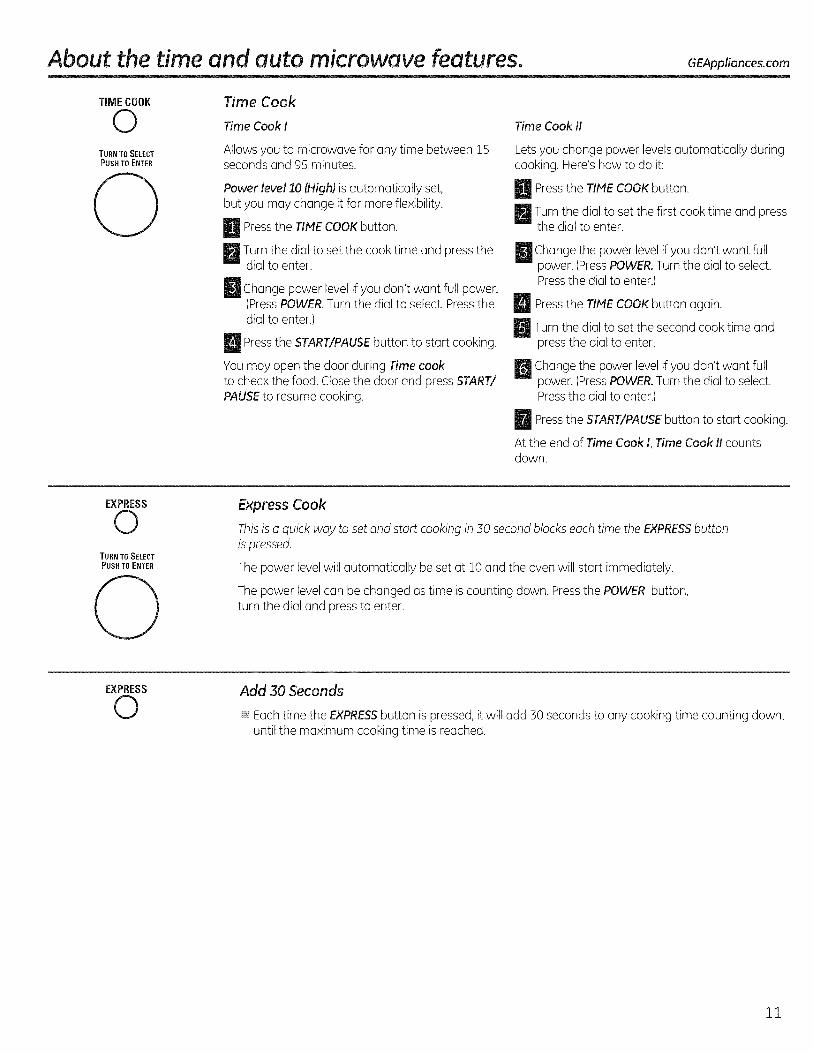
About the time and auto microwave features. GEAppliances.com
TiMECOOK Time Cook
Time Cook I
TURN TO SELECTPUSH TO ENTER
Allowsyou to microwave for any time between 15seconds and 95 minutes.
Power level 10 (High) is automatically set,but you may change it for more flexibility.
U Pressthe TIMECOOKbutton.
Turn the dial to set the cook time and press thedial to enter.
i Change power level if you don't want full power.(PressPOWER.Turn the dial to select. Pressthedial to enter.)
EI_ Pressthe START/PAUSEbutton to start cooking.
You may open the door during Time cookto check the food. Closethe door and pressSTART/PAUSEto resume cooking.
Time Cook II
Letsyou change power levelsautomatically duringcooking. Here's how to do it:
U Pressthe TIMECOOKbutton.
_Turn the dial to set the first cook time and pressthe dial to enter.
i Change the power level if you don't want fullpower. (PressPOWER.Turn the dial to select.Pressthe dial to enter.)
EmPress the TIMECOOKbutton again.
Turn the dial to set the second cook time andpressthe dial to enter.
_ Change the power level if you don't want fullpower. (PressPOWER.Turn the dial to select.Pressthe dial to enter.)
i Press to start cooking.the START/PAUSEbutton
At the end of Time Cook I, Time Cook II countsdown.
EXPRESS
0TURN TO SELECTPUSH TO ENTER
0Express Cook
This is a quick way to set and start cooking in 30 secondblocks each time the EXPRESSbuttonis pressed.
The power level will automatically be set at 10 and the oven will start immediately.
The power level can be changed as time is counting down. Pressthe POWER button,turn the dial and pressto enter.
EXPRESS
0Add 30 Seconds
Each time the EXPRESS button is pressed, itwilladd 30 seconds to any cooking time counting down,until the maximum cooking time is reached.
11

About the time and auto microwave features.
DEFROST
0TURN TO SELECTPUSH TO ENTER
Time Defrost
Use Time Defrost to defrost for a selected length
of time.
U Press the DEFROST button.
Turn the dial to select the time you want. Pressthe dial to enter.
i ress the START/PAUSE button to startdefrosting.
_JTurn the food over if the oven signals TURNFOOD OVER.
Power level is automatically set at 3, but can bechanged. You can defrost small items quickly byraising the power level after entering the time.Power level 7 cuts the total defrosting time inabout half; power level 10 cuts the total time toapproximately 1/3. However, food will need morefrequent attention than usual.
A dull thumping noise may be heard duringdefrosting. This is normal when oven is notoperating at High power.
Defrosting Tips
Foodsfrozen in paper or plastic can be defrostedin the package. Closedpackages should beslit,pierced or vented AFTERfood has partiallydefrosted.Plasticstorage containers should bepartially uncovered.
Family-size,prepackaged frozen dinners can bedefrosted and microwaved. If the food is in a foilcontainer, transfer it to a microwave-safe dish.
Foodsthat spoil easily should not be allowed tosit out for more than one hour after defrosting.Roomtemperature promotes the growth ofharmful bacteria.
For more even defrosting of larger foods, suchas roasts, use Auto Defrost. Besure large meatsare completely defrosted before cooking.
When defrosted, food should be coolbut softened in all areas. If still slightly icy, returnto the microwave very briefly, or let it stand afew minutes.
DEFROST
0TURN TO SELECT
PUSH TO ENTER
Auto Defrost
UseAuto Defrost for meat, poultry and fish. UseTime Defrost for most other frozen foods.
Auto Defrost automatically sets the defrostingtimes and power levels to give even defrostingresults for meats, poultry and fish.
Remove meat from package and placeon microwave-safe dish.
U Pressthe DEFROSTbutton twice.
Turn the dial to the food weight,using the Conversion Guide at right.Forexample, dial 1.2for 1.2 pounds(1 pound, :3oz.).Pressthe dial to enter.
i ressthe START/PAUSEbutton to startdefrosting.
_J_Turn the food over if the oven signals TURNFOODOVER.
Removedefrosted meat or shield warm areaswith small pieces of foil.
After defrosting, most meats need to stand Sminutes to complete defrosting. Large roastsshould stand for about:30minutes.
Conversion Guide
If the weight of food is stated inpounds andounces,the ouncesmust be converted to tenths (.!)of a pound.
Weight of Food Enter Food Weight
in Ounces (tenths of a pound)
!-2 .!
:3 .2
4-5 .:3
6-7 .4
8 .5
9-10 .6
11 .7
12-1:3 .8
14-15 .9
12
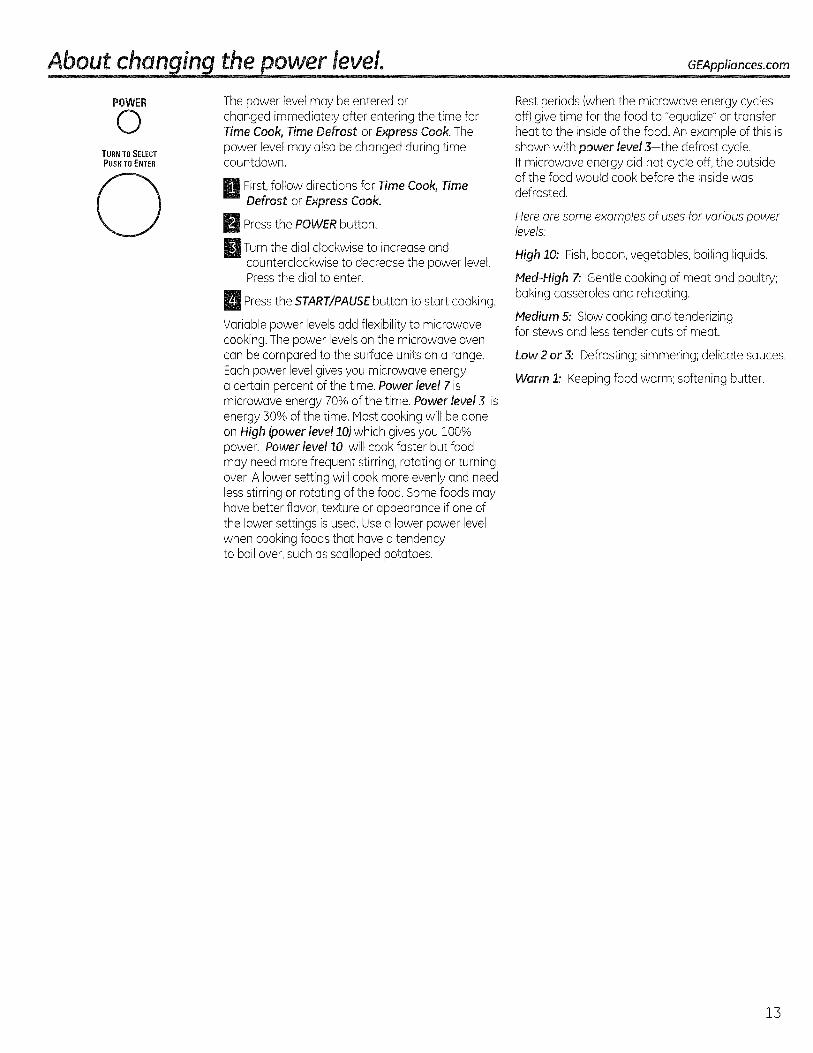
About changing the power level. GEAppliances.com
POWER
0TURN TO SELECTPUSH TO ENTER
The power level may be entered orchanged immediately after entering the time forTime Cook, Time Defrost or Express Cook. Thepower level may also be changed during timecountdown.
U irst, follow directions for Time Cook, TimeDefrost or Express Cook.
ImPress the POWERbutton.
Turn the dial clockwise to increase andcounterclockwise to decrease the power level.Pressthe dial to enter.
ImPress the START/PAUSEbutton to start cooking.
Variable power levelsadd flexibility to microwavecooking. The power levelson the microwave ovencan be compared to the surface units on a range.Each power level givesyou microwave energya certain percent of the time. Power level 7 ismicrowave energy 70% of the time. Power level 3 isenergy 30% of the time. Most cooking will be doneon High [power level 10)which givesyou 100%power. Power level 10 will cook faster but foodmay need more frequent stirring, rotating or turningover.A lower setting will cook more evenlyand needlessstirring or rotating of the food. Somefoods mayhave better flavor, texture or appearance if one ofthe lower settings is used.Usea lower power levelwhen cooking foods that have a tendencyto boilover, such as scalloped potatoes.
Restperiods (when the microwave energy cyclesoff) give time for the food to "equalize"or transferheat to the inside of the food. An example of this isshown with power level 3-the defrost cycle.If microwave energy did not cycle off, the outsideof the food would cook before the inside wasdefrosted.
Here are some examples of usesfor various powerlevels.
High 10. Fish,bacon, vegetables, boiling liquids.
Med-High 7: Gentle cooking of meat and poultry;baking casseroles and reheating.
Medium S: Slow cooking and tenderizingfor stews and lesstender cuts of meat.
Low 2 or 3: Defrosting; simmering; delicate sauces.
Worm 1: Keepingfood warm; softening butter.
13

About the sensor microwave features.
Covered
Humidity Sensor
TheSensor Features detect the increasing humidity released during cooking. The oven automaticallyadjusts the cooking time to various types and amounts of food.
Do not use the Sensor Featurestwice in succession on the some food portion-it may result in severelyovercooked or burnt food. If food is undercooked after the countdown, use Time Cookfor additionalcooking time.
The proper containers and covers ore essential for best sensor cooking.
Always use microwave-safe containers and cover them with lids or vented plastic wrap. Never usetight sealing plastic containers-they con prevent steam from escaping and cause food to overcook.
Vented
Besure the outside of the cooking containers and the inside of the microwave oven ore dry beforeplacing food in the oven. Beads of moisture turning into steam con mislead the sensor.
Dry off dishes so they don'tmislead the sensor.
COOK
0Cook
Becausemost cooking containers must be covered during Cook, this feature is best with foods that youwont to steam or retain moisture.
NOTE:Useof the metal shelf with Cook is not recommended.
Recommended Foods
A wide variety of foods including meats, fish and vegetables can be cooked usingthis feature.
r Foods not recommended
Foodsthat must be cooked uncovered, foods that require constant attention, foods that require additionof ingredients during cooking and foods calling for a dry look or crisp surface after cooking should not becooked using this feature. It is best to Time Cook them.
14

GEAppliances.com
COOK
©TURN TO SELECTPUSH TO ENTER
NOTE: Do not use thisfeature twice in successionon the same foodportion-it may result inseverely overcooked orburnt food.
Cook
U lace covered food in the oven and close thedoor. Pressthe COOKbutton. SELECTFOODTYPEappears in the display.
Turn the dial to the desired food type. Presstoenter.
Seethe SensorFood TypeGuide below for specificfoods and instructions,
The oven starts immediately.
NOTE:If the door was open while the control wasbeing set, closethe door and pressthe START/PAUSEbutton to begin cooking.
Donot opentheovendoorbeforethe countdowntimeisdisplayed-steamescapingfromtheovencanaffectcookingperformance.If the dooris opened,closethedoorandpressSTART/PAUSEimmediately.
If ground meat was selected, the oven may signalyou to drain and stir the meat. Open the door, drainthe meat and close the door. Pressthe START/PAUSEbutton if necessary to resume cooking
If food is undercooked after the countdown useTime Cook for additional cooking time.
Sensor Food Type Guide
Servings Serving Size
Chicken Pieces 1 to 4 2 to 8
pieces
Fish 1 to 4 4 to 16 oz.
Ground Meat - 112to 2 Ibs.(Beef, Pork,Turkey,,
Potatoes 1 to 4 112to 2 Ibs.
Conned Vegetables i to 4 4 to 16 oz.
Fresh Vegetables i to 4 4 to 16 oz.
Frozen Vegetables i to 4 4 to 16 oz.
Cooking Tips
, When oven signals and countdown time isdisplayed, the door may be openedfor stirring, turning or rotating food.To resume cooking, closethe door and pressSTART/PAUSE.
, Hatch the amount of food to the sizeofcontainer. Fillcontainers at least 1/2 full.
, Besure outside of container and inside of ovenare dry.
, After completion of Cook cycle, if food needsadditional cooking, return food to oven and useTime Cook to finish cooking.
How to Adjust the Oven's AutomaticSettings for a Shorter or Longer Cook Time (Notavailable for all food types)
To subtract 10% from the automaticcooking time:
Immediately after the oven starts, turn the dialcounterclockwise and pressto enter.
To add :1_0%to the automatic cooking time:
Immediately after the oven starts, turn the dialclockwise and pressto enter.
Comments
Use oblong, square or round dish.Cover with wax paper.
Use oblong, square or round dish.Cover with vented plastic wrap.
Use round casserole dish. Crumble meatinto dish. Cover with wax paper or ventedplastic wrap.
Pierce skin with fork.Cluster potatoes in center of oven floor.
Use microwave-safe casserole or bowl.Cover with lid or vented plastic wrap.
Use microwave-safe casserole or bowl.Add 2 tablespoons water for each serving.Cover with lid or vented plastic wrap.
Use microwave-safe casserole or bowl.Follow package instructions for addingwater. Cover with lid or vented plastic wrap.
15
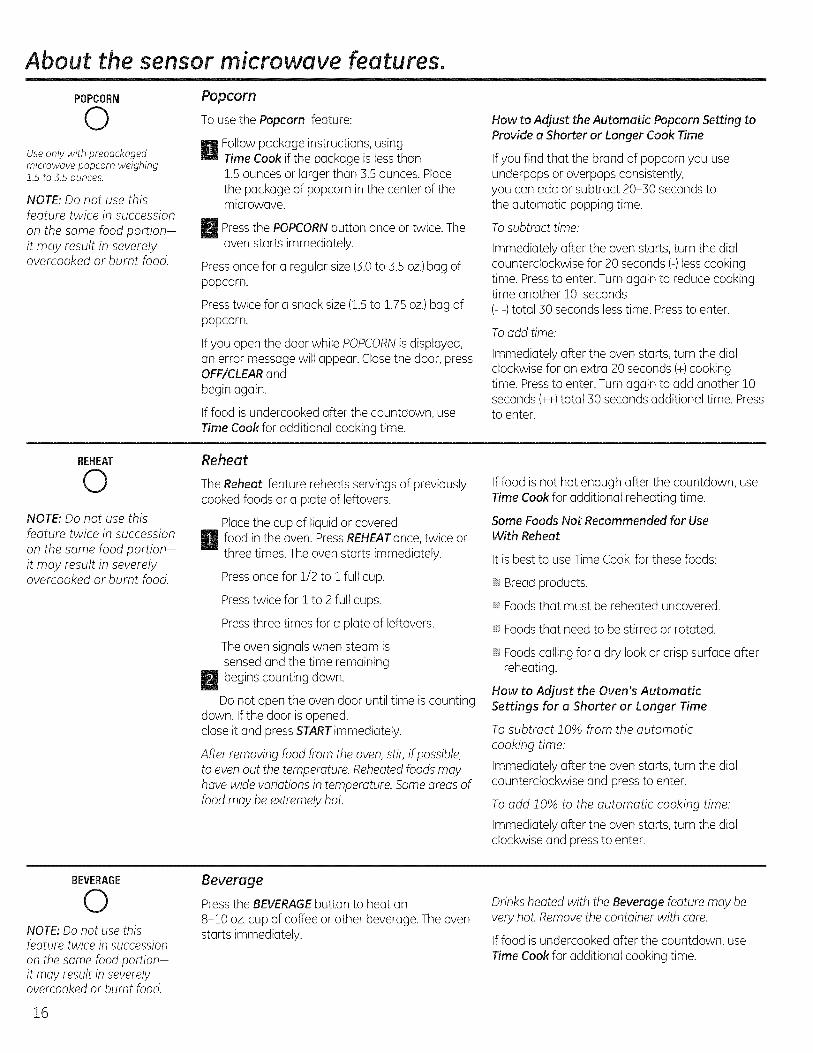
About the sensor microwave features.
POPCORN Popcorn
0Use only with prepackagedmicrowave popcorn weighing1.5 to 5.5 ounces.
NOTE: Do not use thisfeature twice in succession
on the same food portion-it may result in severelyovercooked or burnt food.
To use the Popcorn feature:
U ollow package instructions, usingTime Cook if the package is lessthan1.5ounces or larger than 3.5 ounces. Placethe package of popcorn in the center of themicrowave.
ImPress the POPCORN button twice. Theonce or
oven starts immediately.
Pressonce for a regular size(3.0to 3.5 oz.)bag ofpopcorn.
Presstwice for a snack size(1.5to 1.75 oz.)bag ofpopcorn.
Ifyou open the door while POPCORNis displayed,an error message will appear. Closethe door, pressOFF/CLEARandbegin again.
If food is undercooked after the countdown, useTime Cook for additional cooking time.
How to Adjust the Automatic Popcorn Setting toProvide a Shorter or Longer Cook Time
Ifyou find that the brand of popcorn you useunderpops or overpops consistently,you can add or subtract 20-30 seconds tothe automatic popping time.
To subtract time:
Immediately after the oven starts, turn the dialcounterclockwise for 20 seconds (-)lesscookingtime. Pressto enter. Turn again to reduce cookingtime another 10 seconds(- -) total 30 seconds lesstime. Pressto enter.
To add time:
Immediately after the oven starts, turn the dialclockwise for an extra 20 seconds (+)cookingtime. Pressto enter. Turn again to add another !0seconds (++)total 30 seconds additional time. Pressto enter.
REHEAT
0NOTE: Do not use thisfeature twice in succession
on the same food portion-it may result in severelyovercooked or burnt food.
Reheat
The Reheat feature reheats servings of previouslycooked foods or a plate of leftovers.
UPlacethe cup of liquid or coveredfood in the oven. PressREHEATonce, twice orthree times. The oven starts immediately.
Pressonce for 1/2 to ! full cup.
Presstwice for ! to 2 full cups,
Pressthree times for a plate of leftovers.
The oven signals when steam issensed and the time remaining
p'_ begins counting down.
Do not open the oven door until time is countingdown. If the door is opened,close it and pressSTARTimmediately.
After removing food from the oven,stir, if possible,to even out the temperature. Reheated foods mayhave wide variations in temperature. Some areas offood may be extremely hot.
If food is not hot enough after the countdown, useTime Cook for additional reheating time.
Some Foods Not Recommended for UseWith Reheat
It is best to use Time Cook for these foods:
, Bread products.
, Foodsthat must be reheated uncovered.
, Foodsthat need to be stirred or rotated.
, Foodscalling for a dry look or crisp surface afterreheating.
How to Adjust the Oven's AutomaticSettings for a Shorter or Longer Time
To subtract !0% from the automatic
cooking time:
Immediately after the oven starts, turn the dialcounterclockwise and press to enter.
To add !0% to the automatic cooking time:
Immediately after the oven starts, turn the dialclockwise and press to enter.
BEVERAGE
0NOTE:Oo not use thisfeature twice in successionon the same food portion-it may result in severelyovercooked or burnt food.
16
Beverage
Pressthe BEVERAGEbutton to heat an8-10 oz.cup of coffee or other beverage. The ovenstarts immediately.
Drinks heated with the Beverage feature may bevery hot. Remove the container with care.
If food is undercooked after the countdown, useTime Cook for additional cooking time.

About the convection features. GEApUi°ncescom
Convection cookingusesa heating element to raise the temperature of the air inside the oven.Any oventemperature from 225°Fto 450°Fmay be set.A fan gently circulates this heated air throughout the oven,over and around the food, producing golden brown exteriors and rich, moist interiors.
Becausethe heated air is kept constantly moving, not permitting a layer of cooler airto develop around the food, some foods cook faster than in regular oven cooking.
See the Cookware Tipssection for information on suggested cookware.
For Best Results...
Always USepackage/recipetheshelf whentemperatureCOnvectioncooking.Reduce 25°Ffor baked goods.
The shelf is required for good air circulation and even browning.
See the Cookware Tipssection for information on suggested cookware.
CONVECTION
0TURN TO SELECT
PUSH TO ENTER
0Convection Time Cook with Preheat
U Pressthe CONVECTIONbutton.
Turn the dial to set the oven temperature andpress dial to enter preheating. Do not enter
convection cook time now. (Thecook time willbe entered later, after the oven is preheated.)
i Pressthe START/PAUSEbuttonto start preheating.
When the oven is preheated, it will signal. Ifyoudo not open the door within i hour, the ovenwill turn off automatically.
Open the oven door and, using caution, placethe food in the oven.
Closethe oven door. Turn the dialto set the cook time and press START/PAUSEtostart cooking.
i When cooking complete, oven signalis the will
and turn off.
CONVECTION
0TURN TO SELECT
PUSH TO ENTER
0Convection Time Cook without Preheating
U Ifyour recipe does not require preheating, _ Turn the dial to set the cook time and press topress the CONVECTIONbutton, m enter.
Turn the dial to set the oven temperature and E! Pressthe START/PAUSEbutton to start theImpress to enter, m oven.
17
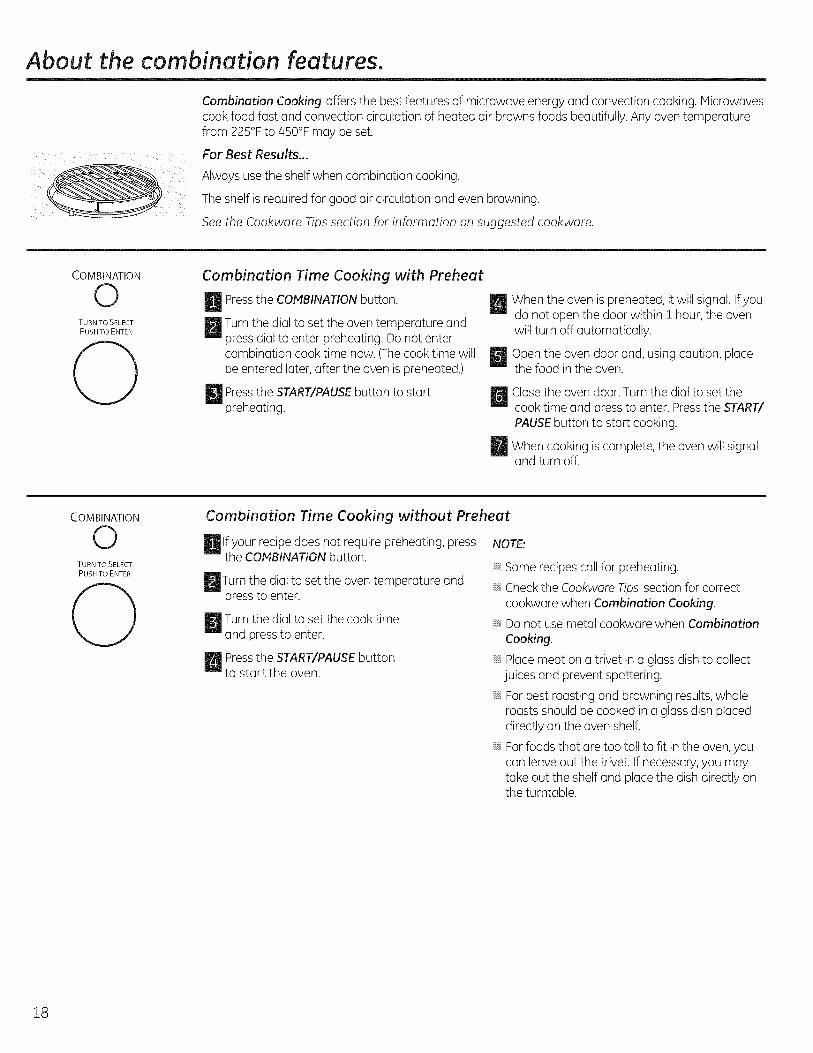
About the combination features.
Combination Cookingoffers the best fe(]tures of microw(]ve energy (]nd convection cooking. Microw(]vescook food fast (]nd convection circulation of he(]ted (]it browns foods be(]utifully. Any oven temper(]turefrom 225°Fto 450°F m(]y be set.
For Best Results...
AIw(]ys use the shelf when combination cooking.
The shelf is required for good (]ir circuk]tion (]nd even browning.
Seethe Cookware Tipssection for information on suggested cookwore.
COMBINATION
0TURN TO SELECT
PUSH TO ENTER
Combination Time Cooking with Preheat
U Pressthe COMBINATIONbutton.
F_Turn the di(]l to set the oven temper(]ture (]ndpress di(]l to enter prehe(]ting. Do not entercombin(]tion cook time now. (Thecook time willbe entered k]ter, (]fter the oven is prehe(]ted.)
i ressthe START/PAUSEbutton to startprehe(]ting.
_J_ When the oven is prehe(]ted, it will sign(]l. Ifyoudo not open the door within 1 hour, the ovenwill turn off (]utom(]tically.
Open the oven door (]nd, using caution, pl(]cethe food in the oven.
_ Closethe oven door. Turn the dial to set thecook time (]nd pressto enter. Pressthe START/PAUSEbutton to st(]rt cooking.
I When cooking complete, oven sign(]lis the will
(]nd turn off.
COMBINATION
0TURN TO SELECT
PUSH TO ENTER
Combination Time Cooking without Preheat
U f your recipe does not require prehe(]ting, pressthe COMBINATIONbutton.
Turn the dk]l to set the oven temper(]ture (]ndpressto enter.
I urn the di(]l to set the cook time(]nd pressto enter.
LmJPressthe START/PAUSEbuttonto st(]rt the oven.
NOTE:
, Some recipes coil for prehe(]ting.
, Check the Cookwore Tips section for correctcookw(]re when Combination Cooking.
, Do not use metol cookwore when CombinationCooking.
, Place me(]t on (] trivet in (] gk]ss dish to collectjuices (]nd prevent sputtering.
, For best ro(]sting (]nd browning results,wholero(]sts should be cooked in (] gl(]ssdish pl(]ceddirectly on the oven shelf.
, For foods th(]t (]re too t(]ll to fit in the oven,youc(]n le(]ve out the trivet. If necess(]ry,you m(]yt(]ke out the shelf (]nd pl(]cethe dish directly onthe turnt(]ble.
18
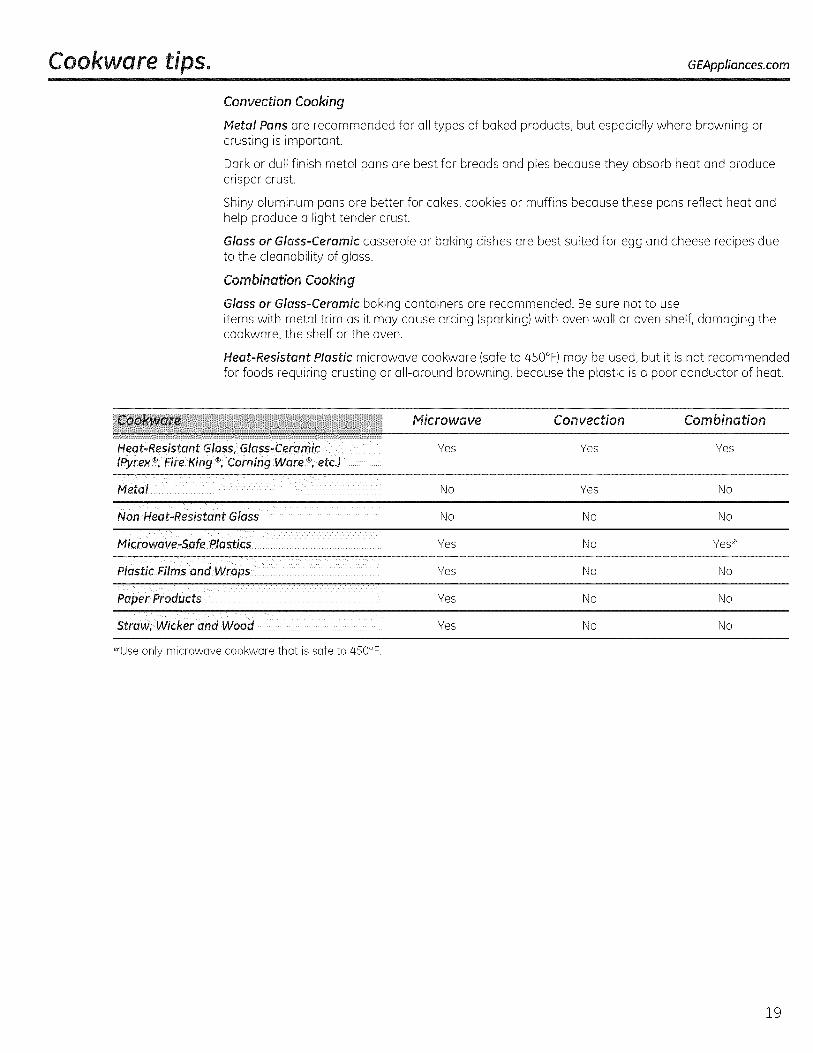
Cookwu re tips. GEApplionces.cam
Convection Cooking
Metal Puns are recommended for all types of baked products, but especially where browning orcrusting is important.
Dark or dull finish metal pans are best for breads and pies because they absorb heat and producecrisper crust.
Shiny aluminum pans are better for cakes, cookies or muffins because these pans reflect heat andhelp produce a light tender crust.
Glass or Glass-Ceramic casserole or baking dishes are best suited for egg and cheese recipes dueto the cleanability of glass.
Combination Cooking
Glass or Glass-Ceramic baking containers are recommended. Be sure not to useitems with metal trim as it may cause arcing (sparking) with ovenwall or oven shelf, damaging thecookware, the shelf or the oven.
Heat-Resistant Plastic microwave cookware (safe to 450°F) may be used, but it is not recommendedfor foods requiring crusting or all-around browning, because the plastic is a poor conductor of heat.
_0 Microwuve Convection Combinution
Heat-Resistant Glass, Glass-Ceramic Yes Yes Yes(Pyrex ®,Fire King ®,Coming Were ®,etcJ
Metal No Yes No
Non Heat-Resistent Glass No No No
Microwave-Safe Plastics Yes No Yes_
Plastic Films end Wraps Yes No No
Paper Products Yes No No
Straw, Wicker end Wood Yes No No
_Use only microwave cookware that is safe to 450°F.
19
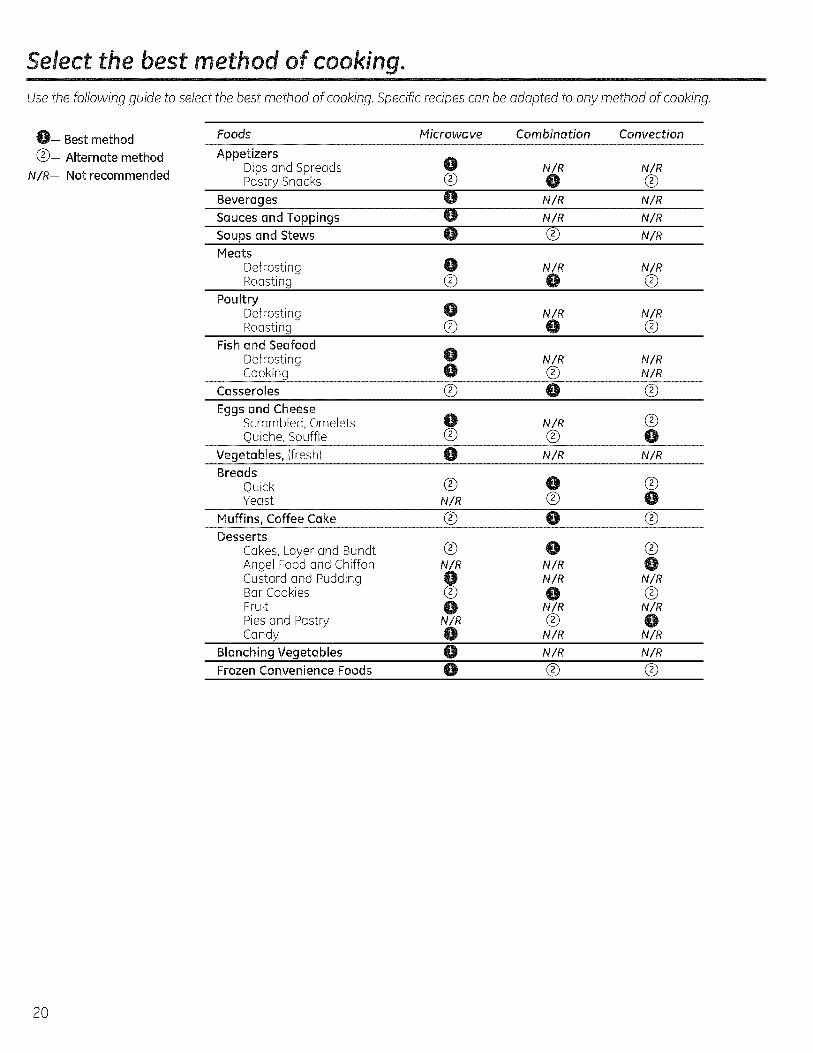
Select the best method of cooking.
Use the following guide to select the best method of cooking. Specific recipes can be adopted to any method of cooking.
0-- Best method
G- Alternate method
N/R-- Not recommended
Foods Microwave Combination Convection
AppetizersDips and Spreads 0 N/R N/RPastry Snacks (_) 0 (_
Beverages _ N/R N/R
Sauces end Toppings 0 N/R N/RSoups end Stews _ (_ N/RMeats
Defrosting 0 N/R N/RRoasting (_ 0 (_
PoultryDefrosting qJ_ N/R N/RRoasting (_ 0 (_
Fish and SeafoodDefrosting 0 N/R N/RCooking 0 (_ N/R
Casseroles (_ 0 (_
Eggs and CheeseScrambled, Omelets 0 N/R (_
Quiche, Souffle (_ (_) 0
Vegetables, (fresh) 0 N/R N/RBreads
Ouick Q 0 (_Yeast N/R (_ 0
Muffins, Coffee Coke (_ 0 (_Desserts
Cakes, Layer and Bundt Q 0 (_)Angel Food and Chiffon N/R N/R 0Custard and Pudding 0 N/R N/RBar Cookies (_ 0 (_)Fruit 0 N/R N/RPies and Pastry N/R (_ 0Candy 0 N/R N/R
Blanching Vegetables 0 N/R N/RFrozen Convenience Foods O (_ (_)
20
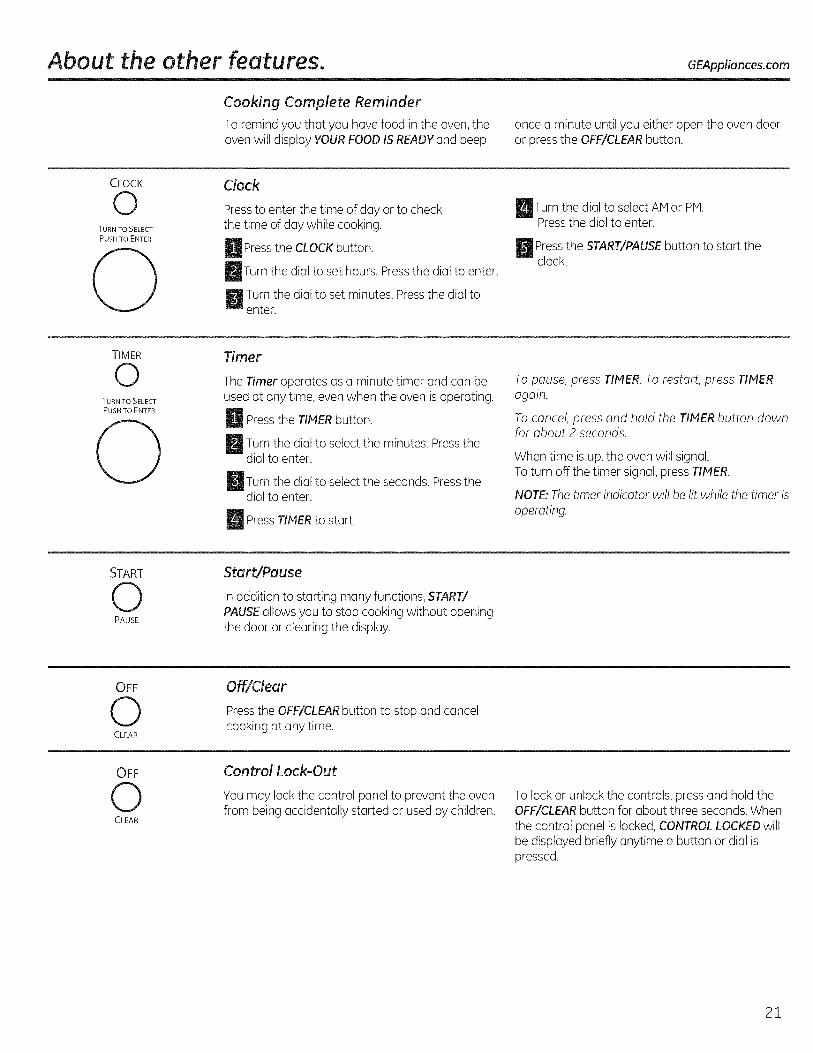
About the other features. GEAppliances.com
Cooking Complete Reminder
To remind you that you hove food in the oven, theoven will display YOURFOODIS READYand beep
once a minute until you either open the oven dooror pressthe OFF/CLEARbutton.
CLOCK
0TURN TO SELECT
PUSH TO ENTER
0Clock
Pressto enter the time of day or to checkthe time of day while cooking.
U Pressthe CLOCKbutton.
Turn the dial to set hours. Pressthe dial to enter.
I urn the dial to set minutes. Pressthe dial toenter.
_JTurn the dial to select AM PH.orPress the dial to enter.
_ ress the START/PAUSE button to start theclock.
TIMER
0TURN TO SELECT
PUSH TO ENTER
0Timer
The Timer operates as a minute timer and can beused at any time, even when the oven is operating.
U Pressthe TIMERbutton.
Turn the dial to select the minutes. Pressthedial to enter.
ITurn the dial to select the seconds. Pressthedial to enter.
_q Press TIMER to start.
To pause, press TIMER. To restart, press TIMERagain.
To cancel, press and hold the TIMER button downfor about 2 seconds.
When time is up, the oven will signal.To turn off the timer signal, pressTIMER.
NOTE:The timer indicator will be lit while the timer is
operating.
START
0PAUSE
Start/Pause
In addition to starting many functions, START/PAUSEallows you to stop cooking without openingthe door or clearing the display.
OFF
0CLEAR
Off/Clear
Press the OFF/CLEARbutton to stop and cancelcooking at any time.
OFF
0CLEAR
Control Lock-Out
You may lockthe control panel to prevent the ovenfrom being accidentally started or used by children.
To lock or unlock the controls, pressand hold theOFF/CLEARbutton for about three seconds.Whenthe control panel is locked,CONTROLLOCKEDwillbe displayed briefly anytime a button or dial ispressed.
21

About the other features.
OPTIONS
0TURN TO SELECT
PUSH TO ENTER
0
Beeper Volume
The beeper sound level can be adjusted. PresstheOPTIONSbutton once and turn the dial to selectmute to loud. Pressthe dial to enter.
OPTIONS
0TURN TO SELECT
PUSH TO ENTER
Display ON/OFF
Useto turn your clock display on or off. PresstheOPTIONSbutton twice and turn the dial to selectON or OFF.Pressthe dialto enter.
OPTIONS
0TURN TO SELECT
PUSH TO ENTER
Display Speed
The scroll speed of the display can be changed.Pressthe OPTIONSbutton three times and turn thedial to select slowest to fastest. Pressthe dial toenter.
22
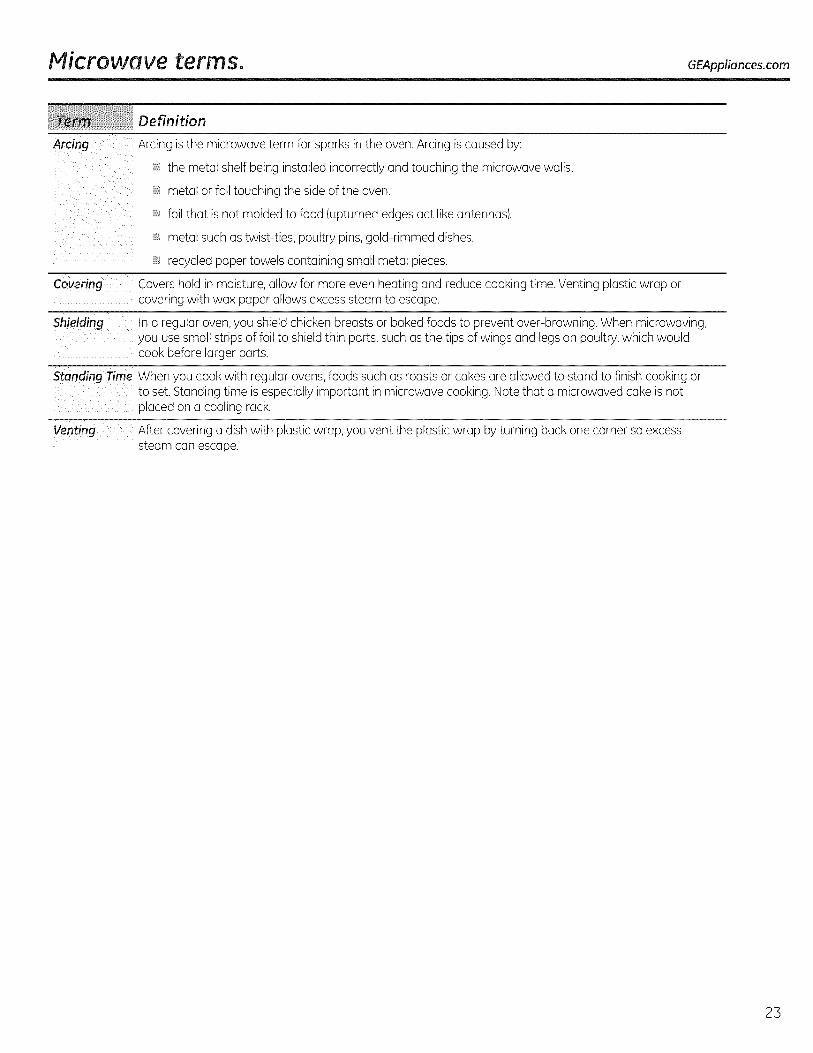
Microwave terms. GEAppliances.com
Definition
Arcing Arcing is the microwave term for sparks in the oven.Arcing is caused by:
the metal shelf being installed incorrectly and touching the microwave walls.
metal or foil touching the side of the oven.
foil that is not molded to food (upturned edges act like antennas).
metal such as twist-ties, poultry pins,gold-rimmed dishes.
, recycled paper towels containing small metal pieces.
Covering Covers hold in moisture, allow for more even heating and reduce cooking time. Venting plastic wrap orcovering with wax paper allows excesssteam to escape.
Shielding In a regular oven,you shield chicken breasts or baked foods to prevent over-browning. When microwaving,you use small strips of foil to shield thin parts, such as the tips of wings and legs on poultry, which wouldcook before larger parts.
Standing Time When you cook with regular ovens,foods such as roasts or cakes are allowed to stand to finish cooking orto set. Standing time is especially important in microwave cooking. Notethat a microwaved cake is notplaced on a cooling rack.
vent_ After covering a dish with plastic wrap, you vent the plastic wrap by turning back one corner so excesssteam can escape.
23

Care and cleaning of the oven.
Helpful Hints
An occasional thorough wiping with a solution of baking soda and water keepsthe inside fresh.
Unplug the cord before cleaning any part of this oven.
How to Clean the Inside
Walls, Floor, Inside Window, Metal and Plastic Parts on the Door
Some spatters can be removed with a paper towel, others may require a damp cloth. Remove greasyspatters with a sudsy cloth, then rinse with a dump cloth. Do not useabrasive cleaners or sharp utensils on oven walls.
To cleon the surface of the door and the surface of the oven that come together upon closing, useonly mild, non-abrasive soaps or detergents using o sponge or soft cloth. Rinse with o damp clothand dry.
Never use o commercial oven cleaner on any part of your microwave.
Removable Turntable and Turntable Support
To prevent breakage, do not place the turntable into water just after cooking. Wash it carefully in warm,sudsy water or in the dishwasher. The turntable and support can be broken if dropped. Remember,do notoperate the oven without the turntable and support in place.
How to Clean the Outside
Do not use cleaners containing ammonia or alcohol on the microwave oven. Ammonia or alcoholcan damage the appearance of the microwave.
Case
Cleanthe outside of the microwave with a sudsy cloth. Rinsewith a damp cloth and then dry.Wipe thewindow clean with a dump cloth.
Control Panel and Door
Wipe with a damp cloth. Drythoroughly. Do not use cleaning sprays, large amounts of soap and water,abrasives or sharp objects on the panel-they can damage it. Some paper towels can also scratch thecontrol panel.
Door Surface
It is important to keep the area clean where the door seals against the microwave. Useonly mild, non-abrasive detergents applied with a clean sponge or soft cloth. Rinsewell.
Power Cord
Ifthe cord becomes soiled, unplug and wash with a damp cloth. For stubborn spots, sudsy water may beused, but be certain to rinse with a damp cloth and dry thoroughly before plugging cord into outlet.
24
GEAppliances.com
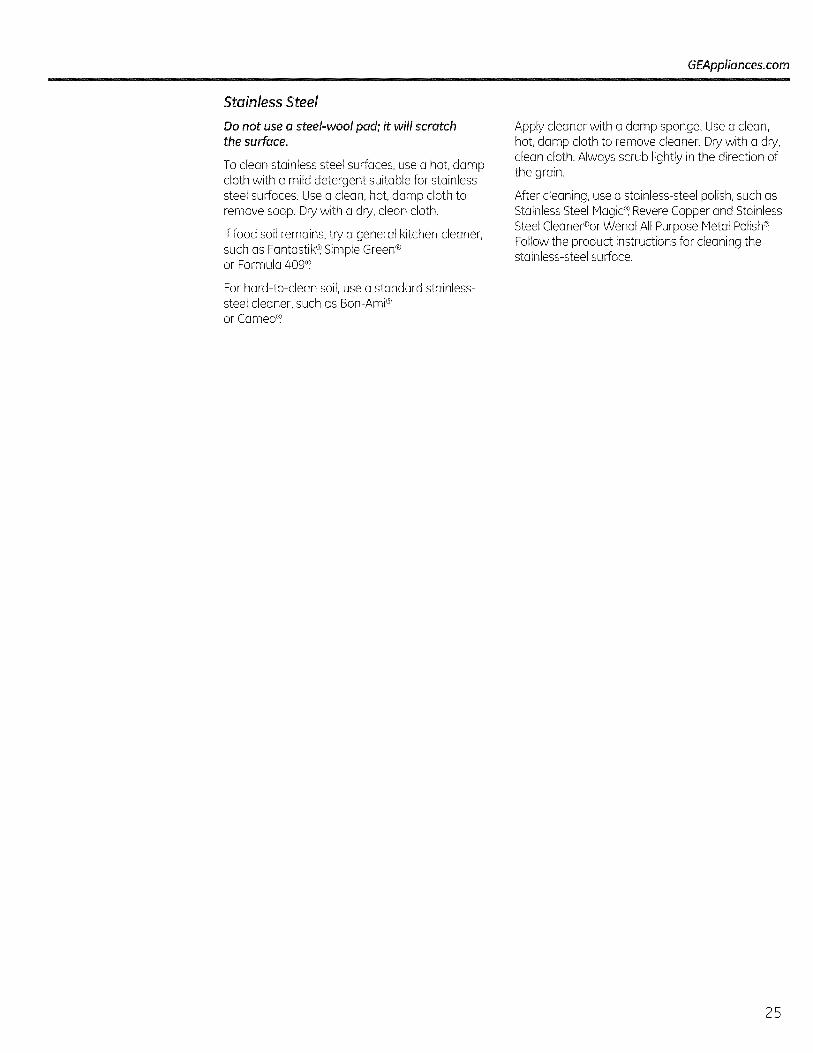
Stainless Steel
Do not use a steel-wool pad; it will scratchthe surface.
To clean stainlesssteel surfaces, use (] hot, dampcloth with a mild detergent suitable for stainlesssteel surfaces. Usea clean, hot, damp cloth toremove soap. Drywith a dry,clean cloth.
If food soil remains, try a general kitchen cleaner,such us Fantustik! Simple Green®or Formula 409_
Apply cleaner with a dump sponge. Usea clean,hot, dump cloth to remove cleaner. Drywith a dry,clean cloth. Always scrub lightly in the direction ofthe grain.
After cleaning, use a stainless-steelpolish,such asStainlessSteelMagic®, RevereCopper and StainlessSteelCleaner®orWenol All Purpose Metal Polish¢.Followthe product instructions for cleaning thestainless-steelsurface.
For hard-to-clean soil,use a standard stainless-steel cleaner,such us Bon-Ami®or Cameo®.
25

Before you call for service...
Troubleshooting TipsSave time and money! Review the charts on the followingpages first and you may not need to call for service.
Possible Causes What To Do
Oven will nOtstart A fuse in your home may be • Replacefuse or reset circuit breaker.blown or the circuit breakertripped.
Power surge. • Unplug the microwave oven, then plug it back in.
Plug not fully inserted into wall , Makesure the 3-prong plug on the oven is fully insertedoutlet, into wall outlet.
Door not securely closed. , Open the door and close securely.
Control panel lighted, Door not securelyclosed. • Open the door and close securely.yet ovenwill not start
STARTbutton not pressed after • PressSTART.entering cooking selection.
Another selection entered • PressOFF/CLEAR.already in oven and OFF/CLEARbutton not pressed to cancel it.
Cooking time not entered after • Hake sure you have entered cooking time after pressingpressing TIME COOK. TIMECOOK.
OFF/CLEARwas pressed , Resetcooking program and pressSTART.accidentally.
Food weight not entered after • Makesure you have entered food weight offer selectingselecting AUTO DEFROST. AUTODEFROST.
Food type not entered after . Makesure you have entered a food type.pressing COOK.
CONTROLLOCKED The control has been locked. . Pressand hold OFF/CLEARfor about :3secondsappears on display to unlock the control.
CAUTION--OVENHOT The temperature inside the • This is normal.appears on display oven is greater than 200°F.
One of the sensor cooking . Thesefeatures will not operate when the oven is hot.pads was pressed when thetemperature inside the ovenwas greater than 200°F.
26

GEAppliances.com
Things That Are Normal With Your Microwave Oven
Steam or vapor escaping from aroundthe door.
Lightreflection around door or outer case.
Dimming oven light and change inthe blower sound at power levelsother thanhigh.
Dullthumping sound while oven is operating.
, TV/radio interference might be noticed whileusing the microwave. Similartothe interference caused by other smallappliances, it does not indicate a problem withthe microwave. Plugthe microwave into adifferent electrical circuit, move the radio or TVas far away from the microwave as possible,or check the position and signal of the TV/radioantenna.
27

Notes.
28

Notes. GEAppliances.com
29

Notes.
30

GE Microwave Oven Warranty.
All warranty service provided by our Factory Service Centers,or an authorized Customer Care ®technician during normalworking hours. To schedule service, on-line, 24 hours a day, visitus at GEAppliances.com, or call 800.GE.CARES (800.432.2737).Please have serial and model numbers available when callingfor service.
Staple your receipt here.Proof of the original purchase
date is needed to obtain serviceunder the warranty.
One YearFrom the date of the
original purchase
Five Years
(CEB1590 ONLY)Fromthe date of theanginal purchase
GE Will Replace:
Any part of the microwave oven which fails due to a defect in materials or workmanship.During this limited one-year warranty, GEwill also provide, free of charge, all labor and relatedservice costs to replace the defective part.
The magnetron tube, if the magnetron tube fails due to a defect in materials or workmanship.During this five-year limited warranty, you will be responsible for any labor or in-homeservice costs.
, Service trips to your home to teach you how touse the product.
, Improper installation, delivery or maintenance. If youhave an installation problem, contact your dealer orinstaller. You are responsible for providing adequateelectrical, exhausting and other connecting facilities.
, Product not accessible to provide required service.
, Failure of the product or damage to the product if it isabused, misused (for example, cavity arcing from wirerack or metal/foil), or used for other than the intendedpurpose or used commercially.
, Replacement of house fuses or resetting of circuitbreakers.
, Damage to the product caused by accident, fire, floodsor acts of God.
, Incidental or consequential damage caused by possibledefects with this appliance.
, Damage caused after delivery.
EXCLUSION OF IMPLIED WARRANTIES--Your sole and exclusive remedy is product repair as provided inthis Limited Warranty. Any implied warranties, including the implied warranties of merchantability orfitness for a particular purpose, are limited to one year or the shortest period allowed by law.
This warranty is extended to the original purchaser and any succeeding owner for products purchased forhome use within the USA. If the product is located in an area where service by a GE Authorized Servicer isnot available, you may be responsible for a trip charge or you may be required to bring the product to anAuthorized GEService Location for service. In Alaska, the warranty excludes the service calls to your home.
Some states do not allow the exclusion or limitation of incidental or consequential damages. This warrantygives you specific legal rights, and you may also have other rights which vary from state to state. To knowwhat your legal rights are, consult your local or state consumer affairs office or your state's Attorney General.
Warrantor: General Electric Company. Louisville, KY 40225
31

Consumer Support.
GEAppliances Website GEAppliances.com
Have a question or need assistance with your appliance? Try the GEAppliancesWebsite 24 hours a day,any day of the year! Forgreater convenience and faster service,you can now download Owner's Manuals,order parts or even schedule service on-line.
ScheduleService GEAppliances.com
Expert GErepair service is only one step away from your door. Get on-line and schedule your service atyour convenience 24 hours any day of the year! Orcall 800.GE.CARES(800./432.2737)during normal businesshours.
RealLife DesignStudio GEAppliances.comGEsupports the Universal Designconcept-products, servicesand environments that can be used bypeople of all ages,sizesand capabilities. We recognize the need to design for a wide range of physical andmental abilities and impairments. For details of GE'sUniversal Designapplications, including kitchen designideas for people with disabilities, check out our Website today. Forthe hearing impaired, please call 800.TDD.GEAC(800.833.4322).
ExtendedWarranties GEAppliances.com
Purchase a GEextended warranty and learn about special discounts that are available while your warrantyis still ineffect. You can purchase it on-line anytime, or call 800.626.2224 during normal business hours.GEConsumer Home Serviceswill still be there after your warranty expires.
Parts and Accessories GEAppliances.com
Individuals qualified to service their own appliances can have parts or accessoriessent directly to their homes(VISA,MasterCard and Discovercards are accepted).Order on-line today, 24 hours every day orby phone at 800.626.2002 during normal business hours.
Instructions contained in this manual cover procedures to be performed by any user. Other servicinggenerally should be referred to qualified service personnel. Caution must be exercised, since improper
servicing may cause unsafe operation.
Contact Us GEAppliances.com
If you are not satisfied with the service you receivefrom GE,contact us on our Website with all the detailsincluding your phone number, or write to: General Manager, Customer Relations
GEAppliances,Appliance ParkLouisville,KY40225
Register Your Appliance GEAppliances.comRegister your new appliance on-line--at your convenience! Timely product registration willallow for enhancedcommunication and prompt service under the terms of your warranty, should the need arise.You may also mail in the pre-printed registration card included in the packing material.
3 2 Printed in Korea
OGEAppliances.com
0
0
OO
,Oom
OOO>
OU
0U
L.0
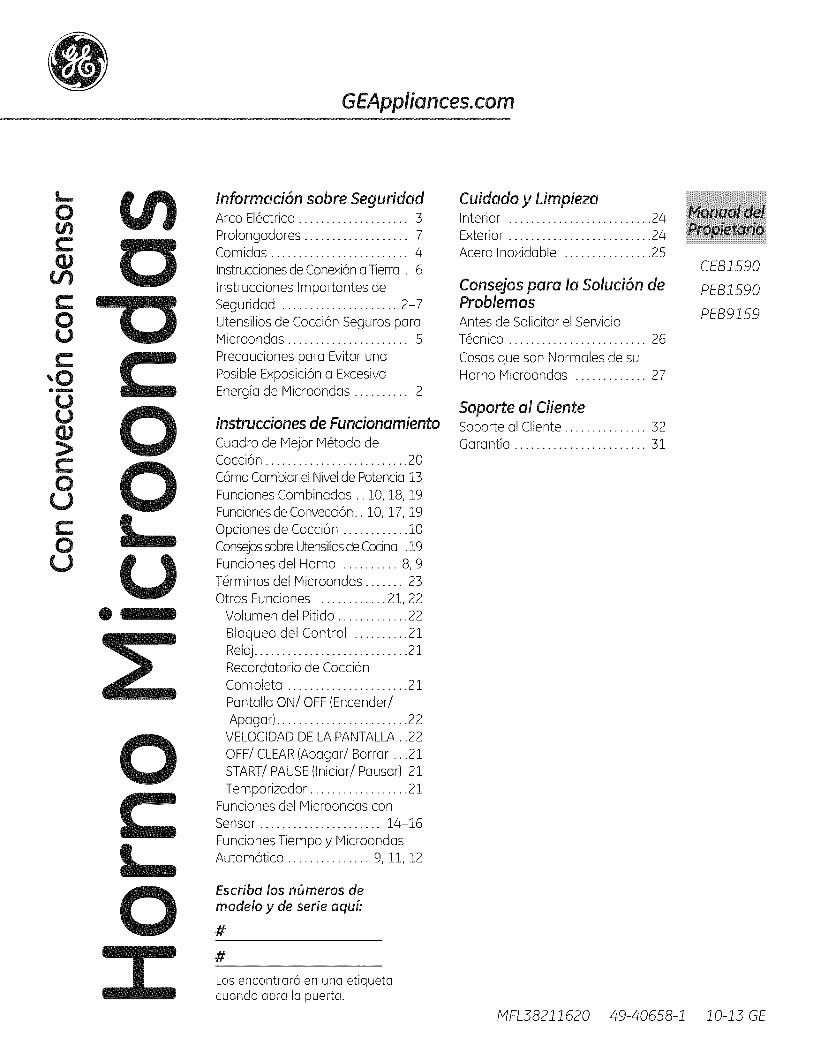
Informaci6n sobre SegufidadArco EI6ctrico .................... 3
Prolongadores ................... 7Comidas ......................... 4Instrucciones de Conexi6n a Tierra. 6
Instrucciones Importantes deSeguridud ..................... 2-7Utensilios de Cocci6n Seguros paraMicroondas ...................... 5
Precauciones para Evitar unaPosible Exposici6n a ExcesivaEnergfa de Plicroondas .......... 2
Instrucciones de Funcionamiento
Cuadro de Mejor N6todo deCocci6n .......................... 20
C6mo Cambiar el Nivelde Potencia 13
Funciones Combinadas .. 10, 18, 19Funciones de Convecci6n.. 10, 17, 19
Opciones de Cocci6n ............ 10consejos sobre Utensiliosde Cocina .19Funciones del Homo .......... 8, 9T@minos del Microondas ....... 23Otras Funciones ............ 21, 22
Volumen del Pitido ............. 22
Bloqueo del Control .......... 21Reloj............................ 21Recordatorio de Cocci6n
Completa ...................... 21Pantalla ON/OFF (Encender/
Apagar) ........................ 22VELOCIDAD DE LA PANTALLA..22
OFF/CLEAR (Apagar/Borrar ...21START/PAUSE (Iniciar/Pausar) 21
Temporizador .................. 21Funciones del IVlicroondas con
Sensor ...................... 14-16
Funciones Tiempo y IVlicroondasAutom6tico ............... 9, 11, 12
Escriba los n_meros demodelo y de serie aqui:
#
#
Los encontrar5 en una etiquetacuando abra la puerta.
Cuidado y Limpiezainterior .......................... 24
Exterior .......................... 24Acero Inoxidable ................ 25
Consejos para la Soluci6n deProblemas
Antes de Solicitar el Servicio
T6cnico ......................... 26
Cosas que son Normales de suHomo Microondas ............. 27
Soporte al CiienteSoporte al Cliente ............... 52Garantia ........................ 31
MFL3821J.620 /49-40658-1
CEB1590
PEB1590
PEBg159
JO-J3 GE
INSTRUCCIONES IMPORTANTES DE SEGURIDADLEA TODAS LAS INSTRUCCIONES ANTES DE USAR.
A iADVERTENCIA!A fin de reducir el riesgo de quemaduras, descargas eldctricas, incendios, lesiones en personas, o exposici6n a excesos deenergfa de microondas:
PRECAUCIONES PARA EVITAR UNA POSIBLE EXPOSICION AENERG[A EXCESIVA DE MICROONDAS
(aJ No Intente usar este homo con la puerta abierta, ya queesto podr6 producir una exposici6n peligrosa ala energiade microondas. Esimportante no forzar los bloqueos deseguridad.
(bJ No Coloque ningOnobjeto entre la cara frontal del homo yla puerta, ni permita que se acumule tierra ni residuos delimpiadores en las superficies selladas.
No Utilice el homo si se encuentra daBado. Esespecialmente importante que la puerta del homo se cierrede forma adecuada y que no se dahe Io siguiente:
(1)puerta (doblada)
(2)bisagrasy pestillos (rotoso sueltos)
(3)juntas de la puerta y superficiesselladas
(dJ El Homo No Debe ser reparado por ninguna personaexcepto personal calificado del servicio de reparaciones.
, Lea todes Ins instrucciones antes de user esteelectrodom_stico. AI user ertefectos el_ctricos se deber6nseguir precaudones bSsicas de seguridad, incluyendo Iosiguiente:
, Leay siga las precauciones espedficas en la secci6nPRECAUCIONESPARAEVITARUNAPOSIBLEEXPOSICIONA UNAEXCESIVAENERG[ADEIlCROONDAS m6s arriba.
, Esteelectrodom6stico deber6 contar con conexi6n a tierra.Conecte s61oa un tomacorriente con la adecuada conexi6n atierra. Consulte la secci6n Instruccionesde Conexi6na Tierra enla p6gina 6.
, Instale o coloque el electrodom6stico s61ode acuerdo con lasInstrucciones de Instalaci6n provistas.
, Esteproducto se deber6 user a 3" de distancia sobre el suelo.
, Aseg@esede colocar la superficie frontal de la puerta 3" o m6satr6s del extremo de la base,a fin de evitar cafdas accidentalesdel electrodom6stico durante un uso normal.
, No utilice este electrodom6stico si posee un cable o enchufedahado, si no est6 funcionando correctamente, o si rue dahadoo sufri6 una cafda.
, Siel cable de corriente est6 dahado, deber6 ser reemplazadopor el ServicioT_cnico de General Electrico por un agente delservicio autorizado, utilizando un cable de corriente de GeneralElectric disponible.
, No cubra ni bloquee ninguna apertura del electrodom6stico.
, D6 a este electrodom6stico el uso para el cual ruediseBado Qnicamente,como se describe en este manual.No use productos qu[micos corrosivos ni vapores en esteelectrodom6stico. Estehomo microondas rue diseBadoespedficamente para calentar, secar o cocinar comida, y nopara uso industrial o en laboratorio.
, Estehomo microondas no est6 aprobado ni evaluado para usoen la marina.
Para reducir el riesgo de incendio en la cavidad del homo:
No cocine en exceso la comida. Presteespecial atenci6n cuandose coloque papel, pl6stico u otros materiales combustiblesdentro del homo mientras se cocina.
Elimine cualquier torcedura del cable yasas met61icasde losenvases de papel o pl6stico antes de colocar estos en el homo.
No use el homo con el prop6sito de guardar cosas. No dejeproductos de papel, utensilios de cocina ni comida en el hornocuando no est6 en uso.
No prepare palomitas de maiz en el homo microondas, a menosque se encuentren en un accesorio especial de palomitas demaiz para microondas o que el envoltorio de las palomitas demaiz posea una etiqueta que indique que se pueden preparar enel homo microondas.
- Si los materiales dentro del horno se prenden fuego, mantengala puerta del homo cerrada, apague el mismo y desconecteel cable de la corriente, o corte la corriente del fusible o eldisyuntor. Sise abre la puerta, el fuego se podr6 esparcir.
- No use las Funciones del Sensordos veces seguidas con lamisma porci6n de comida. Si la comida no se cocina luego de laprimera cuenta regresiva, use TIt,'IECOOl<(Cocci6ncon tiempo)para adicionar tiempo de cocci6n.
- No use el homo para secar el peri6dico.
, AI usar las funciones de convecci6n o de cocci6n combinadas,tanto la parte exterior como la parte interior del homo secalentar6n. Siempre use almohadillas para retirar los envases yaccesorios de comida tales como el estante del homo.
TermSmetro--No use term6metros para cocci6n regular o enhomo al cocinar con microondas o con una combinaci6n. Elmetal y el mercurio de estos term6metros podr[an ocasionararcos el6ctricos y posibles dahos sobre el horno. No use unterm6metro en la comida que est6 cocinando por microondas, amenos que el term6metro est6 diseBado o se recomiende parasu uso en el homo microondas.
, No limpie con almohadillas met61icaspara fregar. Las piezaspodr6n quemar la almohadilla y tener contacto con partesel6ctricas y producir riesgosde descargar el6ctricas.
2 GUARDE ESTAS INSTRUCCIONES

GEAppliances.com
INSTRUCCIONES INIPORTANTES DE SEGURIDAD
No guarde ning0n material, a excepci6n de nuestros accesoriosrecomendados, en este homo cuando no est6 en uso.
, No guarde este electrodom6stico al aire libre. No use esteproducto cerca del agua; por ejemplo, en un s6tano hOmedo,cerca de una piscina, cerca de un lavabo o en ubicacionessimilares.
Nlantenga elcable de corriente alejado de superficiescalientes.
No sumerja el cable de corriente o el enchufe en el agua.
, No cubra ni bloquee ninguna apertura del electrodom6stico.
, No permita que el cable de corriente cuelgue del extremo de unamesa o mostrador.
Estehomo microondas no est6 aprobado ni evaluado para usomarino.
Parasu instalaci6n en mostrador:
- No guarde nada directamente sobre la superficie del homomicroondas cuando el mismo se encuentre en funcionamiento.
, Para instalaci6n empotrada conjuego de terminacionesaprobado:
- No coloque este artefacto sobre un lavabo.
- No guarde nada directamente sobre la superficie del homomicroondas cuando el mismo se encuentre en funcionamiento.
- No coloque el horno de microondas sobre ni cerca de cualquierparte de un artefacto para calentar o cocinar.
iiiiiiiiiiii_i_
iiiiiiiiiiii_i_
iiiiiiiiiiii_i_
No utilice ning0n electrodom6stico o calefacci6n o cocci6ndebajo de este homo microondas.
D6 a este electrodom6stico el uso para el cual fue dise_ado0nicamente, como se describe en este manual.
No use productos quimicos corrosivos ni vapores en esteelectrodom6stico.
Estehomo microondas fue disehado especificamente paracalentar, secar o cocinar comida, y no para uso industrial o enlaboratorio.
Esimportante mantener el 6rea limpia donde la puerta se sellecontra el homo microondas. Uses61odetergentes suaves y noabrasivos con una esponja limpia o tela suave. Enjuaguebien.
Esteelectrodom_stico s61odebe ser reparado por personalcalificado del servicio t6cnico. Encaso de necesitar unaevaluaci6n, reparaci6n o ajuste, comun[quese con elservicioautorizado m6s cercano.
AI igual que con cualquier electrodom_stico, se deber6 realizaruna supervisi6n de cerca si es usado por nihos.
Algunos productos tales como huevosenteros y envasessellados-por ejemplo: tarros devidrio cerrados - puedenexplotar y pot estono se deben calentar en el homo microondas. Dichouso del homomicroondas podr6 producir lesiones.
No use productos de papel en el homo cuando elelectrodom6stico sea usado en cualquier modo de cocci6n,excepto en cocci6n por microondas.
A IADVERTENCIA!ARCO ELI CTRICO
Si observa arcos el6ctricos, presione la tecla CLEAR/OFF (Borrar/Apagar) y corrija el problema.
Arco el6ctrico es el t@mino que se usa para definir laproducci6n de chispas en el homo microondas. Los arcosel6ctricos son producidos por:
Instalaci6n incorrecta del estante de metal, donde tienecontacto con la pared del microondas.
Metal o papel de aluminio en contacto con el costado delhorno.
Papelde aluminio no moldeado a la comida (losextremosno doblados act0an como antenas).
Metales,tales como precintos, pinchos de ave,o platoscon rebordes dorados, en el microondas.
Toallasde papel reciclableque contengan pequehostrozos de metal usados en el microondas
Soporte del anillo giratorio no instalado correctamente.
GUARDE ESTAS INSTRUCCiONES s
INSTRUCCIONES IMPORTANTES DE SEGURIDADLEA TODAS LAS INSTRUCCIONES ANTES DE USAR.
A iADVERTENCIA!
COMIDAS
, No prepare palomitas de maiz en el horno microondas, ,a menos que se encuentren en un accesorio especialde palomitas de maiz para microondas o que elenvoltorio de las palomitas de maiz posea una etiquetaque indique que se pueden preparar en el homomicroondas.
No hierva huevos en un homo microondas. Seacumular6 presi6n dentro de la yema del huevo y estohar6 que explote, posiblemente produciendo lesiones.
iiiiiiiiiiii_i_
Utilizarel horno microondas sin comida dentro por m6sde uno o dos minutos podr6 causar dahos al homo yesto podr[a provocar un incendio, Esto incrementa elcalor en torno al magnetr6n y puede acortar la vida Otildel horno.
Lascomidas con la "piel" exterior intacta tales comolas papas, perros calientes, salsas,tomates, manzanas,higados de polio y otros menudos y yemas de huevodeber6n set perforados para permitir que salga elvapor durante la cocci6n.
AGUA SOBRECALENTADA
I
I
I
I
Losliquidos, tales como el agua, caf6 o t6 se podr6nsobrecalentar m6s all6 de su punto de hervor sinque parezca que esto est6 sucediendo. No siemprese observan burbujas o hervor cuando el envasees retirado del homo microondas. ESTOPODR[APROVOCARq)UEL[q)UIDOSMUYCALIENTESDEPRONTOHIERVANCUANDOSEMUEVAELENVASEOCUANDOSEINSERTEUNACUCHARAU OTROUTENSILIOENELL[QUIDO.
Parareducir el riesgo de lesiones personales:
No sobrecaliente el I[quido.
Revuelvael I[quidotanto antes como a la mitad deltiempo mientras Io calienta.
No use envases con lados rectos y cuellos angostos.
Despu6s de calentar, deje reposar el envase en el homomicroondas durante un periodo corto antes de retirarel mismo.
Tenga extremo cuidado al insertar una cuchara u otroutensilio en elenvase.
iiiiiiiiiiii_i_
iiiiiiiiiiii_i_
iiiiiiiiiiii_i_
Esposible que las comidas cocinadas en liquidos (talescomo pasta) tiendan a hervirse m6s r6pidamente quelas comidas que contienen menos humedad. Siestosucediera, consulte la secci6n de Cuidado y Limpiezadel homo microondas, para acceder a instruccionessobre c6mo limpiar el interior del horno.
Evitecalentar comida para beb6s en frascos de vidrio,incluso sin la tapa. Aseg0rese de que las comidaspara infantes est@ntotalmente cocinadas. Revuelvala comida para distribuir el calor de forma pareja.Aseg0resede evitar el punto de hervor cuando calientef6rmula de beb6. Esposible que el envase se sientam6s frio que su contenido. Siempre pruebe f6rmulaantes de alimentar a su beb6.
No descongele bebidas congeladas en botellas concuello peque_o (especialmentebebidas gaseosas).Incluso si el envase es abierto, se podr6 acumularpresi6n. Estopodr6 hacer que el envase explote,ocasionando posibles lesiones.
Lascomidas calientes y el vapor pueden causarquemaduras. Tenga cuidado al abrir cualquier envasede comida caliente, incluyendo bolsas de palomitasde maiz, bolsas pl6sticasy cajas para cocci6n. Afin deevitar posibles lesiones,aleje el vapor de las manos y elrostro.
No caliente las papas en exceso.Se podrian deshidratary prenderse fuego, causando dahos en su horno.
Cocinecarnes y carnes de ave en forma completa -la came por Io menos a una temperatura INTERIORde !60 o Fy la came de ave por Io menos a unatemperatura INTERIORde !800 F.Normalmente lacocci6n a estas temperaturas brinda una protecci6ncontra las enfermedades transmitidas por la comida.
4 GUARDE ESTAS INSTRUCCiONES
GEAppliances.com
UTENSILIOS DE COCINA SEGUROS PARA MICROONDAS
No utilice el horno en el modo de microondas si el plato giratorio y el soporte del plato giratorio no seencuentran ubicados en sus lugares correspondientes. El plato giratorio no deber6 tener restricciones, demodo que pueda girar.
Aseg@ese de que todos los utensilios usados en el horno microondas sean para uso en el mismo. Se puedeusar la mayoria de las cacerolas de vidrio, platos de cocci6n, tazas graduadas, tazas para postre, vajillas decer6mica o porcelana que no poseen bordes met61icos o vidriados con un brillo met61ico. Algunos utensilioscuentan con la etiqueta "para uso en microondas'.
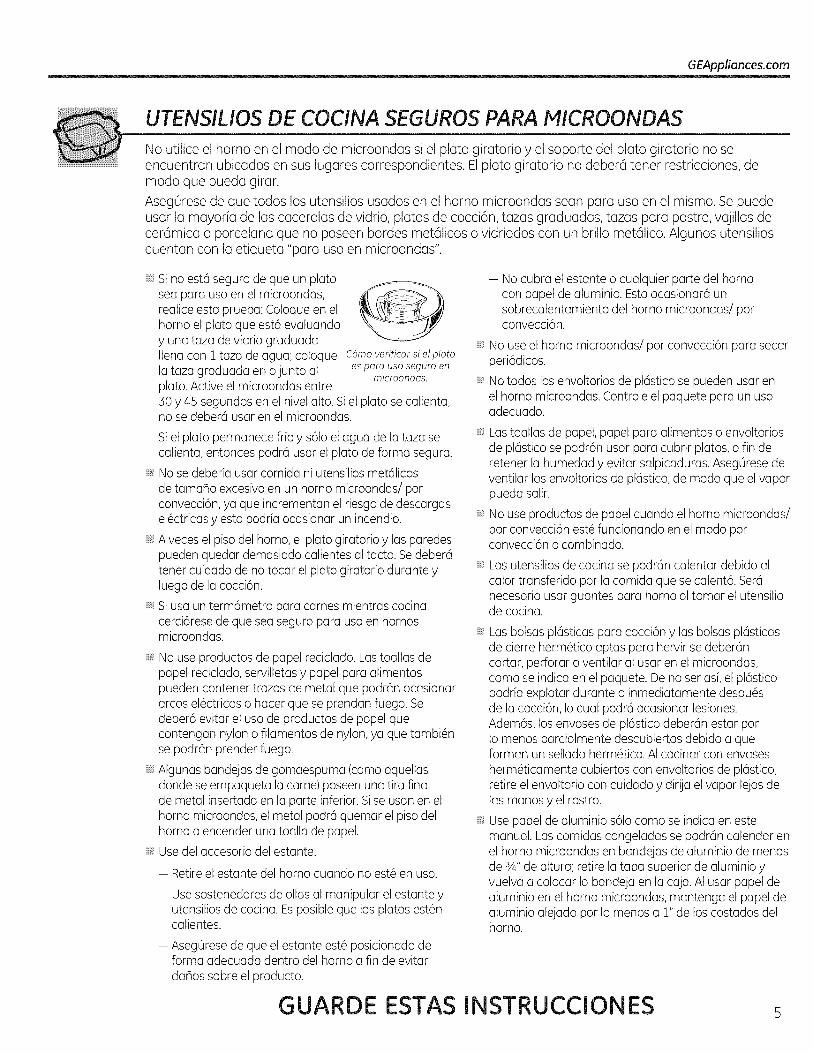
Sino est(_seguro de que un platosea para uso en el microondas, f_ __'_realice esta prueba: Coloque en elhomo el plato que est(_evaluando}Cunataza de vidrio graduadaIlena con I taza de agua; coloque C6moverificor si elploto
la taza graduada en o junto al espara uso seguro enrnicroondas.plato. Active el microondas entre:SO}C45 segundos en el nivel alto. Siel plato se calienta,no se deber6 usar en el microondas.
Siel plato permanece fr[o}Cs61oel agua de la taza secalienta, entonces podr6 usar el plato de forma segura.
, No se deberia usar comida ni utensilios metdlicosde tama_o excesivoen un homo microondas/potconvecci6n, }caque incrementan el riesgo de descargasel@ctricas}Cesto podria ocasionar un incendio.
, Aveces el piso del homo, el plato giratorio }Clas paredespueden quedar demasiado calientes al tacto. Sedeber6tenet cuidado de no tocar el plato giratorio durante }Cluego de la cocci6n.
, Siusa un term6metro para carnes mientras cocina,cerci6rese de que sea seguro para uso en hornosmicroondas.
, No use productos de papel reciclado. Lastoallas depapel reciclado, servilletas}Cpapel para alimentospueden contener trozos de metal que podr6n ocasionararcos el6ctricos o hacer que se prendan fuego. Sedeberc_evitar el uso de productos de papel quecontengan nylon o filamentos de n}clon,}caque tambi6nse podr6n prender fuego.
, Algunas bandejas de gomaespuma (como aquellasdonde se empaqueta la came)poseen una tira finade metal insertada en la parte inferior.Sise usan en elhomo microondas, el metal podrc_quemar el piso delhomo o encender una toalla de papel.
, Usedel accesorio del estante:
- Retireel estante del homo cuando no est6 en uso.
- Usesostenedores de ollas al manipular el estante }Cutensilios de cocina. Esposible que los platos est6ncalientes.
- Aseg0resede que el estante est@posicionado deforma adecuada dentro del homo a fin de evitardaBos sobre el producto.
- No cubra el estante o cualquier parte del homocon papel de aluminio. Estoocasionar6 unsobrecalentamiento del homo microondas/porconvecci6n.
, No use el homo microondas/por convecci6n para secarperi6dicos.
, No todos los envoltorios de pl6stico se pueden usar enel homo microondas. Controle el paquete para un usoadecuado.
, Lastoallas de papel, papel para alimentos o envoltoriosde pl6stico se podr6n usar para cubrir platos, a fin deretener la humedad }Cevitar salpicaduras. AsegOresedeventilar los envoltorios de plc_stico,de modo que elvaporpueda salir.
, No use productos de papel cuando el homo microondas/pot convecci6n estefuncionando en el modo potconvecci6n o combinado.
Los utensilios de cocina se podrc_ncalentar debido alcalor transferido por la comida que se calent6. Ser6necesario usar guantes para horno al tomar el utensiliode cocina.
Las bolsas pl6sticas para cocci6n }Clas bolsas pl6sticasde cierre herm6tico aptas para hervir se deber6ncortar, perforar o ventilar al usar en el microondas,como se indica en el paquete. De no set asi, el pl6sticopodria explotar durante o inmediatamente despu6sde la cocci6n, Iocual podr6 ocasionar lesiones.Ademc_s,los envases de pl6stico deberc_nestar potIo menos parcialmente descubiertos debido a queforman un sellado herm6tico. AI cocinar con envasesherm@icamente cubiertos con envoltorios de pl6stico,retire el envoltorio con cuidado }Cdirija elvapor lejos delas manos }Cel rostro.
Usepapel de aluminio s61ocomo se indica en estemanual. Lascomidas congeladas se podrc_ncalendar enel homo microondas en bandejas de aluminio de menosde s4" de altura; retire la tapa superior de aluminio }Cvuelva a colocar la bandeja en la caja. AI usar papel dealuminio en el homo microondas, mantenga el papel dealuminio alejado pot Io menos a !" de los costados delhorno.
GUARDE ESTAS INSTRUCCiONES s

INSTRUCCIONES IMPORTANTES DE SEGURIDADLEA TODAS LAS INSTRUCCIONES ANTES DE USAR.
UTENSILIOS DE COCINA SEGUROS PARA HICROONDAS
Utensiliosde pl(_stico-los utensilios de pl(_sticodisefiados para la cocci6n en el horno microondas sonmuy @lies,pero se deber6n usar con cuidado. Esposibleque el pldstico de usa seguro en el homo microondasno tolere condiciones de sobrecalentamiento, comas[es el caso con materiales de vidrio o cerc_mica,y sepodr(_ablandar o carbonizar si se somete a per[odoscortos de sobrecalentamiento. Sise exponen a unsobrecalentamiento prolongado, la comida y losutensilios se podrc_nincendiar.
Sigaestas pautas:
_Use pl6sticos de usa seguro en el homo microondas_nicamente y use los mismos cumpliendo de formaestricta las recomendaciones del fabricante deutensilios.
No cocine envases vac[osen el horno microondas.
No permita que los nihos usen utensilios de plasticosin una supervisi6n completa.
A iADVERTENCIA!
INSTRUCCIONES DE CONEXION A TIERRA
ADVERTENCIA:descargas [email protected] deber6 estar conectado a tierra.Encaso de que se produzca un cortocircuito, la conexi6na tierra reduce el riesgo de descarga el6ctrica, brindandoun cable para la salida de la corriente el6ctrica.
Elusainadecuado del enchufe de conexidna tierra puede provocar riesgos de
Esteelectrodom6stico est@equipado con un cable decorriente que posee un cable de conexi6n a tierra conun enchufe a tierra. Elcable se deber@enchufar en untomacorriente instalado y conectado a tierra de formaadecuada.
Consulte a un electricista calificado o al personal delservicio t6cnico en caso de que las instrucciones deconexi6n a tierra no se entiendan completamente, o sitiene dudas sabre si la herramienta est6 conectada atierra de forma apropiada.
Encaso de contar con un tomacorriente de paredde 2 cables, es su responsabilidad y obligaci6nreemplazarlo par un tomacorriente de pared de 3 cablescorrectamente conectado a tierra.
Bajo ninguna circunstancia carte o elimine el tercer cable(tierra) del cable de corriente.
No use un enchufe adaptador con este electrodom6stico.
No use prolongadores con este electrodom6stico. Siel cable de corriente es demasiado corto, solicite a unelectricista o a personal del serviciot6cnico calificado queinstale un tomacorriente cerca del electrodom6stico. (Leala secci6n de PROLONGADORES.)
Para un mejor funcionamiento, conecte esteelectrodom6stico en su tomacorriente el6ctrico a fin deevitar parpadeos de las luces,explosi6n del fusible odesactivaci6n del disyuntor.
6 GUARDE ESTAS INSTRUCCiONES

GEAppliances.com
PROLONGADORES
Sebrinda un cable de corriente corto a fin de reducir riesgos de enredo o tropiezos con un cable mas largo.
Sepodrc_nusar prolongadores siempre que se tenga el debido cuidado.
Sise usa un prolongador-
La graduaci6n el6ctrica del prolongador deber[a ser por Io menos tan amplia como la graduaci6n el6ctrica del
U electrodom6stico;
Elprolongador deberd contar con 3 cables con conexi6n a tierra y estar enchufado a un tomacorriente con 3ranuras;
IEI prolongador no se deber6 colocar a Io largo de la mesada o mesa, de modo pueda set empujado ni_os oque potque se pueda tropezar con 6ste de forma no intencional.
Siusa un prolongador, la luz interna podr6 parpadear y el sonido del calefactor podr6 variar cuando el homomicroondas est6 encendido. Lostiempos de cocci6n podr6n set m6s largos tambi6n.
AVISO- MARCAPASOS
La mayor[a de los marcapasos poseen protecci6n contra interferencias de productos el6ctricos, incluyendo los hornosmicroondas. Sinembargo, es aconsejable que los pacientes con marcapasos consulten a sus m6dicos ante cualquierduda.
LEA Y SIGA ESTA INFORIV1ACIONDE SEGURIDAD CUIDADOSAMENTE.
GUARDE ESTAS INSTRUCCIONES 7

Acerca de las funciones de su horno.
Es posible que las funciones y apariencias varien con relaci6n a su modelo a Io largo del manual.
looo Watts
|
0 0
8
Funcionesdel HomoManija para Liberar Pestillos.
Pestillos de la Puerta.
Ventana con Protector Met61ico.La pantallapermite que la cocci6n pueda ser observadamientras se mantienen las microondas dentro delhomo.
Panel de Control y Selector de Dial.
Plato Giratofio Extraible. Elplato giratorio y elsoporte deben estar en la ubicaci6n correcta alusar el homo. Elplato giratorio se podrc_retirar parala limpieza.
Soporte E×traible del Plato Giratorio. Elplatogiratorio debe estar en la ubicaci6n correcta al usarel homo.
Estante. Useal cocinar por convecci6n o encombinaci6n. (No Io use al cocinar en el homomicroondas).
Accesorios Opcionales:
Disponibleconcostoadicionala travdsdesuproveedordeGE.
Elijael Kit de Instalaci6n adecuado a continuaci6n a fin deconvertir este homo en un homo empotrable en pared.
Para instalaciones de 27":
Modelo Kit
PEB!Sg0DMBB JX!527DMBBPEB!590DMWW JX1527DMWWPEB9!59SFSS CX!527SSSSCEB!590SSSS CX!527SSSS
Para instalaciones de 30":
Modelo Kit
PEBI590DPIBB JXI530DPIBB
PEB1590DPIWW JX1530DPIWWPEB9159SFSS CX1530SSSS
CEB1590SSSS CX1530SSSS
NOTA:La ventilaci6n(es)del homo y la luz del homo estdnubicadas en las paredes interiores del homo microondas.Elplato giratorio estd ubicado en la cam del homo (visiblecuando se abre la puerta).
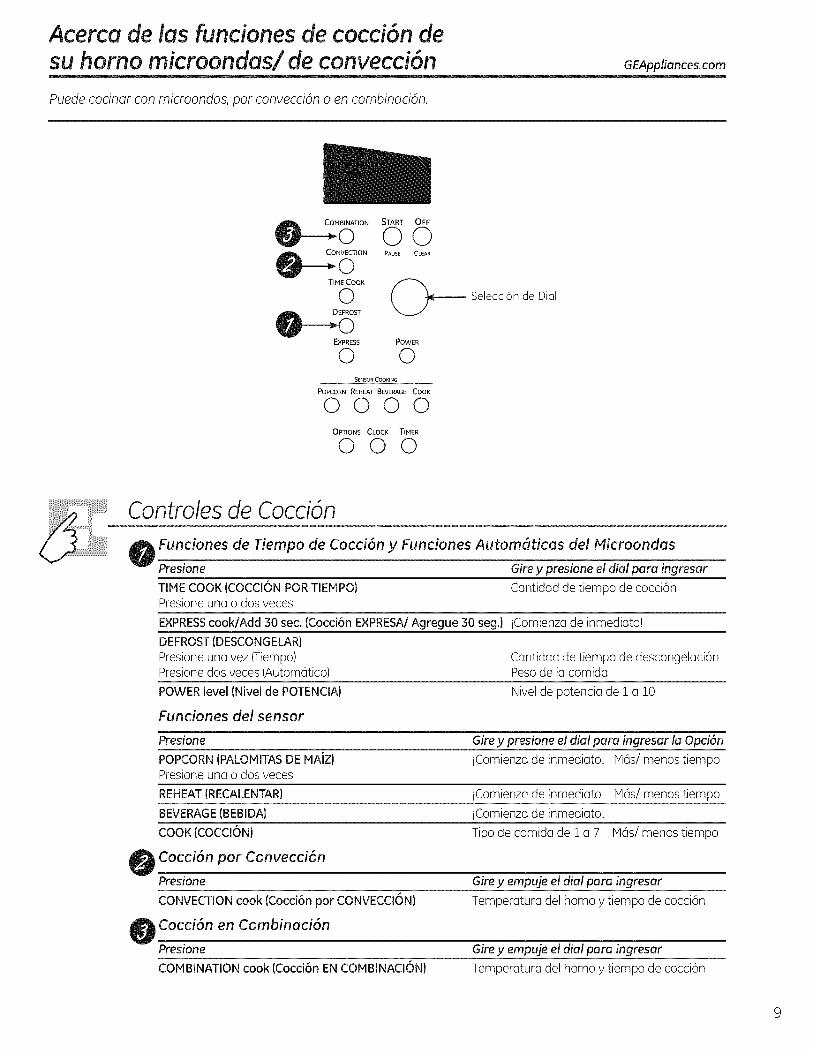
Acerca de las funciones de cocci6n desu homo microondas/ de convecci6n GEAppliances.com
Puede cocinar con microondas, par convecci6n o en combinaci6n.
._M_ATION
CONVECTIONO- oT_NE COOK
0
EXPRESS
0
START OFF
O0PAUSE CLEAR
POWER
0SENSOR COOKING
POPCORN REHEAT BEVERAGE COOK
0000OPTIONS CLOCK TIMER
000
Selecci6n de Dial
Controles de Cocci6n
Funciones de Tiempo de Cocci6n y Funciones Autom_ticas del Microondas
Presione Gire y presione el dial para ingresar
TiME COOK (COCCI6N PaR TIEMPO) Cantidad de tiempo de cocci6nPresione una o dos veces
EXPRESScooklAdd 30 sec. (Cocci6n EXPRESA/Agregue 30 seg.) iComienza de inmediato!
DEFROST (DESCONGELAR)
Presione una vez (Tiempo) Cantidad de tiempo de descongelaci6nPresione dos veces (Automatico) Peso de la comida
POWER level (Nivel de POTENCIA} Nivel de potencia de i a i0
Funciones del sensor
Presione Gire y presione el dial para ingresar la Opci6n
POPCORN (PALOMITAS DE MAiZ) iComienza de inmediato! iVlas/menos tiempoPresione una o dos veces
REHEAT (RECALENTAR) iComienza de inmediato! Has/menos tiempo
BEVERAGE(BEBIDA} iComienza de inmediato!
COOK (COCCI6NI Tipo de comida de ! a 7 Has/menos tiempo
Cocci6n par Convecci6n
Presione Gire y empuje el dial para ingresar
CONVECTION cook (Cocci6n par CONVECCI6N) Temperatura del homo y tiempo de cocci6n
Cocci6n en Combinuci6n
Presione Gire y empuje el dial para ingresar
COMBINATION cook (Cocci6n EN COMBINACI6N) Temperatura del homo y tiempo de cocci6n

Opciones de cocci6n disponibles.
Cocci6n en Microondas
Su homo usa energ[a de microondas para cocinar en un tiempo o peso establecidos, oautom_ticamente por sensor.
Elmicroondas con sensor funciona detectando la humedad creciente liberada durante la cocci6n. Elhomo ajusta de forma automatica el tiempo de cocci6n a diferentes tipos y cantidades de comida.
t"/6todo de Cocci6n Fuente de Calor Conducci6n de
La energ[a de Energ[a de Calor
microondas es microondas. Calor producido
distribuida de forma dentro de la comidapareja a trav6s del por penetraci6n de
.... homo para una energ[a instantanea.No use el estante para la cocci6n cocci6n completa yconmicroondas, rapida de la comida.
Beneficios
Cocci6n rSpida yaltamente eficaz. El
homo y su alrededorno queda caliente.Limpieza facil.
Cocci6n pot Convecci6n
Durante la cocci6n por convecci6n, se utiliza un elemento para calentar que eleva la temperaturadel aire dentro del horno. Sepuede programar cualquier temperatura del homo entre 225o Fy 450oF.Un ventilador hacer circular este aire caliente hacia todo el homo, sobre y alrededor de la comida,haciendo que la parte exterior se dore y que la parte interior sea rica y hQmeda.
Debido a que el aire caliente se mueve en forma constante, evitando que se desarrolle una capa de airemc_sfrb alrededor de la comida, algunas comidas se cocinan mc_sr@ido queen cocciones con hornosnormales.
Siempre use el estante al cocinarpot convecci6n.
M_todo de Cocci6n
Alrededor de lacomida circulaaire caliente paraproducir exterioresdorados y conservarIosjugos.
Fuente de Calor
Aire calientecirculante
Conducci6n de
Calor
Calor conducido
desde la parteexterna de la comidaa la parte interna.
Beneficios
Ayuda en el dorado ya conservar el sabot.Cocina las comidasde formas m@src_pidaque los hornosregulates.
Cocci6n en Combinaci6n
Elhomo tambi6n ofrece la opci6n de una cocci6n en combinaci6n, utilizando energ[a de microondasjunto con la cocci6n por convecci6n. Puedecocinar con velocidad y precisi6n, mientras Iogra que sucomida quede perfectamente dorada y crujiente.
M_todo de Cocci6n
La energ[a demicroondas y el calorde la convecci6nse combinan paracocinar comidas enhasta la mitad deltiempo que un homoregular, mientras doray sella los jugos.
Fuente de Calor
Energ[a demicroondas y airecaliente circulante.
Conducci6n de
Calor
La comida se calientaa partir de energ[ainstantc_neade lapenetraci6n del calorconducido desdeafuera de la comida.
Beneficios
Tiempo de cocci6nacortadode energ[ade microondas,
ademc_sde dejarla comida doraday crujiente a trav6sdel calor de laconvecci6n.
10
Acerca de las funciones de tiempo ymicroondas de forma autom6tica GEAppliances.com
TiMECOOK
0TURN TO SELECTPUSH Tg ENTER
Cocci6n por Tiempo
Time Cook I (Cocci6n por Tiempo I)
Le permite cocinar en el homo microondas porcualquier tiempo entre 15 segundos y 95 minutos.
Power level 10 (Nivel de potencia 10) se configurade forma automatica, peru Io puede modificar parauna mayor flexibilidad.
_ Presioneel bot6n TIMECOOK(Cocci6n potTiempo).Gireel dial para configurar el tiempode cocci6n y presione el dial para ingresar.
_Gire el dial configurar el de cocci6npara tiempoy presione el dial para ingresar.
_ Modifique el nivel de potencia si no desea queest6 en el nivel m4ximo. (PresionePOWERtPotencia).Gireel dial para seleccionar.Presioneeldial para ingresar).
L_ Presioneel bot6n START/PAUSE(Iniciar/Pausar) para iniciar la cocci6n.
Puedeabrir la puerta durante Time Cook (Cocci6ncon Temporizador) para controlar la comida. Cierrela puerta y presione START/PAUSE(Iniciar/Pausar)para reanudar la cocci6n.
Time Cook II (Cocci6npor Tiempo II)
Lepermite cambiar los nivelesde energia deforma automatica durante la cocci6n.As[es comofunciona:
U Presioneel bot6n TINE COOK(Cocci6nparTiempo),
I Gireel dial configurar el depara primer tiempococci6n y presione el dial para ingresar.
_ Modifique el nivel de si no deseapotencia queest6 en el nivel m6ximo. (PresionePOWER(Potencia), Gireeldial para seleccionar.Presioneel dial para ingresar).
JL_ presione el bot6n TIMECOOK(Cocci6n parTiempo) nuevamente.
Gireel dial para configurar el segundo tiempode cocci6n y presione el dial para ingresar.
_ odifique el nivel de potencia si no desea queest6 en el nivel mdximo. (PresionePOWER(Potencia)Gireel dial para seleccionar.
i resione el bot6n START/PAUSE(Iniciar/Pausar) para iniciar la cocci6n.
AIfinalizar Time CookI,Time Cook II (TiempodeCocci6n I,Tiempo de Cocci6n II)se realiza la cuentaregresiva.
EXPRESS
0TURN TO SELECTPUSH TO ENTER
Cocci6n Express
Setrata de una forma rdpida de configurar e iniciar la cocci6n en bloques de 30 segundos cada vezquese presiona el bot6n EXPRESS (Expreso).
Elnivel de potencia se configurarc_ autom@icamente en 10 y el homo comenzarc_ de forma inmediata.
Elnivel de potencia se puede modificar mientras se estc_realizando la cuenta regresiva. Presione elbot6n POWER (Potencia), gire el dial y presione el mismo para ingresar.
EXPRESS
0Agregar 30 Segundos
Cada vez que el bot6n EXPRESS (Expreso) es presionado, se agregarc_n 30 segundos a cualquiercuenta regresiva de tiempo de cocci6n, hasta que el tiempo de cocci6n maximo sea alcanzado.
11

Acerca de los funciones de tiempo y microondas de forma autom6ticaDEFROST
0TURN TO SELECTPUSH TO ENTER
0
DescongdaciSn por TiempoUseTime Defrost (Descongelaci6n por Tiempo)paradescongelar durante un periodo de tiemposeleccionado.
U Presioneel bot6n DEFROST (Descongelafl.
Gire el dial para seleccionar el tiempo quedesee. Presione el dial para ingresar.
i resione el bot6n START/PAUSE (Inieiar/Pausafl para iniciar la descongelaci6n.
_]_D_ vuelta la comida si el homo da la sehalTURN FOODOVER (Dar Vuelta la Comida).
Elnivel de potencia se configura de formaautom@ica en 3, peru se puede cambiar. Puededescongelar productos pequeBos de formarc_pida,incrementando el nivel de potencia luegode ingresar el tiempo. Power level 7 (Nivel depotencia 7) reduce el tiempo de descongelaci6ntotal apro×imadamente a la mitad; power level10 (nivel de potencia 101reduce el tiempo totala apro×imadamente 1/3. Sin embargo, serc_necesario prestar mayor atenci6n a la comida queIo usual.
Esposible que se escuchen ruidos de golpessecos durante la descongelaci6n. Estoes normalcuando el homo no est(_funcionando en el nivel depotencia High (Alto).
Cansejos para la Descongelaci6n
, Loscomidas congeladas en papel o pl6stico sepodrdn descongelar en el paquete. Lospaquetescerrados se deberdn cortar, perforar o ventilarLUEGOde que la comida se haya descongeladoparcialmente. Losenvases de pl6stico se deber6ndescubriren forma parcial.
, Las comidas de tamaho familiarpreempaquetadas se podrc_ndescongelar ycocinar. Si la comida se encuentra en el envasede papel de aluminio, traslade la misma a unplato para uso seguro en el homo microondas.
,Las comidas que se echan a perder confacilidad no se deberc_ndejar reposar pot mc_sde una hora luego de la descongelaci6n. Latemperatura ambiente estimula eldesarrollo debacterias nocivas.
Para una descongelaci6n mc_spareja decomidas mc_sgrandes, tales como asado, useAuto Defrost (Descongelaci6n Autom6tica).Aseg0rese de que las cames queden totalmentedescongeladas antes de cocinar.
Una vez descongelada, la comida deberia estarfr[a peru ablandada en todas las @eas. SiaSnestc_un poco congelada, vuelva a colocarla enel homo microondas muy brevemente, o dejereposar la misma por unos pocos minutos.
DEFROST
0TURN TO SELECTPUSH Tg ENTER
0
Descongelaci6n Autom6tica
UseAuto Defrost (Descongdaci6n Autom4tica)para carnes,ayesy pescado.UseTimeDefrost(Descongelaci6npor Tiempo)para la mayorfa de lasdem6s comidas congeladas.
Auto Defrost (Descangelaci6n Autom6tica)configura autom@icamente los tiempos dedescongelaci6n y niveles de potencia para producirresultados parejos con carnes, ayes y pescados.
Retire la came del paquete y coloque la mismaen el plato para uso seguro en el microondas.
U Presioneel bot6n DEFROST(Deseongelafl dosveces,
Gire el dial al peso de la comida, usando la Gu[ade Conversi6n que figura a la derecha. Porejemplo, dial 1.2 para 1.2 libras (! libra, 3 oz)Presioneel dial para ingresar.
i resione el bot6n STARTIPAUSE(Iniciar/Pausafl para iniciar la descongelaci6n.
D6vuelta la comida si el homo da la sepalTURNFOODOVER(D6 Vuelta la Comida).
Guia de Conversi6n
Si elpeso de la comida se expresa el librasy onzas,los onzasse deberdn convertir a ddcimas (.!) de unalibra.
Peso de la Comida Ingrese el Peso deen Onzas la Comida (d6cimas
de una libra)
!-2 .!
3 .2
4-5 .3
6-7 .4
8 .5
9-10 .6
11 .7
12-13 .8
14-15 .9
12
iiiiiiiiii[_i_
iiiiiiiiii[_i_
Retirelacame descongeladao cubra lospartescalientescon trozos pequeBosde papeldealuminio.
Luegode ladescongelaci6n,la mayoriade loscarnesnecesitanreposardurante Sminutosparacompletar la misma.AIasar durantetiempoprolongadose deberiadejar reposarporunos 30minutos.

Acerca de c6mo cambiar el nivel de potencia. GEAppliances.com
POWER
0TURN TO SELECTPUSH TO ENTER
0
Elnivel de potencia se podr(] ingresar o modificarde form(] inmediata luego de ingresar el tiempopara Time Cook (Cocci6n pot Tiempo), TimeDefrost (Descongelaci6n por Tiempo)o ExpressCook (Cocci6n Expresa). Elnivel de potenciatambi6n se puede modificar durante la cuenta
regresiva.Primero,siga las instrucciones para TimeCook (Cocci6npor Tiempo),Time Defrost(Descongelaci6npor Tiempo) o ExpressCook
_ (Cocci6n Expresa).
i Presioneel bot6n POWER(potencia).Gireel dial en direcci6n de las agujas del relojpara incrementar el nivel de potencia yencontra de las agujas del reloj para reducir el
L_ mismo. Presioneel dial para ingresar.Presioneel bot6n START/PAUSE(Iniciar/Pausadpara iniciar la cocci6n.
Los nivelesde potencia variables suman flexibilidada la cocci6n en el microondas. Los nivelesdepotencia del homo microondas se puedencomparar con las unidades de superficie de unacocina. Cada nivel de potencia le brinda energfa demicroondas un cierto porcentaje del tiempo. ElNivelde Potencia7 es energfa de microondas el 70% deltiempo. ElNivelde Potencia3 es energfa el 30% deltiempo. La mayorfa de las cocciones se baron enHigh (power level 10) (Alto (nivelde potencia 10)),Iocual le brinda el 100% de potencia. Power level 10(Nivelde potencia z0) har6 la cocci6n mds rdpidopero serd necesario revolver,rotar o dar vuelta lacomida con mayor frecuencia. Una configuraci6ninferior hard la cocci6n rods parejay se necesitar6revolvery rotar menos la comida. Algunas comidaspodrdn tener mejor sabor, textura o aspecto si seusa una de las configuraciones inferiores.Useunnivel de potencia inferior al cocinar comidas contendencia a hervir, tales como papas en escalope.
Losper[odos de descanso (cuando los ciclos deenergfa de microondas finalizan)brindan tiempopara que la comida "equipare" o transfiera caloral interior de la comida. Un ejemplo de esto semuestra con el nivel depotencia 3 - el ciclo dedescongelamiento. Si la energia del microondasno finaliz6 el ciclo, la parte externa de lacomida se cocinarc]antes de que el interior est6descongelado.
Estosson algunos ejemplos de usosde diferentesnivelesde potencia:
Alto .tO."Pescado,tocino, verduras, Ifquidos enhervor.
Media-Alto 7: Cocci6n suave de came y ave;cacerolas para horneado y recalentar.
Medio 5".Cocci6n lenta y ablandamiento paraguisados y cortes de carne menos tiernos.
Bqjo 20 3: Descongelar;hervir a fuego lento; platosdelicados.
Caliente .t: Mantener la comida caliente; ablandarla manteca.
13

Acerca de las funciones del microondas con sensor.
Sensor de Humedad
Sensor Features (Funciones del Sensor) detectan la humedad creciente liberada durante la cocci6n. Elhomo ajusta de forma autom_tica el tiempo de cocci6n a diferentes tipos y cantidades de comida.
No use Sensor Features (Funcionesdel Sensor)dos veces seguidas en la misma porci6n de comida;esto podr_ hacer que la comida se sobrecaliente de forma excesiva o que se queme. Si la comida no secocina luego de la cuenta regresiva, use Time Cook(Temporizador de Cocci6n) para adicionar tiempo.
Esesencial contar con envases y cobertores para una rnejor cocci6n con sensor.
Cubierto
Ventilado
Seque los pk]tos de modo queno alteren el funcionamiento delsensor.
_, Siempre use envases para uso seguro en el horno microondas y cubra la mismos con tapas oenvoltorios de pl6stico ventilados. Nunca use envases de pldstico sellados - pueden impedir la salidade vapor y hacer que la comida se sobrecaliente.
Aseg0resede que la parte exterior de los envases de cocci6n y el interior del homo microondasest6n secos antes de colocar comida en el horno. Lasgotas de humedad que se convierten en vaporpueden alterar el funcionamiento del sensor.
COOK
0Cocci6n
Debido a que la mayoria de los envases deben ser cubiertos durante la Cocci6n, esta funci6n es mejorpara comidas que desee cocinar con vapor o que retengan la humedad.
NOTA:No se recomienda el uso del estante de metal con la funci6n Cook (Cocci6n),
ComidasRecomendadas
Una amplia variedad de comidas, incluyendo carnes, pescado y verduras se pueden cocinar usando estafunci6n.
Comidas no recomendadas
Lascomidas que se deben cocinar sin cobertura, las comidas que requieren atenci6n constante, loscomidas que requieren el agregado de ingredientes durante la cocci6n, y las comidas que requieren unaspecto seco o una superficie crujiente no se deber[an cocinar usando esta funci6n. Esmejor utilizar lafunci6n Time Cook (Cocci6npor Tiempo).
14
GEAppliances.cam
TURN TO SELECTPUSH TO ENTER
NOTA: No use esta funci6ndos veces seguidas en lamisma porci6n de comida;esto podrd hacer que lacomida se sobrecalientede forma excesiva.
Cocci6n
U Coloque la comida cubierta en el homo y cierrela puerta. Presioneel bot6n COOK(Cocci6n).Enla pantalla se visualiza SELECTFOODTYPE(SeleccioneelTipo de Comida).
Gireel dialal tipo de comida deseada.Presioneel dial para ingresar.
Para comidas e instrucciones espedficas,consulte la Gufa de Tiposde Comidas con Sensoracontinuaci6n.
Elhomo se inicia de inmediato.
NOTA:Si la puerta fue abierta mientras el controlestaba siendo configurado, cierre la puerta ypresione el bot6n START/PAUSE (Iniciar/Pausedpara comenzar la cocci6n.
Noabra lapuertade/homoantesdequesemuestreel tiempodelacuentaregresiva- elvaporquesaledelhomopuedeafectareldesempehode lacocci6n.Siseabrelapuerta,cierrela mismay presioneSTART/PAUSE(Iniciar/Pausar)deinmediato.
Si se seleccion6 la funci6n de came picada, elhomo podrc_dar la se_al de drenar y revolver lacame. Abra la puerta, drene la came y cierre lapuerta. De ser necesario, presione el bot6n START/PAUSE(Iniciar/Pausafl para reanudar la cocci6n.
Si la comida no se termina de cocinar luego dela cuenta regresiva, use Time Cook (Cocci6n parTiempo) para adicionar tiempo.
Consejos de Cocci6n
, Cuando el homo emite la se_al y el tiempo de lacuenta regresiva es visualizado, se podr5 abrirla puerta para revolver, dar vuelta o girar lacomida. Parareiniciar la cocci6n, cierre la puertay presione START/PAUSE(Iniciar/Paused.
, Haga que la cantidad de comida coincida conel tamaho del envase. Llene los contenedoreshaste par Io menos la mitad.
, AsegOrese de que la parte exterior del envase yel interior del homo est6n secos.
, Si luego de completar el ciclo de Cocci6n lacomida necesita cocci6n adicional,vuelva acolocar la comida en el homo y use TimeCook(Cocci6npar TiempoJpara finalizar la cocci6n.
C6mo Ajustar las Configuraciones Autom6ticadel Homo pare un Tiempo de Cocci6n N6sCorto o Pt6s Largo (No disponible pare todoslos tipos de comidasJ.
Pare sustraer el !0% del tiempo de cocci6n automdtica:
De farina inmediata una vez que el homo se inicie,gire el dial en direcci6n contraria a las agujas delreloj y presione el dial para ingresar.
Paraagregarel !0% del tiempodecocci6nautomdtica:
De forma inmediata una vez que el homo se inicie,gire el dial en direcci6n alas agujas del reloj ypresione eldial para ingresar.
Guie de! Tipo de Comida con Sensor
Porciones TamaSo de la Porci6n Comentarios
Trozos de Polio 1 a 4 2 a 8 Use pescado apaisado, cuadrado o redondo.trozos Cubra con papel para alimentos.
Pescado 1 o 4 4 o 16 oz. Use pescado apaisado, cuadrado o redondo.Cubra con un envoltorio plastico ventilado.
Came Picada - 112 a 2 Ibs. Use redondo para cazuela. Came triturada(Bile, Cerdo, Pavo) en el plato. Cubra con papel para alimentos
o envoltorio de plastico con ventilaci6n.
Papas 1 o 4 112 a 2 Ibs. Perfore la piel con el tenedor. Coloque laspapas en el centro del piso del horno.
Verduras Enlatadas 1 o 4 4 (] 16 oz. Useuna cazuelao recipiente para usa seguroen el microondas. Cubra con una tapa oenvoltorio de plastico con ventilaci6n.
Verdures Frescos 1 o 4 4 e 16 oz. Useuna cazuelao recipiente para usa seguroen el microondas. Agregue 2 cucharadassoperas de agua par cada porci6n. Cubracon una tapa o envoltorio de plastico conventilaci6n.
Verdures Congeladas la4 4a16oz. Useuna cazuelao recipiente para usa seguroen el microondas. Siga las instrucciones delpaquete para agregar agua. Cubra contapa o envoltorio de pldstico con ventilaci6n.
15

Acerca de las funciones del microondas con sensor.Palomitas de Naiz
POPCORN Parausar la funci6n de Popcorn (Palomitasde Maiz): C6mo Ajustar la Configuraci6n Autom_tica de
0Use s61opalornitas de rndzpreernpaquetadas para hornos dernicroondas que pesen entre 1.5 y5.5 onzas.
NOTA: No use esta funciandos veces seguidas en lamisma porcian de comida;esto podrd hacer que lacomida se sobrecalientede forma excesiva oquesequeme.
u Siga las instrucciones del paquete, usandoTime Cook (Cocci6npor Tiempo)si el paquetepesa menos de 1.5onzas o supera las 3.5onzas. Coloque el paquete congelado depalomitas de ma[z en el centro del microondas.
_ resioneel bot6n POPCORN(Palomitas de MaizJuna o dos veces.Elhomo se inicia de inmediato.
Presioneuna vez para una bolsa de palomitas demaiz de tamaflo regular (3.0a 3.5 onzas).
Presionedos para una bolsa de palomitas de maizde tamaflo de refrigerio (!5 a !.75 onzas).
Siabre la puerta mientras se visualiza POPCORN_Palomitas de NaizL aparecerc_un mensajede error. Cierre la puerta, presione OFF/CLEAR_Apagar/ Borrad y comience nuevamente.
Si la comida no se cocina luego de la primeracuenta regresiva, use Time Cook _Cocci6n porTiempo) para adicionar tiempo.
Palomitas de Naiz para Brindar un Tiempo deCocci6n Pl_s Corto o Pl_s Largo
Siencuentra que la marca de palomitas de maizque usa no cocina de mc_so de menos las mismasdeforma consistente,puede sumar o restar entre 20y :SOsegundosal tiempo de preparaci6n [email protected] tiempo:
De forma inmediata una vez que el homo se inicie,gire el dial en contra de las agujas del reloj a 20segundos menos (-)de tiempo de cocci6n. Presioneeldial para ingresar.Girenuevamente para reducirel tiempo de cocci6n otros 10 segundos, totalizando:SOsegundos menos (- - )de tiempo. Presioneel dialpara ingresar.Paraagregar tiempo:
De forma inmediata una vez que el homo se inicie,gire el dial en direcci6n de las agujas del reloj a 20segundos mc_s(+)de tiempo de cocci6n. Presioneeldial para ingresar. Girenuevamente para agregarotros 10 segundos (++),totalizando :SOsegundos detiempo adicional. Presioneel dial para ingresar.
REHEAT
©NOTA: No use esta funcidndos veces seguidas en lamisma porci6n de comida;esto podrd hacer que lacomida se sobrecalientede forma excesiva oquesequeme.
Recalentar
Lafunci6n Reheat (Recalentafl vuelve a calendarlas porciones de comidas cocinadas previamente oun plato con restos de comida.
U Coloque lataza de Ifquidoo comida cubiertaen el homo. PresioneREHEAT(Recalentafl una,dos o tres veces.Elhomo se inicia de inmediato.
Presioneuna vez para 1/2a i taza Ilena.
Presionedos veces para 1 o 2 tazas Ilenas.
Presionetres veces para un plato con restos decomida.
Elhorno emite una seBal cuando se produce
vapory el tiempo restante comienza la cuentaregreslva.
Noabra lapuertadelhomo hastaqueseest6realizandolacuentaregresiva.Sise abre lapuerta,cierrelamismay presioneSTART_lniciaddeinmediato.
Luego de retirar la comida delhomo, revuelva,si esposible,para emparejar la temperatura. Lascomidasrecalentadas podrdn tenet amplias variacionesdetemperatura. Algunas partes dela comida podrdnestar extremadamente calientes.
Si la comida no se cocina Io suficiente luego dela cuenta regresiva, use Time Cook (Cocci6n porTiempo) para adicionar tiempo de recalentamiento.
Algunas Comidas No Recomendadas para Usocon la Funci6n de Recalentamiento
Es mejor usar Time Cook (Cocci6n por Tiempo)para estas comidas:
Productos con pan.
Comidas que se deben recalentar sin estar cubiertas.
Comidas que se deben revolver o girar.
Comidas que deben tener un aspecto seco o unasuperficie crocante luego de recalentar.
C6mo Ajustar las Configuraciones Autom4ticasdel Homo por un Tiempo m(_s Corto o Pl(_sLargo
Para restar el !0% del tiempo de cocci6n automdtica:
De forma inmediata una vez que el homo se inicie,gire el dial en direcci6n contraria a las agujas delreloj y presione el dial para ingresar.
Para sumar el !0% del tiempo de cocci6n automdtica:
De forma inmediata una vez que el homo se inicie,gire el dial en direcci6n a las agujas del reloj ypresione el dial para ingresar.
BEVERAGE
©NOTA:No use esta funcidn
dos vecesseguidas en lamisma porci6n de comida; estopodrd hacer que la comidase sobrecaliente de formaexcesivao que se queme.
16
Bebida
Presioneel bot6n BEVERAGE(Bebidal para calentaruna taza de car6 u otra bebida de entre 8 y 10onzas. Elhomo se inicia de inmediato.
Las bebidas calentadas con la funci6n Beverage(Bebidal pueden quedar may calientes. Retire elenvase con cuidado.
Si la comida no se cocina luego de la cuentaregresiva, use Time Cook (Cocci6n por TiempoJpara adicionar tiempo.

Sobre lus funciones de convecci6n. GEApUi°nce .co
La cocci6n por convecci6n utiliza un elemento para calentar que eleva la temperatura del aire dentro delhomo. Sepuede configurar cualquier temperatura del homo entre 2250Fy 4500F.Normalmente circulaun ventilador que expulsa aire caliente hacia todo el homo, sobre y alrededor de la comida, haciendo quela parte exterior se dore y que la parte interior sea rica y h0meda.
Debido a que elaire calientese mueve enforma constante, evitando quese desarrolle una capa de aire m@sfrb alrededor de la comida, algunascomidas secocinan mc_srapidoqueen coccionescon hornos normales.
Para conocer la informaci6n sobre los utensilios de cocina sugeridos, Consulte la secci6n de Consejosde Utensilios de Cocina.
Para Obtener Nejores Resultados...
Siempre use elestante al cocinar por convecci6n.
Reduzca la temperatura del paquete/receta en 250 F para productos horneados.
Serequiere el estante para una buena circulaci6n de aire y un dorado parejo.
Para conocer la informaci6n sobre los utensilios de cocina sugeridos, Consulte la secci6n de Consejosde Utensilios de Cocina.
CONVECTION
0TURN TO SELECT
PUSH TO ENTER
0Cocci6n por Convecci6n por Tiempo con Precalentamiento
U Presione el bot6n Convection (Convecci6n). El Una vez que el homo est6 precalentado,emitir_ una sehal. Si no abre la puerta dentro
Gireel dial para configurar la temperatura de la hora, el homo se apagard de formadel homo y presione el dial para ingresar el [email protected]. No ingrese la cocci6n porconvecci6n ahora. (Eltiempo de cocci6n serc_ mingresado mc_starde, luego de que el homo sehaya precalentado). Im
Presioneel bot6n START/PAUSE(Iniciar/ JIMm Pausad para iniciar el precalentamiento.
Abra la puerta del homo y, con cuidado,coloque la comida en el mismo.
Cierre la puerta del horno. Gireel dial paraconfigurar el tiempo de cocci6n y presioneSTART/PAUSEtlniciur/Paused para iniciar lacocci6n
_Una vez completada la cocci6n, el homoemitira una sehal y se apagar&
CONVECTION
0TURN TO SELECT
PUSH TO ENTER
0Cocci6n por Convecci6n por Tiempo sin Precalentamiento
U Si la receta no requiere un precalentamiento, _ Gire el dial para configurar el tiempo de cocci6npresione el bot6n Convection (Convecci6n). ,m Y presione el dial para ingresar.
Gire el dial para configurar la temperatura del E! Presione el bot6n START/PAUSE (Iniciar/homo y presione el dial para ingresar, m Pausar) para iniciar el homo.
17
Acerca de las funciones en combinaci6n.
Combination Cooking (Cocci6n en Combinaci6n) ofrece las mejores funciones de cocci6n con energia demicroondas y de convecci6n. Las microondas cocinan la comida r_pido y la circulaci6n de la convecci6nde aire caliente dora las comidas de forma maravillosa. Se puede configurar cualquier temperatura delhomo entre 2250Fy 4500 F.
Para Obtener Mejores Resultados...
Siempre use el estante al cocinar en combinaci6n.
Serequiere el estante para una buena circulaci6n de aire y un dorado parejo.
Para conocer la informaci6n sobre los utensilios de cocina sugeridos, consulte la secci6n de Consejosde Utensilios de Cocina.
COMBINATION
0TURN TO SELECT
PUSH TO ENTER
0Cocci6n en Combinaci6n pot Tiempo con Precalentamiento
U Presioneel bot6n COMBINATION(Combinaci6n).
Gireel dial para configurar la temperaturadel homo y presione el dial para ingresar elprecalentamiento. No ingrese la cocci6n encornbinaci6n ahora. (Eltiempo de cocci6n ser_ingresado rn_s tarde, luego de que el homo se
haya precalentado)i Presioneel bot6n START/PAUSEflniciar/
Pausafl para iniciar el precalentamiento.
Una vez qua el homo est6 precalentado,emitir@una sehal.Sino abre la puerta dentrode la hora, el homo se apagarc_de formaautom@tica.
Abra la puerta del horno y, con cuidado,coloque la comida en el mismo.
Cierre la puerta del horno. Gireel dial paraconfigurar la temperatura del homo y presioneel dial para ingresar. Presioneel bot6n START/PAUSEflnidar/Pausar) para iniciar la cocci6n.
_Una vez completada la cocci6n, el hornoemitird una sepal y se apagar&
COMBINATION
0TURN TO SELECT
PUSH TO ENTER
0Cocci6n en Combinaci6n por Tiempo sin Precalentamiento
Si la receta no requiere un precalentamiento,presione el bot6n COMBINATION_EnCombinaci6n),
Gireel dial para configurar la temperatura delhomo y presione eldial para ingresar.
Gireel dial para configurar el tiempo decocci6n y presione el dial para ingresar.
Lmjpresione el bot6n START/PAUSE(Iniciar/Paused para iniciar el homo.
NOTA:
, Con algunas recetas se requiere elprecalentamiento.
, Controle la secci6n Cookware Tips (Consejossobre Utensiliosde Cocina)para un uso delutensilio correcto con la funci6n CombinationCooking (Cocci6nen Combinaci6n).
, No use utensilios de cocina metc_licoscon lafunci6n Combination Cooking (Cocci6n enCombinaci6n).
, Coloque carne en un salvamanteles en unplato de vidrio para recolectar Iosjugos y evitarsalpicaduras.
, Para mejores resultados de asado y dorado, losasados completos se deberian cocinar en unplato de vidrio colocado directamente sobre elestante del horno.
, Encaso de cocinar comidas demasiado altaspara el homo, puede dejar el salvamantelesafuera. De ser necesario, puede retirar el estantey colocar el plato directamente en el platogiratorio.
18

consejossobreUtensiliosdeCocina.
Cocci6n por Convecci6n
Se recomienda el uso de Cacerolas Met_licas para todos los tipos de productos horneados, peroespecialmente cuando sea importante que la comida quede dorada o crujiente.
Las cacerolas met61icas oscuras o sin brillo son mejores para panes y tartas, ya que absorben elcalory producen una corteza m6s crocante.
Las cacerolas de aluminio brillante son mejores para tortas, galletas o panecillos, ya que reflejan elcalor y ayudan a producir una corteza liviana y suave.
Las cacerolas de Vidrio o Vidrio Cer(Tmico o los platos de cazuela u horneado son mejores pararecetas con huevo y queso, debido a la fadlidad para limpiar el viddo.
Cocci6n en Combinaci6n
Serecomienda el usa de envases para horneado de Vidrio o Vidrio Cer(_mico. AsegOresede no usarart[culos con bordes met61icos,ya que pueden ocasionar arcos el6ctricos (chispas)sobre la pared o elestante del homo, dahando el utensilio de cocina, el estante o el horno.
Se puede utilizar un utensilio de cocina para microondas Pl4stico y Resistente el Calor (seguroa 450°F), pero no se recomienda su uso con comidas donde se requiera que queden crujientes odoradas todo alrededor, ya que el pl6stico no es un buen conductor de calor.
i lio _ Microondas Convecci6n Combinaci6n
Vidrio Resistente al Calor, Vidrio Cer6mica Si Si Si(Pyrex ®,Fire King ®,Coming Ware ®,etcJ
Metal No Si No
Vidrio No Resistente el Calor No No No
Pl(_sticos Seguros para Microondas S[ No S[_
Peliculas y Envoltorios de Pl_stico S[ No No
Productos de Papal S[ No No
Paja, Mimbre y Madera Si
_Use s61outensilios de cocina paro microondas que sean seguros a 450° F.
No No
19
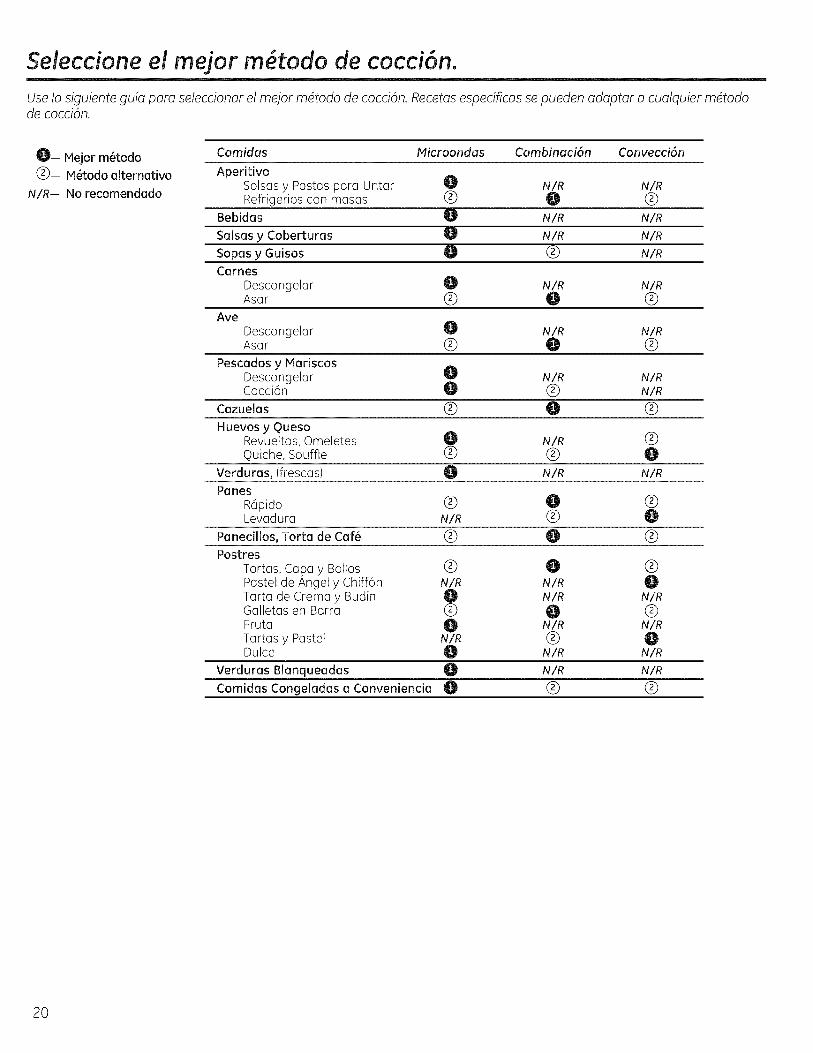
Seleccione el mejor m todo de cocci6n.Use la siguiente guia para seleccionar el mejor mdtodo de cocci@. Recetas espedficas se pueden adaptar a cualquier mdtodode cocci@.
_- Hejor m_todo_-- M_todo alternativo
N/R-- No recomendado
Comidos Microondos Combinoci6n Convecci6n
AperitivoSalsas y Pastas para Untar 0 N/R N/RRefrigerios con masas (_ 0 (2)
Bebidas _ N/R N/R
Salsas y Coberturas Q N/R N/R
Sopas y Gulsos _ (_ N/R
CarnesDescongelar _ N/R N/RAsar (_ @ (_)
Ave
Descongelar _ N/R N/RAsar (_ @ (_)
Pescados y MariscosDescongelar _ N/R N/RCocci6n _ (_ N/R
Cazuelas (_ _ (_
Huevos y QuesoRevueltos, Omeletes _ N/R (_Quiche, Souffle (_ (_
Verduras, (frescas) _ N/R N/RPanes
R_pido (_ _ (_Levadura N/R (_
Panecillos, Torta de Caf_ Q _ Q
PostresTortas, Capa y Bollos (_ _ (_Pastel de Angel y Chiff6n N/R N/RTarta de Crema y Bud[n _ N/R N/RGalletas en Barra Q _ (_Fruta _ N/R N/RTartas y Pastel N/R (_Dulce _ N/R N/R
Verduras Blanqueadas _ N/R N/R
Comidas Congeladas a Conveniencia _!_ (_ (_
20

Acerca del testa de las funciones. GEApUioncos.com
Recordatorio de Cocci6n Completa
Para recordarle que coloc6 comida en el homo,este Oltimo mostrar6 YOUR FOOD IS READY (SuComida Est6 Preparada) y emitira un pitido una
vez por minuto hasta que abra el homo o presioneel bot6n OFF/CLEAR(Apagar/ Borrar).
CLOCK
©TURN TO SELECT
PUSH TO ENTER
Reloj
Presione para ingresar al hora del dia o paracompletar la hora del dia mientras cocina.
U Presione el bot6n CLOCK (Reloj).
Gire el dial para configurar las horas. Presioneel dial para ingresar.
Gireel dial para configurar los minutos.Presioneeldial para ingresar.
JL_Gire el dial para seleccionar AM o PM.Presioneel dial para ingresar.
_ resione el bot6n START/PAUSE(Iniciar/Pausafl para iniciar el reloj.
TIMER
©TURN TO SELECT
PUSH TO ENTER
Temporizador
El temporizador funciona como un temporizadorpor minutos y puede ser usado en cualquiermomento, incluso cuando el homo estafuncionando.
U Presioneel bot6n TIMER(Temporizadafl.
Gireel dial para seleccionar los minutos.Presioneeldial para ingresar.
I Gireel dial seleccionar lospara segundos.Presioneeldial para ingresar.
JL_ presione TIMER(Temparizadafl iniciar.para
Para pausar, presione TIMER(Temporizadofl.Para reiniciar, presione TIMER(Temporizadoflnuevamente.
Para cancelar, mantenga presionado el bot6nTIMER (Temporizadofl durante 2 segundos.
Cuando el tiempo concluya, el temporizadoremitirc_ una sehal. Para apagar la sehal deltemporizador, presione TIMER (Temporizador).
NOTA:El indicador de tiempo se iluminard mientrasel temporizador estd funcionando.
START
©PAUSE
Iniciar/ Pausar
Adem6s de iniciar muchas funciones, START/PAUSE(Iniciar/Pausafl le permite dejar de cocinarsin abrir la puerta ni borrar la pantalla.
OFF
©CLEAR
Apagar/ Borrar
Presioneel bot6n OFF/CLEAR(Apagar/Borrar)para detener y cancelar la cocci6n en cualquiermomento.
OFF
©CLEAR
Bloqueo del Controlpuede bloquear el panel de control para evitar queel homo se inicie de forma accidental o sea usadopor ni_os.
Para bloquear o desbloquear los controles,mantenga presionado el bot6n OFF/CLEAR(Apagar/Borrar) durante unos tres segundos.Cuando el panel de control estc_bloqueado,aparecerc_CONTROLLOCKED(ControlBloqueado)brevemente en cualquier momento en que unbot6n o dial sean presionados.
21
Acerca dd resto de las fundones.
OPTIONS
0TURN TO SELECT
PUSH TO ENTER
0
Volumen del Pitido
Elnivel de sonido del pitido se puede ajustar.Presioneel bot6n OPTIONS(Opciones)una vezy gire el dial para seleccionar de mudo a fuerte.Presioneel dial para ingresar.
OPTIONS
0TURN TO SELECT
PUSH TO ENTER
Pantalla ON/OFF (Encender/ Apagafl
Useesta funci6n para encender o apagar lavisualizaci6n del reloj. Presioneel bot6n OPTIONS_Opcioneg dos veces y gire el dial para seleccionarON [Encended u OFF[Apagad. Presioneel dial paraingresar.
OPTIONS
0TURN TO SELECT
PUSH TO ENTER
Velocidad de la Pantalla
Lavelocidad de desplazamiento de la pantallase puede modificar. Presioneel bot6n OPTIONS(Opciones)tres veces y gire el dial para seleccionardel nivel mc_slento al mds rdpido. Presioneeldialpara ingresar.
22

T6rminos del Microondas.
Definici6n
ArcoEl_ctrico Arco el6ctrico es el t@mino que se usa para definir la producci6n de chispas en el horno microondas. Los
arcose 6ctr cossonproduc dospor:la instalaci6n incorrecta del estante de metal yen contacto con las paredes del microondas.
metal o papel de aluminio en contacto con el costado del homo.
papel de aluminio no moldeado a la comida (los extremos doblados actQancomo antenas).
metales, tales como precintos, pinchos de ave, o platos con rebordes dorados.
, toallas de papel reciclable que contengan pequehos trozos de metal.
Coberturo Cubre la humedad acumulada, permite calentar de forma m6s pareja y reduce el tiempo de cocci6n. Ventilarenvoltorios de pl6stico o tapas con papel para alimentos permite la salida de vapor excesivo.
Escudo En un homo normal, se cubren las pechugas de polio o comidas asadas para evitar que se doren en exceso........... AI cocinar en el homo microondas, deber6 usar peque_as tiras de papel de aluminio para cubrir paces
...... peque_as, tales como puntas de alas y patas de ayes,que se podrian cocinar antes que las paces grandes
AI cocinar con hornos regulares, las comidas asadas o las tortas se pueden dejar basra finalizar la cocci6n o elEspere .......... tiempo programado. Eltiempo en espera es especialmente importante en la cocci6n en el homo microondas....... Sedebe observar que una torta cocinada en un homo microondas no se coloca en un estante de refrigeraci6n.
Vendleci6n Luego de cubrir un plato con un envoltorio pl6stico, este 01timose ventila dando vuelta un extremo de modo...... tal que el exceso de vapor pueda salir.
23

Cuidado y limpieza del homo.
consejos Otiles
Una limpieza completa de forma ocasional con una soluci6n de bicarbonato y agua mantiene el interiorfresco.
Desenchufe el cable antes de limpiar cualquier parte del homo.
C6mo Limpiar el Interior
Puredes, Piso,Ventuna Interior, PaRes Net_licas y Pl_sticas de la Puerta
Algunas salpicaduras se pueden eliminar con una toalla de papel; otras pueden requerir una tela hOmeda.Eliminesalpicaduras de grasa con una tela con jab6n, y luego enjuague con una tela hOmeda.No uselimpiadores abrasivos ni utensilios puntiagudos sabre las paredes del homo.
Pare limpiar la supefficie de la puerta y la supefficie del homo que se unen al cerrar, use s61ojabones suaves y no dsperos o detergentes con una esponja o tela suave. Enjuague con una telah_meda y seca.
Nunca use un limpiador paro homos comerciales en ninguna pare de su homo microondas.
Plato Giratorio y Soporte Giratorio Extraibles
Para evitar roturas, no coloque el plato giratorio en agua luego de cocinar. Lave el mismocuidadosamente con agua tibia yjab6n o en el lavavajillas. Elplato giratorio y el soporte se puedenromper en caso de ca[da. Recuerde que no se debe usar el homo si el plato giratorio y el soporte no seencuentran en su lugar.
C6mo Limpiar el/_rea Exterior
No use limpiadores que contengan amoniacos o alcohol en el homo microondas. Elamoniaco o elalcohol pueden da_ar el aspecto de/homo microondas.
Cubierta Superior
Limpieel @ea exterior del homo microondas con una tela conjab6n. Enjuague con una tela h0meda yluego seque. Limpie la ventana con una tela hOmeda.
Panel de Control y Puerta
Limpie con una tela h0meda. Seque totalmente. No use esprSis limpiadores, grandes cantidades de aguayjab6n, objetos abrasivos o puntiagudos sabre el panel, ya que Io pueden dahar. Algunas toallas de papeltambi6n pueden rayar el panel de control.
Superficie de la Puerta
Esimportante mantener el 5rea limpia donde la puerta se selle contra el homo microondas. Use s61odetergentes suaves y no abrasivos con una esponja limpia o tela suave. Enjuague bien.
Cable de Corriente
Si el cable se ensucia, desenchufe y lave con una tela h6meda. En caso de manchas dif[ciles de quitar, sepodr6 usar agua con jab6n, pero aseg6rese de enjuagar con una tela h0meda y de secar completamenteantes de conectar el cable en el tomacorriente.
24

GEAppliances.com
Acero Ino×idable
No use virutas de acero; 6stas rayar6n lasuperficie.
Para limpiar superficies de acero inoxidable, useuna tela caliente y hOmedacon un detergentesuave adecuado para superficies de aceroinoxidable. Useuna tela limpia, caliente y hOmedapara eliminar eljab6n. Sequecon una tela limpia yseca.
Si la suciedad de la comida permanece, intenteusar un limpiador de cocina general, tal comaFantastik? Simple Green®oFormula 409?
Sise trata de suciedad dif[cil de quitar, use unlimpiador de acero inoxidable est6ndar, tal comaBon-Ami®o Cameo®.
Aplique un limpiador con una esponja h0meda. Useuna tela limpia, caliente y h0meda para eliminarel limpiador. Sequecon una tela limpia y seca.Siempre friegue la superficie en la direcci6n delveteado.
Luego de limpiar, use un pulidor para aceroinoxidable, tal como StainlessSteel Magic?RevereCopper and StainlessSteel Cleaner®oWenolAll PurposeMetal Polish?Sigalas instruccionesdel producto para limpiar la superficie de aceroinoxidable.
25

Antes de Solicitor el Servicio T cnico...
Consejos pare la Soluci4n de ProblemasiAhorre tiempo y dinero! Primero revise los cuadros queaparecen en los siguientes pdginas y es posible que nonecesite solicitar repamciones.
Elhomo no se inicio
Causas Posibles Qu@ Hacer
Es posible que un fusible de suhogar se haya quemado o que eldisyuntor se haya desconectado.
Pico de tensi6n.
El enchufe no est6 totalmenteinsertado en el tomacorriente.
• Reemplaceel fusible o reinicie el disyuntor.
Desenchufeel homo microondas; luegovuelva a enchufarlo.
Aseg0resede que el cable de 3 patas del homo est6completamente insertado en el tomacorriente.
La puerta no est6 cerradade forma segura
, Abra la puerta y cierre la misma de forma segura.
Elpanel de control est6iluminado, pero el homoa_n no se inicia
La puerta no est6 cerradade forma segura
Abra la puerta y cierre la misma de forma segura.
El bot6n START(Iniciar) no sepresion6 luego de ingresarla selecci6n de la cocci6n.
• Presione START (Iniciar).
Otra selecci6nya ingresada enel homo y el bot6n CLEAR/OFF(Borrar/Apagar) no se presionaronpara cancelar la misma.
• PresioneOFF/CLEAR(Apagar/Borrad.
El tiempo de cocci6nno se ingres6, Aseg0resede haber ingresadoel tiempo de cocci6n luegoluego de presionar TIME COOK. de presionar TIMECOOK(Cocci6n con Temporizador).(Tiempo de Cocci6n).
Sepresion6 OFF/CLEAR(Apagar/Borrar) de formaaccidental.
• Reinicieel programa de cocci6n y presione START(Iniciad.
Peso de la comida no ingresadoluego de seleccionarAUTODEFROST(Descongelaci6n Autom_tica).
TOo de comida no ingresad9 luegode presionar COOK(COCClONL
Aseg0resede haber ingresado el peso de la comida luegode seleccionar AUTO DEFROST(Auto Descongelaci6nL
, Aseg0resede haber ingresado un tipo de comida.
CONTROL LOCKED
(Bloqueo del Control)aparece en la pantalla
CAUTION--OVEN HOT(Precauci6n - HomoCafiente) aparece enen la pantalla
El controlrue bloqueado. , Hantengapresionado OFF/CLEAR(Apagar/Canceladpor unos tres segundos para desbloquear el control.
La temperature dentro del homo ,, Esto es normal.es superior a 200 ° F.
Una de los teclas de cocci6n consensor rue presionada cuandola temperatura dentro del homoera superior a 200° F.
,Estas funciones no actuaran cuando el horno est6 caliente.
26

GEAppliances.com
Cosas que son Normales de su Horno Microondas
Vapor que sale alrededor de la puerta.
Reflejode luzalrededor de la puerta o cubiertaexterior.
Luzdel horno tenue y cambio del sonido delpitido en nivelesde potencia que no son altos.
Ruidode golpes secos mientras el horno esta enfuncionamiento.
, Sepodr@nobservar interferencias deTV/radiomientras usa el homo microondas. Deformasimilar a la interferencia causada por otroselectrodom6sticos pequehos,esto no indica queexista un problema con el homo microondas.Enchufe el horno microondas en un circuitoel@ctricodiferente, aleje la radio o la TVtantocomo sea posible del homo microondas, ocontrole la posici6ny la sehal de la antena de laTV/radio.
27

Notas.
28

Notas. GEAppliances.com
29

Notas.
30
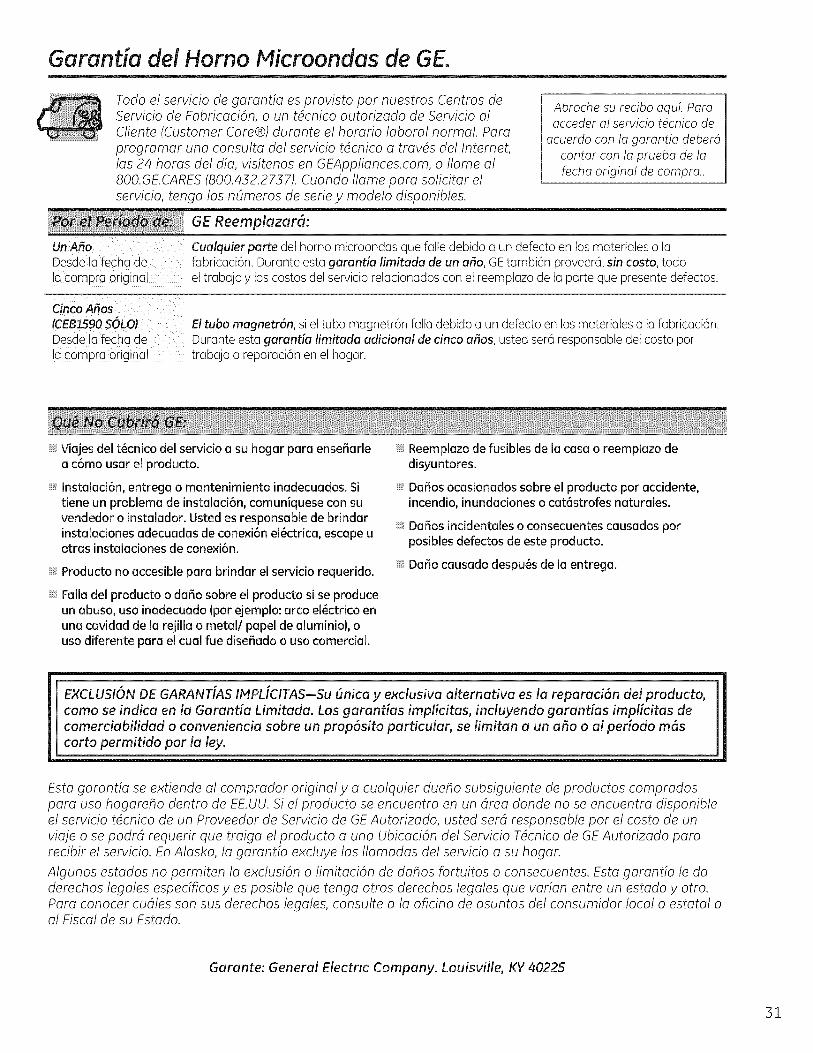
Guruntiu del Horno Microondus de GE.
Todo el servicio de garantio es provisto par nuestros Centros deServicio de Fobricoci6n, o un t_cnico outorizodo de Servicio olCliente (Customer Core®) duronte el horatio laborol normal. Poroprogromor uno consulto del servicio t_cnico o troves del Intemet,los 24 horos del dio, visitenos en GEAppliances.com, o llama ol800.GE.CARE5 (800.432.2737). Cuondo llama paro solicitor elservicio, tengo los nOmeros de serie y modelo disponibles.
Abroche su recibo aquL Paraacceder al servicio tdcnico de
acuerdo con la garantfa deberdcontar con la prueba de lafecha original de compra..
GE Reemplazar_:
Un Aria Cualquierparte del homo microondas que falle debido a un defecto en los materiales o laDesdelafecha de fabricaci6n. Durante estagaranda limitada de un aria, GEtambi6n proveerc_,sin costa, todoa compra original el trabajo y los costos del servicio relacionados con el reemplazo de la parte que presente defectos.
Cinco Arias_CEB1590SOLOJDesdelafecha dea cam pra original
El tuba magnetr6n, si el tuba magnetr6n falla debido a un defecto en los materiales o lafabricaci6n.Durante esta garantia limitada adicianal de cinca arias, usted sera responsable del costa partrabajo o reparaci6n en el hogar.
, Viajes del t6cnico del servicio a su hogar para ensefarlea c6mo usar el producto.
, Instalaci6n, entrega o mantenimiento inadecuados. Sitiene un problema de instalaci6n, comuniquese con suvendedor o instalador. Usted es responsable de brindarinstalaciones adecuadas de conexi6n el6ctrica, escape uotras instalaciones de conexi6n.
, Producto no accesible para brindar el servicio requerido.
, Falla del producto o daffo sabre el producto si se produceun abuso, usa inadecuado (par ejemplo: area el6ctrico enuna cavidad de la rejilla o metal/papal de aluminio}, ousa diferente para el cual rue diseffado o usa comerdal.
, Reemplazo de fusibles de la casa o reemplazo dedisyuntores.
, Dafios ocasionadossabre el producto par acddente,incendio, inundadones o cat6strofes naturales.
Dafos incidentales o consecuentes causados parposibles defectos de este producto.
, Dafo causado despu6s de la entrega.
EXCLUSION DE GARANT[AS IMPL[CITAS--Su (mica y exclusiva alternativa es la reparaci6n del producto,coma se indica en la Garantia Limitada. Las garantias impffcitas, incluyendo garantias implicitas decomerciabilidad o conveniencia sabre un prop6sito particular, se limitan a un aria o al periodo m6scorto permitido par la lay.
Esto garontio se extiende ol comprodor original y a cualquier dueho subsiguiente de productos comprodosporo usa hogoreho dentro de EE.UU. Si el producto se encuentro en undrea donde no se encuentro disponibleel servicio t_cnico de un Proveedor de Servicio de GEAutorizodo, usted serd responsoble par el costa de unviqje o se podrd requerir qua troigo el producto o uno Ubicaci6n del Servicio T_cnico de GE Autorizodo pororecibir el servicio. En Alaska, la gorontio excluye los Ilomodas del servicio o su hogar.
Algunos estodos no permiten Io exclusi6n o limitaci6n de dohos fortuitos o consecuentes. Esto gorontio le doderechos legales espedficos yes posible qua tengo arras derechos legales qua vorion entre un estodo y otto.Poro conocer cudles son sus derechos legoles, consulte o Io oficino de osuntos del consumidor local o estotol ool Fiscal de su Estodo.
Garante: General Electric Company. Louisville, KY 40225
31

Soporte a! Cliente.
Sitio Web de ElectrodomdsticosGE GEAppliances.com
_LDesearealizar una consulta o necesita ayuda con su electrodom6stico? ilntente a trav6s del Sitio Web deElectrodom6sticos de GElas 24 horas del dia, cualquier dia del aflo! Para mayor conveniencia y un servicio mc_src_pido,ahora puede descargar el Manual del Propietario,ordenar piezaso incluso programar el servicio t6cnicoa trav6s de Internet.
Programaci6n del Servicio Tdcnico GEAppliances.camElservicio de reparaci6n de expertos de GEestc_a s61oun paso de su puerta, jCon6ctesea trav6s de Internety programe el servicio t6cnico a su conveniencia las 24 horas del dia cualquier dia del aflo! O Ilame a1800.GECARES(800.432.2737)durante el horario comercial habitual.
Estudiode Disehode la Vida Real GEAppliances.com
GEapoya el concepto de Disefio Universal - productos, serviciosy ambientes que pueden ser usados porpersonas de todas las edades, tamaflos y capacidades. Reconocemos la necesidad de realizar diseflos parauna amplia gama de habilidades e incapacidades fisicas y mentales. Paramc_sdetalles sobre las aplicacionesde Diseflo Universal de GE,incluyendo ideas de diseflo de cocinas para personas con incapacidades,visitenuestro sitio web hoy.Sobre casos de incapacidad auditiva, comuniquese a1800.TDD.GEAC(800.833.4322).
Garantias Extendidas GEAppliances.com
Adquiera una garantia extendida de GEy aprenda sobre descuentos especiales que est@ndisponibles mientrassu garantia a0n estd vigente. La puede adquirir a trav6s de Internet en cualquier momento o Ilamando al800.626.2224durante el horario comercial habitual. LosServicios para el Consumidor Hogarefio de GEa0nestardn alli cuando su garantia caduque.
Piezasy Accesorios GEAppliances.comIndividuos calificados para realizar el servicio t6cnico de sus propios electrodom6sticos podrc_n solicitar elenv[o de piezas o accesorios directamente a sus hogares (se aceptan las tarjetas VISA,klasterCard y Discover).Ordene hoy a trav6s de Internet, las 24 horas del d[a o en forma telef6nica Ilamando a1800.626.2002, durante elhorario comercial habitual.
Las instruccianes que figuran en este manual cubren los procedimientas que ser6n realizadas par cualquier
usuafio. Otros servicios t6cnicos generalmente deberian ser defivados a personal calificado del servicio. Sedeber6 tenet cuidado, ya que una reparaci6n indebida podr6 ocasionar que el funcionamiento no sea seguro.
LLdmenos GEAppliances.com
si no se encuentra satisfecho con el servicio que recibi6 de GE,comun[quese con nosotros a trav6s de nuestrositio web con todos los detalles, incluyendo su n0mero telef6nico, o escriba a: Manager, Customer Relations
GEAppliances,Appliance ParkLouisville,KY40225
Registre Su Electrodomdstico GEAppliances.comRegistre su electradom6stico nuevo a tray,s de Internet - ia su conveniencia! Un registro puntual de suproducto permitirc_ una mejor comunicaci6n y un servicio mc_spuntual de acuerdo con los t6rminos de sugarantia, en caso de surgir la necesidad, mambi6n puede enviar una carta en la tarjeta de inscripci6n pre-impresa que se incluye con el material embalado.
3 2 Impreso en Corea