Embed Size (px)
Citation preview

7/28/2019 GEN II NXT G Simple Soccer Player_0
http://slidepdf.com/reader/full/gen-ii-nxt-g-simple-soccer-player0 1/8
RoboCup Junior Australia Inc Copyright 2011 1
GEN II Robot Soccer
NXT-G
Training Curriculum
(for pulsed ball)
Brian Thomas
**LEGO, Mindstorms and Robolab are Registered Trademarks of the LEGO Corporation

7/28/2019 GEN II NXT G Simple Soccer Player_0
http://slidepdf.com/reader/full/gen-ii-nxt-g-simple-soccer-player0 2/8
RoboCup Junior Australia Inc Copyright 2011 2
Finding the Ball: The Mexican Wave
OverviewThe first part of playing any ball game is to find and chase the ball. This unit allows your
robot to chase the ball when it is in front of the robot.
If you get all of the robots in the class, you can create a Mexican wave of robots.It is assumed that you have some prior knowledge of programming.
Robot SetupAll that you need is motors plugged into outputs A and C and the IR V2 Sensor plugged into
Sensor Port 1.
You will also need to download the IR V2 tile. Just go to
http://www.hitechnic.com/downloadnew.php?category=13 and follow the instructions.
Programming
Create the following simple program that will allow you to check that everything is working
OK.
In this program the IR Seeker is just waiting for a reading from the ball and then the robot
will be told to move forward
The Wait(egg timer) icon should be set to IR Seeker V2 Sensor plugged into Port1. The
Mode should be set to AC(pulsed)
The motor icon is set to Inputs A and C, Power level 100% and Duration 1 second.

7/28/2019 GEN II NXT G Simple Soccer Player_0
http://slidepdf.com/reader/full/gen-ii-nxt-g-simple-soccer-player0 3/8
RoboCup Junior Australia Inc Copyright 2011 3
Save this program as MW. Download this to your robot. Push the orange button on the NXT 3
times until the MW Run file appears.
Place all of the class robots with their backs to the classroom wall
• Push The Orange Button on the robots.
• Nothing should happen.
• The teacher will turn the ball on and roll the ball across the classroom.
• Did you get a Mexican Wave?
• Try rolling the ball further away from the robots. Which robot has the best range?
NotesThe pulsed ball has an incredible range and also can be sensed by reflection off walls.
Experiment with the location of your IR V2 sensor and maybe shield it with black tape toreduce the influence of reflections and still maintain the excellent range.
ExtensionThe IR V2 sensor gives the following readings.
Introduce a Switch into your program to perform the same task, but with a little more
control.
Start by inserting a loop. It will already be set to Unlimited.

7/28/2019 GEN II NXT G Simple Soccer Player_0
http://slidepdf.com/reader/full/gen-ii-nxt-g-simple-soccer-player0 4/8
RoboCup Junior Australia Inc Copyright 2011 4
To get the other tiles, you will need to start with a Complete Palette and then go to the
Advanced Settings to find the IR V2 Sensor Tile
Complete Palette Advanced Settings IR V2 Tile
Then go to Data and Select the Range Tile
Data Range
Select the same setting for the IR V2 as above
Select a range of 4-6 for the Range tile.
Now insert the Switch Tile which can be found next to the Loop Tile in the Flow Palette
Set the Switch to Value and Logic
Use the same Motor Controls as before.
Wire up the Tiles as shown. The drop down controls can be obtained by hovering over the
bottom left hand corner of a tile and then clicking when the drop down tool appears.
Repeat your Mexican Wave. The robots should now only start moving when the ball is directly
in front of them
7/28/2019 GEN II NXT G Simple Soccer Player_0
http://slidepdf.com/reader/full/gen-ii-nxt-g-simple-soccer-player0 5/8
RoboCup Junior Australia Inc Copyright 2011 5
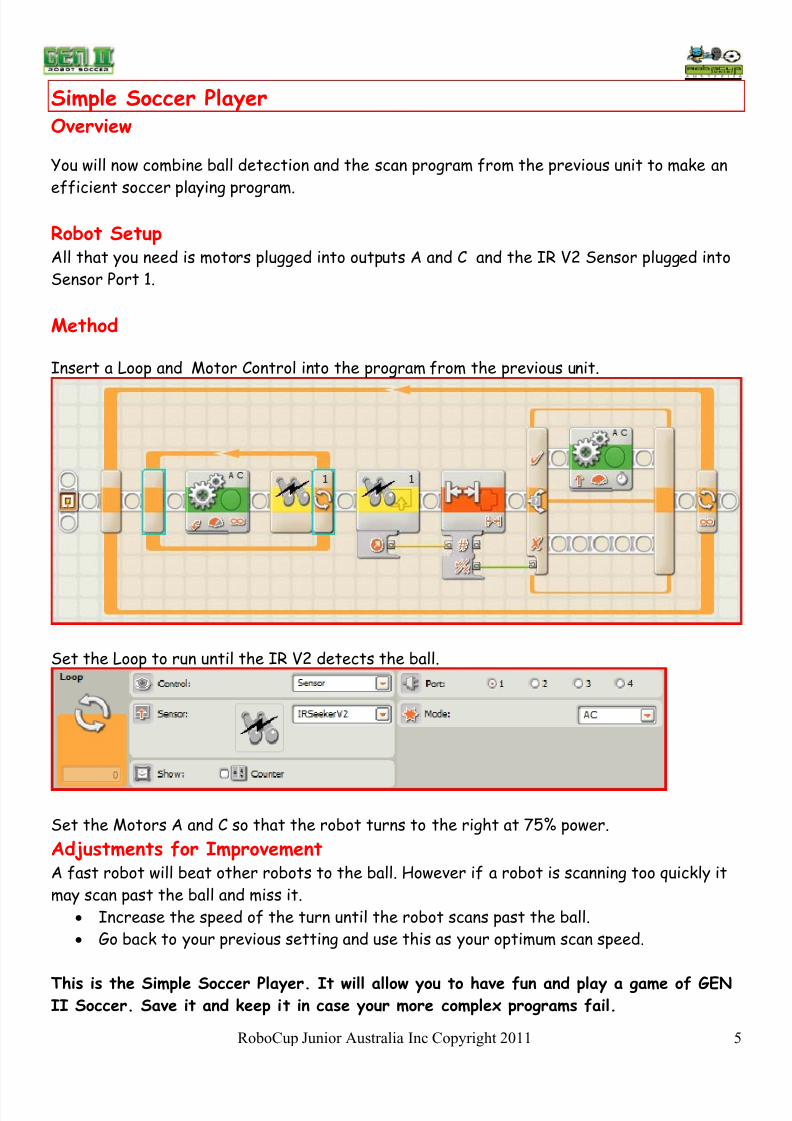
Simple Soccer PlayerOverview
You will now combine ball detection and the scan program from the previous unit to make an
efficient soccer playing program.
Robot SetupAll that you need is motors plugged into outputs A and C and the IR V2 Sensor plugged into
Sensor Port 1.
Method
Insert a Loop and Motor Control into the program from the previous unit.
Set the Loop to run until the IR V2 detects the ball.
Set the Motors A and C so that the robot turns to the right at 75% power.
Adjustments for ImprovementA fast robot will beat other robots to the ball. However if a robot is scanning too quickly it
may scan past the ball and miss it.
• Increase the speed of the turn until the robot scans past the ball.
• Go back to your previous setting and use this as your optimum scan speed.
This is the Simple Soccer Player. It will allow you to have fun and play a game of GENII Soccer. Save it and keep it in case your more complex programs fail.
7/28/2019 GEN II NXT G Simple Soccer Player_0
http://slidepdf.com/reader/full/gen-ii-nxt-g-simple-soccer-player0 6/8
RoboCup Junior Australia Inc Copyright 2011 6
Ball Chase
Overview
You can now use the full facilities offered by the IR V2 to keep the ball under control once you have it, and dribble it down the field.
There are two possible programming options and they both work.
Robot SetupAll that you need is motors plugged into outputs A and C and the IR V2 Sensor plugged into
Sensor Port 1.
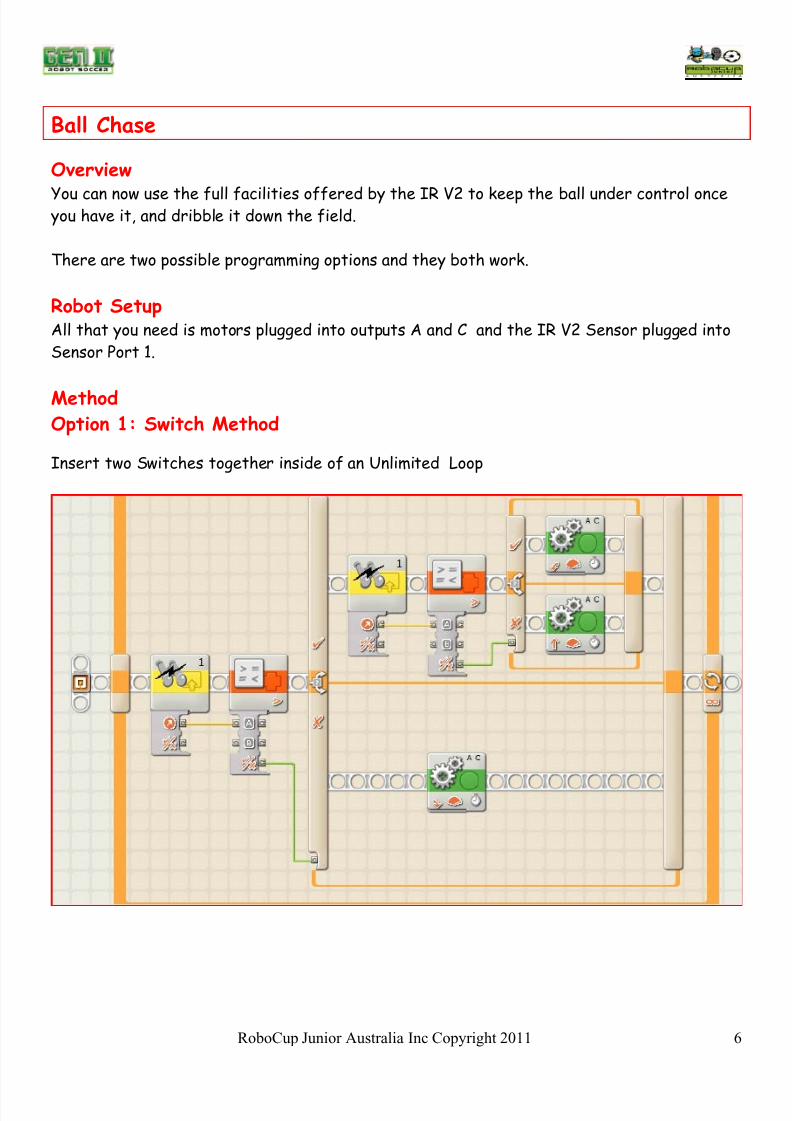
MethodOption 1: Switch Method
Insert two Switches together inside of an Unlimited Loop

7/28/2019 GEN II NXT G Simple Soccer Player_0
http://slidepdf.com/reader/full/gen-ii-nxt-g-simple-soccer-player0 7/8
RoboCup Junior Australia Inc Copyright 2011 7
• Insert the IR V2 Sensor Tile and set is as in the previous unit.
• This time select the Compare Tile from the Data Palette
• For the First Icon select Greater than 3
• For the second Icon select Greater than 6
• Wire up the data ports as shown
• Set the bottom Motor Tile, so that the robot turns left for .2 Seconds and Coast
• Set the top Motor Tile, so that the robot turns right for .2 Seconds and Coast
• Set the middle Motor Tile to forward for 1 Second and Brake.
The robot will now respond to IR V2 readings in the following way.
0-3 Turn Left
4-6 Straight Ahead
7-9 Turn Right
The robot should now scan for the ball if it cannot see it. As soon as it sees the ball it will
chase it down the field.
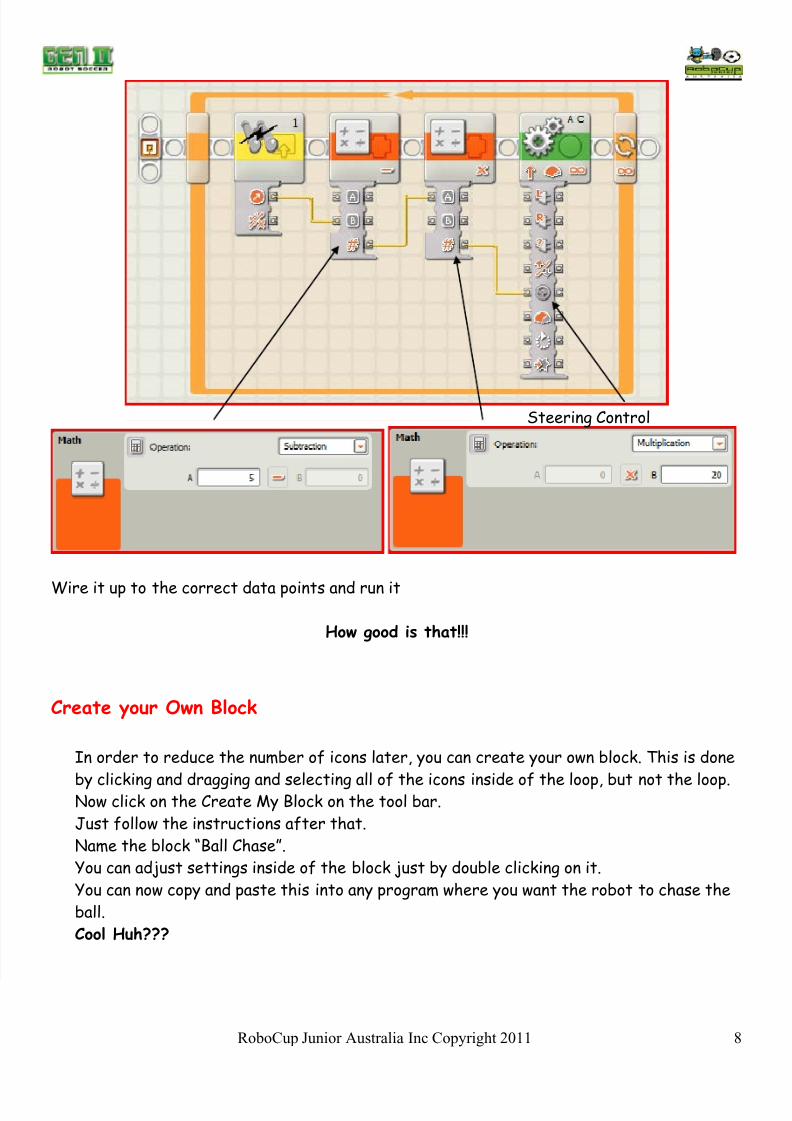
Option 2: Data MethodThis method may take a little more to get your head around, but it works really well.
It involves the manipulation of data coming from the IR V2 to control the steering of the
motors.
The steering control operates on readings of +100 to turn full right and -100 to turn full left.
Data input of 0 will have the robot running straight ahead.
To convert the IR V2 data to this, you must subtract 5 from the reading.
This will give a result of 0 is the ball is straight ahead. 0 to -5 if it is to the left and 0-5 if it
is to the right.
To convert these figures to the 0-100 range required for the steering, you must multiply
them by 20.
You will find the Math blocks in the Data Palette.
7/28/2019 GEN II NXT G Simple Soccer Player_0
http://slidepdf.com/reader/full/gen-ii-nxt-g-simple-soccer-player0 8/8
RoboCup Junior Australia Inc Copyright 2011 8
Steering Control
Wire it up to the correct data points and run it
How good is that!!!
Create your Own Block
In order to reduce the number of icons later, you can create your own block. This is done
by clicking and dragging and selecting all of the icons inside of the loop, but not the loop.Now click on the Create My Block on the tool bar.
Just follow the instructions after that.
Name the block “Ball Chase”.
You can adjust settings inside of the block just by double clicking on it.
You can now copy and paste this into any program where you want the robot to chase the
ball.
Cool Huh???