Embed Size (px)
Citation preview

Geometric Constructions
October - Ch. 3Part of Unit 2 – Lines & Angles

Geometric Constructions• Constructions are made with a
compass and straight-edge.• Constructions have exact
segment lengths and angles.• Measuring with rulers and
protractors is not allowed.

Geometric Constructionshttps://www.youpak.com/watch?v=PcaQpZimdK4
https://www.youpak.com/playlist?list=PLe6hIej94qElX8TJirxKFelMhAx2XO-6l

Ch. 3 Geometric ConstructsBasic Skills
1. Make a straightedge & compass from scratch.
2. Copy a segment.3. Copy an angle.4. Bisect a segment. (Find its midpoint.)
a) with compass b) folding paper5. Bisect an angle: (Find its bisector ray.)
a) with compass b) folding paper

6. Drop a perpendicular through any point on a line.
7. Drop a perpendicular through any point outside the line.
8. Draw a second line parallel to a first, through a point outside the line.
Ch. 3 Geometric ConstructsBasic Skills

1. Make a straightedge & compass from scratch

1. Make a straightedge & compass from scratch
• To make a straightedge, fold a piece of paper. Its folded edge will be straight.
• To make a compass, make loops in both end of a piece of string. Pass a pencil through each loop. Use one pencil eraser-side down on the paper to anchor the center of the compass. Keeping the string taught (tight), draw a circle around the center with the sharpened pencil.

2. Copy a segmenthttps://www.youpak.com/watch?v=bEGAqPbXKyEhttps://www.youpak.com/watch?v=dUhOILbpYq4

2. Copy a segment1. Draw a line.2. Draw a point on the line. (We’ll call it point C)3. Use compass to measure the given segment,
end-to-end.4. Keeping the compass locked at that angle,
place the compass tip on the point on the new line (point C) and trace an arc through the line further down.
5. Label that arc-line intersection point D.6. Original segment AB = new segment CD.

3. Copy an anglehttps://www.youpak.com/watch?v=v3yqhcM6vQMhttps://www.youpak.com/watch?v=agL9WVapsnM

3. Copy an angle
1. Make a ray for one side of the new angle.2. Trace and arc through both sides of the original
angle, from its vertex.3. Trace the same arc from the endpoint of the new ray.4. Measure the length of the arc on the old angle with
the compass. Copy this to the new arc. Make a second arc to form an arc intersection.
5. Draw a second ray to finish the new angle, from the endpoint of the first ray through the arc intersections.

4. Bisect a segment(Find its midpoint)
https://www.youpak.com/watch?v=xmrK8HgCU9E&index=4&list=PLe6hIej94qElX8TJirxKFelMhAx2XO-6l
https://www.youpak.com/watch?v=-xTfkQCd9ME

4. Bisect a segment(Find its midpoint)
1. Set compass wider than estimated midpoint of segment.
2. Place compass needle on segment endpoint A, swing an arc above and below the segment.
3. Repeat from other endpoint B.4. Drop a perpendicular line through both arc
intersections.5. Add symbols to the segment to show that it
has been bisected. (segment AC = segment CB)
5. Bisect an anglehttps://www.youpak.com/watch?v=uEvUTWx4tU0&index=8&list=PLe6hIej94qElX8TJirxKFelMhAx2XO-6l

5. Bisect an anglewith a compass
1. Anchor the needle of the compass on the angle vertex. Swing an arc through both rays (sides) of the angle.
2. Anchor the compass needle on one arc-ray intersection. Swing an arc between the angle sides.
3. Repeat from other arc-ray intersection.4. Draw a third ray from the vertex through the arc-to-
arc intersection. This ray will bisect the angle in half.5. Add symbols to show the two angle halves are
congruent.

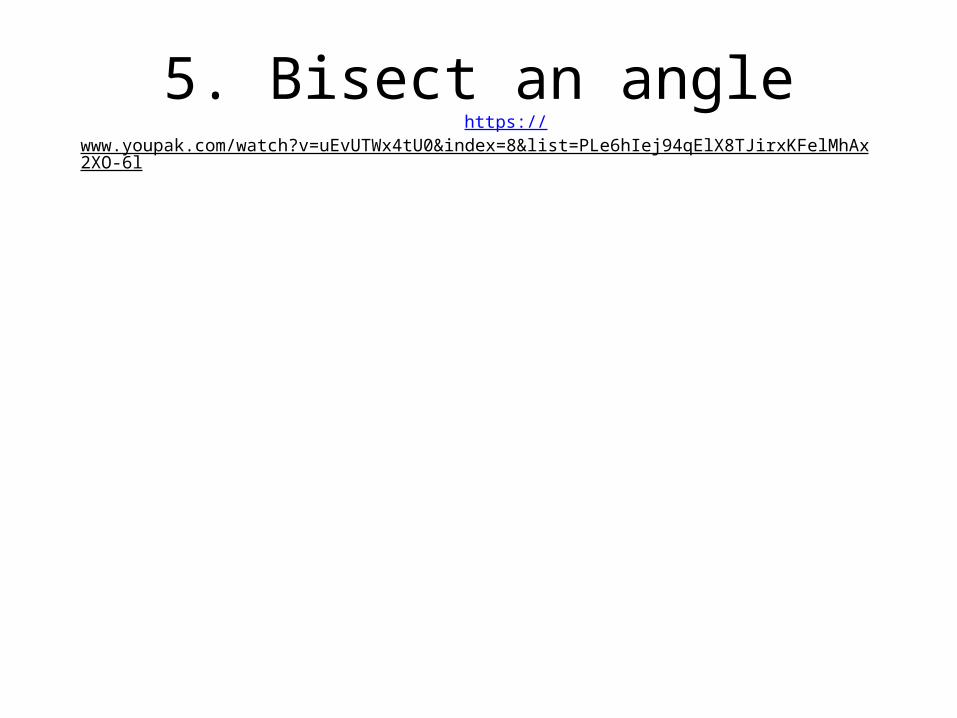
6. ‘Drop’ a perpendicular througha point on a line
https://www.youpak.com/watch?v=MMsJyuiCjwc&index=7&list=PLe6hIej94qElX8TJirxKFelMhAx2XO-6l
6. ‘Drop’ a perpendicular througha point on a line
1. Anchoring the compass on point A on line line, trace arcs through the line on both sides. Now point A is the midpoint between the two line-arc intersections.
2. Use both arc intersections to anchor four more arcs traced above and below point A.
3. Connect these arc intersections. The resulting line should pass through point A.
4. Add symbols to show that the new line is perpendicular to the original line.

7. ‘Drop’ a perpendicular througha point outside a line
https://www.youpak.com/watch?v=UmiS1zDwtsg&index=6&list=PLe6hIej94qElX8TJirxKFelMhAx2XO-6l

7. ‘Drop’ a perpendicular througha point outside a line
1. Draw two arcs from point A, through the line in two places. Makes a segment on the line.
2. Swing arcs from both ends of segment, above and below line. (Four arcs, crossing in two places.)
3. Drop a perpendicular through both arc intersections and original point A.
4. Add symbol to show new and old lines are perpendicular.
8. Draw a second lineparallel to a first, going through a
point off the line.https://www.youpak.com/watch?v=Ic87EjXssAs&index=3&list=PLe6hIej94qElX8TJirxKFelMhAx2XO-6l

8. Draw a second lineparallel to a first
• Lots of ways to do this:1. Drop two perpendicular lines through original line.
Measure the same distance long each perpendicular with the compass. Connect the resulting points, equidistant from the original line.
2. Make three intersecting arcs, all anchored on the original line. Connect arc intersections to form parallel.
• Don’t forget to add symbols to show parallel lines.


Ch. 3 Geometric ConstructionsIntermediate Skills (B level)
1. Build an equilateral triangle.2. Build a square.3. Build a hexagon.4. Build two different non-congruent
triangles, if given two segments of defined length and one angle of defined degrees of measure.


1. Build an equilateral triangle

1. Build an equilateral triangle
1. Draw a segment the length of one side.2. Anchor compass needle on segment end.3. Adjust compass to length of segment and swing arc
one quarter circle from end.4. Repeat with same compass angle, swinging an arc up
from the other segment end.5. Connect both segment ends to the intersection of the
two arcs. This should form an equilateral triangle.6. Add symbols to show that all sides and angles are
congruent.

2. Build an inscribed hexagon
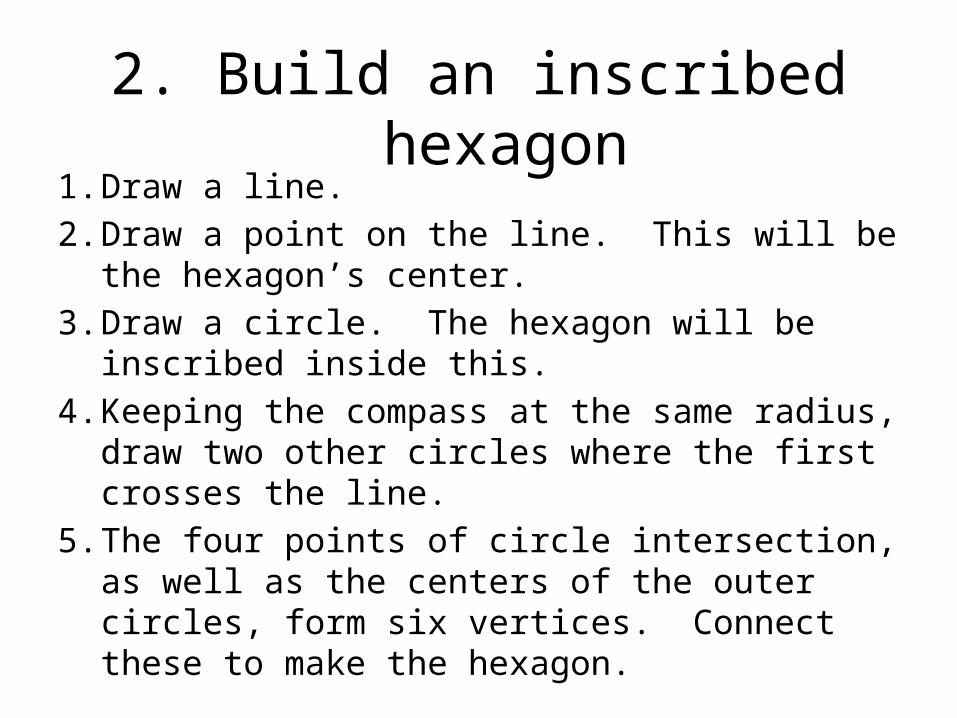
2. Build an inscribed hexagon1. Draw a line.2. Draw a point on the line. This will be the
hexagon’s center.3. Draw a circle. The hexagon will be inscribed
inside this.4. Keeping the compass at the same radius, draw
two other circles where the first crosses the line.5. The four points of circle intersection, as well as
the centers of the outer circles, form six vertices. Connect these to make the hexagon.
3. Build a square
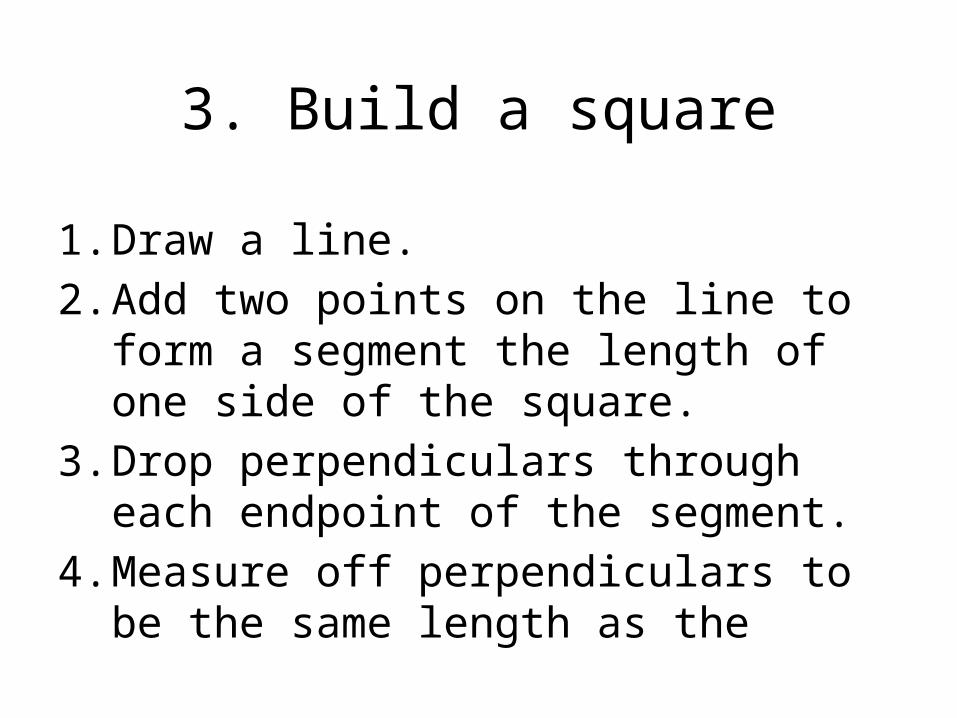
3. Build a square
1. Draw a line.2. Add two points on the line to form a segment
the length of one side of the square.3. Drop perpendiculars through each endpoint
of the segment.4. Measure off perpendiculars to be the same
length as the

4. Build two non-congruent triangles from given angle and two segments


Ch. 3 Geometric ConstructionsMastery Skills (A level)
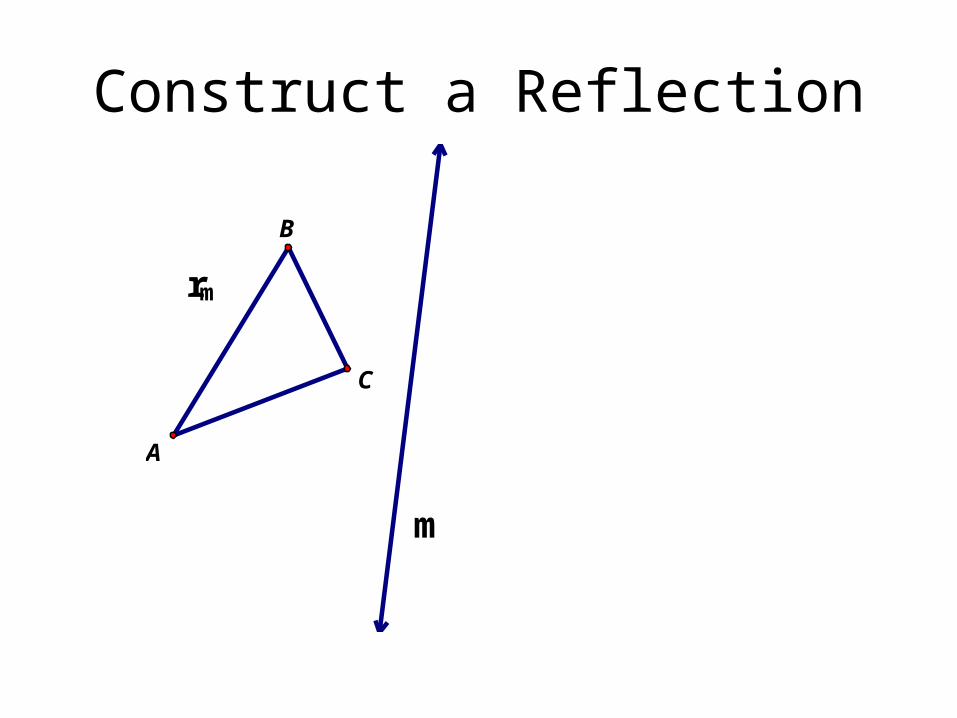
1. Construct a reflected image, if given the pre-image and line of reflection.
2. Construct the line of reflection, if given the pre-image and image.
3. Construct an (x, y) translation of a given pre-image.
4. Construct 90o and 180o rotations…

Construct a Reflection
rm
mA
B
Construct a Reflection
rm
m
A
B
C

Construct a Line of Reflection
A'
B'
C'
C B
A

Construct a Translation
A
B
C
A'

Construct a Translation
A
B
C
B'
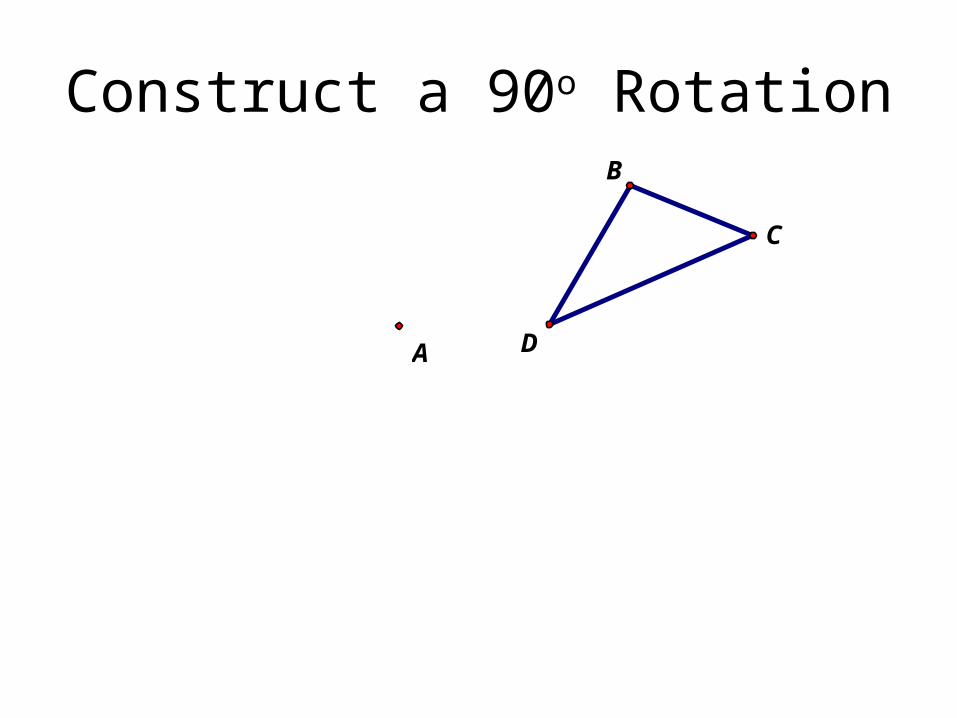
Construct a 90o Rotation
A
B
C
D

Construct a 180o Rotation
A
B
C
D

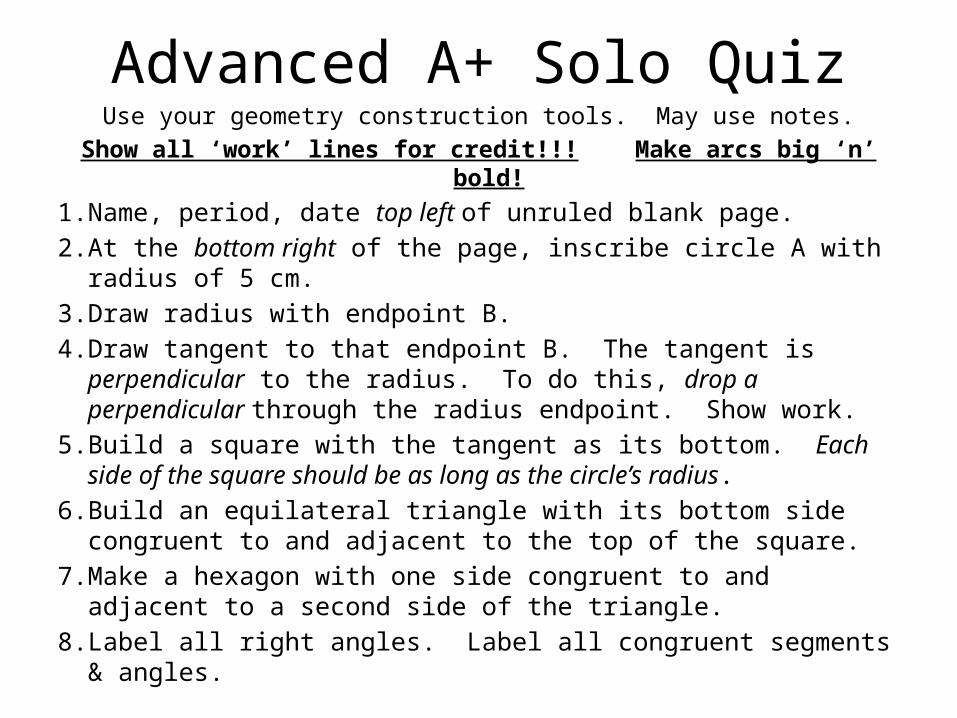
Advanced A+ Solo QuizUse your geometry construction tools. May use notes.
Show all ‘work’ lines for credit!!! Make arcs big ‘n’ bold!1. Name, period, date top left of unruled blank page.2. At the bottom right of the page, inscribe circle A with radius of 5
cm.3. Draw radius with endpoint B.4. Draw tangent to that endpoint B. The tangent is perpendicular to
the radius. To do this, drop a perpendicular through the radius endpoint. Show work.
5. Build a square with the tangent as its bottom. Each side of the square should be as long as the circle’s radius.
6. Build an equilateral triangle with its bottom side congruent to and adjacent to the top of the square.
7. Make a hexagon with one side congruent to and adjacent to a second side of the triangle.
8. Label all right angles. Label all congruent segments & angles.