Embed Size (px)
Citation preview
1C-EN-P
uide
ENEMTX_GR001C_EN_P_Ttlpg.qxd 1/21/04 8:07 AM Page 1
Doc ID ENEMTX-GR00
Getting Results G
Contacting Rockwell Software
Technical Support Telephone—1-440-646-5800Technical Support Fax—1-440-646-5801World Wide Web—www.software.rockwell.comEmail: [email protected]
Copyright Notice © 2004 Rockwell Software Inc., a Rockwell Automation company. All rights reservedPrinted in the United States of AmericaPortions copyrighted by Allen-Bradley Company, LLC, a Rockwell Automation company.This document and any accompanying Rockwell Software products are copyrighted by Rockwell Software Inc. Any reproduction and/or distribution without prior written consent from Rockwell Software Inc. is strictly prohibited. Please refer to the license agreement for details.
Trademark Notices The Rockwell Software logo, RSLinx, RSLogix 5, RSLogix 500, RSLogix 500, RSNetworx for ControlNet, RSNetworx for DeviceNet, RSPower32, RSSql, RSView32 and INTERCHANGE are trademarks of Rockwell Software Inc., a Rockwell Automation company.PLC, PLC-2, PLC-3 and PLC-5 are registered trademarks and Data Highway Plus, DH+, ControlLogix, MicroLogix, PLC-5/20E, PLC-5/40E, PLC-5/80E, SLC and SLC 500 are trademarks of Rockwell Automation.Microsoft, MS-DOS, Windows, and Visual Basic are registered trademarks, and Windows 2000, Windows Me, Windows NT, Windows 98, Windows 95, and Microsoft Access are trademarks of the Microsoft Corporation.ControlNet is a trademark of ControlNet International.DeviceNet is a trademark of the Open DeviceNet Vendors Association.Ethernet is a registered trademark of Digital Equipment Corporation, Intel, and Xerox Corporation.Pentium is a registered trademark of the Intel Corporation.Adobe and Acrobat are trademarks of Adobe Systems Incorporated.IBM is a registered trademark of International Business Machines Corporation.All other trademarks are the property of their respective holders and are hereby acknowledged.
Warranty This Rockwell Software product is warranted in accord with the product license. The product's performance will be affected by system configuration, the application being performed, operator control and other related factors.The product's implementation may vary among users. This manual is as up-to-date as possible at the time of printing; however, the accompanying software may have changed since that time. Rockwell Software reserves the right to change any information contained in this manual or the software at anytime without prior notice.The instructions in this manual do not claim to cover all the details or variations in the equipment, procedure, or process described, nor to provide directions for meeting every possible contingency during installation, operation, or maintenance.
Contents
Chapter 1
Getting Started with RSEnergyMetrix .........................................................1
Intended audience................................................................................................1
Important user information ...............................................................................1
RSEnergyMetrix components ...........................................................................2RSEnergyMetrix Manager............................................................................................2RSEnergyMetrix RT Option ........................................................................................2ChartsPlus Option.......................................................................................................2ReportsPlus option......................................................................................................23PX option ..................................................................................................................3
RSEnergyMetrix communications ..................................................................3
Quick Start ..............................................................................................................3Log in to RSEnergyMetrix Manager............................................................................3Set up a group ............................................................................................................4Set up a device ...........................................................................................................4Set up a meter.............................................................................................................5View meter data..........................................................................................................6
Navigating in RSEnergyMetrix .........................................................................6Client desktop overview.............................................................................................6Meters tab....................................................................................................................6My user settings ..........................................................................................................6Reports tab ..................................................................................................................7System tab ...................................................................................................................7Custom tab ..................................................................................................................7Calendar trend ............................................................................................................7Meter status .................................................................................................................7Meter trend..................................................................................................................7System status ...............................................................................................................8My Start Page ..............................................................................................................8Unit Setup....................................................................................................................8
Chapter 2
Installing RSEnergyMetrix....................................................................................9
Server requirements ............................................................................................9Server software requirements for installing RSEnergyMetrix:...................................9Guidelines for server sizing........................................................................................9
RSEnergyMetrix Getting Results Guide • i
Database size guidelines .......................................................................................... 10Hardware requirements: .......................................................................................... 10
Client requirements ........................................................................................... 11
RSEnergyMetrix Manager Installation ........................................................ 12Pre-installation checks.............................................................................................. 12Installation ................................................................................................................ 12
Chapter 3
Setting up RSEnergyMetrix ............................................................................... 15
Set up the RSEnergyMetrix System............................................................. 15
Overview of Groups and Domains ................................................................ 15
Set up a new group in RSEnergyMetrix Manager ................................... 16
Overview of Roles and Users ......................................................................... 16
Create a role and assign privileges ............................................................. 17
Set up a user and assign roles ...................................................................... 17
Chapter 4
Administering RSEnergyMetrix ...................................................................... 19
Administering the RSEnergyMetrix database .......................................... 19
Database name ................................................................................................... 19
Upgrading to a new release ........................................................................... 19
Chapter 5
Configuring Devices and Meters ................................................................... 21
Overview of devices .......................................................................................... 21
Communications path definition................................................................... 22Paths to Rockwell Automation devices ................................................................... 22Use RSLinx to determine communications path..................................................... 23Communicating with third party devices ................................................................ 23
Set up an Ethernet device............................................................................... 24
Verify communications with a Device ........................................................ 25
Delete a device ................................................................................................... 26
Overview of meters ........................................................................................... 26Meter tags.................................................................................................................. 26Navigating to a Meter ............................................................................................... 27Notes on meters ....................................................................................................... 27
Set up a device-based meter ......................................................................... 27
Set up a Powermonitor, Powermonitor II and Powermonitor 3000 tag28
ii • RSEnergyMetrix Getting Results Guide

Set up a derived tag..................................................................................................29
Automatic data repopulation..........................................................................30Devices supporting ADR ..........................................................................................30Setting up ADR .........................................................................................................31
Alarming .................................................................................................................32Alarming overview....................................................................................................32Types of alarms.........................................................................................................32Alarm subscriptions ..................................................................................................32
Chapter 6
Viewing Meter Data.................................................................................................33
Viewing meter status ........................................................................................33
Viewing standard charts ..................................................................................33Trend chart................................................................................................................33Calendar trend ..........................................................................................................33
Viewing real-time meter data using RT ......................................................34
Chapter 7
Setting Up Billing Reports ..................................................................................35
Overview of rate schedules ............................................................................35Rate schedule elements ............................................................................................35Rate schedule options ..............................................................................................36Line Item Scripting....................................................................................................36Scripting functions ....................................................................................................38
Chapter 8
Running RSEnergyMetrix Reports ................................................................41
Overview ................................................................................................................41Consumption reports ................................................................................................41Demand Analysis reports .........................................................................................41Billing reports............................................................................................................41
Setting up and viewing a standard report .................................................42Viewing, printing and saving report output............................................................42Editing an existing report .........................................................................................42
ReportsPlus overview .......................................................................................43Efficiency ...................................................................................................................43Load factor ................................................................................................................43Power factor..............................................................................................................43Electrical summary report.........................................................................................44Multi-Purpose Report................................................................................................44
RSEnergyMetrix Getting Results Guide • iii
Chapter 9
Using RSEnergyMetrix Options ...................................................................... 45
RT Real-Time Option ......................................................................................... 45Overview................................................................................................................... 45Overview of the RSEnergyMetrix RT User Interface .............................................. 45Set up Powermonitors using RT .............................................................................. 46View Powermonitor data using RT ......................................................................... 47
ChartsPlus Option .............................................................................................. 47Overview................................................................................................................... 47
Client requirements for RT and ChartsPlus .............................................. 48
Chapter 10
Troubleshooting and Support .......................................................................... 49
Troubleshooting FAQ ........................................................................................ 49
System Status Display...................................................................................... 49
Telnet...................................................................................................................... 49
Time zone issues ................................................................................................ 50
Obtaining support............................................................................................... 50
Chapter 11
Activation ....................................................................................................................... 51
Activation .............................................................................................................. 51
Protecting your activation files .................................................................... 52Activities that may damage activation ..................................................................... 52Preventive steps........................................................................................................ 52
Moving activation files ..................................................................................... 53
Activating RSEnergyMetrix software.......................................................... 54RSEnergyMetrix Manager and options .................................................................... 54Upgrading meter limits or adding options.............................................................. 54
Finding more information about activation .............................................. 54
Frequently asked questions on activation................................................ 55Glossary........................................................................................................................... 57
iv • RSEnergyMetrix Getting Results Guide
RSEnergyMetrix is a modular, scalable, web-enabled, client/server energy information and management application. It connects energy-related data sources to a Microsoft SQL database and presents energy information in ways that enable you to monitor and manage your energy use to maximize the value of your enterprise. RSEnergyMetrix is built using Microsoft .NETTM technology, ensuring the highest level of quality, reliability and compatibility now and in the future.
Intended audienceWe assume that you are familiar with:
IBM-compliant personal computers
Client-server systems
Ethernet data networking
Microsoft Windows® operating systems
OLE for Process Control® (OPC) communication
Microsoft dynamic data exchange (DDE) messaging
Microsoft SQL Server
Microsoft Internet Information Services
Allen-Bradley Powermonitors
Allen-Bradley programmable logic controllers (PLC™)
Important user informationThis Rockwell Software product is warranted in accord with the product license. System configuration, the performing application, operator control, and other related factors affect the product’s performance.
The product’s implementation may vary among users.
Rockwell Software reserves the right to change any information contained in this help file or the software at anytime without prior notice.
The instructions in this help file do not claim to cover all the details or variations in the equipment, procedure, or process described, nor to provide directions for meeting every possible contingency during installation, operation, or maintenance.
Chapter
1 Getting Started with RSEnergyMetrix
Getting Started with RSEnergyMetrix • 1
RSEnergyMetrix componentsRSEnergyMetrix consists of modular components that make it easy to scale an energy monitoring and management system to meet your exact needs.
RSEnergyMetrix ManagerRSEnergyMetrix Manager is the core data logging and reporting engine. Use Manager to organize your enterprise's energy architecture, connect to Allen-Bradley Powermonitors and programmable controllers, log energy data and view energy information. Manager can report your energy usage by department or cost center, display load and demand profiles, and correlate energy costs per unit of manufacturing output. It includes a flexible energy rate schedule that enables you to replicate utility bills or generate internal energy billing. Manager is a server-based, web-enabled application that runs on a Windows 2000 or Windows 2003 server. Microsoft Internet Explorer is the client used to access and configure Manager. RSEnergyMetrix Manager is available in three size options with the capacity for 8, 64 or 10,000 meters.
RSEnergyMetrix RT OptionRSEnergyMetrix RT is a Windows-based client-server software package that may be used to configure Allen-Bradley Powermonitors and displays their real-time data and power quality information. RT is a rich-client software application installed with RSEnergyMetrix Manager to provide a real-time Powermonitor connection.
ChartsPlus OptionRSEnergyMetrix ChartsPlus is an optional package available with RSEnergyMetrix Manager that offers extensive custom charting capabilities. ChartsPlus is a “rich client” application that downloads and runs on the client computer. Its look and feel is that of a traditional Windows application rather than a web application.
ReportsPlus optionRSEnergyMetrix ReportsPlus provides additional reports beyond the standard reports included in Manager. ReportsPlus reports are set up and viewed in the same way as standard Manager reports. Like standard reports, ReportsPlus reports may be configured to automatically run on a schedule and optionally send the report output to one or more email addresses. ReportsPlus reports can be identified by a distinctive icon in the report list. You may choose the report output type among PDF (the default), Microsoft Excel, HTML, Rich Text Format (RTF), or Tagged Image File Format (TIFF).
2 • RSEnergyMetrix Getting Results Guide

The additional reports included in ReportsPlus include:
User-configurable Multi-Purpose report
Efficiency report
Load factor report
Power factor report
Electrical summary report
3PX optionRSEnergyMetrix enables RSEnergyMetrix Manager to collect data from third-party energy data sources through an OPC server that you provide. 3PX, like Manager, is offered in 8-, 64- and 10,000-meter packages.
For more information about 3rd party OPC drivers, refer to the Rockwell Software Preferred Server Program.
RSEnergyMetrix communicationsRSEnergyMetrix Manager and RT connect to Allen-Bradley devices using RSLinx Lite, which is included on the RSEnergyMetrix program CD. With the optional 3PX package and customer-provided OPC drivers, RSEnergyMetrix can consolidate energy-related information from a wide variety of third-party meters and other data sources.
Quick StartThis section outlines the main tasks you will need to perform to use RSEnergyMetrix software.
This section is set up as an example. This Quick Start section will guide you through logging on to the software, setting up communications with a meter, beginning to log meter data, and viewing a demand profile. The steps are simplified and presume that you have installed the required server and client software, that you will be using the default roles and users and that you are using an A-B Powermonitor 3000 on Ethernet.
The Quick Start does not include setting up rate schedules or running reports.
Log in to RSEnergyMetrix Manager1. Launch Internet Explorer
2. Enter the URL of the RSEnergyMetrix server in the address field: “http://localhost/RSEnergyMetrix”
Tip Instead of “localhost” you may enter the network name or IP address of the server
Getting Started with RSEnergyMetrix • 3

3. Log in to RSEnergyMetrix using the default credentials. Username = “Admin,” password = “admin.” Password is case-sensitive
Set up a group1. Open up the System folder by clicking on its + sign.
2. Click on the Groups folder in the tree
3. Click the Add button.
4. Enter the appropriate information into the data fields
Parent group - if this is a subgroup, type in the name of its parent group
This group is a domain checkbox - check if this group is to be a domain that Roles, Meters and Reports can be assigned to
Name - type in a name for this group.
Notes - enter any additional information you desire in the Notes field
Default log rate - enter the interval in minutes that you want to log data from your meters. This is the default rate for the group, and may be adjusted for individual meters
Reports title - Type in the first and second line of the report title that will be used for all meters in this group
5. Click the Save button. Your new group now appears in the Groups folder in the System tree.
Set up a device1. Verify that there is an RSLinx Ethernet driver configured (default driver
AB_ETH-1) and that your Powermonitor's IP address is entered in its station mapping
2. In the navigation tree, open the System folder then the Devices folder. Select the group for the new device
3. Click Add a device
4. Enter information into the Device Information fields
Click the This device is enabled checkbox
Select a Domain from the drop-down list
Select a Device class from the drop-down list that matches your Powermonitor 3000
Enter a Name for the device
Tip Enter a log rate of 1 minute for this Quick Start exercise
4 • RSEnergyMetrix Getting Results Guide

Select the device Time zone from the drop-down list
Select a Time sync. interval for synchronizing the Powermonitor 3000 with the server clock
Enter the Device password. The default password is 0 (zero)
5. Enter information into the Device Communications fields.
Enter the Communications path to the device: “AB_ETH-1\aaa.bbb.ccc.ddd” where aaa.bbb.ccc.ddd is the Powermonitor IP address
6. Click the Save button to create the new device
7. Click the Ping Device button to verify communications with the Powermonitor
Set up a meterThis sample procedure configures a meter to work with the sample rate schedule and billing report to be created in subsequent Quick Start topics
1. Open the Meters folder in the navigation tree. Select a group for the meter location
2. Select the Meters tab in the detail pane. Click the Add a new meter link.
3. Select a Parent Group. The default is the group you selected in step 1
4. Select a meter Type from the drop-down list. For the Powermonitor 3000, select Electric
5. Select the Device you configured in the previous topic from the drop-down list
6. Enter a Name for the new meter and any notes you wish to record
7. Select a Time zone for the meter
8. Leave the Contribution factor at 100%
9. Click the Save button.
10. Click the Add a new meter tag link
11. Select Real Energy Net from the “Select device tag to load data” list. The remaining fields fill in automatically
12. Click the Save button
13. Click the Add button to add another tag
14. Select Real Power Demand from the list. Click the Save button
15. Click the Return to Meter Screens link
Getting Started with RSEnergyMetrix • 5
View meter dataBefore you try to view meter data, allow RSEnergyMetrix to log data for a few minutes. In the last step you should have set a 1 minute log rate.
1. Click the Meter Status tab. This displays the 10 most recent reads of the meter
2. Click the Trend tab. Select a meter tag to trend and a start and end date for the trend. Once there has been some data logged, you will see a graph of the selected tag over time.
3. Click the Calendar Trend tab to view a trend of logged data in a calendar format. Click on a day or days to zoom in
Navigating in RSEnergyMetrix
Client desktop overviewAfter you log in, the client desktop appears. On the left is the navigation tree. On the right is the detail pane.
Meters tabThe Meters tab in the navigation tree contains folders that organize the Meters into groups and domains.
Selecting the Meters tab does not change the detail pane content. Select a Group or Domain to view aggregated information from the Meters the group contains.
To access an individual meter, open the desired group or domain and select the desired meter. The detail pane will display the meter status tab.
Note: If you select a different meter tab and then select a different meter, the selected tab will remain selected.
My user settingsThis screen shows the user settings of the currently logged-in user. You may change your personal password from this screen. It also allows you to change other user settings, provided that the role associated with the currently logged-in user has the privilege to edit users.
Important RSEnergyMetrix does not continually monitor for changes in meter configuration. It may take several minutes for RSEnergyMetrix to begin to poll the new or modified tags.
6 • RSEnergyMetrix Getting Results Guide
Reports tabThe reports folder in the navigation tree provides access to standard and optional reports in RSEnergyMetrix. You may select existing reports for viewing or editing, add a new report or delete an existing report. You may set up auto-run report jobs and view automatically generated reports.
System tabThe System tab in the navigation tree contains a number of subfolders that provide access to RSEnergyMetrix setup items such as Devices, Groups, security settings (Roles and Users), Multi-Purpose Report Scripts, and Rate Schedules, as well as links to the System Status and About pages.
Custom tabThe Custom tab contains links to web pages or graphics that you select and/or develop using the Manage custom pages link.
Calendar trendThe calendar trend display shows how the value of a meter tag you select varies over a full month. You may select the meter tag to display from the drop-down list.
To zoom in to a day, click on the day in the calendar. You may overlay days by selecting additional days from the small calendar under the zoomed display.
Meter statusWhen you first select a Meter, the Meter Status tab is selected. The screen will display the last ten values logged for each Meter Tag.
Meter trendThe Meter trend display lets you select and view tags as their values vary by time. You may select up to five tags from one or more meters. You may select a time zone for the trend and the start and end dates from the calendars. Or, enter start and end dates into the date fields and click the Go button. One day is the minimum trend period. If you select an end date earlier than the start date, the system will adjust the start date, and vice versa.
Getting Started with RSEnergyMetrix • 7
System statusClick the System Status link in the Setup tab to see an overview of device communications status. It displays by default a list of errors since your last login. You may also select other error ranges.
Click on a Device Name link to drill down to a detailed list of communications errors associated with the Device.
You may purge errors for individual devices or click the Purge All button and confirm to purge errors associated with all Devices.
My Start PageMy Start Page allows you to set up a tabbed initial RSEnergyMetrix view with tabs and links that let you navigate to your favorite graphs, reports, meters and custom pages with one or two mouse clicks.
The Welcome screen appears until My Start Page is configured. To begin configuring the start page, click the Configure My Start Page link. Each time the user logs in after the My Start Page has been configured, the My Start Page will be displayed instead of the Welcome screen.
Refer to online Help for more information.
Unit SetupPermits you to customize RSEnergyMetrix data collection capabilities by adding and editing data value types, base units and units.
8 • RSEnergyMetrix Getting Results Guide

Server requirements
Server software requirements for installing RSEnergyMetrix:
Windows 2000 Server or Advanced Server, service pack 4, OR
Windows 2003 Server or Advanced Server
Microsoft SQL Server 2000, service pack 3a
You must have administrator privileges to install RSEnergyMetrix
Internet Information Server (IIS) must be installed and enabled to run prior to beginning the RSEnergyMetrix installation procedure
Guidelines for server sizingThe following rules of thumb are offered as a starting point for determining server sizing for RSEnergyMetrix. Other factors will affect the required size of a server. A higher number of tags being logged, a faster log rate, a larger number of users and a larger number of reports being run will require a more powerful server than the guidelines specify.
Chapter
2 Installing RSEnergyMetrix
Important If installing RSEnergyMetrix on Windows 2003 Server, note the following:
Windows 2003 Server does not install IIS automatically. You must select the “Application Server” role, which will automatically install IIS 6.0 and enable the required Web Server extension to run asp.net (Windows Server 2003 CD required).
Windows 2003 Server automatically installs .NET Framework version 1.1, MDAC version 2.8 and Internet Explorer 6.0, so you may skip these steps in the RSEnergyMetrix installation procedure.
The ASPNET Windows username must be assigned as a member of the Administrators group. See page 13.
Installing RSEnergyMetrix • 9
A low-end server has up to 8 meters and logs up to 40 meter tags at a minimum 15 minute log rate
A mid-range server has up to 64 meters and logs up to 320 meter tags at a minimum 15 minute log rate
A high-end server has more than 64 meters and logs more than 500 meter tags at a minimum 15 minute log rate
Database size guidelinesRSEnergyMetrix writes 16 bytes of data to the database for each meter tag logged. Over time, the database can grow to become quite large. Some examples:
A low-end server, logging 40 meter tags at 15 minute intervals, will grow the database at a rate of 2.56 KB per hour or 22 MB per year
A mid-level server, logging 32 meter tags at 15 minute intervals, will grow the database at a rate of 20.5 KB per hour, or 180 MB per year.
A high-end server, logging 1000 meter tags at 15 minute intervals, will grow the database at a rate of 240 KB per hour, or 2.1 GB per year.
Consider these guidelines when determining hard disk requirements for a server as well as database maintenance schedules.
Hardware requirements:These are general guidelines. RSEnergyMetrix is capable of running on a variety of hardware platforms. The main scalability issue is related to processing of logged data (e.g. report generation, trending). CPU speed, number of CPUs, RAM, and RAID 5 for the database files are the main scalability factors (in that order).
A low-end serverWindows 2000 Server
SQL Server 2000 Standard
single 500+ MHz Pentium III
512MB RAM
10GB hard disk
Mid-range serverWindows 2000 Server or Advanced Server
SQL Server 2000 Standard or Enterprise
2 or 4 CPU 800+ MHz Pentium III or better
1GB RAM or higher
30GB hard disk (with separate disks for operating system and log files and RAID 5 for main database files preferred)
10 • RSEnergyMetrix Getting Results Guide

High-end serverA high-end server specification is highly dependent upon the user’s requirements. Please contact Rockwell Automation for more information.
Client requirementsClient requirements for compatibility with RSEnergyMetrix:
Microsoft Windows 98, NT 4.0, 2000 or XP
Internet Explorer 6.0. Internet Explorer 6.0 is included on the RSEnergyMetrix CD
Adobe Acrobat Reader 5.0 or later is required to view RSEnergyMetrix reports
Microsoft .NET Framework version 1.1 is required to use RSEnergyMetrix version 1.3 RT and Charts Plus options. It may be installed from the RSEnergyMetrix installation CD or downloaded from the Microsoft Windows Updates website.
Your client workstation must also be permitted Intranet, Internet or dial-in access to the RSEnergyMetrix server. Contact your IT support personnel for assistance.
Tip If you plan to use the RSEnergyMetrix RT, ChartsPlus and/or ReportsPlus options, make the following security settings on the server:
Add the RSEnergyMetrix server to the list of Trusted Sites. To do this, select Tools > Internet Options from the Internet Explorer menu, and select the Security tab. Select Trusted Sites and click the Sites... button. Add the RSEnergyMetrix server's url to the trusted sites and uncheck the check box to require secure server verification.
Set the .NET Framework security policy for trusted sites to Full Trust. To do this, launch Control Panel from the Windows Start button > Settings > Control Panel. Open the Administrative Tools folder by double-clicking on its icon. Launch the .NET Framework Wizards by double-clicking on its icon. Select the Adjust .net Security wizard. Select Make changes to this computer and click Next. Select Trusted Sites and move the slider to Full Trust. Click Next and then Finish.
Installing RSEnergyMetrix • 11
RSEnergyMetrix Manager Installation
Pre-installation checks1. Check out the server for required customer-provided software:
Windows 2000 Server or Advanced Server, service pack 4, OR
Windows 2003 Server or Advanced Server
SQL 2000 Server, server pack 3a, installed and set up for mixed mode authentication (SQL Server and Windows)
IIS 5 (or 6 with Windows 2003) installed and enabled to run
2. Must have administrator access for Windows and SQL
3. Ping all Ethernet devices (meters and/or controller) the customer wishes to connect to
Correct communications to any meters that don't respond
Verify communications with A-B Ethernet meters via built-in web page
Installation
1. If not already installed, install IIS
2. If not already installed, install Microsoft SQL Server 2000 (NOT included in RSEnergyMetrix base software but available as a bundled option)
3. Install RSLinx Lite 2.41
4. Install Microsoft .NET Framework version 1.1
Tip If you are installing RSEnergyMetrix on Windows 2003 server, you may skip 4, 6 and 9 below as the components are already installed with the operating system.
Important SQL Server must be set up with mixed-mode authentication (Windows and SQL Server). You may make this selection during initial installation or using Enterprise Manager and editing the server properties, security tab after installation. It is recommended that you do not use the default system administrator login (username = “sa”, password = “”) due to known security issues. Record the system administrator login credentials as you will be prompted to enter them when you install RSEnergyMetrix software.
12 • RSEnergyMetrix Getting Results Guide

5. Using Notepad, edit the machine.config file in the directory C:\WinNT\Microsoft.NET\Framework\V1.1.4322\CONFIG. Find the line that reads Username=”Machine” and replace “Machine” with “System”. Save the file with the same name and reboot the server
6. Install Microsoft Data Access Components (MDAC) 2.8
7. Install Internet Explorer WebControls
8. If not already installed, install Adobe Acrobat Reader
9. Install Internet Explorer 6.0
10. Install RSEnergyMetrix
11. When prompted, enter the SQL system administrator account login credentials
12. Install RSEnergyMetrix activations
13. Launch Control Panel from the Start button. Open Administrative Tools and then open Event Viewer. For each of the logs (Application, Security and System), right-click on the log name in the tree and select Properties. In the General tab, select Overwrite events as needed. Click OK. This step is a necessary work-around to an issue in Microsoft .NET that can cause the RSEnergyMetrix logger service to stop if the event log becomes full.
14. Launch Internet Explorer on the server
15. Enter the server url (universal resource locator) into the Internet Explorer address field:
http://localhost/rsenergymetrix
Important If RSEnergyMetrix is installed on a Windows 2003 Server, open:
Windows Control panel > Administrative Tools > Computer Management > Local Users and Groups.
Select Users. Right-click the ASPNET User Name option.
Select Properties and select the “Member Of” tab.
If “Administrators” does not appear in the list, then click the “Add” button, click the “Advanced” button and click “Find Now”.
Select “Administrators” and click “OK”.
When finished reset IIS (Start > Run > “iisreset” > ok).
Tip To use RSEnergyMetrix from a client workstation, substitute the RSEnergyMetrix server name or IP address for “localhost” in the url.
Installing RSEnergyMetrix • 13
16. When the login screen appears, log in using the default login credentials (Username = admin, Password = admin).
17. If you plan to use the RSEnergyMetrix RT, Charts Plus and/or Reports Plus options, make the following security settings on the server:
Add the RSEnergyMetrix server to the list of Trusted Sites. To do this, select Tools > Internet Options from the Internet Explorer menu, and select the Security tab. Select Trusted Sites and click the Sites... button. Add the RSEnergyMetrix server's url to the trusted sites and uncheck the check box to require secure server verification.
Set the .NET Framework security policy for trusted sites to Full Trust. To do this, launch Control Panel from the Windows Start button > Settings > Control Panel. Open the Administrative Tools folder by double-clicking on its icon. Launch the .NET Framework Wizards by double-clicking on its icon. Select the Adjust .net Security wizard. Select Make changes to this computer and click Next. Select Trusted Sites and move the slider to Full Trust. Click Next and then Finish.
18. For each client workstation that you plan to use to run RT, Charts Plus and/or Reports Plus, perform the following steps:
Install .NET Framework 1.1
Set security options listed in step 17
14 • RSEnergyMetrix Getting Results Guide

Set up the RSEnergyMetrix SystemRSEnergyMetrix Manager software allows you to set up a system configuration that helps you understand the energy use patterns of your plant or enterprise.
You may assign a number of meters to a Group, which represents a department, division or process. Meters may also be shared between groups. Groups may be nested.
Roles and Users help you manage the security of the system. You may define an unlimited number of roles and users. Roles are named collections of Privileges. Users are defined by their log-in credentials (user name and password) and their Roles. Multiple Roles may be assigned to a User.
A Domain is a Group that is configured with Roles and Users assigned. Users assigned to a Domain may only access objects defined as Global or assigned to that specific Domain. This feature permits an administrator to allow certain users access to only parts of the system he or she chooses. Domains may be nested.
Devices and Meters may be assigned to a Group or a Domain. Devices and Meters are not permitted to be configured with Global scope.
Rate Schedules, Roles and Users may be configured with Global scope or may be assigned to a Group or Domain.
Select the System tab in the navigation tree to begin configuring the RSEnergyMetrix system.
Overview of Groups and DomainsA Group is a named collection of Devices and Meters that represents a subdivision of your enterprise such as a department, division or process. Groups contain Meters, which may be shared between Groups.
A Domain is a Group that is assigned Roles and Users. Rate Schedules may also be assigned to Domains. Users assigned to a Domain may only access objects assigned to that specific Domain. This feature permits an administrator to allow certain users access to only parts of the system he or she chooses.
Groups and Domains may be nested to any depth.
Chapter
3 Setting up RSEnergyMetrix
Setting up RSEnergyMetrix • 15

Set up a new group in RSEnergyMetrix Manager1. Select up the System tab in the navigation tree
2. Click on the Groups folder in the tree
3. Click the Add button.
4. Enter the appropriate information into the data fields
Parent group - if this is a subgroup, type in the name of its parent group
This group is a domain checkbox - check if this group is to be a domain that Roles, Meters and Reports can be assigned to
Name - type in a name for this group.
Notes - enter any additional information you desire in the Notes field
Default log rate - enter the interval in minutes that you want to log data from your meters. The default rate for the group may be adjusted for individual meters
Reports title - Type in the first and second line of the report title that will be used for all meters in this group
5. Click the Add button. Your new group now appears in the Groups folder in the System tree.
Overview of Roles and UsersA Role is a named collection of privileges assigned to various users to manage security. Roles may be global or domain specific.
A User is a named set of security credentials (user name and password) that permit an individual to access the privileges defined in the Role assigned to the User. More than one Role may be assigned to a User.
Roles and Users may be assigned Global scope where they apply to the entire RSEnergyMetrix system and permit access to all domains, groups, devices, meters, reports and custom pages.
Alternately, Roles and Users may be assigned Domain-specific scope in which they permit access to an individual domain and its sub-groups, devices, meters and reports, as well as other Global objects such as reports, custom pages and rate schedules.
The default roles are Admin, User and Guest, with passwords admin, user and guest respectively.
To configure Roles and Users, navigate to the Roles and Users subfolder under the System folder in the navigation tree.
16 • RSEnergyMetrix Getting Results Guide

Create a role and assign privilegesRSEnergyMetrix utilizes Roles and Users to manage security. To create a Role, navigate to the Roles and Users folder under the System tab in the navigation tree.
1. Click the Add button on the Role Setup screen
2. Select a Parent Group from the drop-down list. If the Role is to be assigned Global scope, select None. Otherwise, select the desired Group (only groups that are Domains appear in the list). Roles that are assigned to domains may only be assigned to Users assigned to the same group or domain
3. Enter a Name for the Role along with any Notes you wish to add
4. To assign Privileges, select an individual privilege from the right-hand list and click the single-arrow button to assign it to the role. You may also click the double-arrow button to assign all the privileges to the Role. This should only be done with caution since this gives any Users assigned this role administrative privileges. You may also use buttons to un-assign privileges
Set up a user and assign rolesTo create a new user, follow these steps:
1. From the Role Setup screen, click the Add User link
2. Fill in the User Setup information fields
Enter the User name to be used to log in to RSEnergyMetrix
Enter additional information such as first and last names, email address, telephone, fax and pager numbers
Enter a Password. Note that the password is case sensitive
Enter a language preference (future functionality)
3. Select User Roles by checking the applicable check boxes. More than one Role may be assigned to a User.
Setting up RSEnergyMetrix • 17

18 • RSEnergyMetrix Getting Results Guide

Administering the RSEnergyMetrix databaseIn the current release of RSEnergyMetrix software, database administration is performed using the functions and features of Microsoft SQL 2000 Enterprise Manager. Please refer to the SQL Server documentation for information on database management and administration.
Database nameRSEnergyMetrix creates a new database with the name “EMMA” when it is installed. It is strongly recommended that do not change the default database name. If you believe that you must change the database name, please contact Rockwell Automation technical support.
Upgrading to a new releaseFrom time to time updated versions of RSEnergyMetrix software may become available. For customers who have purchased software support agreements, these updates are available at no charge.
Follow these steps to upgrade your installation of RSEnergyMetrix to a new version.
1. Back up the RSEnergyMetrix “EMMA” database
2. Insert the RSEnergyMetrix program CD into the server's CD drive
3. If the installation screen does not automatically appear, then launch the autorun.exe file in the root folder of the CD
Chapter
4 Administering RSEnergyMetrix
Caution If your installation of RSEnergyMetrix has been customized by a solution provider (Rockwell Automation or a system integrator), contact the solution provider before attempting any software update. Updating a customized installation without the necessary precautions may disable custom additions to the basic software.
Administering RSEnergyMetrix • 19
4. If you are upgrading a version of RSEnergyMetrix prior to 1.3, then you must install the .NET Framework 1.1. From the installation screen, select “Install .NET Framework 1.1”. Then perform step 5 on page 13.
5. From the installation screen, select “Install RSEnergyMetrix”
6. On the dialog that appears, select “Remove all installed components”
7. The existing installation of RSEnergyMetrix is removed. The database is not removed
8. When the uninstaller completes, select “Install RSEnergyMetrix” again from the installation screen
9. When prompted, enter the SQL system administrator account login credentials
10. In most cases, you will see a message that the existing RSEnergyMetrix database has been found
11. When prompted, select “Yes” to restart the server
Tip If an error message appears related to the installation script version, exit the installation program. Use the Windows Control Panel Add/Remove Programs application to remove RSEnergyMetrix. Then re-start the RSEnergyMetrix installer and install the new version.
20 • RSEnergyMetrix Getting Results Guide
Overview of devicesDevices are physical entities that RSEnergyMetrix communicates with over a network. Examples of devices include:
Allen-Bradley Powermonitors
Allen-Bradley PLC-5 programmable controller
Allen-Bradley SLC 500 programmable controller
Allen-Bradley ControlLogix programmable controller
Allen-Bradley Ethernet Energy Modules (1803-EEMs)
Third-party devices
Setting up a Device in RSEnergyMetrix establishes communications and creates database definitions for the device, and enables device configuration and data monitoring using the optional RSEnergyMetrix RT package.
Devices may be directly connected to the server over a network. Ethernet, ControlNet, serial and DeviceNet devices may be directly connected provided that the RSEnergyMetrix server is also on the network through an appropriate network interface and you have configured the appropriate RSLinx direct device drivers. Devices routed through a ControlLogix gateway or RSLinx gateway are also considered directly connected devices.
Devices may also be set up in a parent/child, or pass-thru configuration. Remote I/O devices must be set up as children of a parent device such as a programmable controller. DeviceNet devices may also be used as “Child” devices.
Chapter
5 Configuring Devices and Meters
Important You must set up Devices before setting up Meters in RSEnergyMetrix.
Configuring Devices and Meters • 21
Communications path definitionThe communications path instructs RSEnergyMetrix how to connect to a device.
Paths to Rockwell Automation devicesRSEnergyMetrix communicates with Allen-Bradley devices such as Powermonitors and programmable controllers using RSLinx communications drivers. You must configure drivers in RSLinx on the RSEnergyMetrix server prior to configuring devices that communicate with the server using the drivers, and enter the device addresses into the driver address lists.
Communications path syntaxThe communications path is written in the following syntax:
[ComputerName!]RSLinxDriverName\PathSegment1\PathSegment2\... \PathSegmentN
ComputerName is optional but if used must be the RSEnergyMetrix server name. RSLinxDriverName corresponds to the name in RSLinx for the driver used to communicate with the device. Examples of default RSLinx driver names are:
AB_ETH-1, Ethernet TCP/IP driver
AB_DF1-1, Serial full-duplex DF1 driver
AB_MASTR-1, Serial half-duplex DF1 master driver
AB_TCP-1, RSLinx Gateway remote driver
1747-SDNPT-1, DeviceNet pass-thru driver for a 1747-SDN card
PathSegment1 through PathSegmentN indicate node numbers, channels, addresses, slot numbers, etc. that make up the “hops” that a message takes. Communications paths may vary from very simple to quite complex.
Examples of communications pathsExamples of paths are:
AB_ETH-1\128.1.100.201, a direct connection to an Ethernet device on the same network as the RSEnergyMetrix server
AB_ETH-1\128.1.100.134\Backplane\4\CH A, the path for a ControlLogix controller with a 1756-DHRIO module in slot 4. The controller will be used as a parent device to a Powermonitor on Remote I/O configured on Channel A of the 1756-DHRIO module
Tip For assistance with RSLinx, open the RSLinx application window on the RSEnergyMetrix server and select Help from the Menu bar.
22 • RSEnergyMetrix Getting Results Guide
AB_ETH-1\128.1.100.82\Backplane\2\A\10\Port2\6, path from the RSEnergyMetrix server, via Ethernet to a ControlLogix Gateway with IP address 128.1.100.82, via ControlNet to a 1788-CN2DN bridge module, via DeviceNet to a Powermonitor 3000 with node address (MAC ID) 6
Communications path rulesAll communications paths begin at the RSEnergyMetrix server. Select the end point of communications paths according to these rules:
For PLC-5 and SLC 500 controllers used as Remote I/O parent devices, the communications path extends to the network address of the PLC-5 or SLC 500 processor (see first example above)
For ControlLogix controllers used as Remote I/O parent devices, the communications path extends to the Remote I/O port on the 1756-DHRIO module (see second example above)
For direct connect devices, the communications path extends through all communications hops to the device's communications port (see third example above). DeviceNet Powermonitors are always configured as direct connect whether using an RSLinx direct or pass-thru driver.
For 1803-EEM Ethernet Energy Module, the following applies:
If the 1803-EEM is based on a SLC 500 controller, the path extends to the network (IP) address of the SLC 5/05
If the 1803-EEM is based on a ControlLogix controller, the path extends through the ControlLogix processor module. For example: AB_ETH-1\128.1.100.134\Backplane\0, where 0 is the processor slot
Use RSLinx to determine communications pathTo use RSLinx to help determine the correct path, following these steps:
1. From the RSEnergyMetrix server, open RSLinx
2. From the RSLinx main menu, select Communications > Configure Shortcuts
3. Using RSWho, drill down to the Powermonitor or parent device as applicable. Note the path shown at the top of the window
4. Copy the entire path and paste it into the Communications path field in the device configuration screen in RSEnergyMetrix. You may optionally omit the computer name at the beginning of the path (up to and including the exclamation point delimiter)
Communicating with third party devicesIn order to communicate with third party devices such as power monitors from other vendors, the optional 3PX OPC connectivity software package must be installed as well as one or more customer-furnished OPC drivers. Enter the OPC server name in the device setup screen.
Configuring Devices and Meters • 23
Set up an Ethernet deviceFollow these steps to set up a device that communicates via Ethernet. Examples of Ethernet devices are 1403 Powermonitor II and 1404 Powermonitor 3000 units with the Ethernet communications option, 1803-EEM Ethernet Energy Modules, and PLC-5E, SLC 5/05 and ControlLogix programmable controllers. If you have already performed a step then skip to the next.
1. Configure an RSLinx Ethernet Devices driver to communicate over the Ethernet network with the device from the RSEnergyMetrix server.
2. In the navigation tree, select the Setup tab and open the Devices folder. Select the Group for the new device.
3. Click Add a device.
4. Enter information into the Device Information fields.
Click the Enable device checkbox if you want the device enabled
Click the Enable real-time logging checkbox if you want to log meter tags in real time from this device
Click the Enable auto data repopulation checkbox to enable this feature
Select a Domain from the drop-down list
Select a Device class from the drop-down list. Be sure that the device class matches the physical device type and that the class name includes “on Ethernet” or “on EthernetIP” as appropriate. Select EthernetIP if you are setting up a Series B Ethernet Powermonitor 3000
Enter a Name for the device. Although the name does not need to be unique, you should select a name that will make it easy for you to recognize this device
Enter any additional information in the Notes field
Select the device Time zone from the drop-down list
Select an Time sync. interval for synchronizing the device clock with the server clock
Enter the Device password if it is different than zero (0)
5. Enter information into the Device Communications fields.
Enter the Communications path to the device.
Set the communications parameters for best operation. See Optimizing communications
Click the Enable comm. loss alarm to enable this feature
24 • RSEnergyMetrix Getting Results Guide
6. Click the Save button to create the new device, or Cancel to discard your device settings.
Verify communications with a DeviceTo verify communications with a configured Device, click the Ping Device button on the Device Setup screen after configuration is complete. A status message will appear to the right of the button.
The Ping Device function performs a read of a particular data object in the target device. In the current version, it reads the date and time table in the target device.
Tip Configure a new Series B Powermonitor 3000 Ethernet unit as a device type 'Powermonitor 3000 Mn w/ EthernetIP.' However, if you replace a Series A Ethernet Powermonitor 3000 with a Series B unit, follow these steps to restore communications with the new device: Open RSLinx on the RSEnergyMetrix server. Remove the IP address of the replaced unit from the Ethernet Devices driver and close the driver configuration window. Open the driver configuration window again and re-enter the replaced unit's IP address. This will re-establish communications using EtherNET/IP but will not require changing the tag addressing.
Tip Refer to the online help for detailed information on setting up device communications using other networks and protocols.
Tip The Ping Device button performs no function and returns no communications status message in the case of OPC devices. The user-supplied OPC driver's diagnostics function will generally indicate the number of active clients and active tags.
Configuring Devices and Meters • 25
Delete a deviceTo delete a Device, follow these steps.
1. Select the device you wish to delete in the Setup tab, Meters folder.
2. Click the Delete button in the Meter Setup screen.
3. Click OK when prompted, or Cancel if you decide not to delete the Device
Overview of metersA meter is a logical source of data to RSEnergyMetrix and is the unit used for licensing RSEnergyMetrix Manager software. There are two types of meters.
Device Meters are data sources that are associated with Devices. Tags associated with Device Meters are generally polled automatically
Manual Meters are data sources that permit data to be entered manually
Meters are assigned to Groups and Domains and may be apportioned among more than one Group or Domain.
Meter tagsMeters may be considered collections of Meter tags. A tag is the basic unit of data collection in RSEnergyMetrix. A tag may be a Device tag, an Manual tag or an Alarm tag.
Device tagsDevice tags are associated with data values polled from a Device. You may set up Device tags to be polled in real time or to be polled from the device's trend (or snapshot) log using automatic data repopulation (ADR).
Derived tagsDerived tags are the result of calculations performed on combinations of other meter tags.
Manual tagsManual tags are placeholders in the database that allow a user to manually input values that are used in reports but are not available as device tags.
Alarm tagsAlarm tags are special tags that facilitate the communicating of alarms to users.
Important Deleting a device also deletes all Meters associated with the device and purges all data associated with those meters in the RSEnergyMetrix database.
26 • RSEnergyMetrix Getting Results Guide

Value typesMost meter tags are associated with a Value type. The value type is used by the billing and reporting functions to aggregate data of a certain type from one or more meters or groups. RSEnergyMetrix includes a number of default Value types. You may easily add custom Value types from the Unit Setup screen in the System tab.
Navigating to a MeterTo navigate to a meter, select the System tab and open the Meters folder in the navigation tree. Then drill down through the group or domain to the desired Meter.
The detail pane display for a meter provides a number associated displays:
The Meter Status tab provides a tabular display of the meter Tags and the last 10 logged values of each Tag
The Trend tab provides a graphical time trend or profile of user selected Tags over a user selected time scale
The Calendar Trend tab allows you to chart user selected Tags in a calendar format
The Meter Setup tab lets you add and delete Meters; and view and edit Meter and Tag configuration
Notes on metersIt is important to understand the difference between a Meter and a Device. A Device is a physical piece of hardware such as a Powermonitor or programmable controller, or a software application such as an OPC server. A Meter is a logical, or virtual, device that functions as a collection of data Tags. Three examples illustrating the importance of this distinction are:
An 1803-EEM is a single Device that contains multiple (up to 48) Meters
A Powermonitor 3000 is a single Device. Each of its status inputs may be used as a Meter by connecting a pulse type meter and counting pulses
A Programmable Controllers is a single Device which may include a number of Meters, each configured as a User Defined Data Source. Some of these Meters may also be Devices, as where a PLC controller concentrates data from multiple Powermonitors for data logging yet each Powermonitor is also accessible from RSEnergyMetrix RT for viewing all data, logs, oscillographs, etc.
Set up a device-based meterFollow these steps to create a device-based Meter.
1. Select the Meters tab in the navigation tree. Select a group or domain for the meter location. If you need to, create a new group.
2. Select the Meters tab in the detail pane. Click the Add a new meter link.
Configuring Devices and Meters • 27
3. The Add a Meter dialog appears.
4. Select a Parent Group. The default is the group selected when you began to configure the meter
5. Select a meter Type from the drop-down list.
6. Select a Device from the drop-down list. If you need to, configure a new Device
7. Enter a name for the new meter and any notes you wish to record
8. Select a time zone for the meter
9. A new meter is automatically configured to contribute 100% of its value to its parent group. To adjust the contribution factor, select the parent group and edit the Group Setup screen
10. Click the Save button. To add meter tags, click the Add a new meter tag link.
Set up a Powermonitor, Powermonitor II and Powermonitor 3000 tag
RSEnergyMetrix makes setup of A-B Powermonitor tags easy and straightforward. Follow these steps:
1. In the Add a Meter Tag window, leave the Meter tag type as Device
2. Select a tag from the Select device tag to load data drop-down list
3. Note that the remaining fields are automatically filled in
4. Set the Log rate to the polling interval you desire
Important Do not change any of the remaining fields from the values that RSEnergyMetrix fills in automatically. Changing the address, data format, scaling, value type and other parameters may prevent logging of the tag or may cause the tag to be logged with erroneous data.
Caution The time that RSEnergyMetrix takes to log data during each polling interval is dependent on the number of devices, meters and tags set up in RSEnergyMetrix; the performance of the local area network; and the characteristics of the server hardware, e.g. number of processors, clock rate and amount of RAM. Setting a Logging Rate faster that the system can complete each polling interval may result in lost data and poor system performance.
28 • RSEnergyMetrix Getting Results Guide
5. Click the Save button to save the new tag, or Cancel to exit without saving
Set up a derived tagA derived tag is used to log values that are calculated from other meter tags. A derived tag script defines the tags and mathematical operations that return the desired value. To create a derived tag, follow these steps:
1. In the Add a Meter Tag window, select Derived as the Meter tag type
2. Enter a Derived tag script in the entry field. Note the following:
The output variable of the script must be Result
Meter tags may be specified using fully qualified tag names or the shortcut method
Scripts may include any functions in the .NET system.math namespace
3. Set the Log rate to the polling interval you desire. The derived tag script will run at the polling interval specified. Derived tag scripts run five minutes after the normal polling time, so that all referenced meter tags have been updated.
4. Click the Save button to save the new tag, or Cancel to exit without saving
Refer to the online Help for more information.
Important RSEnergyMetrix does not continually monitor for changes in meter configuration. It may take several minutes for RSEnergyMetrix to begin to poll the new or modified tags.
Configuring Devices and Meters • 29
Automatic data repopulationAutomatic data repopulation (ADR) is a standard function of RSEnergyMetrix manager. ADR gathers selected data from device data logs rather than real-time data registers. ADR is used to repopulate database gaps caused by network or server outages. ADR will not repopulate gaps in the database that are caused by loss of power to or failure of the metering devices. ADR may also be selected in larger RSEnergyMetrix systems in place of real-time polling to improve network utilization.
ADR periodically reads data logs from the device and, inserts records in the RSEnergyMetrix database where no corresponding data exists. It will not overwrite existing database records.
Devices supporting ADRA-B PowermonitorThe Powermonitor snapshot log holds up to 50 records. Remote I/O communications are supported.
A-B Powermonitor IIRemote I/O, Ethernet and serial communications are supported. The Powermonitor II must be at firmware version 3.00 or later and set up to use either the 16 parameter or 3 and 7 parameter snapshot log.
Important ADR is designed to help assure the integrity of data for billing, cost allocation, demand analysis and consumption reporting, such as real energy, reactive energy and demand real power. Data which is not contained in the device snapshot or trend logs is not available for data repopulation.
Tip Snapshot log energy data is expressed with 7 digit precision while real-time energy data is expressed with 15 digit precision. ADR used with the Powermonitor II may result in inaccuracies in energy consumption and billing reports, especially if the repopulated data occurs at the beginning or end of the reporting period
30 • RSEnergyMetrix Getting Results Guide
A-B Powermonitor 3000All communications networks are supported. The trend log is user configurable and holds a variable number of records depending on the user configuration.
A-B Ethernet Energy Module (1803-EEM)The EEM trend log contains an accumulated energy counter and a demand value for each configured meter.
Setting up ADR1. Configure the Powermonitor or EEM snapshot or trend log to log the
desired parameters at a rate equal to the fastest log rate of any meter tag. For example, if your Powermonitor 3000 logs parameters into the trend log at 15 minute intervals, and one meter tag is logged at a 5 minute log rate, then only one out of three parameters will be logged into that meter tag in RSEnergyMetrix
2. During device setup in RSEnergyMetrix, enable ADR by selecting the check box
3. During meter tag setup, RSEnergyMetrix automatically selects the correct snapshot or trend log parameter value based on the value type you select for the meter type
Tip Trend log energy data is expressed with 7 digit precision while real-time energy data is expressed with 15 digit precision. For accurate reporting results when using ADR, configure the Powermonitor 3000 energy counters to roll-over at 7 or 8 digits depending on your accuracy requirements. This option is available with master module firmware version 1.12 or higher.
Configuring Devices and Meters • 31
Alarming
Alarming overviewRSEnergyMetrix is able to generate email alarms to users based on a number of conditions. When alarms occur, they are entered into an alarm queue in the database. Users are notified by email of alarms according to user-configured alarm subscriptions.
Types of alarmsDevice alarmsDevice alarms correspond to alarm flags in an A-B Powermonitor, Powermonitor II or Powermonitor 3000, or an integer word in a controller such as a PLC-5 or SLC 500. To set up a device alarm, add a meter tag and select Alarm tag from the drop-down list. The alarm tag configuration screen that appears allows you to select the tag address, enter an alarm description, enter a log rate for the alarm, and enable alarm notification. Alarm tag address is the alarm flag in the Powermonitor or integer file and bit address in the PLC-5 or SLC 500 controller.
Communications alarmsA communications alarm is generated when a device fails to respond to four consecutive polls. To enable a communications alarm, select the Enable comm. loss alarm checkbox on the Device Setup screen.
Alarm subscriptionsAbout alarm subscriptionsEach user may configure one or more alarm subscriptions. Each alarm subscription may be assigned to an individual Domain or to 'none' which is a global subscription to all domains. A subscription consists of up to three email addresses along with a schedule that determines when each email address is active.
Setting up an alarm subscriptionNavigate to the My user settings link in the System tab. Click the Add a new alarm subscription link at the bottom of the screen. In the Add Alarm Subscription screen, select the group or domain you wish to subscribe to (or 'none' for all domains), and enter up to three email addresses. Click the Add new notification period link to set up schedules when each email address is active.
32 • RSEnergyMetrix Getting Results Guide

Viewing meter statusWhen you first select a Meter, the Meter Status tab is selected. The screen will display the last ten values logged for each Meter Tag.
Viewing standard chartsRSEnergyMetrix Manager provides two simple charting tools to help you understand your energy usage.
Trend chartThis chart displays a trend of one or more logged parameters from one or mote meters over a time period that you select. You may select up to five parameters on the same chart.
Calendar trendThis chart displays a trend line of one logged parameter in a calendar format. This chart is typically used to display real or reactive power demand over time to pinpoint peaks that vary by day, week or month. You may 'zoom in' on a day's chart by clicking on the day in the calendar view. Selecting multiple days overlays one trend line on top of another, allowing you to compare, for instance, all the Mondays in a month.
Viewing a trend chartTo view a Trend chart, follow these steps:
1. Navigate to and select a meter in the Meters tab of the navigation tree
2. Select the Trend tab in the detail pane
3. A blank chart appears labeled 'No meter tags selected'
4. If necessary, select a time zone for the chart
5. Select a meter tag to display from the drop-down list
6. Select a start and end date for the trend using the calendars. Or, you may enter the start and end dates into the data entry fields and click the Go button
7. To add another meter tag, select another tag from the drop-down list
Chapter
6 Viewing Meter Data
Viewing Meter Data • 33
8. To add a tag from another meter, navigate to and select the other meter in the meters tab of the navigation tree and select a tag from its list. You may view up to 5 tags in a standard Trend chart
9. If you hover the mouse cursor over the trend chart for a moment, a menu bar appears. From this menu bar, you may Save, Print, or Email the chart image
10. Click the Hide button to temporarily not display a meter tag on the trend chart. The tag will still be selected, just not displayed. To show the tag again, click the Show button
11. To permanently remove a tag from the trend chart, click the Remove button.
Viewing a Calendar trendTo view a calendar trend of a meter's data, follow these steps:
1. Navigate to and select the meter in the Meters tab of the navigation tree
2. Select the Calendar trend tab in the detail pane
3. Select the meter tag you wish to trend from the drop-down list. The Calendar trend is most commonly used to display real or reactive demand tags
4. Select a month and year from the respective drop-down lists
5. Use the scroll bars as needed to view the entire calendar display
6. To zoom-in, click on a day in the calendar. You may select multiple days by clicking on each one at a time.
Viewing real-time meter data using RTYou may also view real-time metering data, data logs, harmonics, oscillography and other meter attributes using the optional RSEnergyMetrix RT program. Please refer to ‘Using RSEnergyMetrix Options’ for more information.
34 • RSEnergyMetrix Getting Results Guide
Overview of rate schedulesRSEnergyMetrix Manager provides you with powerful, flexible tools to create energy cost and billing reports. You may use billing reports for:
Shadow billing - replicating the monthly bill from your energy provider
Cost allocation - reporting the real cost of energy for each process or cost center in your enterprise
Tenant billing - generating energy bills for use of your manufacturing or commercial facilities by others
What-if analysis - Comparing costs of energy from different energy providers for the same usage
Rate schedules may have global or domain scope. Global rate schedules may be used in all domains. Domain rate schedules apply to only a single domain.
The RSEnergyMetrix rate schedule model is designed to be very flexible so you may accommodate the wide variety of utility tariffs that exists today and is sure to be expanded in the future. On the other hand, its design does not present you with rate schedule options that you do not need.
Rate schedule elementsA rate schedules comprises a set of rules and formulas that tell RSEnergyMetrix how to transform energy usage data into cost allocation or billing data. You may configure rate schedules to replicate your utility tariff for shadow billing or comparative billing analysis, or develop and implement your own billing rates for internal energy cost recovery from production operations or facility tenants. Rate schedules include the following elements:
General Information - identity of the rate schedule owner, the rate schedules scope (global or local to a domain) and effective dates
Runtime parameters - allow you to manually define and enter report parameters that are not automatically logged into the database
Seasons - support utility tariffs that charge different amounts for energy, demand, etc. depending on the season of the year
Day types - days may be classified as working, non-working, holiday, and as a day of the week (Sunday through Saturday). Each day type may be used in line item calculations
Chapter
7 Setting Up Billing Reports
Setting Up Billing Reports • 35
Times of Use - a simple menu allows you to configure time-of-use billing periods down to the minute (new in Version 1.1)
Line items - flexible Visual Basic .NET scripting combined with specialized functions easily support a variety of utility tariff charges, such as facility, meter or service charges, energy and demand time-of-use charges, “ratchet” demand penalties, transitional competitive charges, sales and use taxes and many others
Global variables - allow line items to interact by sharing data (new in Version 1.1)
Rate schedule optionsExport linkAllows you to export a rate schedule from RSEnergyMetrix to an xml file.
Import linkAllows you to import a rate schedule xml file. If the file is not in the correct format, RSEnergyMetrix will not import it.
Print linkGenerates a printable pdf file containing a full listing of the rate schedule general information, seasons, non-working days, holidays, time-of-use periods, global variables and line items.
Line Item ScriptingThe billing report executes rate schedule line item scripts at report generation time. The scripts control the calculation of quantities, units and charges shown on the billing report output.
FunctionsYou create line item scripts using Microsoft Visual Basic .NET. RSEnergyMetrix provides pre-defined functions that assist you in calculating billing report charges, for example, total consumption, peak, average and ratcheted demand, etc. Each function includes one or more arguments that allow you to pass logged metering parameters from the database, seasons, day types, time-of-use information and other variable to the function.
Your script may also call functions in the .NET System.Math namespace. Refer to the .NET Framework documentation from Microsoft for details on these functions.
Tip In the ExportedRateSchedules folder under the RSEnergyMetrix folder in the install CD is a rate schedule file called Simple time-of-use template v 1.1, which may be used as a starting point for rate schedule development.
36 • RSEnergyMetrix Getting Results Guide

VariablesRSEnergyMetrix has several pre-defined input and output variables that may be used in the line item script.
Input variables have pre-set values which should not be modified in the script:
TotalCharges: Passes the sum of the charges in lower-numbered line items to the script. Provided for sales tax calculations. Returns a Double value
RatePerUnit: This variable passes to the script the Rate per Unit value that you enter when you create or edit the line item. Returns a Double value
BillingPeriodDayCount: Passes the number of days in the current billing period to the script. Returns an Integer value
Output variables control the line item properties on the billing report output:
Quantity: determines the value shown in the quantity column of the billing report.
Unit: displays suitable units in the line item, e.g. “kWh”
Charge: the monetary line item value shown on the billing report.
Visible: local variable of type BOOL that determines if the line item is shown on the billing report or not. Default = True
SuppressGrandTotal: global variable of type BOOL that controls the visibility of the Total Charge field in Billing and Cost Allocation reports. default = False
SuppressGroupSubtotals: Global variable of type BOOL that controls the visibility of group subtotals in the Billing report. Default = false
You may also declare local or global variables (or constants) using the Dim (or Const) statement. Use the following syntax:
Dim MyVariable [As <Type>] [= <value>]
Const MyVariable [As <Type>] = <value>
You may use local variables to structure and simplify scripts that represent complex charges. Local variables do not appear in the report output but may be used to calculate Quantity, Unit, Charge or Visible.
Declare local variables in each line item script. Declare global variables in the Global Variables tab.
Tip There are special naming conventions for parameters and variables used in line item scripts
Setting Up Billing Reports • 37

Scripting functionsRSEnergyMetrix provides the following pre-defined functions for use in rate schedule scripting. Except as noted, each function operates on logged values between the report start and end dates which occur within the defined season, day and time-of-use periods.
Scripting function Description
Average Calculates the average value of a tag
Band Calculates stepped or banded charges, e.g. “first 1000, next 2000" units of a tag
GetData Retrieves a specific logged value from the database
GetUnit Reads the units from the database for use in a report
Lowest Calculates the minimum value of a tag
LowestTimestamp Determines when a minimum value occurred
NLowest Calculates the 'n' lowest values of a tag
NLowestTimestamps Determines when the 'n' minimum values occurred
NPeaks Calculates the 'n' highest values of a tag
NPeakTimestamps Determines when the 'n' maximum values occurred
Peak Calculated the maximum value of a tag
PeakTimestamp Determines the date and time a peak occurred for a tag
Ratchet Used for calculating demand penalties for peaks which occur within a defined period prior to the report period
SeasonDayCount Returns the number of days in the billing period that are in the specified season
SetDateRange Used to obtain reports that compare usage over two different reporting periods
Sum Calculates the arithmetic sum of a non-cumulative tag
38 • RSEnergyMetrix Getting Results Guide
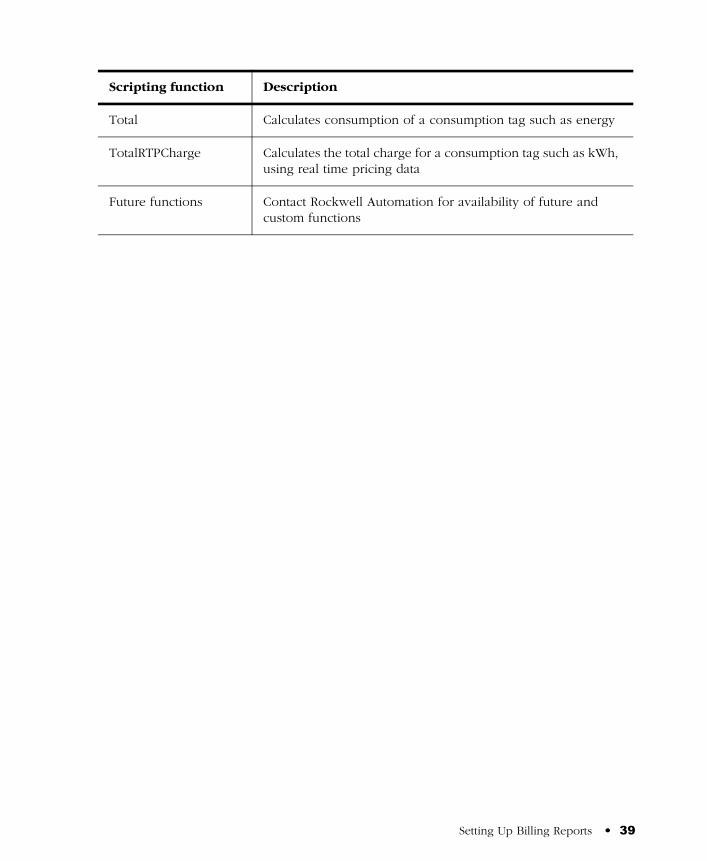
Total Calculates consumption of a consumption tag such as energy
TotalRTPCharge Calculates the total charge for a consumption tag such as kWh, using real time pricing data
Future functions Contact Rockwell Automation for availability of future and custom functions
Scripting function Description
Setting Up Billing Reports • 39

40 • RSEnergyMetrix Getting Results Guide
OverviewRSEnergyMetrix standard reporting converts the energy and production data logged in the database into information you can use to manage your business, improve efficiency and reduce costs.
RSEnergyMetrix reports are generated in standard Adobe Acrobat .pdf format and launched in a separate browser window.
Consumption reportsReports consumption values (kWH, kVARh, etc) for selected meter(s) or group(s) for a specified date/time range.
Demand Analysis reportsReports real and reactive demand values for selected meter(s) or group(s) for a specified date/time range. Reports “worst case scenario” peak demand that would have occurred if each meter or group's peak demand had occurred in the same demand interval.
Billing reportsRuns billing reports for selected meters for a specified date/time range. The report outputs a list of line items and a total charge amount. Each line item consists of a description, quantity, rate and charge.
Billing reports create their output based on rate schedules that you configure.
Chapter
8 Running RSEnergyMetrix Reports
Running RSEnergyMetrix Reports • 41
Setting up and viewing a standard reportTo set up a report, follow these steps:
1. Navigate to the Reports tab in the navigation tree
2. Select the Global Reports folder or another Domain
3. Click the Add button
4. Enter a name for the report
5. Select a Report template from the drop-down list. Do not change the selected Report file
6. Select a Report parent group. If you select a domain, only users with access to that domain will be permitted to view the report
7. In the meter selection window, navigate to and select meters to include in the report. Select a meter by clicking the selection box. A check mark appears when the meter is selected. You may also select groups. To select groups, click the Select by Groups link at the top of the window
8. For billing reports, select a rate schedule from the drop-down list
9. When you have finished setting up the report, click the Save button, or click the Cancel button to discard any changes you have made.
Viewing, printing and saving report output1. Navigate to and select a report
2. Select a report time zone from the drop-down list
3. Enter a report time span. The default report time span is the previous whole month
4. Click the View button. A new Internet Explorer window appears while the report is being generated and then closes automatically. The report opens in a second new window.
5. To print or save the report output use the menu controls in the report output window.
Editing an existing reportTo change selections in an existing report, navigate to and select the report. Click the Edit button. You may modify any report parameters. When you have completed, click the Save button to record you changes or the Cancel button to discard them.
42 • RSEnergyMetrix Getting Results Guide

ReportsPlus overviewRSEnergyMetrix ReportsPlus provides you a package additional reports beyond the standard reports included in Manager.
New in Version 1.1, ReportsPlus reports are set up and viewed in the same way as standard Manager reports. Like standard reports, ReportsPlus reports may be configured to automatically run on a schedule and optionally send the report output to one or more email addresses.
ReportsPlus reports can be identified by a distinctive icon in the report list.
The additional reports included in ReportsPlus include:
EfficiencyThe purpose of this report is to give you information on the “energy efficiency” of part or all of your process, plant or enterprise. You will be able to define an efficiency equation and then execute the equation over a period of time and a group of meters. Examples of how this report may be used are:
Calculating efficiency of a boiler system based on BTU of gas consumed versus steam produced
Calculating production efficiency of a batch manufacturing line by calculating tons of product versus energy consumed
The efficiency report will calculate not only average efficiency over the selected time range, but also snapshots of the efficiency during the range at user-specified intervals. Report output will be graphical and tabular, with a graph of efficiency versus time.
Load factorThe Load Factor report lists minimum, average and peak real power demand, load factor and time of peak demand. You may select Meters to include in the report, as well as the report date range and calculation intervals. The report output contains a tabular report and a graphical chart.
Power factorThe Power Factor report lists real energy net, reactive energy net, and power factor (which is calculated from the real energy and reactive energy values) for selected meters for a selected date range divided into specified calculation intervals (hours, days, or months). Report output is tabular with a chart of power factor on the first page.
For this report to function, the selected meters or groups must be logging Real Energy Net and Reactive Energy Net.
Running RSEnergyMetrix Reports • 43
Electrical summary reportThe Electrical Summary report lists various electrical summary values for selected meters for the selected date and time period. These summaries are:
Total Energy kWh, kVARh and kVAh
Average Demand for kW, kVAR and kVA
Load Factor for kW and kVA
Min and Max values for kW, kVAR, kVA and Power Factor and the date/time they occurred along with the coincident values for the other parameters.
The selected meters must be logging the relevant data in order for it to show up on the report (for example, if Real Power Demand is not logged then there will be no kW figures on the report). Power Factor is calculated from any two of the other three parameters (kW, kVAR, kVA).
Multi-Purpose ReportThe Multi-Purpose Report (introduced in Version 1.3) supports a free-form type of report output that is driven by script code stored in a Multi-Purpose Report Script.
A Multi-Purpose Report Script defines what a Multi-Purpose Report looks like. Multi-Purpose Report Scripts are conceptually similar to rate schedules in that they are a separate entity within RSEnergyMetrix that is combined with selected meters or groups to form a specific report instance. This allows Multi-Purpose Report Scripts to be reused for different meters and groups.
44 • RSEnergyMetrix Getting Results Guide

RT Real-Time Option
OverviewRSEnergyMetrix RT is a Windows-based client-server software package that may be used to configure Allen-Bradley Powermonitors and displays their real-time data and power quality information. RT is a rich-client software application that is installed with RSEnergyMetrix Manager to provide a real-time Powermonitor connection.
Use Microsoft Internet Explorer (6.0 or later) to interact with RT.
RSLinx provides communication between RSEnergyMetrix and the Powermonitor hardware. RSLinx Lite is included with your RSEnergyMetrix software.
RT complements Manager's data logging, cost allocation, profiling and reporting functions by allowing you to configure Powermonitors and to view, print, and save data from Powermonitors. With RT, you can:
Download and upload Powermonitor configurations and save the configurations to the RSEnergyMetrix database
View and print all of the real-time parameters in the Powermonitor
Manually capture oscillographs and view, print and save automatically captured oscillographs
View, save, and print all of the data logs in the Powermonitor
Overview of the RSEnergyMetrix RT User Interface The RSEnergyMetrix RT user interface consists of three parts:
Navigation TreeThe RSEnergyMetrix Manager Navigation Tree is a pane that organizes the Powermonitor Devices and Meters. You must create and set up communications with Powermonitor devices in the System > Devices folder.
Device Configuration window The Device Configuration Window is the window that allows the user to change or view the configuration of an individual Powermonitor.
Chapter
9 Using RSEnergyMetrix Options
Using RSEnergyMetrix Options • 45
Device Viewer window This window is the real-time viewer for all of the Powermonitor data.
The Device Configuration window and the Device Viewer are separate windows which appear “on top” of the RSEnergyMetrix Internet Explorer desktop. You may move, resize, maximize or minimize the windows. If you maximize a window, it may overlap and hide the other windows. To display a hidden or minimized window again, click its name on the Windows Task Bar.
Refer to the online help for more detailed information on using RT to configure and view Allen-Bradley Powermonitor, Powermonitor II and Powermonitor 3000 units.
Set up Powermonitors using RTYou must use RSEnergyMetrix Manager to configure groups and Powermonitors as devices so that you may work with the Powermonitors in RT.
To launch the device configuration window, select a Powermonitor device in the navigation tree Setup tab, and click the Device Configuration button in the device setup screen in the detail pane. If the Powermonitor is already configured, you may upload its settings to RT. Or you can enter new configuration data in RT and download the settings to the Powermonitor.
To set or change Powermonitor properties 1. Navigate to the Powermonitor device in the Setup tab > Devices folder
2. Select the Powermonitor
3. Open the Device Configuration window by clicking the Device Configuration button
4. Change configuration data in any of the tabs, as appropriate, or upload the configuration from the Powermonitor
5. Click Accept to accept the changes and save them to the database
6. Click Download to download the new settings from RSEnergyMetrix RT to the Powermonitor
7. Click Close to close the Device Configuration window
Tip Before configuring Powermonitors in RT, first establish hardware communications using RSLinx and then RSEnergyMetrix communications to the device.
To configure an existing Powermonitor, select the Powermonitor in the Setup tab, meters folder, and click the Device Configuration button on the Device Setup screen.
Enter the Powermonitor password in the Device Setup screen to enable downloads.
46 • RSEnergyMetrix Getting Results Guide
View Powermonitor data using RTTo launch the device viewer for a meter, select a meter in the navigation tree meters tab, and click the Device Viewer button in the meter summary screen in the detail pane.
The Device Viewer window is a tabbed dialog. Select from the tabs to view real-time voltage and current, power, or energy data; oscillograms, transients, or harmonics; input/output data and setpoint status; or data logs.
Refer to the online help for more detailed information on the RT option.
ChartsPlus Option
OverviewRSEnergyMetrix ChartsPlus is an optional package available with RSEnergyMetrix Manager that offers extensive custom charting capabilities. ChartsPlus is a “rich client” application that downloads and runs on the client computer. Its look and feel is that of a traditional Windows application rather than a web application.
ChartsPlus provides formatting and annotations toolbars that provide you with tools for customizing the appearance of your charts.
ChartsPlus provides you with the ability to create customized graphical views of your energy data. Some of the possibilities include:
Enhanced trendChartsPlus allows to plot up to 8 variables. Different time ranges may be selected for each variable and you may select various summary methods for each variable (e.g. you can plot the average Monday for one variable vs. a specific Monday for the same variable or another variable). Also, the chart control itself has many built-in functions such as zoom, scroll, print, export, user customization, etc.
Enhanced calendar trendSame as standard Calendar Trend but can overlay different months and multiple variables.
Load factor chartPlot a trend of load factor over a one-month period as well as daily min, max and average demand.
Refer to the online help for more detailed information on using the ChartsPlus option.
Using RSEnergyMetrix Options • 47

Client requirements for RT and ChartsPlusRSEnergyMetrix ‘rich-client’ options requires Internet Explorer 6.0 or later. IE 6.0 is included in the RSEnergyMetrix program disk. For each client workstation that you plan to use to run RT, Charts Plus and/or Reports Plus, perform the following steps:
1. Install .NET Framework 1.1
2. Add the RSEnergyMetrix server to the list of Trusted Sites. To do this, select Tools > Internet Options from the Internet Explorer menu, and select the Security tab. Select Trusted Sites and click the Sites... button. Add the RSEnergyMetrix server's url to the trusted sites and uncheck the check box to require secure server verification.
3. Set the .NET Framework security policy for trusted sites to Full Trust. To do this, launch Control Panel from the Windows Start button > Settings > Control Panel. Open the Administrative Tools folder by double-clicking on its icon. Launch the .NET Framework Wizards by double-clicking on its icon. Select the Adjust .net Security wizard. Select Make changes to this computer and click Next. Select Trusted Sites and move the slider to Full Trust. Click Next and then Finish.
48 • RSEnergyMetrix Getting Results Guide
Troubleshooting FAQPlease refer to the online Help topics for troubleshooting information.
System Status DisplayThe System Status display provides diagnostic information to help you locate potential causes of logging issues in RSEnergyMetrix.
1. The system status screen is the default screen to appear when you log in to RSEnergyMetrix Manager. You may also click on the System Status link in the RSEnergyMetrix header to access the system status display.
2. You may select one of the List errors options for display.
3. Only devices with errors appear in the list, arranged by the number of device errors in descending order. Click a device name for a list of specific device errors
4. Ten errors at a time are listed with time stamps and error codes. Click a page number to select the next page of device errors
5. You may purge errors from individual devices by clicking the Purge link in the device list or purge all errors by clicking the Purge All button (see above)
TelnetYou may connect to the RSEnergyMetrix server using Telnet to perform a number of diagnostic tasks. To use Telnet, follow these steps.
1. From the Windows Start button, select Run... and enter “Telnet” in the Open field
2. Click OK. In the Telnet window that appears, type the following. “Server name” is the name or IP address of the RSEnergyMetrix server:
set local_echo
open [server name]
3. The RSEnergyMetrix logger debug console window appears. Enter a question mark followed by the <enter> key to list the available commands:
Chapter
10 Troubleshooting and Support
Troubleshooting • 49
In addition to processing the commands you enter, the console will display a running record of logging activity which is useful in troubleshooting logging issues.
Time zone issuesTime zones in the RSEnergyMetrix system are independently set for meters, devices, rate schedules, reports, and the RSEnergyMetrix server. The time zone you select will affect:
Time stamps during data logging
Database logging intervals
Synchronization of device clocks with RSEnergyMetrix server clock
Consumption and Billing reports
Trend graphs
Calendar trend graphs
Obtaining supportTechnical Support Telephone - 440-646-5800
Technical Support Fax - 440-646-5801
World Wide Web - www.software.rockwell.com
Email - [email protected]
Tip Telnet is disabled by default. Please contact Rockwell Automation for assistance with enabling Telnet.
Tip Daylight savings time is accounted for during data logging and data retrieval.
50 • RSEnergyMetrix Getting Results Guide

ActivationRockwell Software's products are copy-protected. Only a computer with access to the activation key can run the software. The key is located in an activation file, which is originally located on the Master disk supplied with the RSEnergyMetrix product or option. The activation file contains one activation key per product. Each key contains one or more licenses depending on how many copies and which options of the product you have purchased.
During the setup process, the setup program gives you the opportunity to move the activation file from the Master disk to the root directory of the drive on which you're installing the software.
When RSEnergyMetrix starts, the software first checks your local hard drives, then network hard drives, and finally local floppy drives for activation. If the system fails to detect either the activation file or the Master disk, the following will occur:
RSEnergyMetrix Manager will start but you will not be able to create devices or meters or log data
RT, ChartsPlus and ReportsPlus options will return an 'Activation not found' error when you attempt to start them
Chapter
11 Activation
Tip Store your Master disks in a safe place. If an activation becomes damaged, the Master disk may be the only means to run your software in an emergency.
Activation • 51

Protecting your activation files
Activities that may damage activationTo avoid damaging your activation files, do not perform the following operations with activation files on the hard drive.
Restore from backup
Upgrade the operating system
Reinstall the same version of DOS or Windows
Un-install DOS or Windows
Compress or un-compress the hard drive
Turn off Windows for Workgroups 32-bit file access. If activation files were moved to a hard drive with 32-bit file access on, turning off 32-bit file access results in activation files being lost. (You can turn on 32-bit disk access and 32-bit file access in Windows for Workgroups without harming the activation file.)
Defragmentation utilities will not harm activation files.
Preventive stepsBefore running any type of utility that may modify the structure or organization of the hard drive, remove activation from the hard drive:
1. Use the Move Activation utility (EvMove) to move activation files from the hard drive to an activation disk.
2. Perform the hard disk operation.
Caution Certain anti-virus software packages, such as Norton Anti-virus, can corrupt the activation files. Configure your anti-virus software to avoid checking the files EVRSI.SYS and 386SWAP.PAR.
Caution EvMove will not move activations if an application using any activation is running. Ensure all software programs are closed and all services such as RSLinx and RSEnergyMetrix logger are stopped before initiating the EvMove utility.
Run EVMOVE.EXE from your hard drive (located in C:\Program Files\Rockwell Software\RSUtil if you accepted the default directory location during installation).
52 • RSEnergyMetrix Getting Results Guide
3. Move the activation files back to the hard drive.
Moving activation filesYou may not move activation files on a computer that has activated programs running. RSEnergyMetrix software utilizes services that run in the background and must be stopped before activations may be moved. To move activations on your server, follow these steps:
1. Before moving activation files on the RSEnergyMetrix server, manually stop the RSEnergyMetrix logger service. If your server is running RSLinx Lite, you do not need to stop the RSLinx service. If your server is running an activated version of RSLinx (OEM, Professional, C-SDK or Gateway), then manually stop the RSLinx service also. To stop these services, follow these steps:
From the Windows Start button, select Settings > Control Panel
Open Administrative Tools, then Services
Select the service you wish to stop
Open the Properties dialog and click the Stop button, then close the dialog
2. Close any other Rockwell Software applications that are running
3. Use the Move Activation utility (EvMove) to move activation files from the activation disk to the hard drive or back from the hard drive to the activation disk as needed
4. Restart the RSEnergyMetrix logger service.
5. If you stopped the RSLinx service, restart the RSLinx program
Caution You must use the move utility, EvMove, to move activation files. Attempts to copy, move or email an activation file by other means will damage the file.
Caution EvMove will not move activations if an application using any activation is running. Ensure all software programs are closed and all services such as RSLinx and RSEnergyMetrix logger are stopped before initiating the EvMove utility.
Caution You must use the move utility, EvMove, to move activation files. Attempts to copy, move or email an activation file by other means will damage the file.
Activation • 53
Activating RSEnergyMetrix software
RSEnergyMetrix Manager and optionsRSEnergyMetrix Manager is a server-based application. Activation files are installed on the server computer's hard disk during normal installation of the software. The installed activations determine the Manager meter limit and which options are enabled. One activation enables Manager, one activation enables the Real Time (RT) options, one activation enables the ChartsPlus option, and one activation enables the ReportsPlus option. There is no limit on the number of users that may access the RSEnergyMetrix server.
Upgrading meter limits or adding optionsYou may purchase RSEnergyMetrix Manager software with capacity for 8, 64 or 10,000 meters. You may increase the meter limit on your server at any time by purchasing and installing an upgrade from Rockwell Automation.
You may also add options such as RT, ChartsPlus and ReportsPlus in the same manner. Check with your local Rockwell Automation representative for option pricing and availability.
Finding more information about activationThe online help (COPYPROT.HLP) is available as part of the RSLinx Lite installation on the RSEnergyMetrix server. It provides more extensive information on activation including subjects such as:
KEYDISK Set this environment variable to tell your computer to look for activation on floppy drives.
CHECKDRIVES Specify which drives to search for activation.
network activation Move activation to a network server to allow multiple users access to the activation.
moving activation See detailed instructions for moving activation.
resetting activation See detailed instructions for using the Reset utility to repair a damaged activation file.
troubleshooting Look up error messages, and get problem-solving suggestions.
Important Your Microsoft SQL 2000 Server license my place limits on the number of concurrent users. It is the customer's responsibility to observe the requirements of all software licenses.
54 • RSEnergyMetrix Getting Results Guide
You can access online help:
from the Help button on one of the EvMove or Reset dialog boxes.
from RSLinx by selecting Help > Copy Protection from the main menu.
without running either RSLinx or the activation utilities. From the Windows Start menu, select Programs > Rockwell Software > Utilities > Activation Help (if you accepted the default directory location during installation).
Frequently asked questions on activationFollowing are some common problems that people encounter with activation and their solutions.
My activation files were damaged. What should I do?If you have lost the activation because the activation file is damaged, you need to reset activation. Follow the Reset Codes instructions on the Rockwell Software Technical Support web page, or call the technical support telephone number. The web page and telephone number are both listed on the inside front cover of this guide.
If you cannot obtain a reset code immediately, follow these instructions to use the Master disk to activate the software as a temporary solution.
To use the Master disk to activate software:
1. Set the KEYDISK environment variable to TRUE. (Please refer to the online help.)
2. Insert your Master disk in the floppy drive.
3. Run your software as usual. Your software will find the activation on the Master disk.
I accidentally deleted the software directory on my hard drive. Do I need to call Rockwell Software for replacement activation files?No. Deleting the program files does not delete your activation. The activation files are not stored in the program directory; they are located in the root directory. Your activation files will not be lost unless you format the hard drive, tamper with hidden files in the root directory, or perform certain other hard drive operations (refer to “Protecting your activation files” topic for more information).
To get the software running again, simply reinstall the software, but do not move the activation when given the opportunity.
Activation • 55

56 • RSEnergyMetrix Getting Results Guide

Device: A physical source of data. A Device is an external hardware device or software application that supplies data either directly to RSEner-gyMetrix or indirectly to RSEnergyMetrix through another Device. Device examples include power monitors, EEMs and PLCs. A soft-ware application example is an OPC server
Domain: A domain is a Group that Roles, Meters and Reports can be assigned to
Group: A named collection of Devices and other Groups. Groups may be nested to any arbitrary level
Meter: A logical source of data (see below). Meters may contain zero or more Tags. Meters may be of type Device or Manual.
Powermonitor: A device that measures the characteristics of the electricity in a circuit.
Privilege: A specific security access flag. Examples of Privileges are: “Edit Users”, “View Rate schedules”, “Run Billing Reports”. A number of pre-defined Privileges are defined “out of the box” in the default Roles of “Admin,” “User” and “Guest”
Role: A named collection of security attributes (Privileges). Roles are assigned to Domains
Tag: A specific value type and addressing information on how to read that value from a Device. Tags are assigned to Meters. Tags may be of type Device, Manual or Derived.
User: A named set of login credentials. Users are assigned to Roles
Glossary
Glossary • 57

58 • RSEnergyMetrix Getting Results Guide

Index
Aactivating RSEnergyMetrix software 54
adding options 54options 54upgrading meter limits 54
activation 51administering the RSEnergyMetrix database 19alarming 32
alarm subscriptions 32overview 32types of alarms 32
automatic data repopulation 30devices supporting ADR 30setting up ADR 31
Cchartsplus option 47
overview 47client requirements 11client requirements for RT and chartsplus48communications path definition 22
paths to Rockwell Automation devices 22
third party devices 23using RSLinx 23
create a role and assign privileges 17
Ddatabase name 19delete a device 26derived tag 29
FFAQ on activation 55
LLoad Factor 43
Mmore information about activation 54moving activation files 53multi-purpose report 44
Nnavigating in RSEnergyMetrix 6
calendar trend 7client desktop overview 6custom tab 7meter status 7meter trend 7meters tab 6my user settings 6reports tab 7system status 8system tab 7
Oobtaining support 50overview of devices 21overview of groups and domains 15overview of meters 26
meter tags 26navigating to a meter 27notes on meters 27
overview of rate schedules 35line item scripting 36
overview of roles and users 16
Pprotecting your activation files 52
activities that damage activation 52preventive steps 52
Index • 59
Qquick start 3
log into manager 3set up a device 4set up a group 4set up a meter 5view meter data 6
RReportsPlus 43
multi-purpose report 44RSEnergyMetrix communications 3RSEnergyMetrix components 2
3PX option 3chartsplus option 2manager 2ReportsPlus option 2RT option 2
RSEnergyMetrix manager installation 12pre-installation checks 12
RT real-time option 45setting up Powermonitors 46user interface 45viewing Powermonitor data 47
running reports overview 41billing reports 41consumption reports 41demand analysis reports 41
Sserver requirements 9
hardware 10
software 9set up a new group in RSEnergyMetrix manager 16set up a user and assign roles 17set up an Ethernet device 24set up device-based meter 27set up Powermonitor device 28set up the RSEnergyMetrix system 15setting up and viewing standard report42
editing 42printing 42saving 42viewing 42
system status display 49
Ttelnet 49time zone issues 50troubleshooting 49
Uupgrading to a new release 19
Vverify communications with a device 25viewing meter status 33viewing real-time meter data using RT 34viewing standard charts 33
calendar trend 33trend chart 33
60 • RSEnergyMetrix Getting Results Guide

DOC ID ENEMTX-GR001C-EN-P - Januaury 2004 62PN XXXXXX-XXSupersedes Publication XXXX-X.X.X - Copyright © 2004 Rockwell Automation. All rights reserved. Printed in the U.S.A.