Embed Size (px)
Citation preview
Getting Started Guide
Secure Remote Access Appliances
Secure Remote Access SRA 4200/1200 Getting Started Guide
Notes, Cautions, and Warnings
© 2012 Dell Inc.
Trademarks: Dell™, the DELL logo, SonicWALL™, SonicWALL GMS™, SonicWALL ViewPoint™, Aventail™, Reassembly-Free Deep Packet Inspection™, Dynamic Security for the Global Network™, SonicWALL Aventail Advanced End Point Control™ (EPC™), SonicWALL Aventail Advanced Reporting™, SonicWALL Aventail Connect Mobile™, SonicWALL Aventail Connect™, SonicWALL Aventail Native Access Modules™, SonicWALL Aventail Policy Zones™, SonicWALL Aventail Smart Access™, SonicWALL Aventail Unified Policy™, SonicWALL Aventail™ Advanced EPC™, SonicWALL Clean VPN™, SonicWALL Clean Wireless™, SonicWALL Global Response Intelligent Defense (GRID) Network™, SonicWALL Mobile Connect™, SonicWALL SuperMassive™ E10000 Series, and all other SonicWALL product and service names and slogans are trademarks of Dell Inc.
2012 – 11 P/N 232-002122-00 Rev. C
NOTE: A NOTE indicates important information that helps you make better use of your system.
CAUTION: A CAUTION indicates potential damage to hardware or loss of data if instructions are not followed.
WARNING: A WARNING indicates a potential for property damage, personal injury, or death.
Dell SonicWALLSRA 4200/1200 Getting Started GuideThis Getting Started Guide contains installation procedures and configuration guidelines for deploying a Dell SonicWALL SRA 1200/4200 appliance into an existing or new network. This document addresses the most common use-case scenarios and network topologies in which the Dell SonicWALL SRA 1200/4200 appliance can be deployed.
Document Contents
This document contains the following sections:
Setting Up Your Network - page 5
Connecting Your SRA 1200/4200 - page 21
Registering Your Appliance - page 23
Network Configuration - page 29
Upgrading Your Appliance - page 41
Support and Training Options - page 45
Safety and Regulatory Information - page 51
11
2
33
4
5
6
7
3

4
Setting Up Your Network
In this Section
This section provides pre-configuration information. Review this section before setting up your Dell SonicWALL SRA 1200/4200 appliance.
• SRA 1200 Package Contents - page 6
• SRA 4200 Package Contents - page 7
• What You Need to Begin - page 8
• Selecting a Deployment Scenario - page 9
• Installing the SRA Appliance - page 11
• Accessing the Management Interface - page 12
• Troubleshooting - page 13
1
Dell SonicWALL SRA 4200/1200 Getting Started Guide 5
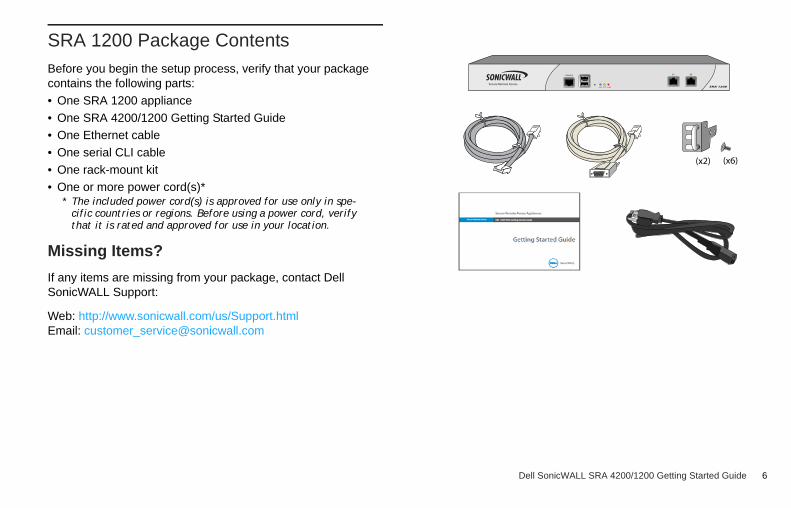
SRA 1200 Package Contents
Before you begin the setup process, verify that your package contains the following parts:
• One SRA 1200 appliance
• One SRA 4200/1200 Getting Started Guide
• One Ethernet cable
• One serial CLI cable
• One rack-mount kit
• One or more power cord(s)** The included power cord(s) is approved for use only in spe-
cific countries or regions. Before using a power cord, verify that it is rated and approved for use in your location.
Missing Items?
If any items are missing from your package, contact Dell SonicWALL Support:
Web: http://www.sonicwall.com/us/Support.html Email: [email protected]
(x6)(x2)
1200SRASecure Remote Access
X0X1CONSOLE
PWR TEST ALARM
Dell SonicWALL SRA 4200/1200 Getting Started Guide 6
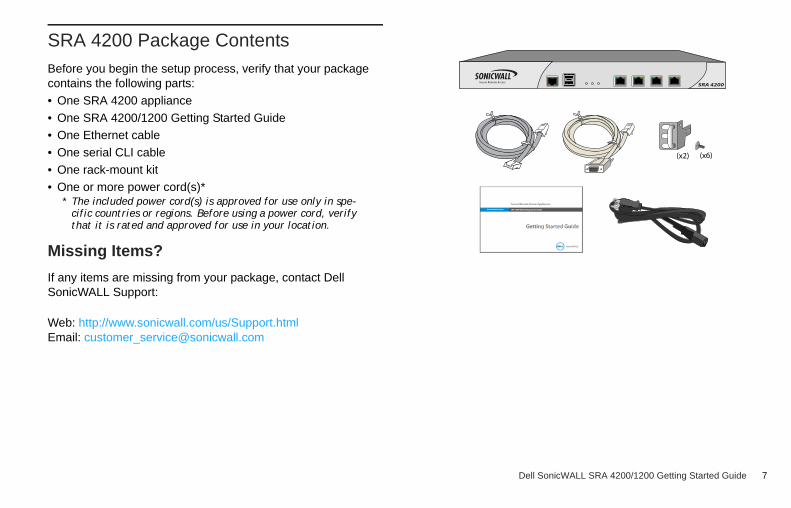
SRA 4200 Package Contents
Before you begin the setup process, verify that your package contains the following parts:
• One SRA 4200 appliance
• One SRA 4200/1200 Getting Started Guide
• One Ethernet cable
• One serial CLI cable
• One rack-mount kit
• One or more power cord(s)** The included power cord(s) is approved for use only in spe-
cific countries or regions. Before using a power cord, verify that it is rated and approved for use in your location.
Missing Items?
If any items are missing from your package, contact Dell SonicWALL Support: Web: http://www.sonicwall.com/us/Support.html Email: [email protected]
(x6)(x2)
Secure Remote Access SRA 4200
Dell SonicWALL SRA 4200/1200 Getting Started Guide 7
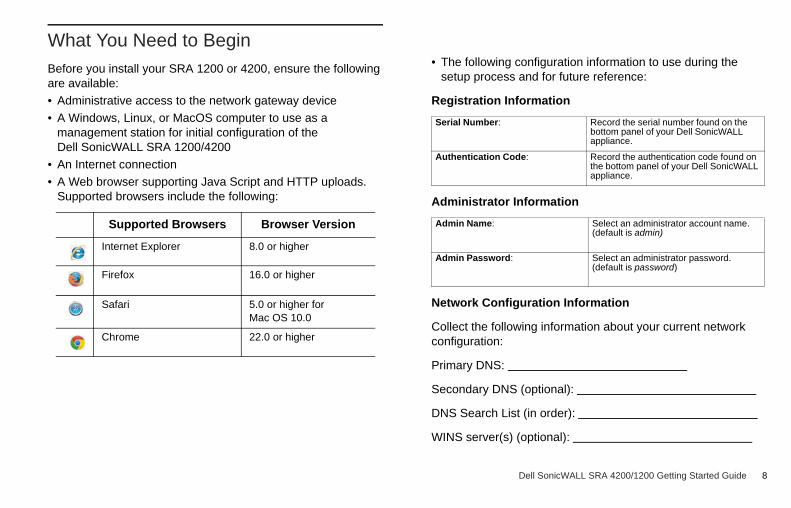
What You Need to Begin
Before you install your SRA 1200 or 4200, ensure the following are available:
• Administrative access to the network gateway device
• A Windows, Linux, or MacOS computer to use as a management station for initial configuration of the Dell SonicWALL SRA 1200/4200
• An Internet connection
• A Web browser supporting Java Script and HTTP uploads. Supported browsers include the following:
• The following configuration information to use during the setup process and for future reference:
Registration Information
Administrator Information
Network Configuration Information
Collect the following information about your current network configuration:
Primary DNS:
Secondary DNS (optional):
DNS Search List (in order):
WINS server(s) (optional):
Supported Browsers Browser Version
Internet Explorer 8.0 or higher
Firefox 16.0 or higher
Safari 5.0 or higher for Mac OS 10.0
Chrome 22.0 or higher
Serial Number:
Record the serial number found on the bottom panel of your Dell SonicWALL appliance.
Authentication Code:
Record the authentication code found on the bottom panel of your Dell SonicWALL appliance.
Admin Name:
Select an administrator account name. (default is admin)
Admin Password:
Select an administrator password. (default is password)
Dell SonicWALL SRA 4200/1200 Getting Started Guide 8
Selecting a Deployment Scenario
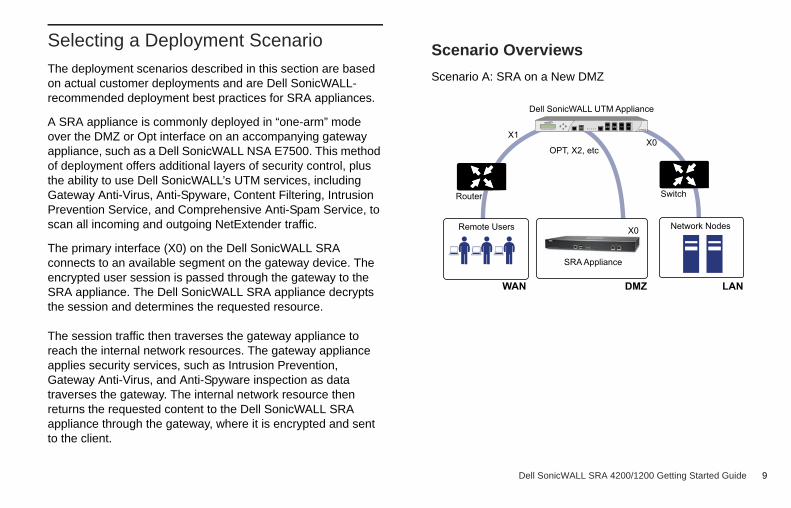
The deployment scenarios described in this section are based on actual customer deployments and are Dell SonicWALL-recommended deployment best practices for SRA appliances.
A SRA appliance is commonly deployed in “one-arm” mode over the DMZ or Opt interface on an accompanying gateway appliance, such as a Dell SonicWALL NSA E7500. This method of deployment offers additional layers of security control, plus the ability to use Dell SonicWALL’s UTM services, including Gateway Anti-Virus, Anti-Spyware, Content Filtering, Intrusion Prevention Service, and Comprehensive Anti-Spam Service, to scan all incoming and outgoing NetExtender traffic.
The primary interface (X0) on the Dell SonicWALL SRA connects to an available segment on the gateway device. The encrypted user session is passed through the gateway to the SRA appliance. The Dell SonicWALL SRA appliance decrypts the session and determines the requested resource.
The session traffic then traverses the gateway appliance to reach the internal network resources. The gateway appliance applies security services, such as Intrusion Prevention, Gateway Anti-Virus, and Anti-Spyware inspection as data traverses the gateway. The internal network resource then returns the requested content to the Dell SonicWALL SRA appliance through the gateway, where it is encrypted and sent to the client.
Scenario Overviews
Scenario A: SRA on a New DMZ
WAN DMZ LAN
SRA Appliance
OPT, X2, etc
X1X0
X0Remote Users
SwitchRouter
Network Nodes
Dell SonicWALL UTM Appliance
E7500Network Security Appliance
Dell SonicWALL SRA 4200/1200 Getting Started Guide 9
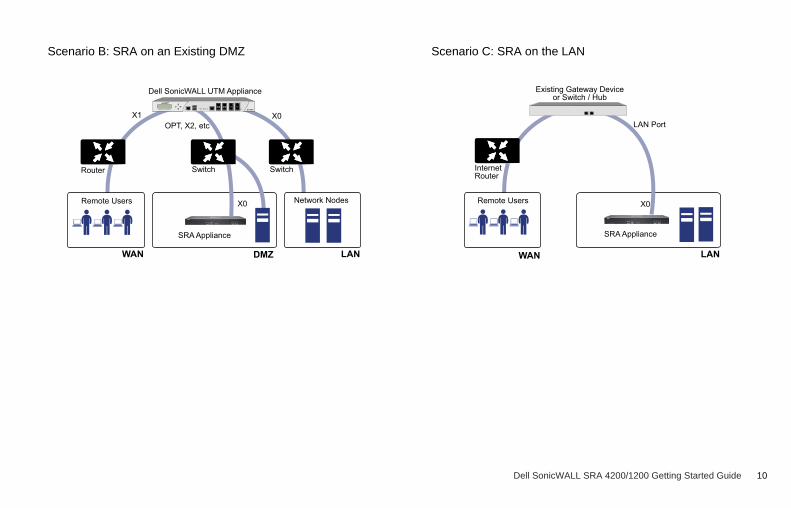
Scenario B: SRA on an Existing DMZ Scenario C: SRA on the LAN
DMZ LANWAN
OPT, X2, etcX1 X0
X0Remote Users Network Nodes
Dell SonicWALL UTM Appliance
E7500Network Security Appliance
SwitchSwitchRouter
SRA Appliance
LANWAN
LAN Port
X0Remote Users
Existing Gateway Deviceor Switch / Hub
InternetRouter
SRA Appliance
Dell SonicWALL SRA 4200/1200 Getting Started Guide 10
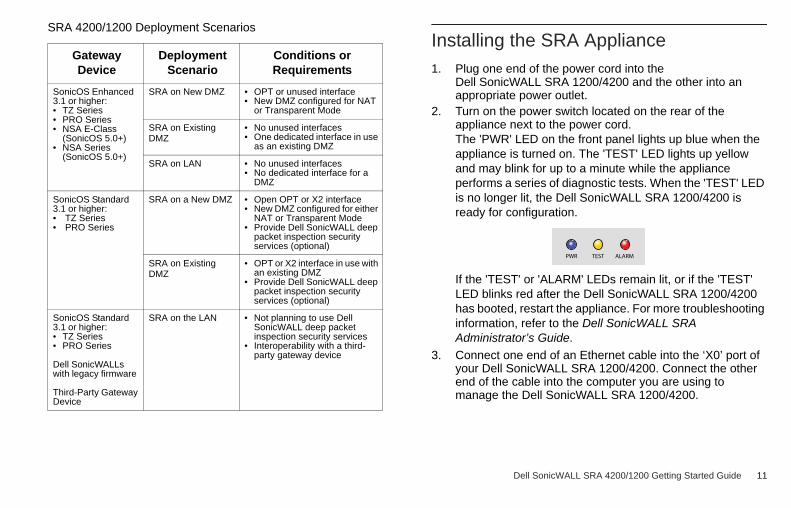
SRA 4200/1200 Deployment ScenariosInstalling the SRA Appliance
1. Plug one end of the power cord into the Dell SonicWALL SRA 1200/4200 and the other into an appropriate power outlet.
2. Turn on the power switch located on the rear of the appliance next to the power cord.The 'PWR' LED on the front panel lights up blue when the appliance is turned on. The 'TEST' LED lights up yellow and may blink for up to a minute while the appliance performs a series of diagnostic tests. When the 'TEST' LED is no longer lit, the Dell SonicWALL SRA 1200/4200 is ready for configuration.
If the 'TEST' or 'ALARM' LEDs remain lit, or if the 'TEST' LED blinks red after the Dell SonicWALL SRA 1200/4200 has booted, restart the appliance. For more troubleshooting information, refer to the Dell SonicWALL SRA Administrator’s Guide.
3. Connect one end of an Ethernet cable into the ‘X0’ port of your Dell SonicWALL SRA 1200/4200. Connect the other end of the cable into the computer you are using to manage the Dell SonicWALL SRA 1200/4200.
Gateway Device
Deployment Scenario
Conditions or Requirements
SonicOS Enhanced 3.1 or higher:• TZ Series• PRO Series• NSA E-Class
(SonicOS 5.0+)• NSA Series
(SonicOS 5.0+)
SRA on New DMZ • OPT or unused interface• New DMZ configured for NAT
or Transparent Mode
SRA on Existing DMZ
• No unused interfaces• One dedicated interface in use
as an existing DMZ
SRA on LAN • No unused interfaces• No dedicated interface for a
DMZ
SonicOS Standard 3.1 or higher:• TZ Series• PRO Series
SRA on a New DMZ • Open OPT or X2 interface• New DMZ configured for either
NAT or Transparent Mode • Provide Dell SonicWALL deep
packet inspection security services (optional)
SRA on Existing DMZ
• OPT or X2 interface in use with an existing DMZ
• Provide Dell SonicWALL deep packet inspection security services (optional)
SonicOS Standard 3.1 or higher:• TZ Series• PRO Series
Dell SonicWALLs with legacy firmware
Third-Party Gateway Device
SRA on the LAN • Not planning to use Dell SonicWALL deep packet inspection security services
• Interoperability with a third-party gateway device
PWR TEST ALARM
Dell SonicWALL SRA 4200/1200 Getting Started Guide 11
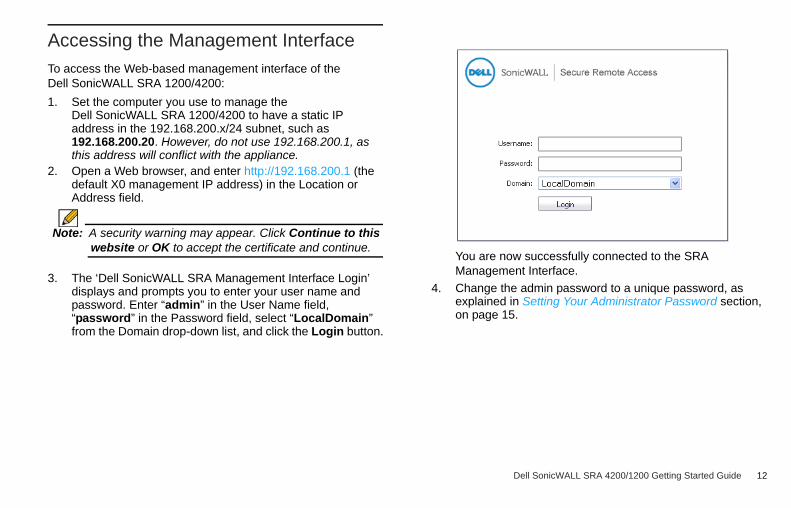
Accessing the Management Interface
To access the Web-based management interface of the Dell SonicWALL SRA 1200/4200:
1. Set the computer you use to manage the Dell SonicWALL SRA 1200/4200 to have a static IP address in the 192.168.200.x/24 subnet, such as 192.168.200.20. However, do not use 192.168.200.1, as this address will conflict with the appliance.
2. Open a Web browser, and enter http://192.168.200.1 (the default X0 management IP address) in the Location or Address field.
Note: A security warning may appear. Click Continue to this website or OK to accept the certificate and continue.
3. The ‘Dell SonicWALL SRA Management Interface Login’ displays and prompts you to enter your user name and password. Enter “admin” in the User Name field, “password” in the Password field, select “LocalDomain” from the Domain drop-down list, and click the Login button.
You are now successfully connected to the SRA Management Interface.
4. Change the admin password to a unique password, as explained in Setting Your Administrator Password section, on page 15.
Dell SonicWALL SRA 4200/1200 Getting Started Guide 12
Troubleshooting
If you cannot connect to the Dell SonicWALL SRA 1200/4200, verify the following configurations:
• Did you plug your management workstation into the interface X0 on the SRA appliance? Management can only be performed through X0.
• Is the link light illuminated on both the management station and the SRA appliance?
• Did you correctly enter the SRA appliance management IP address in your Web browser?
• Is your computer set to a static IP address of 192.168.200.20?
• Is your Domain set to LocalDomain on the login screen?
If you are still unable to connect to the SRA appliance, contact Dell SonicWALL Support:
Web: http://www.sonicwall.com/us/Support.html Email: [email protected]
Dell SonicWALL SRA 4200/1200 Getting Started Guide 13
Connecting Your Appliance
In this Section
This section provides procedures for connecting your Dell SonicWALL SRA 1200/4200 appliance.
• Configuring Your SRA 4200/1200 - page 15
• Connecting Your SRA 1200/4200 - page 21
2
Dell SonicWALL SRA 4200/1200 Getting Started Guide 14
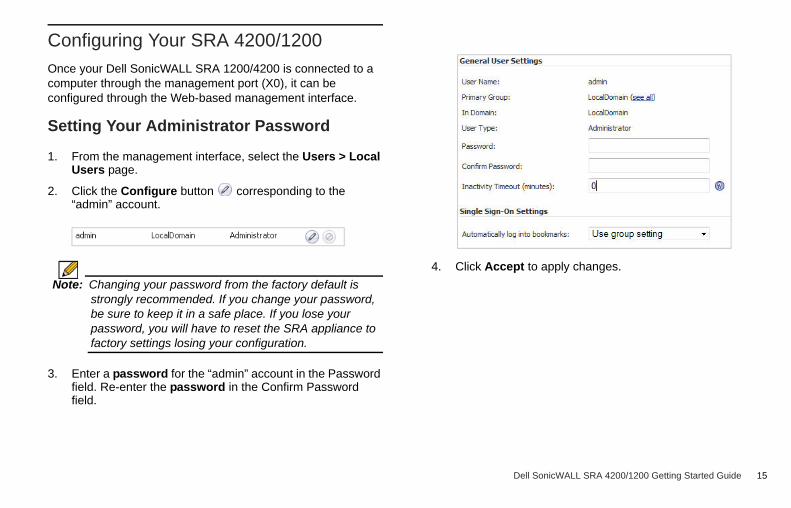
Configuring Your SRA 4200/1200
Once your Dell SonicWALL SRA 1200/4200 is connected to a computer through the management port (X0), it can be configured through the Web-based management interface.
Setting Your Administrator Password
1. From the management interface, select the Users > Local Users page.
2. Click the Configure button corresponding to the “admin” account.
Note: Changing your password from the factory default is strongly recommended. If you change your password, be sure to keep it in a safe place. If you lose your password, you will have to reset the SRA appliance to factory settings losing your configuration.
3. Enter a password for the “admin” account in the Password field. Re-enter the password in the Confirm Password field.
4. Click Accept to apply changes.
Dell SonicWALL SRA 4200/1200 Getting Started Guide 15
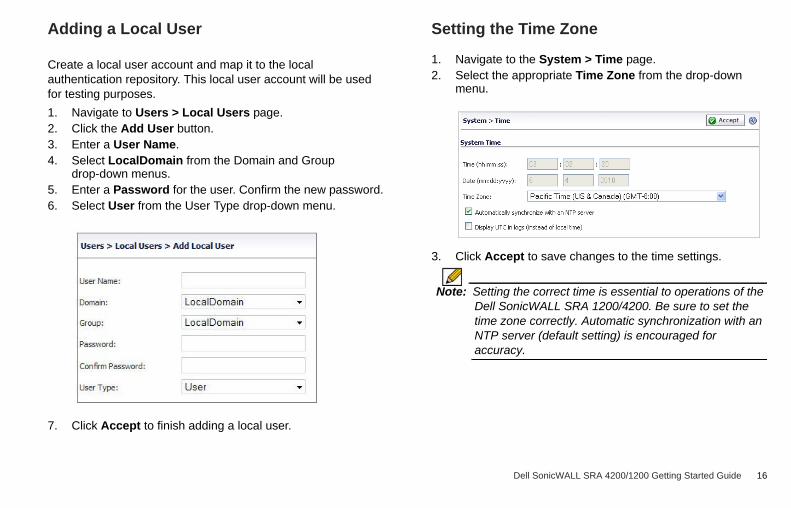
Adding a Local User
Create a local user account and map it to the local authentication repository. This local user account will be used for testing purposes.
1. Navigate to Users > Local Users page.2. Click the Add User button.3. Enter a User Name.4. Select LocalDomain from the Domain and Group
drop-down menus.5. Enter a Password for the user. Confirm the new password.6. Select User from the User Type drop-down menu.
7. Click Accept to finish adding a local user.
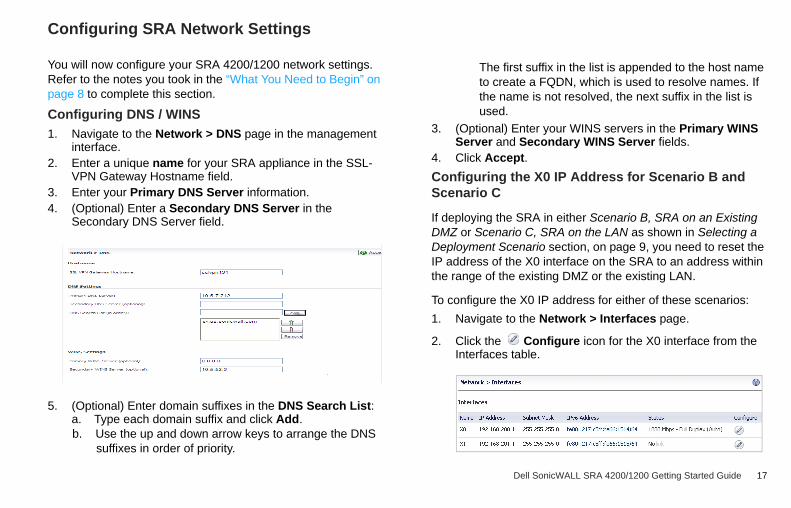
Setting the Time Zone
1. Navigate to the System > Time page.2. Select the appropriate Time Zone from the drop-down
menu.
3. Click Accept to save changes to the time settings.
Note: Setting the correct time is essential to operations of the Dell SonicWALL SRA 1200/4200. Be sure to set the time zone correctly. Automatic synchronization with an NTP server (default setting) is encouraged for accuracy.
Dell SonicWALL SRA 4200/1200 Getting Started Guide 16
Configuring SRA Network Settings
You will now configure your SRA 4200/1200 network settings. Refer to the notes you took in the “What You Need to Begin” on page 8 to complete this section.
Configuring DNS / WINS
1. Navigate to the Network > DNS page in the management interface.
2. Enter a unique name for your SRA appliance in the SSL-VPN Gateway Hostname field.
3. Enter your Primary DNS Server information.4. (Optional) Enter a Secondary DNS Server in the
Secondary DNS Server field.
5. (Optional) Enter domain suffixes in the DNS Search List:a. Type each domain suffix and click Add. b. Use the up and down arrow keys to arrange the DNS
suffixes in order of priority.
The first suffix in the list is appended to the host name to create a FQDN, which is used to resolve names. If the name is not resolved, the next suffix in the list is used.
3. (Optional) Enter your WINS servers in the Primary WINS Server and Secondary WINS Server fields.
4. Click Accept.
Configuring the X0 IP Address for Scenario B and Scenario C
If deploying the SRA in either Scenario B, SRA on an Existing DMZ or Scenario C, SRA on the LAN as shown in Selecting a Deployment Scenario section, on page 9, you need to reset the IP address of the X0 interface on the SRA to an address within the range of the existing DMZ or the existing LAN.
To configure the X0 IP address for either of these scenarios:
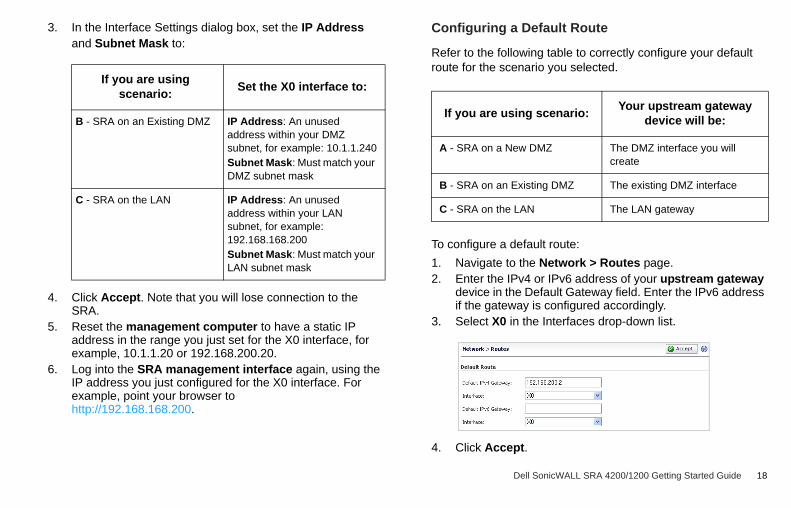
1. Navigate to the Network > Interfaces page.
2. Click the Configure icon for the X0 interface from the Interfaces table.
Dell SonicWALL SRA 4200/1200 Getting Started Guide 17
3. In the Interface Settings dialog box, set the IP Address and Subnet Mask to:
4. Click Accept. Note that you will lose connection to the SRA.
5. Reset the management computer to have a static IP address in the range you just set for the X0 interface, for example, 10.1.1.20 or 192.168.200.20.
6. Log into the SRA management interface again, using the IP address you just configured for the X0 interface. For example, point your browser to http://192.168.168.200.
Configuring a Default Route
Refer to the following table to correctly configure your default route for the scenario you selected.
To configure a default route:
1. Navigate to the Network > Routes page.2. Enter the IPv4 or IPv6 address of your upstream gateway
device in the Default Gateway field. Enter the IPv6 address if the gateway is configured accordingly.
3. Select X0 in the Interfaces drop-down list.
4. Click Accept.
If you are using scenario:
Set the X0 interface to:
B - SRA on an Existing DMZ IP Address: An unused address within your DMZ subnet, for example: 10.1.1.240Subnet Mask: Must match your DMZ subnet mask
C - SRA on the LAN IP Address: An unused address within your LAN subnet, for example: 192.168.168.200Subnet Mask: Must match your LAN subnet mask
If you are using scenario:Your upstream gateway
device will be:
A - SRA on a New DMZ The DMZ interface you will create
B - SRA on an Existing DMZ The existing DMZ interface
C - SRA on the LAN The LAN gateway
Dell SonicWALL SRA 4200/1200 Getting Started Guide 18
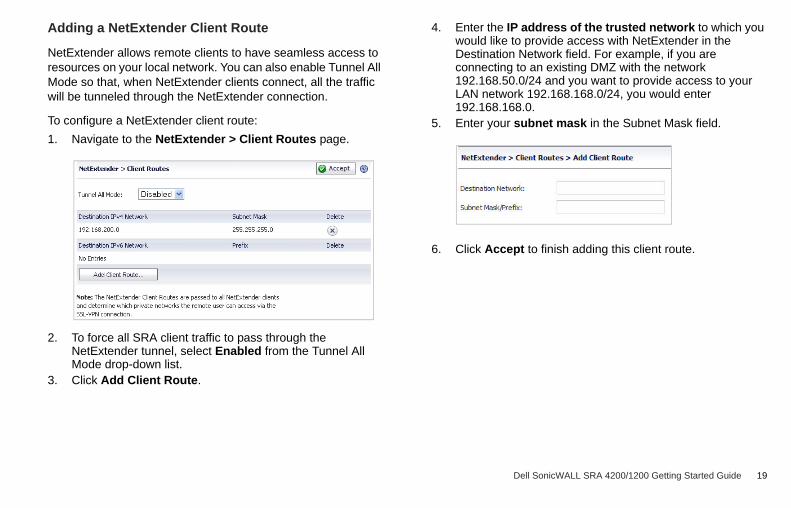
Adding a NetExtender Client Route
NetExtender allows remote clients to have seamless access to resources on your local network. You can also enable Tunnel All Mode so that, when NetExtender clients connect, all the traffic will be tunneled through the NetExtender connection.
To configure a NetExtender client route:
1. Navigate to the NetExtender > Client Routes page.
2. To force all SRA client traffic to pass through the NetExtender tunnel, select Enabled from the Tunnel All Mode drop-down list.
3. Click Add Client Route.
4. Enter the IP address of the trusted network to which you would like to provide access with NetExtender in the Destination Network field. For example, if you are connecting to an existing DMZ with the network 192.168.50.0/24 and you want to provide access to your LAN network 192.168.168.0/24, you would enter 192.168.168.0.
5. Enter your subnet mask in the Subnet Mask field.
6. Click Accept to finish adding this client route.
Dell SonicWALL SRA 4200/1200 Getting Started Guide 19

Setting Your NetExtender Address Range
The NetExtender IP range defines the IP address pool from which addresses will be assigned to remote users during NetExtender sessions. The range needs to be large enough to accommodate the maximum number of concurrent NetExtender users you wish to support.
The range should fall within the same subnet as the interface to which the SRA appliance is connected, and it must not overlap or collide with any assigned addresses if other hosts are on the same segment as the SRA appliance. You can determine the
correct subnet based on your network scenario selection:
To set your NetExtender address range in the management interface:
1. Navigate to the NetExtender > Client Settings page.2. Enter an address range for your clients in the Client
Address Range Begin and Client Address Range End fields.
If you do not have enough available addresses to support your desired number of concurrent NetExtender users, you may use a new subnet for NetExtender. This condition may occur if your existing DMZ or LAN is configured in NAT mode with a small subnet space, such as 255.255.255.224, or more commonly if your DMZ or LAN is configured in Transparent mode and you have a limited number of public addresses from your ISP. In either case, you may assign a new, unallocated IP range to NetExtender (such as 192.168.10.100 to 192.168.10.200) and configure a route to this range on your gateway appliance.
For example, if your current Transparent range is 67.115.118.75 through 67.115.118.80, and you wish to support 50 concurrent NetExtender clients, configure your SRA X0 interface with an available IP address in the Transparent range, such as 67.115.118.80, and configure your NetExtender range as 192.168.10.100 to 192.168.10.200. Then, on your gateway device, configure a static route to 192.168.10.0/255.255.255.0 using 67.115.118.80.
Scenario A Use the default NetExtender range:192.168.200.100 to 192.168.200.200
Scenario B Select a range that falls within your existing DMZ subnet. For example, if your DMZ uses the 192.168.50.0/24 subnet, and you want to support up to 30 concurrent NetExtender sessions, you could use 192.168.50.220 to 192.168.50.249, providing they are not already in use.
Scenario C Select a range that falls within your existing LAN subnet. For example, if your LAN uses the 192.168.168.0/24 subnet, and you want to support up to 10 concurrent NetExtender sessions, you could use 192.168.168.240 to 192.168.168.249, providing they are not already in use.
Scenario A 192.168.200.100 to 192.168.200.200 (default range)
Scenario B An unused range within your DMZ subnetScenario C An unused range within your LAN subnet
Dell SonicWALL SRA 4200/1200 Getting Started Guide 20
Connecting Your SRA 1200/4200
Before continuing, reference the diagrams on the following pages to connect the Dell SonicWALL SRA 1200/4200 to your network.
Refer to the options in “Selecting a Deployment Scenario” on page 9 to determine the proper scenario for your network configuration:
• Scenario A: SRA on a New DMZ - page 21
• Scenario B: SRA on an Existing DMZ - page 22
• Scenario C: SRA on the LAN - page 22
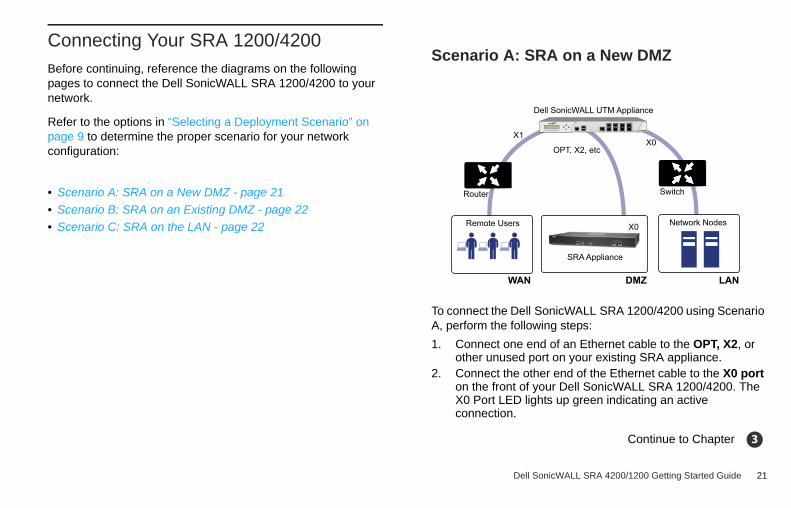
Scenario A: SRA on a New DMZ
To connect the Dell SonicWALL SRA 1200/4200 using Scenario A, perform the following steps:
1. Connect one end of an Ethernet cable to the OPT, X2, or other unused port on your existing SRA appliance.
2. Connect the other end of the Ethernet cable to the X0 port on the front of your Dell SonicWALL SRA 1200/4200. The X0 Port LED lights up green indicating an active connection.
Continue to Chapter
WAN DMZ LAN
SRA Appliance
OPT, X2, etc
X1X0
X0Remote Users
SwitchRouter
Network Nodes
Dell SonicWALL UTM Appliance
E7500Network Security Appliance
3
Dell SonicWALL SRA 4200/1200 Getting Started Guide 21

Scenario B: SRA on an Existing DMZ
To connect the Dell SonicWALL SRA 1200/4200 using Scenario B, perform the following steps:
1. Connect one end of an Ethernet cable to an unused port on your DMZ, either directly to the OPT or X2 on your existing SRA appliance, or to a hub or switch on your DMZ.
2. Connect the other end of the Ethernet cable to the X0 port on your Dell SonicWALL SRA 1200/4200. The X0 Port LED lights up green indicating an active connection.
Continue to Chapter
Scenario C: SRA on the LAN
To connect the Dell SonicWALL SRA 1200/4200 using Scenario C, perform the following steps:
1. Connect one end of an Ethernet cable to an unused port on your LAN hub or switch.
2. Connect the other end of the Ethernet cable to the X0 port on the front of your Dell SonicWALL SRA 1200/4200. The X0 Port LED lights up green indicating an active connection.
Continue to Chapter
DMZ LANWAN
OPT, X2, etcX1 X0
X0Remote Users Network Nodes
Dell SonicWALL UTM Appliance
E7500Network Security Appliance
SwitchSwitchRouter
SRA Appliance
3
LANWAN
LAN Port
X0Remote Users
Existing Gateway Deviceor Switch / Hub
InternetRouter
SRA Appliance
3
Dell SonicWALL SRA 4200/1200 Getting Started Guide 22
Registering Your Appliance
In this Section
This section provides instructions for registering your Dell SonicWALL SRA 1200/4200 appliance.
• Creating a MySonicWALL Account - page 24
• Registering Your SRA Appliance - page 25
• Services and Licensing - page 26
Note: Registration is an important part of the setup process and is necessary to receive the benefits of Dell SonicWALL services, user licensing, firmware updates, and technical support.
3
Dell SonicWALL SRA 4200/1200 Getting Started Guide 23
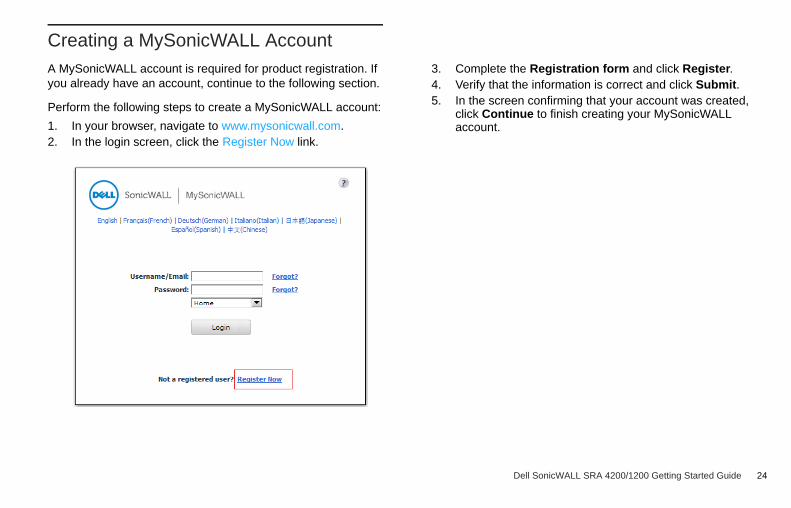
Creating a MySonicWALL Account
A MySonicWALL account is required for product registration. If you already have an account, continue to the following section.
Perform the following steps to create a MySonicWALL account:
1. In your browser, navigate to www.mysonicwall.com.2. In the login screen, click the Register Now link.
3. Complete the Registration form and click Register.4. Verify that the information is correct and click Submit.5. In the screen confirming that your account was created,
click Continue to finish creating your MySonicWALL account.
Dell SonicWALL SRA 4200/1200 Getting Started Guide 24
Registering Your SRA Appliance
This section contains the following subsections:
• Before You Register - page 25
• Product Registration - page 25
Before You Register
Verify that the time, DNS, and default route settings on your Dell SonicWALL SRA 1200/4200 are correct before you register your appliance. To verify or configure these settings, navigate to the ‘System > Time’, ‘Network > DNS’, or ‘Network > Routes’ pages, respectively.
Product Registration
Register your SRA appliance on MySonicWALL to enable full functionality.
1. Login to your MySonicWALL account. If you do not have an account, you can create one at www.mysonicwall.com.
2. On the main page, enter the appliance serial number in the Register A Product field. Click Next.
3. On the My Products page, under Add New Product, enter the friendly name for the appliance, select the Product Group if any, enter the authentication code into the appropriate text boxes, and then click Register.
4. On the Product Survey page, fill in the requested information and click Continue.
Dell SonicWALL SRA 4200/1200 Getting Started Guide 25
Services and Licensing
This section contains the following subsections:
• Service Management - page 26
• Flexible Per-User Licensing - page 27
• Activating Services and Software - page 27
• Trying or Purchasing Services - page 28
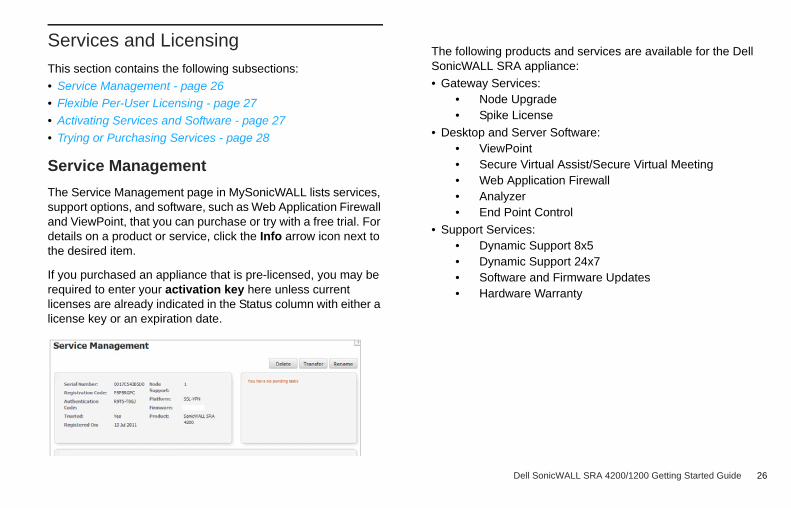
Service Management
The Service Management page in MySonicWALL lists services, support options, and software, such as Web Application Firewall and ViewPoint, that you can purchase or try with a free trial. For details on a product or service, click the Info arrow icon next to the desired item.
If you purchased an appliance that is pre-licensed, you may be required to enter your activation key here unless current licenses are already indicated in the Status column with either a license key or an expiration date.
The following products and services are available for the Dell SonicWALL SRA appliance:
• Gateway Services:• Node Upgrade• Spike License
• Desktop and Server Software:• ViewPoint• Secure Virtual Assist/Secure Virtual Meeting• Web Application Firewall• Analyzer• End Point Control
• Support Services:• Dynamic Support 8x5• Dynamic Support 24x7• Software and Firmware Updates• Hardware Warranty
Dell SonicWALL SRA 4200/1200 Getting Started Guide 26
Flexible Per-User Licensing
Your SRA appliance comes standard with a set number of user licenses. However, as the needs of your organization change, Dell SonicWALL offers flexible options when it comes to adding additional licenses.The ability to purchase a convenient number of additional licenses allows you to plan sensibly for the future, or provide immediate scalability when you need it most.
Activating Services and Software
If you purchase a service subscription or upgrade from a sales representative, you will receive an activation key. This key is emailed to you after online purchases, or is on the front of the certificate that was included with your purchase.
To activate existing licenses, perform the following tasks:
1. Navigate to the 'My Products' page and select the registered product you want to manage.
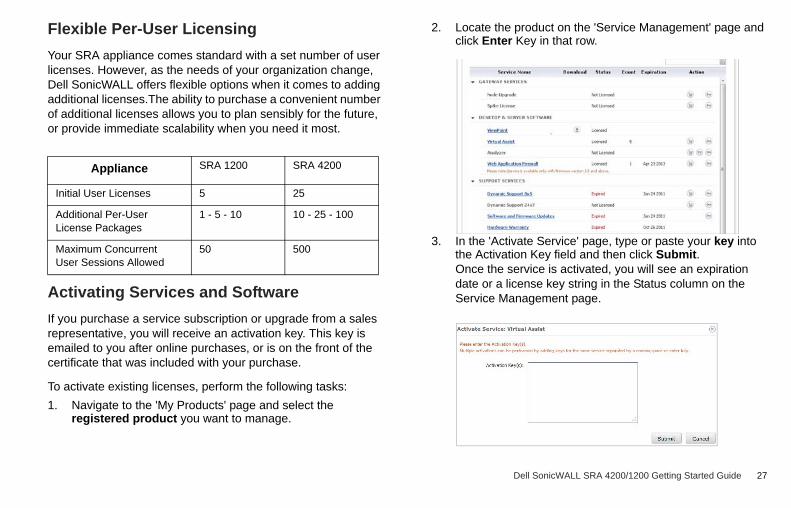
2. Locate the product on the 'Service Management' page and click Enter Key in that row.
3. In the 'Activate Service' page, type or paste your key into the Activation Key field and then click Submit.Once the service is activated, you will see an expiration date or a license key string in the Status column on the Service Management page.
Appliance SRA 1200 SRA 4200
Initial User Licenses 5 25
Additional Per-User License Packages
1 - 5 - 10 10 - 25 - 100
Maximum Concurrent User Sessions Allowed
50 500
Dell SonicWALL SRA 4200/1200 Getting Started Guide 27
Trying or Purchasing Services
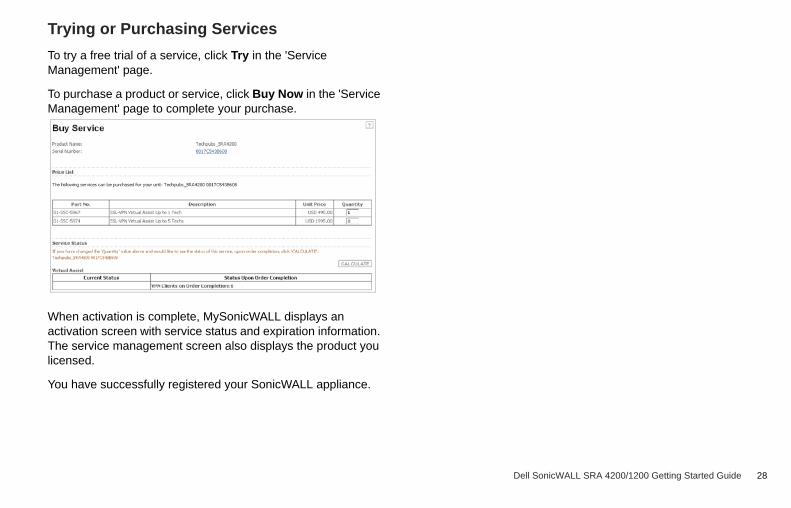
To try a free trial of a service, click Try in the 'Service Management' page.
To purchase a product or service, click Buy Now in the 'Service Management' page to complete your purchase.
When activation is complete, MySonicWALL displays an activation screen with service status and expiration information. The service management screen also displays the product you licensed.
You have successfully registered your SonicWALL appliance.
Dell SonicWALL SRA 4200/1200 Getting Started Guide 28
Network Configuration
In this Section
This section provides detailed overviews of deployment scenarios, as well as configuration instructions for connecting your Dell SonicWALL SRA appliance to various network devices, including gateway appliances.
• Scenario A: SRA on a New DMZ - page 30
• Scenario B: SRA on an Existing DMZ - page 34
• Scenario C: SRA on the LAN - page 37
• Testing Your Remote Connection - page 40
Tip: Before performing the procedures in this section, fill out the information on “What You Need to Begin” on page 8.
4
Dell SonicWALL SRA 4200/1200 Getting Started Guide 29
Scenario A: SRA on a New DMZ
The following procedures explain how to configure your gateway appliance based on Scenario A:
• Connecting to a SRA Appliance - page 30
• Adding a New SRA Custom Zone - page 30
• Allowing a WAN -> SRA Connection - page 31
• Allowing an SRA -> LAN Connection - page 32
Connecting to a SRA Appliance1. Using a computer connected to your LAN, launch your Web
browser and enter the IP address of your existing Dell SonicWALL security appliance in the Location or Address field.
2. When the management interface displays, enter your user name and password in the appropriate fields and click Login.
Note: Remember that you are logging into your Dell SonicWALL security appliance, not the SRA appliance.
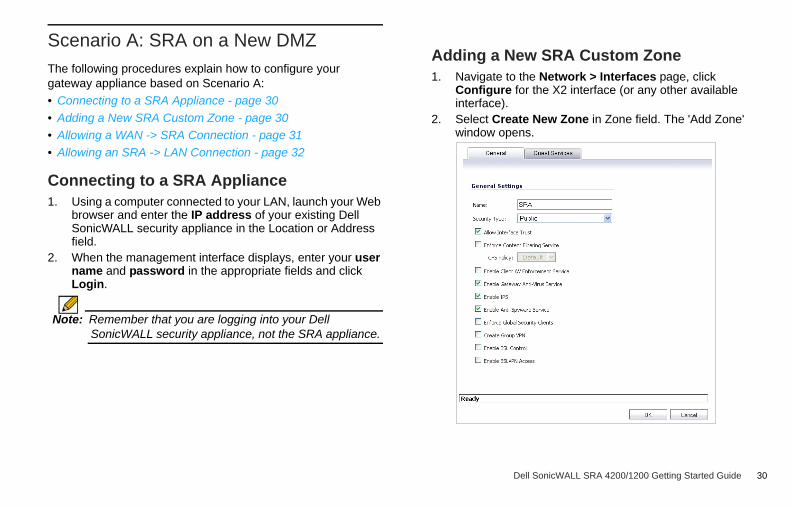
Adding a New SRA Custom Zone1. Navigate to the Network > Interfaces page, click
Configure for the X2 interface (or any other available interface).
2. Select Create New Zone in Zone field. The 'Add Zone' window opens.
Dell SonicWALL SRA 4200/1200 Getting Started Guide 30
3. Enter SRA in the Name field.4. Select Public from the Security Type drop-down menu.5. Unselect the Allow Interface Trust check box.6. Select the Gateway AV, Intrusion Prevention Service
and Anti-Spyware check boxes. Click OK.7. On the 'Edit Interface' window, enter the IP address for this
interface in the IP Address field. For example, “192.168.200.2”. This should be the same address you created in “Configuring the X0 IP Address for Scenario B and Scenario C” on page 17.
8. Enter your Subnet Mask.9. On the 'Management' area, enable the desired
management options.10. Click OK to apply changes.
Allowing a WAN -> SRA Connection
To create a public server access rule for HTTP and HTTPS traffic:
1. Click the Wizards icon in the top right corner of the management interface.
2. On the 'Welcome' page, select the Public Server Wizard, and then click Next.
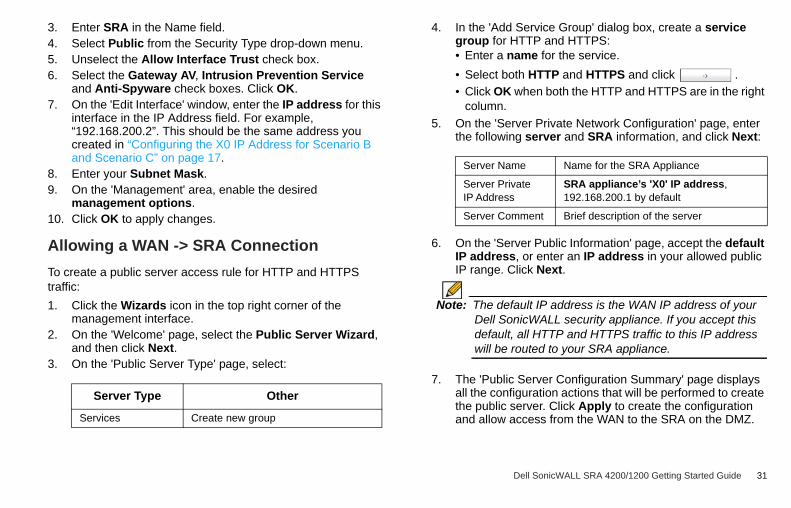
3. On the 'Public Server Type' page, select:
4. In the 'Add Service Group' dialog box, create a service group for HTTP and HTTPS: • Enter a name for the service.
• Select both HTTP and HTTPS and click .
• Click OK when both the HTTP and HTTPS are in the right column.
5. On the 'Server Private Network Configuration' page, enter the following server and SRA information, and click Next:
6. On the 'Server Public Information' page, accept the default IP address, or enter an IP address in your allowed public IP range. Click Next.
Note: The default IP address is the WAN IP address of your Dell SonicWALL security appliance. If you accept this default, all HTTP and HTTPS traffic to this IP address will be routed to your SRA appliance.
7. The 'Public Server Configuration Summary' page displays all the configuration actions that will be performed to create the public server. Click Apply to create the configuration and allow access from the WAN to the SRA on the DMZ.
Server Type Other
Services Create new group
Server Name Name for the SRA Appliance
Server Private IP Address
SRA appliance’s 'X0' IP address, 192.168.200.1 by default
Server Comment Brief description of the server
Dell SonicWALL SRA 4200/1200 Getting Started Guide 31
Allowing an SRA -> LAN Connection
When users have connected to the SRA, they need to be able to connect to resources on the LAN. To allow an SRA to LAN connection, perform the following steps:
1. Navigate to the Network > Address Objects page.
2. In the 'Address Objects' section, click .
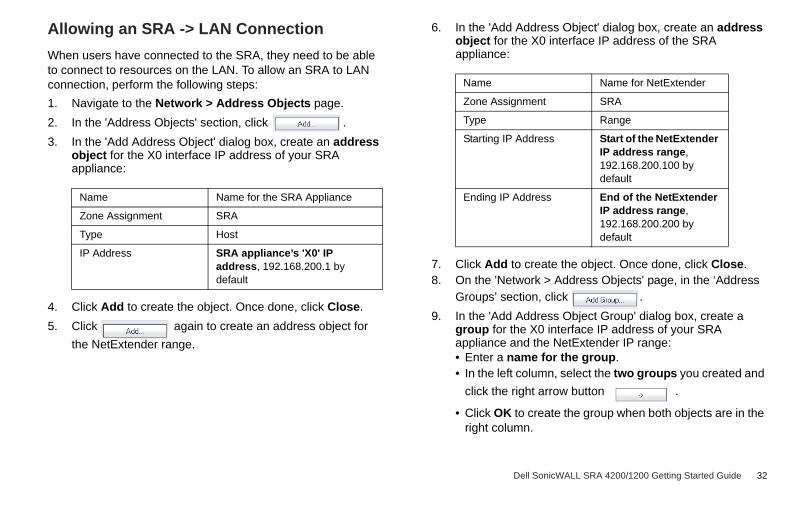
3. In the 'Add Address Object' dialog box, create an address object for the X0 interface IP address of your SRA appliance:
4. Click Add to create the object. Once done, click Close.
5. Click again to create an address object for
the NetExtender range.
6. In the 'Add Address Object' dialog box, create an address object for the X0 interface IP address of the SRA appliance:
7. Click Add to create the object. Once done, click Close.8. On the 'Network > Address Objects' page, in the ‘Address
Groups’ section, click .
9. In the 'Add Address Object Group' dialog box, create a group for the X0 interface IP address of your SRA appliance and the NetExtender IP range:• Enter a name for the group.• In the left column, select the two groups you created and
click the right arrow button .
• Click OK to create the group when both objects are in the right column.
Name Name for the SRA Appliance
Zone Assignment SRA
Type Host
IP Address SRA appliance’s 'X0' IP address, 192.168.200.1 by default
Name Name for NetExtender
Zone Assignment SRA
Type Range
Starting IP Address Start of the NetExtender IP address range, 192.168.200.100 by default
Ending IP Address End of the NetExtender IP address range, 192.168.200.200 by default
Dell SonicWALL SRA 4200/1200 Getting Started Guide 32
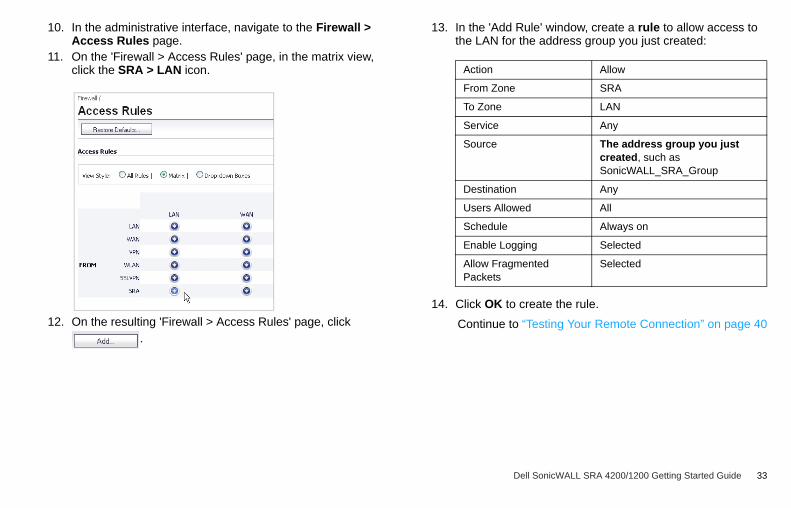
10. In the administrative interface, navigate to the Firewall > Access Rules page.
11. On the 'Firewall > Access Rules' page, in the matrix view, click the SRA > LAN icon.
12. On the resulting 'Firewall > Access Rules' page, click .
13. In the 'Add Rule' window, create a rule to allow access to the LAN for the address group you just created:
14. Click OK to create the rule.
Continue to “Testing Your Remote Connection” on page 40
Action Allow
From Zone SRA
To Zone LAN
Service Any
Source The address group you just created, such as SonicWALL_SRA_Group
Destination Any
Users Allowed All
Schedule Always on
Enable Logging Selected
Allow Fragmented Packets
Selected
Dell SonicWALL SRA 4200/1200 Getting Started Guide 33
Scenario B: SRA on an Existing DMZ
This section provides procedures to configure your gateway appliance based on Scenario B. This section contains the following subsections:
• Connecting to a Dell SonicWALL Security Appliance - page 34
• Adding a New SRA Custom Zone - page 30
• Allowing DMZ -> LAN Connection - page 35
Connecting to a Dell SonicWALL Security Appliance1. Using a computer connected to your LAN, launch your Web
browser, and enter the IP address of your existing Dell SonicWALL security appliance in the Location or Address field.
2. When the management interface displays, enter your User Name and Password in the appropriate fields and click Login.
Note: Remember that you are logging into your Dell SonicWALL firewall, not the SRA appliance.
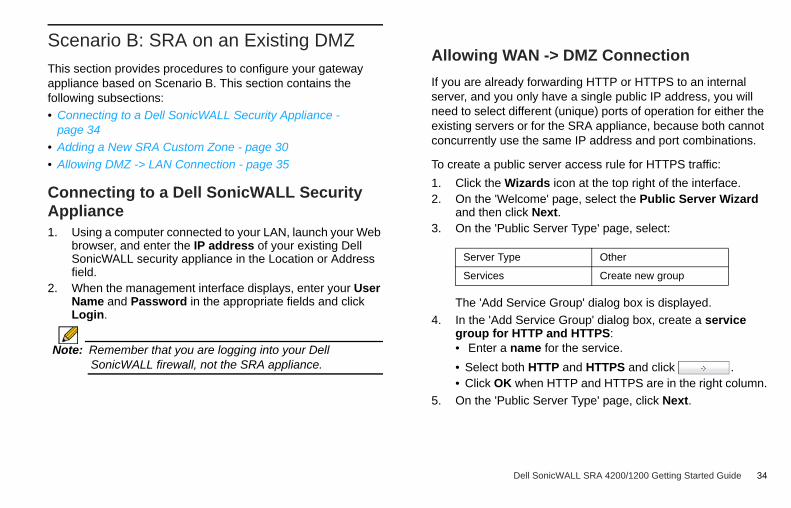
Allowing WAN -> DMZ Connection
If you are already forwarding HTTP or HTTPS to an internal server, and you only have a single public IP address, you will need to select different (unique) ports of operation for either the existing servers or for the SRA appliance, because both cannot concurrently use the same IP address and port combinations.
To create a public server access rule for HTTPS traffic:
1. Click the Wizards icon at the top right of the interface.2. On the 'Welcome' page, select the Public Server Wizard
and then click Next.3. On the 'Public Server Type' page, select:
The 'Add Service Group' dialog box is displayed.
4. In the 'Add Service Group' dialog box, create a service group for HTTP and HTTPS:• Enter a name for the service.
• Select both HTTP and HTTPS and click . • Click OK when HTTP and HTTPS are in the right column.
5. On the 'Public Server Type' page, click Next.
Server Type Other
Services Create new group
Dell SonicWALL SRA 4200/1200 Getting Started Guide 34
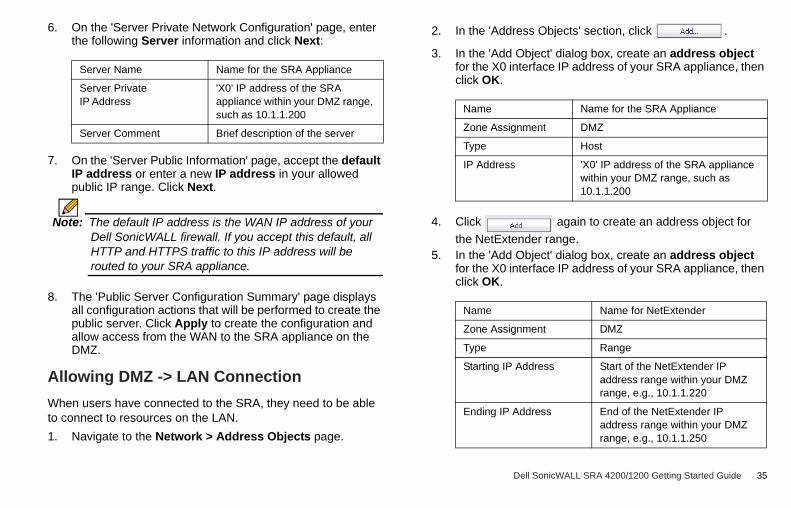
6. On the 'Server Private Network Configuration' page, enter the following Server information and click Next:
7. On the 'Server Public Information' page, accept the default IP address or enter a new IP address in your allowed public IP range. Click Next.
Note: The default IP address is the WAN IP address of your Dell SonicWALL firewall. If you accept this default, all HTTP and HTTPS traffic to this IP address will be routed to your SRA appliance.
8. The 'Public Server Configuration Summary' page displays all configuration actions that will be performed to create the public server. Click Apply to create the configuration and allow access from the WAN to the SRA appliance on the DMZ.
Allowing DMZ -> LAN Connection
When users have connected to the SRA, they need to be able to connect to resources on the LAN.
1. Navigate to the Network > Address Objects page.
2. In the 'Address Objects' section, click .
3. In the 'Add Object' dialog box, create an address object for the X0 interface IP address of your SRA appliance, then click OK.
4. Click again to create an address object for
the NetExtender range.5. In the 'Add Object' dialog box, create an address object
for the X0 interface IP address of your SRA appliance, then click OK.
Server Name Name for the SRA Appliance
Server Private IP Address
'X0' IP address of the SRA appliance within your DMZ range, such as 10.1.1.200
Server Comment Brief description of the server
Name Name for the SRA Appliance
Zone Assignment DMZ
Type Host
IP Address 'X0' IP address of the SRA appliance within your DMZ range, such as 10.1.1.200
Name Name for NetExtender
Zone Assignment DMZ
Type Range
Starting IP Address Start of the NetExtender IP address range within your DMZ range, e.g., 10.1.1.220
Ending IP Address End of the NetExtender IP address range within your DMZ range, e.g., 10.1.1.250
Dell SonicWALL SRA 4200/1200 Getting Started Guide 35
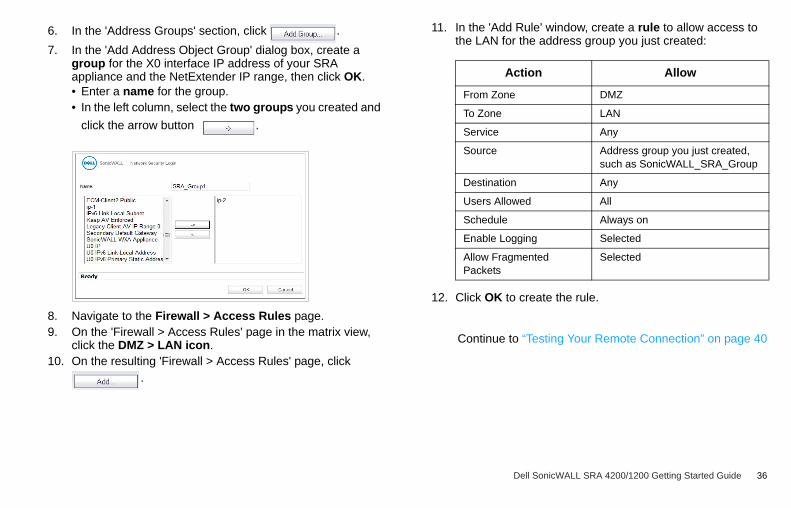
6. In the 'Address Groups' section, click .
7. In the 'Add Address Object Group' dialog box, create a group for the X0 interface IP address of your SRA appliance and the NetExtender IP range, then click OK. • Enter a name for the group.• In the left column, select the two groups you created and
click the arrow button .
8. Navigate to the Firewall > Access Rules page.9. On the 'Firewall > Access Rules' page in the matrix view,
click the DMZ > LAN icon.10. On the resulting 'Firewall > Access Rules' page, click
.
11. In the 'Add Rule' window, create a rule to allow access to the LAN for the address group you just created:
12. Click OK to create the rule.
Continue to “Testing Your Remote Connection” on page 40
Action Allow
From Zone DMZ
To Zone LAN
Service Any
Source Address group you just created, such as SonicWALL_SRA_Group
Destination Any
Users Allowed All
Schedule Always on
Enable Logging Selected
Allow Fragmented Packets
Selected
Dell SonicWALL SRA 4200/1200 Getting Started Guide 36
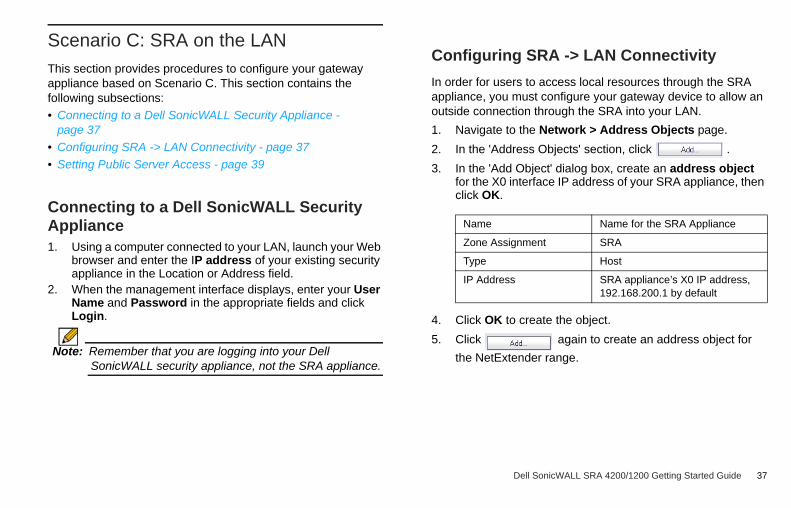
Scenario C: SRA on the LAN
This section provides procedures to configure your gateway appliance based on Scenario C. This section contains the following subsections:
• Connecting to a Dell SonicWALL Security Appliance - page 37
• Configuring SRA -> LAN Connectivity - page 37
• Setting Public Server Access - page 39
Connecting to a Dell SonicWALL Security Appliance1. Using a computer connected to your LAN, launch your Web
browser and enter the IP address of your existing security appliance in the Location or Address field.
2. When the management interface displays, enter your User Name and Password in the appropriate fields and click Login.
Note: Remember that you are logging into your Dell SonicWALL security appliance, not the SRA appliance.
Configuring SRA -> LAN Connectivity
In order for users to access local resources through the SRA appliance, you must configure your gateway device to allow an outside connection through the SRA into your LAN.
1. Navigate to the Network > Address Objects page.
2. In the 'Address Objects' section, click .
3. In the 'Add Object' dialog box, create an address object for the X0 interface IP address of your SRA appliance, then click OK.
4. Click OK to create the object.
5. Click again to create an address object for
the NetExtender range.
Name Name for the SRA Appliance
Zone Assignment SRA
Type Host
IP Address SRA appliance’s X0 IP address, 192.168.200.1 by default
Dell SonicWALL SRA 4200/1200 Getting Started Guide 37
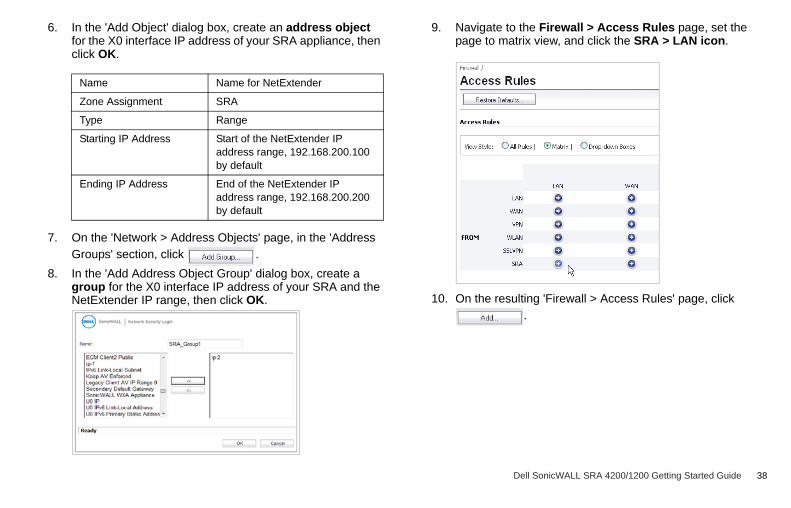
6. In the 'Add Object' dialog box, create an address object for the X0 interface IP address of your SRA appliance, then click OK.
7. On the 'Network > Address Objects' page, in the 'Address Groups' section, click .
8. In the 'Add Address Object Group' dialog box, create a group for the X0 interface IP address of your SRA and the NetExtender IP range, then click OK.
9. Navigate to the Firewall > Access Rules page, set the page to matrix view, and click the SRA > LAN icon.
10. On the resulting 'Firewall > Access Rules' page, click .
Name Name for NetExtender
Zone Assignment SRA
Type Range
Starting IP Address Start of the NetExtender IP address range, 192.168.200.100 by default
Ending IP Address End of the NetExtender IP address range, 192.168.200.200 by default
Dell SonicWALL SRA 4200/1200 Getting Started Guide 38
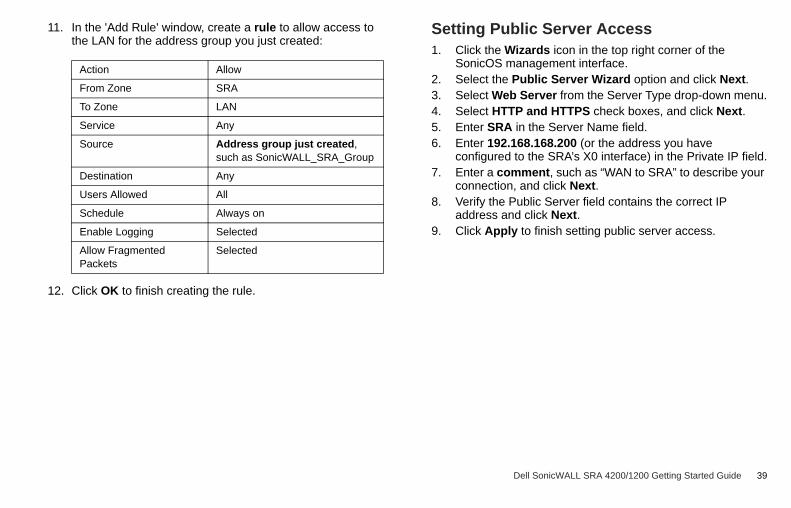
11. In the 'Add Rule' window, create a rule to allow access to the LAN for the address group you just created:
12. Click OK to finish creating the rule.
Setting Public Server Access1. Click the Wizards icon in the top right corner of the
SonicOS management interface.2. Select the Public Server Wizard option and click Next.3. Select Web Server from the Server Type drop-down menu.4. Select HTTP and HTTPS check boxes, and click Next.5. Enter SRA in the Server Name field.6. Enter 192.168.168.200 (or the address you have
configured to the SRA’s X0 interface) in the Private IP field.7. Enter a comment, such as “WAN to SRA” to describe your
connection, and click Next.8. Verify the Public Server field contains the correct IP
address and click Next.9. Click Apply to finish setting public server access.
Action Allow
From Zone SRA
To Zone LAN
Service Any
Source Address group just created, such as SonicWALL_SRA_Group
Destination Any
Users Allowed All
Schedule Always on
Enable Logging Selected
Allow Fragmented Packets
Selected
Dell SonicWALL SRA 4200/1200 Getting Started Guide 39
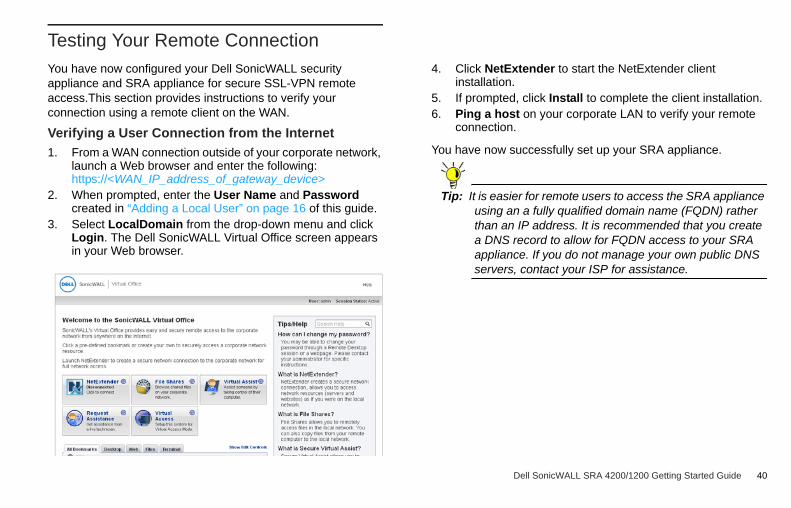
Testing Your Remote Connection
You have now configured your Dell SonicWALL security appliance and SRA appliance for secure SSL-VPN remote access.This section provides instructions to verify your connection using a remote client on the WAN.
Verifying a User Connection from the Internet
1. From a WAN connection outside of your corporate network, launch a Web browser and enter the following:https://<WAN_IP_address_of_gateway_device>
2. When prompted, enter the User Name and Password created in “Adding a Local User” on page 16 of this guide.
3. Select LocalDomain from the drop-down menu and click Login. The Dell SonicWALL Virtual Office screen appears in your Web browser.
4. Click NetExtender to start the NetExtender client installation.
5. If prompted, click Install to complete the client installation. 6. Ping a host on your corporate LAN to verify your remote
connection.
You have now successfully set up your SRA appliance.
Tip: It is easier for remote users to access the SRA appliance using an a fully qualified domain name (FQDN) rather than an IP address. It is recommended that you create a DNS record to allow for FQDN access to your SRA appliance. If you do not manage your own public DNS servers, contact your ISP for assistance.
Dell SonicWALL SRA 4200/1200 Getting Started Guide 40
Upgrading Your Appliance
In this Section
This section provides procedures for upgrading an existing SRA image on a Dell SonicWALL SRA 1200 or 4200 to a newer version.
• Obtaining the Latest SRA Image - page 42
• Exporting Configuration Settings - page 42
• Uploading a New SRA Image - page 43
• Resetting the Appliance in SafeMode - page 44
5
Dell SonicWALL SRA 4200/1200 Getting Started Guide 41
Obtaining the Latest SRA Image
To get a new image file for your SRA 4200/1200, connect to your mysonicwall.com account at:
http://www.mysonicwall.com
Note: If you have already registered your Dell SonicWALL SRA appliance, and you selected Notify me when new firmware is available on the System > Settings page, you are automatically notified of any updates available for your model.
Copy the new SRA image file to a directory on your management station. For the appliances, this is a file ending in “.sig” (a signed image).
Exporting Configuration Settings
Before beginning the update process, export a copy of your SRA appliance configuration settings to your local machine. The Export Settings feature saves a copy of your current configuration settings on your SRA appliance, protecting all your existing settings in the event that it becomes necessary to return to a previous configuration state.
Note: Exporting and Importing system configuration settings is supported when upgrading from a Dell SonicWALL SRA SSL-VPN 200/2000/4000/1200/4200 appliance to a SRA appliance
Perform the following procedures to save a copy of your configuration settings and export them to a file on your local management station:
1. Click the Export Settings. . . button on the System > Settings page and save the settings file to your local machine. The default settings file is named sslvpnSettings.zip.
Tip: To more easily restore settings in the future, rename the .zip file to include the version of the SRA appliance image from which you are exporting the settings.
Dell SonicWALL SRA 4200/1200 Getting Started Guide 42
Uploading a New SRA Image
Note: Dell SonicWALL SRA 1200/4200 appliances do not support downgrading an image and using the configuration settings file from a higher version. If you are downgrading to a previous version of a SRA image, you must select Uploaded Firmware with Factory Defaults – New! You can then import a settings file saved from the previous version or reconfigure manually.
1. Download the SRA image file from www.mysonicwall.com and save it to a location on your local computer.
2. Select Upload New Firmware from the System > Settings page. Browse to the location where you saved the SRA image file, select the file, and click the Upload button. The upload process can take up to one minute.
On a Dell SonicWALL SRA 1200/4200, you are ready to reboot your SRA appliance with the new SRA image. Do one of the following:
1. To reboot the image with current preference, click the boot icon for the following entry: Uploaded Firmware – New!
2. To reboot the image with factory default settings, click the boot icon for the following entry: Uploaded Firmware with Factory Default Settings – New!
Note: Be sure to save a backup of your current configuration settings to your local machine before rebooting the SRA appliance with factory default settings, as described in the previous “Saving a Backup Copy of Your Configuration Settings” section.
3. When prompted, type ERASE and click OK to confirm that you want to reboot the appliance.
4. When the warning message dialog is displayed, click OK to proceed. After clicking OK, do not power off the device while the image is being uploaded to the flash memory.
5. After successfully uploading the image to your SRA appliance, the login screen is displayed. The updated image information is displayed on the System > Settings page.
Dell SonicWALL SRA 4200/1200 Getting Started Guide 43
Resetting the Appliance in SafeMode
If you are unable to connect to the SRA management interface, you can restart the SRA appliance in SafeMode. The SafeMode feature allows you to quickly recover from uncertain configuration states with a simplified management interface that includes the same settings available on the System > Settings page.
To reset the SRA appliance, perform the following steps:
1. Connect your management station to a LAN port on the SRA appliance and configure your management station IP address with an address on the 192.168.200.0/24 subnet, such as 192.168.200.20.
Note: The SRA appliance can also respond to the last configured LAN IP address in SafeMode. This is useful for remote management recovery or hands off recovery in a datacenter.
2. Use a narrow, straight object, like a straightened paper clip or a pen tip, to press and hold the reset button on the security appliance for five to ten seconds. The reset button is on the front panel in a small hole to the right of the USB connectors.The TEST light starts blinking when the SRA appliance has rebooted into SafeMode.
Tip: If this procedure does not work while the power is on, turn the unit off and on while holding the reset button until the TEST light starts blinking.
3. Connect to the SafeMode management interface by pointing the Web browser on your management station to: http://192.168.200.1
4. Try rebooting the SRA appliance with your current settings. Click the boot icon in the same line with Current Firmware.
5. After the SRA appliance has rebooted, try to open the management interface again. If you still cannot open the management interface, use the reset button to restart the appliance in SafeMode again. In SafeMode, restart the SRA image with the factory default settings. Click the boot icon in the same line with Current Firmware with Factory Default Settings.
Dell SonicWALL SRA 4200/1200 Getting Started Guide 44
Support and Training Options
In this Section
This section provides overviews of customer support and training options for Dell SonicWALL SRA appliances.
• Customer Support - page 46
• Warranty Support Policy - page 46
• Knowledge Base - page 47
• User Forums - page 47
• Training - page 48
• Related Documentation - page 49
• Live Product Demos - page 50
6
Dell SonicWALL SRA 4200/1200 Getting Started Guide 45
Customer Support
Dell SonicWALL’s customer support Web site is where you will find featured support topics, tutorials, and more. For answers to support questions, visit:
http://www.sonicwall.com/us/Support.html
For further assistance, Dell SonicWALL offers telephone, email, and Web-based support to customers with valid Warranty Support or a purchased support contract, as explained at:
http://www.sonicwall.com/us/support/contact.html
Please review our Warranty Support Policy for product coverage.
Warranty Support Policy
All Dell SonicWALL appliances come with a 1-year Limited Hardware Warranty which provides delivery of critical replacement parts for defective parts under warranty. In addition, for 90 days from the warranty start date, Dell SonicWALL SRA 4200/1200 appliances are entitled to a Limited Software Warranty which provides bug fixes, updates and any maintenance releases that occur during the coverage term. Visit the Warranty Information page for details on your product’s warranty:
http://www.sonicwall.com/us/support/Services.html#tab=warranty
Dell SonicWALL SRA 4200/1200 Getting Started Guide 46
Knowledge Base
The Knowledge Base allows users to search for Dell SonicWALL documents based on the following types of search tools:
• Browse
• Search for keywords
• Full-text search
For further information, visit:
http://www.sonicwall.com/us/support/2213.html
User Forums
The Dell SonicWALL User Forums is a resource that provides users the ability to communicate and discuss a variety of security and appliance subject matters. Categories include:
• SSL-VPN topics
• VPN Client topics
• Continuous Data Protection topics
• Email Security topics
• Network Anti-Virus topics
• SonicPoint and Wireless topics
For further information, visit:
https://forum.sonicwall.com/
Dell SonicWALL SRA 4200/1200 Getting Started Guide 47
Training
Dell SonicWALL offers an extensive sales and technical training curriculum for Network Administrators, Security Experts and Dell SonicWALL Medallion Partners who need to enhance their knowledge and maximize their investment in Dell SonicWALL Products and Security Applications. Dell SonicWALL Training provides the following resources for its customers:
• E-Training
• Instructor-Led Training
• Custom Training
• Technical Certification
• Authorized Training Partners
For further information, visit:
http://www.sonicwall.com/us/training.html
Dell SonicWALL SRA 4200/1200 Getting Started Guide 48
Related Documentation
See the following related documents for more information:
• Dell SonicOS SSL-VPN Administrator’s Guide
• Dell SonicOS SSL-VPN User’s Guide
• Dell SonicOS SSL-VPN Release Notes
• Dell SonicOS SSL-VPN Feature Modules
• Dell SonicOS Administrator’s Guide
• Dell SonicOS Feature Modules
• Dell SonicWALL GMS Administrator’s Guide
• Dell SonicWALL Analyzer Administrator’s Guide
For further information, visit:
http://www.sonicwall.com/us/support/289.html
Dell SonicWALL SRA 4200/1200 Getting Started Guide 49
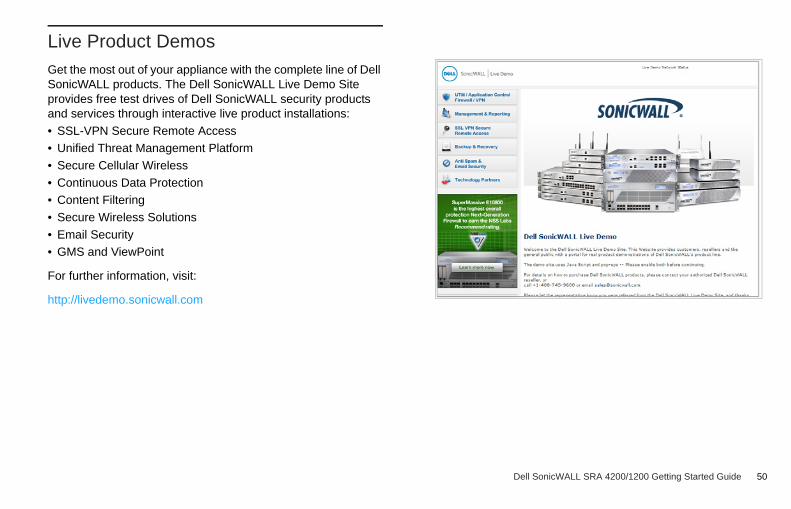
Live Product Demos
Get the most out of your appliance with the complete line of Dell SonicWALL products. The Dell SonicWALL Live Demo Site provides free test drives of Dell SonicWALL security products and services through interactive live product installations:
• SSL-VPN Secure Remote Access
• Unified Threat Management Platform
• Secure Cellular Wireless
• Continuous Data Protection
• Content Filtering
• Secure Wireless Solutions
• Email Security
• GMS and ViewPoint
For further information, visit:
http://livedemo.sonicwall.com
Dell SonicWALL SRA 4200/1200 Getting Started Guide 50
Safety and Regulatory Information
In this Section
This section provides safety and regulatory information for the SRA 1200/4200 appliances.
7
Dell SonicWALL SRA 4200/1200 Getting Started Guide 51
Dell SonicWALL SRA 1200/4200 Appliance
Regulatory Statement and Safety Instructions
The most up-to-date regulatory information can be found in the Dell SonicWALL SRA Regulatory Statement online version located on:
http://www.sonicwall.com/us/support/3893.html.• The above Dell SonicWALL appliances are designed to be
mounted in a standard 19-inch rack mount cabinet. The following conditions are required for proper installation:
• Use the mounting hardware recommended by the rack manufacturer and ensure that the rack is adequate for the application.
• Four mounting screws, compatible with the rack design, must be used and hand tightened to ensure secure installation. Choose a mounting location where all four mounting holes line up with those of the mounting bars of the 19-inch rack mount cabinet.
• Mount in a location away from direct sunlight and sources of heat. A maximum ambient temperature of 104º F (40º C).
• Route cables away from power lines, fluorescent lighting fixtures, and sources of noise such as radios, transmitters and broadband amplifiers.
• The included power cord(s) are approved for use only in specific countries or locations. Before using a power cord, verify that it is rated and approved for use in your location.
• Allow unrestricted airflow around the unit and through the side vents. A minimum of 1 inch (25.44mm) clearance is recommended.
• Mount the SRA appliances evenly in the rack to prevent a hazardous condition caused by uneven mechanical loading.
• If installed in a closed or multi-unit rack assembly, the operating ambient temperature of the rack environment may be greater than room ambient temperature. Therefore, consider installing the equipment in an environment compatible with the maximum recommended ambient temperature shown above.
• Consideration must be given to the connection of the equipment to the supply circuit. The effect of overloading the circuits has minimal impact on overcurrent protection and supply wiring. Appropriate consideration of equipment nameplate ratings must be used when addressing this concern.
• Reliable grounding of rack-mounted equipment must be maintained. Particular attention must be given to power supply connections other than direct connections to the branch circuits such as power strips.
Lithium Battery Warning The Lithium Battery used in the Dell SonicWALL Internet security appliance may not be replaced by the user. The Dell SonicWALL must be returned to a Dell SonicWALL authorized service center for replacement with the same or equivalent type recommended by the manufacturer. If, for any reason, the battery or Dell SonicWALL Internet security appliance must be disposed of, do so following the battery manufacturer's instructions.
Cable Connections All Ethernet and RS232 (Console) cables are designed for intra-building connection to other equipment. Do not connect these ports directly to communication wiring or other wiring that exits the building where the Dell SonicWALL is located.
Regulatory Model/Type Product Name
1RK23-0A01RK23-0A1
Dell SonicWALL SRA1200 Dell SonicWALL SRA4200
Dell SonicWALL SRA 4200/1200 Getting Started Guide 52
Weitere Hinweise zur Montage
• Das Dell SonicWALL Modell ist für eine Montage in einem standardmäßigen 19-Zoll-Rack konzipiert. Für eine ordnungsgemäße Montage sollten die folgenden Hinweise beachtet werden:
• Vergewissern Sie sich, dass das Rack für dieses Gerät geeignet ist und verwenden Sie das vom Rack-Hersteller empfohlene Montagezubehör.
• Verwenden Sie für eine sichere Montage vier passende Befestigungsschrauben, und ziehen Sie diese mit der Hand an. Wählen Sie einen Ort im 19-Zoll-Rack, wo alle vier Befestigungen der Montageschien verwendet werden.
• Wählen Sie für die Montage einen Ort, der keinem direkten Sonnenlicht ausgesetzt ist und sich nicht in der Nähe von Wärmequellen befindet. Die Umgebungstemperatur darf nicht mehr als 40 °C betragen.
• Das beigefügte Netzkabel ist nur für den Gebrauch in Nordamerikas Vorgesehen. Für Kunden in der Europaïschen Union (EU) ist ein Netzkabel nicht im Lieferumfang enthalten..
• Stellen Sie sicher, dass das Gerät vor Wasser und höher Luftfeuchtigkeit geschützt ist.
• Das im Lieferumfang enthaltene bzw. die im Lieferumfang enthaltenen Netzkabel sind nur für die Verwendung in bestimmten Ländern und Regionen zugelassen. Überprüfen Sie bitte vor der Verwendung eines Netzkabels, ob es für die Verwendung in Ihrem Land oder Ihrer Region zugelassen ist und den geforderten Normen entspricht.
• Wenn das Gerät in einem geschlossenen 19”-Gehäuse oder mit mehreren anderen Geräten eingesetzt ist, wird die Temperatur in der Gehäuse höher sein als die Umgebungstemperatur. Achten Sie darauf, daß die Umgebungstemperatur nicht mehr als 40 °C beträgt.
• Bringen Sie die Dell SonicWALL waagerecht im Rack an, um mögliche Gefahren durch ungleiche mechanische Belastung zu vermeiden.
• Prüfen Sie den Anschluss des Geräts an die Stromversorgung, damit der Überstromschutz sowie die elektrische Leitung nicht von einer eventuellen Überlastung der Stromversorgung beeinflusst werden. Prüfen Sie dabei sorgfältig die Angaben auf dem Aufkleber des Geräts.
• Eine sichere Erdung der Geräte im Rack muss gewährleistet sein. Insbesondere muss auf nicht direkte Anschlüsse an Stromquellen geachtet werden wie z. B. bei Verwendung von Mehrfachsteckdosen.
Hinweis zur LithiumbatterieDie in der Internet Security Appliance von Dell SonicWALL verwendete Lithiumbatterie darf nicht vom Benutzer ausgetauscht werden. Zum Austauschen der Batterie muss die Dell SonicWALL in ein von Dell SonicWALL autorisiertes Service-Center gebracht werden. Dort wird die Batterie durch denselben oder entsprechenden, vom Hersteller empfohlenen Batterietyp ersetzt. Beachten Sie bei einer Entsorgung der Batterie oder der Dell SonicWALL Internet Security Appliance die diesbezüglichen Anweisungen des Herstellers.
KabelverbindungenAlle Ethernet- und RS232-C-Kabel eignen sich für die Verbindung von Geräten in Innenräumen. Schließen Sie an die Anschlüsse der Dell SonicWALL keine Kabel an, die aus dem Gebäude in dem sich das Gerät befindet, herausgeführt werden.
Dell SonicWALL SRA 4200/1200 Getting Started Guide 53
FCC Part 15 Class A Notice
NOTE: This equipment was tested and found to comply with the limits for a Class A digital device, pursuant to Part 15 of the FCC Rules. These limits are designed to provide reasonable protection against harmful interference when the equipment is operated in a commercial environment. This equipment generates, uses, and can radiate radio frequency energy. And if not installed and used in accordance with the instruction manual, the device may cause harmful interference to radio communications. Operation of this equipment in a residential area is likely to cause harmful interference in which case the user is required to correct the interference at his own expense.
Canadian Radio Frequency Emissions Statement
This Class A digital apparatus complies with Canadian ICES-003. Cet appareil numérique de la classe A conforme à toute la norme NMB-003 du Canada.
Complies with EN 55022 Class A and CISPR22 Class A
Warning: This is a class A product. In a domestic environment, this product may cause radio interference in which case the user may be required to take adequate measures.
Caution: Modifying this equipment or using this equipment for purposes not shown in this manual without the written consent of Dell SonicWALL, Inc. could void the user's authority to operate this equipment.
Declaration of Conformity
Application of council Directive 2004/108/EC (EMC) and 2006/95/EC (LVD)
Standards to which conformity is declared
EN 55022 (2006) +A (2007) Class AEN 55024 (1998) +A1 (2001), +A2 (2003)EN 61000-3-2 (2006)EN 61000-3-3 (2008)EN 60950-1 (2006)
National Deviations: AR, AT, AU, BE, BR, CA, CH, CN, CZ, DE, DK, FI, FR, GB, GR, HU, IL, IN, IT, JP, KE, KR, MY, NL, NO, PL, SE, SG, SI, SK, US
Dell SonicWALL SRA 4200/1200 Getting Started Guide 54
BMSI Statement (Class A) Regulatory Information for KoreaMinistry of Information and TelecommunicationCertification Numbers: SWL-1RK23-0A0-KCC-REM-SWL-0A0 SWL-1RK23-0A1-KCC-REM-SWL-0A1
All products with country code “” (blank) and “A” are made in the USA.All products with country code “B” are made in China.All products with country code “C” or “D” are made in Taiwan R.O.C.All certificates held by Secuwide, Corp.
Dell SonicWALL SRA 4200/1200 Getting Started Guide 55