Embed Size (px)
Citation preview
Version: 21082017AHM Page 1 of 18
Getting Started Guide Sophos XG Firewall Virtual Appliance
Document Date: August 2017
Getting Started Guide: Sophos XG Firewall Virtual Appliance
Version: 21082017AHM Page 2 of 18
Contents
Change Log ................................................................................................................................................................3
Copyright Notice .........................................................................................................................................................4
Preface ........................................................................................................................................................................5
Minimum Hardware Requirement ............................................................................................................................5
Installation Procedure................................................................................................................................................5 Step 1: Download and Extract OVF Image ............................................................................................................5 Step 2: Access ESX/ESXi Host via vSphere Client ..............................................................................................5 Step 3: Deploy OVF Template .................................................................................................................................7 Step 4: Power on..................................................................................................................................................... 11
Configuring XG Firewall ......................................................................................................................................... 12 Activation and Registration .................................................................................................................................... 12
Step 1: License Agreement ............................................................................................................ 12
Step 2: Register Your Firewall ....................................................................................................... 13
Step 3: Finishing the basic setup................................................................................................... 14
Basic Configuration................................................................................................................................................. 15 a. Setting up Interfaces .............................................................................................................................................. 15 b. Creating Zones ....................................................................................................................................................... 15 c. Creating Firewall Rules ........................................................................................................................................... 15 d. Setting up a Wireless Network ............................................................................................................................... 15

Getting Started Guide: Sophos XG Firewall Virtual Appliance
Version: 21082017AHM Page 3 of 18
Change Log
Date Change Description
December 23, 2015 Rectified a broken link in Step 1 of the ‘Installation Procedure’ section.
July 06, 2016 Updated the images for SFOS MR-3.
August 21, 2017 Updated content for Activation and Registration.
Getting Started Guide: Sophos XG Firewall Virtual Appliance
Version: 21082017AHM Page 4 of 18
Copyright Notice
Copyright 2016-2017 Sophos Limited. All rights reserved. Sophos is a registered trademark of Sophos Limited and Sophos Group. All other product and company names mentioned are trademarks or registered trademarks of their respective owners. No part of this publication may be reproduced, stored in a retrieval system, or transmitted, in any form or by any means, electronic, mechanical, photocopying, recording or otherwise unless you are either a valid licensee where the documentation can be reproduced in accordance with the license terms or you otherwise have the prior permission in writing of the copyright owner.
Getting Started Guide: Sophos XG Firewall Virtual Appliance
Version: 21082017AHM Page 5 of 18
Preface
Welcome to the Getting Started Guide for Sophos XG Firewall Virtual Appliance (referred to in this document as “XG Firewall”) for VMware ESX/ESXi platform. This guide describes how you can download, deploy and run XG Firewall as a virtual machine on VMware ESX/ESXi.
Minimum Hardware Requirement
1. One vCPU 2. 2GB vRAM 3. 2 vNIC 4. Primary Disk with a minimum of 4GB space 5. Report Disk with a minimum of 80GB space
XG Firewall will go into fail-safe mode if the minimum requirements are not satisfied.
Note: To optimize the performance of your XG Firewall, configure vCPU and vRAM according to the license you have purchased. When configuring a number of vCPUs, make sure that you do not exceed the maximum number specified in your license.
Installation Procedure
Prerequisite:
Make sure that VMware ESX/ESXi version 5.0 or later is installed in your network. For VMware ESX/ESXi installation instructions, refer to the VMware documentation:
http://www.vmware.com/support/pubs/vsphere-esxi-vcenter-server-pubs.html
Step 1: Download and Extract OVF Image
Download the .zip file containing the OVF image from https://secure2.sophos.com/en-us/products/next-gen-firewall/free-trial.aspx and save it in your machine.
Step 2: Access ESX/ESXi Host via vSphere Client
Log in to the ESX/ESXi host server on which you want to deploy the OVF template through VMware vSphere Client.
Note: In this guide, we are using VMware vSphere client to connect to the ESX/ESXi host server on which the OVF template is to be deployed.
Getting Started Guide: Sophos XG Firewall Virtual Appliance
Version: 21082017AHM Page 6 of 18
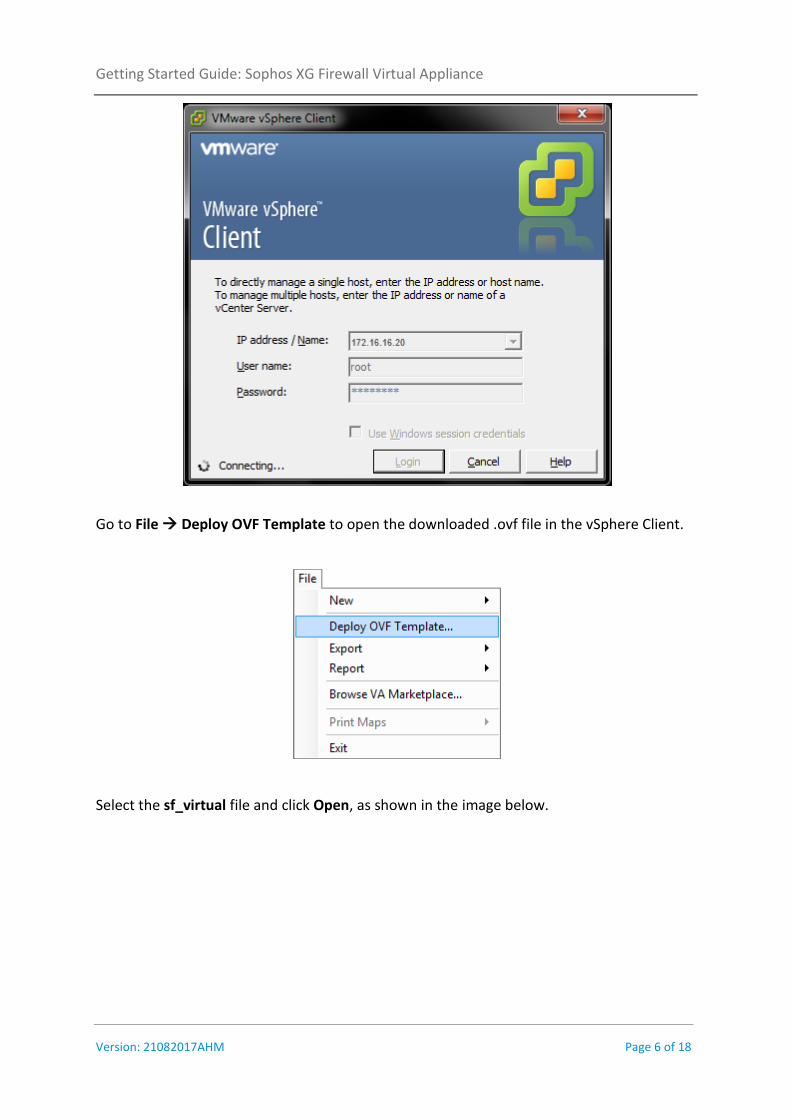
Go to File Deploy OVF Template to open the downloaded .ovf file in the vSphere Client.
Select the sf_virtual file and click Open, as shown in the image below.
Getting Started Guide: Sophos XG Firewall Virtual Appliance
Version: 21082017AHM Page 7 of 18
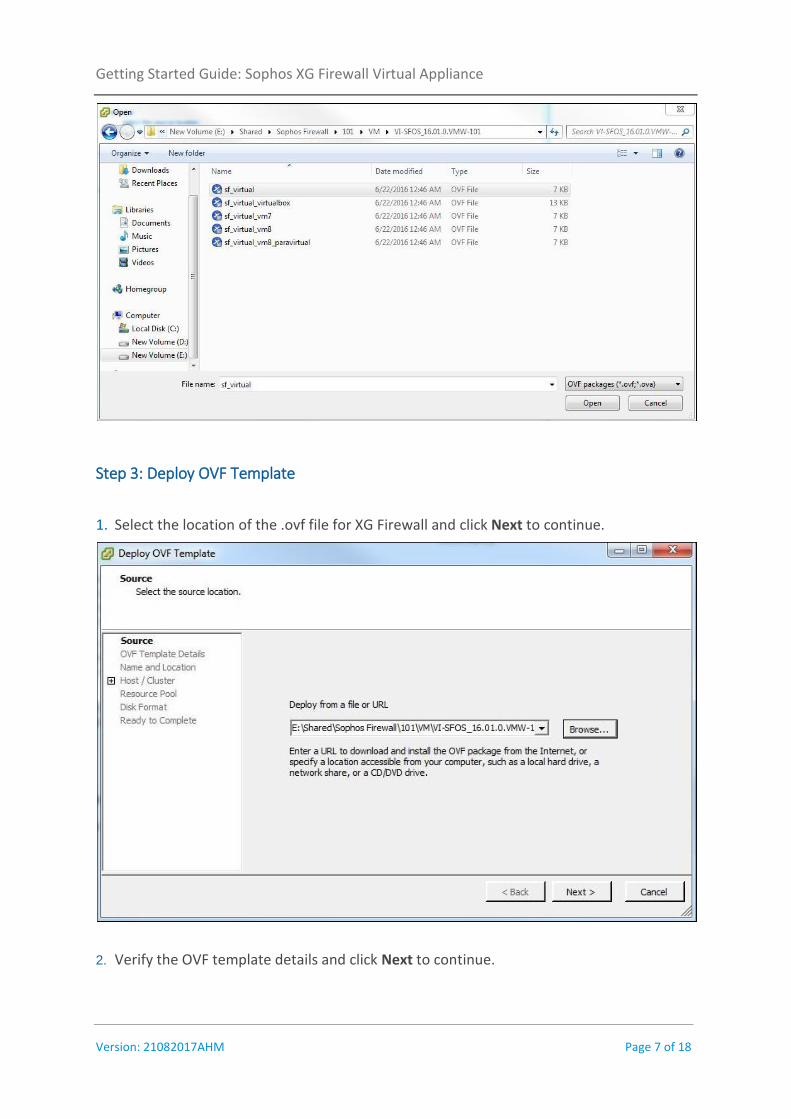
Step 3: Deploy OVF Template
1. Select the location of the .ovf file for XG Firewall and click Next to continue.
2. Verify the OVF template details and click Next to continue.

Getting Started Guide: Sophos XG Firewall Virtual Appliance
Version: 21082017AHM Page 8 of 18
3. Specify a name and location for the OVF template to be deployed and click Next to continue.
4. Select the host/cluster within which you want to deploy the OVF template and click Next to continue.

Getting Started Guide: Sophos XG Firewall Virtual Appliance
Version: 21082017AHM Page 9 of 18
Note: Here, we are deploying the OVF template on a single/standalone server. The configuration may be different in a cluster environment.
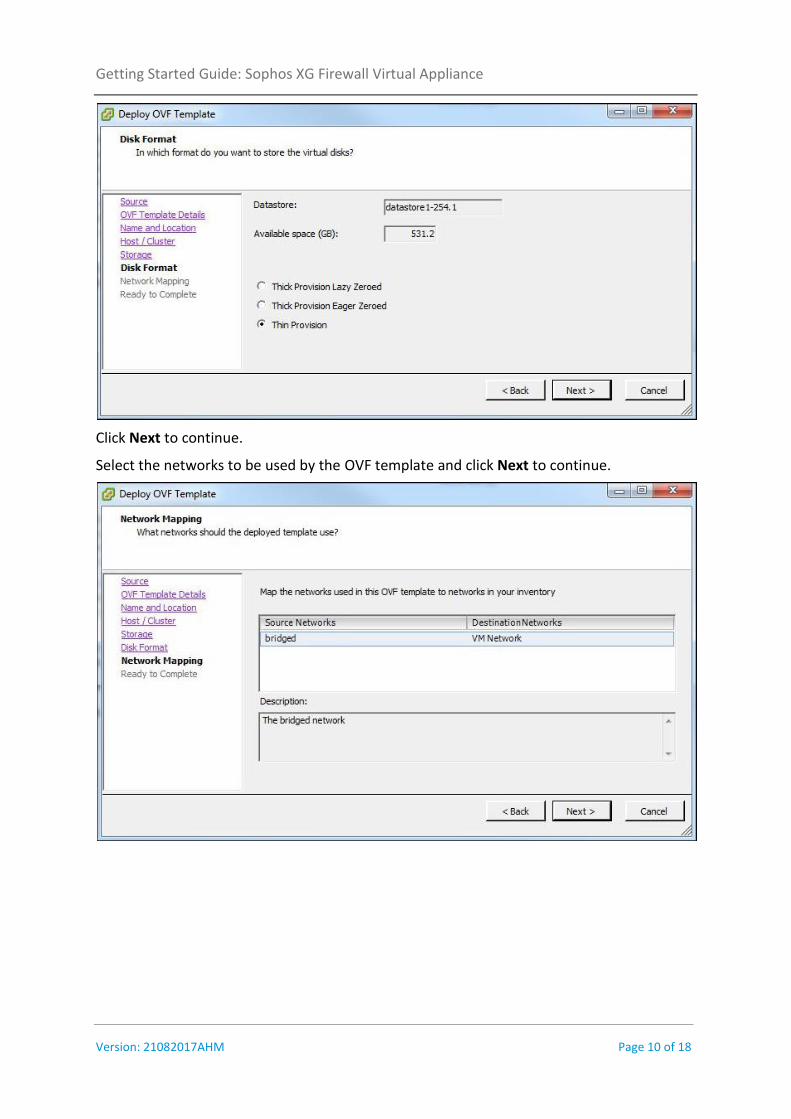
5. Select the format in which you want to store the virtual disks from the available options:
Thin Provision: It uses the minimum required space for the OVF template, saving the rest for other use.
Thick Provision: It uses the entire allotted virtual disk for OVF template installation, wiping out additional data on the disk.
In case of VMware ESXi 5.0 or later, three storage options are available: Thin Provision, Thick Provision Lazy Zeroed and Thick Provision Eager Zeroed. For more information, refer to http://www.vmware.com/.
Getting Started Guide: Sophos XG Firewall Virtual Appliance
Version: 21082017AHM Page 10 of 18
Click Next to continue.
Select the networks to be used by the OVF template and click Next to continue.
Getting Started Guide: Sophos XG Firewall Virtual Appliance
Version: 21082017AHM Page 11 of 18
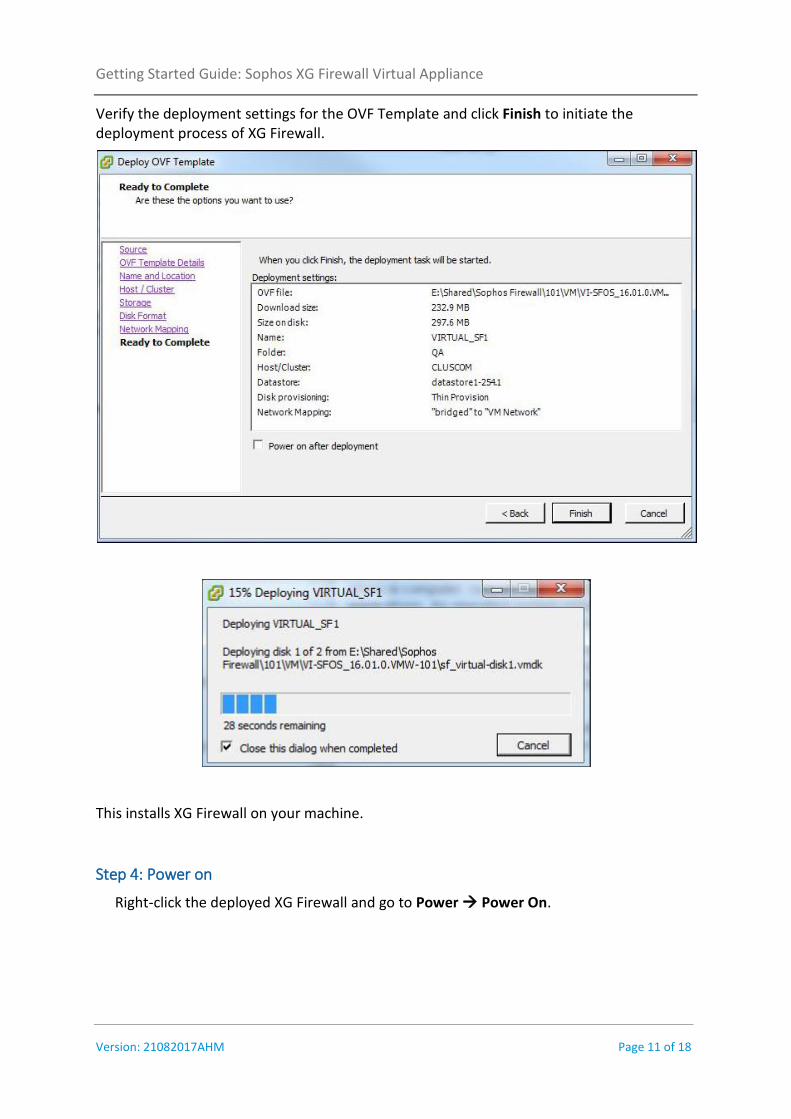
Verify the deployment settings for the OVF Template and click Finish to initiate the deployment process of XG Firewall.
This installs XG Firewall on your machine.
Step 4: Power on
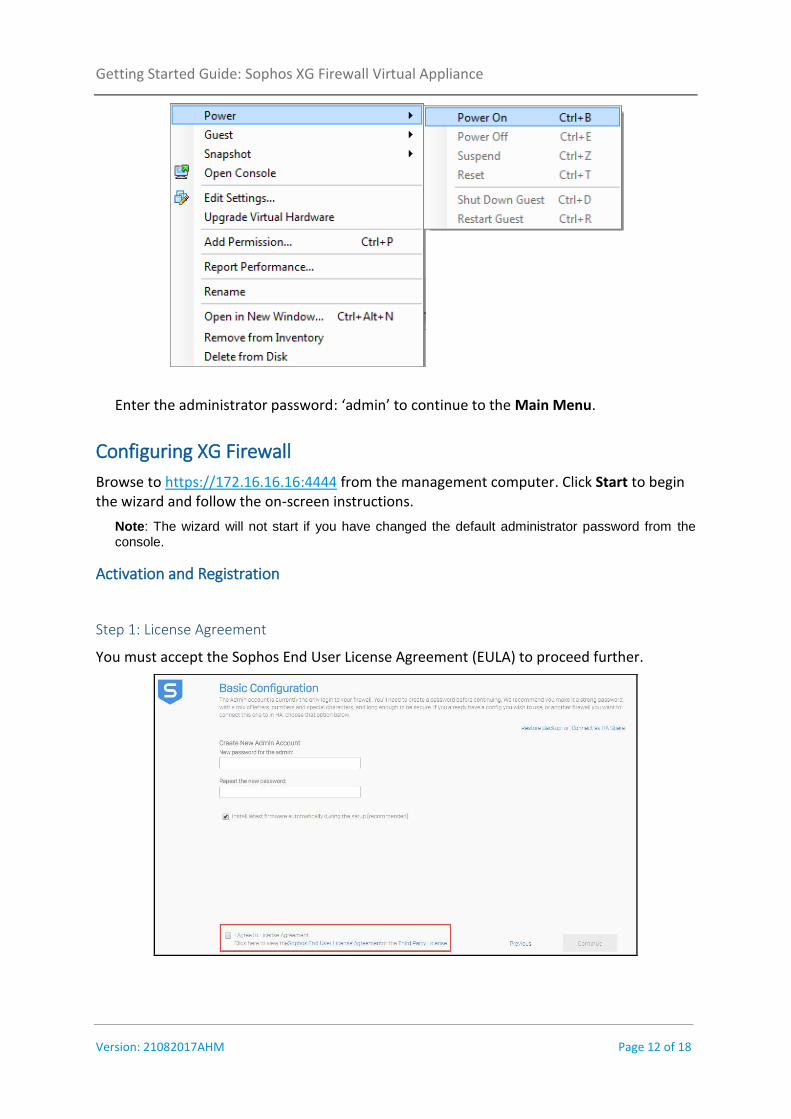
Right-click the deployed XG Firewall and go to Power Power On.
Getting Started Guide: Sophos XG Firewall Virtual Appliance
Version: 21082017AHM Page 12 of 18
Enter the administrator password: ‘admin’ to continue to the Main Menu.
Configuring XG Firewall
Browse to https://172.16.16.16:4444 from the management computer. Click Start to begin the wizard and follow the on-screen instructions.
Note: The wizard will not start if you have changed the default administrator password from the console.
Activation and Registration
Step 1: License Agreement
You must accept the Sophos End User License Agreement (EULA) to proceed further.

Getting Started Guide: Sophos XG Firewall Virtual Appliance
Version: 21082017AHM Page 13 of 18
Step 2: Register Your Firewall
Enter the serial number, if you have it. You can also use your UTM 9 license if you are migrating. Otherwise, you can skip registration for 30 days or start a free trial.
You will be redirected to the MySophos portal website. If you already have a MySophos account, specify your login credentials under “Login”. If you are a new user, sign up for a MySophos account by filling in the details under “Create Sophos ID”.
Complete the registration process.
Getting Started Guide: Sophos XG Firewall Virtual Appliance
Version: 21082017AHM Page 14 of 18
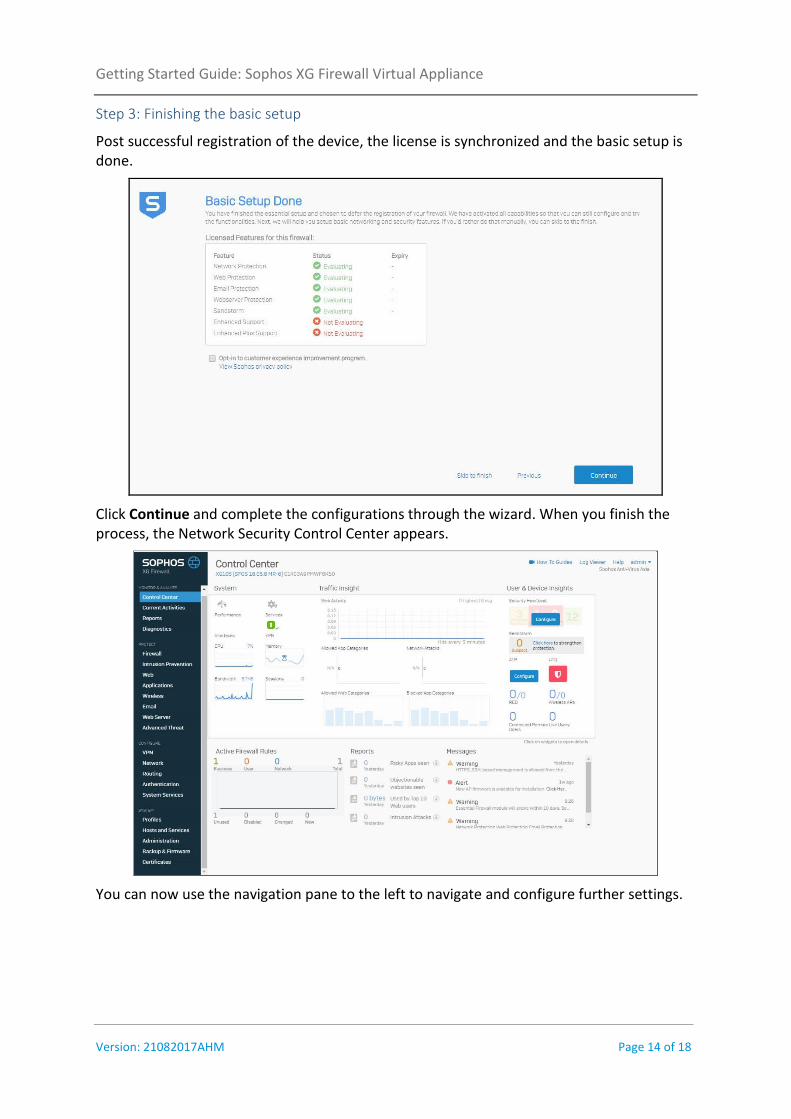
Step 3: Finishing the basic setup
Post successful registration of the device, the license is synchronized and the basic setup is done.
Click Continue and complete the configurations through the wizard. When you finish the process, the Network Security Control Center appears.
You can now use the navigation pane to the left to navigate and configure further settings.
Getting Started Guide: Sophos XG Firewall Virtual Appliance
Version: 21082017AHM Page 15 of 18
Basic Configuration
a. Setting up Interfaces
1. You can add network interfaces and RED connections in the Configure > Network > Interfaces menu. 2. You can add wireless networks in the Protect > Wireless > Wireless Networks menu. SSIDs will also be shown in the interfaces menu once created. 3. You can add access points in Protect > Wireless > Access Points.
b. Creating Zones
Zones are essential in creating firewall rules and, therefore, central to the security model in
XG Firewall. If you wish to create custom zones in addition to the default zones, go to
Configure > Network > Zone. You can use these custom zones when creating interfaces, and
security policies.
c. Creating Firewall Rules
You can create the following types of firewall rules in Protect > Firewall > Add Firewall Rule.
Two types of firewall rules are available:
1. Business Application Rule: To secure a server or service, and allow internal or external
users access to it, use a business application rule.
2. User/Network Rule: To control user access to web and application content, or to control
traffic by source, service, destination, zone, and user, use a user/network rule.
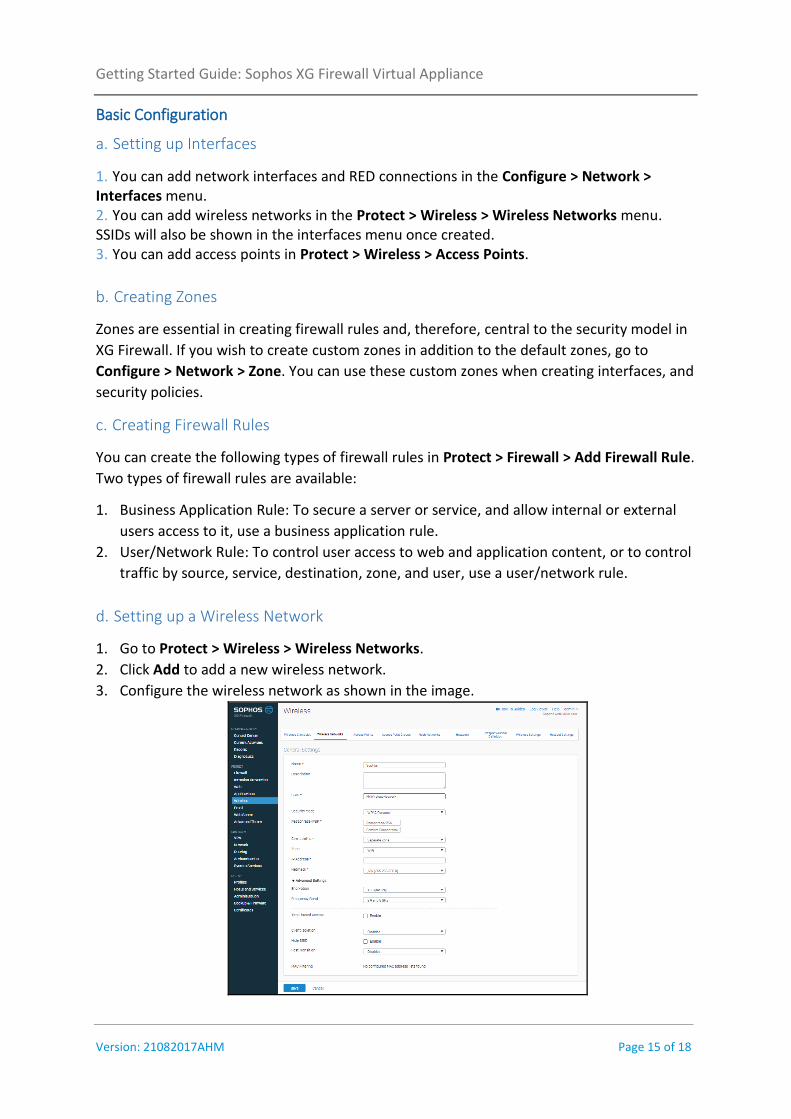
d. Setting up a Wireless Network
1. Go to Protect > Wireless > Wireless Networks.
2. Click Add to add a new wireless network.
3. Configure the wireless network as shown in the image.
Getting Started Guide: Sophos XG Firewall Virtual Appliance
Version: 21082017AHM Page 16 of 18
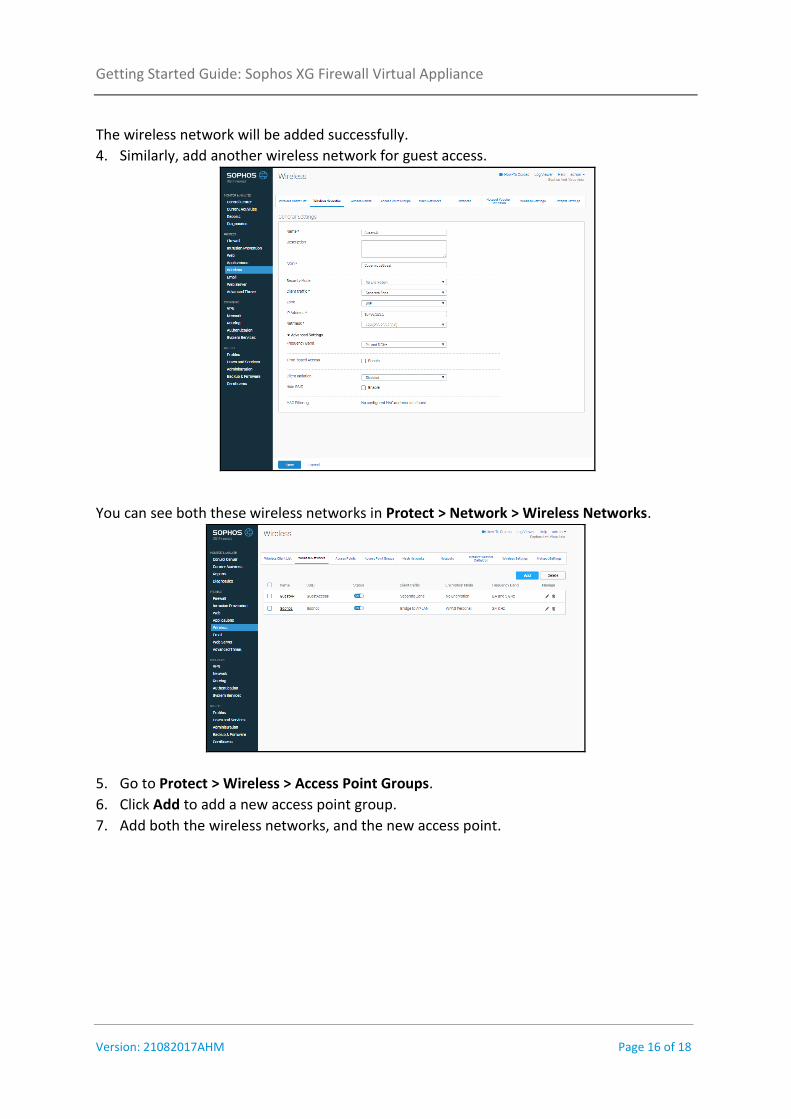
The wireless network will be added successfully.
4. Similarly, add another wireless network for guest access.
You can see both these wireless networks in Protect > Network > Wireless Networks.
5. Go to Protect > Wireless > Access Point Groups.
6. Click Add to add a new access point group.
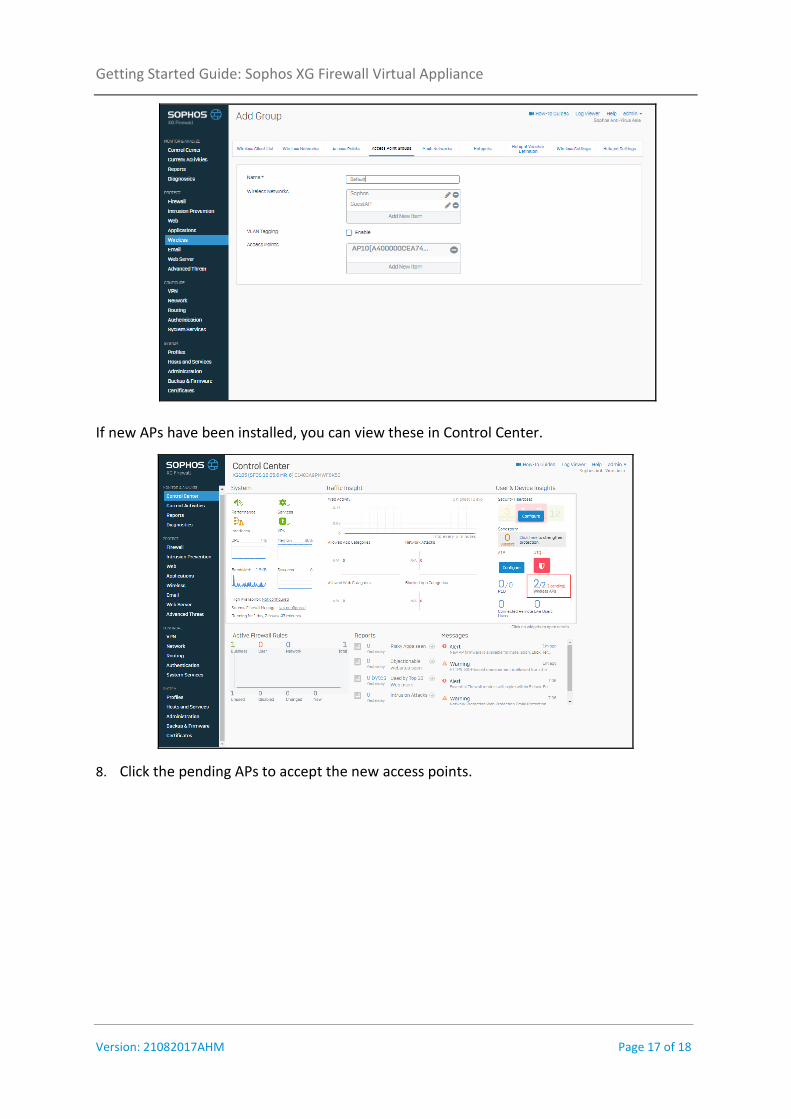
7. Add both the wireless networks, and the new access point.
Getting Started Guide: Sophos XG Firewall Virtual Appliance
Version: 21082017AHM Page 17 of 18
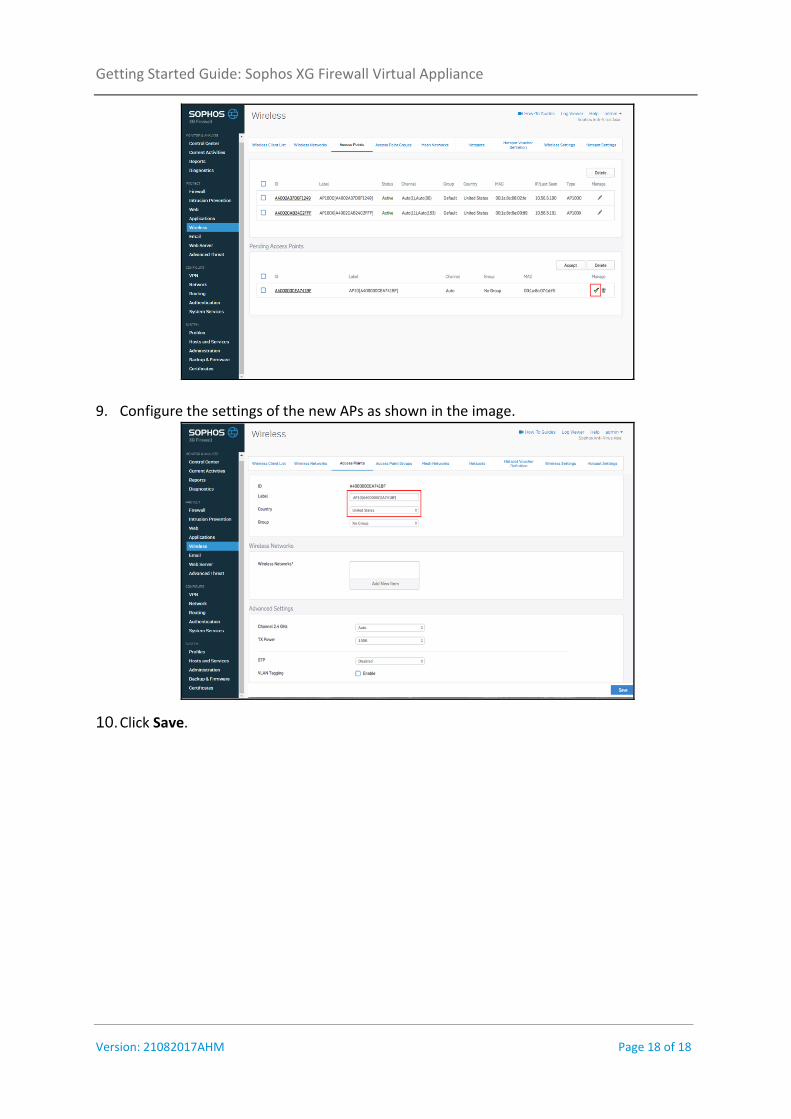
If new APs have been installed, you can view these in Control Center.
8. Click the pending APs to accept the new access points.
Getting Started Guide: Sophos XG Firewall Virtual Appliance
Version: 21082017AHM Page 18 of 18
9. Configure the settings of the new APs as shown in the image.
10. Click Save.