Embed Size (px)
Citation preview

GETTING TO KNOW YOUR TElsTRa TOUGH™ 3
FOR MORE INFORMaTION Call 13 2200 VIsIT telstra.com/mobileVIsIT a TElsTRa sTORE OR PaRTNER

WHaT’s INsIDE
03 Let’s get started
06 Getting connected
11 Making calls, messages and emails
15 Managing your contacts
17 Extra features
19 Extra bits you should know
lET’s GET THIs sHOW ON THE ROaD
You must be excited about your brand new Telstra Tough™ 3.
This guide will help you get up and running as quickly and easily as possible. So you get the most out of your new Telstra Tough™ 3, set aside some time to explore and play around with all the handy features. You can also download the full user guide online from zte.com.au
By the way, your Telstra Tough™ 3 handset is Blue Tick approved which means it’s recommended for rural and regional handheld coverage.
2

lET’s GETsTaRTED
YOUR TElsTRa TOUGH™ 3
YOUR PaCKaGE CONTaINs THE FOllOWING:• Telstra Tough™ 3 handset and battery
• AC charger and USB charging cable
• Headset
• This Getting Started Guide
• Manufacturer’s warranty card
• Mobile Muster recycling bag
3 4
Clear KeyEnter/ OK Key
Microphone
NavigationKeys
Earpiece
Front Camera
Call Key Power/End Key
Left & RightSoft Keys

Handy HintFor more information on status bar icons you can refer to the full user guide online at zte.com.au
Antenna Port
Speaker
Back Camera
Camera key
Volume keysUSB, headphones and charging port
GETTING CONNECTED
1. INsERT sIM CaRD• Remove back cover using the thumb catch on the
bottom right corner of the handset and gently lift off.
• Insert the SIM card with the gold chip facing down and the slanted edge on the top left as shown.
5 6
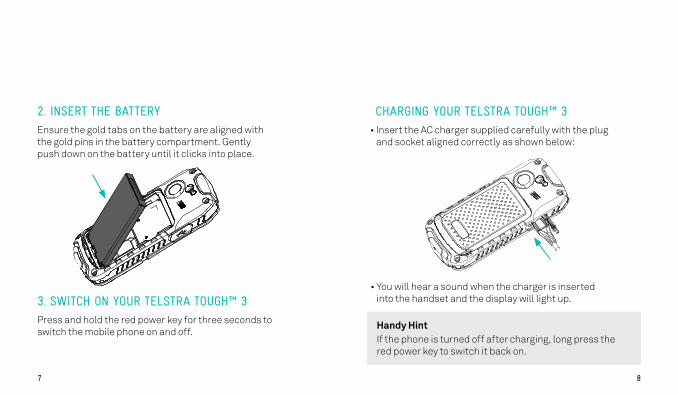
2. INsERT THE BaTTERY Ensure the gold tabs on the battery are aligned with
the gold pins in the battery compartment. Gently push down on the battery until it clicks into place.
3. sWITCH ON YOUR TElsTRa TOUGH™ 3 Press and hold the red power key for three seconds to
switch the mobile phone on and off.
CHaRGING YOUR TElsTRa TOUGH™ 3 • Insert the AC charger supplied carefully with the plug
and socket aligned correctly as shown below:
• You will hear a sound when the charger is inserted into the handset and the display will light up.
Handy HintIf the phone is turned off after charging, long press the red power key to switch it back on.
7 8

JOIN ME CONNECTION MaNaGERJoin Me allows you to manage your contacts, messages, calendar and transfer media files including photos and music by connecting your phone to a compatible computer.
KEYlOCK ON THE KEYPaD• You can lock the keypad from accidental dialling by
holding down the * key until you see Keypad Locked message. To unlock the keypad press the OK key followed by the * key.
• You can set Auto Keylock by opening the menu screen and navigating to Settings and selecting Phone. Use the arrow keys until you find Auto keyguard option and press OK.
MaIN MENU NaVIGaTION The Main Menu is a grid of icons that are used to
access key features on the phone.
• From the Home screen press the centre key to access the Main Menu.
• Using the navigation arrow keys move up, down, left or right and press the centre key to select.
9 10

VOICE Calls Making a voice call
• To make a voice call, enter the number on the keypad and press OK key or the green call key to dial.
If the number already exists in your Contacts, possible matches are listed where you can use up and down arrows to select.
You can also call a number from your Contacts.
• Select Menu, navigate to Contacts and press OK key.
• Use the up and down arrows to search for your contact and press the green call key to dial.
Answering an incoming call
• When you receive an incoming call press the green call key or OK key to answer the call. You can press OK key for loud speaker mode.
• To reject or end a call press the red end key.
TEXT MEssaGING (sMs) Sending a SMS text message
There are two ways to access your SMS messages.
• You can press the right navigation key to access the shortcut for Messages. Alternatively, open the menu screen and navigate to Messages with the arrow keys.
• Press the centre key to create a new message and press it again to select Text message.
• Type in your contact number with the keypad or press the centre key to select a contact from your address book. Use the navigation arrow keys to move up or down and the centre key to select.
• Press the navigation down key to move to the text field and enter your message with the letter keys on the keypad.
• When complete press the centre key to send message.
MaKING Calls,MEssaGEs aND EMaIls
11 12

Viewing a received text message
When you receive a text message an envelope icon will be displayed in the status bar at the top of your display. You will also be notified by a message alert tone and vibration if these settings are active.
• You can press the centre key to view message.
• Alternatively to view all messages, open the Menu screen and navigate to Messages then select Inbox. Your list of messages will be displayed on the screen and you can open a message by using the arrow keys and the centre key to view selected message.
EMaIls Where you have access to the internet on your phone you
can stay on top of your emails with your Telstra Tough™ 3 following these simple instructions.
Setting up your email account
• Open the Menu screen and navigate to Email.
• Press Add to add a new account.
• Choose your account type and press OK to configure.
• Enter your email address and password and press OK. You can also add multiple email accounts if required.
• In your Email screen select Inbox and OK to retrieve new emails.
Sending an email
• In the Email screen use the arrow keys to select New Email.
• Use the down arrow key to enter details in respective fields.
• When you are finished press OK to Send.
Handy HintYou can set up automatic Email Retrieval which means that your mobile will automatically check for new emails. You can set this up in your Email Settings under Automatic Retrieval. Data Charges may apply.
13 14

OPENING YOUR CONTaCT lIsT aND aDDING a NEW CONTaCT
• Open the Menu screen and navigate to Contacts and press OK.
• Open the Options menu using the Left Soft Key, then down arrow until Add new contact is highlighted and press OK.
• Enter in contact details and press Save to complete.
You can also add a Contact from a received call or SMS.
There are some numbers that you may want to call again and again so it’s a good idea to add these to your Contact address book. You can then access these numbers quickly and easily and add special features for each contact.
MaNaGING YOUR CONTaCTs
Handy HintBefore you can import your contacts to your new phone, you’ll need to make sure they’re saved to the SIM card.
To add a contact from a received call:
• Press the green Call key to bring up your call record and select the number you wish to add to your contacts.
• Press the Right Soft Key to enter contact details and then press OK to save.
To add a contact from your SMS:
• Open the Menu screen and navigate to your Messages.
• Open your Inbox and press OK to view the SMS contact.
• Press the Left Soft Key for Options then select Use Highlighted Object. Now select New Contact.
• Enter in contact details and press OK to save.
COPY CONTaCTs FROM sIM CaRD • From your Contacts, select Options using the Left Soft Key.
• Select Advanced, then (U)SIM Management, then select Copy contacts from (U)SIM. Press OK to Mark All or select individual Contacts using the Mark button.
• Press the Left Soft Key for Done when ready.
15 16

EXTRa FEaTUREs
CONNECTING aN EXTERNal aNTENNaUsing an external antenna may be recommended in areas of lower coverage to improve your device performance. External antennas are available from your retailer. Insert the connector carefully to avoid damage to your device.
UsING a MEMORY CaRD (OPTIONal aCCEssORY)
To use the device as a portable storage drive insert a microSD card up to 32GB:
• Remove back cover using the thumb catch on the bottom right corner of the handset and gently lift off.
• Insert the microSD card as shown and press gently to click in to place.
• Replace back cover until it clicks.
• Connect the handset to your computer using the USB cable supplied and the memory card will display as an external drive.
17 18
EXTRa BITs YOU sHOUlD KNOW
COVERaGENext G® coverage depends on your location, device and whether your device has an external antenna attached. Visit telstra.com/mobilebbcoverage to check if you are covered.
aCCEss THE FUll UsER GUIDE You can also download the full user guide online from
zte.com.au
NOTEs
19 20

The spectrum device is a trade mark of Telstra Corporation Limited. ™ and ® are trade marks and registered trade marks of Telstra Corporation Limited, ABN 33 051 775 556.
NOTEs
21 22