Embed Size (px)
Citation preview
1
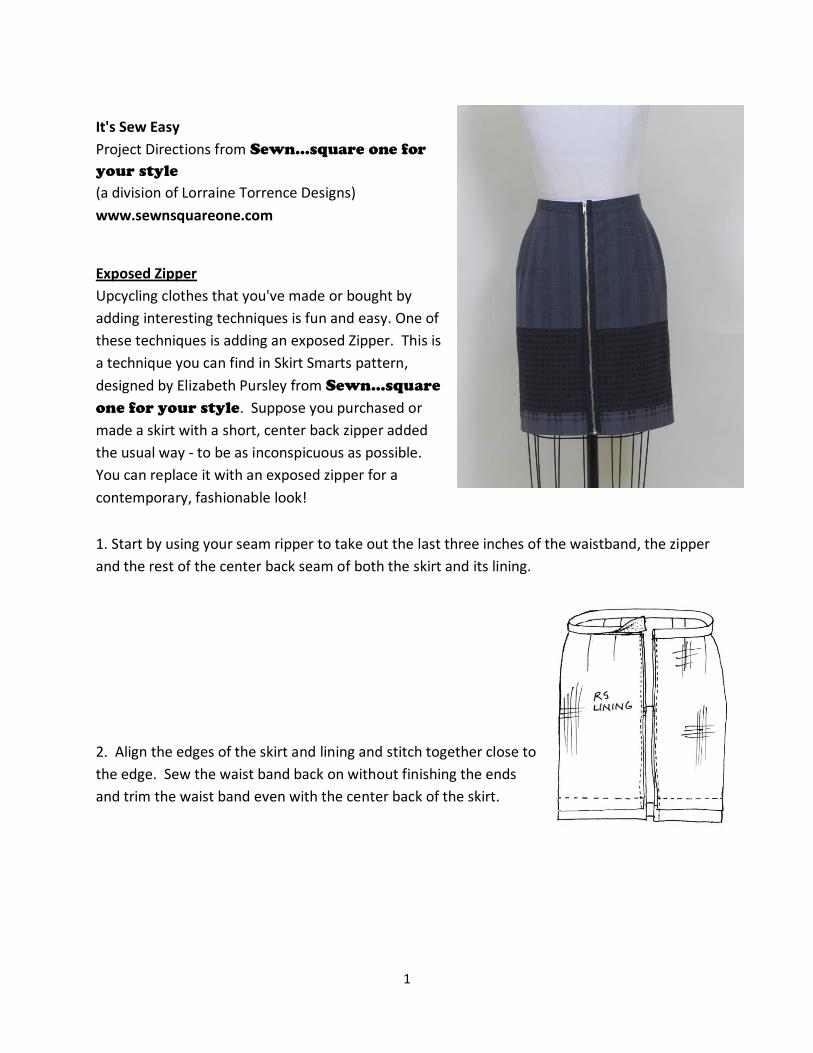
It's Sew Easy
Project Directions from Sewn…square one for
your style
(a division of Lorraine Torrence Designs)
www.sewnsquareone.com
Exposed Zipper
Upcycling clothes that you've made or bought by
adding interesting techniques is fun and easy. One of
these techniques is adding an exposed Zipper. This is
a technique you can find in Skirt Smarts pattern,
designed by Elizabeth Pursley from Sewn…square
one for your style. Suppose you purchased or
made a skirt with a short, center back zipper added
the usual way - to be as inconspicuous as possible.
You can replace it with an exposed zipper for a
contemporary, fashionable look!
1. Start by using your seam ripper to take out the last three inches of the waistband, the zipper
and the rest of the center back seam of both the skirt and its lining.
2. Align the edges of the skirt and lining and stitch together close to
the edge. Sew the waist band back on without finishing the ends
and trim the waist band even with the center back of the skirt.
2
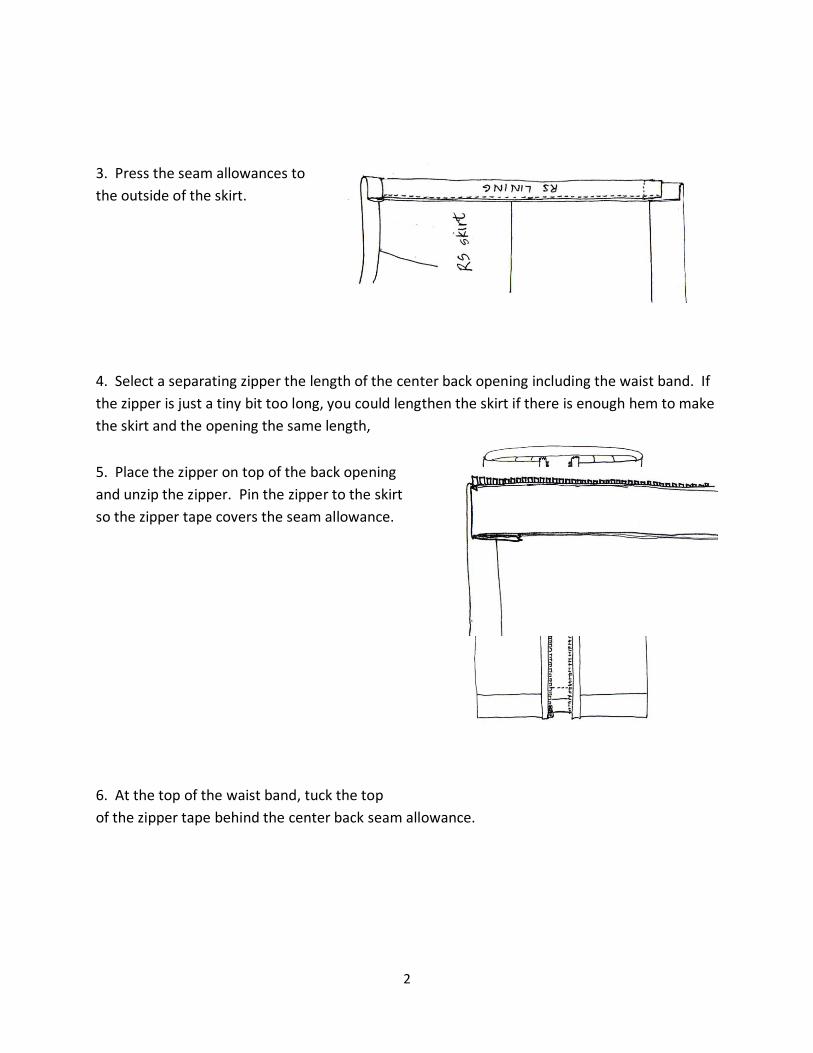
3. Press the seam allowances to
the outside of the skirt.
4. Select a separating zipper the length of the center back opening including the waist band. If
the zipper is just a tiny bit too long, you could lengthen the skirt if there is enough hem to make
the skirt and the opening the same length,
5. Place the zipper on top of the back opening
and unzip the zipper. Pin the zipper to the skirt
so the zipper tape covers the seam allowance.
6. At the top of the waist band, tuck the top
of the zipper tape behind the center back seam allowance.
3
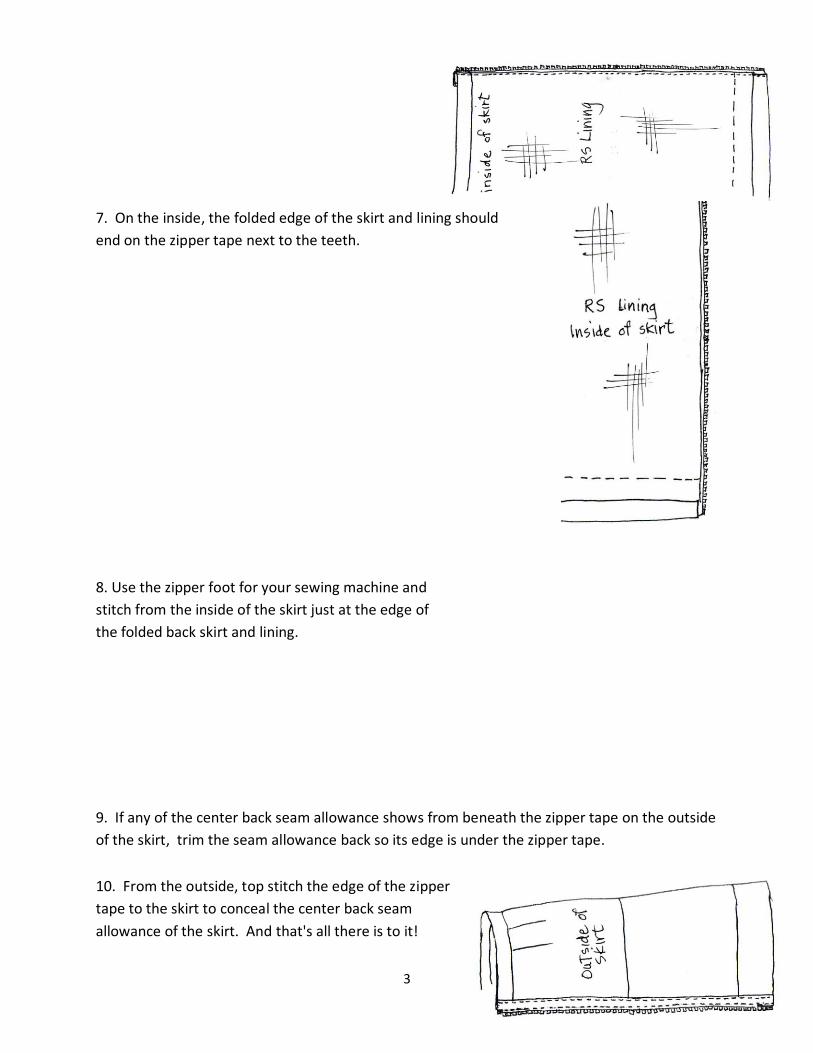
7. On the inside, the folded edge of the skirt and lining should
end on the zipper tape next to the teeth.
8. Use the zipper foot for your sewing machine and
stitch from the inside of the skirt just at the edge of
the folded back skirt and lining.
9. If any of the center back seam allowance shows from beneath the zipper tape on the outside
of the skirt, trim the seam allowance back so its edge is under the zipper tape.
10. From the outside, top stitch the edge of the zipper
tape to the skirt to conceal the center back seam
allowance of the skirt. And that's all there is to it!
4
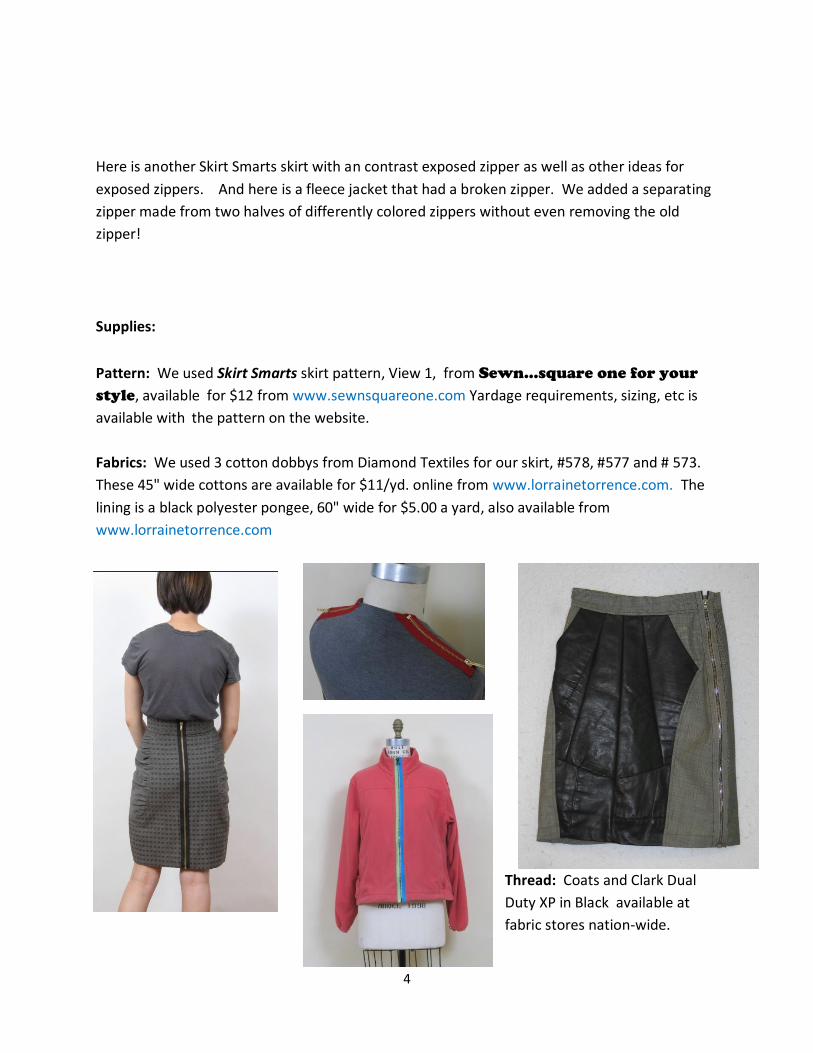
Here is another Skirt Smarts skirt with an contrast exposed zipper as well as other ideas for
exposed zippers. And here is a fleece jacket that had a broken zipper. We added a separating
zipper made from two halves of differently colored zippers without even removing the old
zipper!
Supplies:
Pattern: We used Skirt Smarts skirt pattern, View 1, from Sewn…square one for your
style, available for $12 from www.sewnsquareone.com Yardage requirements, sizing, etc is
available with the pattern on the website.
Fabrics: We used 3 cotton dobbys from Diamond Textiles for our skirt, #578, #577 and # 573.
These 45" wide cottons are available for $11/yd. online from www.lorrainetorrence.com. The
lining is a black polyester pongee, 60" wide for $5.00 a yard, also available from
www.lorrainetorrence.com
Thread: Coats and Clark Dual
Duty XP in Black available at
fabric stores nation-wide.

5
Zipper: Coats and Clark Fashion Zipper in 22' black separating with brass teeth available at
fabric stores nationwide.
Sewing Machine: We are pleased to have been able to use the Brother NX2000 for this project.
We used the regular foot, and the zipper foot.
1
It's Sew Easy
Project Directions from Sewn…square one for your style
(a division of Lorraine Torrence Designs)
www.sewnsquareone.com
Patch Pockets
Upcycling clothes that you've made or bought by adding
interesting techniques is fun and easy. One of these techniques
is adding a patch pocket. This is a technique you can find in
Paper Bag Pant pattern, designed by Gina Marie® from
Sewn…square one for your style. Suppose you purchased pants
without pockets. If you want to add pockets, it's hard to find
the same fabric, but what about adding a pocket from
a different fabric? Find a fabric you like and can launder
the same way as the pants.
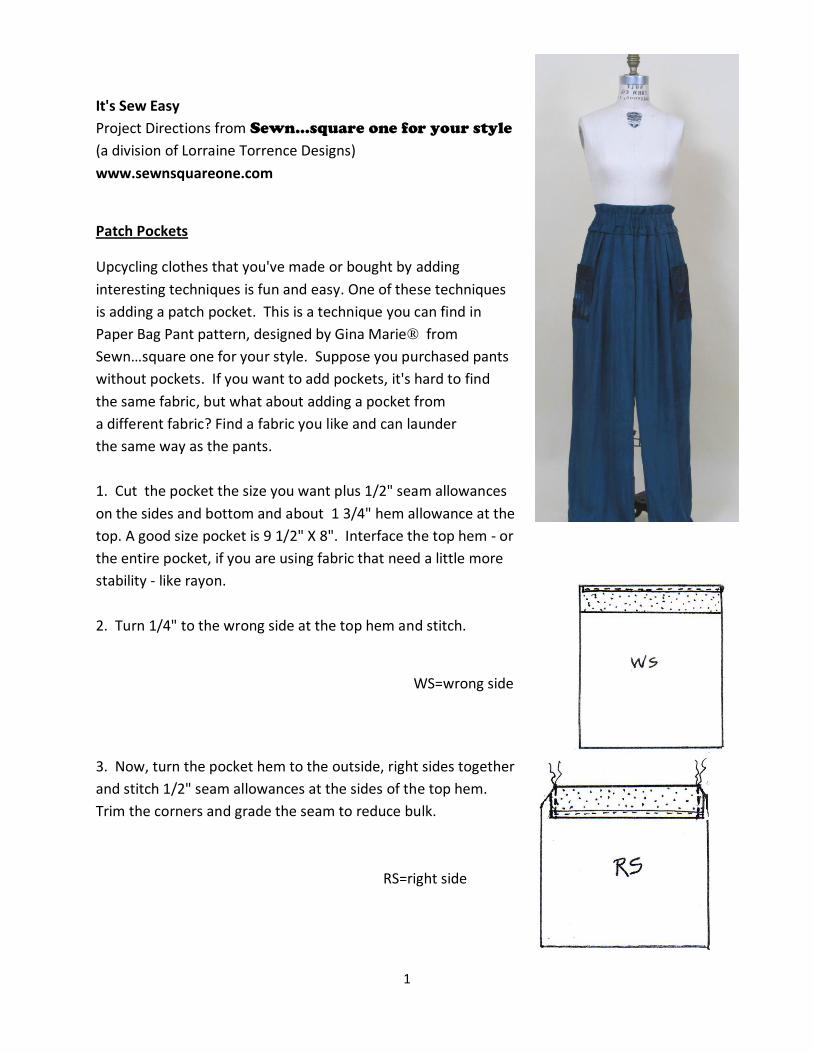
1. Cut the pocket the size you want plus 1/2" seam allowances
on the sides and bottom and about 1 3/4" hem allowance at the
top. A good size pocket is 9 1/2" X 8". Interface the top hem - or
the entire pocket, if you are using fabric that need a little more
stability - like rayon.
2. Turn 1/4" to the wrong side at the top hem and stitch.
WS=wrong side
3. Now, turn the pocket hem to the outside, right sides together
and stitch 1/2" seam allowances at the sides of the top hem.
Trim the corners and grade the seam to reduce bulk.
RS=right side
2
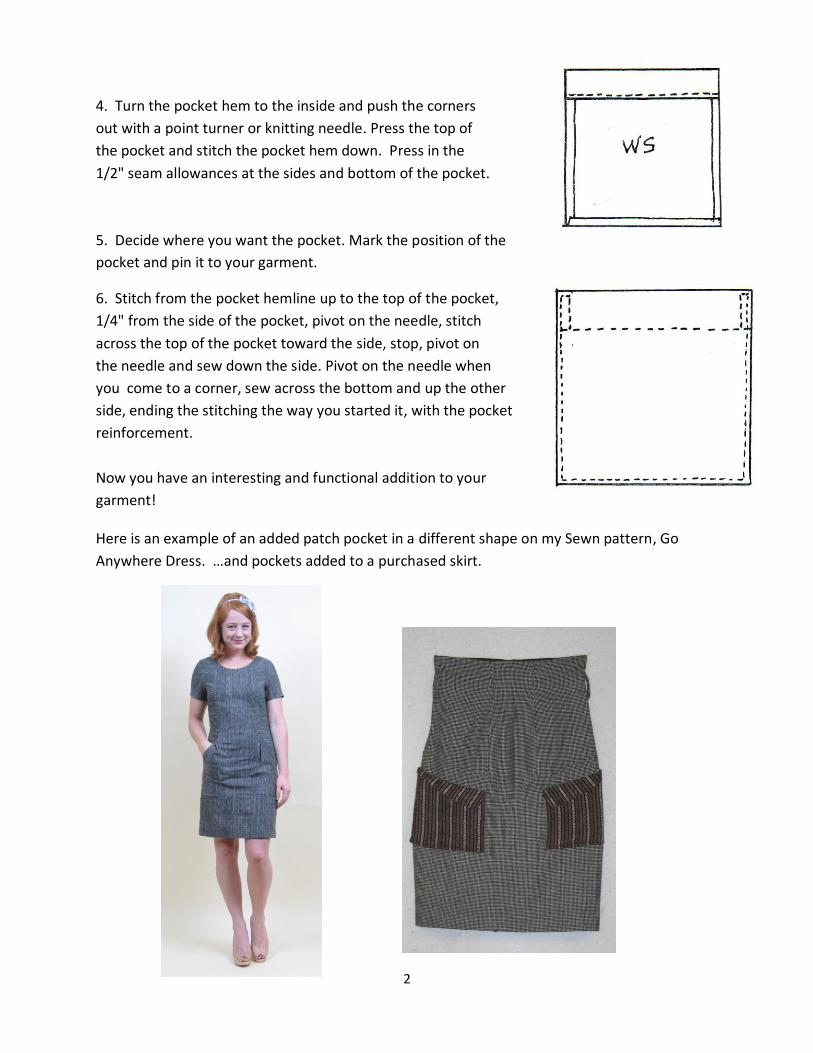
4. Turn the pocket hem to the inside and push the corners
out with a point turner or knitting needle. Press the top of
the pocket and stitch the pocket hem down. Press in the
1/2" seam allowances at the sides and bottom of the pocket.
5. Decide where you want the pocket. Mark the position of the
pocket and pin it to your garment.
6. Stitch from the pocket hemline up to the top of the pocket,
1/4" from the side of the pocket, pivot on the needle, stitch
across the top of the pocket toward the side, stop, pivot on
the needle and sew down the side. Pivot on the needle when
you come to a corner, sew across the bottom and up the other
side, ending the stitching the way you started it, with the pocket
reinforcement.
Now you have an interesting and functional addition to your
garment!
Here is an example of an added patch pocket in a different shape on my Sewn pattern, Go
Anywhere Dress. …and pockets added to a purchased skirt.
3
Supplies:
Pattern: We used Paper Bag Pant from Sewn…square one for your style, available for
$12 from www.sewnsquareone.com Yardage requirements, sizing, etc is available with
the pattern on the website.
Fabrics: We used Teal rayon batik from Island Batik for our pant. The contrast pockets are
Midnight Galaxy rayon batik from Island Batik. These rayons are available online from
www.lorrainetorrence.com
Thread: Coats and Clark Dual Duty XP in Oriental Teal available at fabric stores nation-wide.
Elastic: 1 1/2" wide non-roll elastic available online from www.lorrainetorrence.com
Sewing Machine: We are pleased to have been able to use the Brother NX2000 for this project.
1
It's Sew Easy
Project Directions from Sewn…square one for
your style
(a division of Lorraine Torrence Designs)
www.sewnsquareone.com
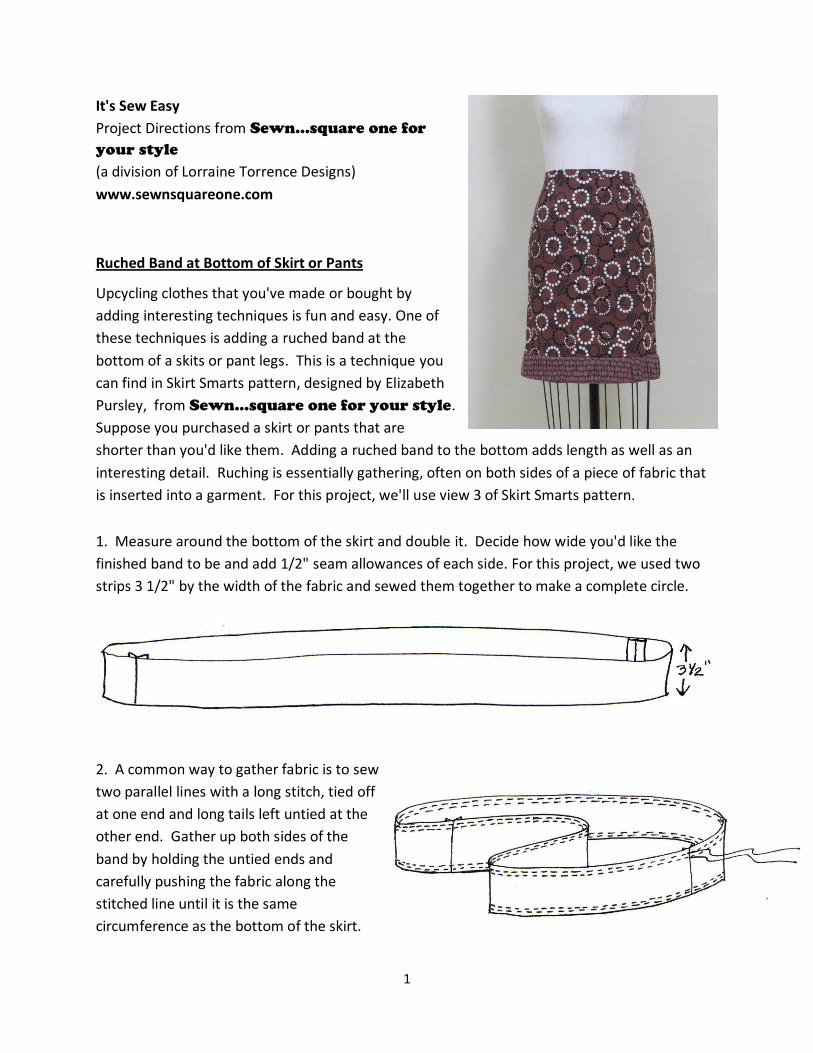
Ruched Band at Bottom of Skirt or Pants
Upcycling clothes that you've made or bought by
adding interesting techniques is fun and easy. One of
these techniques is adding a ruched band at the
bottom of a skits or pant legs. This is a technique you
can find in Skirt Smarts pattern, designed by Elizabeth
Pursley, from Sewn…square one for your style.
Suppose you purchased a skirt or pants that are
shorter than you'd like them. Adding a ruched band to the bottom adds length as well as an
interesting detail. Ruching is essentially gathering, often on both sides of a piece of fabric that
is inserted into a garment. For this project, we'll use view 3 of Skirt Smarts pattern.
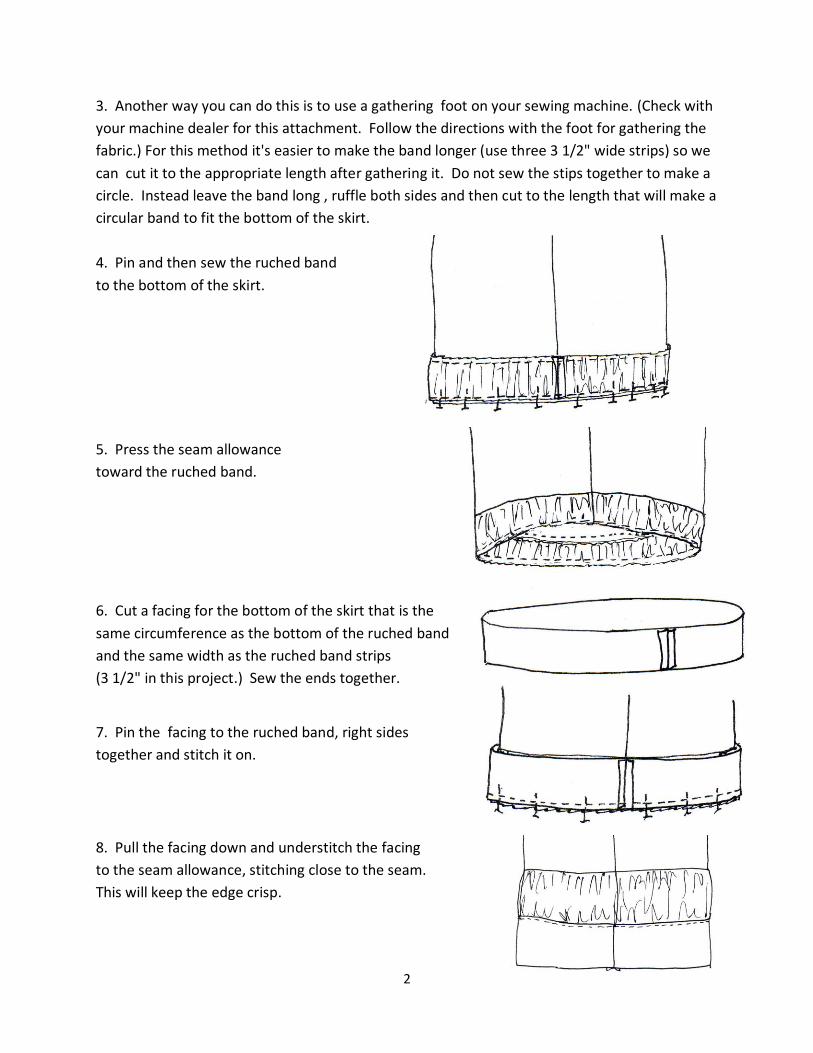
1. Measure around the bottom of the skirt and double it. Decide how wide you'd like the
finished band to be and add 1/2" seam allowances of each side. For this project, we used two
strips 3 1/2" by the width of the fabric and sewed them together to make a complete circle.
2. A common way to gather fabric is to sew
two parallel lines with a long stitch, tied off
at one end and long tails left untied at the
other end. Gather up both sides of the
band by holding the untied ends and
carefully pushing the fabric along the
stitched line until it is the same
circumference as the bottom of the skirt.
2
3. Another way you can do this is to use a gathering foot on your sewing machine. (Check with
your machine dealer for this attachment. Follow the directions with the foot for gathering the
fabric.) For this method it's easier to make the band longer (use three 3 1/2" wide strips) so we
can cut it to the appropriate length after gathering it. Do not sew the stips together to make a
circle. Instead leave the band long , ruffle both sides and then cut to the length that will make a
circular band to fit the bottom of the skirt.
4. Pin and then sew the ruched band
to the bottom of the skirt.
5. Press the seam allowance
toward the ruched band.
6. Cut a facing for the bottom of the skirt that is the
same circumference as the bottom of the ruched band
and the same width as the ruched band strips
(3 1/2" in this project.) Sew the ends together.
7. Pin the facing to the ruched band, right sides
together and stitch it on.
8. Pull the facing down and understitch the facing
to the seam allowance, stitching close to the seam.
This will keep the edge crisp.
3
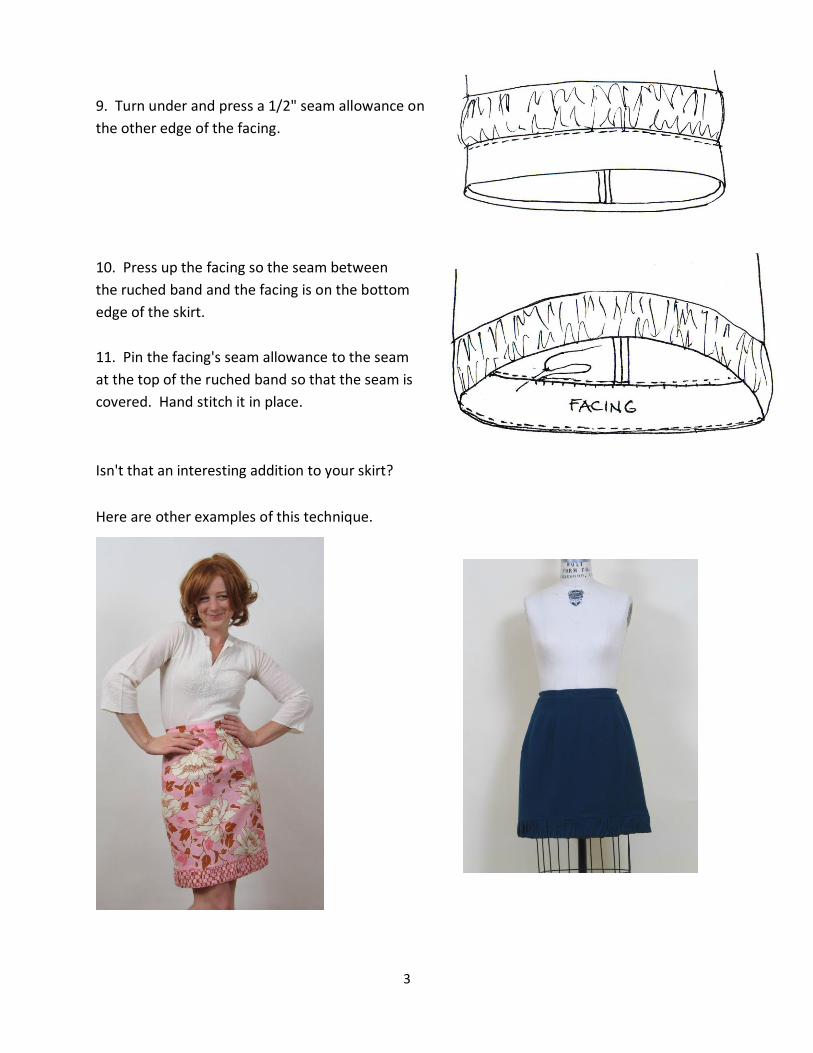
9. Turn under and press a 1/2" seam allowance on
the other edge of the facing.
10. Press up the facing so the seam between
the ruched band and the facing is on the bottom
edge of the skirt.
11. Pin the facing's seam allowance to the seam
at the top of the ruched band so that the seam is
covered. Hand stitch it in place.
Isn't that an interesting addition to your skirt?
Here are other examples of this technique.
4
Supplies:
Pattern: We used Skirt Smarts pattern from Sewn…square one for your style, available
for $12 from www.sewnsquareone.com Yardage requirements, sizing, etc is available with
the pattern on the website.
Fabrics: We used two cotton prints, pattern # 5289 from the Joy Basket line from Blank
Quilting. The contrast ruched band is #5287 Brown from the Joy Basket line from Blank
Quilting. These cottons are available online from www.lorrainetorrence.com
Thread: Coats and Clark Dual Duty XP in Cherry Mahogany available at fabric stores nation-
wide.
Zipper: Coats and Clark 7" zipper in Cherry Mahogany
Sewing Machine: We are pleased to have been able to use the Brother NX2000 for this project.
With it, we used a regular foot, the zipper foot and the ruffling foot.
Sewn…square one for your style is an independent garment pattern company with styles for
contemporary clothing and "learn-to-sew" instructions. We are a division of Lorraine Torrence
Designs * 2112 S. Spokane Street, Seattle, WA 98144 * (206) 725-8687 * Fax (206) 725-6362*
www.sewnsquareone.com * www.lorrainetorrence.com