Embed Size (px)
Citation preview

www.glorystar.tv TollFree866-597-0728
Thisguide is intendedforan individualexperienced inperforming thevarioustasksdescribed,including:
Determininganantennalocationwithaviewofthesatellitespositions.Climbingaladderandworkingonyourroof.Observingsafeworkingpracticesaroundheightsandelectricalhazards.Determiningifwaterpipes,gaslinesorwiresarehiddenbeforedrilling.Usingapowerdrilltodrillholesintoyourhouse.Routingcablethroughwalls,crawlspacesorattics.Safelyliftingandsecuringthe25lb.antennaassembly.GroundingthesystemasrecommendedintheNationalElectricCode.
If you don’t feel completely comfortable with these tasks, you may considercontractingtheinstallationwithalocalsatellitetechnician.Websitehttp://www.FTAinstall.com providesa free referral service for localinstallers.Pleasevisittoday!
••••••••
Glorystar Install Guide
Glorystar requires thatyoucarefully read through thesepagesbeforebeginningtheinstallation.Save all original boxes, manuals, accessories and packagingmaterialsincaseitisnecessarytoreturnthemerchandise.Youhave30daysfromthedateofdeliverytoreturntheequipmentforrefundorexchange.Beforeunpackingorassemblyofanyitem,reviewthewarranty,exchangeandrefundpolicyonthebackoftheSalesInvoice.PleasecallGlorystarwithanyquestionsregardingyourGlorystarequipmentorinstallation
HDVR1200 5.07.2013
DownloadthelatestGEOSATproHDVR�200OwnersManualat:www.geosatpro.com/manuals
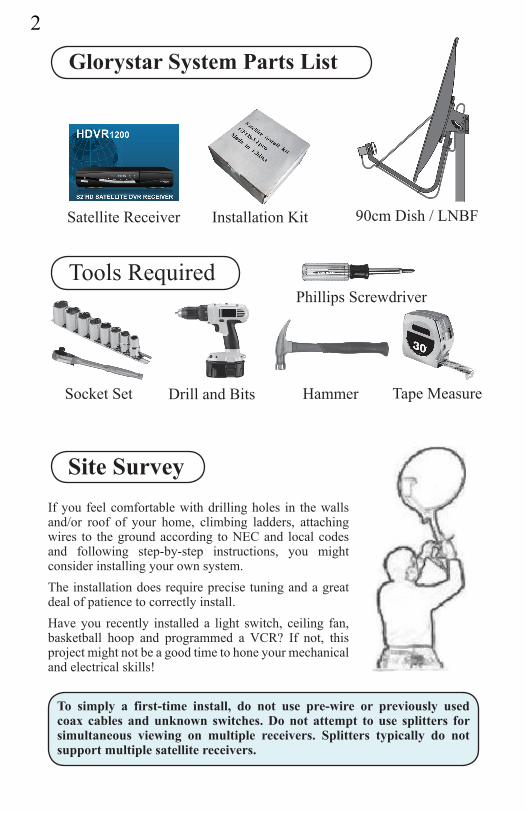
2
InstallationKit
PhillipsScrewdriver
DrillandBits Hammer TapeMeasureSocketSet
SatelliteReceiver
Glorystar System Parts List
ToolsRequired
90cmDish/LNBF
To simply a first-time install, do not use pre-wire or previously used coax cables and unknown switches. Do not attempt to use splitters for simultaneous viewing on multiple receivers. Splitters typically do not support multiple satellite receivers.
Ifyou feelcomfortablewithdrillingholes in thewallsand/or roof of your home, climbing ladders, attachingwires to thegroundaccording toNECand localcodesand following step-by-step instructions, you mightconsiderinstallingyourownsystem.Theinstallationdoesrequireprecisetuningandagreatdealofpatiencetocorrectlyinstall.Have you recently installed a light switch, ceiling fan,basketball hoop and programmed a VCR? If not, thisprojectmightnotbeagoodtimetohoneyourmechanicalandelectricalskills!
Site Survey

www.glorystar.tv TollFree866-597-0728
3
Before assembling anyequipment it is important toverify that the installationlocationhasasuitableareatosafelyandsecurelymountthesatellitedishandhaveaclearlineofsitetoreceivethesatellitesignal.Thesatellitedishmustbepointeddirectlyatthesatellite,withNOobstructionsbetweenthetwo.ThismeansNOtreesandNObuildings.Satellitesignalswillnotpassthroughleaves,limbs,soconsiderfuturetreegrowth,houseremodelingoradditionsandnewconstructioninyourarea.Thedishcannotbeinstalledindoors!
InNorthAmerica,thesatellitedishwillbepointedtowardstheSouth,SoutheastorSouthwest.Satellitesarelocateddirectlyovertheequatorandareapproximately23,000milesaway!Beforeyoustart,youwillneedtodetermineifitpossibleto“see”thesatellitefromyourlocation.
Where Is The Satellite?
Pleasenote:97Wisnot thecompass reading!97Wis theassignedorbital slotwhichcorrespondswiththeearth’sLongitude.TheGalaxy�9satelliteisjusteastofDirecTV’smainsatelliteat�0�W.
Satellite Compass (Azimuth) Reading:_____________

�How High Up in the Sky are the Satel-lites?Depending on where you live, most NorthAmerican satellites will be at an elevationanglebetween30and60degrees inNorthAmerica. Northern Canada and Hawaiianelevationscanbeaslowas�0degrees,butinCentralAmericanandtheCaribbean,thedishes are often aimed almost straight upbetween70-90degrees!
Satellite Dish Elevation Angle: ___________
ElevationAngleFinder
Sight along the top edge of the elevationangle finder with the weighted stringregistering the correct elevation angle foryourtargetsatellite.Isthelineofsightclearwithnobranches,limbsortallbuildings?Ifyouaremountingyourdishonamotor,consultwith themotor installationmanualfor recommendations on dish placementandmounting.
Besure toperformasitesurvey todetermine thebest location toseeasmanysatellites as possible. The satellites are in an arc that begins at the easternhorizonreachingtothehighestpointdirectlysouththenextendingtothewesternhorizon.
Use theaimingcoordinates includedwith this systemor foundathttp://www.GeoSatFinder.comalongwithacompassandtheSiteCheckAngleFinderfoundonthelastpageofthismanualtolocateasuitableareaformountingthedish.
Where to Mount the Dish?
Compass
While facing south, hold the compass levelinthepalmofyourhand.Withtheredneedlepointed exactly at North, reference thecompassreadingforyourtargetsatellite.Arethereanyobviousobstructions?Ifthelineofsightappearsclear,continuetothechecktheelevationangle.

www.glorystar.tv TollFree866-597-0728
5
GroundPostMount
We recommend ground mounting a fixedsatellite dish on a � 5/8” heavy wallgalvanizedpost set in cement.Attachaboltormufflerclamptothebottomoftheposttopreventthepostfromtwistinginthehardenedcement.These itemsare readily available atanyhardwarestore.Fillingthepostwithawetcementmixturewillprovidegreaterrigidity.Thepostmustbeperfectlyplumb,levelonallsides.Postsstandinghigherthan7feetshouldbe stabilized to prevent movement duringhighwinds. Thepostshouldbe installed inadvanceoftheinstallasthecementcantake2�-�8hourstoset.DONOTinstallthedishonawooden�”x�”postorona tree.Thegrainof thewoodwill twist duringdry andrainy seasons causing the dish to swing offof the satellite causing reduced or loss ofsignal.Takeproperprecautionstoprotectthedishfrombeingbumpedduringyardcareordamagedbychildrenatplay.
Dish Mounting Options
RoofMountWallMount
TheGEOSATpro90cmdishassemblyincludesaheavydutyuniversalwall/roofpostmount.Thismountcanbeattachedatalmostanyangleandprovidesastablesecuremount even inhighwind regions if properly attached. The tripod legsMUSTbeinstalled.Theuniversalpostwillfailundermoderatewindloadifthetripodlegshavenotbeeninstalledtosupportthelargerwindloadareaofa36”dish.Thedishandmountaredesignedtoremainoperationalinwindsupto80+mphandsurvivewindgustsover��0+mph.

6
Before assembling a metal dish it is Extremely Important to verify that thereflectorwasnotwarpedorbentduringshipping.Failuretocheckfordishwarpingordamagecouldleadtomanyfrustratinghoursoftryingtolocatethesatellite.Thissimpletestmaybethemostimportantstepinasuccessfulinstallation!
Bad-WarpedReflector Good-Reflector
Findaperfectlyflatsurfacesuchasagaragecementfloorandlaythereflectorfacedown.Aretheedgesofthereflectorlayingperfectlyflat?Ifanyareaoftheedgeisraisedbyevenan�/8thofaninchreceptionofthesatellitesignalwillbeaffected!
Ifyoucannotfindaperfectlyflatsurfaceorifthedishisalreadyinstalled,performthestringtest.Tape a string horizontally from edge to edgeacrossthecenterofthedish.Tapeasecondstringverticallyfromtoptobottomontheedgesofthedish.If the strings do not lightly touch in the center,thedishiswarpedanditmustbecorrectedbeforeaimingthedish.
Dish Assembly
Fixing a Warped ReflectorTocorrectawarpedreflector,holdthedishlikeasteeringwheelandquicklythrustthereflectorawayfromyourbodylikethemotionofpassinga basketball. This quick action will cause thereflectortoslightlyflexandspringbackintothefactorypressedshape.Checkforcorrectionwiththestringtest.Itmaybenecessarytorepeattheflexingprocessseveraltimesuntilthereflectoredgesareuniformlyflat.

www.glorystar.tv TollFree866-597-0728
7
Whenstandinginfrontofthedishandlookingat the back of the LNBF and towards thereflector,rotatetheLNBFcounterclockwise(left) for a positive (+) LNBF Rotation(Skew) setting and Clockwise (right) for anegative(-)LNBFRotation(Skew)setting.Start with the LNBF slid back as far awayfrom the reflector as possible. Tighten thescrewstosecuretheLNBFfromrotating.Noneedtoovertightenandbreaktheclamp.
LNBF Rotation:___________
TheLNBFcatchesthesatellitesignalsreflectedfromthedishandsendthesignaldownthecoaxtothereceiver.ItisimportanttoproperlyinstalltheLNBF.InserttheLNBFintotheclampthenlightlytightenthetwoscrewstosecuretheLNBF.
LNBF Installation
SettheLNBFRotation(SkewAngle)tothesetting specified in the aiming instructionsprovidedwithyoursystem.TheLNBFrotatesinthecircularclampuntilthecenteringlinealignswiththeLNBFRotationangle.FailuretosetthecorrectLNBFRotationwillresultinnotfindingthesatellite!
Dish Aiming
Whensettingtheelevationangleonanoffsetdish, it is important to note that the dish willappearbeaimedlowerthantheactualelevationangletothesatellite.Thescaleontheelevationbracketiscalibratedforaccurateaimingwhenthepostisinstalledperfectlyplumb(leveledonallsides).ThedishelevationangleisnotsetbytheangleoftheLNBFarmorfaceofthedish.

8In North America, satellites are always located South of your location. Tocorrectly aim the dish you must first accurately determine the exact compassreadingangle(azimuth).Metals,electricityandothermagneticdisturbancescancausethecompasstopointincorrectly.
Compassreadingsshouldbemadeatleast�0feetinfrontoforbehindthemetalsatellitedishandawayfromanylargemetalobjectsuchasmetalbuildings,airconditioners,vehicles,utilityandpowerlinesorelectricalpanels.Checkcompassreadingseveraltimestoreduceinstalltimeandtheneedtohunttheentiresouthernskyforthesatellitesignal.
Identifyareferencepointonthehorizonlikeatree,utilitypoleorotherlandmarkthatlinesupwiththecompassreading.Installersoftenfinditeasiertoalignthedish if theycanreferenceanobject that hasbeen identifiedwith thecompassreading.Ifyoucannotlocateavisualreference,stretcha�0-20footropeoutinfrontofthedishinthedirectionofthecompassreadingpointingtowardsthesatellite.
MovedirectlybehindthedishandalignthedishsothattheLNBFarmisaimeddirectlyatthereferencelandmarkorinlinewiththerope.Semi-tightenthepostclampnuts,butallowthedishtobejustlooseenoughtoberotatedleftorrightbyapplyinglightpressure.
DownloadthelatestGEOSATproHDVR�200OwnersManualat:www.geosatpro.com/manuals

www.glorystar.tv TollFree866-597-0728
9
HDVR1200 Satellite Receiver
Rear Panel
�.ConnectUSB2.0DevicesforDVR/Media/Upgrades/WiFi(5v/500ma)
2.ConnectAnalogComponentVideotoTVorothervideoequipment
3.RS232NullModemSerialPortforUpgradeandDiagnostic
�.ConnecttotheSatelliteDishCoaxCable
5.LoopSatelliteSignalOut(notrecommendedfor2ndreceiverconnection)
6.ConnectOpticalDigitalAudiotoDigitalAudioAmplifier
7.ConnectDigitalHDMIVideoandAudiotoTVorothervideoequipment
8.ConnectAnalogCompositeVideotoTVorothervideoequipment
9.ConnectAnalogAudioLeft/Right(decodedDolby)toTVorotherequipment
�0.ConnectstoDCPowerSupply(�2vdc/�500ma/positivetip)
TheFrontpaneloftheHDVR�200satellitereceiverhasmanyoftheimportantcontrolsneededforoperationofyourGlorystarsystem.Itisimportanttoinstallthereceiversothefrontdisplaycanbevisibleforproperremotecontroloperationandtohaveeasyaccesstothecontrolkeysincasetheremotecontrolismisplaced.

�0LEDdisplaylightstoverifyremoteoperationEntertheManualTimerSettingmenuDisplayMediaPlayerforVideos/Photos/MusicPageDowninaListandDVRScanRewindSkipRewindPlayDVR/MediaFreezeVideoorPauseDVR/MediaDisplayDVRRecordingsListDisplaySatelliteListDisplaytheMainMenuScreensChangeChannelorMenuNavigationUp/DownDisplayChannelBanner,2xforProgramEPG,
3xforServiceInformationDisplayElectronicProgramGuide(ifprovided)Increase/DecreaseVolumeNumeric/AlphaKeysfordirectChannelChange
andMenuSettingMuteorEnableMutedAudioSelectStandbyorOperationModeSelectClosedCaptionON/OFFDisplayaFullScreenSignalMeter
�.2.3.�.5.6.7.8.9.�0.��.�2.
�3.��.�5.
�6.�7.�8.�9.
PageUpinaListandDVRScanForwardSkipForwardStopDVRPlayorRecord/StopMediaPlaybackStartDVRManualRecordSelecttheFavoriteListModeMagnifyaPortionoftheScreenExitScreensorFunctionsDisplaytheChannelListorAcceptaMenuItemIncrease/DecreaseVolumeorMenuNavigationLeft/RightReturntoPreviousChannelChangeChannelUp/DownSelectAlternativeLanguage/AudioMode/SoundTrackSelecttoViewTVorListentoRadioChannels
20.2�.22.23.2�.25.26.27.28.29.30.3�.32.
TurntheReceiverON/OFF-17ChangeChannels-11 or30AdjustVolume-14or28MuteAudio-16ViewTV/ListentoRadio-32
•••••
Remote ShortcutsViewChannelList-27 ViewChannelBanner-12ViewSignalMeter-19ElectronicProgramGuide-13
(if available from the broadcaster)
••••

www.glorystar.tv TollFree866-597-0728
��
CAUTION: DO NOT ATTEMPT TO OPERATE ELECTRONIC DEVICES IN AN UNSAFE LOCATION OR IN VIOLATION OF SAFEGUARDS PROVIDED IN THIS MANUAL OR ANY OTHER EQUIPMENT MANUAL PROVIDED WITH THIS SATELLITE SYSTEM.
Removethesatellitereceiverandremotecontrolfromthepackaging.Inspecttheunitbeforeoperation.Ifanyequipmentisdamagedorifyouhaveanyquestions,pleaseimmediatelycontactyourreseller.InstallthetwoincludedAAAbatteriesintotheremotecontrolbatterycompartment.
TheBEST and Easiest methodtoaimthesatellitedishistotemporarilyplacethesatellitereceiverandasmallTVnearthesatellitedish.Thismethodallowstheinstallertoseethesignalchangesthatoccurwithsmalldishmovements.ItisextremelydifficulttoinstallthesatellitesystemiftheTVisinsidethehomeandoutoftheviewoftheinstaller.AttemptingtocommunicatethesignalreadingswithasecondpersonviewingtheTVwillcomplicatetheaimingprocess!
Connect Receiver to a TV
ToviewhighdefinitionvideoinHDandlistentodigitalaudio,connectaHDMIcablebetweenthereceiverandTV.NoothercablesareneededwiththeHDMIcable.AbasicconnectionforstandarddefinitionSDTVviewingistoconnectthetotheTVwiththeincludedRCAcable.ConnecttheyellowVideoportandthewhite/redAudioRCAjacksfromthereceivertotheyellow/white/redRCAplugsontheTV’sAVINjacks.PlugthetelevisionpowerplugintoasurgeprotectedACpowerstrip.TurntheTVpowerONandsettheTVtotheAVinput.TheTVisnowreadytoviewthesatellitereceiver.
Best Quality Picture Poor Quality Picture

�2
ConnectashortRG6coaxcablefromtheLNBFonthesatellitedishtotheSATINportontherearpaneloftheHDVR�200.
Plug the satellite receiver’spower supply into the�2VDCportontherearpaneloftheHDVR�200.PlugtheHDVR�200powersupplyACplugintothesurgeprotectedpowerstrip.
OlderTV:OnlyAntennaJack
Consult the owners manual provided with TV, VCR or other device that willbe connected to the GEOSATpro satellite receiver. Questions regarding theconnectiontoanyotherequipmentshouldbedirectedtothemanufacturerofthatdevice.
Standard Definition Connections (opt.)
VCR-StandardDefinition

www.glorystar.tv TollFree866-597-0728
�3
WhenthereceiverisfirstpoweredON it will display “Welcome! Pleaseselect InstallType”.Press theOKkeyontheremotecontrol to install for theGlorystarChristianSatelliteService.
�.
Receiver Activation and Set-up
Press the remote control Left or Right Navigationkey to select theconnection cable type used to connectthe satellite receiver to the TV. If aHDMIcableisconnected,selectHDMIthenpressOKkeyandcontinuetostep#3.IfaRCAcableisused,selectRCAthenpressOKkeyandskiptostep#5
2.
TV Resolution - To display thebest picture quality, the HDMI outputneeds to be set to the highest qualitythattheTVsupports.PressOK keytoselectthebestresolutionforyourTV.
3.
�80iisthelowestresolutionandwillprovidepoorpicturequality.�080pwillprovidethehighestpicturequality.IfyoudonotknowthehighestresolutionthattheTVsupports,highlightthehighestresolutionof�080pandpressOKkey.IftheTVsupportstheresolution,youwillseeadisplay“YourTVsupportsthisResolution.DoyouwishtoSaveorTestanother?”.Ifyouseethisdisplay,presstheOKkeytosave.
�.
IftheTVdoesnotsupporttheselectedresolution,nothingwilldisplayontheTVscreen.After�0seconds,thereceiverwillreturntotheResolutionQualitymenuscreen.Repeatsteps#3and#�andselectalowerresolutionqualitysettinguntiltheTVdisplaystheselectedresolutionanditissaved.

��Glorystar-LocalTimeissetby
selecting yourTime Zone.WithTimeZone highlighted, press the Left or Right Navigation key to display theinstalllocationtimezone.ForExample:-5:00 EST - New York is the correcttimezoneselectionfortheeastcoastoftheUS.
5.
PresstheDown Navigationkeyto highlight “Does this Time Zoneobserve Daylight Savings?” Press theRight or Left NavigationkeytoselectOFF if your location does not changebetweenStandardandDaylightSavingsorONifyourlocationchangesbetweenStandardandDaylightSavings.
6.
PressOKkeytocontinue.PleasetakeafewminutestoreadthisGlorystarInstallGuide.Whenyouarereadytocontinuetheinstall,presstheOKkeytocontinue.
7.
A Signal Strength reading of 0-5% indicates that the receiver is not properlyconnectedtoaworkingLNBF.ThelowSignal Quality readingatorbelow30%indicatesthatthedishisnotproperlyaimedortheLNBFisnotproperlyrotatedtoreceivethesatellitesignal.
ASignal Strength readingof50-80%indicatesthatthereceiverisconnectedtoaworkingLNBF.NoSignal Quality readingindicatesthatthedishisnotaimed.
Signal Strength and Quality MeterTheSignal StrengthandtheSignal Qualitymetersprovideimportantinformationaboutthesatellitesystem.Herearesomeexamplesofdifferentmeterreadingandwhattheytellyouaboutthewiringconnections,dishaimingandLNBFrotation.It isveryimportanttooptimizetheSignalQualityreadingstoprovidethebestperformanceduringadverseweatherconditions.Thehigher theSignalQualityreading, the better the reception. If the Signal Quality reading is too low, thepicturewillbreakupintolittlesquaresandthesoundmaybecomegarbled,outofsync,choppyordisappearcompletely!
www.glorystar.tv TollFree866-597-0728
�5
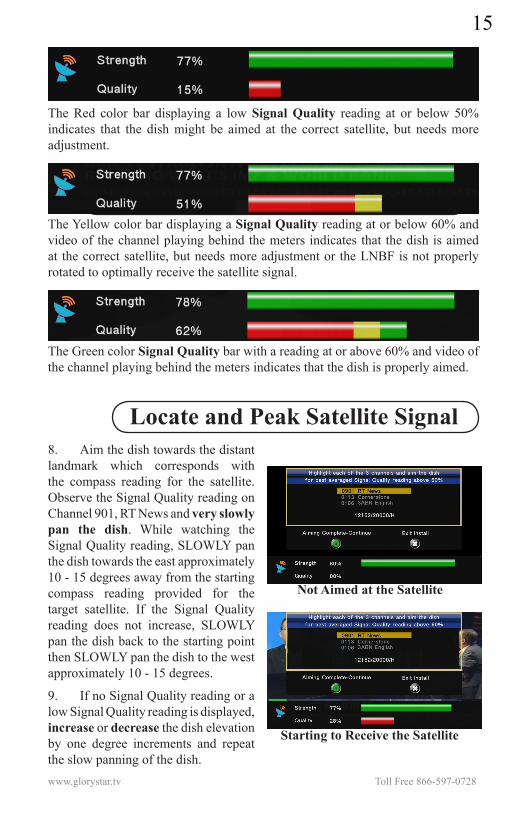
Aimthedishtowardsthedistantlandmark which corresponds withthe compass reading for the satellite.ObservetheSignalQualityreadingonChannel90�,RTNewsandvery slowly pan the dish. While watching theSignalQualityreading,SLOWLYpanthedishtowardstheeastapproximately�0-�5degreesawayfromthestartingcompass reading provided for thetarget satellite. If the Signal Qualityreading does not increase, SLOWLYpanthedishbacktothestartingpointthenSLOWLYpanthedishtothewestapproximately�0-�5degrees.
IfnoSignalQualityreadingoralowSignalQualityreadingisdisplayed,increaseordecreasethedishelevationby one degree increments and repeattheslowpanningofthedish.
8.
9.
Not Aimed at the Satellite
Starting to Receive the Satellite
If any channel displays a Signal Quality reading below50%,additionalfinetuningadjustmentsMUSTbemade.
TheGreencolorSignal Quality barwithareadingatorabove60%andvideoofthechannelplayingbehindthemetersindicatesthatthedishisproperlyaimed.
TheYellowcolorbardisplayingaSignal Quality readingatorbelow60%andvideoofthechannelplayingbehindthemetersindicatesthatthedishisaimedat thecorrectsatellite,butneedsmoreadjustmentortheLNBFisnotproperlyrotatedtooptimallyreceivethesatellitesignal.
The Red color bar displaying a low Signal Quality reading at or below 50%indicates that the dish might be aimed at the correct satellite, but needs moreadjustment.
Locate and Peak Satellite Signal

�6Once the correct satellite is
detected, the Signal Quality readingwill appear and increase from a lowquality Red color meter display to astronger signal indicated with Yellowand a Green meter display when theSignalQualityreadingisgood.
Continue to optimize the dishaimingbymakingverysmall changesto the elevation (up/down) andazimuth(left/right)topeaktheSignalQualityreading.Failuretooptimizeandmaximize the Signal Quality readingmayresultinthelossofprogrammingduringinclementweather.
Whenthedishiscorrectlyaimed,the RT News Channel programmingwillbedisplayedandtheSignalQualityreadingwillread60%orhigher.
�0.
��.
�2.
Almost There! Adjust a Little More...
Great Quality Reading above 60%
PresstheCH/DOWNarrowkeyontheremotecontroltoselectChannel #113, Cornerstone.
Verify the Signal Qualityreadingisatleast60%anddisplayingCornerstone programming. If theSignalQualityislessthan60%,makeverysmalladjustmentstofinetunethedish elevation and azimuth (side toside).
�3.
��.
Quality Reading above 60%
Press the CH/DOWN arrowkey to select Channel #106 , 3ABN English.
Verify the Signal Qualityreadingisatleast50%anddisplayingapicture. If theSignalQuality is lessthan60%,makeverysmalladjustmentstofinetunethedish.
�5.
�6.
The Signal Level (S) is important when determining if the receiver is connected to a working LNBF. A Signal Level reading of 50% or higher indicates a connection to a working LNBF, but does not indicate finding the correct satellite.

www.glorystar.tv TollFree866-597-0728
�7SlightclockwiseorcounterclockwiseadjustmentstotheLNBF rotation
orsliding the LNBFtowardsthereflectororawayfromthereflectormayalsoprovideincreasedSignalQualityreadings.
ChangebetweenChannels 901, 113 and 106andbalanceforPeak Signal Quality readings on these three channels.The Glorystar system will have thebestperformancewhentheSignalQualityLevelsarepeakedandbalancedonallchannelsandweakestchannelhasaSignalQualityreadingatorabove60%.Ifyoumusttoexittheinstallationprocessbeforethethreechannelsareoptimizedorifthepowerisremoved,thereceiverwillreturntostep#�intheset-upscreens.
Whenthedishaimingiscomplete,tightenalldishhardwaretopermanentlyholdthedishinthisposition.
�7.
�8.
�9.
Select “Aiming Complete - Continue” and press OK key toautomatically update the satellitereceiver with the latest Glorystarchannels.Thisprocessmaytakeupto�0minutesandtheupdateprogresswillbedisplayed.Pleasebepatientandwaitforthereceivertoautomaticallypowerdown and restart with a completechannellistinstalled.
Iftheupdateprogressdoesnotprogressin�5minutes,removethepowercordfor�0secondsthenreinserttoreturntostep#�intheset-upscreens.
20.
Ifthedishisnotproperlyaimedandthesatellitesignalisnotstrongenough,thereceivercannotbeupdated.The receiverwill immediatelyexit theupdateanddisplay“NoSignal”oroneofthethreepreprogrammedchannels.Removethepowercordfor�0secondsthenreinserttoreturnthereceivertoreturntostep#�intheset-upscreens.
Congratulations!TheSatellitedishisnowaimedandthereceiverisupdatedwiththelatestfirmwareandGlorystarChannelList.TheGlorystarchannellistwillbeautomaticallyupdatedeachweek.
Youmaysetyoufavoritechannelslistsandscaninadditionalfreechannelsonthesatellite.ThesesettingsandchannelswillnotbedeletedduringtheweeklyGlorystar channel updates. This receiver also records your favorite programs.SimplyattachanUSBharddrivetotheUSBportonthebackofthereceiverandpressrecord.

�8
Channel Banner
ChannelNumber-GlorystarChannelsareorganizedbylanguageandtype:�.
�00 EnglishTV200 SpanishTV300 Russian350 Italian�00 Arabic/Aramaic
•••••
ChannelNameStandardorHighDefinitionTelevisionChannelClosedCaptioningforHearingImpairedAvailableTelevisionorRadioChannelFreeorScrambledChannelCurrentDateandTimesetautomaticallybysatelliteElectronicProgramGuideStartStopTime(if provided by broadcaster)ProgramName(if provided by broadcaster)SignalStrengthandSignalQualityReadings(Quality reading must be above
60% for reliable reception)
2.3.�.5.6.7.8.9.�0.
Pressthei(information)remotecontrolkeytodisplaytheChannel Banner.Thebanner provides information about theTV or Radio channel.This banner willautomaticallydisappearaftertheselecteddisplaytimeintheOSDmenuscreen.PresstheikeytwotimestodisplaydetailedprograminformationifthebroadcasterprovidestheEPG(ElectronicProgramGuide)information.Advancedusersmaypress the i key three times to display detailed technical information about thechannel.
500 Multi-LanguageTV900 News&Entertainment�000 EnglishRadio��00 SpanishRadio�500 Multi-LanguageRadio
•••••
Tolearnmoreabouttheadvancedfeaturesofthisreceiver,pleasereviewthelatestOwnersManual.
Download the latest GEOSATpro HDVR1200 Owners Manual at: www.geosatpro.com/manuals

www.glorystar.tv TollFree866-597-0728
�9
Multiple Room Install
Carefully route the coax cable fromthe dish to the ground block then to thesatellite receiver. Secure all cables usingappropriate cable clips and nylon zipties.Avoidusingwirestaplesas theycandimple or penetrate the cable and cancauselossofsignal!Formdriploopsandcable loops as needed to prevent waterfromrunningdownthecablesandenteringcable connection fittings or into wallpenetrations.Remembertosealallexteriorwalland/orroofholeswithaqualitysealantorsiliconecaulking.
Install the grounding block and wirewhile observing all NEC, NationalElectricalCodeandlocalcodes.Connectthegroundwiretothestructureground.If you are unsure of how to properlyground your satellite system, pleaseconsultwithalocalprofessional.Copiesof the NEC are available at your locallibraryoronline.
Completing the Install and Grounding
Important Notice: GEOSATpro recommends that you DO NOT use existingcoaxialcablingthathasbeenpre-wiredorpreviouslyusedinyourhome.OftenthesecablesarelowqualityRG-59,notratedforsatelliteapplicationsorhavesplittersandotherdevicesthatarenotcompatible.AlwaysconnecttheRG-6typecoaxcabledirectlyfromthesatellitedishLNBFthroughthegroundingblockandattachtotheSatelliteINconnectionontherearofthesatellitereceiver.
Cablesplittersandotherdevicesinthecoaxlinemaycausethesatellitereceivertoshutdownormalfunction.Donotuseanydeviceinthecoaxlineunlessapprovedforsatelliteinstallation.MultiplereceiverinstallationsmustuseamultipleoutputLNBFtoavoidtuningconflictsbetweenthereceivers.Splitterswillnotwork!

20
DVR Record / PlaybackTo enable the Digital Video Record feature of the GEOSATpro HDVR�200,connectanUSBdrivetotheUSBportlocatedontherearpanel.TheminimumsupportedUSBmemorysizeis�GBandthelargestharddriveis2TB.Makesurethatyouconnect anUSBdrivewith adequate space to store theprogrammingthatyouwishtorecordandarchive.StandarddefinitionTVrecordingstypicallyrequireapproximately�GBperhourofrecording.Example:32GBUSBthumbdrivewillprovideapproximately32hoursofTVrecordingwhilea500GBwillallowupto500hours,etc.TheUSBdriveshouldhaveanexternalpowersupply.PortableharddriveswithoutexternalpowersuppliesshouldnotbeusedforDVRoperationas theyarenotdesignedforextendedrecordingandplaybackandhavethepotentialtodamagethereceiver.Recordings may be either played back on the HDVR�200 receiver directly totheTVorunplugtheUSBdriveandconnecttoaPC,Macormediadeviceforviewing,archiving,burningaDVDorrippingamediafile.TheDVRrecordingsarestandardtsextensionfilesandnospecialsoftwareisneededonacomputerormediaplayer.
DVR Quick Keys
IfachannelprovidestheEPGservicedisplayingcurrentandupcomingprogramsonthechannelbanner,presstheEPGkeytodisplaythislist.Selecttheprogramtorecordandpresstheyellowcolorkeytosetafuturerecordingtimer.(Notethatthisfeatureisnotcurrentlyavailableonmostchannels).
EPG - Electronic Program Guide

www.glorystar.tv TollFree866-597-0728
2�
Favorites ListTheHDVR�200receiverallowsyoutocreateuptoeightlistsoffavoriteandfrequentlytunedchannels.
HighlightthechannelthatyouwishtoaddtoaFavoriteListandPresstheFAVkeytodisplayalistofnumbers�-8belowthechannellist.3.
PressMenukeyandpresstheleftorrightnavigationarrowkeytoselectChannel.
HighlightTVChannelEditorifyouwishto create a Favorite List of TV Channels orRadioChannelEditortocreateaFavoriteListofRadiochannels.
�.
2.
PresstheLeftorRightNavigationArrowkeytoselectthetargetFavoriteList.
PresstheOKkeytoaddthechannel.TheFavoriteListnumberwillturntoayellowcolorwhenthehighlightedchannelisaddedtothelist.Achannelmaybeaddeduptooneoruptoalleightfavoritelists.
Toaddanadditionalchannel,presstheUporDownNavigationArrowkeytohighlightanotherchannel.
PresstheLeftorRightNavigationArrowkeytoselectthetargetFavoriteList.
PresstheOKkeytoaddthechannel.
�.
5.
6.
7.
8.
To Save changes, select the green color“O”PressOK.Toexitwithoutsavingchanges,presstheRightNavigationArrowkeytoselecttheredcolor“X”andpresstheOKkey.
��.
Repeatsteps6-8toaddadditonalchannels.PressExitkeywhenfinishedcreatingthefavoritelist(s).
9.�0.

22

www.glorystar.tv TollFree866-597-0728
23Cut Here