Embed Size (px)
Citation preview

www.3dvinci.net Page 1
Google SketchUpDesign Project:Grades 10 - 12
This project works in any version of SketchUp.This advanced design project uses many of SketchUp’s drawing tools, and involves paying some attention to the exact sizes of what you’re drawing. You’ll also make good use of components. The final result: a dream bedroom, complete with furniture and a swimming pool.
Once you understand how this room is built and furnished, the concept can be applied to anything - a dream classroom, dream rec room, dream bathroom, dream gym, etc. It’s a very fun project; kids really get to exercise their creativity designing and furnishing spaces they’d like to live in!
If you need some basic information on downloading Google SketchUp, or about its user interface and basic tools, please see our printable “Intro to SketchUp” PDF.
The PC version is at www.3dvinci.net/SketchUp_Intro_PC.pdf.The Mac version is at www.3dvinci.net/SketchUp_Intro_MAC.pdf.
1. This bedroom will be pretty big, so if you have a person in your model, leave him or here there as a basis for size. Make a rectangle for the basic room shape, but don’t click to finish it yet.
2. Many of SketchUp’s tools can use exact numbers. While you’re using the Rectangle tool, look at the Dimensions box below the SketchUp window. You’ll see the length and width of the rectangle change while you move the mouse. Make this rectangle about 30 feet wide and 40 feet long. (If you want the numbers to be exact, you can type them in and press Enter. Be sure to include the apostrophe foot symbol, and separate the two numbers with a comma.)
Google SketchUp Teacher Guide Google SketchUp Design Project: Grades 10 - 12
www.3dvinci.net Page 2
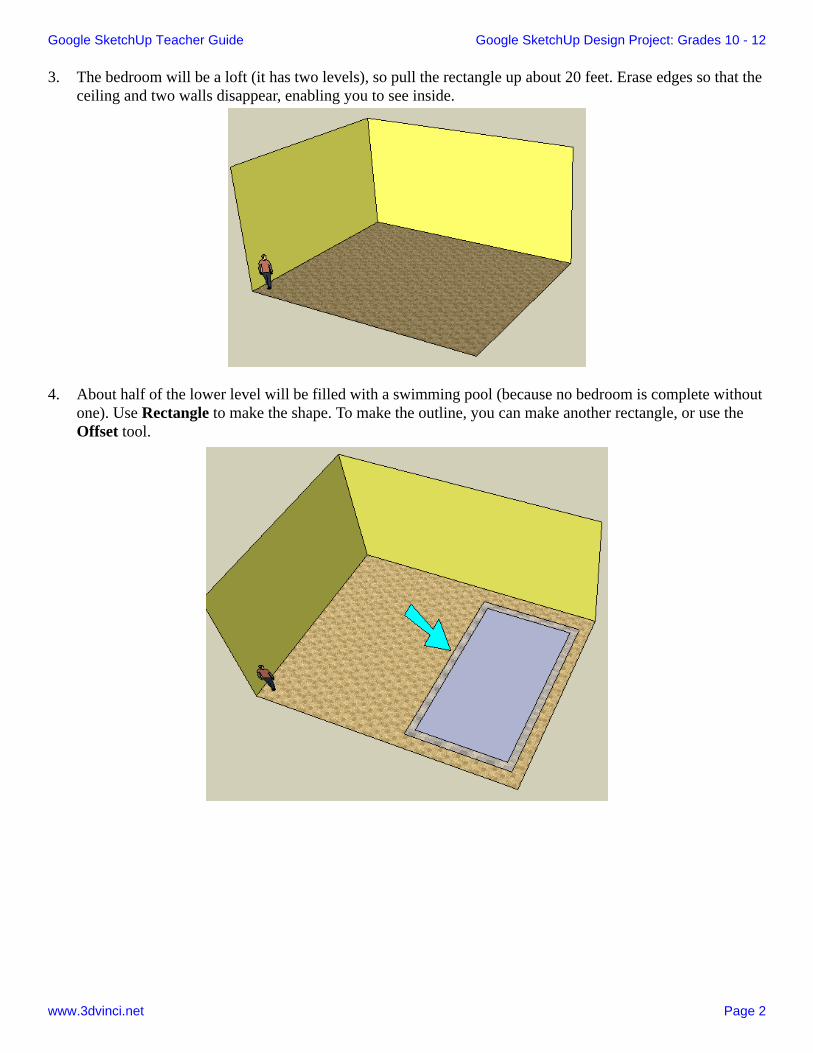
3. The bedroom will be a loft (it has two levels), so pull the rectangle up about 20 feet. Erase edges so that the ceiling and two walls disappear, enabling you to see inside.
4. About half of the lower level will be filled with a swimming pool (because no bedroom is complete without one). Use Rectangle to make the shape. To make the outline, you can make another rectangle, or use the Offset tool.

Google SketchUp Teacher Guide Google SketchUp Design Project: Grades 10 - 12
www.3dvinci.net Page 3
5. Pull up the pool walls, and pull up the floor to make the water line. When you use Push/Pull for this, keep the Ctrl / Option key pressed. This means that the bedroom floor will stay intact, instead of being “sucked up” with the pool objects. (Try it first without the Ctrl / Option key to see the difference). If the water doesn’t seem deep enough, pull the bedroom floor down (without the Ctrl / Option key).
Yes, it looks weird to have a pool sticking out below the floor. But at the end, you can place a large square of grass or concrete around the room, which will hide the bottom of the pool.
6. There is a “Water” folder for materials, which contains one translucent water material. Use this for the face of the water line, and you can see through to the bottom of the pool.

Google SketchUp Teacher Guide Google SketchUp Design Project: Grades 10 - 12
www.3dvinci.net Page 4
7. Now we can make the loft floor. It will be a simple rectangle which extends as far as the pool below. Start with a line along one wall like this:
8. Make the floor long enough to hang a little over the pool (Line 2). When you make Line 3, start drawing in the direction you want the line to go (green, in my example). Press Shift to “lock” the direction, and click the first point of Line 1. This sets the exact length of Line 3.
9. Complete the last line to finish the loft floor.
Google SketchUp Teacher Guide Google SketchUp Design Project: Grades 10 - 12
www.3dvinci.net Page 5
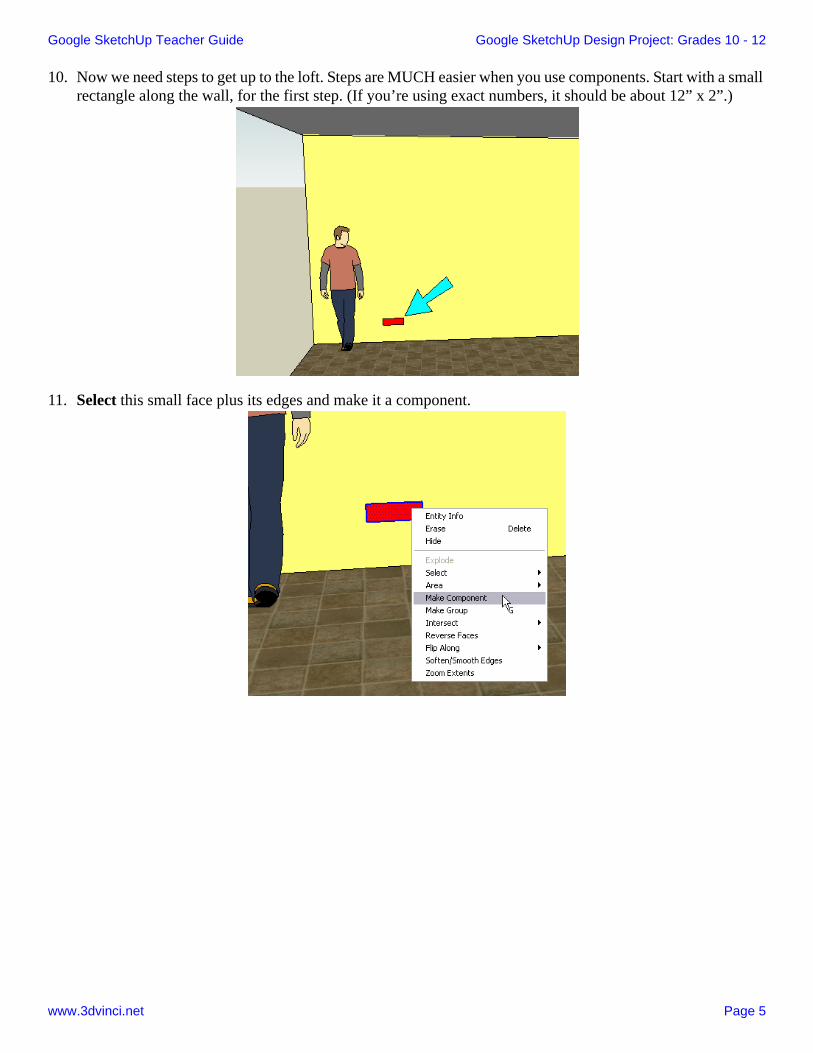
10. Now we need steps to get up to the loft. Steps are MUCH easier when you use components. Start with a small rectangle along the wall, for the first step. (If you’re using exact numbers, it should be about 12” x 2”.)
11. Select this small face plus its edges and make it a component.
Google SketchUp Teacher Guide Google SketchUp Design Project: Grades 10 - 12
www.3dvinci.net Page 6
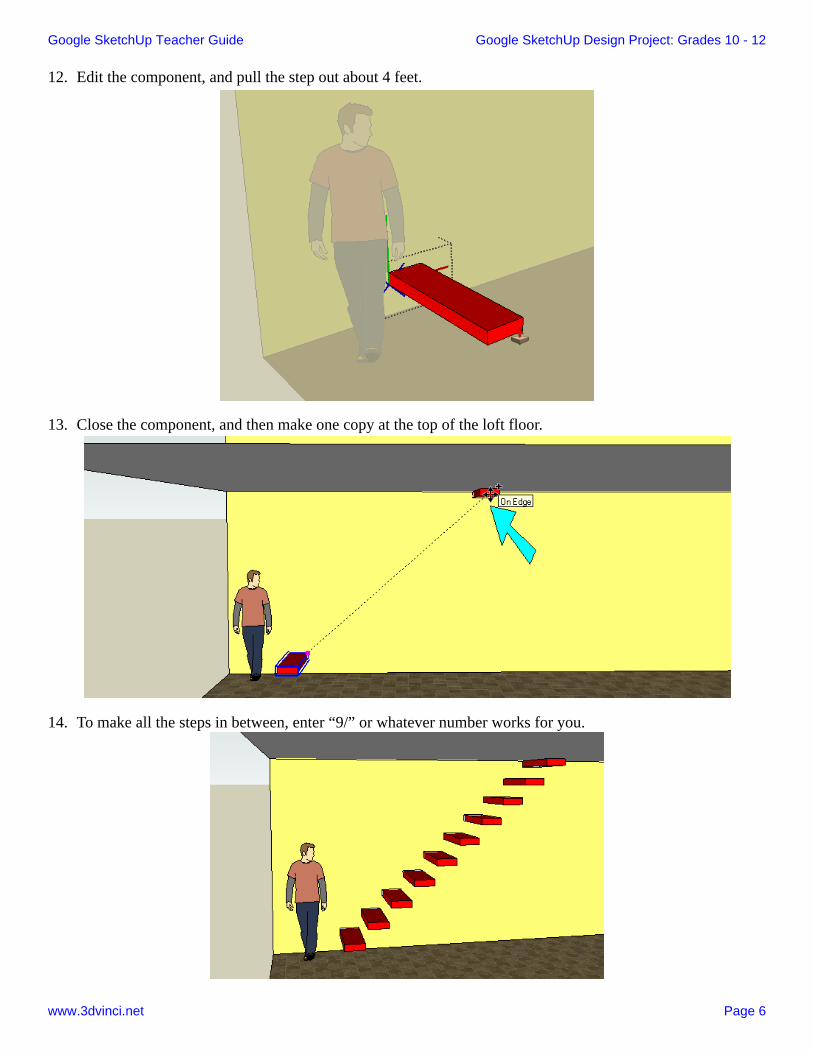
12. Edit the component, and pull the step out about 4 feet.
13. Close the component, and then make one copy at the top of the loft floor.
14. To make all the steps in between, enter “9/” or whatever number works for you.
Google SketchUp Teacher Guide Google SketchUp Design Project: Grades 10 - 12
www.3dvinci.net Page 7
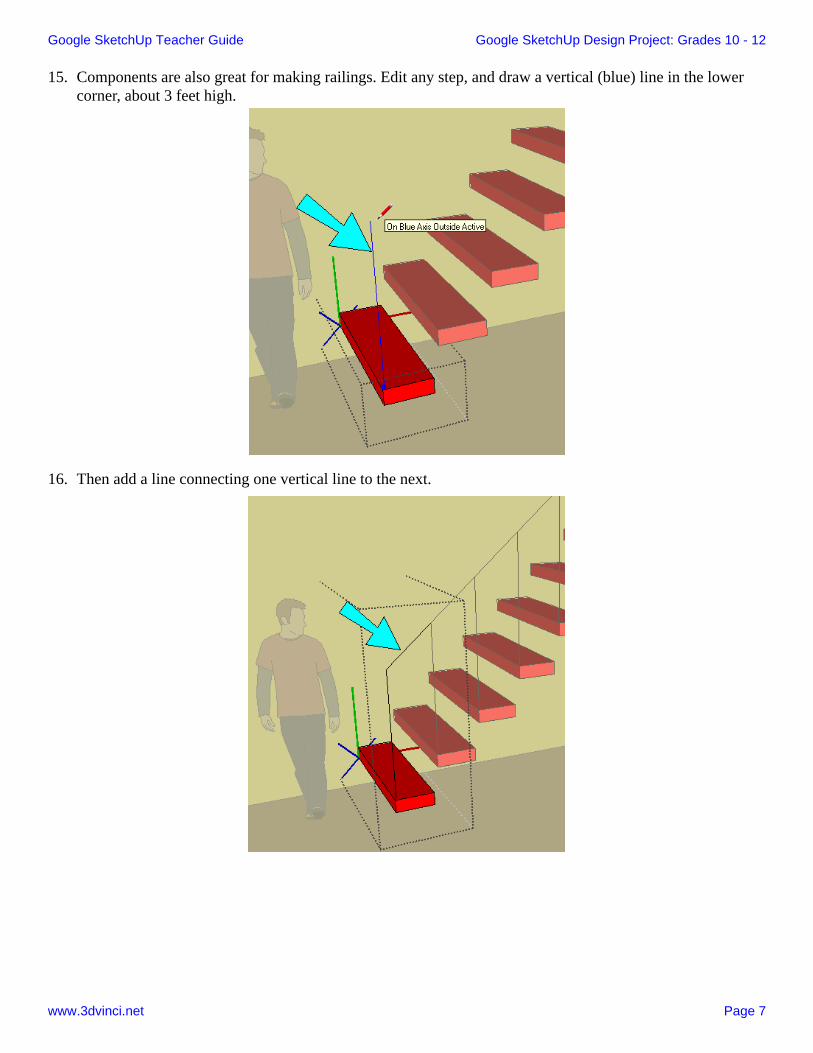
15. Components are also great for making railings. Edit any step, and draw a vertical (blue) line in the lower corner, about 3 feet high.
16. Then add a line connecting one vertical line to the next.
Google SketchUp Teacher Guide Google SketchUp Design Project: Grades 10 - 12
www.3dvinci.net Page 8
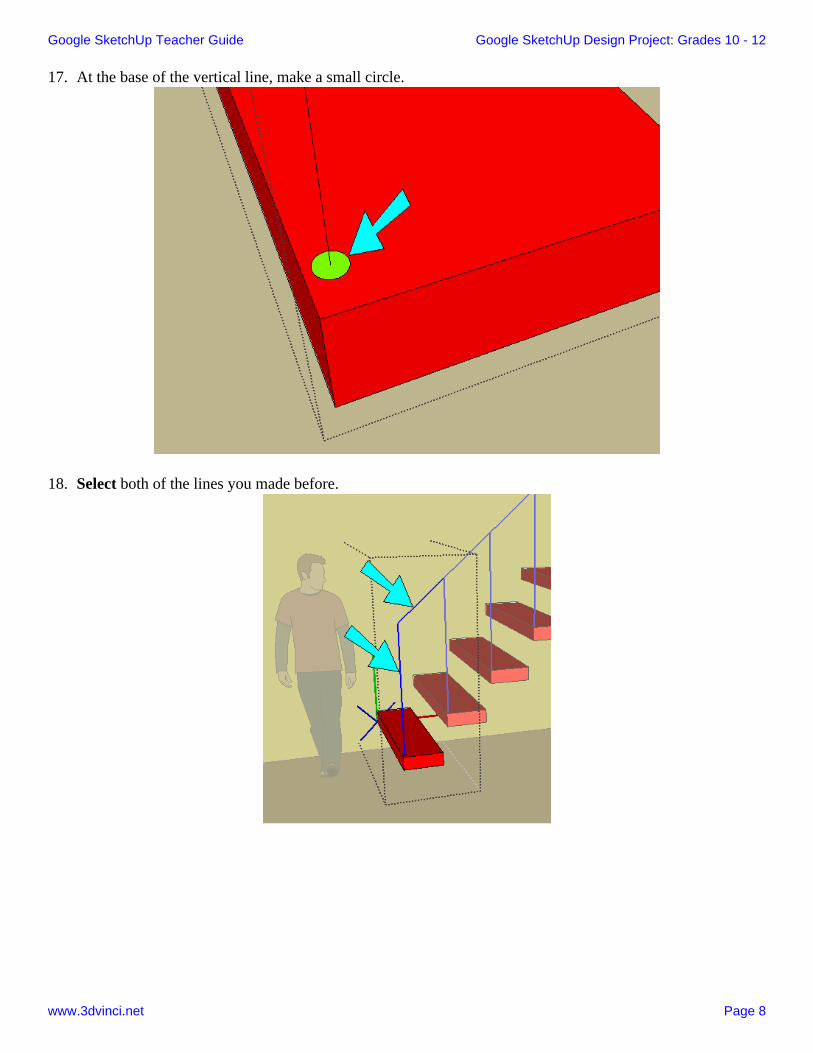
17. At the base of the vertical line, make a small circle.
18. Select both of the lines you made before.
Google SketchUp Teacher Guide Google SketchUp Design Project: Grades 10 - 12
www.3dvinci.net Page 9
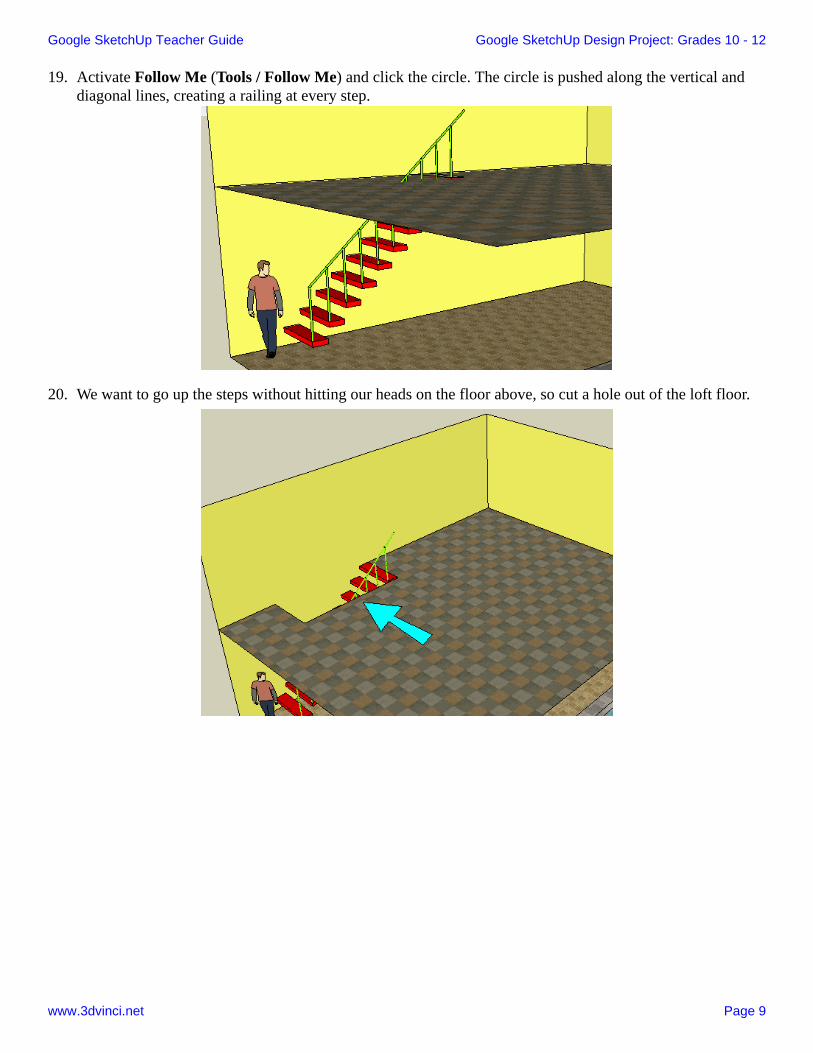
19. Activate Follow Me (Tools / Follow Me) and click the circle. The circle is pushed along the vertical and diagonal lines, creating a railing at every step.
20. We want to go up the steps without hitting our heads on the floor above, so cut a hole out of the loft floor.
Google SketchUp Teacher Guide Google SketchUp Design Project: Grades 10 - 12
www.3dvinci.net Page 10
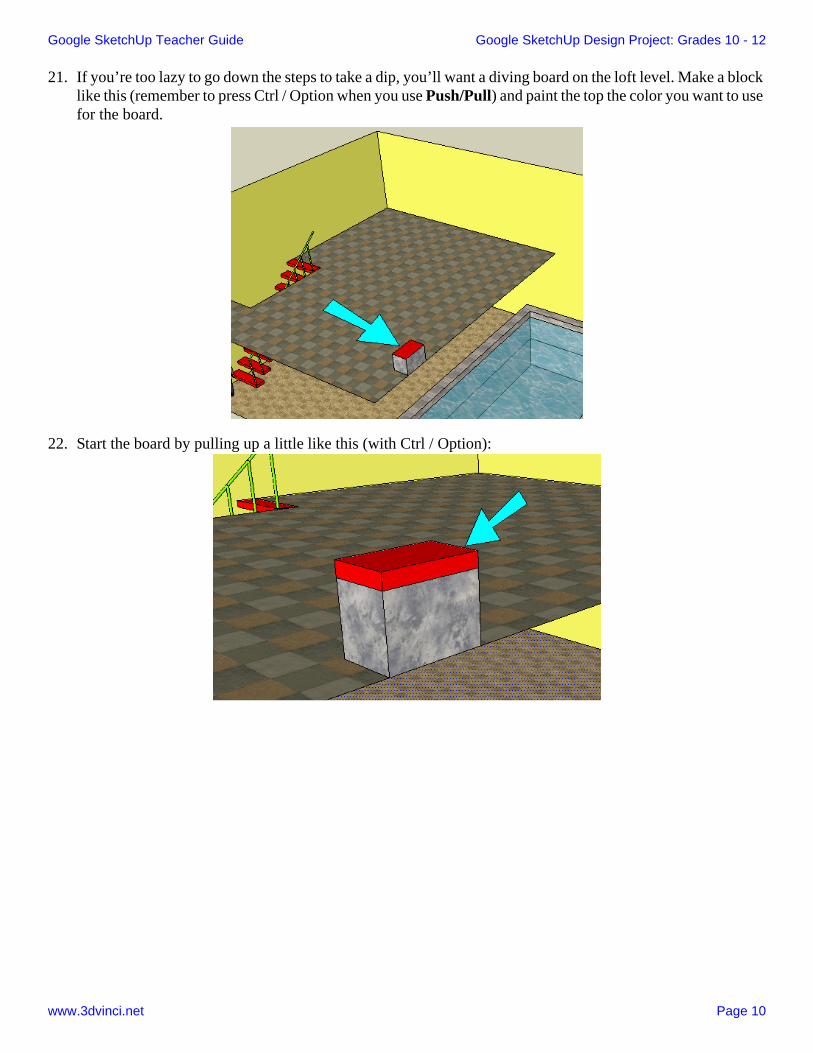
21. If you’re too lazy to go down the steps to take a dip, you’ll want a diving board on the loft level. Make a block like this (remember to press Ctrl / Option when you use Push/Pull) and paint the top the color you want to use for the board.
22. Start the board by pulling up a little like this (with Ctrl / Option):
Google SketchUp Teacher Guide Google SketchUp Design Project: Grades 10 - 12
www.3dvinci.net Page 11
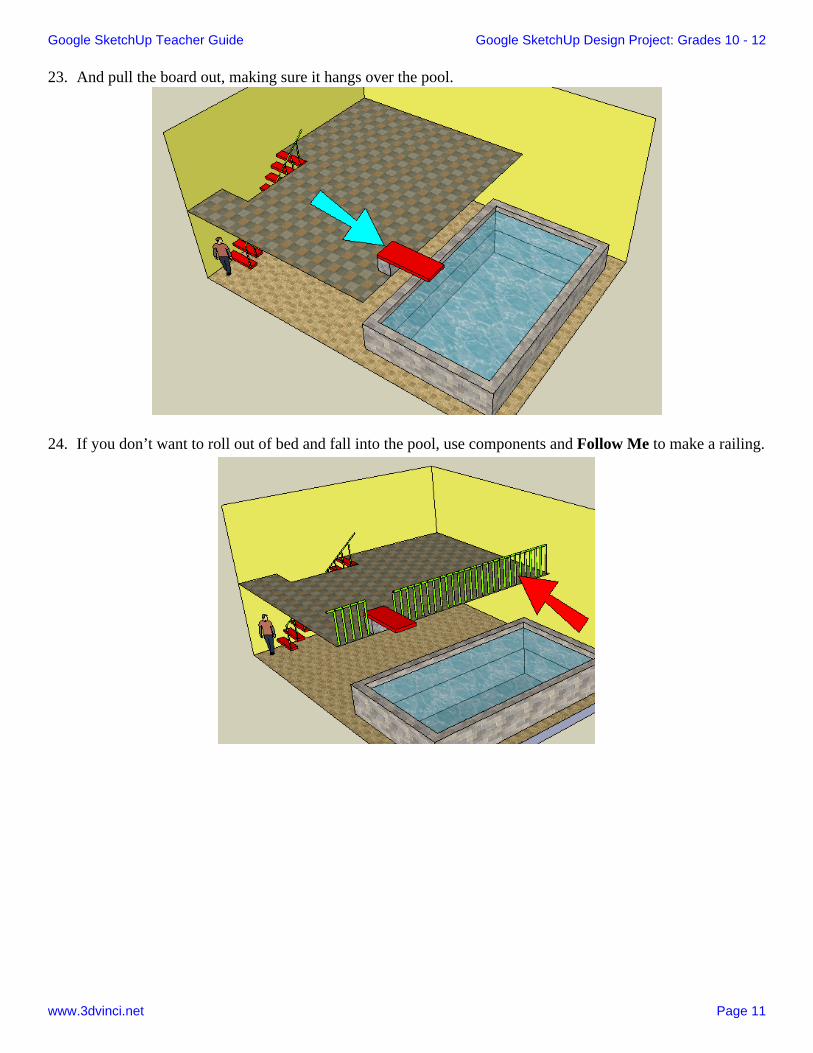
23. And pull the board out, making sure it hangs over the pool.
24. If you don’t want to roll out of bed and fall into the pool, use components and Follow Me to make a railing.
Google SketchUp Teacher Guide Google SketchUp Design Project: Grades 10 - 12
www.3dvinci.net Page 12
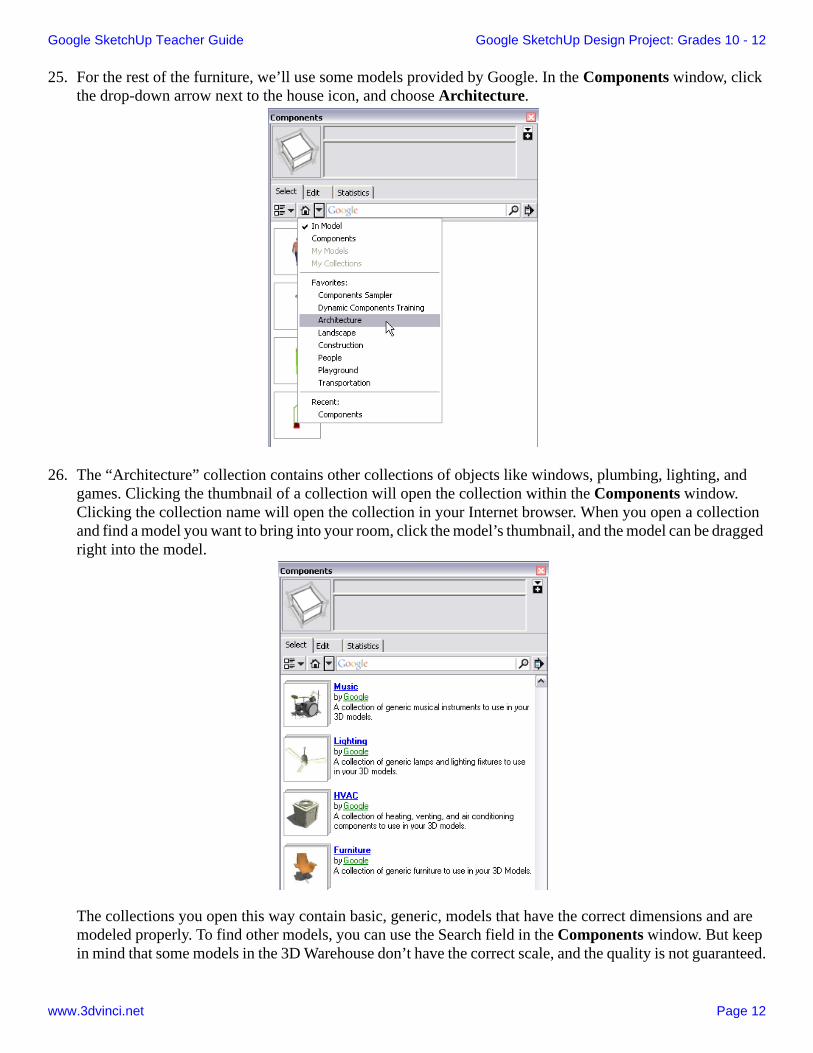
25. For the rest of the furniture, we’ll use some models provided by Google. In the Components window, click the drop-down arrow next to the house icon, and choose Architecture.
26. The “Architecture” collection contains other collections of objects like windows, plumbing, lighting, and games. Clicking the thumbnail of a collection will open the collection within the Components window. Clicking the collection name will open the collection in your Internet browser. When you open a collection and find a model you want to bring into your room, click the model’s thumbnail, and the model can be dragged right into the model.
The collections you open this way contain basic, generic, models that have the correct dimensions and are modeled properly. To find other models, you can use the Search field in the Components window. But keep in mind that some models in the 3D Warehouse don’t have the correct scale, and the quality is not guaranteed.

Google SketchUp Teacher Guide Google SketchUp Design Project: Grades 10 - 12
www.3dvinci.net Page 13
27. Fill both levels of the bedroom however you want. For example, the “Architecture” collection contains collections for beds and dressers.
28. If you want to change any of these components, just edit them. For example, I changed the colors of the bed and tables.
Google SketchUp Teacher Guide Google SketchUp Design Project: Grades 10 - 12
www.3dvinci.net Page 14
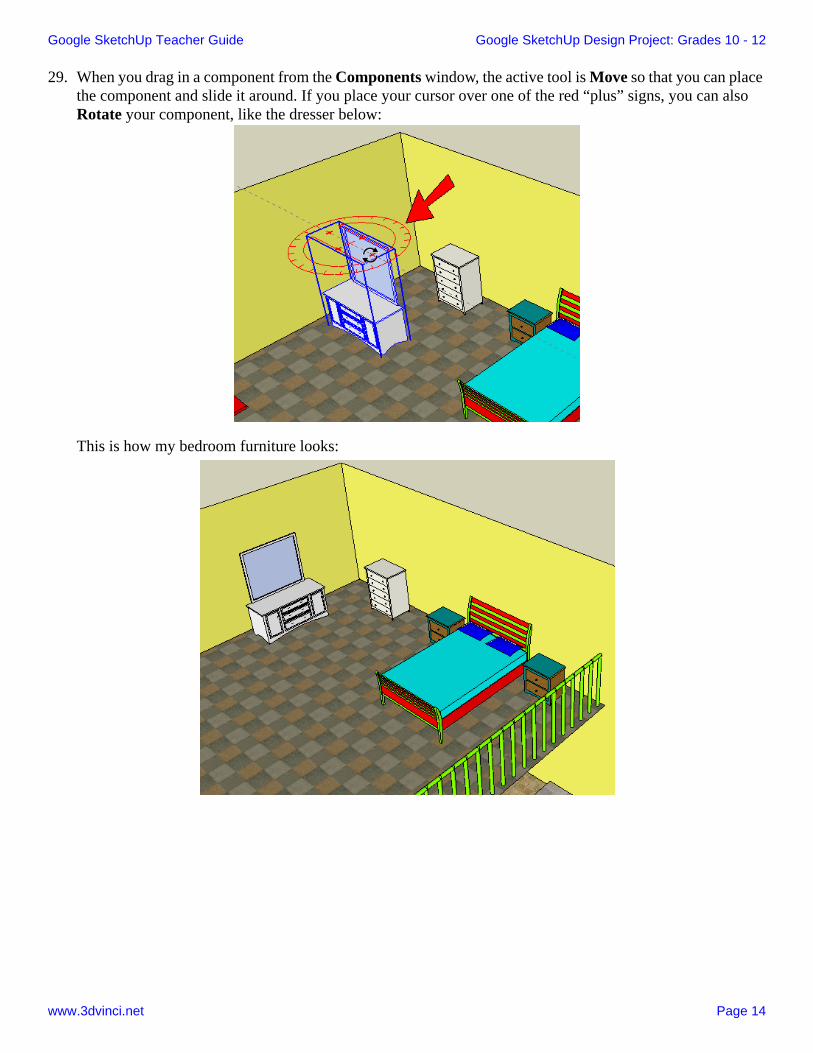
29. When you drag in a component from the Components window, the active tool is Move so that you can place the component and slide it around. If you place your cursor over one of the red “plus” signs, you can also Rotate your component, like the dresser below:
This is how my bedroom furniture looks:
Google SketchUp Teacher Guide Google SketchUp Design Project: Grades 10 - 12
www.3dvinci.net Page 15
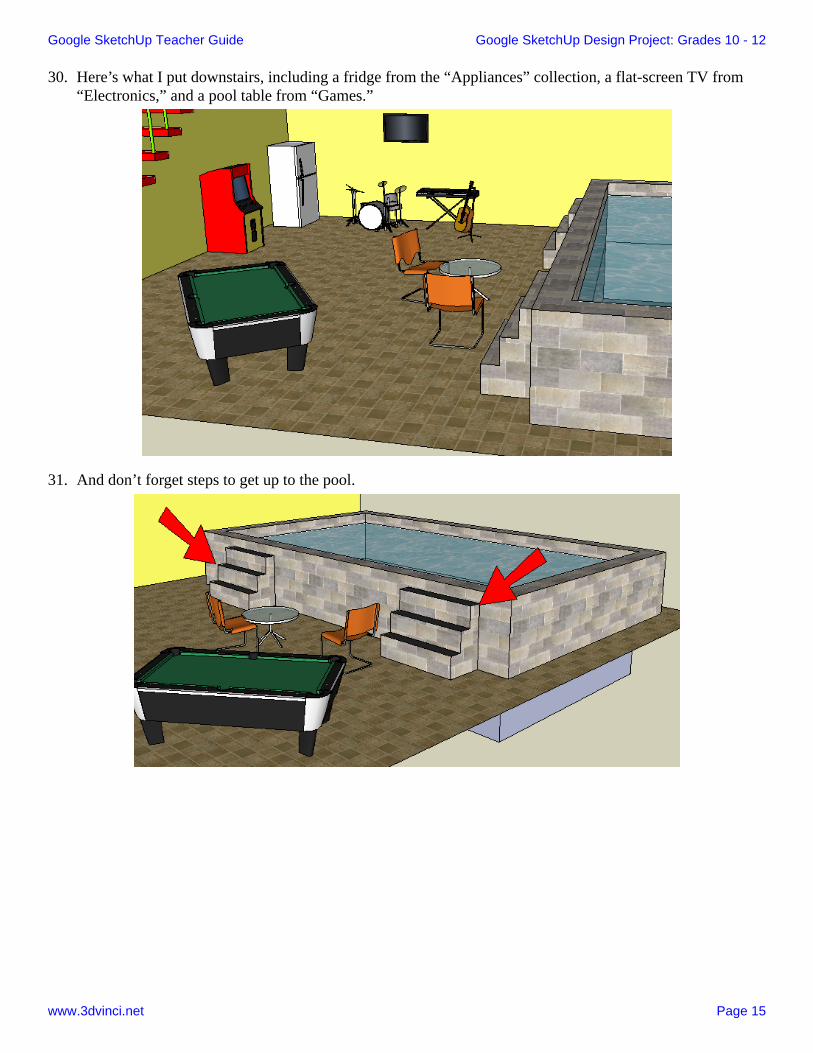
30. Here’s what I put downstairs, including a fridge from the “Appliances” collection, a flat-screen TV from “Electronics,” and a pool table from “Games.”
31. And don’t forget steps to get up to the pool.
Google SketchUp Teacher Guide Google SketchUp Design Project: Grades 10 - 12
www.3dvinci.net Page 16
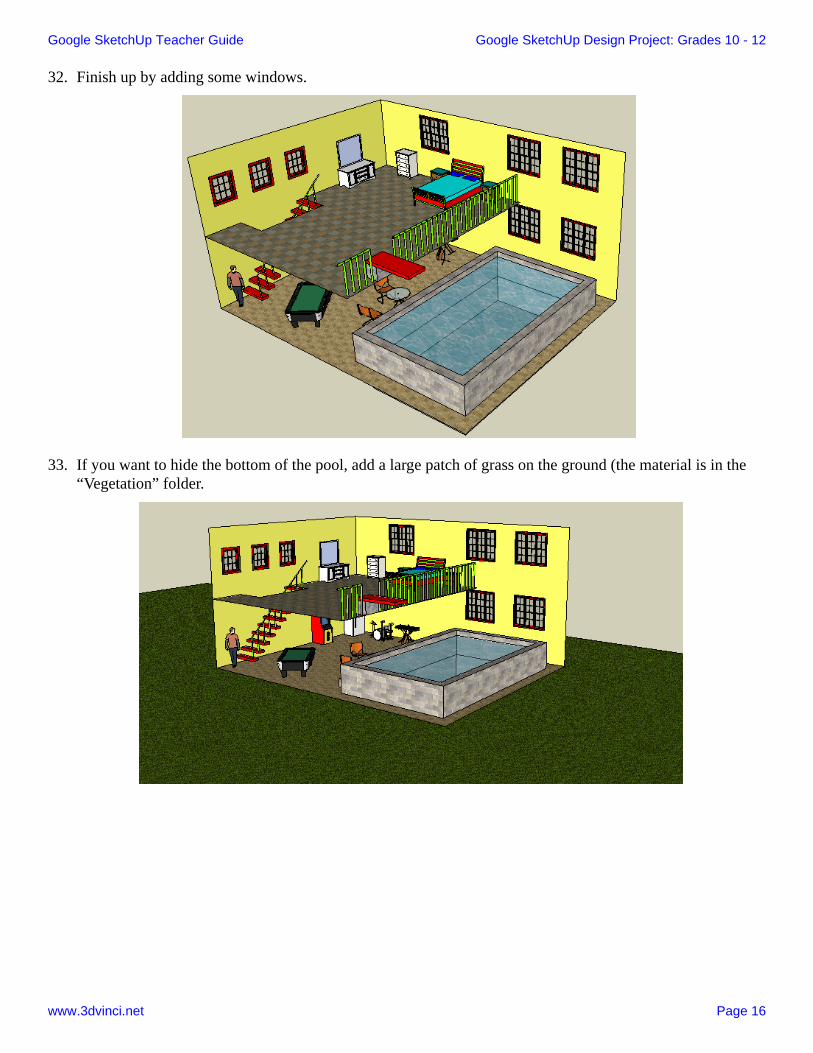
32. Finish up by adding some windows.
33. If you want to hide the bottom of the pool, add a large patch of grass on the ground (the material is in the “Vegetation” folder.
Google SketchUp Teacher Guide Google SketchUp Design Project: Grades 10 - 12
www.3dvinci.net Page 17
If you like this project, please check out 3DVinci's ModelMetricks Advanced Series (http://www.3dvinci.net/ccp0-prodshow/MAB_PDF.html). This age group is capable of creating quite complex models, and making use of geometric concepts, digital images, and sophisticated color usage.
And the book Where in the World? (http://www.3dvinci.net/ccp0-prodshow/MI4_PDF.html) will show you how to find the exact model you're looking for, in Google's 3D Warehouse.
And if you want to receive three ready-to-use projects like these each month, sign up for our SketchUp Projects of the Month subscription (http://www.3dvinci.net/ccp0-prodshow/POM.html).
Google SketchUp Teacher Guide Google SketchUp Design Project: Grades 10 - 12
www.3dvinci.net Page 18
All of the models in the Teacher Guide can be downloaded from Google’s 3D Warehouse: http://sketchup.google.com/3dwarehouse.
• Click this link to see the entire Warehouse collection of models used in the Teacher Guide.
• Click this link to locate this exact bedroom model in the Warehouse.
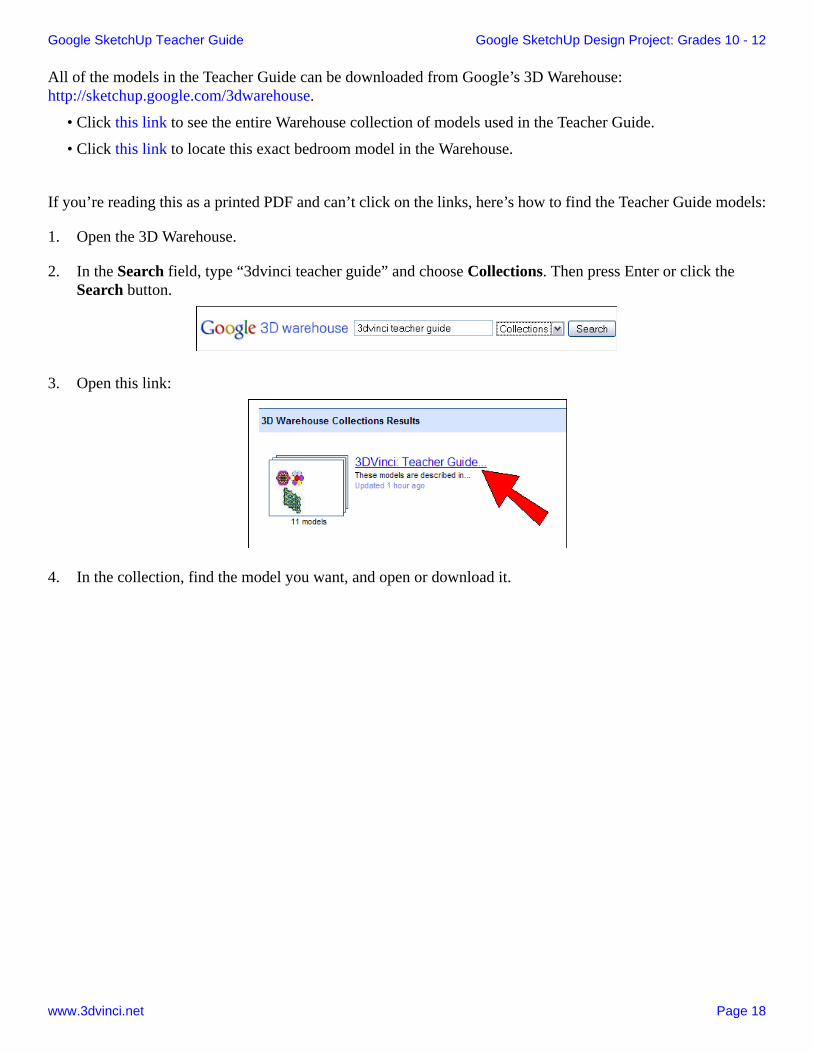
If you’re reading this as a printed PDF and can’t click on the links, here’s how to find the Teacher Guide models:
1. Open the 3D Warehouse.
2. In the Search field, type “3dvinci teacher guide” and choose Collections. Then press Enter or click the Search button.
3. Open this link:
4. In the collection, find the model you want, and open or download it.