Embed Size (px)
Citation preview
Great Lakes Road Stream Crossing Inventory Instructions
5/6/2011
This protocol was developed, reviewed, and tested by the following organizations: U.S. Forest Service, U.S. Fish & Wildlife Service, Michigan DNR, Wisconsin DNR, Huron
Pines, Conservation Resource Alliance, Michigan Technological University, and road commissions.
Funding for development and testing was provided by the U.S. Forest Service, U.S. Fish &
Wildlife Service, and The Nature Conservancy.
1
Great Lakes Stream Crossing Inventory Instructions This document is a guide to completing the Stream Crossing Data Sheet (2/28/11 version). Careful attention to this guidance will ensure consistent crossing assessments, which is critical for identifying problems and prioritizing remediation.
Equipment Check List
Maps with crossing locations Stream crossing data sheets (or electronic data recorder) Clip board Pens/pencils GPS Unit Tape measure (100 ft) Survey pins Folding rule (6 ft) Survey rod (16 ft telescoping) Hand level Camera w/ extra batteries Compass Flow meter (or floating object, such as an orange and a stop watch) Waders, hip boots, wading shoes Safety vests Traffic cones Brush clearing tools Hardhat Safety glasses Flashlight or headlamp First aid kit
Safety
Streams can be hazardous places to work, so take care to sensibly evaluate risks before you begin to survey stream crossings. These surveys will work best with two people to make measurements easier, but also to provide help if needed.
Crews should be aware of road and traffic safety when parking their vehicles and crossing over the road for measurements. Take measurements carefully and estimate if necessary. Avoid wading into even small streams at high flows, pools of unknown depths, or scaling steep and rocky embankments. There are usually ways to make effective estimates of structure dimensions without risking harm. Using an accurate laser rangefinder is one way to measure with less risk. Other approaches include measuring culvert lengths over the top of the roadway instead of through the structure, and measuring an approximate pool width from the roadway, aligning ends of the tape measure with the outside edges of the pool perpendicular to the road.
2
Clean Your Equipment
The following simple precautions will help prevent the spread of invasive species among survey sites. Follow this protocol between every site, but be particularly careful when moving among watersheds.
1. Inspect your equipment and remove any aquatic plants, animals, and mud. 2. Using a jug of clean tap water, rinse all equipment that was in contact with stream water,
including flow meters, tape measures, rulers, and waders. 3. Drain water from all equipment. 4. At the end of the day, store all equipment where it will dry thoroughly before the next
field trip.
Instructions for Filling Out Data Sheet
The following instructions are organized in the same order as the data sheet. The single most important piece of guidance in this document is to completely fill out the data sheet at each site. After a survey is complete, it can be difficult to determine whether a blank field means that the item was not assessed, or whether it was not applicable. Instead of leaving a blank, record “NA” for items that you assessed, but were not present or applicable.
All length measurements should be made in feet and recorded to the nearest 0.1 foot. Do not record inches, even for measurements that are less than one foot. For example, record 0.5 feet instead of 6 inches. Measurements longer than 20 feet may be rounded to the nearest foot if you are not confident in the precision of the measurement (e.g., when you have to lay the tape over the road when measuring the length of a culvert).
3
General Information
Site ID: Record the Site ID from the watershed map. Stream Name: Record the name of the stream, generally relying on names from U.S. Geological Survey topographic maps. Use “Unnamed” if the waterway is not named, or “Unknown” if you are not sure. If a different local name exists, record it in parentheses. Road Name: Record the name or number of the road. If the road does not have a name, use “Unnamed” or describe the road, like “Connor’s Driveway” or “Dirt road off Hwy 23”. Name of Observer(s): Record full names or first initials and last names of survey crew. Date: Record the date that the site was surveyed (in the form mm/dd/yy). GPS Waypoint: Record waypoint name/number from the GPS (Global Positioning System) unit. It is convenient to use the Site ID as the GPS waypoint. Record the position as close to the middle of the road above the structure as is safely possible. Set your GPS unit to: Map Datum = WGS84 Location Format = hddd.ddddd (decimal degrees) On a Garmin unit, Set INTERFACE FORMAT = GARMIN Time: TIME ZONE=CENTRAL, DAYLIGHT SAVINGS = AUTO
GPS Lat/Long: Record coordinates in decimal degrees for the waypoint from the GPS unit. Record all decimal places (do not round). County: Record the name of the county where the crossing is located. Township/Range/Section (Optional): If you are unable to record GPS coordinates, record the township, range, and section where the crossing is located. Adjacent Landowner Information: Record any relevant information about adjacent landowners, such as name or contact information. Additional Comments: Record any additional relevant site information.
4
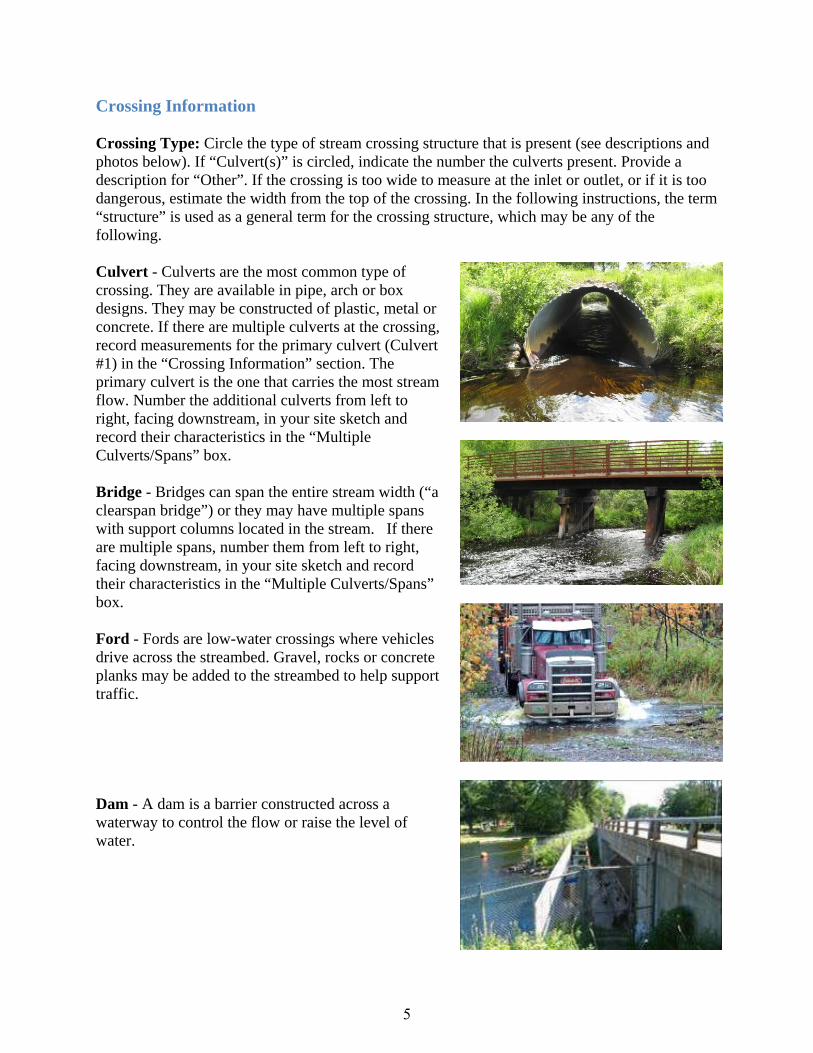
Crossing Information Crossing Type: Circle the type of stream crossing structure that is present (see descriptions and photos below). If “Culvert(s)” is circled, indicate the number the culverts present. Provide a description for “Other”. If the crossing is too wide to measure at the inlet or outlet, or if it is too dangerous, estimate the width from the top of the crossing. In the following instructions, the term “structure” is used as a general term for the crossing structure, which may be any of the following. Culvert - Culverts are the most common type of crossing. They are available in pipe, arch or box designs. They may be constructed of plastic, metal or concrete. If there are multiple culverts at the crossing, record measurements for the primary culvert (Culvert #1) in the “Crossing Information” section. The primary culvert is the one that carries the most stream flow. Number the additional culverts from left to right, facing downstream, in your site sketch and record their characteristics in the “Multiple Culverts/Spans” box. Bridge - Bridges can span the entire stream width (“a clearspan bridge”) or they may have multiple spans with support columns located in the stream. If there are multiple spans, number them from left to right, facing downstream, in your site sketch and record their characteristics in the “Multiple Culverts/Spans” box. Ford - Fords are low-water crossings where vehicles drive across the streambed. Gravel, rocks or concrete planks may be added to the streambed to help support traffic. Dam - A dam is a barrier constructed across a waterway to control the flow or raise the level of water.
5
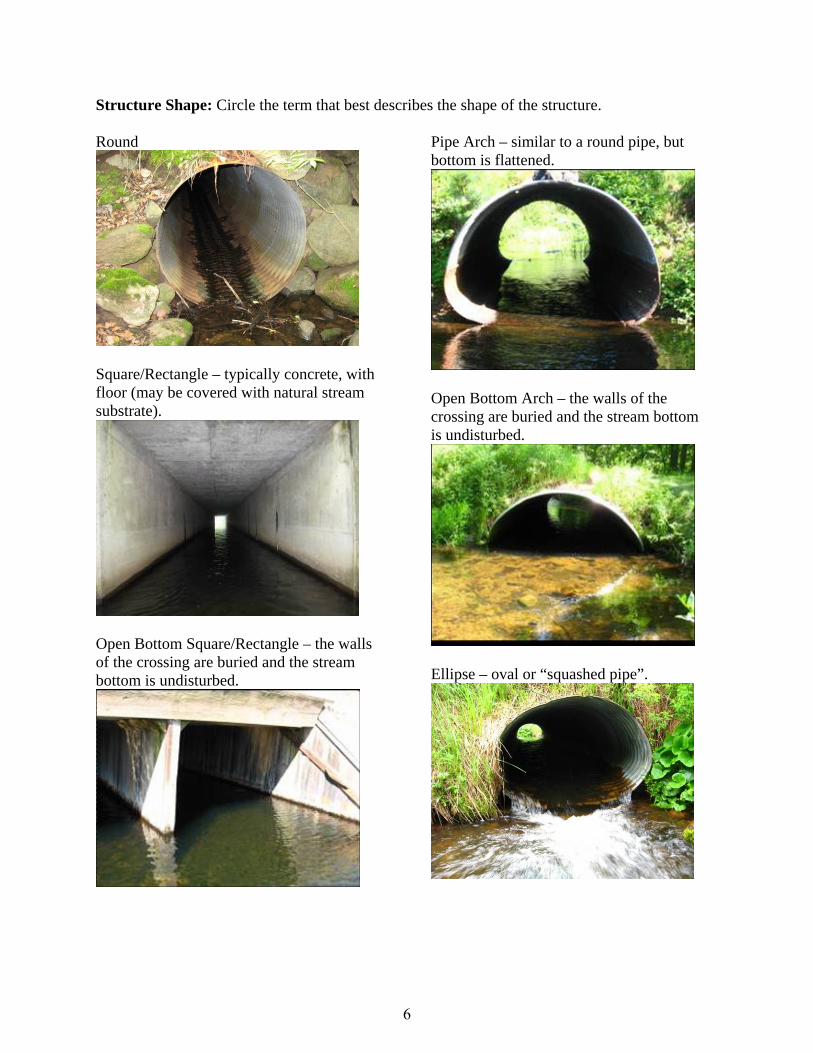
Structure Shape: Circle the term that best describes the shape of the structure. Round
Square/Rectangle – typically concrete, with floor (may be covered with natural stream substrate).
Open Bottom Square/Rectangle – the walls of the crossing are buried and the stream bottom is undisturbed.
Pipe Arch – similar to a round pipe, but bottom is flattened.
Open Bottom Arch – the walls of the crossing are buried and the stream bottom is undisturbed.
Ellipse – oval or “squashed pipe”.
6
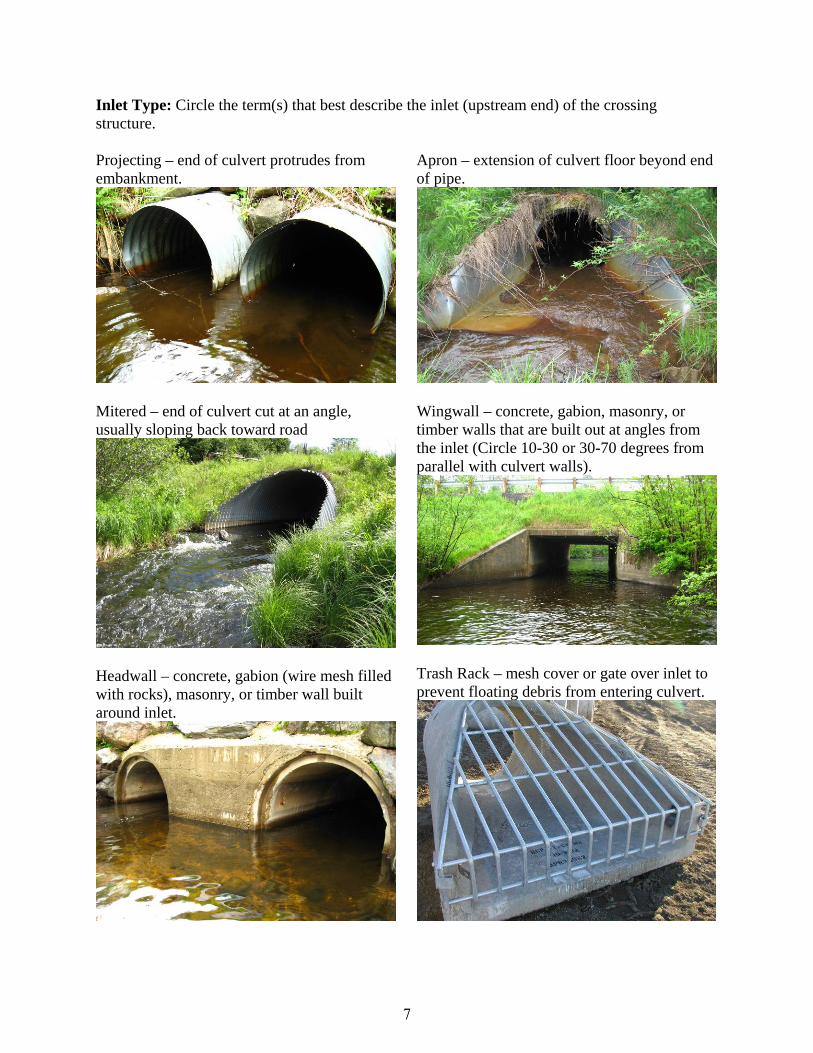
Inlet Type: Circle the term(s) that best describe the inlet (upstream end) of the crossing structure. Projecting – end of culvert protrudes from embankment.
Mitered – end of culvert cut at an angle, usually sloping back toward road
Headwall – concrete, gabion (wire mesh filled with rocks), masonry, or timber wall built around inlet.
Apron – extension of culvert floor beyond end of pipe.
Wingwall – concrete, gabion, masonry, or timber walls that are built out at angles from the inlet (Circle 10-30 or 30-70 degrees from parallel with culvert walls).
Trash Rack – mesh cover or gate over inlet to prevent floating debris from entering culvert.
7
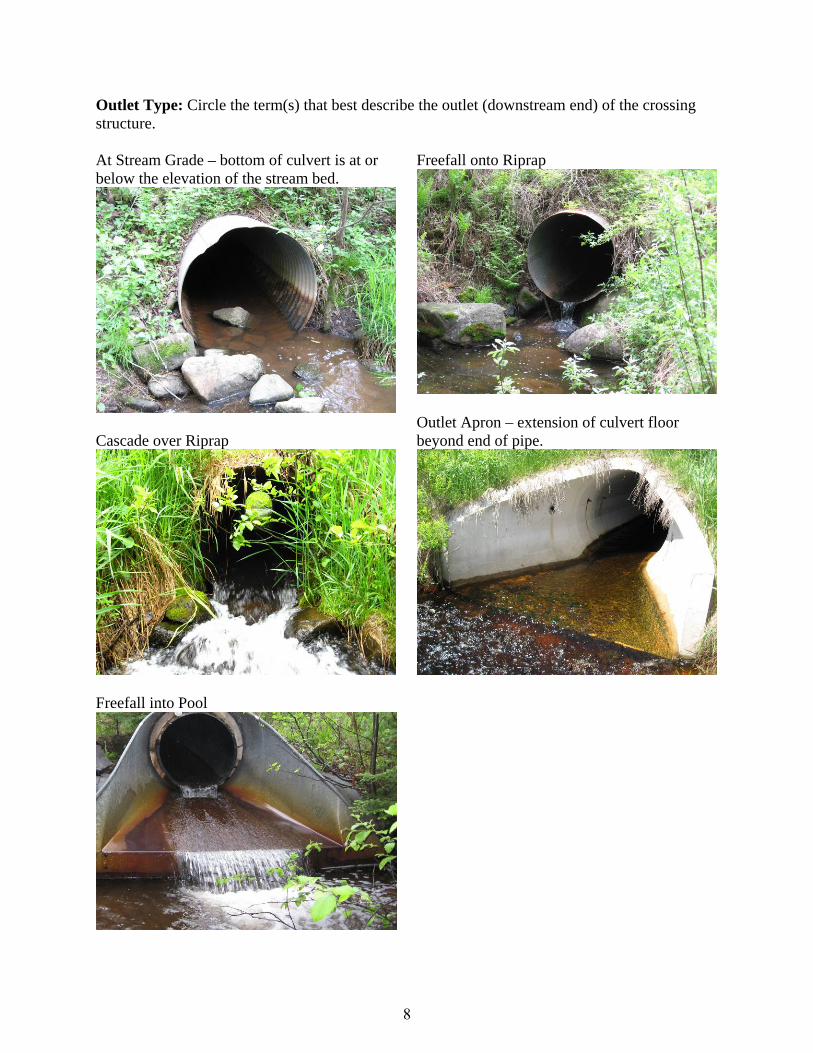
Outlet Type: Circle the term(s) that best describe the outlet (downstream end) of the crossing structure. At Stream Grade – bottom of culvert is at or below the elevation of the stream bed.
Cascade over Riprap
Freefall into Pool
Freefall onto Riprap
Outlet Apron – extension of culvert floor beyond end of pipe.
8
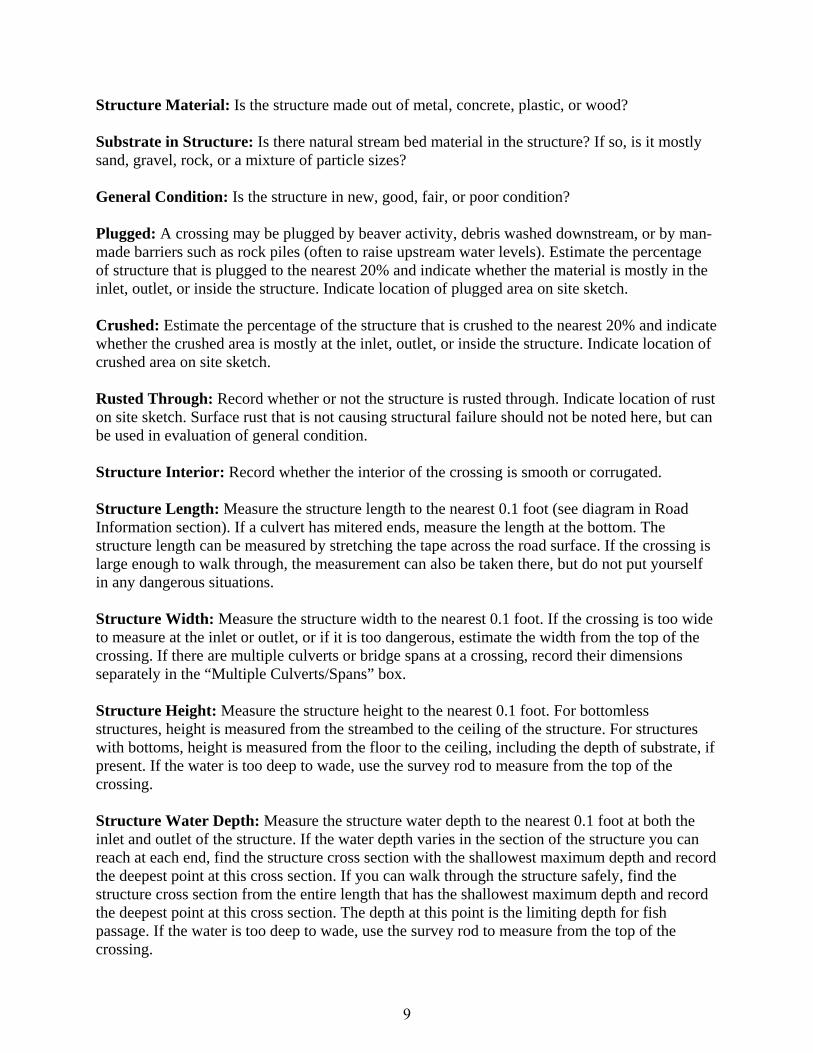
Structure Material: Is the structure made out of metal, concrete, plastic, or wood? Substrate in Structure: Is there natural stream bed material in the structure? If so, is it mostly sand, gravel, rock, or a mixture of particle sizes? General Condition: Is the structure in new, good, fair, or poor condition? Plugged: A crossing may be plugged by beaver activity, debris washed downstream, or by man-made barriers such as rock piles (often to raise upstream water levels). Estimate the percentage of structure that is plugged to the nearest 20% and indicate whether the material is mostly in the inlet, outlet, or inside the structure. Indicate location of plugged area on site sketch. Crushed: Estimate the percentage of the structure that is crushed to the nearest 20% and indicate whether the crushed area is mostly at the inlet, outlet, or inside the structure. Indicate location of crushed area on site sketch. Rusted Through: Record whether or not the structure is rusted through. Indicate location of rust on site sketch. Surface rust that is not causing structural failure should not be noted here, but can be used in evaluation of general condition. Structure Interior: Record whether the interior of the crossing is smooth or corrugated. Structure Length: Measure the structure length to the nearest 0.1 foot (see diagram in Road Information section). If a culvert has mitered ends, measure the length at the bottom. The structure length can be measured by stretching the tape across the road surface. If the crossing is large enough to walk through, the measurement can also be taken there, but do not put yourself in any dangerous situations. Structure Width: Measure the structure width to the nearest 0.1 foot. If the crossing is too wide to measure at the inlet or outlet, or if it is too dangerous, estimate the width from the top of the crossing. If there are multiple culverts or bridge spans at a crossing, record their dimensions separately in the “Multiple Culverts/Spans” box. Structure Height: Measure the structure height to the nearest 0.1 foot. For bottomless structures, height is measured from the streambed to the ceiling of the structure. For structures with bottoms, height is measured from the floor to the ceiling, including the depth of substrate, if present. If the water is too deep to wade, use the survey rod to measure from the top of the crossing. Structure Water Depth: Measure the structure water depth to the nearest 0.1 foot at both the inlet and outlet of the structure. If the water depth varies in the section of the structure you can reach at each end, find the structure cross section with the shallowest maximum depth and record the deepest point at this cross section. If you can walk through the structure safely, find the structure cross section from the entire length that has the shallowest maximum depth and record the deepest point at this cross section. The depth at this point is the limiting depth for fish passage. If the water is too deep to wade, use the survey rod to measure from the top of the crossing.
9

Perch Height: If the crossing is perched (outlet elevated above downstream water surface), measure the vertical distance from the downstream water surface to the bottom of the stream crossing structure to the nearest 0.1 foot interval. If the crossing is not perched, circle NA.
Embedded Depth of Structure: Measure the depth of streambed substrate to the nearest 0.1 foot just inside the inlet and outlet of the structure. If the depth appears to vary substantially, take multiple measurements and record the average. Structure Water Velocity: If you have a current meter, measure the water velocity at the inlet and outlet of the structure. If the maximum water depth is less than 0.4 feet, measure the velocity at the midpoint of the water depth at the deepest point. If the maximum water depth is greater than 0.4 feet, measure the velocity at 0.2 feet above the substrate at a few points that are deeper than 0.4 feet and record the lowest velocity. If you do not have a current meter, drop an orange, bobber, or other floating object into the water at the inlet of the crossing and time how long it takes to float through the structure. Calculate the velocity by dividing the length of the structure by the time it took the item to float through the structure. Be sure to retrieve the item floated through the culvert.
Structure Water Depth
Embedded Depth of Structure
Structure WidthStructure
Height
Structure Water Depth
Embedded Depth of Structure
Structure WidthStructure
Height
10
Stream Information Stream Flow: Circle the term which best describes the stream flow conditions during the survey. (See definition of bankfull flow in the Riffle Information section.)
None – The streambed is dry and there is no water flow.
< ½ Bankfull – The stream channel is less than half filled with water.
< Bankfull – The stream channel is more than half filled with water, but is not full.
= Bankfull – Water has filled completely filled the stream channel, but is not flowing onto the floodplain.
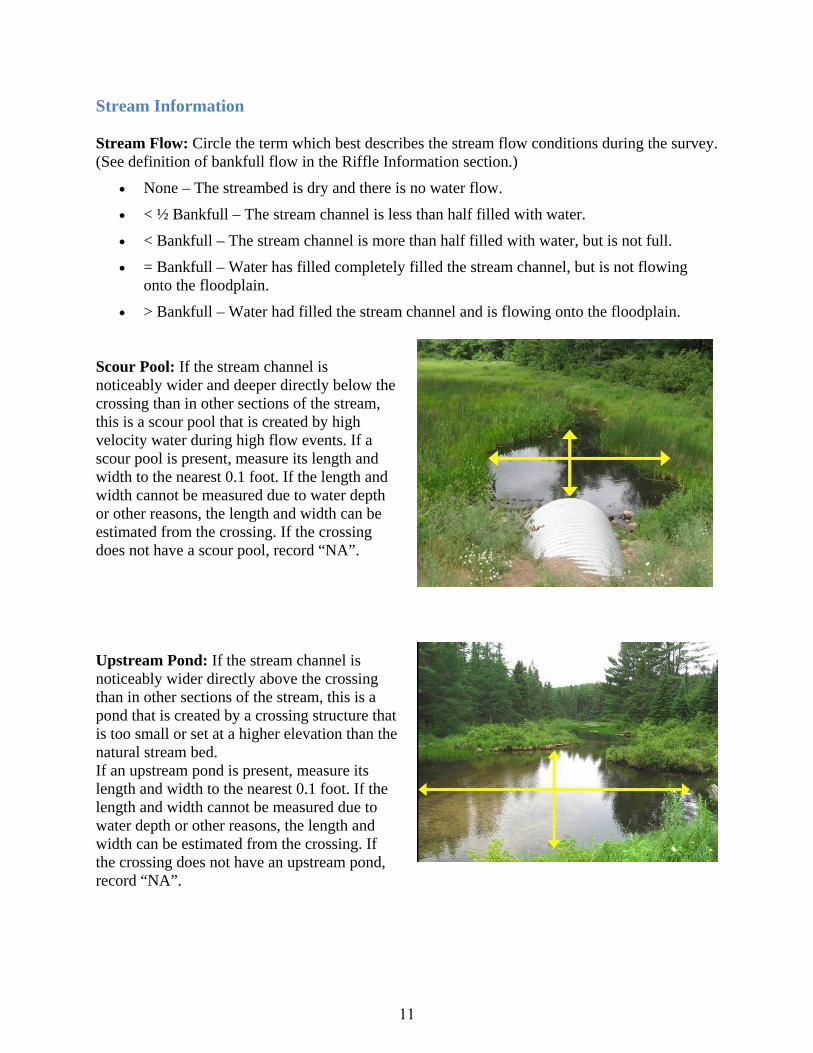
> Bankfull – Water had filled the stream channel and is flowing onto the floodplain. Scour Pool: If the stream channel is noticeably wider and deeper directly below the crossing than in other sections of the stream, this is a scour pool that is created by high velocity water during high flow events. If a scour pool is present, measure its length and width to the nearest 0.1 foot. If the length and width cannot be measured due to water depth or other reasons, the length and width can be estimated from the crossing. If the crossing does not have a scour pool, record “NA”.
Upstream Pond: If the stream channel is noticeably wider directly above the crossing than in other sections of the stream, this is a pond that is created by a crossing structure that is too small or set at a higher elevation than the natural stream bed. If an upstream pond is present, measure its length and width to the nearest 0.1 foot. If the length and width cannot be measured due to water depth or other reasons, the length and width can be estimated from the crossing. If the crossing does not have an upstream pond, record “NA”.
11
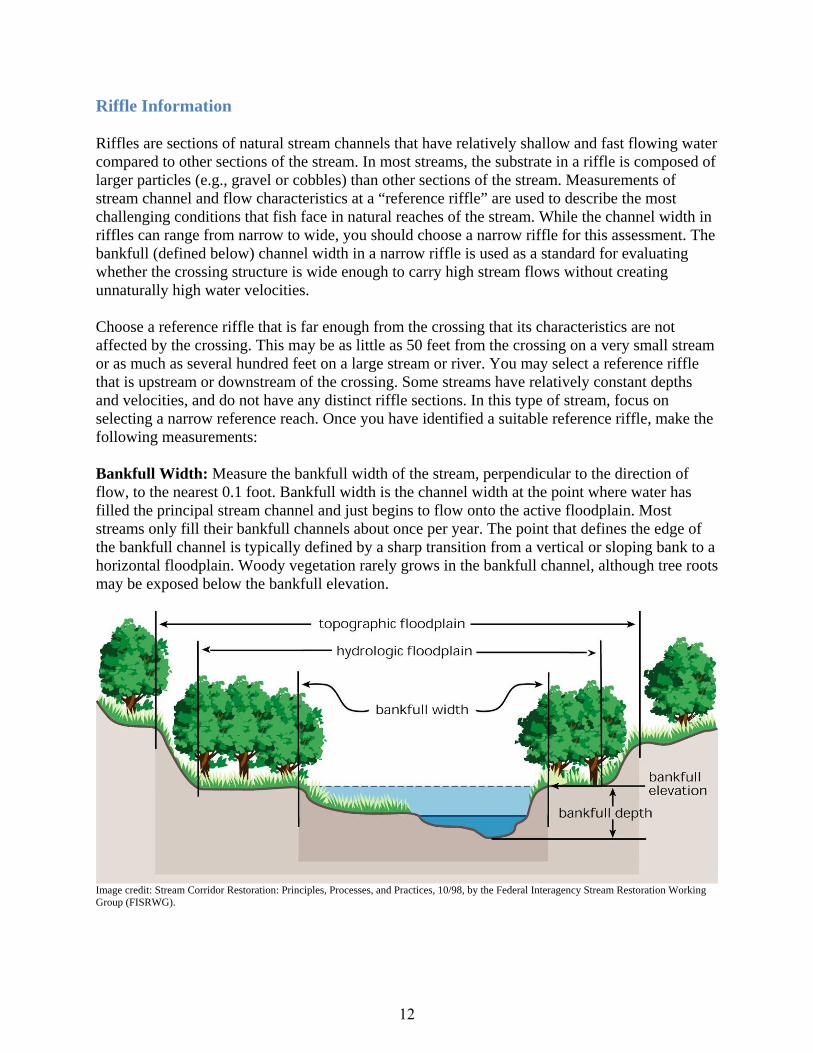
Riffle Information Riffles are sections of natural stream channels that have relatively shallow and fast flowing water compared to other sections of the stream. In most streams, the substrate in a riffle is composed of larger particles (e.g., gravel or cobbles) than other sections of the stream. Measurements of stream channel and flow characteristics at a “reference riffle” are used to describe the most challenging conditions that fish face in natural reaches of the stream. While the channel width in riffles can range from narrow to wide, you should choose a narrow riffle for this assessment. The bankfull (defined below) channel width in a narrow riffle is used as a standard for evaluating whether the crossing structure is wide enough to carry high stream flows without creating unnaturally high water velocities. Choose a reference riffle that is far enough from the crossing that its characteristics are not affected by the crossing. This may be as little as 50 feet from the crossing on a very small stream or as much as several hundred feet on a large stream or river. You may select a reference riffle that is upstream or downstream of the crossing. Some streams have relatively constant depths and velocities, and do not have any distinct riffle sections. In this type of stream, focus on selecting a narrow reference reach. Once you have identified a suitable reference riffle, make the following measurements: Bankfull Width: Measure the bankfull width of the stream, perpendicular to the direction of flow, to the nearest 0.1 foot. Bankfull width is the channel width at the point where water has filled the principal stream channel and just begins to flow onto the active floodplain. Most streams only fill their bankfull channels about once per year. The point that defines the edge of the bankfull channel is typically defined by a sharp transition from a vertical or sloping bank to a horizontal floodplain. Woody vegetation rarely grows in the bankfull channel, although tree roots may be exposed below the bankfull elevation.
Image credit: Stream Corridor Restoration: Principles, Processes, and Practices, 10/98, by the Federal Interagency Stream Restoration Working Group (FISRWG).
12
Wetted Width: Measure the wetted width of the stream, perpendicular to the direction of flow, to the nearest 0.1 foot. Wetted width is the distance between the edges of the water at the time of the measurement. Stream Depth: Measure the water depth from the streambed to the water surface to the nearest 0.1 foot. Select a location that represents the average stream depth. Stream Water Velocity: If you have a current meter, measure the water velocity at the deepest point of the riffle. If the water depth is less than 0.4 feet, measure the velocity at the midpoint of the water depth. If the water depth is greater than 0.4 feet, measure the velocity at 0.2 feet above the substrate.
If you do not have a current meter, drop an orange, bobber, or other floating object into the water at the head of the riffle and time how long it takes to float to the bottom of the riffle. Calculate the velocity by dividing the length of the riffle by the time it took the item to float that distance. Be sure to retrieve the item floated down the stream. Dominant Substrate: Circle the word the best describes the material on the bed of the reference riffle.
Cobble – baseball-sized or larger rocks
Gravel – rocks between the size of a pinhead and a baseball
Sand – particles are smaller than a pinhead and feel gritty between fingers
Silt – very fine particles that don’t stick together
Clay – very fine particles that stick together
Organics – decomposing plant material
Bedrock – solid slabs of rock
13
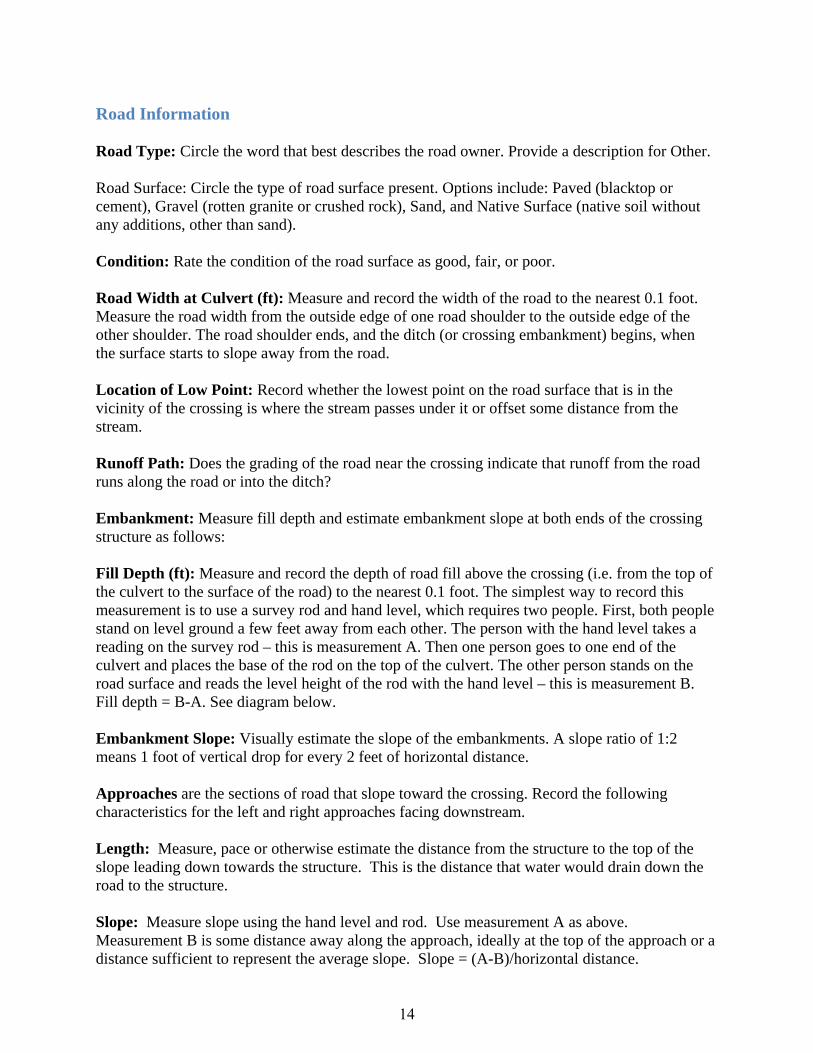
Road Information Road Type: Circle the word that best describes the road owner. Provide a description for Other. Road Surface: Circle the type of road surface present. Options include: Paved (blacktop or cement), Gravel (rotten granite or crushed rock), Sand, and Native Surface (native soil without any additions, other than sand). Condition: Rate the condition of the road surface as good, fair, or poor. Road Width at Culvert (ft): Measure and record the width of the road to the nearest 0.1 foot. Measure the road width from the outside edge of one road shoulder to the outside edge of the other shoulder. The road shoulder ends, and the ditch (or crossing embankment) begins, when the surface starts to slope away from the road. Location of Low Point: Record whether the lowest point on the road surface that is in the vicinity of the crossing is where the stream passes under it or offset some distance from the stream. Runoff Path: Does the grading of the road near the crossing indicate that runoff from the road runs along the road or into the ditch? Embankment: Measure fill depth and estimate embankment slope at both ends of the crossing structure as follows: Fill Depth (ft): Measure and record the depth of road fill above the crossing (i.e. from the top of the culvert to the surface of the road) to the nearest 0.1 foot. The simplest way to record this measurement is to use a survey rod and hand level, which requires two people. First, both people stand on level ground a few feet away from each other. The person with the hand level takes a reading on the survey rod – this is measurement A. Then one person goes to one end of the culvert and places the base of the rod on the top of the culvert. The other person stands on the road surface and reads the level height of the rod with the hand level – this is measurement B. Fill depth = B-A. See diagram below. Embankment Slope: Visually estimate the slope of the embankments. A slope ratio of 1:2 means 1 foot of vertical drop for every 2 feet of horizontal distance. Approaches are the sections of road that slope toward the crossing. Record the following characteristics for the left and right approaches facing downstream. Length: Measure, pace or otherwise estimate the distance from the structure to the top of the slope leading down towards the structure. This is the distance that water would drain down the road to the structure. Slope: Measure slope using the hand level and rod. Use measurement A as above. Measurement B is some distance away along the approach, ideally at the top of the approach or a distance sufficient to represent the average slope. Slope = (A-B)/horizontal distance.
14
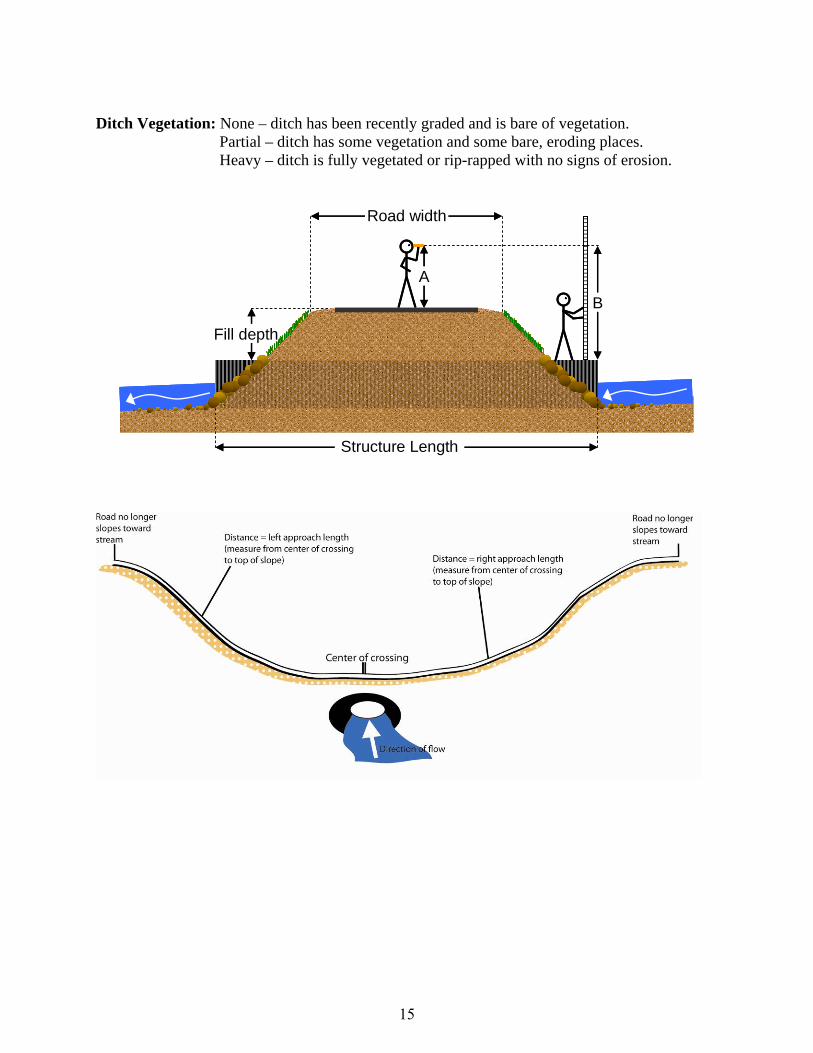
Ditch Vegetation: None – ditch has been recently graded and is bare of vegetation. Partial – ditch has some vegetation and some bare, eroding places. Heavy – ditch is fully vegetated or rip-rapped with no signs of erosion.
Structure Length
A
B
Fill depth
Road width
Structure Length
A
B
Fill depth
Road width
15

Erosion Information Location of Erosion: Record the location of each distinct eroding area using the terms in the diagram below. Left and right are facing downstream. The road approach extends to where it no longer slopes toward the crossing. Road shoulders are considered part of the road or approach, not the ditch. The boundary between an embankment and a ditch is generally where the slope and/or material of the grading changes.
Left approach
Right upstream embank-
ment
Road at crossing
Left upstream ditch Right upstream ditch
Left downstream ditch Right downstream ditch
Rig
ht d
owns
tream
stre
amba
nk
Left
dow
nstre
am
stre
amba
nk
Rig
ht u
pstre
am
stre
amba
nk
Left
upst
ream
stre
amba
nk
Right approach
Left upstream embank-
ment
Right downstream embankment
Left downstream embankment
Erosion Dimensions: Measure the length, width and depth of eroded areas to the nearest 0.1 foot. Eroded Material Reaching Stream: For each eroded area, circle “Yes” or “No” to indicate whether the eroded material appears to be reaching the stream. Material Eroded: Indicate soil type(s) which best describes the eroded sediment. Options include: “Sand”, “Silt”, “Clay”, “Gravel”, “Loam”, “Sandy Loam”, and “Gravelly Loam”. If there is erosion occurring, can corrective actions be installed? Circle “Yes” or “No” to indicate whether there are any corrective actions that can be installed to address the erosion problems. In the “Erosion Notes” section, provide more detail on the correction action options. Extent of Erosion: Circle the word that best describes the overall extent of erosion near the crossing.
16
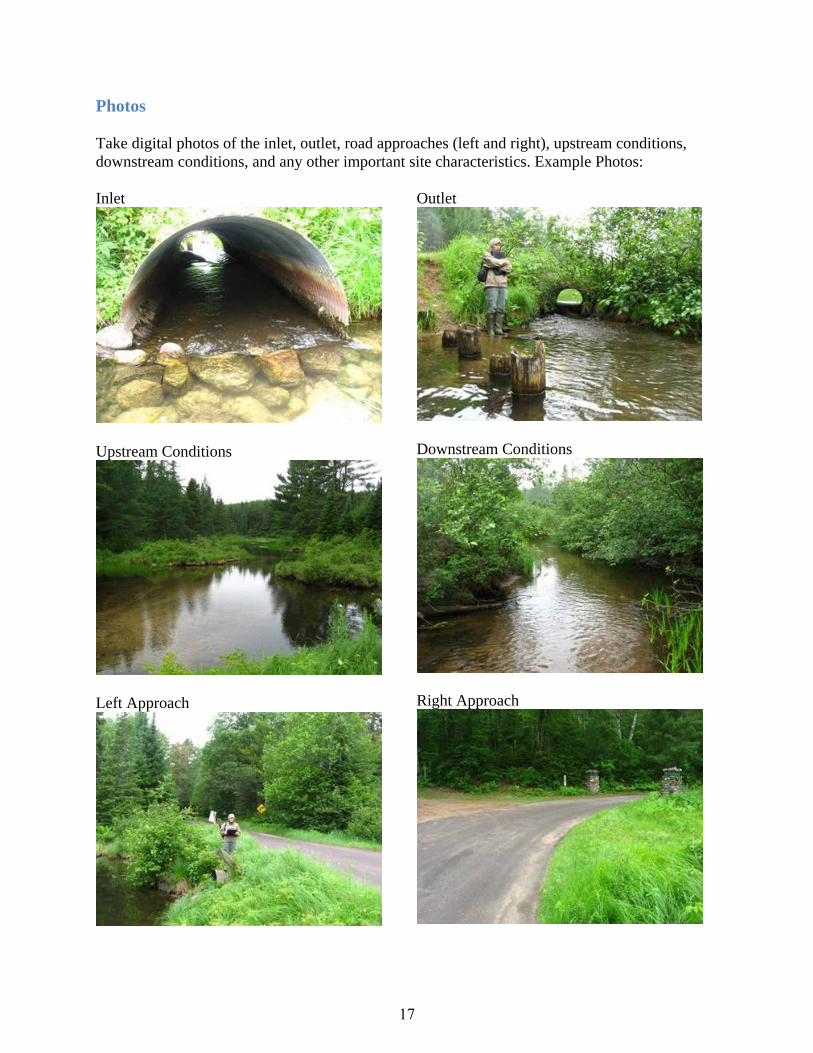
Photos Take digital photos of the inlet, outlet, road approaches (left and right), upstream conditions, downstream conditions, and any other important site characteristics. Example Photos: Inlet
Upstream Conditions
Left Approach
Outlet
Downstream Conditions
Right Approach
17
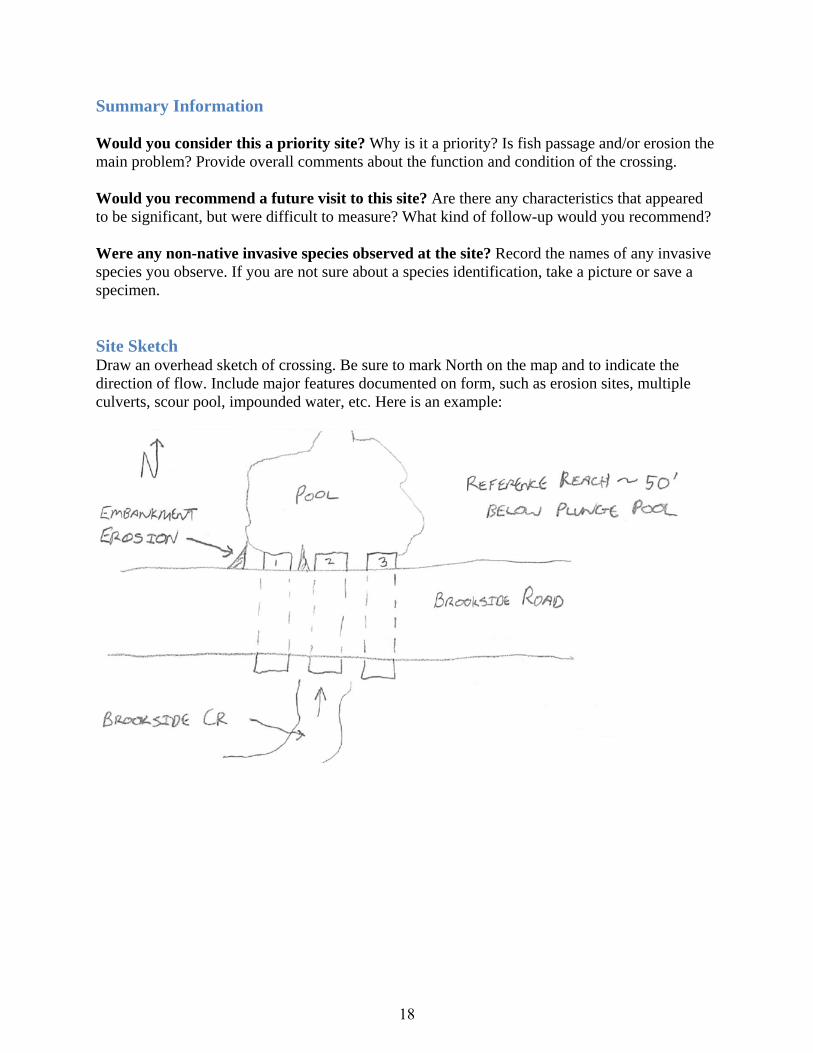
Summary Information Would you consider this a priority site? Why is it a priority? Is fish passage and/or erosion the main problem? Provide overall comments about the function and condition of the crossing. Would you recommend a future visit to this site? Are there any characteristics that appeared to be significant, but were difficult to measure? What kind of follow-up would you recommend? Were any non-native invasive species observed at the site? Record the names of any invasive species you observe. If you are not sure about a species identification, take a picture or save a specimen. Site Sketch Draw an overhead sketch of crossing. Be sure to mark North on the map and to indicate the direction of flow. Include major features documented on form, such as erosion sites, multiple culverts, scour pool, impounded water, etc. Here is an example:
18