Embed Size (px)
Citation preview

NOTE! To the installer: Please make sure you provide this manual to the owner of the equip ment or to the responsible party who maintains the system.
MODELS WG/WGX20**Used in Hazardous Locations Class I, Division 1, Groups C & D GRINDER PUMPINSTALLATION AND SERVICE MANUAL
Part # 13800A764 | © 2018 Pentair plc | 4/16/18

2
Thank you for purchasing your Myers® pump. To help ensure years of trouble-free operation, please read the following manual carefully.
CAUTION: READ THESE SAFETY WARNINGS FIRST BEFORE INSTALLATION, SERVICING OR OPERATING ANY PUMP. THESE INSTRUCTIONS ARE WRITTEN WITH THE UNDERSTANDING THAT THE INDIVIDUALS HAVE EXPERIENCE IN BUILDING WET WELLS AND INSTALLING BASINS, GRINDER PUMPS AND PUMPING EQUIPMENT.
NOTE: Models with Third Party approval(s) are clearly marked on individual pump nameplates.
Hazardous Location Service: WGX20 pumps areto be used for handling sewage, wastewater and storm water only. DO NOT use in other hazardous locations. These motors must be repaired and serviced only at Myers Authorized Service Centersor at the Myers Factory.
Any unauthorized field repair voids the warranty,the hazardous location rating, and FactoryMutual approval.
SAFETY WARNINGS:DANGER: Risk of Electrical Shock or Electrocution. May result in serious injury or death or fire hazard. Installer must disconnect all electrical sources prior to installation, handling or servicing. Only qualified personnel may install this system. NFPA 70/National Electric Code (NEC) or local codes must be followed. System must be properly grounded according to NEC. Do not lift pump by power cord.
DANGER: Biohazard Risk. Once wastewater source has been connected to system, biohazard risk exists. Installer(s) and/or service personnel must use proper personal protective equipment and follow handling procedures per OSHA 29 CFR 1910.1030 when handling equipment after wastewater source has been connected to system.
DANGER: Risk of Asphyxiation. Installer(s) and/or service personnel must use proper personal protective equipment and follow OSHA 29 CFR 1910.146 or OSHA 29 CFR 1926. Pump may be installed in a location classified as a confined space.
DANGER: Risk of Fire or Explosion. Do notsmoke or use open flames in or around this system. WG20 systems are not intended for use in hazardous locations per NFPA 70 National Electric Code. Do not pump flammable liquids.
DANGER: Cutting Risk. Risk of serious cutting or amputation exists. Disconnect all power sources prior to servicing pump or grinding mechanism.
Pump may start without warning. Grinding mechanism is extremely sharp. Use caution when handling grinder mechanism.
DO NOT modify the cord strain relief. When wiring to a system control, connect the pump ground lead to the system ground.
DO NOT run the pump dry. Dry running can overheat the pump (causing burns to anyone handling it) and will void the warranty.
The pump normally runs hot. To avoid burns,allow it to cool for 30 minutes after shutdown before handling it.
Submersible grinder pumps are not approved for use in swimming pools, recreational water installations, decorative fountains or any installation where human contact with the pumped fluid is common. This specialized pump is designed to incorporate a grinding mechanism to remove wastewater particulate and pump the resulting slurry from a residential structure to a collection system.
ON THREE PHASE PUMPS ONLY “MOTOR PROTECTION” MUST BE PROVIDED BY THE INSTALLER. ALL THREE PHASE PUMPS MUST BE INSTALLED WITH MAGNETIC STARTERS HAVING THREE LEG OVERLOAD PROTECTION IN ACCORDANCE WITH THE NATIONAL ELECTRIC CODE. FOR INSTALLATIONS WITH MORE THAN ONE PUMP, EACH PUMP MOTOR MUST HAVE SEPARATE OVERLOAD PROTECTION.
PUMPS WITH SEAL LEAK DETECTORS MUST BE CONNECTED TO THE PROPER CONTROL CIRCUITRY.
Examine all lifting devices, rope or chain for damage before and after each lift.
DO NOT exceed manufacturers recommendation for maximum performance, as this could cause the motor to overheat.
Secure the pump in its operating position so it cannot tip over, fall or slide.
DO NOT pump without safety devices in place.
For hazardous locations, use pumps that are listed and classified for such locations.
Basin must be vented in accordance with the local plumbing codes.
CALIFORNIA PROPOSITION 65 WARNING:
This product and related accessories contain chemicals known to the

3
State of California to cause cancer, birth defects or other reproductive harm.
IMPORTANT: Myers is not responsible for losses, injury or death resulting from failure to observe these safety precautions, misuse or abuse of pumps or equipment.
CONTROL PANELSAll Myers control panels used on these grinders are UL listed and CSA certified. Control panels mounted directly to the basin used outdoors are UL listed and CSA certified waterproof.
If intrinsically safe controls used in hazardous locations are required, Myers can furnish a UL listed or CSA certified panel.
Note: Myers built control panels supply the correct circuitry for moisture and heat sensor connections. Failure to install the correct circuitry with proper connection would negate warranty and Factory Mutual Approval.
LEVEL SENSING CONTROLSIntrinsically-safe type float controls are recommended for all applications and required for hazardous location service. An intrinsically safe control panel relay will limit the current and voltage to the level controls. A Myers control panel can be supplied with this type circuitry.The float level controls maintain the basin sewage water level by controlling pump turn-on and turn-off level.
1. The lower turn-off control should be set so that the pump stops at approximately the top of the pump.
2. The upper turn-on control should be set above the lower turn-off control. The exact height between the two controls is determined by the number of pump starts desired and the depth of the basin. A maximum of 10 starts per hour should not be exceeded.
3. The override control is set at a specified height above the upper turn-on control.
4. The alarm control is set about 6" to 12" above the override control.
5. No control should be set above the inlet invert.
JUNCTION BOXESIf a junction box is used in a hazardous location, it must be a hazardous location approved type with hazardous location cord connectors. Wires from the junction box must pass through a hazardous location seal connector.
AIR VENTINGAir tends to trap in the pump volute when water raises in the sump or when the pump is lowered into water after service. To vent off this air, a small hole is drilled into the pump volute. Be sure this vent hole is clean after any service work on pump.
PUMP MODELS – The WG20 and WGX20 models are offered in 208 and 230 volt single phase and 208, 230, 460 and 575 three phase. They are offered in 50 and 60 Hz configurations.
INSTRUCTIONS – Instructions cover only the pump unit. Separate instructions for the electrical control panel and basin packaged system are included with these items.
CAUTION: PUMP IS ONLY TO BE DISASSEMBLED AT MYERS FACTORY OR AN AUTHORIZED MYERS SERVICE FACILITY.
DESCRIPTION OF PUMP – This pump is intended to grind and pump all normal sewage for home or commercial use.
Pump is of heavy duty construction and submersible type for long life when pumping ground sewage. Motor is capacitor start, capacitor run for single phase. Capacitors and start relay are mounted in electrical control box.
Pump has two oil-filled chambers: (1) the motor and ball bearings and (2) the seal chamber - for long life and best heat transfer.
The lower seal above the pump impeller acts as a buffer for upper seal that holds oil in the motor chamber. If lower seal leaks for any reason, water enters the seal chamber. If motor has the seal leak detector, the electrode will contact the water and close the circuit to the red seal light in the control panel indicting motor must be serviced before upper seal fails.
A heat sensor is attached to stator winding to sense any abnormal heat. If motor temperature for any cause rises above 221ºF the pump is immediately stopped and will not restart until motor cools to a safe temperature.
PUMP CORDS – Each pump has two cords. The power cord contains 4 conductors and the control cord has 5 conductors.
The power cord for single phase uses the color coding for start and main windings and connects to control box terminal strip black (common), white (run), and red (start). The green wire is always ground and connects to ground terminal in control box. For three phase the same 4 conductor color coded cords are used, the black, white and red can be connected to any of the three phase terminals in the control box.
The smaller control cord uses black and white leads for heat sensor and connects to terminal strip in control box. The red and orange wires connect to seal failure terminals in control box and the green or ground lead connects to ground terminal in control box.

4
CAUTION: After pump is installed NEVER WORK ON MOTOR OR GRINDER UNIT WITHOUT DISCONNECTING MOTOR LEAD WIRES FROM CONTROL PANEL. DO NOT RELY ON OPENING CIRCUIT BREAKER ONLY.
INSTALLING PUMP IN BASIN – Complete installation and piping instructions are included with the basin package.
THREE PHASE – When pump is installed to operate on three phase power, pump rotation must be checked. For inside installation where control box is near the sump basin, pump can be laid on side to check rotation before installing in sump.
To check rotation turn Hand-Off-Auto switch to OFF position and turn on circuit breaker. Quickly turn H-O-A switch to HAND position, then OFF. Note grinder impeller rotation. Impeller must rotate
counterclockwise. If rotation is wrong, change any two line leads to motor at control box terminal. Recheck for proper rotation. CAUTION: KEEP HANDS COMPLETELY AWAY FROM GRINDER IMPELLER WHEN MAKING THIS CHECK.
Where pump is installed remote from control box in outside installation a different method is used.
Set the pump in the basin and run in some water so pump can operate. Turn H-O-A switch to hand position and let pump pull water down in basin. When water reaches the bottom of pump, rotation of the water can be observed. Water should rotate in a clockwise direction if pump rotation is correct. If not correct rotation, interchange any two line leads to motor at control panel.
When replacing a pump with a new unit, rotation must be checked.

5
WG/WGX20 PUMP PARTS LIST Ref No. Part No. Description Qty.
1 22407C102 Cord Cap 12 19100A029 Cap Screw, 5/16"-18 x 1" Lg. 83 12672A880 Double Lever Nut 4–7
12672A885 Triple Lever Nut 0–44 10649A102 Tube, Plastic 25 19100A012 Cap Screw, 5/16"-18 x 1-1/4" Lg. 86 05876A122 Gasket, Rubber Tetraseal 17 21570B100X Cap, Upper Bearing 18 05876A123 Gasket, Rubber Tetraseal 19 05022A092 Pipe Plug, 1/4" NPT, Hex HD. 210 05434A043 Screw, Mach., #10-24 x 1/2" Lg. 111 06107A015 Lock Washer, #10 112 07597A017 Screw, Mach., Flat Hd. 213 21571D100X Housing Motor 114 05013A039 Set Screw, 1/4"-20 x 3/8" Lg. 215 19331A005 Washer, Spring 216 08565A013 Bearing, Ball 117 11816A006 Ring Retaining 118 21572C100 Rotor, w/Shaft 1ø 1
21572C101 Rotor, w/Shaft 3ø 119 21573C104 Stator 208/1ø 1
21573C100 Stator 230/1ø 121573C102 Stator 208/230/460/3ø 121573C103 Stator 575/3ø 1
20 08565A018 Bearing, Ball 121 21574D100X Housing, Upper Seal 122 21576A010 Seal, 7/8" Shaft 223 12558A006 Ring Retaining 124 22578A004A Electrode 225 05876A125 Gasket, Rubber Tetraseal 226 22579A000 Ferrule, Rubber 127 21577A000 Plug, Special 128 21578C100X Housing, Lower Seal 129 22581A001 Gasket, Vellumoid 130 21580D102P Casing, Volute 131 28201C301 Pump Impeller, WG20/WGX20 1
28201C305 Pump Impeller, *F Series Only 132 21582B000 Impeller, Grinding 133 07597A018 Mach. Screw, 1/4"-20 x 1" Lg. 134 21583A000 Retainer, Impeller 1
3521584B000 Flange w/Shredding Ring,
WG20/X1
21584B004 Flange w/Shredding Ring, *F Series Only
1
36 19099A012 Cap Screw, Hex 1/4"-20 x 1" Lg. 3

6
WG20 GRINDER PUMP PARTS LIST – FOR PUMPS MANUFACTURED PRIOR TO 1982
ORIGINAL DESIGN
Note: Has a 4 wire control cable and 4 wire power cable and uses Tetraseals (square rings), at the inside corners, between castings.
Ref. No. Description Qty. Part No.
1 Cord Cap Complete 1 22407C10
2 Connector(For 230V–1PH and 200-460-575V–3PH) 3 12672A1
& Connector(230V–3PH, 4 Req. and 460V–3PH, 3 Req.)
AsNoted 21591A1
3 Pipe Plug, 1/4" NPT, Hex HD. 2 5022A54
4 Cap Screw, Hex HD., 5/16-18 x 1-1/4" Lg. 8 19100A12
5 Gasket, Tetraseal, 4-1/8" x 3-7/8" x 1/8" 1 5014A169
6 Cap, Upper Bearing 1 21570B
7 Gasket, Tetraseal, 4-5/8" x 4-3/8" x 1/8" 1 5014A170
8 Tube, Plastic, 1-1/4" Lg. 2 10649A102
9 Mach. Screw, #10-24 x 1/2" Lg. 1 5434A34
10 Lockwasher, #10 1 6107A15
11 Washer, Finger Spring 2 19331A5
12 Bearing, Ball 1 8565A13
13 Ring, Retaining 1 11816A6
14 Rotor with Shaft 1 See Chart Below
– Shaft Only 1 21572C10C
15 Housing with Stator 1 See Chart Below
– Stator Only 1 See Chart Below
16 Motor Housing 1 21571D
17 Bearing, Ball 1 8565A18
18 Gasket, Tetraseal, 5-3/4" x 5-1/2" x 1/8" 2 5014A171
19 Housing, Upper Seal 1 21574D
20 Seal, 7/8" Shaft, Upper 1 21576A
21 Ring, Retaining 1 12558A6
22 Seal, 3/4", Shaft, Lower 1 21579A
23 Cap Screw, Socket Hd., 5/16-18 x 1" Lg. 4 6106A8
24 Mach. Screw, Socket Flat Hd.,5/16-18 x 1" Lg. 6 7597A17
25 Gasket, Vellumoid 1 5231A76
26 Housing, Lower Seal 1 21578C
27 Case, Volute 1 21580D
28 Impeller, Pump 1 21581C
29 Impeller, Grinder 1 21582B
30 Flange with Shredding Ring 1 21584B
31 Set Screw, 1/4"-20 x 3/8" 2 5013A39
32 Mach. Screw, Socket Flat HD.,1/4"-20 x 3/4" Lg. 1 7597A18
33 Ferrule, Rubber 1 12619A1
34 Retainer, Impeller 1 21583A
35 Cap Screw, Hex HD., 1/4"-20 x 1" Lg. 3 19099A12
36 Plug, Special 1 21577A
37 Electrode with Wire 1 21792A
Pump Cat. No.Ref. No. 14
Rotor with Shaft Rotor OnlyRef. No. 15
Housing with Stator Stator Only
WG20-21 21572C 21572C200B 21571D20K 21573C
WG20-03 21572C1 21572C201B 21571D25K 21573C1
WG20-23 21572C1 21572C201B 21571D31K 21573C2
WG20-43 21572C1 21572C201B 21571D31K 21573C2
WG20-53 21572C1 21572C201B 21571D35K 21573C3
3336

7
WIRING DIAGRAMS

8
CHECK LIST TO DETERMINE MOTOR TROUBLEChecking For Moisture in Motor:Use ohmmeter and set on highest scale. Readings on the large power cord between any of the conductors red, black, white to green conductor or motor shell should be more than 500,000 ohms.
Both motor housing and stator must be replaced as a unit as stator is pressed in at the factory and cannot be removed in the field.
Resistance of Windings:Every motor winding has a fixed resistance and winding must check close to the specification values. This winding resistance also determines if motor is connected for voltage being used.
Use ohmmeter for this test and set on scale to read directly in ohms.
Black To Black To White Red Main Start White to Motor Type & Voltage Winding Winding RedSingle Phase, 208V 1.2 4.87 6.07 Single Phase, 230V 1.54 7.60 9.14Three Phase, 200V 2.79 2.79 2.79Three Phase, 230V 3.29 3.29 3.29Three Phase, 460V 13.15 13.15 13.15Three Phase, 575V 19.68 19.68 19.68
Winding Resistance Values in Ohms (Marathon)
TROUBLE CHECK LIST
Troubles listed below are generally not caused by the pump. Other trouble can occur from faulty control box operation. These will be listed with the control box instructions.
CONDITION
Pump runs but does not pump liquid from basin.
PROBABLE CAUSE
1. Pump impeller may be air locked, this occasionally occurs on a new installation. Remove pump and clean volute case weep hole and reinstall pump allowing 2 to 3 minutes for air to weep from pump.
2. Remove pump and guides from wet well, and test in 5 gallon bucket after checking weep hole again. If pump still does not pump, disassemble check valve and check to insure that check valve flapper has not adhered to sealing face. This condition results from assembled basin units setting in the sun before installation. NOTE: Check valve bolts should have Loctite 242 or equivalent applied before reassembly of check valves.
3. If pump will pump water from bucket, try in wet well again. If it still will not pump, the following problems may exist:
a) Ball Valve – Gate Valve may be in off position. b) Discharge piping obstructed c) Valve at street or in main line may be off – redundant check valve
in backwards. d) Tap at force main obstructed – hole not drilled through enough –
pipes pushed into tee too far.
4. If pump has been installed for some time an does not pump, it may be clogged at grinder inlet.
5. Discharge head may be too high. Check elevation. Maximum pump head at zero flow is 105 feet.
6. If above checks do not locate trouble, motor rotor may be loose on shaft which allows motor to run but will not turn impeller or only at low RPM.
PROBABLE CAUSE
9
CONDITION
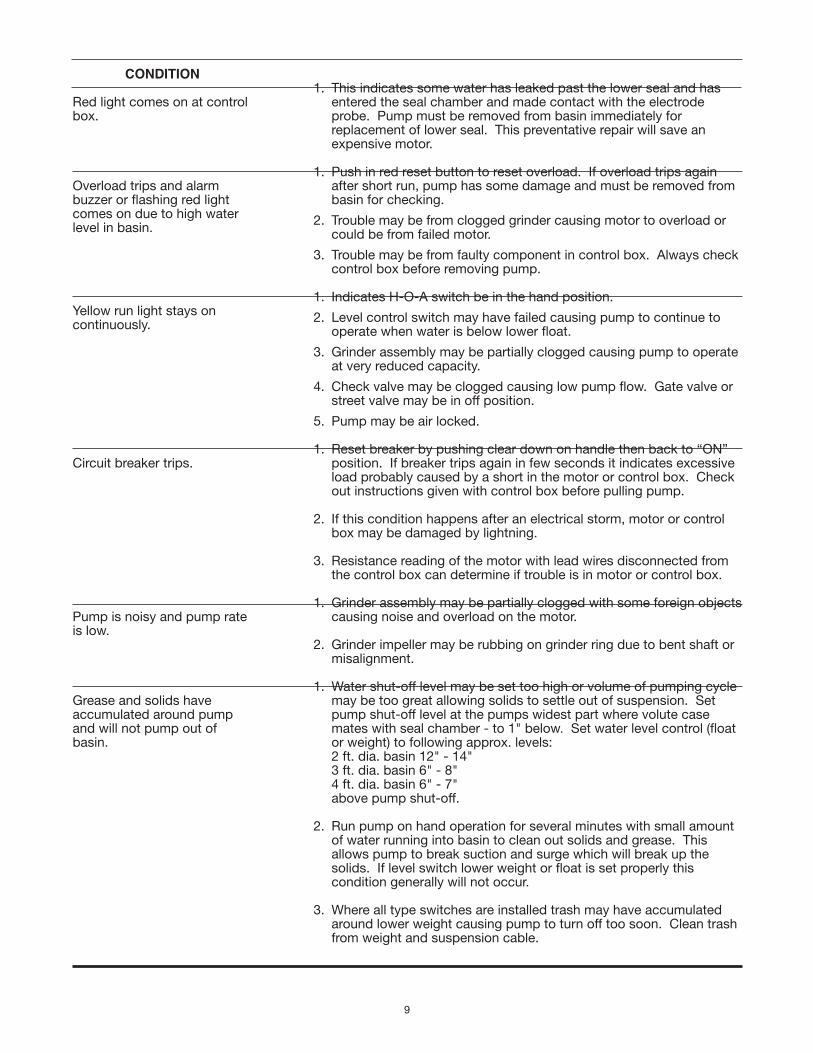
Red light comes on at control box.
Overload trips and alarm buzzer or flashing red light comes on due to high water level in basin.
Yellow run light stays on continuously.
Circuit breaker trips.
Pump is noisy and pump rate is low.
Grease and solids have accumulated around pump and will not pump out of basin.
1. This indicates some water has leaked past the lower seal and has entered the seal chamber and made contact with the electrode probe. Pump must be removed from basin immediately for replacement of lower seal. This preventative repair will save an expensive motor.
1. Push in red reset button to reset overload. If overload trips again after short run, pump has some damage and must be removed from basin for checking.
2. Trouble may be from clogged grinder causing motor to overload or could be from failed motor.
3. Trouble may be from faulty component in control box. Always check control box before removing pump.
1. Indicates H-O-A switch be in the hand position.
2. Level control switch may have failed causing pump to continue to operate when water is below lower float.
3. Grinder assembly may be partially clogged causing pump to operate at very reduced capacity.
4. Check valve may be clogged causing low pump flow. Gate valve or street valve may be in off position.
5. Pump may be air locked.
1. Reset breaker by pushing clear down on handle then back to “ON” position. If breaker trips again in few seconds it indicates excessive load probably caused by a short in the motor or control box. Check out instructions given with control box before pulling pump.
2. If this condition happens after an electrical storm, motor or control box may be damaged by lightning.
3. Resistance reading of the motor with lead wires disconnected from the control box can determine if trouble is in motor or control box.
1. Grinder assembly may be partially clogged with some foreign objects causing noise and overload on the motor.
2. Grinder impeller may be rubbing on grinder ring due to bent shaft or misalignment.
1. Water shut-off level may be set too high or volume of pumping cycle may be too great allowing solids to settle out of suspension. Set pump shut-off level at the pumps widest part where volute case mates with seal chamber - to 1" below. Set water level control (float or weight) to following approx. levels:
2 ft. dia. basin 12" - 14" 3 ft. dia. basin 6" - 8" 4 ft. dia. basin 6" - 7" above pump shut-off.
2. Run pump on hand operation for several minutes with small amount of water running into basin to clean out solids and grease. This allows pump to break suction and surge which will break up the solids. If level switch lower weight or float is set properly this condition generally will not occur.
3. Where all type switches are installed trash may have accumulated around lower weight causing pump to turn off too soon. Clean trash from weight and suspension cable.

10
NOTE: Probe test resistor is used on WGX20 UL Hazardous Location only.
CONTROLCORD
CONTROLCORD
CONTROLCORD
CONTROLCORD
PROBE TEST RESISTORON HAZARDOUS LOCATION ONLY
PROBE TEST RESISTORON HAZARDOUS LOCATION ONLY
PROBE TEST RESISTORON HAZARDOUS LOCATION ONLY
PROBE TEST RESISTORON HAZARDOUS LOCATION ONLY
–
– –
–

11
DIMENSIONS

Warranty Rev. 12/13
STANDARD LIMITED WARRANTY
Pentair Myers® warrants its products against defects in material and workmanship for a period of 12 months from the date of shipment from Pentair Myers or 18 months from the manufacturing date, whichever occurs first – provided that such products are used in compliance with the requirements of the Pentair Myers catalog and technical manuals for use in pumping raw sewage, municipal wastewater or similar, abrasive-free, noncorrosive liquids.
During the warranty period and subject to the conditions set forth, Pentair Myers, at its discretion, will repair or replace to the original user, the parts that prove defective in materials and workmanship. Pentair Myers reserves the right to change or improve its products or any portions thereof without being obligated to provide such a change or improvement for prior sold and/or shipped units.
Start-up reports and electrical schematics may be required to support warranty claims. Submit at the time of start- up through the Pentair Myers website: http://forms.pentairliterature.com/startupform/startupform.asp?type=m. Warranty is effective only if Pentair Myers authorized control panels are used. All seal fail and heat sensing devices must be hooked up, functional and monitored or this warranty will be void. Pentair Myers will cover only the lower seal and labor thereof for all dual seal pumps. Under no circumstance will Pentair Myers be responsible for the cost of field labor, travel expenses, rented equipment, removal/reinstallation costs or freight expenses to and from the factory or an authorized Pentair Myers service facility.
This limited warranty will not apply: (a) to defects or malfunctions resulting from failure to properly install, operate or maintain the unit in accordance with the printed instructions provided; (b) to failures resulting from abuse, accident or negligence; (c) to normal maintenance services and parts used in connection with such service; (d) to units that are not installed in accordance with applicable local codes, ordinances and good trade practices; (e) if the unit is moved from its original installation location; (f) if unit is used for purposes other than for what it is designed and manufactured; (g) to any unit that has been repaired or altered by anyone other than Pentair Myers or an authorized Pentair Myers service provider; (h) to any unit that has been repaired using non factory specified/OEM parts.
Warranty Exclusions: PENTAIR MYERS MAKES NO EXPRESS OR IMPLIED WARRANTIES THAT EXTEND BEYOND THE DESCRIPTION ON THE FACE HEREOF. PENTAIR MYERS SPECIFICALLY DISCLAIMS THE IMPLIED WARRANTIES OF MERCHANTABILITY AND FITNESS FOR ANY PARTICULAR PURPOSE.
Liability Limitation: IN NO EVENT SHALL PENTAIR MYERS BE LIABLE OR RESPONSIBLE FOR CONSEQUENTIAL, INCIDENTAL OR SPECIAL DAMAGES RESULTING FROM OR RELATED IN ANY MANNER TO ANY PENTAIR MYERS PRODUCT OR PARTS THEREOF. PERSONAL INJURY AND/OR PROPERTY DAMAGE MAY RESULT FROM IMPROPER INSTALLATION. PENTAIR MYERS DISCLAIMS ALL LIABILITY, INCLUDING LIABILITY UNDER THIS WARRANTY, FOR IMPROPER INSTALLATION. PENTAIR MYERS RECOMMENDS INSTALLATION BY PROFESSIONALS.
Some states do not permit some or all of the above warranty limitations or the exclusion or limitation of incidental or consequential damages and therefore such limitations may not apply to you. No warranties or representations at any time made by any representatives of Pentair Myers shall vary or expand the provision hereof.
1101 MYERS PARKWAY 490 PINEBUSH ROAD, UNIT 4ASHLAND, OHIO 44805 CAMBRIDGE, ONTARIO, CANADA N1T 0A5PH: 855-274-8947 PH: 800-363-7867WWW.FEMYERS.COM WWW.FEMYERS.COM