Embed Size (px)
Citation preview
Course Groups
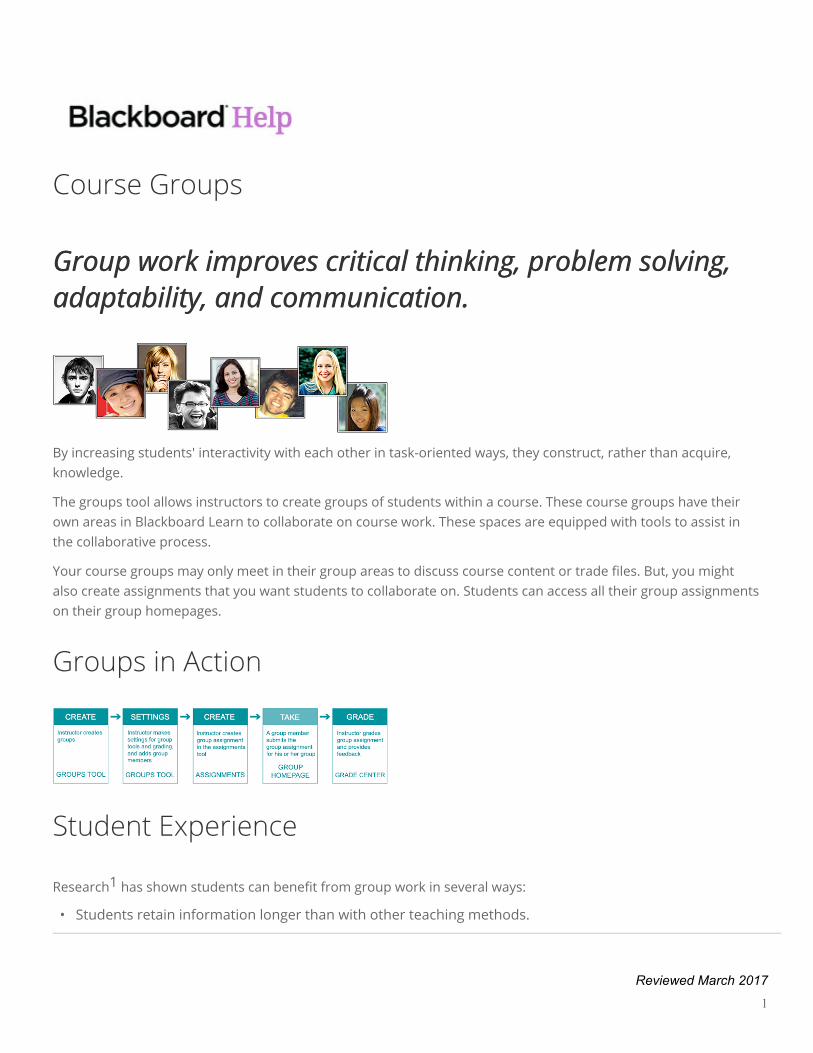
Group work improves critical thinking, problem solving,Group work improves critical thinking, problem solving,adaptability, and communication.adaptability, and communication.
By increasing students' interactivity with each other in task-oriented ways, they construct, rather than acquire,knowledge.
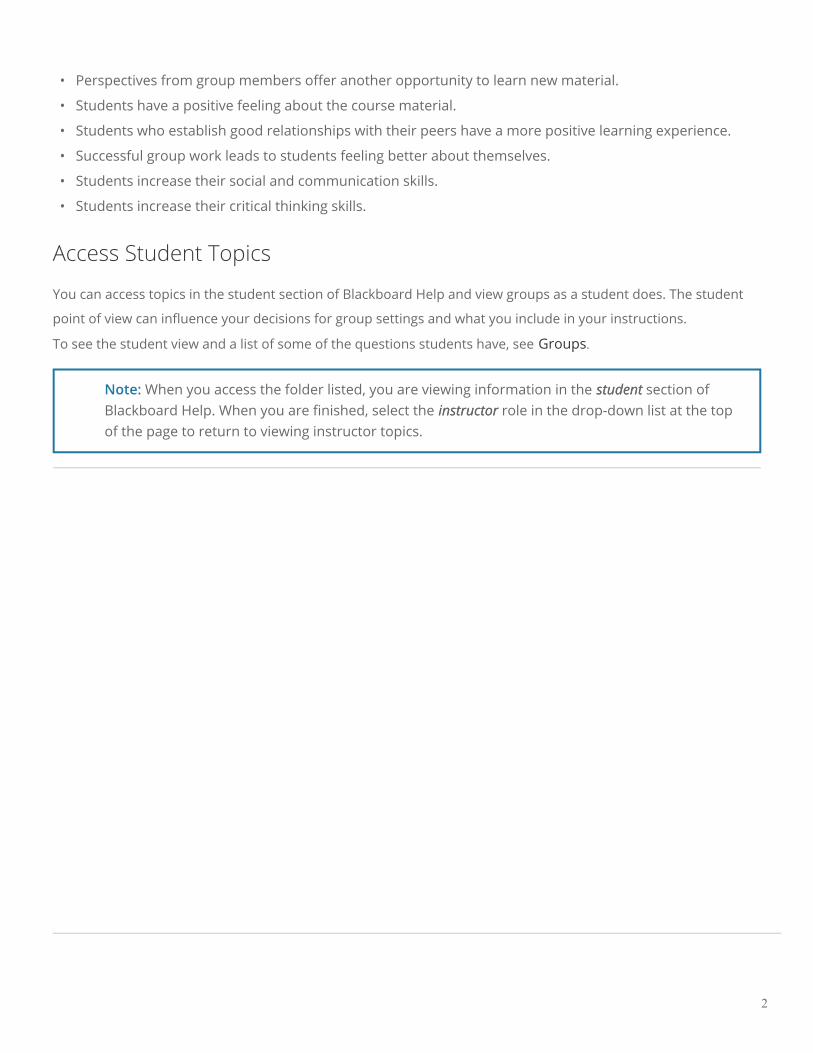
The groups tool allows instructors to create groups of students within a course. These course groups have theirown areas in Blackboard Learn to collaborate on course work. These spaces are equipped with tools to assist inthe collaborative process.
Your course groups may only meet in their group areas to discuss course content or trade files. But, you mightalso create assignments that you want students to collaborate on. Students can access all their group assignmentson their group homepages.
Groups in Action
Student Experience
Research1 has shown students can benefit from group work in several ways:
• Students retain information longer than with other teaching methods.
1
Reviewed March 2017
• Perspectives from group members offer another opportunity to learn new material.
• Students have a positive feeling about the course material.
• Students who establish good relationships with their peers have a more positive learning experience.
• Successful group work leads to students feeling better about themselves.
• Students increase their social and communication skills.
• Students increase their critical thinking skills.
Access Student Topics
You can access topics in the student section of Blackboard Help and view groups as a student does. The student
point of view can influence your decisions for group settings and what you include in your instructions.
To see the student view and a list of some of the questions students have, see Groups.
Note: When you access the folder listed, you are viewing information in the studentstudent section ofBlackboard Help. When you are finished, select the instructorinstructor role in the drop-down list at the topof the page to return to viewing instructor topics.
2
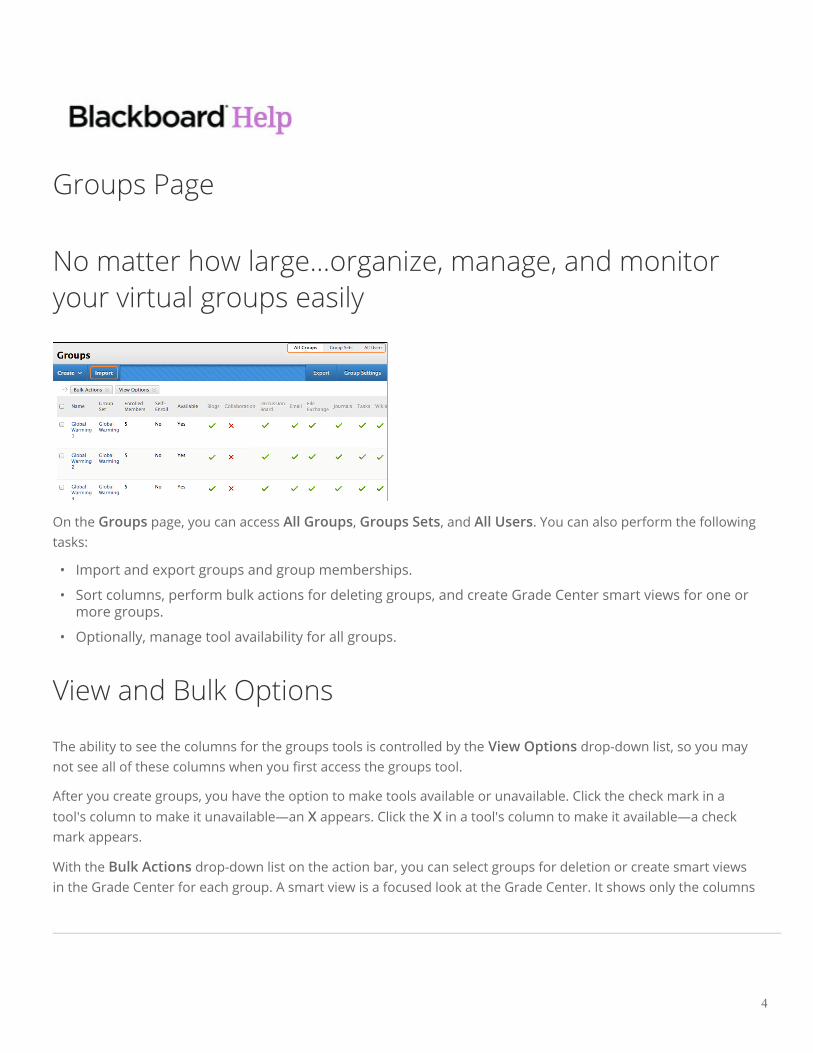
Groups Page
No matter how large...organize, manage, and monitoryour virtual groups easily
On the Groups page, you can access All Groups, Groups Sets, and All Users. You can also perform the followingtasks:
• Import and export groups and group memberships.
• Sort columns, perform bulk actions for deleting groups, and create Grade Center smart views for one ormore groups.
• Optionally, manage tool availability for all groups.
View and Bulk Options
The ability to see the columns for the groups tools is controlled by the View Options drop-down list, so you maynot see all of these columns when you first access the groups tool.
After you create groups, you have the option to make tools available or unavailable. Click the check mark in atool's column to make it unavailable—an X appears. Click the X in a tool's column to make it available—a checkmark appears.
With the Bulk Actions drop-down list on the action bar, you can select groups for deletion or create smart viewsin the Grade Center for each group. A smart view is a focused look at the Grade Center. It shows only the columns
4
that match a set of criteria, and the view is saved for continued use. When the Grade Center includes a great number of students and columns, you can use smart views to quickly find data. To learn more, see Smart Views.
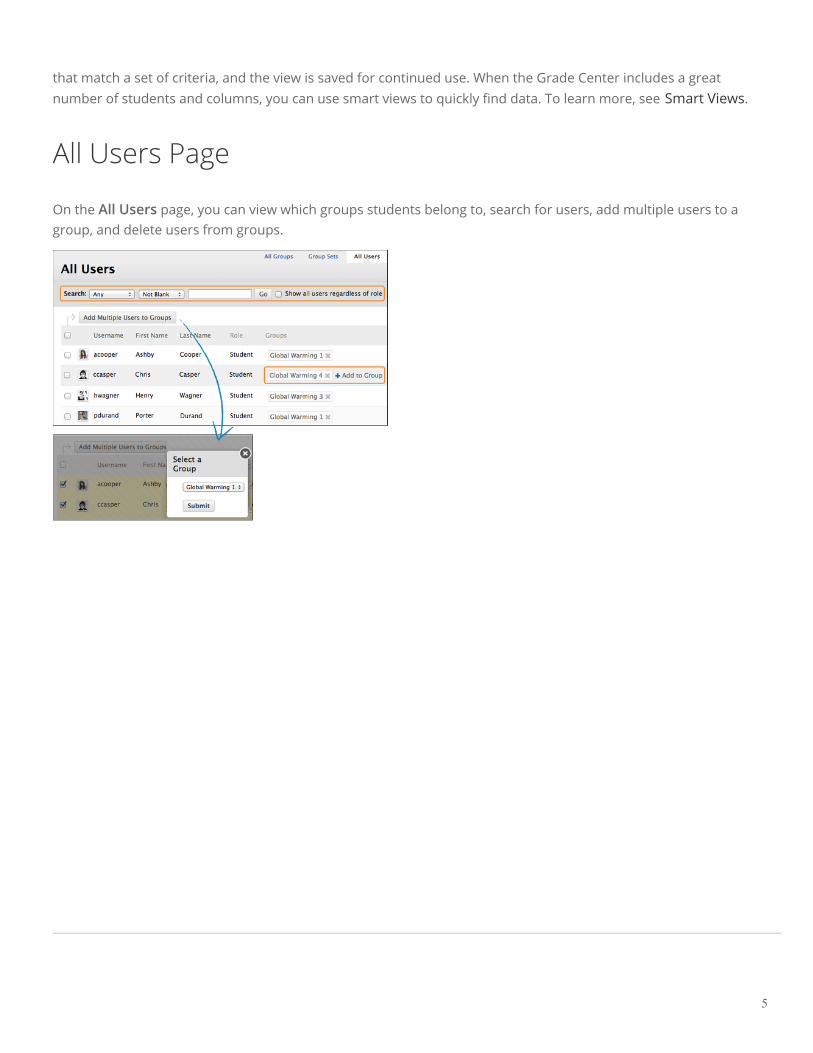
All Users Page
On the All Users page, you can view which groups students belong to, search for users, add multiple users to agroup, and delete users from groups.
5
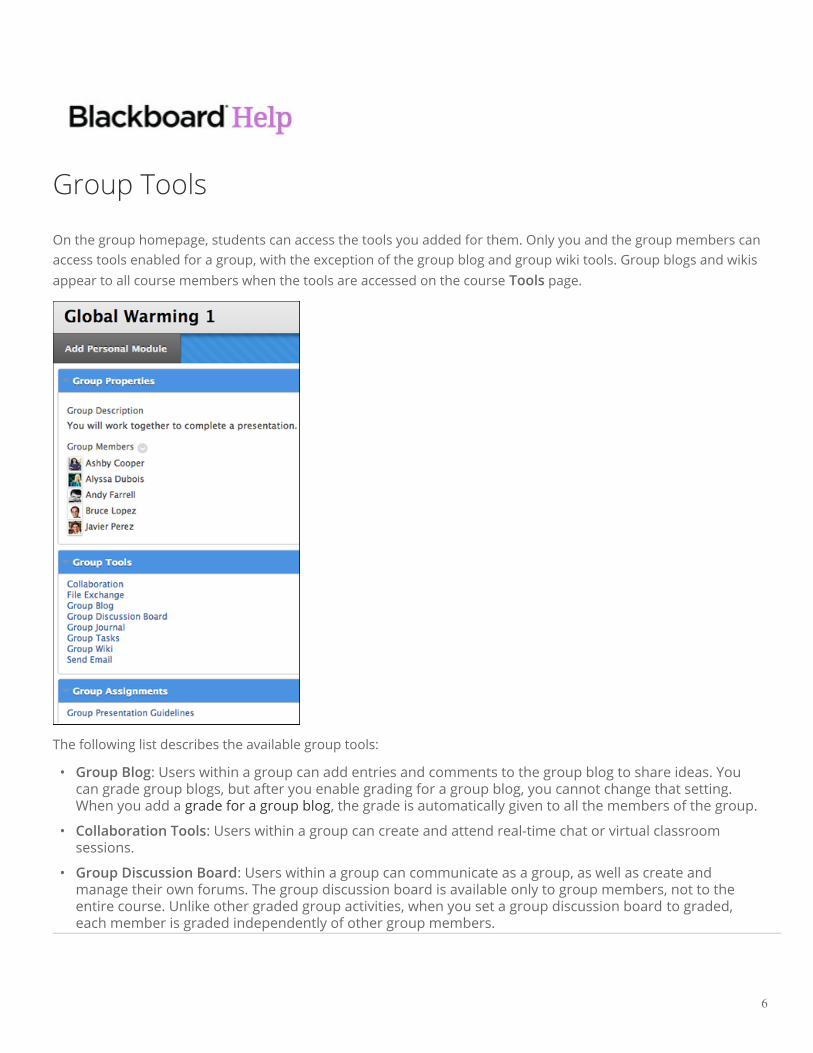
Group Tools
On the group homepage, students can access the tools you added for them. Only you and the group members canaccess tools enabled for a group, with the exception of the group blog and group wiki tools. Group blogs and wikisappear to all course members when the tools are accessed on the course Tools page.
The following list describes the available group tools:
• Group Blog: Users within a group can add entries and comments to the group blog to share ideas. You can grade group blogs, but after you enable grading for a group blog, you cannot change that setting. When you add a grade for a group blog, the grade is automatically given to all the members of the group.
• Collaboration Tools: Users within a group can create and attend real-time chat or virtual classroomsessions.
• Group Discussion Board: Users within a group can communicate as a group, as well as create andmanage their own forums. The group discussion board is available only to group members, not to theentire course. Unlike other graded group activities, when you set a group discussion board to graded,each member is graded independently of other group members.
6

• Email: The group email tool allows for efficient communication. The recipient list is automaticallypopulated with group members, so you can quickly select all or some of them. Emails are sent tomembers’ external email addresses.
• File Exchange: You and group members can use this tool to upload documents to the group area, anddelete files, regardless of who added them. Files appear in the order they were uploaded. Uploadedimages appear in a new browser window. This tool is only available to groups.
• Group Journal: Users within a group can share their thoughts with each other and communicate with you. Journal entries made in the group journal are visible to all group members and you. You can grade group journals, but after you enable grading for a group journal, you cannot change that setting. When you add a grade for a group journal, the grade is automatically given to all the members of the group.
• Group Tasks: Users within a group can define and separate the workload into tasks, while distributingthe list to the entire group. Each task has a status and a due date to help keep members on track. Groupmembers can view the group assigned tasks in the group tasks tool or in the course tasks tool. You andother course members will not see tasks for groups they are not enrolled in when viewing the coursetasks tool.
• Group Wiki: Use group wikis to create a collaborative space for group members to view, contribute, andedit content. By default, all course members can read group wikis, but only members of the group canmake a comment on their group wiki page. You can change the default setting to allow only groupmembers to view a group wiki. You can grade group wikis, but after you enable grading for a group wiki,you cannot change that setting. When you add a grade for a group wiki, the grade is automatically givento all the members of the group.
7
Create Groups
You can create formal groups of students to collaborate on work, and create these groups one at a time or in sets.You can manually select group members or allow students to self-enroll. Each group has its homepage with linksto tools to help students collaborate. Only you and group members can access the group tools.
You have two group creation options:
• Create a single group
• Create a group set
About Group Enrollment Methods
Manual Enroll allows you to assign each student in your course to a group. Manual enrollment is available forboth single groups and group sets.
Random Enroll is available for group sets only. It automatically distributes membership into groups based on adesignated number of students per group or the designated number of groups. Random distribution applies onlyto students who are currently enrolled in your course. You can enroll additional students manually.
Self-Enroll allows students to add themselves to a group using a sign-up sheet. Self-enrollment is an optionavailable for both single groups and group sets.
Note: Students cannot unenroll themselves from groups.
To learn more about which enrollment method might work best for your objectives, see Best Practice: GroupMembership.
Access Groups
On the Control Panel, expand the Users and Groups section and click Groups.
-OR-
In a new course, click the default Groups link on the course menu.
-OR-
8
Access groups using the default Tools link on the course menu. On the Tools page, click Groups.
To learn about the ways you can add groups to your course, see Best Practice: Presenting Groups.
How to Create a Single Group
1. Access the Groups listing page and point to Create on the action bar.
2. For Single Group, click Self-Enroll or Manual Enroll.
3. On the Create Group page, type a name and optional description. Make the group visible to students.
4. Select the check boxes for the course tools you want to make available to the group.
5. Click the Grade option and type Points possible for Blogs, Journals, and Wikis, if you want to gradestudent submissions.
6. Select the check box for Allow Personalization to allow students to add personal modules to thegroup homepage. Only the group member who added the modules can view them.
7. Optionally, select the check box to create a smart view for this group.
8. For self-enroll Sign-up Options, type a name and provide instructions. You might tell students thatthey cannot unenroll themselves from groups. Type the Maximum Number of Members. Select anyother options you want to include.
-OR-
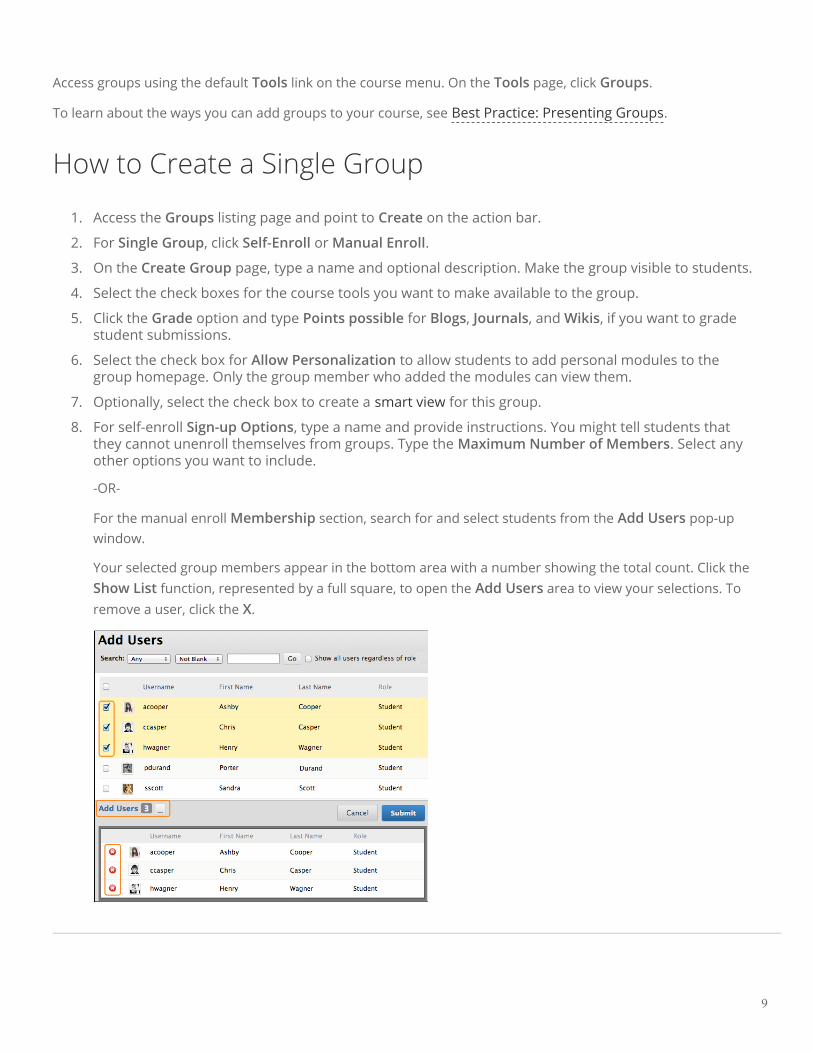
For the manual enroll Membership section, search for and select students from the Add Users pop-upwindow.
Your selected group members appear in the bottom area with a number showing the total count. Click theShow List function, represented by a full square, to open the Add Users area to view your selections. Toremove a user, click the X.
9
9. Click Submit.
The newly created group appears on the Groups listing page.
How to Create a Group Set
1. Access the Groups listing page and point to Create on the action bar.
2. For Group Set, click Self-Enroll, Manual Enroll, or Random Enroll.
Follow the same steps for creating a single group. Then, depending on the enrollment option you choose, use thefollowing information:
• For self-enroll Sign-up options, type a name and instructions. You might tell students that they cannotunenroll themselves from groups. Type the Maximum Number of Members. Select any other optionsyou want to include.
-OR-
• For random enroll Membership section, type the Number of Students per Group to create or theNumber of Groups. Select an option to Determine how to enroll any remaining members in the groups.
-OR-
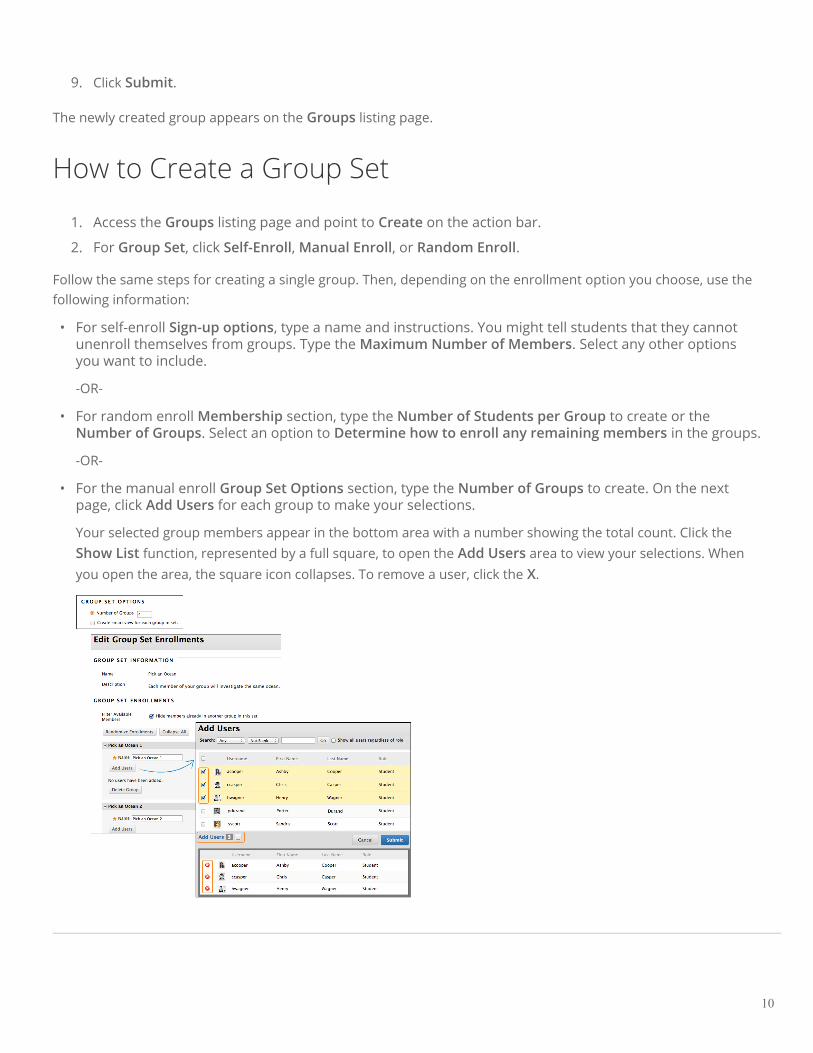
• For the manual enroll Group Set Options section, type the Number of Groups to create. On the nextpage, click Add Users for each group to make your selections.
Your selected group members appear in the bottom area with a number showing the total count. Click theShow List function, represented by a full square, to open the Add Users area to view your selections. Whenyou open the area, the square icon collapses. To remove a user, click the X.
10
Create Group Links
You can add a links to groups in your course so that students can access their groups more easily.
How to Add a Groups Link to the Course Menu
Each new course has a default groups link on the course menu. If you deleted it, you can add it again. You can alsocustomize the name of the link.
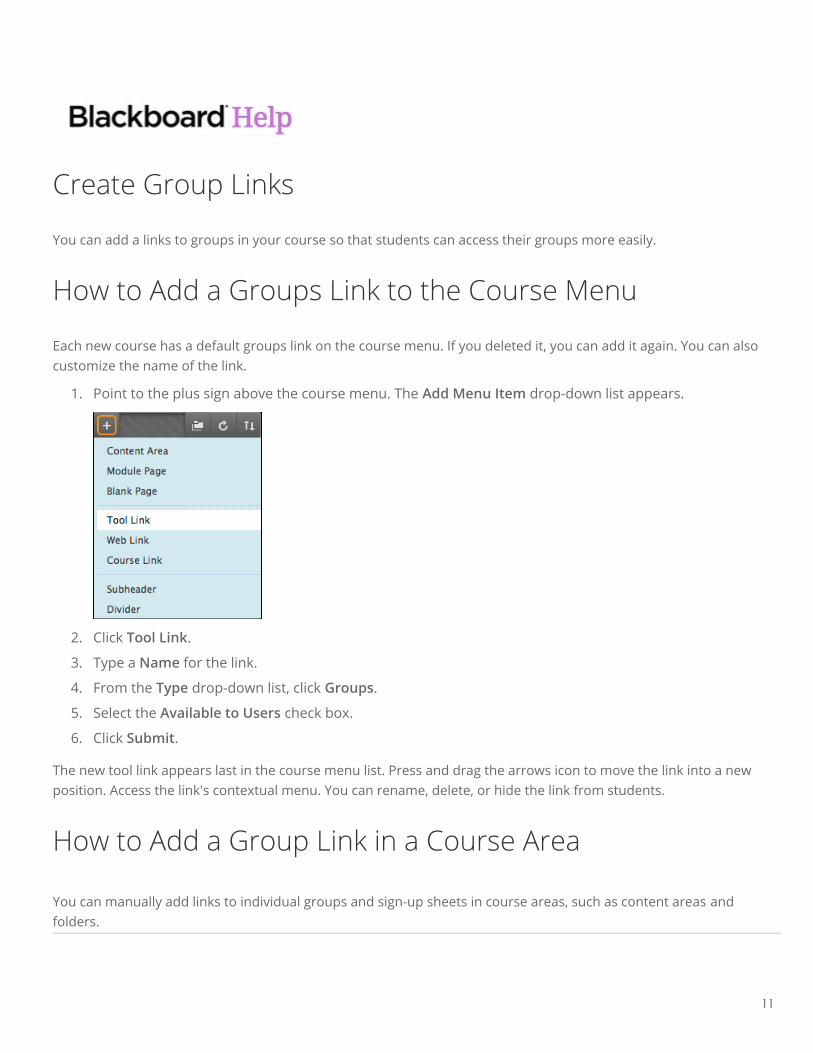
1. Point to the plus sign above the course menu. The Add Menu Item drop-down list appears.
2. Click Tool Link.
3. Type a Name for the link.
4. From the Type drop-down list, click Groups.
5. Select the Available to Users check box.
6. Click Submit.
The new tool link appears last in the course menu list. Press and drag the arrows icon to move the link into a newposition. Access the link's contextual menu. You can rename, delete, or hide the link from students.
How to Add a Group Link in a Course Area
You can manually add links to individual groups and sign-up sheets in course areas, such as content areas andfolders.
11
You can set up a content area to include all the content and tools your students need for the week. After readingthe weekly lecture, and viewing the slide presentation, students can also access the groups tool to complete thegroup assignment. Students do not need to navigate anywhere else in your course to complete all the requiredactivities for the week.
When you add a link to a specific group in a content area, all students will see the link. However, if a student is nota member of the group, he or she will not be able to access the group homepage.
Use the following steps to add a group link in a course area:
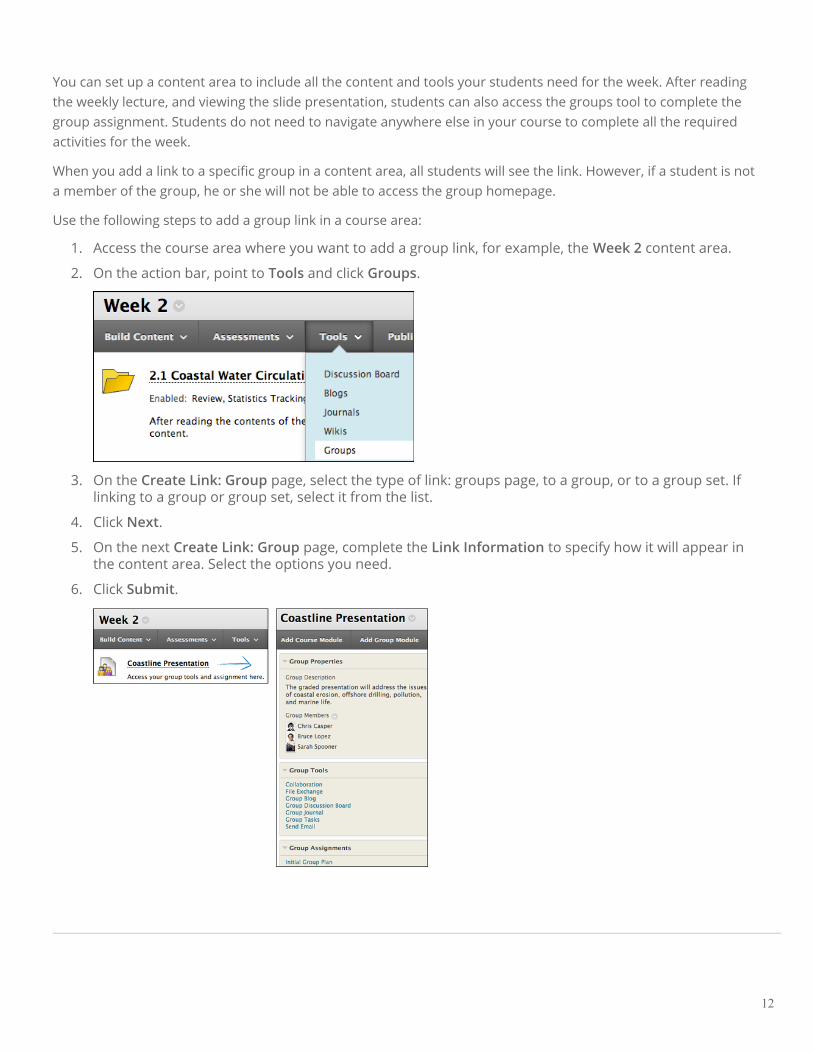
1. Access the course area where you want to add a group link, for example, the Week 2 content area.
2. On the action bar, point to Tools and click Groups.
3. On the Create Link: Group page, select the type of link: groups page, to a group, or to a group set. Iflinking to a group or group set, select it from the list.
4. Click Next.
5. On the next Create Link: Group page, complete the Link Information to specify how it will appear inthe content area. Select the options you need.
6. Click Submit.
12
Remove Students From a Group
Sometimes you need to remove members from a course group. Only course instructors and administrators canremove group members. Students cannot remove themselves from a group or other students from student-created groups.
How to Remove a Student From a Course Group
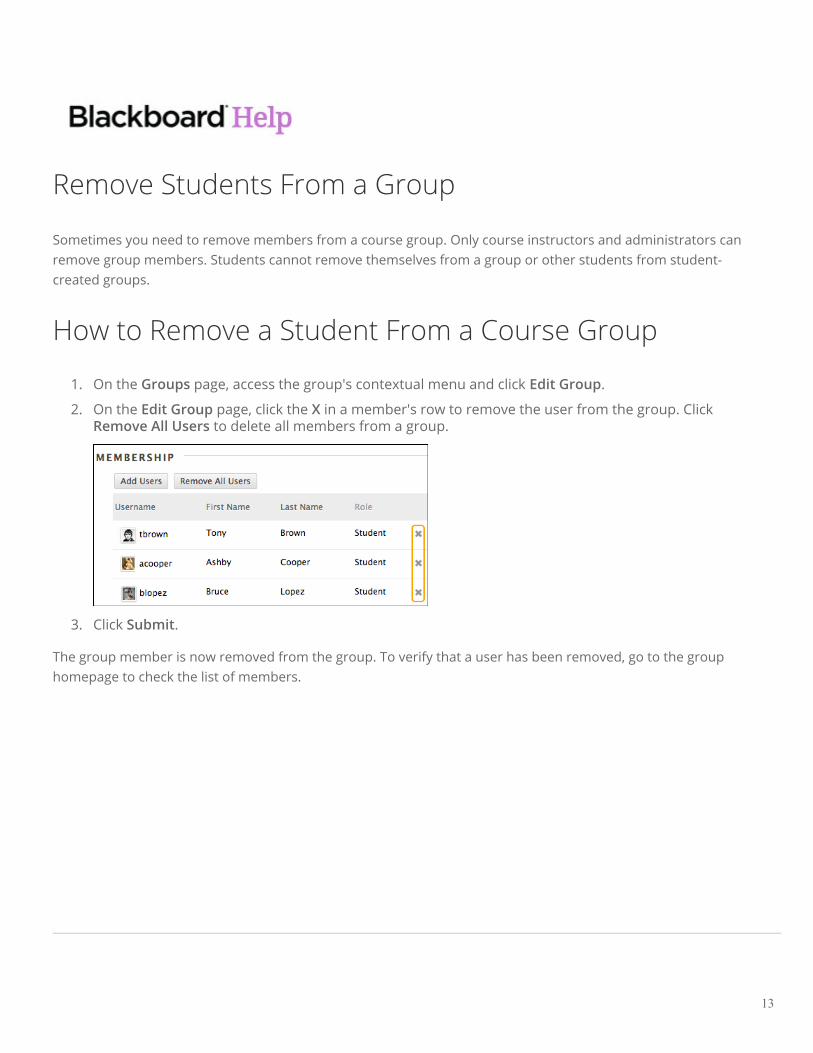
1. On the Groups page, access the group's contextual menu and click Edit Group.
2. On the Edit Group page, click the X in a member's row to remove the user from the group. ClickRemove All Users to delete all members from a group.
3. Click Submit.
The group member is now removed from the group. To verify that a user has been removed, go to the grouphomepage to check the list of members.
13
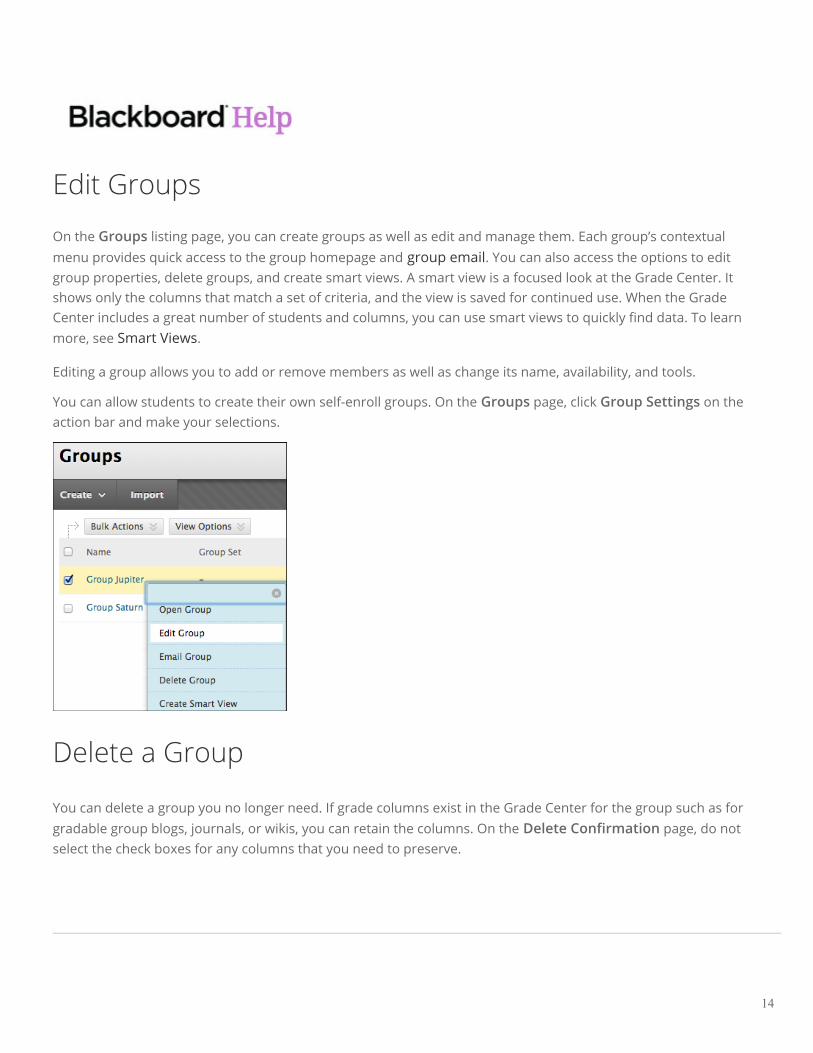
Edit Groups
On the Groups listing page, you can create groups as well as edit and manage them. Each group’s contextual menu provides quick access to the group homepage and group email. You can also access the options to edit group properties, delete groups, and create smart views. A smart view is a focused look at the Grade Center. It shows only the columns that match a set of criteria, and the view is saved for continued use. When the Grade Center includes a great number of students and columns, you can use smart views to quickly find data. To learn more, see Smart Views.
Editing a group allows you to add or remove members as well as change its name, availability, and tools.
You can allow students to create their own self-enroll groups. On the Groups page, click Group Settings on theaction bar and make your selections.
Delete a Group
You can delete a group you no longer need. If grade columns exist in the Grade Center for the group such as forgradable group blogs, journals, or wikis, you can retain the columns. On the Delete Confirmation page, do notselect the check boxes for any columns that you need to preserve.
14

15
Send Email to a Course Group
The group email tool allows for efficient communication. The recipient list is populated automatically with groupmembers so that you can quickly select all or some of them. Emails are sent to members’ external emailaddresses.
If groups prefer to keep communication within their course, they can use course messages, the Blackboard Learninternal mail tool. Because course messages is not available as a group tool, students need to select recipientsfrom the list of all course members. Course messages keeps a record of all messages sent.
Send an Email Message Within a Course Group
1. On the Groups listing page, access a group's contextual menu and click Email Group.
2. On the next page, select the recipients from the Available to Select box and click the right-pointingarrow to move them to the Selected box.
3. Type a Subject and Message.
4. Click Attach a file to browse for file from your computer. You can attach multiple files. After you addone file, the option to attach another file appears.
5. Click Submit.
Note: For Windows, to select multiple users in a row, press the Shift key and click the firstand last names. To select users out of sequence, press the Ctrl key and click each nameneeded. For Mac systems, press the Command key instead of the Ctrl key. You can alsoselect all course members with the Select All function.
A copy of the message is sent to the sender. A receipt page appears after the message is sent listing all recipients.The receipt page does not confirm that users received the message. It only confirms that the message was sent.
16
Create Group Assignments
You want to select group assignments that createinterdependence.
Positive interdependence can help produce meaningful relationships, greater productivity, and growth.
To be sure students do collaborate and interact, you can use the groups tool andgroup assignments to foster an interactive online environment. A good rule of thumbto use before adding group activities is to only assign group work for projects that anindividual student cannot do as well independently, and finish in the set amount oftime.
You can create a group assignment and release it to one or more groups within yourcourse. Each group submits one collaborative assignment and all members receive thesame grade. You can create a single assignment and assign it to all groups, or createseveral unique assignments and assign them to individual groups. Only you and themembers in a group have access to the assignment.
The overall grade for an assignment can appear to users as a numeric value, letter grade, percentage, text, or ascomplete/incomplete. You can choose the primary display for the group assignment column created automaticallyin the Grade Center.
Best Practice
Whenever possible, give students opportunities to get to know each other or work in groups in a non-graded,icebreaker type of activity. The more comfortable your students are with each other in your course as a whole, themore likely they will succeed when working in smaller groups with a focused agenda. Simple group exercises notonly help students feel more comfortable, but also can help them begin to trust one another and communicatemore freely in the online environment.
17
Before You Begin
• A course group must exist prior to creating group assignments for it.
• Students who are enrolled in more than one group receiving the same assignment will be able to submitmore than one attempt for this assignment. You may need to provide these students with an overallgrade for the assignment.
• Students who are not enrolled at the time that a group assignment has been submitted do not haveaccess to that submission. These students can see only that the submission occurred.
• Students who you remove from a group cannot see the group assignments. They can access theirsubmissions from My Grades.
• If you edit the assignment between creation and the due date, the entire group may lose any workalready in progress.
• If you delete a group from the assignment after they have begun the work and prior to submission, theywill lose access to the assignment and lose their work.
How to Create a Group Assignment
1. On the action bar, point to Assessments and click Assignment.
2. On the Create Assignment page, provide the instructions and files.
3. Optionally, select a Due Date.
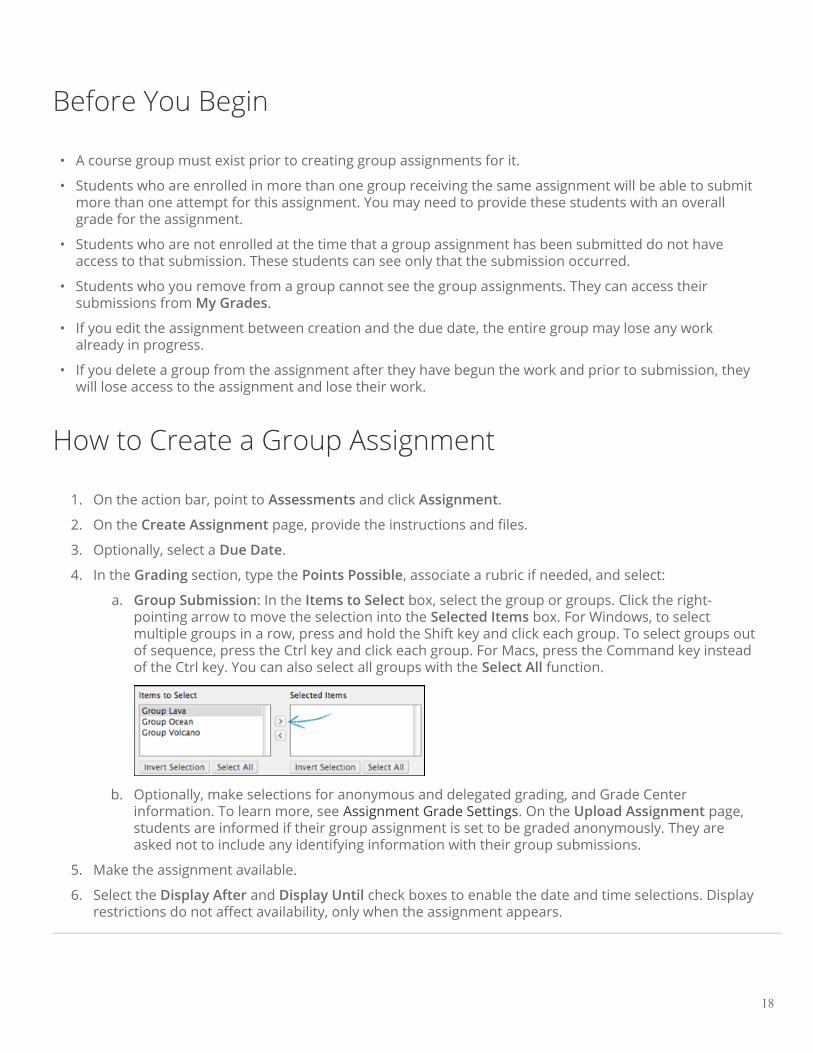
4. In the Grading section, type the Points Possible, associate a rubric if needed, and select:
a. Group Submission: In the Items to Select box, select the group or groups. Click the right-pointing arrow to move the selection into the Selected Items box. For Windows, to selectmultiple groups in a row, press and hold the Shift key and click each group. To select groups outof sequence, press the Ctrl key and click each group. For Macs, press the Command key insteadof the Ctrl key. You can also select all groups with the Select All function.
b. Optionally, make selections for anonymous and delegated grading, and Grade Center information. To learn more, see Assignment Grade Settings. On the Upload Assignment page, students are informed if their group assignment is set to be graded anonymously. They are asked not to include any identifying information with their group submissions.
5. Make the assignment available.
6. Select the Display After and Display Until check boxes to enable the date and time selections. Displayrestrictions do not affect availability, only when the assignment appears.
18
7. Click Submit.
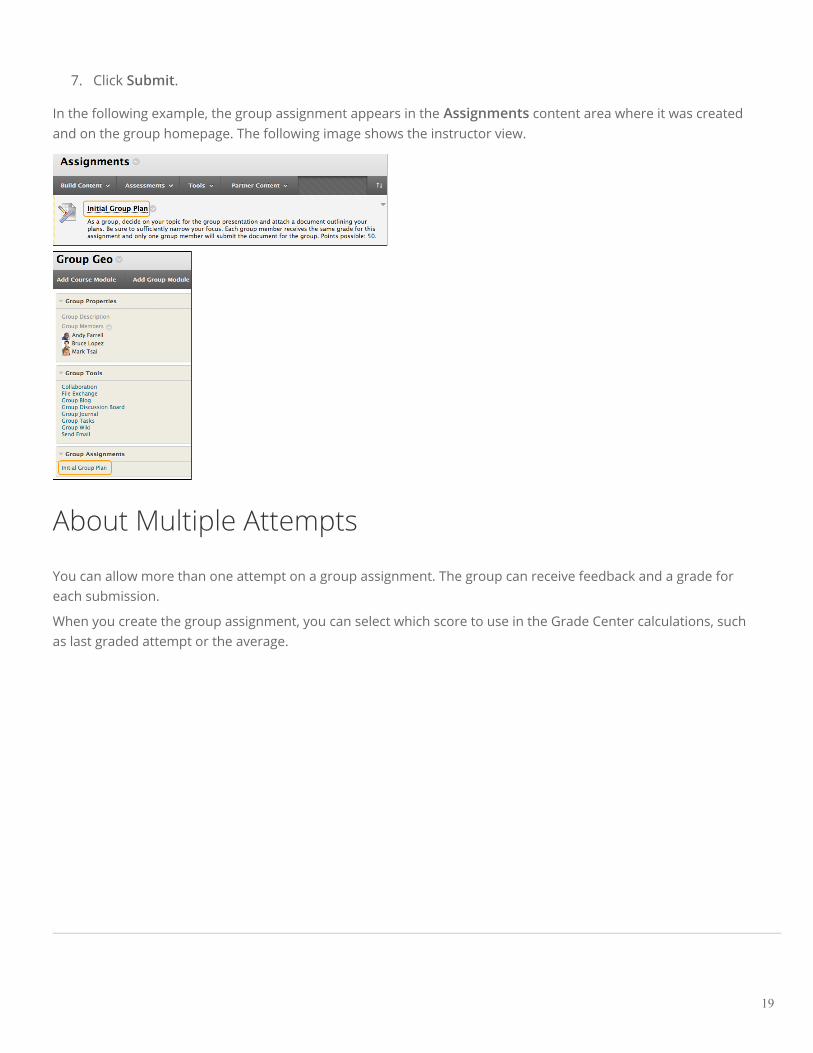
In the following example, the group assignment appears in the Assignments content area where it was createdand on the group homepage. The following image shows the instructor view.
About Multiple Attempts
You can allow more than one attempt on a group assignment. The group can receive feedback and a grade foreach submission.
When you create the group assignment, you can select which score to use in the Grade Center calculations, such as last graded attempt or the average.
19
Grade Group Assignments
When you create a group assignment, a grade column is created automatically in the Grade Center. An assignmentthat has been submitted, but not graded, is indicated with an exclamation mark—the needs grading icon.
You access the Grade Assignment page from the Needs Grading page or the Grade Center. To learn more, seethe Needs Grading Page.
After accessing the Grade Assignment page by either method, the grading process is the same.
How to Access a Group Assignment From the NeedsGrading Page
1. On the Needs Grading page, use the Filter drop-down lists to narrow the list of items to grade byCategory, Item, User, and Date Submitted. For example, you can filter the list by Category and displayonly assignments and by User to select a specific group.
2. Click Go. The filtered items appear on the Needs Grading page. Click a column heading to sort theitems.
3. Access the Grade Assignment page by clicking an item's contextual menu and clicking Grade All Users.
-OR-
Access the Grade Assignment page by clicking a group name in the User Attempt column.
4. The Grade Assignment page appears, and you can proceed with grading.
How to Access a Group Assignment From the GradeCenter
In the Grade Center, group assignments that have been submitted, but not graded, are indicated with anexclamation mark—the needs grading icon. All group members’ cells display the exclamation mark, regardless ofwho submitted the group assignment.
If a group submits an incorrect file—and only one submission is allowed—you must clear that attempt so that thegroup can resubmit.
20
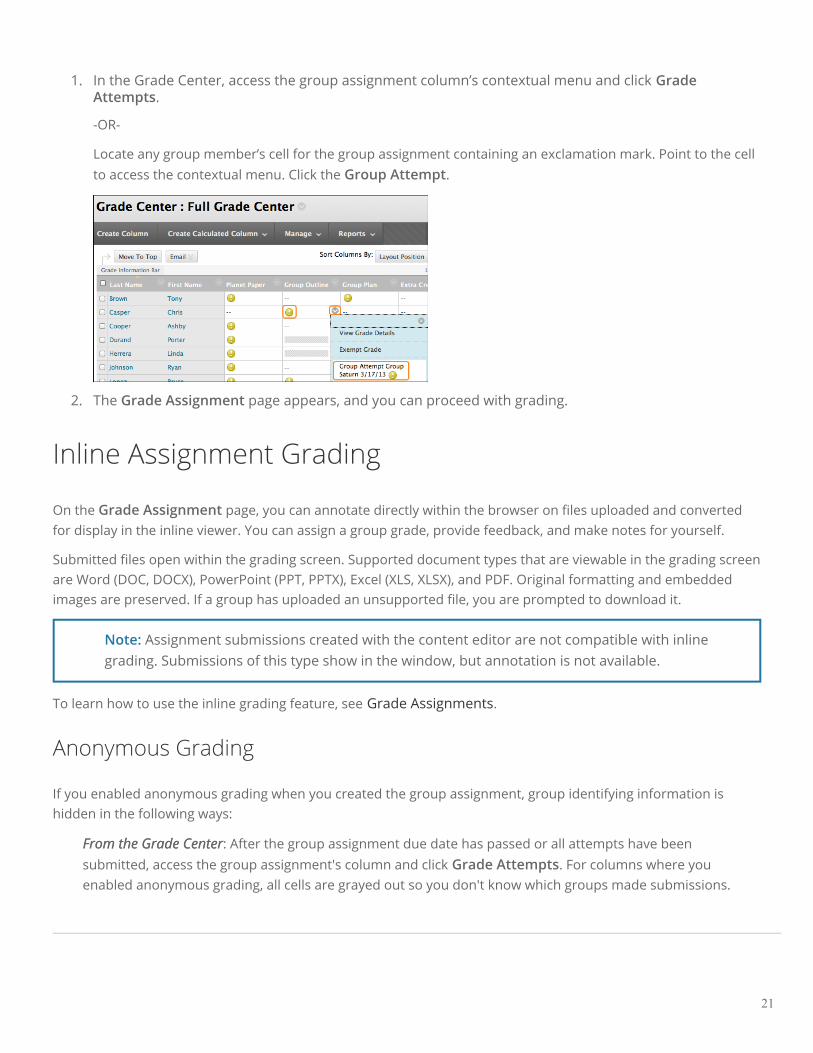
1. In the Grade Center, access the group assignment column’s contextual menu and click GradeAttempts.
-OR-
Locate any group member’s cell for the group assignment containing an exclamation mark. Point to the cellto access the contextual menu. Click the Group Attempt.
2. The Grade Assignment page appears, and you can proceed with grading.
Inline Assignment Grading
On the Grade Assignment page, you can annotate directly within the browser on files uploaded and convertedfor display in the inline viewer. You can assign a group grade, provide feedback, and make notes for yourself.
Submitted files open within the grading screen. Supported document types that are viewable in the grading screenare Word (DOC, DOCX), PowerPoint (PPT, PPTX), Excel (XLS, XLSX), and PDF. Original formatting and embeddedimages are preserved. If a group has uploaded an unsupported file, you are prompted to download it.
Note: Assignment submissions created with the content editor are not compatible with inlinegrading. Submissions of this type show in the window, but annotation is not available.
To learn how to use the inline grading feature, see Grade Assignments.
Anonymous Grading
If you enabled anonymous grading when you created the group assignment, group identifying information ishidden in the following ways:
From the Grade CenterFrom the Grade Center: After the group assignment due date has passed or all attempts have beensubmitted, access the group assignment's column and click Grade Attempts. For columns where youenabled anonymous grading, all cells are grayed out so you don't know which groups made submissions.
21
From the Needs Grading pageFrom the Needs Grading page: Filter the items that need grading to show only the group assignment you wantto grade. In the User Attempt column, all identifying information is replaced with "Anonymous Group" andan attempt ID. From an group assignment's contextual menu, click Grade All Users to begin grading.
Both access options take you to the Grade Assignment page where you view submissions and grade inline as younormally do. As you navigate from group to group, group names are replaced with "Anonymous Group" on theaction bar. You can also see how many gradable group items are in the queue.
To learn more, see Anonymous Grading.
Delegated Grading
When grading group assignments, using grades and feedback from more than one grader helps to promotereliability and remove bias. You can also divide up grading responsibilities for large classes.
Delegated graders follow the same grading steps you do, however, the number of group assignment attempts thatthey see are based on the options you choose. For example, you might ask each grader to grade a random, subsetof the group assignments -OR- have all grader grade all group submissions. Then, you can compare the gradesand assign the final gorup grades.
To learn more, see Delegated Grading.
Change an Individual Member’s Group Grade
You can assign an individual group member a different grade than the group by editing the member's grade. Ifyou change a group member’s grade and assign a new group grade, the new group grade will not affect theindividual’s new grade. Individual members only see one grade, not what each member earned. The individual’snew grade will not appear to the other group members.
In the grading sidebar, click the pencil icon to change the group grade for a member. Type a new grade and clickthe check mark icon to save it. This grade becomes an override grade.
22
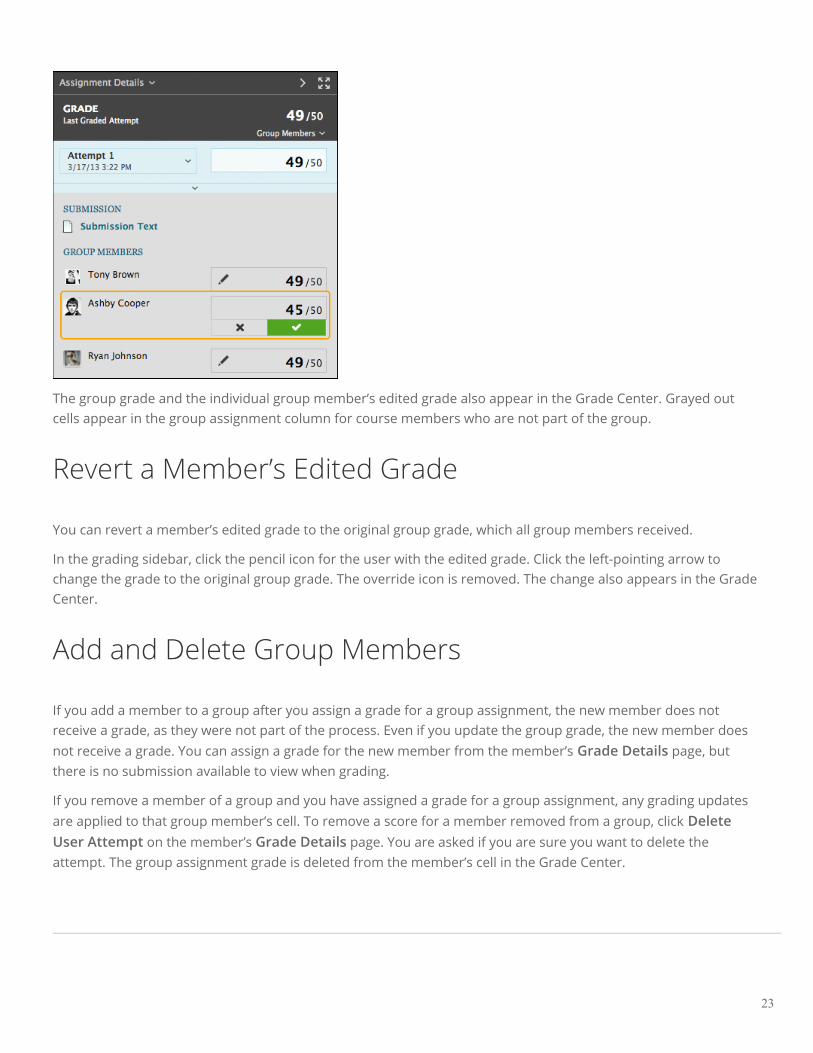
The group grade and the individual group member’s edited grade also appear in the Grade Center. Grayed outcells appear in the group assignment column for course members who are not part of the group.
Revert a Member’s Edited Grade
You can revert a member’s edited grade to the original group grade, which all group members received.
In the grading sidebar, click the pencil icon for the user with the edited grade. Click the left-pointing arrow tochange the grade to the original group grade. The override icon is removed. The change also appears in the GradeCenter.
Add and Delete Group Members
If you add a member to a group after you assign a grade for a group assignment, the new member does notreceive a grade, as they were not part of the process. Even if you update the group grade, the new member doesnot receive a grade. You can assign a grade for the new member from the member’s Grade Details page, butthere is no submission available to view when grading.
If you remove a member of a group and you have assigned a grade for a group assignment, any grading updatesare applied to that group member’s cell. To remove a score for a member removed from a group, click DeleteUser Attempt on the member’s Grade Details page. You are asked if you are sure you want to delete theattempt. The group assignment grade is deleted from the member’s cell in the Grade Center.
23
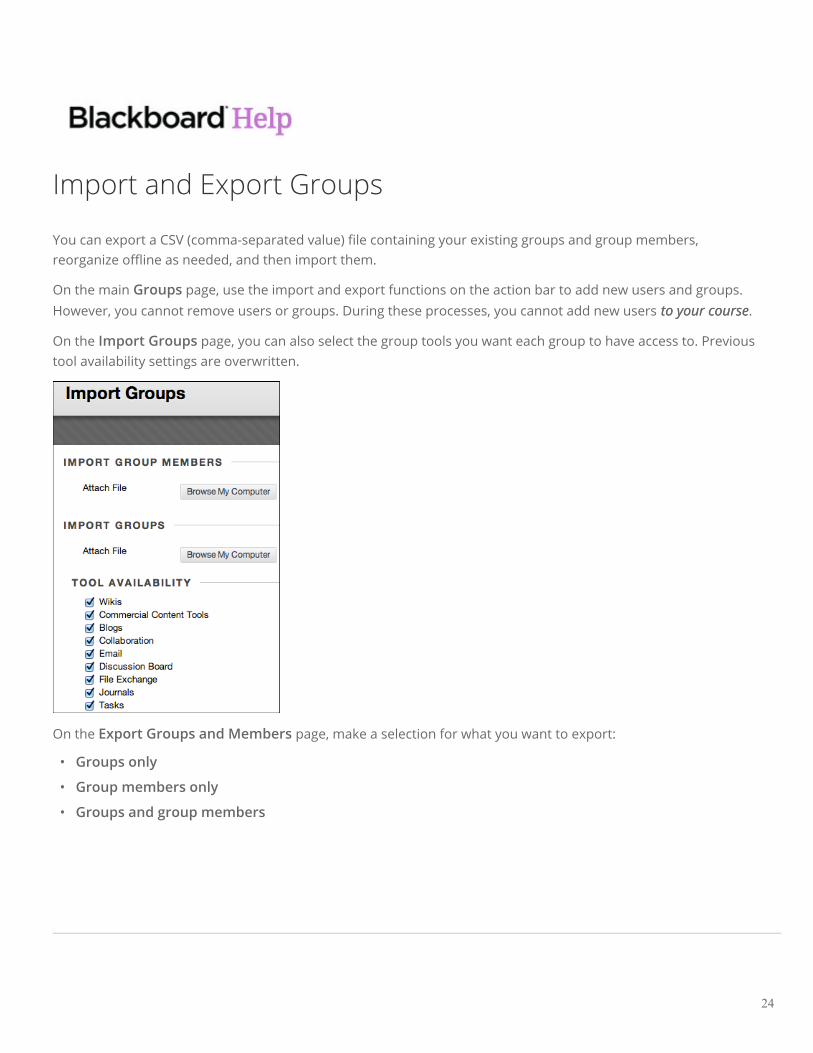
Import and Export Groups
You can export a CSV (comma-separated value) file containing your existing groups and group members,reorganize offline as needed, and then import them.
On the main Groups page, use the import and export functions on the action bar to add new users and groups.However, you cannot remove users or groups. During these processes, you cannot add new users to your courseto your course.
On the Import Groups page, you can also select the group tools you want each group to have access to. Previoustool availability settings are overwritten.
On the Export Groups and Members page, make a selection for what you want to export:
• Groups only
• Group members only
• Groups and group members
24
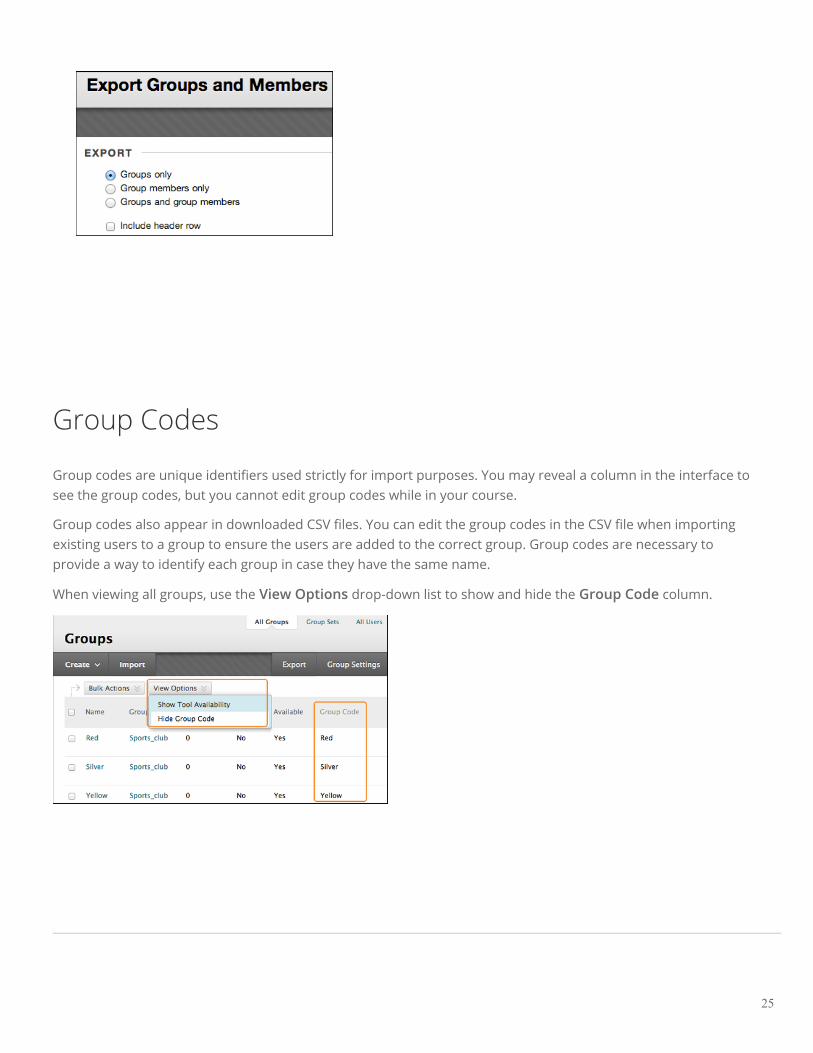
Group Codes
Group codes are unique identifiers used strictly for import purposes. You may reveal a column in the interface tosee the group codes, but you cannot edit group codes while in your course.
Group codes also appear in downloaded CSV files. You can edit the group codes in the CSV file when importingexisting users to a group to ensure the users are added to the correct group. Group codes are necessary toprovide a way to identify each group in case they have the same name.
When viewing all groups, use the View Options drop-down list to show and hide the Group Code column.
25

Best Practices: Groups
Learn about the different ways you can deliver groups in your course andhow to use the tool to your advantage.
In this section...
• Best Practice: Group Collaboration
• Best Practice: Presenting Groups
• Best Practice: Group Membership
• Best Practice: Group Assessment
26

Best Practice: Group Collaboration
As the saying goes: "Two heads are better than one."
Collaborative learning offers many benefits over traditional instruction. As studies show, when students work as ateam, they develop positive attitudes, solve problems more effectively, and experience a greater sense ofaccomplishment.
Ideally, all learning includes active student participation and interaction amongstudents. Instructors who have not introduced group activities into theirteaching arsenals have valid reasons for being hesitant. Some do not want totransfer control from their teacher-centered methods of instruction to theirstudents. Others have heard stories from their colleagues that the experiencewas not worthwhile.
Though you may find the move away from a teacher-controlled environment isa dramatic change, the benefits of collaborative learning far outweigh any
obstacles that you must deal with when implementing group activities.
Benefits of Collaboration
Research shows that students can benefit from group work in several ways:1
• Students retain information longer than with other teaching methods.
• Perspectives from group members offer another opportunity to learn new material.
• Students have a positive feeling about the course material.
• Students who establish good relationships with their peers have a more positive learningexperience.
• Successful group work leads to students feeling better about themselves.
• Students increase their social and communication skills.
• Students increase their critical thinking skills.
27
Challenges of Collaboration
Many students dread group work. Some motivated students report that their slower group members dragthem down. Less confident students complain about being ignored or not taken seriously in group sessions.Groups may break down completely when some teammates are not contributing their fair shares.
Some students prefer only an individual effort and have no desire to help others or ask for help. They objectto the responsibility that comes with collaborative learning.
Some students feel that they spend too much time on group projects and would rather be working throughmore course material and gaining more useful knowledge.
Some students will not approve of sharing one group grade.
Before Assigning Group Work
You do not want students to see group activities as busy work. If working in a group does not enhance yourlearning objectives and provide value, consider alternative teaching techniques. You should use group work onlyfor projects that an individual student cannot do as well alone and finish in the intended amount of time.
Research shows that students work harder when others are relying on them. To encourage this interdependence,create group assignments that require the students to divide the work to meet the goal, question and challengeeach other's ideas, and share feedback and encouragement.
Before incorporating group work into your course, consider the following questions:
• Will the group work further my course objectives?
• What introductory material or group resource information can you provide to help students succeed?
• How will the groups be formed?
• Will students be involved in the planning of the groups?
• How will you assess students' learning and maintain individual accountability? Will you require a groupdeliverable?
• How will you handle concerns and problems?
Source: 1"44 Benefits of Collaborative Learning." gdrc.org n.d. Web. 3 Jan. 2014.
28

Best Practice: Presenting Groups
The way students access groups depends on how you set up your course. As shown in the following image, youcan use three options for setting up groups to achieve different learning objectives.
Options for Presenting Groups to Students
Option A: My Groups
What it looks like:What it looks like:
Each student's groups appear by default in My Groups.
How it works:How it works:
After you create groups and add users, the groups are available to enrolled members in My Groups where userscan expand each group name for quick access to its tools. Since My Groups is populated automatically whenstudents are added to groups, this option is the easiest to implement. Click the arrow to expand the grouphomepage into the content frame.
29
Option B: Course menu link
What it looks like:What it looks like:
Adding a course menu link to the Groups listing page displays all groups a student is enrolled in and availablesign-up sheets.
How it works:How it works:
Because My Groups does not list sign-up sheets, create a link to the Groups listing page, if you want to use self-enroll groups. Adding a link to the course menu is easy and convenient to use. Use the course menu's Add MenuItem drop-down list and create a tool link or a course link. Then, select the Groups listing page in the pop-upcourse map.
Option C: Provide links in a course area
What it looks like:What it looks like:
A link to the Groups listing page, a group homepage, or a sign-up sheet appears in a content area, folder, learningmodule, or lesson plan in close proximity to related content.
How it works:How it works:
Create groups using the groups tool. Next, go to the course area where you want to add the group link. Point toTools on the action bar to access the drop-down list and select Groups. Make your selection on the Create Link:Group page.
30
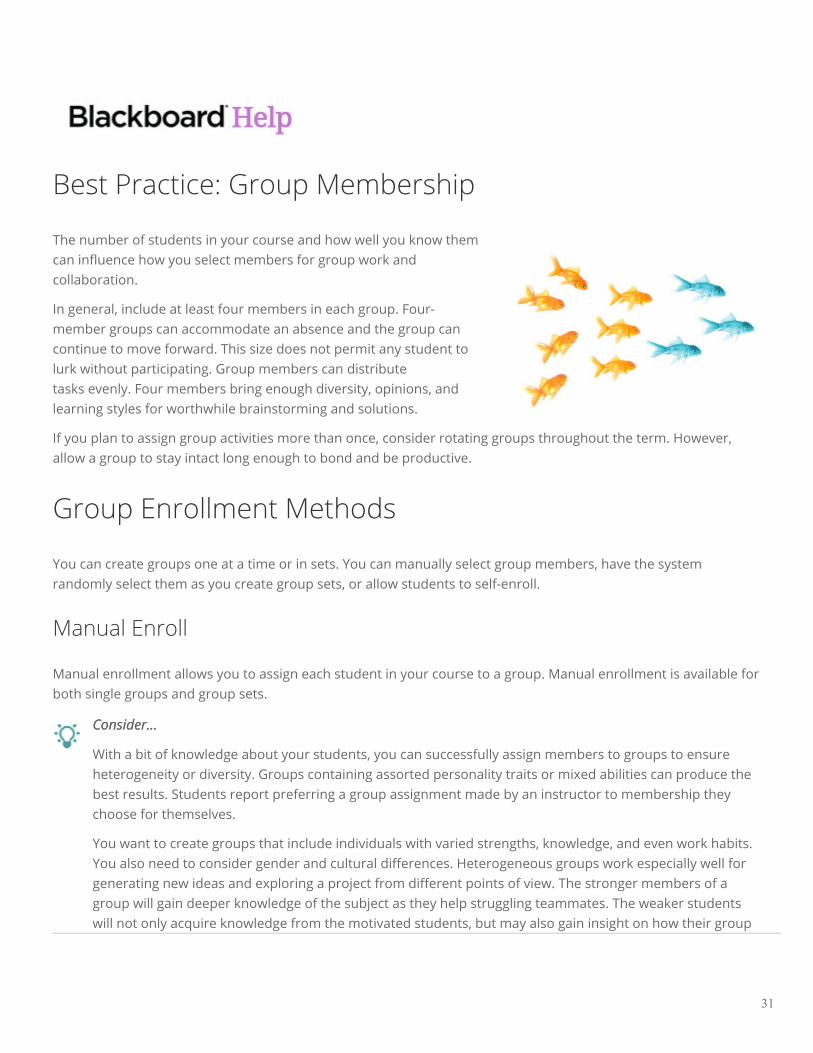
Best Practice: Group Membership
The number of students in your course and how well you know themcan influence how you select members for group work andcollaboration.
In general, include at least four members in each group. Four-member groups can accommodate an absence and the group cancontinue to move forward. This size does not permit any student tolurk without participating. Group members can distributetasks evenly. Four members bring enough diversity, opinions, andlearning styles for worthwhile brainstorming and solutions.
If you plan to assign group activities more than once, consider rotating groups throughout the term. However,allow a group to stay intact long enough to bond and be productive.
Group Enrollment Methods
You can create groups one at a time or in sets. You can manually select group members, have the systemrandomly select them as you create group sets, or allow students to self-enroll.
Manual Enroll
Manual enrollment allows you to assign each student in your course to a group. Manual enrollment is available forboth single groups and group sets.
Consider...Consider...
With a bit of knowledge about your students, you can successfully assign members to groups to ensureheterogeneity or diversity. Groups containing assorted personality traits or mixed abilities can produce thebest results. Students report preferring a group assignment made by an instructor to membership theychoose for themselves.
You want to create groups that include individuals with varied strengths, knowledge, and even work habits.You also need to consider gender and cultural differences. Heterogeneous groups work especially well forgenerating new ideas and exploring a project from different points of view. The stronger members of agroup will gain deeper knowledge of the subject as they help struggling teammates. The weaker studentswill not only acquire knowledge from the motivated students, but may also gain insight on how their group
31
members approach their learning. Hopefully, the results are students feeling good about themselves forhelping others and students motivated by peer examples.
Random Enroll
Random enrollment is available only for group sets and automatically distributes membership into groups basedon a designated number of students per group or the designated number of groups. Random distribution appliesonly to students who are currently enrolled in your course. You can enroll additional students manually. Whennaming a set of groups, the name of each group has a number added to it when they are first created. Forexample, a set of groups named "Research" results in groups named "Research 1," "Research 2," and "Research 3,"depending on the number of groups in the set. After creation, you can edit the group names.
Consider...Consider...
Random assignment to groups may work best for instructors who teach courses containing manystudents—without the opportunity to know them individually. Though random assignment is easy for aninstructor as it requires no preparation, some students may view random assignment as their instructor notcaring.
By assigning students to groups, you avoid the risk that students who select their own partners will spendtoo much time socializing and forming cliques. No students are excluded, disregarded, or chosen last. Also,some instructors feel one of the goals of group work is to collaborate with people you do not know, andrandom assignment increases this likelihood.
Self-Enroll
Self-enrollment allows students to add themselves to a group using a sign-up sheet. You can make sign-up sheetsavailable to students on the groups listing page or by adding a link to a course area, such as a content area,learning module, lesson plan, or folder. When you create a group using sign-up sheets, you can make the groupimmediately available to use or available after all members have signed up. Self-enrollment is an option availablefor both single groups and group sets.
Consider...Consider...
When students self-select groups, they tend to do so based on previous relationships or characteristics:friends, teammates, organization membership, social groups on campus, ethnicity, or gender. Students whohave few affiliations may find it difficult to become a member of groups composed of like individuals.
Homogeneous groups may not need to spend a great deal of time bonding. They may already have a highlevel of trust and agreement so these groups may fit your intended outcomes best.
You need to consider how to promote inclusiveness or use self-enrollment only for those courses whereyou have students with like abilities, interests, and affiliations. You can also use self-enroll groups for groupformation based on interest, non-graded collaborations, extra credit, volunteer situations, or for studygroups.
32
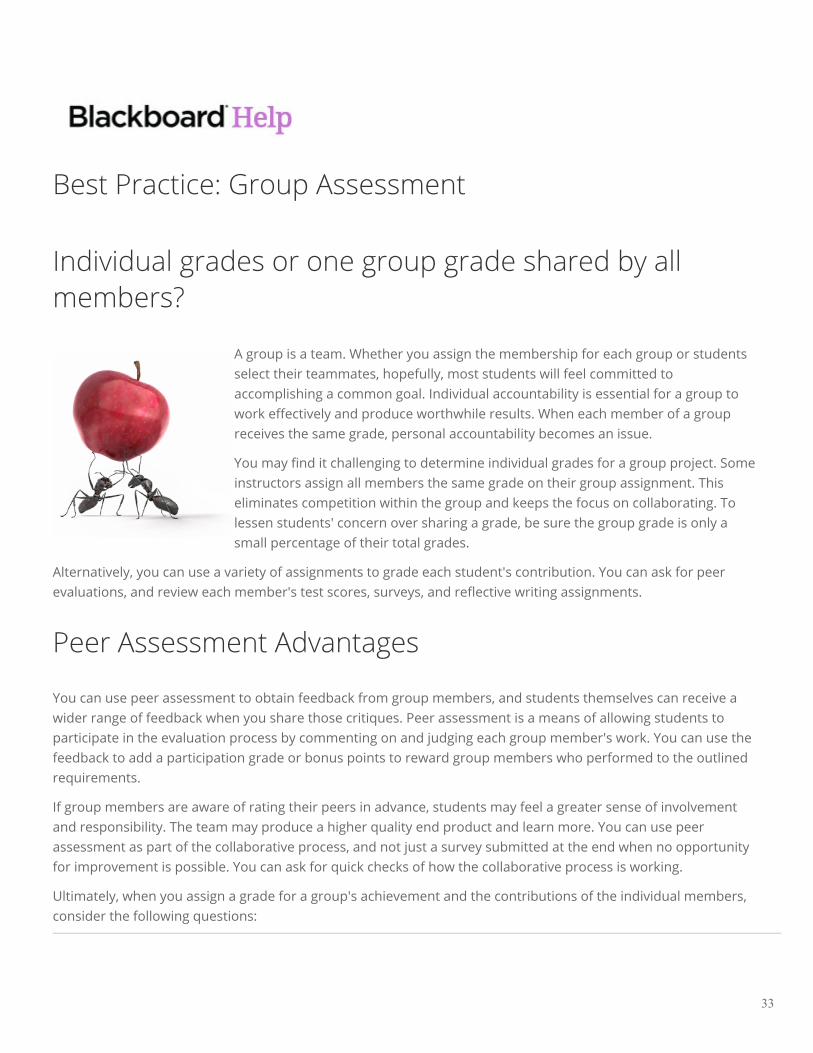
Best Practice: Group Assessment
Individual grades or one group grade shared by allmembers?
A group is a team. Whether you assign the membership for each group or studentsselect their teammates, hopefully, most students will feel committed toaccomplishing a common goal. Individual accountability is essential for a group towork effectively and produce worthwhile results. When each member of a groupreceives the same grade, personal accountability becomes an issue.
You may find it challenging to determine individual grades for a group project. Someinstructors assign all members the same grade on their group assignment. Thiseliminates competition within the group and keeps the focus on collaborating. Tolessen students' concern over sharing a grade, be sure the group grade is only asmall percentage of their total grades.
Alternatively, you can use a variety of assignments to grade each student's contribution. You can ask for peerevaluations, and review each member's test scores, surveys, and reflective writing assignments.
Peer Assessment Advantages
You can use peer assessment to obtain feedback from group members, and students themselves can receive awider range of feedback when you share those critiques. Peer assessment is a means of allowing students toparticipate in the evaluation process by commenting on and judging each group member's work. You can use thefeedback to add a participation grade or bonus points to reward group members who performed to the outlinedrequirements.
If group members are aware of rating their peers in advance, students may feel a greater sense of involvementand responsibility. The team may produce a higher quality end product and learn more. You can use peerassessment as part of the collaborative process, and not just a survey submitted at the end when no opportunityfor improvement is possible. You can ask for quick checks of how the collaborative process is working.
Ultimately, when you assign a grade for a group's achievement and the contributions of the individual members,consider the following questions:
33

• How has the group evaluated its success and each other?
• Does the group deliverable meet the assignment's requirements?
Rubrics and Progress Reports
Provide rubrics, standards, and guidelines before students assess each other's work. Take the time to meetvirtually with each team to discuss team roles, how you expect the team to work together, how often meetingsneed to take place, and how the peer assessment portion affects their final grades.
You can use a simple weekly progress report to help group members stay on track. Include three or four of thefollowing questions:
• Were the week's goals achieved?
• Was enough time spent on the group work?
• Did all members contribute equally?
• Did the members work well together?
• What else could you have contributed to help your team this week?
• What else could others have contributed to help your team this week?
• Who contributed the most or least this week?
• What is one aspect of the team dynamic that you would change?
Another way to assess how students feel about their groups is to ask: What are three positives and one negativeWhat are three positives and one negative
about your group experience this week?about your group experience this week?
To learn more, see Grade Group Assignments and Rubrics.
34


![literaturverzeic h nis - link.springer.com978-3-322-97820-2/1.pdf244 Literaturverzeichnis BALES, R.F./STRODTBECK, F.L. [Group Problem-Solving]: Phases in Group Problem Solving, in:](https://img.pdfslide.net/doc/110x75/5ae39ccf7f8b9a90138dd4b0/literaturverzeic-h-nis-link-978-3-322-97820-21pdf244-literaturverzeichnis-bales.jpg)