Embed Size (px)
Citation preview

1
PB 819
Growing Vegetable Trans plants
in Ten nes see
Agricultural Extension ServiceThe University of Tennessee

2
ContentsIntroduction...................................................................................................................... 3Advantages....................................................................................................................... 3Disadvantages .................................................................................................................. 4Cultivar Selection............................................................................................................. 4Plant-Growing Structures................................................................................................. 5 Greenhouses.................................................................................................................. 5 Site selection and orientation.................................................................................... 5 Heating ..................................................................................................................... 5 Ventilation................................................................................................................. 5 Watering systems for greenhouses............................................................................ 5 Light transmission .................................................................................................... 6 Storage space for greenhouses.................................................................................. 6 Plant fl oat systems: ....................................................................................................... 6 Tray sizes for fl oat beds ............................................................................................ 6 Trays Required per 10,000 Plants ............................................................................ 7 Materials for fl oat beds ............................................................................................. 7 Growing media for fl oat beds ................................................................................... 7 Fertilizing plants grown in fl oat beds ....................................................................... 7 Seeding in fl oat beds................................................................................................. 8 Growth rate from fertilization .................................................................................. 9 Aeration of wa ter ...................................................................................................... 9 Bed protection and heat ............................................................................................ 9 Plant-holding time in fl oat beds.............................................................................. 10 Hardening plants for fi eld setting in the fall ........................................................... 10 Lettuce and mesculin greens .................................................................................. 11Conventional Plant-Growing Practices ......................................................................... 12 Growing containers ................................................................................................ 12 Container size ......................................................................................................... 12Plant trays used for displays .......................................................................................... 13Growing media for containers ....................................................................................... 13 Pre-formulated mixes ............................................................................................. 13 Soil mix .................................................................................................................. 13 Homemade artifi cial media..................................................................................... 13Media sterilization ......................................................................................................... 13 Chemical................................................................................................................. 14 Heat......................................................................................................................... 14Container and structure sterilization .............................................................................. 14Seeding........................................................................................................................... 14 Mechanical seeders..................................................................................................... 15 Hand seeders............................................................................................................... 15Space requirements for transplant production ............................................................... 16Transplanting from seed containers ............................................................................... 16Management practices for growing transplants ............................................................. 16 Damping-off ............................................................................................................... 16 Temperature ................................................................................................................ 18 Day and night temperature management .................................................................... 18 Watering or irrigating.................................................................................................. 19 Light............................................................................................................................ 19 Ventilation................................................................................................................... 19 Fertilization................................................................................................................. 19 Spacing ....................................................................................................................... 20Diagnosing and Correcting Vegetable Trans plant Disorders ......................................... 20Hardening Plants............................................................................................................ 20Summary ........................................................................................................................ 20
3
IntroductionThe production of vegetable plants for com-
mer cial and home use is increasing in Ten nes see. This is partially due to the expansion of green- house fl ower and ornamental production. To meet the demand for home gardeners, growers have grad u al ly added vegetable plants to their spring pro duc tion operation. Growers are fi nding that production of quality plants is a profi table busi ness in urban areas.
Successful vegetable plant production is not a simple practice, because it requires technical knowl- edge of production practices within an enclosed environment, careful planning and man age ment. Com bin ing the required en vi ron men tal con di tions favorable for vegetable plant growth, either in a greenhouse or in a fl oat bed, requires a thorough un- der stand ing of conditions suitable to plant growth. It is the intent of this publication to increase the grower�s knowledge of those re quire ments.
Commercial vegetable growers should grow their own plants to im prove plant and fruit qual-ity, as well as to increase the chances of har vest ing when the supply is low and the price is high. Almost all of the larger tomato producers in East and West Tennessee are now producing many of their own plants. They are doing so because of the advantages involved.
AdvantagesProduction of homegrown plants has several
advantages:1. Growers can more easily control the growing
environment, enabling better sched ul ing of trans- plant ing when it best fi ts soil prep a ra tion and weather conditions. If the soil is too wet or the temperature is cold when plants are ready to set, they can be easily held without losing growth and yields until external en vi ron men tal con di tions improve.
2. Commercial growers can better select the cultivar that best suits their market needs. It is unwise to purchase plants of the fi rst cultivar available if the market demands a specifi c size, shape, quality and color.
3. Home gardeners are better able to assure them- selves of a good-quality plant when it is locally grown in containers rather than pur chas ing bare-root plants.
4. Plants produced by grow ers have a lower risk of disease in fes ta tion. Growers can im ple ment their own practices to control disease and insect pests during the growing pe ri od. In addition, the plant growth rate can be better con trolled through management of the fertility, water and ventilation programs.
5. The ability to choose container size is a distinct advantage for commercial vegetable growers. First, the larger the container (up to a point), the less shock a plant un der goes when transplanted to the fi eld and the greater the mar ket able yields. Second, a plant pro duced in a larger container is usually har vest ed earlier than one grown in a smaller container. This can be a major eco nom ic advantage, depending on the crop being grown and its potential for early sales.
6. Grower-produced plants usually show much less stress than plants shipped bare- root. Re- duc ing stress is a major concern when grow ing veg e ta bles such as broccoli or cau li fl ow er. They should never be stressed during the growing period or during ship ment.
7. The maximum number of plants can be started from expensive seeds (hybrids) because of the better environmental control avail able over seed-ing out-doors. Good emergence reduces the cost of individual seed. For example, tomato seed that costs $230 per 10,000 has an individual seed cost of $0.023 each. How ev er, if the percentage emer-gence drops to 70 percent, the cost of each seed goes to $0.032 each; an increase of 42 per cent, or about $13 per acre for seed.
Growing Vegetable Trans plants in Ten nes see
Alvin D. Rutledge, Professor Emeritus, Extension Plant and Soil Science
4
8. Growers have greater ability to harden the plants before they are transplanted to the fi eld. This usu-ally results in greater plant liv abil i ty in the fi eld and an increase in total yields due to greater plant uni for mi ty and consistency of pro duc tion.
DisadvantagesGrowing transplants has several dis ad van tag es.
First, it requires a lot of knowledge about the con- di tions that infl uence plant growth and how those conditions affect yields and quality once plants have been trans plant ed to the fi eld. Second, total yields can be infl uenced by the man age ment program during the plant growing period. Growers need to know as many of those practices as possible to improve their pro duc -tion and marketing po ten tial. For ex am ple, if a grower desires to increase the number of fruiting clusters on a tomato plant, it can be done through con tain er size se lec tion, the fertility and watering pro gram and the temperature con di tions under which growth occurs. Lower set of the fi rst cluster can be promoted through con tain er size selection, good light, proper wa ter ing and nutrient control.
Thirdly, the costs of the growing structure, containers, heating, ven ti la tion and watering and other op er a tion costs can become quite ex pen sive per plant. However, a growing cost of $0.15 per plant is not very expensive when the potential
return per plant is $5 to $8, but it may be very costly for a plant that can only gross a return of $0.30 each. Growers will have to manage this carefully to keep the per-plant grow ing costs at a level that enables a potential profi t. Finally, it will require a lot of time to properly manage and grow the plants. Plants will have to be pro tect ed during periods of extremely high tem per a ture as well as during periods of low tem per a ture and a possible heat system failure. Thus, it is advisable to have a back-up heating system available should the primary source mal func tion. Water quality used to irrigate the plants should be high to reduce the potential for dis ease con tam i na tion.
Cultivar SelectionSuccessful vegetable pro duc tion requires the
growth of cultivars adapted to Tennessee and that are both desired and competitive within the market channels. Selection of an undesirable cultivar for specifi c mar kets can become an eco nom ic di sas ter for the commercial grower, but it is not a major prob lem for home gar den ers. To aid the com mer -cial grower in selecting cul ti vars, the Ag ri cul tur al Extension Service has available PB 418, “Rec- om mend ed Com mer cial Vegetable Cultivars for Ten nes see.” It is revised and updated every other year, based on research con duct ed in Ten nes see. It
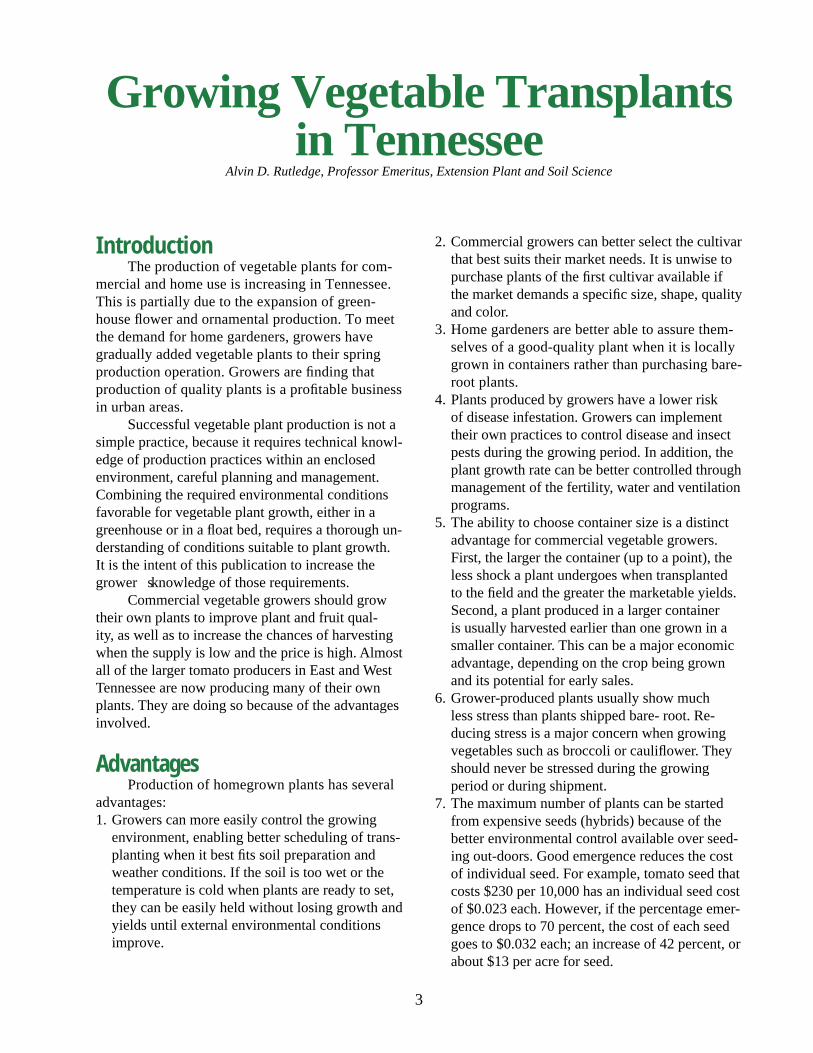
Photo 1. Tomato plants being produced for fi eld transplanting by a commercial grower.

5
pro vides de scrip tive fruit- and dis ease-re sis tant char-acteristics of many of the more com mon cul ti vars available to the Ten nes see grower. Ex ten sion PB 901, “Growing Vegeta-bles in Home Gar dens”, also lists rec om mend ed garden cul ti vars. Both are avail able through your county Ex ten sion offi ce. Refer to them for as sis -tance in se lect ing cul ti vars for Tennessee.
Plant-Growing StructuresGreenhouses:
Plastic or glass green hous es are ideal struc tures for plant pro duc tion. Cur rent ly, almost all greenhouses used for vegetable transplant pro- duc tion in Tennessee are covered with plastic. Plant growth under each type is quite satisfactory, but the initial investment is much greater with glass houses. Fuel costs are 30 to 40 percent less in houses cov-ered with two layers of plastic rather than one, but plastic houses are not as durable as glass. Whether the house is covered with glass or plastic, the main features to consider are the site, adequate heating, ventilation, light transmission, watering facilities and plant bed arrangements to allow convenient and effi cient handling of the plants.
If you desire green house plans, contact your county Extension offi ce and ask for a copy of one of the fol low ing plans:
Plan 795-3: Semi-Permanent GreenhousePlan 6094: Plastic-Covered Greenhouse
Site selection and ori en ta tionLocate greenhouses in sunny areas with good
surface drainage and easy access to high-quality water. Plan for easy access to the house and internal structures. Houses should be oriented north/south to allow max i mum sunlight to reach the plants. The house illustrated in the following photograph is built on a south-facing slope, but it is built to fi t the contour or elevation of the slope. There was no excavation done to level the fl oor of the green house.
Rather, the grow ing platforms were con struct ed in step-like fashion to fi t the existing slope and to provide a level surface for the plants.
HeatingSpecifi c heating and tem per a ture re quire ments
will be discussed with specifi c subjects throughout the publication.
VentilationAdequate ventilation is needed to prevent
excessively high tem per a tures during warm weath er, and to keep the humidity as low as pos si ble to reduce the potential for disease de vel op ment. A fan and louvers with suffi cient capacity to change the air once per minute are necessary. The fan and louvers should be ther mo stat i cal ly con trolled, with both set to open simultaneously. Cool ing fans should be set to start in sequence as the tem per a ture in the green house in creas es. The heating system should be capable of maintaining the air inside the house during cool periods high enough to reduce mois ture con den -sa tion on the ceiling of the green house. Foliage diseases can be re duced by pulling cool, outside air into the house, warming it up so it will pick up moisture and then exchanging it for cool air.
Watering systems for greenhousesSome green house grow ers have be gun us ing
au to mat ic wa ter ing sys tems, while others use hand
Photo 2. Greenhouse built to the slope. Stair-step beds keep plants growing on a level surface.
6
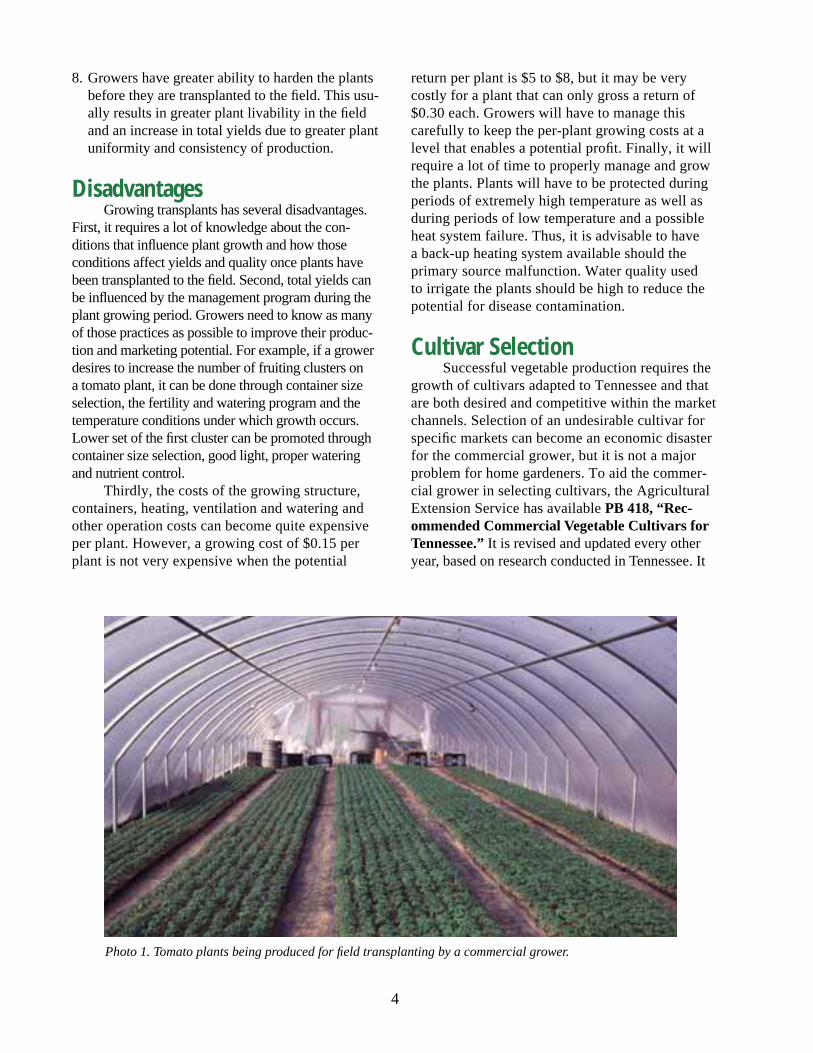
wa ter ing. With au to mat ic systems, mois ture con- di tions are monitored vi su al ly and, when needed, au to mat ic systems are turned on to pro vide mois- ture. Sprinklers are equipped with timers to shut the system down when enough moisture is applied. Some green hous es are equipped with a sprinkler nozzle boom that covers the entire width of the greenhouse. They roll on rails from one end of the house to the other to apply a uniform ap pli ca tion of water over the entire greenhouse, as il lus trat ed in Figure 1. They are usually controlled by tim-ing units to regulate the frequency of water ap- pli ca tion. The speed of move ment along the rails is also con trolled, depending on the amount of water to be needed per application. Always design wa ter ing systems that enable good access to the entire plant beds. The bed design may run either length wise of the greenhouse or the beds may be in peninsular form.
Other methods of watering include the use of hand-watering systems. Hoses equipped with fi ne-mist nozzles with water applied under low pressure are also often used.
Light transmissionVegetable transplants require full sunlight
to develop into strong, stocky plants. Therefore, the covering materials should allow transmission of as much of the total light spectrum as possible. Avoid excessive shade materials in growing veg-etable transplants.
Storage space for greenhousesProvisions for storing containers, necessary
disease and insect control chemicals, growing media and suffi cient work space to accomplish
transplanting should be provided when constructing a greenhouse. This is usually done by construct-ing a “headhouse” in one end of the greenhouse or setting aside an adjacent area for seeding and preparation. Space requirements should include the necessary space for automatic container fi llers and seeders. Individual beds can be constructed on rollers to enable movement of an entire bed for watering and maintenance purposes when work-ing around the plants. Carts can be used to move transplant trays from greenhouses to wagons. Carts should be constructed to enable movement through the greenhouse. Smooth fl oor surfaces may be nec- es sary to move the carts with ease.
Plant fl oat systems:The arrival of the “Float System” in the
tobacco industry offers a new method of growing vegetable transplants. Basically, the “Float System” consists of placing fl oat trays with 242 cells (or less, depending on the crop being grown) per tray on a nutrient-fortifi ed and heated water bed that is covered for protection against the weather and to conserve heat (if spring plants are being grown). The bed can either be constructed inside a green- house or outdoors with the necessary means of pro-viding protection and heat. One major advantage to the fl oat system is that it offers a method of growing fall vegetable plants that Tennessee grow ers have not had prior to its development. Fall plants can be grown under minimally protected outside structures because of the temperature at the time plant grow-ing occurs. This system allows for a very good, uni-form-size transplant to be adequately and quickly produced for fall transplanting. It should provide Tennessee growers a much better opportunity to provide a fall product for the in creas ing fall market opportunities of certain vegetable crops in Tennes-see. Using the fl oat system, a grower does not have to be bothered about daily watering. An illustration of a fl oat bed is provided in Figure 2.
Tray sizes for fl oat bedsFloat trays used in fl oat beds are available in
various cell sizes. They can be purchased in ap- prox i mate ly the following number of cells per tray: 242, 200, 128, 95, 72, 42 and 18. An individual cell of a 242-cell tray is not likely to produce a large enough root ball for most vegetable plants to pro-vide earliness and desired survivability. How ev er, it does appear to be suffi cient for green onions that Figure 1. Automatic greenhouse wa ter ing system.
Rails
Waterboom Bed
Trays

7
do not have to have more than a one-half inch bulb at market time. A 200-cell tray, however, seems to be quite suitable for cabbage, pepper, broccoli, caulifl ower and collards. Tomatoes or the vine crops that require earliness are better adapted to the 42- or 95-cell tray, while lettuce (illustrated in photograph 4) that is to be grown to maturity will require a minimum size of 18 cells per tray. Tray dimensions are approximately 14 by 27 inches.
Trays Required per 10,000 Plants The number of trays required per 10,000
plants is provided in Table 1.
Materials for fl oat bedsConstruction of a fl oat bed requires a level
site. Sides can be made of treated 2" x 6" x 8' lumber, or larger if necessary. Add 2 inches of sand in the bottom of the bed to protect the plastic liners and to assist in leveling the bottom of the bed. For spring production in outdoor beds, 1 inch of Sty-rofoam® insulation is laid in the bottom of the bed and attached to the internal sides. This reduces heat loss from the water into the adjacent soil under-neath, but it may not be necessary for fall plants grown outdoors. Cover the insulation and the inter-nal sides of the bed with two layers of 4 to 6 mil. black plastic. For spring plant production in outdoor beds, add suffi cient water-heating capacity to main-tain the water temperature at 75 degrees. Outdoor beds used for spring plant production will require more than water heaters to develop a good plant in the allotted growing time. The bed used for spring production will require a plastic cover to provide protection from cold temperatures and excessively cool winds. Beds used for pro duc tion of outdoor fall
plants will need to be shaded to keep the germinat-ing seedlings protected from direct contact with the sun. Once germination is complete and seedlings have reached the true leaf stage, they may then be moved into full sunlight.
Growing media for fl oat bedsThe growing media pres ent ly used with tobacco
plants seems to be very suitable for most vegetable plants, as long as the water is fortifi ed with an ap-propriate water-soluble fertilizer. There are several companies sup ply ing growing media used in both tobacco and vegetable transplant production.
Fertilizing plants grown in fl oat bedsThe fertilizer most commonly available in
Tennessee is a water-soluble 20-20-20. However, other suitable water-soluble fer til iz ers are avail- able. Regardless of the fertilizer anal y sis used, base the amount on 100 ppm of N and K as pro- vid ed in Table 2.
Monitor the fertilizer concentration with an electrical conductivity (EC) meter and adjust it in accordance with the draw-down that accompanies evapotranspiration. Some approximate EC readings for peat-lite soil mixtures are provided in Table 3.
The water pH should be in the 6.0 to 6.5 range for good plant root development. Avoid applying too much nitrogen. For tobacco plants, high levels may be desired, but this is not the situation with vegetables. High levels induce the growth of tall, tender plants that do not withstand adverse weather, nor will they be highly productive. It is best for the nitrogen levels to be slightly below the necessary levels than to have excessive levels when growing vegetable plants.
rofderiuqeraeradnasyarT.1elbaT.ezisyartnodesabstnalp000,01
eziSyarT)yartrepsllec(
syarTderiuqeR
deriuqeRaerAdeB)teeferauqs(
81 655 464,1
24 832 726
59 501 672
002 05 231
242 14 801
Figure 2. A 9-tray fl oat bed il lus tra tion. Bed can be expanded to the desired size.
Trays
Plastic Liner
Water Level2 x 8

8
Seeding in fl oat bedsMany tobacco growers use modifi cations of
the “Poor Boy Seeder” (The University of Ten- nes see Agricultural Experiment Station Research Report 94-04, February 1994) to enable seed
passage into the tray when they direct seed into the fl oat tray. It includes a tray holder, a dibble board with a dibble for each cell and two plastic panels for seed alignment. The dibble board fi ts over each fi lled tray to form seed holes and two pieces of 1/16 to 1/8 inch plastic large enough to cover the entire tray and set on top of the tray holder. Each piece of plastic has a hole drilled through that is aligned directly over the center of each cell in the tray. Each piece of plastic is designed so that the lower one can be moved to dis-align the holes through each piece. With the holes unaligned, seeds are spread on the top piece and one seed is allowed to fi ll each hole. The lower piece is then slid into position to enable the holes to align. The seed then falls into the center of the cell directly underneath. This system works well for small-volume growers, but large-volume growers normally use mechanical seeders.
For spring plant production of cabbage, broc-coli, caulifl ower, kale and collards, seeding should be done in late January or early Feb ru ary for a late-March to early-April fi eld transplanting date, depending upon the area of the state where pro duc -tion occurs. For spring tomatoes or peppers, seed-ing should be done in late February or early March for a late-April or early-May transplanting. All of the above crops may be seeded into seed trays and transferred to the fl oat trays at the appropriate stage, or they may be seeded directly into the fl oat trays.
001repderiuqerslairetamrezilitrefdetcelesfosecnuO.2elbaT.muissatopdnanegortinmpp001dnampp05rofretawfosnollag
lairetaMrezilitreFretawfosnollag001rep.szO
KdnaNmpp05 KdnaNmpp001
+etartinmuinommAetartinmuissatoP
5.10.2
0.30.4
+etartinmuidoSetartinmuissatoP
7.20.2
3.50.4
+etartinmuiclaCetartinmuissatoP
7.20.2
3.50.4
+aerUetartinmuissatoP
0.10.2
0.20.4
21-21-21 52.5 5.01
51-51-51,51-0-51 52.4 5.8
02-01-02,02-02-02 02.3 3.6
ytivitcudnoClacirtcelE.3elbaT.sexiMetil-taePni
gnidaeRCE stnemmoC snoitaterpretnI
+5.3 evissecxEebyamstnalP
.detnutsylereves
5.3ot52.2 hgihyreV
worgyamstnalPegnartub,yletauqeda,enozregnadraensi
.seirdliosfiyllaicepse
57.1ot62.1 hgiH
rofyrotcafsitaS.stnalpdehsilbatserofhgihootebyaM
.sgnildees
52.1ot15.0 muideM
rofyrotcafsitaS.htworgtnalplareneg
rofegnartnellecxEnoitazilitreftnatsnoc
.margorp
05.0ot0.0 woL
onseodCEwoLyamtub,mrah
tneirtunwoletacidni.noitartnecnoc

9
For the vine crops (cantaloupes, cucumbers, squash or wa ter mel ons) seed them directly in the larger size cells (18 to 24) in early-April for fi eld transplanting three to four weeks later. Vine crops, however, must have warm water temperature in the root zone or their growth will remain stunted throughout the grow-ing season. The vine crops must be seeded directly into the fl oat tray because the young seedlings do not normally survive when trans plant ed from one tray to another.
For fall production, start cabbage, cau li fl ow er, broccoli and collards no later than July 15 to follow behind tobacco. Kale, on the other hand, can be started about two weeks later because it is a shorter-maturing crop. If fi elds are avail- able, they can be transplanted during the last half of August, which usually allows enough time to mature. All of these crops, except kale, must be in the fi eld by August 20 to provide suffi cient time for them to mature before freezing weather occurs. The ma tu ri ty will depend on the variety selected. A long-maturing variety will need to be planted before August 20, while a short-maturing variety will need to be used at that time.
When direct seeding into fl oat trays, fi ll the cells with moist media and fi rm it down. Use a roll-ing dibble, if available, and make a depression about twice the diameter of the seed in the top of the media, insert the seed and cover with media. The trays can then be moistened and stacked for three or four days until seeds begin to emerge, or they may be im me -di ate ly placed on the water bed. How ev er, growers may fi nd that moistening the media and stack ing the tray for three or four days in a warm area may in-crease the percentage of seed emergence. Im me di ate fl oating could result in water saturation around the seed and impede germination, especially if the water is not at the proper tem per a ture.
Growth rate from fertilizationWhen plants receive more than the levels
of fertilizer indicated in Table 2 per-100 gallons of water, their growth rate may become too rapid, resulting in spindly plants with a low sur viv abil i ty rate. For example, one pound of 20-20-20 water
soluble fertilizer per 100 gallons of water pro duced 19-inch tomato plants in fi ve weeks when grown in the summer under protected beds. That level appears to be toxic to cabbage plants grown under the same conditions. In an on-farm dem on stra tion with green onions, the 8-ounce level appeared to stimulate too-rapid growth, resulting in onion tops that tended to fall over before harvesting occurred. Local whole sal ers turned them down because of this problem.
Aer a tion of wa terResearch and on-farm dem on stra tions on
con stant aer a tion of the wa ter un der neath the trays has produced mixed results. David Coffey aerated cabbage plants being grown for fall production in out-door beds in 1998 at the Plant Science Farm in Knoxville and observed that transplant growth was much faster and harvest was earlier than from plants grown under non-aerated conditions. Jim Wyatt, working with tomatoes at West Tennessee in Jack-son, did not observe added growth from aeration. On-farm demonstrations with tomatoes in Cocke County did not indicate a greater rate of growth than those under non-aerated con di tions.
Bed protection and heatWhether for spring or fall production, beds
should be protected from severe weather conditions.
Fig ure 3. Com po nents of a “poor boy” seeder.
“A” is a seeding tray.“B” is a dibble board with dibbles spaced to align with each cell of the seeding tray. B is placed upside down over A to form holes in the seeding media.“C” is the seeder and the bottom is placed over A. Two strips of plastic (one over the other) have holes suitable for the specifi c seed size drilled to align with each cell of the seeding tray. Each hole in the top sheet is fi lled with a seed and the lower sheet moved into position so that both holes are aligned so the seed will fall through to the cell underneath.
A B C
DibblesTwo plastic strips withholes for seeding
Bottom
10
Cold temperatures will be a problem in the early spring, while hot weather will be a problem for fall production. Spring beds will require supplemental heat. If a greenhouse is used, it should provide suffi -cient heat. If outdoor beds are used, there should be a protective cover over the plants and a heat source both above them and in the water to keep plants growing.
For fall production, an outdoor bed covered with a shade cloth such as tobacco canvas and well ventilated while the plants are emerging and are in the young, seedling stage will provide the necessary protection. This will keep them from being killed or severely damaged from direct exposure to the sun and high temperatures.
Plant-holding time in fl oat bedsUnder Tennessee conditions, the research sta-
tion as well as some local, on-farm cooperators have been unable to hold plants in the fl oat system more than about six weeks with broccoli, cabbage and tomatoes. Green onions have remained longer before root decay and root tissue damage occurs. Usually, a large amount of roots will form in the water below the tray and root tissue will slough off after about six
weeks in the water unless the water is aerated. This will begin to result in plant death in the bed and slow recovery once transplanting to the fi eld occurs. When a large root system occurs in the water and plants have to be removed from the cells, roots are re moved during plant removal from the trays.
Hardening plants for fi eld setting in the fallWhen vegetables are transplanted to the
fi eld in the fall, they are usually set at a time when rainfall is lacking and the tem per a ture is high. This is very injurious to young unhardened vegetable plants. To improve plant livability in the fi eld under such conditions, remove the plants from the fl oat beds about 10 days prior to fi eld transplanting and provide them with only enough moisture to keep them in good shape, but allow them to wilt slightly before applying water. This will harden the plants and enable them to better withstand the higher tem-peratures and lower moisture conditions likely to occur at the time of transplanting and for a few days thereafter. During the July or August tem per a tures, it may require at least one or two mistings per day to the plants to provide good plant livability during the hardening process.
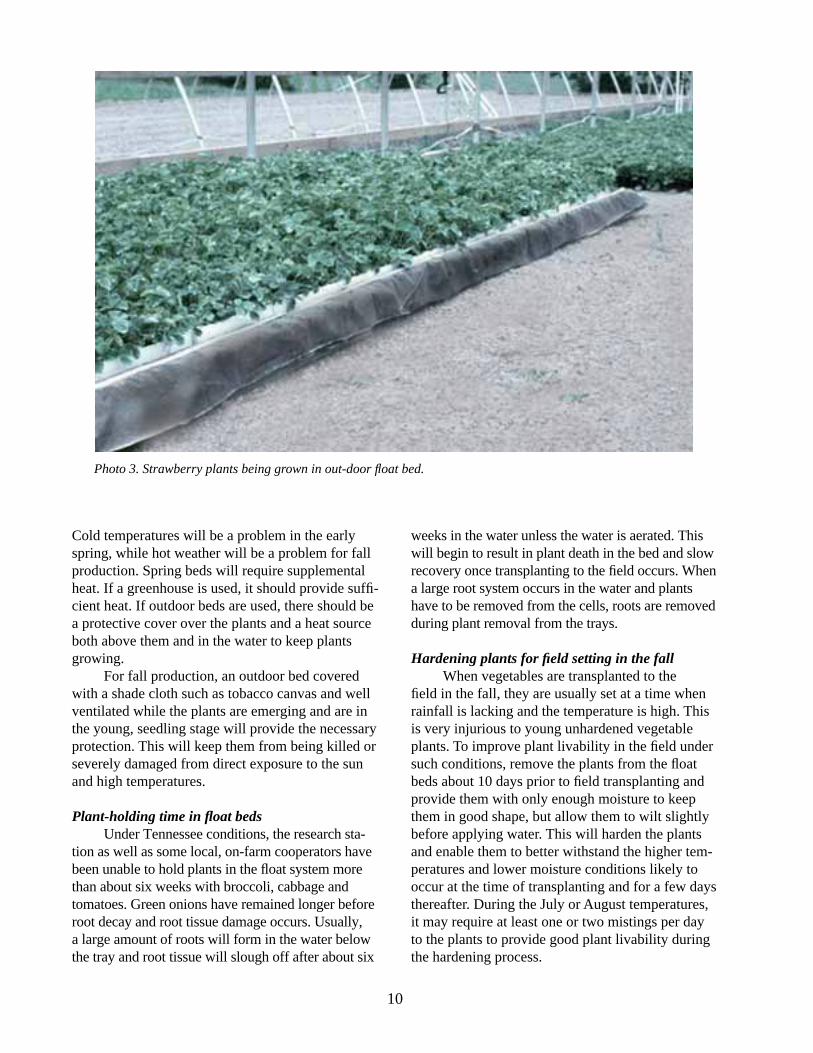
Photo 3. Strawberry plants being grown in out-door fl oat bed.
11
Lettuce and mesculin greensVery good-quality, but small-size, bibb-type
lettuce such as Buttercrunch or Oak Leaf can be grown in the 18-cell trays. Due to a greater light intensity, yields of a spring crop will be about 25 percent greater than a fall crop grown in the same house. In the Knoxville area, consumers have shown a preference for the above two va ri et ies. In 1996, a research trial that evaluated several vari-eties was conducted at the Plant Science Unit in Knox ville. From this trial, four va ri et ies per formed quite well. The best-performing looseleaf types were Simpson Elite and New Red Fire. Of the Bibb types, Ermosa and Summer Bibb were the bet-ter per form ers eval u at ed. If the con sum er accepts the smaller plants, then growth can occur from seed to mar ket able plants in about six weeks in the spring, but it will require a little longer in the fall. Re search ex pe ri ence to date indicates that lettuce taken directly off the fl oat beds will wilt too rapidly for good sales. There fore, a con di tion ing process of with draw ing the water should begin seven to 10 days before going to the market to allow the plant to develop stronger stalks and leaves so water loss after harvest is less of a prob lem.
Efforts have been made to grow and mar-ket fl oat bed lettuce on 3/4- to 1-inch thick 4' x 8' Styrofoam® in su la tion sheets that fl oat directly on the water. The 4' x 8' sheets are cut into 2' x 2' squares and 5/8" di-ameter holes are punched into the sheets with a round, thin, sharp in stru ment such as an alu mi num or copper tube. The hole is then stuffed with cotton balls and lettuce seed placed directly on the cotton and allowed to ger mi nate and grow as it fl oats on the water. Vari-ous fresh market outlets have ex hib it ed interest in displaying the entire 2' x 2' sheet with fresh lettuce on the grocery shelf. The plants can be removed from the in su la tion sheets by lifting them through the hole or by cutting them off and placing them inside a plastic wrap-per for transport to market.
This system of lettuce produc-tion appears to have some commercial appeal. Lettuce can be grown in a very confi ned area. It appears that several crops of lettuce can be grown in one year. The crop has the potential to be
supplied directly to market outlets in a very fresh state and it is less likely to be contaminated from soil splattering on the foliage or head. However, there is a potential for the bed to become contami-nated with diseases if the plastic is not changed or rinsed with a sterilizing solution between crops. Before at tempt ing to use the system to grow crops such as lettuce, a grower must study the market op por tu ni ties before in vest ing heavily. The product produced looks very good, but it may not always fi t into the existing marketing channels because of the pack ag ing problems and consumer desirability. Packaging will need to be worked out by the grower to keep the product fresh, be convenient for the buyer and remain at trac tive to the consumer.
Allen Straw, at the Plateau Ex per i ment Sta- tion, has been working dil i gent ly with mesculin green production in fl oat beds for the past few years. Some interesting observations that he has made follow:1. Todd Planter fl ats were acceptable con tain ers,
but when the seeds were broadcast over the tray, they tended to bounce away from the cell walls, re sult ing in a thick planting at the center of the cell. To reduce this problem, trays without cell dividers are needed to improve uniformity of plant distribution in the cell.
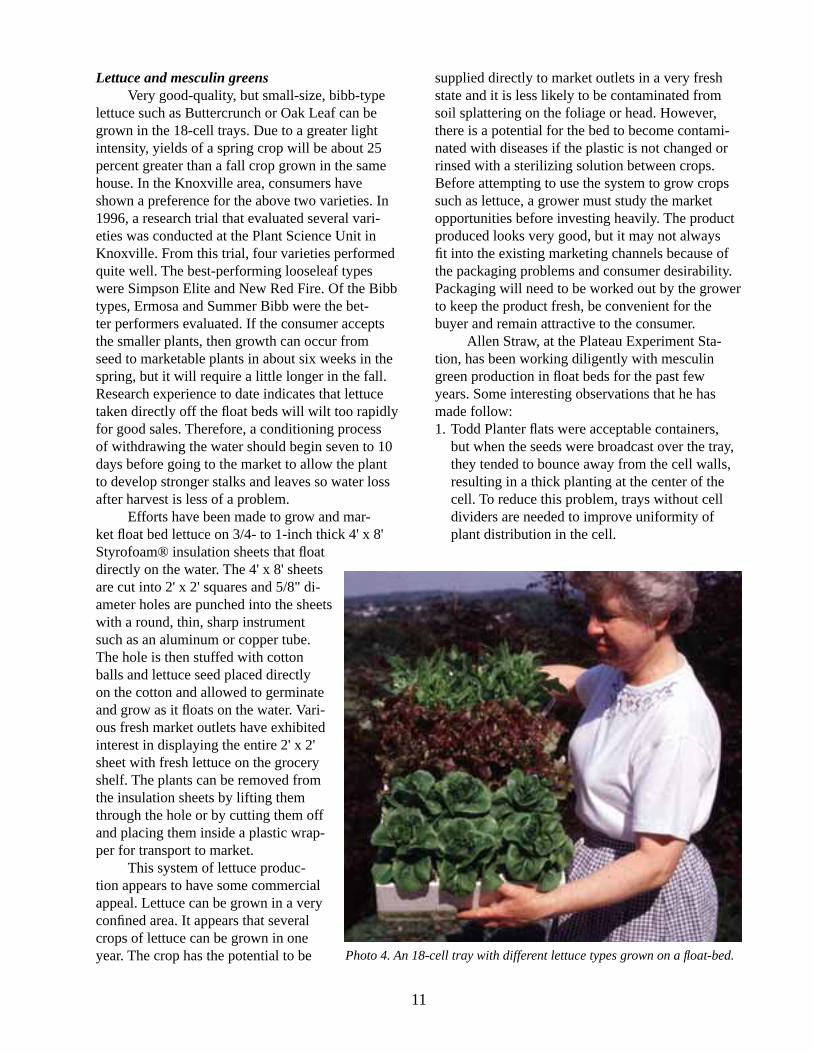
Photo 4. An 18-cell tray with different lettuce types grown on a fl oat-bed.

12
2. Wholesale market personnel have indicated that mesculin mixes from indoor plantings seem too coarse-textured and light-colored for best market sales. Color and market texture appear to be more desirable when grown in outdoor beds.
3. Germination was not as uniform in the outdoor bed as it was in the indoor bed. Cool, wet weath- er prevented rapid, uniform ger mi na tion and delayed maturity.
4. Yields were lower from the outdoor bed than from the indoor bed.
5. Lettuce seems to regrow faster when har vest ing is done with a knife rather than with scissors. Scissors tend to crush the plant stem, resulting in injury and delayed growth.
One pick-your-own strawberry grower in East Tennessee used this method to produce fresh lettuce for sale while the customers purchase strawberries on the farm. Using this system in creas es the po ten -tial to add certain fresh vegetable products during on-farm sales of strawberries.
A disadvantage to fl oat bed lettuce pro duc tion is that there are no fungicides, bactericides or insecticides available if a fungus, bacteria or insect problem arises. The advantages, however, are that the product can be produced without becoming contaminated with soil particles. In addition, it can be sold with the roots attached and does not lose its fresh appearance.
Conventional Plant-Growing Practices
Growing containers:Fibrous, plastic or polystyrene containers
are commonly used for growing transplants. They provide for excellent drainage and air movement. If degradable fi brous containers are used, the entire container can be planted with a minimum of root disturbance. If polystyrene or plastic con tain ers are used, plants must be removed before planting in the fi eld. The roots must be thoroughly wet be-fore transplanting and they must be covered with a minimum of one inch of soil after trans plant ing. The advantages and disadvantages of some of the more common growing containers are provided in Table 4.
Container size:Research in Tennessee has shown that tomato
plants develop better root systems and produce earlier yields if the container size is a minimum of 2 1/4 inches in diameter. Large container size is es pe -cial ly benefi cial for early tomato yields, (photo 5) but is not as important for late yields.
With other crops such as broccoli, cabbage, caulifl ower or pepper, the large container size is not as important as with tomatoes. The size most
.sreniatnocgniworgtnalpnommocfosegatnavdasiddnasegatnavdA.4elbaT
reniatnoC segatnavdA segatnavdasiD
kcolbrebiF .eldnahotysaesI .ylwolsetartenepyamstooR
yartrebiF .ecapsfoesumumixamsedivorP .tewnehweldnahottluciffiD
telleptaepelgniS .noitaraperpaidemonseriuqeR.egarotsrofecapssselsesU
noitaraperptagnildnahlaudividniseriuqeR.elbaliavasezisdetimiL.emit
toptaepelgniS noitarteneptoordoogsedivorPysaE.tsiomtpekfisllawedishguorht
nielbaliavA.dleifehtnieldnahot.sezisegral
tfelfiylisaetuoseirD.tluciffidsinoitarapeStoorfotuoerutsiomkciwnaC.derevocnu
.derevocnutfelfisenoz
stoptaeppirtS finoitarteneptoordoogsedivorP.sezisegralnielbaliavA.tsiomtpek
.llifdnaeraperpotemitsseL
asatcanaC.dleifehtnietarapesotwolS.yrdotdewollafikciw
tinuhtiwtalfcitsalP htiwelbasueR.eldnahotysaE.noitazilirets
gnirudegarotsseriuqeR.detimilebyamseziS.nosaesgniworg-non
13
commonly used with these crops is 1 1/4 to 1 1/2 inches in diameter, because they produce a large enough root ball for good livability at transplanting, and growth and maturity are early enough to meet market demands. In addition, they are also easily transplanted with conventional transplanters.
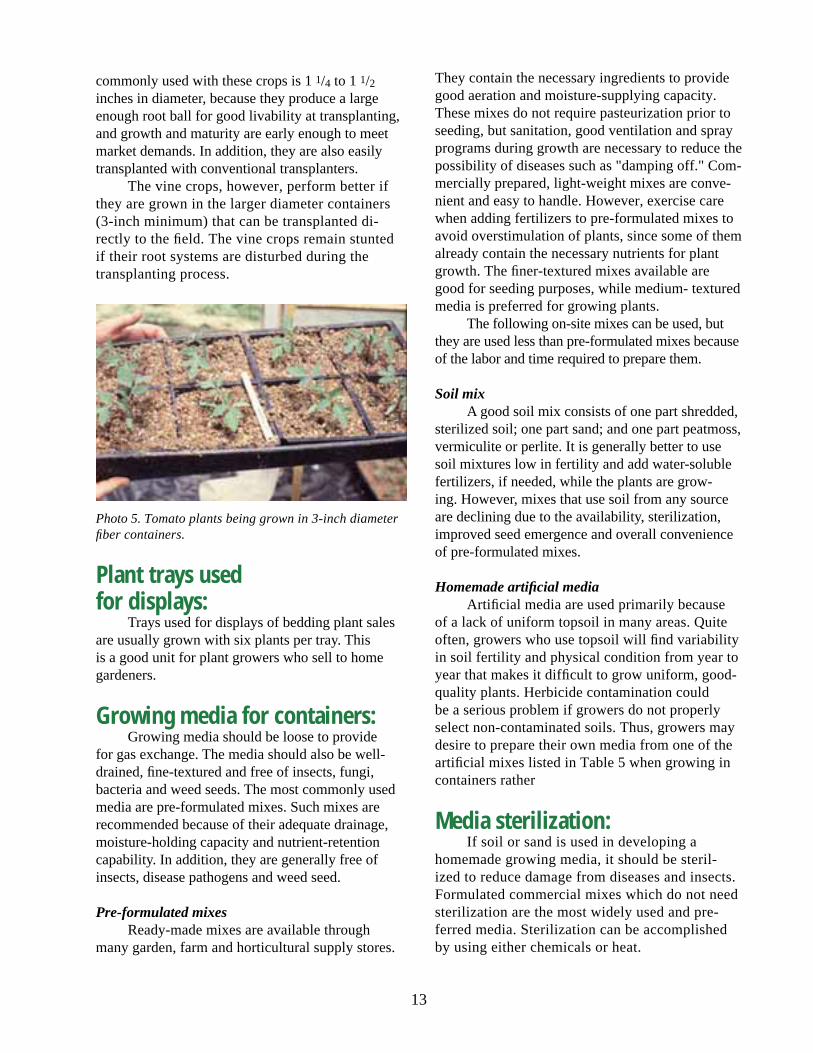
The vine crops, however, perform better if they are grown in the larger diameter containers (3-inch minimum) that can be transplanted di-rectly to the fi eld. The vine crops remain stunted if their root systems are disturbed during the transplanting process.
Photo 5. Tomato plants being grown in 3-inch diameter fi ber con tain ers.
Plant trays used for displays:
Trays used for displays of bedding plant sales are usually grown with six plants per tray. This is a good unit for plant growers who sell to home gar den ers.
Growing media for containers:Growing media should be loose to provide
for gas exchange. The media should also be well-drained, fi ne-textured and free of insects, fungi, bacteria and weed seeds. The most commonly used media are pre-formulated mixes. Such mixes are recommended because of their adequate drainage, moisture-holding capacity and nutrient-retention capability. In addition, they are generally free of insects, disease pathogens and weed seed.
Pre-formulated mixesReady-made mixes are available through
many garden, farm and horticultural supply stores.
They contain the necessary ingredients to provide good aeration and moisture-supplying capacity. These mixes do not require pasteurization prior to seeding, but sanitation, good ventilation and spray programs during growth are necessary to reduce the possibility of diseases such as "damping off." Com-mercially prepared, light-weight mixes are conve-nient and easy to handle. However, exercise care when adding fertilizers to pre-formulated mixes to avoid overstimulation of plants, since some of them already contain the necessary nu tri ents for plant growth. The fi ner-textured mixes available are good for seeding purposes, while medium- textured media is preferred for growing plants.
The following on-site mixes can be used, but they are used less than pre-formulated mixes because of the labor and time required to prepare them.
Soil mixA good soil mix consists of one part shred ded,
sterilized soil; one part sand; and one part peatmoss, vermiculite or perlite. It is generally better to use soil mixtures low in fertility and add water-soluble fertilizers, if needed, while the plants are grow-ing. However, mixes that use soil from any source are declining due to the availability, ster il iza tion, improved seed emergence and overall con ve nience of pre-formulated mixes.
Homemade artifi cial mediaArtifi cial media are used primarily because
of a lack of uniform topsoil in many areas. Quite often, growers who use topsoil will fi nd variability in soil fertility and physical condition from year to year that makes it diffi cult to grow uniform, good-quality plants. Herbicide contamination could be a serious problem if growers do not properly select non-contaminated soils. Thus, growers may desire to prepare their own media from one of the ar ti fi cial mixes listed in Table 5 when growing in containers rather
Media sterilization:If soil or sand is used in developing a
home made growing media, it should be steril-ized to reduce damage from diseases and insects. For mu lat ed commercial mixes which do not need ster il iza tion are the most widely used and pre- ferred media. Ster il iza tion can be ac com plished by using either chem i cals or heat.
14
ChemicalMethyl bromide/chloropicrin mixtures are
used for sterilizing plant beds or soil mixes in a bench-bed, but their use in greenhouse production is decreasing due to the availability of commercially prepared, sterile mixes. It can be applied at two pounds active material per 100 square feet. It should be released into shallow pans distributed at 30-foot intervals underneath a plastic fi lm well-sealed at the edges to prevent escape of the gases. Methyl bro-mide is toxic to humans. Therefore, it should not be allowed to leak from under the plastic. Ven ti la tors should be turned on during treatment to dis si pate any escaping gas. Chloropicrin is tear gas, but it also has some pathogenic effects on certain diseases and, if smelled, signifi es the presence of methyl bromide.
Methyl bromide fumigants are more effec-tive if the soil is loose and friable, moist and with a temperature of 55F or above to a depth of 6 inches when application is made. If the temperature is 60F or above, the plastic can be removed after 24 hours. If it is below 55F, plastic should remain over the medium for at least 48 hours. After the fi lm is removed, stir the medium and wait at least fi ve days before seeding.
HeatSteam or dry heat can also be used for ster-
il iz ing the growing medium in greenhouses or fl oatbeds, but it is less effi cient than other methods. It is laborious, time-consuming and is decreasing in use for veg e ta ble plant production in Tennessee.
Com mer cial growers can use steam heat for large volumes of mixes. The center of the medium should be raised to 160F and held for 30 minutes. Home gardeners who will be using only small quantities of a mix can sterilize by placing the medium into an oven not commonly used for cooking and main- tain ing the tem per a ture con di tions given above.
Container and structure sterilization:
Reusable plastic or polystyrene containers, tools and structures should be sterilized before reusing. This may be accomplished by dipping or spraying with a solution of one pound of cop-per sulfate per 25 gallons of water or a 10 percent solution of commercial bleach. If any of the above are used, rinse thoroughly and allow them to aerate two or three days before seeding or transplanting. When rinsing and aeration are not practiced, seeds and young plants are likely to be severely injured or killed.
SeedingThe best place to begin vegetable plant
production is by purchasing good seed. New seeds have a high germination percentage. Since the price of seed is only about 5 percent of the total cost of growing plants, only the best seed should be used to insure a good return on the investment. Good plants cannot be grown from poor seed. For specifi c seed-ing details, refer to Tables 6 and 7.
.seximlaicifitrafoselpmaxE.5elbaT
1.oN 2.oN
lairetaM dy/tnuomA 3 lairetaM dy/tnuomA 3
taepmunhgapS .ub11 ssomtaepdedderhS .ub11
etilucimreV .ub11 etilreproetilucimrev2.oN .ub11
enotsemildnuorG .sbl5 enotsemilcitimoloddnuorG .sbl2
)0-64-0(etahpsohprepuS .bl1ot2/1 )0-64-0(etahpsohprepuS .zo4
etartinmuissatopromuiclaC .bl1 rezilitref21-21-6 .sbl5
stnemeleroniM 1 tnegagnitteW)tnegreteD( 2 retawfo.lag/.zo3
tnegagnitteW)tnegreteD( 2 retawfo.lag/.zo3
.snoitcerids’rerutcafunamehthtiwecnadroccaniximtnemeleronimelbulos-retawaddA.1.gniximerofebyarpsdnataepdaerpS.2

15
Mechanical seedersWhen large numbers of trays are to be seeded
quickly, mechanical seeders are available to both fi ll the tray or cells with pre-moistened media as they pass continuously on a conveyor underneath a bin shute fi lled with growing media. Excess media is removed to fi ll the tray or cell level full. The tray is also rolled under an automatic rolling dibbler which forms media depressions into which the seed is inserted. Dibbles of the proper spacing and depth are made as needed in each tray, seed are dropped into the dibble and covered with a slight layer of a low density material such as perlite to improve seed emergence. Almost all large scale plant producers now seed directly into the container they intend to use to grow the plants rather than planning to do hand transplanting after plants reach the appropriate height. A basic illustration is provided in Figure 4.
Hand seedersIf seeding is to be done in trays with plans to
transplant the seedlings to growing cells after emer- gence, then the following procedure can be used.
First, fi ll the seeding container to within about 1/2 inch of the top and moisten it if the medium is dry. Next, add moisture before seeding to avoid fl oating the seed out of the media. Provide adequate drain-age in the seeding tray. Level and gently fi rm the planting medium with a small, clean board. With a
large wooden label, self-made dibble board or other suitable instrument, make rows of the desired depth about 1 to 2 inches apart in the tray (see Figure 5).
Plant only one kind of seed per row, label and date for identifi cation purposes. Sow the seed uniformly in the rows at a depth about twice the diameter of the seed. For those crops that transplant well, such as tomatoes, pepper, cabbage, broccoli or caulifl ower, allow them to reach the desired size and then transplant them to individual growing contain-ers and cells. After transplanting, allow fi ve to seven weeks to grow the plants (see Table 6).
Since they will not transplant well, vining veg-etables such as cucumbers, cantaloupes, pump kins, watermelons and squash should be seeded directly into fi brous containers that can be set in the fi eld. Seed these crops two to three weeks ahead of fi eld planting dates.
Figure 4. Illustration of mechanical seeder required for a large number of trays
Direction of Travel
Bin
Growing media
TrayDibbler SeederConveyor
Figure 5. Seeding tray for conventional plant production techniques.
Dibble boardwith row dibbles
Seed tray withartificial growing media
16
Cover the seed with sterilized sand, ver- mic u lite or shredded peat moss. Moisten the surface with a fi ne mist. Cover the container with glass, news pa per or clear plastic and place the seed at the desired temperature for germination (see Table 6). When the young seedlings have emerged, uncover the con tain er to prevent damage to them and keep at the desired temperature for growth. Do not delay uncovering the young seedlings since they are likely to be damaged.
Space requirements for transplant production:
The approximate spaces required for grow-ing the number of plants required per acre based on population per acre and container sizes are sum ma -rized in Table 7.
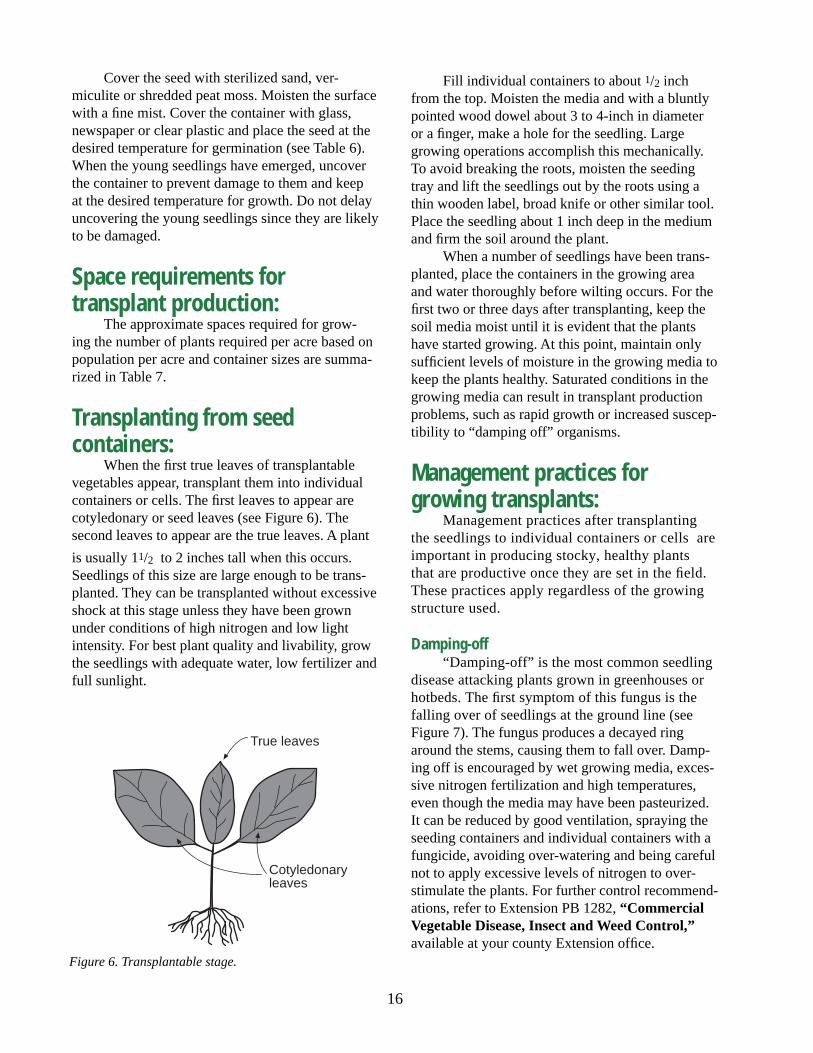
Transplanting from seed containers:
When the fi rst true leaves of transplantable vegetables appear, transplant them into individual containers or cells. The fi rst leaves to appear are cotyledonary or seed leaves (see Figure 6). The second leaves to appear are the true leaves. A plant
is usually 11/2 to 2 inches tall when this occurs. Seedlings of this size are large enough to be trans- plant ed. They can be transplanted without excessive shock at this stage unless they have been grown under conditions of high nitrogen and low light intensity. For best plant quality and livability, grow the seedlings with adequate water, low fertilizer and full sunlight.
Fill individual containers to about 1/2 inch from the top. Moisten the media and with a bluntly pointed wood dowel about 3 to 4-inch in diameter or a fi nger, make a hole for the seedling. Large growing operations accomplish this mechanically. To avoid breaking the roots, moisten the seeding tray and lift the seedlings out by the roots using a thin wood en la bel, broad knife or oth er sim i lar tool. Place the seed ling about 1 inch deep in the medium and fi rm the soil around the plant.
When a number of seedlings have been trans- plant ed, place the containers in the growing area and water thoroughly before wilting occurs. For the fi rst two or three days after transplanting, keep the soil media moist until it is evident that the plants have started growing. At this point, maintain only suf fi cient levels of moisture in the growing media to keep the plants healthy. Saturated con di tions in the grow ing media can result in transplant production prob lems, such as rapid growth or increased sus cep -ti bil i ty to “damping off” organisms.
Management practices for growing trans plants:
Management practices after transplanting the seedlings to individual containers or cells are im por tant in producing stocky, healthy plants that are productive once they are set in the fi eld. These practices apply regardless of the growing structure used.
Damping-off“Damping-off” is the most common seed ling
disease attacking plants grown in greenhouses or hotbeds. The fi rst symptom of this fungus is the falling over of seedlings at the ground line (see Figure 7). The fungus produces a decayed ring around the stems, causing them to fall over. Damp-ing off is en cour aged by wet growing media, exces-sive nitrogen fertilization and high tem per a tures, even though the media may have been pasteurized. It can be reduced by good ventilation, spraying the seeding containers and individual containers with a fun gi cide, avoiding over-wa ter ing and being careful not to apply excessive levels of nitrogen to over-stimulate the plants. For further control rec om men d-a tions, refer to Extension PB 1282, “Com mer cial Vegetable Disease, Insect and Weed Control,” available at your county Ex ten sion offi ce.
True leaves
Cotyledonaryleaves
Figure 6. Transplantable stage.
17
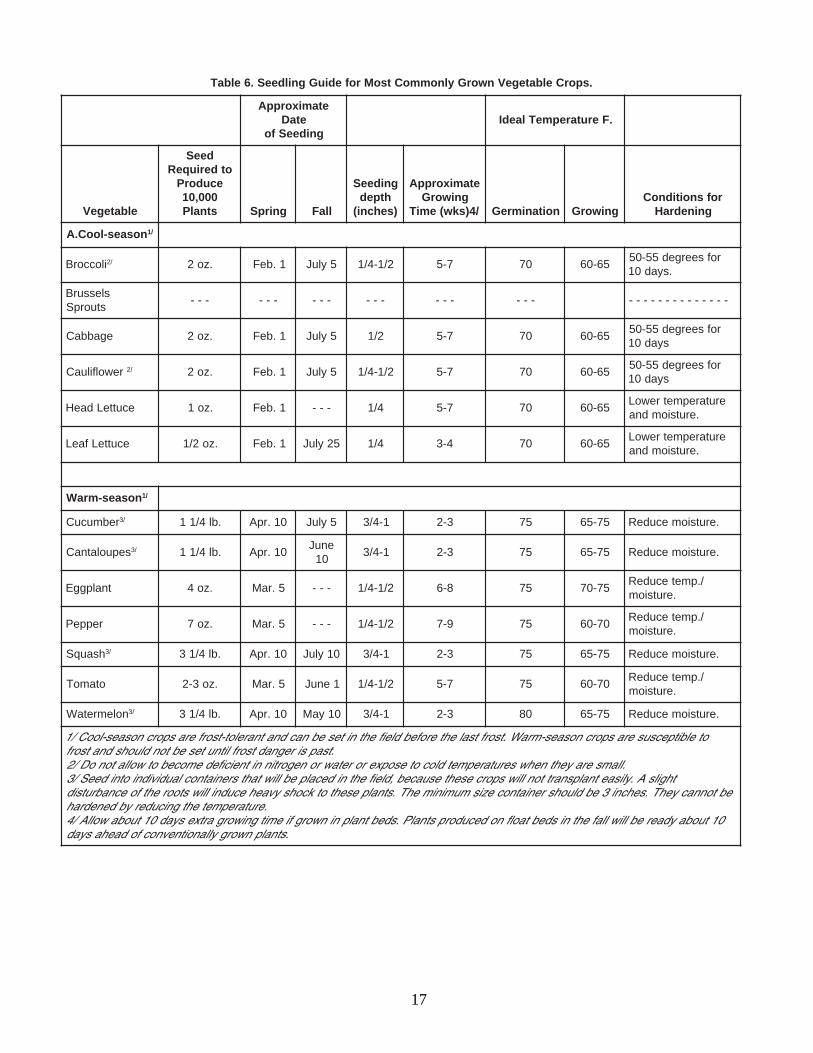
.sporCelbategeVnworGylnommoCtsoMrofediuGgnildeeS.6elbaT
etamixorppAetaD
gnideeSfo.FerutarepmeTlaedI
elbategeV
deeSotderiuqeR
ecudorP000,01stnalP gnirpS llaF
gnideeShtped
)sehcni(
etamixorppAgniworG
/4)skw(emiT noitanimreG gniworGrofsnoitidnoC
gninedraH
nosaes-looC.A /1
iloccorB /2 .zo2 1.beF 5yluJ 2/1-4/1 7-5 07 56-06rofseerged55-05
.syad01
slessurBstuorpS
--- --- --- --- --- --- --------------
egabbaC .zo2 1.beF 5yluJ 2/1 7-5 07 56-06rofseerged55-05
syad01
rewolfiluaC /2 .zo2 1.beF 5yluJ 2/1-4/1 7-5 07 56-06rofseerged55-05
syad01
ecutteLdaeH .zo1 1.beF --- 4/1 7-5 07 56-06erutarepmetrewoL
.erutsiomdna
ecutteLfaeL .zo2/1 1.beF 52yluJ 4/1 4-3 07 56-06erutarepmetrewoL
.erutsiomdna
nosaes-mraW /1
rebmucuC /3 .bl4/11 01.rpA 5yluJ 1-4/3 3-2 57 57-56 .erutsiomecudeR
sepuolatnaC /3 .bl4/11 01.rpAenuJ
011-4/3 3-2 57 57-56 .erutsiomecudeR
tnalpggE .zo4 5.raM --- 2/1-4/1 8-6 57 57-07/.pmetecudeR
.erutsiom
reppeP .zo7 5.raM --- 2/1-4/1 9-7 57 07-06/.pmetecudeR
.erutsiom
hsauqS /3 .bl4/13 01.rpA 01yluJ 1-4/3 3-2 57 57-56 .erutsiomecudeR
otamoT .zo3-2 5.raM 1enuJ 2/1-4/1 7-5 57 07-06/.pmetecudeR
.erutsiom
nolemretaW /3 .bl4/13 01.rpA 01yaM 1-4/3 3-2 08 57-56 .erutsiomecudeR
otelbitpecsuserasporcnosaes-mraW.tsorftsalehterofebdleifehtnitesebnacdnatnarelot-tsorferasporcnosaes-looC/1.tsapsiregnadtsorflitnutesebtondluohsdnatsorf
.llamserayehtnehwserutarepmetdlocotesopxeroretawronegortinnitneicifedemocebotwollatonoD/2thgilsA.ylisaetnalpsnarttonlliwsporcesehtesuaceb,dleifehtnidecalpeblliwtahtsreniatnoclaudividniotnideeS/3
ebtonnacyehT.sehcni3ebdluohsreniatnocezismuminimehT.stnalpesehtotkcohsyvaehecudnilliwstoorehtfoecnabrutsid.erutarepmetehtgnicuderybdenedrah
01tuobaydaereblliwllafehtnisdebtaolfnodecudorpstnalP.sdebtnalpninworgfiemitgniworgartxesyad01tuobawollA/4.stnalpnworgyllanoitnevnocfodaehasyad

18
Good ventilation and low humidity are very important in reducing the incidence of damping-off. Keep air moving through the growing area con tin u- ous ly during bright, shiny days.
TemperatureBetter-quality, more productive plants are
produced when the night temperature is about 10 degrees lower than the day temperature. The more experienced plant growers understand the im por -tance of keeping the growing temperatures as close to the ideal as possible. Unfortunately, many grow-
ers want to keep the greenhouse too hot during the plant-growing phase. Ideal growing tem per a tures are given in Table 6.
Temperatures should be maintained within a fi ve-degree range of those given in Table 6. If tem-peratures are too low, growth is slow and some pur-pling of the leaf veins occurs with many veg e ta ble species. This is a good visual symptom that plants are being hardened, which is a good practice for early transplants. A purple color may also signify that phosphate levels or uptake are low and may require an adjustment. When the temperature is too high, growth is soft, resulting in tall, tender unpro-ductive plants. Soft, tender and elongated plants are susceptible to injury by wind and hot, dry weather after transplanting to the fi eld. Plants with green veins are usually tender and respond un fa vor ably when exposed to adverse weather. They must be hardened before trans plant ing to the fi eld.
Day and night temperature managementThe differences between the day and night
temperatures (DIF) can also be used to control plant height or growth. With a negative DIF, the day
.tf(aerAgniworG.7elbaT 2 ercArePsnoitalupoPtnalPgniyraVrofderiuqeR)seziSreniatnoCtnereffiDgnisU
deriuqeRaerA /1 :foseziSreniatnoCroF
porC ercArePstnalP ni2/11 .ni2 .ni3
seotamoT.1 000,5 '01x'8 '81x'8 '23x'01
000,4 '8x'8 '41x'8 '52x'01
000,3 '7x'7 '11x'8 '91x'01
sporCeloC.2,iloccorB,egabbaC(
)rewolfiluaC
000,03 '74x'01 '48x'01 ---
000,02 '23x'01 '65x'01 ---
000,01 '61x'01 '82x'01 ---
tnalpggE,reppeP.3 005,8 '71x'8 '03x'8 ---
005,7 '61x'8 '82x'8 ---
005,6 '51x'8 '62x'8 ---
1 dda,stcefedtnalprofgnitnuoccadna,stnalpgniniatniamrofstnemeriuqerteemoT/.evobanevigstnemeriuqeraeraehtottnecrep02tuoba
Decay ring caused bypithium (“damping off”)
Figure 7. Illustration of “damping off” symptom.
19
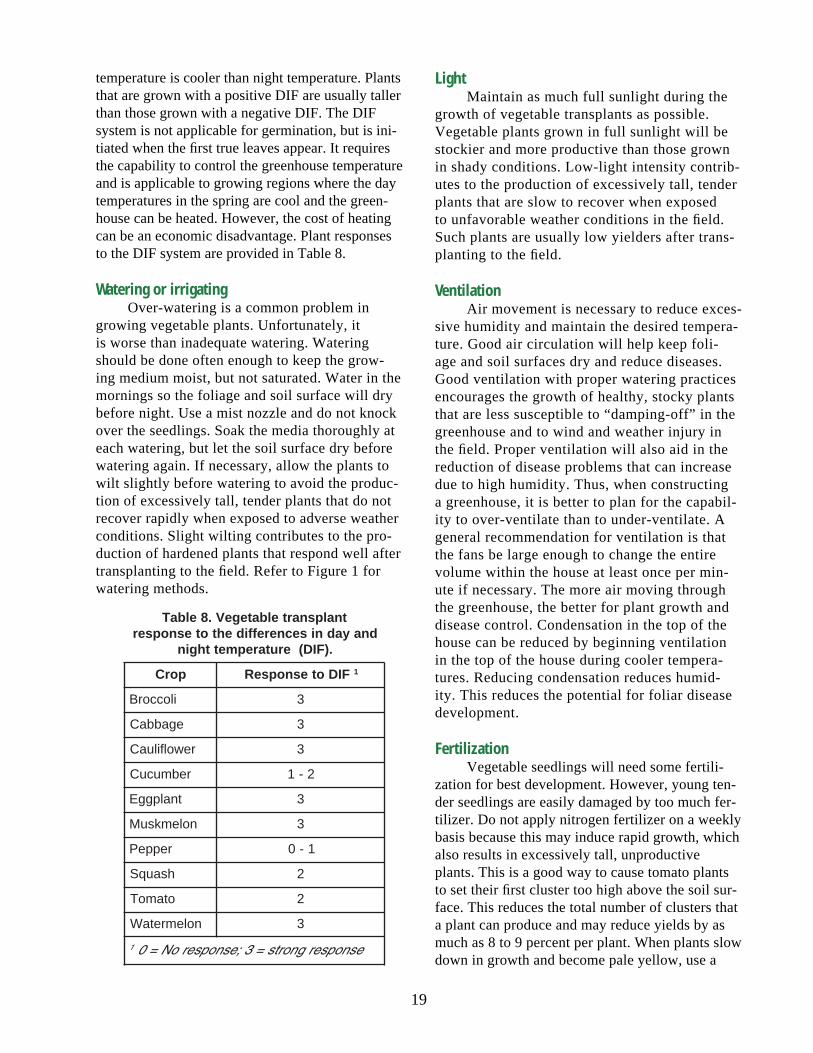
temperature is cooler than night temperature. Plants that are grown with a positive DIF are usually taller than those grown with a negative DIF. The DIF system is not applicable for ger mi na tion, but is ini-tiated when the fi rst true leaves appear. It re quires the capability to control the greenhouse temperature and is applicable to growing regions where the day temperatures in the spring are cool and the green-house can be heated. However, the cost of heating can be an economic disadvantage. Plant responses to the DIF system are provided in Table 8.
Watering or irrigatingOver-watering is a common problem in
growing vegetable plants. Unfortunately, it is worse than inadequate watering. Watering should be done often enough to keep the grow-ing me di um moist, but not saturated. Water in the mornings so the foliage and soil surface will dry before night. Use a mist nozzle and do not knock over the seedlings. Soak the media thoroughly at each watering, but let the soil surface dry before wa ter ing again. If necessary, allow the plants to wilt slightly before watering to avoid the pro duc -tion of excessively tall, tender plants that do not recover rapidly when exposed to adverse weather con di tions. Slight wilting contributes to the pro-duction of hardened plants that respond well after trans plant ing to the fi eld. Refer to Figure 1 for watering methods.
LightMaintain as much full sunlight during the
growth of vegetable transplants as possible. Veg e ta ble plants grown in full sunlight will be stockier and more productive than those grown in shady conditions. Low-light intensity con trib -utes to the production of excessively tall, tender plants that are slow to recover when exposed to un fa vor able weather conditions in the fi eld. Such plants are usually low yielders after trans-planting to the fi eld.
VentilationAir movement is necessary to reduce ex ces -
sive humidity and maintain the desired tem per a- ture. Good air circulation will help keep foli-age and soil surfaces dry and reduce dis eas es. Good ventilation with proper watering practices en cour ag es the growth of healthy, stocky plants that are less susceptible to “damp ing-off” in the green house and to wind and weather injury in the fi eld. Proper ventilation will also aid in the reduction of disease prob lems that can increase due to high humidity. Thus, when constructing a greenhouse, it is better to plan for the capabil-ity to over-ventilate than to under-ventilate. A general rec om men da tion for ventilation is that the fans be large enough to change the entire volume within the house at least once per min-ute if necessary. The more air moving through the greenhouse, the better for plant growth and disease control. Condensation in the top of the house can be reduced by beginning ventilation in the top of the house during cooler tempera-tures. Reducing condensation reduces humid-ity. This reduces the potential for foliar disease de vel op ment.
FertilizationVegetable seedlings will need some fer til i-
za tion for best development. However, young ten-der seedlings are easily damaged by too much fer- til iz er. Do not apply nitrogen fertilizer on a weekly basis because this may induce rapid growth, which also results in excessively tall, unproductive plants. This is a good way to cause tomato plants to set their fi rst cluster too high above the soil sur-face. This reduces the total number of clusters that a plant can produce and may reduce yields by as much as 8 to 9 percent per plant. When plants slow down in growth and become pale yellow, use a
tnalpsnartelbategeV.8elbaTdnayadnisecnereffidehtotesnopser
.)FID(erutarepmetthgin
porC FIDotesnopseR 1
iloccorB 3
egabbaC 3
rewolfiluaC 3
rebmucuC 2-1
tnalpggE 3
nolemksuM 3
reppeP 1-0
hsauqS 2
otamoT 2
nolemretaW 3
1 esnopsergnorts=3;esnopseroN=0
20
water-soluble fertilizer according to the man u fac -tur er�s directions or fertilize with a stock solution containing one of the following con cen tra tions provided in Table 2.
The frequency of applying fertilizer de pends on the needs of the plant and the con cen tra tion of the nutrients in the fertilizer solution. As the con cen tra tion of fertilizer nutrients in the fertil-izer solution increases, the number of applications needed to apply a given amount of fertilizer de- creas es. For further details on fertilization levels, refer to Tables 2 and 3.
SpacingTo further reduce the possibility of pro duc ing
tall, tender plants, it is a good idea to space plants (not the containers) 2 to 3 inches apart. This can be easily accomplished by using 2- to 3- inch diam-eter containers or cells for growing crops such as tomatoes and pepper as well as those crops such as cantaloupes, cucumbers, squash or watermelon that do not withstand transplanting well. Broccoli, cab-bage, caulifl ower or the cole crops can be satisfacto-rily grown in containers or cells that are 11/4 to 2 inches in diameter.
Diagnosing and Correcting Vegetable Trans plant Disorders:
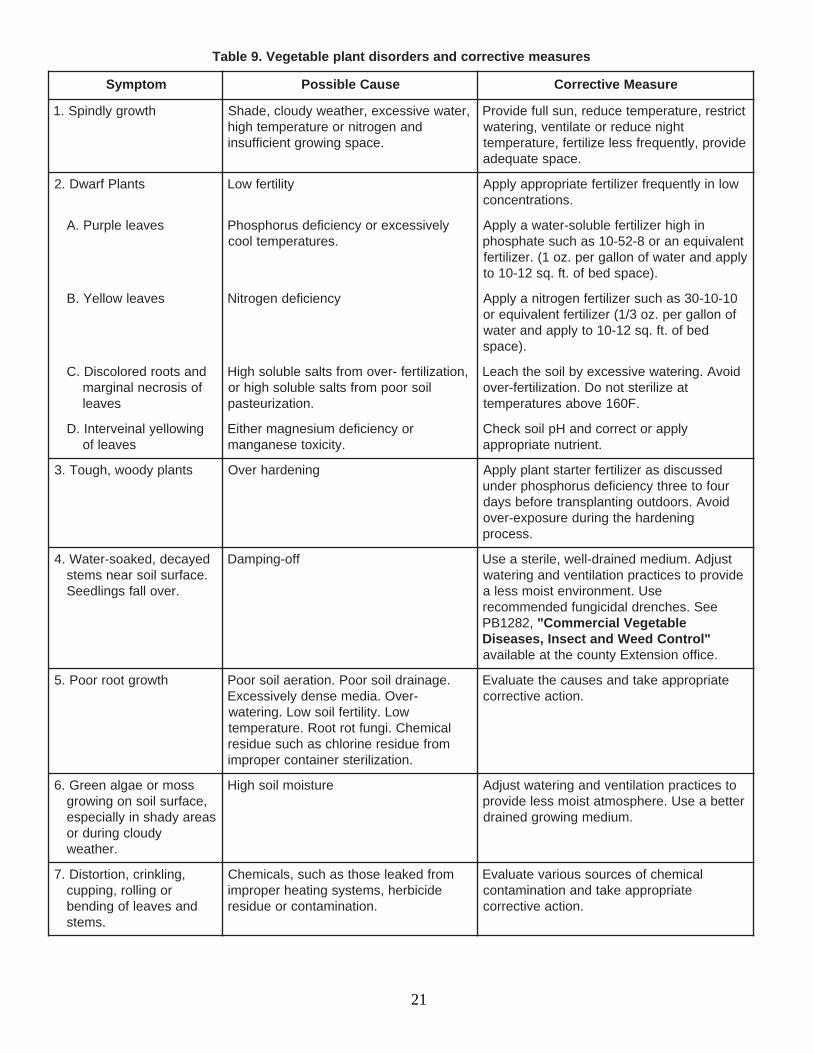
The transplant disorders and cor rec tive mea-sures shown in Table 9 will aid in diagnosing and cor rect ing vegetable problems during the plant-growing stage.
Hardening PlantsPlants which have been growing indoors
cannot be planted abruptly into the fi eld without injury. To reduce injury due to adverse weather, especially in the spring, plants should be "hard- ened" before planting outdoors.
Hardening should begin two weeks before fi eld planting. To harden, plants can be moved to cooler areas outside, or the temperature can be reduced in the present location. Mov-ing plants to a coldframe is an excellent way to harden plants. When moved outdoors, keep plants in the shade at fi rst, but gradually move into full sunlight by increasing the period of exposure each day. Re duce the frequency of watering to slow growth. Slight wilting will
toughen plants. Even cold-hardy plants such as cabbage will be damaged if exposed to freezing temperatures before they have been hardened. After hardening, some plants can be exposed to light frosts without being injured. Almost all of the cool-season crops can be hard ened, but warm-season, vining crops cannot be hard-ened by reducing the temperature. They cannot tolerate cool temperatures. If ex posed, they will usually be stunted. Conditioning treatments for them involves reducing water and fertilizer.
One of the visual symptoms for hardened plants is a slight purplish color which develops in the veins.
For hardening conditions required for specifi c vegetables, refer to Table 6.
Summary Successful plants can be produced by following
the ideas described below.1. Properly construct and equip the desired plant-
growing structure.2. Begin with seed that are viable, disease-resistant
or that have been treated to prevent diseases and have a high percentage of ger mi na tion.
3. Select and grow cultivars that are well adapted and high yielders of a product highly desired by the consumer.
4. Use a growing medium that is loose and friable, free of disease and that provides good drain age, water-holding capacity and nutrient retention capability.
5. Grow only in sterilized media, containers and structures. Follow strict sanitary practices.
6. Follow proper seeding procedures.7. Germinate and grow plants ac cord ing to their
optimum temperature, moisture and fer til iz er requirements. Keep plants and soil from re- main ing wet for long periods of time.
8. Transplant tomatoes into 2- or 3-inch containers for early yields. Seed the cucurbits into larger diameter (3-4 inch) containers that will be planted in the fi eld. Cole crops do not need to go into large containers.
9. Maintain spray programs to control insects and diseases.
10. Maintain proper ventilation, temperature, water and fertilization requirements.11. Harden plants before fi eld setting.
21
serusaemevitcerrocdnasredrosidtnalpelbategeV.9elbaT
motpmyS esuaCelbissoP erusaeMevitcerroC
htworgyldnipS.1 ,retawevissecxe,rehtaewyduolc,edahSdnanegortinroerutarepmethgih
.ecapsgniworgtneiciffusni
tcirtser,erutarepmetecuder,nusllufedivorPthginecuderroetalitnev,gniretaw
edivorp,yltneuqerfsselezilitref,erutarepmet.ecapsetauqeda
stnalPfrawD.2 ytilitrefwoL wolniyltneuqerfrezilitrefetairporppaylppA.snoitartnecnoc
sevaelelpruP.A ylevissecxeroycneicifedsurohpsohP.serutarepmetlooc
nihgihrezilitrefelbulos-retawaylppAtnelaviuqenaro8-25-01sahcusetahpsohpylppadnaretawfonollagrep.zo1(.rezilitref
.)ecapsdebfo.tf.qs21-01ot
sevaelwolleY.B ycneicifednegortiN 01-01-03sahcusrezilitrefnegortinaylppAfonollagrep.zo3/1(rezilitreftnelaviuqero
debfo.tf.qs21-01otylppadnaretaw.)ecaps
dnastoorderolocsiD.Cfosisorcenlanigram
sevael
,noitazilitref-revomorfstlaselbuloshgiHliosroopmorfstlaselbuloshgihro
.noitaziruetsap
diovA.gniretawevissecxeybliosehthcaeLtaeziliretstonoD.noitazilitref-revo
.F061evobaserutarepmet
gniwolleylanievretnI.Dsevaelfo
roycneicifedmuisengamrehtiE.yticixotesenagnam
ylpparotcerrocdnaHplioskcehC.tneirtunetairporppa
stnalpydoow,hguoT.3 gninedrahrevO dessucsidsarezilitrefretratstnalpylppAruofoteerhtycneicifedsurohpsohprednudiovA.sroodtuognitnalpsnarterofebsyad
gninedrahehtgniruderusopxe-revo.ssecorp
deyaced,dekaos-retaW.4.ecafrusliosraensmets
.revollafsgnildeeS
ffo-gnipmaD tsujdA.muidemdeniard-llew,eliretsaesUedivorpotsecitcarpnoitalitnevdnagniretaw
esU.tnemnorivnetsiomsselaeeS.sehcnerdladicignufdednemmocer
,2821BP elbategeVlaicremmoC""lortnoCdeeWdnatcesnI,sesaesiD
.eciffonoisnetxEytnuocehttaelbaliava
htworgtoorrooP.5 .eganiardliosrooP.noitarealiosrooP-revO.aidemesnedylevissecxE
woL.ytilitreflioswoL.gniretawlacimehC.ignuftortooR.erutarepmet
morfeudiserenirolhcsahcuseudiser.noitaziliretsreniatnocreporpmi
etairporppaekatdnasesuacehtetaulavE.noitcaevitcerroc
ssomroeaglaneerG.6,ecafrusliosnogniworgsaeraydahsniyllaicepse
yduolcgnirudro.rehtaew
erutsiomlioshgiH otsecitcarpnoitalitnevdnagniretawtsujdArettebaesU.erehpsomtatsiomsseledivorp
.muidemgniworgdeniard
,gnilknirc,noitrotsiD.7rognillor,gnippuc
dnasevaelfognidneb.smets
morfdekaelesohtsahcus,slacimehCedicibreh,smetsysgnitaehreporpmi
.noitanimatnocroeudiser
lacimehcfosecruossuoiravetaulavEetairporppaekatdnanoitanimatnoc
.noitcaevitcerroc

22
The Agricultural Extension Service offers its programs to all eligible persons regardless of race, color, national origin, sex, age, disability, religion or veteran status and is an Equal Op por tu ni ty Em ploy er.
COOPERATIVE EXTENSION WORK IN AGRICULTURE AND HOME ECONOMICS The University of Tennessee Institute of Agriculture, U.S. De part ment of Agriculture,
and county governments cooperating in furtherance of Acts of May 8 and June 30, 1914. Agricultural Extension Service
Billy G. Hicks, Dean
PB819-5M-8/99 E12-2015-00-060-00


![CartemotoneigeSagLac2014-15 [Unlocked by ] sentier lac st-jean.pdf · 6.6 trans-quÉbec 83 trans-quÉbec 93 trans-quÉbec 93 trans-quÉbec 93 trans-quÉbec 93 trans-quÉbec 93 trans-quÉbec](https://img.pdfslide.net/doc/110x75/5b2cb5eb7f8b9ac06e8b5a01/cartemotoneigesaglac2014-15-unlocked-by-sentier-lac-st-jeanpdf-66-trans-quebec.jpg)