Embed Size (px)
Citation preview

GO300N Manual
www.guepardnetworks.com
High speed access point/CPE 300 Mbps AP/CPE OUTDOOR WIRELESS
Model: GO300N
ADVANCED TECHNOLOGY
Professional Qualcomm Chipset
GO300N was integrated Qualcomm's chipsets. This is an 11N 300Mbps High Power OutdoorCPE/AP/Router/WISP, wireless distance can be 500 - 1.000 meters (as pair CPEs). This Outdoor CPE withthe 802.11n Wi-Fi standard combined 300Mbps Wi-Fi speed over 2.4GHz (300Mbps) and equipped fastethernet WAN port, fast ethernet data rate can be taking care 20-40 end users at the same me.Matching access demand to enjoy seamless HD movies, streaming, online gaming, wireless security andother bandwidth-intensive tasks.
GO300N with user-friendly Web management interface and mul -opera on mode like: AP, WDS,Repeater, Gateway, mul -func on for many appica ons.
1 | P a g e

GO300N Manual
www.guepardnetworks.com
1st Hardware and Opera on mode Instruc on
1) Hardware interface
P1. GO300N physical interface
LED display: parameter indicator: (first character indicate H: Host - master or C: Client – slave or P: Power of transmit frequency; second number indicate: last 3 number of IP address or strength of transmit frequency from 1-10).
DC Power: DC power connector
LED Lights: LED Indicator of System/WiFi signal/WAN port/LAN port.
WAN/POE Port: Fast ethernet WAN/POE Port this port using connect with ADSL modem or Internet mainly or over POE adapter (if do not use DC Power connector).
LAN: Fast ethernet LAN Port for more cable end users.
WDS configura on Bu on (F, S, reset): making paired CPEs.
2) How to supply data and power to GO300N?The connec on diagram showed as P1, internet cable connect to PoE adapter’s LAN Port, GO300N’s WAN/POE port connect to POE adapter’s POE Port, then end users will access into GO300N through cable (GO300N’s LAN port) or wireless (2.4GHz).
2 | P a g e

GO300N Manual
www.guepardnetworks.com
P2. GO300N use PoE adapter: 24V passive PoE (a ached in GO300N complete set)
Please note: if the Wireless AP support 24V passive PoE then the PoE adapter should be 24V Passive PoE.If the wireless AP support 48V IEEE 802.3af/at standard PoE then the PoE adapter should be 48V PoEstandard.
All opera on modesOpera on as diagram as below:
P3. Gateway mode diagram
3 | P a g e

GO300N Manual
www.guepardnetworks.com
P4. AP mode diagram
P5. WISP mode diagram
4 | P a g e

GO300N Manual
www.guepardnetworks.com
P6. Repeater mode diagram
P7. Super WDS mode diagram
There are five opera on modes on this wireless AP/CPE.
5 | P a g e

GO300N Manual
www.guepardnetworks.com
How to connect GO300N Wireless APUsers can connect the PC/Laptop/Smartphone/Tablet… into this wireless AP by Wireless SSID and LAN
cable: The default SSID is Wireless 2.4G for 2.4GHz, SSID’s password is 66666666 (number six
eight mes).
2st GUI Login (Graphic User Interface)
1)Choose the proper power supply mode and opera on mode
2)Assign an IP address for local PC/Worksta onFollowing steps will show how to assign an IP address (sta c IP) for PC a er connect wireless AP and PC by wired cable or wireless: configure local IP address as 192.168.188.X (X can be selected from 2-252) the same network segment as ceiling AP, subnet mask 255.255.255.0, As P3 and P4 shows.
P8. Check Control Panel>Network and Internet>Network Connec ons>Wi-Fi>Proper es (Win 10)
P9. Assign IP address for PC/Worksta on (Such as: 192.168.188.100)
6 | P a g e

GO300N Manual
www.guepardnetworks.com
3) Open browser Microso Edge, Chrome, Firefox… and input device’s
default IP 192.168.188.253 (this is IP default of Wireless AP) on the address bar, then press Enter, a
login page will pop up, input admin in Login Device cell, then press Enter or Login bu on on Admin
interface.
Note: GO300N GUI (support 2.4GHz band) same as GUI GO1200ac excepted GO300N did not supportdual band 2.4GHz/5.8GHz. So we use Illustrated GO1200ac picture for GO300N.
P10. Login interface (GO300N GUI same as Illustrated GO1200ac picture).
3rd Se ngs GUI (Graphic User Interface)1) Home (Device status): A er success login, then P6 Device Status will be showed:
P11. Infographic of Device Status (GO300N GUI same as Illustrated GO1200ac picture).
7 | P a g e

GO300N Manual
www.guepardnetworks.com
Note: GO300N GUI (support 2.4GHz band) same as GUI GO1200ac excepted GO300N did not supportdual band 2.4GHz/5.8GHz
Home (Detail of indices):
• Opera on Mode: Current mode of device (As P6 picture above is AP mode)
• Up me: device period me running un l current (As P6 picture above is 48 minutes and 03 seconds).
• Flow (2G WiFi) bps: Flow chart of 2.4GHz describe flow of AP upstream and downstream in real me.
• Device Informa on: ra o of CPU, Memory usage.
• Device Descrip on: descrip on space for this device (Ex: administrator can input device name, loca on… which hint for maintenance).
• LAN Informa on: showing LAN parameter such as: IP Mode, LAN IP, Subnet, AC/Gateway Address, MAC Address.
• 2G WiFi/5G WiFi: tab showing 2G WiFi/5G WiFi parameter such as: Status (online users), SSID, Channel, Encrypt, MAC Address.
2) Wizard: Shortcut for switching wireless AP’s opera on modes.
Click Wizard in Status page will have pop-up following page to configure the opera on mode:
There are five opera on mode of ceiling wireless AP and there are explana on for each opera on mode for be er use, see P7 below:
P12. Switching func on between wireless AP/CPE’s opera on modes.
8 | P a g e

GO300N Manual
www.guepardnetworks.com
P13. Device is running in AP mode (GO300N GUI same as Illustrated GO1200ac picture).
There are five opera on mode of ceiling wireless AP and there are explana on for each opera on mode for be er use.
• Gateway Mode: In this mode, the device is supposed to connect to internet via ADSL/CableModem. The NAT is enable and PCs in LAN ports share the same IP to ISP through WAN port. Theconnec on type can be setup in WAN page by using PPPOE, DHCP client or sta c IP.
• Repeater Mode: In this mode, the user can access wireless AP, device can be connected to otherwireless network using the wireless. All interfaces are bridged together. Without NAT, firewall andall network related func ons.
• WISP Mode: In this mode, all Ethernet ports are bridged together and wireless clients will connectISP access point. The NAT is enabled and PCs in Ethernet port share the same IP to ISP throughwireless LAN. You must set wireless to client mode first and connect to the ISP AP in Site-Surveypage. The connec on type can be setup in WAN page by using PPPOE, DHCP client and sta c IP.
• AP Mode: In this mode, the AP wireless interface and cable interface bridging together. WithoutNAT, firewall and all network related func ons.
• Super WDS Mode: In this mode, the wireless interface can be connected with other wireless APthrough WDS (The Wireless Distribu on System), and the wireless interface and cable interface.Without NAT, firewall and all network related func ons.
9 | P a g e

GO300N Manual
www.guepardnetworks.com
3) WiFi:
In WiFi, user can check and configure all indices: 2G WiFi, 5G WiFi, MAC ACL, WiFi Timer Off, Advanced.
2G WiFi: This sec on allow configure 04 SSIDs in 2.4GHz frequency, such as: Basic, VAP1, VAP2,VAP3.
P14. WiFi configura on for 2.4GHz frequency (GO300N GUI same as Illustrated GO1200ac picture).
• WiFi Status: Switching bu on is green meaning this SSID is On status. WiFi Analyzer bu on is u lityfor checking all APs and their broadcast channel in current region, which will help us choosing goodchannel to broadcas ng.
• SSID: naming SSID for device in 2.4GHz frequency.
• Hide your SSID?: hiding device’s SSID a er se ng up and connec ng.
• BandWidth: choosing broadcas ng bandwidth which will give full device bandwidth or halfbandwidth with longer distance.
• Channel: choosing device’s broadcas ng channel which will have not interference with other AP’schannel.
• Encrypt: choosing Encryp on (with Password) or Open (without Password)
• WiFi Password: inpu ng password (if choosing Encryp on)
10 | P a g e

GO300N Manual
www.guepardnetworks.com
• WiFi Status: Switching bu on is green meaning this SSID is On status. WiFi Analyzer bu on is u lityfor checking all APs and their broadcast channel in current region, which will help us choosing goodchannel to broadcas ng.
• SSID: naming SSID for device in 5.8GHz frequency.
• Hide your SSID?: hiding device’s SSID a er se ng up and connec ng.
• BandWidth: choosing broadcas ng bandwidth which will give full device bandwidth or halfbandwidth with longer distance.
• Channel: choosing device’s broadcas ng channel which will have not interference with other AP’schannel.
• Encrypt: choosing Encryp on (with Password) or Open (without Password)
• WiFi Password: inpu ng password (if choosing Encryp on)
MAC ACL: This sec on manage users with MAC/ACL in Access Control List. Users in this list is underdevice management, Disable (Disable this func on) or allowing (Allows the device to pass in the rule) ordenied (Prohibited rules within the device through) clients/users access device.
P16. ACL configura on.
• Status: click Add bu on for adding new user. Switching bu on is green meaning this func on is Onstatus.
• MAC Address: MAC address of user/client. Scan bu on is u lity for checking all users and theirMACs.
11 | P a g e

GO300N Manual
www.guepardnetworks.com
• Mark: marking users for hint.
• Click Apply bu on for applying new user or Delete for dele ng user.
WiFi Timer Off: This func on will set Off period of device.
P17. WiFi Timer Off.
• WiFi Timer Off: Switching bu on is green meaning this func on is running.
Time Frame: choosing me frame.
Click Apply bu on for finish.
Advanced
12 | P a g e

GO300N Manual
www.guepardnetworks.com
P18. WiFi Advanced configura on.
• Country Region: Set channels for 2.4GHz match country policy (Reference: h ps://en.wikipedia.org/wiki/List_of_WLAN_channels)
• 2G Mode: choosing 802.11 protocol standards for 2.4GHz frequency, such as: 802.11 b/g/n.
• Mul cast Fast: On/Off this func on (defini on reference: h ps://en.wikipedia.org/wiki/Mul cast ).• Maximum for per AP: allow max users connect per AP.• WLAN Par on: This feature effec vely segregates the wireless band of your choice from the rest of
the Network. With Ethernet-to-WLAN Access disabled.
• Short GI (switch On/Off): Guard Interval is intended to avoid signal loss from mul -path effect.• Coverage Threshold: This func on allow GO300N’s antennas improving more sensi ve to client
devices. Which help GO300N can keep ght connec on with clients and improving broadcas ng distance.
• Packet Threshold: This value is used to set the maximum size of packet a client can send. Smaller packets improve reliability, but they will decrease performance. Unless you’re facing problems with an unreliable network, reducing the fragmenta on threshold is not recommended. Make sure it is set to the default se ngs (recommend 2346).
• RTS Threshold: RTS stands for ‘Request to send’ and is send by the client to the access point – it essen ally asks for permission to send the next data packet. The lower the threshold, the more stable your Wi-Fi network, since it essen ally asks more o en when sending packages. However, if you don’t have problems with your Wi-Fi you should make sure that the RTS Threshold is set to the maximum allowed.
• TX Power: This func on allow to increase transmi ng power which will device transmi ng longer distance and passing more barrier (wall, floor, tree canopy…)
• DFS: Dynamic Frequency Selec on (DFS) is a WiFi func on that enables WLANs to use 5 GHz frequencies that
are generally reserved for radars. If you are planning to use DFS channels, you first have to verify that both
13 | P a g e

GO300N Manual
www.guepardnetworks.com
your WiFi access points and wireless clients support this func onality.
• 2G Distance: choosing suitable distance scenario for pair CPEs in 2.4GHz frequency.
4) Network:
Se ng up Network on device.
AP Mode: When AP run in AP Mode
P19. WiFi configura on in AP mode.
LAN Se ngs (AP Mode)
• IP Mode: choosing method to get IP from LAN (Such as: Sta c IP/Get IP from AC/Gateway).
• Click Apply bu on for finish.
VLAN Se ngs: configuring VLAN per SSID. For using this func on, checking On in drag list at thebo om GUI.
14 | P a g e

GO300N Manual
www.guepardnetworks.com
P20. VLAN Se ngs in AP mode.
• 2G WiFi: input VLAN per SSID in 2.4GHz frequency (Such as: AP/VAP1/VAP2/VAP3).
• Click Apply bu on for finish.
Gateway Mode: When AP run in Gateway Mode
P21. WiFi configura on in Gateway mode.
LAN Se ngs (GatewayMode)
15 | P a g e

GO300N Manual
www.guepardnetworks.com
• LAN IP: inpu ng range LAN IP of device (sta c IP host).
• Subnet: inpu ng LAN Subnet.
• STP (Spanning Tree Protocol): switching bu on to green to ac vate this func on.• DHCP Servers (Dynamic Host Configura on Protocol): switching bu on to green to ac vate this
func on.• Start Address: inpu ng start IP address (avoid IP address had setup in LAN IP above). • Max Number: inpu ng quan ty of IP addresses except LAN IP of device(limited quan ty: 254 IP
addresses)• DHCP Lease Time: choosing me period to release all IP addresses.• Assigned IP Number: Numbers of IP addresses have been assigned. Clicking DHCP List bu on to view
assigned IPs.
Sta c DHCP: se ng up LAN clients/users with sta c IP by using this func on.
WAN Se ngs: this func on is configure WAN port which connect ISP’s modem, router, fiberconverter or business’s switch, router.
P22. WAN Se ngs configura on in Gateway mode.
• Connect Method: choosing which connec ng method use for device (Sta c, PPPoE, DHCP).• MTU: the maximum transmission unit the size of the largest protocol data unit (PDU) that can be
communicated in a single network layer transac on (we can set: 1400-1500).• Set DNS Manually: se ng default DNS for device. We can use DNS informa on of ISP or another
public DNS, such as Google: 8.8.8.8/8.8.4.4• Primary DNS: configuring first DNS informa on.
• Secondary DNS: configuring second DNS informa on (if Primary DNS is busy or meout).
• Band Type: choosing real bandwidth which connect to WAN port.
• Upstream: inpu ng allowed upstream bandwidth.
16 | P a g e

GO300N Manual
www.guepardnetworks.com
• Downstream: inpu ng allowed downstream bandwidth.
WAN Advanced Se ngs:
P23. WAN Advanced Se ngs
• Enable web server access on WAN port (8080): Switching bu on to green to ac vate this func on.
• MAC Clone: cloning client/user MAC. Switching bu on to green to ac vate this func on.
• Enable Ping Access on WAN: Allowing clients/users outside LAN can ping this device over WAN port connec on. Switching bu on to green to ac vate this func on.
• Enable IPsec pass through on VPN connec on: Switching bu on to green to ac vate this func on.
• Enable PPTP pass through on VPN connec on: Switching bu on to green to ac vate this func on.• Enable L2TP pass through on VPN connec on: Switching bu on to green to ac vate this func on.
URL Mapping:
P24. Configuring URL Mapping
17 | P a g e

GO300N Manual
www.guepardnetworks.com
5) Security: running in Gateway/WISP Mode
Gateway Mode: When AP run in Gateway Mode
URL Filter: this func on issues rules permit or prohibit staffs/users access prohibited websites withschedule me or permanent.
P25. Configuring URL Filter
• Click Add bu on in the bo om for crea ng new rule.• Switching bu on Status to green to ac vate this rule.
• Rule Name: naming the rule.
• Time Group: choosing created previous me group or Any or Custom for applying this rule.
• Time Range: scheduling me in hours.
• Work Date: scheduling me in daily or week.
• URL: website address for applying this rule.• Mark: marking hint.
• Click Save bu on for saving new rule.
• Apply all rules by choosing Enable URL Filter Func on in bo om drag list, click Apply bu on for finish.
• Remove rule by choosing rule and click Delete bu on in the bo om.
18 | P a g e
GO300N Manual
www.guepardnetworks.com
IP Filter: This func on issues rules permit or prohibit staffs/users in IP Range/IP Group accessprohibited service ports & Protocol with schedule me or permanent.
P26. Configuring IP Filter
• Click Add bu on in the bo om for crea ng new rule.
• Switching bu on Status to green to ac vate this rule.• Rule Name: naming the rule.
• Time Group: choosing created previous me group or Any or Custom for applying this rule.
• Time Range: scheduling me in hours.
• Work Date: scheduling me in daily or week.
• IP Group: choosing created previous IP group (IP range) or Custom for applying this rule.
• Port Range: rule approve in port range (1-65535).• Mark: marking hint.
• Click Save bu on for saving new rule.
• Apply all rules by choosing Prohibited rules within the device through (or Allow the device to pass in the rule) in bo om drag list, click Apply bu on for finish.
• Remove rule by choosing rule and click Delete bu on in the bo om.
MAC Filter: This func on issues rules permit or prohibit staffs/users with MACs access through devicein schedule me or permanent.
19 | P a g e

GO300N Manual
www.guepardnetworks.com
P27. Configuring MAC Filter
• Click Add bu on in the bo om for crea ng new rule.
• Switching bu on Status to green to ac vate this rule.• Rule Name: naming the rule.
• Time Group: choosing created previous me group or Any or Custom for applying this rule.
• Time Range: scheduling me in hours.
• Work Date: scheduling me in daily or week.
• Mark: marking hint.
• Click Save bu on for saving new rule.• Apply all rules by choosing Prohibited rules within the device through (or Allow the device to pass in
the rule) in bo om drag list, click Apply bu on for finish.• Remove rule by choosing rule and click Delete bu on in the bo om
Security: Mapping port func on.
• Click Add bu on in the bo om for crea ng new rule.
• Switching bu on Status to green to ac vate this rule.
• Rule Class: choosing the available rules, such as: User defined, HTTP, HTTPS, FTP, POP3, SMTP, DNS, Telnet, IPSEC, Remote Desktop.
• Rule Name: Naming rule.
• Protocol: Choosing the available protocols, such as: TCP, UDP or Both.
• LAN IP: inpu ng client/user IP LAN or Scan bu on for selec ng.
20 | P a g e

GO300N Manual
www.guepardnetworks.com
P28. Configuring Security.
• External port: inpu ng port range to connect WAN (1-65535).
• Internal port: inpu ng port range to connect from LAN (1-65535).
• Mark: marking hint.
• Click Save bu on for saving new rule.• Apply rule by selec ng new rule and Enable Port Mapping Func on in bo om drag list, click Apply
bu on for finish.• Remove rule by choosing rule and click Delete bu on in the bo om
DMZ: The purpose of a DMZ is to add an addi onal layer of security to an organiza on's local areanetwork (LAN): an external network node can access only what is exposed in the DMZ, while the rest ofthe organiza on's network is firewalled.
P29. Configuring DMZ.
21 | P a g e

GO300N Manual
www.guepardnetworks.com
• Switching bu on Enable DMZ to green to ac vate this func on.
• DMZ Host: inpu ng Host’s IP address which need move to this zone (DMZ). Or choosing Host’s IP address by Scan bu on.
• Click Apply bu on for finish.
6) Manage: running in AP/Gateway/WISP Mode
This sec on manage basis configura ons of device included:
AP Mode: When AP run in AP Mode
Configure
P30. Configuring Management (AP mode).
• Backup: Save the configura on file on device to your computer.• Restore: Restore the configura on file on your computer (by click Choose file bu on and browsing file) to device.
Reset Default: reset device to factory default.
Reboot
P31. Configuring Reboot.
22 | P a g e
GO300N Manual
www.guepardnetworks.com
• Reboot: reboot device immediately.
• Timed reboot: switching bu on to green to ac vate this func on.
• Reboot me: choosing the date and me in week to restart device.
• Restart interval: interval to restart device in period 1 day - 10 days.
• Click Apply bu on for finish.
Modify Password
• Old Password: inpu ng Old Password.• New Password: inpu ng New Password which want to change.
• Confirm Password: confirming New Password.
• Click Apply bu on for finish.
Upgrade: upgrading new firmware for device.
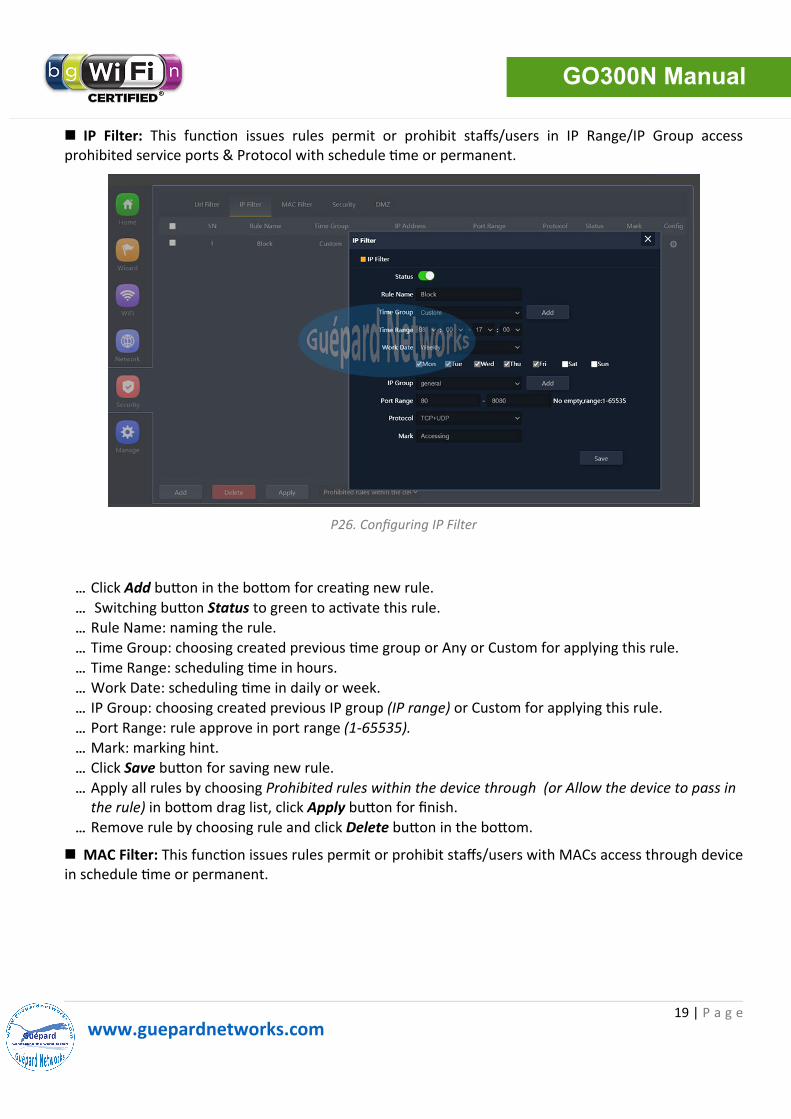
Time: upda ng me for device.
P31. Configuring System Time.
• System Time: current me of device.• NTP Enable: switching bu on to green to ac vate NTP func on.• Time Zone Select: choosing local me zone.• Manual IP Se ngs: switching bu on to green to ac vate this func on.• NTP Server: choosing available public NTP servers.
• Click Apply bu on for finish.
Log: managing device’s log.
Gateway Mode: When AP run in Gateway/WISP Mode
Configure
23 | P a g e

GO300N Manual
www.guepardnetworks.com
P32. Configuring management (Gateway/WISP mode).
• Backup: Save the configura on file on device to your computer.• Restore: Restore the configura on file on your computer (by click Choose file bu on and browsing file) to device.
Reset Default: reset device to factory default.
Reboot
P33. Configuring Reboot (Gateway/WISP mode).
• Reboot: reboot device immediately. • Timed reboot: switching bu on to green to ac vate this func on.
• Reboot me: choosing the date and me in week to restart device.
• Restart interval: interval to restart device in period 1 day - 10 days.
• Click Apply bu on for finish.
Modify Password
• Old Password: inpu ng Old Password.
• New Password: inpu ng New Password which want to change.
• Confirm Password: confirming New Password.
• Click Apply bu on for finish.
24 | P a g e

GO300N Manual
www.guepardnetworks.com
Upgrade: upgrading new firmware for device.
Time: upda ng me for device.
P34. Configuring System Time (Gateway/WISP mode).
• System Time: current me of device.• NTP Enable: switching bu on to green to ac vate NTP func on.• Time Zone Select: choosing local me zone.• Manual IP Se ngs: switching bu on to green to ac vate this func on and inpu ng NTP’s IP
address.
• NTP Server: choosing available public NTP servers.
• Click Apply bu on for finish.
Log: managing device’s log.
Flow Control: this func on (QoS) control all bandwidth flows to users which can assure system quality of service.
• Click Add bu on in the bo om for crea ng new QoS rule.
• Switching bu on Status to green to ac vate this rule.
• IP Group: choosing created previous IP group (IP range) or Custom for applying this rule.• IP Address: inpu ng IP range or choosing IP address from running list by clicking Scan bu on.
• Time Group: scheduling me in daily or week.
• Limited Mode: choosing QoS mode, such as: Exclusive limited bandwidth (the allowed bandwidth perclient/user in IP range) or Shared Limited Bandwidth (shared total bandwidth for all clients/users in IP range).
• Up: fixed upstream in rate Kbps.• Down: fixed downstream in rate Kbps.
• Mark: marking hint.• Click Save bu on for saving new QoS rule.
• Apply all rules by choosing Enable QoS (or Disable) in bo om drag list, click Apply bu on for finish.
• Remove rule by choosing rule and click Delete bu on in the bo om.
25 | P a g e

GO300N Manual
www.guepardnetworks.com
P35. Configuring QoS-Flow Control (Gateway/WISP mode).
IP Group: crea ng Groups with IP range. Every Group can use rule which controlled by administrator.
P35. Crea ng IP Group (Gateway/WISP mode).
26 | P a g e
GO300N Manual
www.guepardnetworks.com
• Click Add bu on in the bo om for crea ng new Group.
• Group Name: Naming Group.
• IP Address: inpu ng IP range or choosing IP address from running list by clicking Scan bu on.
• Mark: marking hint.
• Click Save bu on for saving new Group.• Remove Group by choosing Group and click Delete bu on in the bo om.
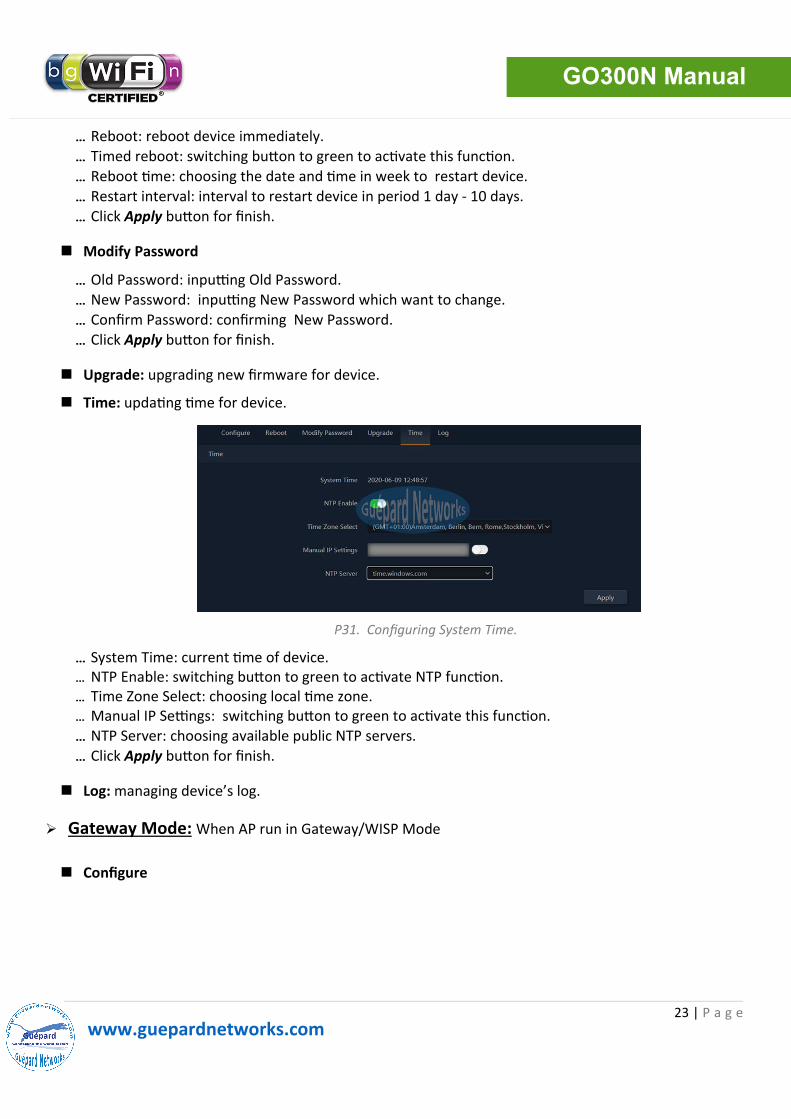
Time Group: crea ng Groups with me schedule. Every Group can use rule which controlled by administrator.
• Click Add bu on in the bo om for crea ng new me group.• Time Group: Naming new me group.
• Time Range: scheduling me in hours.
• Work Date: scheduling me in daily or week.
• Mark: marking hint.
• Click Save bu on for crea ng new me group.
• Remove me group by choosing me group and click Delete bu on in the bo om.
P36. Crea ng Time Group (Gateway/WISP mode).
7) Exit: Exit GUI (Graphic User Interface).
Exi ng device’s GUI by clicking bu on on the right top as below:
27 | P a g e

GO300N Manual
www.guepardnetworks.com
4th WDS configura on bu ons:
28 | P a g e

GO300N Manual
www.guepardnetworks.com
5th Trouble Shoo ng:
No. Symptoms of AP device Solu on
1 AP’s Indicator off Please make sure the PoE module connec on is connected right PoE Port. And PoE adapter connect right power outlet.
2 I forget user name and password in GUI login
Press and hold the “Reset” bu on more than 15 seconds to restore factory default
3 I cannot login the AP through WEB management
1. Please make sure PC and AP’s IP Address are in same network segment, then check if can Ping AP’s IP address: PC start--input “and” in Run, then ping 192.168.188.2532. Login again a er Restore this ceiling AP to factory default.3. Make sure there isn’t any equipment to take IP address of 192.168.188.253 in the same network4. Check LAN cable to avoid any problem, recommend do not use unshielded twisted pair Ethernet cable.
4 I forget the AP’s SSID and passwords
1. Login to AP’s GUI page by internet cable, then reset password in WiFi se ng.2. Restore to factory default
5 I can’t access to AP’s IP address1. Check AP’s DHCP and make it enabled in Gateway mode.2. Check the internet connec on between AP and the root router/switch in AP and Repeater mode.3. Or AP run in AP mode. PC should change IP matching AP’s IP subnet.
6 I can’t access into Internet even finished the se ngs of wireless AP
1. If dynamic IP user, login wireless AP’s WEBpage, check Internet se ngs--WAN Se ng--Dynamic IP, fill in right informa on.2.If ADSL user, login wireless AP’s WEB page, checkInternet se ngs--WAN se ng--PPPOE, then input the right user name and password3. Please set PC’s IP address as obtain IP addressautoma cally
7 How to change IP address in localnetwork
Click Advanced se ngs-Network-LAN se ngs-IP address se ng-Apply
8 How to Reset Wireless APPress and hold the “Reset” bu on more than 15 seconds a er power on. The Wireless AP will be restored back factory default a er the Wireless AP restart.
29 | P a g e