Embed Size (px)
Citation preview
User G
uide
EDDIE Enterprise Data Delivery Information Environment
EDDIE User Guide
2 | P a g e
Contents Introduction to EDDIE ................................................................................................................................... 3
Log into EDDIE ............................................................................................................................................... 3
Overview of EDDIE Homepage ...................................................................................................................... 4
Setting your Business Objects Preferences ................................................................................................... 4
Documents Tab ............................................................................................................................................. 6
Search for Documents................................................................................................................................... 7
Running Standard Reports ............................................................................................................................ 8
Report Viewer Toolbar Options .............................................................................................................. 10
Left-side Panel Options ........................................................................................................................... 11
Pinning a Report Open ................................................................................................................................ 11
Saving a Report to your Favorites ............................................................................................................... 11
Closing a Document .................................................................................................................................... 12
Scheduling a Report .................................................................................................................................... 12
Creating a Schedule................................................................................................................................. 13
Viewing / Deleting a Schedule ................................................................................................................ 17
Sending a Document using the EDDIE Inbox............................................................................................... 18

EDDIE User Guide
3 | P a g e
Introduction to EDDIE The EDDIE (Enterprise Data Delivery Information Environment) is a web-based secured Business Objects Content Management System. EDDIE allows easy access to running our University Standard reports, our Solution Library reports, and a safe environment to save your favorite ad hoc reports.
Logging into EDDIE 1. Open the EDDIE login page: https://eddie.ds.uillinois.edu/
2. Click the button.
3. Enter your University NetID and Password.
4. Click the LOG IN button.
EDDIE User Guide
4 | P a g e
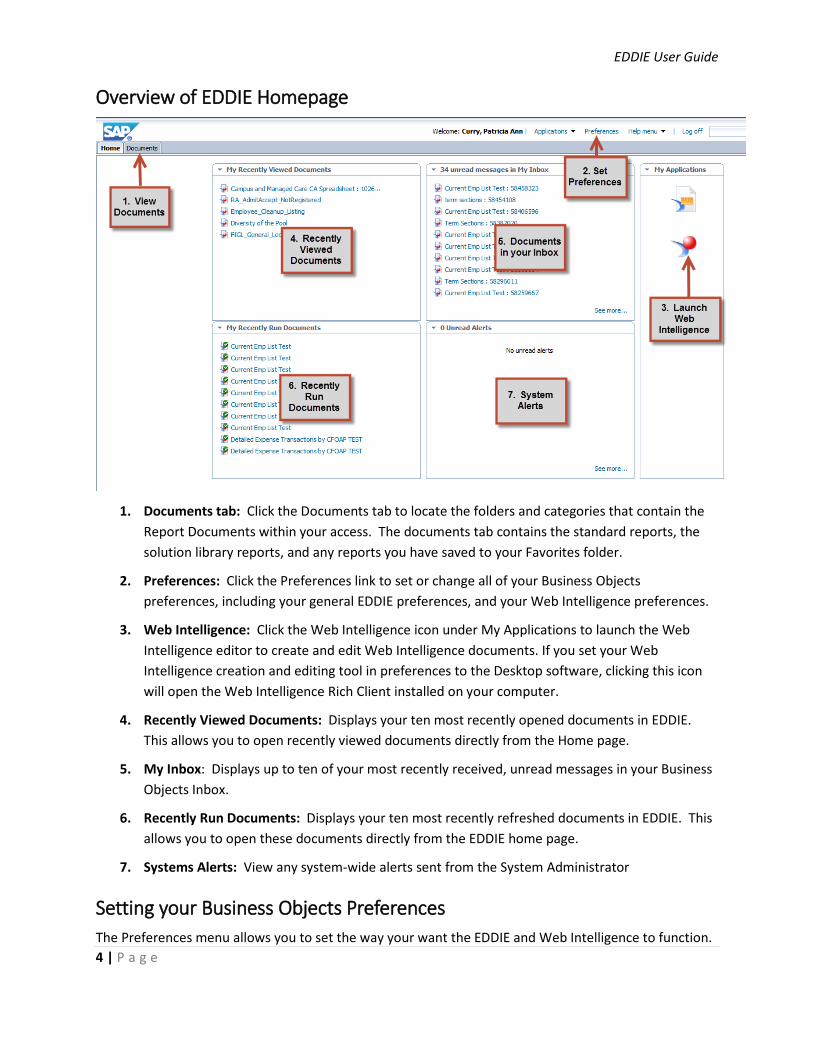
Overview of EDDIE Homepage
1. Documents tab: Click the Documents tab to locate the folders and categories that contain the Report Documents within your access. The documents tab contains the standard reports, the solution library reports, and any reports you have saved to your Favorites folder.
2. Preferences: Click the Preferences link to set or change all of your Business Objects preferences, including your general EDDIE preferences, and your Web Intelligence preferences.
3. Web Intelligence: Click the Web Intelligence icon under My Applications to launch the Web Intelligence editor to create and edit Web Intelligence documents. If you set your Web Intelligence creation and editing tool in preferences to the Desktop software, clicking this icon will open the Web Intelligence Rich Client installed on your computer.
4. Recently Viewed Documents: Displays your ten most recently opened documents in EDDIE. This allows you to open recently viewed documents directly from the Home page.
5. My Inbox: Displays up to ten of your most recently received, unread messages in your Business Objects Inbox.
6. Recently Run Documents: Displays your ten most recently refreshed documents in EDDIE. This allows you to open these documents directly from the EDDIE home page.
7. Systems Alerts: View any system-wide alerts sent from the System Administrator
Setting your Business Objects Preferences The Preferences menu allows you to set the way your want the EDDIE and Web Intelligence to function.
EDDIE User Guide
5 | P a g e
1. From the Home Page, click the Preferences link.
2. Under General Preferences, you can:
a. Reset your options to the defaults.
b. Select a different tab, folder, or category as your start page.
c. Select which columns you want to display in the Documents tab.
d. Change the document viewing location (view in the EDDIE portal or open documents in separate windows)
e. Set the maximum number of items (documents) to display in lists per page. Increasing this number will allow you to see more documents in your folders and categories without having to use page navigation.
3. Under Web Intelligence preferences, you can:
a. Select how you would like to view Web Intelligence documents in EDDIE. Choices include:
i. HTML (Default)
ii. Desktop (requires Rich Client installation)
iii. PDF
b. Select how you would like to modify and create Web Intelligence documents. Choices include:
i. HTML (Default)
ii. Desktop (requires Rich Client to be installed). If you want to open and save reports to your computer, you need to use the Rich Client. The HTML version requires that you save your documents in EDDIE.
EDDIE User Guide
6 | P a g e
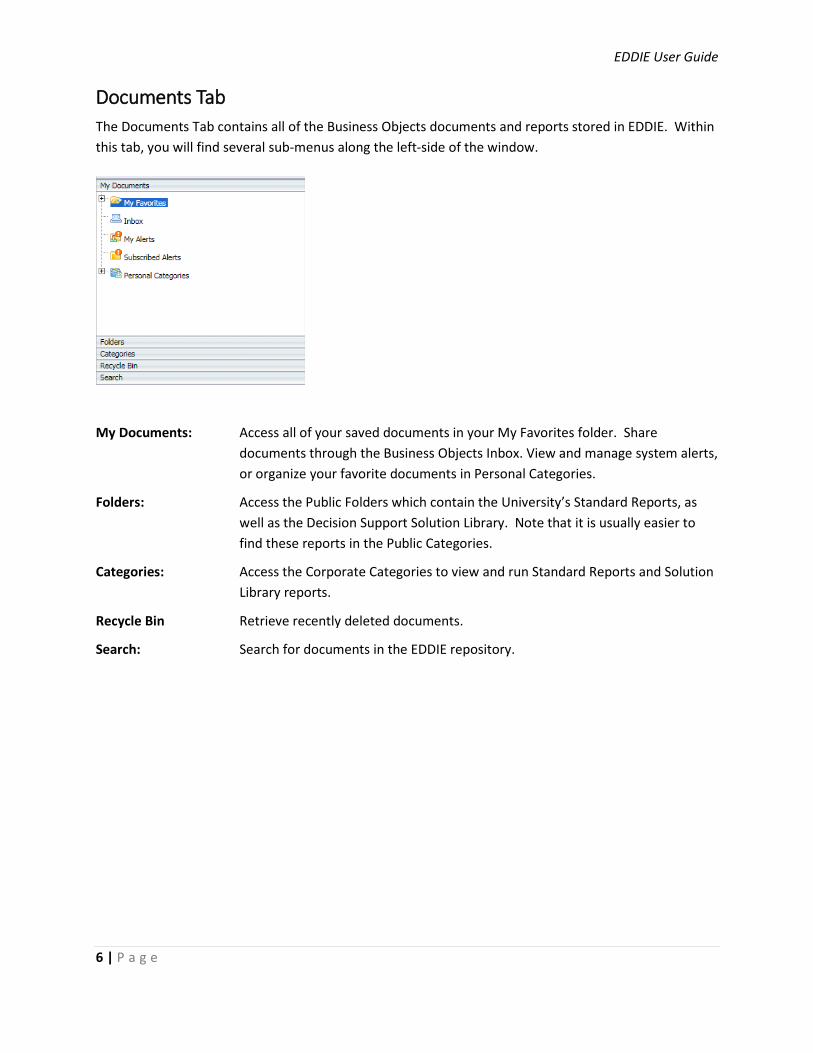
Documents Tab The Documents Tab contains all of the Business Objects documents and reports stored in EDDIE. Within this tab, you will find several sub-menus along the left-side of the window.
My Documents: Access all of your saved documents in your My Favorites folder. Share documents through the Business Objects Inbox. View and manage system alerts, or organize your favorite documents in Personal Categories.
Folders: Access the Public Folders which contain the University’s Standard Reports, as well as the Decision Support Solution Library. Note that it is usually easier to find these reports in the Public Categories.
Categories: Access the Corporate Categories to view and run Standard Reports and Solution Library reports.
Recycle Bin Retrieve recently deleted documents.
Search: Search for documents in the EDDIE repository.
EDDIE User Guide
7 | P a g e
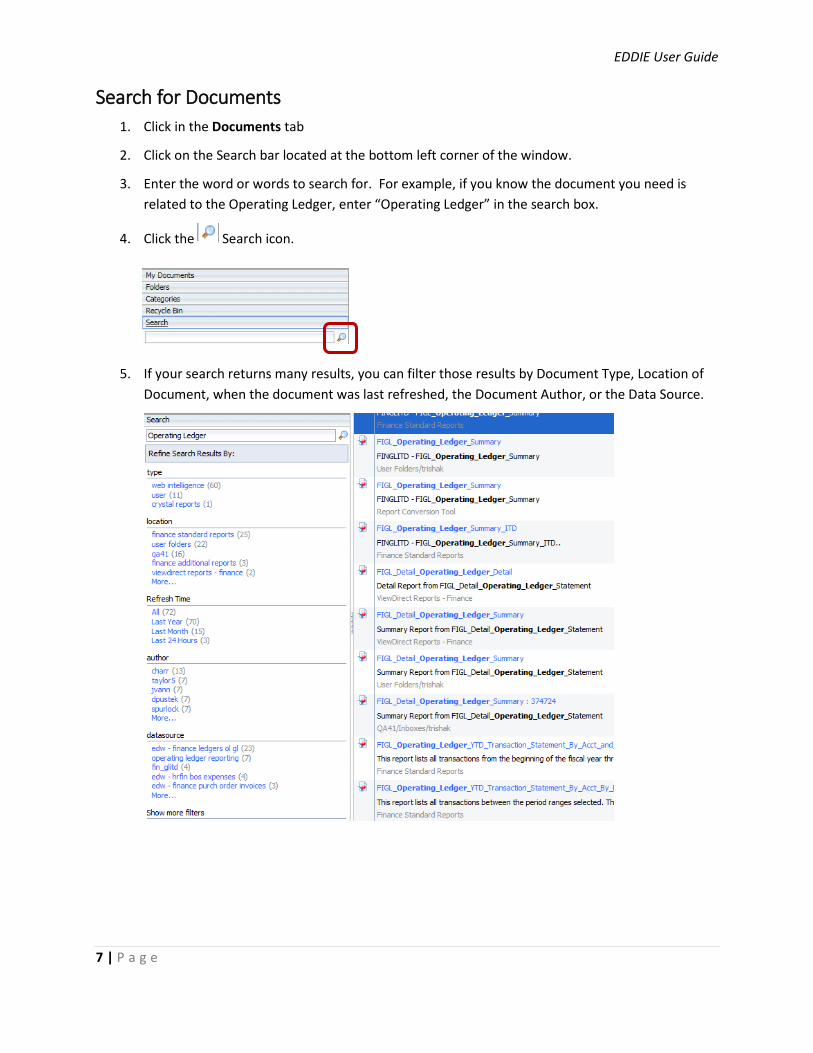
Search for Documents 1. Click in the Documents tab
2. Click on the Search bar located at the bottom left corner of the window.
3. Enter the word or words to search for. For example, if you know the document you need is related to the Operating Ledger, enter “Operating Ledger” in the search box.
4. Click the Search icon.
5. If your search returns many results, you can filter those results by Document Type, Location of Document, when the document was last refreshed, the Document Author, or the Data Source.
EDDIE User Guide
8 | P a g e
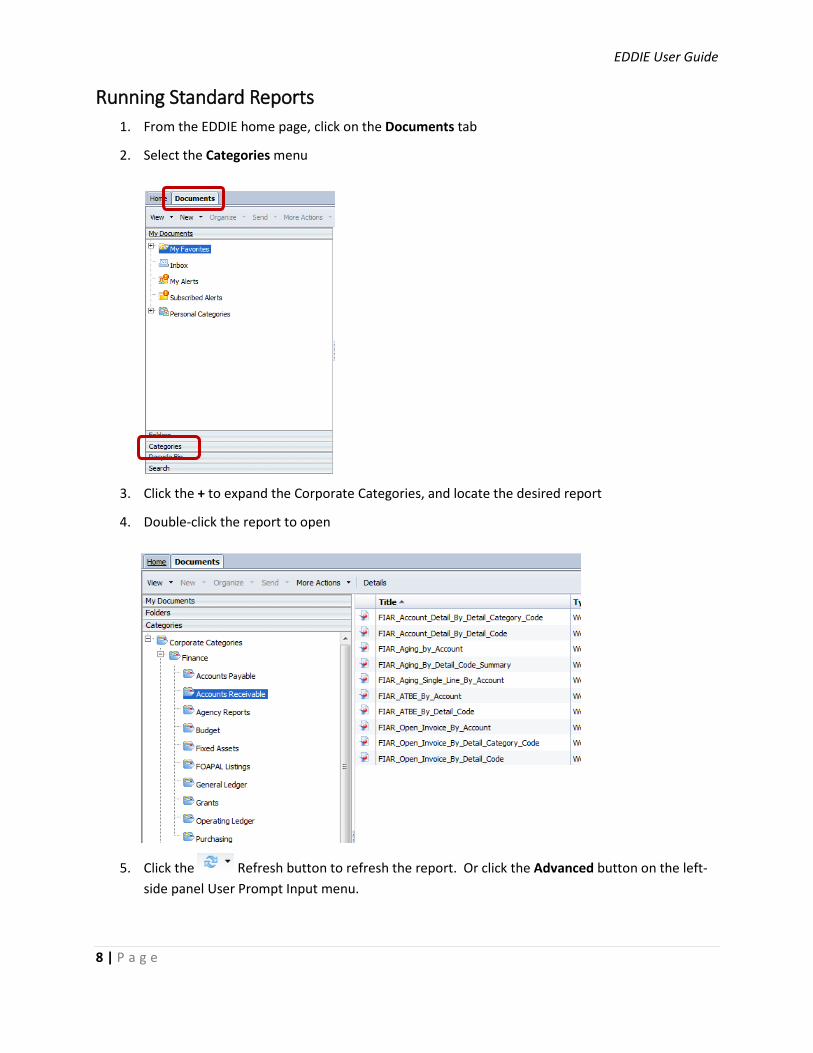
Running Standard Reports 1. From the EDDIE home page, click on the Documents tab
2. Select the Categories menu
3. Click the + to expand the Corporate Categories, and locate the desired report
4. Double-click the report to open
5. Click the Refresh button to refresh the report. Or click the Advanced button on the left-side panel User Prompt Input menu.
EDDIE User Guide
9 | P a g e
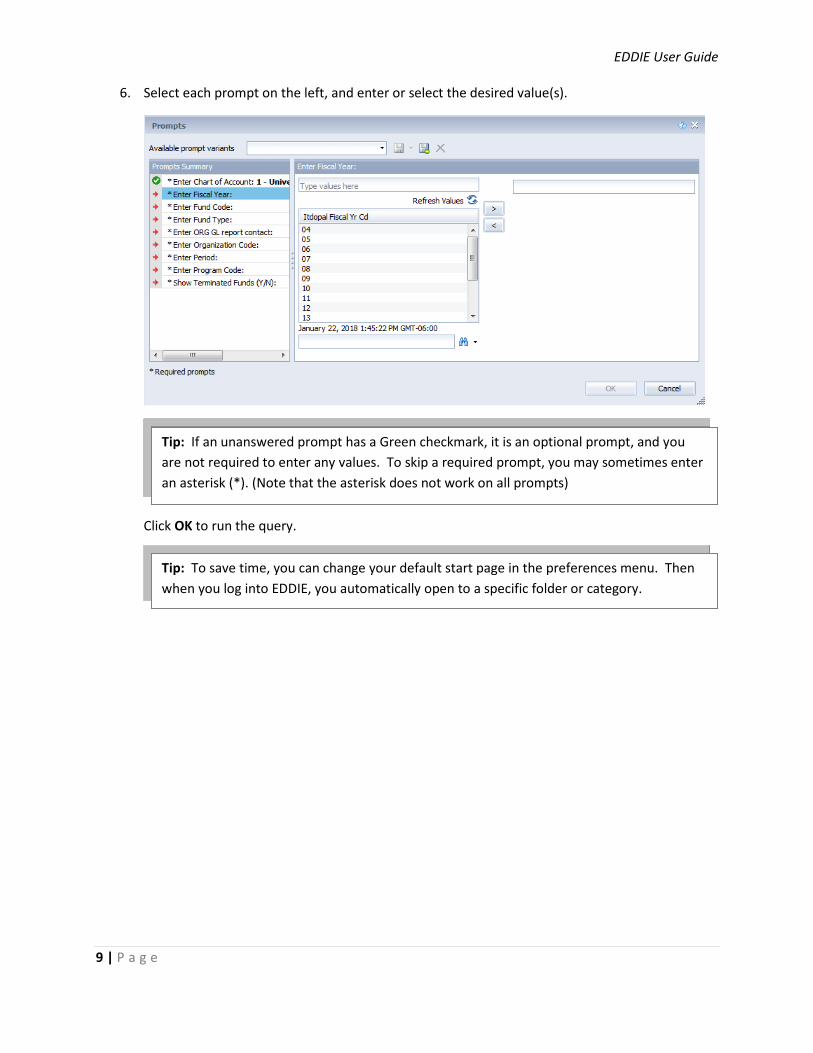
6. Select each prompt on the left, and enter or select the desired value(s).
Click OK to run the query.
Tip: If an unanswered prompt has a Green checkmark, it is an optional prompt, and you are not required to enter any values. To skip a required prompt, you may sometimes enter an asterisk (*). (Note that the asterisk does not work on all prompts)
Tip: To save time, you can change your default start page in the preferences menu. Then when you log into EDDIE, you automatically open to a specific folder or category.
EDDIE User Guide
10 | P a g e
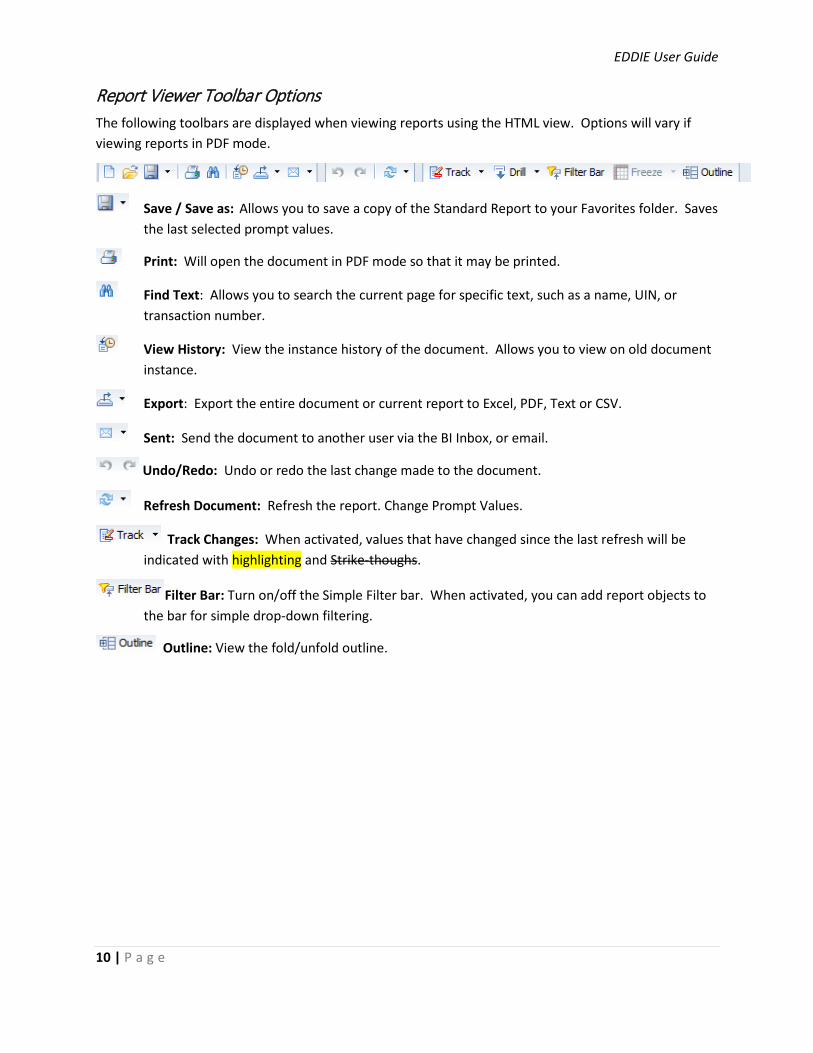
Report Viewer Toolbar Options The following toolbars are displayed when viewing reports using the HTML view. Options will vary if viewing reports in PDF mode.
Save / Save as: Allows you to save a copy of the Standard Report to your Favorites folder. Saves the last selected prompt values.
Print: Will open the document in PDF mode so that it may be printed.
Find Text: Allows you to search the current page for specific text, such as a name, UIN, or transaction number.
View History: View the instance history of the document. Allows you to view on old document instance.
Export: Export the entire document or current report to Excel, PDF, Text or CSV.
Sent: Send the document to another user via the BI Inbox, or email.
Undo/Redo: Undo or redo the last change made to the document.
Refresh Document: Refresh the report. Change Prompt Values.
Track Changes: When activated, values that have changed since the last refresh will be indicated with highlighting and Strike-thoughs.
Filter Bar: Turn on/off the Simple Filter bar. When activated, you can add report objects to the bar for simple drop-down filtering.
Outline: View the fold/unfold outline.
EDDIE User Guide
11 | P a g e
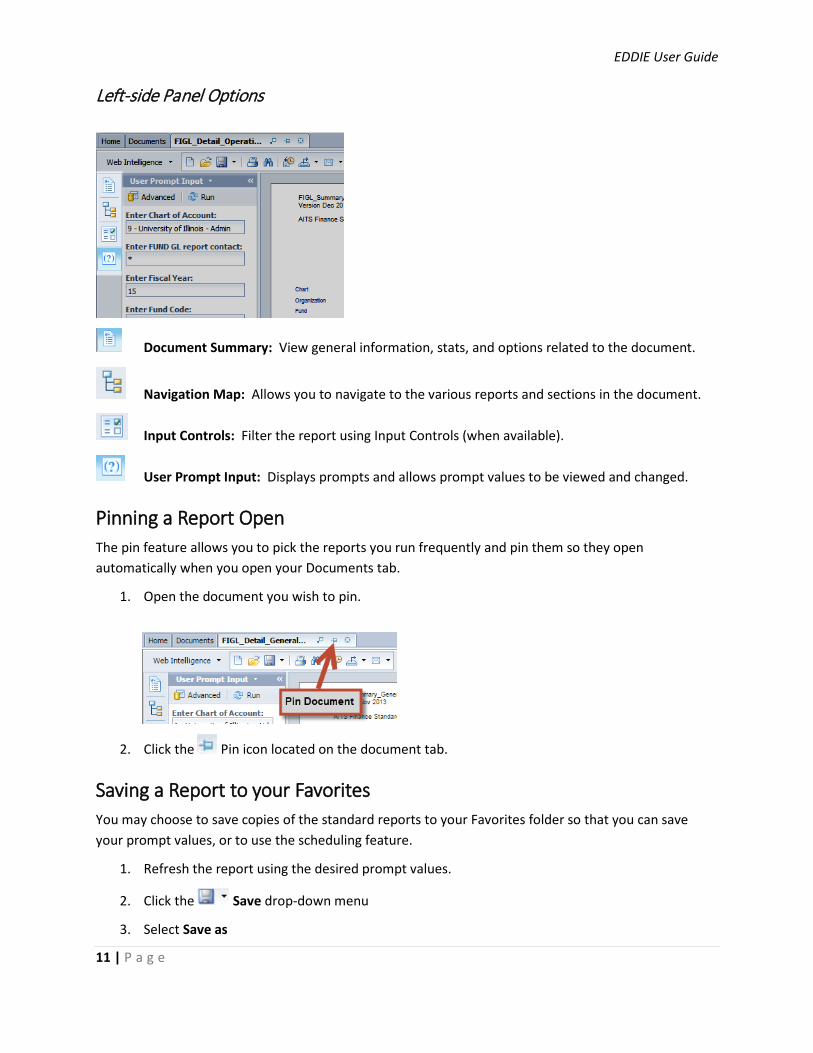
Left-side Panel Options
Document Summary: View general information, stats, and options related to the document.
Navigation Map: Allows you to navigate to the various reports and sections in the document.
Input Controls: Filter the report using Input Controls (when available).
User Prompt Input: Displays prompts and allows prompt values to be viewed and changed.
Pinning a Report Open The pin feature allows you to pick the reports you run frequently and pin them so they open automatically when you open your Documents tab.
1. Open the document you wish to pin.
2. Click the Pin icon located on the document tab.
Saving a Report to your Favorites You may choose to save copies of the standard reports to your Favorites folder so that you can save your prompt values, or to use the scheduling feature.
1. Refresh the report using the desired prompt values.
2. Click the Save drop-down menu
3. Select Save as
EDDIE User Guide
12 | P a g e
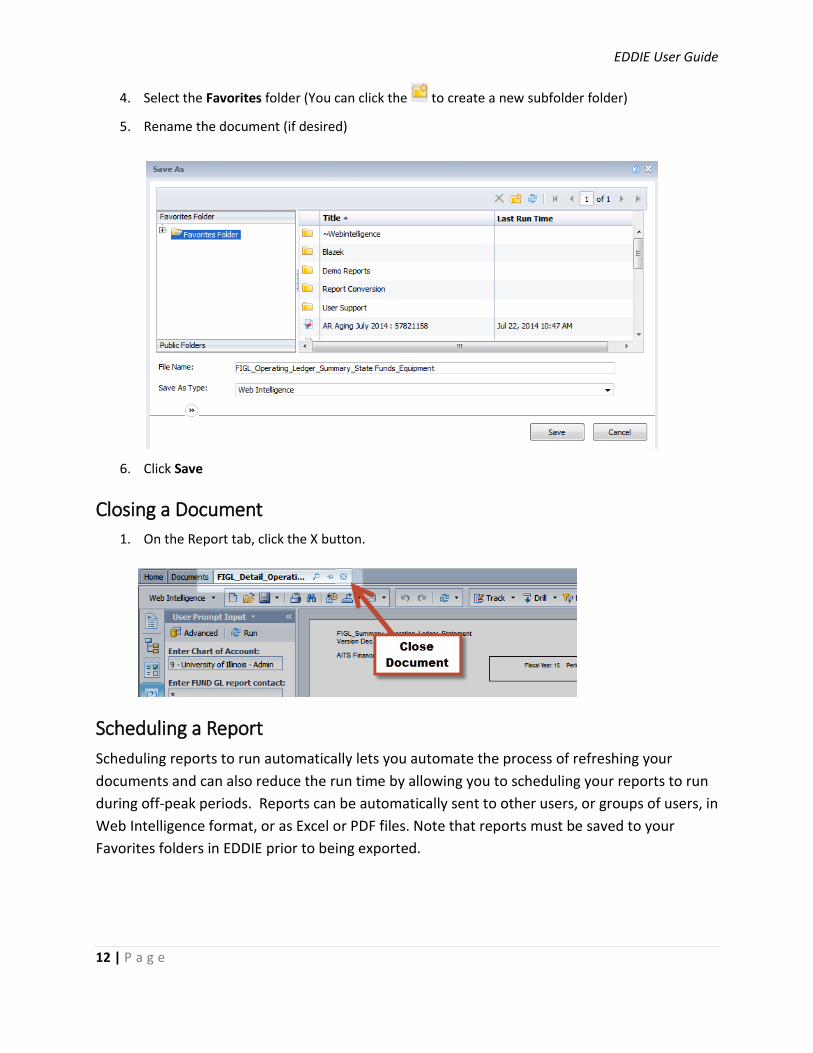
4. Select the Favorites folder (You can click the to create a new subfolder folder)
5. Rename the document (if desired)
6. Click Save
Closing a Document 1. On the Report tab, click the X button.
Scheduling a Report Scheduling reports to run automatically lets you automate the process of refreshing your documents and can also reduce the run time by allowing you to scheduling your reports to run during off-peak periods. Reports can be automatically sent to other users, or groups of users, in Web Intelligence format, or as Excel or PDF files. Note that reports must be saved to your Favorites folders in EDDIE prior to being exported.
EDDIE User Guide
13 | P a g e
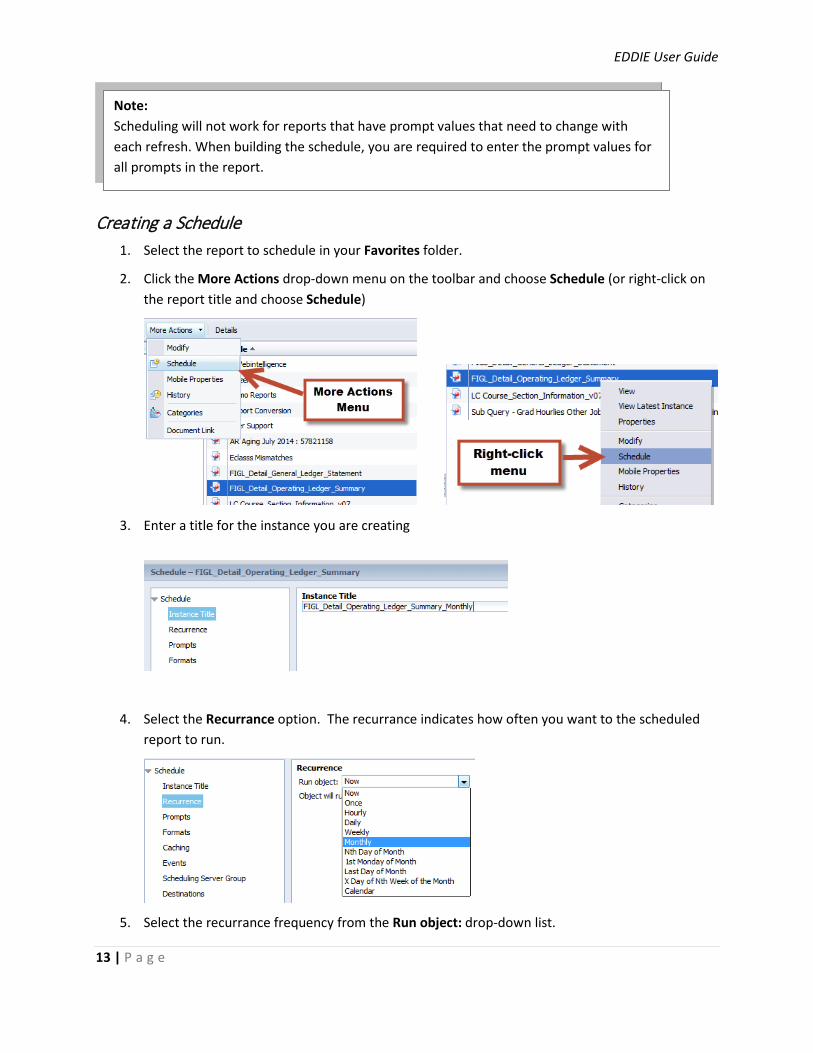
Creating a Schedule 1. Select the report to schedule in your Favorites folder.
2. Click the More Actions drop-down menu on the toolbar and choose Schedule (or right-click on the report title and choose Schedule)
3. Enter a title for the instance you are creating
4. Select the Recurrance option. The recurrance indicates how often you want to the scheduled report to run.
5. Select the recurrance frequency from the Run object: drop-down list.
Note: Scheduling will not work for reports that have prompt values that need to change with each refresh. When building the schedule, you are required to enter the prompt values for all prompts in the report.
EDDIE User Guide
14 | P a g e
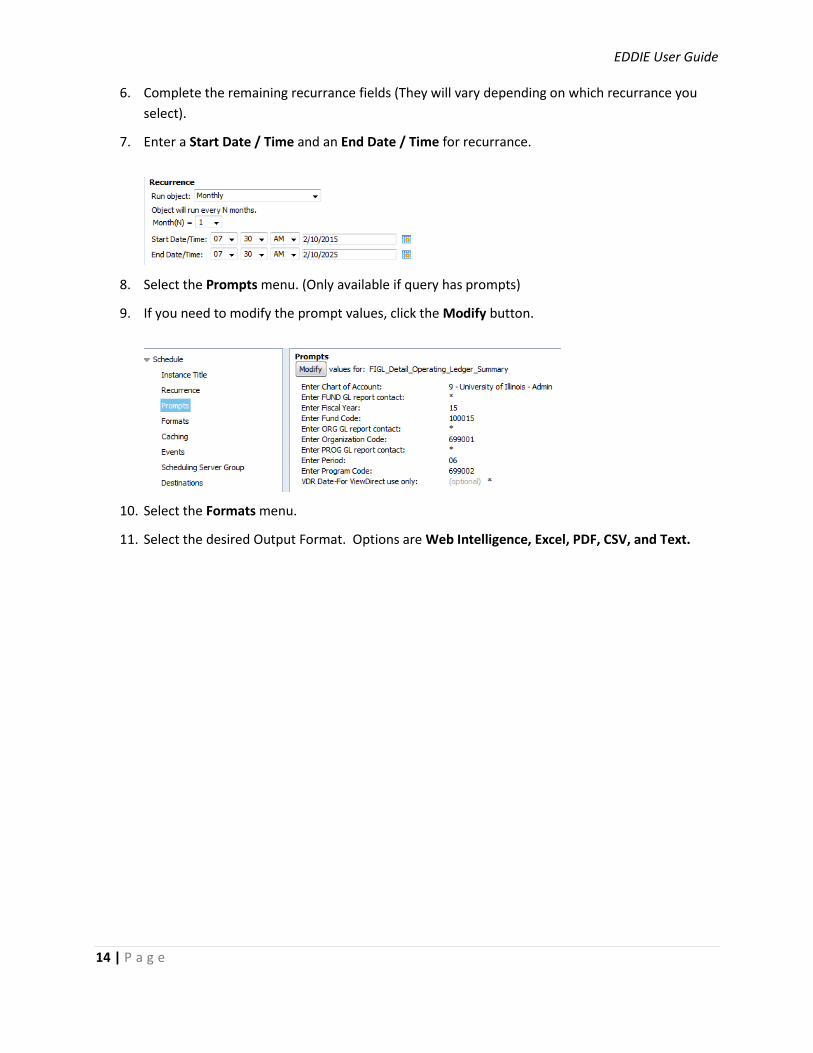
6. Complete the remaining recurrance fields (They will vary depending on which recurrance you select).
7. Enter a Start Date / Time and an End Date / Time for recurrance.
8. Select the Prompts menu. (Only available if query has prompts)
9. If you need to modify the prompt values, click the Modify button.
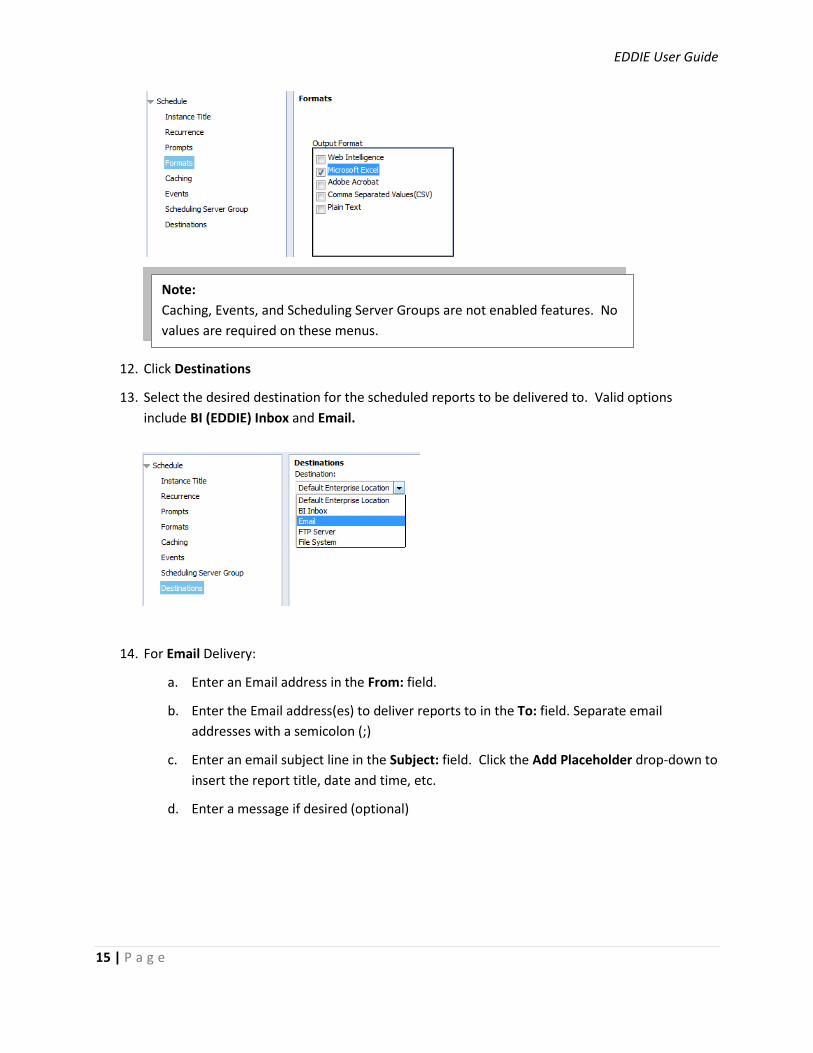
10. Select the Formats menu.
11. Select the desired Output Format. Options are Web Intelligence, Excel, PDF, CSV, and Text.
EDDIE User Guide
15 | P a g e
12. Click Destinations
13. Select the desired destination for the scheduled reports to be delivered to. Valid options include BI (EDDIE) Inbox and Email.
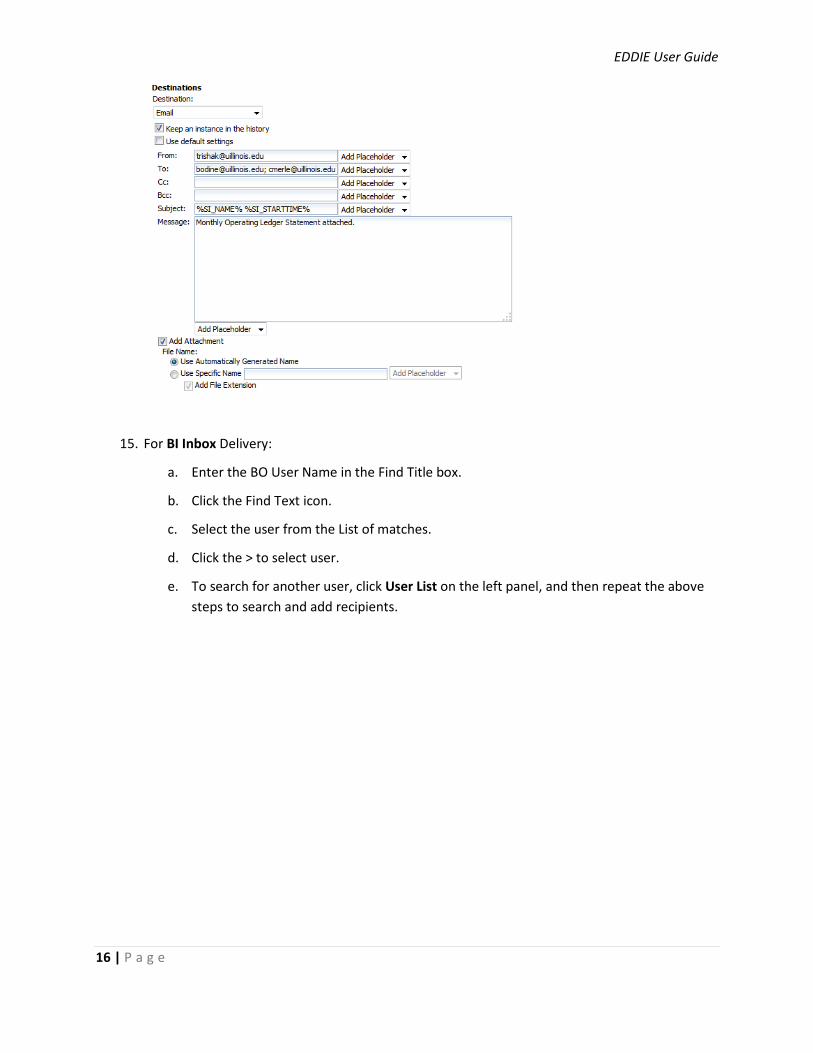
14. For Email Delivery:
a. Enter an Email address in the From: field.
b. Enter the Email address(es) to deliver reports to in the To: field. Separate email addresses with a semicolon (;)
c. Enter an email subject line in the Subject: field. Click the Add Placeholder drop-down to insert the report title, date and time, etc.
d. Enter a message if desired (optional)
Note: Caching, Events, and Scheduling Server Groups are not enabled features. No values are required on these menus.
EDDIE User Guide
16 | P a g e
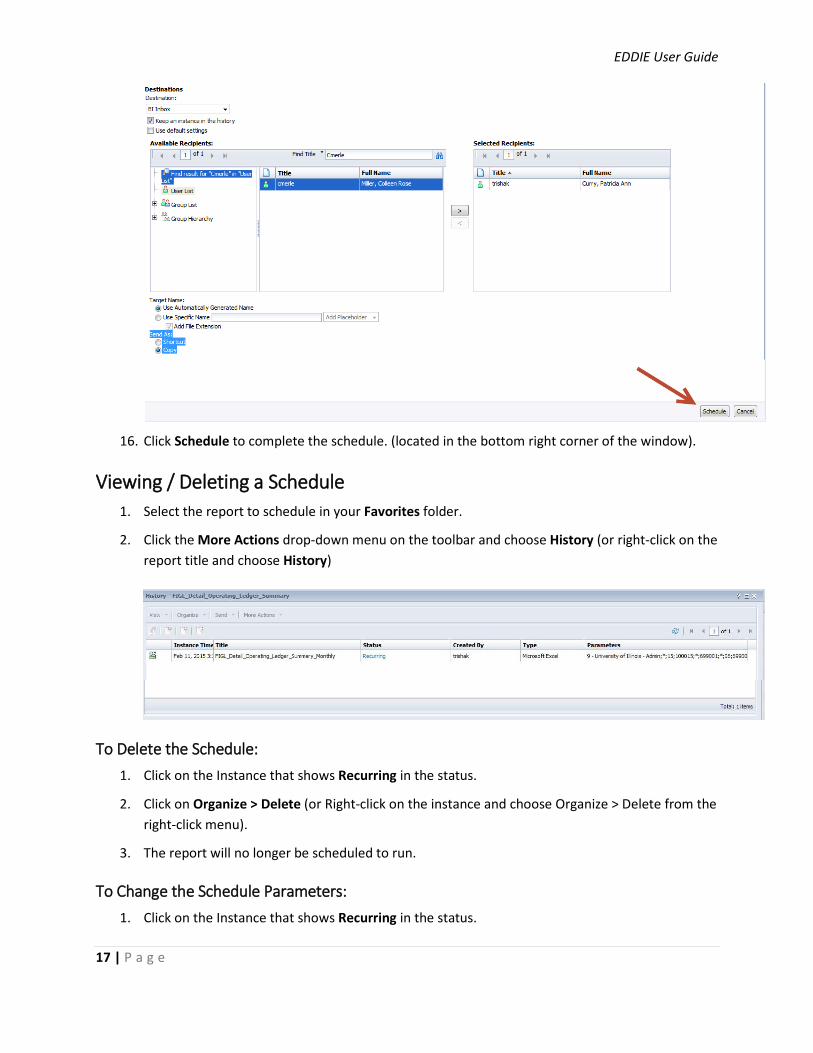
15. For BI Inbox Delivery:
a. Enter the BO User Name in the Find Title box.
b. Click the Find Text icon.
c. Select the user from the List of matches.
d. Click the > to select user.
e. To search for another user, click User List on the left panel, and then repeat the above steps to search and add recipients.
EDDIE User Guide
17 | P a g e
16. Click Schedule to complete the schedule. (located in the bottom right corner of the window).
Viewing / Deleting a Schedule 1. Select the report to schedule in your Favorites folder.
2. Click the More Actions drop-down menu on the toolbar and choose History (or right-click on the report title and choose History)
To Delete the Schedule: 1. Click on the Instance that shows Recurring in the status.
2. Click on Organize > Delete (or Right-click on the instance and choose Organize > Delete from the right-click menu).
3. The report will no longer be scheduled to run.
To Change the Schedule Parameters: 1. Click on the Instance that shows Recurring in the status.
EDDIE User Guide
18 | P a g e
2. Click on More Actions > Reschedule (or right-click and choose Reschedule)
3. Follow the steps for creating a schedule to make changes to the schedule parameters.
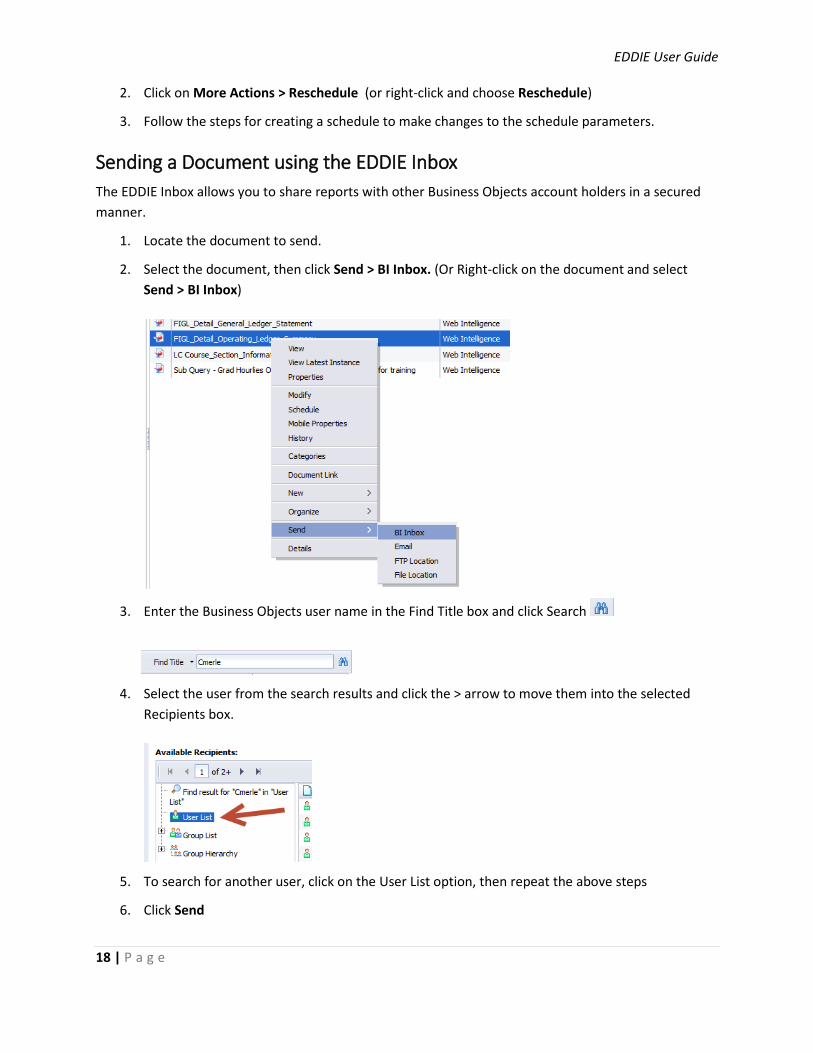
Sending a Document using the EDDIE Inbox The EDDIE Inbox allows you to share reports with other Business Objects account holders in a secured manner.
1. Locate the document to send.
2. Select the document, then click Send > BI Inbox. (Or Right-click on the document and select Send > BI Inbox)
3. Enter the Business Objects user name in the Find Title box and click Search
4. Select the user from the search results and click the > arrow to move them into the selected Recipients box.
5. To search for another user, click on the User List option, then repeat the above steps
6. Click Send