Embed Size (px)
Citation preview

Onboarding Guide for Premium Teachers
● Getting started
Signing up as a teacher
Using Google SSO or Clever
Activating Premium
Adding students
Resetting a student’s password
● Assignments
● Data
● Lessons
● Contact Us

Signing up as a Teacher
Signing Up Manually as a Teacher
1. Go to noredink.com.
2. Click “Sign up for FREE!”
3. Click “I’m a Teacher.”
4. Fill out the fields and click “Sign Up for a Teacher Account.”
Note: You can also sign up using Google or Clever. Directions can be found here.
3
2
Creating classes
1. Once your account has been created, find and select your school.
2. Create a class by naming it and selecting the appropriate grade level(s).
3. You can create more than one class, by clicking the blue “add class” button. You can also skip this and do it later.
4. Once you’ve added all of your classes, click “Done for now”
GETTING STARTED
1
34

Linking an Existing Account to Google SSO or Clever
1. Log in on noredink.com.
2. Click on your name in the top right corner and then click “Settings.”
3. Click the red “Link with Google Account” or the blue “Link with Clever Account” button on the right side of the screen.
4. Select the Google or Clever account you’d like to use.
Signing Up as a Teacher with Google or Clever
Why would I want to do this?Linking with Google or Clever means you can access your NoRedInk account with the same login information that you use for Google Apps or Clever.
1. Go to noredink.com.
2. Click “Sign up for FREE!”
3. Click the “Sign Up with Google” or the “Log in with Clever” button.
4. Select the Google or Clever account you’d like to use.
3
4
Signing up as a TeacherGETTING STARTED
2

1. Log in, click your name at the top right corner of your screen, and click “Settings.”
2. Enter the premium code given to you by your school’s administrator and click “Update Account.” If your school has a site license, you’re all set!
3. If your school only purchased Premium for some of its students, click your name once more, then select “Manage Classes” in the dropdown.
4. Choose a class for which your school has purchased premium accounts, click the “Activate” button.
5. When the notification pops up, follow the directions on the screen, and press the “Activate Premium” button.
6. If you have successfully made your class Premium, you should see “inactive” has changed to “active” for the class. Repeat steps 3-6 for all classes that should be Premium.
1
2
4
Note: Once you have activated Premium, the action cannot be undone. If you are unsure whether or not a Premium license has been purchased for a class, please ask your administrator!
Activating PremiumGETTING STARTED
6

Give students a class code and have them manually create their account (Recommended!)
1. Click “add students” for the class you want students to join. Your class code will pop up in a modal.
2. Send students to noredink.com.
3. Have them click “Sign up for FREE” and select “I’m a student.”
4. Have them enter the Class Code.
5. Have students fill out their information and click “Sign Up for a Student Account.”
1
3
4
Give class code to students and have them sign up using Google or Clever SSO
1. Find the unique Class Code for the class you want students to join.
2. Send students to noredink.com.
3. Have them click “Sign up for FREE” and select “I’m a student.”
4. Have them enter the Class Code.
5. Have them click the “Sign up with Google” or the “Log in with Clever” button to create a linked account.
5
There are three ways to add students to a class.
Adding studentsGETTING STARTED

Add students yourself
1. Go to your “Home” page.
2. Click “Add Students” next to the class to which you want to add students.
3. Click the “Add Manually” tab
4. Enter a student’s last name, first name, and gender and click “Save.” Repeat for each student you want to add.
5. Students will automatically be assigned temporary usernames and passwords. Once they’ve logged in with that information, they can go to their “Settings” pages and edit their passwords.
6. Please note that if you add students manually, students simply need to go to noredink.com, click “Log In,” and enter the username and temporary password we assigned them. Students do not need to use the “Sign up for FREE!” button.
4
6
2
There are three ways to add students to a class.
Adding studentsGETTING STARTED

3
1. Click your name, then “Manage Classes”
2. Select the appropriate class class
3. Switch to the students tab
4. Click “Actions,” then “Reset password” for theappropriate student
2
3
4
The student will be assigned a new temporary password. Once he has logged in with the new information, he can go to “Settings” to edit his password.
1
Resetting a student’s passwordGETTING STARTED

Planning Diagnostics Planning Diagnostics give a broad overview of how students are performing. We’d recommend giving a Planning Diagnostic at the beginning of every school year or semester to get a general sense of strengths and weaknesses. Note that Planning Diagnostics do not produce a percentage grade; rather, they’ll group students into one of four performance bands.
Unit Diagnostics Unit Diagnostics allow for a more zoomed-in view of how students are doing on specific skills. A Unit Diagnostic can be given before the start of a teaching cycle to get a sense of what students already know and to figure out what areas might be challenging for students. Note that Unit Diagnostics are intended to be compared later to a growth quiz.
PracticePractice allows students to master skills at their own pace. Rather than assigning a specific number of questions, you’ll assign a number of skills to work on; students of different levels may require more or fewer questions to prove mastery. Generally, a single skill takes 5-10 minutes to complete.
QuizNew quizzes allow teachers to assess students on a specific skill or set of skills.
Growth QuizGrowth Quizzes are created to match previous quizzes or Unit Diagnostics, assessing the same concepts but using different questions. They are intended to give teachers a sense of students’ growth over time. These types of quizzes can be thought of as a summative assessment at the end of a learning cycle.
Ada
ptiv
e
Set n
umbe
r of
ques
tions
Can
be
follo
wed
w
ith g
row
th q
uiz
Giv
es %
gra
de
The 5 assignment typesASSIGNMENTS & DATA

Unit Cycles
NoRedInk units ensure that you and your students can track learning over time. Once you’ve identified the unit you’ll teach next, start with a Unit Diagnostic, which will act as a pre-quiz. This will set a baseline for student understanding and help you target further instruction.
Next, assign Practice to guide students through our mastery-based scope-and-sequence. Our exercises provide instant remediation and adapt to each student’s needs.
Finally, use a Growth Quiz to gauge student learning at the conclusion of the unit. This assessment provides new questions similar to those from the original Pre-Quiz. You’ll be able to celebrate student growth and identify those learners who need additional support.
Planning Diagnostics
At the beginning of each school year or semester, we recommend using Planning Diagnostics to group students into performance bands and rank content areas to help you prioritize and plan. Our curriculum team has built a library of standards-aligned, grade-level-appropriate diagnostics to help you identify strengths and weaknesses across your classes. Assign one in seconds here.
Recommended flowASSIGNMENTS & DATA
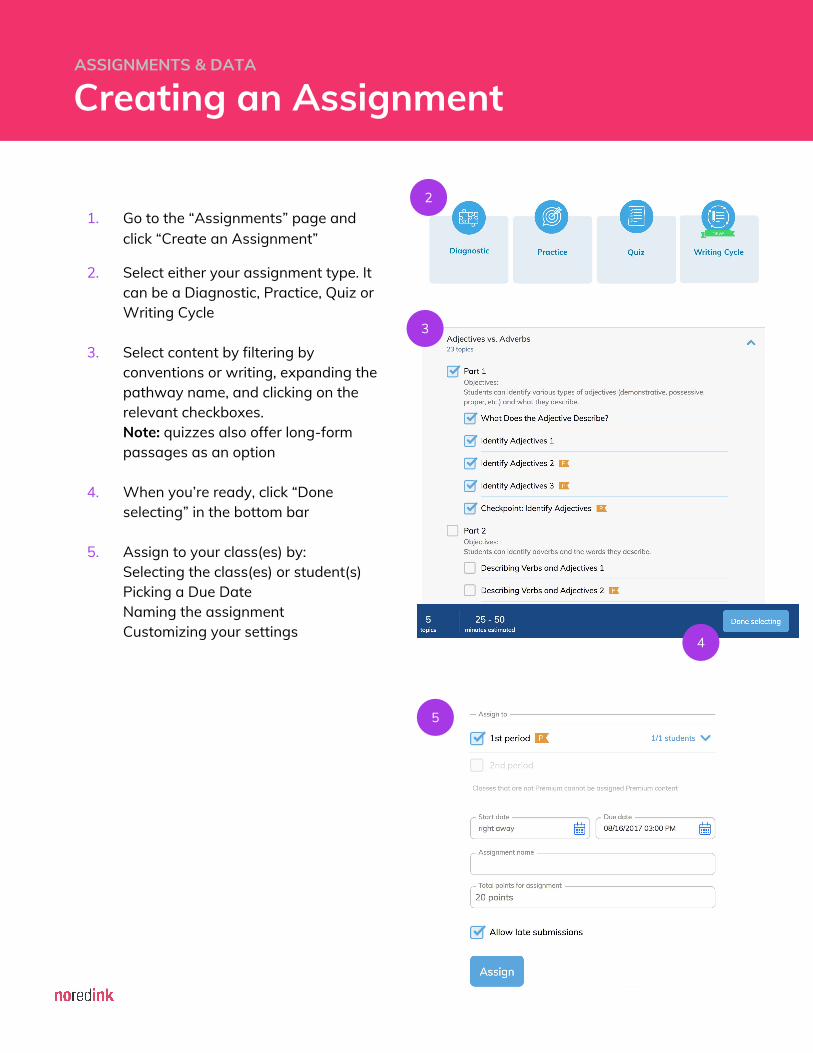
Creating an AssignmentASSIGNMENTS & DATA
1. Go to the “Assignments” page and click “Create an Assignment”
2. Select either your assignment type. It can be a Diagnostic, Practice, Quiz or Writing Cycle
3. Select content by filtering by conventions or writing, expanding the pathway name, and clicking on the relevant checkboxes.Note: quizzes also offer long-form passages as an option
4. When you’re ready, click “Done selecting” in the bottom bar
5. Assign to your class(es) by:Selecting the class(es) or student(s)Picking a Due DateNaming the assignmentCustomizing your settings
2
3
4
5
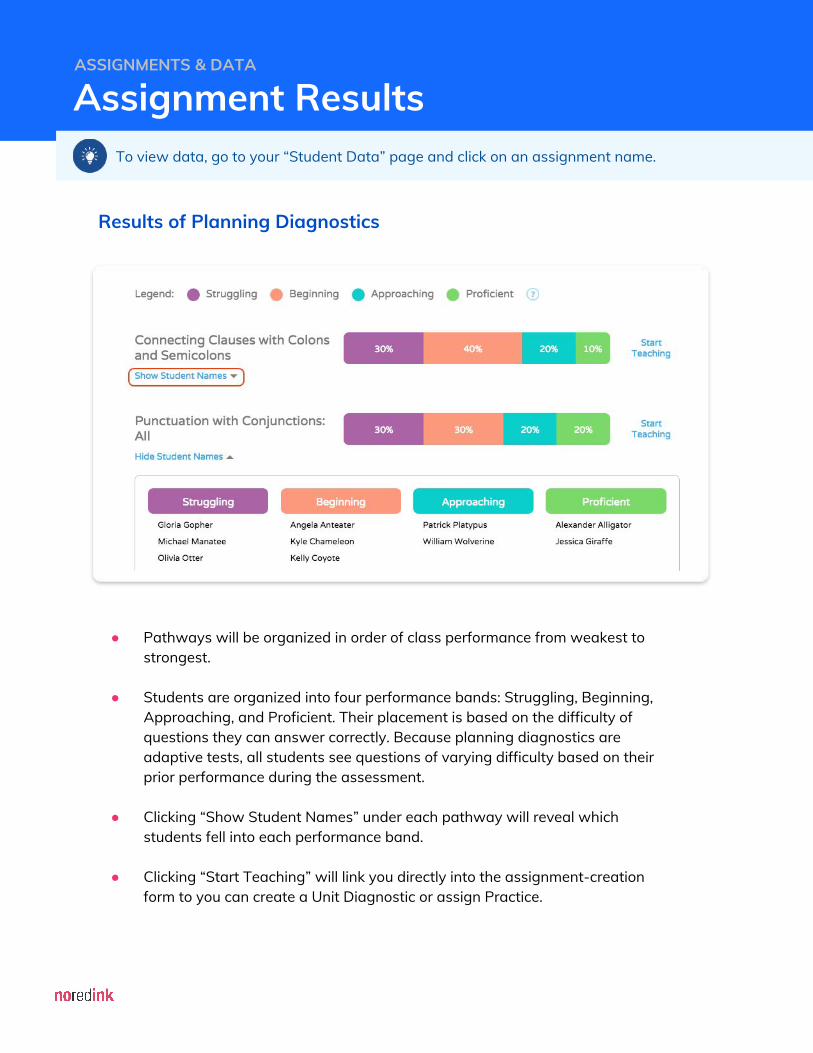
Results of Planning Diagnostics
Assignment ResultsASSIGNMENTS & DATA
● Pathways will be organized in order of class performance from weakest to strongest.
● Students are organized into four performance bands: Struggling, Beginning, Approaching, and Proficient. Their placement is based on the difficulty of questions they can answer correctly. Because planning diagnostics are adaptive tests, all students see questions of varying difficulty based on their prior performance during the assessment.
● Clicking “Show Student Names” under each pathway will reveal which students fell into each performance band.
● Clicking “Start Teaching” will link you directly into the assignment-creation form to you can create a Unit Diagnostic or assign Practice.
To view data, go to your “Student Data” page and click on an assignment name.
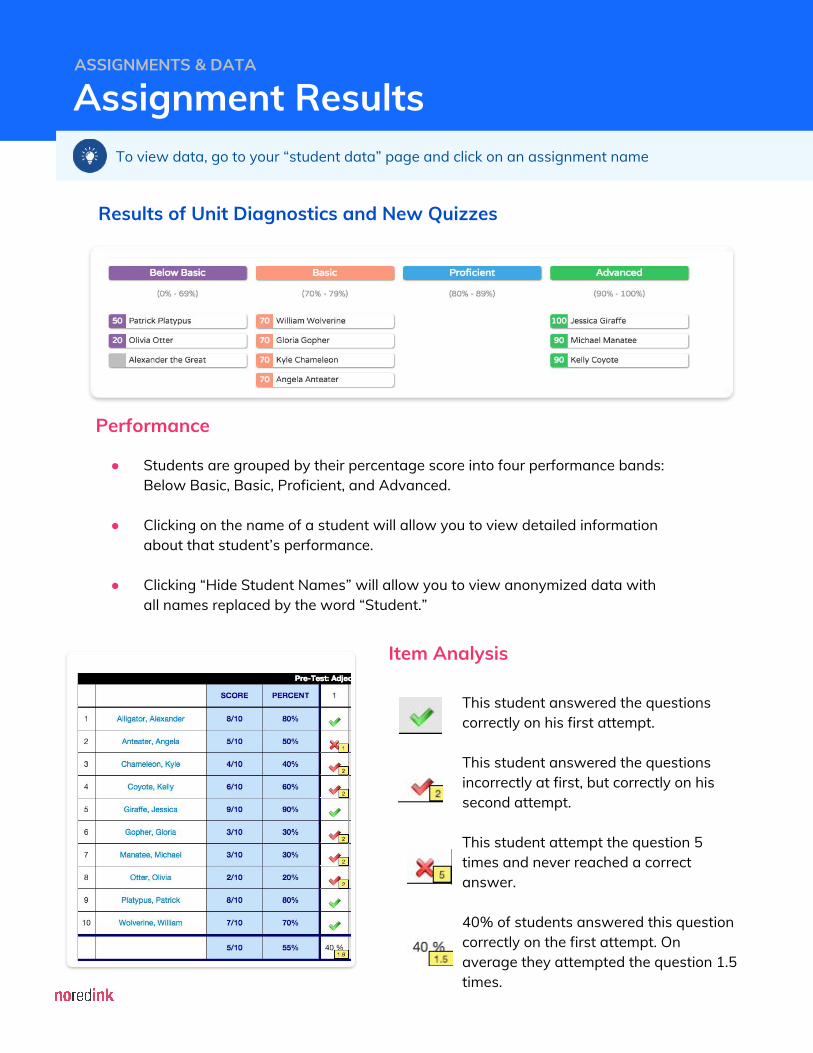
Results of Unit Diagnostics and New Quizzes
Assignment ResultsASSIGNMENTS & DATA
To view data, go to your “student data” page and click on an assignment name
● Students are grouped by their percentage score into four performance bands: Below Basic, Basic, Proficient, and Advanced.
● Clicking on the name of a student will allow you to view detailed information about that student’s performance.
● Clicking “Hide Student Names” will allow you to view anonymized data with all names replaced by the word “Student.”
Performance
Item Analysis
This student answered the questions correctly on his first attempt.
This student answered the questions incorrectly at first, but correctly on his second attempt.
This student attempt the question 5 times and never reached a correct answer.
40% of students answered this question correctly on the first attempt. On average they attempted the question 1.5 times.
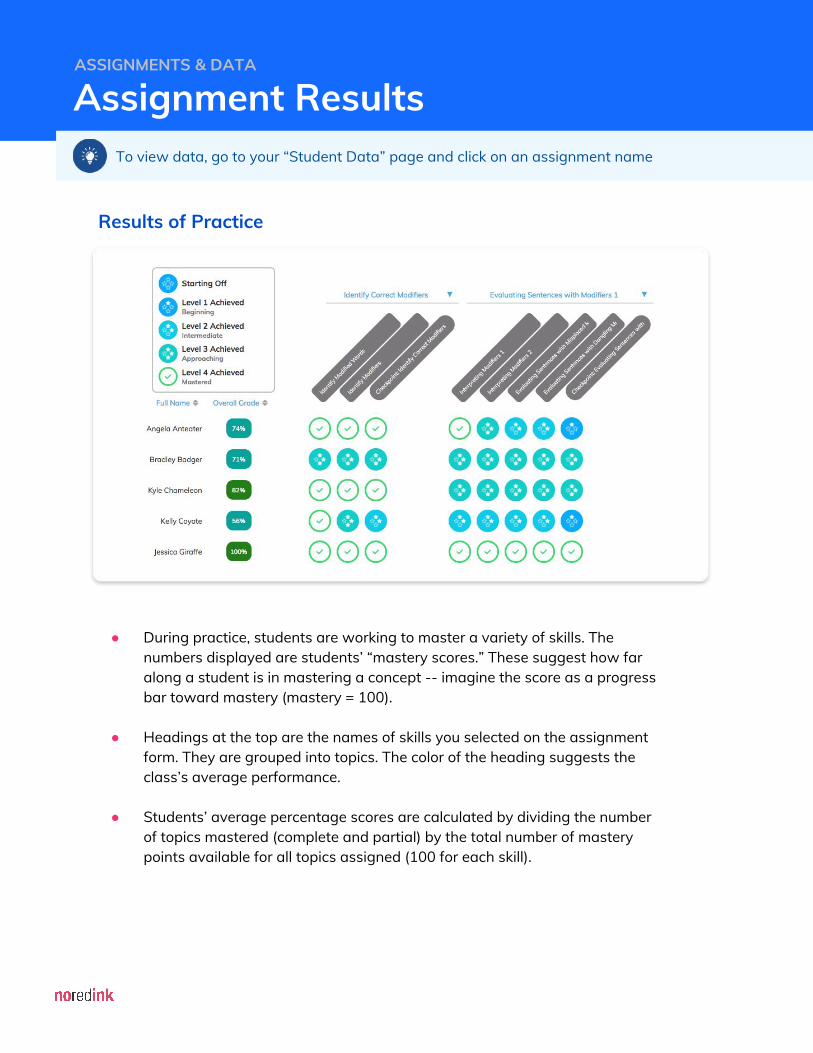
Results of Practice
Assignment ResultsASSIGNMENTS & DATA
● During practice, students are working to master a variety of skills. The numbers displayed are students’ “mastery scores.” These suggest how far along a student is in mastering a concept -- imagine the score as a progress bar toward mastery (mastery = 100).
● Headings at the top are the names of skills you selected on the assignment form. They are grouped into topics. The color of the heading suggests the class’s average performance.
● Students’ average percentage scores are calculated by dividing the number of topics mastered (complete and partial) by the total number of mastery points available for all topics assigned (100 for each skill).
To view data, go to your “Student Data” page and click on an assignment name
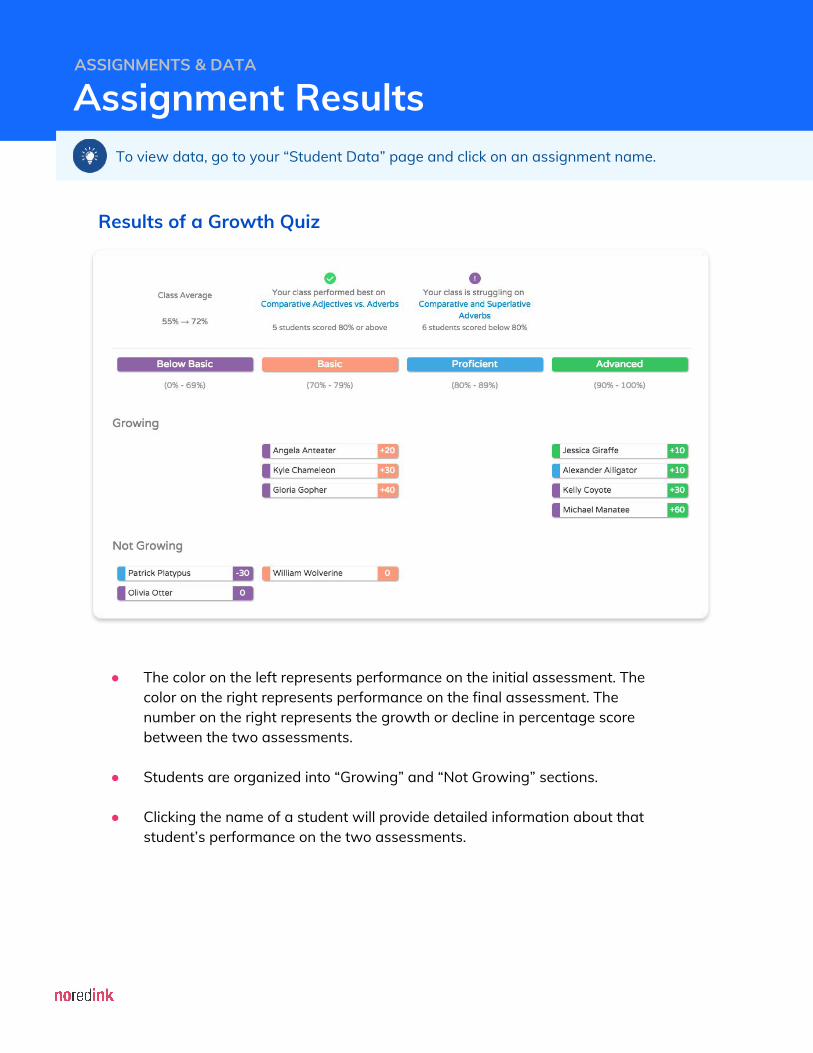
Results of a Growth Quiz
Assignment ResultsASSIGNMENTS & DATA
● The color on the left represents performance on the initial assessment. The color on the right represents performance on the final assessment. The number on the right represents the growth or decline in percentage score between the two assessments.
● Students are organized into “Growing” and “Not Growing” sections.
● Clicking the name of a student will provide detailed information about that student’s performance on the two assessments.
To view data, go to your “Student Data” page and click on an assignment name.

Mastery
Using the Data PageASSIGNMENTS & DATA
This tab of the Data page aggregates all student mastery data. It is intended to give you an up-to-date representation of student performance across all types of assessment and practice.
● The percentage on the main page represents how far your class has progressed on that pathway as a whole. Pathways with a checkmark are complete.
● Clicking on a pathway will allow you to see student mastery of each skill within that pathway. Skills are grouped into parts. For more information on how to interpret this page, see the section above entitled “Results of Practice.”
● Clicking “Assign More Practice” or “Assign Quiz” will bring you directly to the assignment form and will preselect the pathway you’re currently viewing.
To view data, go to your “Student Data” page.
Gradebook
This page allows you to see the results of all assignments in a single location. You can change the way work is scored and displayed; filter by assignment type, date, or content; and export data as a CSV or Excel file.
● Headings are color-coded based on the class average.
● Clicking on a heading will take you to the results of that specific assignment.
● Clicking on a student’s name will take you to the individual results page for that student.
● Students can be sorted by name or grade average.

Accessing Mini LessonsLESSONS
The Lessons page will allow you to access a library of NoRedInk’s mini lessons. These are great tools to project to your entire class or review with a small group of students. Each lesson also includes a link to “Practice this!” which will allow you to try a few questions on that concept.
Note: Students have access to this same library! Encourage them to look up lessons as necessary.

OTHER TIPS
To explore what the site looks like to students, click the “View as NoRedInk as a student” link on your “Home” sidebar. Your Teacher account has a complete, fully functional student account attached to it.
View the site as a student
For using NoRedInk

OTHER TIPS
You can access a feedback form by clicking “Help & Info” at the top right of your screen, then clicking “Contact Us” at the bottom of the next screen.
If the problem is related to a specific class, please select that class from the drop-down menu. You can also report a bug related to a specific student by first selecting the class name and then the student’s name.
If you include a screenshot in your report, we can fix your problem much faster! The most useful screenshots include a picture of your problem and the URL of the webpage.
If you have activated Premium for your account, any help requests you submit using this form will automatically be marked as “high priority” by our support staff.
If you have any additional questions or you encounter a bug on the site, feel free to access help center articles via the “help” tab, or email [email protected].
Enjoy the site!
Contact Us
For using NoRedInk


![Untitled-1 [kachhiproperties.com]...PLOT 10 12 13 14 15 16 17 18 19 20 21 22 23 24 25 26 27 28 29 30 TYPE OF PLOT SQ. FT. PREMIUM PREMIUM PREMIUM PREMIUM PREMIUM PREMIUM PREMIUM PREMIUM](https://img.pdfslide.net/doc/110x75/60d9385783220366c70105ab/untitled-1-plot-10-12-13-14-15-16-17-18-19-20-21-22-23-24-25-26-27-28-29.jpg)