Embed Size (px)
Citation preview

Guide to Powering Agent Vi Analytics on Milestone’s XProtect
Contents
Powering Analytics on Milestone’s XProtect 1 February 2018
Contents
1 Overview ........................................................................................................................ 2
1.1 About this Guide .................................................................................................................... 2
1.2 Version Compliance .............................................................................................................. 2
1.3 Enabling Procedure ............................................................................................................... 3
2 Specific Installation and Configuration Aspects ........................................................ 3
2.1 savVi's Prerequisites ............................................................................................................. 3
2.2 All-In-One Installation with Milestone XProtect .................................................................. 3
2.3 Required Credentials Settings for XProtect Corporate ..................................................... 5
2.4 Optimizing savVi-Analyst and savVi-Manager Performance ............................................. 6
3 Event Integration Using AgentVi Event Monitoring Milestone Plugin ....................... 7
3.1 Overview of the Integration Process.................................................................................... 7
3.2 Installing the Agent Vi Event Monitoring Milestone Plugin ............................................... 7
3.3 Initializing Agent Vi's Analytics Integration in Milestone Management Client ................ 8
3.4 Configure Default Agent Vi Analytics Event & Alarm ...................................................... 12
3.4.1 Define Agent Vi's Analytics Event .............................................................................. 12 3.4.2 Define an Associated Alarm ....................................................................................... 13 3.4.3 Restart the Milestone XProtect Event Server service ................................................ 14
3.5 Configuring and Viewing in Milestone Smart Client ........................................................ 15
3.6 Triggering Specific Actions with XPCO ............................................................................. 16
3.7 Triggering Specific Actions with XPE ................................................................................ 19
3.8 Troubleshooting Agent Vi Event Monitoring Milestone Plugin Integration ................... 21
4 savVi-Analyst embedded in Milestone Smart Client ................................................. 23

Powering Analytics on Milestone’s XProtect 2 February 2018
1 Overview
Integration of Milestone's XProtect with Agent Vi's savVi offers:
Real-Time Detections and Alerts. Events of interest are detected through real-time
analysis of multiple video sources and sent to XProtect Smart Client.
Video Search. Recorded video is queried and events of interest are located and
extracted from the XProtect recording server.
Business Intelligence. Statistical information related to the behavior of people and
vehicles is generated from the surveillance video, including traffic volumes, traffic
trends and motion patterns. Generation of such data uses live video from XProtect
connected cameras and recorded video from XProtect recording server.
These capabilities are available for IP cameras and encoders powered by embedded Vi-
Agent ("Optimized Deployment", for greater scalability) and for cameras managed by
XProtect but not powered by Vi-Agent ("Flexible Deployment" using Vi-Agent Proxy to pull
live video from XProtect).
1.1 About this Guide
This guide shows how to deploy and configure savVi and Milestone's XProtect for video analytics.
1.2 Version Compliance
savVi 5.4
Check Agent Vi’s website for supported VMS versions
For savVi-Analyst embedded in Milestone Smart Client: Milestone’s Xprotect
Corporate 2017 R3 (Server + Client 32Bit)
Note:
All configuration details in this document referring to XPCO apply also to XProtect Expert.
All configuration details in this document that refer to XPE apply also to XProtect Professional and Express editions.

Powering Analytics on Milestone’s XProtect 3 February 2018
1.3 Enabling Procedure
To enable analytics with XProtect:
1. Install savVi. For additional information, please refer to the Agent Vi online Certification Program, Installer course, Installation and Configuration lesson
2. Use savVi-Manager to configure the connection with Milestone server and to add cameras. For additional information, please refer to the Agent Vi online Certification Program, Installer course, VMS Integration lesson.
When adding the Milestone VMS to savVi select the Milestone VMS version in savVi according to the following table:
Milestone version Select in savVi
Essential+ Not supported
Express Enterprise
Express+ Corporate
Professional Enterprise
Professional+ Corporate
Expert Enterprise
Corporate Corporate
3. When deploying savVi with Milestone XProtect Corporate, Express+ 2017 and Professional+ 2017 editions, and when savVi and XProtect are installed on separate servers, you must implement one of the following options:
• When adding the VMS to savVi, specify the VMS using its hostname and not the IP address
• Add the savVi server's IP address and hostname to the Windows ‘hosts’ file (Windows\System32\drivers\etc\hosts) residing on the XProtect Management Server.
4. When deploying real-time detection and alerts, configure XProtect to receive analytics events (see Event Integration Using ).
5. Ensure that all Agent Vi’s client/server machines as well as all XProtect’s client/server machines are continuously time-synchronized by a single NTP server.
Note: Refer also to the section below for aspects specific to savVi – XProtect integration.
2 Specific Installation and Configuration Aspects
2.1 savVi's Prerequisites
You’ll require:
Milestone XProtect installed and configured.
When deploying on Windows Server (2008 or 2012) operating systems, enable
Desktop Experience using Windows Server Manager.
For Milestone 2017verify that .NET 3.5 is installed
2.2 All-In-One Installation with Milestone XProtect
An All-In-One installation is aimed for deployments in which Milestone XProtect and savVi can be installed and run on a single server. Note that in addition to the standard installation steps:

Powering Analytics on Milestone’s XProtect 4 February 2018
savVi must be installed on the server only after Milestone XProtect is installed.
During installation of savVi, you may be prompted that port 8080 is being used by
another program. If so, provide an alternative port number, e.g., 8082.
Contact Agent Vi Support for information on the required server resources.

Powering Analytics on Milestone’s XProtect 5 February 2018
2.3 Required Credentials Settings for XProtect Corporate
For XProtect Corporate compatibility, apply these settings:
1. In the Properties screen of the VAP and VMS Manager services, click tab Log On and check the radio button. This account (the machine user’s account) instead of the default Local System account.
Figure 2-1: VAP/VMS Manager Service Properties
2. Click Browse and navigate to the user privileged to log in to the Milestone PC and to Milestone XProtect Corporate.
3. Click OK and restart the service.
4. Edit the Recorder Server configuration file:
a. On the PC/s running Milestone’s XProtect Corporate recording server, find the RecorderConfig.xml file usually located in path:
C:\Documents and Settings\All Users\Application Data\Milestone\XProtect Corporate Recording Server
-OR-
C:\program files\milestone\xprotect corporate recording server
-OR- C:\ProgramData\Milestone\XProtect Corporate Recording Server
b. In the file's <webserver> section, find the element <host>. Set to the IP of the PC running the recording server, e.g., change from <host/> (empty by default) to <host>192.168.2.100</host>
c. Save the file and restart Milestone’s XProtect Corporate recording server and XProtect Corporate management server.
Note: With Milestone XProtect Corporate and Workgroup environment, a local Windows user
should be used. The user must be identical to the user defined in Milestone XProtect.

Powering Analytics on Milestone’s XProtect 6 February 2018
2.4 Optimizing savVi-Analyst and savVi-Manager Performance
You can configure Milestone's recording settings for optimal savVi-Analyst and savVi-Manager performance.
➢ To optimize savVi-Analyst performance:
Make sure that Milestone’s recording retention time and savVi-Analyst metadata retention time are aligned, i.e., how long recordings and metadata are saved until deleted. savVi-Analyst metadata retention time must not exceed Milestone’s recording retention time.
When Milestone's recording settings are configured as triggered by motion detection, savVi-Analyst’s ability to present results thumbnails and playback can be compromised if motion detection is not sensitive enough. Optimize savVi-Analyst performance by adjusting the following parameters in XProtect:
• Increase the motion sensitivity and/or-
• Increase the time before/after motion is detected and triggers recording start/stop:
Create a new ‘Rule’ in Milestone's Management Client that is a copy of the default rule ‘Default Record on Motion Rule’.
Set the time before/after to +-10 seconds (Default = 3 seconds).
Disable the default rule after the new rule is created.
• Alternatively, i.e., instead of the two options above, configure Milestone to constantly record, i.e., independently of motion detection:
Create a new rule with ‘Action’ set to Start Recording and ‘Time Interval’ set to Always.
Powering Analytics on Milestone’s XProtect 7 February 2018
3 Event Integration Using AgentVi Event Monitoring Milestone Plugin
Read this section if you deployed savVi Real-Time Detection and Alerts and you want to view events in Milestone XProtect.
Integration of savVi based on Milestone Integration Platform (MIP) offers these benefits:
Simple to configure. It takes just a few steps to be able to receive analytics events for
any number of cameras, Multi-LBSs (savVi’s server) and any number of analytics
rules per camera.
You can view analytics tracking (also referred to as ‘Metadata Overlay’ or ‘OSD’) in
real-time from Milestone Smart Client.
You can view past events, navigate to a video recording of a specific event and view
analytics tracking for that event.
you can view events retrieval up to one hour loss after recuperating from LBS
disconnection
Analytics events can be linked with specific XProtect actions.
3.1 Overview of the Integration Process
Make sure you meet savVi's Prerequisites
Install Agent Vi Event Monitoring Milestone Plugin
Initialize Agent Vi's analytics integration in XProtect Management Client
For the most common use-case of triggering analytics events and viewing alarms in
Smart Client, refer to Configure Default Agent Vi Analytics Event & Alarm and
Configuring and Viewing in Milestone Smart Client.
For a more advanced setup of triggering specific actions in Milestone XProtect, refer
to Triggering Specific Actions with XPCO and Triggering Specific Actions with EPE.
3.2 Installing the Agent Vi Event Monitoring Milestone Plugin
Install the Agent Vi Event Monitoring Milestone Plugin on all PCs hosting:
Milestone XProtect Event Server
Milestone Management Application
Milestone XProtect Smart Client
If an earlier version of the MIP Plugin is already installed, install the new version on top of
it (.ie., upgrade).
➢ To install the Agent Vi Event Monitoring Milestone Plugin:
1. Close all Milestone’s client applications such as Smart Client and the Management Client.
2. Run the Agent Vi Event Monitoring Milestone Plugin installer file.

Powering Analytics on Milestone’s XProtect 8 February 2018
➢ After installing the Agent Vi Event Monitoring Milestone Plugin:
1. On the Event Server PC, restart the Milestone XProtect Event Server Service (from Windows Services panel).
2. Start Milestone’s client applications as required.
3.3 Initializing Agent Vi's Analytics Integration in Milestone Management Client
➢ To initialize the integration:
1. Open the Milestone Management Client
2. In the tree, expand MIP Plug-ins AgentViEventMonitoring
3. Right-click AgentViEventMonitoring and choose Add/Create New:
Figure 3-1: Milestone Management Client – Create New
4. In the form that opens (see Error! Reference source not found.) specify:
i. Valid savVi's user name and password
ii. The host Name or IP Address of the Vi-Server that you are integrating with (i.e., the PC on which the Vi-LBS service is running) as well as the Web Service port number
iii. Attributes of the Secondary Vi-Server, if deployed (otherwise leave blank)
iv. The option "Receive analytics events from this savVi server" should be unselected only in Master/Slave deployment when setting up the savVi server connection to XProtect Slave server. In other cases, should be left selected.

Powering Analytics on Milestone’s XProtect 9 February 2018
Figure 3-2: Milestone Management Client - Specifying Vi-Server
5. In case of several savVi systems connected to Milestone XProtect:
a. Steps 3 and 4 are needed to be done for every savVi server
b. In case of Master/Slave deployment, there is a need to define all savVi systems for XProtect Master Server. When configuring the Slave Server, define only the savVi system which is connected to the currently being configured Slave.

Powering Analytics on Milestone’s XProtect 10 February 2018
6. In case you want to work simultaneously with more than one savVi server, you can add a new Vi-Server as described in the screen below and configure in the same way as described above:
Figure 3-3: Milestone Management Client - Specifying Vi-Server
7. Verify that Analytics Events are enabled:
With XPCO:
a. Open the Options dialog from the Tools menu and click the Analytics Events Settings tab.
b. Check Enabled under Analytics Events Settings:

Powering Analytics on Milestone’s XProtect 11 February 2018
Figure 3-4: Milestone Management Client (XPCO) – Analytics Events – Enabled
Powering Analytics on Milestone’s XProtect 12 February 2018
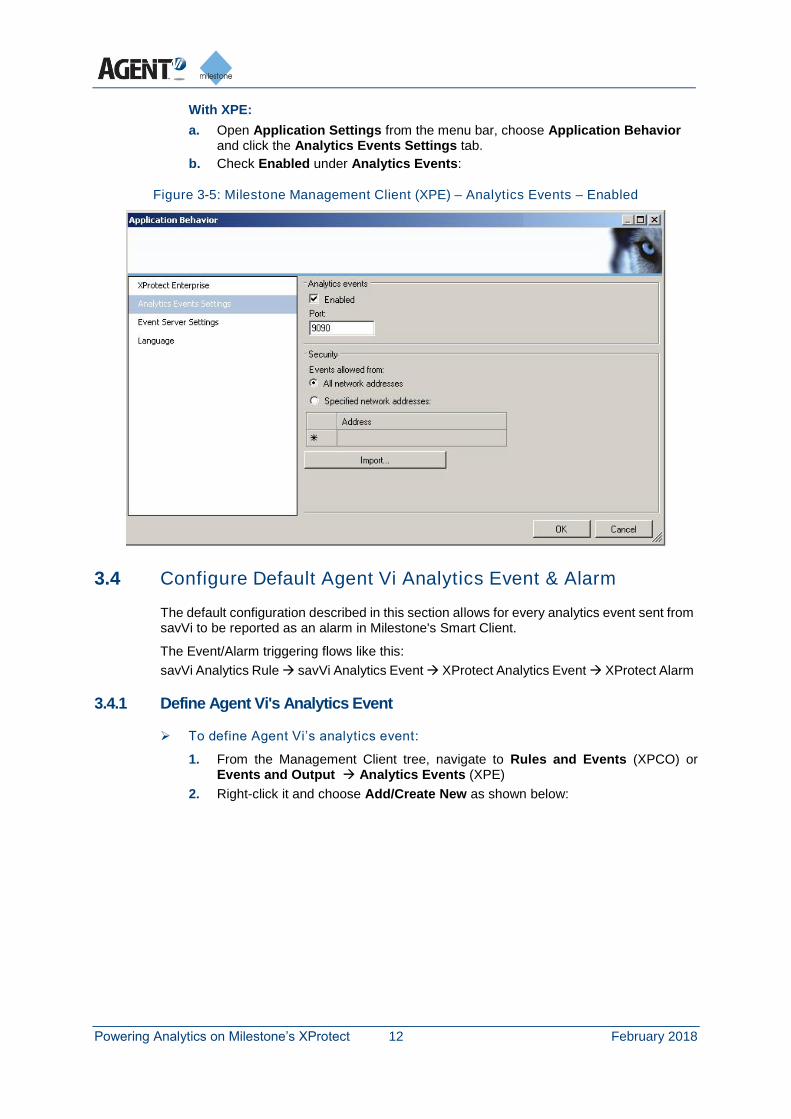
With XPE:
a. Open Application Settings from the menu bar, choose Application Behavior and click the Analytics Events Settings tab.
b. Check Enabled under Analytics Events:
Figure 3-5: Milestone Management Client (XPE) – Analytics Events – Enabled
3.4 Configure Default Agent Vi Analytics Event & Alarm
The default configuration described in this section allows for every analytics event sent from savVi to be reported as an alarm in Milestone's Smart Client.
The Event/Alarm triggering flows like this:
savVi Analytics Rule savVi Analytics Event XProtect Analytics Event XProtect Alarm
3.4.1 Define Agent Vi's Analytics Event
➢ To define Agent Vi’s analytics event:
1. From the Management Client tree, navigate to Rules and Events (XPCO) or Events and Output Analytics Events (XPE)
2. Right-click it and choose Add/Create New as shown below:

Powering Analytics on Milestone’s XProtect 13 February 2018
Figure 3-6: Milestone Management Client – Analytics Events – Create New
3. In the form that opens (shown below) specify the event Name as Agent Vi Event.
Figure 3-7: Milestone Management Client – Name - Agent Vi Event
Important:
In Step 3 above, name the new entry exactly as specified: Agent Vi Event
3.4.2 Define an Associated Alarm
With XPE:
1. Right-click Alarm Definitions under Alarms and click Create New; the form below opens.

Powering Analytics on Milestone’s XProtect 14 February 2018
2. In the Triggering event field, choose Agent Vi Event as shown below.
3. In the Sources field, click Select; in the Select Sources screen that opens, open the Servers tab, choose All cameras and Add it to the Selected list.
4. Save the Alarm Definition by clicking OK.
Figure 3-8: Milestone Management Client – Alarm Definition
With XPCO:
1. Choose the Alarm Data Settings node (under the Alarms tree) and switch to the Alarm List Configuration tab
2. Verify that the recommended attributes are included: Time, Source, Tag and Message. Add any of the attributes if missing.
3. Right-click Alarm Definitions under Alarms and click Add New.
4. In the Triggering event field, choose Analytics Events in the upper list and Agent Vi Event in the lower list as shown below.
5. In the Sources field, click Select; in the Select Sources screen that opens, open the Servers tab, choose All cameras and Add it to the Selected list.
6. Save the Alarm Definition by clicking OK.
Figure 3-3: Milestone Management Client (XPCO) – Alarm Definition
3.4.3 Restart the Milestone XProtect Event Server service
After completing the steps above, restart the Milestone XProtect Event Server service for the configuration to take effect.

Powering Analytics on Milestone’s XProtect 15 February 2018
3.5 Configuring and Viewing in Milestone Smart Client
1. Open the Milestone Smart Client
2. Define a view:
a. Choose a Live view panel on the left-hand side of the application window.
b. Click the Setup button on the right-hand side of the application window:
c. Define a new View: first define a new group; right-click the newly created group
name and define a new view, for example, (1 + 2*); it’s unimportant which one is chosen so long as it’s broad enough to contain the alarms list.
d. From System Overview drag the Alarm List item to the broad part of your newly created view.
e. Note that you can change the order of the Alarm List columns. It’s recommended to move the Tag column to the right so that its value becomes visible, since it contains an event description.
f. In System Overview expand the cameras list and drag the relevant cameras to the remaining views
3. When switching to the Live View tab:
a. All generated events appear in the list.
b. The metadata overlay appears in the camera view.
4. When switching to the Playback tab:
a. The camera view switches to the relevant event time when you click on an event.
b. The event plays back when you click the Play button in the Time Navigation window on the left.
c. The metadata overlay appears in the camera view. It may take a few minutes for the metadata overlay to be available for display
5. In the Alarms list, note the Tag column containing the analytics event description (e.g., ‘Vehicle motion detected’). If the Tag column is unavailable, right-click the table header bar to add it. If you’re still unable to add it in conjunction to XPCO, refer to Alarm Data Settings in XProtect Management Client described above.
Figure 3-9: Milestone Smart Client (7.0) – Alarm List

Powering Analytics on Milestone’s XProtect 16 February 2018
3.6 Triggering Specific Actions with XPCO
This section shows how to handle more advanced scenarios for executing an action when an event occurs. The capability is available in Milestone XProtect Corporate Edition and is achieved by linking the analytics event to an XProtect user-defined event and user- defined rule.
The event/alarm triggering flows like this:
savVi Analytics Rule savVi Analytics Event XPCO Analytics Event XPCO Alarm XPCO User-Defined Event XPCO User-Defined Rule XPCO Action
➢ To configure savVi and Milestone XPCO for triggering actions:
1. In savVi-Manager, navigate to Sensor > Rules > Actions for each rule that must trigger a specific analytics event in XProtect.
2. Define an External ID for a rule; it will be used in the Milestone XProtect configuration as described below.
Figure 3-10: Vi-Setup – External Rule ID
3. Add a new Analytics Event using the Milestone XProtect Management Client. The name must be identical to the External Rule ID defined using savVi-Manager in the previous step, for example, Line Crossing #1, as shown in the above screen.
4. Define a new User-Defined Event using Milestone XProtect Management Client as shown in the figure below:

Powering Analytics on Milestone’s XProtect 17 February 2018
Figure 3-11: Milestone Management Client – User Defined Event
5. Add a new alarm that links between the Analytics Event and the User-Defined Event. Note the areas marked red in the screen capture below. For the Triggering event field, choose the analytics event defined in step 3 (Line Crossing #1 in the example above). For the Event triggered by alarm field, choose the user-defined event created in step 4 (Line Crossing User Define Event #1 in the example above).

Powering Analytics on Milestone’s XProtect 18 February 2018
Figure 3-12: Milestone Management Client – Alarm Definition
6. Add a new rule to the Milestone XProtect Management Client. Choose the User defined event created in step 4 (Line Crossing User Define Event #1 in the example above).

Powering Analytics on Milestone’s XProtect 19 February 2018
Figure 3-13: Milestone Management Client – Manage Rule
7. Click Next and choose conditions if necessary.
8. Click Next and choose an action (or several). Best practice: Define a bookmark using Create bookmark on… or move a camera to a predefined preset.
9. Finish the rule definition.
10. After completing the steps above, restart the Milestone XProtect Event Server service for the configuration to take effect.
3.7 Triggering Specific Actions with XPE
This section shows how to trigger actions based on analytics events when using Milestone XProtect Enterprise Edition to allow, for example, a savVi analytics rule defined on a fixed camera move a PTZ camera to a required preset.
The event/alarm triggering flows like this:
savVi Analytics Rule savVi Analytics Event XPE Analytics Event XPE Alarm XPE Manual Event XPE Camera Action

Powering Analytics on Milestone’s XProtect 20 February 2018
➢ To configure savVi and Milestone XPE for triggering actions:
1. In savVi, define an analytics rule (on a static camera if you want to trigger a PTZ action after the target is detected). Define the rule's External Rule ID as the name of the Analytics Event you'll be defining in Milestone XPE.
2. In XPE Management Client create a new Analytics Event (under Alarms in the configuration tree). Give it exactly the same name as the External Rule ID in the above step.
3. Create a Manual Event from XPE:
a. Go to Events and Output Manual Events
b. Right-click to Add New Manual Event as shown below.
Figure 3-14: Milestone Management Client – Manual Event
4. Create an Alarm Definition from XPE:
a. Navigate to Alarms Alarms Definitions Create New
b. Choose the new Analytics Event defined in step #2 as the Triggering Event.
c. In the Sources field, click Select; in the Select Sources screen that opens, open the Servers tab, choose All cameras and Add it to the Selected list.
d. Specify the Manual Event (defined in step #3) to be triggered when the alarm is received.
5. To trigger a PTZ action:
a. Under Cameras and Storage Information, right-click the designated PTZ camera.
b. Choose Properties PTZ on Event.

Powering Analytics on Milestone’s XProtect 21 February 2018
c. Select the Manual Event (defined above) and the PTZ preset you want to jump to when the event occurs.
Figure 3-15: Milestone Management Client – PTZ on Event
3.8 Troubleshooting Agent Vi Event Monitoring Milestone Plugin Integration
Table 3-16: Troubleshooting Agent Vi Event Monitoring Milestone Plugin Integration
Problem Corrective Action
The user doesn’t see AgentViEventMonitoring under the MIP plugins node in Milestone XProtect Management Client
Verify that the Agent Vi Event Monitoring Milestone Plugin is installed.
The user doesn’t see Alarm definitions under the Alarm node in Milestone XProtect Management Client
Verify that the service of Milestone Event Server is running.
There are no analytics alarms in Smart Client • Verify that the Vi-Server parameters in
XProtect Management Client were defined
correctly
• Restart the Milestone Event Server if it was
not restarted after defining Vi-Server properties
• Verify that Agent Vi Event is defined. Note that
it is case sensitive. It must be correctly
connected to the alarm definition.

Powering Analytics on Milestone’s XProtect 22 February 2018
Problem Corrective Action
In Smart Client there is no metadata (or the metadata is partial) when playing back recorded video
• Click the Play button again in case it wasn’t
clicked the first time.
• Verify that ‘Store to Event Metadata’ is checked
in the rule definition in savVi.
In Smart Client there are no alarms in Alarm List, the header is red, and it displays a message regarding user privileges.
This is mostly relevant when operating with Milestone Enterprise or Professional. In this case, each new user defined in Management Client has limited privileges by default.
• Verify that the user connected to the Smart
Client has sufficient user privileges:
In XProtect Management Client, check the
properties of the user under Advanced
Configuration > Users
All the above actions did not help; you’re still unable to view analytics events in Milestone. Follow the instructions under the Corrective Action column to the right, to obtain Milestone MIP log files.
• Enable viewing hidden files and folders on
Milestone’s machine
• Open Milestone XProtect Smart Client
installation directory. By default, it is installed at
C:\Program Files\Milestone\XProtect Smart
Client
or at
C:\Program Files (x86)\Milestone\XProtect
Smart Client for 32 bit Smart Client versions
• Open the client.exe.config file
• Uncomment the commented elements in
<Logger name="MIPLogger">
(Delete " < ! -- " and " --> " at the beginning
and the end of the line)
• Reproduce the issue.
• Copy the C:\ProgramData\Milestone directory
into a zip archive and send it to your support
team.
Smart Client:
There’s no possibility of adding a Tag column to the Alarm List.
• Open the XProtect Management Client
• Choose the Alarm Data Settings on the right
• Choose the Alarm List Configuration tab
• Add Tag to the Selected Columns list
• Save the new setting
Smart Client:
An error occurs when opening the Smart Client on Windows Server 2008.
• May occur because the Enhanced Security
Configuration for the current user is turned on.
• To turn it off, open the Security Information in
the Server Manager and set the Enhanced
Security Configuration to be Off for the
relevant user type.
The recorded video is not synchronized with object metadata overlays.
• Verify that clocks are synchronized on PCs
running:
✓ Milestone XProtect Event Server
✓ savVi Vi-LBS Service
✓ savVi Vi-AS services

Powering Analytics on Milestone’s XProtect 23 February 2018
4 savVi-Analyst embedded in Milestone Smart Client
savVi provides an option to deploy Agent Vi’s savVi-Analyst (Video Search and Business Intelligence application) within Milestone Smart Client (currently supported with Milestone Corporate 2017 R3).
This option can be used in parallel with Agent Vi Event Monitoring Milestone Plugin.
Figure 4-1: Milestone Smart client – savVi-Analyst
To deploy savVi-Analyst embedded in Milestone Smart Client please follow the steps below:
1. Verify Milestone 2017 R3 Management Client and 32-bit Smart Client are installed 2. Install savVi 3. Update VMS Manager service and VAP services logon user to the correct Windows
user to connect the Milestone Corporate Server (as explained in section 2.3) 4. Install AgentVi Analyst Milestone Plugin 5. In savVi-Manager client, add the Milestone VMS (Administrator Resources -> VMS
Servers) 6. Add Milestone cameras to savVi (through “VMS Cameras” screen) 7. Calibrate the Milestone sensors in savVi 8. Verify that the savVi-Analyst option is enabled (through “savVi-Analyst” tab for each
sensor or via “More Settings” to configure in bulk) 6. In the Milestone Management Client, configure AgentVi Analyst plugin:
• Under MIP Plugins -> AgentVi Analyst, select AgentVi Analyst
• Right Click and select Add New
• Configure the Analyst Server with the savVi server details as shown in the following picture:

Powering Analytics on Milestone’s XProtect 24 February 2018
Figure 4-2: Milestone Management Client - Analyst configuration
7. Run Milestone Client as administrator 8. Open the savVi-Analyst tab and operate it in the same way as you would operate the
standalone savVi-Analyst client
Figure 4-3: Milestone Smart client – savVi-Analyst results

Notice
Copyright © 2003-2018 by Agent Video Intelligence Ltd.
Agent Video Intelligence Ltd. holds the copyright to this manual. All rights reserved. No part of this publication may be reproduced or transmitted in any form or by any means without prior written consent from Agent Video Intelligence Ltd.
Disclaimer
The information in this manual was accurate and reliable at the time of its release for this specific version. However, Agent Video Intelligence Ltd. reserves the right to change the specifications of the product described in this manual without prior notice at any time.
The customer should note that in the field of video there are a number of patents held by various parties. It is the responsibility of the user to assure that a particular implementation does not infringe on those patents. Agent Video Intelligence Ltd. does not indemnify the user from any patent or intellectual property infringement.
Trademarks
Agent Vi™, Vi™, savVi™, savVi-Analyst™, savVi-Manager™, Vi-Agent™, Vi-Agent Proxy™ and Vi-Server™ are trademarks of Agent Video Intelligence Ltd.
All other proprietary names mentioned in this manual are the trademarks of their respective owners.
www.agentvi.com