Embed Size (px)
Citation preview
Guide to the MidoNet PluginRelease 4.0-4.0.0-1
OpenStack Foundation
May 11, 2016
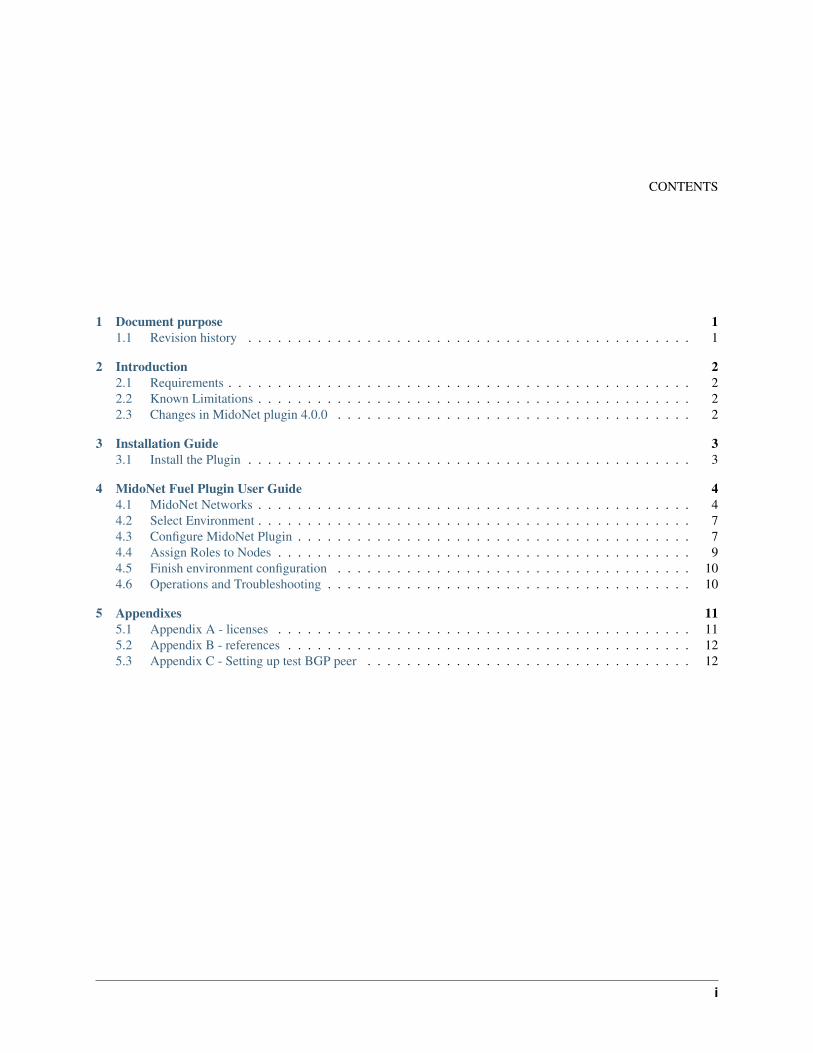
CONTENTS
1 Document purpose 11.1 Revision history . . . . . . . . . . . . . . . . . . . . . . . . . . . . . . . . . . . . . . . . . . . . . 1
2 Introduction 22.1 Requirements . . . . . . . . . . . . . . . . . . . . . . . . . . . . . . . . . . . . . . . . . . . . . . . 22.2 Known Limitations . . . . . . . . . . . . . . . . . . . . . . . . . . . . . . . . . . . . . . . . . . . . 22.3 Changes in MidoNet plugin 4.0.0 . . . . . . . . . . . . . . . . . . . . . . . . . . . . . . . . . . . . 2
3 Installation Guide 33.1 Install the Plugin . . . . . . . . . . . . . . . . . . . . . . . . . . . . . . . . . . . . . . . . . . . . . 3
4 MidoNet Fuel Plugin User Guide 44.1 MidoNet Networks . . . . . . . . . . . . . . . . . . . . . . . . . . . . . . . . . . . . . . . . . . . . 44.2 Select Environment . . . . . . . . . . . . . . . . . . . . . . . . . . . . . . . . . . . . . . . . . . . . 74.3 Configure MidoNet Plugin . . . . . . . . . . . . . . . . . . . . . . . . . . . . . . . . . . . . . . . . 74.4 Assign Roles to Nodes . . . . . . . . . . . . . . . . . . . . . . . . . . . . . . . . . . . . . . . . . . 94.5 Finish environment configuration . . . . . . . . . . . . . . . . . . . . . . . . . . . . . . . . . . . . 104.6 Operations and Troubleshooting . . . . . . . . . . . . . . . . . . . . . . . . . . . . . . . . . . . . . 10
5 Appendixes 115.1 Appendix A - licenses . . . . . . . . . . . . . . . . . . . . . . . . . . . . . . . . . . . . . . . . . . 115.2 Appendix B - references . . . . . . . . . . . . . . . . . . . . . . . . . . . . . . . . . . . . . . . . . 125.3 Appendix C - Setting up test BGP peer . . . . . . . . . . . . . . . . . . . . . . . . . . . . . . . . . 12
i
CHAPTER
ONE
DOCUMENT PURPOSE
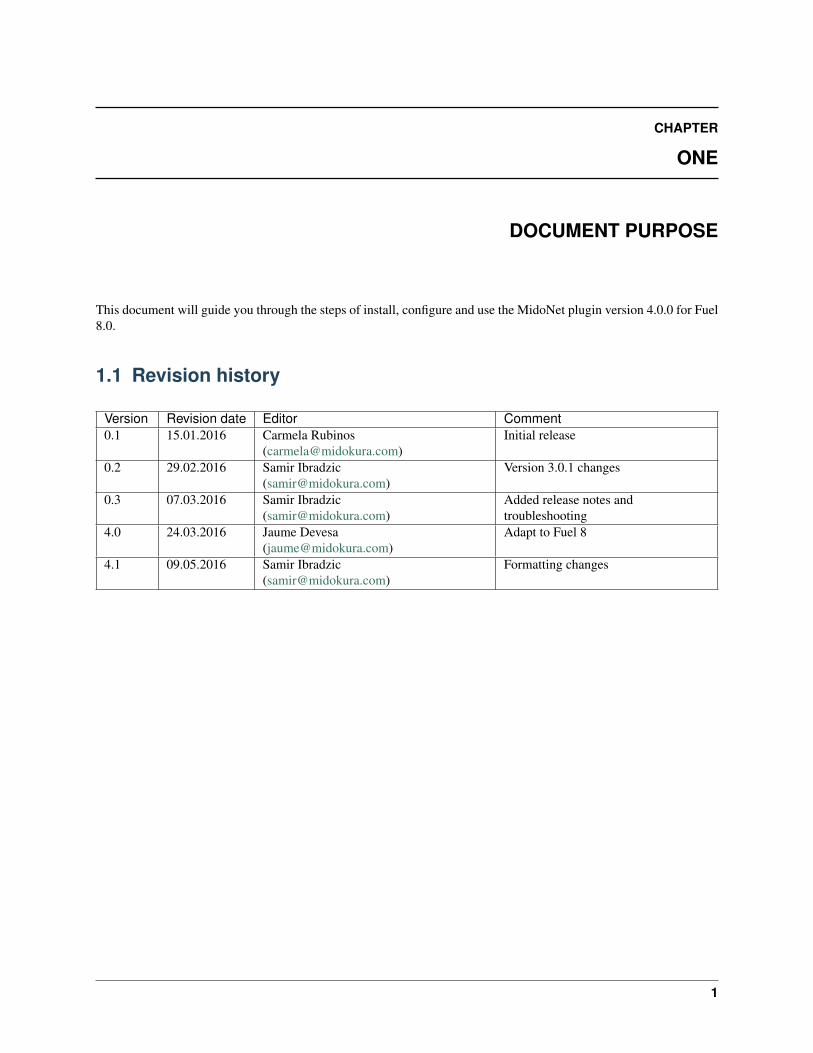
This document will guide you through the steps of install, configure and use the MidoNet plugin version 4.0.0 for Fuel8.0.
1.1 Revision history
Version Revision date Editor Comment0.1 15.01.2016 Carmela Rubinos
([email protected])Initial release
0.2 29.02.2016 Samir Ibradzic([email protected])
Version 3.0.1 changes
0.3 07.03.2016 Samir Ibradzic([email protected])
Added release notes andtroubleshooting
4.0 24.03.2016 Jaume Devesa([email protected])
Adapt to Fuel 8
4.1 09.05.2016 Samir Ibradzic([email protected])
Formatting changes
1

CHAPTER
TWO
INTRODUCTION
MidoNet is an Apache licensed production grade network virtualization software for Infrastructure-as-a-Service (IaaS)clouds. Plugin for Fuel 8.0 provides the puppet manifests to install all the components to deploy easily MidoNet withFuel in both lab or production environments.
Fuel MidoNet plugin is capable of deploying MidoNet v2015.06 on top of Mirantis OpenStack Fuel version 8.0. Thereare no prerequisites to use the MidoNet plugin: MidoNet is Open Source, and the plugin sets the repositories fromwhere download and install MidoNet packages.
This plugin also supports Midokura Enterprise MidoNet (MEM) installation by allowing the user to choose the optionfrom the Fuel Web UI. The packages are available to download from a password protected-repository. The neededcredentials will be provided by Midokura.
2.1 Requirements
Requirement Version/CommentFuel 8.0MidoNet plugin for Fuel 4.0.0
2.2 Known Limitations
• The plugin has some limitations regarding node count scalability for NSDB (Network State Database) nodes.Once number of nodes with such role have been determined on initial deployment, it can not be changed.Controller and Compute role nodes are not affected by this limitation, current plugin version supports Controllerand Compute scalability.
• Current version of plugin can only deploy single MidoNet Gareway role node. MidoNet itself supports anynumber of gateway nodes, it is only a plugin limitation, additional gateways needs to be set up manually.
2.3 Changes in MidoNet plugin 4.0.0
• New features:
• Support for Fuel 8.0
• Tasks are included in the deployment stage of Fuel instead of in the post_deployment, so the time ofdeployment has decreased around 20-30 minutes, as well as it makes the deployment more reliable.
• MidoNet option available in the Networking Setup during the environment creation, making the configurationof an environment with MidoNet much easier.
2
CHAPTER
THREE
INSTALLATION GUIDE
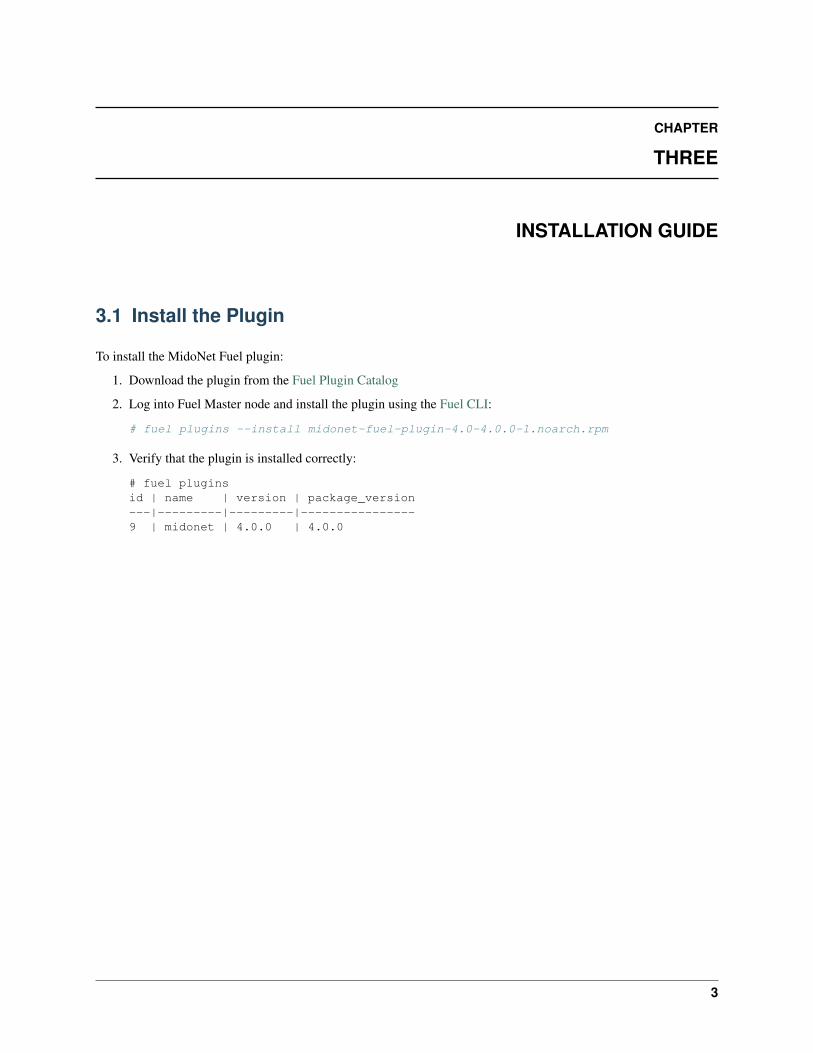
3.1 Install the Plugin
To install the MidoNet Fuel plugin:
1. Download the plugin from the Fuel Plugin Catalog
2. Log into Fuel Master node and install the plugin using the Fuel CLI:
# fuel plugins --install midonet-fuel-plugin-4.0-4.0.0-1.noarch.rpm
3. Verify that the plugin is installed correctly:
# fuel pluginsid | name | version | package_version---|---------|---------|----------------9 | midonet | 4.0.0 | 4.0.0
3

CHAPTER
FOUR
MIDONET FUEL PLUGIN USER GUIDE
Once the Fuel MidoNet plugin has been installed (following Installation Guide), you can create OpenStack environ-ments that use MidoNet SDN controller as a Neutron back-end.
4.1 MidoNet Networks
MidoNet changes the behaviour of default Neutron deployments, understanding what MidoNet plugin does, especiallyin regard to external networks, is essential to configure and use MidoNet Fuel plugin properly.
MidoNet plugin is compatible with both Neutron + GRE and Neutron + VxLAN network tunnelling overlays, solet’s focus on showing the differences between the Neutron default ML2 deployments first.
4.1.1 Neutron without MidoNet plugin
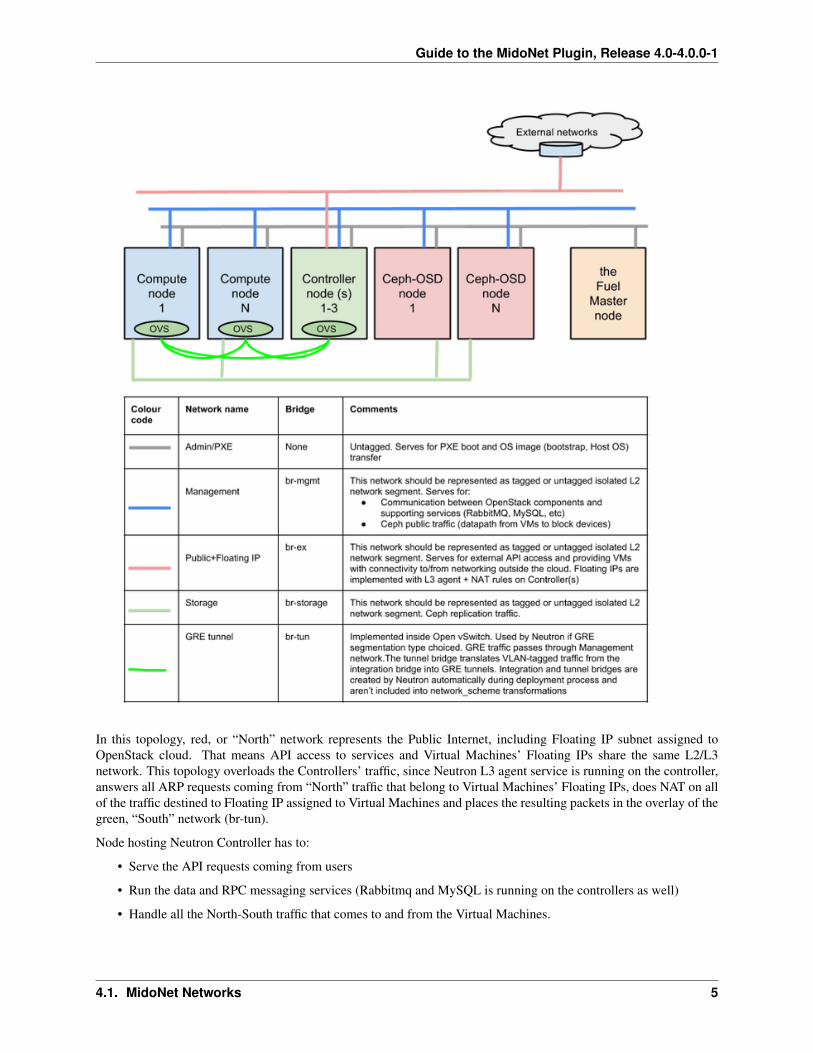
Fuel 7.0 reference architecture contains some useful information in Neutron Network Topologies section. First, let’shave an overview of Neutron-default ML2 topolgy:
4
Guide to the MidoNet Plugin, Release 4.0-4.0.0-1
In this topology, red, or “North” network represents the Public Internet, including Floating IP subnet assigned toOpenStack cloud. That means API access to services and Virtual Machines’ Floating IPs share the same L2/L3network. This topology overloads the Controllers’ traffic, since Neutron L3 agent service is running on the controller,answers all ARP requests coming from “North” traffic that belong to Virtual Machines’ Floating IPs, does NAT on allof the traffic destined to Floating IP assigned to Virtual Machines and places the resulting packets in the overlay of thegreen, “South” network (br-tun).
Node hosting Neutron Controller has to:
• Serve the API requests coming from users
• Run the data and RPC messaging services (Rabbitmq and MySQL is running on the controllers as well)
• Handle all the North-South traffic that comes to and from the Virtual Machines.
4.1. MidoNet Networks 5
Guide to the MidoNet Plugin, Release 4.0-4.0.0-1
4.1.2 Neutron with MidoNet plugin
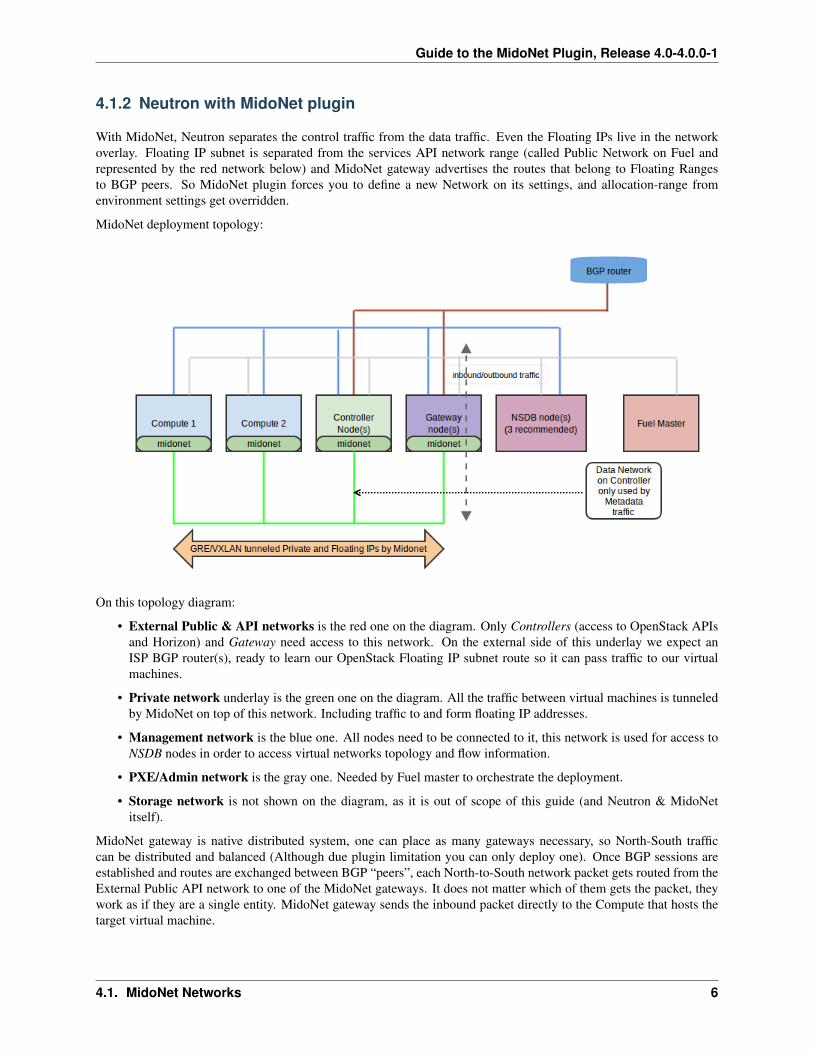
With MidoNet, Neutron separates the control traffic from the data traffic. Even the Floating IPs live in the networkoverlay. Floating IP subnet is separated from the services API network range (called Public Network on Fuel andrepresented by the red network below) and MidoNet gateway advertises the routes that belong to Floating Rangesto BGP peers. So MidoNet plugin forces you to define a new Network on its settings, and allocation-range fromenvironment settings get overridden.
MidoNet deployment topology:
On this topology diagram:
• External Public & API networks is the red one on the diagram. Only Controllers (access to OpenStack APIsand Horizon) and Gateway need access to this network. On the external side of this underlay we expect anISP BGP router(s), ready to learn our OpenStack Floating IP subnet route so it can pass traffic to our virtualmachines.
• Private network underlay is the green one on the diagram. All the traffic between virtual machines is tunneledby MidoNet on top of this network. Including traffic to and form floating IP addresses.
• Management network is the blue one. All nodes need to be connected to it, this network is used for access toNSDB nodes in order to access virtual networks topology and flow information.
• PXE/Admin network is the gray one. Needed by Fuel master to orchestrate the deployment.
• Storage network is not shown on the diagram, as it is out of scope of this guide (and Neutron & MidoNetitself).
MidoNet gateway is native distributed system, one can place as many gateways necessary, so North-South trafficcan be distributed and balanced (Although due plugin limitation you can only deploy one). Once BGP sessions areestablished and routes are exchanged between BGP “peers”, each North-to-South network packet gets routed from theExternal Public API network to one of the MidoNet gateways. It does not matter which of them gets the packet, theywork as if they are a single entity. MidoNet gateway sends the inbound packet directly to the Compute that hosts thetarget virtual machine.
4.1. MidoNet Networks 6
Guide to the MidoNet Plugin, Release 4.0-4.0.0-1
In this way controller nodes gets significantly less overloaded, since they only need to answer user requests and theydon’t handle VM traffic at all (the only exception is the metadata traffic at VM provisioning time).
Following the learned concepts, we are ready to create a Fuel environment that uses MidoNet.
4.2 Select Environment
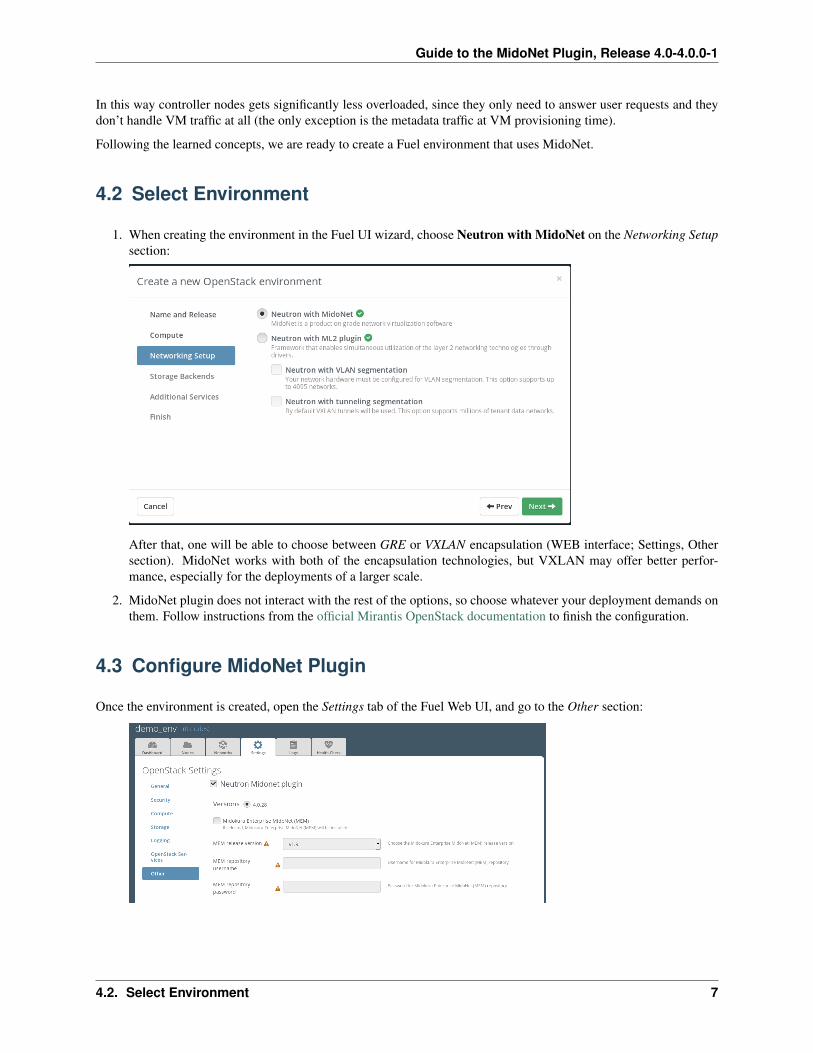
1. When creating the environment in the Fuel UI wizard, choose Neutron with MidoNet on the Networking Setupsection:
After that, one will be able to choose between GRE or VXLAN encapsulation (WEB interface; Settings, Othersection). MidoNet works with both of the encapsulation technologies, but VXLAN may offer better perfor-mance, especially for the deployments of a larger scale.
2. MidoNet plugin does not interact with the rest of the options, so choose whatever your deployment demands onthem. Follow instructions from the official Mirantis OpenStack documentation to finish the configuration.
4.3 Configure MidoNet Plugin
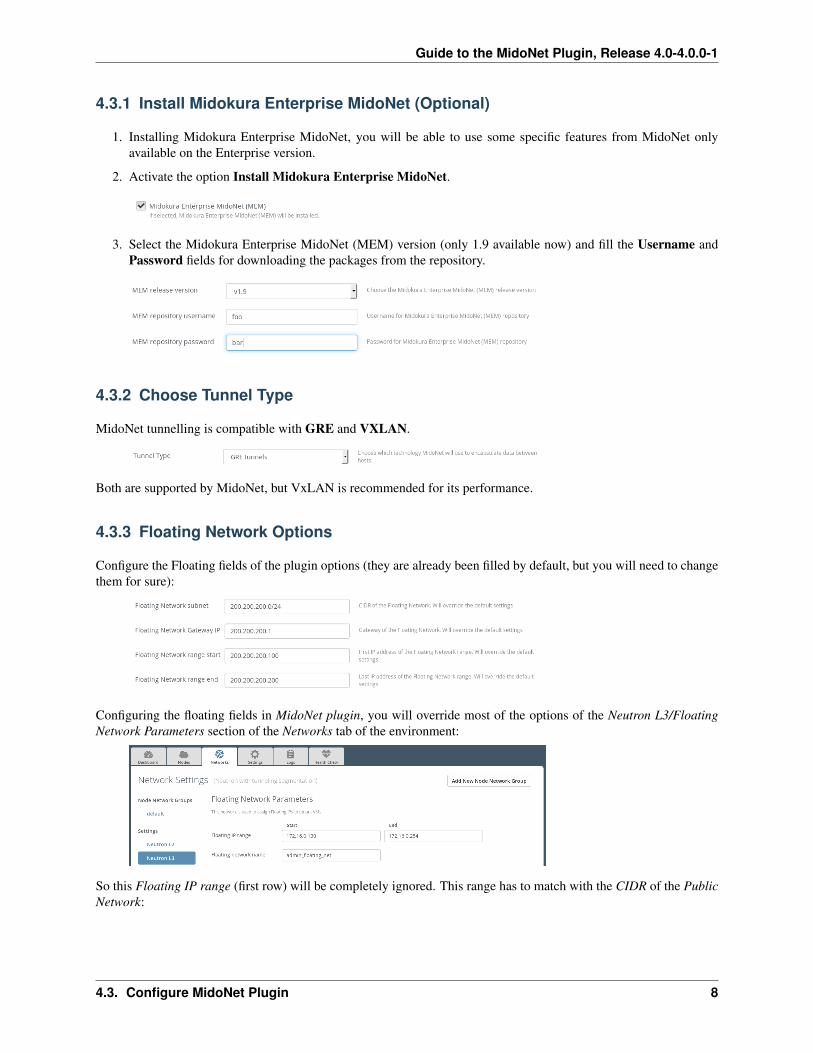
Once the environment is created, open the Settings tab of the Fuel Web UI, and go to the Other section:
4.2. Select Environment 7
Guide to the MidoNet Plugin, Release 4.0-4.0.0-1
4.3.1 Install Midokura Enterprise MidoNet (Optional)
1. Installing Midokura Enterprise MidoNet, you will be able to use some specific features from MidoNet onlyavailable on the Enterprise version.
2. Activate the option Install Midokura Enterprise MidoNet.
3. Select the Midokura Enterprise MidoNet (MEM) version (only 1.9 available now) and fill the Username andPassword fields for downloading the packages from the repository.
4.3.2 Choose Tunnel Type
MidoNet tunnelling is compatible with GRE and VXLAN.
Both are supported by MidoNet, but VxLAN is recommended for its performance.
4.3.3 Floating Network Options
Configure the Floating fields of the plugin options (they are already been filled by default, but you will need to changethem for sure):
Configuring the floating fields in MidoNet plugin, you will override most of the options of the Neutron L3/FloatingNetwork Parameters section of the Networks tab of the environment:
So this Floating IP range (first row) will be completely ignored. This range has to match with the CIDR of the PublicNetwork:
4.3. Configure MidoNet Plugin 8

Guide to the MidoNet Plugin, Release 4.0-4.0.0-1
Which only will be used for API-accessible IPs to the OpenStack services but not for Virtual Machine’s floating IPs.Please refer to Neutron with Midonet plugin section of this document if it is not clear enough to you.
4.3.4 Configure BGP
Fill the BGP attributes:
There is a nice tutorial in this document: Setting up test BGP peer to run a BGP peer for testing environments.
4.4 Assign Roles to Nodes
1. Go to the Nodes tab and you will see the Network State DataBase and MidoNet HA Gateway roles availableto be assigned to roles.
4.4. Assign Roles to Nodes 9
Guide to the MidoNet Plugin, Release 4.0-4.0.0-1
2. Some general advice to be followed:
• Gateway role should be given to a dedicated node.
• NSDB role can be combined with any other roles, but note that it needs at least 4GB RAM for itself(dedicated storage hihgly recommended).
Fuel will force you to choose at least one NSDB node in your environment (3 are recommended).
4.5 Finish environment configuration
We recommend to run a Connectivity Check before deploy the environment
4.6 Operations and Troubleshooting
A successful deployment done with MidoNet Fuel plugin will produce fully working OpenStack environment, withMidoNet as a Neutron network back-end. MidoNet is fully compatible with Neutron and Nova APIs and most of itsaspects can be directly managed by OpenStack Horizon WEB interface, as well as Neutron API.
4.6.1 Operating MidoNet
For advanced networking features supported by MidoNet please see MidoNet Operations Guide. For general MidoNettroubleshooting, assuming the deployment went fine, please see MidoNet Troubleshooting Guide.
4.6.2 Troubleshooting MidoNet Fuel deployment
In a case MidoNet Fuel deployment failed for some reason, first thing to do is to make sure that the initiated deploymentsatisfies the plugin Known Limitations.
In a case MidoNet Fuel deployment failed for some other reason, useful thing to be checked are various log outputsavailable in Fuel WEB UI. Click on the Logs tab and observe logging information. Default log displayed in the WEBinterface shows “Web backend” logs, which are too general to provide any troubleshooting information, we want tocheck “Astute” logs, which can be selected by clicking Source drop down menu, followed by clicking Show button.In case of deployment errors, important messages will be shown in red, identifying which stage of deployment mayhave failed, and on which node(s).
Next step is to look into how deployment tasks were executed at target nodes. After identifying nodes in previousstep, select “Other servers” in the Logs drop-down menu, following by selecting an appropriate node in Node and“puppet” in Source drop-down menus. Again, important failures should be marked in red. Depending on user’s levelof understanding of these messages, they should either be included in MidoNet support claims to help to help thetroubleshooting or an action can be taken by user to prevent issue from happening on re-deployment.
4.5. Finish environment configuration 10
CHAPTER
FIVE
APPENDIXES
5.1 Appendix A - licenses
5.1.1 Third Party Components Used in MidoNet OSS
Name Project Web Site Licenseakka https://typesafe.com/community/core-projects/akka Apache 2.0Apache Cassandra http://cassandra.apache.org Apache 2.0Apache Commons http://commons.apache.org/ Apache 2.0Apache Server http://httpd.apache.org Apache 2.0Apache Tomcat http://tomcat.apache.org Apache 2.0Apache Zookeeper http://zookeeper.apache.org Apache 2.0AspectJ http://projects.eclipse.org/projects/tools.aspectj EPL 1.0Curator http://curator.apache.org Apache 2.0Disruptor https://github.com/LMAX-Exchange/disruptor Apache 2.0EqualsVerifier https://github.com/jqno/equalsverifier Apache 2.0guava https://github.com/google/guava Apache 2.0Guice https://github.com/google/guice Apache 2.0Hamcrest http://hamcrest.org/ BSD Three ClauseHibernate Validator http://hibernate.org/validator Apache 2.0HttpComponents http://hc.apache.org Apache 2.0infinispan http://infinispan.org/ Apache 2.0Jackson http://jackson.codehaus.org Apache 2.0Java https://www.java.com Oracle Binary Code License AgreementJcabi Aspects http://aspects.jcabi.com/index.html BSD Three ClauseJetty http://eclipse.org/jetty/ Apache 2.0. and Eclipse 1.0jminix https://code.google.com/p/jminix/ Apache 2.0JMockit http://jmockit.org MITjna https://github.com/twall/jna LGPL 2.1. v4.0 and later: Apache 2.0.JsonPath https://github.com/jayway/JsonPath Apache 2.0JSch http://www.jcraft.com BSD-styleLOGBack http://logback.qos.ch EPL 1.0. and LGPL 2.1Metrics https://dropwizard.github.io/metrics Apache 2.0mockito https://github.com/mockito/mockito MITnetty http://netty.io Apache 2.0NGINX http://nginx.org BSD Two ClauseOpen vSwitch http://openvswitch.org Apache 2.0powermock https://code.google.com/p/powermock Apache 2.0
Continued on next page
11
Guide to the MidoNet Plugin, Release 4.0-4.0.0-1
Table 5.1 – continued from previous pageName Project Web Site Licenseprotobuf https://developers.google.com/protocol-buffers BSD Three ClauseRxJava http://reactivex.io Apache 2.0scala http://scala-lang.org BSD Three Clausescala-logging https://github.com/typesafehub/scala-logging Apache 2.0typesafeconf https://github.com/typesafehub/config Apache 2.0ScalaCheck http://scalacheck.org BSD Three ClauseScalaTest http://scalatest.org Apache 2.0Scallop https://github.com/scallop/scallop MITslf4j http://www.slf4j.org MIT
5.1.2 Puppet Modules
Name Licenseripienaar-module_data Apache 2.0deric-zookeeper Apache 2.0midonet-cassandra Apache 2.0puppetlabs-java Apache 2.0puppetlabs-tomcat Apache 2.0midonet-midonet Apache 2.0
5.2 Appendix B - references
• MidoNet Web Site
• MidoNet v2015.06 Documentation
• MidoNet v2015.06 Code
• Midokura Enterprise MidoNet (MEM) v1.9 Documentation
• Midokura Enterprise MidoNet (MEM) 30 Day Trial
• Fuel Plugins Catalog
5.3 Appendix C - Setting up test BGP peer
BGP routing is an exterior gateway protocol supported and recommended to MidoNet production use case. An externalBGP peer is necessary for Floating IP (FIP) traffic between the deployed OpenStack cloud instances and the externalnetwork(s). These BGP peers are usually available for production or data-center ISP environments, so for the sake ofsupporting BGP tests under lab or proof-of-concept conditions we are providing instructions on how to set up a “fake”BGP peer that provide fully functional external connectivity. This guide shows how it can be done by setting up VyOSnetwork operating system instance to serve up as an external BGP peer.
VyOS is a community fork of Vyatta, a Linux-based network operating system that provides software-based networkrouting, firewall, and VPN functionality.
5.3.1 Introduction
VyOS works just fine as a live OS when booted from VyOS ISO and configured properly, but we will cover somebasic steps on how to install it to an actual server or a virtual machine. Being a network operating system and a router
5.2. Appendix B - references 12
Guide to the MidoNet Plugin, Release 4.0-4.0.0-1
appliance, it makes sense to install it on a host that has multiple network interfaces. Minimum hardware requirementsfor VyOS are single core CPU and 512MB of RAM. It can run just fine without any permanent storage, which is onlynecessary to save the configuration state.
5.3.2 Required addressing information
For the sake of this example we assume following IP addresses will be used in this guide:
• VyOS management IP on eth0 interface: 10.20.0.254/24
• Default gateway for management subnet: 10.20.0.1
Also, BGP protocol itself needs some parameters to be set up. For our simple demonstration we assume that VyOSBGP peer that we are creating is going to communicate with MidoNet gateway BGP peer. As a part of BGP specifica-tion, each BGP peer has to have AS number which identifies it when connecting to other peers. Also, BGP peers needsto find each other on specific IP addresses, belonging to a same IP subnet. For our example, we assume following ASnumbers and IP addresses:
• BGP IP subnet: 10.88.88.0/30
• VyOS BGP peer IP address: 10.88.88.1
• VyOS BGP peer AS number: 65535
• MidoNet BGP gateway IP address: 10.88.88.2
• MidoNet BGP gateway AS number: 12345
Finally, to fulfill the purpose of this BGP setup, we need to know which Floating IP subnet is going to be handled byMidoNet-based OpenStack cloud, so we specify subnet:
• Floating IP subnet: 200.200.200.0/24
5.3.3 VyOS Installation
We start installing by booting our server or VM from VyOS ISO and logging in with username and password, bothvyos by default. Following that, we run this command to install VyOS to a hard drive:
vyos@vyos:~$ install image
After that the following installation prompts will be displayed:
Welcome to the VyOS install program. This scriptwill walk you through the process of installing theVyOS image to a local hard drive.Would you like to continue? (Yes/No) [Yes]: YesProbing drives: OKLooking for pre-existing RAID groups...none found.The VyOS image will require a minimum 1000MB root.Would you like me to try to partition a drive automaticallyor would you rather partition it manually with parted? Ifyou have already setup your partitions, you may skip this step
Partition (Auto/Parted/Skip) [Auto]:
I found the following drives on your system:vda 4294MB
Install the image on? [vda]:
5.3. Appendix C - Setting up test BGP peer 13
Guide to the MidoNet Plugin, Release 4.0-4.0.0-1
This will destroy all data on /dev/vda.Continue? (Yes/No) [No]:
Confirm the that you really want to install VyOS to the target disk drive by typing Yes. The rest of the installation canbe completed by simply pressing Enter on each prompt, and typing the desired administrator password when asked:
How big of a root partition should I create? (1000MB - 4294MB) [4294]MB:
Creating filesystem on /dev/vda1: OKDone!Mounting /dev/vda1...What would you like to name this image? [1.1.7]:OK. This image will be named: 1.1.7Copying squashfs image...Copying kernel and initrd images...Done!I found the following configuration files:
/config/config.boot/opt/vyatta/etc/config.boot.default
Which one should I copy to vda? [/config/config.boot]:
Copying /config/config.boot to vda.Enter password for administrator accountEnter password for user ’vyos’:Retype password for user ’vyos’:I need to install the GRUB boot loader.I found the following drives on your system:vda 4294MB
Which drive should GRUB modify the boot partition on? [vda]:
Setting up grub: OKDone!vyos@vyos:~$
This means that the installation has been successful, time to reboot VyOS and do some configuration:
vyos@vyos:~$ rebootProceed with reboot? (Yes/No) [No] Yes
Broadcast message from root@vyos (ttyS0) (Mon Feb 29 12:28:15 2016):
The system is going down for reboot NOW!
5.3.4 Essential VyOS Configuration
Following the reboot, we need to configure VyOS management IP address and ssh access. Do this by accessingconfiguration mode:
vyos@vyos:~$ configure[edit]
Set up management IP address, default gateway, ssh access and a DNS name:
vyos@vyos# set interfaces ethernet eth0 address 10.20.0.254/24[edit]vyos@vyos# set interfaces ethernet eth0 description MGMT
5.3. Appendix C - Setting up test BGP peer 14
Guide to the MidoNet Plugin, Release 4.0-4.0.0-1
[edit]vyos@vyos# set protocols static route 0.0.0.0/0 next-hop 10.20.0.1[edit]vyos@vyos# set service ssh port 22[edit]vyos@vyos# set service dns forwarding listen-on eth0[edit]vyos@vyos# set service dns forwarding name-server 8.8.8.8[edit]
To apply as well as save the configuration changes do:
vyos@vyos# commit[ service ssh ]Restarting OpenBSD Secure Shell server: sshd.
[edit]vyos@vyos# saveSaving configuration to ’/config/config.boot’...Done[edit]vyos@vyos# exitexitvyos@vyos:~$ exitlogout
Our VyOS instance should be accessible via ssh at 10.20.0.254 now:
$ ssh [email protected]
5.3.5 VyOS BGP Configuration
It is time to configure VyOS as a BGP peer. For this we will use all the IP and AS addresses we mentioned above.Enter the configuration mode,
vyos@vyos:~$ configure[edit]
followed by a stream of commands:
set interfaces ethernet eth1 address 10.88.88.1/30set policy prefix-list DEFAULT rule 100 action permitset policy prefix-list DEFAULT rule 100 prefix 0.0.0.0/0set policy prefix-list DEFAULT rule 999 action denyset policy prefix-list DEFAULT rule 999 le 32set policy prefix-list DEFAULT rule 999 prefix 0.0.0.0/0set policy prefix-list fromAS12345 rule 100 action permitset policy prefix-list fromAS12345 rule 100 le 32set policy prefix-list fromAS12345 rule 100 prefix 200.200.200.0/24set policy prefix-list fromAS12345 rule 999 action denyset policy prefix-list fromAS12345 rule 999 le 32set policy prefix-list fromAS12345 rule 999 prefix 0.0.0.0/0commit
set policy route-map fromAS12345 rule 100 match ip address prefix-list fromAS12345set policy route-map fromAS12345 rule 100 action permitset policy route-map fromAS12345 rule 999 action denycommit
5.3. Appendix C - Setting up test BGP peer 15
Guide to the MidoNet Plugin, Release 4.0-4.0.0-1
set policy route-map toAS12345 rule 100 action permitset policy route-map toAS12345 rule 100 match ip address prefix-list DEFAULTset policy route-map toAS12345 rule 100 set metric 100set policy route-map toAS12345 rule 999 action denycommit
set protocols bgp 65535 neighbor 10.88.88.2 default-originate route-map toAS12345set protocols bgp 65535 neighbor 10.88.88.2 route-map export toAS12345set protocols bgp 65535 neighbor 10.88.88.2 route-map import fromAS12345set protocols bgp 65535 neighbor 10.88.88.2 soft-reconfiguration inboundset protocols bgp 65535 neighbor 10.88.88.2 remote-as 12345commit
Now, we can verify if our VyOS BGP peer is actually connected to the other BGP peer(s):
vyos@vyos# run show ip bgp summaryBGP router identifier 10.20.0.254, local AS number 65535IPv4 Unicast - max multipaths: ebgp 1 ibgp 1RIB entries 1, using 96 bytes of memoryPeers 1, using 4560 bytes of memory
Neighbor V AS MsgRcvd MsgSent TblVer InQ OutQ Up/Down State/PfxRcd10.88.88.2 4 12345 7 8 0 0 0 00:04:22 1
Total number of neighbors 1
If you see an output similar to the above, congratulations, you have set up your VyOS BGP peer correctly! It is advisedto save this configuration:
vyos@vyos# saveSaving configuration to ’/config/config.boot’...Done[edit]
5.3.6 VyOS NAT Configuration
In our test setup, the Floating IP subnet 200.200.200.0/24 is not real public IP subnet, hence the “fake BGP peer”mention in the begining of this guide. In lab condition we want to make “fake” OpenStack instances into believingthey really can use a floating IP from a 200.200.200.0/24 subnet. For that to work we have to set up some NAT rulesin our VyOS so that our OpenStack instances can really talk to public Internet. First, we create this NAT rule to allowFloating IP subnet to access public Internet:
set nat source rule 10 source address 200.200.200.0/24set nat source rule 10 outbound-interface eth0set nat source rule 10 protocol allset nat source rule 10 translation address masqueradecommit
Second, we create NAT rule that will allow traffic from out management subnet, 10.20.0.0/24, to a fake public FloatingIP subnet:
set nat source rule 11 source address 10.20.0.0/24set nat source rule 11 outbound-interface eth1set nat source rule 11 protocol allset nat source rule 11 translation address masqueradecommit
5.3. Appendix C - Setting up test BGP peer 16
Guide to the MidoNet Plugin, Release 4.0-4.0.0-1
Don’t forget to save this configuration:
vyos@vyos# saveSaving configuration to ’/config/config.boot’...Done[edit]
5.3.7 Final consideration
In a likely case that we want to make fake Floating IP subnet, 200.200.200.0/24, available from the rest of our internalmanagement network, 10.20.0.0/24, it is highly advised to set up a static route in the management network gatewayrouter, 10.20.0.1. For example:
# ip route add 200.200.200.0/24 via 10.20.0.254
In case management gateway router is not accessible, the above static route can be set at each individual host thatneeds to access “fake” Floating IP network range.
5.3. Appendix C - Setting up test BGP peer 17


![The StackLight InfluxDB-Grafana Plugin for Fuel Documentation · The StackLight InfluxDB-Grafana Plugin for Fuel Documentation, Release 1.0.0 [root@fuel ~]# fuel plugins --install](https://img.pdfslide.net/doc/110x75/5ee0f025ad6a402d666bff9d/the-stacklight-influxdb-grafana-plugin-for-fuel-documentation-the-stacklight-iniuxdb-grafana.jpg)