Embed Size (px)
Citation preview
Guideline for Interdisciplinary Care and Maintenance of Long-Term Central
Venous Catheters, in Patients with Cancer.
If you are using a printed copy of this document please be aware that it may not be the latest version. To view the latest version visit www.beatson.scot.nhs.uk
Lead Manager: General Manager Responsible Director: Director for Regional Services Approved by: BWOSCC Clinical Governance
Committee Document Origin: BWOSCC Practice Development
& Education Date approved: May 2013 Date for Review: May 2015 Replaces previous version: [if applicable]
N/A
Version
BWOSCC CVC Guideline 2013 V3.0
1
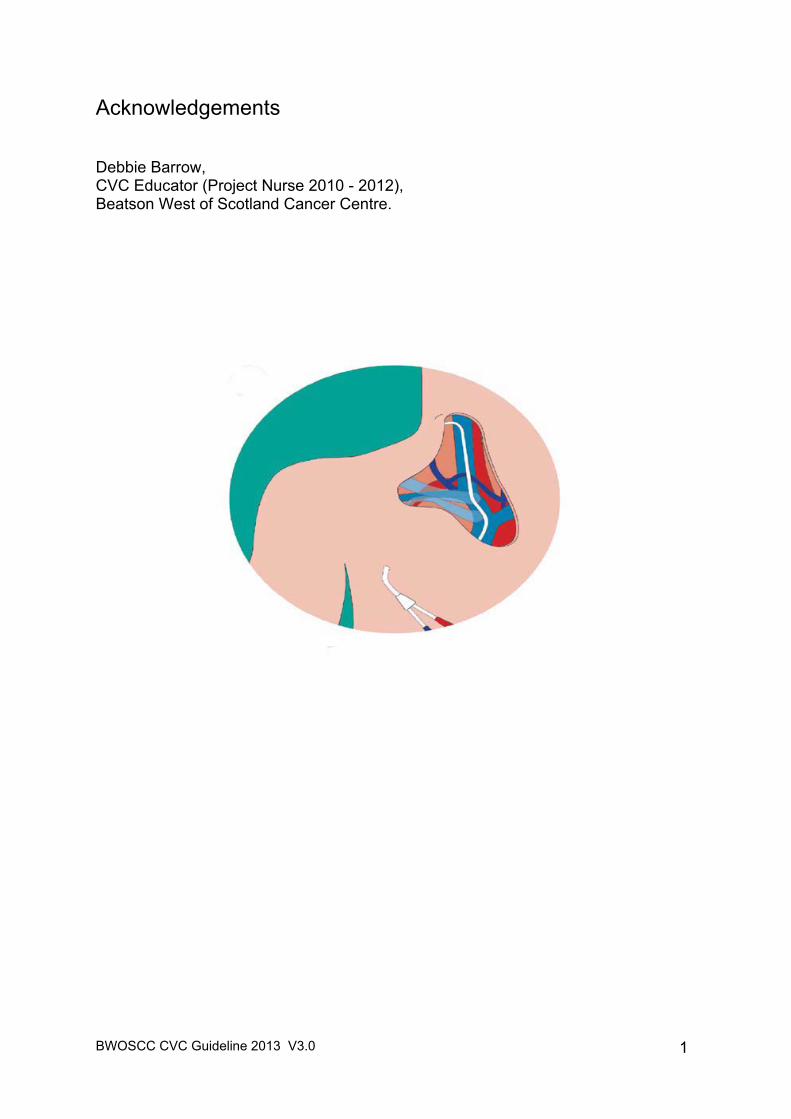
Acknowledgements Debbie Barrow, CVC Educator (Project Nurse 2010 - 2012), Beatson West of Scotland Cancer Centre.
BWOSCC CVC Guideline 2013 V3.0
2
Contents Section Page 1 Introduction 4 2 Background 4 3 CVC Care Bundle 6 4 Scope 7 5 Roles, Responsibilities and Accountability 7 5.1 Manager responsibilities 7 5.2 Healthcare Worker Responsibilities 7 6 Education, Training and Competency 8 7 Documentation 9 8 Referral of Patients with a CVC to Primary Care 11 9 Types of Central Venous Catheters 11 10 CVC Practice Guidelines 12 10.1 Skin tunnelled Central Venous Catheter (tCVC) 12 10.1.1 Dressing change and catheter flush 13 10.1.2 Obtaining routine blood samples 16 10.1.3 Obtaining blood culture samples 19 10.1.4 Removal procedure for tCVC 20 10.1.5 Urokinase administration protocol for persistent withdrawal
Occlusion (Hickman and PICC line catheters) 21
10.1.6 Urokinase administration protocol for complete catheter occlusion (Hickman and PICC line catheters)
26
10.1.7 Troubleshooting- Hickman (tCVC) 30 10.2 Peripherally Inserted Central Catheter (PICC) 33 10.2.1 Dressing change and catheter flush 34 10.2.2 Obtaining routine blood samples 37 10.2.3 Obtaining blood culture samples 40 10.2.4 Removal procedure for PICC 42 10.2.5 Troubleshooting- PICC 44 10.3 Implantable Port (Port-a-cath) 47 10.3.1 Port flush and obtaining routine blood samples 48 10.3.2 Obtaining blood culture samples 52 10.3.3 Removal procedure for implantable port 53 10.3.4 Urokinase administration protocol for persistent withdrawal
occlusion (Port-a-cath) 54
10.3.5 Urokinase administration protocol for complete catheter Occlusion (Port-a-cath)
58
BWOSCC CVC Guideline 2013 V3.0
3
10.3.6 Troubleshooting- implantable port 62 11 Definition of Terms 64 12 Monitoring, Surveillance and Audit 66 13 Communication and Implementation Plan 67 14 References 68 15
Key Related Documents 69
Appendix 1 Health Protection Scotland (HPS)- Summary of Key Recommendations –CVC insertion and maintenance
71
Appendix 2 6 Step Hand Hygiene Technique and 5 moments for Hand Hygiene
72
Appendix 3 Beatson West of Scotland Cancer Centre CVC Care and Maintenance Chart
73
Appendix 4 Checklist for patients discharged from hospital with a cytotoxic ambulatory pump
74
Appendix 5 Medical Device Alert-Chlorhexidine
75
Appendix 6 Health Protection Scotland (HPS): Preventing Contamination when taking a sample for blood culture
76
Appendix 7 Persistent Withdrawal Occlusion (PWO) from Hickman/ PICC line catheters
77
Appendix 8 Complete Catheter Occlusion from Hickman/ PICC line catheters
78
Appendix 9 Audit Measures and the Model for Improvement
79
BWOSCC CVC Guideline 2013 V3.0
4
1 Introduction
1.1 The guideline aims to standardise the care and maintenance of Long Term Central Venous Catheters (CVC’s).
1.2 It aims to promote consistently safe and reliable processes within clinical practice for the care and maintenance of Long Term CVC’s.
1.3 It provides the foundation to progress and improve the quality of CVC care and maintenance delivered.
1.4 It advises all Healthcare Professionals (HCPs) working within cancer care and involved with the delivery or support of cancer patients with a CVC both in the acute and primary care divisions of NHS Greater Glasgow and Clyde.
1.5 The guideline includes general principles and guidance on the care and maintenance of Peripherally Inserted Central Catheters (PICC’s), Groshong lines, Hickman lines and Implantable ports, intended for long-term access.
1.6 Evidence based practice is essential in order to achieve positive patient outcomes and minimise complication rates including catheter related bloodstream infection (CRBSIs).
1.7 For purposes of this guideline the terminology Central Venous Catheters (CVC’s) will be used only throughout the document.
2 Background
2.1 The use of a CVC is often an essential clinical requirement for patients with cancer, to enable safe administration of treatment or to facilitate blood withdrawal when there is poor venous access. CVC’s are used for repeated administration of chemotherapy, fluids, blood products, medications, total parental nutrition and also used for blood sampling.
2.2 The major advantage of a central venous access device is that it allows reliable access to the patient’s circulation without the discomfort of repeated cannulation and venepuncture. Although various peripheral insertion sites can be used for each device, the basic principle is that the tip of the device lies within the central venous system (superior or inferior vena cava or right atrium) where the blood flow around the catheter tip is maximised reducing physical and chemical damage to the vein wall.
2.3 CVC’s are only inserted in the acute hospital environment by competent practitioners.
2.4 Many of the patients receiving chemotherapy will have their CVC managed between treatments within the community setting. Primary Care healthcare
BWOSCC CVC Guideline 2013 V3.0
5
professionals are therefore frequently involved in providing on-going care for patients with a CVC when patients are discharged into the community.
2.5 Health care associated infections (HAIs) affect approximately 1 in 10 patients. Two of the strongest factors linked with these types of infections are the degree of underlying illness, and the use of medical devices. Cancer patients receiving chemotherapy may have both risk factors: the diagnosis of cancer and a medical device to enable intravenous delivery of chemotherapy. A third factor complicates their position further; they may be immunosuppressed as a consequence of their disease and/or the treatment they receive. The CVC, along with the vulnerable nature of the patient, and the duration of insertion / use, increases the risk of catheter related blood stream infections (CRBSIs).
2.6 The Scottish National Healthcare Associated Infection (HAI) Prevalence Survey (2007) reported CVC’s as a leading cause of device-related bacteraemias (blood stream infections) which are a major cause of morbidity, with increased severity of patient illness and prolonged hospital stays.
2.7 CVC’s can cause CRBSIs by enabling microorganisms to gain direct access to the blood stream. There is strong evidence that CRBSIs can originate from the patient’s skin at the insertion site; from hub contamination; from the hands of Healthcare Workers (HCWs); or from infusate contamination where asepsis has not been practiced during the preparation of drugs. Once microorganisms enter and settle on the catheter surface, biofilm can form on the catheter lumen and if the catheter remains in situ over time, parts of the biofilm can float into the blood stream giving rise to a blood stream infection (BSI).
2.8 CVC’s disrupt the integrity of the skin, making infection with bacteria or fungi possible. Infection may spread to the bloodstream and hemodynamic changes and organ dysfunction (severe sepsis) may ensue, possibly leading to death.
2.9 Health Protection Scotland (HPS) presented a review of scientific evidence in April 2012 which identifies a set of key recommendations aimed at minimising the risk of CRBSIs with a focus on the use of evidence based interventions for optimal maintenance of CVC’s and ensure the safety of patients with a CVC. Recommendations advocated by HPS include the use of quality improvement tools such as care bundles which alongside surveillance and audit allow analysis of data generated to adjust and improve systems, performance and outcome.
The HPS k ey recommendations and their s cientific grade of ev idence for th e CVC maintenance quality improvement tool are:
1) Ensure that the need for the CVC in situ is reviewed and recorded
today (on a daily basis) (Category 1A); 2) Ensure that the CVC dressing is intact (Category 1B); 3) Ensure that the CVC dressing has been changed in the last seven
days (Category 1B) 4) Ensure that 2% chlorhexidine gluconate in 70% isopropyl alcohol is
used for cleaning the insertion site during dressing changes (Category 1A);
BWOSCC CVC Guideline 2013 V3.0
6
5) Ensure that hand hygiene is performed immediately before accessing the line/site (WHO Moment 2) (Category 1A);
6) Ensure that an antiseptic containing 70% isopropyl alcohol is used to clean the access hub prior to accessing – rub the access hub for at least 15 seconds (‘scrub the hub’) (Category 1B). – see below for local modification of this recommendation.
These six recommendations form the HPS CVC Maintenance Care Bundle see Appendix 1. These guidelines have adopted the above recommendations for optimal maintenance of CVC’s with the exception of number 6. Pratt et al (2007) in the ‘epic2: guidelines for preventing healthcare- associated infections in NHS Hospitals’ highlight that where there is a prolonged CVC dwell time and more frequent catheter hub access there is an increased likelihood of a CRBSI emanating from a colonised catheter hub. They therefore recommend the use of 2% chlorhexidine gluconate in 70% isopropyl alcohol as the antiseptic of choice to clean the access hub prior to accessing. This statement therefore replaces the sixth recommendation as the evidence of choice in this local guideline for clinical practice.
3 CVC Care Bundle
3.1 The CVC bundle is a group of evidence-based interventions, when implemented together, result in better outcomes than when implemented individually. The science supporting each bundle component is sufficiently established to be considered the standard of care.
3.2 The bundle is not intended to be a comprehensive list of all elements of care related to CVC’s; rather the bundle approach to a small group of interventions.
3.3 Compliance with the bundle is measured by adherence to all elements of the bundle. If all elements have been accomplished, or if an element is documented as medically contraindicated, the bundle is counted as complete for that patient.
3.4 The approach has been most successful when all elements are executed together, an “all-or-none” strategy. If any of the elements are absent, no credit is given. There is no option for “partial credit.”
BWOSCC CVC Guideline 2013 V3.0
7
4 Scope
4.1 This guideline is applicable to all Registered Nurses and Medical Staff involved in the care of adult patients with a Hickman Line (skin tunnelled catheter - tCVC), Peripheral Inserted Central Catheter (PICCs), Groshong line or an Implantable Port (Port-a-Cath). For the purposes of this document Registered Nurses and Medical Staff will be referred to as Health Care Professionals (HCPs)
4.2 It advises all HCPs working within cancer care and involved with the delivery or support of cancer patients with a CVC both in the acute and primary care divisions of NHS Greater Glasgow and Clyde.
4.3 Health Care Support Workers (HCSW’s) who have been appropriately trained and deemed competent can renew the CVC dressing only. They should not be involved in the withdrawal of blood or in the flushing of these devices.
4.4 This document does not include guidance on acute CVC lines, CVC insertion, complications of insertion, parenteral feeding and intravenous therapy administration.
5 Roles, Responsibilities and Accountability
5.1 Manager Responsibilities
• Ensure all staff involved in the care and maintenance of a CVC: Has access to the guideline document. Has access to all equipment required for the care and maintenance of
the CVC. Is appropriately trained and has attended or accessed an update
session annually. Are made aware of a ny policy c hanges a nd the need for new skills
update, followed by the appropriate training. • The line manager / clinical lead should ensure that the healthcare worker has
access to relevant education and training provision as identified during eKSF Personal Development Planning and Review.
• To ensure safe and effective practice, the line manager is responsible for working c losely with the healthc are worker caring for a patient with a CVC and ensuring adequate clinical support in relation to supervision.
5.2 Healthcare Worker Responsibilities
• To practice within their professional competency. • To adhere at all times to the clinical practice guidance within this guideline. • To identify any areas for skills update or training requirement.
BWOSCC CVC Guideline 2013 V3.0
8
• To obtain patient consent prior to any procedure being carried out, according to the consent policy.
• All HCPs c ompetant in the care and maintenance of a CVC are personally accountable for their actions and om issions and are professionally accountable for the patient ass essment and treatment, including the care and maintenance of a CVC.
• All HCPs trained in the care and ma intenance of a CVC are expected to keep themselves up to date with current best practice in the management of CVC’s and are responsible for ensuring they maintain their knowled ge and skill around their practice.
• The person accepting responsibility fo r the care and maintenance of the CVC must ensure that the documentation re cord of the care is accurate and clear.
6 Education, Training and Competency
6.1 All HCPs involved in the care of the patient with a CVC must be appropriately trained and deemed competent in all aspects of the care and management of CVC’s.
6.2 Prior to attending a CVC workshop all Registered Nurses should already hold a current competency certificate for *Intra-venous Medicine administration. (*Exemption criteria for community nursing staff).
6.3 Aspects of CVC interventions which involve the practice of intravenous therapy must not be delegated to individuals who have not been assessed as competent in this role.
6.4 HCPs involved in the care and management of patients with CVC’s must have completed the LearnPro NHS mandatory infection prevention and control training and updates including: -
NES: Aseptic Technique. NES: HAI Induction. NES: Needlestick Injury.
Other associated linked modules include:
GGC: Consent Information. GGC: Information sharing.
BWOSCC CVC Guideline 2013 V3.0
9
6.5 Practitioners should not engage in the care and management of CVC’s unsupervised until they have achieved competence in CVC practice.
6.6 All HCPs accessing and managing CVC’s should undergo a period of supervised practice and complete a BWOSCC CVC competency portfolio for each type of CVC used in their clinical practice. See Appendix 2.
6.7 Competency will be assessed by appropriately skilled practitioners as identified within the service teams.
6.8 All HCPs accessing and managing CVC’s should attend a theoretical and practical training workshop to cover the following:
Patient assessment. Types of devices used and how to recognize them. Anatomy of line placement. Rationale for placement. Terminology used in association with CVC’s. Infection Prevention and Control measures. Use of personal protective equipment. Care and management of CVC’s including blood sampling; line flushing;
dressing changes. Principles of care bundles and quality improvement measures. Use of equipment. Recognition of complications and how to manage them. Sources of help and advice. Documentation of care and maintenance undertaken.
6.9 HCPs managing CVC’s must be able to demonstrate their competency and be able to:
Demonstrate proficiency in caring for a patient with a CVC. Discuss the issues of accountability and responsibility in relation to CVC care
and maintenance; managing complications of a CVC. Describe indications for use of central venous catheters. Discuss knowledge of the advantages and disadvantages of:
Tunnelled catheters (e.g. Hickman Lines) Non Tunnelled catheters (e.g. PICC lines) Implantable Ports (e.g. Port-a-Cath)
Demonstrate anatomical knowledge of potential sites for central venous
catheters and discuss the advantages and disadvantages of each. Discuss specific safety issues associated with different routes of
administration as well as care and prevention of catheter related bloodstream infection (CRBSI) and managing a CVC safely.
Discuss the immediate complications of central line insertion. Tunnelled, non-tunnelled and implantable ports.
Recognise and manage common complications associated with the CVC.
BWOSCC CVC Guideline 2013 V3.0
10
Discuss suture removal from entry and exit sites. Discuss the advice that patients and carers require prior to and post CVC
insertion, relating to their CVC care. Discuss the physical and psychological impact a CVC has upon the patient
and carer. Discuss dressing choice and disinfectant choice for exit site in relation to the
evidence base. Demonstrate safe accessing of long term CVC ensuring aseptic technique. Discuss the evidence in support of disinfection of catheter lumen / access
hub and choice of disinfectant. Explain the principles behind choice of syringe size when accessing and
flushing CVC’S. Discuss, with reference to guidelines, flushing and locking the lumens of long
term CVC’s. Describe the action to be taken in event that no blood can be withdrawn from
the lumen (if taking a blood sample) or there is resistance to flushing.
6.10 A certificate of completion will be issued to all practitioners on receipt of signed-off competencies. *Practitioners should not practice independently in CVC care and maintenance without a signed-off competency and completion certificate.
6.11 An electronic update session will be available for practitioners to access and should be completed a minimum of annually.
7 Documentation
7.1 Documentation should comply with NMC Record Keeping Guidance for Nurse and Midwives (NMC 2009) and NHS GGC Professional Standards for Record Keeping (2009).
7.2 Within the hospital setting CVC care and maintenance must be documented in the case record as well as the patient held diary. Documentation should include a record of the care and maintenance carried out, any complications identified and the actions taken and known outcomes. See Appendix 3.
7.3 The patient held diary is the recognised communication tool used between acute and primary care to facilitate clear communication of the CVC care and maintenance, complications identified and actions taken between care settings. Where required and appropriate this written communication should be further supported with a telephone conversation between the care settings.
7.4 An NHSGGC Part 2 Discharge Letter / Transfer Plan should be completed for all patients being referred for the first time to the community nursing team for CVC care and maintenance. Patients should also be given information for their type of CVC device.
7.5 If a patient is being discharged to the community team with an ambulatory pump containing cytotoxic medicine the discharge checklist must be
BWOSCC CVC Guideline 2013 V3.0
11
completed in addition to the NHSGGC Part 2 Discharge Letter / Transfer Plan and accompany the patient. See Appendix 4.
7.6 When the CVC device is removed this should be recorded in the patient case record and the reason for removal clearly documented.
7.7 All blood cultures and /or swabs taken from the CVC device should be clearly documented in the patient care record to identify the date and time these are taken.
8 Referral of Patients with a CVC to Primary Care
8.1 It is expected that prior to discharge from hospital, patients and their carers should:
1. Receive both verbal and written education regarding the care of the CVC
line. 2. Educate patients in the importance of hand hygiene and refraining from
unnecessary handling of the catheter entry site. 3. Be given a contact number to cal if any concerns or complications arise.
8.2 A CVC care plan / guideline which include clear information on all care and maintenance procedures to be undertaken by the primary care team should be supplied.
8.3 Other essential information should include contact details of the referring hospital ward and responsible Consultant as well as a process or pathway to manage any complications that may arise.
8.4 The role of the receiving Community Nursing team is to ensure that all of the above has happened and to reiterate education and advice.
9 Types of Central Venous Catheters
9.1 Selection of the most appropriate device for each individual patient may reduce the risk of subsequent catheter related complications. The most appropriate catheter will be selected by the lead clinician based on a clinical risk assessment and the therapy to be administered.
9.2 There are several types of devices, but broadly they fall into two categories:
1. Skin tunnelled lines: Hickman lines, Implantable Ports.
2. Peripherally inserted central catheters:
valved non-valved.
BWOSCC CVC Guideline 2013 V3.0
12
10 CVC Clinical Practice Guidelines
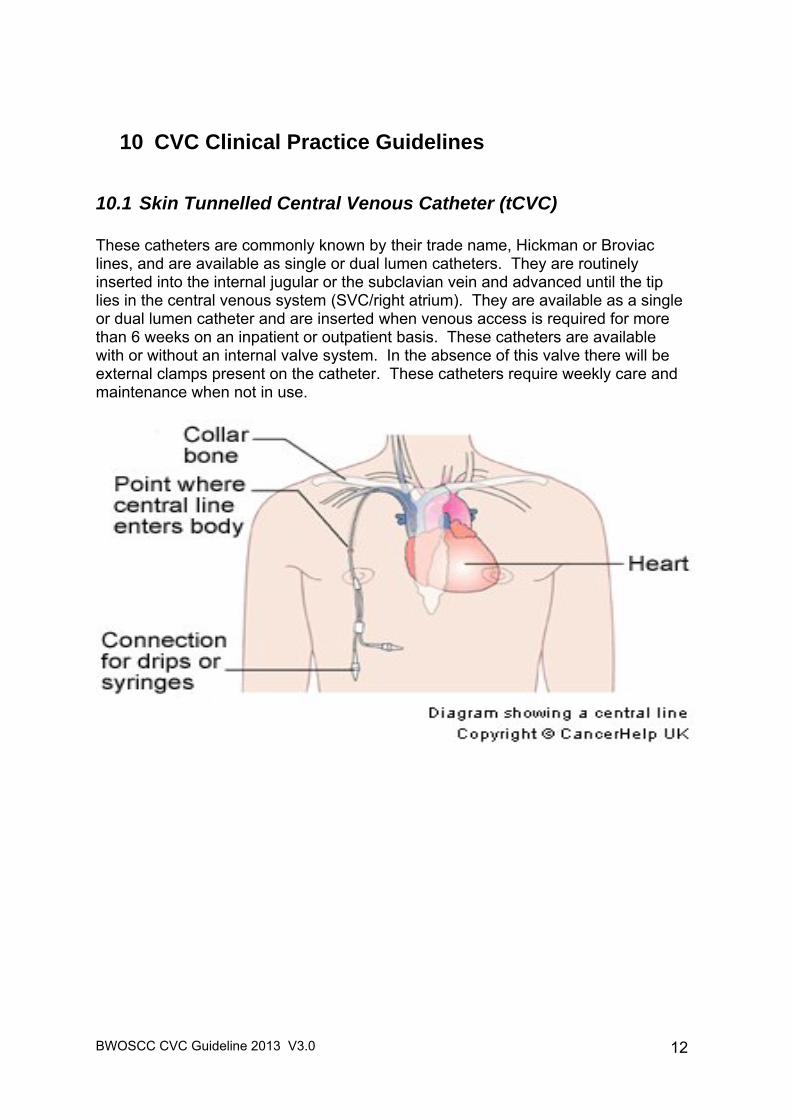
10.1 Skin Tunnelled Central Venous Catheter (tCVC) These catheters are commonly known by their trade name, Hickman or Broviac lines, and are available as single or dual lumen catheters. They are routinely inserted into the internal jugular or the subclavian vein and advanced until the tip lies in the central venous system (SVC/right atrium). They are available as a single or dual lumen catheter and are inserted when venous access is required for more than 6 weeks on an inpatient or outpatient basis. These catheters are available with or without an internal valve system. In the absence of this valve there will be external clamps present on the catheter. These catheters require weekly care and maintenance when not in use.
BWOSCC CVC Guideline 2013 V3.0
13
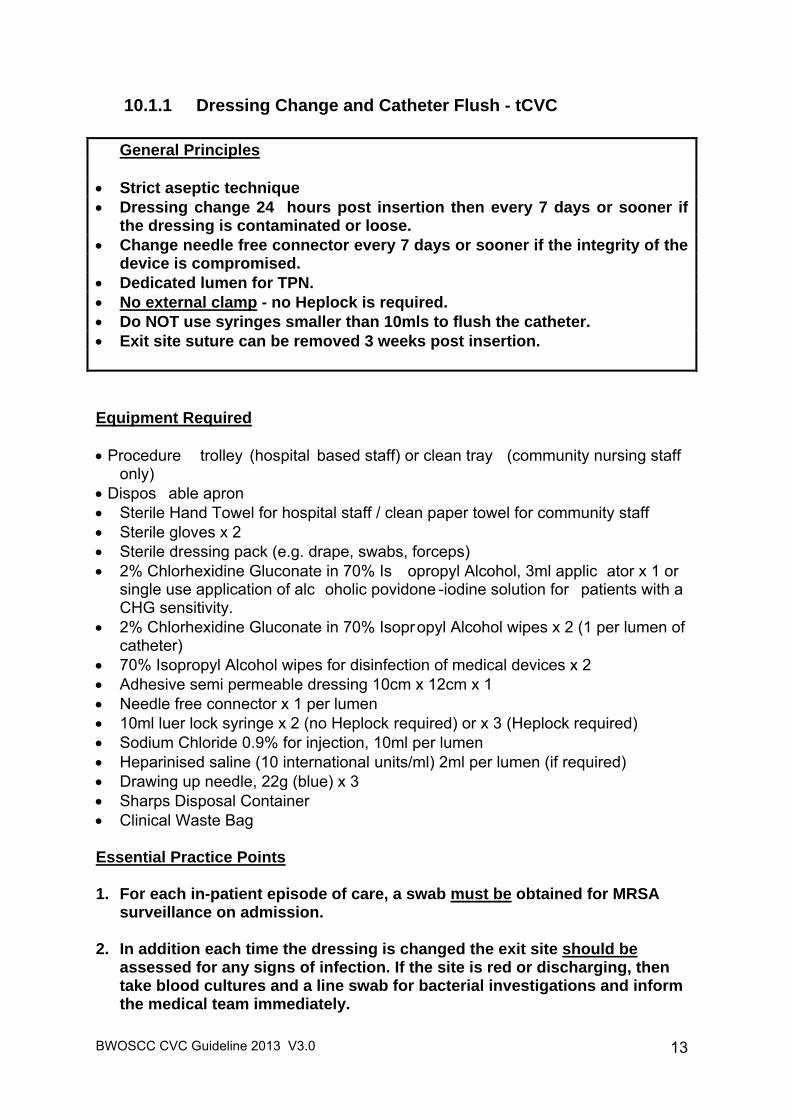
10.1.1 Dressing Change and Catheter Flush - tCVC
General Principles Strict aseptic technique Dressing change 24 hours post insertion then every 7 days or sooner if
the dressing is contaminated or loose. Change needle free connector every 7 days or sooner if the integrity of the
device is compromised. Dedicated lumen for TPN. No external clamp - no Heplock is required. Do NOT use syringes smaller than 10mls to flush the catheter. Exit site suture can be removed 3 weeks post insertion. Equipment Required Procedure trolley (hospital based staff) or clean tray (community nursing staff
only) Dispos able apron Sterile Hand Towel for hospital staff / clean paper towel for community staff Sterile gloves x 2 Sterile dressing pack (e.g. drape, swabs, forceps) 2% Chlorhexidine Gluconate in 70% Is opropyl Alcohol, 3ml applic ator x 1 or
single use application of alc oholic povidone -iodine solution for patients with a CHG sensitivity.
2% Chlorhexidine Gluconate in 70% Isopropyl Alcohol wipes x 2 (1 per lumen of catheter)
70% Isopropyl Alcohol wipes for disinfection of medical devices x 2 Adhesive semi permeable dressing 10cm x 12cm x 1 Needle free connector x 1 per lumen 10ml luer lock syringe x 2 (no Heplock required) or x 3 (Heplock required) Sodium Chloride 0.9% for injection, 10ml per lumen Heparinised saline (10 international units/ml) 2ml per lumen (if required) Drawing up needle, 22g (blue) x 3 Sharps Disposal Container Clinical Waste Bag Essential Practice Points 1. For each in-patient episode of care, a swab must be obtained for MRSA
surveillance on admission. 2. In addition each time the dressing is changed the exit site should be
assessed for any signs of infection. If the site is red or discharging, then take blood cultures and a line swab for bacterial investigations and inform the medical team immediately.
BWOSCC CVC Guideline 2013 V3.0
14
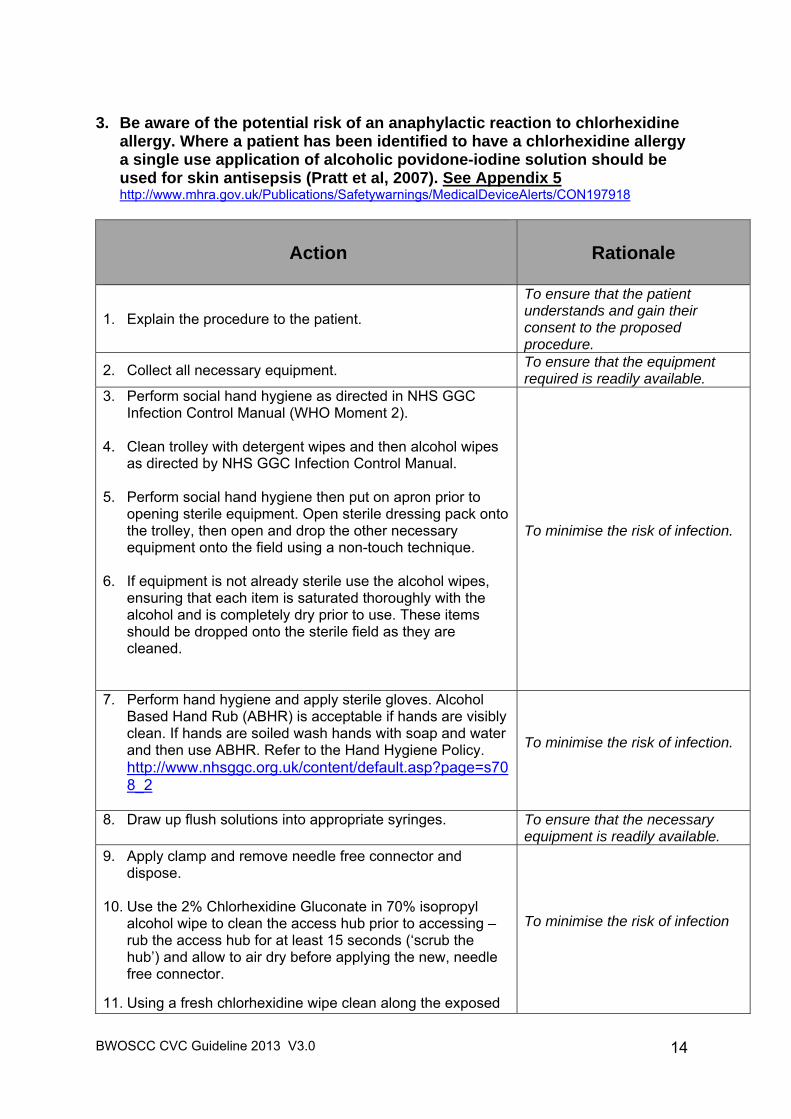
3. Be aware of the potential risk of an anaphylactic reaction to chlorhexidine
allergy. Where a patient has been identified to have a chlorhexidine allergy a single use application of alcoholic povidone-iodine solution should be used for skin antisepsis (Pratt et al, 2007). See Appendix 5 http://www.mhra.gov.uk/Publications/Safetywarnings/MedicalDeviceAlerts/CON197918
Action
Rationale
1. Explain the procedure to the patient.
To ensure that the patient understands and gain their consent to the proposed procedure.
2. Collect all necessary equipment. To ensure that the equipment required is readily available.
3. Perform social hand hygiene as directed in NHS GGC Infection Control Manual (WHO Moment 2).
4. Clean trolley with detergent wipes and then alcohol wipes
as directed by NHS GGC Infection Control Manual.
5. Perform social hand hygiene then put on apron prior to opening sterile equipment. Open sterile dressing pack onto the trolley, then open and drop the other necessary equipment onto the field using a non-touch technique.
6. If equipment is not already sterile use the alcohol wipes,
ensuring that each item is saturated thoroughly with the alcohol and is completely dry prior to use. These items should be dropped onto the sterile field as they are cleaned.
To minimise the risk of infection.
7. Perform hand hygiene and apply sterile gloves. Alcohol Based Hand Rub (ABHR) is acceptable if hands are visibly clean. If hands are soiled wash hands with soap and water and then use ABHR. Refer to the Hand Hygiene Policy. http://www.nhsggc.org.uk/content/default.asp?page=s708_2
To minimise the risk of infection.
8. Draw up flush solutions into appropriate syringes.
To ensure that the necessary equipment is readily available.
9. Apply clamp and remove needle free connector and dispose.
10. Use the 2% Chlorhexidine Gluconate in 70% isopropyl alcohol wipe to clean the access hub prior to accessing – rub the access hub for at least 15 seconds (‘scrub the hub’) and allow to air dry before applying the new, needle free connector.
11. Using a fresh chlorhexidine wipe clean along the exposed
To minimise the risk of infection
BWOSCC CVC Guideline 2013 V3.0
15
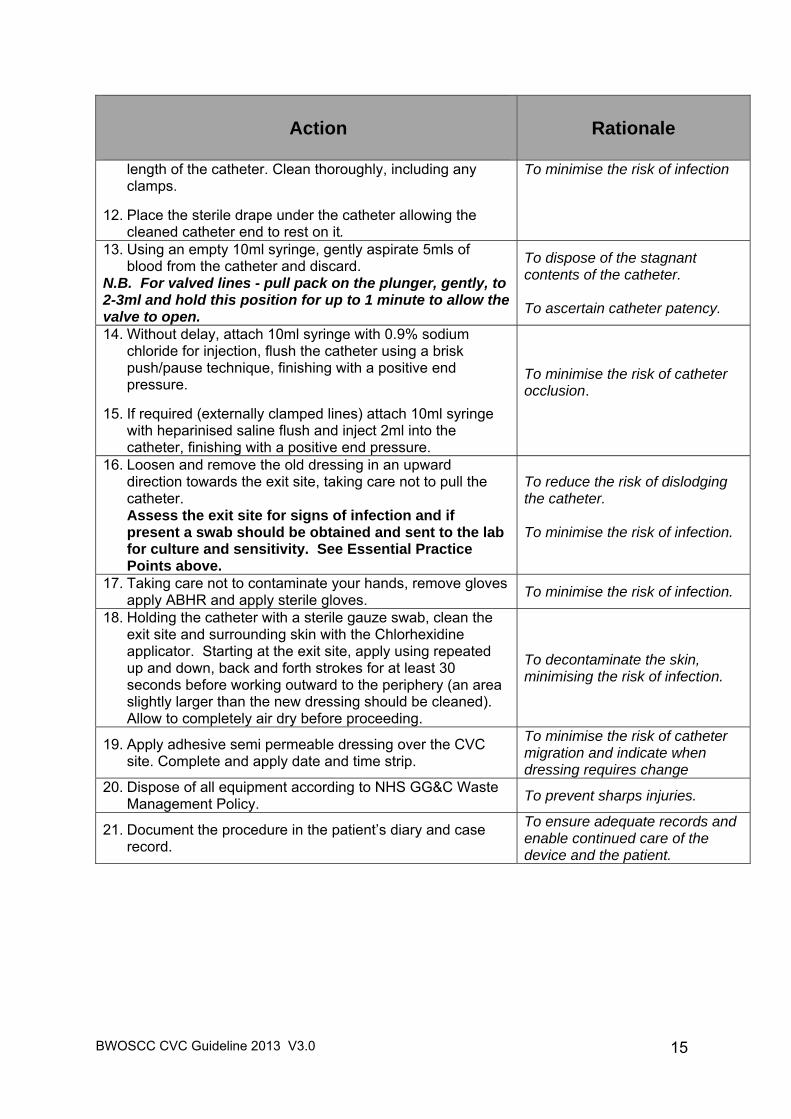
Action
Rationale
length of the catheter. Clean thoroughly, including any clamps.
12. Place the sterile drape under the catheter allowing the
cleaned catheter end to rest on it.
To minimise the risk of infection
13. Using an empty 10ml syringe, gently aspirate 5mls of blood from the catheter and discard.
N.B. For valved lines - pull pack on the plunger, gently, to 2-3ml and hold this position for up to 1 minute to allow the valve to open.
To dispose of the stagnant contents of the catheter. To ascertain catheter patency.
14. Without delay, attach 10ml syringe with 0.9% sodium chloride for injection, flush the catheter using a brisk push/pause technique, finishing with a positive end pressure.
15. If required (externally clamped lines) attach 10ml syringe with heparinised saline flush and inject 2ml into the catheter, finishing with a positive end pressure.
To minimise the risk of catheter occlusion.
16. Loosen and remove the old dressing in an upward direction towards the exit site, taking care not to pull the catheter. Assess the exit site for signs of infection and if present a swab should be obtained and sent to the lab for culture and sensitivity. See Essential Practice Points above.
To reduce the risk of dislodging the catheter. To minimise the risk of infection.
17. Taking care not to contaminate your hands, remove gloves apply ABHR and apply sterile gloves. To minimise the risk of infection.
18. Holding the catheter with a sterile gauze swab, clean the exit site and surrounding skin with the Chlorhexidine applicator. Starting at the exit site, apply using repeated up and down, back and forth strokes for at least 30 seconds before working outward to the periphery (an area slightly larger than the new dressing should be cleaned). Allow to completely air dry before proceeding.
To decontaminate the skin, minimising the risk of infection.
19. Apply adhesive semi permeable dressing over the CVC site. Complete and apply date and time strip.
To minimise the risk of catheter migration and indicate when dressing requires change
20. Dispose of all equipment according to NHS GG&C Waste Management Policy. To prevent sharps injuries.
21. Document the procedure in the patient’s diary and case record.
To ensure adequate records and enable continued care of the device and the patient.
BWOSCC CVC Guideline 2013 V3.0
16
10.1.2 Obtaining Routine Blood Samples - tCVC General Principles Strict aseptic technique Discard first 5-10mls withdrawn for routine blood samples Stop infusion running via the CVC immediately prior to obtaining blood
samples If blood culture sample to be obtained, these should be taken first then the
routine samples Equipment Required
Procedure trolley (hospital based staff) or clean tray (community nursing staff
only) Dispos able apron Sterile dressing pack (i.e. drape, swabs, forceps) Sterile hand towel for hospital staff or clean paper towel for community staff Sterile gloves Sterile Vacuette Standard Tube Holder with connector 2% Chlorhexidine Gluconate in 70% Isopropyl Alcohol wipes x 1 70% Isopropyl Alcohol wipes x 2 for disinfection of medical devices Drawing up needle 22G (blue) x 2 10ml leur lock syringe x 2 (no Heplock required) or 3 (Heplock required) 0.9% Sodium Chloride for injection, 10ml Heparinised saline (10 international units/ml) 2ml, if required Sharps disposal container Laboratory request forms Blood sample bottles Specimen bags Clinical waste bag

BWOSCC CVC Guideline 2013 V3.0
17
Action
Rationale
1. Explain the procedure to the patient.
To ensure that the patient understands and gain their consent to the proposed procedure.
2. Collect all necessary equipment. To ensure that the equipments required is readily available.
3. Perform social hand hygiene as directed in NHS GGC Infection Control Manual (WHO Moment 2).
4. Clean trolley with detergent wipes and then alcohol wipes
as directed by NHS GGC Infection Control Manual.
5. Perform social hand hygiene then put on apron prior to opening sterile equipment. Open sterile dressing pack onto the trolley, then open and drop the other necessary equipment onto the sterile field using a non-touch technique.
6. If equipment is not already sterile use the alcohol wipes,
ensuring that each item is saturated thoroughly with the alcohol and is completely dry prior to use. These items should be dropped onto the field as they are cleaned.
7. Perform hand hygiene and apply sterile gloves. Alcohol Based Hand Rub (ABHR) is acceptable if hands are visibly clean. If hands are soiled wash hands with soap and water and then use ABHR. Refer to the Hand Hygiene Policy. http://www.nhsggc.org.uk/content/default.asp?page=s708_2
To ensure that the necessary equipment is readily available.
8. Use the 2% Chlorhexidine Gluconate in 70% isopropyl alcohol wipe to clean the needle free connector prior to accessing – rub the connector for at least 15 seconds (‘scrub the hub’) and allow to air dry.
9. Place the sterile drape to create a sterile field. 10. Attaching the empty 10ml syringe, open the clamp (if
present) and gently withdraw 5 - 10ml of blood, close the clamp (if present), detach the syringe and discard. (N.B. For valved lines – pull back on the plunger gently to 2-3ml and hold this position for up to 1 minute to allow the valve to open.)
To discard the stagnant contents of the catheter before obtaining blood samples required. To ascertain catheter patency.
11. Attach the Vacuette bottle holder to the needle free connector, open the clamp and insert blood collection bottles in sequence. Once samples obtained, close clamp (if present) and detach the Vacuette bottle holder from the
To ensure that adequate blood samples are obtained safely minimising the risk of sharps injury.
BWOSCC CVC Guideline 2013 V3.0
18
Action
Rationale
needle free connector. 12. Without delay, attach the 10ml syringe with 0.9% sodium
chloride for injection to the needle free connector, open the clamp (if present) and using the ‘push-pause’ technique flush the catheter, finishing with a positive end pressure, close the clamp (if present) and detach the syringe and discard.
13. If required (externally clamped catheters), attach 10ml syringe with heparinised saline and inject 2ml into the catheter, finishing with a positive end pressure, closing the clamp before detaching the syringe.
To minimise the risk of catheter occlusion.
14. Following correct identification of the patient both verbal and from wristband, label the blood collection bottles at the bedside and place in the transport bag with the appropriate request form.
To correctly identify the patient and label the specimens correctly. To ensure the samples are accurately labelled and packed for safe transport to the lab.
15. Dispose of all waste in accordance with the NHS GG&C Waste Management Policy.
To prevent sharps injuries and correct disposal of clinical waste.
16. Document the procedure in the patient’s record. To ensure that accurate records and enable continued care of the device and patient.
BWOSCC CVC Guideline 2013 V3.0
19
10.1.3 Obtaining Blood Culture Samples - tCVC
General Principles Obtain blood culture samples from a CVC if it is thought to be the source
of infection or if instructed by medical staff. Do NOT discard the first 5-10mls of blood. Peripheral blood culture samples must be taken at the same time. If multi-lumen catheter, blood culture samples (both aerobic and
anaerobic) should be obtained from each lumen. In accordance with HPS ‘Preventing Contamination When Taking a Sample
for Blood Culture’ (see Appendix 6): - 1. Decontaminate bottle tops with 70% Isopropyl Alcohol and allow to air dry
completely. 2. Hand hygiene to be performed immediately before the procedure (WHO
Moment 2). 3. Strict aseptic technique. 4. Blood cultures should be taken before other blood samples. 5. The anaerobic blood culture bottle should be inoculated first. Equipment Required Procedure trolley (hospital based staff) Dispos able apron Sterile dressing pack (i.e. drape, swabs, forceps) Sterile Hand Towel Sterile Gloves 2% Chlorhexidine Gluconate in 70% Isopropyl Alcohol wipes x 2 70% Isopropyl Alcohol wipes x 2 for disinfection of medical devices Drawing up needle, 22G (blue) x 2 10ml leur lock syringe x 2 per lumen 0.9% Sodium Chloride for injection 10ml per lumen Heparinised Saline (10iu/ml) 2ml per lumen (if required) Blood culture sample bottles Specimen bags Vacuette Lueradapter Vacuette Blood Culture Bottle Holder Laboratory request forms Sharps disposal container Clinical waste bag
BWOSCC CVC Guideline 2013 V3.0
20
Before you start – Check that the bottles are in date. The broth should be clear and the sensor on the bottle a dark colour. Do NOT use if the broth is cloudy.
Action
Rationale
1. Follow guid ance as p er procedure for routine blood sampling actions 1 -11.
2. Attach the Vacuette Blood Culture bottle holder and adaptor to the needle free connector, open the clamp and insert blo od culture bottles. The anaerobic blood culture bottle should be inoculated first. Once samples are obtained, close clamp (if present) and detach the Vacuet te holder from the needle free connector. Do NOT take any other samples prior to taking the blood cultures. If other blood samples are required at this time they can be taken once the culture samples have been taken.
To ensure that adequate blood samples are obtained safely minimising the risk of sharps injury and to avoid cross contamination of additives between tubes during blood withdrawal.
3. Follow guid ance as p er procedure for routine blood sampling actions 14 - 18.
10.1.4 Removal - tCVC THIS PROCEDURE SHOULD ONLY BE CARRIED OUT BY HCPs
When catheter is to be removed, the medical/nursing practitioner will make the appropriate referral to the Vascular Access Service. The patient will receive information regarding the appointment and instructions on any pre-procedure preparation required. If the tCVC is being removed due to infection or because blood cultures have been positive, the tip should be sent for culture.
BWOSCC CVC Guideline 2013 V3.0
21
10.1.5 Urokinase Administration Protocol for Persistent Withdrawal Occlusion (PWO) – Hickman Line (tCVC) and PICC Line Catheters.
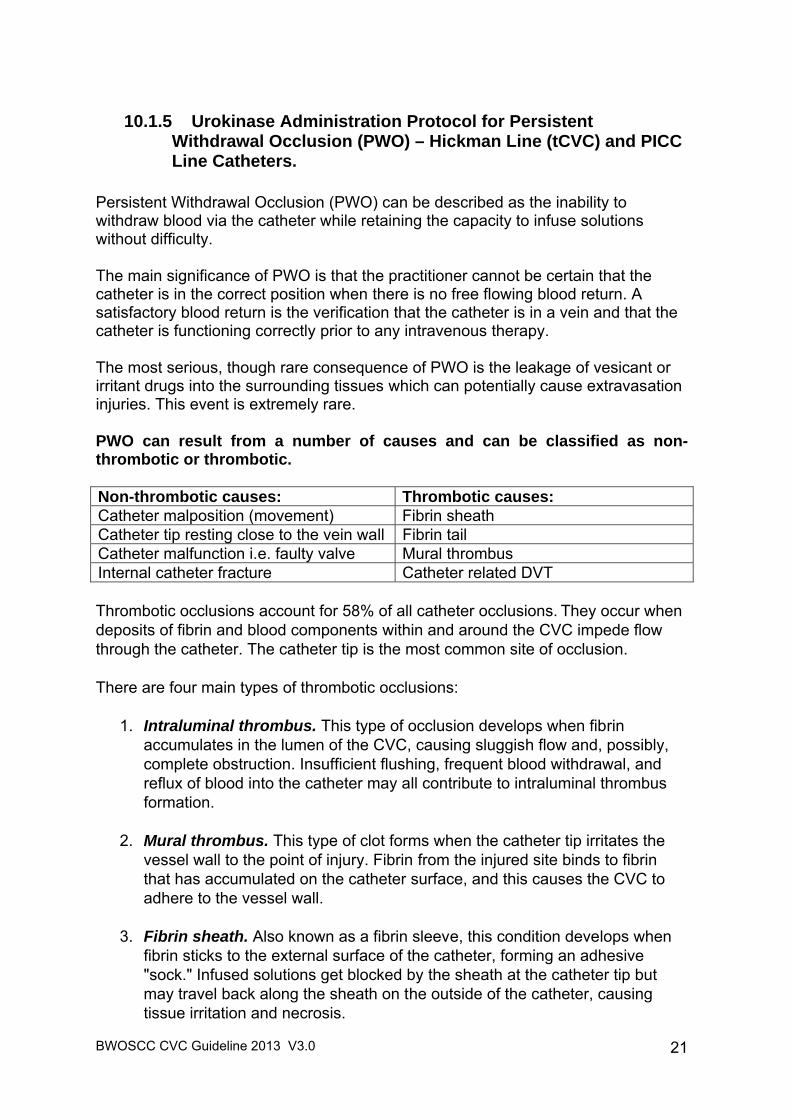
Persistent Withdrawal Occlusion (PWO) can be described as the inability to withdraw blood via the catheter while retaining the capacity to infuse solutions without difficulty. The main significance of PWO is that the practitioner cannot be certain that the catheter is in the correct position when there is no free flowing blood return. A satisfactory blood return is the verification that the catheter is in a vein and that the catheter is functioning correctly prior to any intravenous therapy. The most serious, though rare consequence of PWO is the leakage of vesicant or irritant drugs into the surrounding tissues which can potentially cause extravasation injuries. This event is extremely rare. PWO can result from a number of causes and can be classified as non-thrombotic or thrombotic. Non-thrombotic causes: Thrombotic causes: Catheter malposition (movement) Fibrin sheath Catheter tip resting close to the vein wall Fibrin tail Catheter malfunction i.e. faulty valve Mural thrombus Internal catheter fracture Catheter related DVT Thrombotic occlusions account for 58% of all catheter occlusions. They occur when deposits of fibrin and blood components within and around the CVC impede flow through the catheter. The catheter tip is the most common site of occlusion. There are four main types of thrombotic occlusions:
1. Intraluminal thrombus. This type of occlusion develops when fibrin accumulates in the lumen of the CVC, causing sluggish flow and, possibly, complete obstruction. Insufficient flushing, frequent blood withdrawal, and reflux of blood into the catheter may all contribute to intraluminal thrombus formation.
2. Mural thrombus. This type of clot forms when the catheter tip irritates the
vessel wall to the point of injury. Fibrin from the injured site binds to fibrin that has accumulated on the catheter surface, and this causes the CVC to adhere to the vessel wall.
3. Fibrin sheath. Also known as a fibrin sleeve, this condition develops when
fibrin sticks to the external surface of the catheter, forming an adhesive "sock." Infused solutions get blocked by the sheath at the catheter tip but may travel back along the sheath on the outside of the catheter, causing tissue irritation and necrosis.
BWOSCC CVC Guideline 2013 V3.0
22
4. Fibrin tail. Also called a fibrin flap, this type of occlusion forms when fibrin
adheres to the end of the catheter. This tail often acts as a one-way valve, permitting infusion when the infused solution pushes the tail away from the catheter tip, but preventing withdrawal as the tail is sucked against the tip.
The vast majority of thrombotic occlusions develop without symptoms, but an experienced clinician may be able to spot subtle warning signs. As the thrombus begins to form, the CVC may seem sluggish, infusion pump alarms may sound more frequently, or clots may appear in the external segment of catheter. There may also be swelling in the extremity on the side in which the CVC was placed. A thrombotic occlusion may be diagnosed based only on these signs, or it may be confirmed using imaging techniques. Thrombolytic Agents. Thrombolytic agents are a group of drugs which work by breaking down blood clots (clot lysis). Urokinase is the most commonly used thrombolytic agent in catheter care. A bolus dose of Urokinase may help to break down the fibrin formation at the tip of the catheter therefore preventing withdrawal occlusion. The most common recommended initial dose of Urokinase for use as a bolus lock for catheter clearance is 5,000 international units / 2mls. Higher doses of Urokinase are given in some specialist clinical areas following expert advice. If a higher dose is being used this must be discussed with the medical team responsible for the patient care. In all circumstances the Urokinase must be prescribed. Further dose variation can be found via the following link: http://www.medicinescomplete.com/mc/bnf/current/PHP1588-syner-kinase.htm Contraindications Check that the patient is not allergic to Urokinase or to any of the excipients in the formulation (for example mannitol). Urokinase should be used with caution if the patient is actively bleeding or is at risk of haemorrhage (e.g. coagulopathy, thrombocytopenia, therapeutic anticoagulant therapy, following surgery or cerebrovascular bleeding, immediately post-partum, severe hepatic disease). If any doubt about administering Urokinase this should be discussed with the Consultant Team responsible for the patient.
BWOSCC CVC Guideline 2013 V3.0
23
Equipment Required This procedure should only be conducted by competent HCPs in a hospital environment within normal working hours i.e. 09 00 – 17 00.
Procedure trolley Dispos able apron Sterile dressing pack (i.e. drape, swabs, forceps) Sterile gloves Sterile hand towel 10ml syringe x 4 Needle free connector x 1 per lumen Drawing up needle 23G (blue) x 2 2% Chlorhexidine Gluconate in 70% Is opropyl Alcohol wipes ( at least one
per lumen of catheter) 70% Isopropyl Alcohol wipes for disinfection of medical devices Urokinase 5,000 international units per lum en ( must be prescribed) and
reconstituted with 0.9% Sodium Chloride for injection. 0.9% Sodium chloride for Injection 10mls per lumen Heparinised saline (10 international units/ml) 2ml per lumen (if required) Clinical waste bag Sharps disposal container
The Procedure Before proceeding check the following:
That there are no kinks in the line. Ask the patient to take a deep breath in and hold whilst attempting to
aspirate the catheter. If a PICC Line also try altering t he position of the arm and/or try 30 o head
down tilt. If clamps are present, move cl amp fu rther down the catheter then roll th e
previously clamped section in your fingers gently to ensure that the catheter walls are not ‘stuck’ together’.
Prior to undertaking t his procedure an x-ray should be obtained to verify the correct position of the catheter in a blood vessel.
BWOSCC CVC Guideline 2013 V3.0
24
Action
Rationale
1. Explain the procedure to the patient.
To ensure that the patient understands and gain their consent to the proposed procedure.
2. Collect all necessary equipment. To ensure that the equipment required is readily available.
3. Perform social hand hygiene as directed in NHS GGC Infection Control Manual (WHO Moment 2).
4. Clean trolley with detergent wipes and then alcohol
wipes as directed by NHS GGC Infection Control Manual.
5. Perform social hand hygiene then put on apron prior to opening sterile equipment. Open sterile dressing pack onto the trolley, then open and drop the other necessary equipment onto the sterile field using a non-touch technique.
6. If equipment is not already sterile use the alcohol wipes,
ensuring that each item is saturated thoroughly with the alcohol and is completely dry prior to use. These items should be dropped onto the field as they are cleaned.
To minimise the risk of infection.
7. Perform hand hygiene and apply sterile gloves. Alcohol Based Hand Rub (ABHR) is acceptable if hands are visibly clean. If hands are soiled wash hands with soap and water and then use ABHR. Refer to the Hand Hygiene Policy. http://www.nhsggc.org.uk/content/default.asp?page=s708_2
To minimise the risk of infection.
8. Place the sterile drape to create a sterile field. 9. Use a 2% Chlorhexidine Gluconate in 70% isopropyl
alcohol wipe to clean the access hub prior to accessing – rub the access hub for at least 15 seconds (‘scrub the hub’) and allow to air dry before applying the new, needle free connector.
�
To minimise the risk of infection.
An attempt should be made to withdraw blood prior to instilling the Urokinase: 10. Attach an empty 10ml syringe to the needle free
connector and attempt to withdraw blood.
11. If a clamped line, unclamp and gently pull back on the
To assess for blood withdrawal prior to proceeding with Urokinase administration.
BWOSCC CVC Guideline 2013 V3.0
25
Action
Rationale
syringe plunger to 2 – 3 mls. 12. If an unclamped line, gently pull back on the syringe
plunger to 2 – 3 mls and hold this position for up to one minute to allow the catheter valve to open.
If blood withdrawal has not been successful: 13. Attach the 10ml syringe containing the Urokinase
solution (5,000 international units in 2mls) and instil into the catheter lumen.
14. If the line has an external clamp this should be left unclamped while the Urokinase lock is insitu.
15. Leave the Urokinase insitu for 60 – 120 minutes, and
then withdraw the Urokinase lock. 16. With a fresh 10ml syringe attempt to withdraw blood.
To instil the Urokinase Lock safely.
If blood withdrawal is possible: - 17. Without delay, attach the 10ml syringe with 0.9%
sodium chloride for injection to the needle free connector, open the clamp (if present) and using the ‘push-pause’ technique flush the catheter, finishing with a positive end pressure, close the clamp (if present) and detach the syringe and discard.
18. If required (externally clamped catheters), attach 10ml syringe with heparinised saline and inject 2ml into the catheter, finishing with a positive end pressure, closing the clamp before detaching the syringe.
To minimise risk of catheter occlusion.
If blood withdrawal is still NOT possible: - 19. If procedure unsuccessful on first attempt, steps 14 – 17
may be repeated once more after leaving a one hour gap between each attempt.
20. If the procedure is unsuccessful after two attempts, try again in 24 hours and leave the urokinase lock insitu for 12 – 24 hours as an in-patient.
21. If the procedure is still not successful, the line should be
removed.
To instil the Urokinase Lock safely.
22. Dispose of all waste in accordance with the NHS GG&C Waste Management Policy.
To prevent sharps injuries and correct disposal of clinical waste.
23. Document the procedure in the patient’s record. To ensure that accurate records and enable continued care of the device and patient.
BWOSCC CVC Guideline 2013 V3.0
26
10.1.6 Urokinase Administration Protocol for Complete Catheter Occlusion Where Thrombus is suspected - Hickman Line (tCVC) and PICC Line Catheters.
Complete catheter occlusion is when there is an inability to infuse any solution into the catheter together with the inability to aspirate any blood from it. Complete occlusion can result from a thrombotic or a non-thrombotic cause. In order to be able to diagnose and manage the occlusion effectively, it is important to verify the source of the problem. A thrombotic complete occlusion develops as a result of a build-up of blood within the catheter. The most common non-thrombotic causes of catheter occlusions are:
• Mechanical obstruction • Drug or mineral precipitates • Lipid residue
If a thrombus is suspected proceed:- Equipment Required This procedure should only be conducted by competent HCPs in a hospital environment within normal working hours i.e. 09 00 – 17 00.
Procedure trolley Dispos able apron Sterile dressing pack (i.e. drape, swabs, forceps) Sterile gloves Sterile hand towel 10ml syringe x 4 3 – way tap Needle free connector x 1 per lumen Drawing up needle 23G (blue) x 2 2% Chlorhexidine Gluconate in 70% Is opropyl Alcohol wipes ( at least one
per lumen of catheter) 70% Isopropyl Alcohol wipes for disinfection of medical devices Urokinase 5,000 int ernational units per lumen ( must be prescribed)
reconstituted with 0.9% Sodium Chloride for Injection 0.9% Sodium chloride for Injection 10mls per lumen Heparinised saline (10 international units/ml) 2ml per lumen (if required) Clinical waste bag Sharps disposal container

BWOSCC CVC Guideline 2013 V3.0
27
The Procedure An attempt should be made to withdraw blood prior to instilling the Urokinase:
Attach an empty 10ml syringe to the needle free connector and attempt to withdraw blood.
If a clamped line, unclamp and gently pull back on the syr inge plunger to 2
– 3 mls.
If an unclamped line, gently pull back on the syringe plunger to 2 – 3 mls and hold t his position for up to one minut e to allow the catheter valve to open.
With all lines ask the patient to take a deep breath in and hold whilst
attempting to aspirate the catheter.
If a PICC Line also try altering the position of the arm and/or try 30o head down tilt.
That there are no kinks.
If clamps are present, move cl amp fu rther down the catheter then roll the
previously clamped section in your fingers gently to ensure that the catheter walls are not ‘stuck’ together’.
Action
Rationale
1. Follow steps 1 – 8 for PWO. To ensure that the patient understands and gain their consent to the proposed procedure.
2. Using a 10ml syringe reconstitute the Urokinase vial to achieve 5,000 international units in 2mls. per lumen.
3. Prime the 3-way tap with the Urokinase solution at 3 o’clock access point on the tap. Do not disconnect the syringe. Turn tap off to the syringe containing the Urokinase.
�
To safely prepare Urokinase prior to administration.
4. Use a 2% Chlorhexidine Gluconate in 70% isopropyl alcohol wipe to clean the access hub prior to accessing – rub the access hub for at least 15 seconds (‘scrub the hub’) and allow to air dry.
To minimise the risk of infection.

BWOSCC CVC Guideline 2013 V3.0
28
Action
Rationale
If blood withdrawal has not been successful: 5. Attach the 3 – way tap directly to the catheter
lumen. Attach an empty 10ml syringe to the 6 o’clock access point on the tap.
6. Pull gently back on the empty syringe plunger to create a vacuum in the catheter to approximately 8mls and hold the plunger at 8mls whilst turning the closed position onto the empty syringe. A small amount of Urokinase will then be drawn into vacuum. Remove the empty syringe and expel air from the empty syringe.
7. When complete clamp the line if required and
remove the 3 – way tap. 8. Use a 2% Chlorhexidine Gluconate in 70%
isopropyl alcohol wipe to clean the access hub prior to accessing – rub the access hub for at least 15 seconds (‘scrub the hub’) and allow to air dry.
9. If the line has an external clamp this should be
left unclamped while the Urokinase lock is in situ.
10. Leave the Urokinase in situ for 60 – 120 minutes, and then withdraw the Urokinase lock.
11. With a fresh 10ml syringe attempt to withdraw
blood.
To instil the Urokinase Lock safely.
BWOSCC CVC Guideline 2013 V3.0
29
Action
Rationale
If blood withdrawal is possible: - 12. Without delay, attach the 10ml syringe with 0.9%
sodium chloride for injection to the needle free connector, open the clamp (if present) and using the ‘push-pause’ technique flush the catheter, finishing with a positive end pressure, close the clamp (if present) and detach the syringe and discard.
13. If required (externally clamped catheters), attach 10ml syringe with heparinised saline and inject 2ml into the catheter, finishing with a positive end pressure, closing the clamp before detaching the syringe.
To minimise risk of catheter occlusion.
If blood withdrawal is still NOT possible: - 14. If the procedure is unsuccessful after two attempts,
try again in 24 hours and leave the urokinase lock insitu for 12 – 24 hours as an in-patient.
15. If the procedure is still not successful, the line
should be removed.
To instil the Urokinase Lock safely.
16. Dispose of all waste in accordance with the NHS GG&C Waste Management Policy.
To prevent sharps injuries and correct disposal of clinical waste.
17. Document the procedure in the patient’s record. To ensure that accurate records and enable continued care of the device and patient.

BWOSCC CVC Guideline 2013 V3.0
30
10.1.7 Troubleshooting – Hickman (tCVC)
Problem
Possible cause Treatment
Systemic Infection Generally feeling
unwell Sore throat Pyre xia Rigor after flushing Hypotension Shock
Bacteraemia Community Nurses – Refer to Cancer Centre without delay.
Refer to medical team – may be treatable without device removal depending on the patient’s clinical status and colonising organism.
Only take blood cultures from the device if it is thought to be the source of the infection.
Obtain blood cultures from each lumen of the device and peripherally.
Monitor all vital signs and early warning score (NEWS) – frequency will depend on patient’s clinical status.
For device salvage – consider antibiotic or Taurolock (discuss with Microbiologist).
If line is to be removed, send catheter tip for culture and sensitivity. N.B. Taurolock is a medical device which needs to be prescribed with the correct formulation http://www.taurolock.com/en/download-en
Exit Site Infection Inflammation and tenderness at the exit site +/- exudate
Exit site infection Community Nurses – Refer to GP. If unresolved refer to Cancer Centre.
Obtain wound swab for culture and sensitivity.
Redress exit site, aseptically. If exudate present consider if increase frequency of dressing change or alternative dressing is necessary.
Minimise tension applied to the catheter as possible exit site infection may destabilise the cuff.
Refer and discuss with medical team to consider if antibiotic therapy is indicated.
Persistent Withdrawal Occlusion (PWO) No blood return on aspiration, flushing with no resistance
Thrombus within catheter lumen
Fibrin sheath Migration of the
catheter tip Lipid aggregation
(TPN only)
Community Nurses – contact Cancer Centre and record in patient’s diary.
Obtain x-ray to verify correct position of the CVC in a blood vessel.
If CVC is verified to be in the correct position - Refer to Appendix 7 and section 10.1.5 for actions to be taken
BWOSCC CVC Guideline 2013 V3.0
31
Problem
Possible cause Treatment
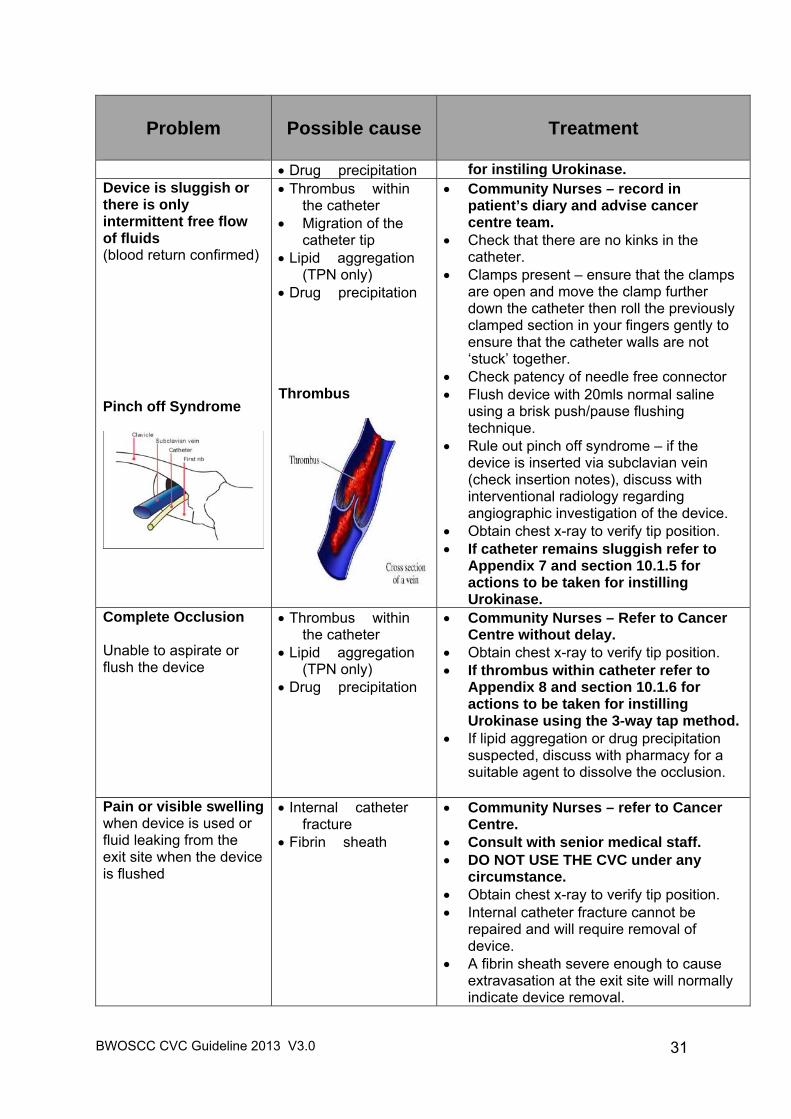
Drug precipitation for instiling Urokinase. Device is sluggish or there is only intermittent free flow of fluids (blood return confirmed) Pinch off Syndrome
Thrombus within the catheter
Migration of the catheter tip
Lipid aggregation (TPN only)
Drug precipitation Thrombus
Community Nurses – record in patient’s diary and advise cancer centre team.
Check that there are no kinks in the catheter.
Clamps present – ensure that the clamps are open and move the clamp further down the catheter then roll the previously clamped section in your fingers gently to ensure that the catheter walls are not ‘stuck’ together.
Check patency of needle free connector Flush device with 20mls normal saline
using a brisk push/pause flushing technique.
Rule out pinch off syndrome – if the device is inserted via subclavian vein (check insertion notes), discuss with interventional radiology regarding angiographic investigation of the device.
Obtain chest x-ray to verify tip position. If catheter remains sluggish refer to
Appendix 7 and section 10.1.5 for actions to be taken for instilling Urokinase.
Complete Occlusion Unable to aspirate or flush the device
Thrombus within the catheter
Lipid aggregation (TPN only)
Drug precipitation
Community Nurses – Refer to Cancer Centre without delay.
Obtain chest x-ray to verify tip position. If thrombus within catheter refer to
Appendix 8 and section 10.1.6 for actions to be taken for instilling Urokinase using the 3-way tap method.
If lipid aggregation or drug precipitation suspected, discuss with pharmacy for a suitable agent to dissolve the occlusion.
Pain or visible swelling when device is used or fluid leaking from the exit site when the device is flushed
Internal catheter fracture
Fibrin sheath
Community Nurses – refer to Cancer Centre.
Consult with senior medical staff. DO NOT USE THE CVC under any
circumstance. Obtain chest x-ray to verify tip position. Internal catheter fracture cannot be
repaired and will require removal of device.
A fibrin sheath severe enough to cause extravasation at the exit site will normally indicate device removal.
BWOSCC CVC Guideline 2013 V3.0
32
Problem
Possible cause Treatment
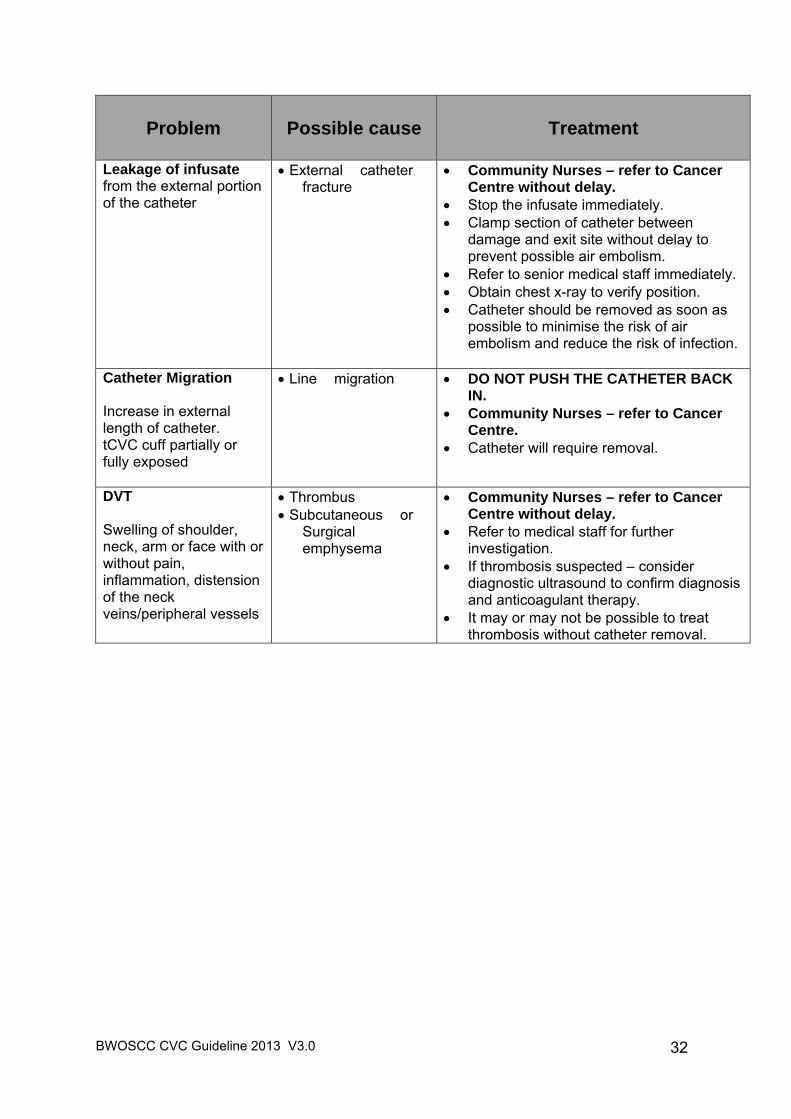
Leakage of infusate from the external portion of the catheter
External catheter fracture
Community Nurses – refer to Cancer Centre without delay.
Stop the infusate immediately. Clamp section of catheter between
damage and exit site without delay to prevent possible air embolism.
Refer to senior medical staff immediately. Obtain chest x-ray to verify position. Catheter should be removed as soon as
possible to minimise the risk of air embolism and reduce the risk of infection.
Catheter Migration Increase in external length of catheter. tCVC cuff partially or fully exposed
Line migration DO NOT PUSH THE CATHETER BACK IN.
Community Nurses – refer to Cancer Centre.
Catheter will require removal.
DVT Swelling of shoulder, neck, arm or face with or without pain, inflammation, distension of the neck veins/peripheral vessels
Thrombus Subcutaneous or
Surgical emphysema
Community Nurses – refer to Cancer Centre without delay.
Refer to medical staff for further investigation.
If thrombosis suspected – consider diagnostic ultrasound to confirm diagnosis and anticoagulant therapy.
It may or may not be possible to treat thrombosis without catheter removal.
BWOSCC CVC Guideline 2013 V3.0
33
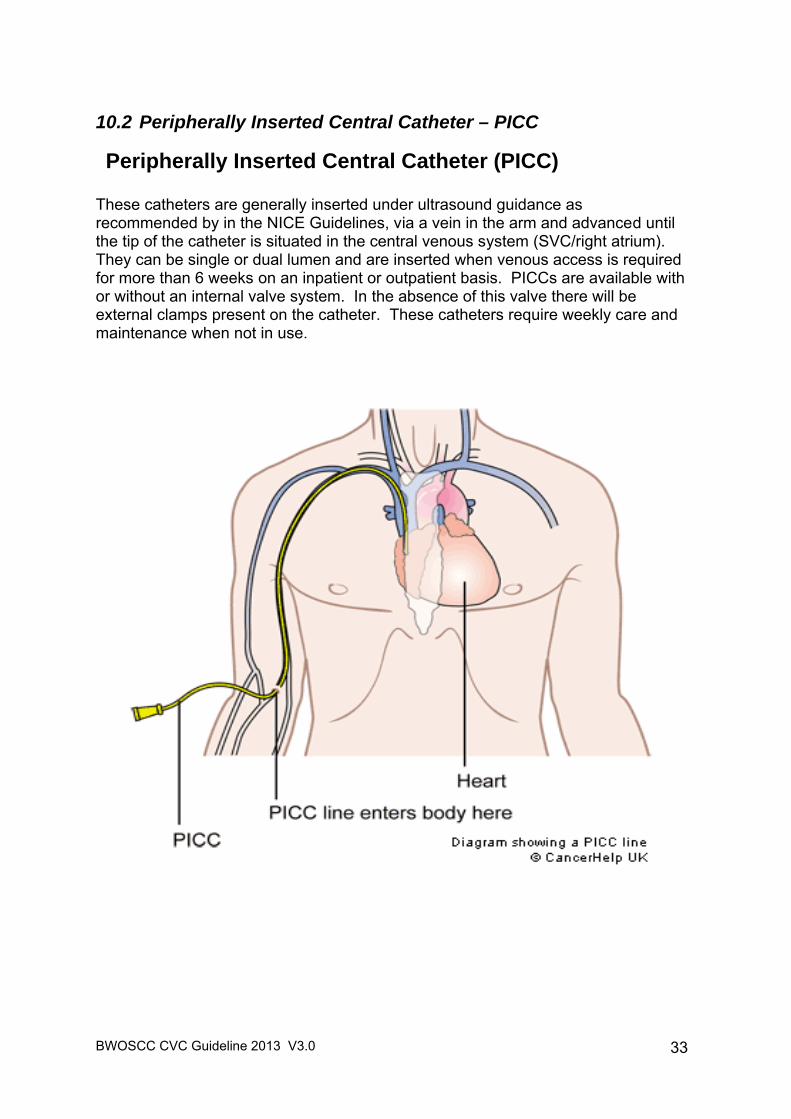
10.2 Peripherally Inserted Central Catheter – PICC
Peripherally Inserted Central Catheter (PICC) These catheters are generally inserted under ultrasound guidance as recommended by in the NICE Guidelines, via a vein in the arm and advanced until the tip of the catheter is situated in the central venous system (SVC/right atrium). They can be single or dual lumen and are inserted when venous access is required for more than 6 weeks on an inpatient or outpatient basis. PICCs are available with or without an internal valve system. In the absence of this valve there will be external clamps present on the catheter. These catheters require weekly care and maintenance when not in use.
BWOSCC CVC Guideline 2013 V3.0
34
10.2.1 Dressing Change and Catheter Flush - PICC
General Principles Strict aseptic technique Dressing change 24 hours post insertion then every 7 days or sooner if
the dressing is contaminated or loose. Change needle free connector every 7 days or sooner if the integrity of the
device is compromised. Change the catheter stabilisation device every 7 days or sooner if the
device is contaminated or loose. Dedicated lumen for TPN No external clamp - no Heplock required Do NOT use syringes smaller than 10mls to flush the catheter Equipment Required Procedure trolley (hospital based staff) or clean tray (community nursing staff
only) Dispos able apron Non-sterile gloves Sterile hand towel (hospital based staff) or clean paper towel (community
nurses) Sterile gloves Disposable measuring tape (single-use) Sterile dressing pack (e.g. drape, swabs, forceps) 2% Chlorhexidine Gluconate in 70% Isopropyl Alcohol, 3ml applicator x 1 or
single use application of alcoholic povidone-iodine solution for patients with CHG sensitivity.
2% Chlorhexidine Gluconate in 70% Isopropyl Alcohol wipes x 2 70% Isopropyl Alcohol wipes x 2 for disinfection of medical devices Adhesive semi permeable dressing 10cm x 12cm x 1 Catheter securing device (e.g. Grip lock, ‘Statlok’) if required Needle free connector x 1 per lumen Sterile broad one inch steri-strips (e.g. Leucostrips) 10ml luer lock syringe x 2 (no Heplock required) or x 3 (Heplock required) Sodium Chloride 0.9% for injection 10ml per lumen Heparinised saline (10 international units/ml) 2ml per lumen (if required) Drawing up needle, 22g (blue) x 2 Sharps disposal container Clinical Waste bag
BWOSCC CVC Guideline 2013 V3.0
35
Essential Practice Points 1. For each in-patient episode of care, a swab must be obtained for MRSA
surveillance on admission. 2. In addition each time the dressing is changed the exit site should be
assessed for any signs of infection. If the site is red or discharging, then take blood cultures and a line swab for bacterial investigations and inform the medical team immediately.
3. If the PICC has an external clamp (non-valved line) the line should be
flushed with both Sodium Chloride 0.9% for injection 10ml per lumen and Heparinised saline (10 international units/ml) 2ml per lumen.
4. Be aware of the potential risk of an anaphylactic reaction to chlorhexidine
allergy. Where a patient has been identified to have a chlorhexidine allergy a single use application of alcoholic povidone -iodine solution should be used for skin antisepsis (Pratt et al, 2007). See Appendix 5 http://www.mhra.gov.uk/Publications/Safetywarnings/MedicalDeviceAlerts/CON197918
Action
Rationale
1. Explain the procedure to the patient.
To ensure that the patient understands and gain their consent to the proposed procedure.
2. Collect all necessary equipment. To ensure that the equipment required is readily available.
3. Perform social hand hygiene as directed in NHS GGC Infection Control Manual (WHO Moment 2).
4. Clean trolley with detergent wipes and then alcohol wipes as
directed by NHS GGC Infection Control Manual.
5. Perform social hand hygiene then put on apron prior to opening sterile equipment. Open sterile dressing pack onto the trolley, then open and drop the other necessary equipment onto the sterile field using a non-touch technique.
6. If equipment is not already sterile use the alcohol wipes,
ensuring that each item is saturated thoroughly with the alcohol and is completely dry prior to use. These items should be dropped onto the sterile field as they are cleaned.
To minimise the risk of infection
7. Perform hand hygiene and apply sterile gloves. Alcohol Based Hand Rub (ABHR) is acceptable if hands are visibly clean. If hands are soiled wash hands with soap and water and then use ABHR. Refer to the Hand Hygiene Policy. http://www.nhsggc.org.uk/content/default.asp?page=s708_2
To minimise the risk of infection.
BWOSCC CVC Guideline 2013 V3.0
36
Action
Rationale
8. Draw up flush solutions into appropriate syringes.
To ensure that the necessary equipment is readily available.
9. Remove the old dressing, apply ABHR and sterile gloves.
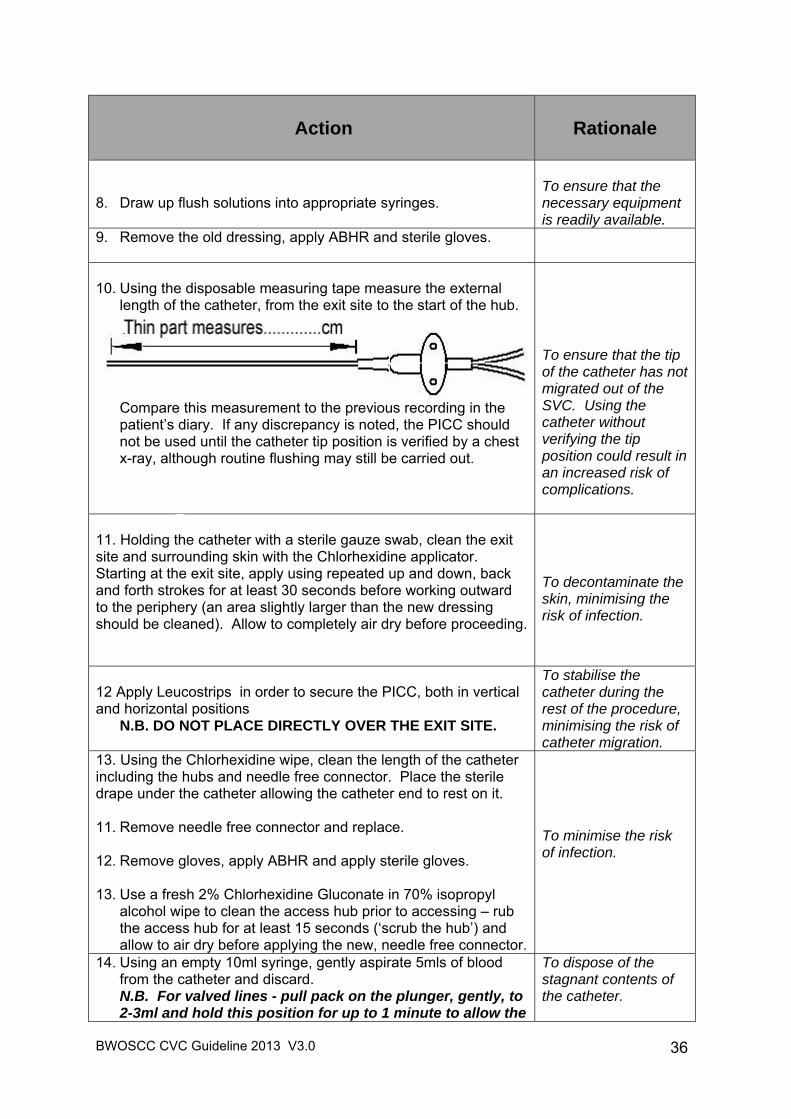
10. Using the disposable measuring tape measure the external
length of the catheter, from the exit site to the start of the hub.
Compare this measurement to the previous recording in the patient’s diary. If any discrepancy is noted, the PICC should not be used until the catheter tip position is verified by a chest x-ray, although routine flushing may still be carried out.
To ensure that the tip of the catheter has not migrated out of the SVC. Using the catheter without verifying the tip position could result in an increased risk of complications.
11. Holding the catheter with a sterile gauze swab, clean the exit site and surrounding skin with the Chlorhexidine applicator. Starting at the exit site, apply using repeated up and down, back and forth strokes for at least 30 seconds before working outward to the periphery (an area slightly larger than the new dressing should be cleaned). Allow to completely air dry before proceeding.
To decontaminate the skin, minimising the risk of infection.
12 Apply Leucostrips in order to secure the PICC, both in vertical and horizontal positions
N.B. DO NOT PLACE DIRECTLY OVER THE EXIT SITE.
To stabilise the catheter during the rest of the procedure, minimising the risk of catheter migration.
13. Using the Chlorhexidine wipe, clean the length of the catheter including the hubs and needle free connector. Place the sterile drape under the catheter allowing the catheter end to rest on it. 11. Remove needle free connector and replace. 12. Remove gloves, apply ABHR and apply sterile gloves. 13. Use a fresh 2% Chlorhexidine Gluconate in 70% isopropyl
alcohol wipe to clean the access hub prior to accessing – rub the access hub for at least 15 seconds (‘scrub the hub’) and allow to air dry before applying the new, needle free connector.
To minimise the risk of infection.
14. Using an empty 10ml syringe, gently aspirate 5mls of blood from the catheter and discard. N.B. For valved lines - pull pack on the plunger, gently, to 2-3ml and hold this position for up to 1 minute to allow the
To dispose of the stagnant contents of the catheter.
BWOSCC CVC Guideline 2013 V3.0
37
Action
Rationale
valve to open. To ascertain catheter patency.
15. Without delay, attach 10ml syringe containing 0.9% sodium chloride for injection, flush the catheter using a brisk push/pause technique, finishing with a positive end pressure.
16. If required (externally clamped lines) attach 10ml syringe with heparinised saline and inject 2ml into the catheter, finishing with a positive end pressure.
To minimise the risk of catheter occlusion.
17. Apply securing device if required, and cover exit site with adhesive semi permeable dressing, ensuring that the catheter is covered with the dressing. Complete and apply date and time strip.
To minimise the risk of catheter migration.
18. Dispose of all equipment according to NHS GG&C Waste Management Policy.
To prevent sharps injuries.
19. Document the procedure in the patient’s diary and case record.
To ensure adequate records and enable continued care of the device and the patient.
10.2.2 Obtaining Routine Blood Samples from a PICC
General Principles Strict aseptic technique. Discard first 5-10mls withdrawn for routine blood samples. Stop infusion immediately prior to obtaining blood samples. If blood culture sample to be obtained, these should be taken first then the
routine samples. Equipment required Procedure trolley (hospital based staff) or clean tray (community nursing staff
only) Dispos able apron Sterile Hand Towel Sterile dressing pack (i.e. drape, swabs, forceps) Clinical Waste Bag Sterile gloves Blood sample bottles 2% Chlorhexidine Gluconate in 70% Isopropyl Alcohol wipes x 1 70% Isopropyl Alcohol wipes x 2 for disinfection of medical devices Drawing up needle, 22g (blue) x 2
BWOSCC CVC Guideline 2013 V3.0
38
10ml luer lock syringe x 2 (no Heplock required) or 3 (Heplock required) 0.9% Sodium Chloride for injection, 10ml Heparinised saline (10 international units/ml) 2ml, if required Vacuette Standard Tube Holder, sterile Sharps disposal container Specimen bags Laboratory request forms Clinical Waste Bag Essential Practice Points 1. If the PICC has an external clamp (non-valved line) the line should be
flushed with both Sodium Chloride 0.9% for injection 10ml per lumen and Heparinised saline (10 international units/ml) 2ml per lumen.
Action
Rationale
1. Explain the procedure to the patient.
To ensure that the patient understands and gain their consent to the proposed procedure.
2. Collect all necessary equipment. To ensure that the equipments required is readily available.
3. Perform social hand hygiene as directed in NHS GGC Infection Control Manual (WHO Moment 2).
4. Clean trolley with detergent wipes and then alcohol wipes
as directed by NHS GGC Infection Control Manual.
5. Perform social hand hygiene then put on apron prior to opening sterile equipment. Open sterile dressing pack onto the trolley, then open and drop the other necessary equipment onto the sterile field using a non-touch technique.
6. If equipment is not already sterile use the alcohol wipes,
ensuring that each item is saturated thoroughly with the alcohol and is completely dry prior to use. These items should be dropped onto the field as they are cleaned.
To minimise the risk of infection. To ensure that the necessary equipment is readily available
7. Perform hand hygiene and apply sterile gloves. Alcohol Based Hand Rub (ABHR) is acceptable if hands are visibly clean. If hands are soiled wash hands with soap and water and then use ABHR. Refer to the Hand Hygiene Policy. http://www.nhsggc.org.uk/content/default.asp?page=s708_2
.
8. Use the 2% Chlorhexidine Gluconate in 70% isopropyl alcohol wipe to clean the needle free connector prior to
To discard the stagnant contents of the catheter before
BWOSCC CVC Guideline 2013 V3.0
39
Action
Rationale
accessing – rub the connector for at least 15 seconds (‘scrub the hub’) and allow to air dry.
9. Place the sterile drape under the cleaned catheter. 10. Attaching the empty 10ml syringe, open the clamp (if
present) and gently withdraw 5-10ml of blood to discard, close the clamp (if present), and detach the syringe. N.B. For valved lines – pull back on the plunger gently to 2-3ml and hold this position for up to 1 minute to allow the valve to open.)
obtaining blood samples required. To ascertain catheter patency.
11. Attach the Vacuette standard tube holder to the needle free connector, open the clamp and insert blood collection bottles as required. Once samples obtained, close clamp (if present) and detach the tube holder from the needle free connector.
To ensure that adequate blood samples are obtained safely minimising the risk of sharps injury
12. Without delay, attach the syringe containing 10ml 0.9% sodium chloride for injection, open the clamp (if present) and using the ‘push-pause’ technique flush the catheter, finishing with a positive end pressure, close the clamp (if present) and detach the syringe.
13. If required (externally clamped catheters), attach 10ml syringe with heparinised saline and inject 2ml into the catheter, finishing with a positive end pressure, closing the clamp before detaching the syringe.
To minimise the risk of catheter occlusion.
14. Following correct identification of the patient both verbal and from wristband, label the blood collection bottles at the bedside and place in the transport bag with the appropriate request form.
To correctly identify the patient and label the specimens correctly. To ensure the samples are accurately labelled and packed for safe transport to the lab.
15. Dispose of all waste in accordance with the GG&C Waste Management Policy. To prevent sharps injuries.
16. Document the procedure in the patient’s record. To ensure that accurate records and enable continued care of the device and patient.

BWOSCC CVC Guideline 2013 V3.0
40
10.2.3 Obtaining Blood Culture Samples from a PICC General Principles Only obtain blood culture samples from a CVC if it is thought to be the
source of infection or if instructed by medical staff. Do NOT discard the first 5-10mls of blood. Peripheral blood culture samples must be taken at the same time. If multi-lumen catheter, blood culture samples (both aerobic and
anaerobic) should be obtained from each lumen. In accordance with HPS Preventing Contamination When Taking a Sample
for Blood Culture (see Appendix 6):- 1. Decontaminate bottle tops with 70% Isopropyl Alcohol and allow to air dry
completely. 2. Hand hygiene to be performed immediately before the procedure (WHO
Moment 2). 3. Strict aseptic technique. 4. Blood cultures should be taken before other blood samples. 5. The anaerobic blood culture bottle should be inoculated first. Equipment Required Procedure trolley (hospital based staff) or clean tray (community nursing staff
only) Dispos able apron Sterile hand towel Sterile gloves Sterile dressing pack (i.e. drape, swabs, forceps) 2% Chlorhexidine Gluconate in 70% Isopropyl Alcohol wipes x 2 70% Isopropyl Alcohol wipes x 2 for disinfection of medical devices 10ml luer lock syringe x 2 per lumen 0.9% Sodium Chloride for injection 10ml per lumen Heparinised Saline (10 international units/ml) 2ml per lumen (if required) Drawing up needle, 22g (blue) x 2 Blood culture sample bottles Specimen bags Vacuette Lueradapter Vacuette Blood Culture Bottle Holder Laboratory request forms Sharps disposal container Clinical waste bag
BWOSCC CVC Guideline 2013 V3.0
41
Essential Practice Points 1. Before you start – Check that the bottles are in date. The broth should be
clear and the sensor on the bottle a dark colour. Do NOT use if the broth is cloudy.
2. If the PICC has an external clamp (non-valved line) the line should be
flushed with both Sodium Chloride 0.9% for injection 10ml per lumen and Heparinised saline (10 international units/ml) 2ml per lumen.
Action
Rationale
1. Follow guidance as per procedure for routine blood sampling actions 1 – 10.
2. Attach the vacuette blood culture bottle holder and adaptor to the needle free connector, open the clamp and insert blood culture bottles in sequence. The anaerobic blood culture bottle should be inoculated first. Once samples are obtained, close clamp (if present) and detach the vacuette holder from the needle free device. Do NOT take any other samples prior to taking the blood cultures. If other blood samples are required at this time they can be taken once the culture samples have been taken.
To ensure that the necessary equipment is readily available.
3. Follow guidance as per procedure for routine blood sampling actions 12 - 16.
BWOSCC CVC Guideline 2013 V3.0
42
10.2.4 Removal Procedure - PICC THIS PROCEDURE SHOULD ONLY BE CARRIED OUT BY HCPs COMPETENT IN THIS PROCEDURE.
If the PICC is being removed due to infection or because blood cultures have been positive, the tip should be sent for culture.
Equipment Required Procedure trolley Dispos able apron Non-sterile gloves Sterile dressing pack (i.e. drape, swabs, forceps) 2% Chlorhexidine Gluconate in 70% Is opropyl Alcohol, 3ml applicator x 1 or
single use application of alcoholic pov idone - iodine solution for patients with CHG sensitivity.
Sterile gloves Sterile hand towel Adhesive gauze dressing, 6cm x 7cm Disposable measuring tape Sterile scissors Specimen container Clinical waste bag
Action
Rationale
1. Explain the procedure to the patient.
To ensure that the patient understands and gain their consent compliant with the proposed procedure.
2. Position the patient in a supine p osition with their arm extended at a 45-90° angle from torso, supp orted on a pillow. Ensure the insertion site is at or below the level of the heart.
To help to minimise the risk of air embolism.
3. Collect all necessary equipment. To ensure that the equipment required is readily available.
4. Perform social hand hygiene as directed in NHS GGC Infection Control Manual (WHO Moment 2).
5. Clean trolley with detergent wipes and then alcohol wipes
as directed by NHS GGC Infection Control Manual.
6. Perform social hand hygiene then put on apron prior to opening sterile equipment. Open sterile dressing pack onto the trolley, then open and drop the other necessary equipment onto the sterile field using a non-touch
To minimise the risk of infection.
BWOSCC CVC Guideline 2013 V3.0
43
Action
Rationale
technique. 7. If equipment is not already sterile use the alcohol wipes,
ensuring that each item is saturated thoroughly with the alcohol and is completely dry prior to use. These items should be dropped onto the field as they are cleaned.
8. Perform hand hygiene and apply sterile gloves. Alcohol Based Hand Rub (ABHR) is acceptable if hands are visibly clean. If hands are soiled wash hands with soap and water and then use ABHR. Refer to the Hand Hygiene Policy. http://www.nhsggc.org.uk/content/default.asp?page=s708_2
To straighten out the venous anatomy and provide a less tortuous route for the catheter to travel along.
9. Perform social hand hygiene, apply non-sterile gloves, then loosen and remove the current PICC dressing in an upward direction towards the exit site.
10. Clean the exit site and surrounding skin with the Chlorhexidine solution. Starting at the exit site, apply using repeated up and down, back and forth strokes for at least 30 seconds before working outward to the periphery (an area slightly larger than the new dressing). Allow to completely air dry before proceeding.
To minimise the risk of infection.
11. Take a sterile gauze swab in your non-dominant hand in preparation for covering the exit site on removal of the catheter.
To minimise the risk of post removal bleeding.
12. Gently grasp the catheter at the exit site and pull the PICC gently and steadily. Continue to move your hand near to the exit site as you remove the catheter. You should be able to remove the catheter smoothly. DO NOT PULL AGAINST RESISTANCE this could result in catheter fracture and embolus. If resistance met; apply warm, moist heat to the upper arm for 20 minutes then attempt to remove the catheter again. If resistance continues, discuss with the a senior member of medical staff.
Resistance may be due to vein spasm, therefore applying heat the affected area will encourage vasodilation
13. Once the catheter has been completely removed apply gentle pressure to the exit site for 1-2 minutes or until bleeding stops. Then apply sterile gauze dressing. This can be removed in 24 hours.
To minimise the risk of bleeding from the exit site.
14. Assess the integrity of the catheter by measuring the entire length of the catheter and compare this measurement to the initial recording in the insertion record.
To ensure that the entire catheter has been removed.
15. Send tip for culture and sensitivity if the catheter is being removed due to infection or if positive blood cultures.
To assist in the diagnosis of a catheter related blood stream infection.
16. Document the procedure performed in the patient case record and PICC diary.
To ensure adequate records and enable continued care of the patient.
BWOSCC CVC Guideline 2013 V3.0
44
10.2.5 Troubleshooting - PICC
Problem
Possible cause Treatment
Systemic Infection Generally feeling
unwell Sore throat Pyre xia Rigor after flushing Hypotension Shock
Bacteraemia Community Nurses – Refer to Cancer Centre without delay.
Refer to medical team – may be treatable without device removal depending on the patient’s clinical status and colonising organism.
Only take blood cultures from the device if it is thought to be the source of the infection.
Obtain blood cultures from each lumen of the device and peripherally.
Monitor all vital signs and early warning score (NEWS) – frequency will depend on patient’s clinical status.
For device salvage – consider antibiotic or Taurolock (discuss with Microbiologist).
If line is to be removed, send catheter tip for culture and sensitivity. N.B. Taurolock is a medical device which needs to be prescribed with the correct formulation http://www.taurolock.com/en/download-en
Exit Site Infection Inflammation and tenderness at the exit site +/- exudate
Exit site infection
Community Nurses – Refer to GP, if unresolved refer to Cancer Centre.
Obtain wound swab for culture and sensitivity.
Redress exit site, aseptically. If exudate present increase. frequency of dressing change
Refer to medical team, consider antibiotic therapy.
Persistent Withdrawal Occlusion No blood return on aspiration, flushing with no resistance
Thrombus within catheter lumen
Fibrin sheath Migration of the
catheter tip
Community Nurses – contact Cancer Centre and record in patient’s diary.
Obtain x-ray to verify correct position of the CVC in a blood vessel.
If CVC is verified to be in the correct position - Refer to Appendix 7 and section 10.1.5 for actions to be taken for instilling Urokinase.
Device is sluggish or there is only intermittent free flow of fluids
Thrombus within the catheter
Migration of the
Community Nurses – record in patient’s diary and advise cancer centre team.
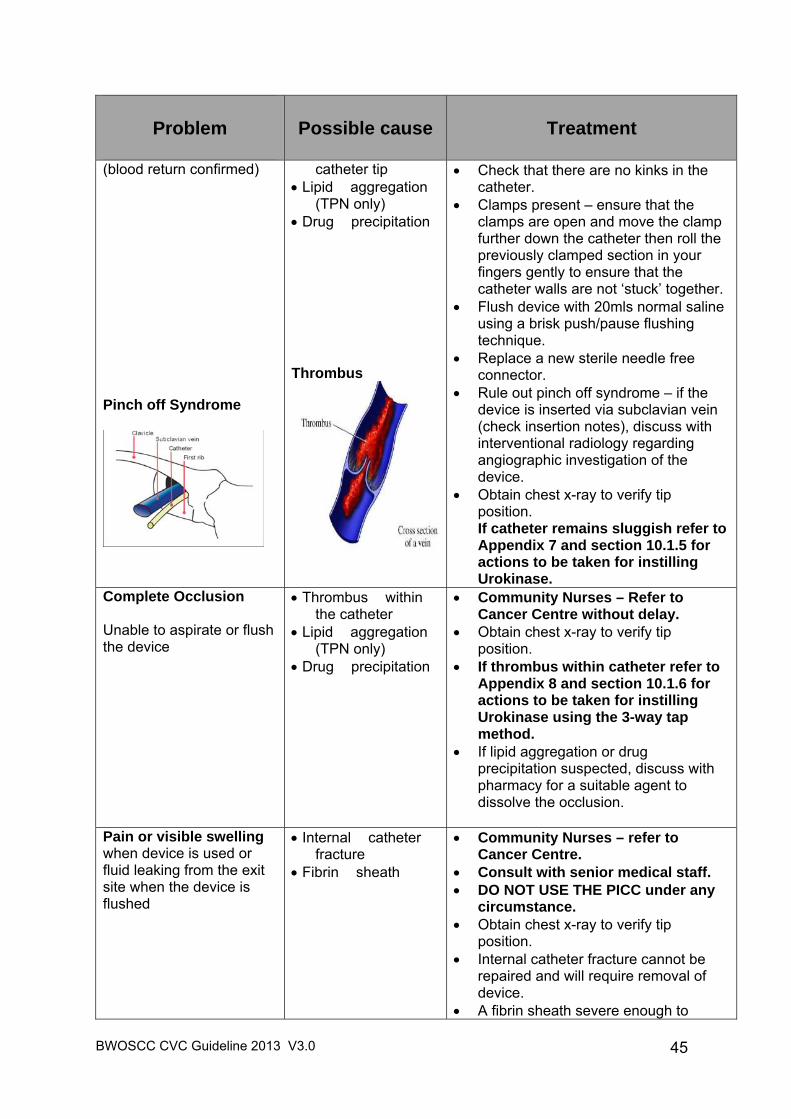
BWOSCC CVC Guideline 2013 V3.0
45
Problem
Possible cause Treatment
(blood return confirmed) Pinch off Syndrome
catheter tip Lipid aggregation
(TPN only) Drug precipitation Thrombus
Check that there are no kinks in the catheter.
Clamps present – ensure that the clamps are open and move the clamp further down the catheter then roll the previously clamped section in your fingers gently to ensure that the catheter walls are not ‘stuck’ together.
Flush device with 20mls normal saline using a brisk push/pause flushing technique.
Replace a new sterile needle free connector.
Rule out pinch off syndrome – if the device is inserted via subclavian vein (check insertion notes), discuss with interventional radiology regarding angiographic investigation of the device.
Obtain chest x-ray to verify tip position. If catheter remains sluggish refer to Appendix 7 and section 10.1.5 for actions to be taken for instilling Urokinase.
Complete Occlusion Unable to aspirate or flush the device
Thrombus within the catheter
Lipid aggregation (TPN only)
Drug precipitation
Community Nurses – Refer to Cancer Centre without delay.
Obtain chest x-ray to verify tip position.
If thrombus within catheter refer to Appendix 8 and section 10.1.6 for actions to be taken for instilling Urokinase using the 3-way tap method.
If lipid aggregation or drug precipitation suspected, discuss with pharmacy for a suitable agent to dissolve the occlusion.
Pain or visible swelling when device is used or fluid leaking from the exit site when the device is flushed
Internal catheter fracture
Fibrin sheath
Community Nurses – refer to Cancer Centre.
Consult with senior medical staff. DO NOT USE THE PICC under any
circumstance. Obtain chest x-ray to verify tip
position. Internal catheter fracture cannot be
repaired and will require removal of device.
A fibrin sheath severe enough to
BWOSCC CVC Guideline 2013 V3.0
46
Problem
Possible cause Treatment
cause extravasation at the exit site will normally indicate device removal.
Leakage of infusate from the external portion of the catheter
External catheter fracture
Community Nurses – refer to Cancer Centre without delay.
Stop infusate. If there is a clamp, clamp the catheter
ABOVE the damaged area without delay to prevent possible air embolism.
Cover the whole PICC with an occlusive dressing.
A single PICC may be able to be repaired. This should be discussed without delay with the team who inserted the PICC i.e. Chemotherapy team or Vascular Access Team.
If unable to repair, the PICC should be removed as soon as possible to minimise the risk of air embolism and reduce the risk of infection.
Catheter Migration Increase or decrease in external length of catheter This is verified by comparing the external measurement with the original measurement at placement in the case record / PICC Diary.
Line migration Community Nurses – refer to Cancer Centre.
DO NOT PUSH THE CATHETER BACK IN.
Contact PICC insertion team for advice.
A chest x-ray should be carried out to review the position of the tip of the PICC.
If the tip of the line is in the right atrium – withdraw the PICC the desired length.
If the tip of the line is in the mid or lower SVC –use the PICC as normal. Observe for any signs of thrombosis.
The tip of the PICC is in the upper SVC or out of the SVC. The PICC will require removal.
DVT Swelling of shoulder, neck, arm or face with or without pain, inflammation, distension of the neck veins/peripheral vessels
Thrombus Subcutaneous /
Surgical emphysema
Community Nurses – refer to Cancer Centre without delay.
Refer to medical staff for further investigation.
If thrombosis suspected – consider diagnostic ultrasound to confirm diagnosis and anticoagulant therapy.
It may or may not be possible to treat thrombosis without catheter removal.
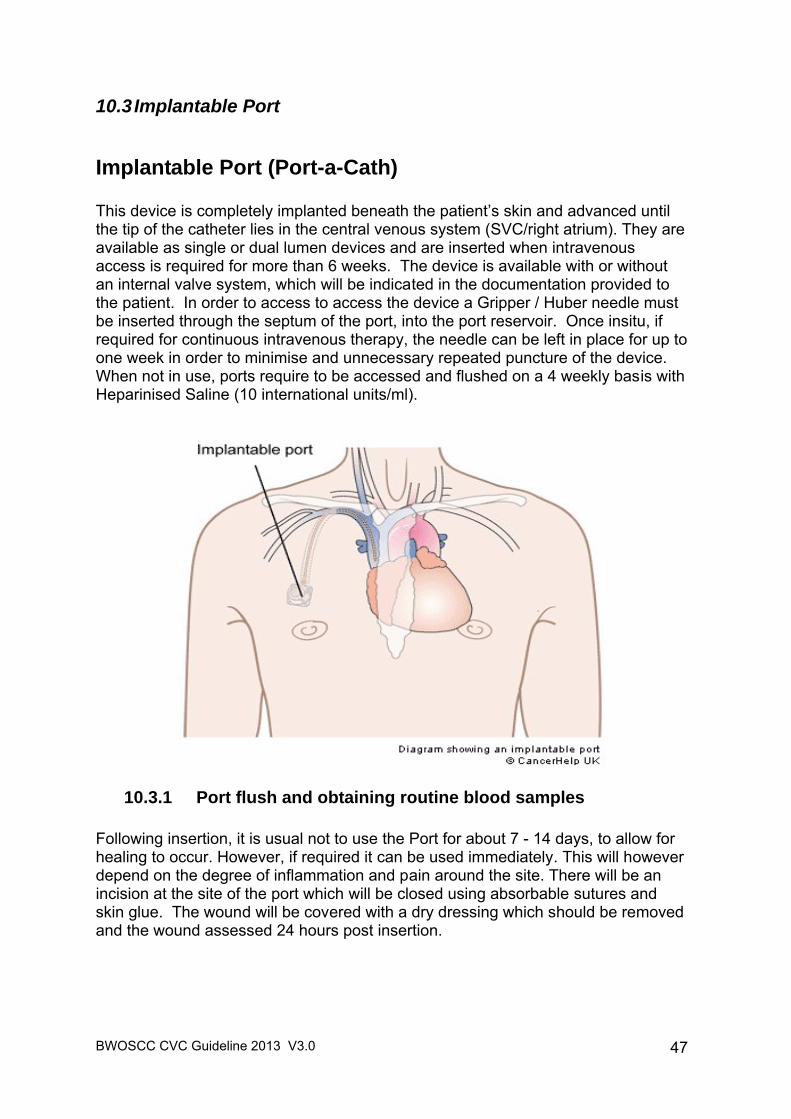
BWOSCC CVC Guideline 2013 V3.0
47
10.3 Implantable Port
Implantable Port (Port-a-Cath) This device is completely implanted beneath the patient’s skin and advanced until the tip of the catheter lies in the central venous system (SVC/right atrium). They are available as single or dual lumen devices and are inserted when intravenous access is required for more than 6 weeks. The device is available with or without an internal valve system, which will be indicated in the documentation provided to the patient. In order to access to access the device a Gripper / Huber needle must be inserted through the septum of the port, into the port reservoir. Once insitu, if required for continuous intravenous therapy, the needle can be left in place for up to one week in order to minimise and unnecessary repeated puncture of the device. When not in use, ports require to be accessed and flushed on a 4 weekly basis with Heparinised Saline (10 international units/ml).
10.3.1 Port flush and obtaining routine blood samples Following insertion, it is usual not to use the Port for about 7 - 14 days, to allow for healing to occur. However, if required it can be used immediately. This will however depend on the degree of inflammation and pain around the site. There will be an incision at the site of the port which will be closed using absorbable sutures and skin glue. The wound will be covered with a dry dressing which should be removed and the wound assessed 24 hours post insertion.
BWOSCC CVC Guideline 2013 V3.0
48
General Principles Strict aseptic technique. There are several different types of Port-a-Caths. Caution should always
be exercised to ensure that the manufacturer’s instructions are referred and adhered to, to ensure that the correct flush volumes are used to adequately fill the dead space volume of the port reservoir and catheter length. The port can have a single or double septum.
Gripper / Huber needle must be used when gaining access. If required for intravenous therapy, the gripper / Huber needle should be
changed every 7 days or sooner if the integrity of the device is compromised.
If unused the device should be accessed, flushed and locked every four weeks as described below.
Equipment Required Procedure trolley (hospital based staff) or clean tray (community nursing staff
only). Dispos able apron. Sterile dressings pack (i.e. drape, swabs, forceps). Sterile hand towel (hospital based st aff) or clean paper towel (com munity
nurses). Sterile gloves. 70% Isopropyl Alcohol wipes x 2 for disinfection of medical devices. 2% Chlorhexidine Gluconate in 70% Is opropyl Alcohol, 3ml applic ator x 1 or
single use application of alcoholic povi done - iodine s olution for patients wit h a CHG sensitivity.
Gripper / Huber needle: Length (3/4 inch, 1 inch or 1 ¼ inch): dependant on the amount of
subcutaneous tissue between the skin surface and the port. Gauge (19 or 22) dependant on the viscosity of the fluid to be infused.
Needle free connector. 10ml luer lock syringe x 2 (no Heplock required) or 3 (Heplock required). Sodium Chloride 0.9% for injection, 10ml. Heparinised Saline (10 inte rnational units/ml), 5ml (i f required – c heck patient’s
documentation).(ref required to suppot lowest possible dose) Vacuette Standard Tube Holder and connector, sterile Sharps disposal container Specimen bags Blood sample bottles Laboratory request forms Clinical waste bag
BWOSCC CVC Guideline 2013 V3.0
49
Prior to accessing the port, topical anaesthetic may be applied over the site, covered with an adhesive semi-permeable dressing according to the manufacturer’s instructions. However, it should be noted that creams can leave a lipid residue that can create a nidus for microbial growth; therefore residue from the topical anaesthesia must be removed using soap and water, prior to preparation (disinfection) as soap and water has been found to be superior in removing lipid residue from the skin. Ensure that the topical anaesthetic has been removed immediately prior to preparing the site for access.
Action
Rationale
1. Explain the procedure to the patient.
To ensure that the patient understands and gain their consent to the proposed procedure.
2. Collect all necessary equipment. To ensure that the equipment required is readily available.
3. Perform social hand hygiene as directed in NHS GGC Infection Control Manual (WHO Moment 2).
4. Clean trolley with detergent wipes and then alcohol wipes as
directed by NHS GGC Infection Control Manual.
5. Perform social hand hygiene then put on apron prior to opening sterile equipment. Open sterile dressing pack onto the trolley, then open and drop the other necessary equipment onto the sterile field using a non-touch technique.
6. If equipment is not already sterile use the alcohol wipes,
ensuring that each item is saturated thoroughly with the alcohol and is completely dry prior to use. These items should be dropped onto the sterile field as they are cleaned.
To minimise the risk of infection.
7. Perform hand hygiene and apply sterile gloves. Alcohol Based Hand Rub (ABHR) is acceptable if hands are visibly clean. If hands are soiled wash hands with soap and water and then use ABHR. Refer to the Hand Hygiene Policy. http://www.nhsggc.org.uk/content/default.asp?page=s708_2
To minimise the risk of infection.
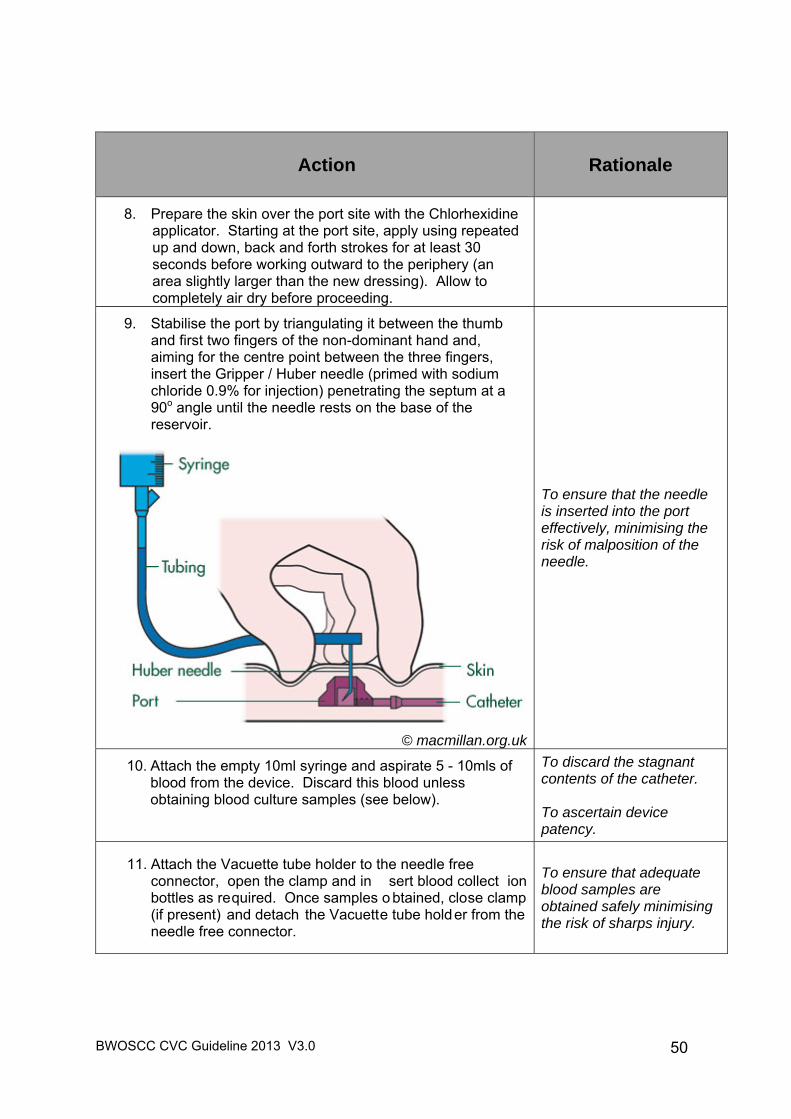
BWOSCC CVC Guideline 2013 V3.0
50
Action
Rationale
8. Prepare the skin over the port site with the Chlorhexidine applicator. Starting at the port site, apply using repeated up and down, back and forth strokes for at least 30 seconds before working outward to the periphery (an area slightly larger than the new dressing). Allow to completely air dry before proceeding.
9. Stabilise the port by triangulating it between the thumb and first two fingers of the non-dominant hand and, aiming for the centre point between the three fingers, insert the Gripper / Huber needle (primed with sodium chloride 0.9% for injection) penetrating the septum at a 90o angle until the needle rests on the base of the reservoir.
© macmillan.org.uk
To ensure that the needle is inserted into the port effectively, minimising the risk of malposition of the needle.
10. Attach the empty 10ml syringe and aspirate 5 - 10mls of blood from the device. Discard this blood unless obtaining blood culture samples (see below).
To discard the stagnant contents of the catheter. To ascertain device patency.
11. Attach the Vacuette tube holder to the needle free connector, open the clamp and in sert blood collect ion bottles as required. Once samples o btained, close clamp (if present) and detach the Vacuette tube holder from the needle free connector.
To ensure that adequate blood samples are obtained safely minimising the risk of sharps injury.
BWOSCC CVC Guideline 2013 V3.0
51
12. Without delay, attach t he 10ml syringe containing 0.9% sodium chlo ride, open t he clamp (if present) and using the ‘push-p ause’ techn ique flush t he catheter, finishing with a posit ive end pressure, clo se the clamp (if present) and detach the syringe.
13. If required (see product information), attach 10ml syringe
with Heparinised Saline and inject 5mls into the catheter, finishing with a positive end pressure.
To minimise the risk of catheter occlusion.
14. If the Gripper / Huber needle is to remain in situ; apply an adhesive se mi-permeable dressing t o secure th e needle in place.
To stabilise the needle and minimise the risk of accidental dislodgement.
15. If the Gripp er / Huber needle is to be remo ved; stabilise the port with the non-dominant hand and, taking the Gripper / Huber needle in the other remove the needle.
To minimise trauma to the tissue.
16. Following correct identification of t he patient label the blood collection bottles at the bedside and place in the transport bag with the appropriate request form.
To correctly identify the patient and label the specimens correctly. To ensure the samples are accurately labelled and packed for safe transport to the lab.
17. Dispose of all waste in accordance with the GG&C Waste Management Policy.
To prevent sharps injuries.
18. Record procedure performed in the patient case record.
To ensure adequate records and enable continued care of the device and the patient.
BWOSCC CVC Guideline 2013 V3.0
52
10.3.2 Obtaining Blood Culture Samples – Implantable Port
General Principles Only obtain blood culture samples from a CVC if it is thought to be the
source of the bacteraemia Strict aseptic technique Do NOT discard first 5-10mls withdrawn The anaerobic blood culture bottle should be inoculated first. Peripheral blood culture samples must be obtained at the same time If port samples should be obtained from each lumen Stop infusion immediately prior to obtaining blood samples Equipment Required Procedure trolley (hospital based staff) or clean tray (community nursing staff
only) Dispos able apron Sterile hand towel Sterile gloves Blood sample bottles Sterile dressing pack (i.e. drape, swabs, forceps) 2% Chlorhexidine Gluconate in 70% Is opropyl Alcohol, 3ml applic ator x 1 or
single use application of alcoholic povi done - iodine s olution for patients wit h a CHG sensitivity.
70% Isopropyl Alcohol wipes x 2 for disinfection of medical devices Drawing up needle 23G (blue) x 2 Gripper / Huber needle 10ml leur lock syringe, x 2 0.9% sodium chloride for injection, 10ml per lumen Heparinised saline (10iu/ml) 5ml per lumen chamber Vacuette Blood Culture Bottle Holder and connector, sterile Sharps disposal container Specimen bags Lab request forms Clinical waste bag
BWOSCC CVC Guideline 2013 V3.0
53
Action
Rationale
1. Follow the guidance as per procedure for routine blood sampling actions 1 – 11.
2. Attach the Vacuette bottle holder and connector to the needle free connector, open the clamp and insert blood culture bottles as required. The anaerobic blood culture bottle should be inoculated first. Once samples obtained, close clamp (if present) and detach the Vacuette holder from the needle free connector.
To ensure that adequate blood samples are obtained safely minimising the risk of sharps injury
3. Follow guidance as per procedure for routine blood sampling actions 11-18.
10.3.3 Removal – Implantable Port
THIS PROCEDURE SHOULD ONLY BE CARRIED OUT BY HCPs COMPETENT IN THIS PROCEDURE.
When the patient’s device is to be removed the medical/nursing practitioner will make the appropriate referral to Interventional Radiology and will ensure that the patient receives information regarding the appointment and instructions on any pre-procedure preparation required.
BWOSCC CVC Guideline 2013 V3.0
54
10.3.4 Urokinase Administration Protocol for Persistent Withdrawal Occlusion (PWO) – Implantable Ports (Port-a-Cath)
See background information in section 10.1.5. Equipment Required This procedure should only be conducted by competent HCPs in a hospital environment within normal working hours i.e. 09 00 – 17 00.
Procedure trolley Dispos able apron. Sterile dressings pack (i.e. drape, swabs, and forceps). Sterile hand towel Sterile gloves. 70% Isopropyl Alcohol wipes x 2 for disinfection of medical devices. 2% Chlorhexidine Gluconate in 70% Is opropyl Alcohol, 3ml applicator x 1 or
single use application of al coholic povidone - iodine solution for patients with a CHG sensitivity.
Gripper / Huber needle:
Length (3/4 inch, 1 inc h or 1 ¼ inch): dependant on the amount of subcutaneous tissue between the skin surface and the port.
Gauge (19 or 22) dependant on the vi scosity of the fluid to be infused.
Needle free connector. 10ml luer lock syringe x 6 Sodium Chloride 0.9% for injection, 10ml. Drawing up needle 23G (blue) x 2 Heparinised Saline (10 internat ional units/ml), 5ml (i f required – check
patient’s documentation to determine if the port has integral valves or not). Urokinase 5,000 international units reconstituted in 0. 9% Sodium Chloride
for In jection ( must be prescribed) to fill the catheter lumen dead spac e volume as per manufacturer’s instructions.
Clinical Waste Bag. Sharps disposal container.
BWOSCC CVC Guideline 2013 V3.0
55
The Procedure An attempt should be made to withdraw blood prior to instiling the Urokinase: 1. Attach an empty 10ml syringe to the needle free connector and gently pull back plunger
and attempt to withdraw blood. If blood withdrawal is not possible in the first instance try the following:
2. Ask the patient to take a deep breath in and hold whilst attempting to aspirate the
catheter.
3. Also try altering the position of the arm and/or try 30o head down tilt.
4. Prior to undertaking this procedure an x-ray should be obtained to verify the correct position of the catheter tip in a blood vessel.
Action
Rationale
5. Explain the procedure to the patient.
To ensure that the patient understands and gain their consent to the proposed procedure.
6. Collect all necessary equipment. To ensure that the equipment required is readily available.
7. Perform social hand hygiene as directed in NHS GGC Infection Control Manual (WHO Moment 2).
8. Clean trolley with detergent wipes and then alcohol wipes as
directed by NHS GGC Infection Control Manual.
9. Perform social hand hygiene then put on apron prior to opening sterile equipment. Open sterile dressing pack onto the trolley, then open and drop the other necessary equipment onto the sterile field using a non-touch technique.
10. If equipment is not already sterile use the alcohol wipes, ensuring
that each item is saturated thoroughly with the alcohol and is completely dry prior to use. These items should be dropped onto the sterile field as they are cleaned.
To minimise the risk of infection.
11. Perform hand hygiene and apply sterile gloves. Alcohol Based Hand Rub (ABHR) is acceptable if hands are visibly clean. If hands are soiled wash hands with soap and water and then use ABHR. Refer to the Hand Hygiene Policy. http://www.nhsggc.org.uk/content/default.asp?page=s708_2
To safely reconstitute Urokinase.
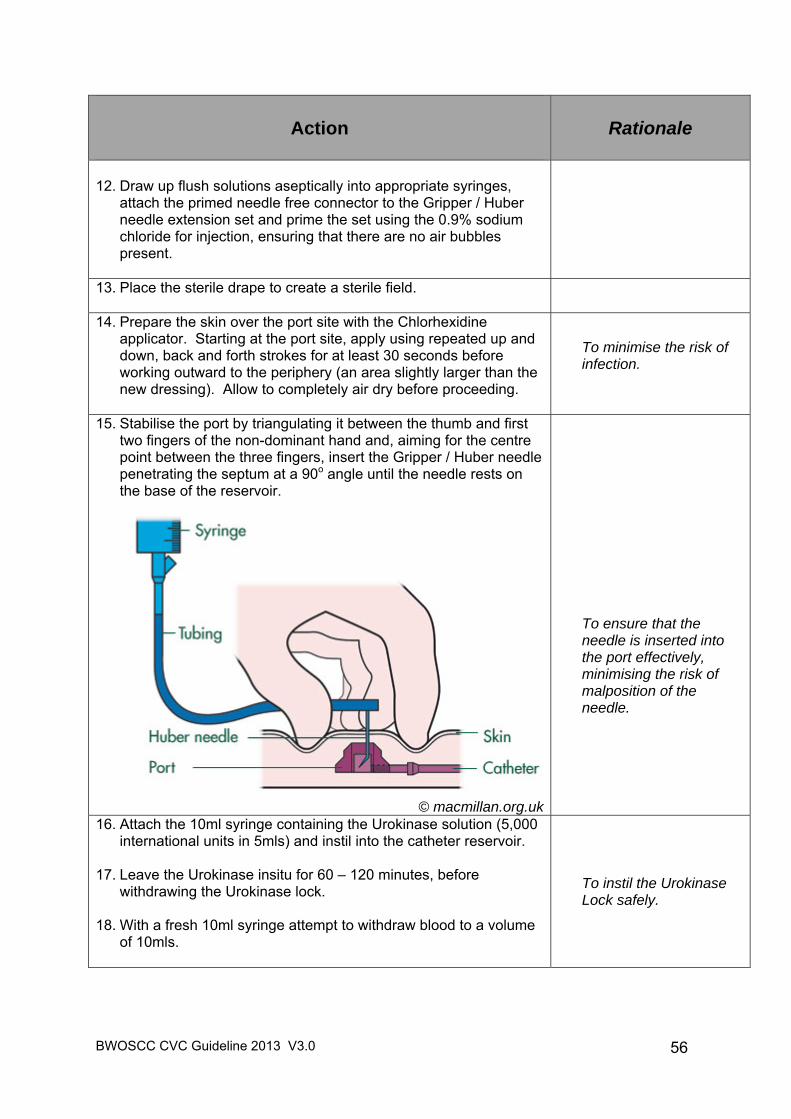
BWOSCC CVC Guideline 2013 V3.0
56
Action
Rationale
12. Draw up flush solutions aseptically into appropriate syringes,
attach the primed needle free connector to the Gripper / Huber needle extension set and prime the set using the 0.9% sodium chloride for injection, ensuring that there are no air bubbles present.
13. Place the sterile drape to create a sterile field.
14. Prepare the skin over the port site with the Chlorhexidine applicator. Starting at the port site, apply using repeated up and down, back and forth strokes for at least 30 seconds before working outward to the periphery (an area slightly larger than the new dressing). Allow to completely air dry before proceeding.
To minimise the risk of infection.
15. Stabilise the port by triangulating it between the thumb and first two fingers of the non-dominant hand and, aiming for the centre point between the three fingers, insert the Gripper / Huber needle penetrating the septum at a 90o angle until the needle rests on the base of the reservoir.
© macmillan.org.uk
To ensure that the needle is inserted into the port effectively, minimising the risk of malposition of the needle.
16. Attach the 10ml syringe containing the Urokinase solution (5,000 international units in 5mls) and instil into the catheter reservoir.
17. Leave the Urokinase insitu for 60 – 120 minutes, before
withdrawing the Urokinase lock. 18. With a fresh 10ml syringe attempt to withdraw blood to a volume
of 10mls.
To instil the Urokinase Lock safely.
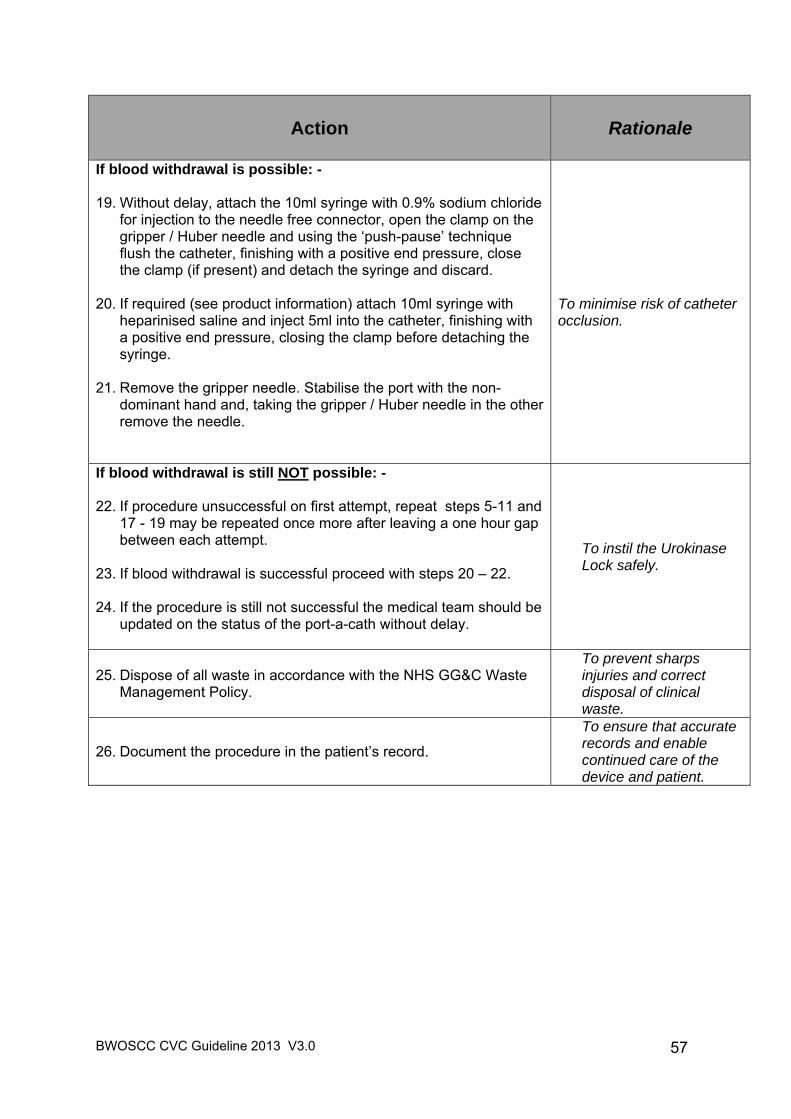
BWOSCC CVC Guideline 2013 V3.0
57
Action
Rationale
If blood withdrawal is possible: - 19. Without delay, attach the 10ml syringe with 0.9% sodium chloride
for injection to the needle free connector, open the clamp on the gripper / Huber needle and using the ‘push-pause’ technique flush the catheter, finishing with a positive end pressure, close the clamp (if present) and detach the syringe and discard.
20. If required (see product information) attach 10ml syringe with heparinised saline and inject 5ml into the catheter, finishing with a positive end pressure, closing the clamp before detaching the syringe.
21. Remove the gripper needle. Stabilise the port with the non-
dominant hand and, taking the gripper / Huber needle in the other remove the needle.
To minimise risk of catheter occlusion.
If blood withdrawal is still NOT possible: -
22. If procedure unsuccessful on first attempt, repeat steps 5-11 and 17 - 19 may be repeated once more after leaving a one hour gap between each attempt.
23. If blood withdrawal is successful proceed with steps 20 – 22.
24. If the procedure is still not successful the medical team should be updated on the status of the port-a-cath without delay.
To instil the Urokinase Lock safely.
25. Dispose of all waste in accordance with the NHS GG&C Waste Management Policy.
To prevent sharps injuries and correct disposal of clinical waste.
26. Document the procedure in the patient’s record.
To ensure that accurate records and enable continued care of the device and patient.
BWOSCC CVC Guideline 2013 V3.0
58
10.3.5 Urokinase Administration Protocol for Complete Catheter Occlusion Where Thrombus is suspected - Implantable Ports (Port-a-Cath)
See background information in section 10.1.5. Equipment Required This procedure should only be conducted by competent nursing and medical staff in a hospital environment within normal working hours i.e. 09 00 – 17 00.
Procedure trolley Dispos able apron. Sterile dressings pack (i.e. drape, swabs, and forceps). Sterile hand towel Sterile gloves. 70% Isopropyl Alcohol wipes x 2 for disinfection of medical devices. 2% Chlorhexidine Gluconate in 70% Is opropyl Alcohol, 3ml applicator x 1 or
single use application of alcoholic povidone-iodine solution for patients with a CHG sensitivity.
Gripper / Huber needle:
Length (3/4 inch, 1 inc h or 1 ¼ inch): dependant on the amount of subcutaneous tissue between the skin surface and the port.
Gauge (19 or 22) dependant on the vi scosity of the fluid to be infused.
Needle free connector. 10ml luer lock syringe x 6 Sodium Chloride 0.9% for injection, 10ml. Drawing up needle 23G (blue) x 3 3 – way tap Heparinised Saline (10 internat ional units/ml), 5ml (i f required – check
patient’s documentation to determine if the port has integral valves or not). Urokinase 5,000 international units reconstituted in 0. 9% Sodium Chloride
for In jection ( must be prescribed) to fill the catheter lumen dead spac e volume as per manufacturers instructions.
Clinical Waste Bag. Sharps disposal container.
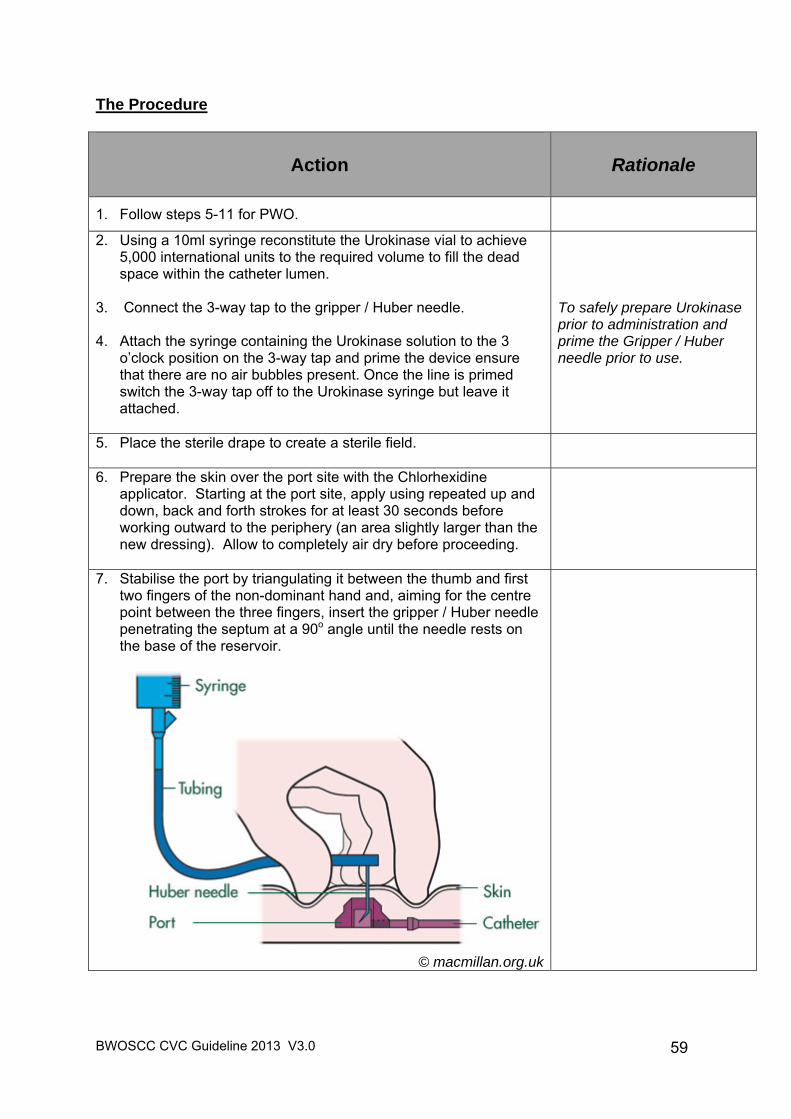
BWOSCC CVC Guideline 2013 V3.0
59
The Procedure
Action
Rationale
1. Follow steps 5-11 for PWO.
2. Using a 10ml syringe reconstitute the Urokinase vial to achieve 5,000 international units to the required volume to fill the dead space within the catheter lumen.
3. Connect the 3-way tap to the gripper / Huber needle.
4. Attach the syringe containing the Urokinase solution to the 3 o’clock position on the 3-way tap and prime the device ensure that there are no air bubbles present. Once the line is primed switch the 3-way tap off to the Urokinase syringe but leave it attached.
To safely prepare Urokinase prior to administration and prime the Gripper / Huber needle prior to use.
5. Place the sterile drape to create a sterile field.
6. Prepare the skin over the port site with the Chlorhexidine applicator. Starting at the port site, apply using repeated up and down, back and forth strokes for at least 30 seconds before working outward to the periphery (an area slightly larger than the new dressing). Allow to completely air dry before proceeding.
7. Stabilise the port by triangulating it between the thumb and first two fingers of the non-dominant hand and, aiming for the centre point between the three fingers, insert the gripper / Huber needle penetrating the septum at a 90o angle until the needle rests on the base of the reservoir.
© macmillan.org.uk
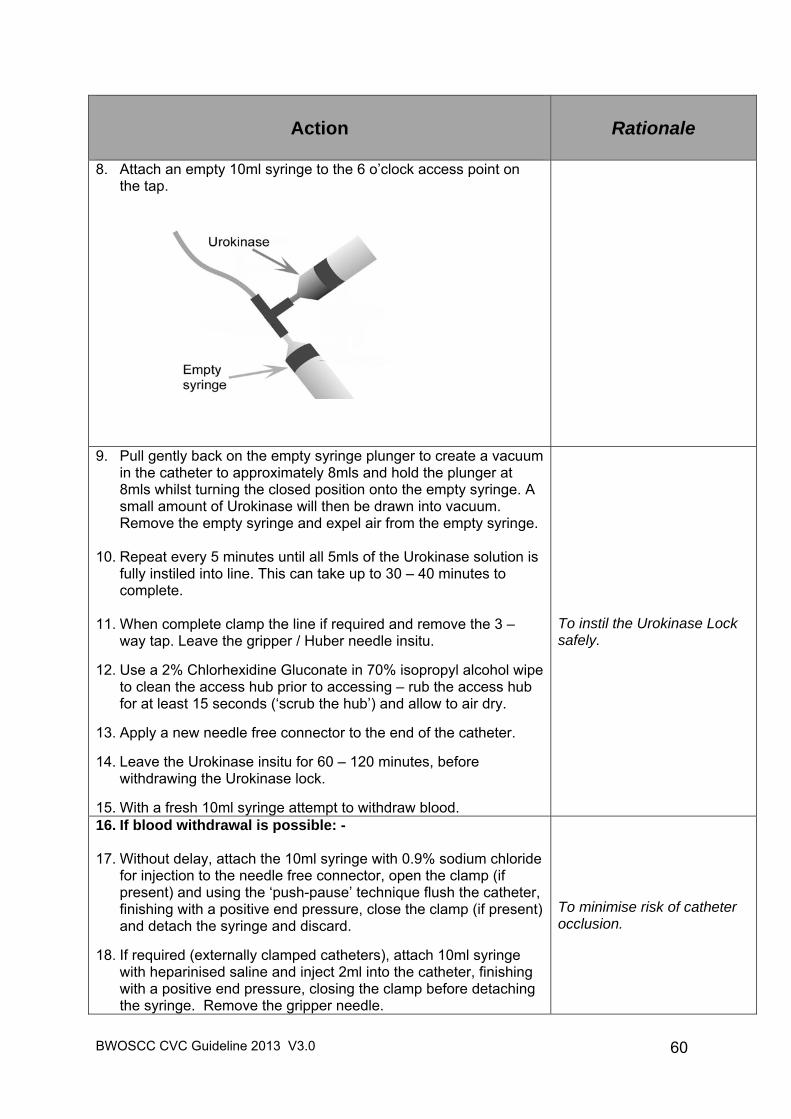
BWOSCC CVC Guideline 2013 V3.0
60
Action
Rationale
8. Attach an empty 10ml syringe to the 6 o’clock access point on the tap.
9. Pull gently back on the empty syringe plunger to create a vacuum in the catheter to approximately 8mls and hold the plunger at 8mls whilst turning the closed position onto the empty syringe. A small amount of Urokinase will then be drawn into vacuum. Remove the empty syringe and expel air from the empty syringe.
10. Repeat every 5 minutes until all 5mls of the Urokinase solution is fully instiled into line. This can take up to 30 – 40 minutes to complete.
11. When complete clamp the line if required and remove the 3 – way tap. Leave the gripper / Huber needle insitu.
12. Use a 2% Chlorhexidine Gluconate in 70% isopropyl alcohol wipe
to clean the access hub prior to accessing – rub the access hub for at least 15 seconds (‘scrub the hub’) and allow to air dry.
13. Apply a new needle free connector to the end of the catheter.
14. Leave the Urokinase insitu for 60 – 120 minutes, before withdrawing the Urokinase lock.
15. With a fresh 10ml syringe attempt to withdraw blood.
To instil the Urokinase Lock safely.
16. If blood withdrawal is possible: - 17. Without delay, attach the 10ml syringe with 0.9% sodium chloride
for injection to the needle free connector, open the clamp (if present) and using the ‘push-pause’ technique flush the catheter, finishing with a positive end pressure, close the clamp (if present) and detach the syringe and discard.
18. If required (externally clamped catheters), attach 10ml syringe with heparinised saline and inject 2ml into the catheter, finishing with a positive end pressure, closing the clamp before detaching the syringe. Remove the gripper needle.
To minimise risk of catheter occlusion.
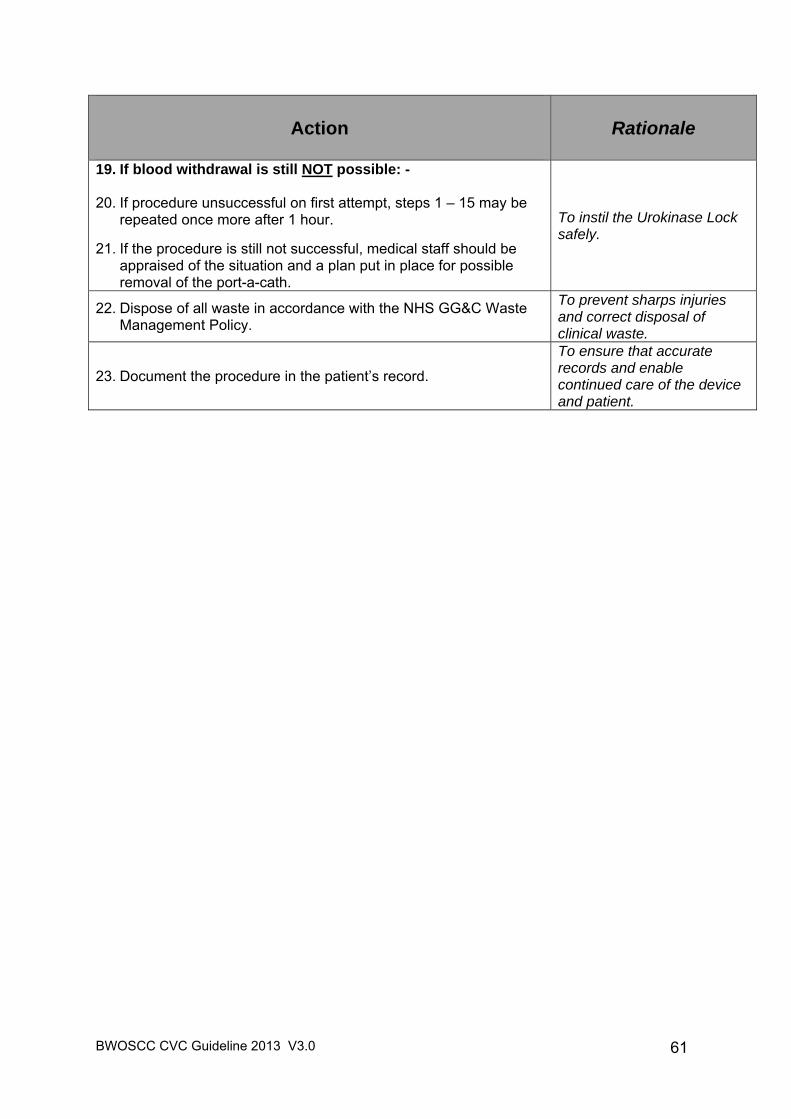
BWOSCC CVC Guideline 2013 V3.0
61
Action
Rationale
19. If blood withdrawal is still NOT possible: - 20. If procedure unsuccessful on first attempt, steps 1 – 15 may be
repeated once more after 1 hour. 21. If the procedure is still not successful, medical staff should be
appraised of the situation and a plan put in place for possible removal of the port-a-cath.
To instil the Urokinase Lock safely.
22. Dispose of all waste in accordance with the NHS GG&C Waste Management Policy.
To prevent sharps injuries and correct disposal of clinical waste.
23. Document the procedure in the patient’s record.
To ensure that accurate records and enable continued care of the device and patient.
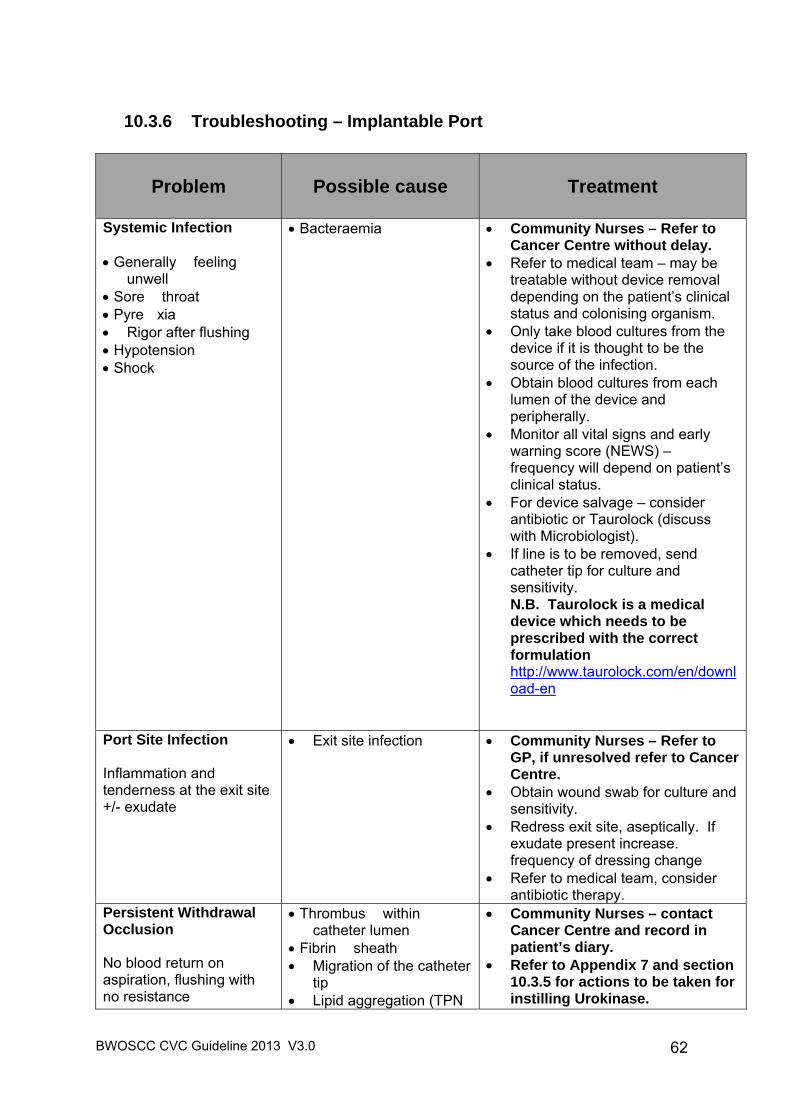
BWOSCC CVC Guideline 2013 V3.0
62
10.3.6 Troubleshooting – Implantable Port
Problem
Possible cause Treatment
Systemic Infection Generally feeling
unwell Sore throat Pyre xia Rigor after flushing Hypotension Shock
Bacteraemia Community Nurses – Refer to Cancer Centre without delay.
Refer to medical team – may be treatable without device removal depending on the patient’s clinical status and colonising organism.
Only take blood cultures from the device if it is thought to be the source of the infection.
Obtain blood cultures from each lumen of the device and peripherally.
Monitor all vital signs and early warning score (NEWS) – frequency will depend on patient’s clinical status.
For device salvage – consider antibiotic or Taurolock (discuss with Microbiologist).
If line is to be removed, send catheter tip for culture and sensitivity. N.B. Taurolock is a medical device which needs to be prescribed with the correct formulation http://www.taurolock.com/en/download-en
Port Site Infection Inflammation and tenderness at the exit site +/- exudate
Exit site infection
Community Nurses – Refer to GP, if unresolved refer to Cancer Centre.
Obtain wound swab for culture and sensitivity.
Redress exit site, aseptically. If exudate present increase. frequency of dressing change
Refer to medical team, consider antibiotic therapy.
Persistent Withdrawal Occlusion No blood return on aspiration, flushing with no resistance
Thrombus within catheter lumen
Fibrin sheath Migration of the catheter
tip Lipid aggregation (TPN
Community Nurses – contact Cancer Centre and record in patient’s diary.
Refer to Appendix 7 and section 10.3.5 for actions to be taken for instilling Urokinase.
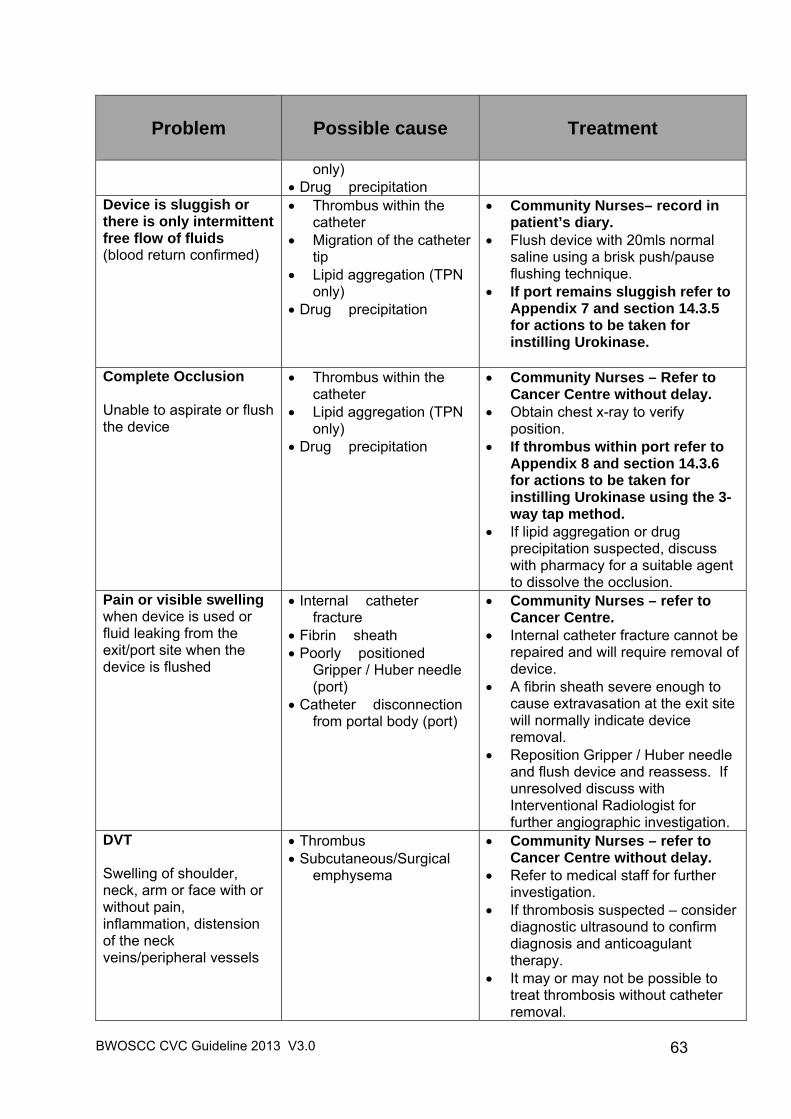
BWOSCC CVC Guideline 2013 V3.0
63
Problem
Possible cause Treatment
only) Drug precipitation
Device is sluggish or there is only intermittent free flow of fluids (blood return confirmed)
Thrombus within the catheter
Migration of the catheter tip
Lipid aggregation (TPN only)
Drug precipitation
Community Nurses– record in patient’s diary.
Flush device with 20mls normal saline using a brisk push/pause flushing technique.
If port remains sluggish refer to Appendix 7 and section 14.3.5 for actions to be taken for instilling Urokinase.
Complete Occlusion Unable to aspirate or flush the device
Thrombus within the catheter
Lipid aggregation (TPN only)
Drug precipitation
Community Nurses – Refer to Cancer Centre without delay.
Obtain chest x-ray to verify position.
If thrombus within port refer to Appendix 8 and section 14.3.6 for actions to be taken for instilling Urokinase using the 3-way tap method.
If lipid aggregation or drug precipitation suspected, discuss with pharmacy for a suitable agent to dissolve the occlusion.
Pain or visible swelling when device is used or fluid leaking from the exit/port site when the device is flushed
Internal catheter fracture
Fibrin sheath Poorly positioned
Gripper / Huber needle (port)
Catheter disconnection from portal body (port)
Community Nurses – refer to Cancer Centre.
Internal catheter fracture cannot be repaired and will require removal of device.
A fibrin sheath severe enough to cause extravasation at the exit site will normally indicate device removal.
Reposition Gripper / Huber needle and flush device and reassess. If unresolved discuss with Interventional Radiologist for further angiographic investigation.
DVT Swelling of shoulder, neck, arm or face with or without pain, inflammation, distension of the neck veins/peripheral vessels
Thrombus Subcutaneous/Surgical
emphysema
Community Nurses – refer to Cancer Centre without delay.
Refer to medical staff for further investigation.
If thrombosis suspected – consider diagnostic ultrasound to confirm diagnosis and anticoagulant therapy.
It may or may not be possible to treat thrombosis without catheter removal.
BWOSCC CVC Guideline 2013 V3.0
64
11 Definition of Terms
Air embolism Obstruction of the vascular system by a bubble of air.
Aseptic Technique
This is a sterile procedure per formed to prevent contaminat ion and risk of contracting infection. Catheter lock
The solution used to fill the lumen of t he device and then allo wed to dwell for a period of time whilst the dev ice is idle (e.g. normal saline, heparinised saline, Taurolock™). Chlorhexidine Gluconate applicator
A sterile, single use applic ator for cleaning t he skin containing 2% Chlorhexidine Gluconate in 70% Isoprop yl Alcoho l. The current product is Chloraprep® CVC
Refers to the group of Central Venous Catheters inserted into the venous system ensuring that the tip of the catheter lies within the central venous system (SVC/IVC/right atrium). Can be inserted to preserve peripheral access, administer large volumes of intravenous fluids, administer irritant, vesicant or hyper-osmolar fluids and prevent repeated cannulation of the peripheral veins. Extravasation
This is the infiltration of a drug into surrounding tissue. Fibrin Sheath
The result of fibrin and platelet deposits along the external wall of the catheter. When the sheath reaches the tip it acts as a one-way valve, allowing infusion of solutions but not the aspiration of blood. Should the fibrin sheath totally encase the catheter from the tip to the exit site, this would result in extravasation of the solution infused into the exit site tissue.
Heparinised saline
An anticoagulant which is injected into the catheter and locked in place to prevent the formation of thrombus at the tip of the catheter. Various studies show that the lowest effective concentration should be used, routinely 10 international units/ml. Hyper-osmolar solution
A solution with a higher concentration of salts and/or other dissolved material than normal tissue. Irritant solution
An agent which, produces discomfort or pain at a venepuncture site or along the lumen of a vein.
BWOSCC CVC Guideline 2013 V3.0
65
Needle free connector
A device connected to the end of the catheter maintaining a closed system whilst in place, allowing for the administration of therapy without the need to puncture with a needle. The device should be changed every 7 days as part of the weekly care and maintenance or sooner if compromised. Persistent withdrawal occlusion
The inability to aspirate blood from the device but solutions will infuse freely usually cause by fibrin formation around the tip of the catheter. Phlebitis
Inflammation of a vein caused by infection, the presence of a foreign body (catheter), or medication being given. Symptoms generally include warmth, swelling, pain and redness around the vein. Pinch off
A possible complication associated with subclavian lines when the catheter can be compressed between the clavicle and first rib causing transient obstruction, however it can cause a tear in the catheter or complete transection of the catheter. If suspected, this should be investigated further. Positive end pressure
A technique used to prevent the backflow of blood into the tip of the catheter. This is achieved by closing the clamp whilst continuing to inject the final ml of solution in the syringe or removing the syringe from the injection cap whilst continuing to exert pressure on the plunger of the syringe with your thumb. Push-pause flushing technique
This technique requires that you flush the device briskly, pausing briefly after each ml, approximately. This creates turbulence within the lumen of the catheter, decreasing the risk of platelets and fibrin adhering to the catheter walls, minimizing the risk of occlusion.
Scrub the Hub
Using 2% Chlorhexidine Gluconate in 70% Isopropyl Alcohol wipes, cleanse the needle free connector using a twisting motion (as if juicing an orange) for at least 15 second, allowing to completely air dry before using. Social hand hygiene
The basic principle of hand hygiene is to remove transient microorganisms. This is achieved by washing the hands using the Six Step Hand Hygiene Technique with warm, running water and soap.
Taurolock™
An antimicrobial lock used to minimize the risk of catheter related to sepsis. Taurolock is a medical device which needs to be prescribed with the correct formulation http://www.taurolock.com/en/download-en
BWOSCC CVC Guideline 2013 V3.0
66
Thrombolytic A drug used to break down blood clots and fibrin in the catheter. Thrombosis
A blood clot that has formed inside an intact blood vessel. Total occlusion
When you are unable to aspirate blood from the device and infuse solutions into the device. Vesicant solution
A drug capable of causing tissue necrosis when extravasated.
12 Monitoring, Surveillance and Audit
12.1 This guideline will be reviewed two years after initial publication against staff compliance with the CVC bundle and key infection prevention and control recommendations.
12.2 This may be subject to amendments or revisions before a planned review to align clinical practice with any updates received from Health Protection Scotland.
12.3 The guideline will also be audited against key elements of infection prevention that would focus on achieving a reduction in the incidence of catheter related bloodstream infection (CRBSI).
12.4 Clinical Teams will be encouraged and supported through the Scottish Patient Safety Programme (SPSP) to use the Model for Improvement to accelerate improvements with all CVC care processes and outcomes. On a monthly basis the appropriate clinical teams will collect data to demonstrate their compliance with the CVC Care and Maintenance Bundle. Where compliance is less than 95% clinical teams will be expected to identify changes with their care processes to lead to improvement.
Further details about the Model for Improvement on can be found at: www.ihi.org http://www.scottishpatientsafetyprogramme.scot.nhs.uk/docs/usingthemodelforimprovement.pdf. See Appendix 9.
BWOSCC CVC Guideline 2013 V3.0
67
13 Communication and Implementation Plan
13.1 This guideline will be made available to all staff in NHS GGC via the Intranet (StaffNet). All Senior Managers and Clinical Leads will be asked to cascade the guideline through their normal communication mechanisms.
13.2 Education and training will be coordinated through the BWOSCC Practice Development and Education team in collaboration with individual clinical experts in CVC clinical practice from the service area.
13.3 Consultation of the document prior to implementation includes peer review by:
Clinica l Experts
BWOSCC Clinical Governance Committee
Regional Services SAB Committee
Lead Nurse Director for Community Health Partnerships NHS GGC
Regional Services Clinical Risk Lead
BWOSCC CVC Guideline 2013 V3.0
68
14 References 1. Centers for Disease Control & Prevention (2011) Guidelines for the prevention
of Intravascular Catheter-Related Infections, U.S. Department of Health and Human Services. (Available at http://www.cdc.gov/hicpac/bsi/bsi-guidelines-2011.html).
2. Institute for Healthcare Improvement (2012) How-to Guide: Prevent Central
Line-Associated Bloodstream Infections, IHI, Cambridge, MA. (Available at http://www.ihi.org/knowledge/Pages/Tools/HowtoGuidePreventCentralLineAssociatedBloodstreamInfection.aspx).
3. Nursing & Midwifery Council (2008) The Code: Standards of Conduct,
Performance and Ethics for Nur ses and Mi dwives, NMC, London. (Available at http://www.nmc-uk.org/Publications/Standards/The-code/Introduction).
4. Nursing & Midwifery Council (2010) Standards for Medicines Management,
NMC, London. (Available at http://www.nmc-uk.org/Documents/NMC-Publications/NMC-Standards-for-medicines-management.pdf).
5. Nursing & Midwifery C ouncil (2009) Recor d Keeping: Guidance for nurses and
midwives, NMC, London. (Available at http://www.nmc-uk.org/Documents/NMC-Publications/NMC-Record-Keeping-Guidance.pdf).
6. NHS GG & C (2008) Safe & Secure Hand ling of Medicines in Hospital War ds,
Theatres and Department. (Available at http://www.staffnet.ggc.scot.nhs.uk/Applications/PM/Policy%20Documents/Safe%20Handling%20Medicines%20Policy%20Acute.pdf).
7. NHS National Services Scotland (2012) Targeted Lite rature Review: What are
the key infection prevention and contro l recommendations to inform a central vascular catheter (C VC) maintenance ca re quality improvement tool? Health Protection Scotland, Edinburgh. (Available at http://www.documents.hps.scot.nhs.uk/hai/infection-control/evidence-for-care-bundles/literature-reviews/cvc-maintenance-review.pdf ).
8. NHS National Services Scotland (2012) Key Recommendations: Preventing
infections when inserting and maintaining a CVC. Health Protection Scotland, Edinburgh. (Available at http://www.documents.hps.scot.nhs.uk/hai/infection-control/evidence-for-care-bundles/key-recommendations/cvc.pdf ).
9. NHS National Services Scotland (2012) Targeted Lite rature Review: What are
the key infection prevention and control recommendations to inform a prevention of contamination of blood culture quality impr ovement tool? Health Prote ction Scotland, Edinburgh. (Available at http://www.documents.hps.scot.nhs.uk/hai/infection-control/evidence-for-care-bundles/literature-reviews/blood-culture-review.pdf).
BWOSCC CVC Guideline 2013 V3.0
69
10. NHS National Services Scotland (2012) Key Recommendations: Preventing contamination when taking a sample for blood culture. Health Protection Scotland, Edinburgh. (Available at http://www.documents.hps.scot.nhs.uk/hai/infection-control/evidence-for-care-bundles/key-recommendations/blood-culture.pdf).
11. Pratt RJ, Pellowe CM, Wilson JA, Loveday HP, Harper PJ, Jones SRLJ,
McDougall C, Wilcox MH. epic2: National Evidence-Based Guidelines for Preventing Healthcare-Associated Infections in NHS Hospitals in England. The Journal of Hospital Infection 2007; 65: suppl 1:S33-S49. (Available at http://download.journals.elsevierhealth.com/pdfs/journals/0195-6701/PIIS0195670107600024.pdf).
12. Royal College of Nursing (2010) Standards for Infusion Therapy, RCN IV
Therapy Forum, London. (Available at http://www.rcn.org.uk/__data/assets/pdf_file/0005/78593/002179.pdf).
15 Key Related Documents The following documents should be read in conjunction with this guideline:
NHS GGC Consent Policy on Healthca re Assessment, Care & Treatment (2011) http://www.staffnet.ggc.scot.nhs.uk/Corporate%20Services/Clinical%20Governance/Clinical%20Effectiveness/Documents/CONSENT%20POLICY4%2000MAR11-updated%2003-03-2011Final.doc
NHS GGC Infection Control Manual (electronic version)
http://www.nhsggc.org.uk/content/default.asp?page=s708 NHS GGC Waste Management Policy (2009)
http://www.staffnet.ggc.scot.nhs.uk/Info%20Centre/Health%20and%20Safety/Corporate%20Health%20and%20Safety/Documents/Policies/Waste%20Policy.pdf
NHS GGC Hand Hygiene Policy & Procedure (electronic version) http://www.nhsggc.org.uk/content/default.asp?page=s710
NHS GGC Safe Use of Latex Policy (2010)
http://www.staffnet.ggc.scot.nhs.uk/Info%20Centre/Health%20and%20Safety/Corporate%20Health%20and%20Safety/Documents/Policies/Latex%20Policy.pdf
NHSGGC Glove / Latex – Health Surveillance: Supporting Guidance (2010)
http://www.staffnet.ggc.scot.nhs.uk/Info%20Centre/Health%20and%20Safety/Documents/latex%20guidance%20%20hlth%20surv%2010.pdf
NHS GGC Control of Substances Hazardous to Health (COSHH) Policy (2011) http://www.staffnet.ggc.scot.nhs.uk/Info%20Centre/Health%20and%20Safety/Corporate%20Health%20and%20Safety/Documents/Policies/COSHH%20Policy.pdf
NHS GGC Policy on t he Provision & Us e of Personal Protective Equipment (2010) http://www.staffnet.ggc.scot.nhs.uk/Info%20Centre/Health%20and%20Safety/Corporate%20Health%20and%20Safety/Documents/Policies/PPE%20Policy.pdf
BWOSCC CVC Guideline 2013 V3.0
70
NHS GGC Safe Handling of Medicines in Hospital Wards, Theatres and
Departments (2008) http://www.staffnet.ggc.scot.nhs.uk/Applications/PM/Policy%20Documents/Safe%20Handling%20Medicines%20Policy%20Acute.pdf
NHS GGC Blood Culture Policy (not yet published)
NHS GGC Professional Standards for Record Keeping (2009) http://www.staffnet.ggc.scot.nhs.uk/Corporate%20Services/Clinical%20Governance/Key%20Information/Documents/Professional%20Standards%20for%20Record%20Keeping%20ver%204.doc
NHS GGC Management of Needlestick In juries and Exposures to Blood and High-Risk Body Fluids (2007). http://www.staffnet.ggc.scot.nhs.uk/Acute/Emergency%20Care%20Med%20Specialities/Acute%20Medicine/Documents/nhsggc_Quick_Reference_Guide_Initial_Action_Plan_2.pdf
NHS GGC Management of Occupationa l and Non-Occupat ional Exposures
to Bloodborne Viruses (2007). http://library.nhsggc.org.uk/mediaAssets/Infection%20Control/nhsggc_Guideline_for_the_management_of_exposures_to_bloodborne_viruses_2007_10.pdf
NHS GGC Nutrition Resource Manual (2012) http://www.staffnet.ggc.scot.nhs.uk/Acute/Division%20Wide%20Services/Food%20Fluid%20And%20Nutrition/Pages/FFN_nutrman_LMCD_310812.aspx
NHS GGC CVC Policy Draft form

BWOSCC CVC Guideline 2013 V3.0
71
Appendix 1: Health Protecting Scotland (HPS): Summary of key recommendations for CVC insertion and maintenance
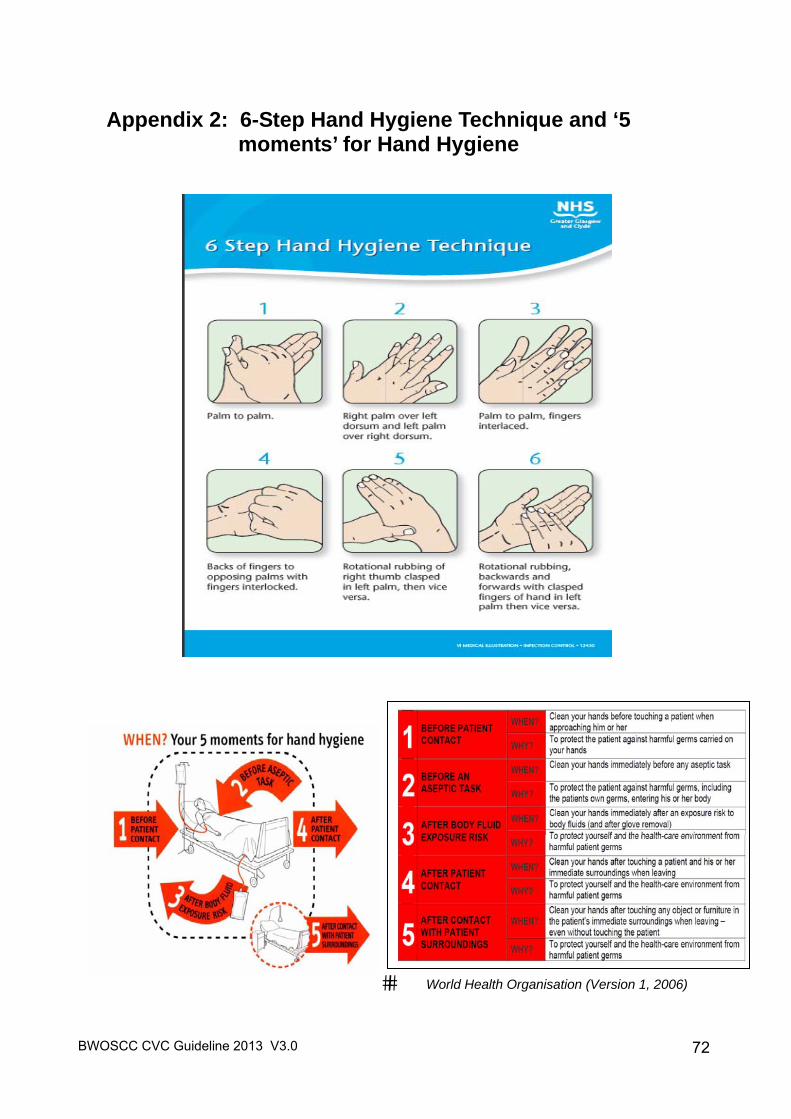
BWOSCC CVC Guideline 2013 V3.0
72
Appendix 2: 6-Step Hand Hygiene Technique and ‘5 moments’ for Hand Hygiene
�� World Health Organisation (Version 1, 2006)
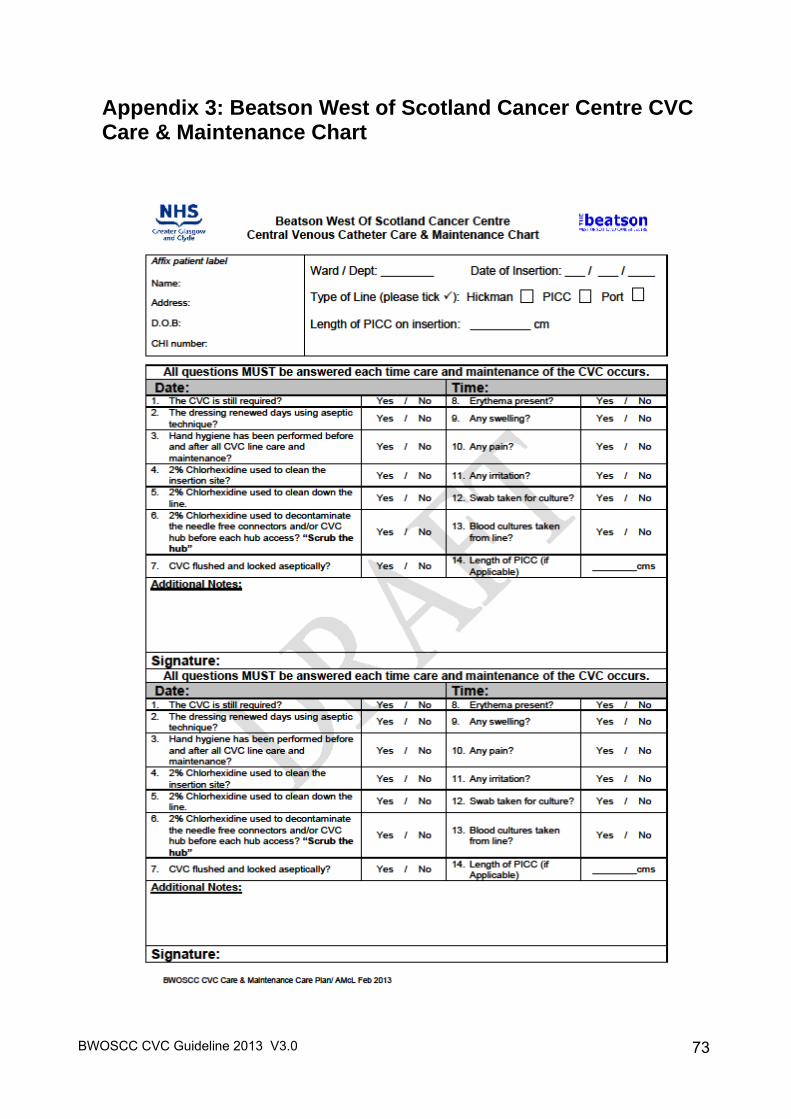
BWOSCC CVC Guideline 2013 V3.0
73
Appendix 3: Beatson West of Scotland Cancer Centre CVC Care & Maintenance Chart
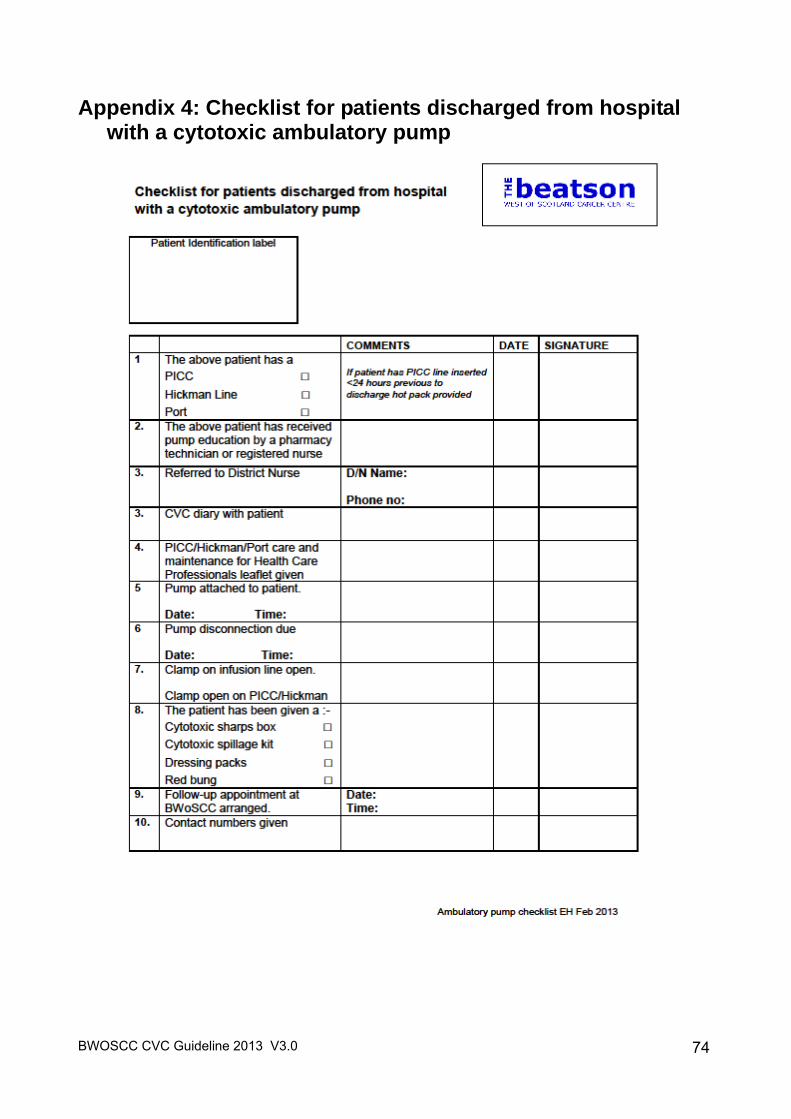
BWOSCC CVC Guideline 2013 V3.0
74
Appendix 4: Checklist for patients discharged from hospital with a cytotoxic ambulatory pump
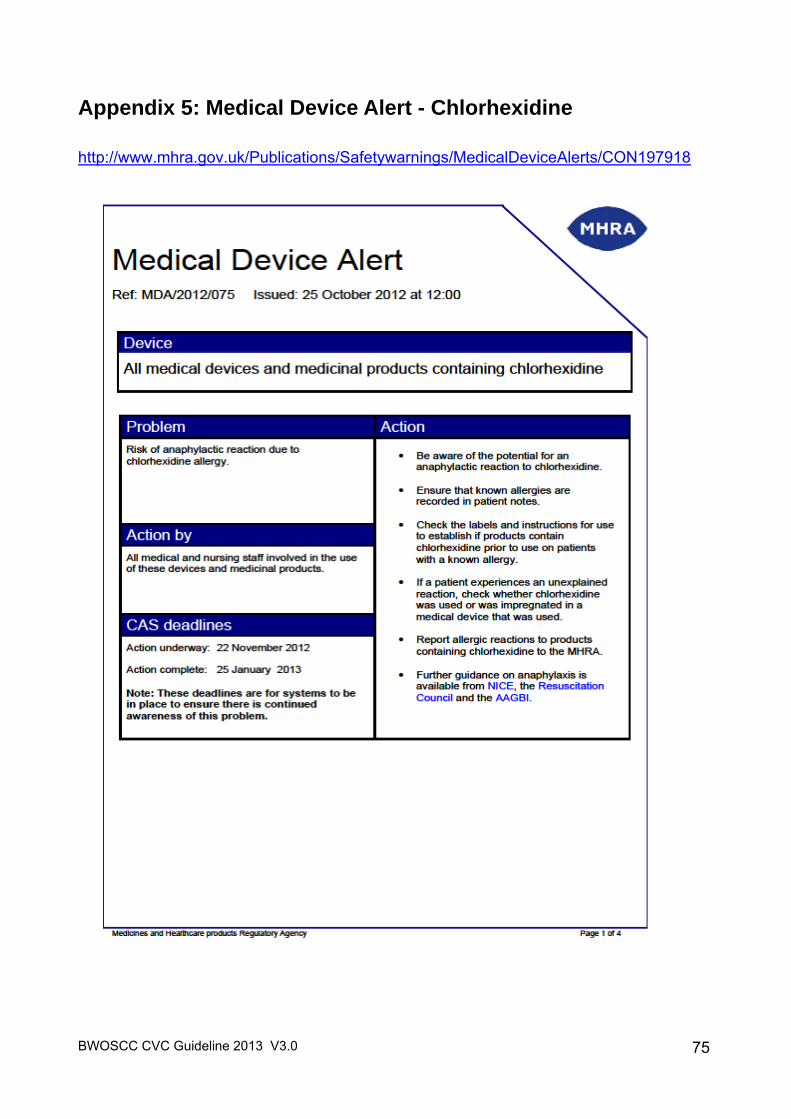
BWOSCC CVC Guideline 2013 V3.0
75
Appendix 5: Medical Device Alert - Chlorhexidine http://www.mhra.gov.uk/Publications/Safetywarnings/MedicalDeviceAlerts/CON197918
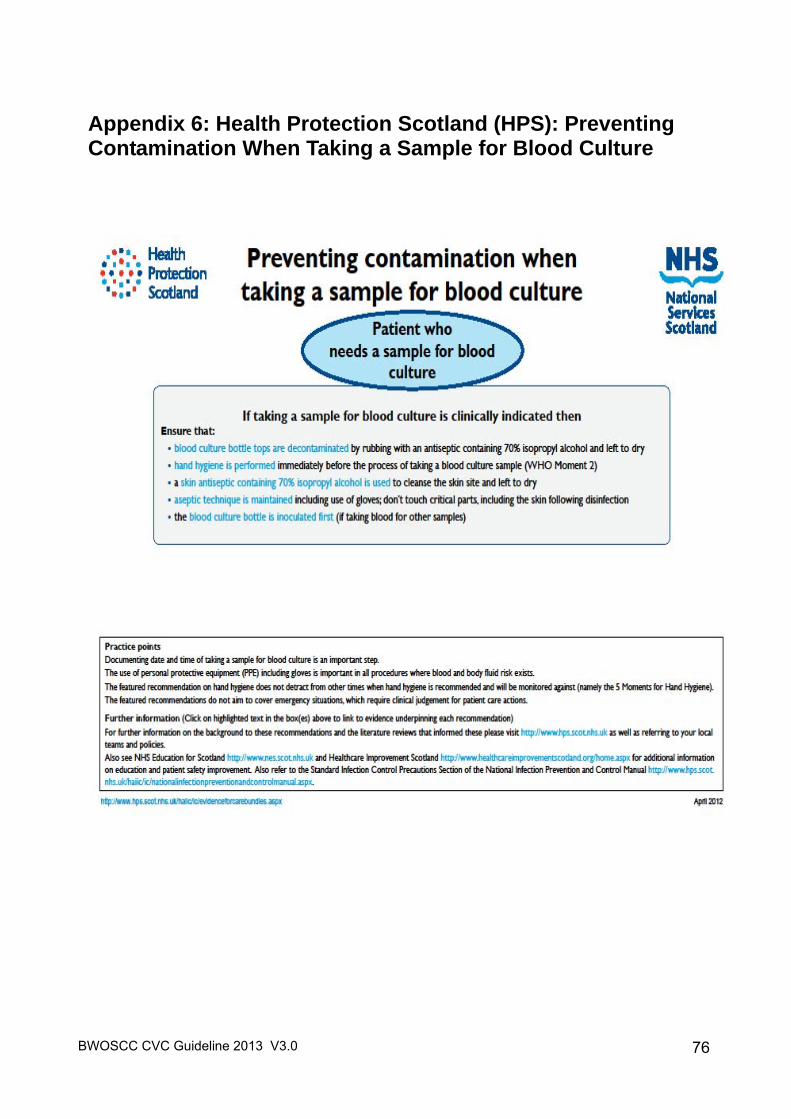
BWOSCC CVC Guideline 2013 V3.0
76
Appendix 6: Health Protection Scotland (HPS): Preventing Contamination When Taking a Sample for Blood Culture
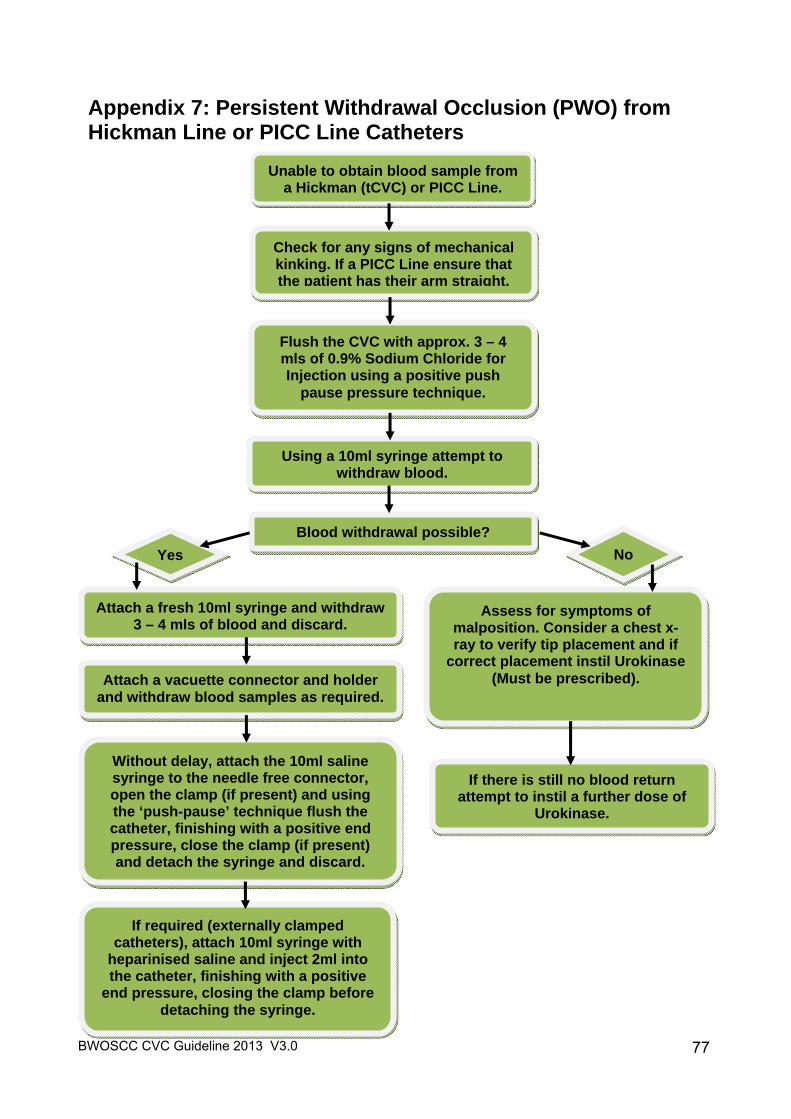
BWOSCC CVC Guideline 2013 V3.0
77
Appendix 7: Persistent Withdrawal Occlusion (PWO) from Hickman Line or PICC Line Catheters
Check for any signs of mechanical kinking. If a PICC Line ensure that the patient has their arm straight.
Unable to obtain blood sample from a Hickman (tCVC) or PICC Line.
Flush the CVC with approx. 3 – 4 mls of 0.9% Sodium Chloride for Injection using a positive push
pause pressure technique.
Using a 10ml syringe attempt to withdraw blood.
Blood withdrawal possible?
Yes No
Attach a fresh 10ml syringe and withdraw 3 – 4 mls of blood and discard.
Attach a vacuette connector and holder and withdraw blood samples as required.
Without delay, attach the 10ml saline syringe to the needle free connector, open the clamp (if present) and using the ‘push-pause’ technique flush the catheter, finishing with a positive end pressure, close the clamp (if present) and detach the syringe and discard.
If required (externally clamped catheters), attach 10ml syringe with
heparinised saline and inject 2ml into the catheter, finishing with a positive
end pressure, closing the clamp before detaching the syringe.
Assess for symptoms of malposition. Consider a chest x-ray to verify tip placement and if
correct placement instil Urokinase (Must be prescribed).
If there is still no blood return attempt to instil a further dose of
Urokinase.
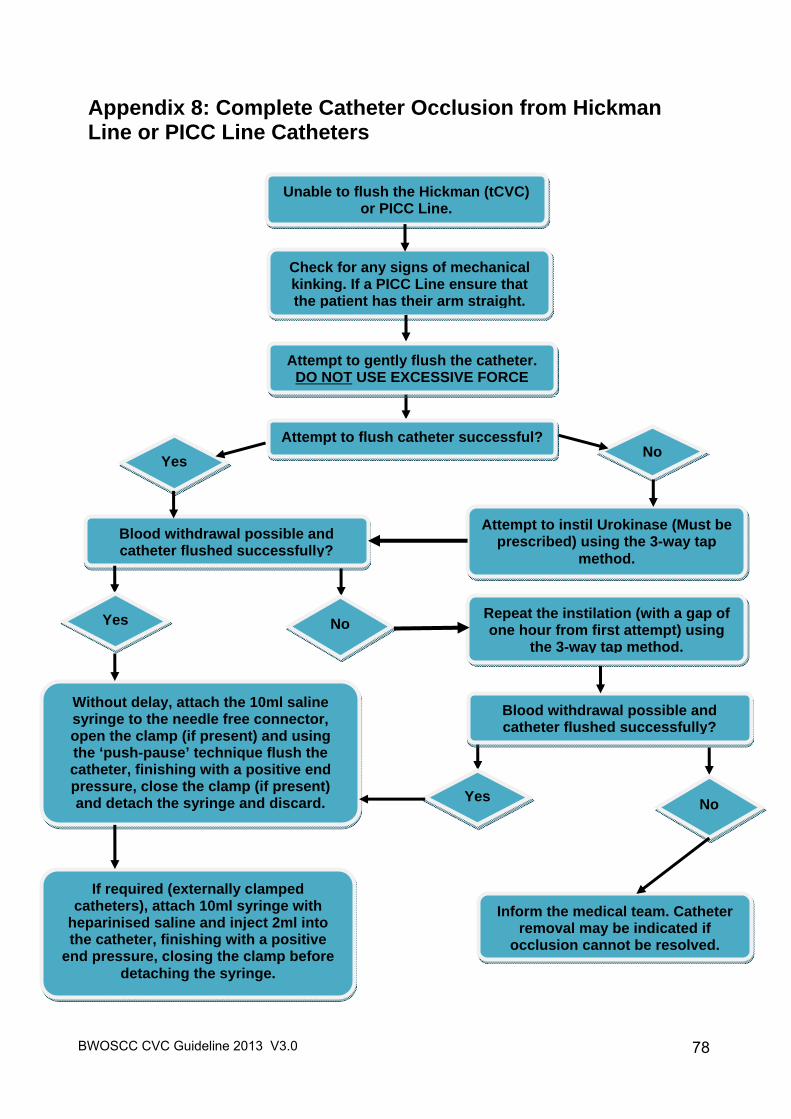
BWOSCC CVC Guideline 2013 V3.0
78
Appendix 8: Complete Catheter Occlusion from Hickman Line or PICC Line Catheters
Check for any signs of mechanical kinking. If a PICC Line ensure that the patient has their arm straight.
Unable to flush the Hickman (tCVC) or PICC Line.
Repeat the instilation (with a gap of one hour from first attempt) using
the 3-way tap method.
Blood withdrawal possible and catheter flushed successfully?
Yes No
Inform the medical team. Catheter removal may be indicated if
occlusion cannot be resolved.
Without delay, attach the 10ml saline syringe to the needle free connector, open the clamp (if present) and using the ‘push-pause’ technique flush the catheter, finishing with a positive end pressure, close the clamp (if present) and detach the syringe and discard.
If required (externally clamped catheters), attach 10ml syringe with
heparinised saline and inject 2ml into the catheter, finishing with a positive
end pressure, closing the clamp before detaching the syringe.
Attempt to instil Urokinase (Must be prescribed) using the 3-way tap
method.
Attempt to gently flush the catheter. DO NOT USE EXCESSIVE FORCE
Attempt to flush catheter successful?
Yes No
Blood withdrawal possible and catheter flushed successfully?
Yes No
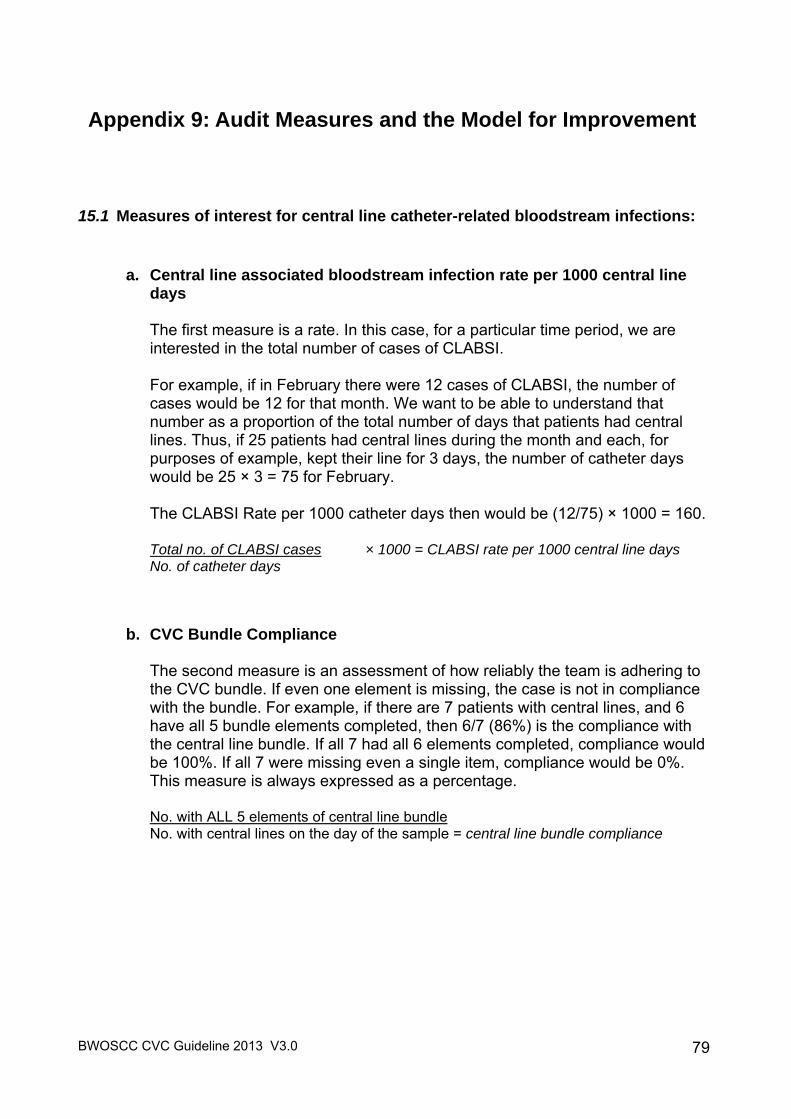
BWOSCC CVC Guideline 2013 V3.0
79
Appendix 9: Audit Measures and the Model for Improvement
15.1 Measures of interest for central line catheter-related bloodstream infections:
a. Central line associated bloodstream infection rate per 1000 central line days
The first measure is a rate. In this case, for a particular time period, we are interested in the total number of cases of CLABSI. For example, if in February there were 12 cases of CLABSI, the number of cases would be 12 for that month. We want to be able to understand that number as a proportion of the total number of days that patients had central lines. Thus, if 25 patients had central lines during the month and each, for purposes of example, kept their line for 3 days, the number of catheter days would be 25 × 3 = 75 for February. The CLABSI Rate per 1000 catheter days then would be (12/75) × 1000 = 160. Total no. of CLABSI cases × 1000 = CLABSI rate per 1000 central line days No. of catheter days
b. CVC Bundle Compliance
The second measure is an assessment of how reliably the team is adhering to the CVC bundle. If even one element is missing, the case is not in compliance with the bundle. For example, if there are 7 patients with central lines, and 6 have all 5 bundle elements completed, then 6/7 (86%) is the compliance with the central line bundle. If all 7 had all 6 elements completed, compliance would be 100%. If all 7 were missing even a single item, compliance would be 0%. This measure is always expressed as a percentage.
No. with ALL 5 elements of central line bundle No. with central lines on the day of the sample = central line bundle compliance
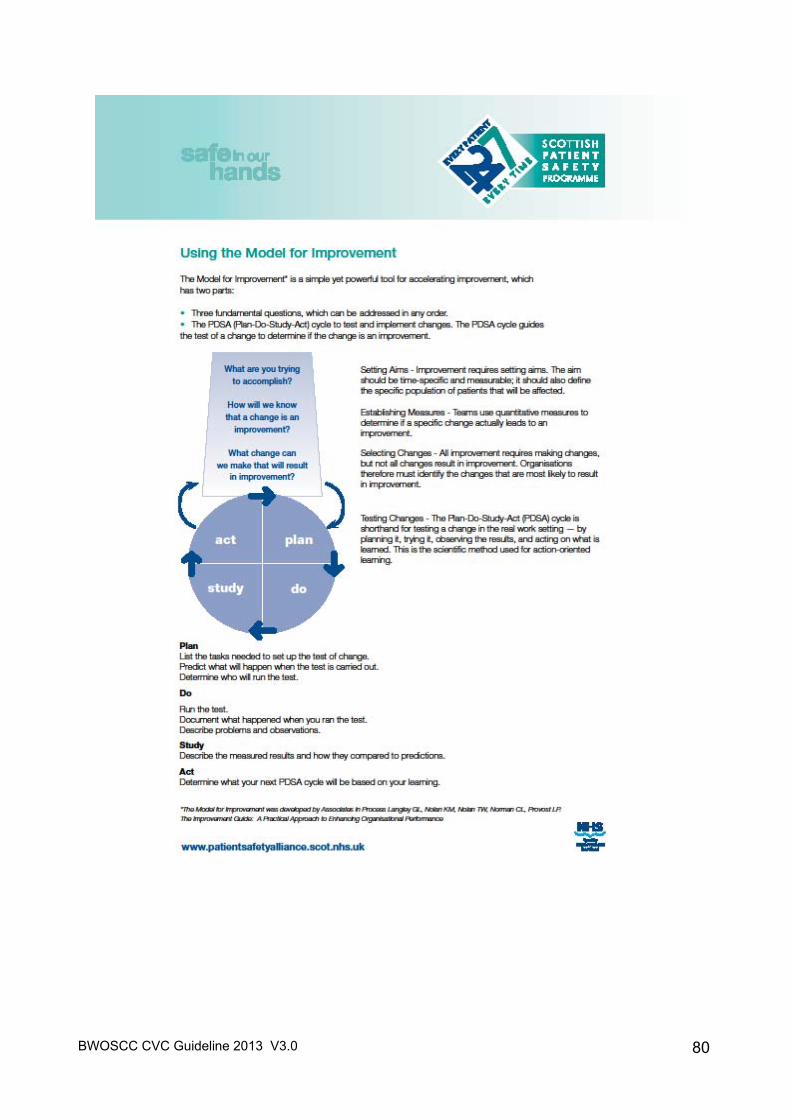
BWOSCC CVC Guideline 2013 V3.0
80