Embed Size (px)
Citation preview

E-TENDERING GUIDE FOR BIDDER
1
OIL INDIA LIMITED
GUIDELINES TO BIDDERS
FOR
E-PROCUREMENT APPLICATION

E-TENDERING GUIDE FOR BIDDER
2
TABLE OF CONTENTS
Sl. No.
Contents Page No.
1. Introduction 3
2. General instructions to bidder for e-tender 4
3. Pre-requisites 5
4. Accessing oil‟s e-tender site 6
5. Online vendor registration 8
6. Process for obtaining user ID & password for participation in OIL‟s E-tenders
8
7. View and download tender documents 10
8. Online payment for tender fee/ EMD 15
9. Procedure for online bid submission flow chart 22
9.1 Create, Save & Encrypt Response 23
9.2 Edit & Decrypt Response 27
9.3 Payment Term & Incoterm 29
9.4 Fill up Questions 31
9.5 Upload Technical Documents 32
9.6 Upload Price Bid 38
9.7 Check and Submit Response 52
10. Disclaimer 57

E-TENDERING GUIDE FOR BIDDER
3
1. INTRODUCTION
User manual for viewing, downloading and participation of
tenders in oil‟s e-tender portal PURPOSE The Purpose of this document is to educate the bidders about how to view and download the tender details from the OIL‟s e-tender portal. The steps to be followed for participation and submission of offers.

E-TENDERING GUIDE FOR BIDDER
4
2. GENERAL INSTRUCTIONS TO BIDDER FOR E-TENDER
Two important documents are uploaded on this webpage:
The Compatibility Settings guides about the Internet Explorer Browser setting to work properly the OIL‟s e-tender portal. The second is guideline to the bidders about the details of the pre-requisite for the e-tendering in OIL.
Users are requested to go through this document in detail before actually working on the system.

E-TENDERING GUIDE FOR BIDDER
5
3. PRE-REQUISITES
FOR VIEWING AND DOWNLOADING:
OIL‟s E-Tender Portal runs only on Internet Explorer (IE) 8.0 and above. User should have a valid User ID from OIL for E-Tender Access [ Else Guest
Login can be used] Tender should have been published in the E-tender Portal. All Open Tender which are open can be viewed by all including Guest Users. Limited Tenders meant for specific Vendor can only access through the Login
with their User ID, provided the tender is addressed to them.
FOR PARTICIPATION:
Bidders should have a valid logon ID and Password. Tender Fee has to be paid as per the Tender requirement. For Open Tenders, bidders need to go to the Individual Tender and Register
[Tender wise] for allowing them for participation [Detail Procedure available in the manual under participation]
Valid Digital Signature of Class III with Organizations Name along with Encryption Certificate.
For Technical setting and other information please refer “Guidelines to
Bidders for participating in OIL” and “FAQ”. NOTE: Since, our – tender portal is running on port: 1443, please ask your network team to open the port no. 1443 in the firewall so that the page gets displayed in the browser properly.

E-TENDERING GUIDE FOR BIDDER
6
4. ACCESSING OIL‟S E-TENDER SITE
Open internet explorer (IE 8.0 or above)
Go to Oil India Limited‟s website : www.oil-india.com
Go to “For vendors” menu and the “e-tenders” For opening the e-tender Log-on page, one can go through the following path:
1
2

E-TENDERING GUIDE FOR BIDDER
7
Bidder May Access the OIL‟s E-tender site directly by using the URL: https://etender.srm.oilindia.in/irj/portal NOTE :
Bidders are requested to use Internet Explorer only for OIL‟s E-tender

E-TENDERING GUIDE FOR BIDDER
8
5. ONLINE VENDOR REGISTRATION
1) For obtaining User ID and Password, interested bidders are requested to go for Online Registration. Please do go to the url:
https://etender.srm.oilindia.in/irj/portal And go to the link Supplier Enlistment for E-Tender .Other details can be viewed in www.oil-india.com. Bidders are advised to apply for user ID at least 7 days prior to the last date of tender fee payment for their own interests. User ID‟s shall be processed within 4 days, subject to furnish complete information by the bidder. OIL shall not be responsible for any delays in allocation of user ID/password and other tender related formalities.
2) Once the registration is completed initially user id and password will be
assigned to the bidder.
6. PROCESS FOR OBTAINING USER ID & PASSWORD FOR PARTICIPATION IN OIL‟S E- TENDERS
For participating in Oil India limited e-tenders, all new vendors must get themselves enlisted in Oil India Limited‟s e-procurement portal through the following steps. Also, please use only internet explorer IE-8 or above only.
1) Please do go to the url: https://etender.srm.oilindia.in/irj/portal and go to the link “Supplier Enlistment” for E-Tender
E-TENDERING GUIDE FOR BIDDER
9
2) Fill up the details for issuing user ID:
3) Following are the mandatory documents to be uploaded during registration:
a) PAN Card and previous year‟s audited balance sheet in case of domestic vendor.
b) Valid Business License/Company registration certificate (translated to English, if provided in a foreign language) and previous year‟s audited balance sheet, in case of foreign vendor.
4) After submission of the required details, a link for questionnaire form shall
be issued to the registered email:

E-TENDERING GUIDE FOR BIDDER
10
5) Please fill up the questionnaire and submit the same to complete the
registration process. 6) After successful submission of the questionnaire, a request ID shall be
generated for correspondence. 7) After scrutiny of your documents, „Vendor code‟ and „Password‟ will be
communicated to your e-mail, if the documents are found to be in order.
For, the detailed procedure for payments towards „Tender Fee‟ and „Bid Security/EMD‟ through „Payment Gateway‟, please refer the instructions as incorporated in the tender(s).
7. VIEW AND DOWNLOAD TENDER DOCUMENTS
For accessing and participation, e-tender portal user Id and Passwords are issued from OIL. Else, users without having user ID can to use „Guest‟ to login into the portal. On Login into the portal, the first page comes as under:
To Search a particular Tender / Rfx Number
Bidder may search all the current
tenders by keeping “Event
Number” as blank and then click
“Apply” button. All the Current
tender will be displayed below in
the “Event Number” column.
Bidder may search a tender by
filling up the tender no./ RFx in
the field of “Event Number” and
then click “Apply” . The tender
will be displayed below

E-TENDERING GUIDE FOR BIDDER
11
Click on “Refresh” at the bottom of the page to get the updated data.
Display Tender [Rfx ] On clicking on the Tender number [In the field of Event No.] [ RFx] , a new window
will open with the Rfx in display mode.
Click on the “Event Number” .
A new window will open with the Rfx in display mode.

E-TENDERING GUIDE FOR BIDDER
12
RFX Display
In the display mode, details are available as submission deadline, opening date, Tender fee, EMD requirements, Integrity Pact etc. Now “click” on Question area near to Rfx parameter area under Rfx information tab to get all the questions maintained in the RFx. All the questions whose answers are expected by the vendor to fill are displayed in this area (some of them are mandatory, marked with red star) as per tender requirements.
Click on Item tab to view the details of the material and services of the RFx.

E-TENDERING GUIDE FOR BIDDER
13
Download Technical Documents/ Tender Documents
1) Click
2) This will redirect to the C-folder in following structure. This is the area to
view and download the Technical details like Details of Materials, Schedule of Services, BEC/BRC, Terms and Conditions of the Tender, Integrity Pact etc. Window with Technical Rfx button, system will redirect to the following structure:
3) Under “EXTERNAL AREA” Folder two folder will be visible:
Tender Documents folder: Contains all relevant documents for the tender Amendment Folder: Contains all relevant documents for tender amendment.
Technical attachments

E-TENDERING GUIDE FOR BIDDER
14
To open/view/save the file, please click the documents in Current Version
4) Choose the following option to Open/Save
E-TENDERING GUIDE FOR BIDDER
15
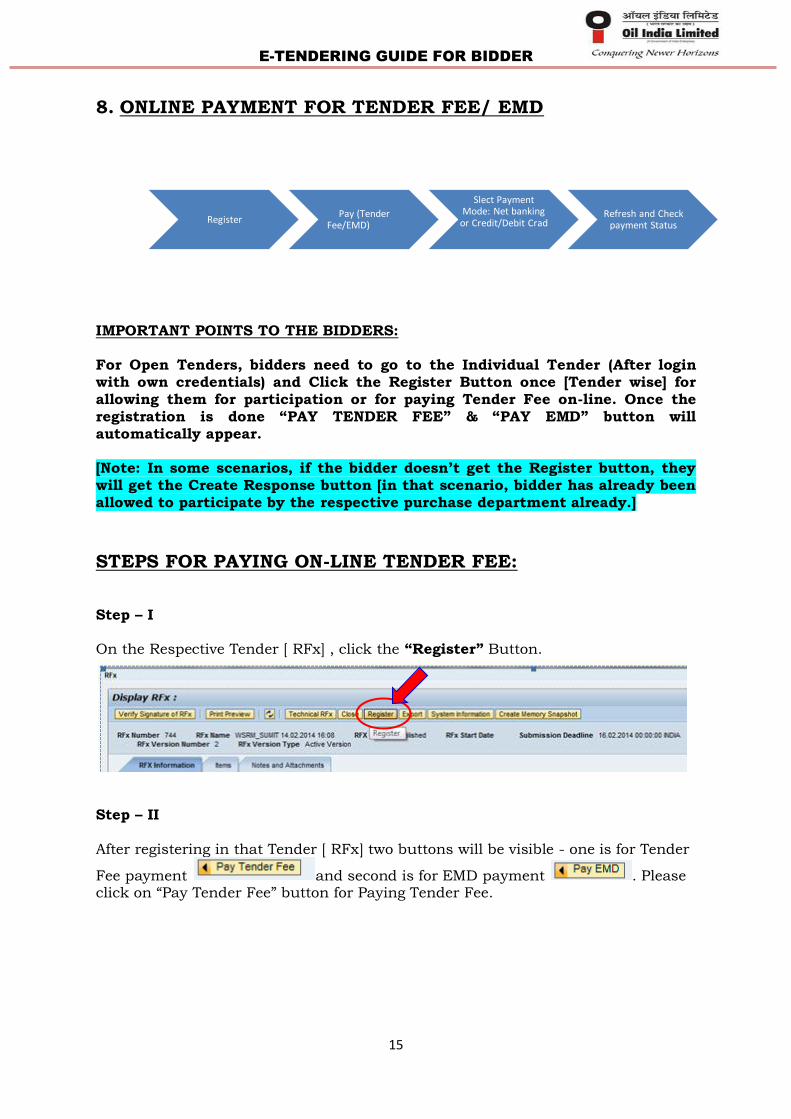
8. ONLINE PAYMENT FOR TENDER FEE/ EMD
IMPORTANT POINTS TO THE BIDDERS: For Open Tenders, bidders need to go to the Individual Tender (After login with own credentials) and Click the Register Button once [Tender wise] for allowing them for participation or for paying Tender Fee on-line. Once the
registration is done “PAY TENDER FEE” & “PAY EMD” button will automatically appear. [Note: In some scenarios, if the bidder doesn‟t get the Register button, they will get the Create Response button [in that scenario, bidder has already been allowed to participate by the respective purchase department already.]
STEPS FOR PAYING ON-LINE TENDER FEE:
Step – I On the Respective Tender [ RFx] , click the “Register” Button.
Step – II After registering in that Tender [ RFx] two buttons will be visible - one is for Tender
Fee payment and second is for EMD payment . Please click on “Pay Tender Fee” button for Paying Tender Fee.
Register Pay (Tender
Fee/EMD)
Slect Payment Mode: Net banking
or Credit/Debit Crad
Refresh and Check payment Status

E-TENDERING GUIDE FOR BIDDER
16
Step – III After clicking on “Pay Tender Fee” button one new page would open. In this page Tender [RFx] Fee details are available.
Under Payment Selection Dropdown two options will be available:
Pay through using Debit / Credit Card
Pay through Net banking

E-TENDERING GUIDE FOR BIDDER
17
Step – IV Based on your selection confirmation button is visible, please click on that and proceed further for payment.
A. Through Debit/Credit Card
B. Through Net Banking
Step-V After confirmation of payment one mail is sent to your registered mail id with RFx and Transaction ID. Step-VI Based on your selection please proceed with the payment process. A. Through Debit/Credit Card

E-TENDERING GUIDE FOR BIDDER
19
B. Through Net Banking

E-TENDERING GUIDE FOR BIDDER
20
Select the Banking gateway
After selecting the Bank, click on It will lead you to the Bank Gateway based on the bank selected. In the example, we have shown ICICI bank Page.
After payment process is complete, it returns back to SRM with Payment details.

E-TENDERING GUIDE FOR BIDDER
21
Step-VII
Click on button
Step-VIII
Click on refresh button to Refresh the Page and get the correct status. Once Payment of Tender Fee is successful, pay tender fee button will be
Step-IX
Click on and “Open” or “Save” to get the Payment Receipt.
Step-X PDF is getting generated with payment details. Step-XI Once Payment is successful, you should get one mail with RFx and payment details. “Create response” button is also enabled. Click on that for further response creation. Follow the further Steps from the option Create Response For
the Tender. NOTE: In case of a failed transaction for tender fee payment [vendor failed to get the create response button, although payment deducted from the card/bank account], the vendor will have to initiate the payment process again.
Duplicate payment if any will be refunded. For details please refer “Important Points for the Bidders for on-line Payment” For exemption of tender fee/ EMD , please submit the NSIC/MSME Certificate etc to contact details mentioned under RFx Details. In that scenario, bidder has been allowed to participate by the respective purchase department and “CRETE RESPONSE” button will be appeared only when exemption of tender
fee is maintained by purchaser in system.
E-TENDERING GUIDE FOR BIDDER
22
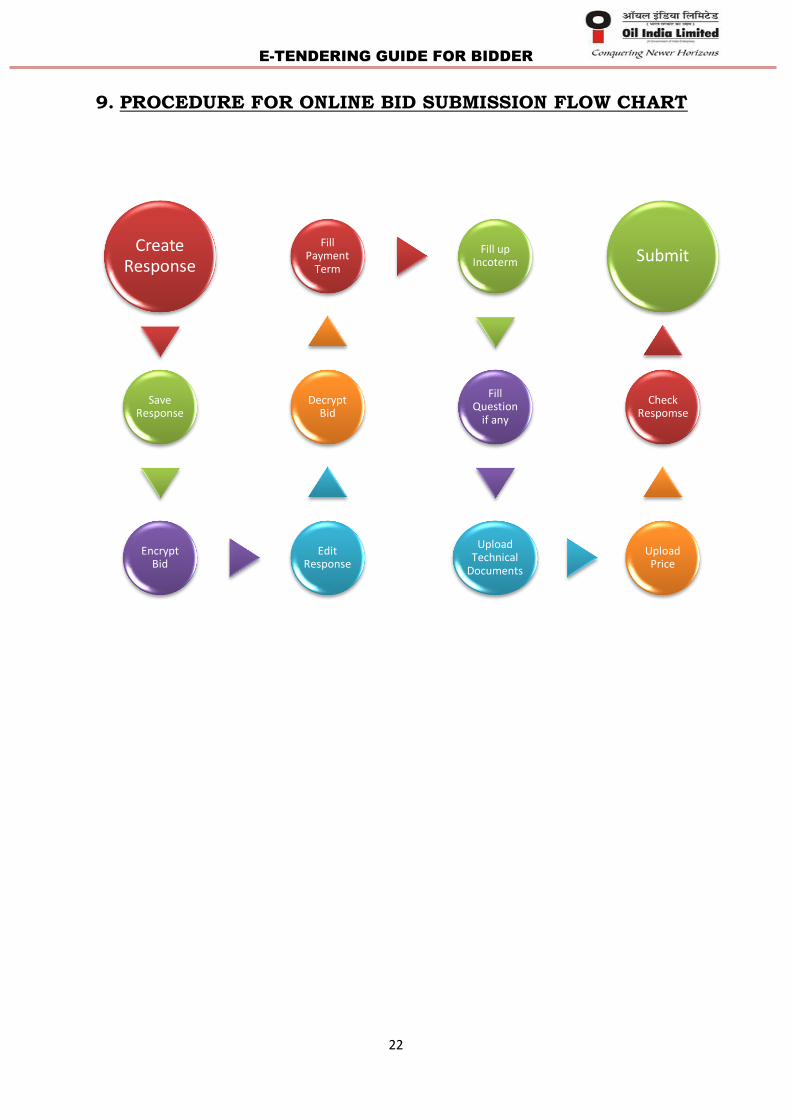
9. PROCEDURE FOR ONLINE BID SUBMISSION FLOW CHART
Create Response
Save Response
Encrypt Bid
Edit Response
Decrypt Bid
Fill Payment
Term
Fill up Incoterm
Fill Question
if any
Upload Technical
Documents
Upload Price
Check Respomse
Submit

E-TENDERING GUIDE FOR BIDDER
23
1. Click on the SDI0696P17 <TENDER NO.>link.
2. Click on the Create Response button.
For Response Submission, please ensure that pre-conditions are full filled. In tenders, where Tender fee is applicable, it has to be paid on-line only before the tender fee submission deadline. Once the tender fee part is paid, bidders will get 'Create Response' button through which responses are to be created.
CREATE, SAVE & ENCRYPT RESPONSE
Technical attachments

E-TENDERING GUIDE FOR BIDDER
24
3. Click on Save button
On creating the Response, system will generate a response number. Once it is generated, it is advised to save the number. To work on that, go to EDIT mode & bidder can upload/modify till the same is submitted.
4. In case JAVA applet comes, Click on the Run button
Technical attachments
E-TENDERING GUIDE FOR BIDDER
25
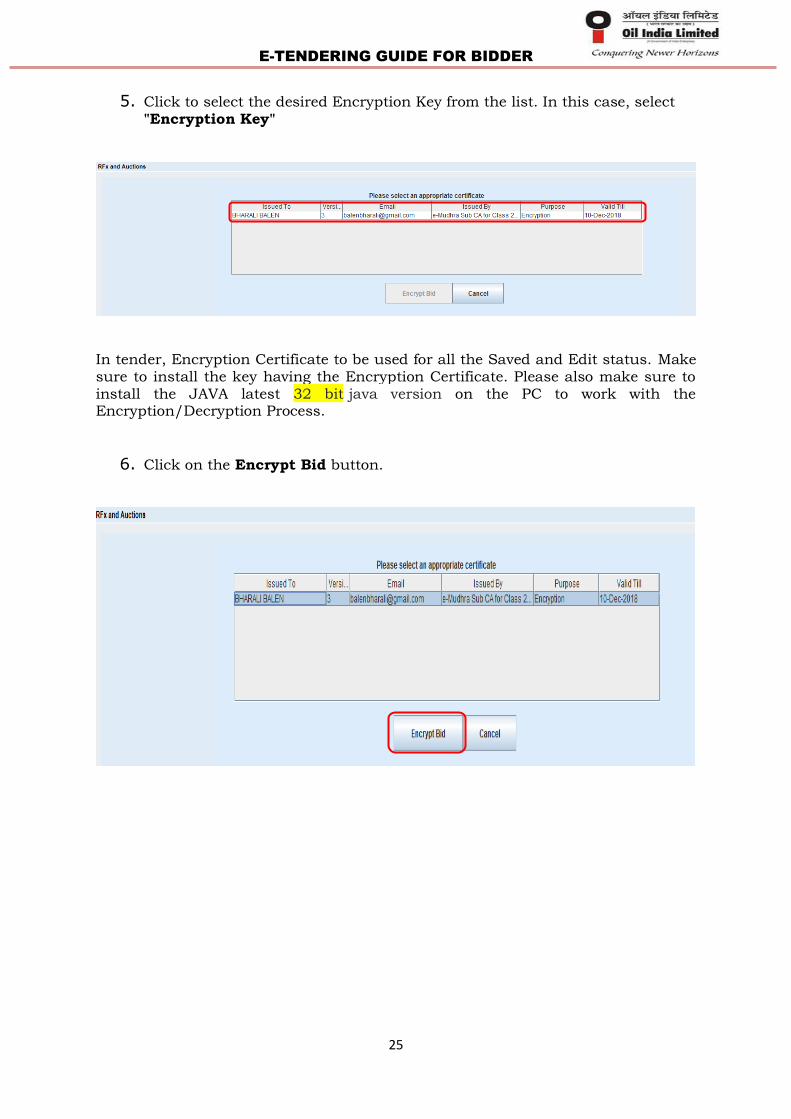
5. Click to select the desired Encryption Key from the list. In this case, select "Encryption Key"
In tender, Encryption Certificate to be used for all the Saved and Edit status. Make sure to install the key having the Encryption Certificate. Please also make sure to install the JAVA latest 32 bit java version on the PC to work with the Encryption/Decryption Process.
6. Click on the Encrypt Bid button.

E-TENDERING GUIDE FOR BIDDER
26
7. Click on the Close button
8. Click on Refresh button
Technical attachments
E-TENDERING GUIDE FOR BIDDER
27
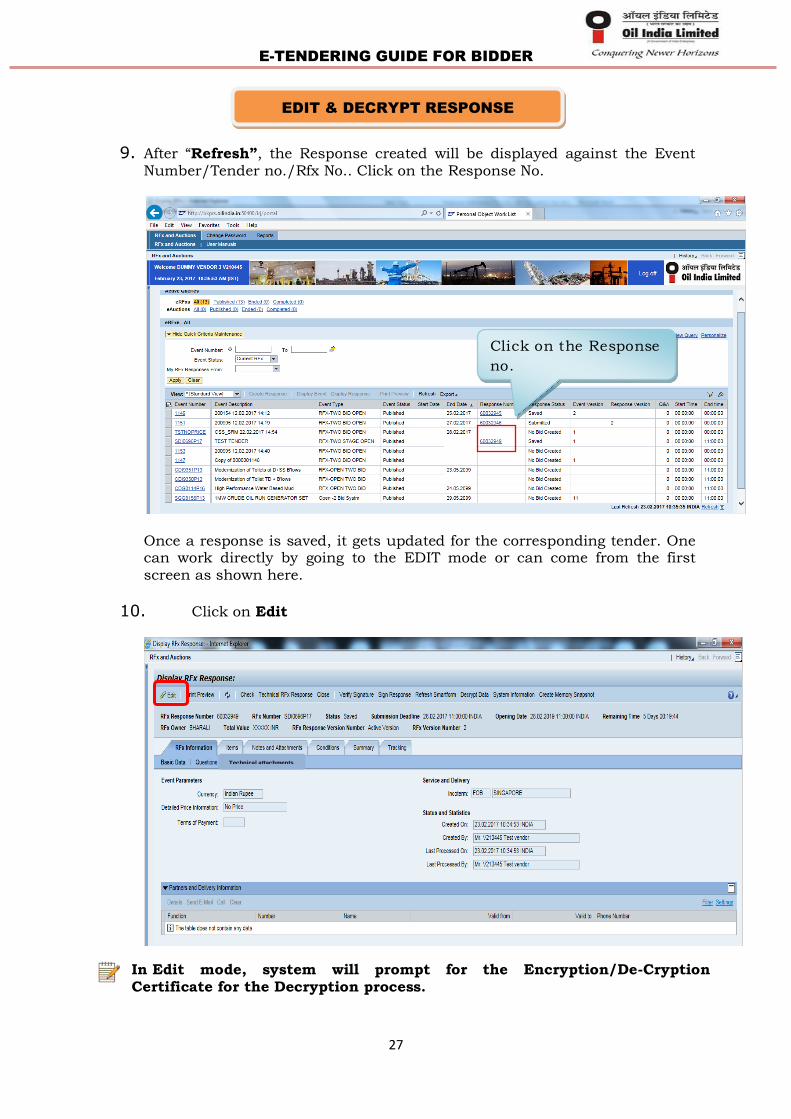
9. After “Refresh”, the Response created will be displayed against the Event Number/Tender no./Rfx No.. Click on the Response No.
Once a response is saved, it gets updated for the corresponding tender. One can work directly by going to the EDIT mode or can come from the first screen as shown here.
10. Click on Edit
In Edit mode, system will prompt for the Encryption/De-Cryption Certificate for the Decryption process.
Click on the Response
no.
EDIT & DECRYPT RESPONSE
Technical attachments

E-TENDERING GUIDE FOR BIDDER
28
11. Click on the Run button.
12. Click to select the same Certificate used for Encryption to De-Crypt
13. Click on the Decrypt button.
14. Enter DSC Pin and press OK
Enter PIN
E-TENDERING GUIDE FOR BIDDER
29
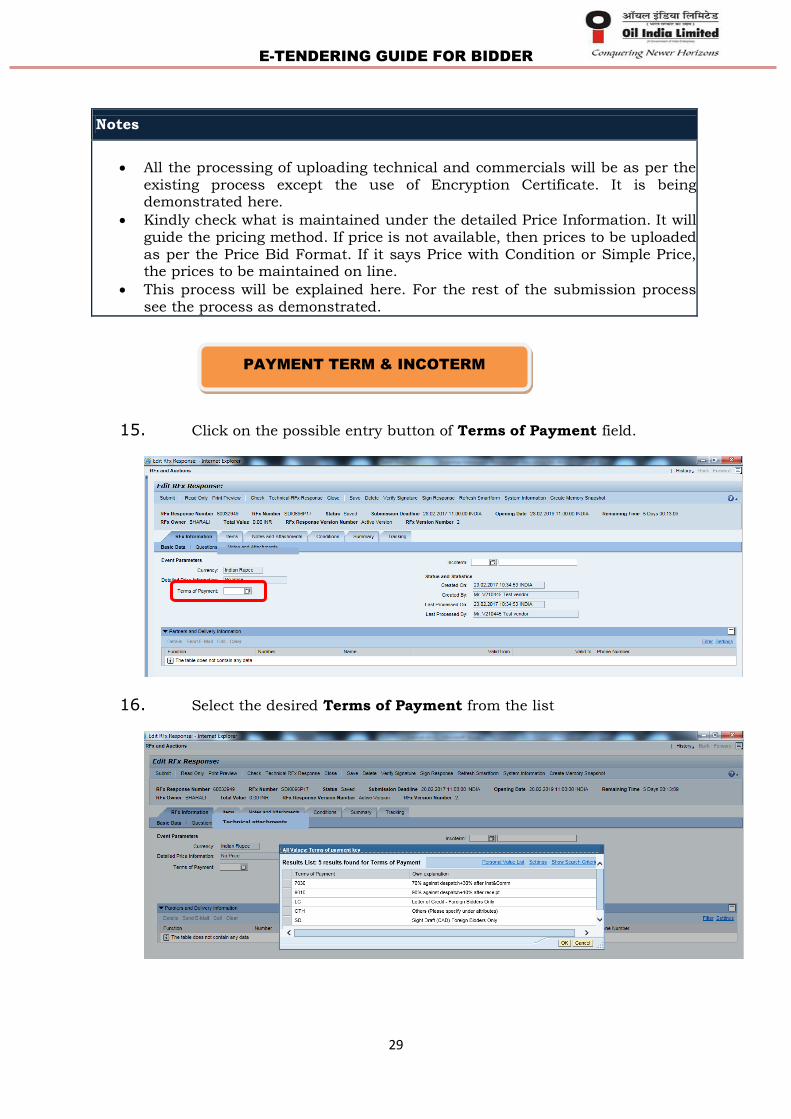
Notes
All the processing of uploading technical and commercials will be as per the
existing process except the use of Encryption Certificate. It is being demonstrated here.
Kindly check what is maintained under the detailed Price Information. It will guide the pricing method. If price is not available, then prices to be uploaded as per the Price Bid Format. If it says Price with Condition or Simple Price, the prices to be maintained on line.
This process will be explained here. For the rest of the submission process see the process as demonstrated.
15. Click on the possible entry button of Terms of Payment field.
16. Select the desired Terms of Payment from the list
PAYMENT TERM & INCOTERM
Technical attachments
E-TENDERING GUIDE FOR BIDDER
30
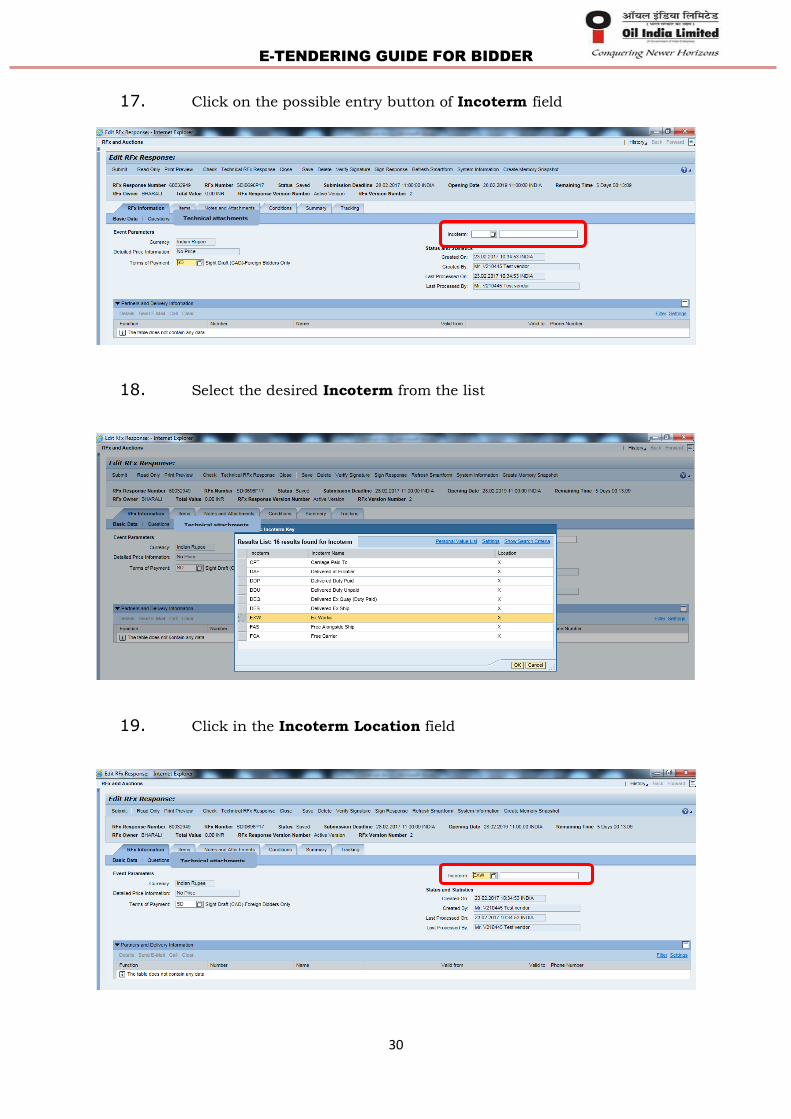
17. Click on the possible entry button of Incoterm field
18. Select the desired Incoterm from the list
19. Click in the Incoterm Location field
Technical attachments
Technical attachments
Technical attachments
E-TENDERING GUIDE FOR BIDDER
31
Technical attachments
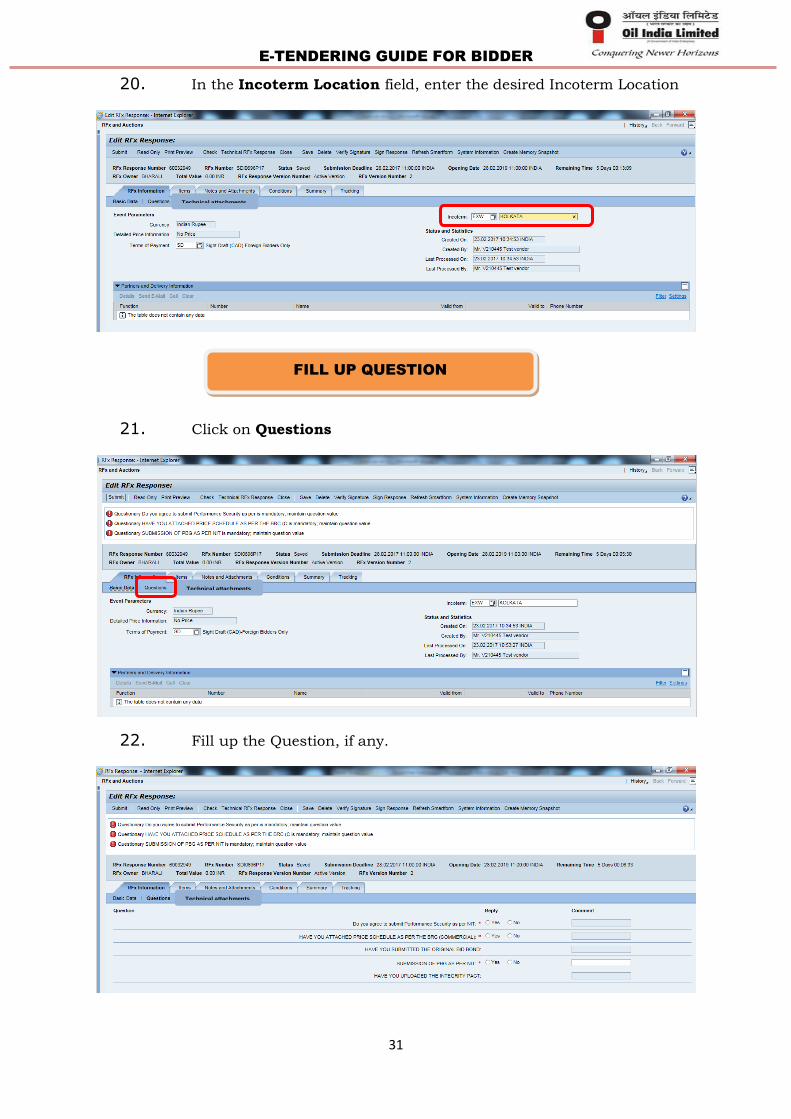
20. In the Incoterm Location field, enter the desired Incoterm Location
21. Click on Questions
22. Fill up the Question, if any.
FILL UP QUESTION
Technical attachments
Technical attachments

E-TENDERING GUIDE FOR BIDDER
32
NOTE: Sometime in some tender questions are not maintained. In such cases bidder may not require to fill any questions.
23. Technical Bid Upload: Technical files to be added under RFX Information >“Technical Attachments”
NOTES: a. System will allowed any file like doc, pdf, xls, jpg etc. b. Signed file should be less than 10 MB. However, it is advisable to
upload smaller file only.
24. Click “TECHNICAL ATTACHMENTS” under Rfx Information
Area for
upload
Technical Bid
UPLOAD TECHNICAL DOCUMENTS
Technical attachments
Technical attachments

E-TENDERING GUIDE FOR BIDDER
33
The area “TECHNICAL ATTACHMENTS” under “RFx Information” is used for uploading Techno –Commercial Un-price Bid Only. No price to be upload these are until and unless calls for particular tender.
25. Click “Add Attachment”
26. Screen after click add attachment
Technical attachments
Technical attachments
Technical attachments

E-TENDERING GUIDE FOR BIDDER
34
27. Click on the Browse field.
28. Select the file from the local PC [TECHNICAL BID]. Double-click on the
selected file. Please note the signed file less than 10 MB.
29. Fill up Description
Technical attachments
Technical attachments

E-TENDERING GUIDE FOR BIDDER
35
30. Click OK
31. Select the Digital Signature
Technical attachments
E-TENDERING GUIDE FOR BIDDER
36
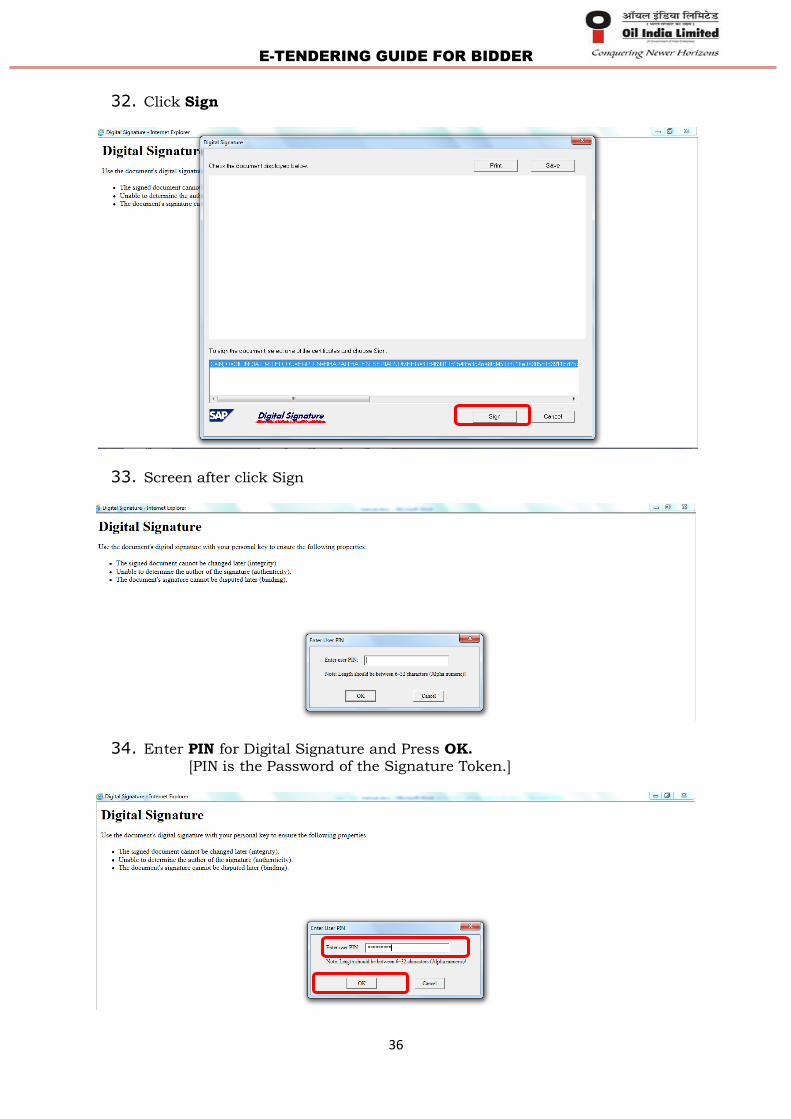
32. Click Sign
33. Screen after click Sign
34. Enter PIN for Digital Signature and Press OK.
[PIN is the Password of the Signature Token.]

E-TENDERING GUIDE FOR BIDDER
37
35. Documents Signed and Details of the Signer will be displayed. Press OK
36. Technical Documents Uploaded Successfully
37. The uploaded files should be displayed with file name. In the same way upload all the technical files one-by-one through the 'Add Attachment' button as explained. Once all the files are uploaded then click on the Save button & close the screen and reopen to edit.
Once the Document is
signed, signer details will
be displayed.
Press “OK”
Technical attachments
Technical attachments
E-TENDERING GUIDE FOR BIDDER
38
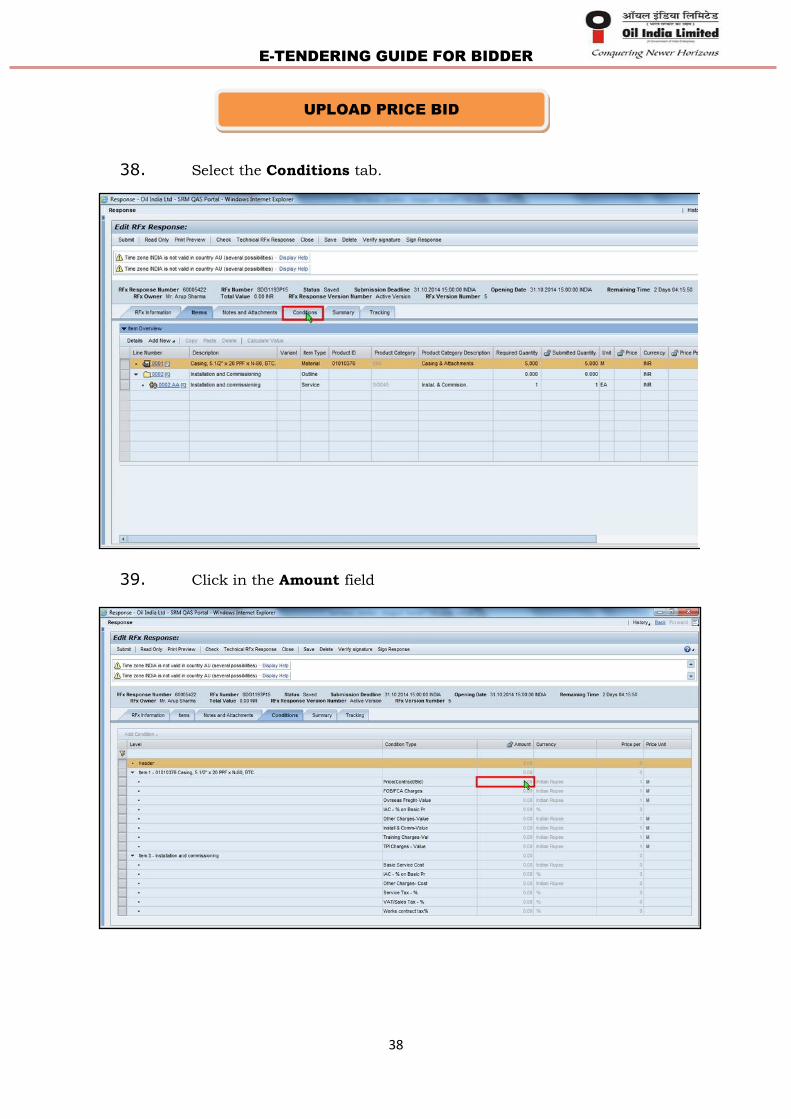
38. Select the Conditions tab.
39. Click in the Amount field
UPLOAD PRICE BID

E-TENDERING GUIDE FOR BIDDER
39
40.
In the Amount field, enter the desired Amount. In this case, enter "500000".
41
.
Click to drop down the Currency list.

E-TENDERING GUIDE FOR BIDDER
40
42.
Select the desired Currency from the list. In this case, select "United States Dollar"
43.
Click in the Amount field.

E-TENDERING GUIDE FOR BIDDER
41
44.
In the Amount field, enter the desired Amount. In this case, enter "500".
45.
Click to drop down the Currency list.

E-TENDERING GUIDE FOR BIDDER
42
46.
Select the desired Currency from the list. In this case, select "United States Dollar"
47.
Click in the Amount field.

E-TENDERING GUIDE FOR BIDDER
43
48.
In the Amount field, enter the desired Amount. In this case, enter "5000".
49.
Click in the Amount field.

E-TENDERING GUIDE FOR BIDDER
44
50.
In the Amount field, enter the desired Amount. In this case, enter "5000".
51.
Click to drop down the Currency list.

E-TENDERING GUIDE FOR BIDDER
45
52.
Select the desired Currency from the list. In this case, select "United States Dollar".
53.
Click in the Amount field.

E-TENDERING GUIDE FOR BIDDER
46
54.
In the Amount field, enter the desired Amount. In this case, enter "12.36".
55. If the “Details Price Information” of the Tender is “No Price” then Price to be filled up under Header “Notes & Attachment”
56. Click “Add Attachment”

E-TENDERING GUIDE FOR BIDDER
47
57. Screen after click Add Attachment
58. Click Browse and select the Price Bid file from the Computer
59. Select the file and double click on the same

E-TENDERING GUIDE FOR BIDDER
48
60. Fill up the Description and click “OK”
61. Select the Digital Signature and click Sign
E-TENDERING GUIDE FOR BIDDER
49
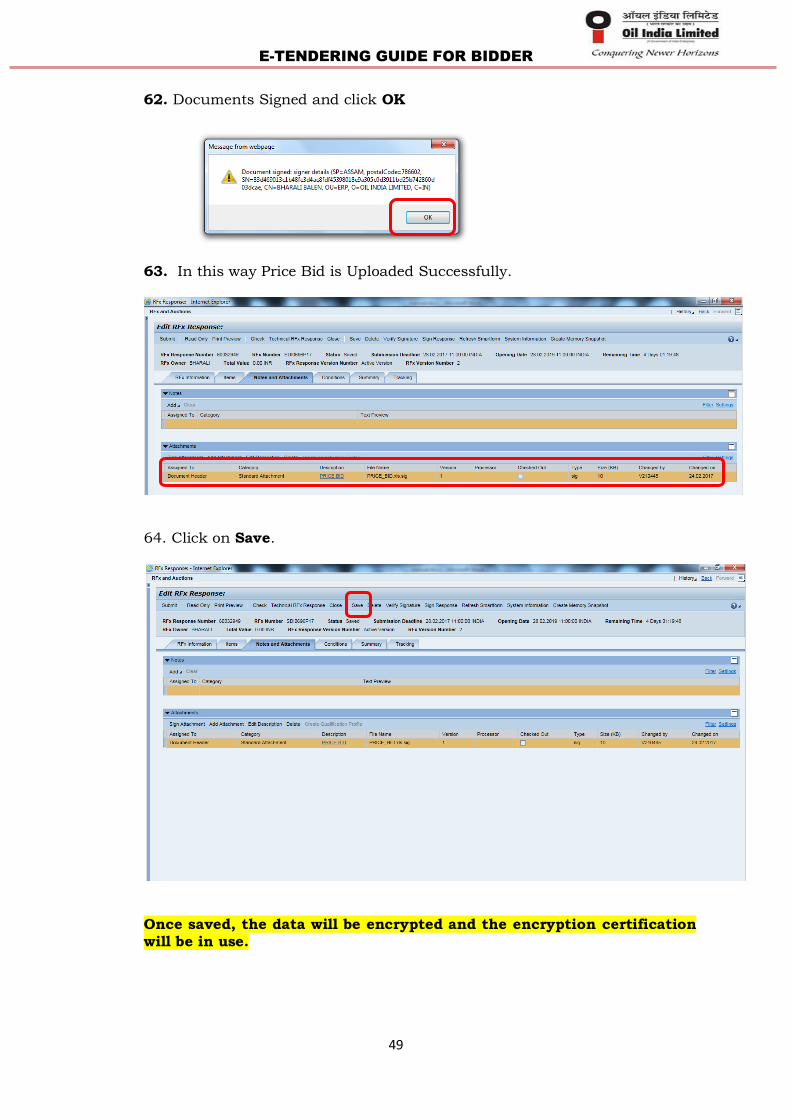
62. Documents Signed and click OK
63. In this way Price Bid is Uploaded Successfully.
64. Click on Save.
Once saved, the data will be encrypted and the encryption certification will be in use.
E-TENDERING GUIDE FOR BIDDER
50
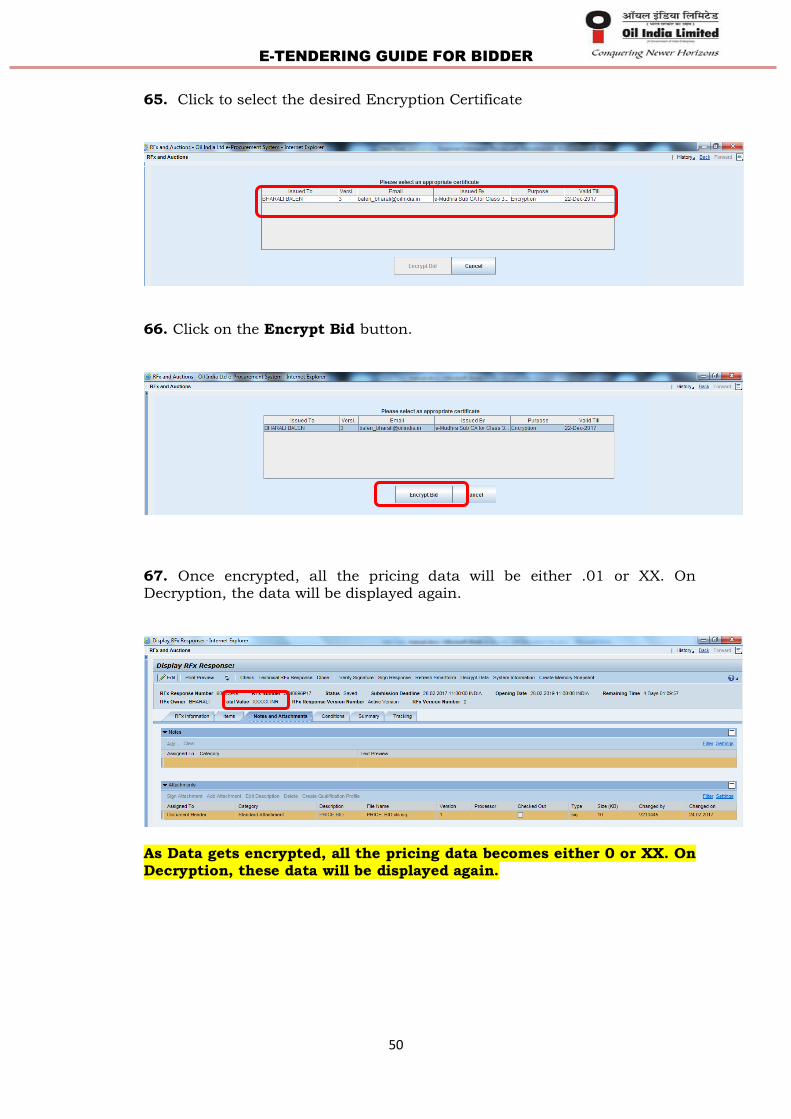
65. Click to select the desired Encryption Certificate
66. Click on the Encrypt Bid button.
67. Once encrypted, all the pricing data will be either .01 or XX. On Decryption, the data will be displayed again.
As Data gets encrypted, all the pricing data becomes either 0 or XX. On Decryption, these data will be displayed again.

E-TENDERING GUIDE FOR BIDDER
51
68. The encrypted Data will be displayed only when click “Decrypt data”
69. Click on “Close”
70. Click on Refresh
Now uploading part is complete. We have to come to the initial screen. It is always better to come to the first screen and refresh the page and
then going in into the response for the submission process.

E-TENDERING GUIDE FOR BIDDER
52
71. Click on the “Response No”
72. Click on Edit
73. Click to select the same encryption certificate used for De-cryption else data will not decrypt.
CHECK AND SUBMIT RESPONSE

E-TENDERING GUIDE FOR BIDDER
53
74. Click on the Decrypt Bid button
75. Enter PIN
76. Press OK
77. Click on “Check ”
E-TENDERING GUIDE FOR BIDDER
54
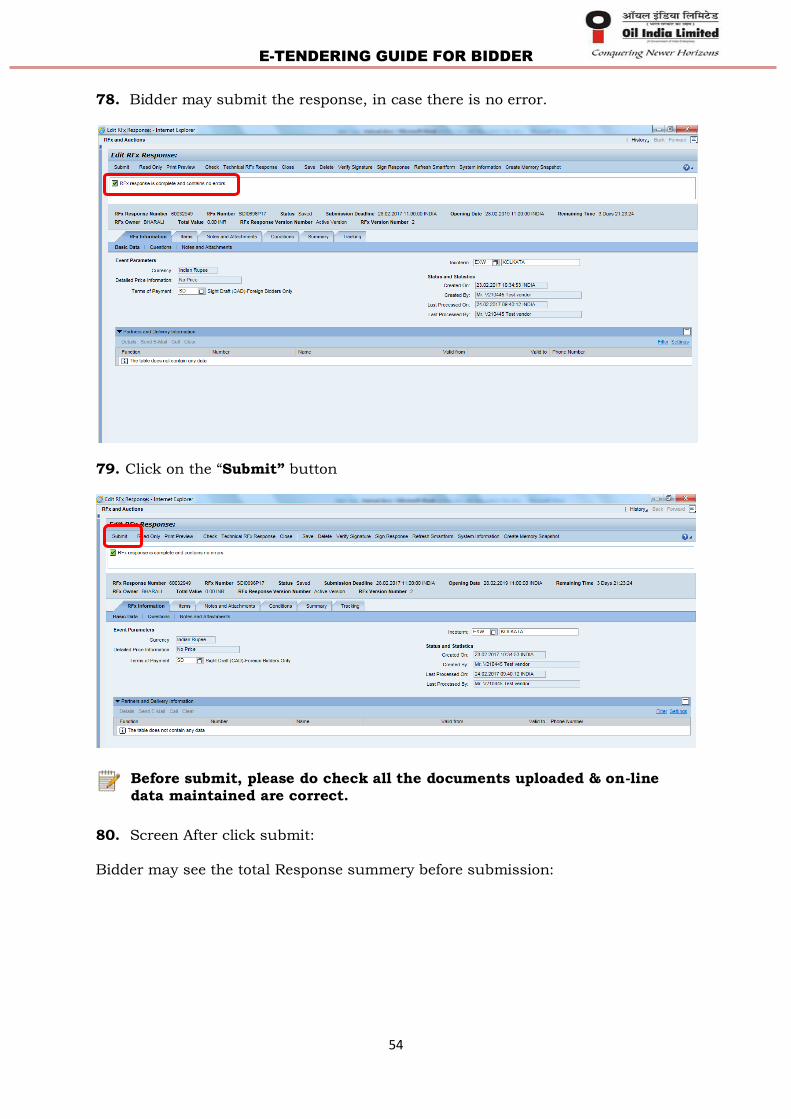
78. Bidder may submit the response, in case there is no error.
79. Click on the “Submit” button
Before submit, please do check all the documents uploaded & on-line data maintained are correct.
80. Screen After click submit: Bidder may see the total Response summery before submission:

E-TENDERING GUIDE FOR BIDDER
55
81. Select the Digital Signature and click “Sign”

E-TENDERING GUIDE FOR BIDDER
56
82. Documents Signed and Click OK
83. After signing, the response has to be Encrypted again.
84. Select the Encryption Certificate and Press Encrypt Bid
85. Click Close button

E-TENDERING GUIDE FOR BIDDER
57
86. Click on Refresh.
87. The Status of the Response must be submitted
This is the end of Response Submission with Encryption Key process.

E-TENDERING GUIDE FOR BIDDER
58
DISCLAIMER
It may be noted that this is an effort to help bidders with E-Tendering Guide for downloading/uploading of bids during e-bidding process. OIL does not stand responsible on failure to upload the e-bids successfully based on these
Instructions
(END OF THE DOCUMENT)