Embed Size (px)
Citation preview

SPOOKY BAKES & GHOULISH TREATS
Halloween

Baking can get a little serious around here, so this year we’ve teamed up with our sister brand, Dr. Oetker to dial up the fun and go all-out for Halloween!
While it’s tempting to stock up on spooky supermarket sweets for our little trick or treaters, we hope this collection of recipes inspires you to whip up something from scratch. With a little help from Dr. Oetker, adding a touch of macabre in the form of fondant horns, edible eyeballs or royal icing bones is scarily easy.
But perhaps you’re throwing a more grown-up haunted dinner party? Don’t panic - we’ve added a little Queen twist on the usual Halloween fare. These recipes certainly aren’t just for kids...
So Queen Bakers, gather up your ghouls and welcome in the witches with this creepy collection of sweet treats (not tricks) for your most delicious Halloween yet!
Happy baking,
Trick or treat, Queen Bakers?

Contents
Oozing Eyeball Marshmallow Slice 4
Gingerbread Skeletons 6
Devil Uni-horn Mini Cupcakes 10
Spooky Vanilla Panna Cotta Puddings 14
Spider Web Cheesecake 16
Claw Mark Cupcakes 20
Black Velvet Cobweb Cake 24
3

4
Oozing Eyeball Marshmallow Slice
SERV ES: 20 | PREP : 40 M I N | CO O K: 40 M I N
INGREDIENTS
Brownie Base1 ½ cups (330g) caster sugar
1 cup (125g) cocoa powder
Pinch of salt
180g butter, melted
2 large eggs, lightly whisked
2 tsp Queen Vanilla Bean Paste
¾ cup (110g) plain flour
¼ tsp baking powder
Queen Black Food Colour Gel
Marshmallow½ cup (125ml) water
2 sachets (24g) Dr. Oetker Gelatine
¼ cup (60ml) water
1 ½ cups (330g) caster sugar
2/3 cup (160ml/240g) Queen Glucose Syrup
2 tsp Queen Natural Peppermint Extract
Queen Green Food Colour Gel
300g Cadbury Dairy Milk Peppermint
METHOD
Brownie Base
Preheat oven to 160°C (fan forced). Grease and line a 16cm x 26cm brownie tin with baking paper allowing 2cm of baking paper to extend beyond the sides of the tin.
In a large bowl, combine sugar, cocoa powder and salt. Mix to combine and then gradually stir in melted butter. Add eggs, Black Food Colour Gel and Vanilla Bean Paste, mixing until just combined. Sift together flour and baking powder and add to mixture, mixing until just incorporated.
Pour batter into prepared tin, spreading evenly. Bake for 30 minutes. Allow to cool completely in tin before using a flat based cup to press the brownie down to forming a flat fudgy base for the marshmallow.
Marshmallow
Place ½ cup of water in the bowl of a stand mixer fitted with a whisk attachment and sprinkle over gelatine. Set aside.
In a medium saucepan, combine ¼ cup of water, sugar and glucose. Heat over low heat until sugar has dissolved then increase to medium heat until sugar reaches 115°C (soft ball stage).
Continued overleaf
Topped with fondant eyeballs and oozing green peppermint slime, this delicious slice is the perfect recipe to dial up your creepy baking game.

7
Oozing Eyeball Marhsmallow Slice
SERV ES: 20 | PREP : 40 M I N | CO O K: 40 M I N
INGREDIENTS
Topping200g dark cooking chocolate
2 tbsp vegetable oil
Dr. Oetker Ready to Roll Icing White
Dr. Oetker Ready to Roll Icing Black & Red
METHOD / Cont.
Marshmallow
With the stand mixer at a medium speed, carefully pour the hot sugar syrup down the side of the bowl (not over whisk attachment) into gelatine. Increase mixer to high and beat until mixture has tripled in volume and mixer bowl is no longer hot to the touch. Add Peppermint Extract and 20 drops Green Food Colour Gel, mixing to combine.
Working quickly with a spatula, spread marshmallow mixture over the base. Place pieces of peppermint filled chocolate over the surface of the marshmallow and set aside at room temperature for 3-4 hours or 1-2 hours in the fridge.
Topping
Combine chocolate and vegetable oil in a microwave safe bowl and heat in 30 second bursts, stirring in between until melted. Allow to cool slightly before pouring over marshmallow.
Roll pieces of white Ready to Roll Icing into balls of various sizes and press a small ball of black Ready to Roll Icing in the center. Roll small pieces of Red Ready to Roll Icing between your finger tips, creating a tapered end. Apply to eyeballs to create veins. Place all over slice, allow chocolate to set before cutting into pieces to serve.
Topped with fondant eyeballs and oozing green peppermint slime, this delicious slice is the perfect recipe to dial up your creepy baking game.
Before creating your eyeballs, be sure to knead Ready to Roll Icing until smooth and pliable to make it easier to work with.

8
Skeleton Gingerbread
SERV ES: 20 - 30 | PREP : 30 M I N + CH I L L I N G | CO O K: 10 M I N
INGREDIENTS
50g butter
130g brown sugar
½ cup (125ml/175g) treacle syrup
1 egg, lightly whisked
1 tsp Queen Vanilla Bean Paste
2 tsp ground cinnamon
Queen Black Food Colour Gel
2 ½ cups (375g) plain flour
2 tsp ground ginger
¾ tsp ground cloves
½ tsp bicarb soda
¼ tsp baking powder
Pinch of salt
Dr. Oetker Royal Icing, to decorate
Note: treacle syrup can be found in the baking and sugar supermarket aisle.
METHOD
In a small saucepan, place butter, sugar and treacle syrup over a low heat stirring, until butter has melted and sugar has dissolved. Pour into a large bowl and set aside to cool for 10 minutes.
Add egg, Vanilla Bean Paste and Black Food Colour Gel to butter mixture, stirring to combine. Sift flour, ginger, cinnamon, cloves, baking powder, bicarb soda and salt over the butter mixture and mix to form a dough. Turn out onto a lightly floured surface and knead until smooth. Shape into a disc, wrap in cling wrap and allow to rest in the fridge for 1 hour.
Preheat oven to 160°C (fan forced). Line two baking trays with baking paper. Divide the dough in two and cover one with cling film. Roll first batch of dough between two sheets of baking paper until 5mm thick. Cut cookies from the dough and place on prepared trays. Repeat with remaining dough. Bake for 5-6 minutes, allow up to 8-10 minutes for larger cookies. Allow to cool on trays for 5 minutes (longer for larger cookies) to cool before transferring to a wire to cool completely.
Using half the packet of Royal Icing (165g) prepare royal icing with 1 tablespoon of water (20ml) and mix according to packet directions. Spoon into a piping bag fitted with a 1mm tip to decorate.
Turn your everyday gingerbread people into spooky skeletons! A fun Halloween twist on a classic, these biscuits make a fun decorating project for kids.
If you don’t have a piping bag on hand, simply use a zip lock bag with the corner
snipped off.

11
Devil Uni-Horn Mini Cupcakes
SERV ES: 24 - 30 | PREP : 30 M I N | CO O K: 22 M I N
INGREDIENTS
Cupcakes2/3 cup (100g) plain flour
2 tbsp (20g) cocoa powder
140g caster sugar
1 ½ tsp baking powder
Pinch of salt
40g butter, room temperature
½ cup (125ml) milk
1 large egg
1 tsp Queen Vanilla Bean Paste
Queen Black Food Colour Gel
Swiss Meringue Buttercream 2 large (60g) egg whites
¾ cup (165g) caster sugar
Pinch of salt
180g unsalted butter, room temperature
2 tsp Unicorn Dream Flavour for Icing
Queen Red Food Colour Gel
Horns Dr. Oetker Ready to Roll Icing Black
METHOD
Cupcakes
Preheat oven to 160°C (fan forced). Line a 24-hole mini cupcake tin with cases.
In the bowl of a stand mixer fitted with a paddle attachment, add flour, cocoa, sugar, baking powder, salt and butter. Mix on low until a sandy consistency.
Combine egg, milk, Vanilla Bean Paste and Black Food Colour Gel a jug and whisk to combine. With the mixer on low, slowly pour wet mixture into dry ingredients, mixing until just combined.
Fill cupcake cases approx 2 tsp full and bake for 10-12 minutes or until cupcakes bounce back when lightly pressed. Allow to cool for 5 minutes before placing on a wire rack to cool completely.
Continued overleaf
When devils and unicorns collide! These naughty-but-nice cupcakes with fluffy Swiss meringue buttercream are perfect for a grown-up Halloween treat.

12
Devil Uni-Horn Mini Cupcakes
SERV ES: 24 - 30 | PREP : 30 M I N | CO O K: 22 M I N
TIPS
• Temperature is very important when making the buttercream. The egg white mixture needs to be hot enough to dissolve the sugar, but have cooled down enough before adding the butter.
• If the buttercream mixture splits, this is perfectly fine, just keep mixing until smooth.
METHOD / Cont.
Swiss Meringue Buttercream
Wipe the bowl of an electric mixer with vinegar to remove any traces of grease. Prepare a double boiler by placing the mixer bowl over a saucepan of simmering water, ensuring the bowl doesn’t touch the water.
Combine egg whites, sugar and salt in bowl of a stand mixer. Set over simmering water, stirring constantly with a spatula for approximately 10 minutes, until egg whites reach 80°C.
Transfer to stand mixer fitted with a whisk attachment and whip at high speed for 10 minutes, until meringue is glossy, stiff, and cool. With mixer running, add butter a tablespoon at a time. Do not worry if mixture splits, keep mixing.
Add Unicorn Dream Flavour for Icing and Red Food Colour Gel, mixing to combine. Spoon into piping bag fitted with a round piping tip, pipe onto cupcakes.
Knead Black Ready to Roll Icing until smooth and pliable. Roll between your fingers to create a tapered tip, then mold into devil horns and place onto cupcakes to serve.
When devils and unicorns collide! These naughty-but-nice cupcakes with fluffy Swiss meringue buttercream are perfect for a grown-up Halloween treat.
15
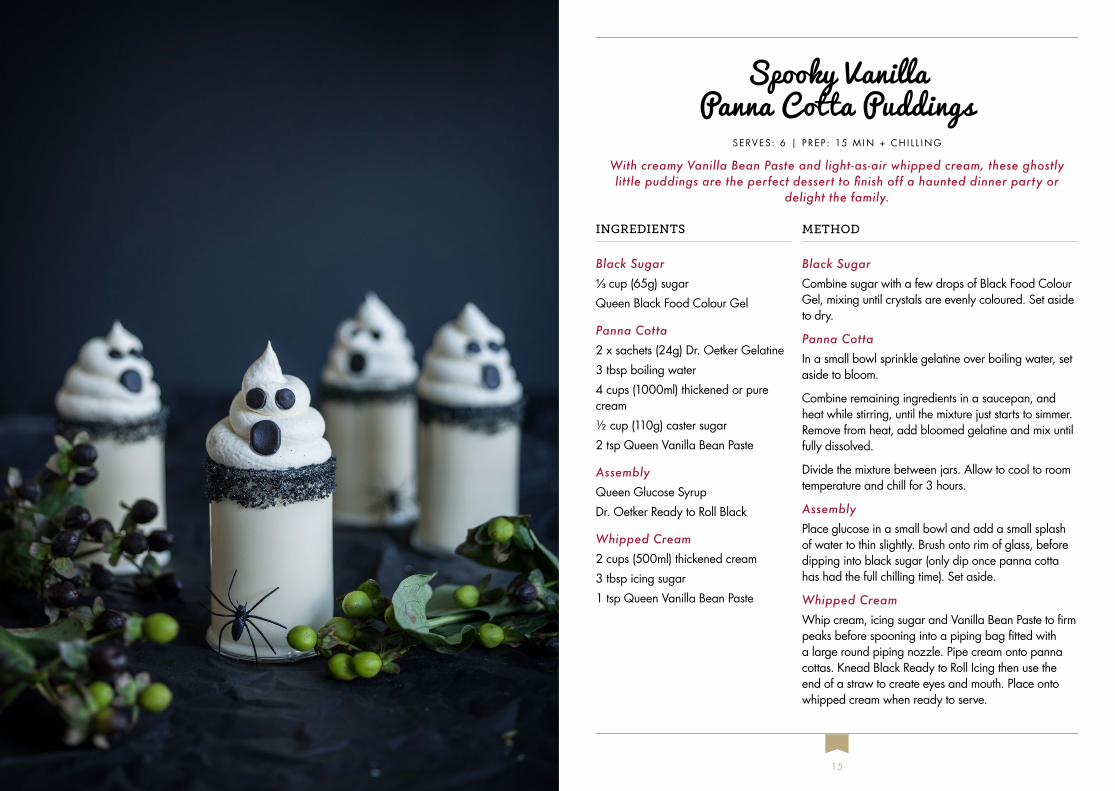
Spooky Vanilla Panna Cotta Puddings
SERV ES: 6 | PREP : 15 M I N + CH I L L I N G
INGREDIENTS
Black Sugar⅓ cup (65g) sugar
Queen Black Food Colour Gel
Panna Cotta2 x sachets (24g) Dr. Oetker Gelatine
3 tbsp boiling water
4 cups (1000ml) thickened or pure cream
½ cup (110g) caster sugar
2 tsp Queen Vanilla Bean Paste
AssemblyQueen Glucose Syrup
Dr. Oetker Ready to Roll Black
Whipped Cream2 cups (500ml) thickened cream
3 tbsp icing sugar
1 tsp Queen Vanilla Bean Paste
METHOD
Black Sugar Combine sugar with a few drops of Black Food Colour Gel, mixing until crystals are evenly coloured. Set aside to dry.
Panna Cotta In a small bowl sprinkle gelatine over boiling water, set aside to bloom.
Combine remaining ingredients in a saucepan, and heat while stirring, until the mixture just starts to simmer. Remove from heat, add bloomed gelatine and mix until fully dissolved.
Divide the mixture between jars. Allow to cool to room temperature and chill for 3 hours.
AssemblyPlace glucose in a small bowl and add a small splash of water to thin slightly. Brush onto rim of glass, before dipping into black sugar (only dip once panna cotta has had the full chilling time). Set aside.
Whipped CreamWhip cream, icing sugar and Vanilla Bean Paste to firm peaks before spooning into a piping bag fitted with a large round piping nozzle. Pipe cream onto panna cottas. Knead Black Ready to Roll Icing then use the end of a straw to create eyes and mouth. Place onto whipped cream when ready to serve.
With creamy Vanilla Bean Paste and light-as-air whipped cream, these ghostly little puddings are the perfect dessert to finish off a haunted dinner party or
delight the family.

16
Spider Web Cheesecake
SERV ES: 12 | PREP : 30 M I N + CH I L L I N G
INGREDIENTS
Crust180g Oreo cookies
90g butter, melted
Cheesecake400g cream cheese, softened
¾ cup (110g) icing sugar
2 tsp Queen Vanilla Bean Paste
500ml thickened cream, room temperature
¼ cup (60ml) boiling water
20g Dr. Oetker Gelatine
1 ½ tsp Queen Strawbr’y & Cream Flavour for Icing
100g dark cooking chocolate, melted
Queen Black Food Colour Gel
Dr. Oetker Ready to Roll Icing Black
METHOD
Crust
Grease and line the base of a 20cm round spring form cake tin. In a food processor, crush cookies to a fine crumb. Add melted butter and pulse to combine. Using the back of a spoon, flatten into prepared tin.
Cheesecake
In the bowl of a stand mixer fitted with the paddle attachment, mix cream cheese until smooth, add icing sugar and Vanilla Bean Paste, mixing to combine. Add half of the cream, mixing until smooth. Add remaining cream and mix well to combine. Sprinkle gelatine over boiling water and mix to dissolve. With the mixer running on low, add to cheesecake mixture down the side of the bowl in a thin stream and mix until well combined.
Set half of the mixture aside in a bowl. With the remaining mixture in the mixing bowl, add Strawb’ry & Cream Flavour for Icing, mixing to combine. Reserve ⅓ cup of the strawb’ry cheesecake mixture and keep covered away from any drafts to slow the setting. Pour the remaining strawbr’y mixture onto prepared base and place in the freezer, while you mix the chocolate layer.
Continued overleaf
With a decadent Oreo base and clever two-tone layers, your innocent guests will be easily snared by this deliciously creamy cheesecake web!
TIP: always add gelatine to water and not water to gelatine, as the latter will not mix smoothly.

19
Spider Web Cheesecake
SERV ES: 12 | PREP : 30 M I N + CH I L L I N G
TIPS
• If gelatine does not fully dissolve in boiling water, zap for 10 seconds in the microwave and mix until fully dissolved. Do not allow mixture to boil in microwave.
• If the cheesecake is left longer than 2-3 hours the black colour will start to leech into the lighter coloured web and layer, creating a green hue on the edges of the web and layer. This adds an extra spooky touch to the cheesecake, but if you prefer the white and black look, serve after the recommended chill time.
• If black mixture is looking a bit too thick to give a nice flat top, microwave in 10 second increments to soften it back up before pouring into tin
METHOD / Cont.
Melt dark chocolate in a microwave safe bowl in 30 second increments until melted. Mix through remaining half of the cream cheese mixture until combined. Add black food colour gel and mix to incorporate.
Remove cheesecake from freezer and pour over chocolate layer. Trasnsfer remaining ⅓ cup of cheesecake mixture into a piping bag and pipe 5 circles onto surface of cheesecake starting with a generous filled-in circle in the middle. Using a toothpick, drag through the cheesecake, starting from the center. Refrigerate for 2-3 hours until set.
Using Black Ready to Roll Icing, make a fondant spider by rolling a smaller ball for the head, and a slightly large ball for the abdomen. Use a toothpick to add texture to the abdomen. Finish by adding eight legs to the head portion of the spider and place on top of cheesecake.
With a decadent Oreo base and clever two-tone layers, your innocent guests will be easily snared by this deliciously creamy cheesecake web!

20
Claw Mark Cupcakes
SERV ES: 12 | PREP : 40 M I N | CO O K: 20 M I N
INGREDIENTS
Cupcakes 65g unsalted butter, at room temperature
2/3 cup (150g) caster sugar
1 large egg
1 tsp Queen Vanilla Bean Paste
½ cup (125ml) buttermilk
2 tbsp (20g) cocoa powder
1 cup (150g) plain flour
½ tsp salt
½ tsp bicarbonate of soda
1½ tsp white vinegar
Queen Red Food Colour Gel
Cream Cheese Filling 125g cream cheese, softened
¼ cup (40g) icing sugar
1 tbsp milk
½ tsp Queen Vanilla Bean Paste
METHOD
Cupcakes
Preheat oven to 160°C (fan forced). Line a 12 hole cupcake tin with cupcake liners.
In the bowl of a stand mixer fitted with the paddle attachment, cream butter and sugar until light and fluffy. Add egg and Vanilla Bean Paste, beat until incorporated.
In a separate bowl, soft together cocoa, flour, salt and bicarb soda. Set aside.
Reduce the mixer speed to low and slowly add half of the buttermilk. Add half of the flour mixture and mix until combined. Repeat the process with the remaining buttermilk and flour then add vinegar and Red Food Colour Gel, mixing until smooth.
Divide batter between cupcake liners and bake for 20 minutes, or until an inserted skewer comes out clean. Cool in tin for 10 minutes before transferring to a rack to cool completely.
Cream Cheese Filling
Using a hand mixer, beat cream cheese until smooth. Add icing sugar and milk, mixing until combined.
Continued overleaf
These creepy cupcakes might look terrifying, but they’re actually quite sweet! Slice them open to reveal a gory cream cheese filling.
Don’t skimp on the strawberry
jam ‘blood’, these cupcakes look even better a little messy!

23
INGREDIENTS / Cont.
Assembly½ cup strawberry jam
Queen Red Food Colour Gel
12 fresh or frozen raspberries, to fill cupcakes
TIPS
• Fondant icing is not suitable for chilling. Apply icing on the day you intend to eat them.
METHOD / Cont.
Assembly
Combine strawberry jam and a drop of Red Food Colour Gel. Set aside. Using a cupcake corer or a knife, cut out the middle of the cupcake, reserving the cores. Add some cream cheese filling and 1 raspberry, then top with core cut down to size.
Brush a light coating of jam onto top of cupcake to allow ready to roll icing to adhere.
Knead Ready to Roll Icing White until smooth and pliable. Roll out to 3-5mm thick and using a cookie cutter or bottom of glass with a knife, cut circles of similar size to the cupcakes, ensuring the cupcake is fully covered. Place on top of cupcakes and gently smooth with fingers. Using a sharp knife, cut 4 claw marks into the cupcakes. Using a toothpick, paint jam mixture into the claw marks.
Claw Mark Cupcakes
SERV ES: 12 | PREP : 40 M I N | CO O K: 20 M I N
These creepy cupcakes might look terrifying, but they’re actually quite sweet! Slice them open to reveal a gory cream cheese filling.

24
Black Velvet Cobweb Cake
SERV ES: 12 -14 | PREP : 30 M I N | CO O K: 90 M I N
INGREDIENTS
Cake250g unsalted butter, softened
1¼ cups (275g) caster sugar
2 tsp Queen Vanilla Bean Paste
3 large eggs
2 cups (300g) self raising flour, sifted
⅓ cup (35g) cocoa, sifted
1 cup (250ml) buttermilk
Queen Black Food Colour Gel
Buttercream250g unsalted butter, softened
3 cups (450g) icing sugar
½ tsp Queen Bubblegum Flavour for Icing
Queen Green Food Colour Gel
Queen Black Food Colour Gel
Assembly1 cup Halloween lollies of your choice (e.g. snakes, sour worms)
1 cup white marshmallows
METHOD
Cake
Preheat oven to 160°C (fan forced). Grease and line a deep 20cm round cake tin with baking paper.
Place butter, sugar and Vanilla Bean Paste in the bowl of a stand mixer fitted with the paddle attachment and beat for 8-10 minutes until pale and creamy. Add eggs one at a time, beating between each addition.
Sift flour, baking powder and cocoa over butter mixture, then add buttermilk and Black Food Colour Gel. Mix over low speed until just combined.
Pour into prepared tin and bake for 75-90 minutes until an inserted skewer comes out clean. Allow to cool for 30 minutes in the tin, then transfer to a cooling rack to cool completely.
Buttercream
Place butter in bowl of a stand mixer and beat on medium-high speed for 6-8 minutes until pale and fluffy.
With mixer off, sift in icing sugar and add Bubble Gum Flavour for Icing. With mixer on lowest speed, mix to combine then increase speed to high and beat until light and fluffy, approximately 2-3 minutes. Add Green and Black Food Colour Gel with a ratio of 2 drops green to 1 drop black, keep adding until you reach your desired shade.
Deliciously dense and moist, this creepy crawly cake is a Halloween show-stopper. Making the web can get a little sticky, but it’s well worth it for the end result!
This impressive cake has it all;
bubblegum-scented buttercream, sticky
marshmallow web and a sweet surprise inside!

27
TIPS
• Using chopped up lollies makes cutting the cake easier than using whole jelly snakes or worms.
• Add just enough black gel so that the cake is a deep dark grey, the cake will get darker as it bakes, turning it a spooky shade of black.
• The cake needs to be slightly chilled after icing so that the marshmallow sticks to the buttercream.
METHOD / Cont.
Assembly
Using a serrated knife, cut cake in half horizontally. Spread buttercream over first layer, place chopped up lollies (this makes cutting the cake easier than using whole jelly snakes or worms) over buttercream. Place second cake layer on top. Roughly crumb coat exterior of cake and place in fridge for 30 minutes to set.
In a microwave-safe bowl, melt marshmallows for 10 seconds and mix until smooth. Allow to cool slightly and mix until mixture becomes stringy. Once cool enough to handle, wear gloves or use your hands to pull and stretch melted marshmallow around cake in different directions.
Finish with plastic spiders for the full creepy effect!
Black Velvet Cobweb Cake
SERV ES: 12 -14 | PREP : 30 M I N | CO O K: 90 M I N
Deliciously dense and moist, this creepy crawly cake is a Halloween show-stopper. Making the web can get a little sticky, but it’s well worth it for the end result!
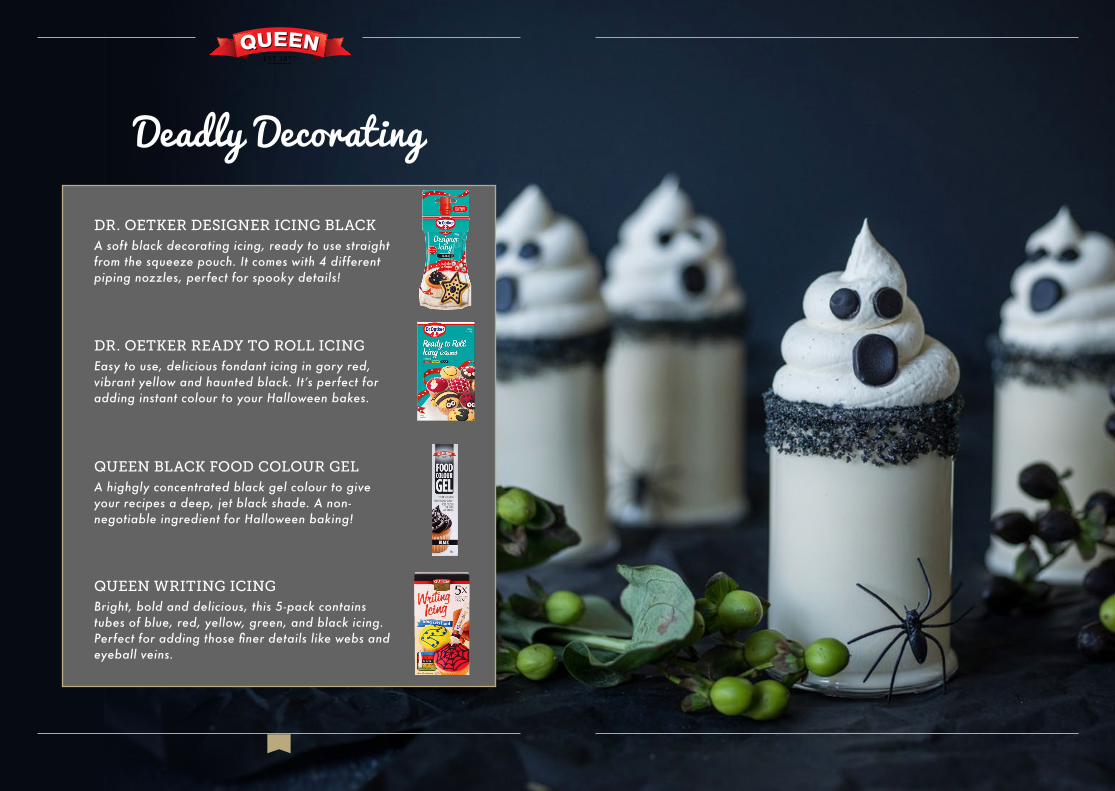
Deadly Decorating
DR. OETKER DESIGNER ICING BLACKA soft black decorating icing, ready to use straight from the squeeze pouch. It comes with 4 different piping nozzles, perfect for spooky details!
DR. OETKER READY TO ROLL ICINGEasy to use, delicious fondant icing in gory red, vibrant yellow and haunted black. It’s perfect for adding instant colour to your Halloween bakes.
QUEEN BLACK FOOD COLOUR GELA highgly concentrated black gel colour to give your recipes a deep, jet black shade. A non-negotiable ingredient for Halloween baking!
QUEEN WRITING ICINGBright, bold and delicious, this 5-pack contains tubes of blue, red, yellow, green, and black icing. Perfect for adding those finer details like webs and eyeball veins.

For more recipes and baking tips visit www.queen.com.au
HalloweenSPOOKY BAKES & GHOULISH TREATS