Embed Size (px)
Citation preview

Handy-Mag I
474 E. 105th StreetCleveland, OH 44108-1378
(216) 681-7400 • Fax (216) 681-7009www.clevelandsteeltool.com • [email protected]
800-446-4402

Table of Contents
Warranty ................................................................................................................ 1
Safety Precautions ................................................................................................ 2
General Information ............................................................................................... 3
Specifications ........................................................................................................ 3
Grounding Instructions/Extension Cords ............................................................... 4
Getting Started ...................................................................................................... 5
Before the Cut ....................................................................................................... 6
Making the Cut ...................................................................................................... 7
After the Cut .......................................................................................................... 7
Maintenance .......................................................................................................... 8
Troubleshooting ..................................................................................................... 9
Parts List......................................................................................................... 10-11
Parts Breakdown ................................................................................................. 13
Handy-Mag I

Handy-Mag I
WarrantyThe Cleveland Steel Tool Company will, within one (1) year of date of purchase, replace or repair F.O.B. the factory, any goods, which are defective in materials and workmanship provided that the buyer returns the defective goods, freight prepaid, to the seller, which shall be the buyer’s sole and exclusive remedy for the defective goods. THIS WARRANTY IS VOID IF YOU ATTEMPT REPAIRS YOURSELF. This warranty is void if the items have been damaged by accident, neglect, or other causes not arising out of defects in materials or workmanship. This warranty does not apply to machines and/or components which have been altered, changed or modified in any way, or subjected to use beyond recommended capacities and specifications. Electrical components are subject to respective manufacturer’s warranties. In no event shall The Cleveland Steel Tool Co. be liable for loss or damage resulting directly or indirectly from the use of merchandise or from any other cause. The Cleveland Steel Tool Co. is not liable for any costs incurred on such goods or consequential damages. No officer, employee or agent of the Cleveland Steel Tool Co. is authorized to make oral representations or warranty of fitness or to waive any of the foregoing terms of sales and none shall be binding on The Cleveland Steel Tool Co.
Proof of purchase date required
This warranty does not apply to machines and/or components which have been altered, changed or modified in any way, or subjected to use beyond seller recommended capacities and specifica-tions. In no event shall seller be liable for labor costs expended on such goods or consequential damages. Seller shall not be liable to the purchaser or any other person for loss, downtime, or damage directly or indirectly arising from the use of the goods from any other cause. The Cleve-land Steel Tool Co. reserves the right to make improvements and design modifications to the machine without prior notice.
_______________________________________________
Company Name
Date of Purchase_________Serial #___________________
1
1

2
Handy-Mag ISAFETY PRECAUTIONS
1. The operator of this machine should thoroughly understand this manual before starting any operation.
2. The area around the machine should be well lit, dry, and free from obstructions.
3. Wear eye and ear protection at all times.
4. All maintenance and repair work should be performed by a person familiar with the machine.
5. Do not use Handy-Mag I drilling machines on surfaces or materials being welded. Do ing so can damage the machine’s electrical components.
6. Disconnect the power from the machine before performing any maintenance or repair work. Turn power switch to the OFF position when changing tooling.
7. Always disconnect from the power source before moving. Be sure switches are off before connecting to a power source.
8. Magnet will not hold properly on thin materials (under 3/8”) or rough and dirty surfaces.
9. Always use safety chain and chip shield provided with machine.
10. Assure all tooling is properly held in position before starting any operation. Periodically check all tooling for tightness.
11. Do not use dull or broken cutters.
12. Keep tools sharp and clean for better and safer performance. Follow instructions for lubricating and changing accessories. Inspect tool cords periodically and if damaged, have repaired by authorized service facility. Inspect extension cords periodically and replace if damaged. Keep handles dry, clean and free from oil and grease.
13. Beware of slugs ejected at end of cut. They become HOT during the cut.
14. Keep bottom of magnet burr free and clear of chips and debris.
15. Drilling stacked material requires a special STACKED GEOMETRY cutter.

General InformationThe Cleveland Steel Tool Handy-Mag I is a lightweight, compact drilling system that features: • A capacity up to 1-1/2" diameter through 2” material *Drilling stacked material requires a special STACKED GEOMETRY cutter. • Positive slug ejection system • Internal cutter lubrication for increased tool life • Powerful motor with cast aluminum housing • Adjustable motor slide ways • Complete coolant system • Safety Chain • Chip shield • Rugged carrying case
SPECIFICATIONS:
• Annular cutter range: 7/16” thru 1-1/2” • Annular cutter depth range: 0-2” • Twist drill capacity: 1/2” • Weight: 26 lbs. • Height: 15” • Voltage: 110v AC only, 10 amps, 1200 watts, earth ground & double insulation • Frequency: 50-60 HZ • RPM No Load: 550 RPM • Magnetic Holding Deadlift: 2200 lbs. • Magnet dimensions: 6-1/2" x 3" footprint
3
Handy-Mag I

Warning:Improperly connecting the grounding wire can result in the risk of electrical shock. Check with a qualified electri-cian if you are in doubt as to whether the outlet is properly grounded. Do not modify the plug provided with tool. Never remove the grounding prong from the plug. Do not use tool if the cord or plug is damaged. Have it repaired before using. If the plug will not fit the outlet, have a proper outlet installed by a qualified electrician. The Handy-Mag I must be plugged into an appropriate outlet, properly installed and grounded in accordance with all codes and ordinances. The rigid ear or lug extending from the adapter must be connected to a permanent ground such as a properly grounded outlet box or receptacle. Simply remove the center screw from the outlet, insert the adapter and reattach the screw through the green grounding ear to the outlet. If in doubt of proper grounding, call a qualified electrician.
Handy-Mag IGrounding Instructions
Use only 3-wire extension cords that have 3-prong ground-ing type plugs and 3-pole receptacles that accept the tool’s plug. Replace or repair damaged cords. Make sure your ex-tension cord is in good condition. When using an extension cord, be sure to use one heavy enough to carry the current your product will draw. An undersized cord will cause a drop in line voltage resulting in loss of power and overheating. If in doubt, use the next heavier gage. The smaller the gage number, the heavier the cord.
Extension Cords
Drip Loop: To help prevent fluids from travel-ing the power cord and contacting the power source, tie a drip loop in the power cord.
4

Getting Started Your Handy-Mag I package should contain the following parts:
QTY Part# Description 1 Handy-Mag I 1 Carrying Case 1 Owners Manual 1 MEHTA44 Chuck Adapter 1 MEHTA51 1/2" Chuck 1 ME3517 Coolant connector 1 ME3542 Coolant Tank 1 ME3544 Coolant Tube 3 ME3562 Crank Handle 1 ME3577 Wrench 8mm 1 ME3578 2.5mm Hex Key 1 ME3579 4mm Hex Key 1 ME3582 Safety Guard 1 ME3583 Safety Chain
Assemble 3 crank handles (ME3562) to the crank spindle (ME3561). The crank spindle is mounted on the right side of the machine frame, if necessary it can be reversed for lefthand operation. Attach the coolant tube (ME3544) to the coolant tank (ME3542). Attach coolant tube (ME3544) to coolant connector (ME3517).
Handy-Mag I
What You Need To KnowType of material to be drilled, Brinell or Rockwell hardness, material thickness and position should all be determined to ensure proper selection of Handy-Mag I cutting tools, RPM, coolant and drilling time.
Remove any excessive mill scale or rust from the surface to be drilled.
When drilling materials under 3/8” thick, an additional steel plate may be required to achieve proper magnetic adhesion.
Drilling stacked material requires a special STACKED GEOMETRY cutter.
Material that has been flame cut may have become heat treated and therefore difficult to drill. Avoid drilling near such areas whenever possible.
Drilling with the Handy-Mag I in horizontal positions requires a special lubrication for Handy-Mag I cutters. Consult The Cleveland Steel Tool Co. for details.
5

Handy-Mag I
Before the Cut1. Select the correct pilot pin and place it in the cutter shank from the rear. Align the flats on the cutter shank with the arbor body set screws. Insert cutter shank into the arbor body.
2. Tighten the set screws securely on the cutter shank flats. Note: The set screws should be recessed in the arbor body when tight.
3. Place the Handy-Mag I machine on work piece with pilot pin over the center of hole to be drilled.
4. Connect machine to power source.
5. Lower Handy-Mag I cutter to surface of material to be cut. Fill coolant tank with a water soluble cool-ant. Open coolant tap (ME3543) to release coolant. Note:Coolant flow starts when pilot pin contacts work surface. Coolant flow can be stopped by lifting pin off work surface.
6. Safety chain must be securely fastened to machine and around the work being drilled. Note: Safety chain is intended only to secure drill to work piece in case of emergency, such as a loss of power to the magnetic base.
7. Attach safety guard (ME3582) to machine with butterfly screws (ME3581) and washers.
Caution! Do not use the Handy-Mag I for work other than it’s intended use.
The Handy-Mag I is designed to work only with the tooling provided.Use of other tooling may cause damage to the drill,
cause personal injury and void the warranty.
CAUTION: Always use safety chain. Failure to do so could result in personal injury and/or damage to the Handy-Mag I drilling machine.
6
Changing the Arbor to Optional Drill Chuck To convert the Handy-Mag I from annular cutters to twist drill chuck: 1. Unscrew arbor (ME3502) from motor spindle. 2. Remove the 3 arbor support screws and the arbor support bracket (ME3573). 3. Fit chuck adapter (MEHTA44) and drill chuck (MEHTA51) to motor spindle. NOTE: Store arbor and arbor support bracket in the carrying case. To convert back to annular cutters, reverse the process.

7
Handy-Mag I
Making the CutCAUTION: Always use chip shield.1. Move magnet switch to “On” position, panel lamp should illuminate indicating power is on. Magnetic base should be firmly secured to work piece at this time.
2. Start drill motor by depressing green motor “On” button.
3. Using the feed handles, advance cutter into material until Handy-Mag I cutter has established an external groove in the material, during the remainder of cut apply, smooth constant pressure without overloading motor. NOTE: Handy-Mag I cutters are designed for uninterrupted cutting, chips are evacuated during the cut. Do not peck drill when using Handy-Mag I cutters.
CAUTION: If drill motor should stall or stop before a complete cut is made, always shut the motor off and remove the cutter from the hole before attempt-ing to restart the motor. Failure to do so could result in personal injury and/or damage to the Handy-Mag I drilling machine or cutter.
After the Cut1. After the Handy-Mag I cutter has finished the cut, the “slug” or uncut center portion of material will be expelled when motor is returned to the full up position. Beware of slugs ejected at end of cut. They become HOT during the cut.
2. Return the machine to a full upright position and depress red motor “OFF “ button. Wait until motor completely stops.
3. Move magnet switch to “OFF” position when ready to release magnetic base from work surface.

8
Handy-Mag I
Maintenance1. Adjusting motor slide tension:The motor slide assembly may become loose and require adjustment after the machine has been in service. Wrenches are provided in the tool kit for performing adjustments. • Using the feed handles, position motor and slide assembly in the full up position. • Loosen 5 jam nuts (ME3548) and equally tighten 5 adjustment screws (ME3547) using 2.5mm and 8mm combination wrench and hex key. • Do not over tighten adjustment screws. Excessive slide tension can damage the machine. Properly adjusted, the motor/slide assembly should have no side to side movement and remain positioned without drifting down.
2. Inspecting magnet base:Keep bottom of magnet clean, free of chips, burrs, nicks, oil and other contaminants. Inspect magnet face to insure surface is flat and square. A worn magnet surface dramatically reduces magnetic holding force.
3. Lubricating motor slideways:Periodically clean and lubricate motor slide ways with lithium base grease.
4. Inspecting arbor support system:Visually inspect arbor, sleeve and support bracket for wear.
Caution: Always remove cutter from arbor body before measuring runout, never use hands or fingers to rotate arbor or motor spindle.
5. Checking arbor runout:Arbor runout should not exceed .0035 per revolution. This is most accurately measured by placing a dial indi-cators needle inside of arbor bore and rotating arbor while observing indicator.
6. Motor brush inspection:Inspect motor brushes and replace as needed during extended periods of heavy machine usage.
CAUTION: Never operate machine with worn or missing parts.

9
Handy-Mag I
Troubleshooting1. Magnetic base is not holding securely: • Material being drilled must be a minimum of 3/8" thick for proper magnetic adhesion. • Surface of material should be free of chips, debris, rust and mill scale. • Verify size of cutter. It should not exceed machines capacity. • Check magnet face for unevenness, nicks and burrs. • Welding equipment should not be connected to material being drilled.
2. Drill motor is running, arbor and spindle is not turning: • Spindle key (HM3506) could be sheared.
3. Motor slows when drilling: • Check extension cord requirements if one is being used. (pg. 4) • Excessive downfeed pressure during drilling cycle will cause motor to slow and overheat. • The cutting tool may need to be resharpened.
4. Coolant system not working: • Coolant system is gravity dependent. Machine must be in an upright position to operate properly. • Consistency of coolant mixture is too thick. • Check for the correct pilot pin.
5. Slugs not ejecting from cutter: • Lack of coolant can cause slugs to expand in cutter bore. • Check for correct pilot pin. • Check for broken internal arbor parts. *Drilling stacked material requires a special STACKED GEOMETRY cutter.
6. Breaking cutters: • Coolant must be applied to the interior of the cutter. • Excessive downfeed pressure when cutter contacts work surface can cause breaks. • Confirm material hardness. • Drilling stacked material with improper cutter. (Drilling stacked material requires special cutters) • Dull cutters and dull or chipped cutting edges require excessive feed pressure resulting in breakage. • Excessive arbor runout. (see pg.8 for maintenance) • Motor spindle is bent or there is a worn arbor sleeve. • Motor slide is improperly adjusted. (see pg.8)
7. Oversized or rough holes: • Insufficient coolant. • Excessive feed pressure. • Dull cutter. • Worn support bracket roller bearing or arbor body sleeve. • Bent motor spindle. • Motor slide improperly adjusted.

10
Handy-Mag I
Parts ListQTY
211111121211114111111121122244121
121112121111115521111121141121331
QTY
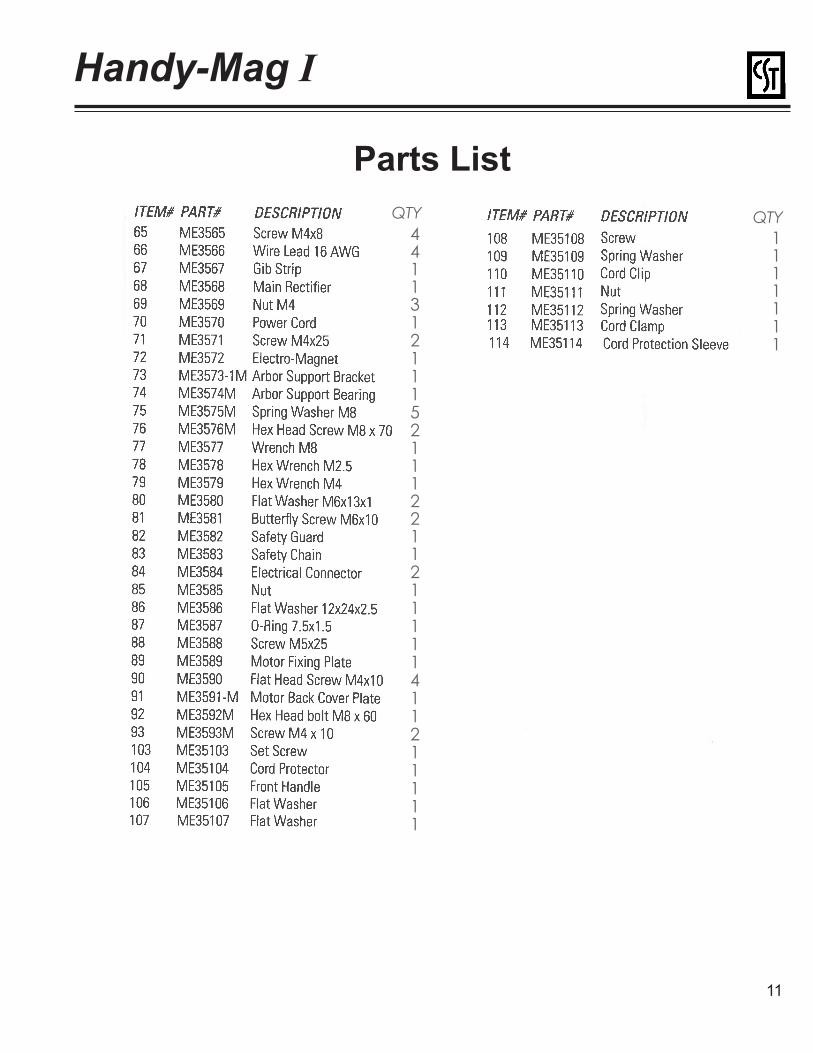
11
Handy-Mag I
Parts List
4411312111521112211211111411211111
QTY1111111
QTY

Part
s B
reak
dow
n
Han
dy-M
ag I