Embed Size (px)
Citation preview
Hard Disk Encryption
Client Administrator Guide
Version 9.5.1 Patch 1
© 2010 Symantec Corporation. All rights reserved.
1400 Fashion Island Boulevard, Suite 200San Mateo, CA 94404415.683.2200
GuardianEdge and Authenti-Check are either trademarks or registered trademarks of GuardianEdge Technologies Inc. (now part of Symantec). Microsoft, Active Directory, Windows Vista, Windows XP, and Windows 2000 are either registered trademarks or trademarks of Microsoft Corporation. Novell is a registered trademark of Novell, Inc. Any other trademarks used herein are the property of their respective owners and are hereby acknowledged. Other product and company names mentioned herein may be the trademarks of their respective owners.
Information in this document is subject to change without notice. Except as provided below, no part of this document may be reproduced or transmitted in any form or by any means, electronic or mechanical, for any purpose, without the express written permission of Symantec Corporation. For as long as you are permitted to use the Software, you are permitted to reproduce or modify this document, or otherwise integrate all or portions of the text of this document with other user documentation, for the sole and limited purpose of creating user documentation for your internal business purposes and not for further distribution. Any permitted use of this document by you shall retain the copyright and proprietary notices in substantially the form set forth above. No modifications or additions made by you to this document shall create, alter, or in any way increase the scope of any limited warranties of functionality or any other support obligations made by Symantec Corporation or otherwise alter the terms of any agreement regarding the Software between you and Symantec Corporation. To the extent that you modify this document or integrate it with other user documentation, you agree to provide Symantec Corporation with a copy upon request.
Printed in the United States of America.
Client Administrator Guide Contents
Contents
1. Introduction . . . . . . . . . . . . . . . . . . . . . . . . . . . . . . . . . . . . . . . . . . . . . . . . . . . . . . . . . . . . . . . . . . . . . . . . . . . . . . . . 1Overview. . . . . . . . . . . . . . . . . . . . . . . . . . . . . . . . . . . . . . . . . . . . . . . . . . . . . . . . . . . . . . . . . . . . . . . . . . . . . . . . . 1GuardianEdge Roles . . . . . . . . . . . . . . . . . . . . . . . . . . . . . . . . . . . . . . . . . . . . . . . . . . . . . . . . . . . . . . . . . . . . . . . . 1
Policy Administrator . . . . . . . . . . . . . . . . . . . . . . . . . . . . . . . . . . . . . . . . . . . . . . . . . . . . . . . . . . . . . . . . . . . . 1Client Administrator . . . . . . . . . . . . . . . . . . . . . . . . . . . . . . . . . . . . . . . . . . . . . . . . . . . . . . . . . . . . . . . . . . . . 1User . . . . . . . . . . . . . . . . . . . . . . . . . . . . . . . . . . . . . . . . . . . . . . . . . . . . . . . . . . . . . . . . . . . . . . . . . . . . . . . . . 2Client Administrator/Registered User Comparison . . . . . . . . . . . . . . . . . . . . . . . . . . . . . . . . . . . . . . . . . . . . 3
Best Practices . . . . . . . . . . . . . . . . . . . . . . . . . . . . . . . . . . . . . . . . . . . . . . . . . . . . . . . . . . . . . . . . . . . . . . . . . . . . . 3Partition Changes . . . . . . . . . . . . . . . . . . . . . . . . . . . . . . . . . . . . . . . . . . . . . . . . . . . . . . . . . . . . . . . . . . . . . . 3Boot-Time Defragmenters . . . . . . . . . . . . . . . . . . . . . . . . . . . . . . . . . . . . . . . . . . . . . . . . . . . . . . . . . . . . . . . 3System Restore Tools . . . . . . . . . . . . . . . . . . . . . . . . . . . . . . . . . . . . . . . . . . . . . . . . . . . . . . . . . . . . . . . . . . . 3Trusted Software . . . . . . . . . . . . . . . . . . . . . . . . . . . . . . . . . . . . . . . . . . . . . . . . . . . . . . . . . . . . . . . . . . . . . . . 4Local Administrator Privileges . . . . . . . . . . . . . . . . . . . . . . . . . . . . . . . . . . . . . . . . . . . . . . . . . . . . . . . . . . . . 4Computer Shutdown . . . . . . . . . . . . . . . . . . . . . . . . . . . . . . . . . . . . . . . . . . . . . . . . . . . . . . . . . . . . . . . . . . . . 4Password Security . . . . . . . . . . . . . . . . . . . . . . . . . . . . . . . . . . . . . . . . . . . . . . . . . . . . . . . . . . . . . . . . . . . . . . 4Frequent Information Backup . . . . . . . . . . . . . . . . . . . . . . . . . . . . . . . . . . . . . . . . . . . . . . . . . . . . . . . . . . . . . 4
2. Registration Prompts . . . . . . . . . . . . . . . . . . . . . . . . . . . . . . . . . . . . . . . . . . . . . . . . . . . . . . . . . . . . . . . . . . . . . . . . . 5Overview. . . . . . . . . . . . . . . . . . . . . . . . . . . . . . . . . . . . . . . . . . . . . . . . . . . . . . . . . . . . . . . . . . . . . . . . . . . . . . . . . 5The Prompts . . . . . . . . . . . . . . . . . . . . . . . . . . . . . . . . . . . . . . . . . . . . . . . . . . . . . . . . . . . . . . . . . . . . . . . . . . . . . . 5
Grace Restarts Available . . . . . . . . . . . . . . . . . . . . . . . . . . . . . . . . . . . . . . . . . . . . . . . . . . . . . . . . . . . . . . . . 5Registration Mandate . . . . . . . . . . . . . . . . . . . . . . . . . . . . . . . . . . . . . . . . . . . . . . . . . . . . . . . . . . . . . . . . . . . 6Multiple Users . . . . . . . . . . . . . . . . . . . . . . . . . . . . . . . . . . . . . . . . . . . . . . . . . . . . . . . . . . . . . . . . . . . . . . . . 6
3. Pre-Windows Authentication . . . . . . . . . . . . . . . . . . . . . . . . . . . . . . . . . . . . . . . . . . . . . . . . . . . . . . . . . . . . . . . . . . 7Overview. . . . . . . . . . . . . . . . . . . . . . . . . . . . . . . . . . . . . . . . . . . . . . . . . . . . . . . . . . . . . . . . . . . . . . . . . . . . . . . . . 7The Startup Screen . . . . . . . . . . . . . . . . . . . . . . . . . . . . . . . . . . . . . . . . . . . . . . . . . . . . . . . . . . . . . . . . . . . . . . . . . 7Keyboard Selection. . . . . . . . . . . . . . . . . . . . . . . . . . . . . . . . . . . . . . . . . . . . . . . . . . . . . . . . . . . . . . . . . . . . . . . . . 8Password Logons . . . . . . . . . . . . . . . . . . . . . . . . . . . . . . . . . . . . . . . . . . . . . . . . . . . . . . . . . . . . . . . . . . . . . . . . . . 9Token Logons . . . . . . . . . . . . . . . . . . . . . . . . . . . . . . . . . . . . . . . . . . . . . . . . . . . . . . . . . . . . . . . . . . . . . . . . . . . . 10Computer Lockout . . . . . . . . . . . . . . . . . . . . . . . . . . . . . . . . . . . . . . . . . . . . . . . . . . . . . . . . . . . . . . . . . . . . . . . . 11
About Lockouts . . . . . . . . . . . . . . . . . . . . . . . . . . . . . . . . . . . . . . . . . . . . . . . . . . . . . . . . . . . . . . . . . . . . . . 11Lockout Prevention . . . . . . . . . . . . . . . . . . . . . . . . . . . . . . . . . . . . . . . . . . . . . . . . . . . . . . . . . . . . . . . . . . . . 12Lockout Recovery . . . . . . . . . . . . . . . . . . . . . . . . . . . . . . . . . . . . . . . . . . . . . . . . . . . . . . . . . . . . . . . . . . . . . 13
4. Administrator Client Console . . . . . . . . . . . . . . . . . . . . . . . . . . . . . . . . . . . . . . . . . . . . . . . . . . . . . . . . . . . . . . . . . 16Overview. . . . . . . . . . . . . . . . . . . . . . . . . . . . . . . . . . . . . . . . . . . . . . . . . . . . . . . . . . . . . . . . . . . . . . . . . . . . . . . . 16Logon . . . . . . . . . . . . . . . . . . . . . . . . . . . . . . . . . . . . . . . . . . . . . . . . . . . . . . . . . . . . . . . . . . . . . . . . . . . . . . . . . . 16
Basics . . . . . . . . . . . . . . . . . . . . . . . . . . . . . . . . . . . . . . . . . . . . . . . . . . . . . . . . . . . . . . . . . . . . . . . . . . . . . . 16Password Logons . . . . . . . . . . . . . . . . . . . . . . . . . . . . . . . . . . . . . . . . . . . . . . . . . . . . . . . . . . . . . . . . . . . . . 17Token Logons . . . . . . . . . . . . . . . . . . . . . . . . . . . . . . . . . . . . . . . . . . . . . . . . . . . . . . . . . . . . . . . . . . . . . . . . 18
Home. . . . . . . . . . . . . . . . . . . . . . . . . . . . . . . . . . . . . . . . . . . . . . . . . . . . . . . . . . . . . . . . . . . . . . . . . . . . . . . . . . . 19Navigation. . . . . . . . . . . . . . . . . . . . . . . . . . . . . . . . . . . . . . . . . . . . . . . . . . . . . . . . . . . . . . . . . . . . . . . . . . . . . . . 20
User Interface Elements . . . . . . . . . . . . . . . . . . . . . . . . . . . . . . . . . . . . . . . . . . . . . . . . . . . . . . . . . . . . . . . . 20Mouse Navigation . . . . . . . . . . . . . . . . . . . . . . . . . . . . . . . . . . . . . . . . . . . . . . . . . . . . . . . . . . . . . . . . . . . . . 20Keyboard Navigation . . . . . . . . . . . . . . . . . . . . . . . . . . . . . . . . . . . . . . . . . . . . . . . . . . . . . . . . . . . . . . . . . . 21
Registered Users . . . . . . . . . . . . . . . . . . . . . . . . . . . . . . . . . . . . . . . . . . . . . . . . . . . . . . . . . . . . . . . . . . . . . . . . . . 21Drive Encryption. . . . . . . . . . . . . . . . . . . . . . . . . . . . . . . . . . . . . . . . . . . . . . . . . . . . . . . . . . . . . . . . . . . . . . . . . . 22
GuardianEdge Hard Disk Encryption iii
Client Administrator Guide Contents
Encryption . . . . . . . . . . . . . . . . . . . . . . . . . . . . . . . . . . . . . . . . . . . . . . . . . . . . . . . . . . . . . . . . . . . . . . . . . . . 22Decryption . . . . . . . . . . . . . . . . . . . . . . . . . . . . . . . . . . . . . . . . . . . . . . . . . . . . . . . . . . . . . . . . . . . . . . . . . . 23Check-In . . . . . . . . . . . . . . . . . . . . . . . . . . . . . . . . . . . . . . . . . . . . . . . . . . . . . . . . . . . . . . . . . . . . . . . . . . . . 25
About . . . . . . . . . . . . . . . . . . . . . . . . . . . . . . . . . . . . . . . . . . . . . . . . . . . . . . . . . . . . . . . . . . . . . . . . . . . . . . . . . . 27
5. Hard Disk Access & Recovery . . . . . . . . . . . . . . . . . . . . . . . . . . . . . . . . . . . . . . . . . . . . . . . . . . . . . . . . . . . . . . . . 28Overview. . . . . . . . . . . . . . . . . . . . . . . . . . . . . . . . . . . . . . . . . . . . . . . . . . . . . . . . . . . . . . . . . . . . . . . . . . . . . . . . 28Recovery Steps . . . . . . . . . . . . . . . . . . . . . . . . . . . . . . . . . . . . . . . . . . . . . . . . . . . . . . . . . . . . . . . . . . . . . . . . . . . 28
Basics . . . . . . . . . . . . . . . . . . . . . . . . . . . . . . . . . . . . . . . . . . . . . . . . . . . . . . . . . . . . . . . . . . . . . . . . . . . . . . 28Recover /A . . . . . . . . . . . . . . . . . . . . . . . . . . . . . . . . . . . . . . . . . . . . . . . . . . . . . . . . . . . . . . . . . . . . . . . . . . 28Drive Encryption Access Utility . . . . . . . . . . . . . . . . . . . . . . . . . . . . . . . . . . . . . . . . . . . . . . . . . . . . . . . . . . 29Hard Disk Consistency Check . . . . . . . . . . . . . . . . . . . . . . . . . . . . . . . . . . . . . . . . . . . . . . . . . . . . . . . . . . . 29Recover /D . . . . . . . . . . . . . . . . . . . . . . . . . . . . . . . . . . . . . . . . . . . . . . . . . . . . . . . . . . . . . . . . . . . . . . . . . . 30Recover /B . . . . . . . . . . . . . . . . . . . . . . . . . . . . . . . . . . . . . . . . . . . . . . . . . . . . . . . . . . . . . . . . . . . . . . . . . . 30
Appendix A. Novell Support . . . . . . . . . . . . . . . . . . . . . . . . . . . . . . . . . . . . . . . . . . . . . . . . . . . . . . . . . . . . . . . . . . . 32Overview. . . . . . . . . . . . . . . . . . . . . . . . . . . . . . . . . . . . . . . . . . . . . . . . . . . . . . . . . . . . . . . . . . . . . . . . . . . . . . . . 32SSO for Novell Not Enabled . . . . . . . . . . . . . . . . . . . . . . . . . . . . . . . . . . . . . . . . . . . . . . . . . . . . . . . . . . . . . . . . 32Turn On Feature Does Not Work . . . . . . . . . . . . . . . . . . . . . . . . . . . . . . . . . . . . . . . . . . . . . . . . . . . . . . . . . . . . . 33SSO Not Enabled . . . . . . . . . . . . . . . . . . . . . . . . . . . . . . . . . . . . . . . . . . . . . . . . . . . . . . . . . . . . . . . . . . . . . . . . . 33
Appendix B. Visually Impaired User Support . . . . . . . . . . . . . . . . . . . . . . . . . . . . . . . . . . . . . . . . . . . . . . . . . . . . . . 34Overview. . . . . . . . . . . . . . . . . . . . . . . . . . . . . . . . . . . . . . . . . . . . . . . . . . . . . . . . . . . . . . . . . . . . . . . . . . . . . . . . 34After Client Administrator Logon . . . . . . . . . . . . . . . . . . . . . . . . . . . . . . . . . . . . . . . . . . . . . . . . . . . . . . . . . . . . 34Double Registration . . . . . . . . . . . . . . . . . . . . . . . . . . . . . . . . . . . . . . . . . . . . . . . . . . . . . . . . . . . . . . . . . . . . . . . 34Multiple Users, Multiple Domains/Computer Names . . . . . . . . . . . . . . . . . . . . . . . . . . . . . . . . . . . . . . . . . . . . . 35
Appendix C. Keyboard Layouts . . . . . . . . . . . . . . . . . . . . . . . . . . . . . . . . . . . . . . . . . . . . . . . . . . . . . . . . . . . . . . . . . 36Overview. . . . . . . . . . . . . . . . . . . . . . . . . . . . . . . . . . . . . . . . . . . . . . . . . . . . . . . . . . . . . . . . . . . . . . . . . . . . . . . . 36Toggling Keyboard Layouts . . . . . . . . . . . . . . . . . . . . . . . . . . . . . . . . . . . . . . . . . . . . . . . . . . . . . . . . . . . . . . . . . 36Windows Keyboard Definition . . . . . . . . . . . . . . . . . . . . . . . . . . . . . . . . . . . . . . . . . . . . . . . . . . . . . . . . . . . . . . . 36
Windows 7 . . . . . . . . . . . . . . . . . . . . . . . . . . . . . . . . . . . . . . . . . . . . . . . . . . . . . . . . . . . . . . . . . . . . . . . . . . 36Windows Vista . . . . . . . . . . . . . . . . . . . . . . . . . . . . . . . . . . . . . . . . . . . . . . . . . . . . . . . . . . . . . . . . . . . . . . . 40Windows XP and Windows 2000 . . . . . . . . . . . . . . . . . . . . . . . . . . . . . . . . . . . . . . . . . . . . . . . . . . . . . . . . . 45
Appendix D. Token Usage & Error Messages . . . . . . . . . . . . . . . . . . . . . . . . . . . . . . . . . . . . . . . . . . . . . . . . . . . . . . 50Overview. . . . . . . . . . . . . . . . . . . . . . . . . . . . . . . . . . . . . . . . . . . . . . . . . . . . . . . . . . . . . . . . . . . . . . . . . . . . . . . . 50Token Usage . . . . . . . . . . . . . . . . . . . . . . . . . . . . . . . . . . . . . . . . . . . . . . . . . . . . . . . . . . . . . . . . . . . . . . . . . . . . . 50
Insertion . . . . . . . . . . . . . . . . . . . . . . . . . . . . . . . . . . . . . . . . . . . . . . . . . . . . . . . . . . . . . . . . . . . . . . . . . . . . 50Recognition . . . . . . . . . . . . . . . . . . . . . . . . . . . . . . . . . . . . . . . . . . . . . . . . . . . . . . . . . . . . . . . . . . . . . . . . . . 50
Error Messages . . . . . . . . . . . . . . . . . . . . . . . . . . . . . . . . . . . . . . . . . . . . . . . . . . . . . . . . . . . . . . . . . . . . . . . . . . . 51Pre-Windows Logon . . . . . . . . . . . . . . . . . . . . . . . . . . . . . . . . . . . . . . . . . . . . . . . . . . . . . . . . . . . . . . . . . . . 51Administrator Client Console Logon . . . . . . . . . . . . . . . . . . . . . . . . . . . . . . . . . . . . . . . . . . . . . . . . . . . . . . 53
Glossary . . . . . . . . . . . . . . . . . . . . . . . . . . . . . . . . . . . . . . . . . . . . . . . . . . . . . . . . . . . . . . . . . . . . . . . . . . . . . . . . . . . 55
Index . . . . . . . . . . . . . . . . . . . . . . . . . . . . . . . . . . . . . . . . . . . . . . . . . . . . . . . . . . . . . . . . . . . . . . . . . . . . . . . . . . . . . . 60
GuardianEdge Hard Disk Encryption iv
Client Administrator Guide Figures
GuardianEdge Hard Disk Encryption v
FiguresFigure 2.1—Registration Prompt, Grace Restarts Available . . . . . . . . . . . . . . . . . . . . . . . . . . . . . . . . . . . . . . . . . . . . 5Figure 2.2—Registration Prompt, Mandate . . . . . . . . . . . . . . . . . . . . . . . . . . . . . . . . . . . . . . . . . . . . . . . . . . . . . . . . . 6Figure 2.3—Registration Prompt, Multiple Users . . . . . . . . . . . . . . . . . . . . . . . . . . . . . . . . . . . . . . . . . . . . . . . . . . . . 6Figure 3.1—Pre-Windows Startup, Default . . . . . . . . . . . . . . . . . . . . . . . . . . . . . . . . . . . . . . . . . . . . . . . . . . . . . . . . . 8Figure 3.2—Keyboard Layout Bar . . . . . . . . . . . . . . . . . . . . . . . . . . . . . . . . . . . . . . . . . . . . . . . . . . . . . . . . . . . . . . . . 8Figure 3.3—Pre-Windows Logon, Password . . . . . . . . . . . . . . . . . . . . . . . . . . . . . . . . . . . . . . . . . . . . . . . . . . . . . . . . 9Figure 3.4—Pre-Windows Logon, One-Minute Delay for Incorrect Logon . . . . . . . . . . . . . . . . . . . . . . . . . . . . . . . 10Figure 3.5—Pre-Windows Logon, Token . . . . . . . . . . . . . . . . . . . . . . . . . . . . . . . . . . . . . . . . . . . . . . . . . . . . . . . . . . 10Figure 3.6—Pre-Windows Lockout Warning . . . . . . . . . . . . . . . . . . . . . . . . . . . . . . . . . . . . . . . . . . . . . . . . . . . . . . . 12Figure 3.7—Pre-Windows Lockout Message . . . . . . . . . . . . . . . . . . . . . . . . . . . . . . . . . . . . . . . . . . . . . . . . . . . . . . . 13Figure 3.8—Pre-Windows Client Administrator Lockout Recovery Logon, Password . . . . . . . . . . . . . . . . . . . . . . . 13Figure 3.9—Pre-Windows Client Administrator Lockout Recovery Logon, Token . . . . . . . . . . . . . . . . . . . . . . . . . 14Figure 4.1—Administrator Client Console Logon, Password . . . . . . . . . . . . . . . . . . . . . . . . . . . . . . . . . . . . . . . . . . 17Figure 4.2—Administrator Client Console Logon, Token . . . . . . . . . . . . . . . . . . . . . . . . . . . . . . . . . . . . . . . . . . . . . 18Figure 4.3—Select Certificate . . . . . . . . . . . . . . . . . . . . . . . . . . . . . . . . . . . . . . . . . . . . . . . . . . . . . . . . . . . . . . . . . . . 19Figure 4.4—Administrator Client Console Home . . . . . . . . . . . . . . . . . . . . . . . . . . . . . . . . . . . . . . . . . . . . . . . . . . . 19Figure 4.5—Administrator Client Console User Interface Elements . . . . . . . . . . . . . . . . . . . . . . . . . . . . . . . . . . . . . 20Figure 4.6—Administrator Client Console Registered Users Panel . . . . . . . . . . . . . . . . . . . . . . . . . . . . . . . . . . . . . . 22Figure 4.7—Administrator Client Console Encryption Panel . . . . . . . . . . . . . . . . . . . . . . . . . . . . . . . . . . . . . . . . . . 23Figure 4.8—Administrator Client Console Decryption Panel . . . . . . . . . . . . . . . . . . . . . . . . . . . . . . . . . . . . . . . . . . 24Figure 4.9—Administrator Client Console Check-In Panel, Unenforced Communication . . . . . . . . . . . . . . . . . . . . 25Figure 4.10—Administrator Client Console About Panel . . . . . . . . . . . . . . . . . . . . . . . . . . . . . . . . . . . . . . . . . . . . . 27Figure A.1—Novell GINA Authenticator . . . . . . . . . . . . . . . . . . . . . . . . . . . . . . . . . . . . . . . . . . . . . . . . . . . . . . . . . 32Figure C.1—Windows 7: Region and Language, Keyboards and Languages . . . . . . . . . . . . . . . . . . . . . . . . . . . . . . 37Figure C.2—Windows 7: Text Services and Input Languages, US English Keyboard . . . . . . . . . . . . . . . . . . . . . . . 37Figure C.3—Windows 7: Add Input Language . . . . . . . . . . . . . . . . . . . . . . . . . . . . . . . . . . . . . . . . . . . . . . . . . . . . . 38Figure C.4—Windows 7: Text Services and Input Languages, US English and French Keyboards . . . . . . . . . . . . . 38Figure C.5—Windows 7: Language Bar . . . . . . . . . . . . . . . . . . . . . . . . . . . . . . . . . . . . . . . . . . . . . . . . . . . . . . . . . . . 39Figure C.6—Windows 7: Region and Language, Administrative . . . . . . . . . . . . . . . . . . . . . . . . . . . . . . . . . . . . . . . 39Figure C.7—Windows 7: Welcome Screen and New User Accounts Settings . . . . . . . . . . . . . . . . . . . . . . . . . . . . . 40Figure C.8—Vista: Regional and Language Options, Keyboards and Languages . . . . . . . . . . . . . . . . . . . . . . . . . . . 41Figure C.9—Vista: Text Services and Input Languages, US English Keyboard . . . . . . . . . . . . . . . . . . . . . . . . . . . . 41Figure C.10—Vista: Add Input Language . . . . . . . . . . . . . . . . . . . . . . . . . . . . . . . . . . . . . . . . . . . . . . . . . . . . . . . . . 42Figure C.11—Vista: Text Services and Input Languages, US English and French Keyboards . . . . . . . . . . . . . . . . . 42Figure C.12—Vista: Language Bar . . . . . . . . . . . . . . . . . . . . . . . . . . . . . . . . . . . . . . . . . . . . . . . . . . . . . . . . . . . . . . 43Figure C.13—Vista: Regional and Language Options, Administrative . . . . . . . . . . . . . . . . . . . . . . . . . . . . . . . . . . . 43Figure C.14—Vista: Regional and Language Settings . . . . . . . . . . . . . . . . . . . . . . . . . . . . . . . . . . . . . . . . . . . . . . . . 44Figure C.15—XP/2000: Regional and Language Options, Languages . . . . . . . . . . . . . . . . . . . . . . . . . . . . . . . . . . . 45Figure C.16—XP/2000: Text Services and Input Languages, US English Keyboard . . . . . . . . . . . . . . . . . . . . . . . . 46Figure C.17—XP/2000: Add Input Language . . . . . . . . . . . . . . . . . . . . . . . . . . . . . . . . . . . . . . . . . . . . . . . . . . . . . . 46Figure C.18—XP/2000: Text Services and Input Languages, US English and French Keyboards . . . . . . . . . . . . . . 47Figure C.19—XP: Regional and Language Options, Advanced . . . . . . . . . . . . . . . . . . . . . . . . . . . . . . . . . . . . . . . . 48Figure C.20—XP: Change Default User Settings Warning . . . . . . . . . . . . . . . . . . . . . . . . . . . . . . . . . . . . . . . . . . . . 48
Client Administrator Guide Introduction
1. Introduction
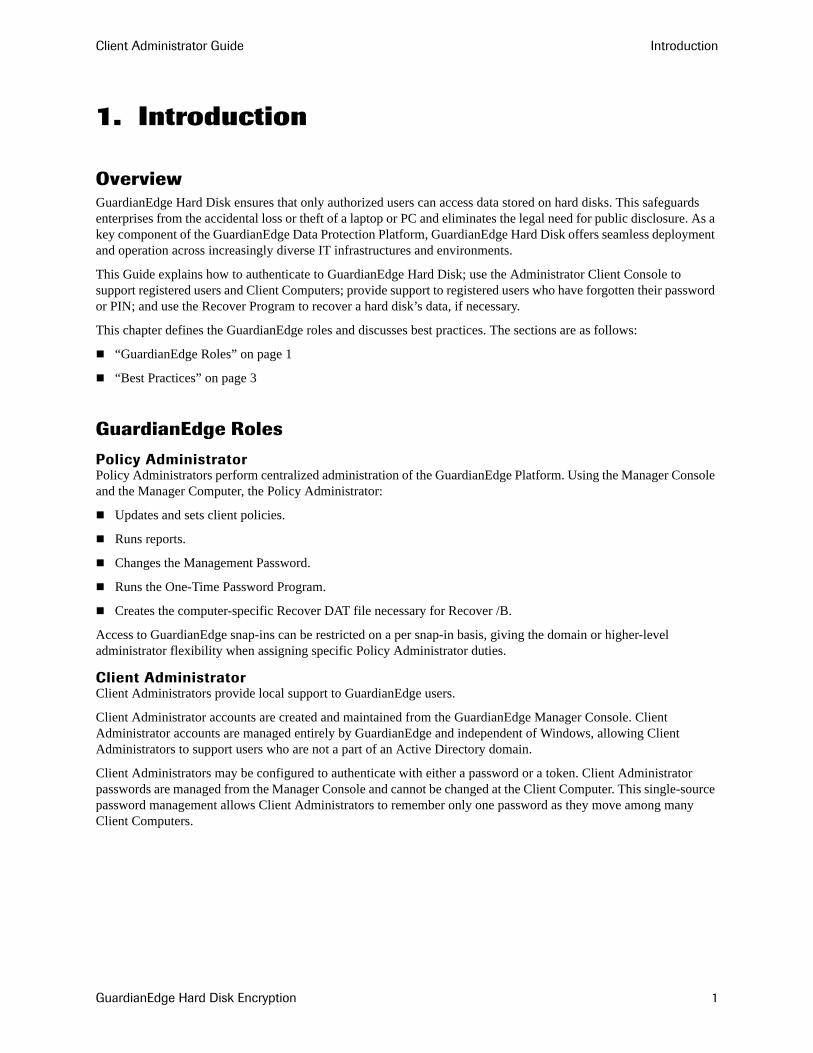
OverviewGuardianEdge Hard Disk ensures that only authorized users can access data stored on hard disks. This safeguards enterprises from the accidental loss or theft of a laptop or PC and eliminates the legal need for public disclosure. As a key component of the GuardianEdge Data Protection Platform, GuardianEdge Hard Disk offers seamless deployment and operation across increasingly diverse IT infrastructures and environments.
This Guide explains how to authenticate to GuardianEdge Hard Disk; use the Administrator Client Console to support registered users and Client Computers; provide support to registered users who have forgotten their password or PIN; and use the Recover Program to recover a hard disk’s data, if necessary.
This chapter defines the GuardianEdge roles and discusses best practices. The sections are as follows:
“GuardianEdge Roles” on page 1
“Best Practices” on page 3
GuardianEdge Roles
Policy AdministratorPolicy Administrators perform centralized administration of the GuardianEdge Platform. Using the Manager Console and the Manager Computer, the Policy Administrator:
Updates and sets client policies.
Runs reports.
Changes the Management Password.
Runs the One-Time Password Program.
Creates the computer-specific Recover DAT file necessary for Recover /B.
Access to GuardianEdge snap-ins can be restricted on a per snap-in basis, giving the domain or higher-level administrator flexibility when assigning specific Policy Administrator duties.
Client AdministratorClient Administrators provide local support to GuardianEdge users.
Client Administrator accounts are created and maintained from the GuardianEdge Manager Console. Client Administrator accounts are managed entirely by GuardianEdge and independent of Windows, allowing Client Administrators to support users who are not a part of an Active Directory domain.
Client Administrators may be configured to authenticate with either a password or a token. Client Administrator passwords are managed from the Manager Console and cannot be changed at the Client Computer. This single-source password management allows Client Administrators to remember only one password as they move among many Client Computers.
GuardianEdge Hard Disk Encryption 1
Client Administrator Guide Introduction
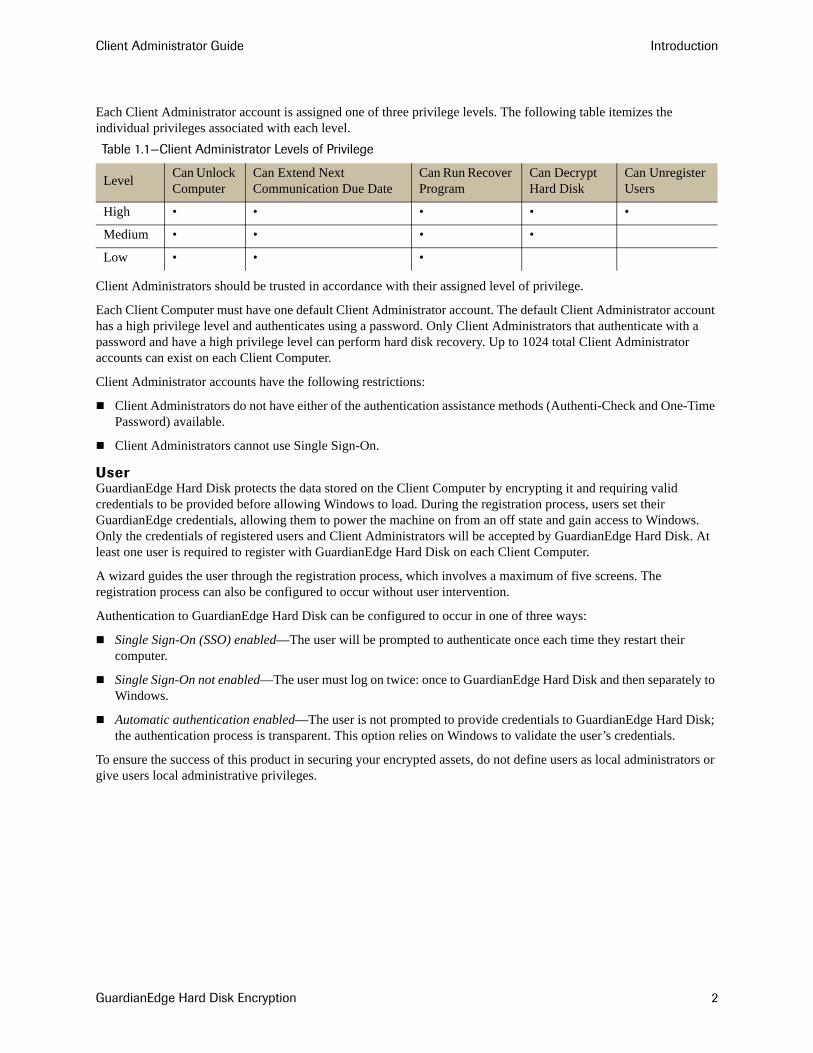
Each Client Administrator account is assigned one of three privilege levels. The following table itemizes the individual privileges associated with each level.
Client Administrators should be trusted in accordance with their assigned level of privilege.
Each Client Computer must have one default Client Administrator account. The default Client Administrator account has a high privilege level and authenticates using a password. Only Client Administrators that authenticate with a password and have a high privilege level can perform hard disk recovery. Up to 1024 total Client Administrator accounts can exist on each Client Computer.
Client Administrator accounts have the following restrictions:
Client Administrators do not have either of the authentication assistance methods (Authenti-Check and One-Time Password) available.
Client Administrators cannot use Single Sign-On.
UserGuardianEdge Hard Disk protects the data stored on the Client Computer by encrypting it and requiring valid credentials to be provided before allowing Windows to load. During the registration process, users set their GuardianEdge credentials, allowing them to power the machine on from an off state and gain access to Windows. Only the credentials of registered users and Client Administrators will be accepted by GuardianEdge Hard Disk. At least one user is required to register with GuardianEdge Hard Disk on each Client Computer.
A wizard guides the user through the registration process, which involves a maximum of five screens. The registration process can also be configured to occur without user intervention.
Authentication to GuardianEdge Hard Disk can be configured to occur in one of three ways:
Single Sign-On (SSO) enabled—The user will be prompted to authenticate once each time they restart their computer.
Single Sign-On not enabled—The user must log on twice: once to GuardianEdge Hard Disk and then separately to Windows.
Automatic authentication enabled—The user is not prompted to provide credentials to GuardianEdge Hard Disk; the authentication process is transparent. This option relies on Windows to validate the user’s credentials.
To ensure the success of this product in securing your encrypted assets, do not define users as local administrators or give users local administrative privileges.
Table 1.1—Client Administrator Levels of Privilege
Level Can Unlock Computer
Can Extend Next Communication Due Date
Can Run Recover Program
Can Decrypt Hard Disk
Can Unregister Users
High • • • • •
Medium • • • •
Low • • •
GuardianEdge Hard Disk Encryption 2
Client Administrator Guide Introduction
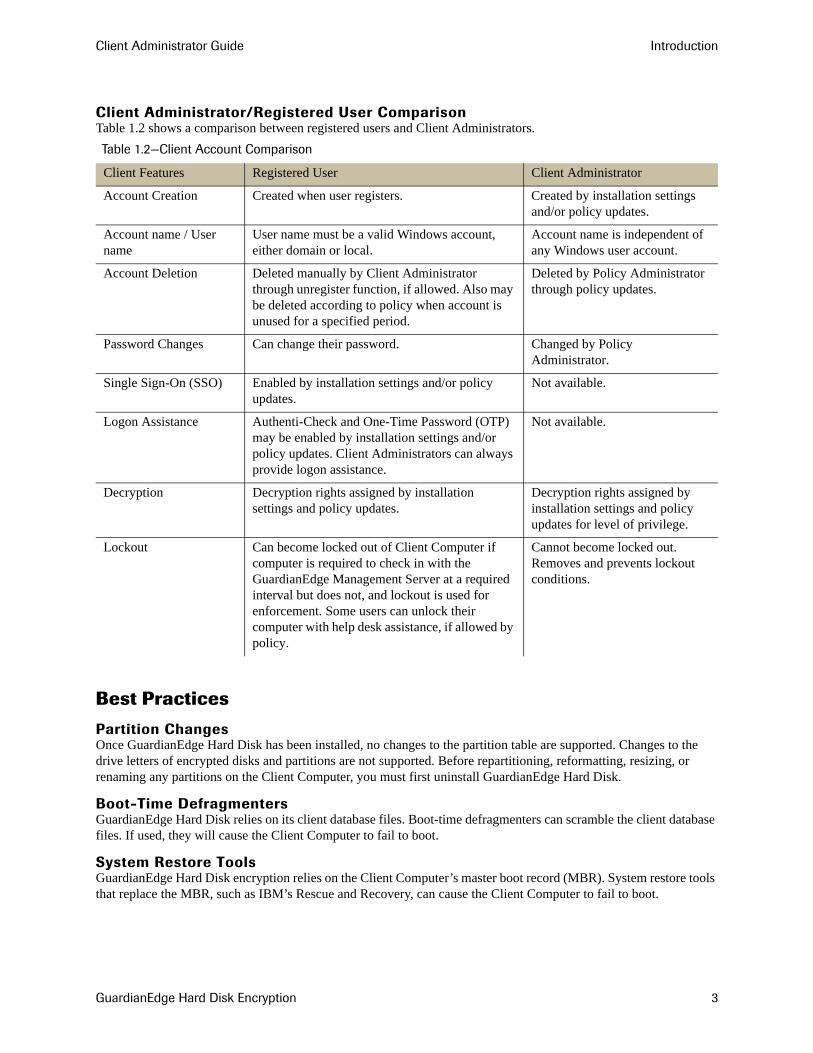
Client Administrator/Registered User ComparisonTable 1.2 shows a comparison between registered users and Client Administrators.
Best Practices
Partition ChangesOnce GuardianEdge Hard Disk has been installed, no changes to the partition table are supported. Changes to the drive letters of encrypted disks and partitions are not supported. Before repartitioning, reformatting, resizing, or renaming any partitions on the Client Computer, you must first uninstall GuardianEdge Hard Disk.
Boot-Time DefragmentersGuardianEdge Hard Disk relies on its client database files. Boot-time defragmenters can scramble the client database files. If used, they will cause the Client Computer to fail to boot.
System Restore ToolsGuardianEdge Hard Disk encryption relies on the Client Computer’s master boot record (MBR). System restore tools that replace the MBR, such as IBM’s Rescue and Recovery, can cause the Client Computer to fail to boot.
Table 1.2—Client Account Comparison
Client Features Registered User Client Administrator
Account Creation Created when user registers. Created by installation settings and/or policy updates.
Account name / User name
User name must be a valid Windows account, either domain or local.
Account name is independent of any Windows user account.
Account Deletion Deleted manually by Client Administrator through unregister function, if allowed. Also may be deleted according to policy when account is unused for a specified period.
Deleted by Policy Administrator through policy updates.
Password Changes Can change their password. Changed by Policy Administrator.
Single Sign-On (SSO) Enabled by installation settings and/or policy updates.
Not available.
Logon Assistance Authenti-Check and One-Time Password (OTP) may be enabled by installation settings and/or policy updates. Client Administrators can always provide logon assistance.
Not available.
Decryption Decryption rights assigned by installation settings and policy updates.
Decryption rights assigned by installation settings and policy updates for level of privilege.
Lockout Can become locked out of Client Computer if computer is required to check in with the GuardianEdge Management Server at a required interval but does not, and lockout is used for enforcement. Some users can unlock their computer with help desk assistance, if allowed by policy.
Cannot become locked out. Removes and prevents lockout conditions.
GuardianEdge Hard Disk Encryption 3
Client Administrator Guide Introduction
Trusted SoftwareFirewalls and anti-virus software should be installed on Client Computers to protect against viruses and secure computers against invasive software that arrives over the network, such as a Trojan horse. File sharing, peer-to-peer networks, and FTP servers are not recommended. Network logon scripts must be approved scripts. If remote access to stored data is allowed, users with remote access must be required to authenticate.
Local Administrator PrivilegesUsers should not be defined as local administrators or given local administrative privileges.
Computer ShutdownIt is best not to leave a computer unattended, particularly in an insecure location, such as a cafe. If you must step away, you should at least press the Windows logo key+L to invoke the Windows logon. For GuardianEdge Hard Disk protection, the computer must be powered down.
Password SecurityClient Administrators and users that authenticate using a password should not share their passwords with anyone else and should avoid writing them down. They should be aware of others watching over his/her shoulder as they type their password. If this has happened, the password should be changed.
Frequent Information BackupUser data as well as log files should be backed up on a regular basis. This will allow users to recover from theft or hard disk failure. The user data backups should be physically protected or encrypted.
GuardianEdge Hard Disk Encryption 4
Client Administrator Guide Registration Prompts
2. Registration Prompts
OverviewOne of the first signs that GuardianEdge Hard Disk has been installed is a prompt for account registration.
If at least one user has registered, you do not need to register and can dismiss any registration prompts. Your Client Administrator credentials are sufficient to authenticate you to the GuardianEdge Platform, to launch the Administrator Client Console, and to allow you to move among Client Computers to support registered users.
You may want to register as a user to increase the security of the computer if no other user has registered.
If you register for a registered user account, you will have two valid accounts for accessing GuardianEdge Hard Disk: your Client Administrator account and your registered user account.
You can unregister your registered user account later using the Administrator Client Console, if your privilege level permits. Each Client Computer has a maximum number of registered users allowed. By unregistering your account you free up a slot for someone else to register.
See the User Guide for information on the registration process, on using the User Client Console, and on performing other registered user tasks.
The Prompts
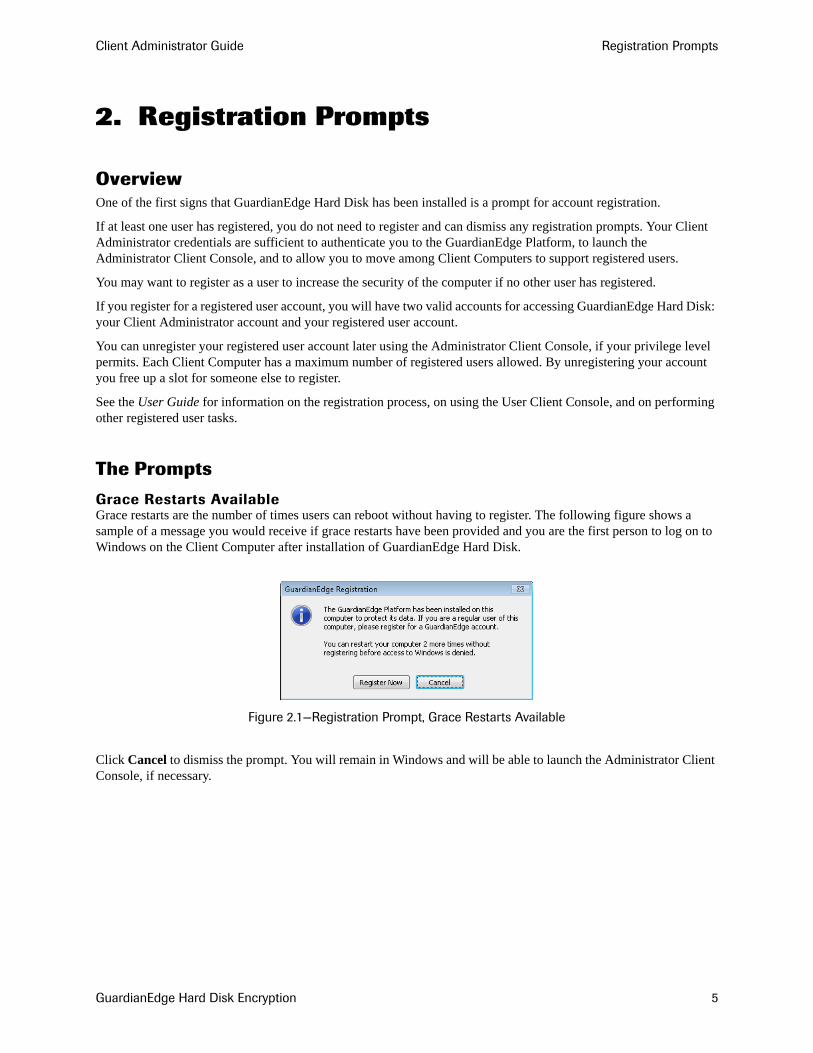
Grace Restarts AvailableGrace restarts are the number of times users can reboot without having to register. The following figure shows a sample of a message you would receive if grace restarts have been provided and you are the first person to log on to Windows on the Client Computer after installation of GuardianEdge Hard Disk.
Figure 2.1—Registration Prompt, Grace Restarts Available
Click Cancel to dismiss the prompt. You will remain in Windows and will be able to launch the Administrator Client Console, if necessary.
GuardianEdge Hard Disk Encryption 5
Client Administrator Guide Registration Prompts
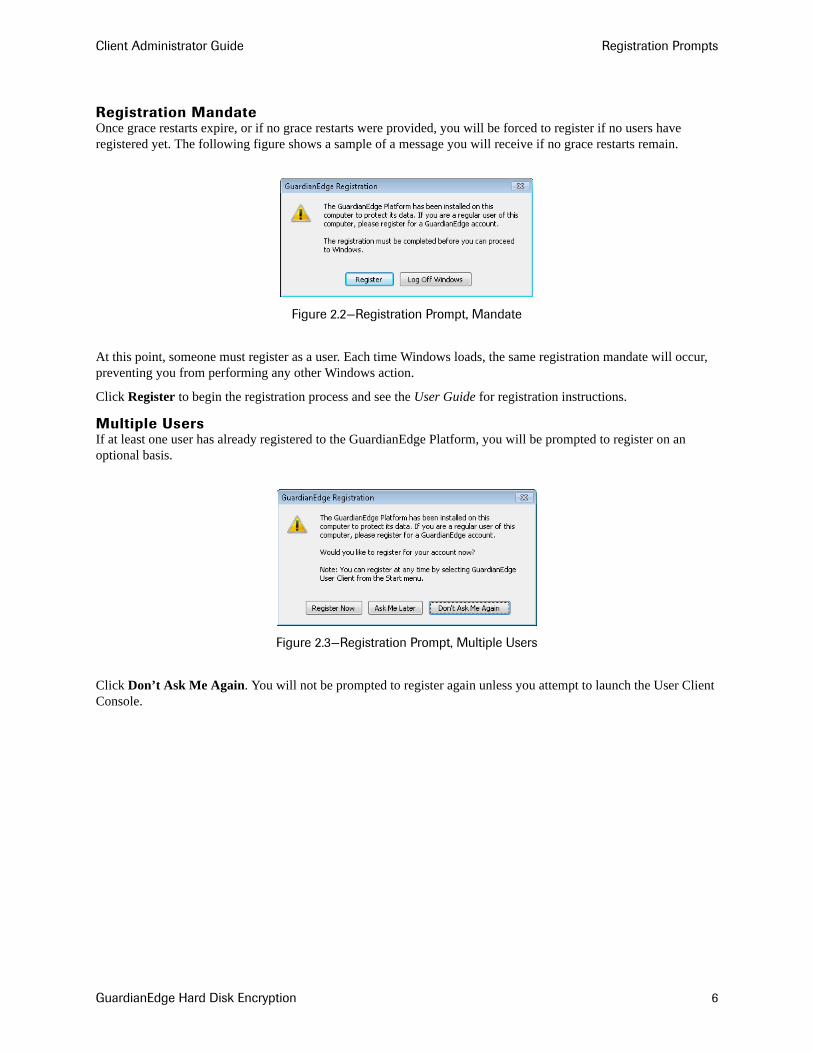
Registration MandateOnce grace restarts expire, or if no grace restarts were provided, you will be forced to register if no users have registered yet. The following figure shows a sample of a message you will receive if no grace restarts remain.
Figure 2.2—Registration Prompt, Mandate
At this point, someone must register as a user. Each time Windows loads, the same registration mandate will occur, preventing you from performing any other Windows action.
Click Register to begin the registration process and see the User Guide for registration instructions.
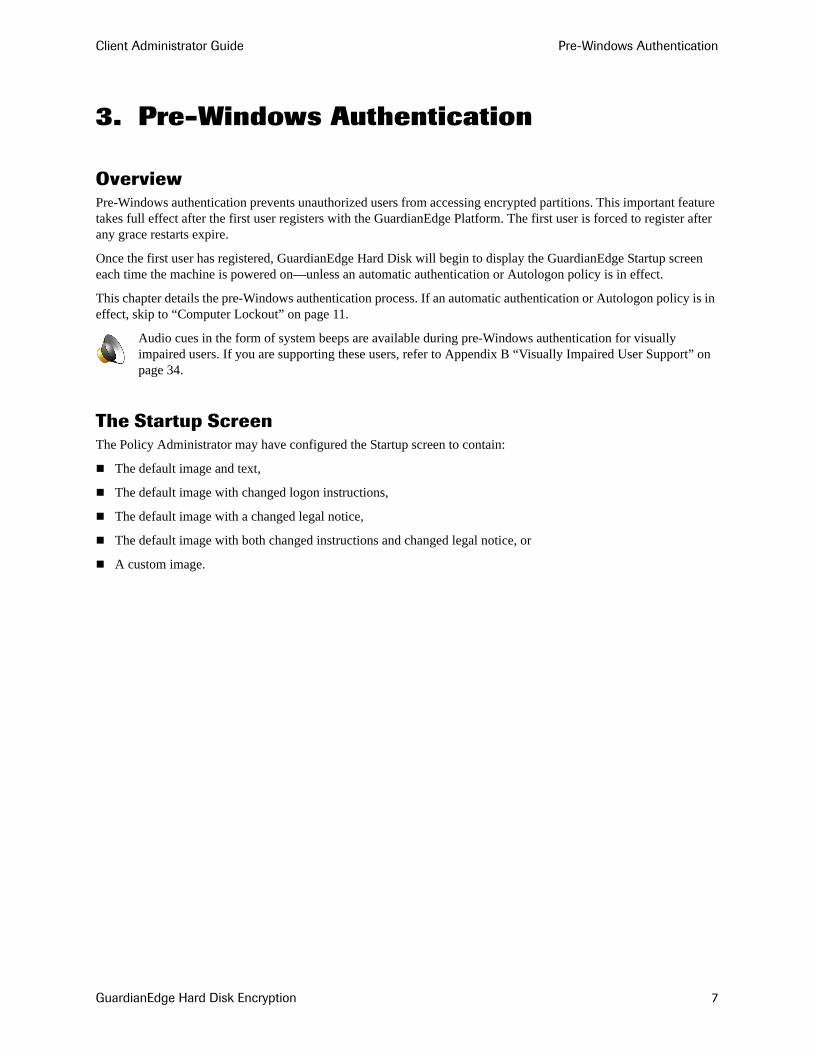
Multiple UsersIf at least one user has already registered to the GuardianEdge Platform, you will be prompted to register on an optional basis.
Figure 2.3—Registration Prompt, Multiple Users
Click Don’t Ask Me Again. You will not be prompted to register again unless you attempt to launch the User Client Console.
GuardianEdge Hard Disk Encryption 6
Client Administrator Guide Pre-Windows Authentication
3. Pre-Windows Authentication
OverviewPre-Windows authentication prevents unauthorized users from accessing encrypted partitions. This important feature takes full effect after the first user registers with the GuardianEdge Platform. The first user is forced to register after any grace restarts expire.
Once the first user has registered, GuardianEdge Hard Disk will begin to display the GuardianEdge Startup screen each time the machine is powered on—unless an automatic authentication or Autologon policy is in effect.
This chapter details the pre-Windows authentication process. If an automatic authentication or Autologon policy is in effect, skip to “Computer Lockout” on page 11.
The Startup ScreenThe Policy Administrator may have configured the Startup screen to contain:
The default image and text,
The default image with changed logon instructions,
The default image with a changed legal notice,
The default image with both changed instructions and changed legal notice, or
A custom image.
Audio cues in the form of system beeps are available during pre-Windows authentication for visually impaired users. If you are supporting these users, refer to Appendix B “Visually Impaired User Support” on page 34.
GuardianEdge Hard Disk Encryption 7

Client Administrator Guide Pre-Windows Authentication
Figure 3.1 shows the default Startup screen.
Figure 3.1—Pre-Windows Startup, Default
If you authenticate with a password, press CTRL+ALT+DEL.
If you authenticate with a token and the token is already inserted, you may not see the Startup screen, or you may see it flash briefly. If you do see the Startup screen, insert your token. For proper insertion of your token and for a description of token behavior when the token is being read, refer to Appendix D “Token Usage & Error Messages” on page 50.
If you need to change the keyboard with which you enter your credentials, continue to the next section.
Otherwise, if you authenticate with a token, skip to “Token Logons” on page 10. If you authenticate with a password, skip to “Password Logons” on page 9.
Keyboard SelectionOnce the Logon screen appears, GuardianEdge Hard Disk shows the active keyboard layout in a bar displayed in the lower right-hand corner of your computer screen.
Figure 3.2—Keyboard Layout Bar
If your system administrator defined multiple keyboards and you need a keyboard layout different than the one identified in the bar, use the key sequences listed in Table 3.1 to toggle to another keyboard layout.
Before toggling, be sure to click on the Keyboard Layout bar, to place the focus there (the title bar becomes dark).
GuardianEdge Hard Disk Encryption 8
Client Administrator Guide Pre-Windows Authentication
Once you have toggled to the desired keyboard, click on the Logon window and proceed to the appropriate section:
“Password Logons” on page 9, or
“Token Logons” on page 10.
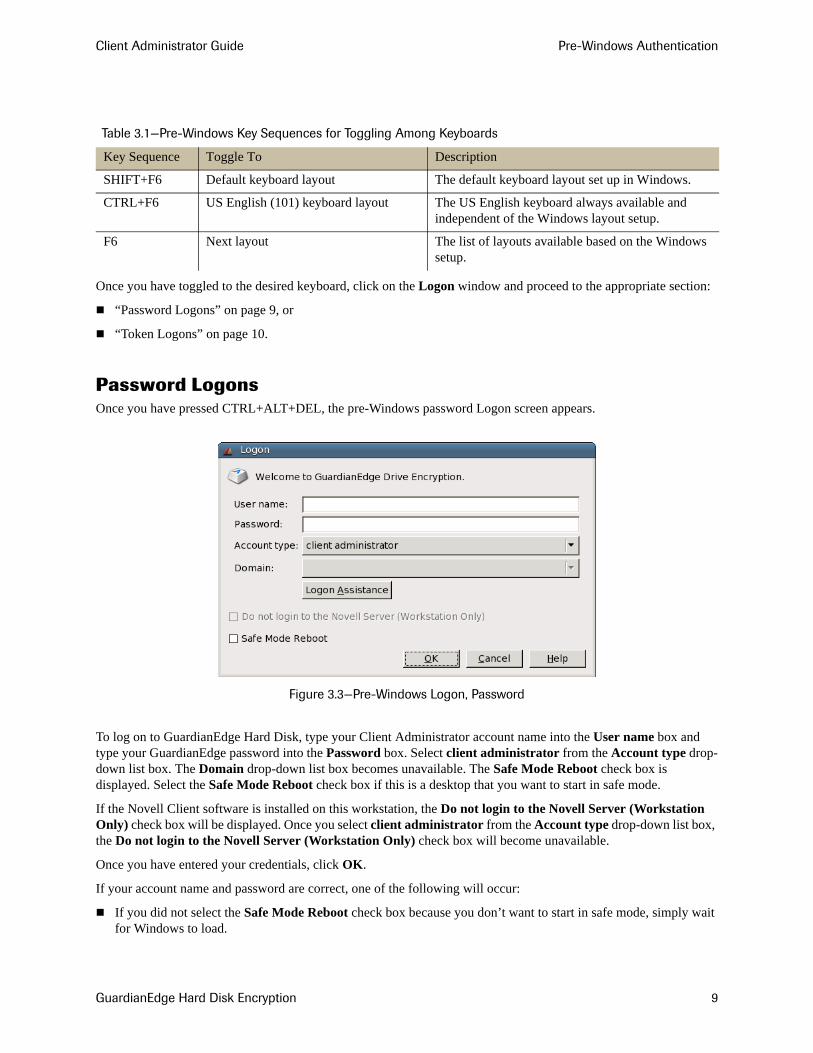
Password LogonsOnce you have pressed CTRL+ALT+DEL, the pre-Windows password Logon screen appears.
Figure 3.3—Pre-Windows Logon, Password
To log on to GuardianEdge Hard Disk, type your Client Administrator account name into the User name box and type your GuardianEdge password into the Password box. Select client administrator from the Account type drop-down list box. The Domain drop-down list box becomes unavailable. The Safe Mode Reboot check box is displayed. Select the Safe Mode Reboot check box if this is a desktop that you want to start in safe mode.
If the Novell Client software is installed on this workstation, the Do not login to the Novell Server (Workstation Only) check box will be displayed. Once you select client administrator from the Account type drop-down list box, the Do not login to the Novell Server (Workstation Only) check box will become unavailable.
Once you have entered your credentials, click OK.
If your account name and password are correct, one of the following will occur:
If you did not select the Safe Mode Reboot check box because you don’t want to start in safe mode, simply wait for Windows to load.
Table 3.1—Pre-Windows Key Sequences for Toggling Among Keyboards
Key Sequence Toggle To Description
SHIFT+F6 Default keyboard layout The default keyboard layout set up in Windows.
CTRL+F6 US English (101) keyboard layout The US English keyboard always available and independent of the Windows layout setup.
F6 Next layout The list of layouts available based on the Windows setup.
GuardianEdge Hard Disk Encryption 9
Client Administrator Guide Pre-Windows Authentication
If you did not select the Safe Mode Reboot check box because this is a laptop that you want to start in safe mode, start pressing F8 repeatedly.
If you selected the Safe Mode Reboot check box and this is a desktop, a message will be displayed, notifying you that the computer will be restarted to provide you with the safe mode option. Click Restart Computer. The computer will power down and power back on. The behavior then varies per operating system.
On Windows Vista or later, you will be presented with the safe mode option screen.
On Windows XP or earlier, you will be presented with an operating system selection screen. Press F8. Then you will be presented with the safe mode option screen.
If your password is not correct, the logon fails. Check your password and enter your credentials again.
Your Policy Administrator may have implemented a logon delay to occur when one or more incorrect password attempts are made. This delay helps protect the Client Computer against unwanted password-guessing attacks. If such a setting or policy is in place and you trigger that restriction, a message appears informing you that the number of allowed logon attempts has been exceeded and a countdown of 60 seconds commences.
Figure 3.4—Pre-Windows Logon, One-Minute Delay for Incorrect Logon
Logon assistance is not available to Client Administrators. If you click Logon Assistance, you will be informed that logon assistance methods do not exist for this user name.
After the countdown, you return to the Logon screen (Figure 3.3), where you can enter your credentials again.
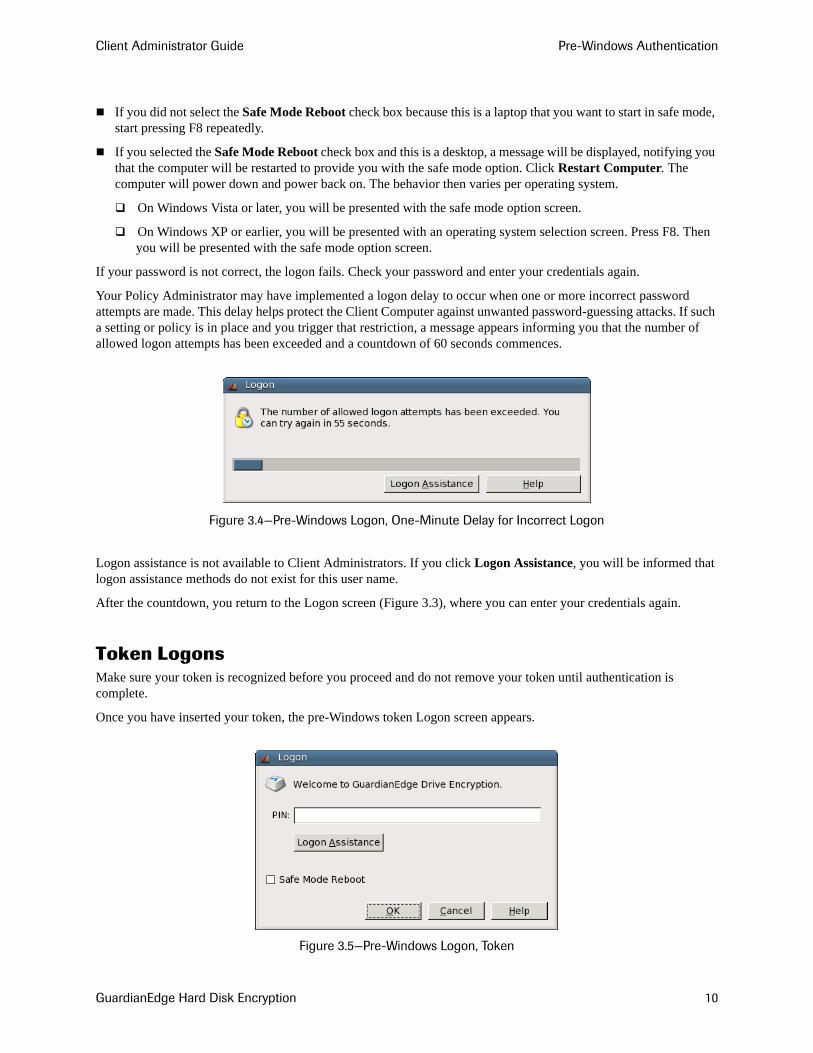
Token LogonsMake sure your token is recognized before you proceed and do not remove your token until authentication is complete.
Once you have inserted your token, the pre-Windows token Logon screen appears.
Figure 3.5—Pre-Windows Logon, Token
GuardianEdge Hard Disk Encryption 10
Client Administrator Guide Pre-Windows Authentication
Type your PIN into the PIN box. Select the Safe Mode Reboot check box if this is a desktop that you want to start in safe mode. Click OK. Do not remove your token until processing completes.
If your PIN is correct, one of the following will occur:
If you did not select the Safe Mode Reboot check box because you don’t want to start in safe mode, simply wait for Windows to load.
If you did not select the Safe Mode Reboot check box because this is a laptop that you want to start in safe mode, start pressing F8 repeatedly.
If you selected the Safe Mode Reboot check box and this is a desktop, a message will be displayed, notifying you that the computer will be restarted to provide you with the safe mode option. Click Restart Computer. The computer will power down and power back on. The behavior then varies per operating system.
On Windows Vista or later, you will be presented with the safe mode option screen.
On Windows XP or earlier, you will be presented with an operating system selection screen. Press F8. Then you will be presented with the safe mode option screen.
If your PIN is not correct, the logon fails. Check your PIN and re-enter the information, then click OK to resubmit. If it fails again, contact the appropriate administrator.
You can also reference Appendix D “Pre-Windows Logon” on page 51.
Computer Lockout
About LockoutsIf lockouts are used to force a Client Computer to check in with the GuardianEdge Management Server according to a prescribed schedule, when a computer fails to check in, registered users will not be able to boot to Windows.
The first time this Logon screen appears and you enter your PIN and click OK, this message may appear, “GuardianEdge Hard Disk has detected an unrecognized token. Please wait while it is evaluated.” This short delay occurs because the system is recording the token ID and certificate information.
If Autologon is activated while a computer is in a lockout state, the Autologon policy preempts the lockout condition for as long as the Autologon policy is in effect.
GuardianEdge Hard Disk Encryption 11
Client Administrator Guide Pre-Windows Authentication
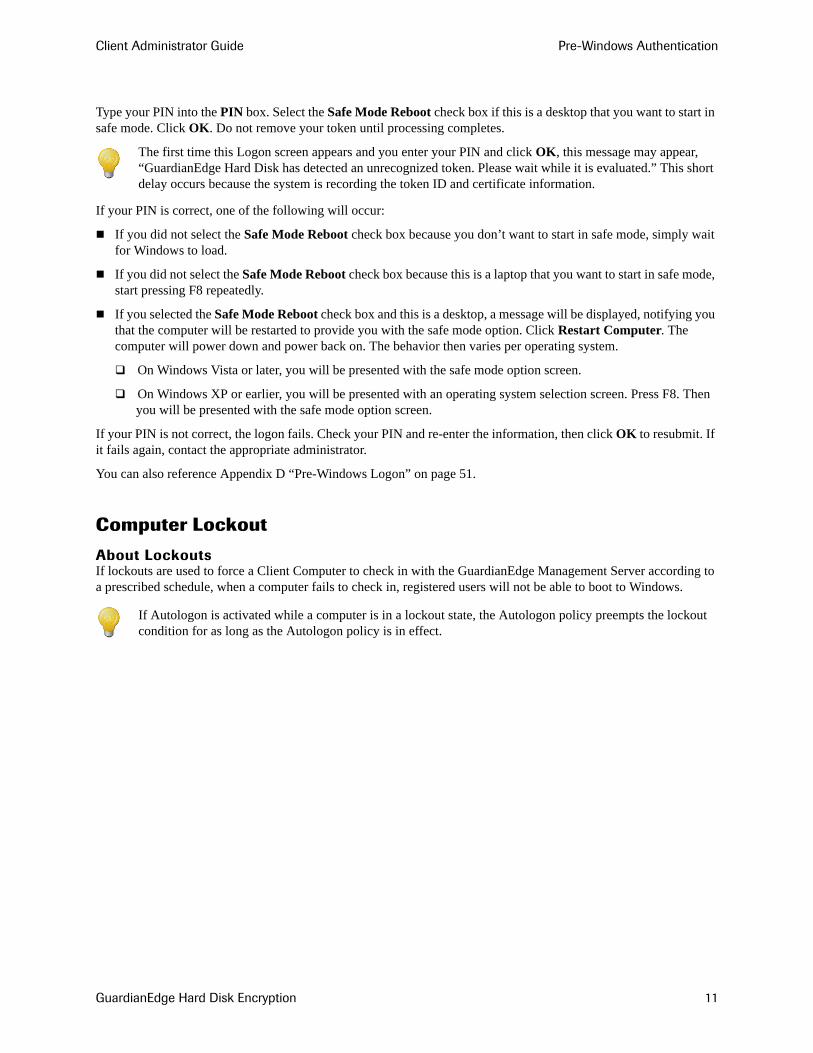
Lockout PreventionIf a Client Computer is about to be locked, a Server Communication Required warning message appears before the Startup screen loads.
Figure 3.6—Pre-Windows Lockout Warning
The message identifies the number of days left before the lockout and advises the user to contact a Client Administrator. After the user clicks OK, they can log on to the computer as normal.
If a user contacts you about this warning, you can prevent the lockout in one or more of the following ways:
Resolve the problem that is preventing the Client Computer from connecting to the GuardianEdge Management Server.
Ask the user to launch the User Client Console, go to the Drive Encryption - Check-In panel, and click the Check In Now button. The Client Computer will try to communicate with the GuardianEdge Management Server. If communication is successful, lockout is prevented and the Next Communication Due By date is extended by the check-in interval.
Go to the user’s computer. Either log on at the pre-Windows logon prompt or, if the user is logged into Windows, launch the Administrator Client Console, go to the Drive Encryption - Check-In panel, and click the Extend Due Date button. Either action updates the Next Communication Due By date by the check-in interval.
GuardianEdge Hard Disk Encryption 12
Client Administrator Guide Pre-Windows Authentication
Lockout Recovery
Basics
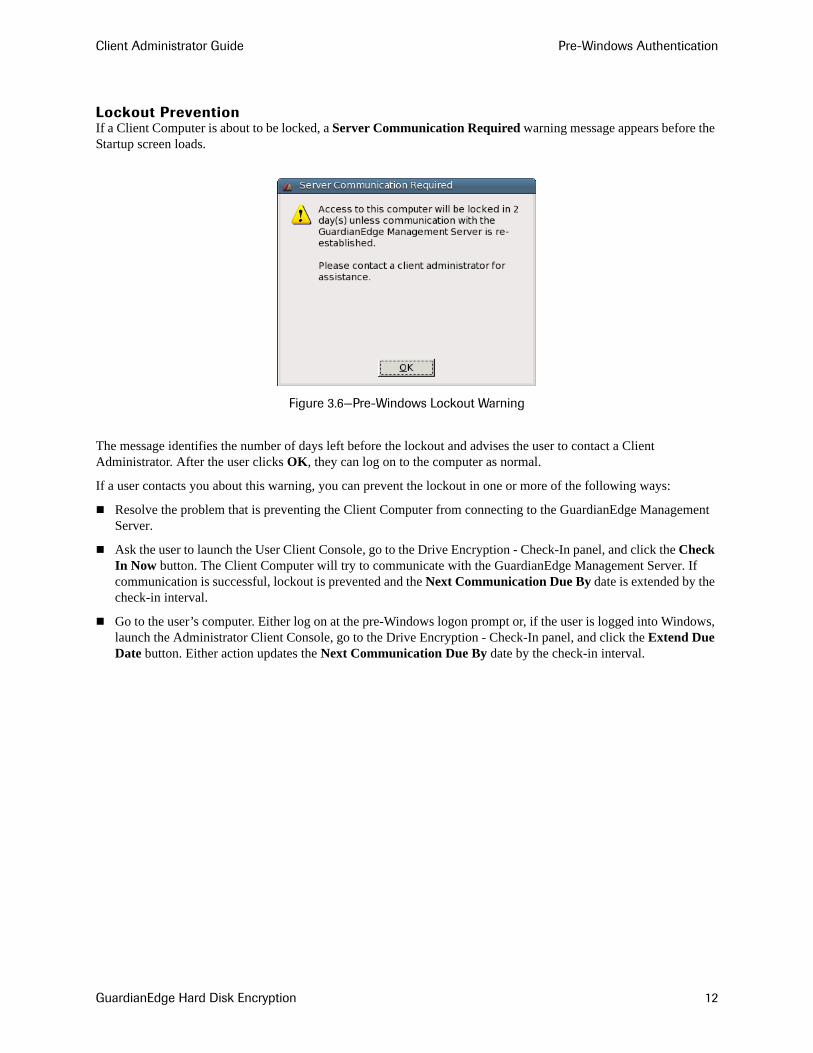
If the Client Computer is already locked, an Access Denied error message appears immediately upon reboot.
Figure 3.7—Pre-Windows Lockout Message
The HelpDesk Assisted Unlock button is for users who have been provisioned with the OTP unlock feature and is not relevant to Client Administrators.
Click Administrator Login Unlock.
The Startup screen will be displayed.
If you log on with a token, insert your token and skip to “Token Lockout Recovery Logon” on page 14.
If you log on with a password, press CTRL+ALT+DEL and continue to the next section.
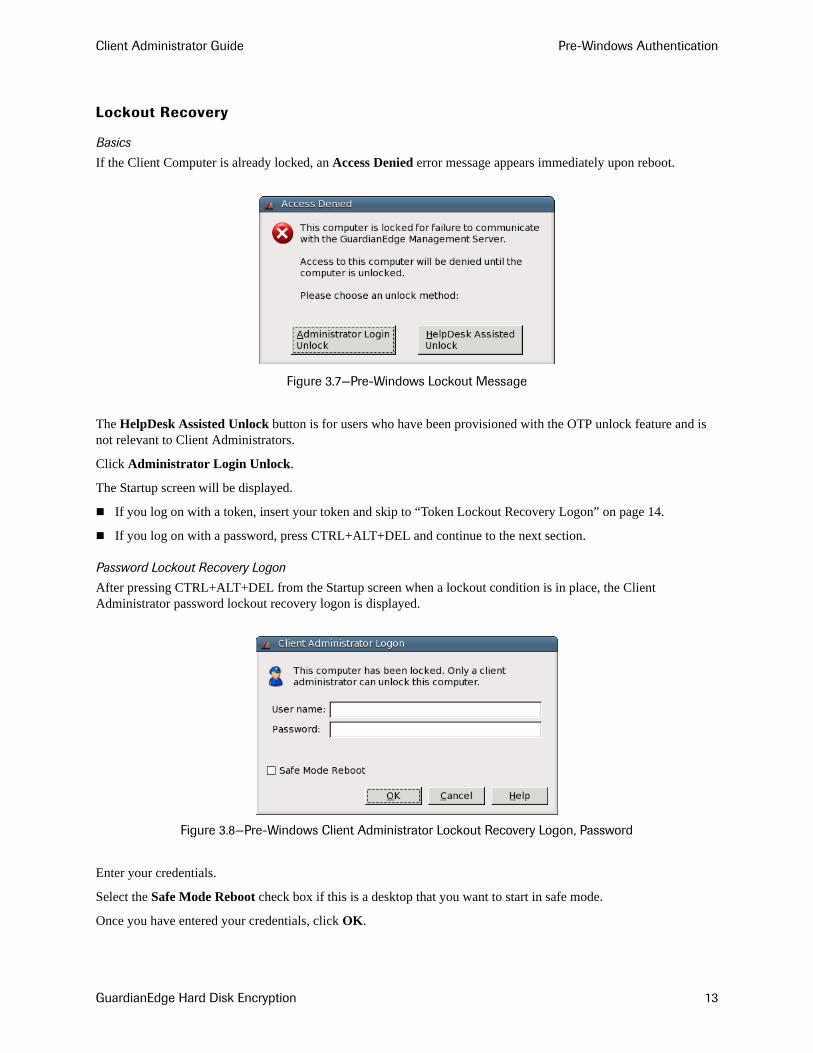
Password Lockout Recovery Logon
After pressing CTRL+ALT+DEL from the Startup screen when a lockout condition is in place, the Client Administrator password lockout recovery logon is displayed.
Figure 3.8—Pre-Windows Client Administrator Lockout Recovery Logon, Password
Enter your credentials.
Select the Safe Mode Reboot check box if this is a desktop that you want to start in safe mode.
Once you have entered your credentials, click OK.
GuardianEdge Hard Disk Encryption 13
Client Administrator Guide Pre-Windows Authentication
If your account name and password are correct, the computer will be unlocked and the next communication due date extended.
If you did not select the Safe Mode Reboot check box because you don’t want to start in safe mode, simply wait for Windows to load.
If you did not select the Safe Mode Reboot check box because this is a laptop that you want to start in safe mode, start pressing F8 repeatedly.
If you selected the Safe Mode Reboot check box and this is a desktop, a message will be displayed, notifying you that the computer will be restarted to provide you with the safe mode option. Click Restart Computer. The computer will power down and power back on. The behavior then varies per operating system.
On Windows Vista or later, you will be presented with the safe mode option screen.
On Windows XP or earlier, you will be presented with an operating system selection screen. Press F8. Then you will be presented with the safe mode option screen.
If your password is not correct, the logon fails. Check your password and enter your credentials again.
Your Policy Administrator may have implemented a logon delay to occur when one or more incorrect password attempts are made. This delay helps protect the Client Computer against unwanted password-guessing attacks. If such a setting or policy is in place and you trigger that restriction, a message appears informing you that the number of allowed logon attempts has been exceeded and a countdown of 60 seconds commences.
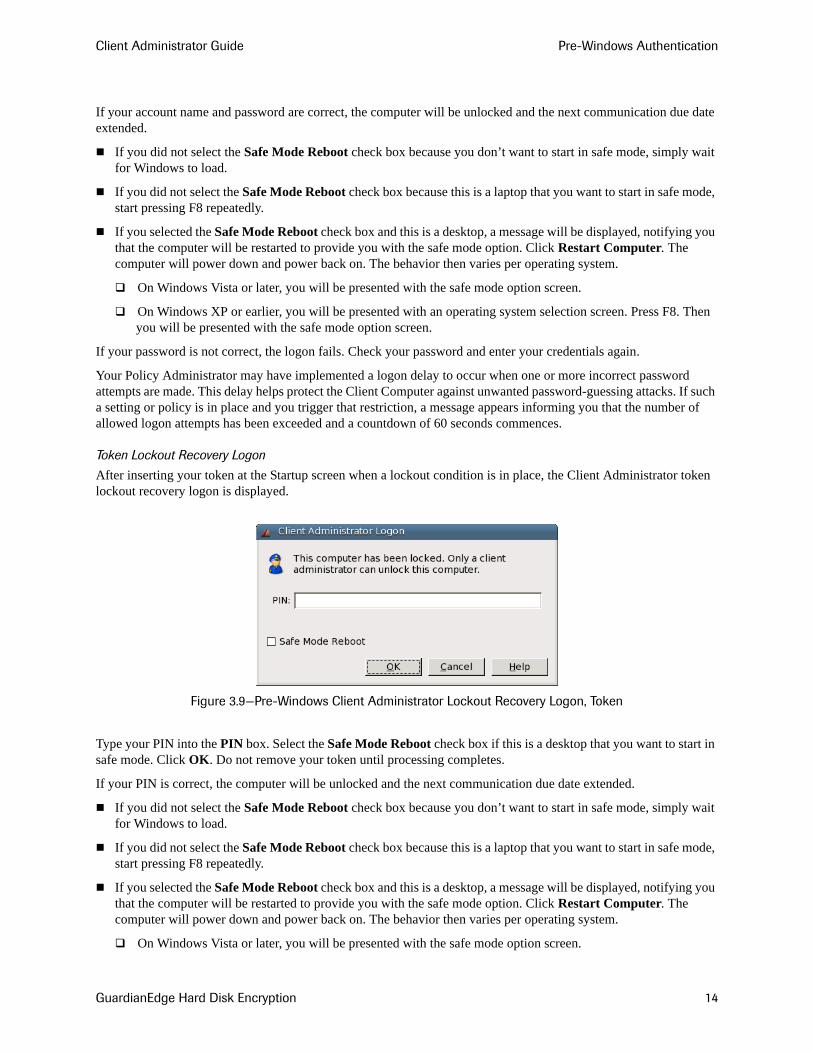
Token Lockout Recovery Logon
After inserting your token at the Startup screen when a lockout condition is in place, the Client Administrator token lockout recovery logon is displayed.
Figure 3.9—Pre-Windows Client Administrator Lockout Recovery Logon, Token
Type your PIN into the PIN box. Select the Safe Mode Reboot check box if this is a desktop that you want to start in safe mode. Click OK. Do not remove your token until processing completes.
If your PIN is correct, the computer will be unlocked and the next communication due date extended.
If you did not select the Safe Mode Reboot check box because you don’t want to start in safe mode, simply wait for Windows to load.
If you did not select the Safe Mode Reboot check box because this is a laptop that you want to start in safe mode, start pressing F8 repeatedly.
If you selected the Safe Mode Reboot check box and this is a desktop, a message will be displayed, notifying you that the computer will be restarted to provide you with the safe mode option. Click Restart Computer. The computer will power down and power back on. The behavior then varies per operating system.
On Windows Vista or later, you will be presented with the safe mode option screen.
GuardianEdge Hard Disk Encryption 14
Client Administrator Guide Pre-Windows Authentication
On Windows XP or earlier, you will be presented with an operating system selection screen. Press F8. Then you will be presented with the safe mode option screen.
If your PIN is not correct, the logon fails. Check your PIN and re-enter the information, then click OK to resubmit. If it fails again, contact the appropriate administrator.
You can also reference Appendix D “Pre-Windows Logon” on page 51.
GuardianEdge Hard Disk Encryption 15
Client Administrator Guide Administrator Client Console
4. Administrator Client Console
OverviewAll Client Administrators can use the Administrator Client Console to:
View the encryption status of fixed disks and partitions.
Encrypt one or more unencrypted partitions or disks.
View and extend the date the computer must next check in with the GuardianEdge Management Server, if check-in is required.
View the GuardianEdge registered user accounts on the computer.
Client Administrators with medium and high levels of privilege can also use the console to decrypt the hard disk.
Client Administrators with a high level of privilege can additionally use the console to unregister users.
To start the Administrator Client Console, on the Start menu, click All Programs, click GuardianEdge, and then click GuardianEdge Administrator Client.
If the User Client Console is open, you will be prompted to close it, as both consoles cannot be running simultaneously.
Logon
BasicsWhen the Administrator Client Console launches, it prompts you for your GuardianEdge credentials.
If you log on with a token, see “Token Logons” on page 18. If you log on with a password, see the next section.
If you are assisting a visually impaired user, who uses JAWS to navigate Windows, turn off JAWS prior to launching the Administrator Client Console.
GuardianEdge Hard Disk Encryption 16
Client Administrator Guide Administrator Client Console
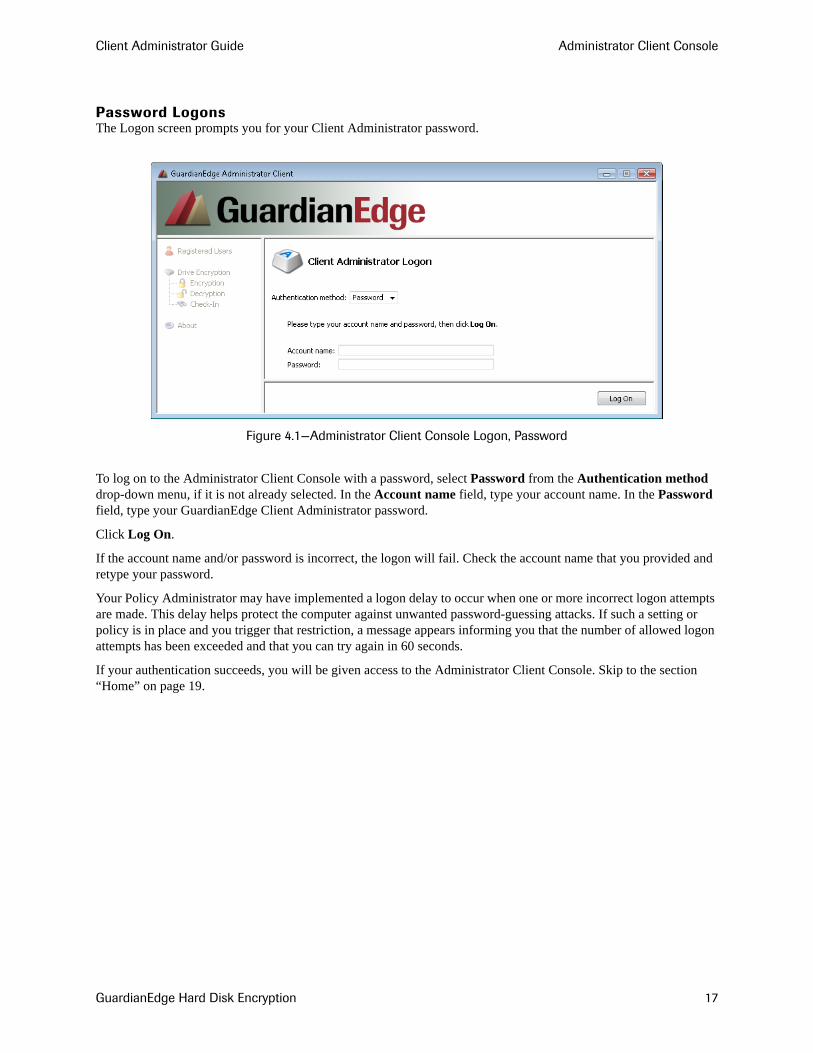
Password LogonsThe Logon screen prompts you for your Client Administrator password.
Figure 4.1—Administrator Client Console Logon, Password
To log on to the Administrator Client Console with a password, select Password from the Authentication method drop-down menu, if it is not already selected. In the Account name field, type your account name. In the Password field, type your GuardianEdge Client Administrator password.
Click Log On.
If the account name and/or password is incorrect, the logon will fail. Check the account name that you provided and retype your password.
Your Policy Administrator may have implemented a logon delay to occur when one or more incorrect logon attempts are made. This delay helps protect the computer against unwanted password-guessing attacks. If such a setting or policy is in place and you trigger that restriction, a message appears informing you that the number of allowed logon attempts has been exceeded and that you can try again in 60 seconds.
If your authentication succeeds, you will be given access to the Administrator Client Console. Skip to the section “Home” on page 19.
GuardianEdge Hard Disk Encryption 17
Client Administrator Guide Administrator Client Console
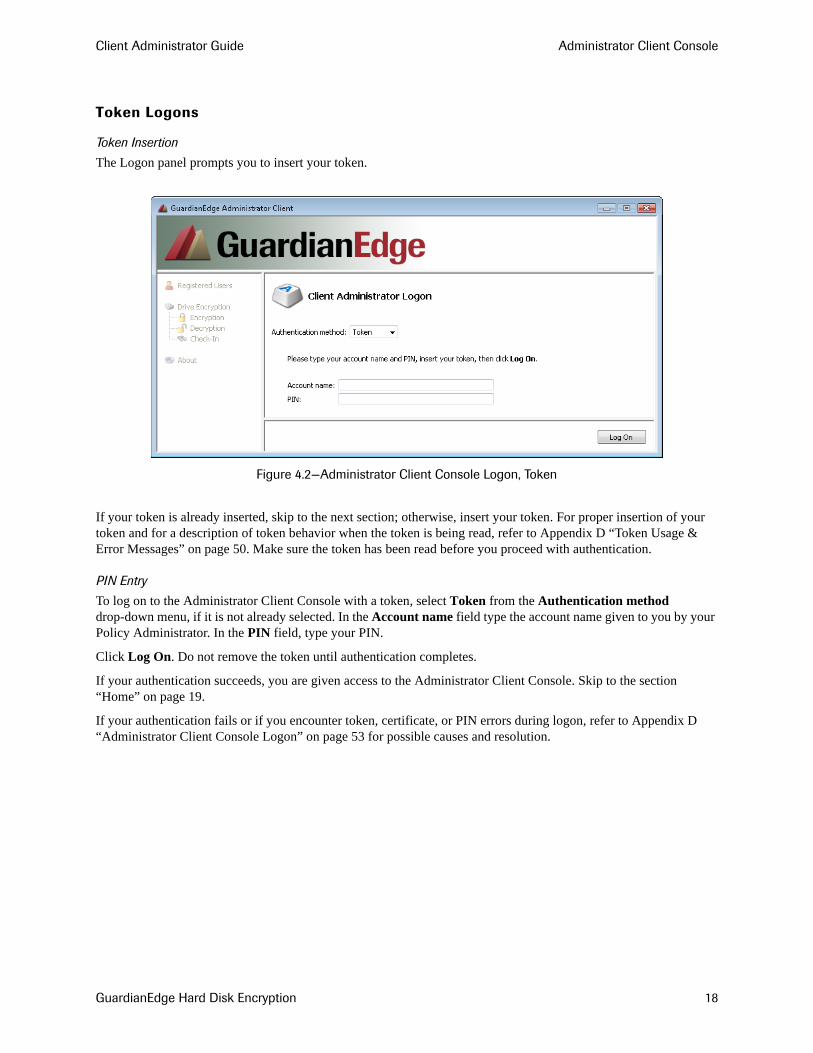
Token Logons
Token Insertion
The Logon panel prompts you to insert your token.
Figure 4.2—Administrator Client Console Logon, Token
If your token is already inserted, skip to the next section; otherwise, insert your token. For proper insertion of your token and for a description of token behavior when the token is being read, refer to Appendix D “Token Usage & Error Messages” on page 50. Make sure the token has been read before you proceed with authentication.
PIN Entry
To log on to the Administrator Client Console with a token, select Token from the Authentication method drop-down menu, if it is not already selected. In the Account name field type the account name given to you by your Policy Administrator. In the PIN field, type your PIN.
Click Log On. Do not remove the token until authentication completes.
If your authentication succeeds, you are given access to the Administrator Client Console. Skip to the section “Home” on page 19.
If your authentication fails or if you encounter token, certificate, or PIN errors during logon, refer to Appendix D “Administrator Client Console Logon” on page 53 for possible causes and resolution.
GuardianEdge Hard Disk Encryption 18
Client Administrator Guide Administrator Client Console
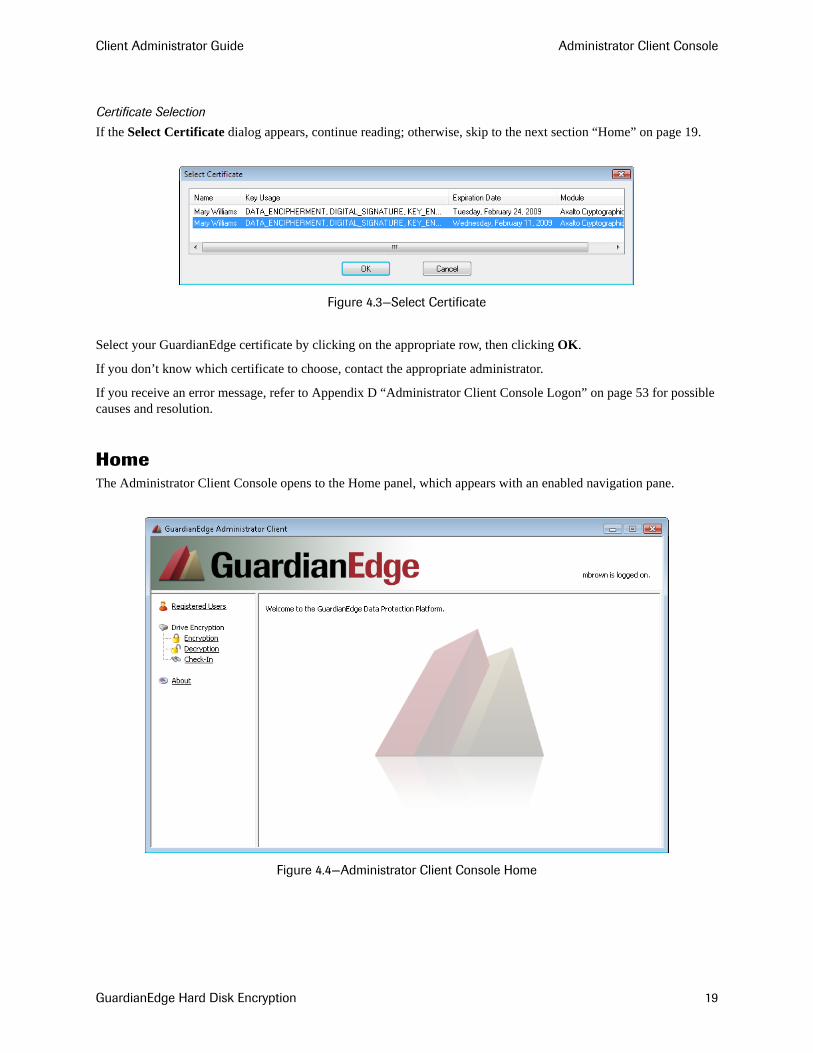
Certificate Selection
If the Select Certificate dialog appears, continue reading; otherwise, skip to the next section “Home” on page 19.
Figure 4.3—Select Certificate
Select your GuardianEdge certificate by clicking on the appropriate row, then clicking OK.
If you don’t know which certificate to choose, contact the appropriate administrator.
If you receive an error message, refer to Appendix D “Administrator Client Console Logon” on page 53 for possible causes and resolution.
HomeThe Administrator Client Console opens to the Home panel, which appears with an enabled navigation pane.
Figure 4.4—Administrator Client Console Home
GuardianEdge Hard Disk Encryption 19
Client Administrator Guide Administrator Client Console
Navigation
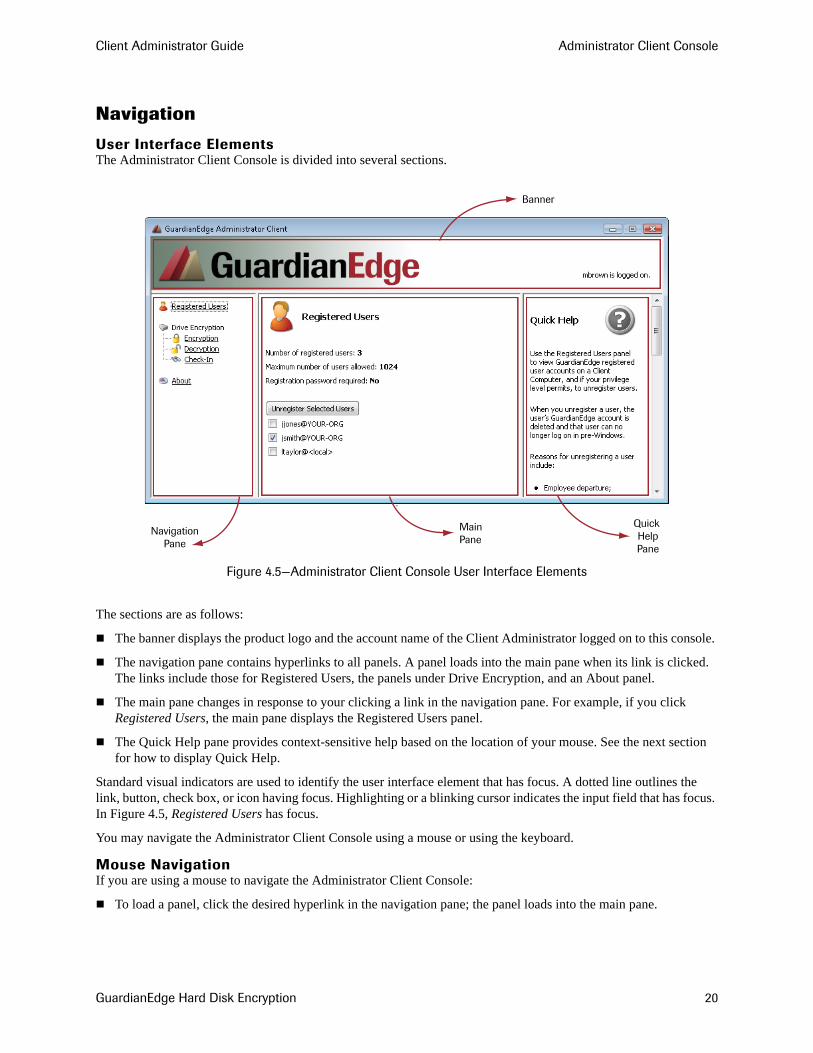
User Interface ElementsThe Administrator Client Console is divided into several sections.
Figure 4.5—Administrator Client Console User Interface Elements
The sections are as follows:
The banner displays the product logo and the account name of the Client Administrator logged on to this console.
The navigation pane contains hyperlinks to all panels. A panel loads into the main pane when its link is clicked. The links include those for Registered Users, the panels under Drive Encryption, and an About panel.
The main pane changes in response to your clicking a link in the navigation pane. For example, if you click Registered Users, the main pane displays the Registered Users panel.
The Quick Help pane provides context-sensitive help based on the location of your mouse. See the next section for how to display Quick Help.
Standard visual indicators are used to identify the user interface element that has focus. A dotted line outlines the link, button, check box, or icon having focus. Highlighting or a blinking cursor indicates the input field that has focus. In Figure 4.5, Registered Users has focus.
You may navigate the Administrator Client Console using a mouse or using the keyboard.
Mouse NavigationIf you are using a mouse to navigate the Administrator Client Console:
To load a panel, click the desired hyperlink in the navigation pane; the panel loads into the main pane.
Banner
NavigationPane
Quick HelpPane
MainPane
GuardianEdge Hard Disk Encryption 20
Client Administrator Guide Administrator Client Console
To display Quick Help, click the help icon . The Quick Help pane appears. To close the Quick Help pane, click the help icon again.
Keyboard Navigation
Direct Access
Use the keys listed in Table 4.1 to directly access Administrator Client Console panels.
TAB Key Access
To navigate the Administrator Client Console:
Press the TAB key to move among the screen elements. A dotted line surrounds the link, input field, button, or icon, indicating which element has the focus (Figure 4.5). In the example, Registered Users has focus.
To load a panel, press the TAB key to the desired link in the navigation pane, then press ENTER. The panel loads into the main pane and focus moves to the panel.
To display Quick Help, press the TAB key until the focus is on the help icon , then press ENTER or the SPACEBAR. To close the Quick Help pane, press ENTER or the SPACEBAR again. Note that Quick Help applies at the panel level; context-sensitive Quick Help is available only when using a mouse.
To select a check box, press the TAB key to place focus on the box, then press the SPACEBAR. To toggle off the selection, press the SPACEBAR again.
To activate a button, press the TAB key to place focus on the button, then press ENTER or the SPACEBAR.
The TAB key follows standard user-interface behavior:
Tabbing order within each panel is top to bottom, left to right.
To move down, press the TAB key; to move up, press SHIFT+TAB.
To scroll, use the UP ARROW key and the DOWN ARROW key.
When you use the TAB key to navigate, you may need to press the key more than once to place the focus on the next desired link, input field, button, or icon, depending on the location of the current focus.
Registered UsersUse the Registered Users panel to view GuardianEdge registered user accounts on a Client Computer, and if your privilege level permits, to unregister users.
Table 4.1—Access Keys
To Go To This Panel Press This Key
Registered Users ALT+U
Drive Encryption Encryption ALT+E
Decryption ALT+D
Check-In ALT+C
About ALT+B
GuardianEdge Hard Disk Encryption 21
Client Administrator Guide Administrator Client Console
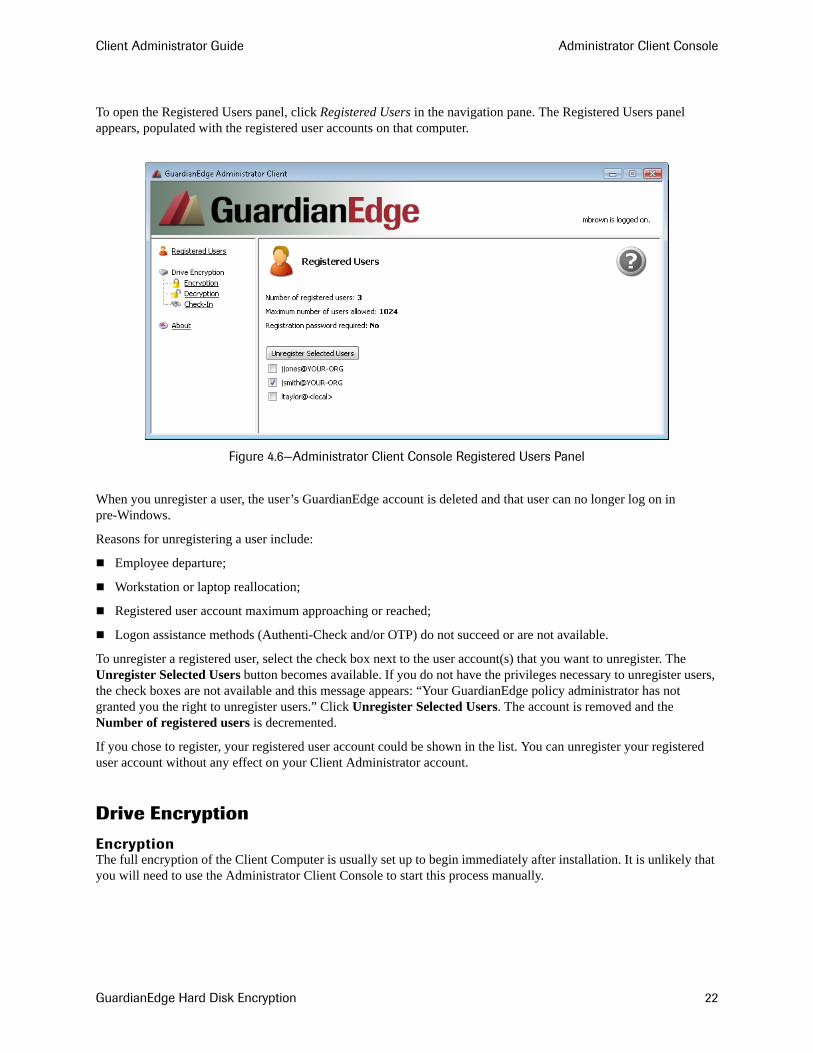
To open the Registered Users panel, click Registered Users in the navigation pane. The Registered Users panel appears, populated with the registered user accounts on that computer.
Figure 4.6—Administrator Client Console Registered Users Panel
When you unregister a user, the user’s GuardianEdge account is deleted and that user can no longer log on in pre-Windows.
Reasons for unregistering a user include:
Employee departure;
Workstation or laptop reallocation;
Registered user account maximum approaching or reached;
Logon assistance methods (Authenti-Check and/or OTP) do not succeed or are not available.
To unregister a registered user, select the check box next to the user account(s) that you want to unregister. The Unregister Selected Users button becomes available. If you do not have the privileges necessary to unregister users, the check boxes are not available and this message appears: “Your GuardianEdge policy administrator has not granted you the right to unregister users.” Click Unregister Selected Users. The account is removed and the Number of registered users is decremented.
If you chose to register, your registered user account could be shown in the list. You can unregister your registered user account without any effect on your Client Administrator account.
Drive Encryption
EncryptionThe full encryption of the Client Computer is usually set up to begin immediately after installation. It is unlikely that you will need to use the Administrator Client Console to start this process manually.
GuardianEdge Hard Disk Encryption 22
Client Administrator Guide Administrator Client Console
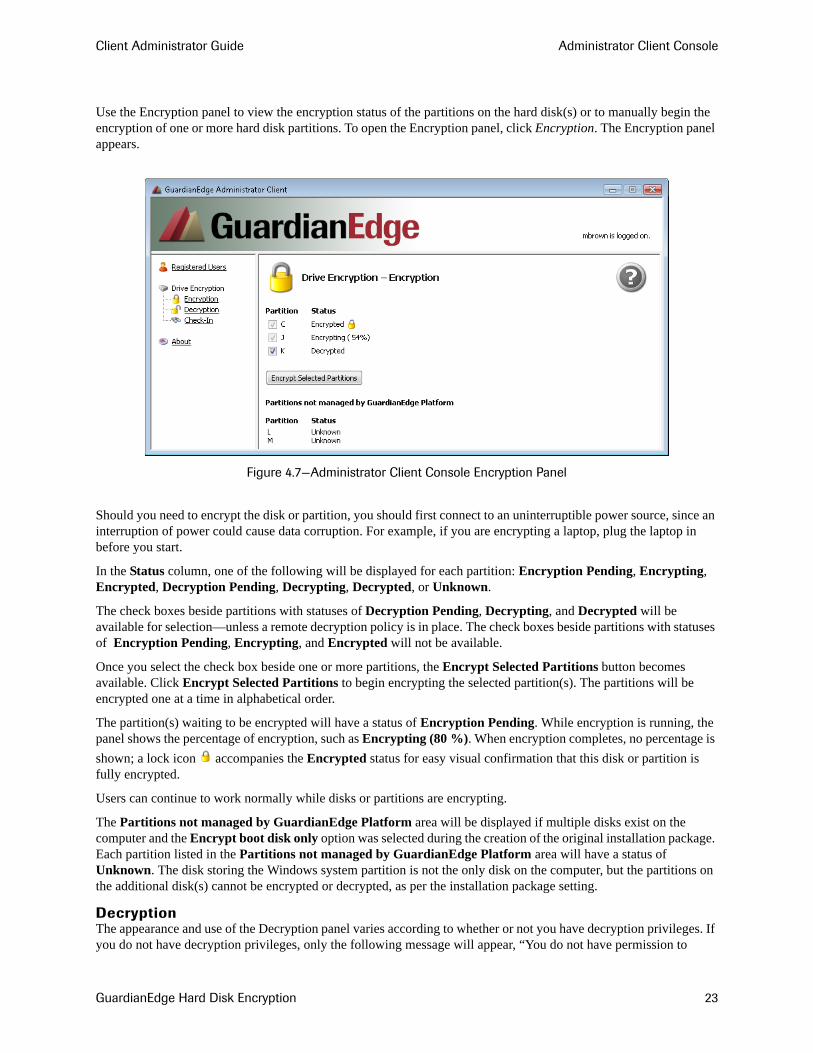
Use the Encryption panel to view the encryption status of the partitions on the hard disk(s) or to manually begin the encryption of one or more hard disk partitions. To open the Encryption panel, click Encryption. The Encryption panel appears.
Figure 4.7—Administrator Client Console Encryption Panel
Should you need to encrypt the disk or partition, you should first connect to an uninterruptible power source, since an interruption of power could cause data corruption. For example, if you are encrypting a laptop, plug the laptop in before you start.
In the Status column, one of the following will be displayed for each partition: Encryption Pending, Encrypting, Encrypted, Decryption Pending, Decrypting, Decrypted, or Unknown.
The check boxes beside partitions with statuses of Decryption Pending, Decrypting, and Decrypted will be available for selection—unless a remote decryption policy is in place. The check boxes beside partitions with statuses of Encryption Pending, Encrypting, and Encrypted will not be available.
Once you select the check box beside one or more partitions, the Encrypt Selected Partitions button becomes available. Click Encrypt Selected Partitions to begin encrypting the selected partition(s). The partitions will be encrypted one at a time in alphabetical order.
The partition(s) waiting to be encrypted will have a status of Encryption Pending. While encryption is running, the panel shows the percentage of encryption, such as Encrypting (80 %). When encryption completes, no percentage is shown; a lock icon accompanies the Encrypted status for easy visual confirmation that this disk or partition is fully encrypted.
Users can continue to work normally while disks or partitions are encrypting.
The Partitions not managed by GuardianEdge Platform area will be displayed if multiple disks exist on the computer and the Encrypt boot disk only option was selected during the creation of the original installation package. Each partition listed in the Partitions not managed by GuardianEdge Platform area will have a status of Unknown. The disk storing the Windows system partition is not the only disk on the computer, but the partitions on the additional disk(s) cannot be encrypted or decrypted, as per the installation package setting.
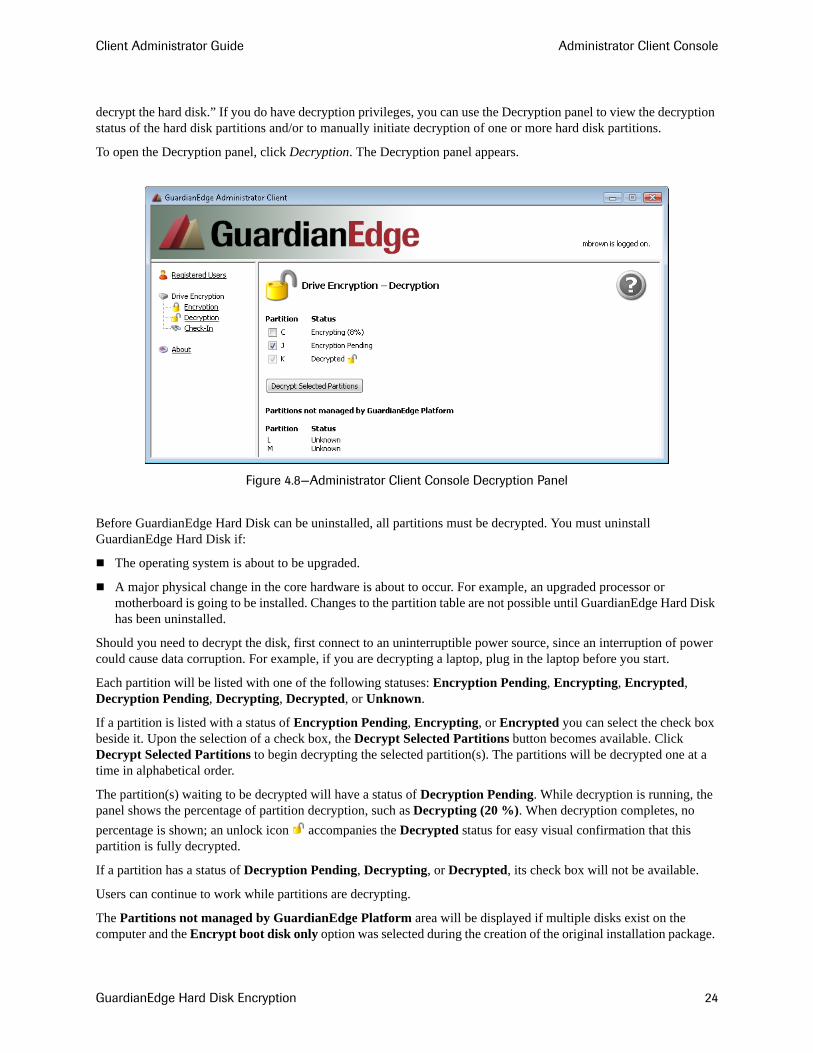
DecryptionThe appearance and use of the Decryption panel varies according to whether or not you have decryption privileges. If you do not have decryption privileges, only the following message will appear, “You do not have permission to
GuardianEdge Hard Disk Encryption 23
Client Administrator Guide Administrator Client Console
decrypt the hard disk.” If you do have decryption privileges, you can use the Decryption panel to view the decryption status of the hard disk partitions and/or to manually initiate decryption of one or more hard disk partitions.
To open the Decryption panel, click Decryption. The Decryption panel appears.
Figure 4.8—Administrator Client Console Decryption Panel
Before GuardianEdge Hard Disk can be uninstalled, all partitions must be decrypted. You must uninstall GuardianEdge Hard Disk if:
The operating system is about to be upgraded.
A major physical change in the core hardware is about to occur. For example, an upgraded processor or motherboard is going to be installed. Changes to the partition table are not possible until GuardianEdge Hard Disk has been uninstalled.
Should you need to decrypt the disk, first connect to an uninterruptible power source, since an interruption of power could cause data corruption. For example, if you are decrypting a laptop, plug in the laptop before you start.
Each partition will be listed with one of the following statuses: Encryption Pending, Encrypting, Encrypted, Decryption Pending, Decrypting, Decrypted, or Unknown.
If a partition is listed with a status of Encryption Pending, Encrypting, or Encrypted you can select the check box beside it. Upon the selection of a check box, the Decrypt Selected Partitions button becomes available. Click Decrypt Selected Partitions to begin decrypting the selected partition(s). The partitions will be decrypted one at a time in alphabetical order.
The partition(s) waiting to be decrypted will have a status of Decryption Pending. While decryption is running, the panel shows the percentage of partition decryption, such as Decrypting (20 %). When decryption completes, no percentage is shown; an unlock icon accompanies the Decrypted status for easy visual confirmation that this partition is fully decrypted.
If a partition has a status of Decryption Pending, Decrypting, or Decrypted, its check box will not be available.
Users can continue to work while partitions are decrypting.
The Partitions not managed by GuardianEdge Platform area will be displayed if multiple disks exist on the computer and the Encrypt boot disk only option was selected during the creation of the original installation package.
GuardianEdge Hard Disk Encryption 24
Client Administrator Guide Administrator Client Console
Each partition listed in the Partitions not managed by GuardianEdge Platform area will have a status of Unknown. The disk storing the Windows system partition is not the only disk on the computer, but the partitions on the additional disk(s) cannot be encrypted or decrypted, as per the installation package setting.
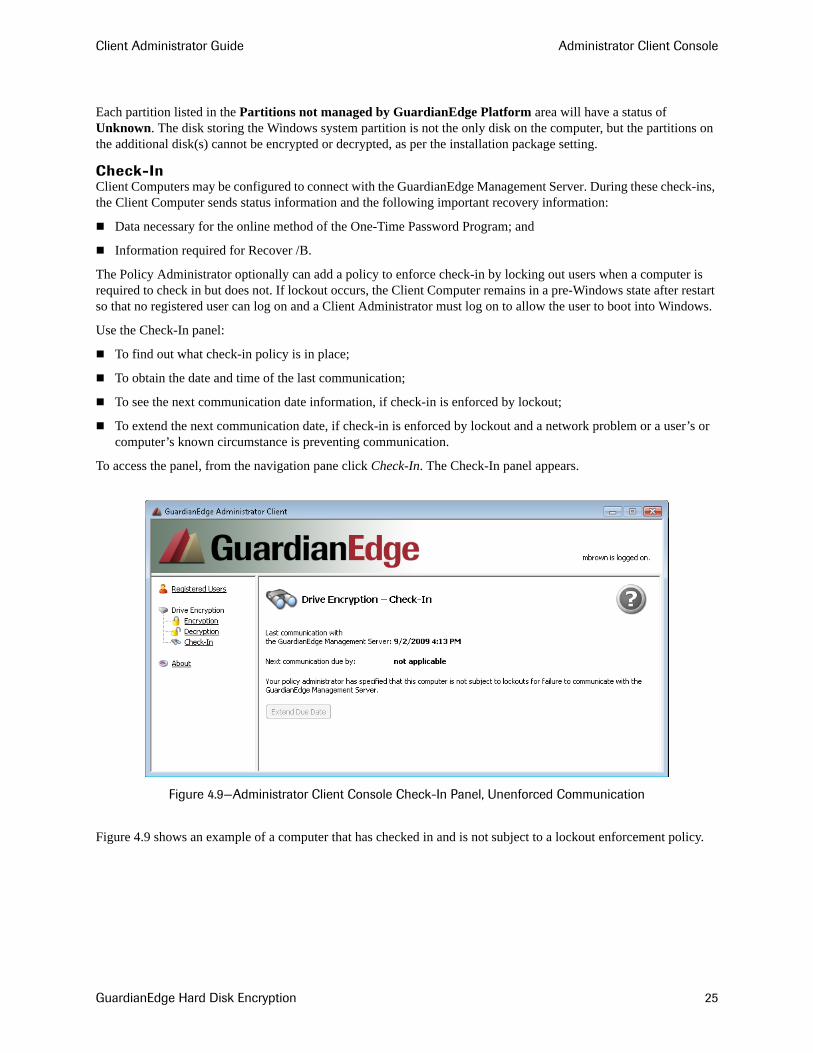
Check-InClient Computers may be configured to connect with the GuardianEdge Management Server. During these check-ins, the Client Computer sends status information and the following important recovery information:
Data necessary for the online method of the One-Time Password Program; and
Information required for Recover /B.
The Policy Administrator optionally can add a policy to enforce check-in by locking out users when a computer is required to check in but does not. If lockout occurs, the Client Computer remains in a pre-Windows state after restart so that no registered user can log on and a Client Administrator must log on to allow the user to boot into Windows.
Use the Check-In panel:
To find out what check-in policy is in place;
To obtain the date and time of the last communication;
To see the next communication date information, if check-in is enforced by lockout;
To extend the next communication date, if check-in is enforced by lockout and a network problem or a user’s or computer’s known circumstance is preventing communication.
To access the panel, from the navigation pane click Check-In. The Check-In panel appears.
Figure 4.9—Administrator Client Console Check-In Panel, Unenforced Communication
Figure 4.9 shows an example of a computer that has checked in and is not subject to a lockout enforcement policy.
GuardianEdge Hard Disk Encryption 25
Client Administrator Guide Administrator Client Console
The information displayed in the Check-In panel varies as described in the following table.
The Extend Due Date button is available only under the following circumstances:
At least one user has registered,
The Client Computer is configured to communicate with the GuardianEdge Management Server, and
A lockout enforcement policy is in effect.
If lockouts are used for enforcement of check-in and the computer fails to check in, then registered users will not be able to boot to Windows. If the Policy Administrator pushes a policy that enables one or more users to have the OTP unlock capability, those users can attempt to unlock their computers with assistance from the help desk.
If the Check-In panel indicates that a lockout is imminent, click Extend Due Date. The Next communication due by field will be incremented from today’s date and time by the required communication interval.
Separately, you should ensure that the issue preventing the Client Computer from connecting to the GuardianEdge Management Server is resolved. The lockout experience is discussed further in “Computer Lockout” on page 11.
Table 4.2—Check-In Panel Information
Field Label Value Meaning
Last communication with the GuardianEdge Management Server
Date and time Communication with the GuardianEdge Management Server occurred on the specified date at the specified time.
never connected This Client Computer has never connected to the GuardianEdge Management Server. The user will not be able to use the online method of the OTP Program. You will not have the Recover /B option available for the Recover Program.
Next communication due by
Future date and time A lockout enforcement policy is in effect and this Client Computer must make contact with the GuardianEdge Management Server no later than the specified date and time.
Past date and time in red with a warning icon . Tooltip message, “Communication is overdue,” appears.
A lockout enforcement policy is in effect and this Client Computer has failed to connect within the mandatory interval. A lockout is imminent, upon the next reboot.
not applicable until the first user registers
The first user has not yet registered.
not applicable A lockout enforcement policy is not in effect.
GuardianEdge Hard Disk Encryption 26
Client Administrator Guide Administrator Client Console
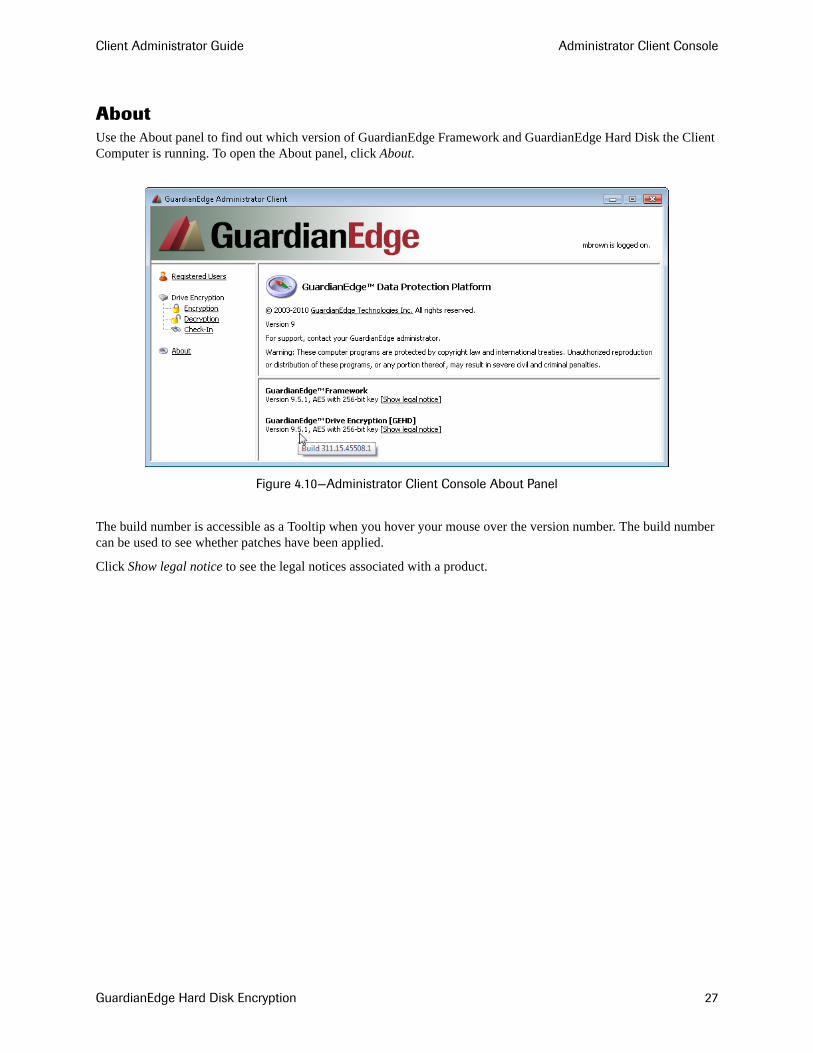
AboutUse the About panel to find out which version of GuardianEdge Framework and GuardianEdge Hard Disk the Client Computer is running. To open the About panel, click About.
Figure 4.10—Administrator Client Console About Panel
The build number is accessible as a Tooltip when you hover your mouse over the version number. The build number can be used to see whether patches have been applied.
Click Show legal notice to see the legal notices associated with a product.
GuardianEdge Hard Disk Encryption 27
Client Administrator Guide Hard Disk Access & Recovery
5. Hard Disk Access & Recovery
OverviewGuardianEdge provides the Drive Encryption Access Utility and the Recover Program on bootable CDs to assist you in the event that a Client Computer fails to boot. Each allows you to access the data on the hard disk using the Microsoft Windows Preinstallation Environment (Windows PE) operating system. While both can be run by a qualified Client Administrator, we recommend that you contact GuardianEdge technical support for assistance with the process.
Drive Encryption Access Utility—allows you to back up data to servers or external disks for hard disk replacement, perform file system and Windows system repair, and complete other system administration tasks.
Recover Program—attempts to regain access to data on your hard disk by repairing the GuardianEdge client database files or by performing an emergency decryption of the entire hard disk.
Contact GuardianEdge technical support at your earliest convenience when dealing with a technical issue that involves critical data. Document all events that preceded the problem, list any actions taken, and identify any error messages encountered. Depending on your situation, technical support personnel may walk you through one or more of the following steps as you attempt recovery.
Before you begin, identify the version number of the Client Computer. Ensure that the Recover Program and Drive Encryption Access Utility have the same version number.
Recovery Steps
BasicsThe following steps should be performed in sequence:
1. Recover /A
2. Drive Encryption Access Utility
3. Hard Disk Consistency Check
4. Recover /D
5. Recover /B
Recover /AIf your computer has encountered a serious error and you cannot load Windows, first run the Recover Program with the /A option. The /A option attempts to repair damaged client database files.
After Recover /A runs, the Audit Trail is reset and all events logged in pre-Windows that have not been moved to the Windows Event Log are lost.
To run Recover with the /A option, you will need the Recover Program CD.
To run Recover with the /A option:
1. Remove all bootable media.
2. Insert the Recover Program CD into the appropriate drive.
GuardianEdge Hard Disk Encryption 28
Client Administrator Guide Hard Disk Access & Recovery
3. Restart the computer, booting from the Recover Program CD. You may need to modify the BIOS to boot from CD/DVD. A command line window is displayed, and the Recover Program launches automatically.
4. Follow the instruction to make sure the computer is connected to an uninterruptible power supply, then click Next.
5. The drop-down menu on this screen will be populated with a list of all physical drives managed by the GuardianEdge Platform. Each entry in the menu will show the physical disk number and size in MB, and will be marked “Bootable GEHD” or “Secondary GEHD” to indicate whether the drive is bootable or secondary. A client computer with only one managed disk will show a single bootable entry, while a client computer with multiple managed disks will show a bootable entry and one or more secondary entries. If more than one disk is shown, ensure that you select the bootable disk for this initial recover /A proceedure. After recover /A completes on the bootable drive, perform recover /A again on each secondary drive.
From the drop-down menu, select the physical drive to process, then click Next.
6. A verification screen will scroll pairs of volume files being read as part of an integrity check. When it completes, click Next.
7. If the integrity check fails, recover /A will be one of the three recover options available. Ensure that the recover /A option button is selected, then click Next.
If the selected physical drive passes the integrity check, the recover /A option will be unavailable, and the recover /D option will be selected. Skip ahead to “Recover /D” on page 30.
8. You will be asked to authenticate with a Client Administrator account name and password, after which you follow the program prompts. If you enter incorrect credentials three times, you will be required to wait one minute before attempting to authenticate again.
If the /A option succeeds in repairing the client database files and you are able to boot, you once again have access to the computer. If the /A option does not succeed, exit the Recover Program and proceed to the next step: Drive Encryption Access Utility.
Drive Encryption Access UtilityThe Drive Encryption Access Utility may indicate Windows problems. It allows you to map to a network drive and pull off your critical files to a safe location, before you attempt to work on the Windows operating system.
Once you have copied off your data, take a look at your Windows operating system.
If the Drive Encryption Access Utility does not succeed, proceed to the next step: Hard Disk Consistency Check.
Hard Disk Consistency CheckIf running Recover /A fails and if the Drive Encryption Access Utility is not able to see the hard disk or to authenticate the person running the utility, then the possibility exists that the drive has physically failed.
If the hardware manufacturer provided a bootable repair CD with a read-only consistency check option, locate and utilize this CD.
A failed consistency check will allow you to determine that physical problems exist.
To save the output of the Recover Program to removable media, exit the Recover Program after its initial launch by clicking Exit. At the command-line prompt, type GERecoverWinPE and press ENTER to relaunch the Recover Program. At the command-line prompt, type Notepad and press ENTER to launch Notepad. When the Recover Program completes, copy the contents of the Recover Program’s document window and paste it into the Notepad document, which you can then save to a USB thumb drive or other removable media.
The Drive Encryption Access Utility cannot be run while encryption or decryption is in progress.
GuardianEdge Hard Disk Encryption 29
Client Administrator Guide Hard Disk Access & Recovery
The next step depends on the specifics of your situation. One step may be for you to send the disk to a data recovery house. Or GuardianEdge technical support may try a sector-by-sector image copy to back up your data onto another disk.
Recover /DIf your disk passed the consistency check, run the Recover Program with the /D option once, to attempt to regain access to the data on your hard disk. The /D option attempts to repair the GuardianEdge Hard Disk client database files, then tries to decrypt the hard disk. After Recover /D runs, the Audit Trail is reset and all events logged in pre-Windows that have not been moved to the Windows Event Log are lost.
To run Recover /D:
1. Connect the computer to an uninterruptible power supply.
2. Remove all bootable media.
3. Insert the Recover Program CD into the appropriate drive.
4. Restart the computer, booting from the Recover Program CD. You may need to modify the BIOS to boot from CD/DVD. A command line window is displayed, and the Recover Program launches automatically.
5. Follow the instruction to verify that the computer is connected to an uninterruptible power supply, then click Next. A verification screen will scroll pairs of volume files being read as part of an integrity check. When it completes, click Next.
6. The three recovery options appear with their descriptions. Select the option button for recover /D.
You will be asked to authenticate with a Client Administrator account name and password. If you enter incorrect credentials three times, you will be required to wait one minute before attempting to authenticate again. Once you have authenticated, follow the program prompts.
Once the program starts running, do not stop it or shut down the computer. The process must run to completion. A typical problem disk can take hours, days, or weeks to decrypt. If the process runs into a series of bad sectors—perhaps hundreds of thousands of them—it will try multiple times to read them and the process may appear to have stopped. You will see a progress bar showing the percentage of disk decryption displayed on the screen; the progress bar may remain stationary for quite some time. If the process cannot successfully read a sector after multiple attempts, the process moves to the next sector. Readable sectors are read in, decrypted, and then written back to the disk.
When the program ends, if you see a success message, you will have a fully or partially decrypted disk, depending on the extent of damage.
Until you see a final message indicating success or failure, let the program run.
If you see a failure message, exit the Recover Program and proceed to the next step: Recover /B.
Recover /BRecover /B should be performed only with the assistance of GuardianEdge technical support.
Never run this option more than once, whether it succeeds or fails. Running Recover /D twice will cause double decryption and permanent loss of data.
To save the output of the Recover Program to removable media, exit the Recover Program after its initial launch by clicking Exit. At the command-line prompt, type GERecoverWinPE and press ENTER to relaunch the Recover Program. At the command-line prompt, type Notepad and press ENTER to launch Notepad. When the Recover Program completes, copy the contents of the Recover Program’s document window and paste it into the Notepad document, which you can then save to a USB thumb drive or other removable media.
GuardianEdge Hard Disk Encryption 30
Client Administrator Guide Hard Disk Access & Recovery
If all previous steps failed, it may mean that a very important cryptographic key cannot be found. The Recover Program using the /B option reads from a computer-specific recover DAT file that contains that key, allowing you to decrypt your data.
The Policy Administrator creates the DAT file by exporting a Client Computer’s data from the database. For this reason, Recover /B is only available for computers that have checked in at least once with the GuardianEdge Management Server.
When the Policy Administrator creates the DAT file, the administrator defines a Recovery Password to protect the DAT file. When the administrator provides the DAT, they tell you the password. Typically the administrator gives the DAT file an informative name, perhaps containing the name of the computer and the current date and time, such as D9HCPD3_20090525_Recover.dat.
You may need to modify the BIOS to boot from CD/DVD. A command line window is displayed, and the Recover Program launches automatically.
Select the option button for recover /B.
Browse to the DAT file. You will be prompted for the Recovery Password associated with the DAT file. Enter the password. The Recover Program will generate several information and warning messages and/or prompts, depending on what the program encounters. The most severe warning message occurs if something goes wrong when the Recover Program attempts to compare values in the DAT file with the client database files, as described below.
If the Recover Program detects a mismatch between the DAT file and the client database files, the program stops and issues a warning that the data on the hard disk will be destroyed if you continue the recovery process. Click Cancel to cancel the recovery operation.
If the Recover Program is unable to compare the backup file and the client database files due to file corruption of client database files, the program halts and issues the same warning message as stated in the previous paragraph. Only if you are absolutely certain that the DAT file is the correct file should you continue the process; otherwise, click Cancel to cancel the recovery operation.
If the Recover Program detects that the DAT file is corrupted, the Recover Program stops. Click Cancel to cancel the recovery operation.
Make sure that you have the correct DAT file. Since the data in the DAT file is computer-specific, running /B using a recovery data file intended for another computer will corrupt your hard disk files.
Also make sure that the computer is connected to an uninterruptible power supply; otherwise, data loss can occur if the process stops.
To save the output of the Recover Program to removable media, exit the Recover Program after its initial launch by clicking Exit. At the command-line prompt, type GERecoverWinPE and press ENTER to relaunch the Recover Program. At the command-line prompt, type Notepad and press ENTER to launch Notepad. When the Recover Program completes, copy the contents of the Recover Program’s document window and paste it into the Notepad document, which you can then save to a USB thumb drive or other removable media.
GuardianEdge Hard Disk Encryption 31
Client Administrator Guide Novell Support
Appendix A. Novell Support
OverviewIf your organization uses Novell to manage your network, GuardianEdge Hard Disk makes it possible to associate a user’s GuardianEdge/Windows account with a Novell account. The user name and password may be the same or they may be different. SSO for Novell enables a user who logs on in pre-Windows to be admitted to Windows and Novell without further authentication.
GuardianEdge Hard Disk’s Single Sign-On feature will synchronize with Novell if all of the following statements are true.
A policy exists for this registered user’s GuardianEdge account that enables SSO.
The GuardianEdge Platform has captured the user’s Novell account information and synchronized it with the user’s GuardianEdge/Windows account.
The Novell GINA is installed in the GINA chain.
Refer to the User Guide for a discussion of the user’s experience with this feature. This appendix discusses error conditions that could occur.
SSO for Novell Not EnabledWhen the user clicks the Novell SSO link in the navigation pane, the following message may be displayed: “Your GuardianEdge account has the Single Sign-On feature, but your computer is not configured for Novell SSO to work with the GuardianEdge Platform.”
This message is related to product installation sequence. The correct installation sequence for Novell SSO to work with the GuardianEdge Platform is:
1. Install Novell Client for Windows.
2. Install GuardianEdge Hard Disk.
If GuardianEdge Hard Disk is already installed at the time of Novell Client for Windows installation, the following message will be displayed:
Figure A.1—Novell GINA Authenticator
No was clicked.
To fix the problem, correct the installation sequence:
1. Decrypt any and all encrypted hard disk partitions.
2. Uninstall GuardianEdge Hard Disk.
GuardianEdge Hard Disk Encryption 32
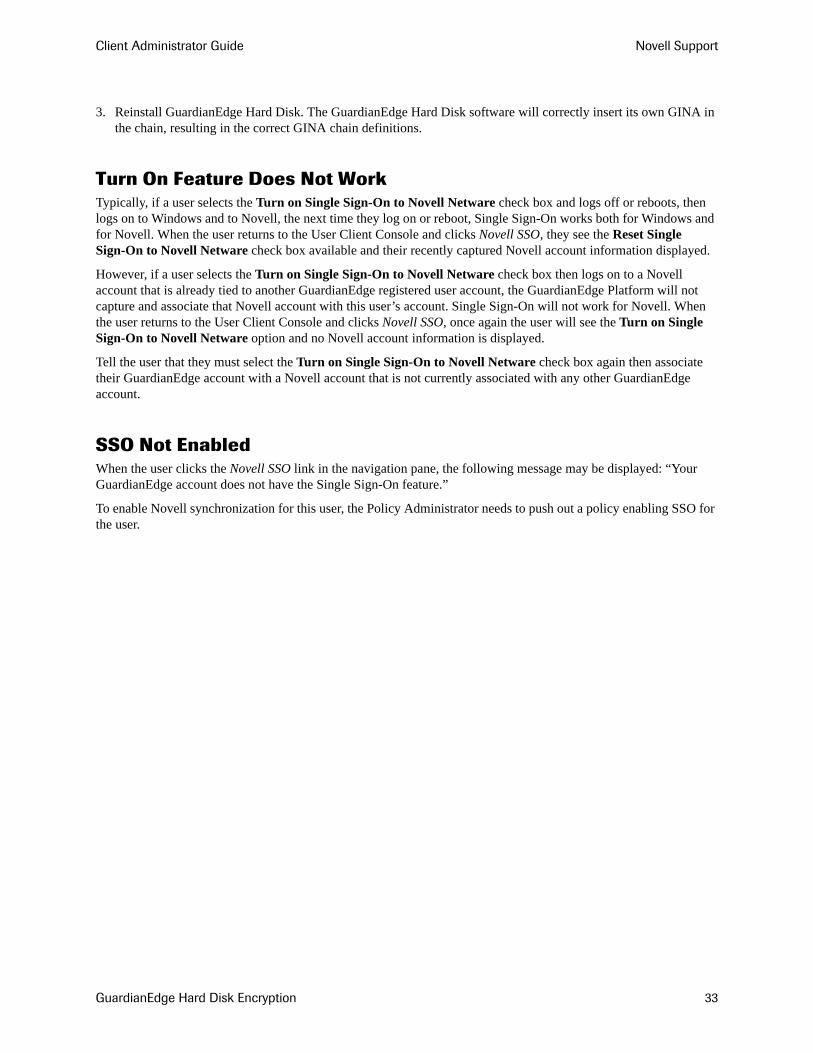
Client Administrator Guide Novell Support
3. Reinstall GuardianEdge Hard Disk. The GuardianEdge Hard Disk software will correctly insert its own GINA in the chain, resulting in the correct GINA chain definitions.
Turn On Feature Does Not WorkTypically, if a user selects the Turn on Single Sign-On to Novell Netware check box and logs off or reboots, then logs on to Windows and to Novell, the next time they log on or reboot, Single Sign-On works both for Windows and for Novell. When the user returns to the User Client Console and clicks Novell SSO, they see the Reset Single Sign-On to Novell Netware check box available and their recently captured Novell account information displayed.
However, if a user selects the Turn on Single Sign-On to Novell Netware check box then logs on to a Novell account that is already tied to another GuardianEdge registered user account, the GuardianEdge Platform will not capture and associate that Novell account with this user’s account. Single Sign-On will not work for Novell. When the user returns to the User Client Console and clicks Novell SSO, once again the user will see the Turn on Single Sign-On to Novell Netware option and no Novell account information is displayed.
Tell the user that they must select the Turn on Single Sign-On to Novell Netware check box again then associate their GuardianEdge account with a Novell account that is not currently associated with any other GuardianEdge account.
SSO Not EnabledWhen the user clicks the Novell SSO link in the navigation pane, the following message may be displayed: “Your GuardianEdge account does not have the Single Sign-On feature.”
To enable Novell synchronization for this user, the Policy Administrator needs to push out a policy enabling SSO for the user.
GuardianEdge Hard Disk Encryption 33
Client Administrator Guide Visually Impaired User Support
Appendix B. Visually Impaired User Support
OverviewGuardianEdge Hard Disk provides audio cues through a computer’s internal speakers to escort visually impaired users through the pre-Windows logon process.
To understand the user experience with audio cues, refer to the User Guide.
The feature is designed and documented for use with no prefilled user name and a prefilled domain, as discussed in the Installation Guide.
This appendix discusses the difficulties that a visually impaired password-based user may experience under the following circumstances:
The last person to log on to this Client Computer in pre-Windows was a Client Administrator.
The registered user is the only user on this computer, but has registered for two GuardianEdge accounts: a domain account and a local account.
Multiple users have registered with a mix of domain and local accounts.
After Client Administrator LogonWhen a Client Administrator logs on to a Client Computer in pre-Windows, the next time the user reboots, the Account type is set to client administrator and the Domain drop-down list box is disabled. Therefore, when you are supporting visually impaired users and you log on to their computer, before you leave that computer:
1. Reboot the computer. A short beep sounds, indicating the Startup screen (Figure 3.1). Press CTRL+ALT+DEL to bring up the pre-Windows password logon screen.
2. Set Account type to registered user.
3. Select the user’s domain or computer name from the Domain drop-down list box. Press TAB.
4. Two beeps sound; the cursor is in the User name field. Have the user type their user name, then press TAB.
5. Three beeps sound; the cursor is in the Password field. Have the user type their password, then press ENTER to submit their credentials.
Once the logon succeeds, the next time the user reboots, the pre-Windows password logon screen Account type and Domain fields are correctly prefilled.
Double RegistrationThe user may have logged on to Windows under their domain account and separately under a local account. As a result, the user may have registered twice. This will result in two domains in the pre-Windows logon.
To remove the complication:
1. Go to the user’s Client Computer.
2. Log on to Windows (optional, if the user is already logged on to Windows).
3. Launch the Administrator Client Console and authenticate.
4. Go to the Registered Users panel and unregister one of the user’s two accounts.
GuardianEdge Hard Disk Encryption 34
Client Administrator Guide Visually Impaired User Support
5. Reboot. Make sure the user logs on successfully with their remaining account. The Domain field will now be correctly prefilled upon subsequent reboots.
Multiple Users, Multiple Domains/Computer NamesThe audio cues feature is not designed for use on kiosk computers where users have registered with a mixture of domains and/or computer names.
GuardianEdge Hard Disk Encryption 35
Client Administrator Guide Keyboard Layouts
Appendix C. Keyboard Layouts
OverviewFor Client Computers that require pre-boot authentication, GuardianEdge Hard Disk offers a means of selecting different keyboard layouts in pre-Windows.
Toggling Keyboard LayoutsHaving an alternate keyboard layout to toggle to may be useful to you if you find yourself in a situation where you are supporting a registered user whose physical keyboard is unfamiliar to you. For example, you may be assisting a user who is in France and your GuardianEdge user name and password are US English. If you are logging on in pre-Windows and you are about to enter your Client Administrator credentials, you can toggle to your familiar keyboard layout. Even though you actually will be typing on an unfamiliar physical keyboard, the computer will interpret the incoming characters as if they were entered from the keyboard that you have selected to be the active keyboard.
To see the complete set of keyboard layout states—including when SHIFT, CAPS, or ALTGR keys are pressed—visit http://www.microsoft.com/globaldev/reference/keyboards.mspx.
Windows Keyboard Definition
Windows 7
Initial Steps
This section describes the steps to take to configure additional keyboards in Windows 7 and to assign an input language to that keyboard.
1. From the Start menu click Control Panel.
2. Within the Classic view, click Region and Language. The Region and Language window opens. Click the Keyboards and Languages tab.
Registered users must create their passwords and Authenti-Check question/answer pairs in Windows using a supported keyboard. That supported keyboard can then be selected in pre-Windows, if necessary, during authentication. For the list of supported keyboards, refer to the Installation Guide.
GuardianEdge Hard Disk Encryption 36
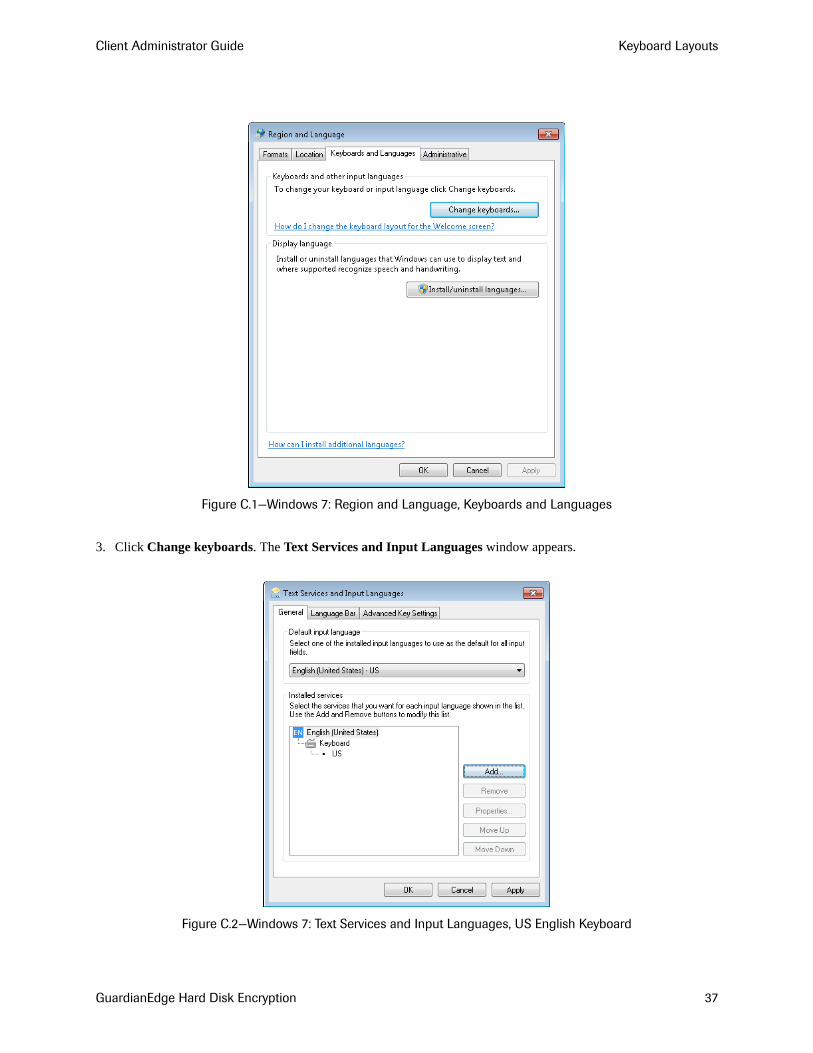
Client Administrator Guide Keyboard Layouts
Figure C.1—Windows 7: Region and Language, Keyboards and Languages
3. Click Change keyboards. The Text Services and Input Languages window appears.
Figure C.2—Windows 7: Text Services and Input Languages, US English Keyboard
GuardianEdge Hard Disk Encryption 37
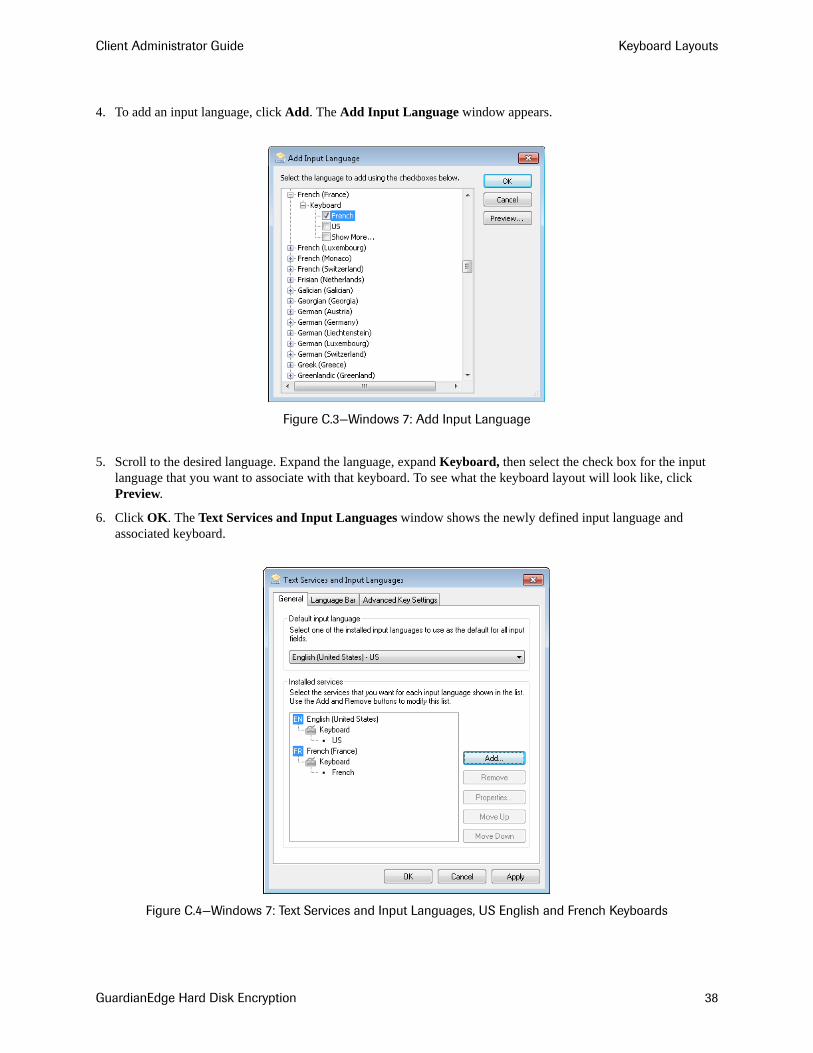
Client Administrator Guide Keyboard Layouts
4. To add an input language, click Add. The Add Input Language window appears.
Figure C.3—Windows 7: Add Input Language
5. Scroll to the desired language. Expand the language, expand Keyboard, then select the check box for the input language that you want to associate with that keyboard. To see what the keyboard layout will look like, click Preview.
6. Click OK. The Text Services and Input Languages window shows the newly defined input language and associated keyboard.
Figure C.4—Windows 7: Text Services and Input Languages, US English and French Keyboards
GuardianEdge Hard Disk Encryption 38
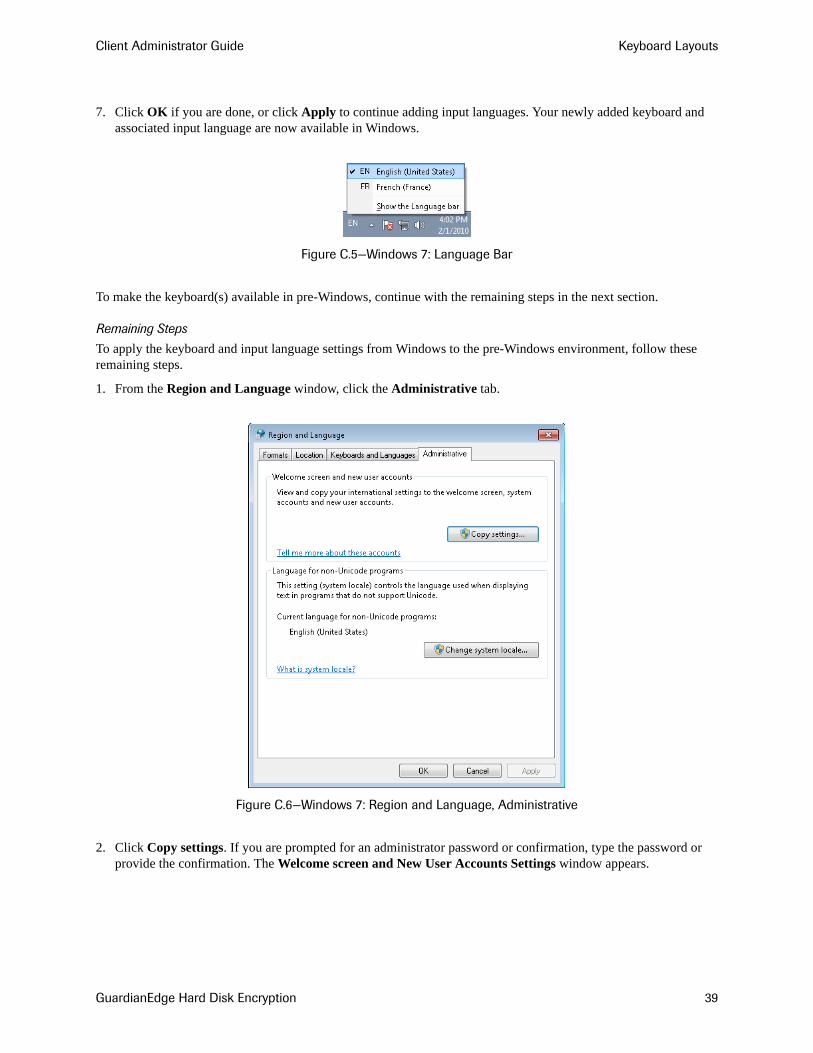
Client Administrator Guide Keyboard Layouts
7. Click OK if you are done, or click Apply to continue adding input languages. Your newly added keyboard and associated input language are now available in Windows.
Figure C.5—Windows 7: Language Bar
To make the keyboard(s) available in pre-Windows, continue with the remaining steps in the next section.
Remaining Steps
To apply the keyboard and input language settings from Windows to the pre-Windows environment, follow these remaining steps.
1. From the Region and Language window, click the Administrative tab.
Figure C.6—Windows 7: Region and Language, Administrative
2. Click Copy settings. If you are prompted for an administrator password or confirmation, type the password or provide the confirmation. The Welcome screen and New User Accounts Settings window appears.
GuardianEdge Hard Disk Encryption 39
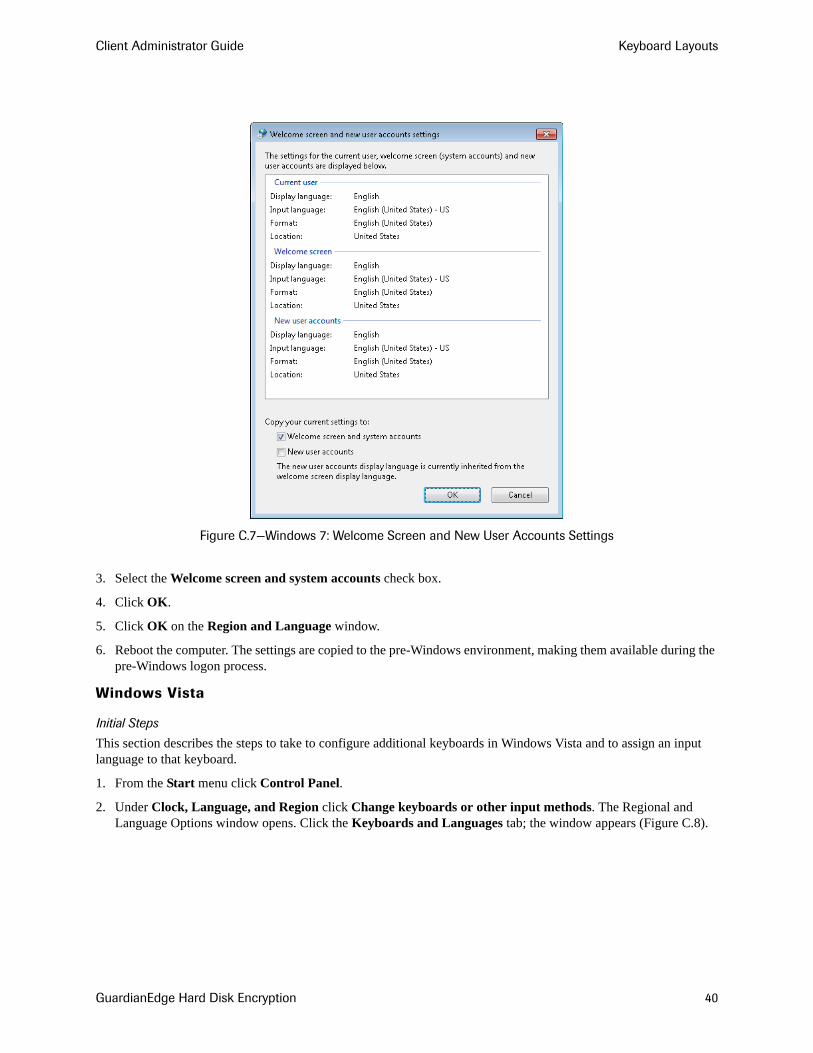
Client Administrator Guide Keyboard Layouts
Figure C.7—Windows 7: Welcome Screen and New User Accounts Settings
3. Select the Welcome screen and system accounts check box.
4. Click OK.
5. Click OK on the Region and Language window.
6. Reboot the computer. The settings are copied to the pre-Windows environment, making them available during the pre-Windows logon process.
Windows Vista
Initial Steps
This section describes the steps to take to configure additional keyboards in Windows Vista and to assign an input language to that keyboard.
1. From the Start menu click Control Panel.
2. Under Clock, Language, and Region click Change keyboards or other input methods. The Regional and Language Options window opens. Click the Keyboards and Languages tab; the window appears (Figure C.8).
GuardianEdge Hard Disk Encryption 40
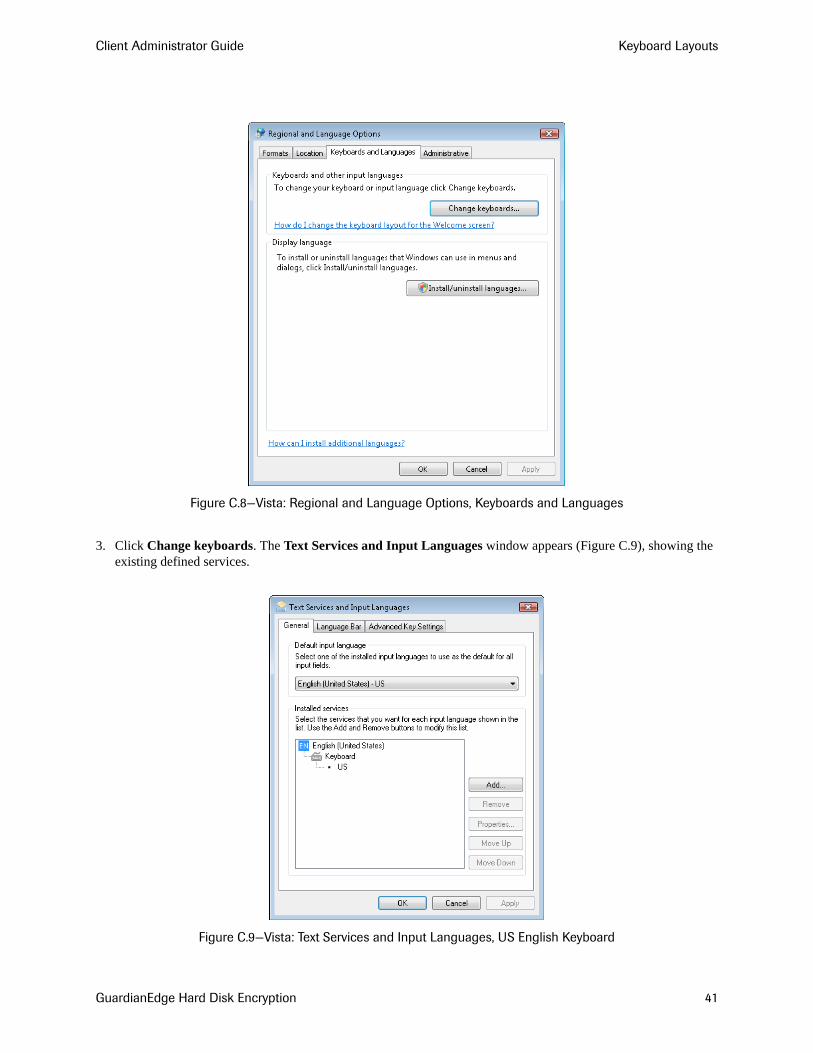
Client Administrator Guide Keyboard Layouts
Figure C.8—Vista: Regional and Language Options, Keyboards and Languages
3. Click Change keyboards. The Text Services and Input Languages window appears (Figure C.9), showing the existing defined services.
Figure C.9—Vista: Text Services and Input Languages, US English Keyboard
GuardianEdge Hard Disk Encryption 41

Client Administrator Guide Keyboard Layouts
4. To add an input language, from the Installed services section click Add. The Add Input Language window appears (Figure C.10).
Figure C.10—Vista: Add Input Language
5. Scroll to the desired language. Expand the language, expand Keyboard, then select the check box for the input language that you want to associate with that keyboard.
6. To see what the keyboard layout will look like, click Preview.
7. Click OK. The Text Services and Input Languages window shows the newly defined input language and associated keyboard.
Figure C.11—Vista: Text Services and Input Languages, US English and French Keyboards
GuardianEdge Hard Disk Encryption 42
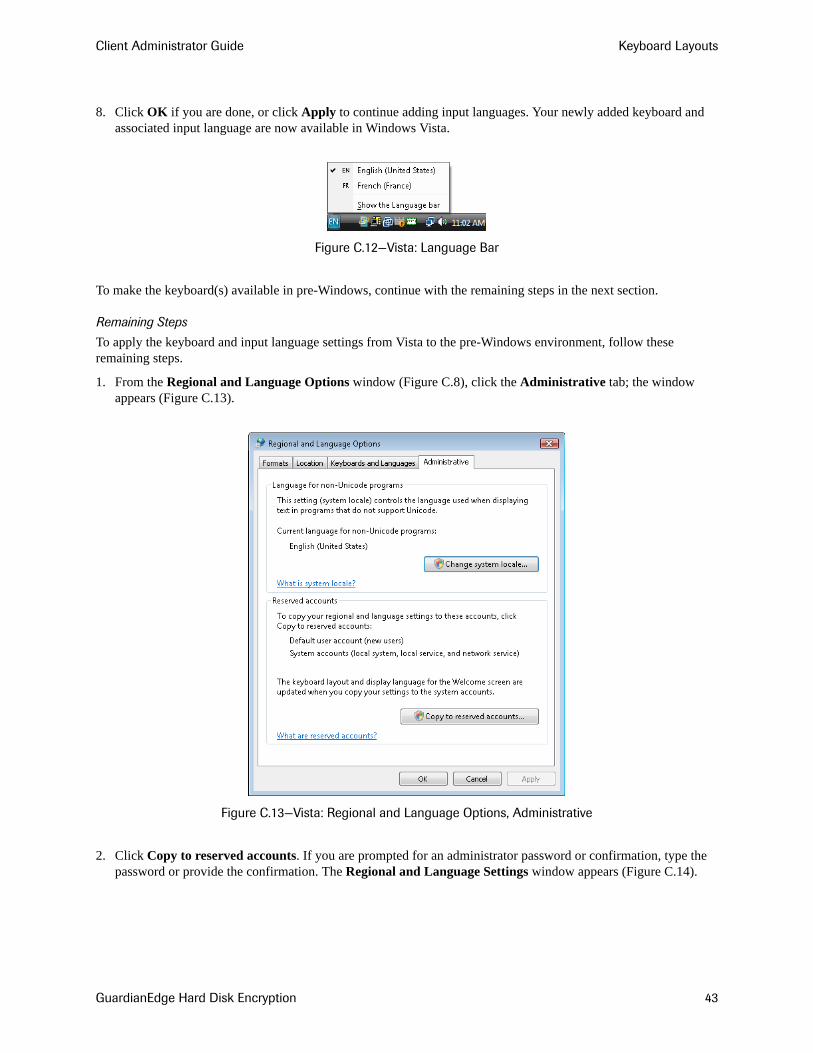
Client Administrator Guide Keyboard Layouts
8. Click OK if you are done, or click Apply to continue adding input languages. Your newly added keyboard and associated input language are now available in Windows Vista.
Figure C.12—Vista: Language Bar
To make the keyboard(s) available in pre-Windows, continue with the remaining steps in the next section.
Remaining Steps
To apply the keyboard and input language settings from Vista to the pre-Windows environment, follow these remaining steps.
1. From the Regional and Language Options window (Figure C.8), click the Administrative tab; the window appears (Figure C.13).
Figure C.13—Vista: Regional and Language Options, Administrative
2. Click Copy to reserved accounts. If you are prompted for an administrator password or confirmation, type the password or provide the confirmation. The Regional and Language Settings window appears (Figure C.14).
GuardianEdge Hard Disk Encryption 43
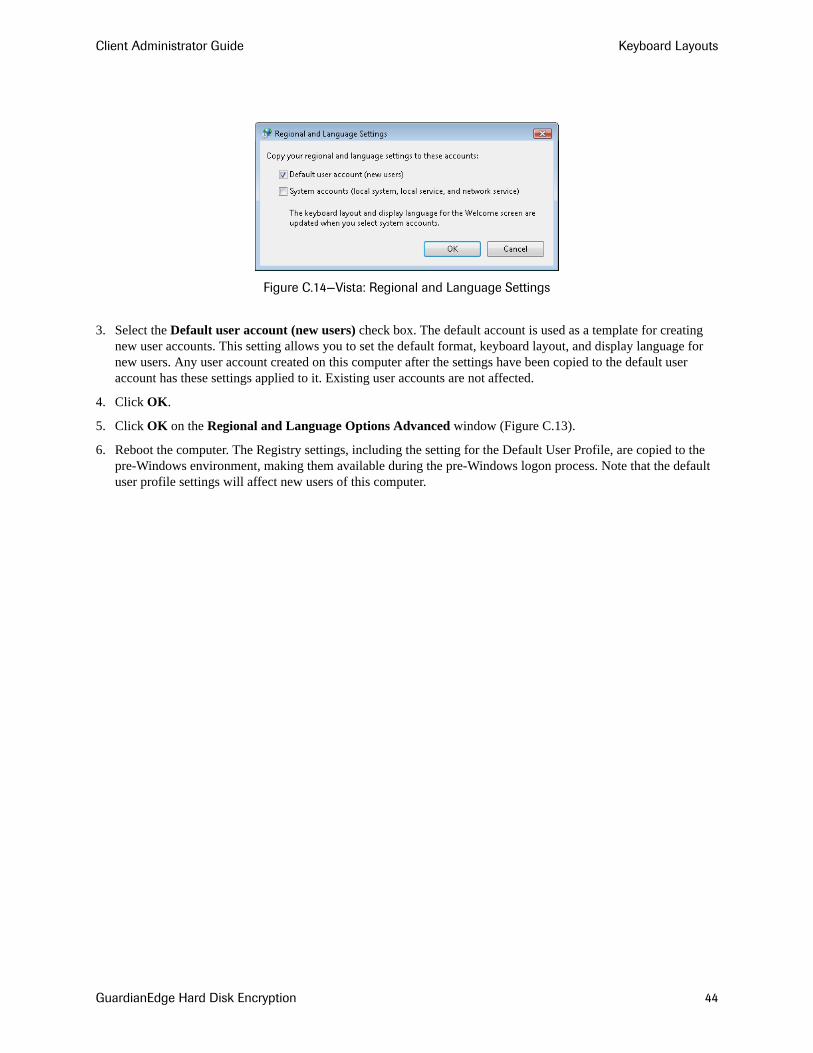
Client Administrator Guide Keyboard Layouts
Figure C.14—Vista: Regional and Language Settings
3. Select the Default user account (new users) check box. The default account is used as a template for creating new user accounts. This setting allows you to set the default format, keyboard layout, and display language for new users. Any user account created on this computer after the settings have been copied to the default user account has these settings applied to it. Existing user accounts are not affected.
4. Click OK.
5. Click OK on the Regional and Language Options Advanced window (Figure C.13).
6. Reboot the computer. The Registry settings, including the setting for the Default User Profile, are copied to the pre-Windows environment, making them available during the pre-Windows logon process. Note that the default user profile settings will affect new users of this computer.
GuardianEdge Hard Disk Encryption 44
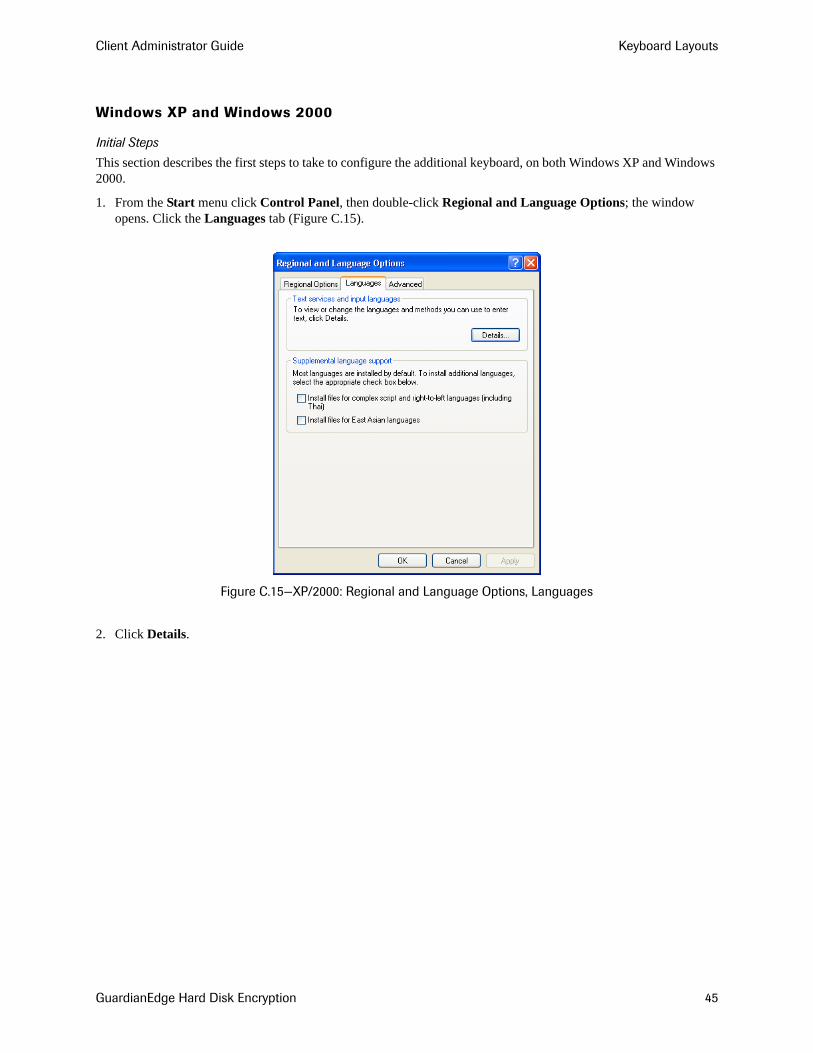
Client Administrator Guide Keyboard Layouts
Windows XP and Windows 2000
Initial Steps
This section describes the first steps to take to configure the additional keyboard, on both Windows XP and Windows 2000.
1. From the Start menu click Control Panel, then double-click Regional and Language Options; the window opens. Click the Languages tab (Figure C.15).
Figure C.15—XP/2000: Regional and Language Options, Languages
2. Click Details.
GuardianEdge Hard Disk Encryption 45
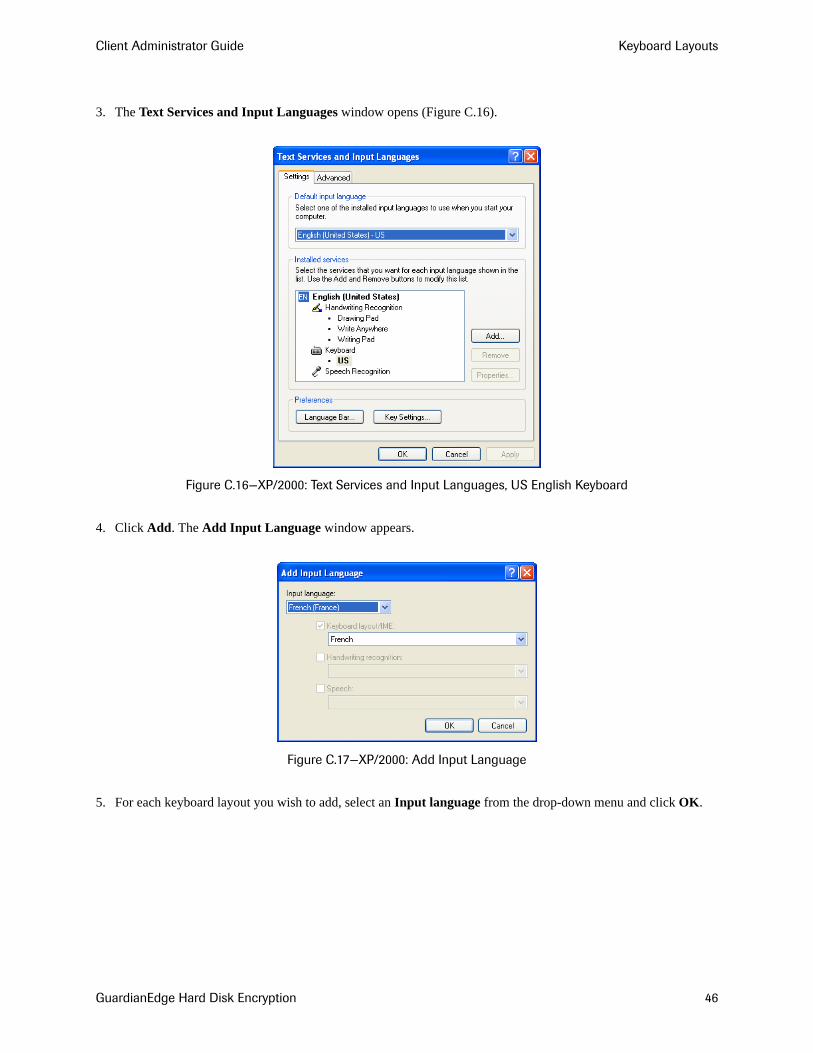
Client Administrator Guide Keyboard Layouts
3. The Text Services and Input Languages window opens (Figure C.16).
Figure C.16—XP/2000: Text Services and Input Languages, US English Keyboard
4. Click Add. The Add Input Language window appears.
Figure C.17—XP/2000: Add Input Language
5. For each keyboard layout you wish to add, select an Input language from the drop-down menu and click OK.
GuardianEdge Hard Disk Encryption 46
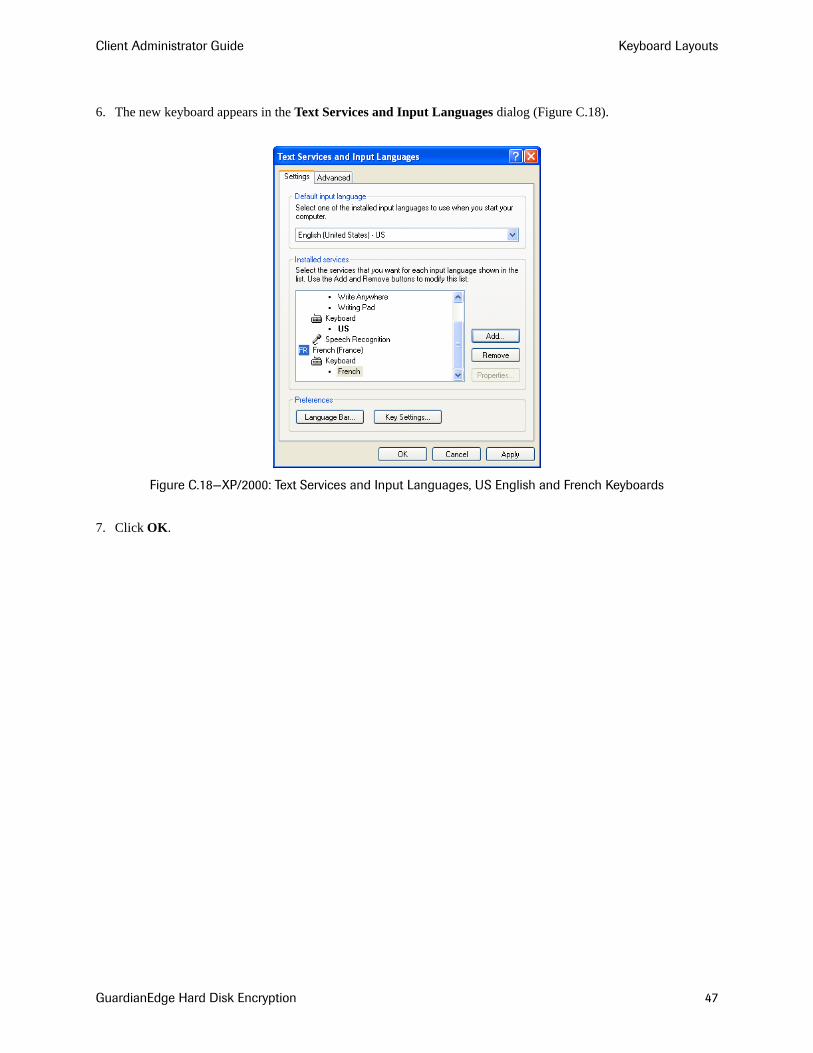
Client Administrator Guide Keyboard Layouts
6. The new keyboard appears in the Text Services and Input Languages dialog (Figure C.18).
Figure C.18—XP/2000: Text Services and Input Languages, US English and French Keyboards
7. Click OK.
GuardianEdge Hard Disk Encryption 47
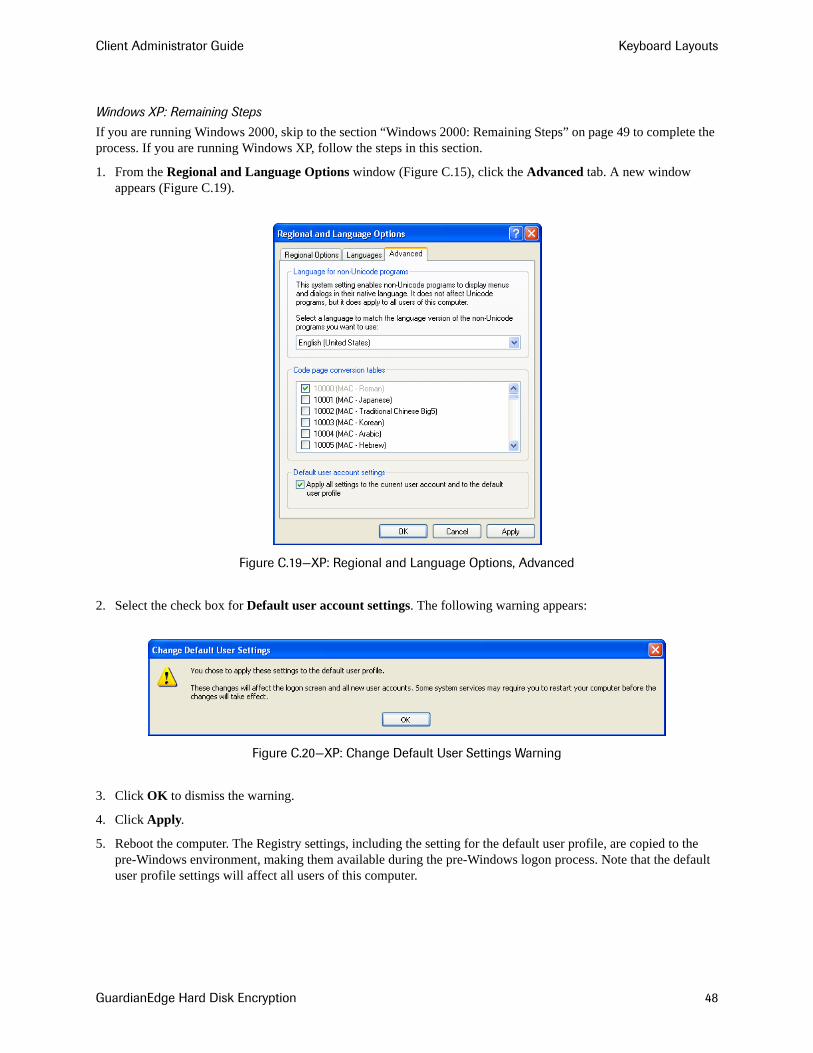
Client Administrator Guide Keyboard Layouts
Windows XP: Remaining Steps
If you are running Windows 2000, skip to the section “Windows 2000: Remaining Steps” on page 49 to complete the process. If you are running Windows XP, follow the steps in this section.
1. From the Regional and Language Options window (Figure C.15), click the Advanced tab. A new window appears (Figure C.19).
Figure C.19—XP: Regional and Language Options, Advanced
2. Select the check box for Default user account settings. The following warning appears:
Figure C.20—XP: Change Default User Settings Warning
3. Click OK to dismiss the warning.
4. Click Apply.
5. Reboot the computer. The Registry settings, including the setting for the default user profile, are copied to the pre-Windows environment, making them available during the pre-Windows logon process. Note that the default user profile settings will affect all users of this computer.
GuardianEdge Hard Disk Encryption 48

Client Administrator Guide Keyboard Layouts
Windows 2000: Remaining Steps
In Windows 2000, once you complete “Windows XP and Windows 2000” on page 45, use the Registry editor, RegEdit, to update the default user profile as follows:
1. Copy the values from “HKEY_CURRENT_USER\Keyboard Layout\Preload” to “HKEY_USERS\.DEFAULT\Keyboard Layout\Preload.”
2. Copy the values from “HKEY_CURRENT_USER\Keyboard Layout\Substitutes” to “HKEY_USERS\.DEFAULT\Keyboard Layout\Substitutes.”
3. Reboot.
GuardianEdge Hard Disk Encryption 49
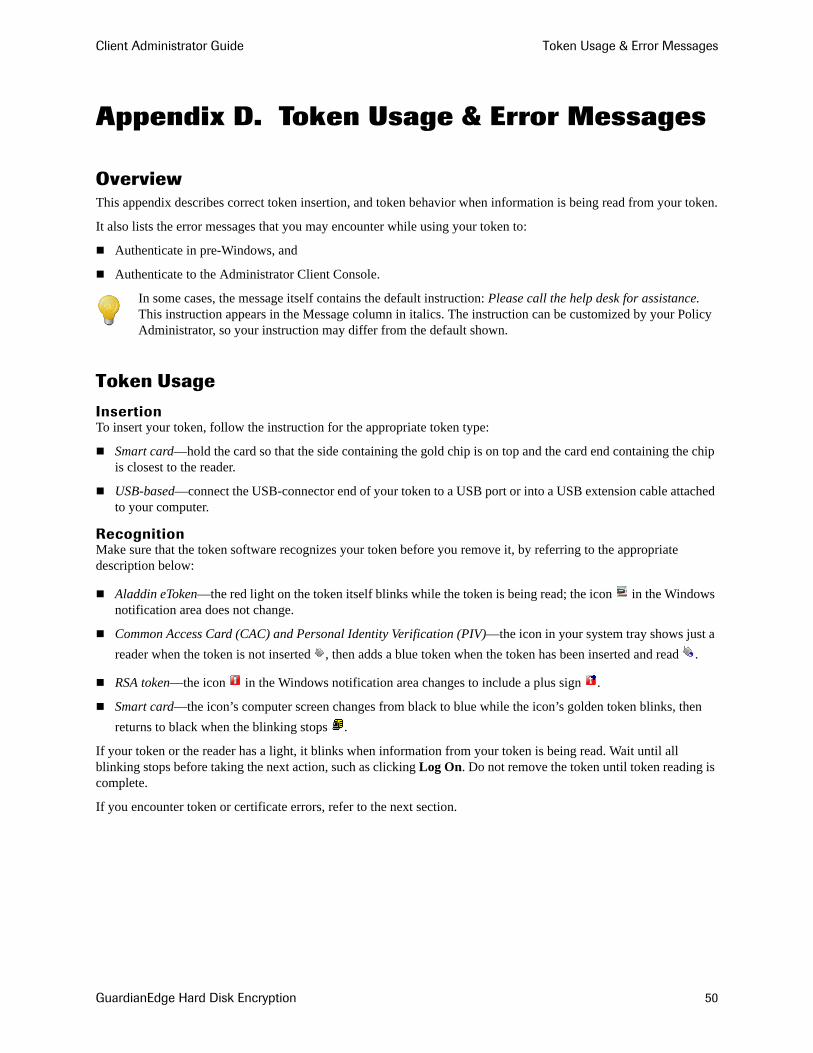
Client Administrator Guide Token Usage & Error Messages
Appendix D. Token Usage & Error Messages
OverviewThis appendix describes correct token insertion, and token behavior when information is being read from your token.
It also lists the error messages that you may encounter while using your token to:
Authenticate in pre-Windows, and
Authenticate to the Administrator Client Console.
Token Usage
InsertionTo insert your token, follow the instruction for the appropriate token type:
Smart card—hold the card so that the side containing the gold chip is on top and the card end containing the chip is closest to the reader.
USB-based—connect the USB-connector end of your token to a USB port or into a USB extension cable attached to your computer.
RecognitionMake sure that the token software recognizes your token before you remove it, by referring to the appropriate description below:
Aladdin eToken—the red light on the token itself blinks while the token is being read; the icon in the Windows notification area does not change.
Common Access Card (CAC) and Personal Identity Verification (PIV)—the icon in your system tray shows just a reader when the token is not inserted , then adds a blue token when the token has been inserted and read .
RSA token—the icon in the Windows notification area changes to include a plus sign .
Smart card—the icon’s computer screen changes from black to blue while the icon’s golden token blinks, then returns to black when the blinking stops .
If your token or the reader has a light, it blinks when information from your token is being read. Wait until all blinking stops before taking the next action, such as clicking Log On. Do not remove the token until token reading is complete.
If you encounter token or certificate errors, refer to the next section.
In some cases, the message itself contains the default instruction: Please call the help desk for assistance. This instruction appears in the Message column in italics. The instruction can be customized by your Policy Administrator, so your instruction may differ from the default shown.
GuardianEdge Hard Disk Encryption 50
Client Administrator Guide Token Usage & Error Messages
Error Messages
Pre-Windows LogonTable D.1 lists the error messages that may be generated when you attempt to log on to GuardianEdge Hard Disk in pre-Windows.
Table D.1—Pre-Windows Logon Messages
Token Type Message Meaning Action
CAC / Smart Card
The inserted token is not responding. Please make sure the token is inserted correctly and try again.
Your token is not inserted correctly.
Refer to the previous section “Token Usage” on page 50 for detailed information about proper token insertion. Remove the token. Reinsert the token in the appropriate manner. Click OK.
CAC / Smart Card
The inserted token could not be recognized. You will need to use a token that can be recognized by the system.
The type of token you are attempting to log on with does not match the type of token your Policy Administrator configured for your use.
Click OK to dismiss the message, remove the incorrect token, then insert the correct one, if you have it.
Smart Card
A matching certificate could not be found on this token. The current token will need to be replaced or modified by an administrator.
Please try to use Logon Assistance from the Password Logon screen.
No client administrator account matching the certificate(s) on your token could be found. You may have the wrong token.
Contact the administrator who issued you this token or the Policy Administrator who created your Client Administrator account.
RSA An error occurred during communication with the token.
To try logging on with a token again, click Restart Computer. Your computer will restart automatically.
Your token’s certificate is not intended for your GuardianEdge account or your token does not contain any certificates.
Click Restart Computer from the message box.
Insert the token intended for your GuardianEdge account.
If you do not know which token or certificate to use, contact the appropriate administrator.
If you are sure the token is the correct one, remove it, reinsert it, and try again.
GuardianEdge Hard Disk Encryption 51
Client Administrator Guide Token Usage & Error Messages
All A certificate validation error has occurred. The current token will need to be replaced or modified by an administrator.
Please call the help desk for assistance.
The certificate on this token is not within its validity period. Either it has expired or is not yet valid.
Your certificate may have been issued today, but is not yet valid because the Certificate Authority issues certificates using Greenwich Mean Time (GMT). Therefore, your local system date has not yet caught up with the GMT activation date.
Either wait for the local system time to catch up with GMT or contact the person who issued this token to you.
All Incorrect PIN. You inserted your token for the Startup screen but did not enter your PIN—or you entered an incorrect PIN—on the Logon screen before clicking OK.
Click OK to dismiss the message. Check your PIN, then type your PIN and click OK. Take care as you type your PIN, since resubmitting the wrong PIN a number of times could result in a blocked PIN.
All GuardianEdge Drive Encryption has detected that the token has been removed. Please click OK to restart the login process.
You removed your token before your logon process was complete.
Click OK. the Startup screen will be displayed. Insert your token and/or token reader. The Logon for tokens will be displayed. Type your PIN then click OK.
Your token reader was unplugged after GuardianEdge Hard Disk detected your token.
Plug the reader back in, then reboot. Insert your token at the Startup screen to bring up the Logon screen. Type your PIN then click OK.
All The PIN is blocked for this token. The current token needs to be replaced or modified by an administrator.
Please call the help desk for assistance.
Your PIN has been blocked by your token software for exceeding the maximum number of incorrect retries to enter your PIN.
Follow the instructions for getting assistance. Your PIN is blocked. The appropriate administrator will need to replace or modify your token.
Table D.1—Pre-Windows Logon Messages (Continued)
Token Type Message Meaning Action
GuardianEdge Hard Disk Encryption 52
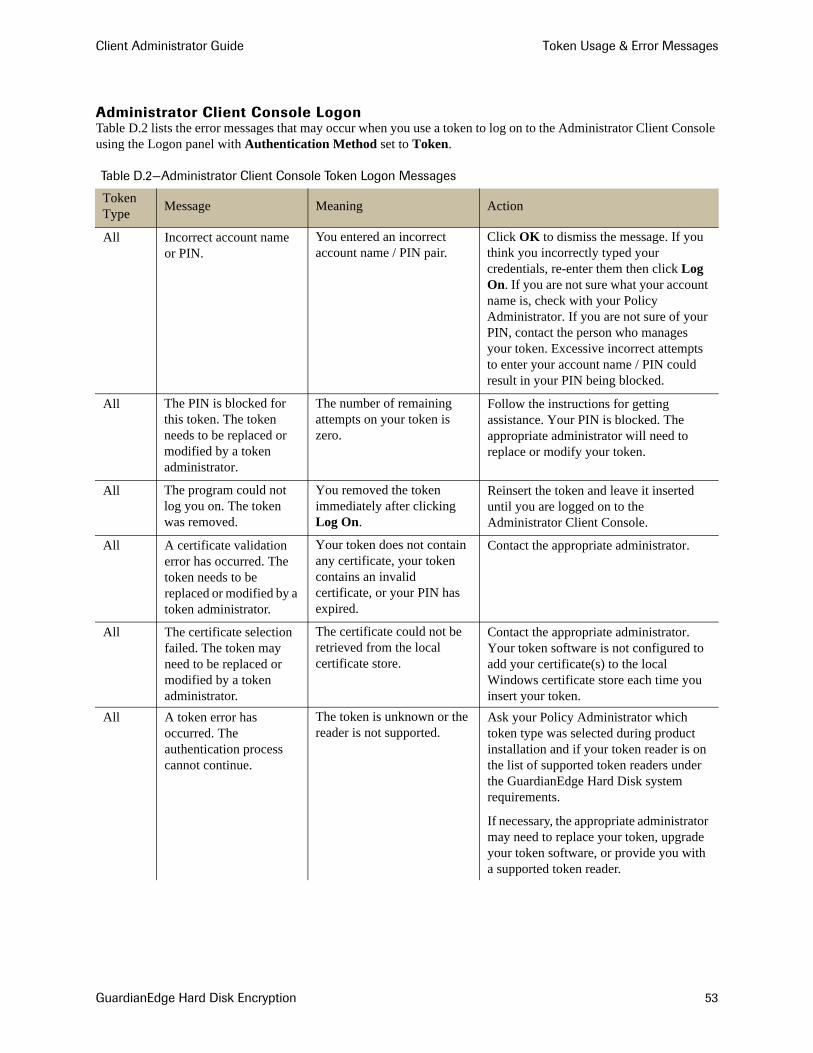
Client Administrator Guide Token Usage & Error Messages
Administrator Client Console LogonTable D.2 lists the error messages that may occur when you use a token to log on to the Administrator Client Console using the Logon panel with Authentication Method set to Token.
Table D.2—Administrator Client Console Token Logon Messages
Token Type Message Meaning Action
All Incorrect account name or PIN.
You entered an incorrect account name / PIN pair.
Click OK to dismiss the message. If you think you incorrectly typed your credentials, re-enter them then click Log On. If you are not sure what your account name is, check with your Policy Administrator. If you are not sure of your PIN, contact the person who manages your token. Excessive incorrect attempts to enter your account name / PIN could result in your PIN being blocked.
All The PIN is blocked for this token. The token needs to be replaced or modified by a token administrator.
The number of remaining attempts on your token is zero.
Follow the instructions for getting assistance. Your PIN is blocked. The appropriate administrator will need to replace or modify your token.
All The program could not log you on. The token was removed.
You removed the token immediately after clicking Log On.
Reinsert the token and leave it inserted until you are logged on to the Administrator Client Console.
All A certificate validation error has occurred. The token needs to be replaced or modified by a token administrator.
Your token does not contain any certificate, your token contains an invalid certificate, or your PIN has expired.
Contact the appropriate administrator.
All The certificate selection failed. The token may need to be replaced or modified by a token administrator.
The certificate could not be retrieved from the local certificate store.
Contact the appropriate administrator. Your token software is not configured to add your certificate(s) to the local Windows certificate store each time you insert your token.
All A token error has occurred. The authentication process cannot continue.
The token is unknown or the reader is not supported.
Ask your Policy Administrator which token type was selected during product installation and if your token reader is on the list of supported token readers under the GuardianEdge Hard Disk system requirements.
If necessary, the appropriate administrator may need to replace your token, upgrade your token software, or provide you with a supported token reader.
GuardianEdge Hard Disk Encryption 53
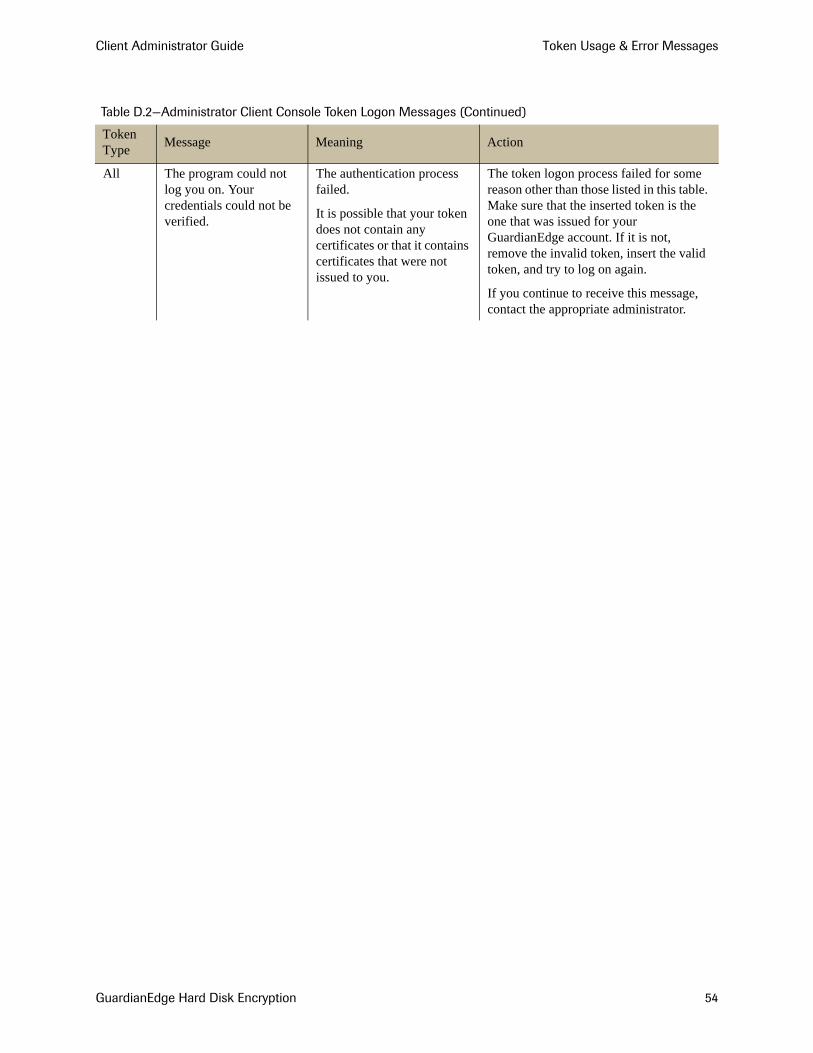
Client Administrator Guide Token Usage & Error Messages
All The program could not log you on. Your credentials could not be verified.
The authentication process failed.
It is possible that your token does not contain any certificates or that it contains certificates that were not issued to you.
The token logon process failed for some reason other than those listed in this table. Make sure that the inserted token is the one that was issued for your GuardianEdge account. If it is not, remove the invalid token, insert the valid token, and try to log on again.
If you continue to receive this message, contact the appropriate administrator.
Table D.2—Administrator Client Console Token Logon Messages (Continued)
Token Type Message Meaning Action
GuardianEdge Hard Disk Encryption 54
Client Administrator Guide Glossary
Glossary
Active Directory Active Directory is a directory service that provides the means to manage the identities and relationships that make up network environments. Active Directory provides network administrators with a hierarchical view of the network and a single point of administration for all network objects.
Authenti-Check Authenti-Check allows users missing their credentials to gain access to their computers and/or the User Client Console without assistance. A set of up to three question-answer pairs authenticates the user. Password users will be prompted to change their password upon successful completion of a pre-Windows Authenti-Check process. The User Client Console will launch automatically upon successful completion of a pre-Windows authentication process for a token-only user, so that they can use it to change tokens, if necessary. Authenti-Check is not available to Client Administrators.
Autologon Autologon is a policy used by Policy Administrators for remotely deploying software to computers protected by GuardianEdge Hard Disk. Software installations typically require several restarts of Client Computers, and Autologon authenticates without registered user or Client Administrator intervention. The Policy Administrator defines a period of time during which Autologon remains active, along with the total number of restarts that may occur within the defined period. Autologon does not decrement the number of available grace restarts.
Automatic Authentication
If the Client Computer is set for automatic authentication, GuardianEdge Hard Disk will not require valid GuardianEdge credentials to be provided before allowing Windows to load. This option relies on Windows to authenticate users.
In addition, users will be registered automatically unless a registration password is required. Requiring a registration password serves to avoid reaching the maximum registered user limit and to limit the number of users that can gain access to the User Client Console.
Certificate Certificates are issued by trusted third parties called certificate authorities. The certificate authority digitally signs the certificate at the time of issuance, thereby attesting that the certificate has been issued to a specific user, organization, or server.
GuardianEdge Hard Disk Encryption 55
Client Administrator Guide Glossary
Client Administrator Client Administrators provide local support to GuardianEdge users. When creating or updating Client Administrator accounts, the Policy Administrator assigns one of three privilege levels.
High—unregister registered users, decrypt encrypted partitions, extend the Client Computer’s next communication date, and unlock Client Computers.
Medium—decrypt encrypted partitions, extend the Client Computer’s next communication date, and unlock Client Computers.
Low—extend the Client Computer’s next communication date and unlock Client Computers.
Client Administrators cannot change their own passwords or use password-recovery methods.
Client Database The client database consists of a series of volume files and is part of the GuardianEdge file system. Once the location of the client database files has been specified during the creation of the Client Computer installation packages and the installation has completed, these files must never be moved or disturbed. See “Best Practices” on page 3.
GuardianEdge Data Protection Framework
GuardianEdge Data Protection Framework provides GuardianEdge Platform–wide features, such as authentication methods and settings, as well as registered user and Client Administrator accounts and information.
GuardianEdge Password
This password is used by registered users and by Client Administrators to authenticate to the GuardianEdge Platform during pre-boot authentication. Once Windows has loaded, registered users who do not have SSO enabled use this password to authenticate to the User Client Console and Client Administrators use their password to authenticate to the Administrator Client Console. Registered users who have SSO enabled and log off of their GuardianEdge session when closing the User Client Console, must also authenticate if they launch the console again during their Windows session. The Client Administrator uses their password to authenticate to Recover /A and Recover /D.
A Client Administrator’s password must be between 2 and 32 characters and is defined by the Policy Administrator through installation settings and policies.
If automatic authentication is in effect, users will not have a GuardianEdge password. Otherwise, users will define their GuardianEdge password during registration. If SSO is enabled, the user’s GuardianEdge password will be the same as their Windows password. If SSO is not enabled, the user’s GuardianEdge password will differ from their Windows password and they will be able to change this password using the User Client Console.
Job Access With Speech (JAWS)
JAWS is a screen-reader software program for visually impaired users.
GuardianEdge Hard Disk Encryption 56
Client Administrator Guide Glossary
Master Boot Record (MBR)
A master boot record (MBR) is the first sector (sector zero) of a data storage device, such as a hard disk. It is sometimes used for bootstrapping operating systems, sometimes used for holding a disk’s partition table, and sometimes used for identifying disk media. On some computers it can also be unused or ignored.
One-Time Password (OTP)
The One-Time Password (OTP) Program allows users to recover from a forgotten password, PIN, or token with help desk assistance. This assistance provides the user with a one-time password—called a response key—which allows the user to temporarily authenticate. A password-based user is then prompted to enter a new password.
The OTP Program can also be used by users who have the privilege to unlock a locked computer, with help desk assistance.
Two methods are available for assisting users: online and offline.
The online method is easier and more secure, but will not succeed unless the Client Computer has made contact with the GuardianEdge Management Server at least once following the registration of the user requiring assistance.
The offline method can be used if the online method fails or if the Client Computer has never checked in with the GuardianEdge Management Server. The registered user provides the help desk with an OTP personal identifier to help ensure their identity. They also provide the help desk with a challenge key; the help desk in turn provides the user with a response key.
Partition A logical division on a hard disk that allows the application of operating system–specific logical formatting to that division only and not to the entire hard disk.
Password Management The ability of a Policy Administrator to define attributes to which a registered user’s password must adhere, such as age, reusability, and complexity, if Single Sign-On (SSO) is not enabled. This password management applies during the registration process when a user defines a password, during password-recovery methods when a user is prompted to change their password, and in the User Client Console Password panel, where registered users without SSO may change their GuardianEdge passwords. This feature is both a Framework installation setting and computer policy.
Policy Administrator Policy Administrators perform centralized administration of the GuardianEdge Platform. Using the Manager Console and the Manager Computer, the Policy Administrator performs one or more of the following activities:
Updates and sets client policies.
Runs reports.
Changes the Management Password.
Creates the computer-specific Recover DAT file necessary for Recover /B.
Runs the One-Time Password Program.
GuardianEdge Hard Disk Encryption 57

Client Administrator Guide Glossary
Pre-Windows The GuardianEdge Hard Disk environment that loads upon reboot, before the Windows operating system loads, if the Client Computer is not configured for automatic authentication. This environment helps protect the Client Computer’s primary hard disk by requiring authentication before a user gains access to Windows and thus to the computer’s file system.
Recover Program The Recover Program can be used if a Client Computer encounters a serious error and cannot load Windows. The program attempts to regain access to data on the hard disk(s) by repairing the GuardianEdge client database files or by performing an emergency decryption.
Registration Registration is the process wherein users set their credentials so that they can authenticate in pre-Windows. In addition, users may be asked to set password recovery information. Registration may be configured to occur with or without the user’s intervention. The first user is required to register after the designated number of grace restarts has expired.
Re-Registration Existing GuardianEdge registered users are prompted to re-register if a Policy Administrator issues a computer policy requiring them to change their authentication method—from password to token, or from token to password—by a certain date. Refer to the User Guide for details.
Silent Client A silent client is a Client Computer installed from a Framework Client package created from a GuardianEdge Manager Console whose installation mode does not require connection to GuardianEdge Management Server. Silent clients do not communicate with the GuardianEdge Management Server. If the computer has never checked in, the online method of the One-Time Password recovery method and the Recover /B hard disk recovery option—which requires computer-specific data stored in the database during check-in—are not available.
Single Sign-On (SSO) A feature that allows GuardianEdge registered users to use their Windows password or PIN as their GuardianEdge password or PIN. If SSO is enabled, the user logs on once in pre-Windows and is then authenticated to Windows. If SSO is not enabled, the registered user logs on in pre-Windows using their GuardianEdge password, then logs on to Windows using their Windows password.
All users must authenticate to the User Client Console, unless automatic authentication is enabled. If SSO is enabled, a user can authenticate once to the User Client Console in a Windows session, then optionally close and relaunch the User Client Console without further authentication.
Windows manages password changes, imposing Windows password criteria. GuardianEdge Framework keeps the GuardianEdge password synchronized with the Windows password.
SSO See Single Sign-On.
GuardianEdge Hard Disk Encryption 58
Client Administrator Guide Glossary
Unregistration Unregistration is the removal of a GuardianEdge registered user account. This is generally performed by the Client Administrator using the Administrator Client Console. Common reasons for unregistration include an employee departure or if a user has forgotten their password or PIN and logon assistance methods have failed or are unavailable.
The Policy Administrator can set a policy that unregisters users who have not logged on during a designated time period. This can serve to keep kiosk machines from exceeding the maximum user limit.
User At least one user is required to register with GuardianEdge on each Client Computer. A wizard guides the user through the registration process, which involves a maximum of four screens. The registration process can also be configured to occur without user intervention.
Authentication to GuardianEdge Hard Disk can be configured to occur in one of three ways:
Single Sign-On enabled—The user will be prompted to authenticate once each time they restart their computer.
Single Sign-On not enabled—The user must log on twice: once to GuardianEdge Hard Disk and then separately to Windows.
Automatic authentication enabled—The user is not prompted to provide credentials to GuardianEdge Hard Disk; the authentication process is transparent. This option relies on Windows to validate the user’s credentials.
GuardianEdge Hard Disk Encryption 59
Client Administrator Guide Index
Index
A
About panel, description 27Administrator Client Console
description 16Drive Encryption tasks 22logging on 16navigating 20unregistering users 21
automatic authentication 2, 55GuardianEdge password 56
B
best practices, list 3build number, viewing 27
C
Check-In panel, description 25Client Administrator
compared to registered user 3role 56single-source passwords 1
consistency check, when to run 29
D
Decryption panel, description 23Drive Encryption
Check-In 25Decryption 23Encryption 22
Drive Encryption Access Utilitydescription 28running 29
F
focus 20
G
grace restarts, definition 5
H
hard disk recoveryoverview 28steps 28
J
JAWS 56
K
keyboard layouts, defining 36
L
lockoutCheck-In panel settings 26description 11, 25extending next communication due date 26
preempted by Autologon 11preventing 12recovering from 13
logging onAdministrator Client Console using password 17Administrator Client Console using token 18pre-Windows using password 9pre-Windows using token 10
N
navigationdirect access keys 21mouse 20TAB key 21
Novell supportoverview 32SSO for Novell not enabled 32SSO not enabled 33Turn on feature does not work 33
Q
Quick Help, use 20
R
Recover Program/A option 28/B option 25, 30–31, 58/D option 30client check-in effect 26client check-in requirement 25DAT file creation 31description 28, 58
Recovery Password, description 31recovery, see hard disk recoveryregistered user
compared with Client Administrator 3viewing and unregistering 21
Registered Users panel, description 22registration, prompting 5
T
tokenreader 50
token error messagesAdministrator Client Console logon 53pre-Windows logon 51
token logonAdministrator Client Console 18multiple certificates 19pre-Windows 10
U
unregistering usersabout 21manual process 22
V
version information, viewing 27
GuardianEdge Hard Disk Encryption 60

Client Administrator Guide Index
visually impaired user supportafter Client Administrator logon 34double registration 34
multiple users/domains 35overview 34
GuardianEdge Hard Disk Encryption 61