Embed Size (px)
Citation preview

HART® Calibration Assistant
154
Users Manual
February 2016© 2016 Fluke Corporation. All rights reserved. Specific tions are subject to change without notice.All product names are trademarks of their respective companies.

Users Manual
LIMITED WARRANTY AND LIMITATION OF LIABILITYEach Fluke product is warranted to be free from defects in material and workmanship under normal use and service. The warranty period is three years and begins on the date of shipment. Parts, product repairs, and services are warranted for 90 days. This warranty extends only to the original buyer or end-user customer of a Fluke authorized reseller, and does not apply to fuses, disposable batteries, or to any product which, in Fluke's opinion, has been misused, altered, neglected, contaminated, or damaged by accident or abnormal conditions of operation or handling. Fluke warrants that software will operate substantially in accordance with its functional specifications for 90 days and that it has been properly recorded on non-defective media. Fluke does not warrant that software will be error free or operate without interruption.
Fluke authorized resellers shall extend this warranty on new and unused products to end-user customers only but have no authority to extend a greater or different warranty on behalf of Fluke. Warranty support is available only if product is purchased through a Fluke authorized sales outlet or Buyer has paid the applicable international price. Fluke reserves the right to invoice Buyer for importation costs of repair/replacement parts when product purchased in one country is submitted for repair in another country.
Fluke's warranty obligation is limited, at Fluke's option, to refund of the purchase price, free of charge repair, or replacement of a defective product which is returned to a Fluke authorized service center within the warranty period.
To obtain warranty service, contact your nearest Fluke authorized service center to obtain return authorization information, then send the product to that service center, with a description of the difficulty, postage and insurance prepaid (FOB Destination). Fluke assumes no risk for damage in transit. Following warranty repair, the product will be returned to Buyer, transportation prepaid (FOB Destination). If Fluke determines that failure was caused by neglect, misuse, contamination, alteration, accident, or abnormal condition of operation or handling, including overvoltage failures caused by use outside the product’s specified rating, or normal wear and tear of mechanical components, Fluke will provide an estimate of repair costs and obtain authorization before commencing the work. Following repair, the product will be returned to the Buyer transportation prepaid and the Buyer will be billed for the repair and return transportation charges (FOB Shipping Point).
THIS WARRANTY IS BUYER'S SOLE AND EXCLUSIVE REMEDY AND IS IN LIEU OF ALL OTHER WARRANTIES, EXPRESS OR IMPLIED, INCLUDING BUT NOT LIMITED TO ANY IMPLIED WARRANTY OF MERCHANTABILITY OR FITNESS FOR A PARTICULAR PURPOSE. FLUKE SHALL NOT BE LIABLE FOR ANY SPECIAL, INDIRECT, INCIDENTAL OR CONSEQUENTIAL DAMAGES OR LOSSES, INCLUDING LOSS OF DATA, ARISING FROM ANY CAUSE OR THEORY.
Since some countries or states do not allow limitation of the term of an implied warranty, or exclusion or limitation of incidental or consequential damages, the limitations and exclusions of this warranty may not apply to every buyer. If any provision of this Warranty is held invalid or unenforceable by a court or other decision-maker of competent jurisdiction, such holding will not affect the validity or enforceability of any other provision.
11/99
Fluke CorporationP.O. Box 9090Everett, WA 98206-9090U.S.A.
Fluke Europe B.V.P.O. Box 11865602 BD EindhovenThe Netherlands

Users Manual
154HART® Calibration Assistant
IntroductionThe Fluke 154 HART® Calibration Assistant (the Product) consists of the HART® Modem (the Modem) and the Tablet with FlukeHART (the App). Wireless technology connects the Modem to the Tablet and App. Wires connect the Modem to a HART field device (the Device). Use the App to configure and calibrate the Device.
The intended user is familiar with the basic functions of wireless devices and mobile technology.
How to Contact Fluke To contact Fluke:
• Technical Support USA: 1-800-44-FLUKE (1-800-443-5853)• Repair USA: 1-888-99-FLUKE (1-888-993-5853)• Canada: 1-800-36-FLUKE (1-800-363-5853)• Europe: +31 402-675-200• Japan: +81-3-6714-3114• Russia: +8-495-664-75-12• Singapore: +65-6799-5566• Anywhere in the world: +1-425-446-5500• Or, visit Fluke's Website at www.fluke.com.• To register your product, visit register.fluke.com.• To register your App, see Use the Product.• To see, print, or download the latest manual supplement, visit http://
us.fluke.com/usen/support/manuals.
1

Users Manual
Safety InformationA Warning identifies hazardous conditions and actions that could cause bodily harm or death. A Caution identifies conditions and actions that could damage the Meter, the equipment under test, or cause permanent loss of data.
XWWarning
To prevent possible electrical shock, fire, or personal injury:
• Read all safety information before you use the Product.
• Carefully read all instructions.
• Use the Product only as specified, or the protection supplied by the Product can be compromised.
• Do not Tap voltages >30 V ac rms, 42 V ac peak, or 60 V dc.
• Do not use the Product around explosive gas, vapor, or in damp or wet environments.
• Do not use the Product if it operates incorrectly.
• Do not use the Product if it is damaged.
• Disable the Product if it is damaged.
• Do not apply more than the rated voltage, between the terminals or between each terminal and earth ground.
• Use only Fluke approved power adapters to charge the battery.
• Disconnect the battery charger and move the Product or battery to a cool, non-flammable location if the rechargeable battery becomes hot
(>50 °C) during the charge period.
• Do not disassemble or crush battery cells and battery packs.
• Batteries contain hazardous chemicals that can cause burns or explode. If exposure to chemicals occurs, clean with water and get medical aid.
• Have an approved technician repair the Product.
2

Users Manual
SymbolsTable 1 is a list of symbols used on the Product or in this document.
Unpack the ProductCarefully unpack all items from the box and make sure that you have the items listed in Table 2. After you unpack and inspect the Product, fully charge the Modem and Tablet before use. See Batteries.
Table 1. Symbols
Symbol Description
Consult user documentation.
X WARNING. HAZARDOUS VOLTAGE. Risk of electric shock.
W WARNING. RISK OF DANGER.
Spent Lithium batteries should be disposed of by a qualified recycler or hazardous materials handler per local regulations. Contact your authorized Fluke Service Center for recycling information.
) Certified by CSA Group to North American safety standards.
P Conforms to European Union directives.
Conforms to relevant Australian EMC standards.
à Conforms to relevant South Korean EMC standards.
~
This product complies with the WEEE Directive marking requirements. The affixed label indicates that you must not discard this electrical/electronic product in domestic household waste. Product Category: With reference to the equipment types in the WEEE Directive Annex I, this product is classed as category 9 "Monitoring and Control Instrumentation" product. Do not dispose of this product as unsorted municipal waste.
3

Users Manual
Table 2. Standard Accessories
Item Description PN
Tablet and Accessories Varies by country
HART Modem 4766133
Carrying Case 4757850
D USB Cable for charging Modem 3563901
E AC280 Sure Grip Hook Clip, Red 1613782
F AC280 Sure Grip Hook Clip, Black 2063165
G Fluke-754, Alligator Clip Set, Extended Tooth 3765923
H TPAK80 Strap 669960
I Magnet 669952
-- Quick Reference Guide, not pictured 4766015
-- Safety Information, not pictured 4766026
-- Fluke 154 Users Manual, stored on Tablet, not pictured. --
4

Users Manual
Turn on the ProductTo turn on the Tablet, push the power button on the side of the Tablet.
To register the App:
1. Connect the Tablet to the internet.The information in this step is for a Samsung Galaxy. The steps can be different based on the Tablet used. For more information, see the manual of the Tablet manufacturer.a. Tap Apps.
b. Tap Settings. If it is not on the main Apps screen, swipe to the side through the Apps screens until Settings is visible.
c. On the left side of the screen, select Wi-Fi.d. On the right side of the screen, select the Internet to connect to.e. Push (Home) located below the screen on the Tablet.f. Open the Tablet browser to verify the Tablet is connected to the Internet.g. Push .
2. Tap .3. Tap I Accept on the FlukeHART End User License Agreement (EULA) screen.4. On the Registration screen:
a. Delete the default email address and company name.b. Enter your email address and company name.c. Select the box to get emails when updates are available.d. Review the legal notices.
5. Tap Update Registration.
5

Users Manual
App FamiliarizationThis section explains how to use the App menu.
FlukeHART MenuUse the App menu to view the Device or Modem that is connected to the App, connect to a new Device or Modem, save the Device configurations, change App settings, show App registration information, and more. To use the App menu, the Device connectivity indicator must be visible. See Device Explorer number 6.
To open the App Menu, Tap .
To exit App submenus:
1. Tap .2. Select Device Explorer.The App submenus are explained in the next sections.
New Device1. Select New Device to connect to a new device.2. Select Done in the message box that opens.
The App automatically identifies and communicates with the new Device, and the status of the communication shows on the status bar.
3. Exit the App submenu.
Device ExplorerSelect Device Explorer to exit the App menu and view Device menus.
Figure 1 and Table 3 show a sample menu and how to use it.
NoteThe sample menu below will not show on the screen until after you connect the Product. See Use the Product.
6

Users Manual
Figure 1. Sample Menu
Status words show here.
7

Users Manual
Table 3. Sample Menu Navigation
Item Description
App menu buttonSelect to connect to a new device or modem, print Device information, etc.
App submenu title
Device model and DDVisible when a Device is connected.
NoteMay not be visible while a Method runs.
D Device Status iconVisible on Device Explorer menu. Select to view Device Status menu.
E Device tagVisible when a Device is connected.
F Device connectivity indicatorVisible when a Device is connected to the App.
GModem connectivity indicatorConnected means the App and Modem are paired and online.Not Connected means the App and Modem are not paired and online.
H Status barShows the status of communication between the App and the Device.
I Back arrowSelect to go back to the previous screen.
J Device menu or Device submenu titleVisible when a Device is connected.
K Variable labelSelect to view more information about the variable.
8

Users Manual
Settings1. Select Settings to view or change the App settings listed in Table 4.2. To save changes, tap Save Settings.3. Exit the App submenu.
L Unit of Measure
M Read-only variable value
N
Drop down box variable selection1. Tap to open a list of available variable values.2. Select the value to change to that value.3. Tap COMMIT or CANCEL. See item descriptions below.
O
Read-write variable value1. Tap to open a keyboard.2. Change the value.3. Tap Done to close the keyboard.4. Tap COMMIT or CANCEL. See item descriptions below.
P
Function buttonsBlack buttons open submenus. Tap to navigate to required submenu to view or change data.Blue buttons run a script called a Method.1. Tap to calibrate the Device, troubleshoot the Device, or run other
available Methods.2. In necessary, follow the instructions on the screens that open.
Q COMMIT
When font is yellow, tap to send changes to the Device.
R CANCEL
When font is yellow, tap to cancel changes and keep original values.
Table 3. Sample Menu Navigation (cont.)
Item Description
9

Users Manual
Wireless DevicesYou can view available wireless devices, view the Modem that is connected, or connect to a new Modem.
To connect to another Modem:
1. Turn on the new Modem.2. Tap Wireless Devices to view a list of available wireless devices.3. If the Modem is not on the list of available devices, tap SCAN.
A list of available devices shows.4. If the Modem is on the list of available devices, select the new Modem.
NoteWhen more than one modem is in the same area, multiple HART Modems are listed. It may require trial and error to determine which modem is connected.
Table 4. App Settings
Setting Description
Default Modem
Shows the default modem. Select Reset to remove the default modem. To set a new default modem, see Wireless Devices.
Hart Master Select the appropriate box to set the Primary Master or Secondary Master for Multi-master systems.
Polling Address
Select to change the Polling Address to look for Devices on Multi-drop networks. The default address is Polling Address 0. If there are more addresses than can fit in the window, scroll to see the complete list of Polling Addresses.
LanguageSelect to change the language of the DD data.The default language is English. If the selected language is not available in the DD, English is used.
10

Users Manual
5. If prompted for a pairing code, enter 1234.6. Exit the App submenu.
Document DeviceYou can save Device configurations as a comma delimited text file and a formatted PDF file.
1. Select to save Device configuration to a file.2. You can edit the fields: File location, Technician, Notes, Header, Footer.
NoteThe File location field defaults to /storage/emulated/0/FlukeHART/file_name. The Tablet converts this to My Files/Device Storage/FlukeHART/file_name.
The file location is needed to view the file on the Tablet and to transfer the file to a PC. See Save Files to PC.
3. Tap Save Configuration.4. If the file already exists, select Yes to overwrite the file or No to enter a new
file name.5. Tap OK.
RegistrationSelect to view or update the App registration information.
AboutSelect to view information about the App.
ExitSelect to close the App.
11

Users Manual
Use the ProductThe Modem and App come paired to each other. To use a different modem, pair the new Modem to the App. See Wireless Devices.
The Device manufacturer develops Device Descriptions (DD) for their products and stores them in a DD Library. The latest DD Library is installed on the Tablet. The menus, data, status, and configurations will be different based on the Device DD.
When updates to the App or DD Library are available, Fluke emails a link to the email address used to register the Product. To make sure you receive the update emails, verify the email address in the App Registration submenu is correct.
XWWarning
The Tablet and Modem are not rated for intrinsic safety and should only be connected in a safe area.
NoteConnect the Modem, Device, and Loop Power Supply before you turn on the Modem to improve initial communication reliability.
1. Turn off the Tablet and the Modem.2. Attach the clips to the wires of the Modem.3. Connect the clips to the Device across the 4 to 20 mA connection on the
Device.
Although the communication signal is available anywhere along the 4 mA to 20 mA wire, it is often easiest to connect the Modem to the terminals of the Device. Figure 2 shows the System Diagram with a Fluke 754, with an internal 250 Ω resister, as the Loop Power Supply.
12

Users Manual
Figure 2. System Diagram with Fluke 754 as Loop Power Supply
If a suitable load resistance is not available, place a 250 Ω resistor in series with the Device power supply. Connect the Modem across the loop load resistor (A-B) or across the Device terminals (C-D). See Figure 3.
Figure 3. Resistor System Diagram
754 DOCUMENTING PROCESS CALIBRATOR
TEST DC PWR+ –+–
–+
Loop PowerSuppy
HARTDevice
250 ΩB C
D
A
13
Users Manual
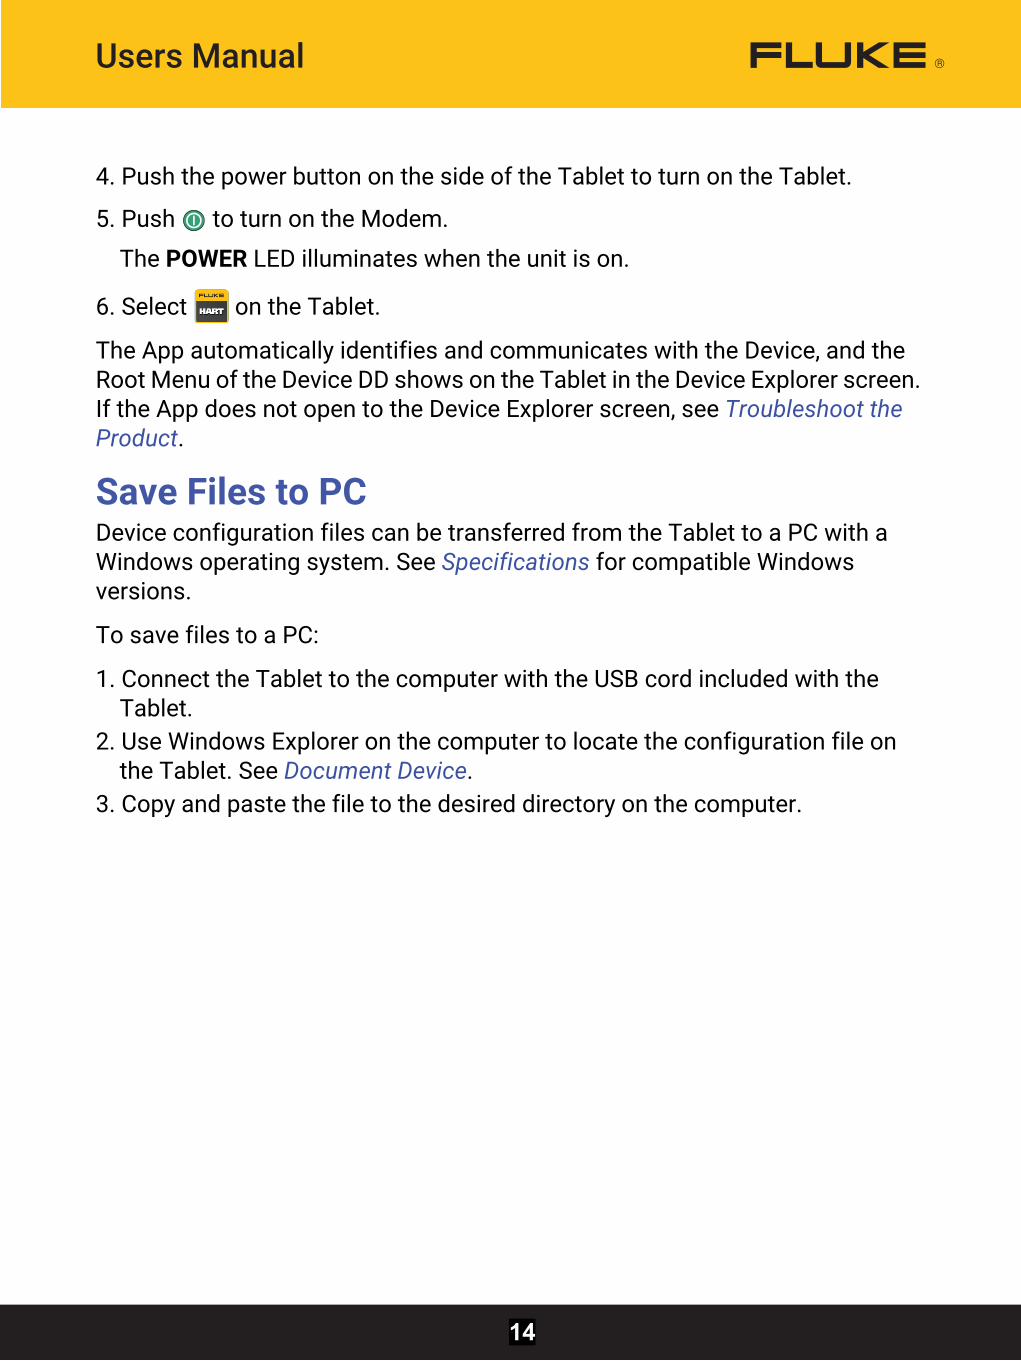
4. Push the power button on the side of the Tablet to turn on the Tablet.
5. Push to turn on the Modem.
The POWER LED illuminates when the unit is on.
6. Select on the Tablet.
The App automatically identifies and communicates with the Device, and the Root Menu of the Device DD shows on the Tablet in the Device Explorer screen. If the App does not open to the Device Explorer screen, see Troubleshoot the Product.
Save Files to PCDevice configuration files can be transferred from the Tablet to a PC with a Windows operating system. See Specifications for compatible Windows versions.
To save files to a PC:
1. Connect the Tablet to the computer with the USB cord included with the Tablet.
2. Use Windows Explorer on the computer to locate the configuration file on the Tablet. See Document Device.
3. Copy and paste the file to the desired directory on the computer.
14

Users Manual
Troubleshoot the ProductIf the App fails to connect to the Device or the connection is unreliable, try the steps in Table 5.
Table 5. Troubleshoot the Product
Problem Make sure...
Device is not connected
The loop power supply is on.
The loop resistance is between 250 Ω and 1 KΩ.
The loop current is within HART limits.
For multi-drop configurations, all transmitters in loop have unique addresses.
The Modem is connected across the loop resistor or the transmitter terminals.
The Modem battery is charged.
The Modem power switch is on and the POWER LED is illuminated.
The Modem can connect to the App. Try to pair the Modem with the App.
The App functions as expected. 1. Close the App.2. Restart the App.
The Tablet functions as expected. Restart the Tablet.
15

Users Manual
Maintenance
Clean the ProductClean the Product occasionally with a damp cloth and mild detergent. Do not let moisture get into the Product.
BatteriesCharge the Modem BatteryConnect the USB cable to the USB Port on the Modem and the PC USB Port or AC USB plug adapter. The yellow CHARGING LED illuminates. The CHARGING LED blinks when the battery is almost fully charged.
Connection is unreliable.
The Tablet is within 76.2 m (250 ft) of the Device.
The orientation of the Device to the Modem is adjusted for good radio link strength.
The Modem battery is charged.
The Modem is connected to the Device before the Modem is turned on.
The Device is not in Burst mode.The Modem can connect while in Burst mode, but it may take more attempts to connect.
The Modem can connect to the App.Try to pair the modem with the App.
The App functions as expected.1. Close the App.2. Restart the App.
The Tablet functions as expected.Restart the Tablet.
Table 5. Troubleshoot the Product (cont.)
Problem Make sure...
16

Users Manual
The red CHARGE ERROR LED illuminates when an error is detected.
1. Remove the USB cable from the Modem.2. Turn the Modem off.3. Put the Modem in a cool location for 30 minutes.4. Connect the USB cable again and charge the battery.If the condition continues, contact Fluke. See How to Contact Fluke.
Turn the Modem off when not in use to extend the battery life.
Charge the Tablet BatterySee the instructions from the manufacturer.
To view the Radio Frequency Data Class B Instruction Sheet, visit http://us.fluke.com/usen/support/manuals and search for PN 4409209.
Specifications
ModemBattery
Type .................................... Rechargeable Li-IonLife ...................................... 19 hours continuous useChargingTemperature....................... 0 °C to 40 °C (32 °F to 104 °F)
Max Voltage ........................... 30 VTemperature
Operating ............................ 0 °C to 50 °C (32 °F to 122 °F)Storage..................................≤1 month: -10 °C to 45 °C
(14 °F to 113 °F)>6 months: 20 °C ±5 °C
Humidity ................................. 0 % to 90 % (non-condensing)Size ......................................... 50 mm x 70 mm x 20 mm
(2.0 in. x 2.75 in. x 0.8 in.)
17

Users Manual
Weight .................................... 170 g (6 oz)IP Rating................................. 52Safety ..................................... IEC 61010-1: Pollution Degree 2,
IEC 62133Wireless Radio
Frequency........................... 2412 MHz to 2462 MHzOutput Power ..................... <100 mW
Software RequirementsFlukeHART.......................... Android 5.0To save files to PC............. Windows 7 or newer
Electromagnetic Compatibility (EMC)International ....................... IEC 61326-1: Portable, IEC 61326-2-2
CISPR 11: Group 1, Class AGroup 1: Equipment has intentionally generated and/or uses conductively-coupled radio frequency energy that is necessary for the internal function of the equipment itself.
Class A: Equipment is suitable for use in all establishments other than domestic and those directly connected to a low-voltage power supply network that supplies buildings used for domestic purposes. There may be potential difficulties in ensuring electromagnetic compatibility in other environments due to conducted and radiated disturbances.
Korea (KCC)........................ Class A Equipment (Industrial Broadcasting & Communication Equipment)
Class A: Equipment meets requirements for industrial electromagnetic wave equipment and the seller or user should take notice of it. This equipment is intended for use in business environments and not to be used in homes.
TabletSee specifications from the manufacturer.
18