Embed Size (px)
Citation preview
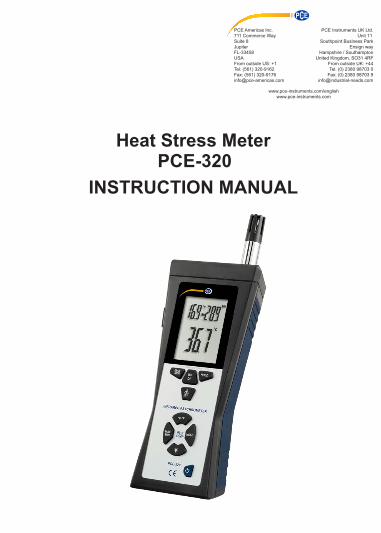
Heat Stress Meter PCE-320
INSTRUCTION MANUAL
PCE Americas Inc.711 Commerce Way Suite 8 JupiterFL-33458USAFrom outside US: +1Tel: (561) 320-9162Fax: (561) [email protected]
www.pce-instruments.com/englishwww.pce-instruments.com
PCE Instruments UK Ltd. Unit 11
Southpoint Business Park Ensign way
Hampshire / SouthamptonUnited Kingdom, SO31 4RF
From outside UK: +44Tel: (0) 2380 98703 0
Fax: (0) 2380 98703 9 [email protected]
INTRODUCTION Thank you for purchasing the PCE-320
Climate Meter. This device offers non-contact (infrared) temperature measurements capability. The built-in laser pointer increases target accuracy while the backlight LCD and handy push-buttons combine for convenient, ergonomic operation. Type K thermocouple functionality and Humidity & Temperature Sensor of highest reliability and excellent long-term stability are also built-in.
Proper use and care of this meter will provide years of reliable service.
2
1.Features:1 . 3 in professional measuring instrument:
Type k, IR and Psychrometer. 2. Triple digital LCD display.3. Built-in microprocessor circuit assuresexcellent performance and accuracy.4. Fast response , all data calculated fourtimes in one second.5. Standard type k(NiCr-NiAI) Thermocoupleinput jack suitable for all kinds of type kprobe.6. Infrared to measure surface temp.7. Red laser indicator included.8. LCD With Backlight9. Automatic range selection1 O. USB 11. Low battery indication.12. Auto Power o�.13. Handheld size,easy to carr y.
3
The software incl. further instructions can be downloaded here:https://www.pce-instruments.com/english/download-win_4.htm
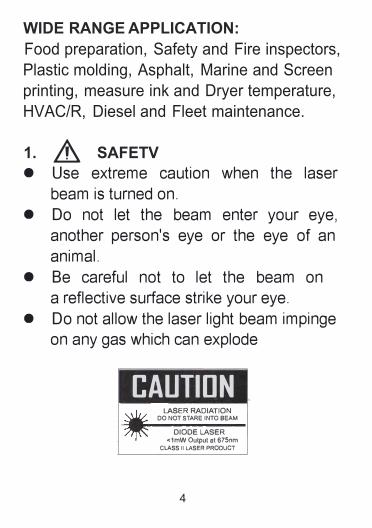
WIDE RANGE APPLICATION: Food preparation, Safety and Fire inspectors, Plastic molding, Asphalt, Marine and Screen printing, measure ink and Dryer temperature, HVAC/R, Diesel and Fleet maintenance.
1. � SAFETV• Use extreme caution when the laser
beam is turned on.• Do not let the beam enter your eye,
another person's eye or the eye of ananimal.
• Be careful not to let the beam ona reflective surface strike your eye.
• Do not allow the laser light beam impingeon any gas which can explode
CAUTIDN LASER RADIATION
DO NOT STARE INTO BEAM
DIODELASER
<1mW Output at 675nm CLASS ll LASER PROOUCT
4
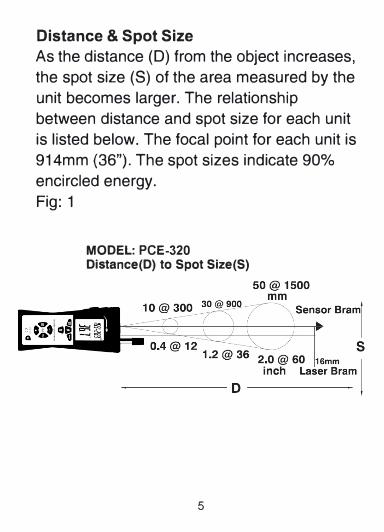
Distance & Spot Size
As the distance (O) from the object increases,
the spot size (S) of the area measured by the
unit becomes larger. The relationship
between distance and spot size for each unit
is listed below. The focal point for each unit is
914mm (36"). The spot sizes indicate 90%
encircled energy.
Fig: 1
MODEL: PCE-320 Distance(D) to Spot Size(S)
5
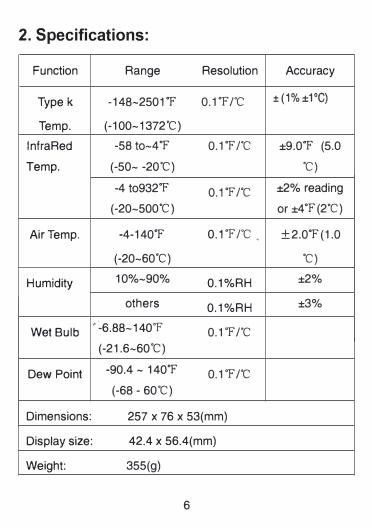
2. Specifications:
Function Range Resolution Accuracy
Type k -148-2501 'F 0.1 'F /'C ± (1% ±1ºC)
Temp. (-100-1372'C)
lnfraRed -58 to-4'F 0.1'F/'C ±9.0'F (5.0
Temp. (-50- -20'C) ºC)
-4 to932'F 0.1'F/'C ±2% reading
(-20-500ºC) or±4ºF(2ºC)
AirTemp. -4-140ºF 0.1'F/'C . ±2.0'F(1.0
(-20-60ºC) ºC)
Humidity 10%-90% 0.1%RH ±2%
others 0.1%RH ±3%
Wet Bulb -·-6.88-140'F 0.1'F/'C (-21.6-60'C)
Dew Point -90.4 - 140'F 0.1'F/"C (-68 - 60'C)
Dimensions: 257 x 76 x 53(mm)
Display size: 42.4 x 56.4(mm)
Weight: 355(g)
6
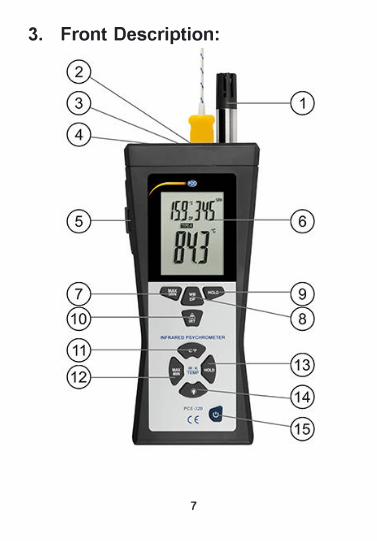
3. Front Description:
7
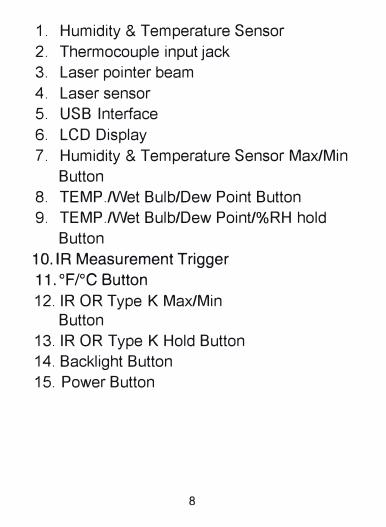
1. Humidity & Temperature Sensor2. Thermocouple input jack3. Laser pointer beam4. Laser sensor5. USB Interface6. LCD Display7. Humidity & Temperature Sensor Max/Min
Button8. TEMP./Wet Bulb/Dew Point Button9. TEMP./Wet Bulb/Dew Point/%RH hold
Button1 O. IR Measurement Trigger
11. ºF/ºC Button
12. IR OR Type K Max/MinButton
13. IR OR Type K Hold Button14. Backlight Button15. Power Button
8
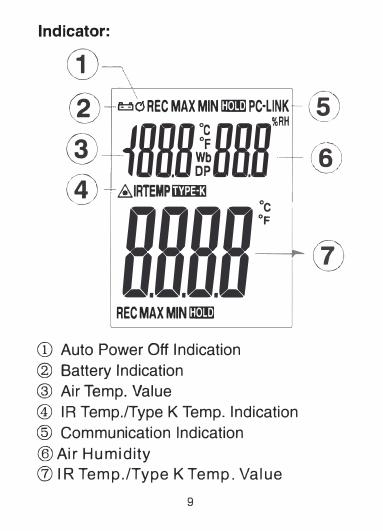
lndicator:
�G REC MAX MIN H PC·LINK
1BHBJBHff RH
&IRTEMPii:lm
®
®
CD
®
®
@
nnnn=
� aaaa-®
RECMAXMINH
CD Auto Power Off I ndication ® Battery lndication @ Air Temp. Value @ IR Temp./Type K Temp. lndication @ Communication lndication
@Air Humidity (J) IR Temp./Type K Temp. Value
9

4.0peration:
1)�Air Humidity and temp. MAX,MIN,
Recording Function.
- Press the Max/Min button to begin capturingthe Minimum and Maximum values, The 'REC'icon will appear on the upper left corner of thedisplay.- Press the Max/Min to view maximum andminimum recorded readings.- Press and Hold the Max/Min button until thedisplay returns to standard operation to exit theMax/Min function and the "REC" icon on theupper left comer will disappear.
2)©Press to select the operation mode from
air temperature, d_ew point and web bulb.
10
3)�- Press the HOLD button to freeze Air
Humidity and temp. reading in the upper half
display, The 'HOLD' icon will appear on the
upper right corner of the display. Press the
HOLD button again to return to normal
operation and the 'HOLD' icon will disappear.
4)@ - Press to measure surface temp. By
activating IR function.
- Release to hold the surface temperature
value 1 O seconds, and later change
to measure type k temp.
5)0-Press to change temperature unit.
11
6)� IR temp. or Type k MAX,MIN, RecordingFunction. - Press the Max/Min button to begincapturing the Minimum and Maximum values, The 'REC' icon will appear on the lower left comer of the display. - Press the Max/Min to view maximum andminimum recorded readings.- Press and Hold the Max/Min button until thedisplay retums to standard operation to exitthe Max/Min function and the "REC" icon onthe lower left comer will disappear.
7)9 ,·- Press the HOLD button to freeze I.R or type
k temp. reading in the lower half display,The 'HOLD' icon will appear on the lower ofthe display. Press the HOLD button againto retum to normal operation and the'HOLD' icon will disaQpear.
12

8)0- Press the button to turn the meter on or off.
5. Auto Power OFF:
- The meter will automatically turn off after 15
minutes if no keys are pressed during this
period.
6. Bypass Auto Power Off:
The meter will automatically turn off after
15 minutes in the normal. When you turn on
the meter, and press the button @ first,an
"disAPO" appears on the LCD, then you ean release the button and the automatic power off feature will be disabled.
7.Low Battery:
lf the battery indicator appears on
the upper left comer of the display, this
indicates battery is low. Please replace with
a 9 volt battery.
13

8. Warranty:
The meter is warranted to be free
from defects in material and workmanship
for a period of two years from the date
of purchase. This warranty covers
normal operation and does not cover
batter, misuse, abuse, alteration, tampering,
neglect, improper maintenance or damage
resulting from leaking batteries. Proof of
purchase is required for warranty repair.
-
14