Embed Size (px)
Citation preview

This supersedes and replaces in its entirety all previously published versions of this document. T1431 (Last revised on 08.08.16)
DESCRIPTIONBostik HeatStep™ is a comfortable, cost-efficient electric radiant heat system that can be used on concrete slab or plywood substrates. Almost every type of floor covering can be warmed with Bostik HeatStep™, including engineered hardwood, ceramic & porcelain tile, stone, laminates, vinyl, or carpet. Warm, luxurious floors are popular in bathrooms, shower floors, kitchens, entries, or any room with cold floors. Two options are available for Bostik HeatStep™ installations to accommodate a large range of applications.
BOSTIK HEATSTEP™ MATIs easy, fast and designed for safety. • Simply roll out the mats. • Use the two-sided tape to attach to the subfloor. • Cover with a cementitious layer and let cure fully. • Install the floor covering.
BOSTIK HEATSTEP™ WIREOffers the flexibility to cover large rooms and accommodate complex room layouts. • Secure the cable straps to the subfloor.• Stretch the cable between the cable straps.• Cover with a cementitious layer and let cure fully. • Install the floor covering. For both options, ensure that the floor covering used is approved in writing by the manufacturer for use with radiant floor heat systems. The cementitious layer used to cover the Bostik HeatStep™ Mat or Bostik HeatStep™ Wire may be Bostik’s SL-150™ Self-Leveling Underlayment, any Bostik Portland cement patch (Bostik Webcrete® 95, Bostik Webcrete® 98, Bostik UltraFinish™), or any Bostik thin set or mortar (Bostik ReFlex®, Bostik Single-Flex® F.S., Bostik Single-Flex®, Bostik Big Tile & Stone™, Bostik Bostik PM™, Bostik Porcelain-Mate™, Bostik Tile-Mate® Premium, Bostik Ditra-Set™ Thin-Set, Bostik Tile-Mate® Floor & Wall, (Mud-in-a-Bag). If installing on a
plywood subfloor, the thin set or mortar must be polymer modified (Bostik ReFlex®, Bostik Single- Flex® F.S., Bostik Single-Flex®, Bostik Big Tile & Stone™, Bostik PM™, Bostik Ditra-Set™ Bostik Thin-Set, Tile- Mate® Floor & Wall, (Mud-in-a-Bag).Bostik HeatStep™ thermostat controls are offered in programmable and basic models. An integral relay system is offered to control large systems. These dual-voltage controls sense floor or air temperature, have built in GFCI protection and energy-saving SmartStart technology. Designed for safety, all Bostik HeatStep™ cables are built with dual twisted wires to shield against EMF (Electromagnetic Fields). Bostik HeatStep™ products are fully grounded and operate with ground fault circuit protection when using a Bostik HeatStep™ thermostat control.
BENEFITS OF BOSTIK HEATSTEP™ FLOOR WARMING SYSTEMS:• Maintenance-free.• Completely silent, no vents or duct work.• Comfortable, even heat without the drying effects of forced
air heating.• Efficient – warmth at your feet.• Fewer airborne particles than when using forced air heating.• All Bostik HeatStep™ wire and mat products are made
in America.
KEY FEATURES
– Maintenance free– Warm hardwood, ceramic, stone,
laminates & other floor coverings– Comfortable, even heat without the
drying effects of forced air
HeatStep™
FLOOR WARMING SYSTEM
INSTALLATION BENEFITS1. Adhesive strips speed up the installation process by allowing
either side of the mat to b e adhered to the floor so they don’t move around when troweling the Bostik cementitious layer.
2. Bostik HeatStep™ Mats lay out flatter for easier troweling.3. Thin, open-weave construction allows the cementitious layer
to flow through the mat and easily bond with the underlying material. This one-step application adds only 1/8" thickness over a normal tile installation.
4. Single power lead construction makes mats easy to install and simpler to connect to the control.
5. The industry’s highest-quality heating wire using ETFE high-temperature insulation, urethane jacket, and oxygen-free copper heating elements for corrosion resistance, temperature resistance, abrasion resistance, and longevity.
6. Twisted, twin-wire construction creates ultra-low EMF.7. 120-VAC and 240-VAC models available for small residential to
large commercial applications.8. Shielded and fully grounded 10-ft. power lead provides jobsite
safety and durability. Power leads are color-coded for 120 VAC or 240 VAC.
INSTALLATION CONSIDERATIONSSubstrate Prep: Proper preparation of the substrate is critical to a successful installation. The substrate should be clean, flat, dry, and free of voids, projections, loose materials, oil, grease, sealers and all other surface contaminates. For installation on a plywood subfloor, ensure that either a second underlayment-grade layer or a cement backerboard is added to the main plywood subfloor. For concrete subfloors, a crack-isolation and insulation barrier may be used. Do not install any Bostik HeatStep™ product over expansion joints. A channel may be cut into the subfloor to accomodate the thicker splice between the heating wire and power lead. Efficiency: The efficiency of the product is highly dependent on the site conditions and specific application. For example, concrete slabs that extend outside of the structure may significantly reduce efficiency as it carries heat away from the interior. Plywood subfloors with no insulation underneath may allow heat to escape to the airspace below. Using adequate insulation below the Bostik HeatStep™ layer can significantly increase efficiency, reduce heat up times, and lower operating costs.Cementitious Installation: All of the heating wire and power lead splice must be fully embedded in the cementitious layer. Exposed wire or crowning will void the warranty. Be careful not to damage the heating wires with the trowel or other tools when applying the cementitious layer. Always make sure the Wire Fault Detector is connected to each Bostik HeatStep™ Mat or Wire for the entire installation process so that the location of any damage is easier to determine. Please read the installation instructions for further details.Engineered Hardwood Flooring Installation: Make sure the cementitious layer is fully cured prior to flooring installation. If installed on a green concrete slab, the slab must be fully cured as well. Run the system for a minimum of 72 hours prior to installation of the flooring, and then reduce the temperature of the slab to the acceptable range for the adhesive application. After the adhesive is fully cured, gradually increase the temperature on the thermostat by 1-2 degrees per day until the optimal heating temperature is achieved. This allows the wood to gradually acclimate and will minimize the occurrence or severity of shrinking, cracking, cupping or bowing.
NOTE: At the beginning of each heating season, the same procedure of gradually increasing the heat by 1-2 degrees per day must be followed.
BOSTIK HEATSTEP™ MATSBostik HeatStep™ Mats are designed for safety and ease of installation. Bostik HeatStep™ Mats are UL® Listed for the U.S. and Canada, and are manufactured in the U.S. All mats have the “S-pattern” wire construction and produce 12 watts/sq. ft. (41 Btu/hr./sq. ft.), which is enough to heat many spaces.
DESIGNING A BOSTIK HEATSTEP™ MAT FLOOR WARMING SYSTEM• Evaluate how many square feet of floor to be heated. Do not put
under cabinets or appliances. • Leave your Bostik HeatStep™ Mat at least 6" away from the
toilet wax ring and 4"–6" away from walls. • To keep toes warm, install right up to the toe-kick in front
of kitchen or bath cabinets, and in front of a toilet, shower, or tub.
• Select one mat, or a combination of mats, to fill the area. Remember, multiple mats of the same voltage can be wired together to fill larger areas.
• The tape and mesh may be cut between wires to make turns or to fill in odd-shaped areas. DO NOT CUT THE WIRES.
• Bostik HeatStep™ Mat is UL Listed for installation in shower floors and benches.
• See Bostik HeatStep™ installation manual for more details.
HOW MUCH BOSTIK HEATSTEP™ MAT SHOULD I ORDER?1. Calculate total wall-to-wall area of the room. Subtract the
square footage of all built-ins (tub, toilet, cabinets, etc.). Total area – built-ins) = ( ____ – ____ ) = ____ sq. ft.
2. Multiply this area by 0.90. Round down to the nearest 5 sq. ft. This is the heated area. ______ x 0.90 = ______ sq. ft. of heated area.
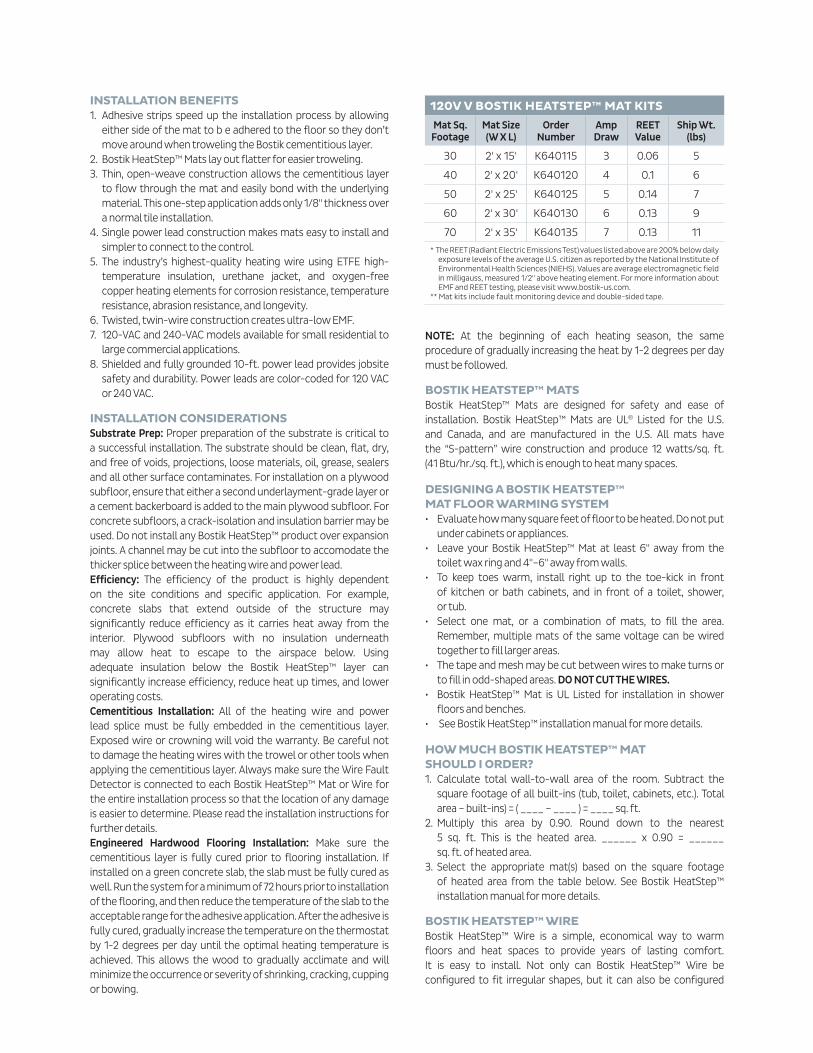
3. Select the appropriate mat(s) based on the square footage of heated area from the table below. See Bostik HeatStep™ installation manual for more details.
BOSTIK HEATSTEP™ WIREBostik HeatStep™ Wire is a simple, economical way to warm floors and heat spaces to provide years of lasting comfort. It is easy to install. Not only can Bostik HeatStep™ Wire be configured to fit irregular shapes, but it can also be configured
120V V BOSTIK HEATSTEP™ MAT KITS
Mat Sq. Footage
Mat Size(W X L)
Order Number
Amp Draw
REET Value
Ship Wt. (lbs)
30 2' x 15' K640115 3 0.06 5
40 2' x 20' K640120 4 0.1 6
50 2' x 25' K640125 5 0.14 7
60 2' x 30' K640130 6 0.13 9
70 2' x 35' K640135 7 0.13 11
* The REET (Radiant Electric Emissions Test) values listed above are 200% below daily exposure levels of the average U.S. citizen as reported by the National Institute of Environmental Health Sciences (NIEHS). Values are average electromagnetic field in milligauss, measured 1/2" above heating element. For more information about EMF and REET testing, please visit www.bostik-us.com.
** Mat kits include fault monitoring device and double-sided tape.

HOW MUCH BOSTIK HEATSTEP™ WIRE SHOULD I ORDER?1. Calculate total wall-to-wall area of the room. Subtract the
square footage of all built-ins (tub, toilet, cabinets, etc.). (Total area – built-ins) = ( ____ –____ ) = ____ sq. ft.
2. Multiply this area by 0.90. Round down to the nearest 5 sq. ft. This is the heated area. ______ x 0.90 = ______ sq. ft. of heated area.
3. Choose a “spacing factor” of 2", 2.5", or 3" on center. Below are guidelines for application and spacing recommendations.
• 2" on center = 15 Watts/sq. ft. Use on concrete basement slabs, sunrooms, and in other high heat loss areas.
• 2.5" on center = 12 Watts/sq. ft. Use in bathrooms, kitchens, dining/living areas, etc.
• 3" on center = 10 Watts/sq. ft. Use in hallways, entries, low heat loss areas, etc.
4. Select the appropriate wire(s) based on the square footage of heated area and the “spacing factor”
BOSTIK HEATSTEP™ WARRANTYAll Bostik HeatStep™ Mat or Bostik HeatStep™ Wire products come with a 10 Year Limited Warranty, or a 25 Year Limited System Warranty. Bostik HeatStep™ thermostats and relay come with a 2 Year Limited Warranty.
to heat multiple flooring types and locations. For example, differences in heat loss between a kitchen and breakfast area could be accommodated by using two different spacings: 3" on center (10 watts/sq. ft.) in the kitchen, and 2" on center (15 watts/sq. ft.) in the colder breakfast area. Transitions in floor covering materials can be accommodated in the same way: 3" on center (10 watts/sq. ft.) could be used under tile or thin stone, and 2" on center (15 watts/sq. ft.) spacing could be used under thicker hardwood or carpet.
DESIGNING A BOSTIK HEATSTEP™ WIRE FLOOR HEATING SYSTEM• Evaluate how many square feet of floor to be heated. Do not
put under cabinets or appliances. Generally, about 85–90% of the open areas should be heated.
• Leave the wire at least 6" away from the toilet wax ring and 4" – 6" away from your walls.
• To keep toes warm, install right up to the toe-kick in front of kitchen or bath cabinets, and in front of a toilet, shower, or tub.
• Remember, multiple wires of the same voltage can be connected together to fill larger areas.
• Bostik HeatStep™ Wire is UL Listed for installation in shower floors and benches.
• See Bostik HeatStep™ installation manual for more details.
240V BOSTIK HEATSTEP™ WIRE KITS
Sq. Ft. Coverage Varies Wire Configurations Order Number Wire Length Amp Draw REET Value Ship Wt. (lbs)
2" OC 2.5" OC* 3" OC
64 80 96 K640280 376 4 0.14 8.5
80 100 120 K640210 470 5 0.16 11
96 120 144 K640212 564 6 0.13 13
112 140 168 K640214 658 7 0.14 15
128 160 192 K640216 752 8 0.11 17
Wire Kits include Fault Monitoring Device, Double-sided Tape and Cable Strap.* 2.5" on-center wire spacing is most common** The REET (Radiant Electric Emissions Test) values listed above are 200% below daily exposure levels of the average U.S. citizen as reported by the National Institute of
Environmental Health Sciences (NIEHS). Values are average electromagnetic field in milligauss, measured 1/2" above heating element. For more information about EMF and REET testing, please visit www.bostik-us.com.
FIGURE 1
Installation of Bostik HeatStep™ Mat on Concrete Subfloor
Tile/Stone
Thin Set
Bostik HeatStep™ Mat
Insulating layer (cork or other
suitable material) - optional
Slab
Wood
Adhesive
Cementitious Layer
FIGURE 2
Installation of Bostik HeatStep™ Mat on Plywood Subfloor
Wood
Adhesive
Cementitious Layer
Tile/Stone/Wood
Thin Set
Bostik HeatStep™ Mat
Backer Board
Thin Set (for leveling bed)
Plywood subfloor
Floor joistInsulation (optional)

BOSTIK HOTLINE
Bostik, Inc.11320 W. Watertown Plank RoadWauwatosa, WI 53226www.bostik.com/us
Smart help1-800-726-7845
FOR DIRECT, INCIDENTAL, CONSEQUENTIAL, OR SPECIAL DAMAGES TO THE MAXIMUM EXTENT ALLOWED BY LAW. DISCLAIMERS OF IMPLIED WARRANTIES MAY NOT BE APPLICABLE TO CERTAIN CLASSES OF BUYERS AND SOME STATES DO NOT ALLOW THE EXCLUSION OR LIMITATION OF INCIDENTAL OR CONSEQUENTIAL DAMAGES, SO THE ABOVE LIMITATIONS MAY NOT APPLY TO YOU. It is the buyer’s obligation to test the suitability of the product for an intended use prior to using it. The Limited Warranty extends only to the original purchaser and is not transferable or assignable. Any claim for a defective product must be filed within 30 days of discovery of a problem, and must be submitted with written proof of purchase.
CHEMICAL EMERGENCY: 800-424-9300 (USA), 703-527-3887 (International)MEDICAL EMERGENCY: 866-767-5089
LIMITED WARRANTYLimited Warranty found at www.bostik.com/us. TO THE MAXIMUM EXTENT ALLOWED BY LAW, BOSTIK DISCLAIMS ALL OTHER EXPRESS OR IMPLIED WARRANTIES, INCLUDING WITHOUT LIMITATION WARRANTIES OF MERCHANTABILITY AND FITNESS FOR A PARTICULAR PURPOSE. UNLESS OTHERWISE STATED IN THE LIMITED WARRANTY, THE SOLE REMEDY FOR BREACH OF WARRANTY IS REPLACEMENT OF THE PRODUCT OR REFUND OF THE BUYER’S PURCHASE PRICE. BOSTIK DISCLAIMS ANY LIABILITY
FIGURE 3
Installation of Bostik HeatStep™ Wire on Concrete Subfloor
FIGURE 4
Installation of Bostik HeatStep™ Wire on Plywood Subfloor
Wood
Adhesive
Cementitious Layer
Tile/Stone
Thin Set
Bostik HeatStep™ Wire Cable
Backer Board
Cable Strap
Thin Set or Leveling Bed
Plywood subfloor
Floor Joist
Tile/Stone
Thin Set
Bostik HeatStep™ Wire Cable
Cable Strap
Insulating Layer (cork or other suitable
material) - optional
Slab
Wood
Adhesive
Cementitious Layer
Insulation (optional)