Embed Size (px)
Citation preview

Page 1 of 10 | Digital Transformation Curriculum ptc.com/academic-program
Hello ThingWorx! Create a basic “Hello World” in ThingWorx ThingWorx is a powerful enterprise IoT platform that provides fundamental Digital Transformation capabilities in combination with other PTC products. However, because it is so flexible and powerful, it can be difficult for new users to know how to create simple solutions to the most common IoT problems. This guide walks a user through a very basic example of using ThingWorx to retrieve and display some publicly available data, and display that data on a dashboard:
Screenshot of a ThingWorx “Mashup” (webpage) showing Temperature in Fahrenheit.
Starting from this basic foundation, users are encouraged to develop more complex examples. Follow-up tutorial will explain how this tutorial works, and how to apply this more broadly. Note: This guide does not attempt to instill best practices, particularly for enterprise users. This is only meant to be an onboarding exercise; a “Hello World” ThingWorx experience.
Overview A common aim in IoT development is to build a dashboard that can display publicly available data – for example, the current temperature at a certain location. This example shows how to get data from OpenWeather (https://openweathermap.org) and display it on a mashup (a ThingWorx dashboard/webpage).
Requirements Users will need:
1. Access to a ThingWorx instance 2. A free developer account at OpenWeather (https://openweathermap.org) 3. Optional: an installed copy of Postman (https://www.getpostman.com)

Page 2 of 10 | Digital Transformation Curriculum ptc.com/academic-program
Table of Contents
Create a basic “Hello World” in ThingWorx ..................................................................................................... 1
Overview ................................................................................................................................................................................................... 1 Requirements ........................................................................................................................................................................................ 1 Questions? .............................................................................................................................................................................................. 2
Creating Three Basic ThingWorx Elements ................................................................................................................. 3 Set up the Service ............................................................................................................................................................................ 4
Test the Service .................................................................................................................................................................................. 5 Showing the Data on the Mashup ........................................................................................................................................ 5
Debugging and Troubleshooting ........................................................................................................................... 9
Test the API call with Postman (https://www.getpostman.com) ............................................................... 9 Extract a different data element from the JSON results ................................................................................. 10
Questions? Feedback and questions can be submitted on the PTC Academic Community: https://community.ptc.com/t5/PTC-Academic-Program-Discussions/bd-p/PTCAcademicProgram

Page 3 of 10 | Digital Transformation Curriculum ptc.com/academic-program
Creating ThingWorx Elements
1. Begin by logging into ThingWorx.
2. On the left side of the ThingWorx Composer dashboard, you will see the Modeling, Analytics and Visualization items in the Entity List (image at right)
a. This exercise, will walk through the creation of two different elements:
i. A Thing, that has a service to get the data from the data source (OpenWeather)
ii. A Mashup, that will display the data
3. Create a new Thing that will get the data from the data source (OpenWeather):
a. Click Things from the Entity List. b. Click + New to create a new thing c. Name this thing HelloThingWorxGetTempThing d. Under Thing Template, find and choose
GenericThing (see image below) i. *If you are using a shared ThingWorx
instance, add your initials to the beginning of each name you give something in ThingWorx
ii. This is a template for a Thing that will allow use of JavaScript for the API call
e. Click Save

Page 4 of 10 | Digital Transformation Curriculum ptc.com/academic-program
4. With the HelloThingWorxGetTempThing tab still active in the composer, in the Entity Information list (see image at right), click Services
a. Click Edit and + Add My Service to add a new Service to this Thing
b. Name the service HelloThingWorxGetTempService c. Click Done and Save
5. Edit the HelloThingWorxGetTempService you just created by clicking the pencil icon
6. On the Input/Output tab (image at right)
a. Set the Base Type to Long i. This is the format that the
temperature value will be stored in
b. Click Save Entity in the bottom-right
7. Leave this open for now. We’re going to paste some code into the Script field on the right in a couple more steps.
Set up the Service In order to access the OpenWeather data, it’s necessary to create an account at the OpenWeather API site:
8. Create an account at https://openweathermap.org/api
a. Once you have done that, click on API keys b. Your unique API Key will appear under the
word Key (see image at right)
9. Follow the instructions on the Current Weather Data page (https://openweathermap.org/current) to create an API URL for your city
a. Use the city list (http://bulk.openweathermap.org/sample/city.list.json.gz) to find the ID for your city (for example, Boston = 4317656)
b. Make a note of the CITY-ID for your city for later.
10. Return to your HelloThingWorxGetTempService in ThingWorx.

Page 5 of 10 | Digital Transformation Curriculum ptc.com/academic-program
The JavaScript needed to extract the temperature is included below. In the script, notice the ThingWorx built-in GetJSON function; this is used to retrieve data from OpenWeather
11. Copy and paste the code below into the script window for the HelloThingWorxGetTempService in ThingWorx:
JavaScript Code: //Define parameters sent in API call to OpenWeather var params = { url: "https://api.openweathermap.org/data/2.5/weather?id=CITY-ID&APPID=ENTER-YOUR-API-KEY-HERE&units=metric" /* STRING */, //API data source timeout: 500 /* NUMBER */, //give up after 500 milliseconds if something goes wrong }; //Perform API request, retrieve JSON file, write to result variable var result = Resources["ContentLoaderFunctions"].GetJSON(params); //this is a ThingWorx function that retrieves the data result = result.main.temp; // set the service output (result) equal to the temperature from the data
12. Replace “CITY-ID” with your city ID from the OpenWeather city list.
13. Replace “ENTER-YOUR-API-KEY-HERE” with your API Key from OpenWeather
14. The temperature will be returned, by default, in Kelvin. In the URL in the code above
metric units are specified, which gives temperature in Celsius. Replace metric with imperial for Fahrenheit.
15. Click Save Entity to save your changes a. The service must be saved every time a change is made in order for a test to
use the updated script.
Test the Service
16. Click the Test button b. A Test Service popup will open c. Click the Execute Service button in the
bottom-right corner d. If everything is done correctly, the results
should appear in the popup: e. If it didn’t work, skip to the last section on
Debugging and Troubleshooting
Showing the Data on the Mashup It’s relatively easy to create a simple mashup and display the data. While it’s possible and also pretty easy to customize the look and feel of a mashup, this example only includes the minimum steps required to get the data to display.

Page 6 of 10 | Digital Transformation Curriculum ptc.com/academic-program
17. Click Save Entity, Done, and Save (at the top of the screen) to save all the changes to the HelloThingWorxGetTempThing.
18. Click the Home button (at the top-left hand corner of the ThingWorx composer) window so that you can see the Entity List (see step 2 of this guide):
a. Click Mashups and + New to create a new mashup b. Leave the Mashup Type as Page and the Layout Options as Responsive c. Click Done
2. To set up the mashup layout with some columns; on the left, click on the Widgets tab
a. Find the Layout entity in the list b. Drag and drop the Layout entity into the center window c. Select a Horizontal Layout with 4 columns d. Click Done
3. To add a label to the mashup:
a. Find the Label entity in the list b. Drag and drop the Layout entity into the second column of the layout
i. ThingWorx will ask you if you want to add a Panel, click Yes c. Find and drag the label to the top of the column d. In the bottom-left corner, in the Properties area, find the -T- Text field e. In the field, enter Temperature in your city f. Click Enter
4. To add a Grid to display the temperature data:
a. Find the Grid entity in the list b. Drag the Grid widget and drop it into the third column of the layout c. Once added, at the top of the window, the Grid Widget will read “Must Be
Bound To Data”
19. To bind the Grid Widget to some data, click the green “+” on the top-right hand corner of the ThingWorx composer window.
d. In the window that pops up, begin typing “HelloThingWorx” in the search field (see below)
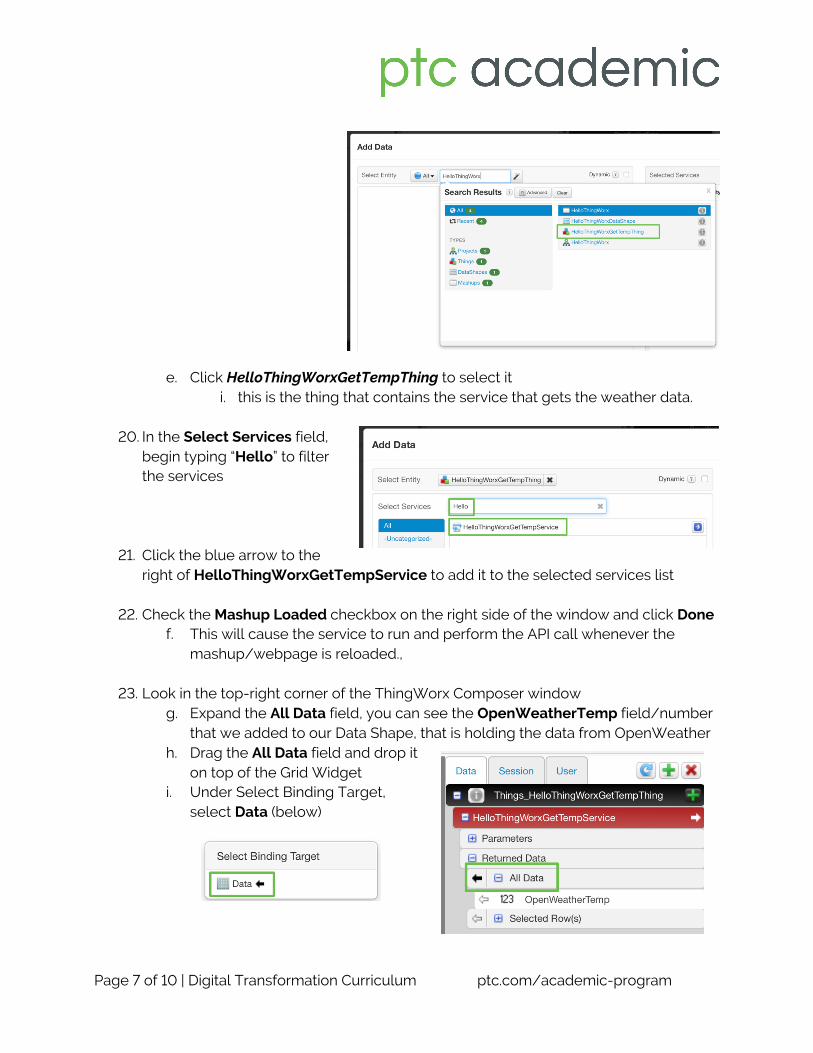
Page 7 of 10 | Digital Transformation Curriculum ptc.com/academic-program
e. Click HelloThingWorxGetTempThing to select it i. this is the thing that contains the service that gets the weather data.
20. In the Select Services field,
begin typing “Hello” to filter the services
21. Click the blue arrow to the right of HelloThingWorxGetTempService to add it to the selected services list
22. Check the Mashup Loaded checkbox on the right side of the window and click Done
f. This will cause the service to run and perform the API call whenever the mashup/webpage is reloaded.,
23. Look in the top-right corner of the ThingWorx Composer window g. Expand the All Data field, you can see the OpenWeatherTemp field/number
that we added to our Data Shape, that is holding the data from OpenWeather h. Drag the All Data field and drop it
on top of the Grid Widget i. Under Select Binding Target,
select Data (below)

Page 8 of 10 | Digital Transformation Curriculum ptc.com/academic-program
j. In the bottom section of the ThingWorx window, an arrow will now show that the data is bound to the widget (below).
24. Click Save at the top of the window to save the mashup
k. ThingWorx will switch to the Info tab and prompt you to name the mashup l. Enter any name (no spaces) and click Save m. Click View Mashup to see the mashup n. The mashup should load and show the current temperature.
There’s a lot more that can be done from here, like formatting the data to just show the time and creating a more user-friendly UI, but those tasks fall outside of the scope of this guide.

Page 9 of 10 | Digital Transformation Curriculum ptc.com/academic-program
Debugging and Troubleshooting
Test the API call with Postman (https://www.getpostman.com)
• Use Postman to debug the API call and see the data that is being returned from OpenWeather (see image below)

Page 10 of 10 | Digital Transformation Curriculum ptc.com/academic-program
Extract a different data element from the JSON results
• Export the JSON and create an HTML page to display the data value you are interested in displaying (see image below)
• Example JSON data and HTML code below o Save both files to the same folder, and
double-click open the HTML file. You should see something like the text at right:
JSON (filename = response.json) Note that for the html page, the JSON data must be changed to an object as show below (alldata = ‘[JSON data’]) alldata=’[{“coord”:{“lon”:-92.06,”lat”:29.88},”weather”:[{“id”:800,”main”:”Clear”,”description”:”clear sky”,”icon”:”01d”}],”base”:”stations”,”main”:{“temp”:87.67,”pressure”:1017,”humidity”:58,”temp_min”:86,”temp_max”:89.01},”wind”:{“speed”:9.17,”deg”:150},”clouds”:{“all”:1},”dt”:1569189162,”sys”:{“type”:1,”id”:4563,”message”:0.0091,”10oconut”:”US”,”sunrise”:1569153388,”sunset”:1569197138},”timezone”:-18000,”id”:4317656,”name”:”Boston”,”cod”:200}]’
HTML CODE: <!doctype html> <html> <head> <script type="text/javascript" src="response.json"></script> <script type="text/javascript" > function load() { var mydata = JSON.parse(alldata); document.getElementById("json").innerHTML = JSON.stringify(mydata[0].main.temp, undefined, 2); } </script> </head> <body onload="load()"> Extracted JSON value: <div id= "json"></div> </body> </html>