Embed Size (px)
Citation preview

1
Helpful Hint
CREATING A LARGE FORMAT MAP OR DOCUMENT
Applies to Version: Windows XP Submitted by: Geotechnology Team
Washington State Office Spokane, Washington
Helpful Hint Date: 08/04/2005 Purpose To set up a page layout for printing a large map, poster or sign; create a digital file of a large map, and transfer a file for printing at an office with a large format plotter. To utilize this helpful hint you will first need to have installed a printer driver for a large format plotter. Instructions for adding a plotter to your list of available printers can be found in the helpful hint, “Installing a plotter driver for making large format documents”.
Instructions
To create a large map file with the Customer Service Toolkit, refer to Page 2
To create a large format document with MS-Word, go to Page 6
To create a large format document with MS-Excel, see Page 7
To create a large format document with MS-PowerPoint, go to Page 9
To transfer a file to an office with a plotter, refer to Page 10
For offices with a plotter: To print a PDF of a large map using Adobe Reader, see Page 13

2
Creating a large format map with the Customer Service Toolkit This tutorial begins at the point where the Customer Service Toolkit has been used to create plan map data. Use the Map Products button to create a map layout of your completed plan data:
On the Map Products window, use the Heading tab to select your desired map components, then on the Layout tab select any size layout (the layout size will be changed in the next step):

3
You now have a map layout but the layout needs to be changed to match the large format size you want to print with the plotter. Under the File Menu select Page Setup:
Make the following changes on the Page Setup window:
Select the HP5500_PS_plotter and check the box for ‘Same as Printer’
Select the paper size ANSI D = 22” x 34” ANSI E = 34” x 44” Select either the Windows Printer Engine or PostScript engine. The Windows version has more user changeable options.
Click OK when done changing settings.
The paper sizes given are common sizes used for printing large maps. Many other sizes are available, including a user defined custom page size. Keep in mind that the width of the paper roll installed on the plotter will limit the size of one dimension of your map layout. The typical paper roll sizes are 36” or 42” wide.

4
After ‘OK’ is clicked the map layout will change to the selected paper size. Complete the map by adjusting the size and location of the map elements. Check the map scale and the position of the data within the layout data frame—the scale may be able to be increased to provide greater clarity of the data. When the map is finished, go to the File Menu and select Export Map:
Verify the ‘Save in’ location is the Resource_Maps folder within the current customer’s folder structure. Change the name of the PDF file to be created, and then click Options:
5
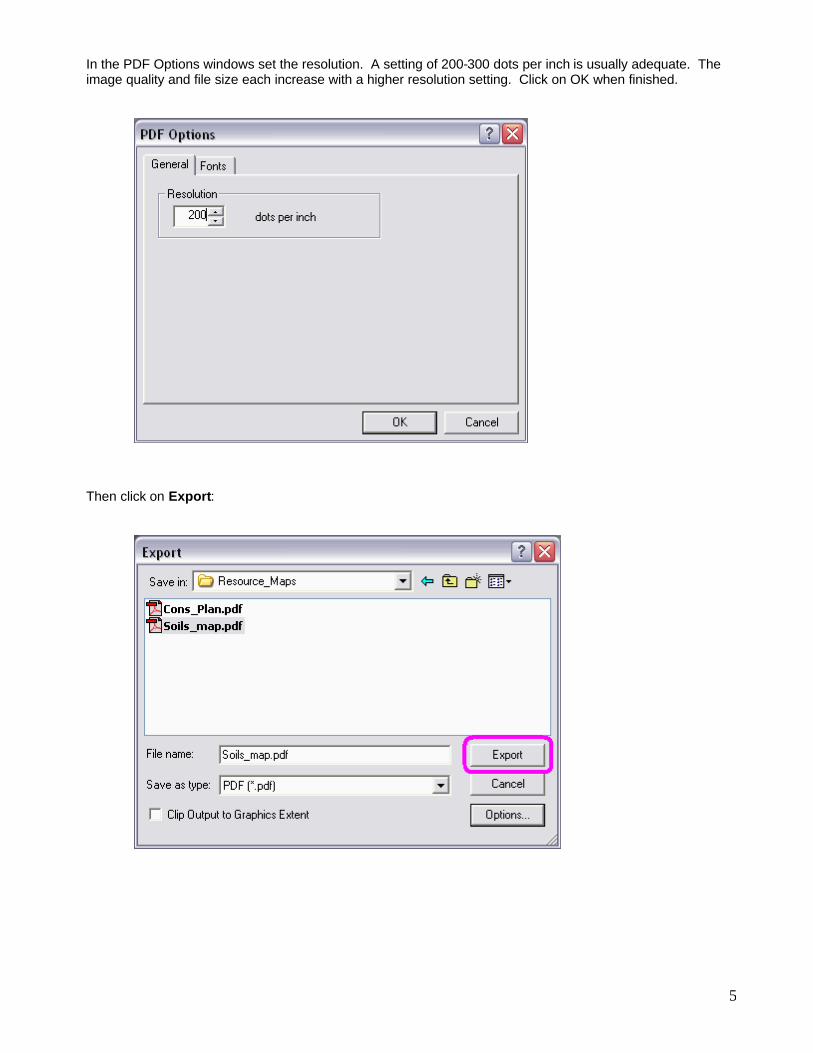
In the PDF Options windows set the resolution. A setting of 200-300 dots per inch is usually adequate. The image quality and file size each increase with a higher resolution setting. Click on OK when finished.
Then click on Export:

6
The PDF file will be created and stored in the Resource Maps folder:
Open the PDF to make sure the file was successfully created—occasionally only a portion of the map will be drawn and the PDF will need to be re-created. If the PDF of the map looks correct the file can be sent for printing at an office with a large format plotter. Instructions for transferring the map file to another office can be found on Page 10. (NOTE: You can also use this Export Map method to create several other image formats, such as JPG, BMP, etc.)
An alternative to using the ‘Export Map’ method is to click on the ‘Save Work’ button on the Toolkit toolbar. This is a quick way to create a PDF of the map. The downside to this method is that the location where the file is saved cannot be changed, the resolution of the PDF cannot be changed, and the file type cannot be changed. PDFs created with the Save Work button are typically about 35% larger than a PDF created with a resolution of 200 using the Export Map method. Creating a large format document with MS-Word The largest page size that can be made in MS-Word is 22” x 22”. Printing a document larger than those dimensions will require the document to be scaled to a larger size, which must be done during the print setup at the office where the document will be printed. You will need to provide the scaling factor to whoever will be printing your document. Instructions for transferring the file to another office can be found on Page 10.

7
Creating a large format MS-Excel Spreadsheet Printing a large spreadsheet can be done two ways. One way is to simply create a normal size spreadsheet at 8.5” x 11” or 11x” x 17”, then have the spreadsheet scaled to a larger size when printing. The other method involves setting the actual page size to match a page size available on the plotter. To do this, follow these steps: Select Print from File menu:
Select the HP5500 plotter and Click on Close (do not click on OK) Excel will now recognize page sizes available on the plotter.

8
Next select Page Setup from the File Menu:
Then select the page size and any other settings you wish to make and click OK
The spreadsheet is now ready to be created at the large page size. Keep in mind that since the spreadsheet is already a large size (rather than a small size being scaled to a large size); the text will likely need to be made larger than normal to be read easily when printed. When finished, the file can be sent for printing at an office with a large format plotter. Instructions for transferring the map file to another office can be found on Page 10.

9
Creating a large format document with MS-PowerPoint Select Page Setup from the File Menu:
Then under the ‘Slides sized for:’ pull-down select Custom, and set the width, height and orientation for your project. Remember that the maximum width paper roll that can be used on the plotter is 42” so that is the maximum size for one dimension of your slide. Click OK when finished.
Complete your slide/poster design and save the file. The file can then be sent for printing at an office with a large format plotter. Instructions for transferring the file to another office can be found on Page 10.

10
Transferring a file to another office for printing on a large format plotter The 10 large format plotters in Washington state NRCS are located at: Mount Vernon, Olympia, Chehalis, Okanogan, Ephrata, Zillah, Colville, Spokane Service Center, State Office, and Walla Walla. There are several ways to transfer files to another office. Since these files can get very large ITS does not want us to use email to transfer the files. The preferred method is to establish a network connection to the remote office server and use Windows Explorer to copy the file to the remote server. Open Windows Explorer: Quick ways to open windows explorer are: hold down the Windows Key while pressing E
…or, click the Windows Explorer icon on the Office Shortcut bar In the Windows Explorer window, click on the Search button:
Then click on Printers, computers, or people:

11
Select A Computer on the Network:
Then type in the name of the server and click on Search. These are the plotter locations and server names:
Mount Vernon Service Center wamtvernonc001 Olympia – West Area Office waolympia0c001 Chehalis Service Center wachehalisc001 Okanogan Service Center waokanoganc001 Ephrata – Area Office waephrata0c001 Zillah Service Center wazillah00c001 Colville Service Center wacolvillec001 Walla Walla Service Center wawallawalc001 Spokane Service Center waspokane0c001 State Office waspokane2c001

12
The search results will show the name of the server. Right-click on the server name and select explore:
Then navigate to ‘\shared\HP5500_Plotter_UVPS42’ and use Windows Explorer to copy and paste or drag and drop the file from your computer to the ‘Files_to_Print’ folder on the remote server.
HINT: To make future connections to this server faster, save the connection
in Favorites. In Windows Explorer click on Favorites, then Add to Favorites and save the connection. This works the same way as a web site favorite is saved and accessed. The last step is to contact someone at the office where the file was sent to request the printing of your file. Specifics for the print job will need to be provided, such as:
Paper size Print quality (is this a final print or a draft copy) Paper type (regular, photo, etc.) Print orientation (portrait or landscape) Number of copies needed Date when needed

13
Print a PDF of a large map using Adobe Reader These instructions are shown using Adobe Reader 6.0 to print the PDF map. Start Adobe Reader and use File Menu--Open to browse to and open the file to be printed. Then under the File Menu select Print Setup. Change the printer name to the HP5500_PS_Plotter then click on Properties:
On the Layout tab select the document Orientation then click on the Advanced button:

14
Select the Paper Size and click on OK:
Commonly used sizes are:
ANSI D (22” x 34”) ANSI E (34” x 44”)
Click on the Device Options tab and select the appropriate Print Quality. The Production and Productivity settings provide good results for most printing needs. The Max Quality setting should be used for final prints or printing on photographic paper. Click on OK after the print quality has been set.

15
Next, click on the Page Layout tab. Make sure that the Size is set to the paper size you selected. Look at the image in the Layout View. The orientation of the image will change when the Rotate box is checked. Use the rotate option to orient the print to use the least amount of paper. The Enable Scaling check box can be used if the original size of the document does not match the desired print size. Click on OK when finished, and then click on OK again to exit the Print Setup window. To print the map go to the File Menu, select Print, verify the map layout/orientation and click on OK.
Check this image to make sure the page size and orientation are correct.