Embed Size (px)
DESCRIPTION
HEYEX DICOM Interface_Administrator Guide_DRAFT September
Citation preview

HEYEX DICOM Interface, Administrator Guide © 2011 Heidelberg Engineering, Inc. All Rights Reserved
HEYEX DICOM Interface for Spectralis
For HEYEX 1.7, Spectralis/HRA 5.4
Administrator Manual
Rev. 0.9-1, August 2011 © Heidelberg Engineering GmbH 2011 Art.No. Draft QM No. Draft
DRAFT

DRAFT
HEYEX DICOM Interface, Administrator Guide © 2011 Heidelberg Engineering, Inc. All Rights Reserved
2
Contents
1 Introduction ..................................................................................................................... 3
1.1 Document Purpose and Audience ............................................................................................. 3
1.2 Supported DICOM SOP Classes ............................................................................................... 3
1.3 Abbreviations ............................................................................................................................. 3
2 Preparation ...................................................................................................................... 4
2.1 Technical Requirements ............................................................................................................ 4
2.2 HEYEX – Database Cleanup ..................................................................................................... 4
2.3 Patient-ID-Policy of EHR ........................................................................................................... 5
2.4 Preparation in EHR and PACS system ..................................................................................... 5
2.5 Information to be collected ........................................................................................................ 5
2.6 Installation Tools ........................................................................................................................ 5
3 Software Installation ....................................................................................................... 6
3.1 Installing the DICOM License .................................................................................................... 6
3.2 Installing the DICOM Software................................................................................................ 7
4 Configuration ................................................................................................................. 11
4.1 Configuring the Modality Worklist Service ............................................................................... 11
4.1.1 Mandatory Worklist Settings ........................................................................................ 11
4.1.2 Optional Worklist Settings ............................................................................................ 12
The DICOM Configuration window opens. ........................................................................................ 12
4.2 Configuring the Storage Service .............................................................................................. 16
4.2.1 Mandatory Storage Settings ........................................................................................ 16
4.2.2 Optional Storage Settings ............................................................................................ 18
4.3 Configuring the Common Settings ........................................................................................... 20
5 Troubleshooting ............................................................................................................ 21
5.1 Log Files .................................................................................................................................. 21
5.2 Error Messages and Actions ................................................................................................... 22
5.2.1 Worklist Problems ........................................................................................................ 22 5.2.2 Send Problems ............................................................................................................. 23

DRAFT
HEYEX DICOM Interface, Administrator Guide © 2011 Heidelberg Engineering, Inc. All Rights Reserved
3
1 Introduction
1.1 Document Purpose and Audience
This document is written for DICOM and IT administrators, who are responsible for overall imaging network and system integration. The documents covers the installation, configuration and troubleshooting of the DICOM interface for SPECTRALIS. The readers of this document are expected to be familiar with the DICOM standard and the DICOM integration process. They should also be familiar with the DICOM systems that will be connected to the Spectralis and the DICOM support those systems offer.
1.2 Supported DICOM SOP Classes
Spectralis provides standard conformance to the following DICOM SOP classes:
SOP Class Name SOP Class UID Role
Modality Worklist Information Model – FIND 1.2.840.10008.5.1.4.31 SCU
Encapsulated PDF Storage SOP Class 1.2.840.10008.5.1.4.1.1.104.1 SCU
Ophthalmic Photography 8 Bit Image Storage 1.2.840.10008.5.1.4.1.1.77.1.5.1 SCU
Ophthalmic Tomography Image Storage 1.2.840.10008.5.1.4.1.1.77.1.5.4 SCU
Verification Service Class 1.2.840.10008.1.1 SCU
1.3 Abbreviations
AET Application Entity Title
DICOM Digital Imaging and Communications in Medicine
EHR Electronic Health Record
EPDF Encapsulated PDF
HEYEX Heidelberg Eye Explorer
IOD Image Object Definition
MWL Modality Worklist
OP Ophthalmic Photography
OPT Ophthalmic Tomography
PACS Picture Archiving and Communication System
SCP Service Class Provider
SCU Service Class User
SOP Service Object Pair

DRAFT
HEYEX DICOM Interface, Administrator Guide © 2011 Heidelberg Engineering, Inc. All Rights Reserved
4
2 Preparation
2.1 Technical Requirements
The following requirements apply to all Spectralis instruments and Spectralis viewing stations on which you would like to install the HEYEX DICOM Interface:
Operating system: Windows XP (32bit) Pro (SP2) or Windows 7 (32bit)
Minimum network requirements: 100MBit/second, Recommended: 1GBit/second
All users on instrument and viewing stations must have full control permission to folder C:\HEYEX including all subfolders
2.2 HEYEX – Database Cleanup
Note: If your Heidelberg Eye Explorer database does not yet contain any patient files (e.g. with a new instrument), you can skip this section. It is strongly recommended to “clean up” the patient database in Heidelberg Eye Explorer (HEYEX) before installation, in order to minimize the accidental creation of duplicate patient records or false record merges. Duplicate records or false merges can occur when the demographics for an existing patient record in HEYEX do not exactly match the demographics in the EHR system. Although HEYEX verifies incoming records against those in HEYEX, not all scenarios can be identified as duplicate or mismatching records. The following steps are strongly recommended to be performed in HEYEX before installation:
Merge Duplicates: Search the database for duplicate patient records and merge them (via function: “Change Patient”). For instructions, please refer to the Spectralis User Manual “Merging Patient Files”
Check the patient name fields “Last” and “First” for any middle initials or other additions which may not match the “Last Name” and “First Name” sections in DICOM tag Patientname [0010, 0010]
Fill in blank fields in patient files, such as “Last”, “First”, “Date of Birth”, “Patient ID”.
Correct typos in patient names and make sure the spelling of the names in HEYEX match the spelling in the EHR system.
Match the format of the patient ID to the format provided via the modality worklist, in DICOM tag PatientID [0010,0020]. For example, if a patient ID in HEYEX is “123-456”, but in the worklist it is “123456”, you should remove the hyphen “-“ from the patient IDs in HEYEX.
Enter any missing data in patient records in the fields “Last”, “First”, “Date of Birth”, “Patient ID”

DRAFT
HEYEX DICOM Interface, Administrator Guide © 2011 Heidelberg Engineering, Inc. All Rights Reserved
5
2.3 Patient-ID-Policy of EHR
Confirm that your Worklist SCP (usually the EHR) mandates a Patient ID for each record. Should the Worklist SCP allow blank Patient ID fields, please contact your Heidelberg Engineering support hotline. Warning! Patient records without a patient ID can lead to duplicate or mixed up patient records.
2.4 Preparation in EHR and PACS system
In EHR and PACS: Add the Spectralis instrument as a DICOM node, assign an AE Title and configure the relevant data dictionaries
In EHR: Create schedulable procedures/consults for Spectralis
In PACS: Enable the receipt of all supported DICOM IODs from Spectralis (EPDF, OP, OPT)
2.5 Information to be collected
To configure the DICOM interface, please have the following information handy:
Information about the Worklist SCP (EHR) Information about the Storage SCP (PACS)
AE Title: AE Title:
Port: Port:
IP Address/Hostname: IP Address/Hostname:
Local AE Title(s):
This is the AE Title that was assigned in the EHR to the Spectralis instrument (and viewing stations)
Local AE Title(s):
This is the AE Title that was assigned in the PACS to the Spectralis instrument (and viewing stations)
Name for Spectralis Procedure: Supported IODs: EPDF OP OPT g
2.6 Installation Tools
Please have the following items handy:
The information from section 2.1.5
DICOM Software CD
DICOM License CD
These Installation Instructions
Spectralis DICOM Conformance Statement (recommended)
EHR and PACS DICOM Conformance Statements (recommended)

DRAFT
HEYEX DICOM Interface, Administrator Guide © 2011 Heidelberg Engineering, Inc. All Rights Reserved
6
3 Software Installation
3.1 Installing the DICOM License
1. Locate the PC on which the Heidelberg Eye Explorer License Manager runs.
Info: The license manager is usually installed at the Spectralis PC or on a server. A magnifying glass icon in the task tray indicates the license manager.
2. Make sure all HEYEX applications in the network are closed.
3. Insert the [Name] CD into the CD-ROM drive
4. The installation will begin automatically and you will see this window for a very brief moment (1-2 seconds).
Info: If the installation does not begin automatically navigate to the .exe file on the CD and run it.
5. Open the license manager by double clicking on the magnifying glass icon in the task tray
6. In the info tab, click on the photograph of the dongle, then click Apply.
Tip: You should now see the following licenses in the Activated components field:
“DICOM Interface – Basic” (or “COMP_031)
“Spectralis DICOM Interface” (or “COMP_038)
7. Click OK to exit the License Manager.

DRAFT
HEYEX DICOM Interface, Administrator Guide © 2011 Heidelberg Engineering, Inc. All Rights Reserved
7
3.2 Installing the DICOM Software
Follow these steps on your SPECTRALIS instrument PC(s) and on any Spectralis viewing stations which you would like to integrate into the DICOM workflow. The installation on viewing station requires steps 1, 4-11, and 20.
1. Check the Operating System
If the operating system is not Windows XP or Windows 7 (32 bit), the operating system must be updated prior to the software installation.
2. Switch on the isolating transformer, PC and the monitor.
3. Switch off the power supply of the SPECTRALIS instrument (not the PC).
4. Make sure Heidelberg Eye Explorer is closed.
5. Insert the DICOM Software Installation CD into the PC’s CD drive.
6. Wait for the automatic start or double-click "Setup.exe" in the root directory on the CD.
Setup.exe
7. A Security Warning may appear.
Click “Run”
The dialog box “Setup Language” is displayed.
7. Select a language
8. Click “OK”
DRAFT
HEYEX DICOM Interface, Administrator Guide © 2011 Heidelberg Engineering, Inc. All Rights Reserved
8
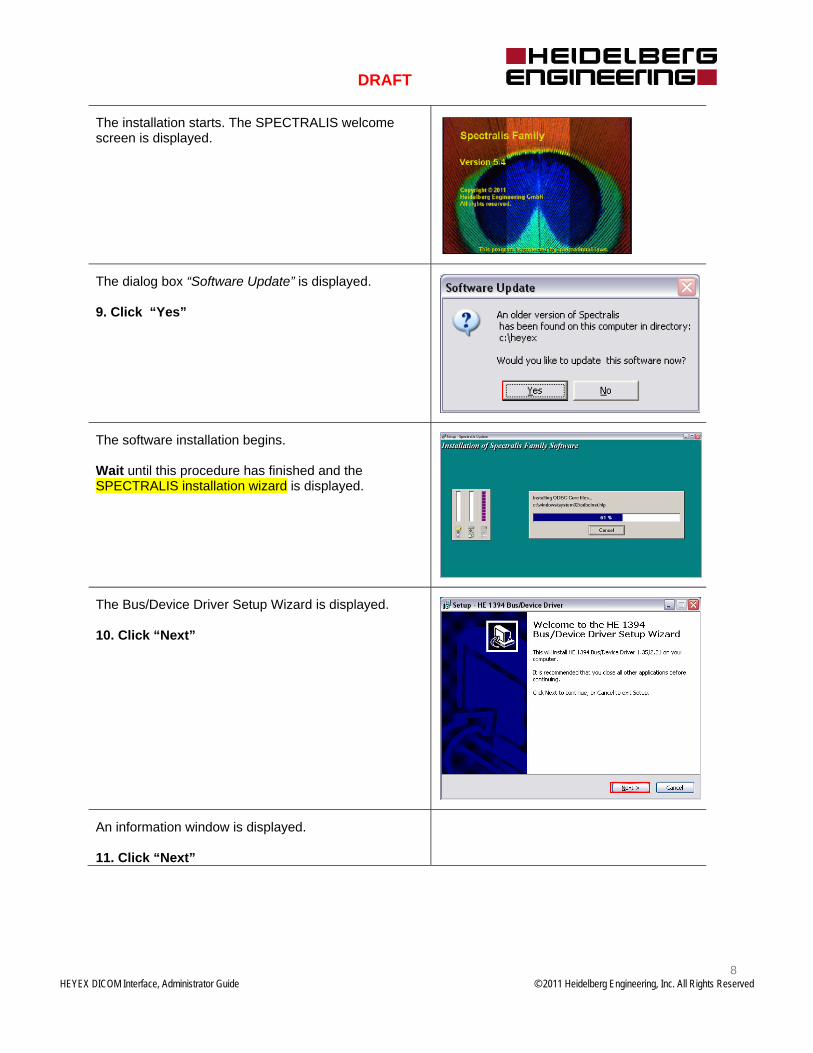
The installation starts. The SPECTRALIS welcome screen is displayed.
The dialog box “Software Update” is displayed. 9. Click “Yes”
The software installation begins. Wait until this procedure has finished and the SPECTRALIS installation wizard is displayed.
The Bus/Device Driver Setup Wizard is displayed. 10. Click “Next”
An information window is displayed. 11. Click “Next”

DRAFT
HEYEX DICOM Interface, Administrator Guide © 2011 Heidelberg Engineering, Inc. All Rights Reserved
9
The dialog box “Hardware Installation” is displayed. 12. Click “Continue Anyway”
The “Setup Complete” window is displayed. 13. Check “Yes, I want to restart my computer now”
14. Click Finish The PC restarts.
15. Switch on the power supply of the SPECTRALIS instrument.
After the PC has restarted, , the “Found New Hardware Wizard” window is displayed 16. Select “No, not this time” 17. Click “Next”

DRAFT
HEYEX DICOM Interface, Administrator Guide © 2011 Heidelberg Engineering, Inc. All Rights Reserved
10
The next “Found New Hardware Wizard” window is displayed 18. Select “Install the Software Automatically (Recommended)” 19. Click “Next”
The “Setup Complete” window is displayed. 20. Click “Finish” The installation is complete. You can now launch Heidelberg Eye Explorer.
DRAFT
HEYEX DICOM Interface, Administrator Guide © 2011 Heidelberg Engineering, Inc. All Rights Reserved
11
4 Configuration
4.1 Configuring the Modality Worklist Service
Follow these steps on your SPECTRALIS instrument PC(s) and on those Spectralis viewing stations on which you would like to be able to query the worklist.
4.1.1 Mandatory Worklist Settings
4.1.1.1 Worklist Parameters
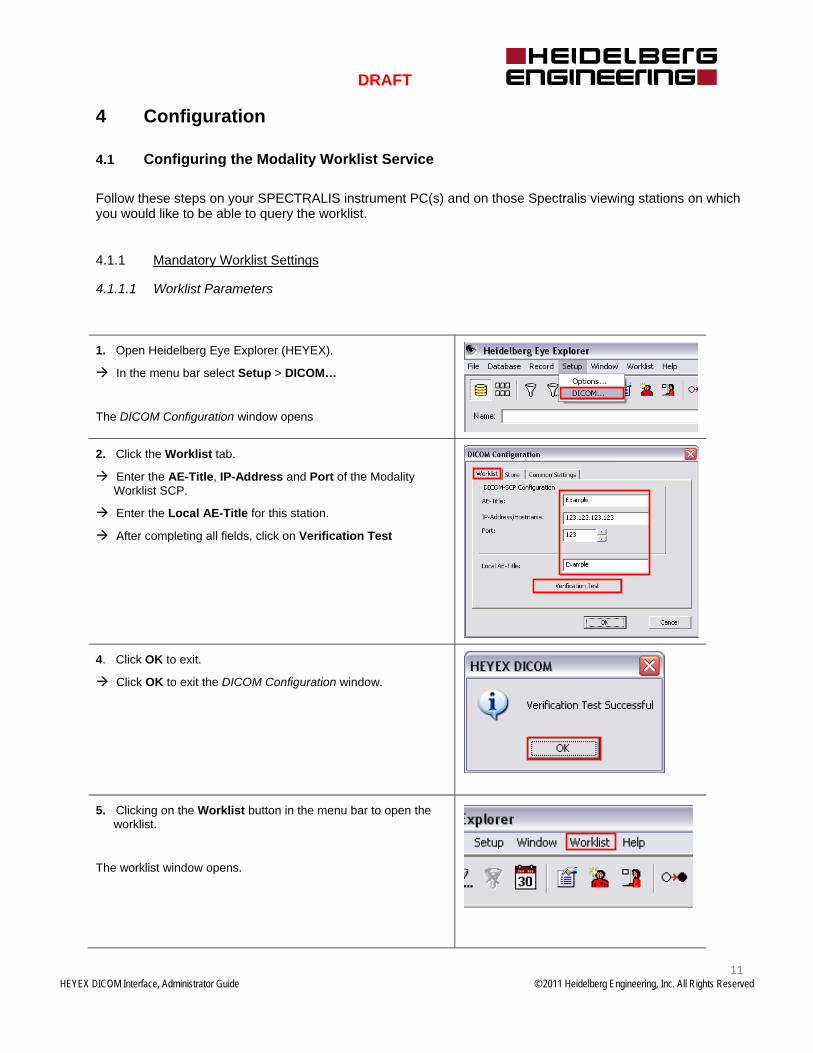
1. Open Heidelberg Eye Explorer (HEYEX).
In the menu bar select Setup > DICOM…
The DICOM Configuration window opens
2. Click the Worklist tab.
Enter the AE-Title, IP-Address and Port of the Modality Worklist SCP.
Enter the Local AE-Title for this station.
After completing all fields, click on Verification Test
4. Click OK to exit.
Click OK to exit the DICOM Configuration window.
5. Clicking on the Worklist button in the menu bar to open the worklist.
The worklist window opens.
DRAFT
HEYEX DICOM Interface, Administrator Guide © 2011 Heidelberg Engineering, Inc. All Rights Reserved
12
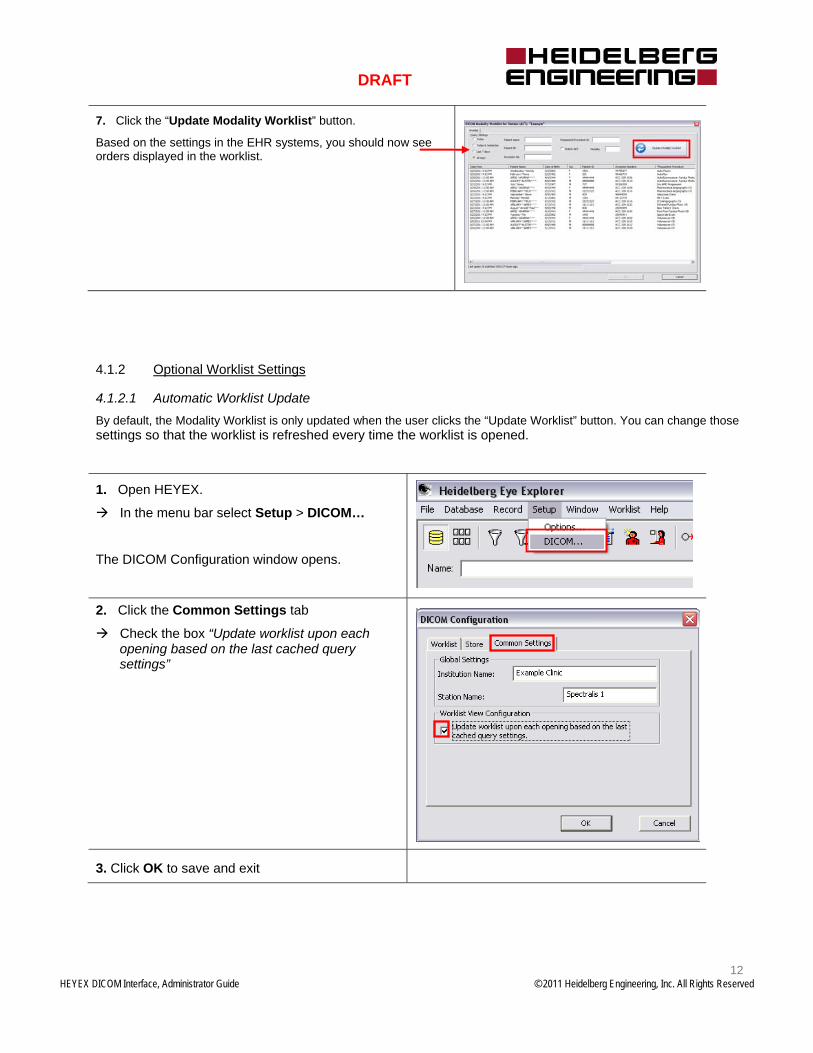
7. Click the “Update Modality Worklist” button.
Based on the settings in the EHR systems, you should now see orders displayed in the worklist.
4.1.2 Optional Worklist Settings
4.1.2.1 Automatic Worklist Update
By default, the Modality Worklist is only updated when the user clicks the “Update Worklist” button. You can change those settings so that the worklist is refreshed every time the worklist is opened.
1. Open HEYEX.
In the menu bar select Setup > DICOM…
The DICOM Configuration window opens.
2. Click the Common Settings tab
Check the box “Update worklist upon each opening based on the last cached query settings”
3. Click OK to save and exit
DRAFT
HEYEX DICOM Interface, Administrator Guide © 2011 Heidelberg Engineering, Inc. All Rights Reserved
13
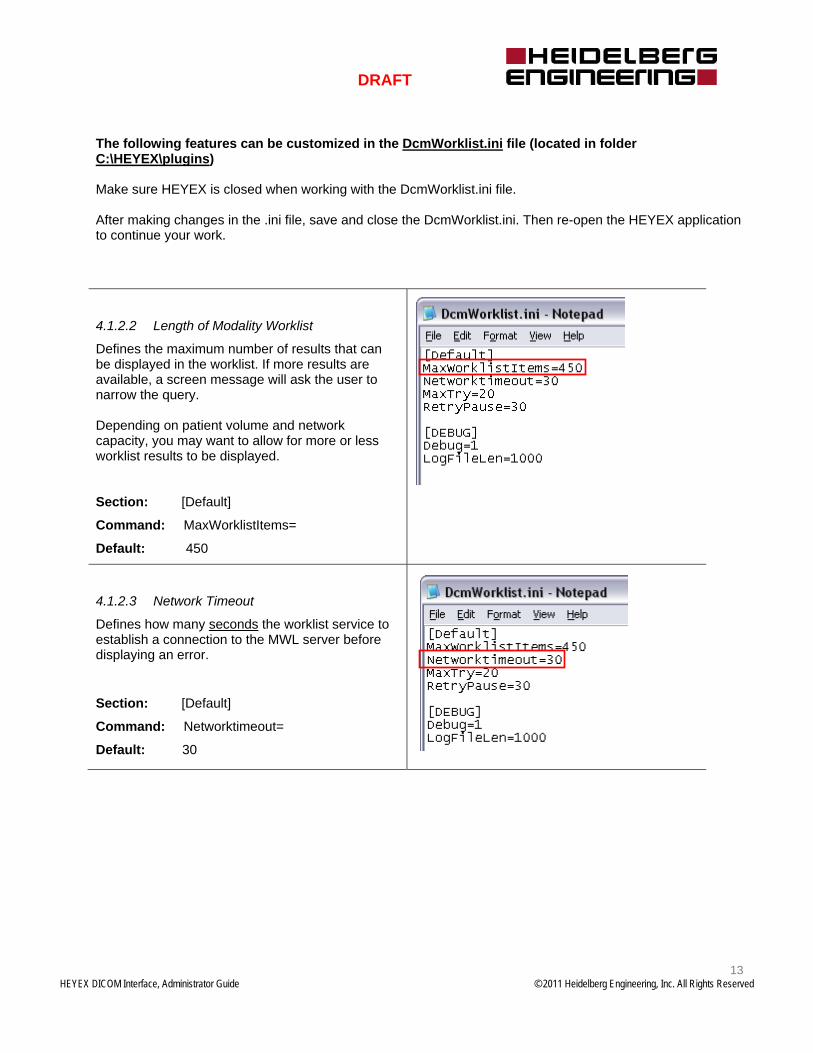
The following features can be customized in the DcmWorklist.ini file (located in folder C:\HEYEX\plugins) Make sure HEYEX is closed when working with the DcmWorklist.ini file. After making changes in the .ini file, save and close the DcmWorklist.ini. Then re-open the HEYEX application to continue your work.
4.1.2.2 Length of Modality Worklist
Defines the maximum number of results that can be displayed in the worklist. If more results are available, a screen message will ask the user to narrow the query. Depending on patient volume and network capacity, you may want to allow for more or less worklist results to be displayed. Section: [Default]
Command: MaxWorklistItems=
Default: 450
4.1.2.3 Network Timeout
Defines how many seconds the worklist service to establish a connection to the MWL server before displaying an error.
Section: [Default]
Command: Networktimeout=
Default: 30

DRAFT
HEYEX DICOM Interface, Administrator Guide © 2011 Heidelberg Engineering, Inc. All Rights Reserved
14
4.1.2.4 Maximum Query Attempts
Defines how many times the worklist service will try to receive query results for a failed query.
After the number of tries has been reached, the worklist service will quit the query attempts.
Section: [Default]
Command: MaxTry=
Default: 20
4.1.2.5 Worklist Query Retry
Defines how many seconds will pass between each retry.
Section: [Default]
Command: RetryPause=
Default: 30
4.1.2.6 Debug Level
Defines the amount of detail that is being recorded in the log file for modality worklist queries. The higher the debug level, the more detail is being recorded. Possible values are 0-3.
Section: [DEBUG]
Command: Debug=
Default: 1
4.1.2.7 Log File Size
Defines the size in kb
Section: [DEBUG]
Command: LogFileLen=
Default: 1000

DRAFT
HEYEX DICOM Interface, Administrator Guide © 2011 Heidelberg Engineering, Inc. All Rights Reserved
15
4.1.2.8 Wildcard Queries
By default, patient names wildcard queries are enabled. However, adjustments may be required, depending on your MWL SCP system. Perform a patient name wildcard query by entering only the first few letters of a patient’s last name. If no results show, try changing the default setting in the .ini file to ‘=0’. Make sure to save and close the DcmWorklist.ini file before opening HEYEX.
Section: [WLQUERY]
Command: AddPatientAsterisk=
Default: 1
4.1.2.9 Worklist Customization
You can customize the information that is displayed in the worklist. Any information received with can be displayed.
Each worklist column has its own 4-line block of parameters. Edit the parameters according to your preferences.
Section: [WLVIEW_COL]
Default columns:
COL1: Date/Time COL2: Patient Name COL3: Date of Birth COL4: Sex COL5: Patient -ID COL6: Station COL7: Accession Number COL8: Requested Procedure COL9: Procedure Step Description
4.1.2.10 Tooltip Customization
You can change what information is displayed in tooltip when hovering the mouse over a worklist item.
Section: [WLVIEW]
Command: TooltipTag=
Default: (0010,0010);"Requested Procedure ID:"(0040,1001); "Modality:"(0008,0060)

DRAFT
HEYEX DICOM Interface, Administrator Guide © 2011 Heidelberg Engineering, Inc. All Rights Reserved
16
4.2 Configuring the Storage Service
Follow these steps on your SPECTRALIS instrument PC(s) and on those Spectralis viewing stations from which you would like to send images to the PACS.
4.2.1 Mandatory Storage Settings
4.2.1.1 Storage Parameters
1. Open Heidelberg Eye Explorer.
In the menu bar select Setup > DICOM…
The DICOM Configuration window opens
2. Click the Store tab
Enter the AE-Title, IP-Address and Port of the Storage SCP
Enter the Local AE-Title for Spectralis.
After completing all fields, click Verification Test
5. Click OK to exit.
Click OK to exit the DICOM Configuration window.

DRAFT
HEYEX DICOM Interface, Administrator Guide © 2011 Heidelberg Engineering, Inc. All Rights Reserved
17
4.2.1.2 Image Export Settings
Enable DICOM export only for IODs that are supported by your PACS. If non-supported IODs are enabled, users will receive error messages every time a non-supported image file is sent to the PACS.
1. Open Heidelberg Eye Explorer.
In the menu bar select Setup > Options…
The Options window opens.
2. Click the Plug Ins tab
Select hraviewer
Click Setup…
The Preferences window opens.
3. Click the plus (+) sign in front of “Data Export Options” to expand the options
Select “DICOM Data Export”
Under “Supported DICOM IODs” check the IODs which are supported by your PACS system.
Click OK to save and exit the Preferences window
Click OK to exit the Setup window
Close the Heidelberg Eye Explorer application and reopen it for the new settings to take effect.
DRAFT
HEYEX DICOM Interface, Administrator Guide © 2011 Heidelberg Engineering, Inc. All Rights Reserved
18
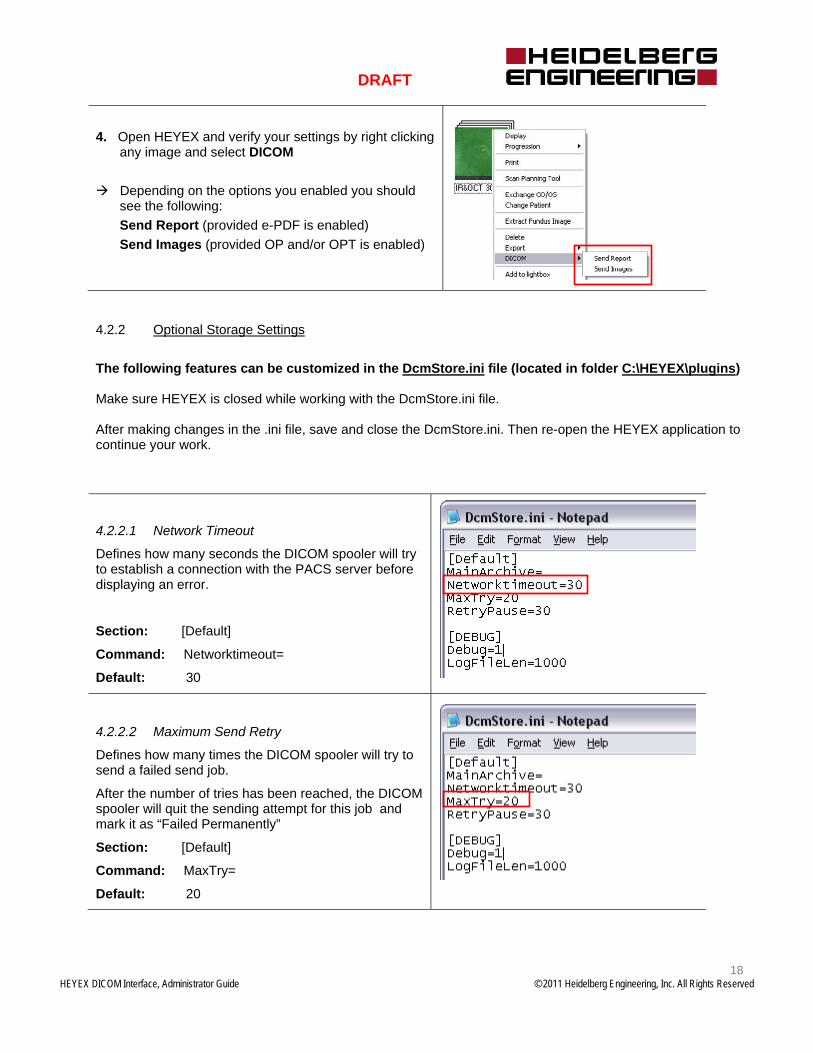
4. Open HEYEX and verify your settings by right clicking any image and select DICOM
Depending on the options you enabled you should see the following:
Send Report (provided e-PDF is enabled)
Send Images (provided OP and/or OPT is enabled)
4.2.2 Optional Storage Settings
The following features can be customized in the DcmStore.ini file (located in folder C:\HEYEX\plugins) Make sure HEYEX is closed while working with the DcmStore.ini file. After making changes in the .ini file, save and close the DcmStore.ini. Then re-open the HEYEX application to continue your work.
4.2.2.1 Network Timeout
Defines how many seconds the DICOM spooler will try to establish a connection with the PACS server before displaying an error.
Section: [Default]
Command: Networktimeout=
Default: 30
4.2.2.2 Maximum Send Retry
Defines how many times the DICOM spooler will try to send a failed send job.
After the number of tries has been reached, the DICOM spooler will quit the sending attempt for this job and mark it as “Failed Permanently”
Section: [Default]
Command: MaxTry=
Default: 20

DRAFT
HEYEX DICOM Interface, Administrator Guide © 2011 Heidelberg Engineering, Inc. All Rights Reserved
19
4.2.2.3 Send Retry Pause
Defines how many seconds will pass between each retry.
Section: [Default]
Command: RetryPause=
Default: 30
4.2.2.4 Debug Level
Defines the amount of detail that is being recorded in the log file for send jobs. The higher the debug level, the more detail is being recorded. Possible values are 0-3.
Section: [DEBUG]
Command: Debug=
Default: 1
4.2.2.5 Length of Log File
Defines the size in kb
Section: [DEBUG]
Command: LogFileLen=
Default: 1000
DRAFT
HEYEX DICOM Interface, Administrator Guide © 2011 Heidelberg Engineering, Inc. All Rights Reserved
20
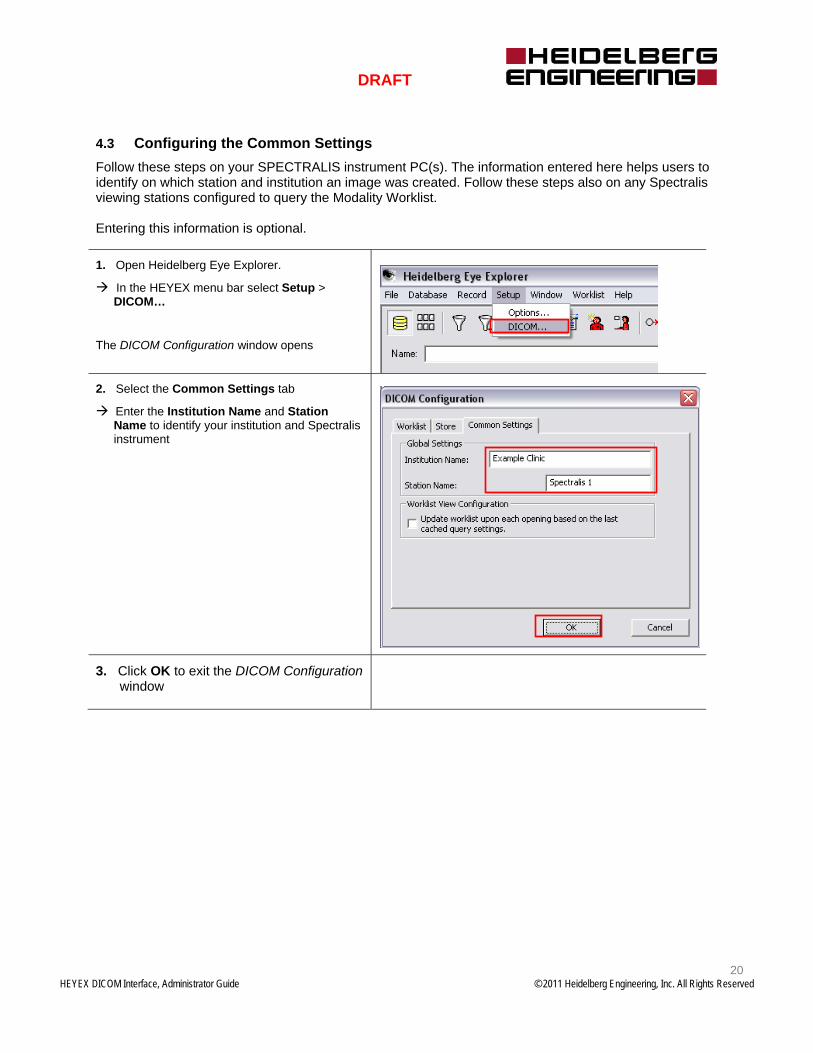
4.3 Configuring the Common Settings Follow these steps on your SPECTRALIS instrument PC(s). The information entered here helps users to identify on which station and institution an image was created. Follow these steps also on any Spectralis viewing stations configured to query the Modality Worklist. Entering this information is optional.
1. Open Heidelberg Eye Explorer.
In the HEYEX menu bar select Setup > DICOM…
The DICOM Configuration window opens
2. Select the Common Settings tab
Enter the Institution Name and Station Name to identify your institution and Spectralis instrument
3. Click OK to exit the DICOM Configuration window
DRAFT
HEYEX DICOM Interface, Administrator Guide © 2011 Heidelberg Engineering, Inc. All Rights Reserved
21
5 Troubleshooting
5.1 Log Files
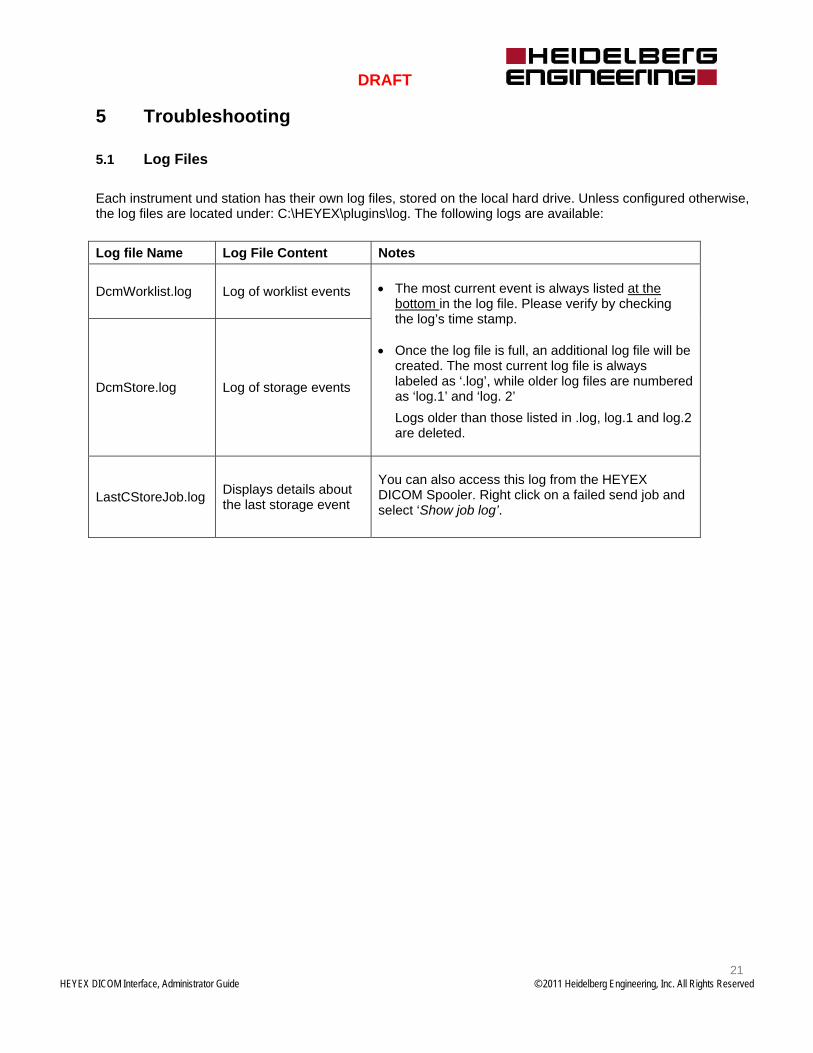
Each instrument und station has their own log files, stored on the local hard drive. Unless configured otherwise, the log files are located under: C:\HEYEX\plugins\log. The following logs are available:
Log file Name Log File Content Notes
DcmWorklist.log Log of worklist events
The most current event is always listed at the
bottom in the log file. Please verify by checking the log’s time stamp.
Once the log file is full, an additional log file will be created. The most current log file is always labeled as ‘.log’, while older log files are numbered as ‘log.1’ and ‘log. 2’
Logs older than those listed in .log, log.1 and log.2 are deleted.
DcmStore.log Log of storage events
LastCStoreJob.log Displays details about the last storage event
You can also access this log from the HEYEX DICOM Spooler. Right click on a failed send job and select ‘Show job log’.
DRAFT
HEYEX DICOM Interface, Administrator Guide © 2011 Heidelberg Engineering, Inc. All Rights Reserved
22
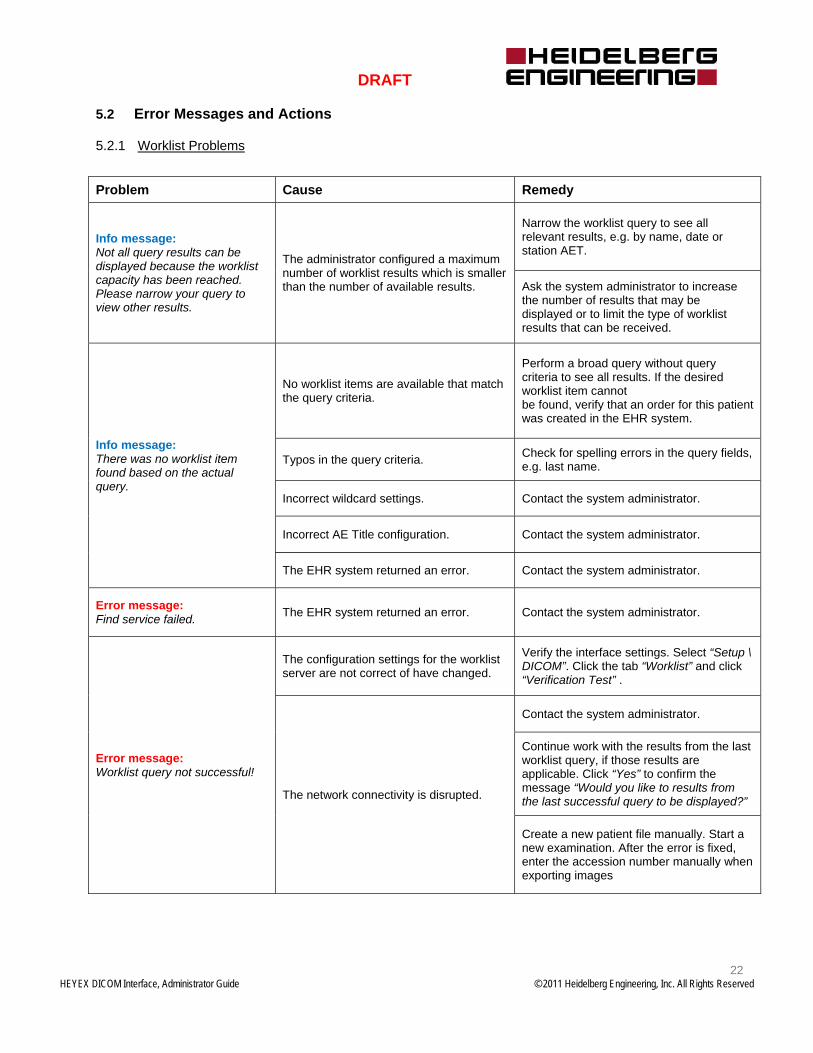
5.2 Error Messages and Actions
5.2.1 Worklist Problems
Problem Cause Remedy
Info message: Not all query results can be displayed because the worklist capacity has been reached. Please narrow your query to view other results.
The administrator configured a maximum number of worklist results which is smaller than the number of available results.
Narrow the worklist query to see all relevant results, e.g. by name, date or station AET.
Ask the system administrator to increase the number of results that may be displayed or to limit the type of worklist results that can be received.
Info message: There was no worklist item found based on the actual query.
No worklist items are available that match the query criteria.
Perform a broad query without query criteria to see all results. If the desired worklist item cannot be found, verify that an order for this patient was created in the EHR system.
Typos in the query criteria. Check for spelling errors in the query fields, e.g. last name.
Incorrect wildcard settings. Contact the system administrator.
Incorrect AE Title configuration. Contact the system administrator.
The EHR system returned an error. Contact the system administrator.
Error message: Find service failed.
The EHR system returned an error. Contact the system administrator.
Error message: Worklist query not successful!
The configuration settings for the worklist server are not correct of have changed.
Verify the interface settings. Select “Setup \ DICOM”. Click the tab “Worklist” and click “Verification Test” .
The network connectivity is disrupted.
Contact the system administrator.
Continue work with the results from the last worklist query, if those results are applicable. Click “Yes” to confirm the message “Would you like to results from the last successful query to be displayed?”
Create a new patient file manually. Start a new examination. After the error is fixed, enter the accession number manually when exporting images

DRAFT
HEYEX DICOM Interface, Administrator Guide © 2011 Heidelberg Engineering, Inc. All Rights Reserved
23
5.2.2 Send Problems
Problem Cause Remedy
Warning message: No connection parameters configured for DICOM Storage SCP. Please configure DICOM Storage SCP first.
The parameters for the Storage Server have not been configured in HEYEX or are incomplete
Verify the DICOM interface settings and make sure that all fields are populated. Select “Setup \ DICOM”. Click the tab “Store” and click “Verification Test”
Contact the system administrator.
Warning message: Any movies and fundus tomographies included in your selection will not be exported as DICOM report! In order to export movies and fundus tomographies, please expand each file and then select the desired images for export.
A movie file or fundus tomographie has been selected to be exported as a report.
Expand the movie files or the fundus tomographies first. Then select the image to be included in the report.
Warning message: Your current selection contains OCT images. Since the export of OCT images was not enabled during the DICOM configuration, these images will not be sent to the PACS.
The administrator did not enable the option to send OCT images to the PACS system, since it may not support the storage of OCT images.
Verify with the system administrator whether the PACS system can store OCT images.
Send OCT images as reports.
Error message: Unable to export the requested data to PACS.
The send process was canceled by the user.
If the send process was canceled unintentionally, try resending the images.
An error in the HEYEX software occurred.
Contact your local distributor or Heidelberg Engineering
Error message: Send error
The configuration settings for the storage server are not correct or have changed.
Verify the interface settings. Select “Setup \ DICOM”. Click the tab “Storage” and click “Verification Test”
The network connectivity is interrupted.
Contact the system administrator.
An image type that has been sent is not supported by the PACS system.
Send each scan individually. Check the job log for each image to identify which images cause the error. Try to send the scan as images and as reports.
The PACS system returned an error. Contact the system administrator.

DRAFT
HEYEX DICOM Interface, Administrator Guide © 2011 Heidelberg Engineering, Inc. All Rights Reserved
24
Corporate Headquarters Heidelberg Engineering GmbH • Tiergartenstr. 15 • 69121 Heidelberg • Germany
Phone +49 6221 6463-0 • Fax +49 6221 646362 • www.HeidelbergEngineering.de
US Main Office Heidelberg Engineering, Inc. • 1808 Aston Avenue, Suite 130 • Carlsbad, CA 92008
Phone 760 536-7000 • Fax 760 536-7100 • www.HeidelbergEngineering.com
US Service Center Heidelberg Engineering, Inc. • 410 Harris Road • Smithfield, RI 02917
Phone 401 349-0500 • Fax 401 349-0504 • www.HeidelbergEngineering.com