Embed Size (px)
Citation preview
High Frequency Ventilation Outline Part A
1. How is this ventilator classified?
2. Ventilator Concept (brief theory of operation and features) -What in the World is a Phasitron? -Operator Set Parameters -Variable Parameters -Indications -Contraindications
3. An overview of the device (an in-service) including an explanation of the modes of ventilation and how to set them up (what knobs to turn) -Ventilator Overview and Controls -Ventilation and Oxygenation
• Ventilation • Oxygenation
-Clinical Application Conclusion
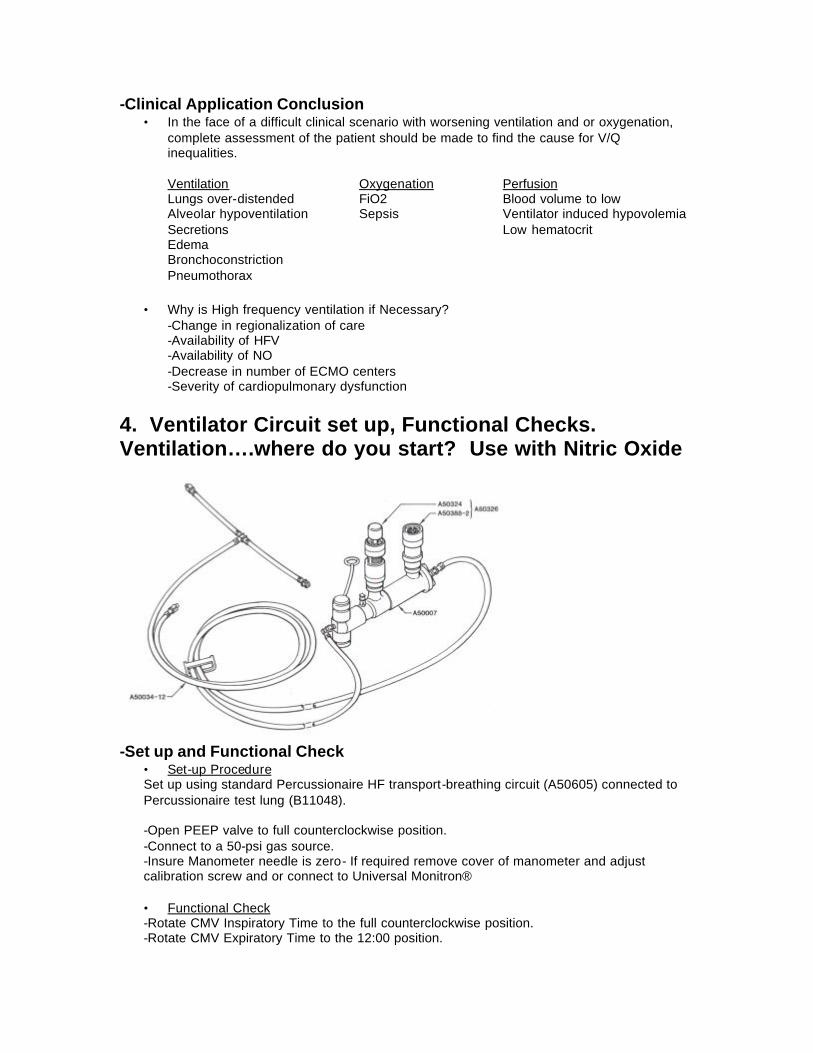
4. Ventilator Circuit set up, Functional Checks. Ventilation….where do you start? Use with Nitric Oxide -Set up and Functional Check
• Set-up Procedure • Functional Check
-The Bronchotron with Nitric Oxide
5. Which disease processes do best with what ventilator settings and why -Strategies for Clinical Management
6. Clinical things to look for and be aware of during flight when using this device
7. Why is this device so useful on transport and how has using this device changed things for your transport team, and the way you care for the patient during transport.
8. Discuss how the device can be mounted or positioned during transport (configurations)
9. Provide “clinical tips” regarding use of this device (tips that make things easier or less complicated)
10. Are there any special considerations when integrating this device into your transport program (education, mounting/configuration issues, regulations, calibration, maintenance)
High Frequency Ventilation
1. How is this ventilator classified? The Bronchotron is classified as a pneumatically powered, pressure limited, time cycled, high frequency flow interrupter. As the name implies the Bronchotron allows the operator to control CO2 removal (ventilation) and oxygenation (diffusive).
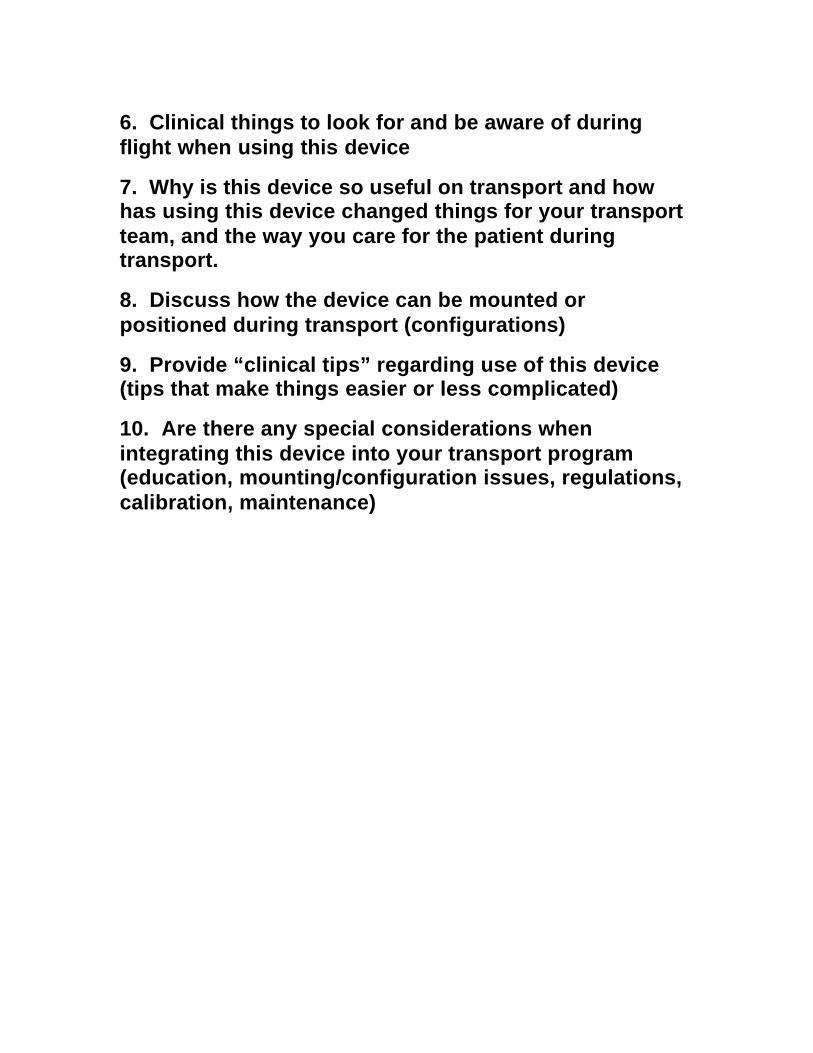
2. Ventilator Concept (brief theory of operation and features) Compared to conventional ventilators the Bronchotron delivers high frequency or conventional IMV breaths. With the unique Phasitron, which is the mechanical/physiological interface, these breaths are precisely delivered to selected pressures. (see below).
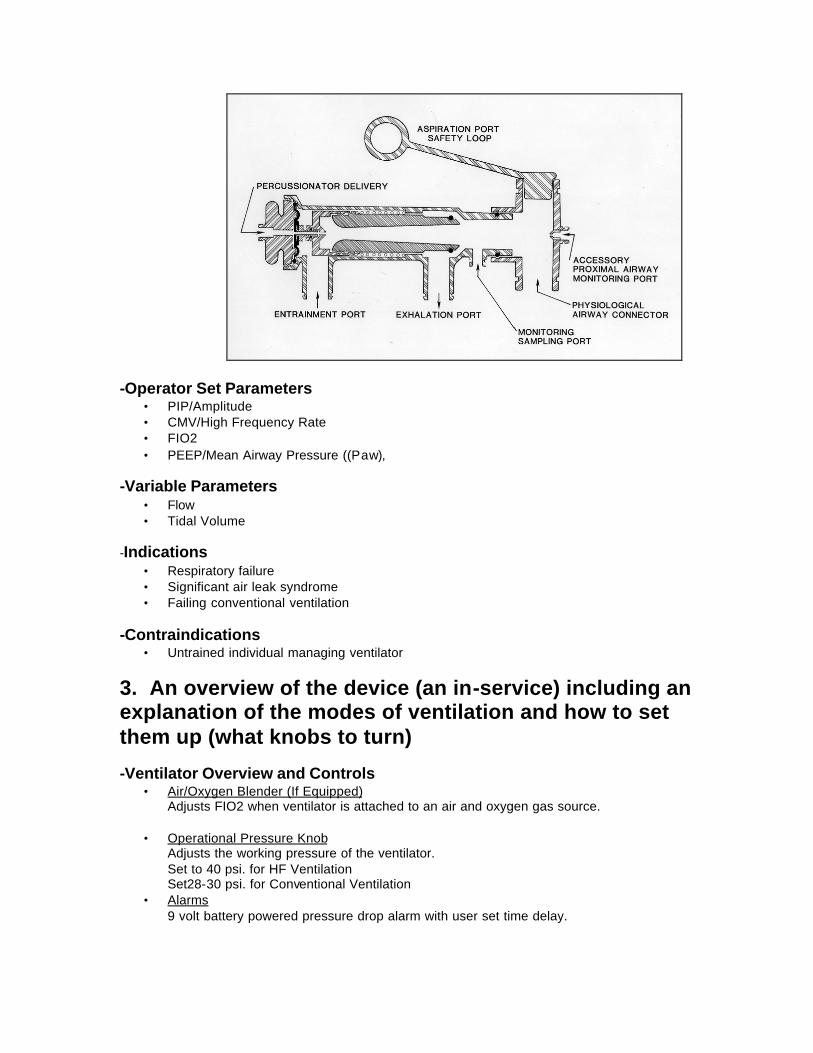
Exhalation is passive, to a selected operator programmed baseline. -What in the World is a Phasitron?
• The Phasitron is the Mechanical/Physiological interface. • The Phasitron is a sliding venturi that acts as both the inhalation and exhalation valve • As gas is pulsed through the jet orifice, humidified and blended gases are entrained
through the entertainment port and delivered to the patient at programmed limits • As PIP is reached and the lungs are inflated, backpressure is reflected to the venturi
throat. • As pressure is increased downstream of the venturi, flows automatically decrease.
This protects the lungs from dissecting pressures and flows and has been given the term “fluidic clutching”.
• The Phasitron also allows for “Oscillatory Equilibrium” which is, during the inspiratory phase the desired PIP is reached and held, inspiratory and expiratory volumes equalize, further enhancing diffusion and the mixing of gases (see diagram below).
-Operator Set Parameters
• PIP/Amplitude • CMV/High Frequency Rate • FIO2 • PEEP/Mean Airway Pressure ((Paw),
-Variable Parameters
• Flow • Tidal Volume
-Indications
• Respiratory failure • Significant air leak syndrome • Failing conventional ventilation
-Contraindications
• Untrained individual managing ventilator
3. An overview of the device (an in-service) including an explanation of the modes of ventilation and how to set them up (what knobs to turn) -Ventilator Overview and Controls
• Air/Oxygen Blender (If Equipped) Adjusts FIO2 when ventilator is attached to an air and oxygen gas source.
• Operational Pressure Knob
Adjusts the working pressure of the ventilator. Set to 40 psi. for HF Ventilation Set28-30 psi. for Conventional Ventilation
• Alarms 9 volt battery powered pressure drop alarm with user set time delay.
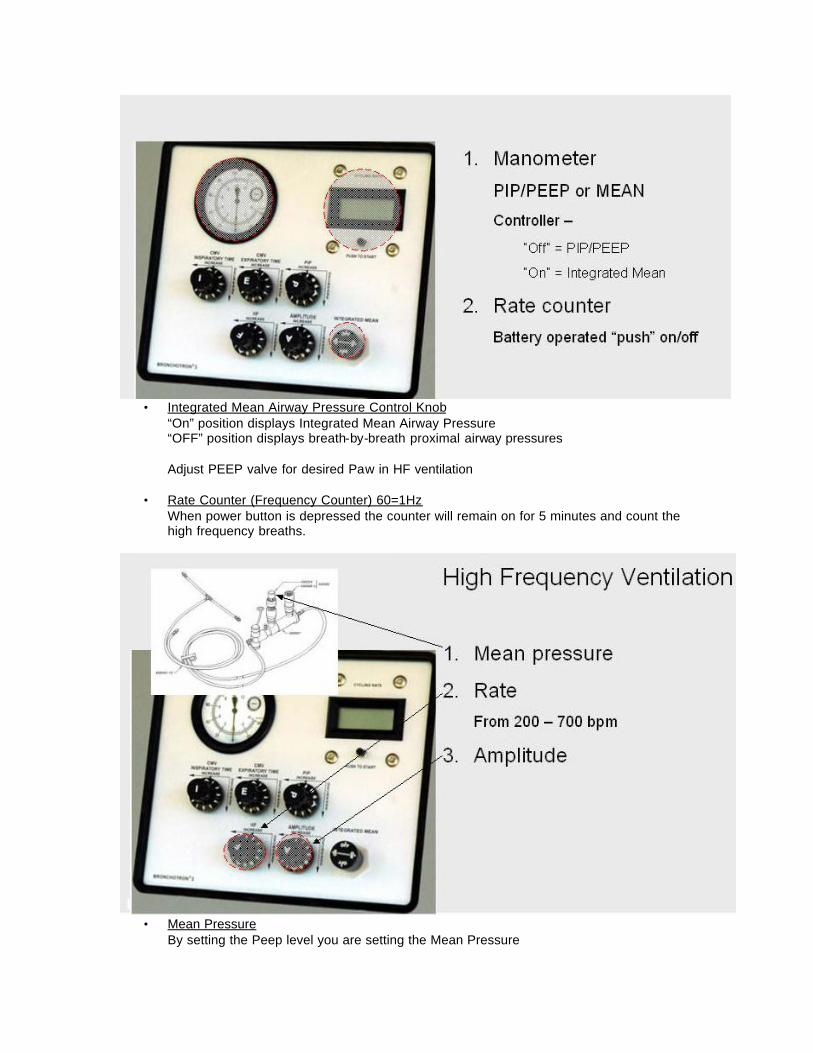
• Integrated Mean Airway Pressure Control Knob
“On” position displays Integrated Mean Airway Pressure “OFF” position displays breath-by-breath proximal airway pressures
Adjust PEEP valve for desired Paw in HF ventilation
• Rate Counter (Frequency Counter) 60=1Hz
When power button is depressed the counter will remain on for 5 minutes and count the high frequency breaths.
• Mean Pressure
By setting the Peep level you are setting the Mean Pressure
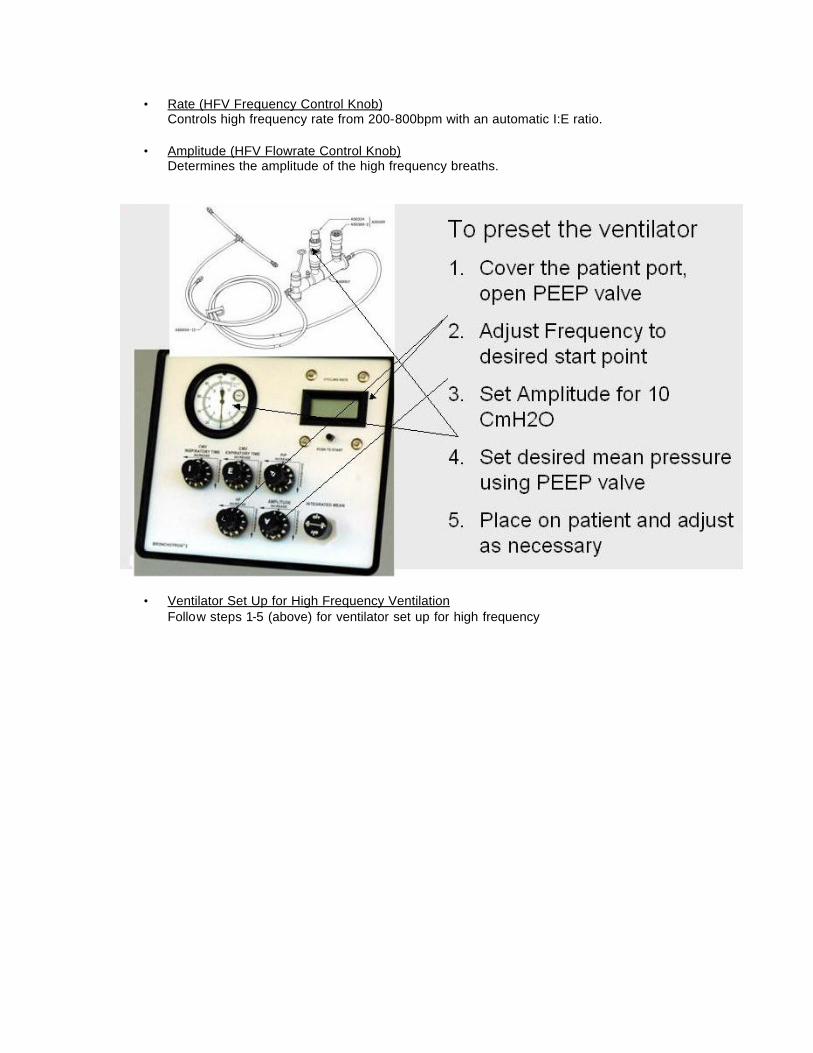
• Rate (HFV Frequency Control Knob) Controls high frequency rate from 200-800bpm with an automatic I:E ratio.
• Amplitude (HFV Flowrate Control Knob)
Determines the amplitude of the high frequency breaths.
• Ventilator Set Up for High Frequency Ventilation Follow steps 1-5 (above) for ventilator set up for high frequency

• “I” Time (Inspiratory Time Knob)
Controls the inspiratory time of the conventional breath .3 sec.- Hold.
• PIP (CMV Rate Flowrate Control Knob) Controls the PIP during the conventional breath.
• “E” Time (Expiratory time Knob) Controls the expiratory time of the conventional breath .3 sec.- Hold.
• Ventilator Set Up for Conventional Ventilation
Follow the steps (above) for conventional ventilator set up
-Ventilation and Oxygenation • Ventilation
-Control over arterial PCO2 is achieved by manipulating delivered volumes and less on frequency changes. -Know the physiology of the machine as well as the disorder you are treating. . -CMV = VCO2 = VT X f
-Increase PIP in 2-3 cm H2O increments -PIP is directly related to Tidal Volume delivery -Assessment of PIP in the face of small ET tubes is important -Small or undersized ET tubes may cause under ventilation if not considered -Change rate to increase minute ventilation.
. -HF = VCO2 = (VT)
2 X f -Amplitude: small changes in tidal volume are very powerful -Decrease oscillatory frequency, the lower the high frequency rate the greater the inspiratory time the more high frequency volume delivered.
*Make one change at a time and wait for stabilization before making subsequent changes.
• Oxygenation -Control over arterial PO2 is achieved by the manipulation of mean airway pressure and or FIO2.
-A near linear relationship exists between lung volume and oxygenation. The parameters that will have the most effect over oxygenation in order of importance are:
-Increase FIO2 to increase alveolar pO2 in both CMV and HFV -Increase Oscillatory CPAP/PEEP (Paw), Increase PIP. This has direct effect in mean airway pressure.
-Normal mean lung volume is proportional to mean airway pressure -Tidal volumes are so small, need to have optimal lung volumes or expansion -Fine line with lung volume. Major short -term impact of excessive lung volume may be impaired blood flow and trauma.
-Amplitude (tidal volume)-effects ventilation
-Not much affect on O2 except if patient has atelectasis or patchy infiltrates may open up lung and improve oxygenation i.e. MAS or pneumonia. -Using amplitude to improve oxygenation usually means Paw is to low.
-Increase Pulse Frequency
-High frequencies produce a greater mean airway pressure -Faster you go, more likely to air trap -Increased rate in air trapping disorder will decrease oxygenation due to air trapping.
-Clinical Application Conclusion • In the face of a difficult clinical scenario with worsening ventilation and or oxygenation,
complete assessment of the patient should be made to find the cause for V/Q inequalities.
Ventilation Oxygenation Perfusion Lungs over-distended FiO2 Blood volume to low Alveolar hypoventilation Sepsis Ventilator induced hypovolemia Secretions Low hematocrit Edema Bronchoconstriction Pneumothorax
• Why is High frequency ventilation if Necessary?
-Change in regionalization of care -Availability of HFV -Availability of NO -Decrease in number of ECMO centers -Severity of cardiopulmonary dysfunction
4. Ventilator Circuit set up, Functional Checks. Ventilation….where do you start? Use with Nitric Oxide
-Set up and Functional Check
• Set-up Procedure Set up using standard Percussionaire HF transport-breathing circuit (A50605) connected to Percussionaire test lung (B11048). -Open PEEP valve to full counterclockwise position. -Connect to a 50-psi gas source. -Insure Manometer needle is zero- If required remove cover of manometer and adjust calibration screw and or connect to Universal Monitron®
• Functional Check -Rotate CMV Inspiratory Time to the full counterclockwise position. -Rotate CMV Expiratory Time to the 12:00 position.
-Rotate CMV Flowrate control to the full clockwise position. -Rotate Percussion control to full clockwise position. -Rotate IPV Flowrate control full counterclockwise. -Observe a frequency of 185-210 bpm. -Rotate IPV Flowrate clockwise. -Observe a gentle decrease in amplitude until “off” at the full clockwise position. -Rotate IPV Flowrate to full counterclockwise position. -Rotate Percussion control slowly to full counterclockwise position. -Observe an increase in frequency. -Max frequency should be >700bpm. -Rotate IPV Flowrate to the full “off” clockwise position. -Rotate CMV Inspiratory Time control to the 12:00 position. -Rotate CMV Flowrate control to the 12:00 position. -Observe an inspiratory time of approx. 2 seconds. -Observe an expiratory time of approx. 2 seconds. -Observe a rate <20bpm >12bpm. -Rotate PEEP valve from open to close position-observing change in baseline pressure. -Rotate CMV Flowrate from full counterclockwise to full clockwise “off” position. -Observe an increase and decrease in Peak Inspiratory pressure (PIP). -Rotate Inspiratory Time control full clockwise. -Rotate Expiratory Time control full counterclockwise. -Rotate CMV Flowrate control to 12:00 position. -Observe a rate of >39bpm.
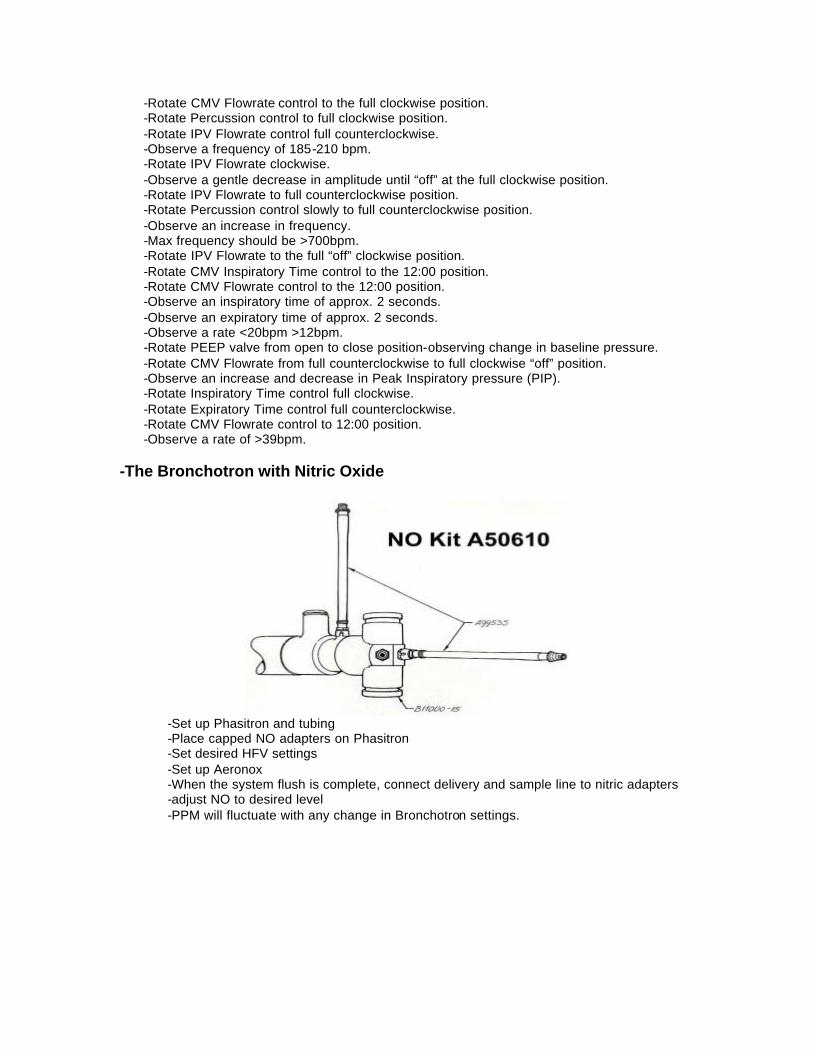
-The Bronchotron with Nitric Oxide
-Set up Phasitron and tubing
-Place capped NO adapters on Phasitron -Set desired HFV settings -Set up Aeronox -When the system flush is complete, connect delivery and sample line to nitric adapters -adjust NO to desired level -PPM will fluctuate with any change in Bronchotron settings.
5. Which disease processes do best with what ventilator settings and why -Strategies for Clinical Management
• Hyaline Membrane Disease / Diffuse Alveolar Disease in the Preterm -Mean airway pressure: 1-2cm H20 > conventional ventilation -Frequency: 500 bpm -Amplitude: Chest wall movement
• Diffuse Alveolar Disease in the Term / Near Term
-Mean airway pressure: 2-4cm H20 > conventional ventilation -Frequency: 500 bpm -Amplitude: Chest wall movement
• Pneumonia / Sepsis (focal pneumonia)
-Mean airway pressure: equal to or 1 cm H20 < conventional ventilation -Frequency: 380-420 bpm -Amplitude: Chest wall movement
• Meconium Aspiration (with air trapping)
-Mean airway pressure: equal to conventional ventilation -Frequency: 350-400 bpm -Amplitude: Good chest wall movement
• Meconium Aspiration (diffusely hazy) -Mean airway pressure: 2-5cm H20 > conventional ventilation -Frequency: 350-500 bpm -Amplitude: Good chest wall movement
• Pulmonary Hypoplasia (uniform)
-Mean airway pressure: equal to conventional ventilation. Advance 1 cm H20 until oxygen saturation increases - -Frequency: 500 bpm -Amplitude: Minimal chest wall movement
• Pulmonary Hypoplasia (non-uniform)
-Mean airway pressure: equal to or 1-2cm H20 > conventional ventilation -Frequency: 500 bpm -Amplitude: Chest wall movement
• Severe Air Leak in the Preterm (PIE)
-Mean airway pressure: 1 cm H2O < conventional ventilation -Frequency: 500 bpm -Amplitude: Minimal chest wall movement
• Gross Air Leak in the Preterm -Mean airway pressure: equal to or 1 cm H20 > conventional ventilation -Frequency: 500 bpm -Amplitude: Chest wall movement
• Gross Air Leak in the Term / Near Term -generally poor inflation -Mean airway pressure: 1-2 cm H20 > conventional ventilation

-Frequency: 500 bpm -Amplitude: Chest wall movement
• Persistent Pulmonary Hypertension of the Neonate
-Mean airway pressure: equal to conventional ventilation -Frequency: 350-420 bpm -Amplitude: Adjust amplitude for alkalosis if needed
6. Clinical things to look for and be aware of during flight when using this device -CXR after stabilized on HF -Aeration, rib expansion
-Check where liver is, rib spacing -Make sure ETT is secure before moving patient -Difficult to assess chest wiggle “on the road”…TCM is nice, I-stat -Paw can drift if patient compliance changes -Watch vent settings closely while plugging and unplugging from hospital/aircraft/ambulance
7. Why is this device so useful on transport and how has using this device changed things for your transport team, and the way you care for the patient during transport. -pneumatically driven, no EMI interference -small and lightweight -can deliver both HFV and CMV -gas consumption -compatible with NO -decrease barotrauma -improve pt stability -patients already on HFV easier to move 8. Discuss how the device can be mounted or positioned during transport (configurations)
9. Provide “clinical tips” regarding use of this device (tips that make things easier or less complicated) -carry spare parts -Grease “O” rings when cleaning tubing and putting phasitron back together -Peep valves break easily, we replace them yearly -not able to achieve chest wiggle, PIP etc…change diaphragm -Frequency does not always read out when on test lung start w/ballpark, adjust on patient. -One adjustment may change other settings. -2.0 ETT, made need to really increase settings to effectively oxygenate/ventilate patient.
10. Are there any special considerations when integrating this device into your transport program (education, mounting/configuration issues, regulations, calibration, maintenance)


![Airway Humidification During High-Frequency Percussive ... · ventilation, high-frequency ventilation, airway humidification . [Respir Care 2009;54(3):350 358.] Introduction In general,](https://img.pdfslide.net/doc/110x75/5edb55e8ad6a402d66658116/airway-humidification-during-high-frequency-percussive-ventilation-high-frequency.jpg)